
Illuminate the darkness with GameFront’s Child of Light walkthrough as we lead you through the water-color world of Lemuria. In this distinctly fairy tale adventure, you’ll play as a lost Princess fighting through a strange, magical land.
It’s a side-scrolling ode to classic JRPGs — you’ll gain a party, unlock powerful skills, and experience a story as you watch the Princess grow into a great hero. Don’t miss a beat of Ubisoft’s downloadable fable, check out the full game guide below.
Want to dig even deeper into the secrets of the story? Check out our Child of Light cheats list for trophy guides and other hiddden unlockables. Or get our in-depth thoughts on GameFront’s Child of Light review.

Head toward the right side of the screen. You’ll shortly come to a road sign that reads “Right to the Old Monastary.”

Continue toward the right and you’ll drop into a short tunnel with a box at its center. Push the box all the way to the right side of the tunnel and use it to jump out.

Continue toward the right and you’ll pass under a tree and come to another cave. Ignore the cave and head back toward the left. You’ll climb a ledge where you jump onto the tree.

Follow the tree branches to the right and you’ll climb up to another sign post. Continue past it toward the right and the path will lead you to house with a pink tree. A dialogue sequence will trigger.

After the dialogue ends you’ll be joined by continue past the pink tree toward the right. After a little while you’ll trigger a brief tutorial on collecting wishes.

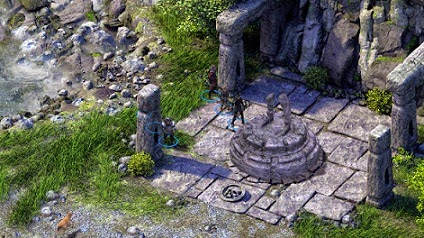
Continue toward the right and you’ll come a large tree with a door. There are three symbols above the door. Sticking out of the ground are three scepters with matching symbols. Make Igniculus glow and use him to light the scepters. Move him around so the shadows they cast cover the corresponding symbols above the door. Once you’ve done all three the door will open.

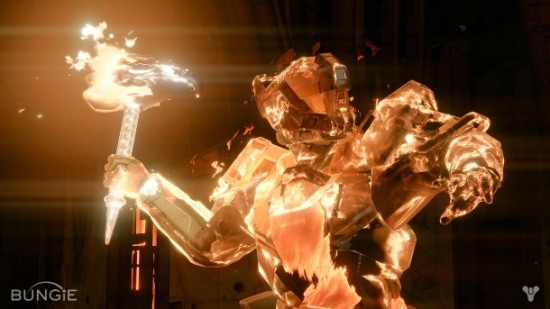
Enter and take the sword from the statue. The game’s first battle will trigger from here. Follow the instructions to learn how it works and kill the monster. After the fight you’ll have leveled up. Use the skill point to upgrade your abilities and continue to the right.

Continue toward the right and you’ll come to a dark cavern. Use Igniculus to light the way. Once you climb out of it you’ll come to a ledge. Push the nearby box up to it so you can jump up the ledge and continue.

You’ll come to another signpost. When you reach the signpost the chapter will end.
Return to the Main Walkthrough Page

When the chapter begins head toward the right. You’ll pass a carriage with a crow on it. Shortly after this you’ll come to a fountain with a ghost patrolling nearby. Fight the ghost (it’s weak against light magic) and, once it’s beaten, proceed. Take note that if you climb the tree to left of the fountain you’ll find a chest containing an Oculi. Equip it and press on toward the right.

You’ll come to a darkened tunnel. Use Igniculus to light your way. You’ll come to a point where the way splits and you can either jump up onto a raised pathway or keep following the floor down toward the right. Doing the latter will lead you to a chest containing a Firefly Elixer. Just be ready for a fight because you’ll encounter a hostile gargoyle on your way to it.

After you crack open the chest head back to the aforementioned and hop up onto it. Climb the adjoining path out of the tunnel and you’ll find yourself outside again in the middle of a stone pathway. On the left will be a ledge that you can’t reach. Heading right will lead you to a row pillars and arches where you’ll find a impassable gate and a crate. You can’t access the door right now but you can push the crate back toward the left to reach the ledge.

Once you’ve jumped onto the ledge head left. You’ll come to a doorway guarded by a ghost. Kill the ghost and enter the door. This will elad you to a large room at the center of which is a platform with a blue circle. Position Igniculus over the circle and make him glow. This will activate a lift that you can lower and raise by again triggering the circle again.

Ride the lift up and you’ll come to a nook where you’ll find a crate. Push the crate onto the lift and trigger it again so it lowers back down to the floor. With that done, push the crate right until its pressed against the platform on the right side of the screen. Hop up onto the platform and drop back down to the floor where you’ll find another crate that you can use to access the ledge on the far right Jump up to it and then onto the floor above. Follow it to the left where you’ll find a switch. Trigger the switch and a section of the floor below will start rising and lowering at regular intervals. Drop back down and pull the crate you used earlier onto this section of floor. Once that’s done ride it up and pull the crate across the floor onto a button toward the right. This will open a gate behind which is a door you can use to exit the room.

You’ll find yourself back outside. Head toward the right and you’ll find yourself standing near switch. Trigger it and you’ll open that pesky gate that you couldn’t get past earlier. This will also open a trap door to the right that you can drop through to reach the now open gate. Head through it and you’ll enter a Monastary with a large stain glassed window.

Head toward the right and climb the ramps up to the floor above. You’ll come to a device with four, differently colored lenses (red, blue, green, purple). You may notice three torches with colored glass flames on their tops. To proceed you need to use Igniculus to light up the glass torches with their corresponding lens. There’s a crank the left that you can use to rotate the lenses so that you can illuminate the one you need. Once you’ve lit up all three torches a boss battle will commence.

After you light the three torches you’ll enter into a boss battle with a pair of giant statues. This battle isn’t overly hard but it has its tricks. For instance, the statues fond of casting Wings of Mercury to increase their speed. Beyond that, however, the bulk of their moves will be straightforward physical attacks that deal moderate damage and little else. Your strategy to combat them, in turn, doesn’t need to be all that fancy either. They’re weak to light magic so hit them with your spells until you’re out of MP. Once it (and your restorative sources) run dry, pummel them with your sword and heal as necessary until they’re defeat. After the fight there will be another dialogue sequence. When it ends you’ll have gained the power to fly. Fly up to the ceiling and toward the left to exit the Monastary and end the chapter.
Return to the Main Walkthrough Page

When Chapter 3 begins your goal will be to make your way to the Tree of Thorns. To do this make you’ll need make your way back toward the Altar of Mahthildis, a.k.a. the spot where you first started when the game began. When the chapter begins you’ll pass a sign post directing you back toward the altar. Almost immediately to the left of this is a floating platform with some houses. Use your wings to fly over to the platform where you’ll meet the jester Rubella. A dialogue sequence will trigger, after which Rubella will join your party.

After Rubella joins, you can hop down the ground below if you want and walk back to the Altar using the same path you followed to reach the Monastery in Chapter 2. That said, you want to spend a little time exploring now that you can reach a whole slew of previously inaccessible areas. For instance, roughly to the left of where you meet Rubella is another platform on it with a house you on it that you can enter. Inside you’ll find a chest containing some Healing Tonics. We’ve listed the locations of some other noteworthy spots below.

From the house where you found the Healing Tonics keep flying left. If you maintain an altitude roughly in the middle of the screen you should come to another floating section of ground in the middle of which is a treasure chest. Open it to find a Magic Potion. If you drop of the right side of this area and descend you’ll also come to a chest on top of a tree. This also contains a Magic Potion.

If you descend back down to the ground from here and right you’ll walk under a waterfall and enter shadowy cavern that you passed through earlier in the game. Climb up to the top of the cavern and you should see a spider dangling from above. To the left of said spider is a ledge with a chest. Fly up there, kill the spider and open the chest containing two Rough Sapphire Occuli.

Return to the area with the carriage with a crow sitting on it. Once you reach the carriage fly up into the air and toward the right. You’ll come to a tree with a tunnel leading into it. Follow it toward the right and you should come to a house. Enter it and you’ll enter and area full of thorns. Being sure to avoid the thorns (they cause damage if you touch them), navigate to the bottom left portion of the area to find an HP Stardust item. Head toward the bottom right side of this area to find a chest containing a Rough Sapphire.

If you continue flying at a moderate altitude toward the left side of the screen you’ll eventually come to a large grouping of trees. Fly over it and you’ll find a platform with a house on it containing a chest with two Rough Emeralds inside it. The platform itself will also house a chest with a Revive inside. Below the platform you’ll also find a pit. Descend down into and you’ll discover a Defense Stardust item.

Exploring the side of this same tree cluster you should also find a tunnel on its side. Head into the tunnel and you’ll find a Strength Stardust item. Keep following the tunnel and it will descend down the ground below where you’ll find a chest guarded by a wolf. If you head left from this chest you’ll find yourself near the tree with three scepter puzzle you had to solve in Chapter 1. If you head left from here it will take you back to the Altar of Mahthildis.

As you make your back toward the Altar you’ll come to a sign post at the edge of a cliff. Jump down to the ground below and then head toward the right. There’s a hidden cave here inside which you’ll find a wolf up on a ledge guarding a chest. Fly up to it, defeat the wolf and open the chest to obtain two Magic Potions. Once you do that, head out of the cave and fly back into the treetops immediately outside until you can’t fly any higher. If you head left at this altitude you’ll run into several chests and item containers containing a variety of goodies and Oculi.

Continue toward the left and you will eventually find your way back to the Altar of Mahthildis. Continue left and you’ll come to a spot where you can fly up or keep going toward the Tree of Thorns. Take a moment to fly up. Doing this will lead you to a few more monster fights as well as a few more treasure chests. Once you’ve cleared out all of the enemies and claimed all of the goodies descend back down and continue toward the Tree of Thorns. This should quickly bring you into contact with an ogre will try to block your path. After a brief dialogue sequence a boss battle will begin.

Your fight with the Ogre will be a bit tougher than your last boss bout with the two statues. He’s accompanied by a pair of Wolves that, while not a huge threat, can serve as an annoying distracting. The Ogre himself, meanwhile, can dish out some powerful attacks at a decent clip. His Ogre’s Wrath ability is particularly annoying because it both damages and slows down its target. Your best strategy is simply to take down the Wolves first and then, once he’s solo, focus your efforts on taking down the Ogre. Avoid using magic attacks as that will trigger a counterattack from him. Likewise, make sure to remember Rubella’s healing skills as the Ogre’s pummeling blows will eat sizable chunks of your health every time they land.

Once the Ogre is defeated you’ll arrive at the entrance of the Tree of Thorns. Once you enter the tree fly left and start making your way through it. The Tree is, not surprisingly, full of thorny sections that will damage you if you bump into them so move with care as you navigate it. Also be keeping your eyes out for treasure chests as there are more than a few scattered about the area. When you exit the Tree you’ll arrive at a village and the chapter will end.
Return to the Main Walkthrough Page

When the chapter begins you’ll be at entrance to Capilli Village. Search the houses here to find a few treasure chests containing assorted goodies. Once that’s done head to the pathway marked by the arrow and use it to continue further into the village. Head right once you enter the next section of the village and search all of the houses for loot. Once that’s finished head back toward the left and you should find a Bearded Man standing near a well. This will trigger a dialogue sequence after which you’ll receive the quest “Finn’s Plight.” After this, move to enter the well. Doing so will lead to the Bearded Man, a.k.a. Finn, joining your party.

Upon entering the well descend down the opening tunnel and start making your way deeper into the well. This will eventually lead you into a large chamber with a hanging bucket at its center. Below the bucket is a small section of floor. The chamber also continues to the left and the right. If you head right you’ll shortly come to an ascending tunnel that leads to an item container and treasure chest protected by some monsters and some spike traps. Snag these and return to the main chamber. Head left from and you’ll shortly come to a room with a door locked by a puzzle. To solve said puzzle use Igniculus to illuminate the two scepters near the door and position their shadows over the matching symbols on the wall. One the door’s unlocked use it to continue into the next area.

Once you’re in the next room head right. You’ll almost immediately come to a spike trap. You should notice a light blue orb immediately to the right of the trap. Use Igniculus to illuminate the orb and the trap will stop for a moment, allowing you to pass through safely. Continue toward the right, making sure to not miss the small chamber in the ceiling immediately after the spike trap. It’s not a necessity, but why pass up two treasure chests when you don’t have to? Once that’s done head right and you should quickly come to a spot where you can either descend to a lower level and find some more treasure or press on. Doing so will lead you to a large room with a statue head resting in the water on the floor.

Talk to the crow resting in the statue head and then continue toward the right until you reach the room’s wall. From there ascend and you should come across a tunnel opening guarded by a boar monster. Defeat the monster and continue toward the right, using Igniculus to shut down some pesky spike traps. Immediately after the traps you’ll come to another large chamber where you’ll trigger a boss fight.

The boss in this fight is a three headed hydra. You’ll note, when the battle begins, that each of its three heads are differently colored. These colors dictate their elemental alignment (fire, earth, water) and are the key to winning this fight. When the battle begins swap your party members around so that you’re using Finn and Rubella. Finn’s elemental magic will come much more in handy than Aurora’s attacks. Likewise, Rubella’s speedy melee strikes and healing powers will be useful in disrupting the hydra’s attacks and keeping Finn standing. Once the actual fight begins, pick a head and hammer it. Use Rubella’s attacks to disrupt the hydra’s attacks and casting as necessary, but ultimately do what you can to keep Finn focused on delivering consistent elemental spells against the same head until it’s defeated. As long as you can keep this up without dying, you should be able to whittle the heads away until they’re all defeated.

Once the boss battle ends a dialogue sequence will trigger and you’ll be transported back to the village where all the crows will have transformed into people. Immediately to the right of your position when you regain movement control will be an old man named Avo with an exclamation point over his head. Speak to him and he’ll give you a side quest that you can pursue at your leisure. If you don’t feel like doing that right now though, head toward the left side of the screen. You’ll eventually trigger a dialogue sequence. After it ends continue left until you arrive at a sign that reads

When you reach the sign, first drop down to the right of it where you’ll find a treasure chest and then a tunnel you can descend down to find another an item container. After you collect these head back to the sign and then continue left. Initially it will look like you can go both high and low. That said, if you try to ascend toward the left you’ll be blocked by gusts of wind. The only way you’ll be able to proceed is through a tunnel toward the bottom left of the screen.

This tunnel will also fill with the same gusts of wind, but they come and go at regular intervals, making it possible for you to seek shelter when they’re blowing and to advance when they die down. Eventually the tunnel will stop going left and start leading up. When you exit you’ll find yourself at an intersection where you can go both left and right. Heading right will just lead you to another chest. Grab it and proceed left and you’ll exit into a large open area at the end of which you’ll find the entrance to The Plains of Rambert. Use it and you’ll trigger a story sequence at the end of which the chapter will end.
Return to the Main Walkthrough Page

When the chapter begins you’ll be standing on a cliff near a sign reading. Hop down to the ground below and a dialogue sequence will trigger. After it ends, continue toward the left side of the screen. You’ll pass underneath waterfalls that both slow you and force you to descend under their weight. You will arrive at another cliff. Again jump over its edge and descend to the area below. You should shortly come to a broken mine track with a monster on it. Defeat the monster and then fly down to the track immediately below to find a chest containing two Lull Elixirs. After that cross the track to the left side of the screen to find another monster and an item container with two Quicken Elixirs inside.

Once you’ve done ascend again and you should find the other side of the broken mine track mentioned earlier. This piece of the track will lead into a three-pronged spinning saw trap that you’ll need to circumvent to proceed. Just wait until one of the blades passes and then use the empty space before the next one arrives to fly through. Directly above the saw trap is a switch. Fly up there and trigger it. Once you use, it descend back down into the trap and exit to the left. Doing so will trigger a dialogue scene, after which Norah will join your party.

After Norah joins, take a moment to explore the area for chests and item containers, clearing away the local enemies on the way. Once they’re all gone ascend to the top left corner of the area. You’ll come to a mine track atop which is a crate. To the left of the crate is a gap in the track through which a waterfall is flowing. Push the crate through the gap to the stone cliff below. Said cliff has a pressure plate on it that opens a door when its pressed down. Use the crate to push down the plate, opening the door to the left.

Pass through this door and you’ll come to another saw trap. Pass through it and exit to the left to enter another wide open area. Explore it for treasure and then proceed again to the top left corner of the area to find another collapsed mine track that leads inside an internal chamber with another saw trap. This one is a bit unique in that it’s stationary and only turns when you hit a switch on a floor above. To pass through this area you need to rotate the saw so that the rounded part is facing up and the flat, toothed edge is pointed downward. Once you’ve done this. Exit back out through the door you entered through and descend to a door just below the mine track. Enter this door and you’ll pass underneath the saw blade. You can exit out the left to continue but there’s also a tunnel (lined with spike traps) you can descend down to find more enemies and loot.

Assuming you just continue on, descend down to the ground and walk toward the left. You’ll encounter some treasure and enemies, but you’ll also run into Madame Capilli. After the subsequent dialogue sequence ends, fly up and toward the left. You’ll come upon a giant. Fly over his head and you’ll find your way to a city where the chapter will end.
Return to the Main Walkthrough Page

When the level begins descend down into the village of Bolmus below. Take a few minutes to explore for chests and treasure. Once you’ve cleared out all of the houses and rooftops descend down to the streets and walk all the way toward the left side of the village. You’ll come to a gate. Enter and talk to the Mayor whom you’ll find on the left side of the screen. After this dialogue ends exit back outside where you’ll run into Robert. After you converse with him he’ll join the party and you’ll be transported to the face of the giant Magna.

After another conversation Magna will open his mouth so you can enter. Once you’re inside another dialogue sequence will trigger after which you should descend down into a tunnel immediately to the left. This will lead you down to an area where you’ll discover Magna’s heart. You should note that tit’s covered in webs. To clear it away you need to find three giant spider monsters scattered around Magna’s insides.

From Magna’s hear descend downward tunnel toward the left. The tunnel winds a bit, but if you follow it right to its end you’ll be led to a group of the aforementioned spiders. Initiate the fight and you’ll find yourself up against three of them. These guys are kind of a pain in the butt, mostly just because they don’t have any real weaknesses and can take quite a bit of punishment. Your best bet is to use Norah’s time manipulation abilities to slow the spiders down while also speeding your fighters up. You may then want to switch over to using Rubella for her fast attacks and healing magic along with Robert who has some nice abilities that are useful for doling out extra damage and performing group attacks. Do the best you can, of course, to try and disrupt their attacks. That said, you’d still do best to focus your efforts toward whittling down their numbers and killing them off one at a time.

Return the chamber containing Magna’s heart and make your way down the tunnel downward toward the right. Almost immediately the tunnel will fork with one branch leading further downward and another heading further right. For the time being, head down. Keep your eyes out for monsters to fight and treasure to snag on the way, but otherwise just follow the tunnel to its end where you’ll find a second set of the giant spiders. Kill them in the same fashion you did the first. Once they’re dead, head immediately to the left of the spot where you find these spiders. This should lead you down a short tunnel where you’ll come to a large chamber containing a giant vault. Use the switches to match the symbols on the door to the symbols above the door-frame and three scepters will rise out of the vault. Use Igniculus to illuminate them and the vault will open, giving you access to a trove of treasure and completing Robert’s side quest.

Once you’ve done this, make your way back up toward the central heart chamber. Don’t head back into the heart chamber itself, though. When you reach the spot where the tunnel forked downward and toward the right, head right and follow it. This should lead to an area with fireballs shooting back and forth between the ceiling and the floor. Just beyond this is the third group of spiders. Attack and kill them. With this third group dead make your back to the central heart chamber and interact with the heart itself. This will trigger a boss battle.

This battle will pit you up against a gigantic sized spider with two of the smaller spiders you’ve been chasing down and fighting throughout your time inside Magna. From the get-go use Norah’s or Robert’s abilities to slow the three combatants down. Once that’s done you’ll want to pick off the two smaller spiders so you can focus your efforts on their larger sibling. The giant spider itself comes equipped with some powerful single target and group melee strikes. These aren’t too hard to survive, but be ready to swap in Rubella at a moment’s notice for some healing. Just be prepared to be constantly hitting it with slowing spells/attacks, as it will speed itself up every time you interrupt one of its attacks. Beyond that, just keep hitting it and healing your party until it’s defeated. Once you’ve beaten the giant spider, you’ll be transported back to town. A dialogue sequence will initiate, after which you can fly back down to Magna’s face and ask him for a ride to the next area of the game. This ends the chapter.
Return to the Main Walkthrough Page

When the chapter begins, step off of Magnar’s hand and make your way toward the left. You should come almost immediately to a sign reading “Up to the Temple of the Moon.” Continue past this toward the left and you’ll come to a tall cliff face. Fly up its side and the ascend into the air above. You’ll come to a series of floating platforms that contain treasure chests and monsters. Clear them away and continue upward until you find an opening that leads up into a new area.

Immediately after entering this new area head toward the left. You should encounter a circus carriage and a sad looking jester named Tristis. Talk to him and after a bit of dialogue sequence he’ll join your party. This will also satisfy one of the game’s side quests. Once that’s done, continue upward. You’ll pass a spiked leading into a larger room filled with monsters and scattered spiked platforms. Space is a bit tight, so be extra careful as you move around as it can be especially easy here to inadvertently bump into a spiky spot and take some unnecessary damage. Fly up toward the top left part of this area and you should find an ascending tunnel leading back outside. Follow it and a boss battle will trigger at its end.

When the fight begins you’ll find yourself up against a giant Griffin accompanied by a pair of Dark Ghosts. Take down the Ghosts first. They’re susceptible to light magic so use Aurora’s spells to quickly vanquish them. Once they’re out of the way, use Norah or Robert’s abilities to slow the Griffin. The Griffin itself relies mostly on a few solid melee and breath attacks that can damage single and multiple targets fairly effectively. It will also cast a group slowing spell if you interrupt any of its attacks, so keep that in mind. Otherwise, focus your attention on going through the usual routine of whittling down its health while also keeping your own fighters healthy and healed. The Griffin isn’t the toughest of opponents so if you keep a consistent offensive going you should have it beaten in no time at all.

With that boss fight out of the way, enter the Temple of the Moon that it was guarding. You’ll trigger an immediate narrative sequence, after which you should make your toward the left side of the screen. You’ll eventually come to a large door, in front of which you’ll see your companions crying. Speak to each of them in succession and then enter the door. Once you pas the door you’ll enter another large area. Search the ground level for loot and then fly upwards until you reach a platform with a mirror on it. This will trigger another dialogue sequence, after which you should interact with the mirror. Once this is done make your way toward the left side of the screen until you find Norah again. This will trigger another lengthy dialogue sequence.

When this sequence ends you’ll find yourself in a foggy, dream like area. After some more dialogue you’ll regain control of Aurora. Chase the fireflies on the right side of the screen and then return to Aurora’s mother to trigger another narrative sequence. This will end the chapter.
Return to the Main Walkthrough Page

When the chapter begins you’ll exit your cage and Oengus will join your party. After that, make your way toward the left where you’ll shortly come to a locked door. You can’t get through it so you’ll need to get around it. Nearby you should find an ascending passageway. Fly up it and you’ll find yourself on the right side of a large dark tree with some treasure chests nearby. Open the chests and head toward the left where you can descend down a similar passageway.

This should lead you down into an area with where you’ll eventually come to a fork in the road. If you head left you’ll pass through some spike traps and find some enemies and a few chests. Heading down meanwhile will lead you to a contraption that you can’t activate with Igniculus who you’re unfortunately lacking at the moment. To proceed, advance toward the left side of the room to find a large read door. Head inside and you’ll find all of your party mates in cages. Free them and then exit back out the door.

Once you’ve retrieved all you friends head back to the contraption you couldn’t open earlier and use Igniculus to reposition the gears so that they so can spin together and open a gate at the bottom of the screen. Once you have the gate open, proceed downward. This will lead you into an area filled with monsters and treasure chests. Continue working your downward and you should eventually find your way down to a door at the base of a set of stairs where Oengus will give you a side quest. You can enter the door and complete it or press on toward the right to continue the chapter. Assuming you head right you’ll exit outside. Keep toward the right and you’ll shortly trigger a dialogue sequence that ends in a boss battle.

When this battle begins you’ll find yourself up against Cordelia in dragon form. She’ll be accompanied by a pair of reaper look-alikes. When the battle begins, focus your efforts on taking down the reapers. They’re weak against light magic so bring out Aurora and use her spells to dole out elemental damage. While this is going on swap between Robert and Rubella to keep your enemies slowed and your party healed. After you defeat the reapers, focus your attentions on Cordelia herself. Cordelia on her lonesome isn’t all that tough of an opponent. She does have some nasty melee strikes, as well as an annoying habit of auto-healing whenever you interrupt her attacks, but overall this is another standard bout of wearing down her health with a consistent barrage of attacks. She may occasionally also resurrect one of the reapers, but you can just can kill them and return to pummeling her. Once you kill her continue toward the right and enter the Flooded Lands to end the chapter.
Return to the Main Walkthrough Page

When the chapter begins exit the elevator and make your way toward the left. You should see a white orb you can illuminate with Igniculus. Doing so will open a gate on the wall up above. Fly through it and you’ll drop into a secret chamber containing a treasure chest. Crack it open to find a pair of Potent Faery Nectar’s.

From there head toward the right side of the screen. If you advance all the way to the top right corner of this area you’ll activate a side quest. Pursue the quest if you want and then clear the area of monsters and treasure and then make your way toward the center of the room where you’ll find a pillar of ice jutting out of a pit in the floor. Descend down into the pit and you’ll enter a new section where you’ll find several more monsters and chests. If you head toward the right you’ll find the entrance to an entirely separate area filled to the brim with spikes and containing more chests and a powerful monster.

To actually advance through the chapter, however, make toward the left side of the screen and you’ll eventually come to a cliff with a cluster of ice growing out of the wall above. Fly off of the cliff and descend down into the area below where you can continue toward the left. This will eventually lead you to a large chamber with two waterfalls pouring out of the ceiling. If you ascend upwards you’ll find to ledges poking out of the wall. The two highest ones have chest on them. The two right below them meanwhile contain a pull switch and a monster. Kill the enemies, open the chests and use the switch. This will open a gate on the floor just below the switch.

Head through the open gate and you’ll shortly come to a large door sealed by a puzzle. This puzzle is very similar to the other Igniculus-centric ones you’ve solved prior in the game, though with a bit of a twist. You need to use the statues to light up the proper sections of the door and you need to do them in the right order. If you look at the door itself you’ll note that there’s four symbols running from left to right across its top section. There are matching symbols on two pairs of statues lining the left and right sides of the room. Each statue holds a blue item in its hand. Following the sequence on the door, illuminate each blue item and maneuver the shadow over the spot on the door that matches. Match all four in the proper sequence and the door will open. If you make a mistake and do it in the wrong order you’ll have to start again.

Once the puzzle is solved and the door opened, use it to enter the next area. Head toward the right and you’ll come to a pair of gates. The first gate has an orb above it that you can illuminate with Igniculus. Doing so will open the gate, but only for a short while. After a few seconds it will slam shut again. To open the second gate meanwhile, fly up to the ceiling. You should find an opening you can fly up through. Use it and head toward the right to find a pull switch. Activate the pull switch and you’ll trigger the second gate. This gate will also stay open for just a few seconds. Open both gates in quick succession and then fly quickly through before they shut.

Once through those gates head toward the the right. You’ll come to a broken staircase near which you’ll find a crate on a ledge. Push the crate off the ledge and toward the right. You’ll come to a pull switch. To the right of the pull switch is a small nook with a button under it. Push the crate onto the button. This will open a nearby gate behind which you’ll find some treasure and a monster. Once you’ve cleared that room out make your way upward until you reach another gate with another pull switch nearby. Trigger it to open the gate and then head through to trigger a dialogue sequence.

After the dialogue sequence ends the room will fill with a poisonous green gas. As long as the gas remains your health will drain. Before you can continue you need to hit two switches hidden inside rooms on the left and right sides of the room. Turning these switches will also unlock a pathway leading into an ascending tunnel. Once the gas is gone and the way is clear, head up into said tunnel. As you make your way upward spikes will start emerging from the wall. Keep flying upward and you’ll eventually come to a room containing some chests. Open the chests, heal up and head into the next room to trigger a boss battle.

This fight will be between you and Nox’s dragon from. In addition to Nox herself, you’ll also need to fight a pair of tentacles. Overall, this fight isn’t the toughest. Nox can deal some hefty melee strikes, but it’s easy to just set up a pattern of regular attacks that will wear her down. All you need to do is bring out Finn and have him cast lighting attacks. It’s up to you if you want to use group spells to hit all three of Nox at once, or just use a single-target spell to dole out heavier, more focused damage on one target at a time. While you’re doing this, also bring out Rubella and use her healing abilities and fast attacks to keep Finn alive and Nox’s attacks disrupted. Just keep this up and eventually Nox’s tentacles will get knocked out of the fight. Once that’s done you can swap Rubella for Aurora (or another preferred fighter) and finish Nox off. After you beat Nox an extended dialogue sequence trigger. After it ends the game’s final boss battle will trigger.

When the battle begins you’ll find yourself up against the monster form of the evil Queen Umbra. Alongside her you’ll face two imp-creatures. Both Umbra and the Imps are vulnerable to light magic. This means, of course, that you’ll want to use Aurora heavily in this fight. As with the previous battle with Nox you’ll want to make a choice early about whether you’re going to focus your efforts on one enemy at a time or multi-target spells to dish out group damage. You’ll also want to use Rubella again to keep Aurora alive. Don’t even bother swapping between other characters or using Rubella to disrupt attacks. As long as all three enemies are alive you’ll want to focus her on healing. It’s also important in this fight to not disrupt Umbra’s attacks. She has some nasty counters that you’re better off just avoiding. Beyond that, just stay alive and keep on the pressure and Umbra will fall. This, in turn, will end the game.
Return to the Main Walkthrough Page

 Splatoon Wii U tips
 Battlefield 3: Top 10 Things People Hate About BF3s Multiplayer
 Octodad: Dadliest Catch Walkthrough
 Guild Wars 2: Heart of Thorns beginners guide
 How to do Borderlands The Pre-Sequel Research And Development Side Quests