Chapter 3: Inequalities
Your overall objective this mission is to get to the Hospital. Right from the start you’ll simply be walking, interacting with the world when needed, and listening to the conversation between Marquis and Galahad. As I’ve stated many times in this game, it’s very linear as far as the directions you can go, so simply follow Marqui where he tells you to and you should be fine.
After a short cutscene where Galahad and Lafayette are spotted it’s time to head through an alleyway. Move through it to spark a cutscene which ends with Galahad break some scumbag’s arm, and then speak with the woman cowering in the corner before moving on.
Now it’s time to get your first taste of lockpicking. In order to pick the lock you’ll need to hold L2 and circling the R stick around until the controller rumbles the most, and then press R2 to lock it into place.
Once you’re through the door move forward until you pass through a curtain and into a cutscene which ends with Galahad and Marquis losing their weapons. There are a few collectibles in this area, so feel free to grab them if you want, but then move over to where your partner is chatting with a couple of the establishment’s “workers” and then follow them up the steps after the short cinematic.
Keep moving down the upper hallway until another cutscene plays and you end up inside a room with a “busy” man and woman. Once the man goes for his gun Galahad will rush forward and you’ll need to go through a quick quick time event to grab the gun and knock the man out. Once he’s down for the count and you have your hands on a nice shiny Duelist Revolver head out of the room through the door beside the dresser and out onto the balcony.
The next few minutes of gameplay are going to focus on very linear movement, so take a left out of the doorway from the last room and head onto the rooftops. From here you’ll be hopping from ledge to ledge until you eventually reach a rooftop which leads to a jump into a room on the opposite side of the alleyway below. Jump across and climb inside to find a crank to the right. Interact with it and use it to pull the hanging boxes outside up a little bit higher, then drop back onto the ledge on this side of the alley and shimmy into the window just to your right.
Once inside the window make your way downstairs until you find two guards in front of you. Make good use of your revolver and take them down with a few well-placed headshots then keep moving into the next room where you’ll find a few weapons and grenades sitting around. That’s mighty convenient.
Head out the window from the weapon room and drop down further back to the ground, following Marquis up to the gallows where a short cutscene will play that ends with you taking cover from a rebel ambush.
It’s time to put in some real work, as there are two snipers total in the windows ahead of you. Focus on them first, but make sure you’re making quick adjustments with your weapons and aren’t staying out of cover very long when aiming. Once they’re down take out the remaining rebel scum in your way and then head up into the building above the arch to grab that sniper, or if you want to hold onto your other weapon feel free to do that. Either way, once you’ve made your ammo run move forward through the arch and take out the remaining enemies ahead before heading down the open alleyway to your left. A cart will be pushed in the way, which causes you to detour into the open door on the left. Head up those stairs and through the building to drop into another large battle.
Stick close to the starting point for the best cover, and never drop all the way down into the courtyard when facing these enemies. Watch out for grenadiers and shotgunners, as both will take you down quickly without too much effort. Shotgunners will also rush your position, so whenever Marquis yells out about one of them make sure to locate him and put him down without a second thought.
Once you’ve finished up this battle head over to Marquis and help him move the cart so you can continue into the next area. Move forward up to the rooftop until you trigger a cutscene that ends with Galahad needing to locate the others and Sentinel 5 using the Monocular. Follow the instructions on screen to signal the ship once you locate it (it’s off to the left of where you start off looking), and once that’s done it’s time to continue on.
After regaining control of Galahad keep moving forward, taking out any rebels in your way, until you meet back up with Percival and Igraine. Enjoy the lengthy cutscene until you gain possession of the Thermite Rifle. Use the rifle to first spray down enemies with Thermite, then hit R1 to launch the secondary flare which will ignite them.
Move through the fight and follow the directions on screen to Ignite the Distillery, and then to save the constable after he gets shot. Once you’re inside the distillery it’s time to head over to the broken down furnace in the doorway and interact with it to drop your Thermite magazine onto it, then ignite it to create a way through.
Head forward into the next area where Galahad will spot a weakness in the bridge overhead, as well as be introduced to a new enemy, the Rebel Heavy. These enemies are tough, with heavy duty armor, and will take quite a few shots to take down. Once he’s down and the other enemies are cleared out, head up to the overturned wagon to help Percival pull it down. Now climb up and head into the building and out onto the rickety landing outside the window to put the Thermite on the bridge and destroy it.
Now simply keep moving forward to spark the final chapter cutscene and move onto Chapter 4.


 Led Zeppelin surprise fans with new songs
 4 Creative Hobbies That Can Improve Your Life Today
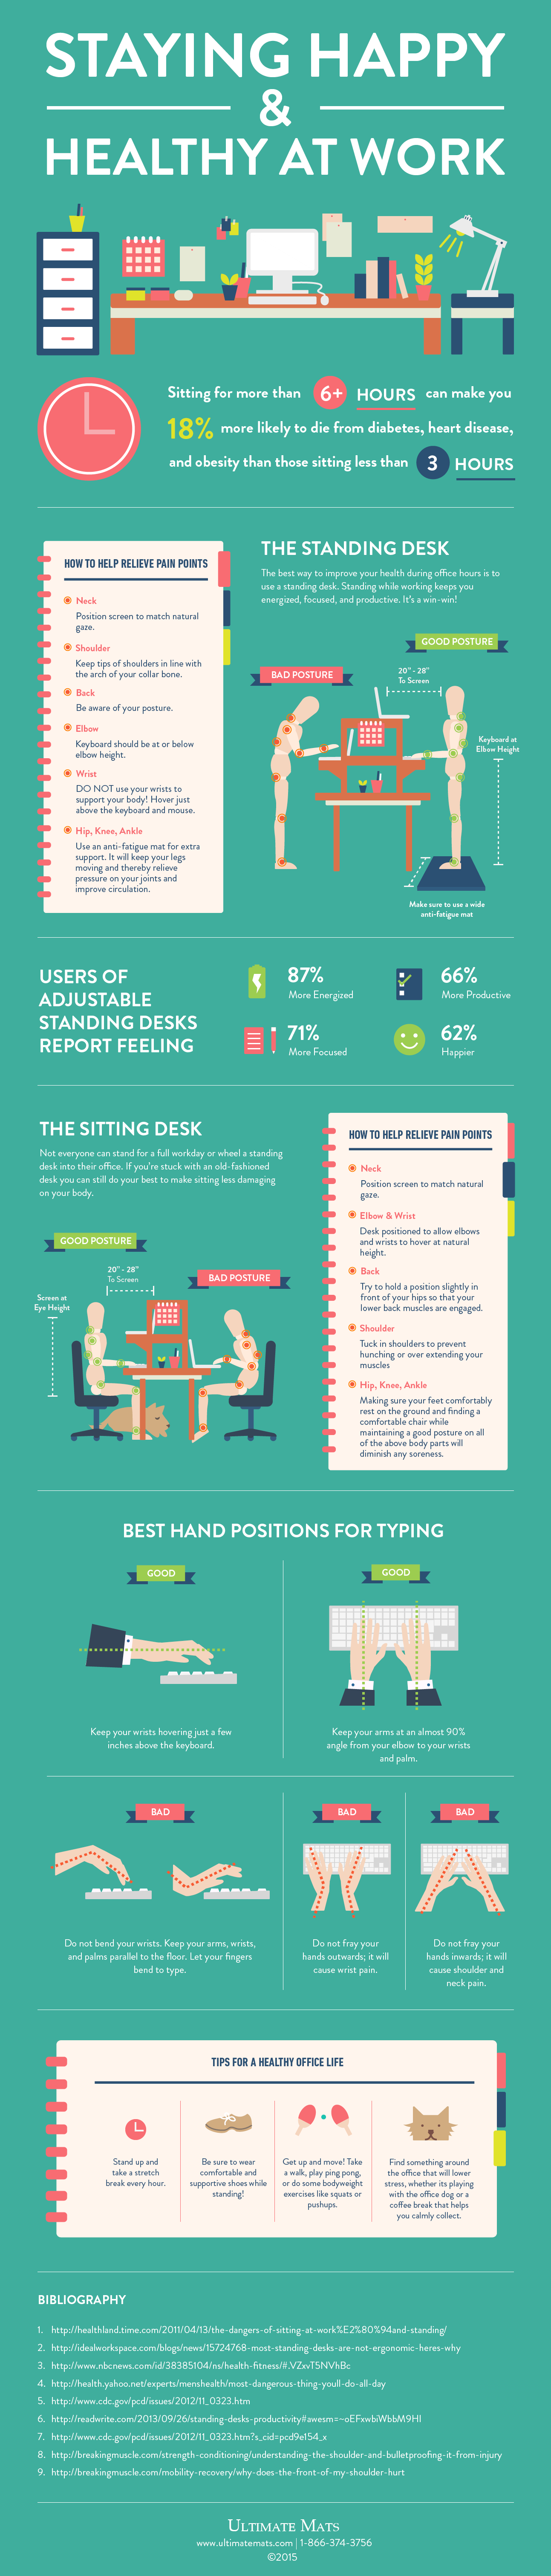 Get More Done At Work The Easiest Way Possible
 Katy Perry will release a video game for Smartphones
 Changed Location for Loot items in Dark Souls II: Scholar of the First Sin