Mystery Trackers: Paxton Creek Avenger Walkthrough, Guide, & Tips
Mystery Trackers: Paxton Creek Avenger Walkthrough

Welcome to the Mystery Trackers: Paxton Creek Avenger Walkthrough
Someone’s made it their personal vendetta to bring down the Mystery Trackers.
Whether you use this document as a reference when things get difficult or as a road map to get you from beginning to end, we’re pretty sure you’ll find what you’re looking for here.
This document contains a complete Mystery Trackers: Paxton Creek Avenger game walkthrough featuring annotated screenshots from actual gameplay!
We hope you find this information useful as you play your way through the game. Use the walkthrough menu below to quickly jump to whatever stage of the game you need help with.
Remember to visit the Big Fish Games Forums if you find you need more help. Have fun!
This walkthrough was created by Amanda Barrera, and is protected under US Copyright laws. Any unauthorized use, including re-publication in whole or in part, without permission, is strictly prohibited.
General Tips
- This is the official guide for Mystery Trackers: Paxton Creek Avenger.
- This guide will not show when you have to zoom into a location; the screenshots will show each zoom scene.
- Hidden-object puzzles are referred to as HOPs. This guide will not show screenshots of the HOPs, however, it will mention when an HOP is available and the inventory item you’ll collect from it.
- Use the Map to fast travel to a location.
Chapter 1: The Avenger

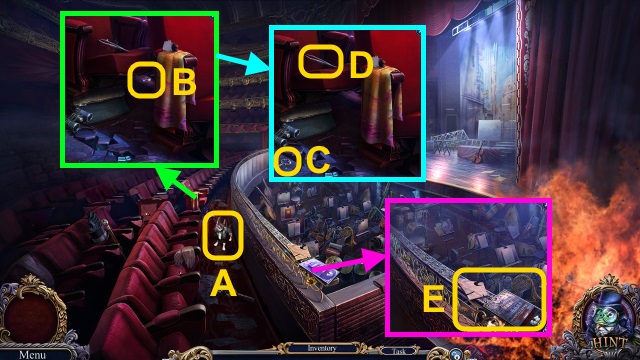
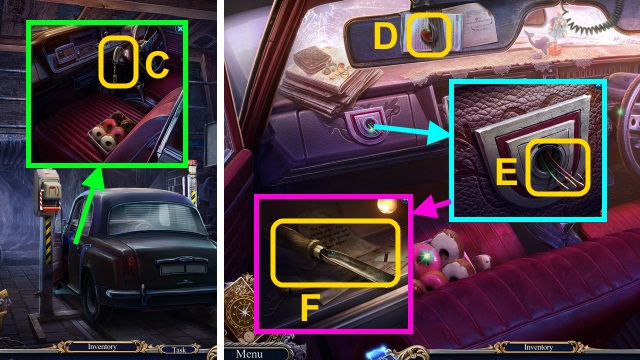
- Examine the scene; take ELF (A).
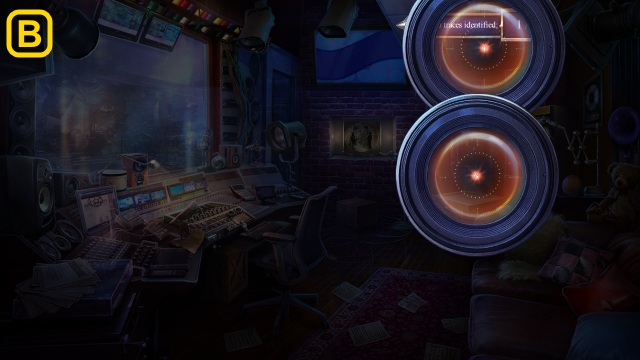
- Use ELF (B); take the BADGE PIECE (C) and TWEEZERS (D).
- Take the PIECE OF PAPER and flyer (E).

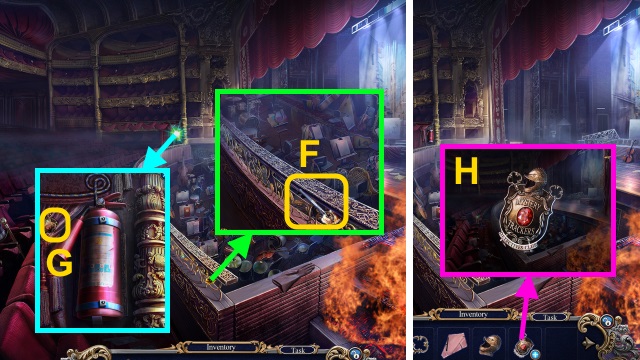
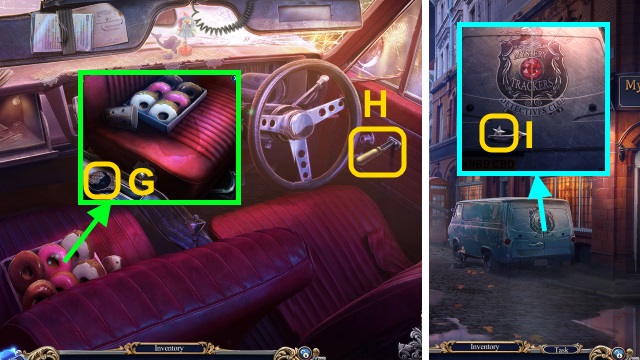
- Use the TWEEZERS; receive the BADGE PIECE (F).
- Take the MT BADGE (G).
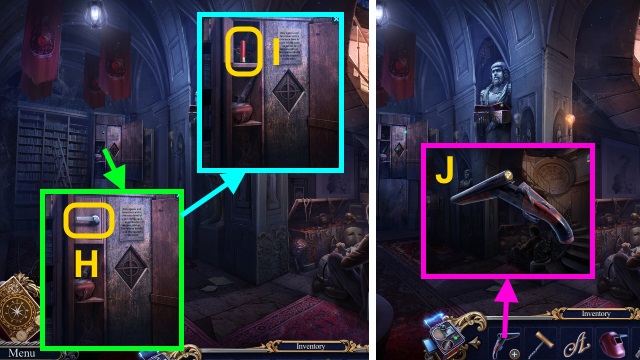
- Combine the MT BADGE and 2 BADGE PIECES (H); take the MT BADGE.

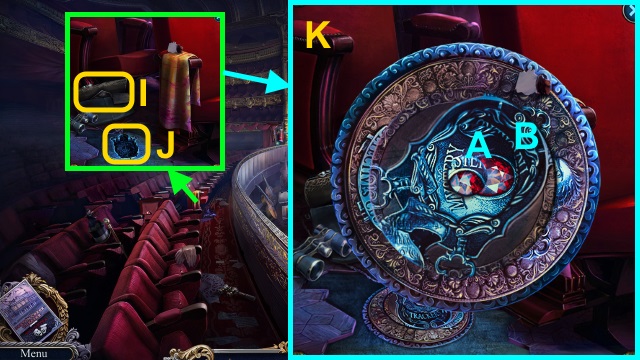
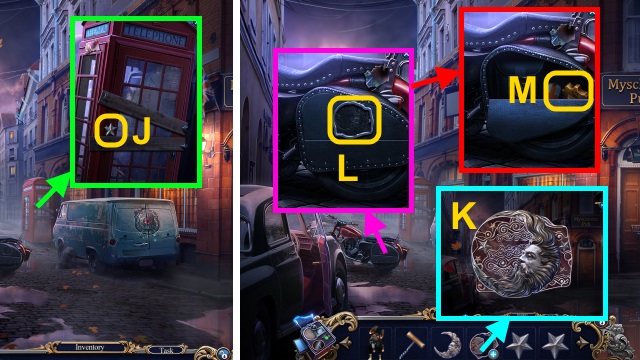
- Open the bag (I); examine the photo.
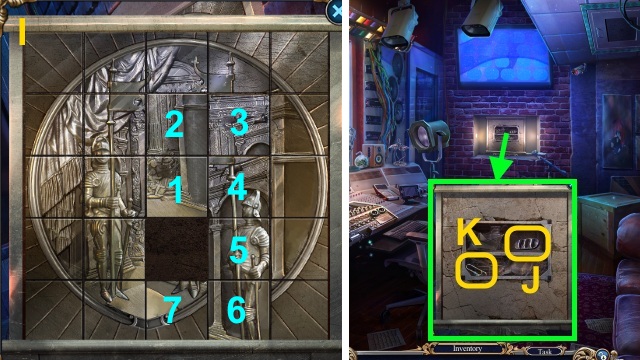
- Move the tiles; place the MT BADGE for a mini-game (J).
- Solution (K): Ax6-Bx5.

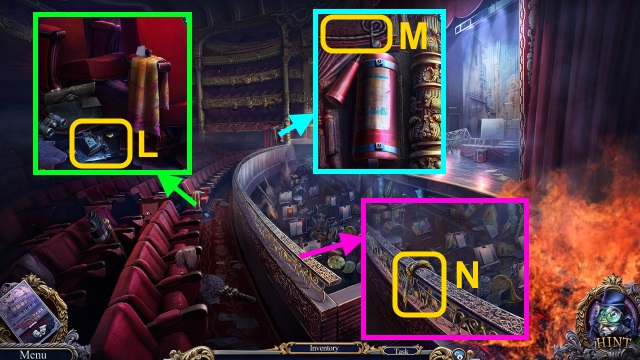
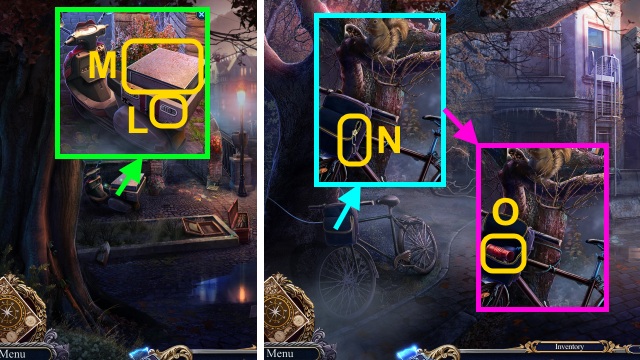
- Take the THERMAL SCOPE and KNIFE (L).
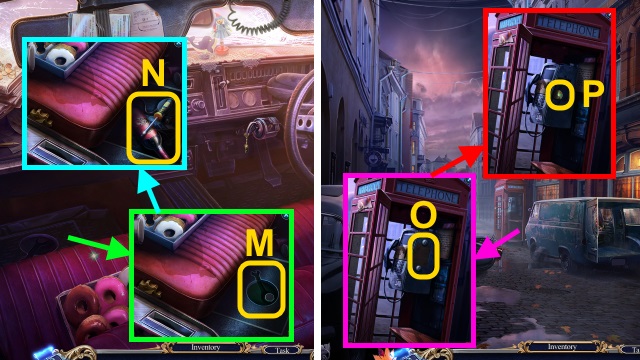
- Use the KNIFE (M); receive the ROPE.
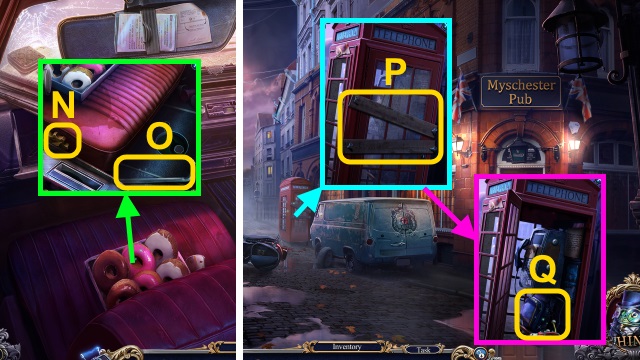
- Tie the ROPE (N).

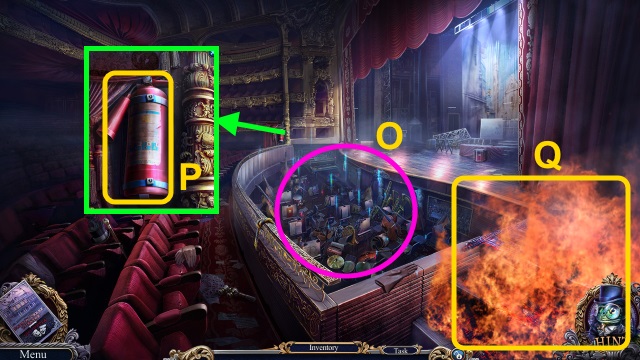
- Play the HOP; receive the WRENCH (O).
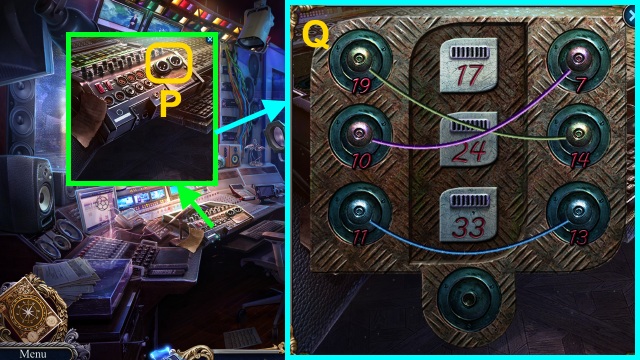
- Use the WRENCH; take the FIRE EXTINGUISHER (P).
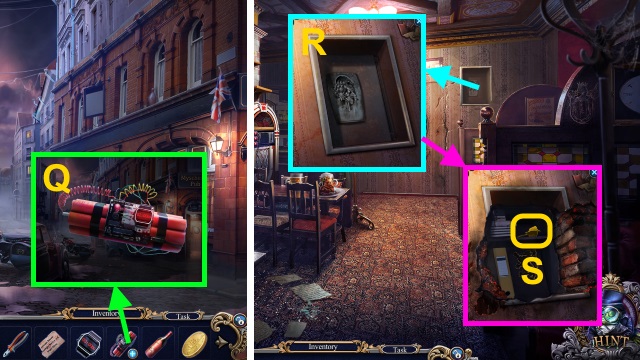
- Use the FIRE EXTINGUISHER (Q).
- Walk forward.

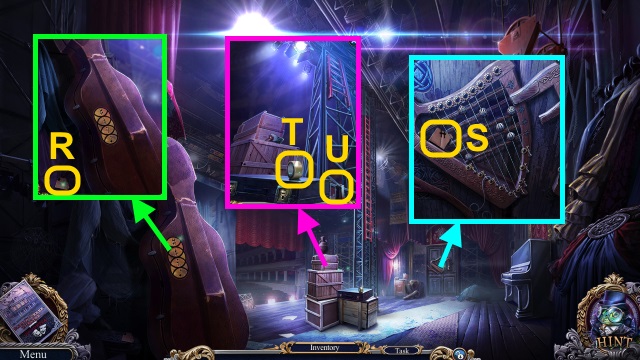
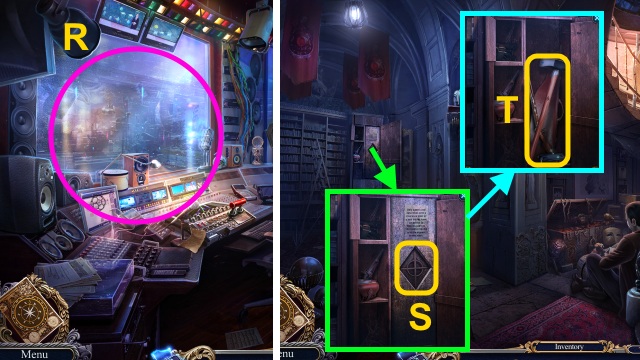
- Take the PIECE OF PAPER (R).
- Take the PIECE OF PAPER (S).
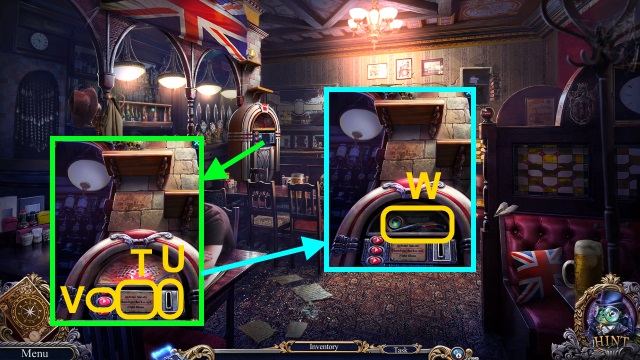
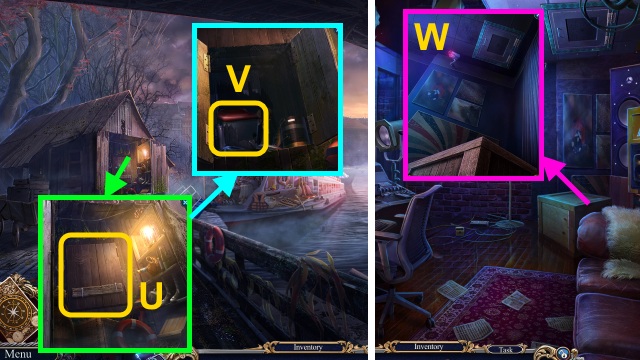
- Take the TAPE (T) and RECHARGEABLE BATTERY (U).

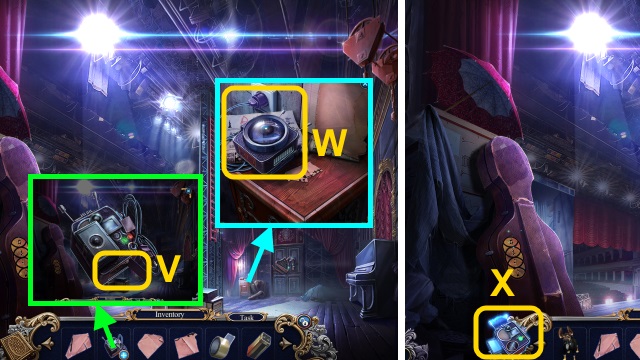
- Open the THERMAL SCOPE; place the RECHARGEABLE BATTERY (V).
- Take the DEAD THERMAL SCOPE.
- Place the DEAD THERMAL SCOPE (W); take the Thermal Scope.
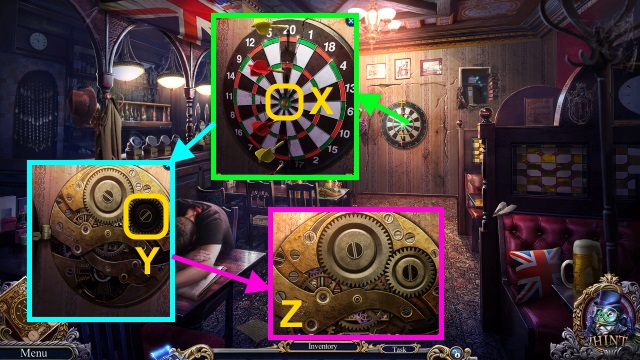
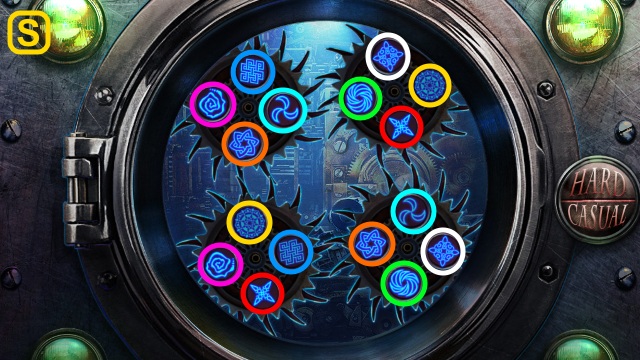
- Use the Thermal Scope for a mini-game (X).

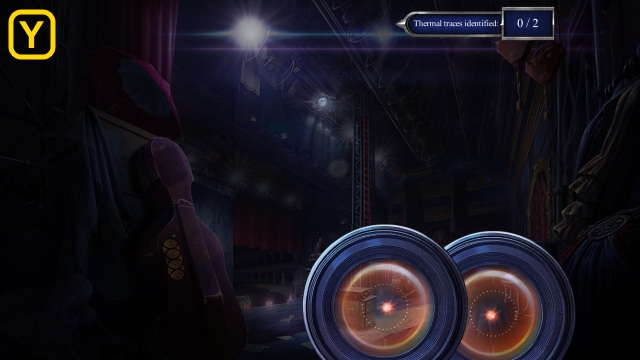

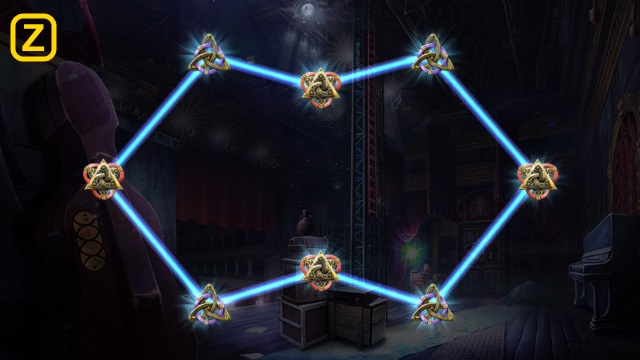
- Solution (Y-Z).
- Receive the BROKEN THERMAL SCOPE.

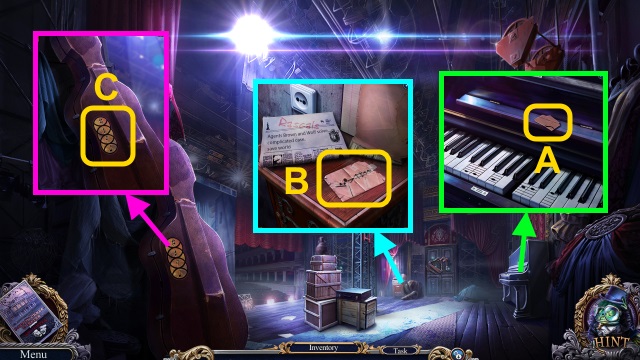
- Take the PIECE OF PAPER (A).
- Place the 4 PIECES OF PAPER; use the TAPE (B).
- Take the CODE.
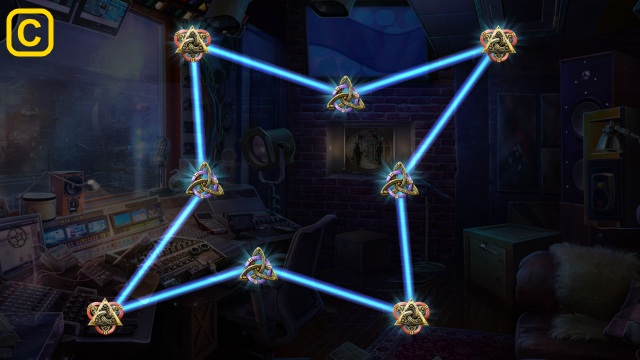
- Place the CODE for a mini-game (C).

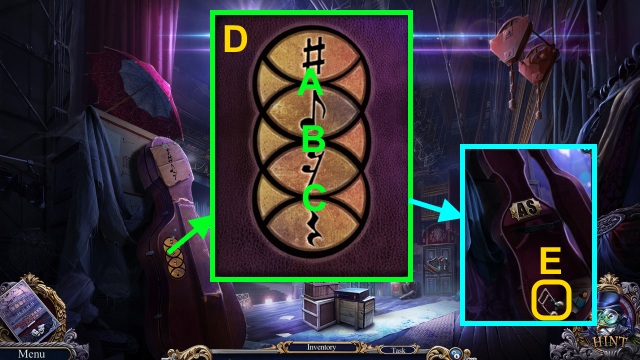
- Solution (D): C-B-A.
- Take the KEY (E).
- Walk down.

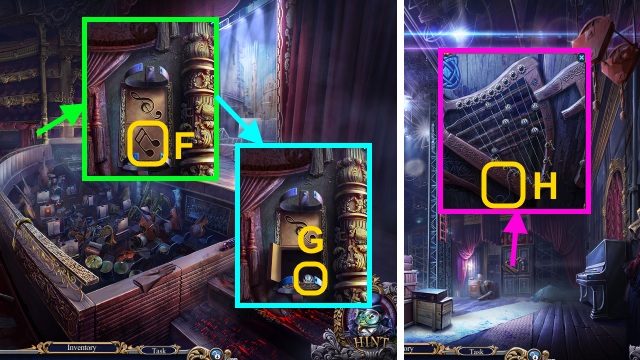
- Place the KEY (F).
- Take the STRING (G).
- Walk forward.
- Move the string (H); place the STRING for a mini-game.

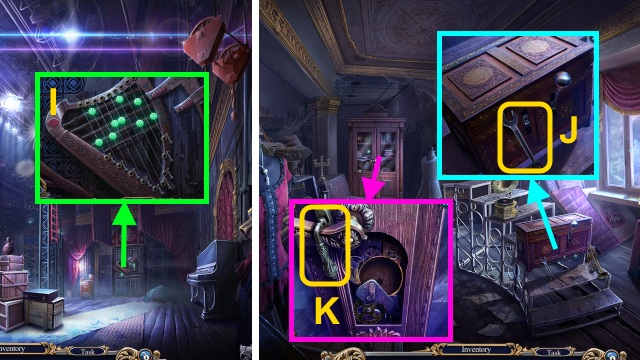
- Solution is random (I).
- Walk forward.
- Take the WRENCH (J).
- Take the WINDOW HANDLE (K).

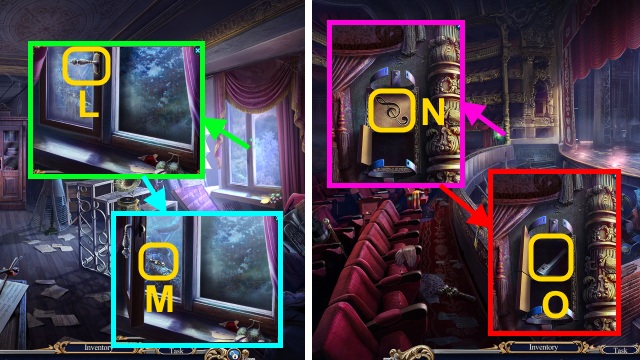
- Place the WINDOW HANDLE (L); turn it.
- Use ELF (M); take the TREBLE CLEF.
- Walk down twice.
- Place the TREBLE CLEF (N).
- Take the KEY (O).

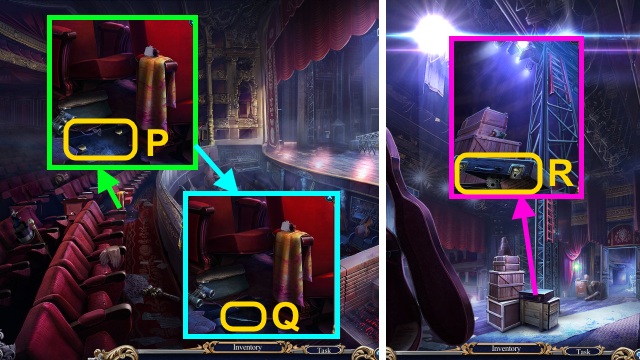
- Use the WRENCH (P); take the LOCKPICK (Q).
- Walk forward.
- Use the LOCKPICK; take the GEAR (R).
- Walk forward.

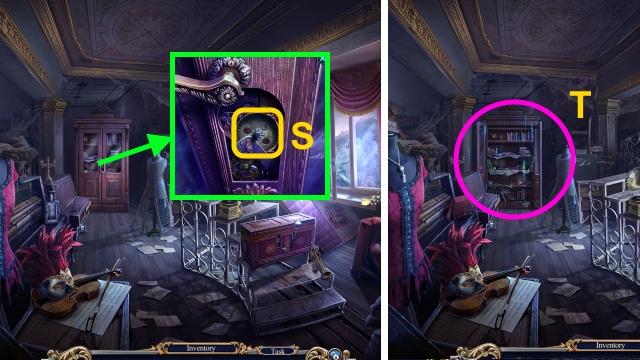
- Place the GEAR (S); open the door.
- Play the HOP; receive the SHEET MUSIC (T).
- Walk down.

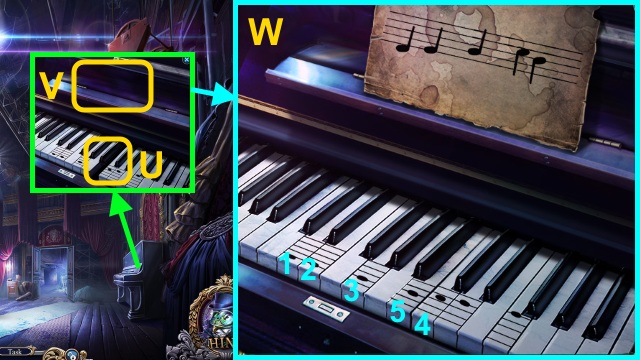
- Place the KEY (U) and SHEET MUSIC (V) for a mini-game.
- Solution (W).
- Walk right.
Chapter 2: The Theater

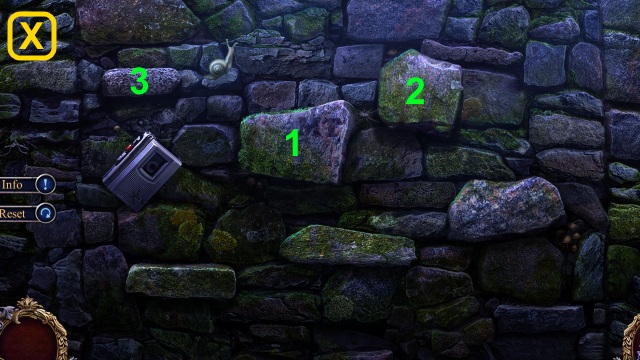
- Play the mini-game; solution (X).

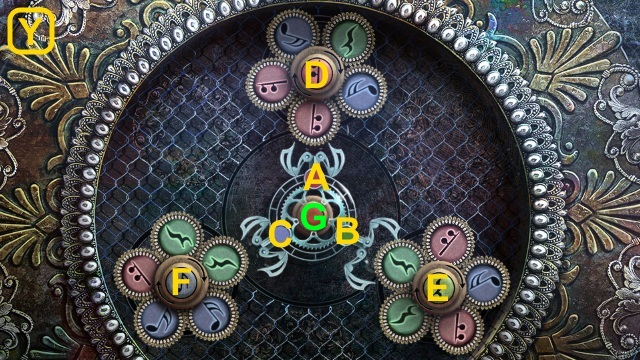
- Solution (Y): Fx2-C-Ex3-B-Dx2-A-G-Fx4-C-Ex4.
- B-Dx4-A-Fx3-C-E-B-D-A-Gx2-Fx3-C-Ex3-B-Dx3.
- A-F-C-Ex3-B-Dx3-A-Gx2-Fx3-C-Ex3-B-Dx3-A.

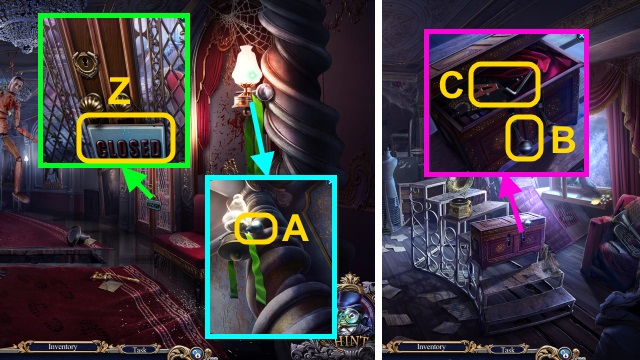
- Take the PLATE (Z).
- Use ELF; take the LEVER (A).
- Walk down, then forward.
- Place the LEVER; pull it (B).
- Take the LETTER and HEX KEY (C).

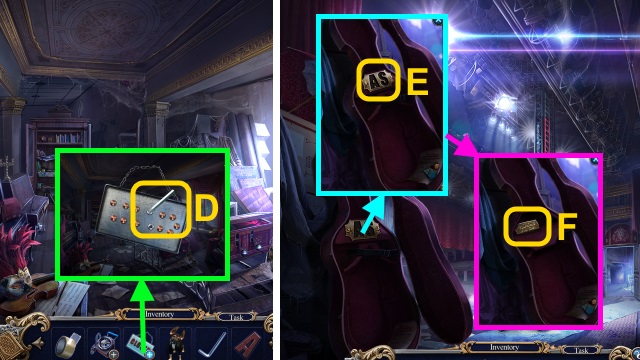
- Examine the PLATE; use the HEX KEY (D).
- Receive the LETTER.
- Walk down.
- Place the 2 LETTERS (E); take the SIGNATURE (F).
- Walk right.

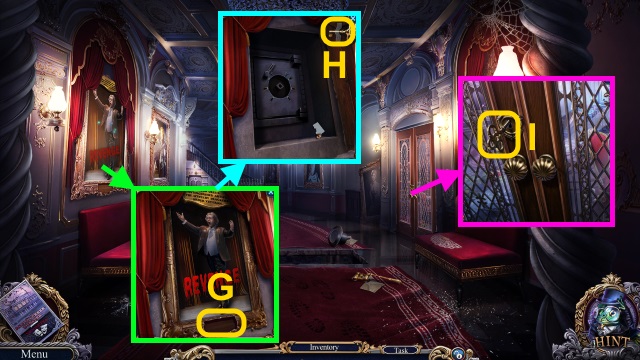
- Place the SIGNATURE (G).
- Take the KEY (H).
- Use the KEY (I).
- Walk right.

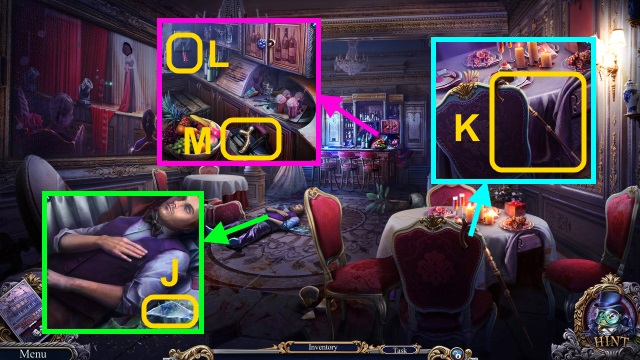
- Take the BOTTLE PIECE (J).
- Take the BROKEN CANE (K).
- Use ELF (L); take the CANE HANDLE and BAG (M).

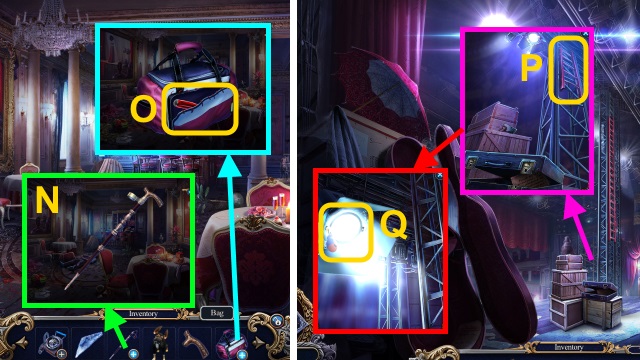
- Examine the BROKEN CANE; use the CANE HANDLE and TAPE (N).
- Take the TAPED CANE.
- Use the BOTTLE PIECE on the BAG; take the SCREWDRIVER (O).
- Walk down twice.
- Use the TAPED CANE (P).
- Use the SCREWDRIVER (Q); take the LENS.

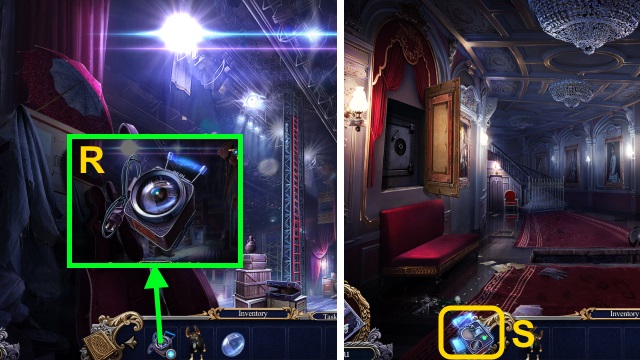
- Examine the BROKEN THERMAL SCOPE; place the LENS (R).
- Take the Thermal Scope.
- Walk right.
- Use the Thermal Scope for a mini-game (S).

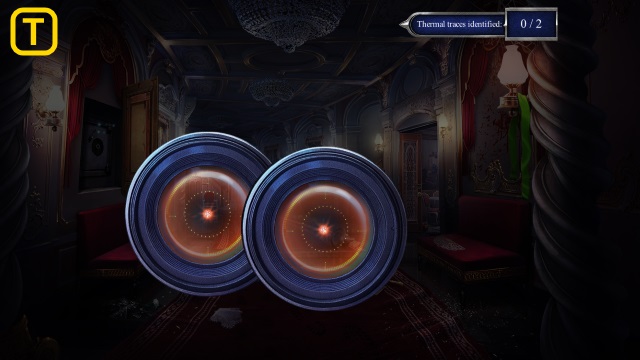

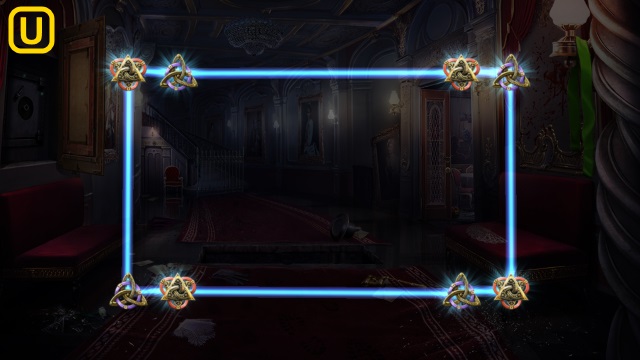

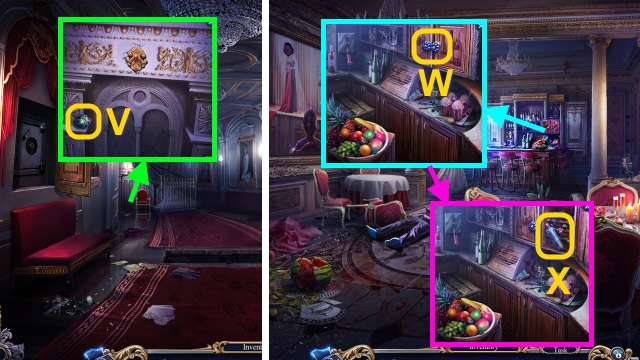
- Take the CABINET HANDLE (V).
- Walk right.
- Place the CABINET HANDLE (W); open the cupboard.
- Take the MINERAL WATER (X).

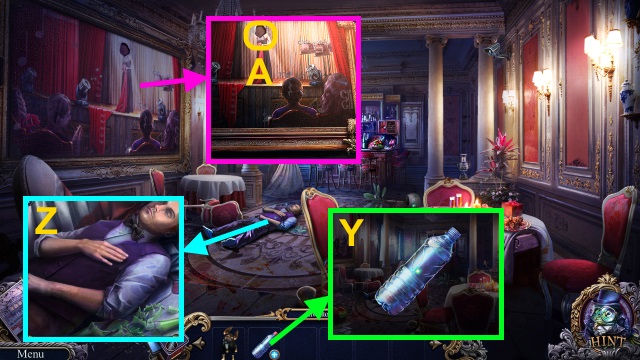
- Open the MINERAL WATER (Y); take the BOTTLE OF MINERAL WATER.
- Pour the BOTTLE OF MINERAL WATER (Z); receive the PICTURE PIECE.
- Place the PICTURE PIECE (A).

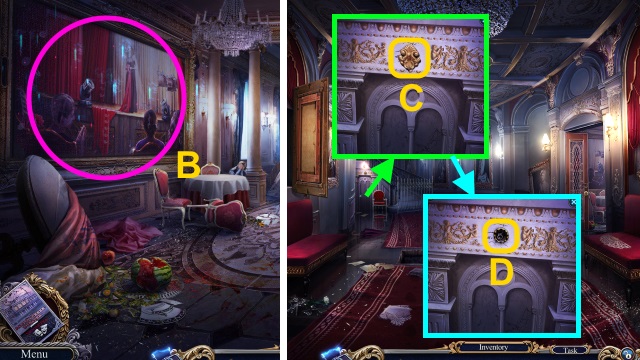
- Play the HOP; receive the BUTTON (B).
- Walk down.
- Examine the decoration (C); place the BUTTON (D).
- Walk left.

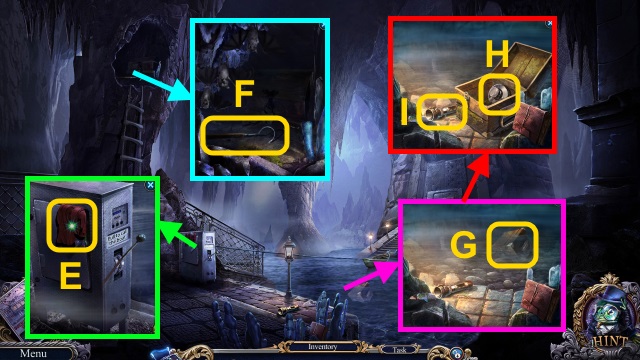
- Take the CLOTH (E).
- Use ELF (F); take the HOOK.
- Use the HOOK (G).
- Open the box; take the SAFE HANDLE (H) and LANTERN (I).
- Walk down.

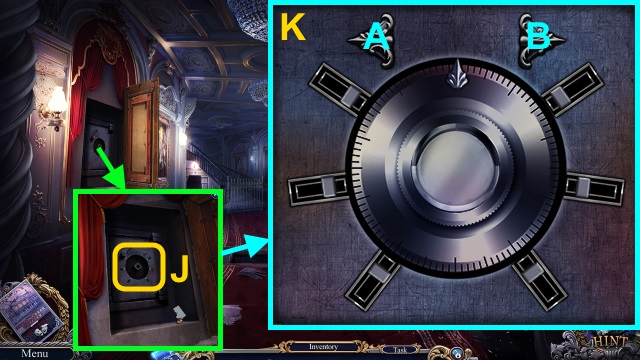
- Place the SAFE HANDLE for a mini-game (J).
- Solution (K): (B-A-Bx2-Ax2).

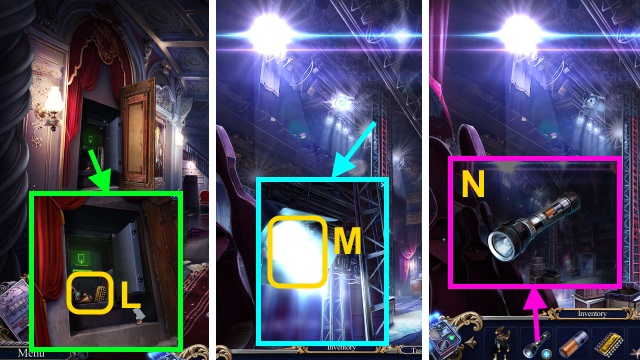
- Take the MICROCHIP, BATTERY, and QUESTION MARK (L).
- Walk down.
- Use the CLOTH (M); receive the BULB.
- Open the LANTERN; place the BATTERY and BULB (N); take the LIT LANTERN.
- Walk right, then left.

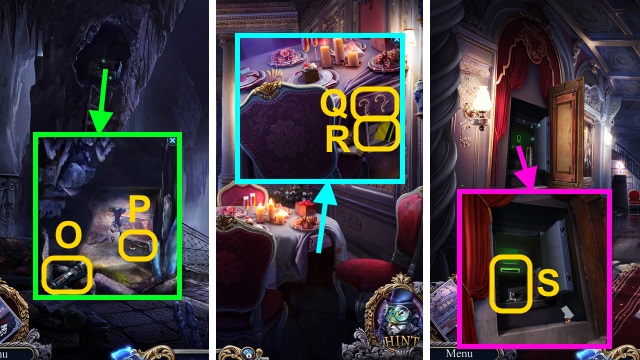
- Use the LIT LANTERN (O); take the QUESTION MARK (P).
- Walk down, then right.
- Move the cloth; place the 2 QUESTION MARKS (Q).
- Take the SWIPE CARD (R).
- Walk down.
- Use the SWIPE CARD; take the BOX KEY (S).
- Walk left.

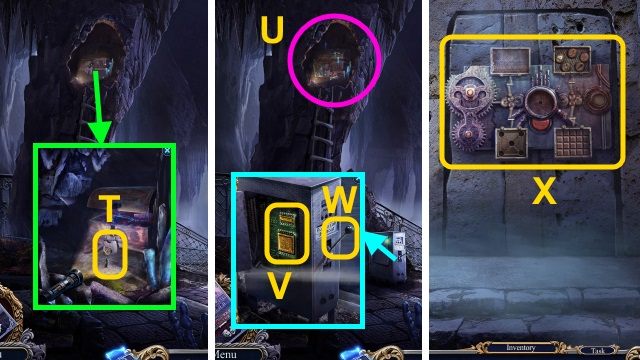
- Use the BOX KEY (T).
- Play the HOP; receive the MICROCHIP (U).
- Move the cover and chips; place the 2 MICROCHIPS (V).
- Pull the lever (W).
- Examine the door for a mini-game (X).

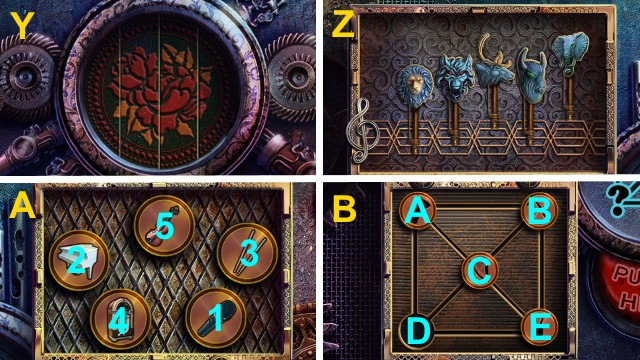

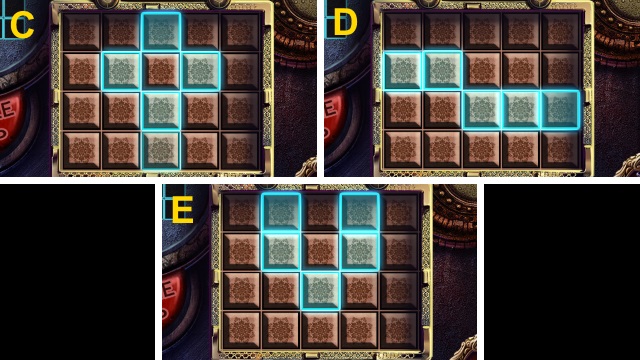
- Solution (Y-A).
- Solution (B): E-B-C-A-D-E-C.
- Solution (C-E).

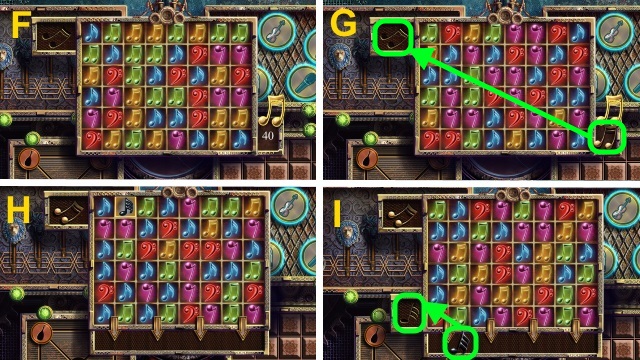
- Solution is random (F).
- Solution (G).
- Solution is random (H).
- Solution (I).
Chapter 3: The Avenger’s Hideout

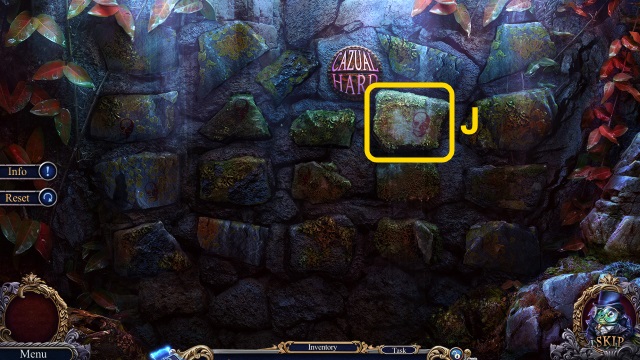
- Examine the brick for a mini-game (J).

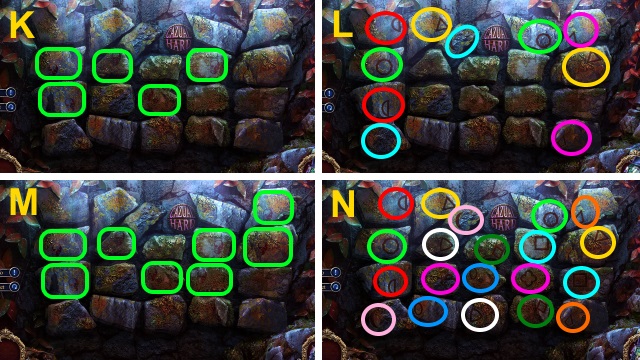
- Casual solution: (K-L).
- Hard solution (M-N).

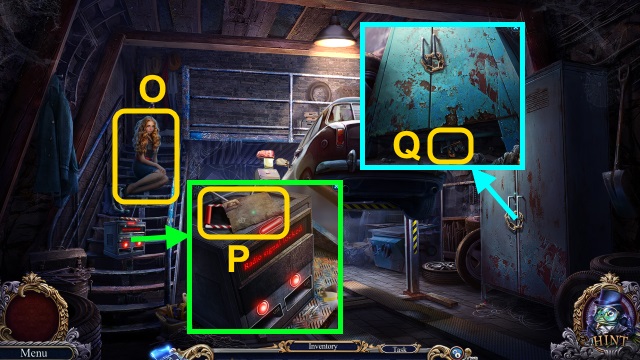
- Talk to the girl (O); receive the HAIRPIN.
- Take the Map and MASTER SWITCH (P).
- Use ELF (Q); take the REPAIR AMULET.

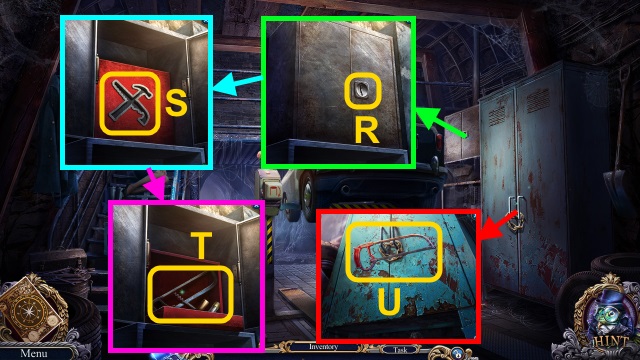
- Use the HAIRPIN (R).
- Place the REPAIR AMULET (S).
- Take the HACKSAW, CORKSCREW, and FUSE (T).
- Use the HACKSAW (U).

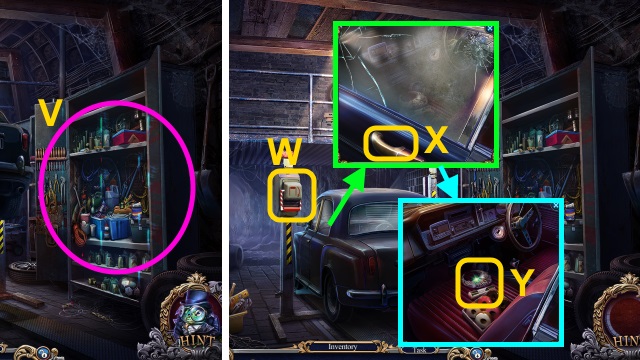
- Play the HOP; receive the CAR HANDLE (V).
- Use the MASTER SWITCH (W).
- Use the CAR HANDLE (X); open the door.
- Take the FUSE and NIGHT SYMBOL PIECE (Y).

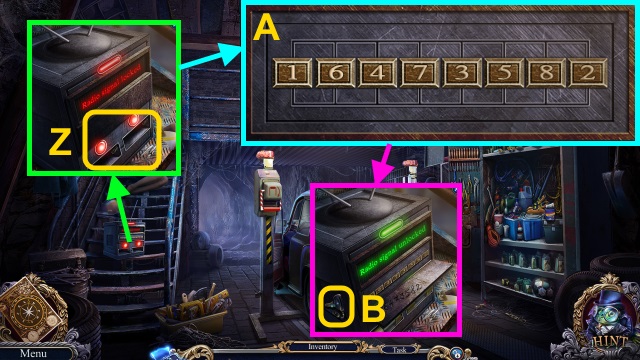
- Place the 2 FUSES for a mini-game (Z).
- Solution (A).
- Take the IGNITION KEY (B).

- Use the IGNITION KEY (C).
- Examine the sun visor; take the BUTTON (D).
- Place the BUTTON (E); press it.
- Take the CHISEL (F).

- Take the BROKEN NIGHT SYMBOL (G).
- Use the CHISEL (H).
- Walk right.
- Take the NIGHT SYMBOL PIECE (I).

- Take the NIGHT SYMBOL PIECE (J).
- Combine the BROKEN NIGHT SYMBOL and 3 NIGHT SYMBOL PIECES (K); take the NIGHT SYMBOL.
- Place the NIGHT SYMBOL (L).
- Take the ENGLISH BADGE and HANDLE (M).
- Walk left.

- Place the HANDLE (N); turn it.
- Take the CROWBAR (O).
- Walk right.
- Use the CROWBAR (P).
- Take the BAG, CLIPPERS, and WIRE (Q).
- Walk left.

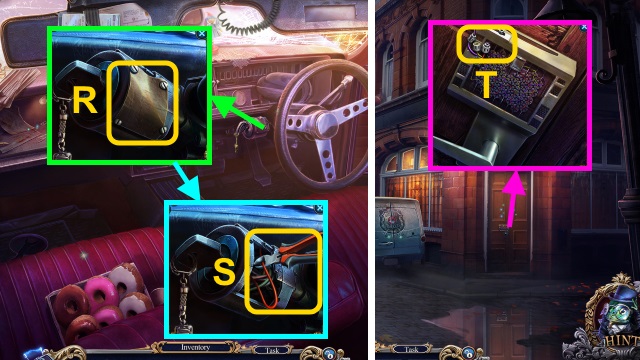
- Use the ENGLISH BADGE (R).
- Use the CLIPPERS (S); take the WIRE.
- Walk right.
- Place the 2 WIRES for a mini-game (T).

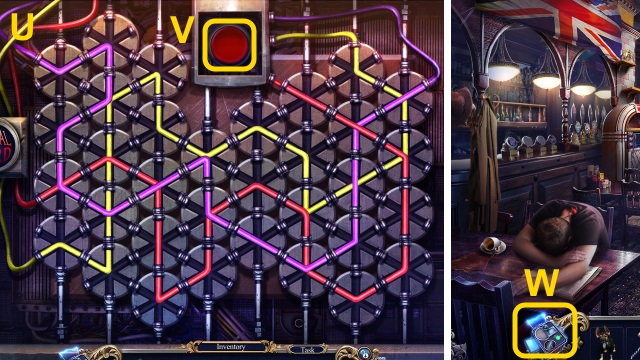
- Solution (U).
- Press the button (V).
- Walk right.
- Use the Thermal Scope for a mini-game (W).

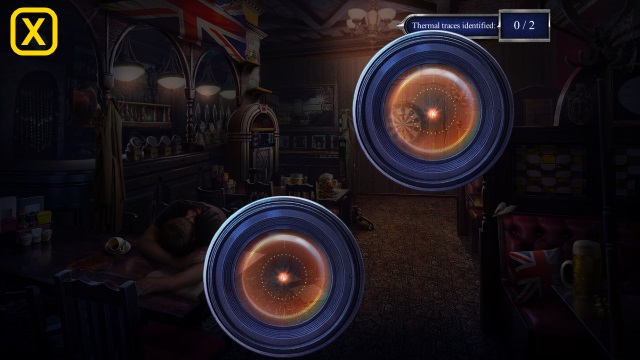

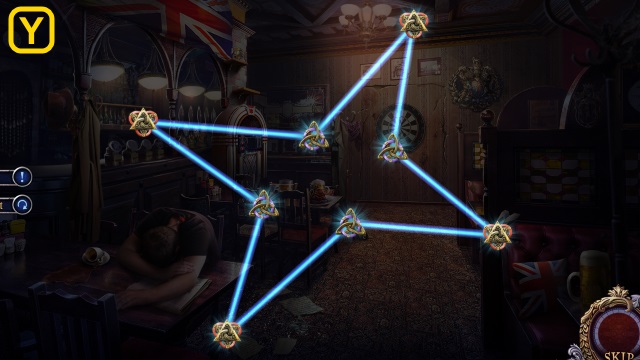

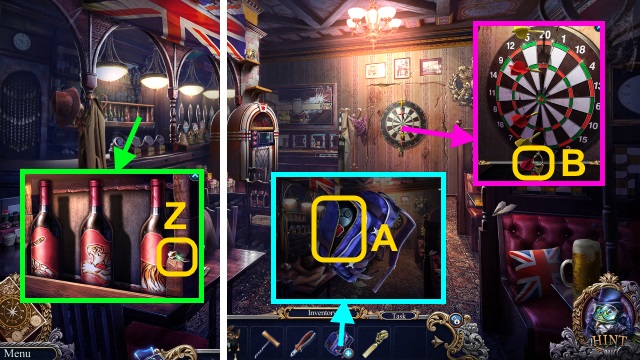
- Take the ZIPPER PULL (Z).
- Combine the BAG and ZIPPER PULL; take the DIGITAL WATCH and TOOL SYMBOL (A).
- Take the TRUCK KEY (B).

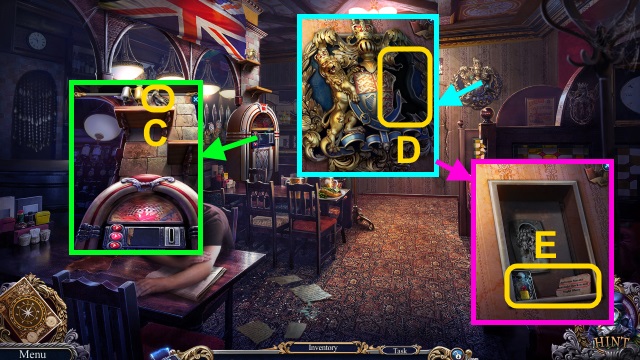
- Use ELF (C); receive the CREST PIECE.
- Place the CREST PIECE (D).
- Take the MT CARD and SONG LIST (E).
- Walk down.

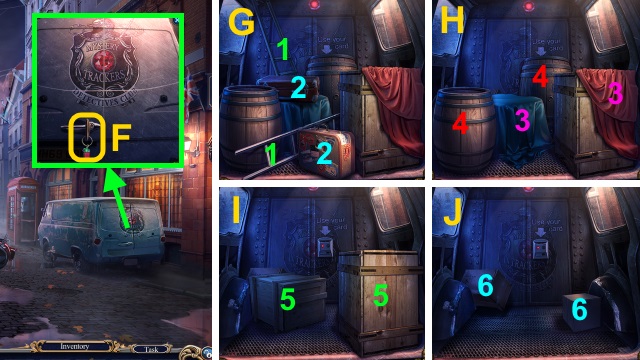
- Use the TRUCK KEY for a mini-game (F).
- Solution (G-J).

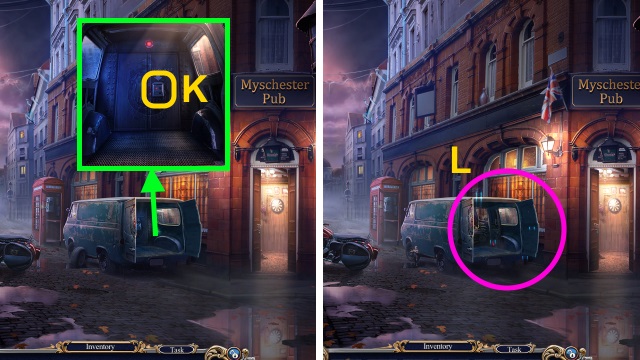
- Use the MT CARD (K).
- Play the HOP; receive the BOMB (L).
- Walk left.

- Place the TOOL SYMBOL (M).
- Take the BOTTLE and SCREWDRIVER (N).
- Walk right.
- Use the SCREWDRIVER (O).
- Take the 25 PENCE (P).

- Combine the BOMB and DIGITAL WATCH (Q); take the BOMB.
- Walk right.
- Place the BOMB (R).
- Take the DART (S).

- Place the SONG LIST (T) and 25 PENCE (U).
- Press the button (V).
- Take the RIFLE and MECHANISM PIECE (W).

- Use the DART (X).
- Place the MECHANISM PIECE (Y).
- Examine the machinery for a mini-game (Z).

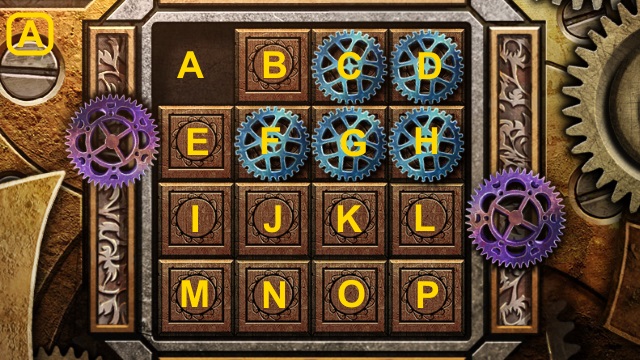
- Casual solution (A): E-F-G-C-D-H-L-K-G-C-D-H-L-K-G-C.
- Hard solution: E-F-B-C-G-F-J-L-H-D-C.
- G-K-O-P-L-H-D-C-G-K-O-P-L-H-G-K-O-P.
- Walk forward.
Chapter 4: The Secret Base

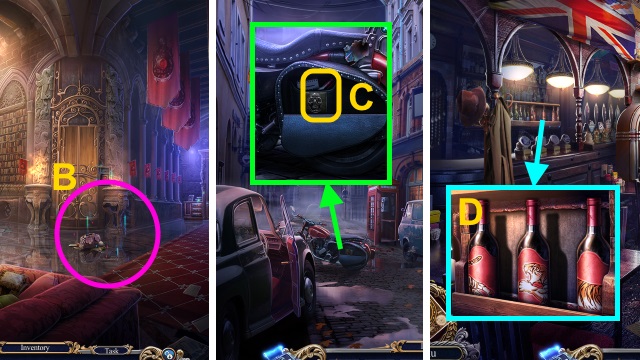
- Play the HOP; receive the SKULL SYMBOL (B).
- Walk down twice.
- Place the SKULL SYMBOL (C).
- Take the BOTTLE (D).
- Walk right.

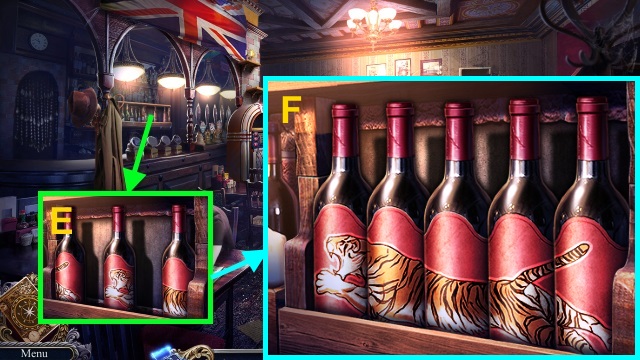
- Place the 2 BOTTLES for a mini-game (E).
- Solution (F).

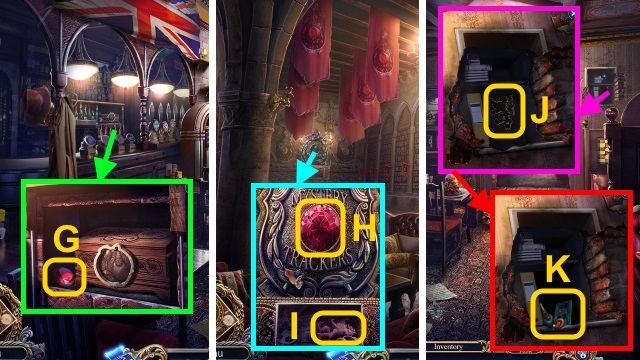
- Take the RUBY (G).
- Walk forward.
- Place the RUBY (H); take the EMBLEM (I).
- Walk down.
- Place the EMBLEM (J).
- Take the BUTTON, BADGE PIECE, and INCOMPLETE MICROCHIP (K).
- Walk forward.

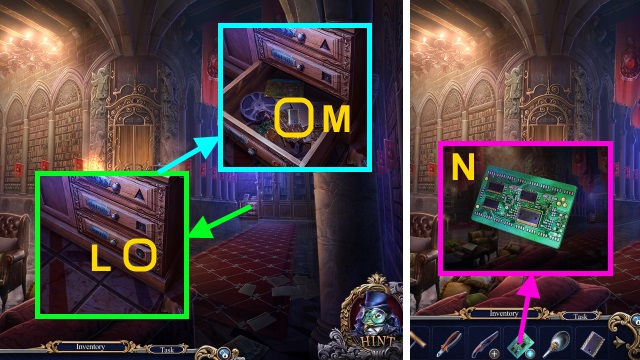
- Place the BUTTON (L); take the MICROCHIP PART (M).
- Combine the INCOMPLETE MICROCHIP and MICROCHIP PART (N); take the ELEVATOR MICROCHIP.

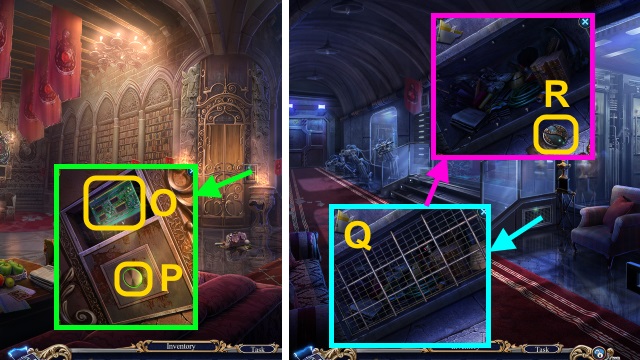
- Remove the board; place the ELEVATOR MICROCHIP (O).
- Press the button (P).
- Go forward.
- Use the CLIPPERS (Q); use ELF.
- Take the BARTENDER BADGE and BUTTON (R).
- Walk down.

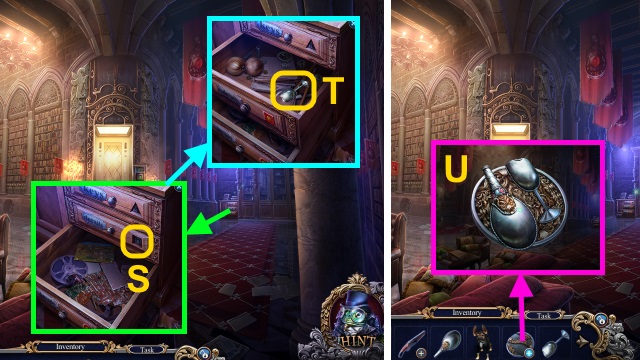
- Place the BUTTON (S); take the BADGE PIECE (T).
- Combine the BARTENDER BADGE and 2 BADGE PIECES (U); take the BARTENDER BADGE.
- Walk down.

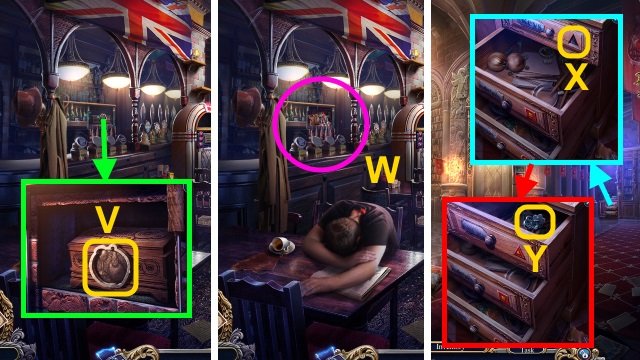
- Place the BARTENDER BADGE (V).
- Play the HOP; receive the BUTTON (W).
- Walk forward.
- Place the BUTTON (X); take the TRIHEDRON KEY (Y).
- Walk forward.

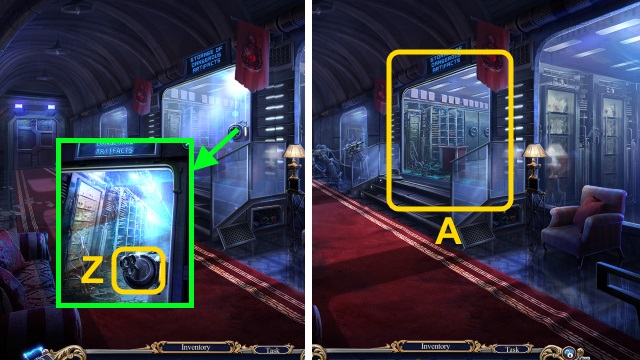
- Use the TRIHEDRON KEY (Z).
- Examine the room for a mini-game (A).

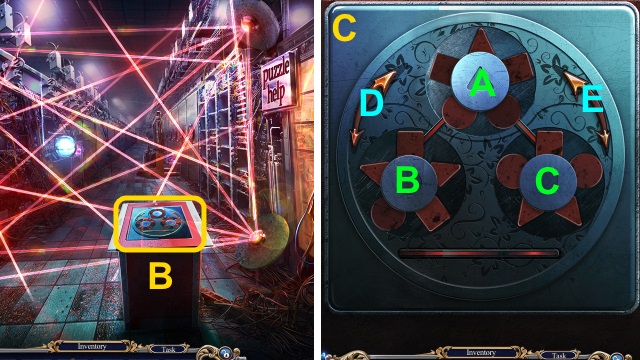

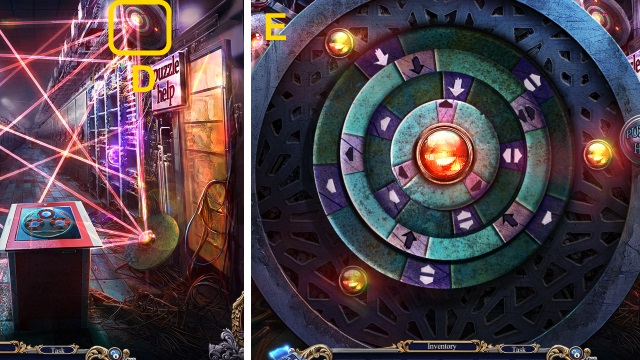
- Solution (B).
- Solution (C): D-C-A-B-D-E-Bx2-A-D.
- A-C-E-A-C-E-AX2-C-E-B-A-D.
- Solution (D).
- Solution (E): Transfer the energy to the outer lights.

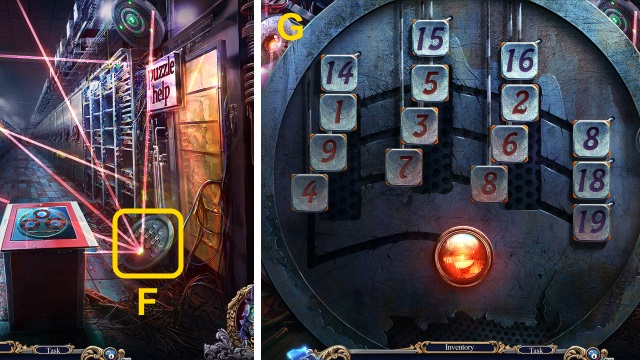

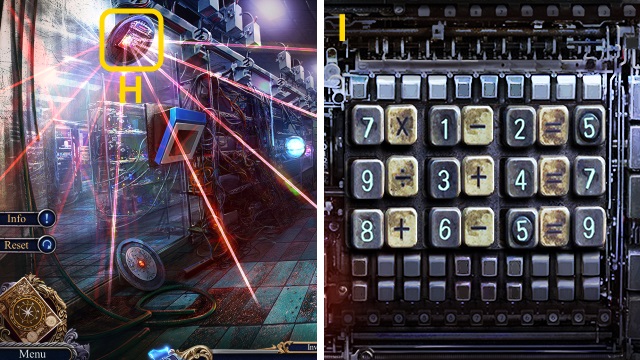
- Solution (F-I).
- Receive the COLD SOURCE.

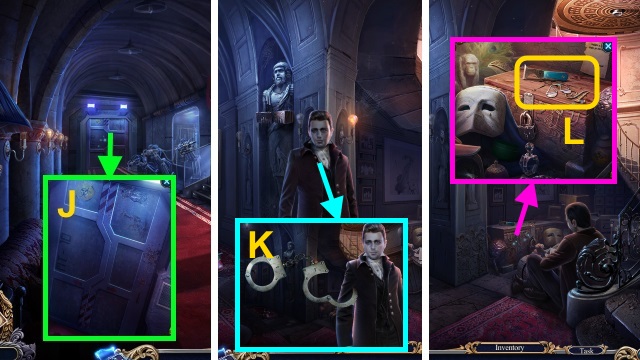
- Use the COLD SOURCE (J).
- Talk to Andy (K); use the cuffs.
- Receive the LENS AMULET.
- Take the SCRAPER, AVENGER MARK, and AMULET SCALES (L).

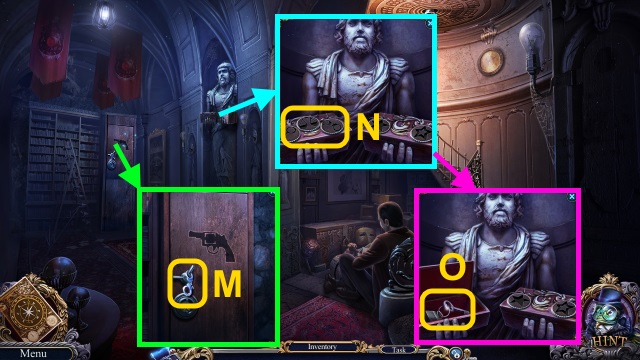
- Take the AMULET CUFFS (M).
- Place the AMULET CUFFS, AMULET SCALES, and LENS AMULET (N).
- Take the CHEST KEY (O).

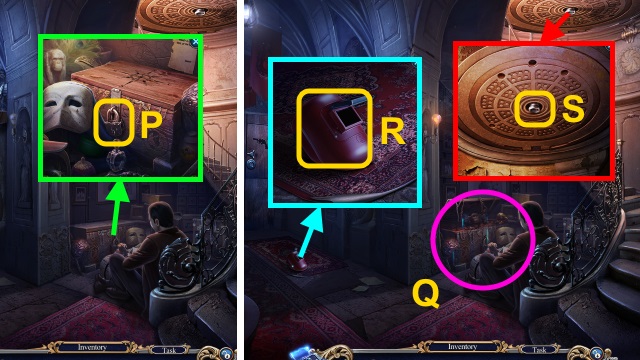
- Use the CHEST KEY (P).
- Play the HOP; receive the VALVE (Q).
- Take the PROTECTIVE MASK (R).
- Place the VALVE (S).
- Go right.

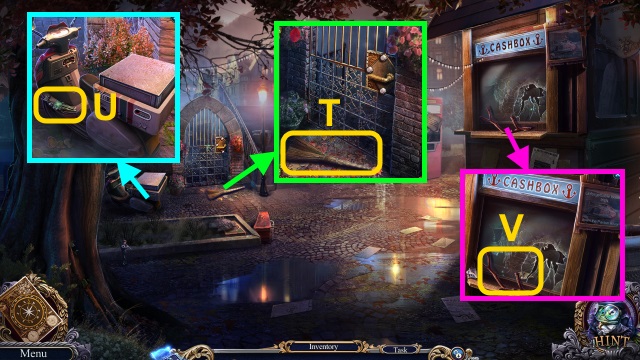
- Examine the scene; take the BROOM (T).
- Take the FIGURINE PART (U).
- Take the BRANCH (V).

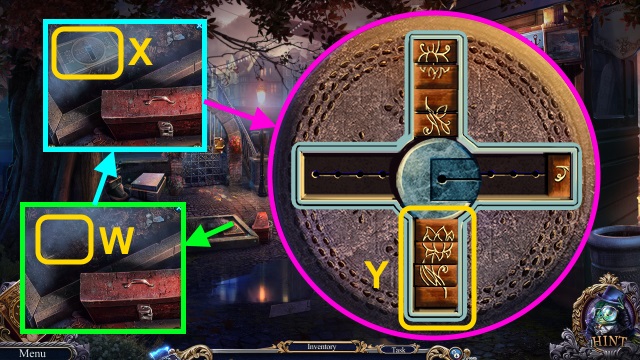
- Use ELF (W); use the BROOM.
- Examine the lock for a mini-game (X).
- Solution (Y).

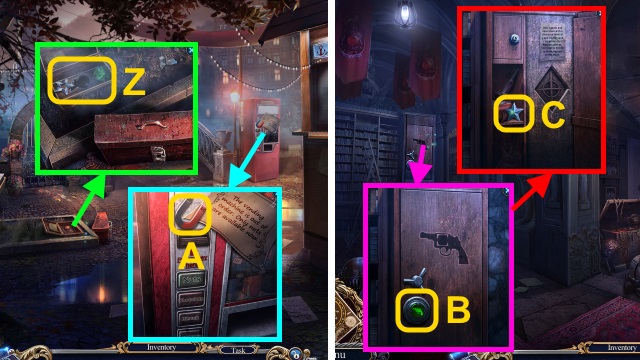
- Take the BUTTON and STAR (Z).
- Use the SCRAPER (A); receive the MAGNET.
- Walk down.
- Place the BUTTON; press it (B).
- Take the STAR (C).

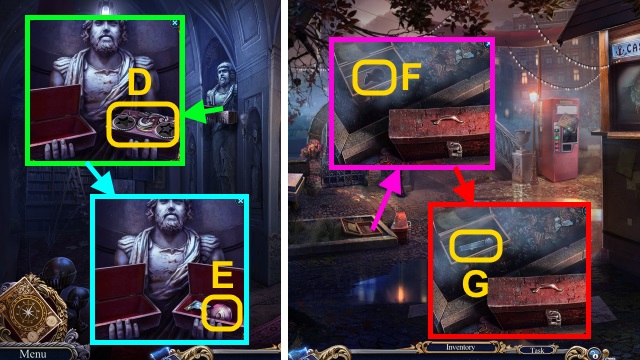
- Place the 2 STARS (D).
- Take the AGENT BADGE (E).
- Walk right.
- Place the AGENT BADGE (F).
- Take the CABINET HANDLE (G).
- Walk down.

- Use the CABINET HANDLE (H).
- Take the CARTRIDGE (I).
- Combine the RIFLE and CARTRIDGE (J); take the LOADED GUN.
- Go right.

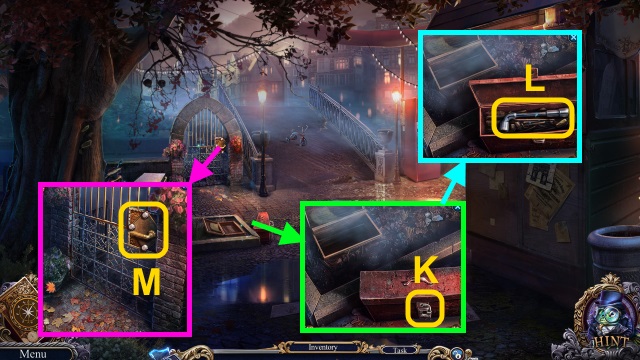
- Use the LOADED GUN (K).
- Take the BOLT REMOVER (L).
- Use the BOLT REMOVER (M).

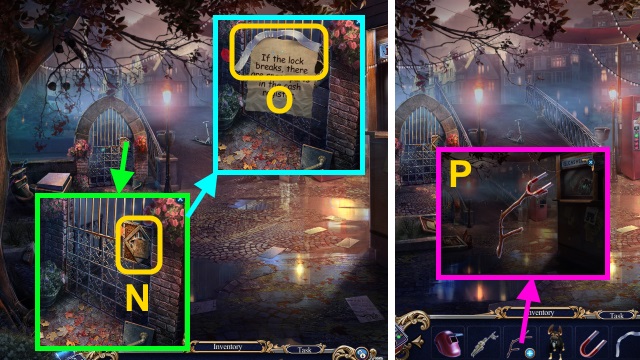
- Read the note (N); take the TAPE (O).
- Combine the BRANCH, MAGNET, and TAPE (P); take the MAGNET BRANCH.

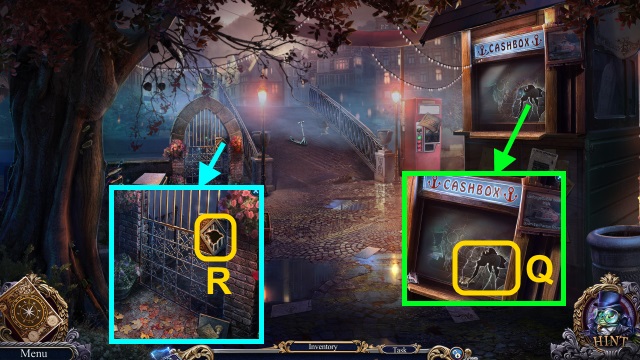
- Use the MAGNET BRANCH; receive the MECHANISM PART.
- Place the MECHANISM PART for a mini-game.

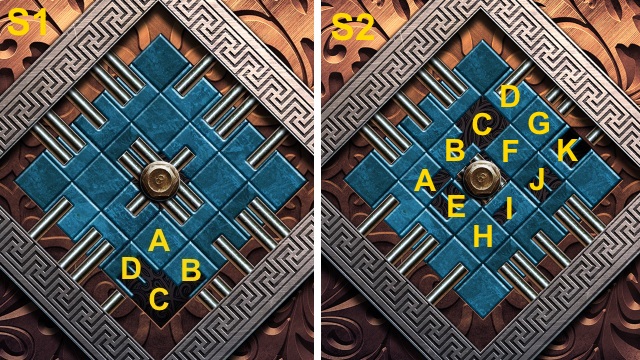
- Casual solution (S1): D-A-B-C-D-A.
- Hard solution (S2): F-J-I-H-E-A-B-C-F.
- J-I-H-E-A-B-C-F-J-I-H-E-A-B-C-F-J-I-H.
- E-A-B-C-F-G-K-J-F-C-B-A-E-H-I-J-F.
- C-B-A-E-H-I-J-F-C.
- Walk left.
Chapter 5: The TV Station

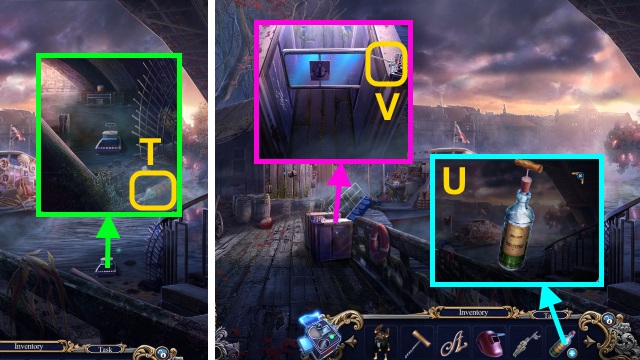
- Take the ANTIRUST BOTTLE (T).
- Use the CORKSCREW on the ANTIRUST BOTTLE (U); take the ANTIRUST.
- Take the REMOTE CONTROL (V).

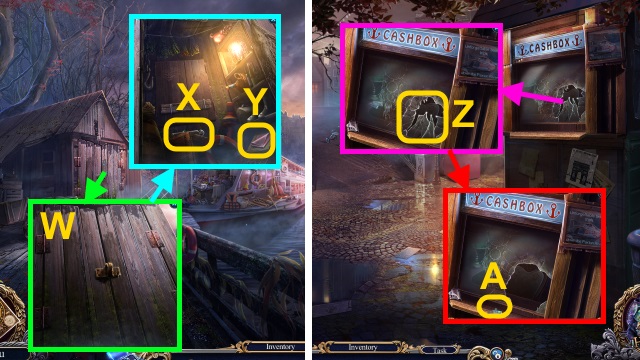
- Use the ANTIRUST (W).
- Take the PINCERS (X) and CLOTH (Y).
- Walk down.
- Use the CLOTH and ELF (Z).
- Take the TICKET (A).
- Walk left.

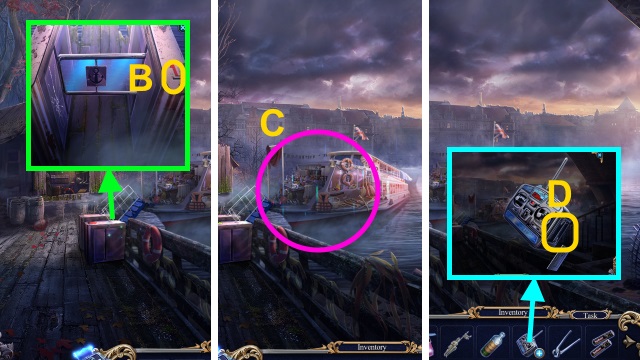
- Use the TICKET (B).
- Play the HOP; receive the BATTERIES (C).
- Open the REMOTE CONTROL; place the BATTERIES (D).
- Take the SHIP REMOTE CONTROL.

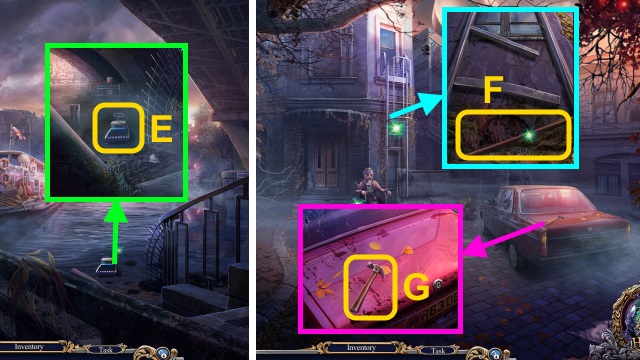
- Use ELF and the SHIP REMOTE CONTROL (E).
- Walk down, then forward.
- Take the POLE (F).
- Take the HAMMER (G).

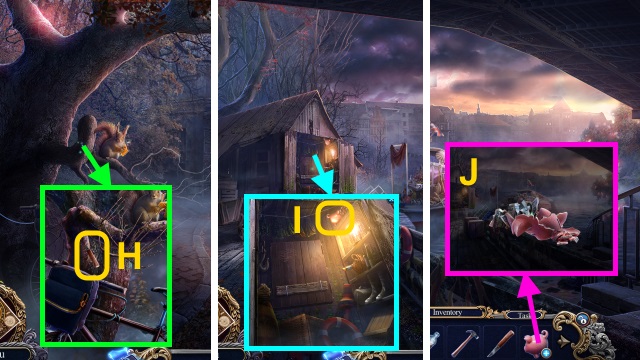
- Use the PINCERS (H); receive the PENKNIFE.
- Walk down, then left.
- Use the POLE (I); receive the MONEY BOX.
- Combine the MONEY BOX and HAMMER (J); take the MONEY.
- Walk down.

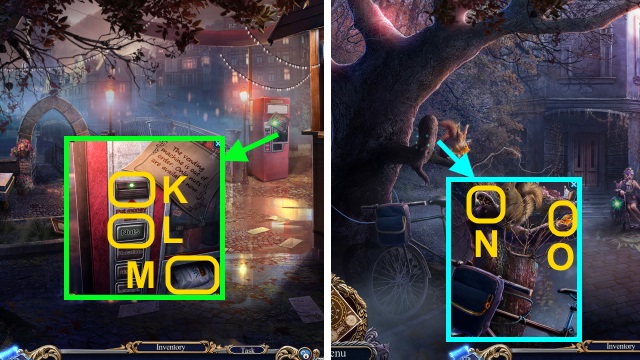
- Use the MONEY (K); press the button (L).
- Take the NUTS (M).
- Walk forward.
- Place the NUTS (N); take the TRUNK KEY (O).

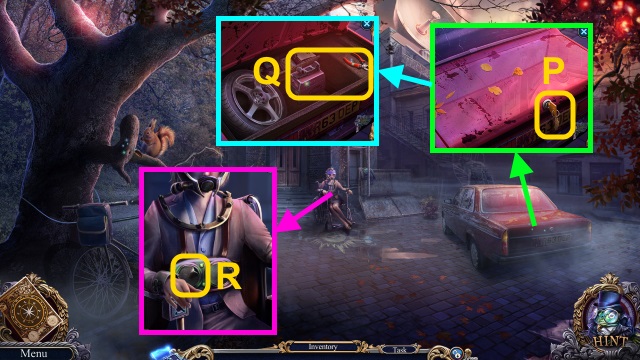
- Use the TRUNK KEY (P).
- Take the BROKEN WELDER and SIDE CUTTER (Q).
- Use the PENKNIFE for a mini-game (R).


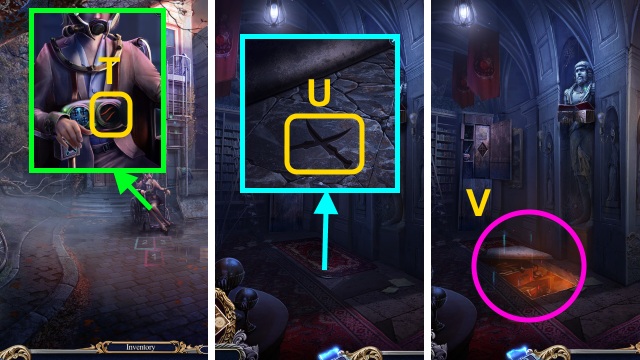
- Use the SIDE CUTTER (T).
- Receive the CROSSED DAGGERS.
- Walk down twice.
- Move the rug; place the CROSSED DAGGERS (U).
- Play the HOP; receive the OVAL BUTTON (V).
- Go right.

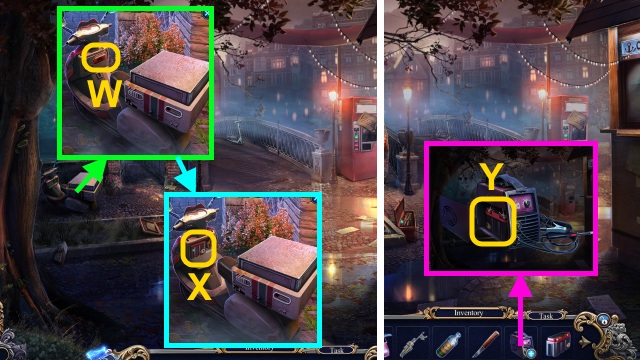
- Place the OVAL BUTTON (W); press it.
- Take the RECHARGEABLE BATTERY (X).
- Open the BROKEN WELDER; place the RECHARGEABLE BATTERY (Y).
- Take the WELDER.
- Walk forward.

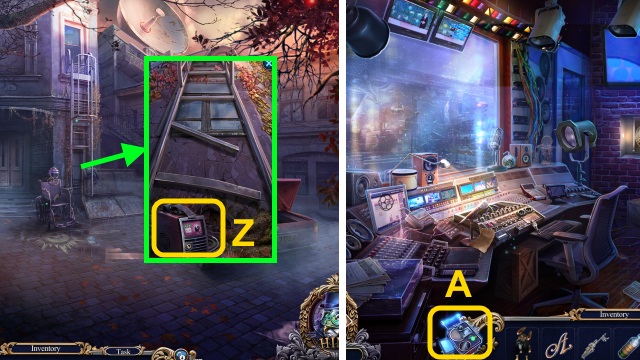
- Place the WELDER (Z); use the PROTECTIVE MASK.
- Go forward.
- Examine the scene; use the Thermal Scope for a mini-game (A).



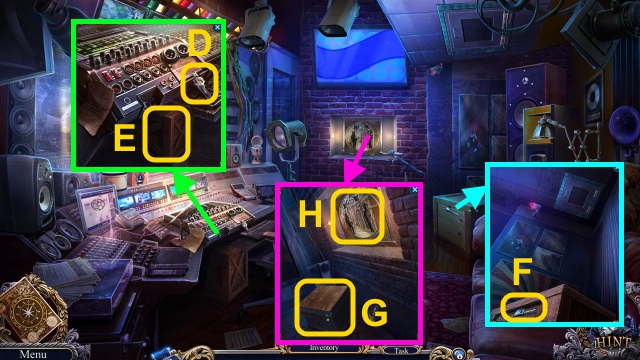
- Examine the scene; take the FIGURINE PART (D) and BOX (1/4) (E).
- Take the FIGURINE PART (F).
- Take the BOX (2/4) (G); place 3 FIGURINE PARTS for a mini-game (H).

- Solution (I).
- Take the SLIDER (J) and CLIP (K).
- Walk down twice.

- Place the SLIDER (L); take the BOX (3/4) (M).
- Walk forward.
- Use the ANTIRUST and CLIP (N); unzip the bag.
- Take the LEVER (O).
- Walk forward.

- Place the LEVER for a mini-game (P).
- Solution (Q).

- Play the HOP; receive the DIAMOND SHAPE (R).
- Walk down three times.
- Place the DIAMOND SHAPE (S).
- Take the AXE and ELECTRIFIER (T).
- Go right, then left.

- Examine the door (U); use the AXE.
- Use ELF; take the BOX (4/4) (V).
- Go to the Studio.
- Place the BOX (4/4) for a mini-game (W).

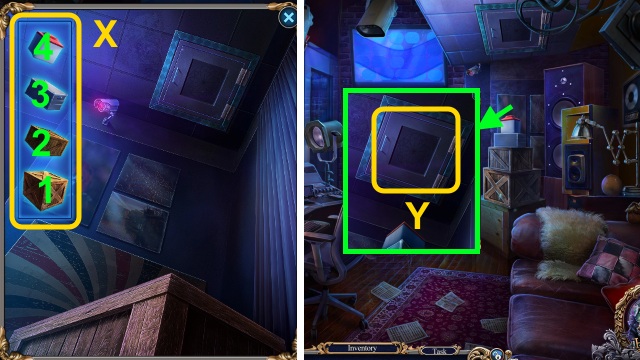
- Solution (X).
- Open the hatch (Y).
- Go up.

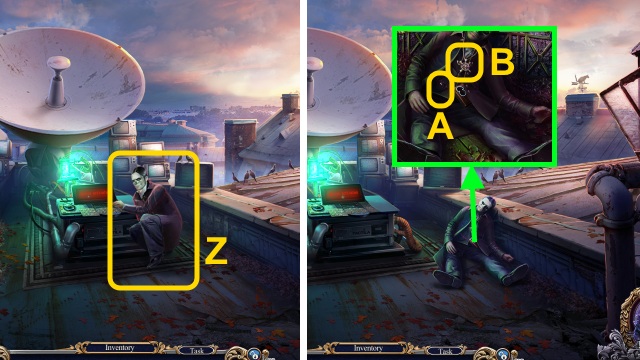
- Use the ELECTRIFIER (Z).
- Use the PENKNIFE; take the AVENGER MARK (A) and MEDALLION (B).
- Walk down twice.

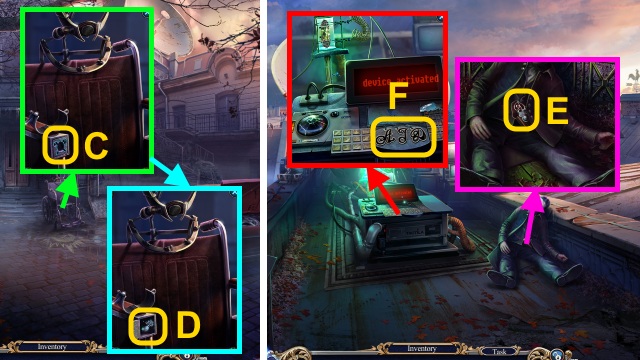
- Place the MEDALLION (C).
- Take the PLATE (D).
- Go to the Roof.
- Place the PLATE; take the AVENGER MARK (E).
- Place the 3 AVENGER MARKS for a mini-game (F).

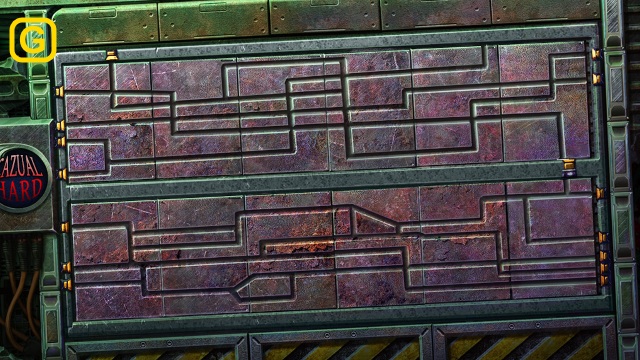

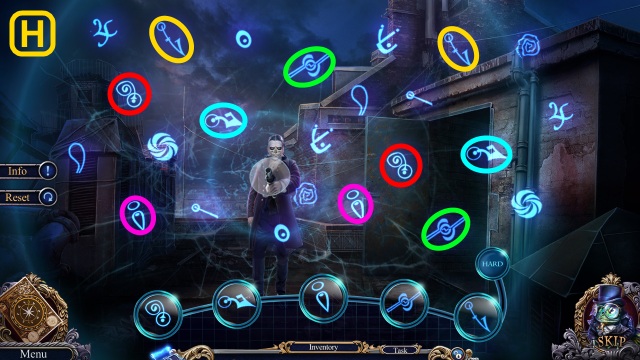

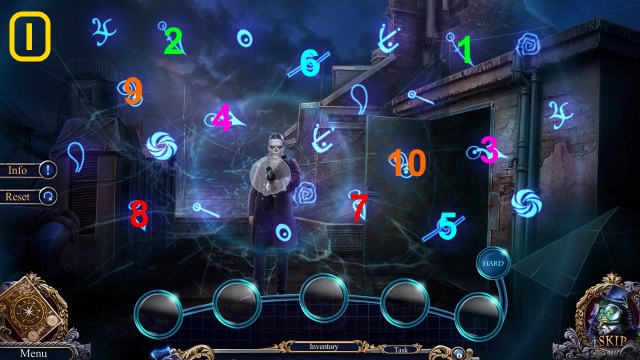
- Solution (H-I).
- Congratulations! You have completed Mystery Trackers: Paxton Creek Avenger.


 The Scruffs: Return of the Duke Walkthrough, Guide, & Tips
 RealMYST Walkthrough, Guide, & Tips
 Mystic Diary: Haunted Island Walkthrough, Guide, & Tips
 Nancy Drew: Secret of Shadow Ranch Walkthrough, Guide, & Tips
 Weather Lord: Following the Princess Walkthrough, Guide, & Tips