Flux Family Secrets: The Rabbit Hole Walkthrough

Welcome to the Flux Family Secrets: The Rabbit Hole Walkthrough!
Jesse is back at Flux mansion after thwarting the efforts of her nemesis, Veronica, but this time 30 years in the past!
Whether you use this document as a reference when things get difficult or as a road map to get you from beginning to end, we’re pretty sure you’ll find what you’re looking for here.
This document contains a complete Flux Family Secrets: The Rabbit Hole game walkthrough featuring annotated screenshots from actual gameplay!
We hope you find this information useful as you play your way through the game. Use the walkthrough menu below to quickly jump to whatever stage of the game you need help with.
Remember to visit the Big Fish Games Forums if you find you need more help. Have fun!
This walkthrough was created by Margie B.
General Tips

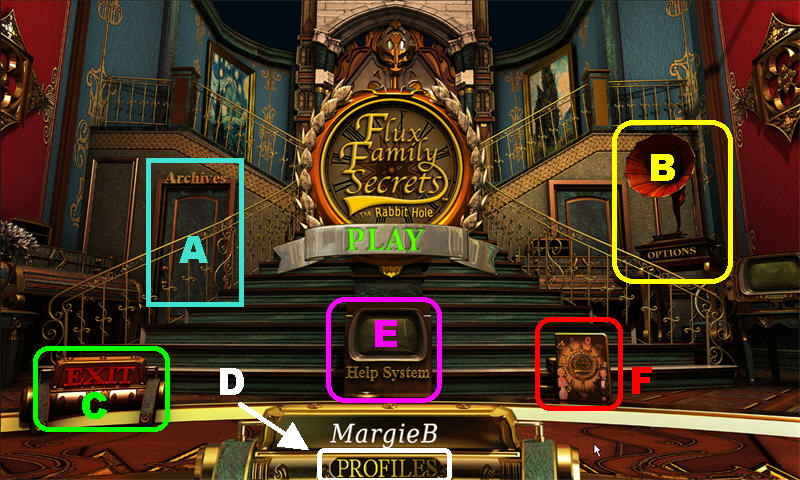
- There are 12 chapters in the game.
- The Archives Door (A) on the left grants you access to the Badges, High Scores List, and Credits.
- The OPTIONS Gramophone (B) on the right allows you to adjust your settings and view your cumulative playing time.
- Click on the EXIT Sign (C) in the lower left to leave the Main Menu.
- Manage your Profiles (D) in the lower center.
- View the Help System (E) in the lower center.
- You can click on the Book (F) in the lower right to access a direct link to the original Flux Family Secrets.
- You can skip a mini-game once the Skip Button has been recharged. To view instructions for a mini-game, click on the small red “?” in the lower right.
- Move objects out of the way using the Open Hand Icon.
- Use the Magnifying Glass in the lower left corner to zoom into parts of the scene; disable it by right-clicking or using the space bar.
- Items written in blue, in Hidden Object Scenes, can only be found by performing other actions. You may need to move an item out of the way, or open something, to locate them.

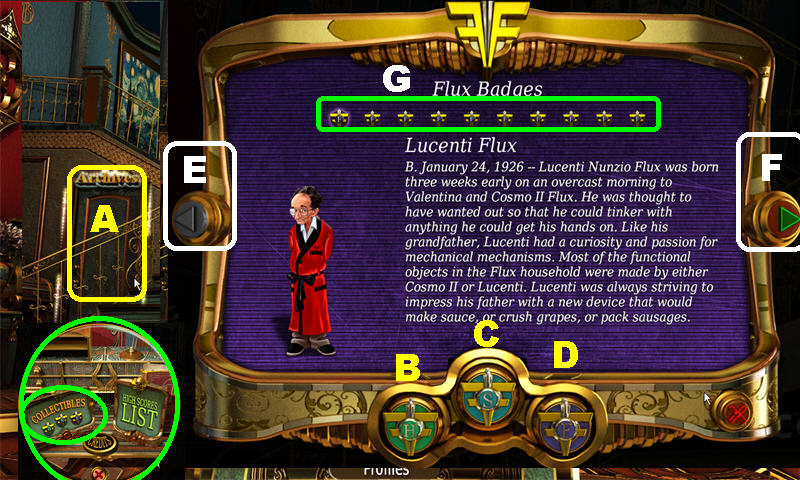
- There are 3 types of Collectible Badges in the game, 10 of each kind for a total of 30.
- Each Badge will grant you access to certain types of information in the game.
- Go to the Main Menu and click on the Archives Door (A) on the left to view all the Badges you’ve collected.
- Click on each Badge (B-C-D) to view the information for a specific badge.
- Use the Left and Right Arrows (E-F) to scroll through each piece of information.
- Click on the Badge Icon (G) to sort through information for each character or clue.
- The locations of all the Badges are marked in the screenshots. The History Badges have the initials “HB” next to them. The Secrets Badges are marked with “SB,” and Flux Badges are marked with “SB.”
- You can find a complete list of Badges at the end of chapter 12.
Chapter 1: Mansion Entrance

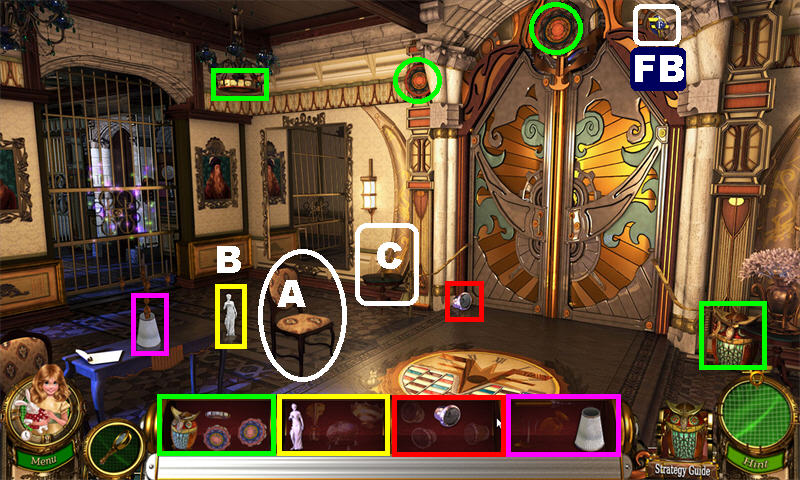
- Pick up FLUX BADGE 1/10 in the upper right.
- Pick up the highlighted items in the scene to assemble the OWL.
- Move the chair (A); pick up the PIECE OF MUSIC BOX (B).
- Place the assembled OWL on the table (C) to trigger a puzzle.

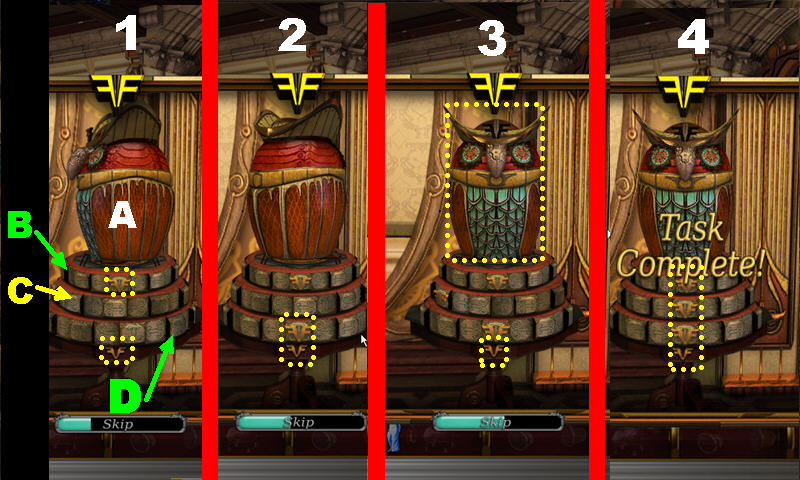
- The starting position of the owl will vary with each game; however, you can solve any puzzle by following the steps below using the markings on the screenshot as a guide.
- Move “B” until the “FF” letters line up with the “FF” on the table.
- Move “D” until the “FF” letters line up with the “FF” on the table.
- Move “A” until the owl’s is facing forward, in line with the “FF” on the table.
- Move “C” until the “FF” letters line up with the “FF” on the table to complete puzzle.

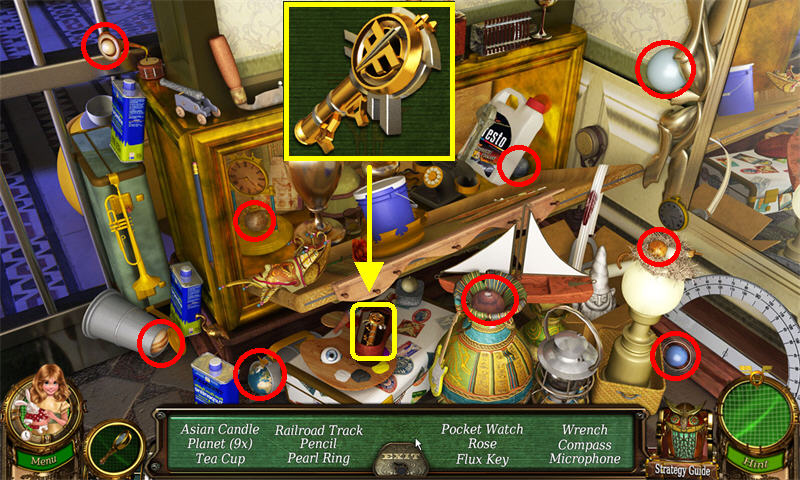
- Click on the open drawer (D) next to the gated door to trigger a Hidden Object Scene.
- The 9 PLANETS are marked in red.
- The FLUX KEY will be added to inventory.
- Open the gate on left with the FLUX KEY; click on the key once to unlock the door. Go through door.

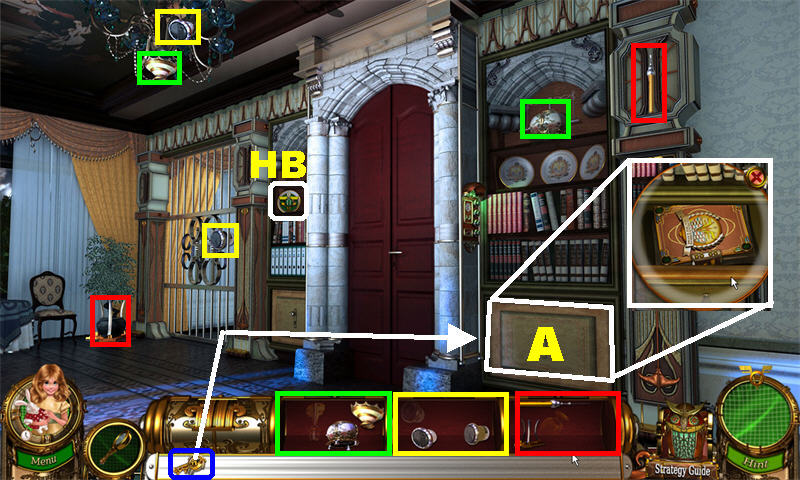
- Pick up HISTORY BADGE 1/10 on the left.
- Pick up the highlighted items in the scene.
- Open the drawer (A) with the FLUX KEY; pick up FLUX BOOK inside.
- Go left.

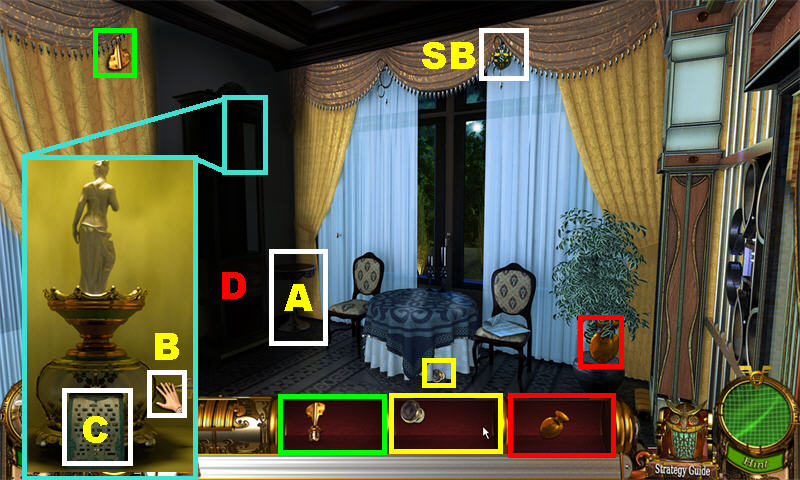
- Pick up SECRETS BADGE 1/10 in the upper center.
- Pick up the highlighted items to assemble the LAMP, BUTTIONS, and MUSIC BOX.
- Place the LAMP on the table (A).
- Place the MUSIC BOX above the cabinet to trigger a puzzle.
- Place the KEY on the right side of the music box (B); click on the key.
- Pick up the PUNCHCARD (C) at the bottom of the music box.
- Click on the Hidden Object Scene (D).

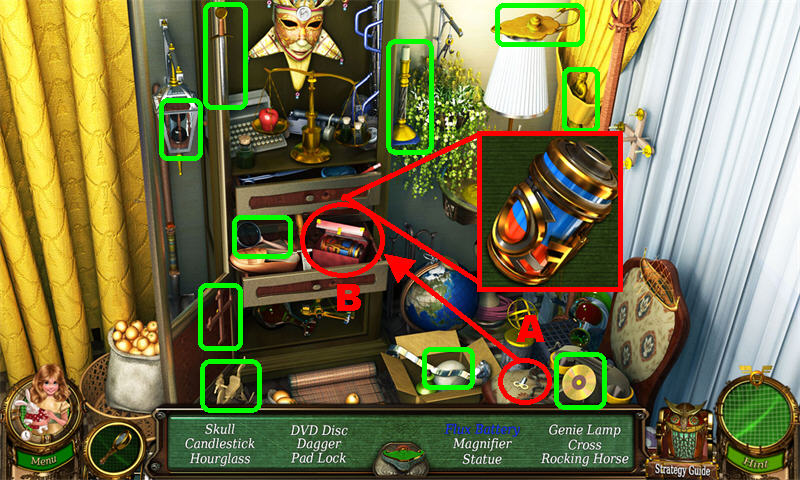
- Open the red case (A) with the KEY (B); pick up the FLUX BATTERY inside the case.
- Go right.

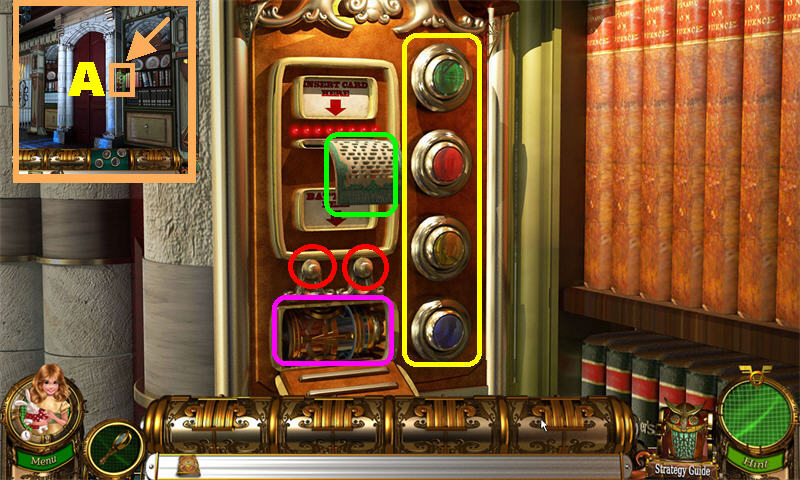
- Zoom into the control panel (A) to the right of the door.
- Place the PANEL BUTTONS in the 4 empty slots, marked in yellow.
- Place the PUCNHCARD on the slot marked in green.
- Click on the 2 buttons marked in red to open the panel below; place the FLUX BATTERY inside.
- Click on the 2 buttons marked in red to close the panel.
- Duplicate the sequence shown on the colored buttons.
- Complete 4 rounds to win this puzzle. The solutions are random.
- Go through the open door to enter the Library.
Chapter 2: Mansion Library

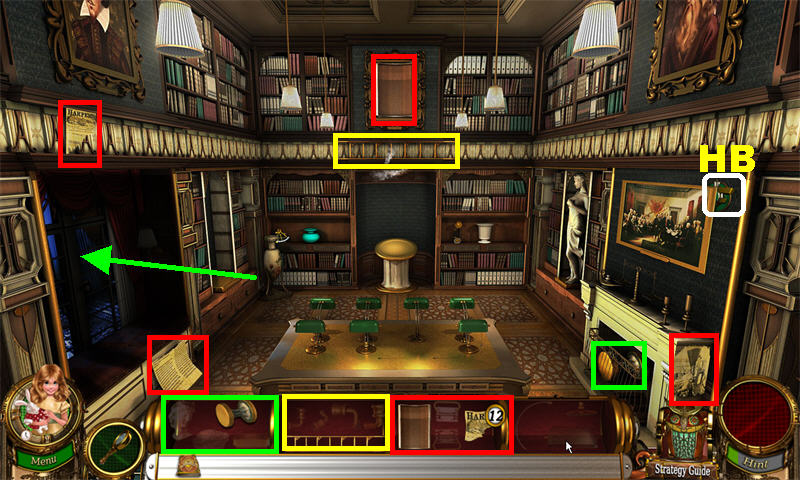
- Pick up HISTORY BADGE 2/10 in the upper right.
- Pick up the highlighted items.
- Go left.

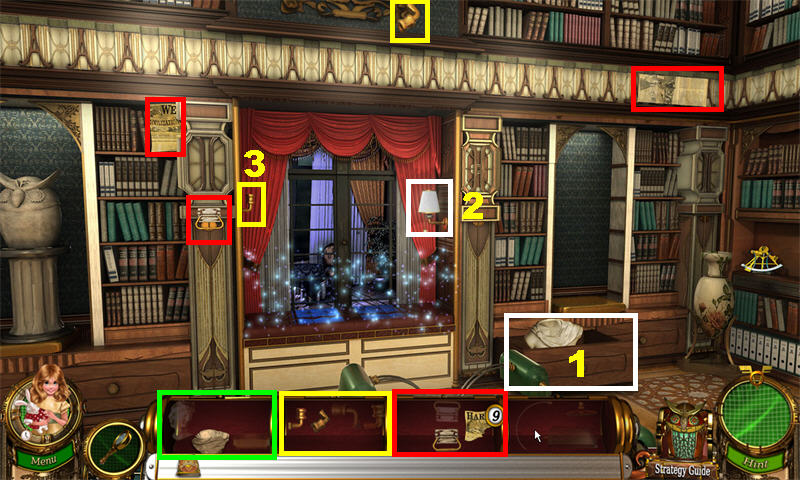
- Pick up the highlighted items.
- Open the drawer (1) on the right; pick up the PIECE OF APOLLO.
- Turn on the light (2) on right.
- Pick up the PIECE OF LADDER (3) on the left curtain.
- Play the Hidden Object Scene in the lower center.

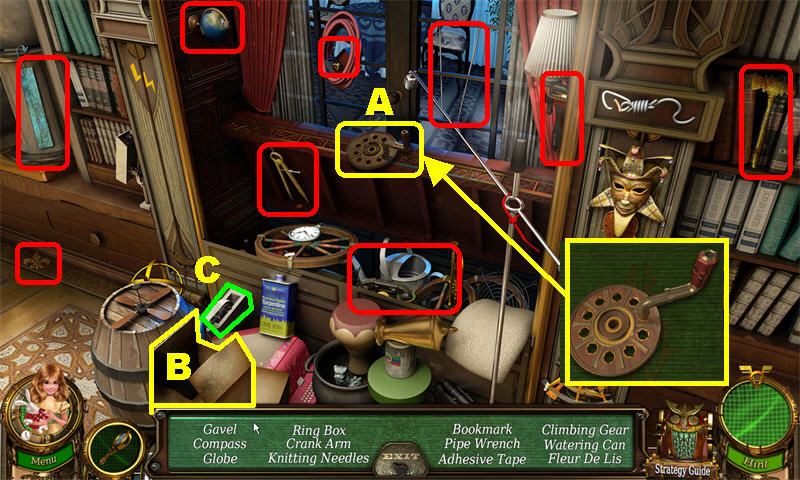
- Pick up the CRANK ARM (A) in the upper center.
- Move the box (B) in the lower left; pick up the ADHESIVE (C).
- Go right twice.

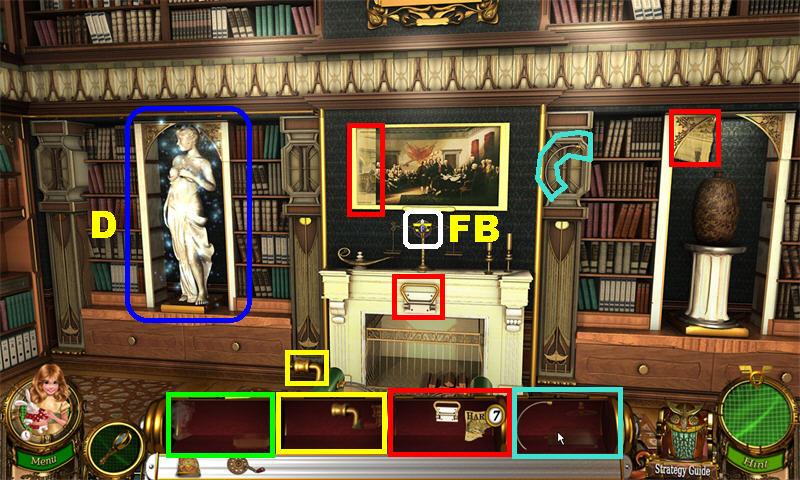
- Pick up FLUX BADGE 2/10 above the fireplace.
- Pick up highlighted items.
- Click on the statue (D) to trigger a Hidden Object Scene.

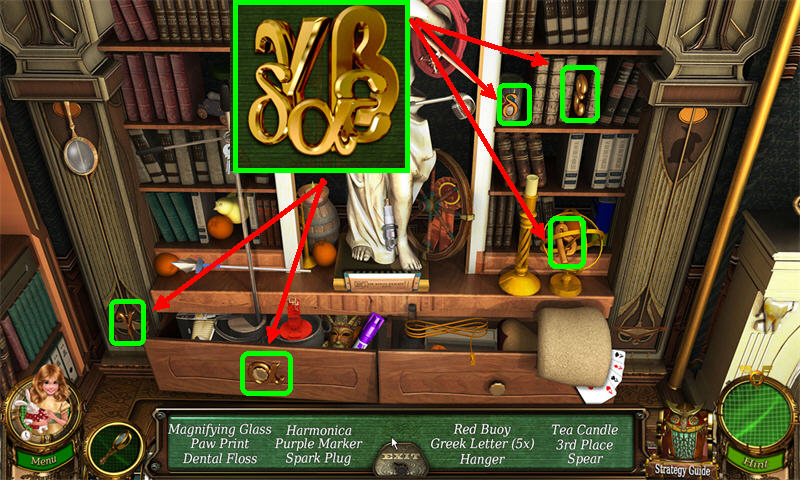
- The 5 GREEK LETTERS are marked in green.
- Go to the left.

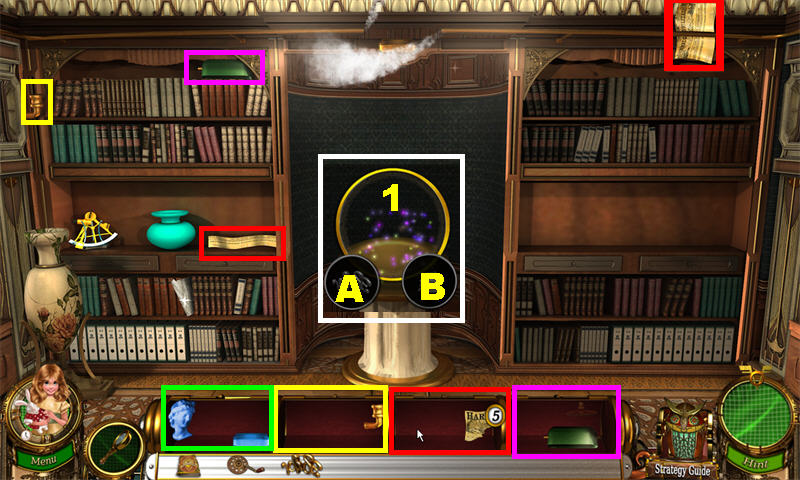
- Pick up the marked items to assemble the LADDER.
- Click on the Stand Recipe Puzzle (1); place the GREEK LETTERS (A) and the FLUX BOOK (B) in the small circles to trigger a puzzle.

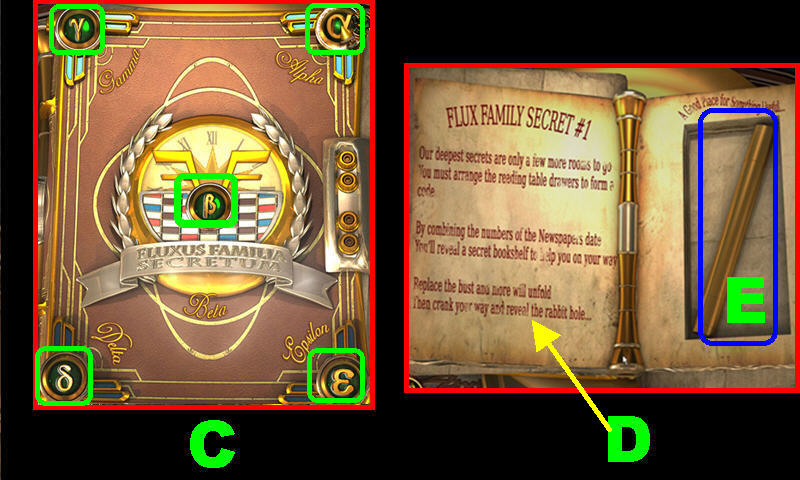
- Place the GREEK LETTERS (Fig. C) in the order shown in the screenshot.
- Read the clues to a different puzzle in the book (D).
- Pick up the PIPE (E) on the right side of the book.
- Go right.

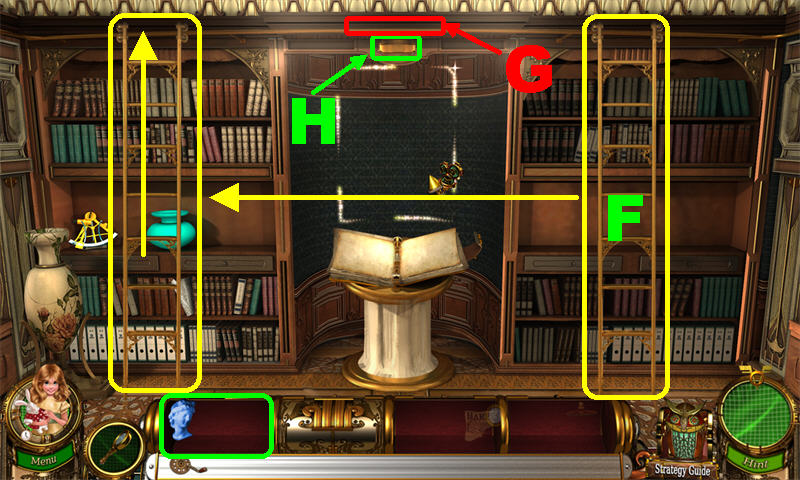
- Place the PIPE (G) on the burst of steam in the upper center.
- Pick up the PIECE OF APOLLO (H) in the upper center, after the steam has stopped.
- Place the LADDER (F) on the right side of the bookcase; click on it to move it all the way to the left.
- Move the LADDER to the left; go up the ladder.

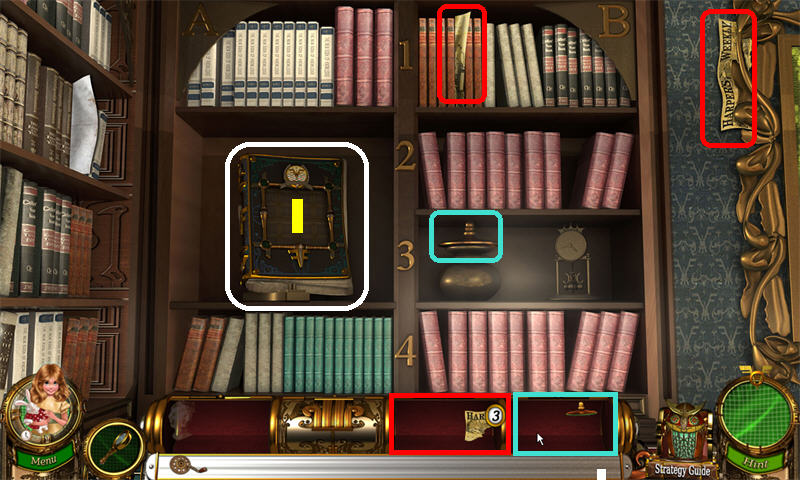
- Pick up the highlighted items.
- Click on the book (I) to trigger a puzzle.

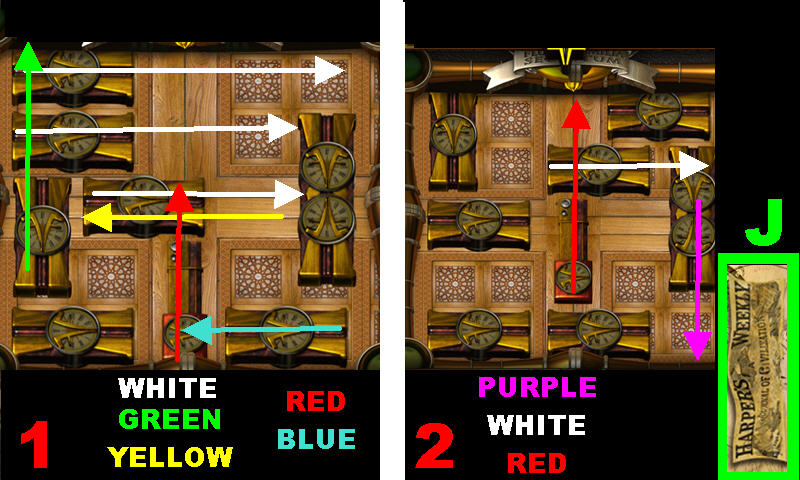
- Move the Red Block towards the Flux emblem.
- Please look at the screenshot for a step-by-step solution for this puzzle.
- Pick up the last PIECE OF NEWSPAPER (J) on the right, after the puzzle has been completed.
- Go down.

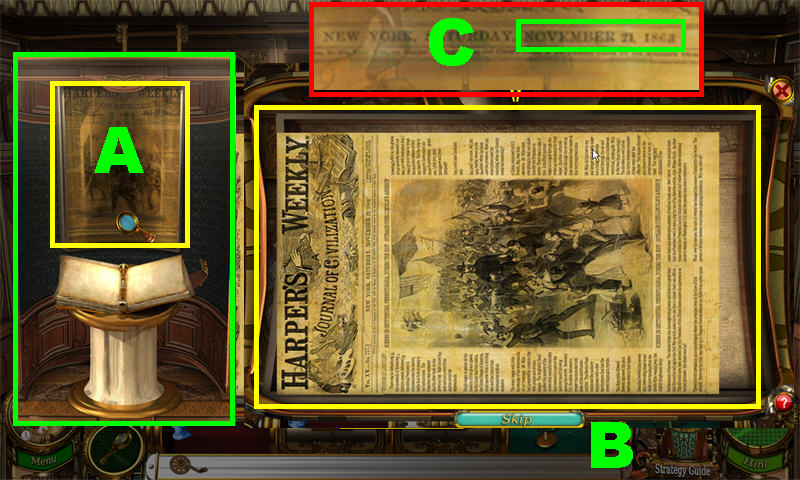
- Place the NEWSPAPER (A) on the back wall to trigger a puzzle.
- Assemble the newspaper by dragging the pieces onto each other.
- Please look at the screenshot for the solution (B).
- Note the date (C) of “November 21, 1863” on the newspaper .
- Exit and go down.

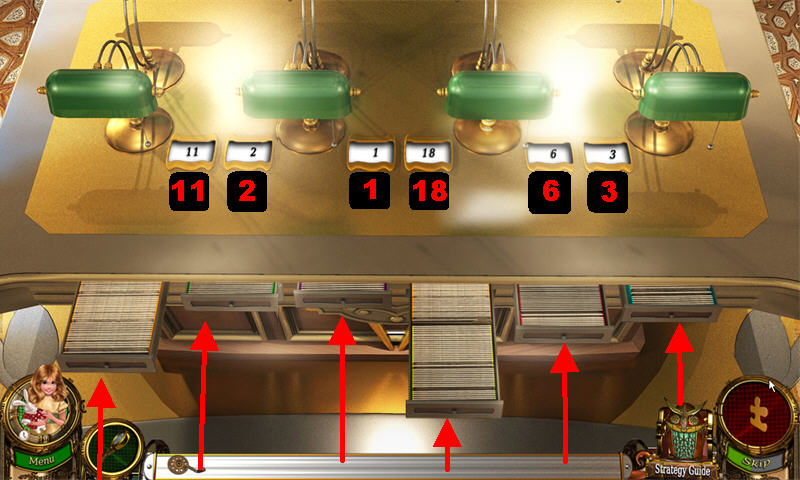
- Place the READING LAMP on the table and click on it to trigger a puzzle.
- You must correctly enter the date found on the newspaper on the table.
- You can change the numbers on the table by pulling the drawers below the table.
- From left to right, arrange the numbers 11, 2, 1, 18, 6, 3 to solve the puzzle.

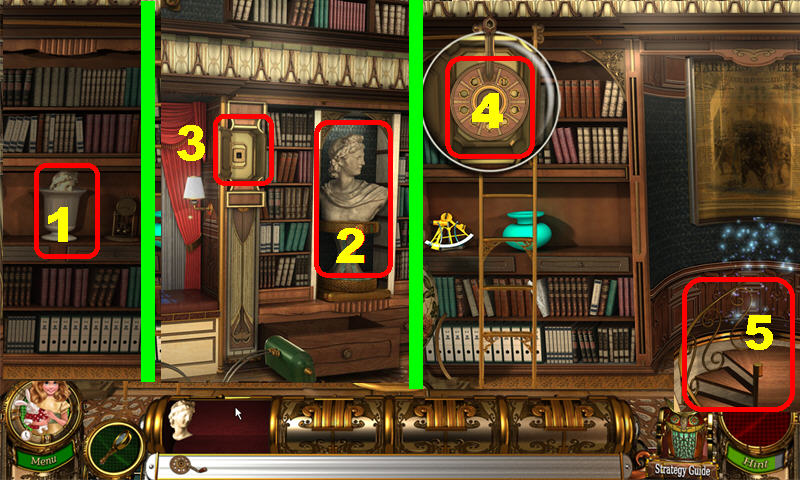
- Pick up the last PIECE OF APOLLO (1) on the shelf.
- Go left.
- Place APOLLO (2) in the niche.
- Place the CRANK ARM (3) on the mechanism by the right curtains.
- Click on the CRANK (4) in the upper left 3 times to reveal stairs.
- Go through the stairs (5) to enter the Secret Corridor.
Chapter 3: Mansion Corridor

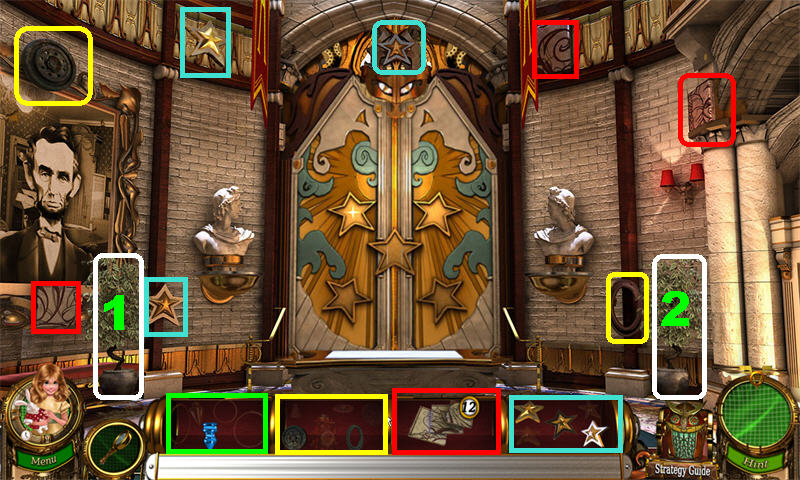
- Move the left plant (1) and the right plant (2) out of the way so you can pick up what is behind them.
- Pick up the highlighted items.
- Go right.

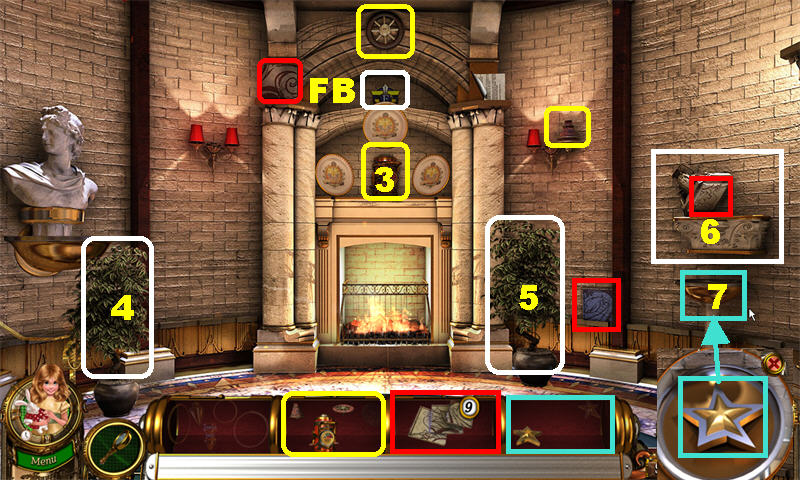
- Pick up FLUX BADGE 3/10 in the upper center.
- Move the center plate above the fireplace; pick up the PIECE OF FIRE EXTINGUISHER (3) behind the plate.
- Move the left plant (4) and the right plant (5) out of the way.
- Open the lid (6) in the upper right.
- Zoom into the fountain (7) in the lower right; pick up the PIECE OF STAR.
- Pick up the highlighted items.
- Go left twice.

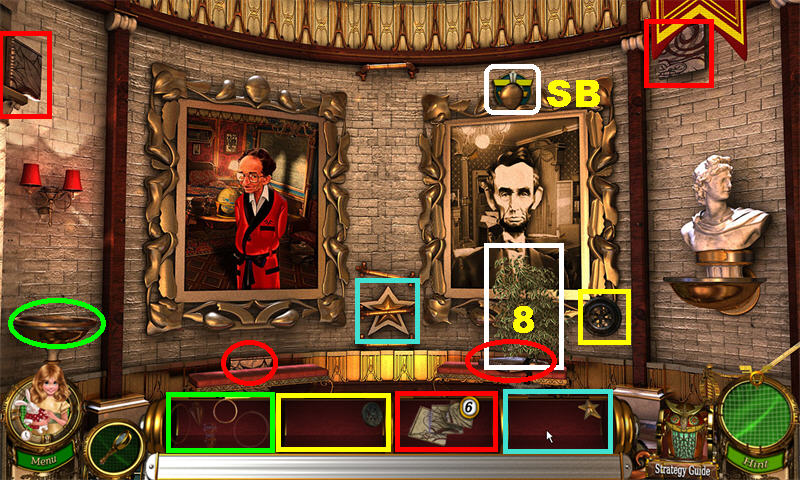
- Pick up SECRETS BADGE 2/10 above the right painting.
- Move the plant (8) out of the way. The plant blocks an item each time you move it.
- Pick up the highlighted items to assemble the FIRE EXTINGUISHER and STAR.
- Go right 2 times.

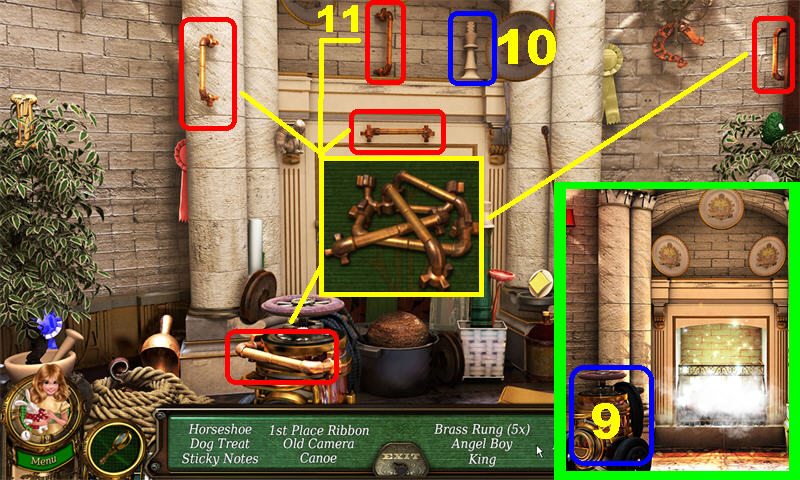
- Extinguish the fire in the fireplace with the FIRE EXTINGUISHER (9) by placing it on the ground.
- Zoom into the fireplace to trigger a Hidden Object Scene.
- Move the last plate above the fireplace; pick up the chess KING (10).
- Move the center plate; pick up the BRASS RUNG PIECE (11).
- The BRASS RUNGS are marked in red and will be added to inventory.
- Go left twice.

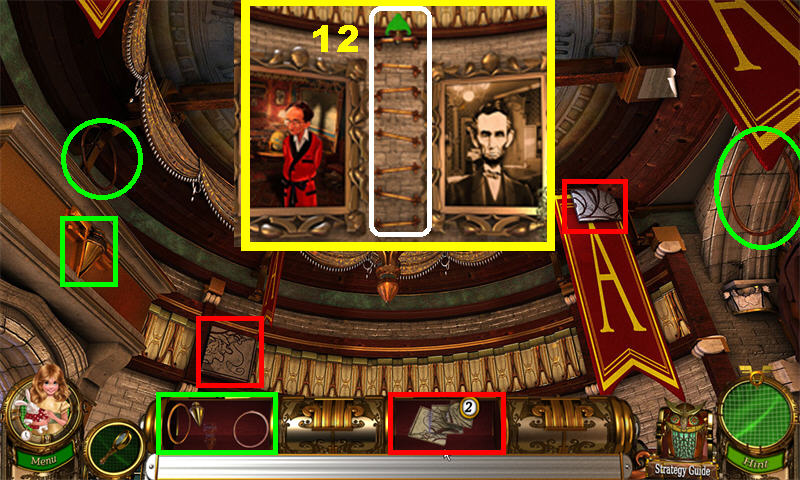
- Place the RUNGS on the ladder (12) in between the 2 paintings; go up the ladder.
- Pick up the marked items to assemble the TILES.
- Go down and right.

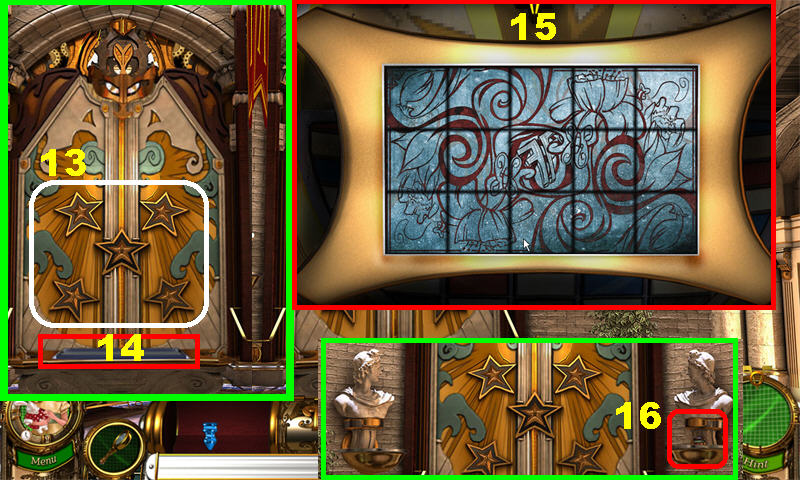
- Place each of the 5 STARS (13) on the door.
- Place TILES on the table (14) at the bottom of the door to trigger a puzzle.
- Rotate the tiles to reflect the image shown on the screenshot (15).
- Pick up the GYRO PIECE (16) below the right bust, after the puzzle has been solved.
- Go left and up the ladder.
- Place the GYRO in the center of the ceiling.
- Go through the door.
Chapter 4: Apollo Room

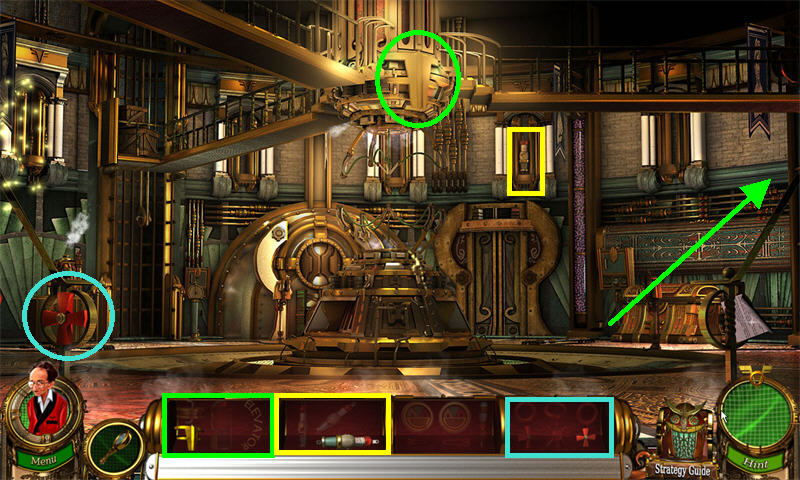
- Collect the highlighted items.
- Go right.

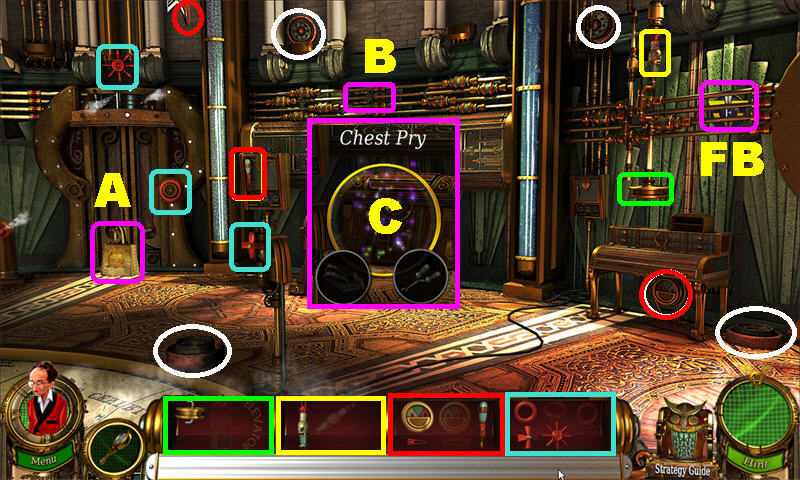
- Pick up FLUX BADGE 4/10 in the upper right.
- Pick up highlighted items.
- Pick up the SATCHEL (A) in the lower left.
- Pick up the POST DIGGER (B) in the upper center.
- Click on the Chest Pry Recipe Puzzle (C); place the POST DIGGER and SATCHEL in the circles.
- Click on the chest again; place the 4 WEIGHTS, circled in white, into the circles.

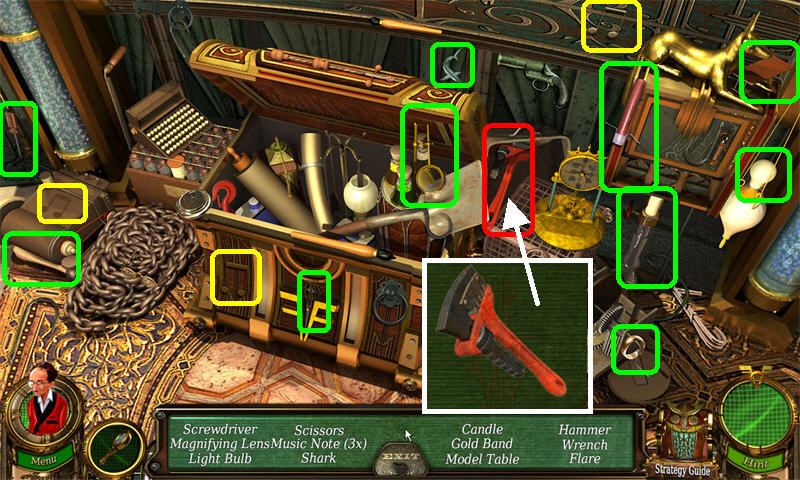
- Zoom into the chest to play a Hidden Object Scene.
- The 3 MUSICAL NOTES are marked in yellow.
- The WRENCH will be added to inventory.
- Go left.

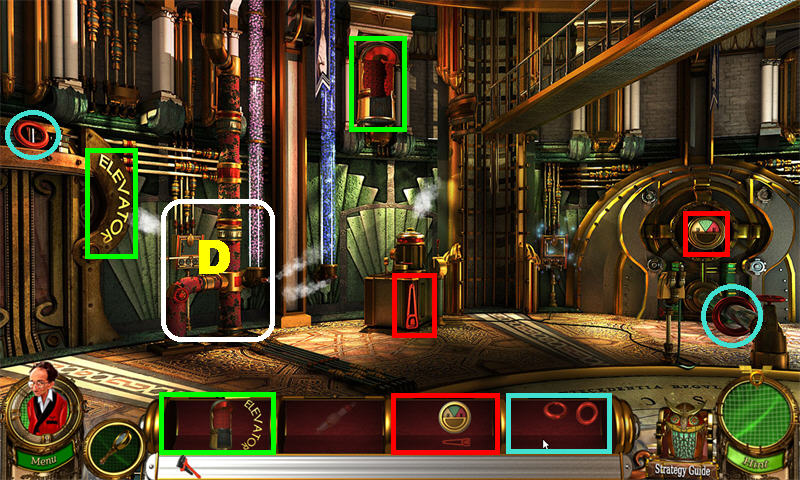
- Collect all the highlighted items to assemble the GAUGES, VALVE WHEELS, and ELEVATOR.
- Zoom into the left pipes (D).

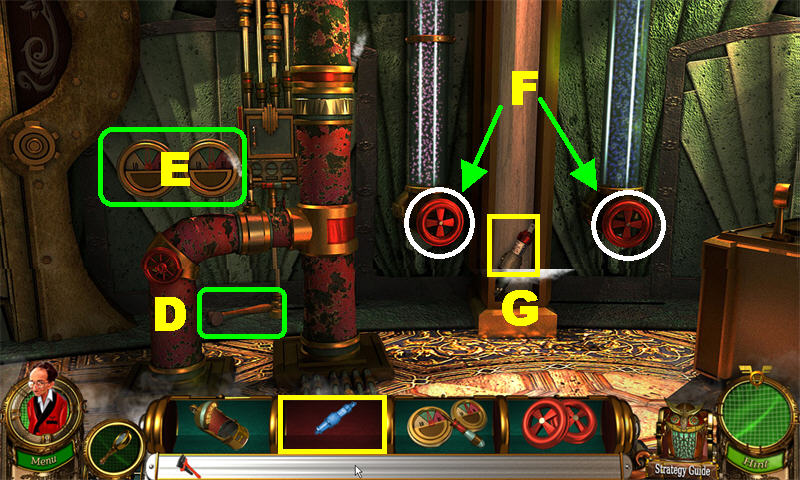
- Pick up the HAMMER (D) on the left.
- Place the GAUGES on the left side (E).
- Place the 2 VALVE WHEELS on the areas marked in white on the right (F).
- Turn both valve wheels with the WRENCH to turn off the steam; pick up the FUSE (G) between the valves.
- Exit.

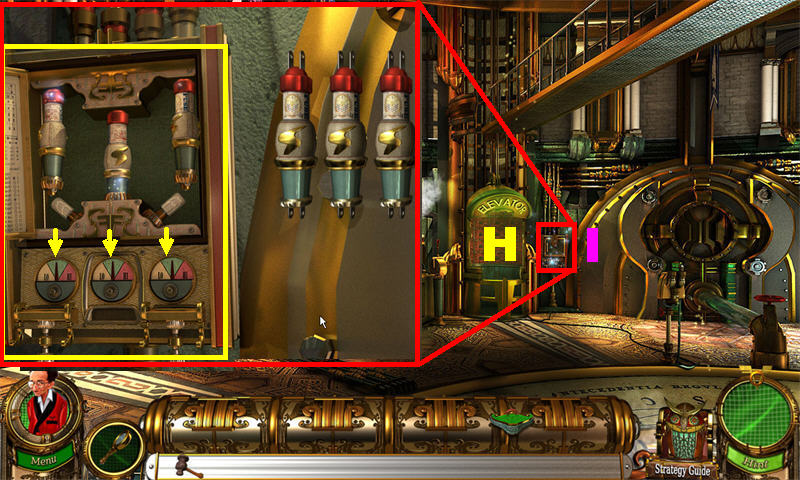
- Place the ELEVATOR below the walkway (H).
- Zoom into the control panels (I) next to the elevator.
- Open the case and place the 3 FUSES inside the correct panel. The gauge will fall in the green zone when a fuse is placed correctly. The solution is random.
- Go up the elevator.

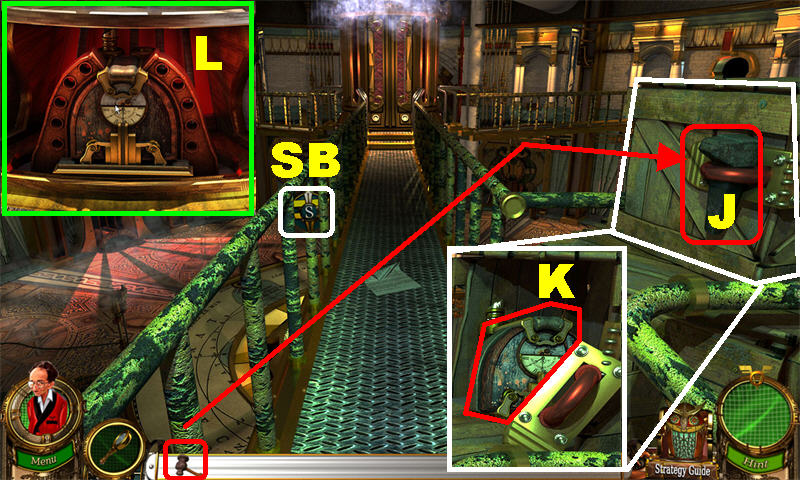
- Pick up SECRETS BADGE 3/10 on the left railing.
- Remove the RAIL SPIKE (J) in the upper right with the HAMMER.
- Pick up the APOLLO CALIBRATOR (K) in the upper right.
- Go down, right, down, and forward.
- Place the APOLLO CALIBRATOR (L) in the center of the apparatus.
- Place the RAIL SPIKE in the OWL that pops up in the center of the screen.
Chapter 5: Lincoln 1

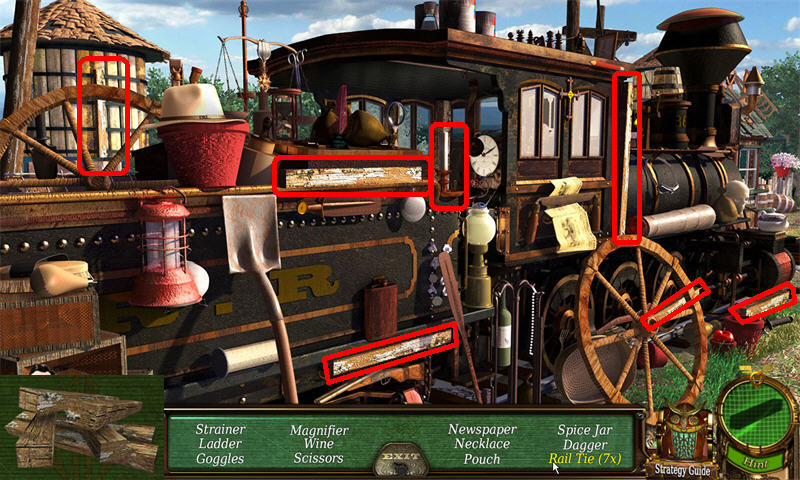
- Play the Hidden Object Scene on the left.
- The 7 RAIL TIES are marked in red and will be added into inventory.

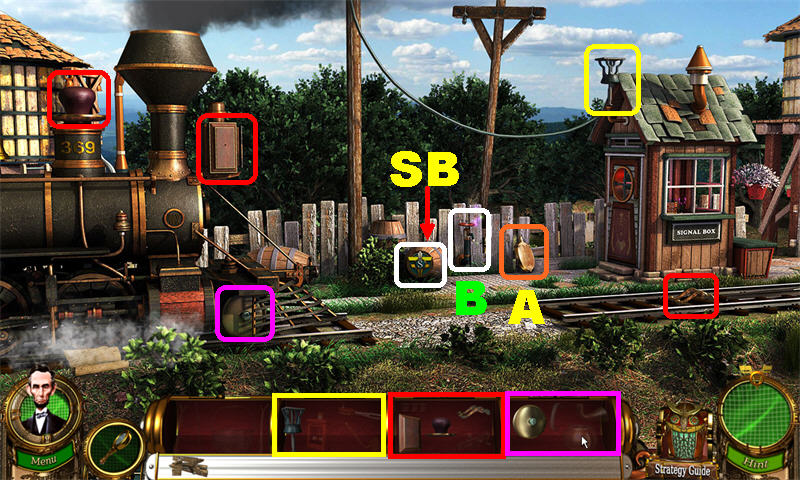
- Pick up SECRETS BADGE 4/10 on the barrel in the lower center.
- Pick up the EMPTY CANTEEN (A) in the lower right.
- Pick up the highlighted items.
- Turn on the faucet (B); fill the EMPTY CANTEEN with water from the faucet.
- Go right.

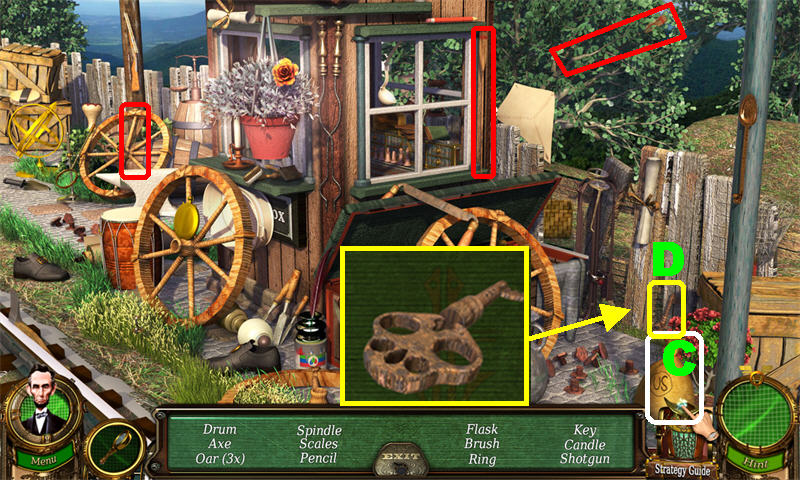
- Play the Hidden Object Scene on the left.
- The 3 OARS are marked in red.
- Move the money bag (C) in the lower right; pick up the KEY (D).
- The key will be added to inventory.

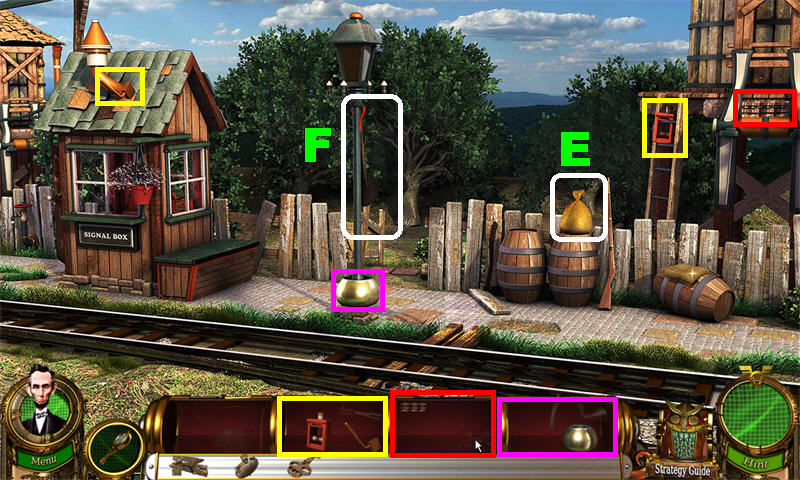
- Pick up highlighted items.
- Pick up the GUN POWDER (E) on the right.
- Pick up the SHOVEL (F) on the lamppost.
- Go through the fence.

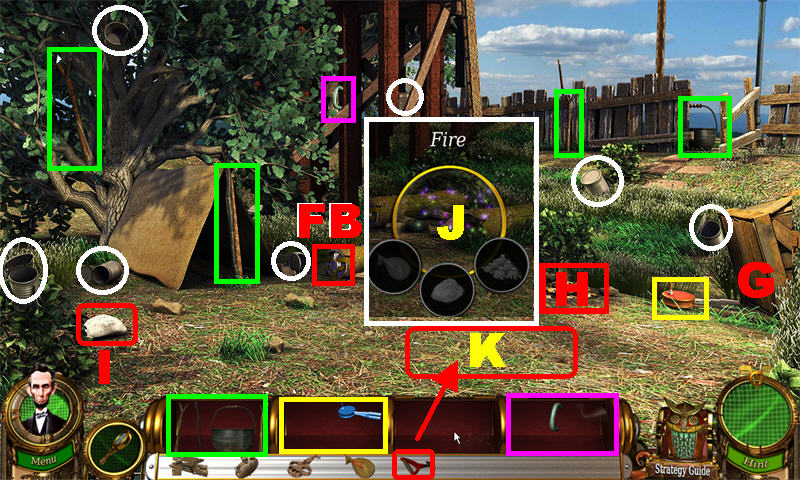
- Pick up FLUX BADGE 5/10 on the left log in the center of the ground.
- Lift the crate (G) on the right; pick up the PIECE OF LEVER below it.
- Pick up the highlighted items to assemble the POT, LEVER, and TEAPOT.
- Pick up the DRY LEAVES (H) in the lower center.
- Pick up the FLINT STONE (I) in the lower left.
- Open the Fire Recipe Puzzle (J); add the GUNPOWDER, FLINT STONE, and DRY LEAVES to the circles.
- Place the POT over the fire pit.
- Click on the pot; place the 7 CANS, circled in white, into the pot to create the MOLTEN METAL.
- Dig 3 holes (K) in the ground with the SHOVEL; place the MOLTEN METAL and the FULL CANTEEN on the ground.
- The RAIL TRACKS will be added to inventory.
- Exit through the fence.

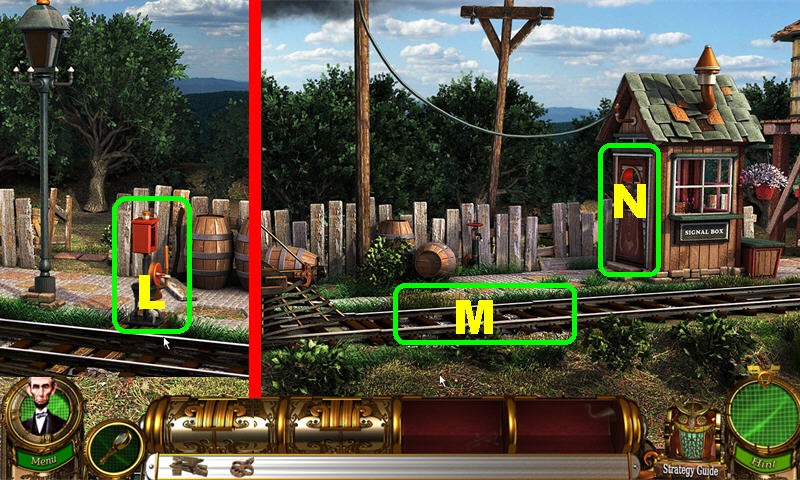
- Place the LEVER (L) on the tracks; click on the lever.
- Go left.
- Place the RAIL TIES and the RAIL TRACKS (M) on the broken rail.
- Open the right door (N) with the KEY; go through the signal box door.

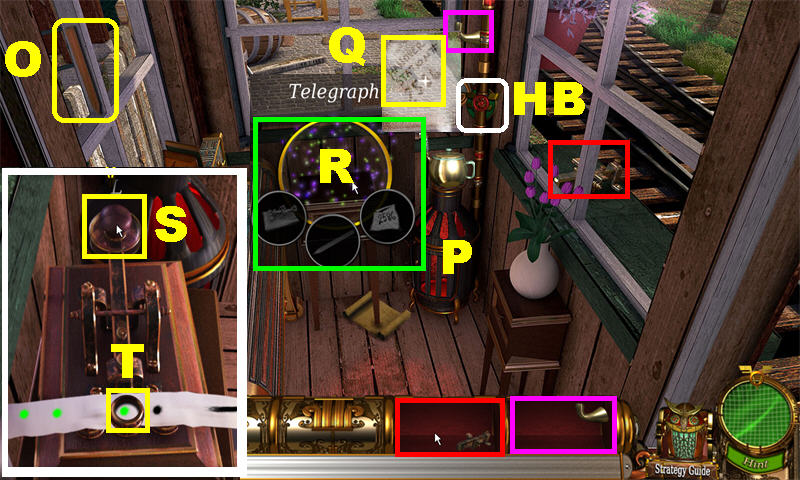
- Pick up HISTORY BADGE 3/10 by the back window.
- Pick up the PENCIL (O) in the upper left.
- Pick up the highlighted items to assemble the TEAPOT and TELEGRAPH.
- Place the TEAPOT on the furnace (P); pick up the STEAM CLUE (Q) on the window above.
- Open the Telegraph Recipe Puzzle (R); add the PENCIL, TELEGRAPH, and STEAMCLUE to the circles.
- Click on the telegraph to trigger a puzzle.
- Click on the LEVER (S) when the ‘dot’ or ‘dash’ is in the hit circle (T).
- The message states: “LINCOLN TRAIN ON WAY.”
- Place the REVERE COFFEE URN into the owl.
Chapter 6: Boston Tavern

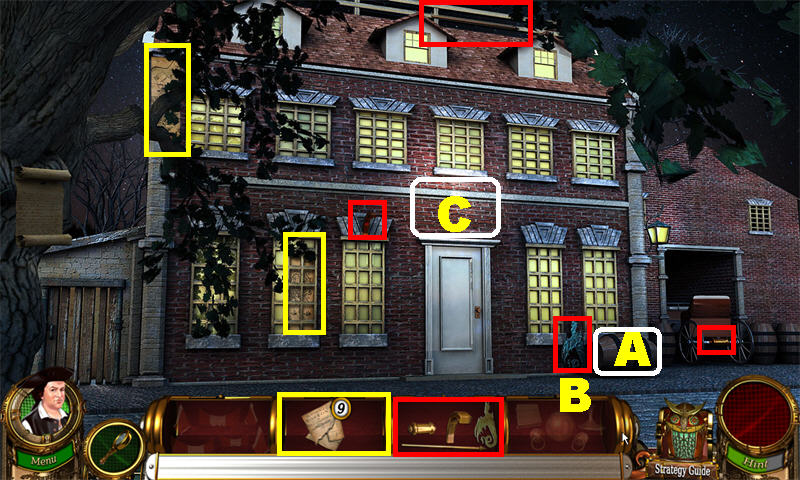
- Move the barrel (A) to pick up a PIECE OF SIGN (B).
- Pick up the highlighted items to assemble the SIGN.
- Place the SIGN (C) above the door; go through the door.

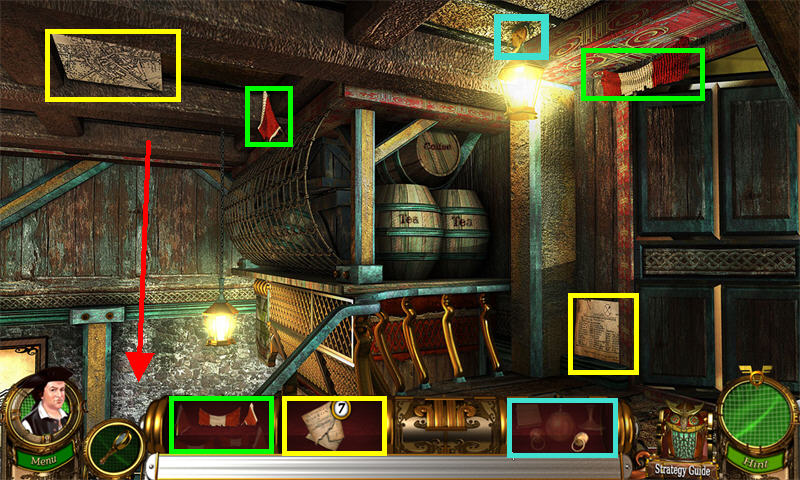
- Pick up the highlighted items.
- Go down.

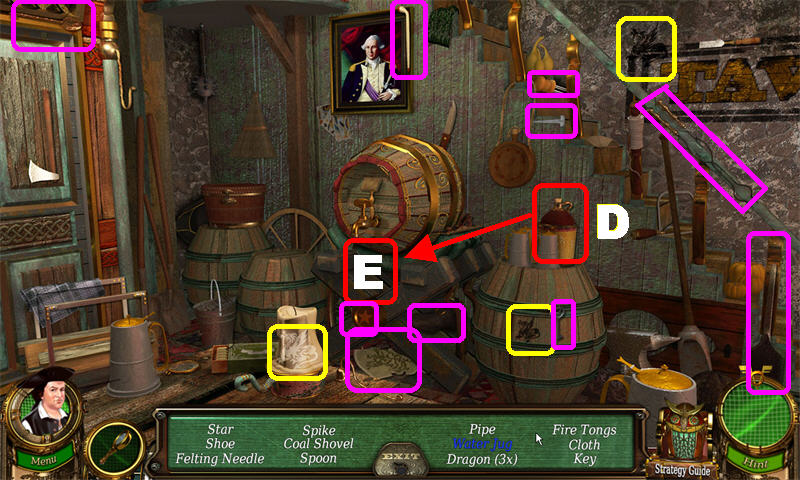
- Play the Hidden Object Scene on the right.
- The 3 DRAGONS are marked in yellow.
- Pick up the JUG (D) on the right and place it below the barrel (E) in the upper center to fill it with water.
- The jug will be added to inventory.

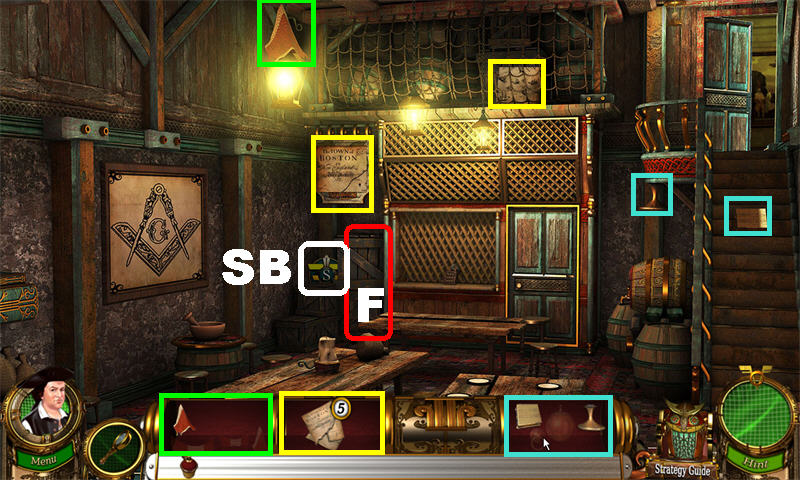
- Pick up SECRETS BADGE 5/10 on left.
- Pick up the highlighted items.
- Zoom into the crates (F) on the left.

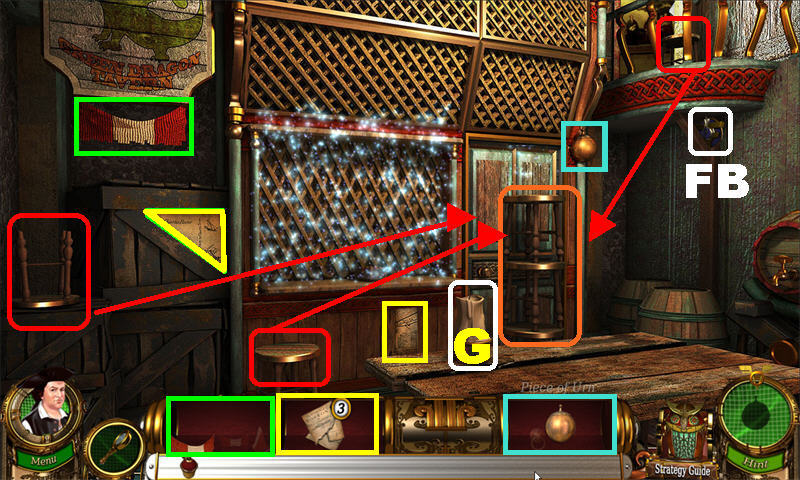
- Pick up FLUX BADGE 6/10 in the upper right.
- Move the candle (G) out of the way.
- Pick up the highlighted items.
- Place the 3 STOOLS, marked in red, in the lower right (H); click above the stools to open a Hidden Object Scene.

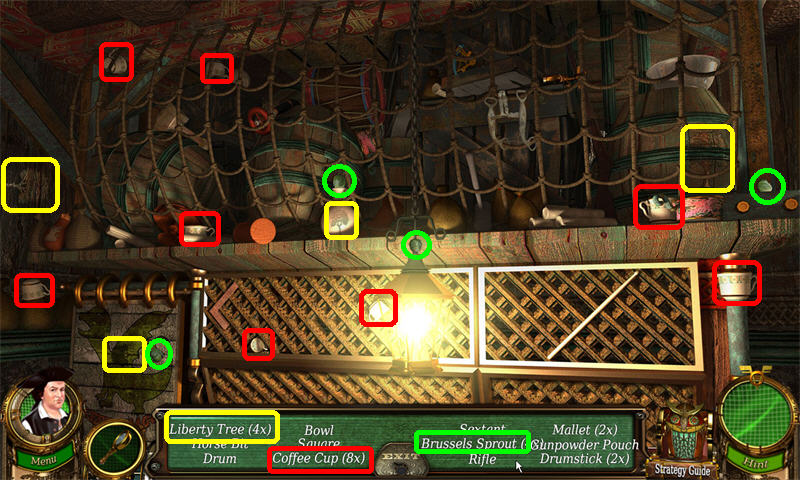
- The 4 LIBERTY TREES are marked in green.
- The 8 COFFEE CUPS are marked in red.
- The 4 BRUSSEL SPROUTS are circled in green.
- The coffee cups will be added to inventory.
- Zoom into the sparkly area after you’ve completed your search to trigger a puzzle.

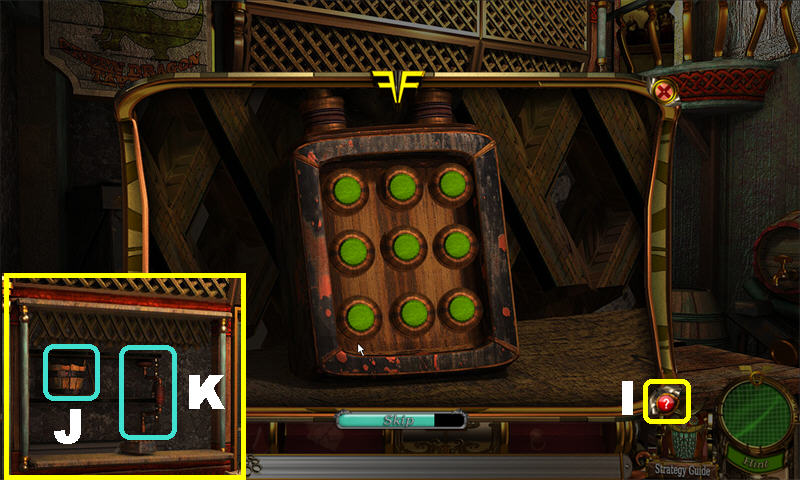
- Please click on the “?” (I) in the lower right to view the instructions for this puzzle.
- Press the buttons in the correct order until they all turn green.
- The solution for this puzzle is random.
- Pick up the BUCKET (J) and the OLD DRILL (K) on the shelf after the puzzle has been completed.
- Exit and go left.

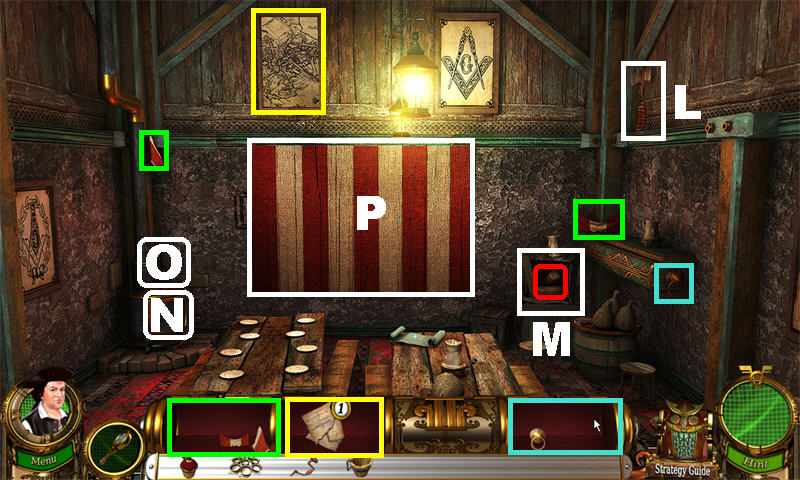
- Pick up the highlighted items to assemble the FLAG, URN, and MAP.
- Pick up the HATCHET (L) in upper right.
- Open the crate (M) on the right with the HATCHET; pick up the LOGS inside.
- Place the LOGS in the fireplace (N).
- Place the JUG (O) above the stove to heat it.
- Place the FLAG on the back wall (P).
- Exit and click in the upper right.

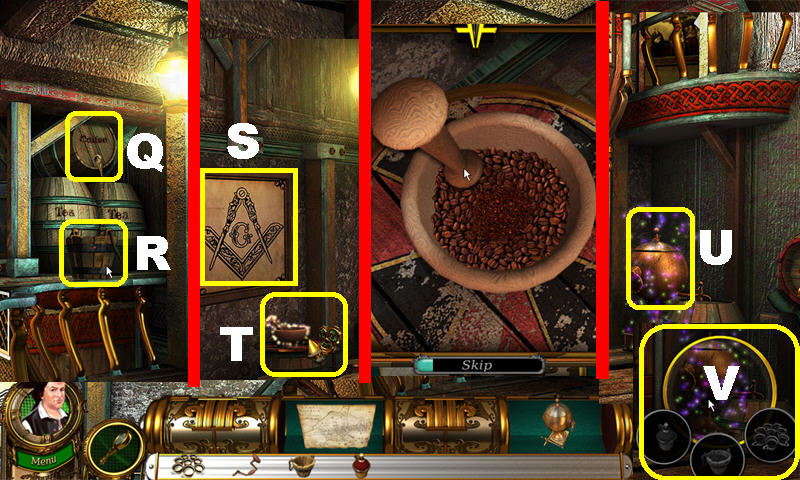
- Place the OLD DRILL on the barrel (Q) in upper center.
- Place the BUCKET below the barrel to fill it (R). The COFFEE BEANS will be added to inventory.
- Go down.
- Place the MAP over the Masonic Poster (S).
- Place the COFFEE BEANS in the mortar and pestle (T) to trigger a puzzle.
- Grind the coffee with the pestle until the pestle disappears.
- GROUND COFFEE will be added to inventory.
- Go forward.
- Place the URN (U) on the right side of the table.
- Open the Urn Puzzle Piece (V); place the GROUND COFFEE, HOT WATER, and CUPS OF COFFEE into the circles.
- The CUPS OF COFFEE are added to inventory.
- Exit and go left.
- Place the CUPS OF COFFEE on the left table.
- Put the FLUX CAPACITOR in the owl.

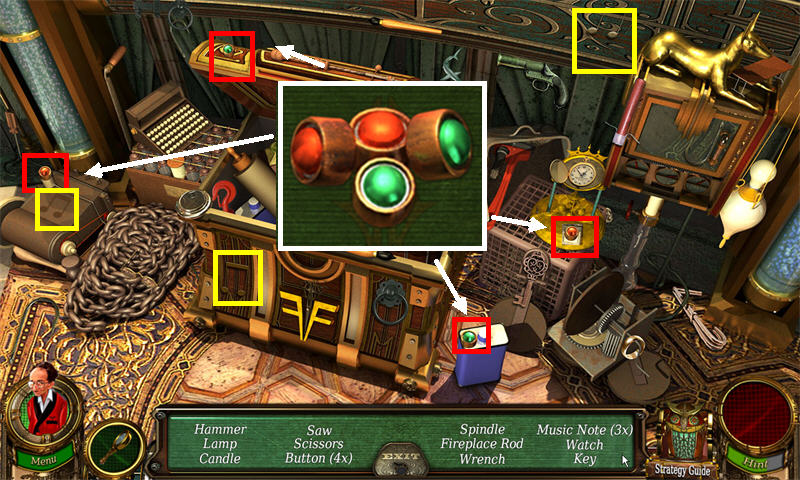
- You are transported to Apollo’s Room. Click on the chest on the right to trigger a Hidden Object Scene.
- The 4 BUTTONS are marked in red and will be added to inventory.
- The 3 MUSIC NOTES are marked in yellow.
- Go forward.

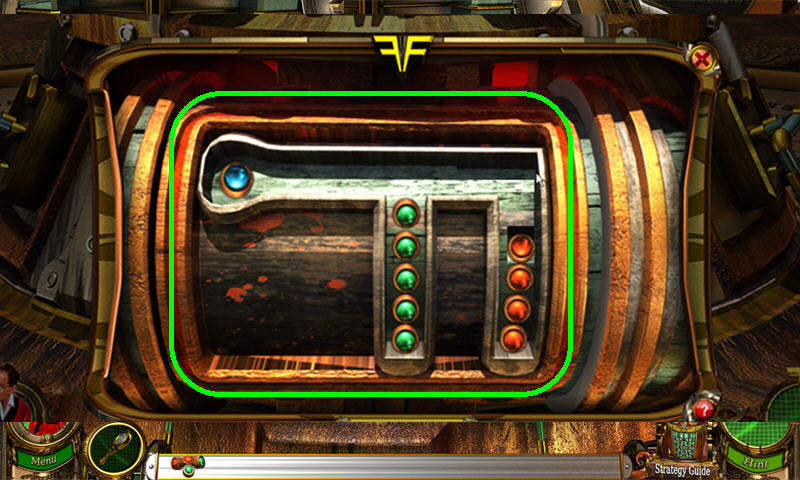
- Place the CAPACITOR and the BUTTONS on the Apollo Machine to trigger a puzzle.
- Click on the “?” (W) in the lower right to view the instructions for this puzzle.
- Place the red pieces in the right columns, the green pieces in the center, and the blue piece in the top left.
- Please look at the screenshot for the final solution.
Chapter 7: Antiquities Room

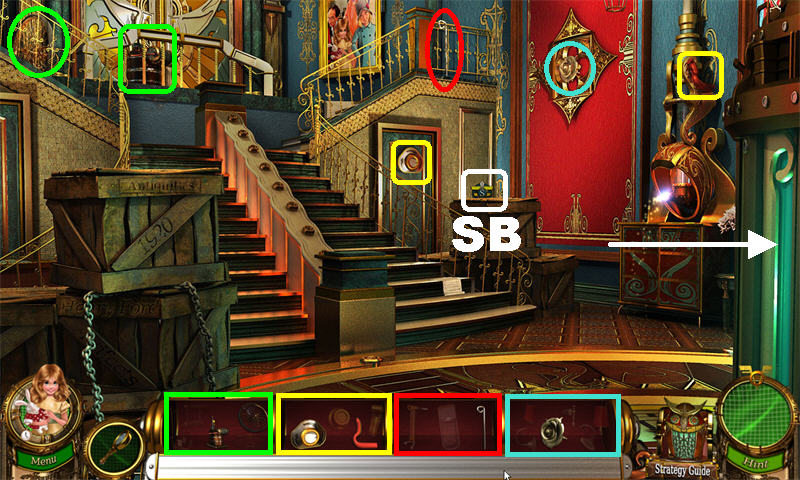
- Pick up SECRETS BADGE 6/10 on the right.
- Pick up the highlighted items.
- Go right.

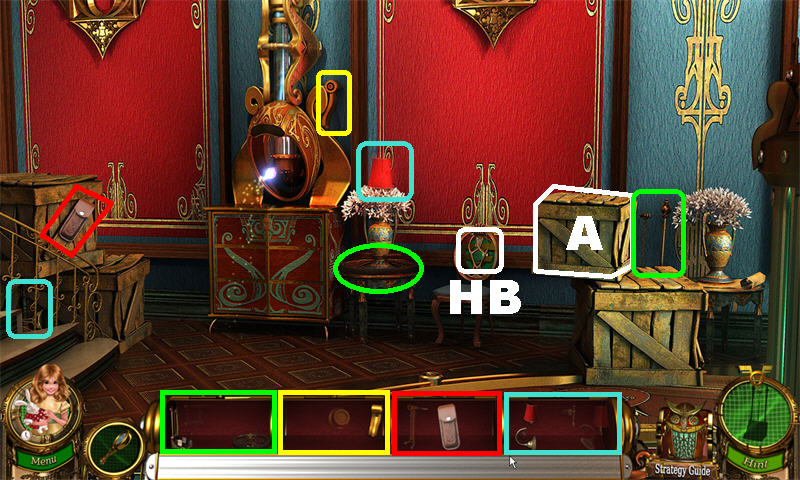
- Pick up HISTORY BADGE 4/10 behind the chair.
- Pick up the marked items.
- Move the crate in the upper right (A); pick up the PIECE OF FLUX LIFT.
- Exit and go up the steps.

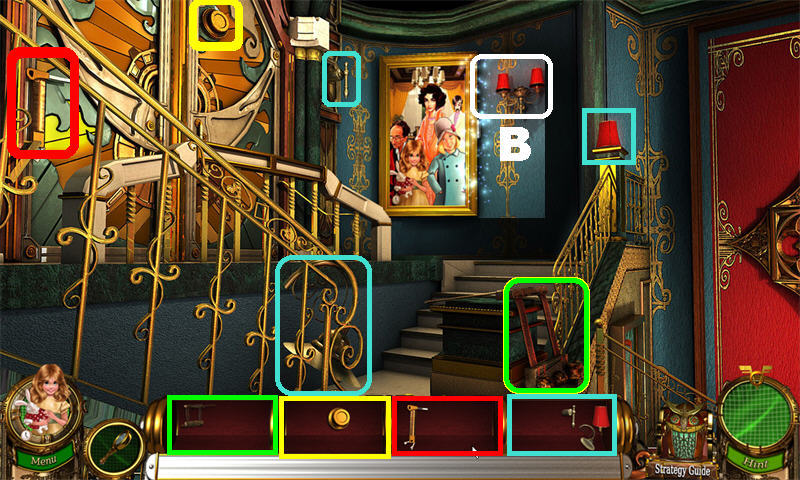
- Pick up the highlighted items to assemble the FLUX LIFT, LEVER, LOCKPICK, and SCONCE.
- Place the SCONCE (B) in the upper right; click on the side of the painting to trigger a puzzle.

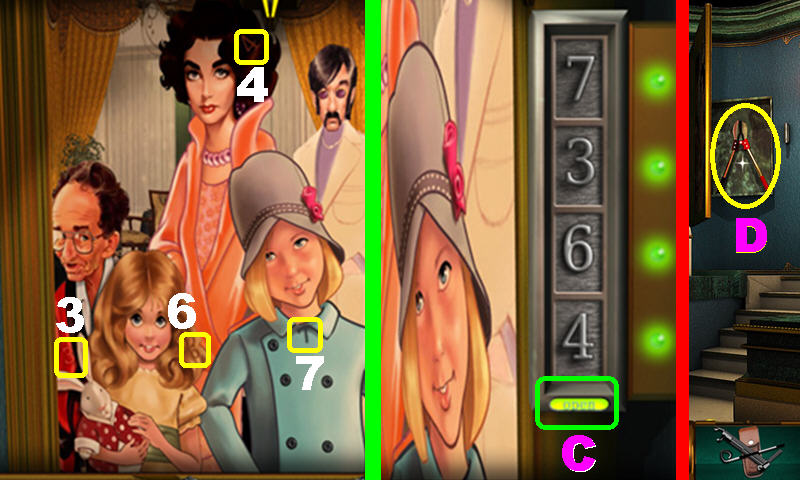
- Pick up the 4 NUMBERS marked in yellow in the painting.
- Click on the lock and place the NUMBERS into the slots. Click on the open button (C) below the slots to enter your selection.
- Correct numbers will have a green light next to them; incorrect numbers will have a red light.
- The solutions are random.
- Pick up the BOLT CUTTERS (D) behind the puzzle.
- Exit and go right.

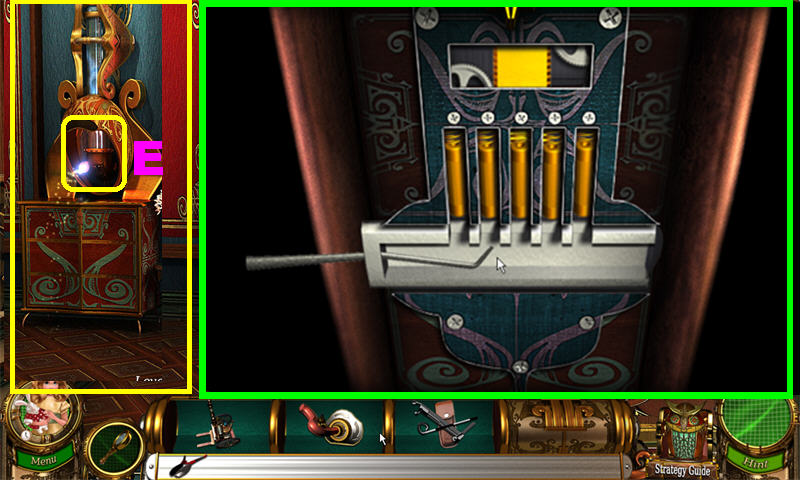
- Place the LEVER above the stand (E).
- Open the stand with the LOCKPICK to trigger a puzzle.
- You can solve this puzzle in any order. Click on the cylinder at the exact moment it is at its highest point to lock it in place. Make a mistake and you will have to start over.

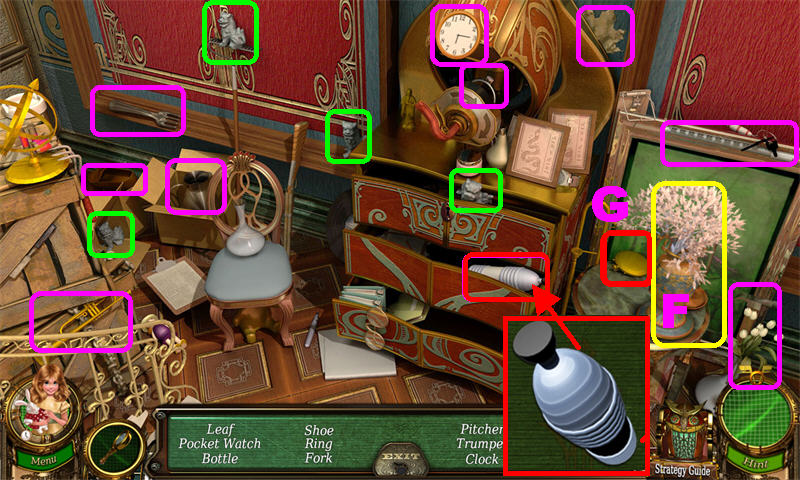
- Play the Hidden Object Scene.
- Move the plant (F); pick up the POCKET WATCH (G).
- The 4 DRAGONS are marked in green.
- The WATER BOTTLE will be added to inventory.
- Go down.
- Place the FLUX LIFT on the left crates.
- Place WATER BOTTLE on the flux lift.
- Zoom into the chain on the left; break the chains with the BOLT CUTTERS in the bubble.
- Pick up the CYLINDER RECORD and place it in the owl.
Chapter 8: Ford

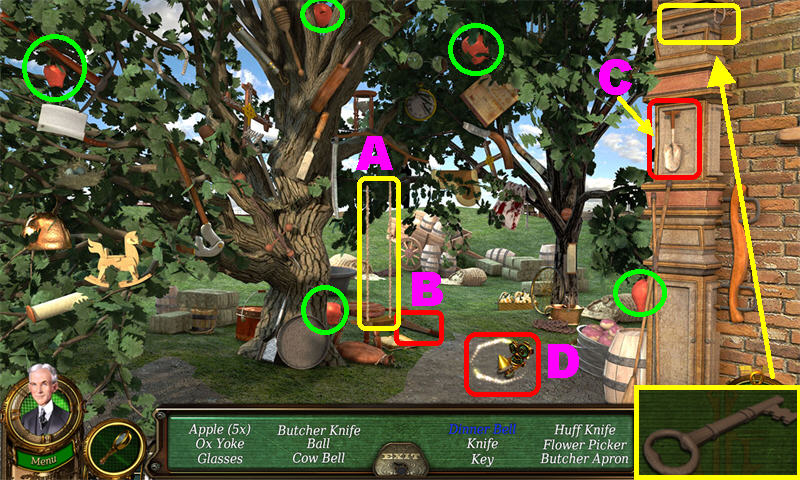
- Play the Hidden Object Scene on the left.
- The 5 APPLES are marked in green.
- Click on the swing (A) to make the knife fall; pick up the KNIFE (B) on the ground.
- Use the SPADE (C) in the upper right to dig the hole (D) on the right side of the ground to pick up the DINNER BELL.
- The KEY will be added to inventory.

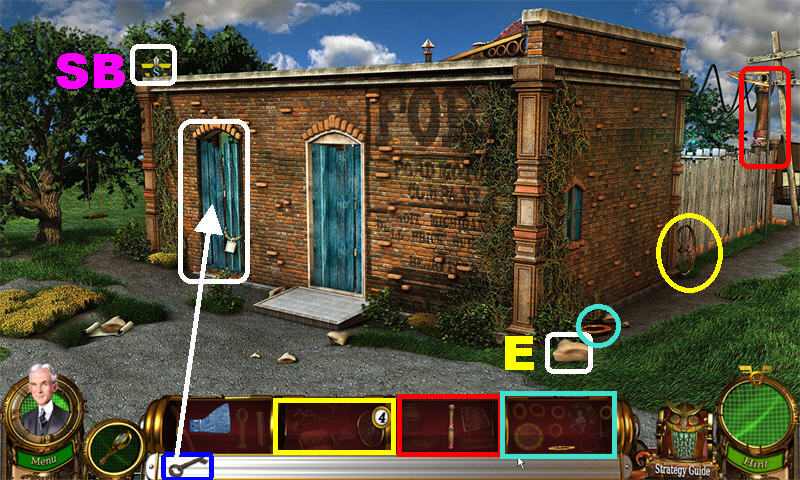
- Pick up SECRETS BADGE 7/10 in the upper left side of the building.
- Move the rock (E) on the lower right.
- Pick up the highlighted items.
- Unlock the left door with the KEY. Go through the door.

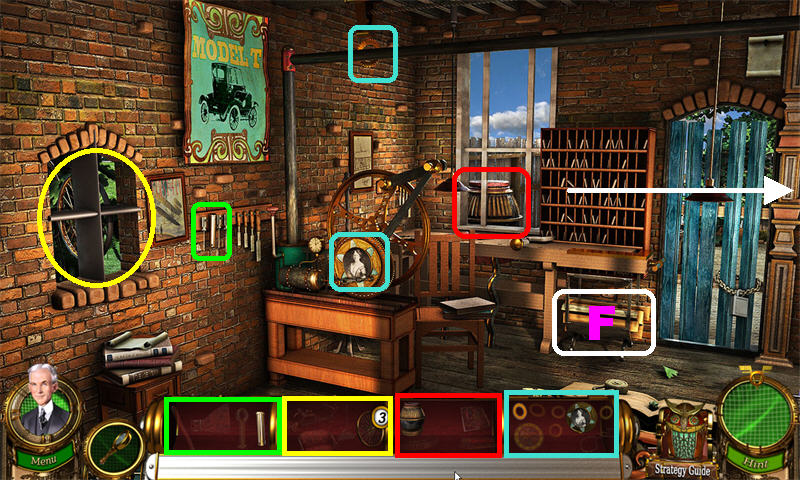
- Pick up the highlighted items.
- Pick up the WOOD (F) in the lower right.
- Turn right.

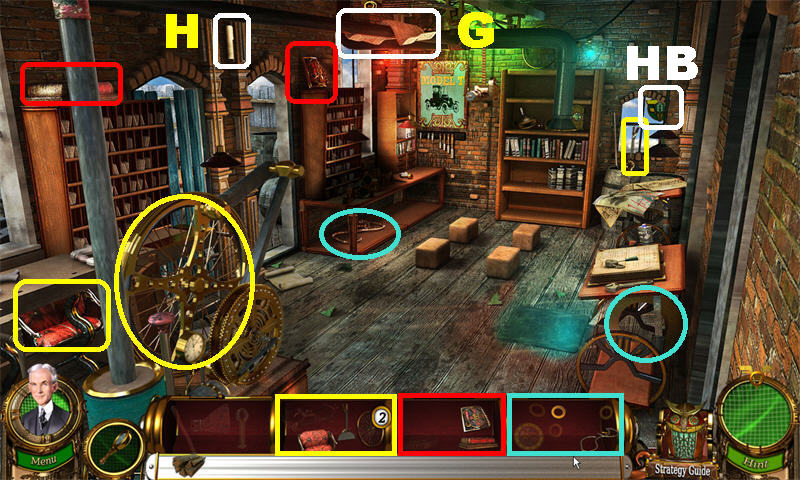
- Pick up HISTORY BADGE 5/10 in the upper right.
- Pick up the highlighted items.
- Pick up the NEWSPAPER (G) in upper center.
- Grab the CANDLE (H) in the upper left.
- Go through the left entrance.

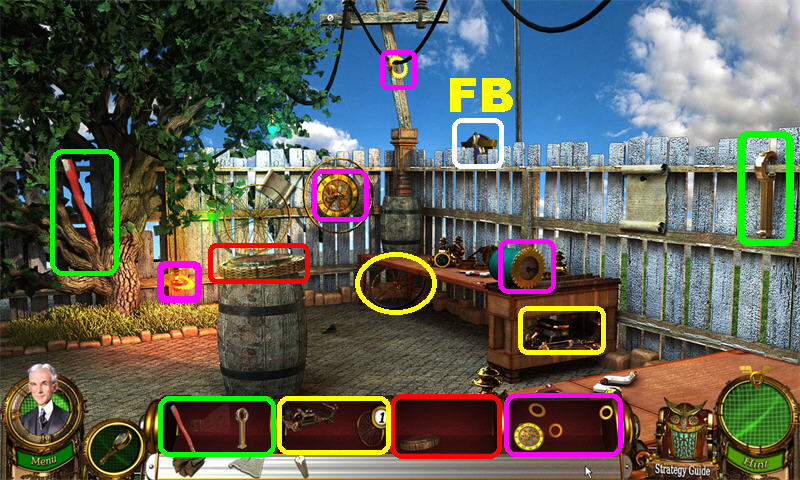
- Pick up FLUX BADGE 7/10 on the fence.
- Pick up the highlighted items to assemble the QUADRICYCLE, STOVE, and WATCH.
- Exit this scene.

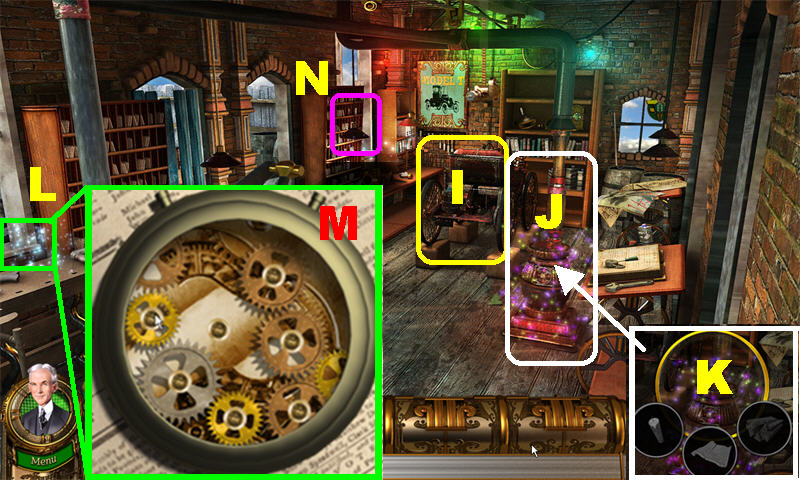
- Place the QUADRICYCLE (I) on the floor.
- Place the STOVE (J) next to the quadricycle.
- Open the Stove Recipe Puzzle (K); place the NEWSPAPER, CANDLE, and WOOD in the circle.
- Place the WATCH (L) in the lower left to trigger a puzzle.
- Arrange the gears as shown in the screenshot (M) to solve the puzzle. Not all gears will be used.
- The LIGHTBULB will be added to inventory once the puzzle is completed.
- Place the LIGHTBULB in the lamp (N) on the left table; click on the table to play a Hidden Object Scene.

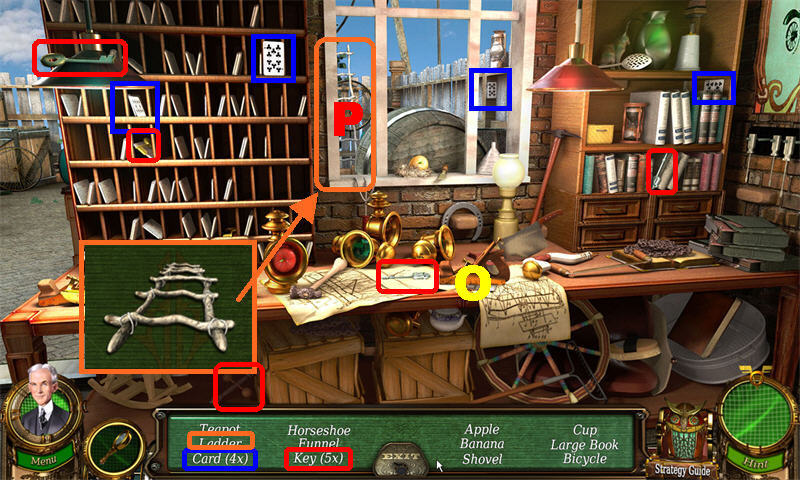
- The 4 CARDS are marked in blue.
- Drag the plane (O) out of the way; pick up the KEY below it.
- The 5 KEYS are marked in red.
- The LADDER (P) will be added to inventory.
- Go to the front of the house.

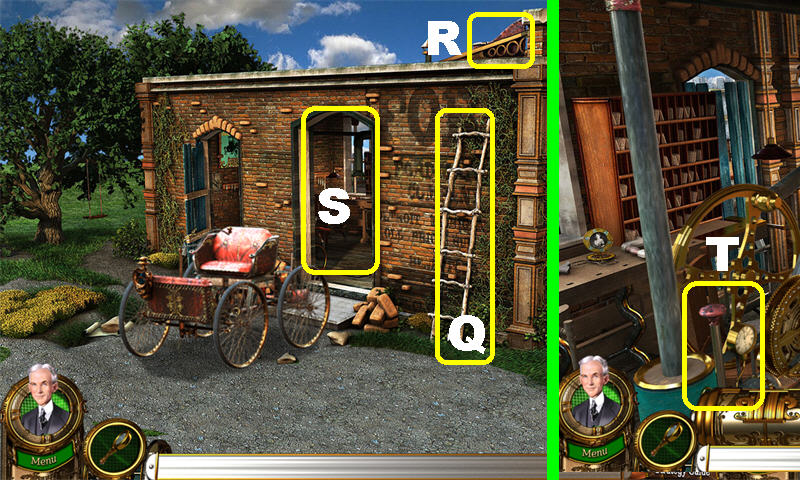
- Place the LADDER (Q) on the right side of the wall; pick up the last AXE (R) fragment above it.
- Chop the right door (S) down with the AXE; go inside and turn right.
- Flip the lever (T) in the lower left and the Quadricycle will come out of the right door.
- Place the BOSTON TEA inside the owl.
Chapter 9: The Boston Wharf

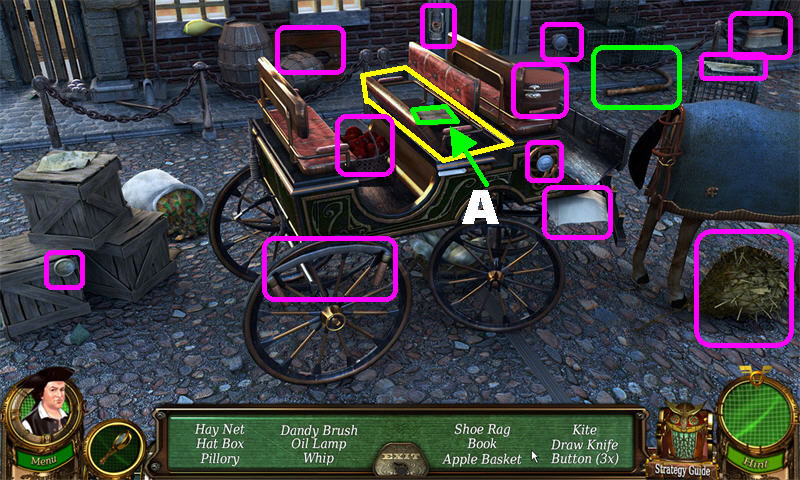
- Zoom into the back of the carriage to trigger a Hidden Object Scene.
- Open the bench on the carriage; pick up the BOOK (A) inside.
- The WHIP will be added to inventory.

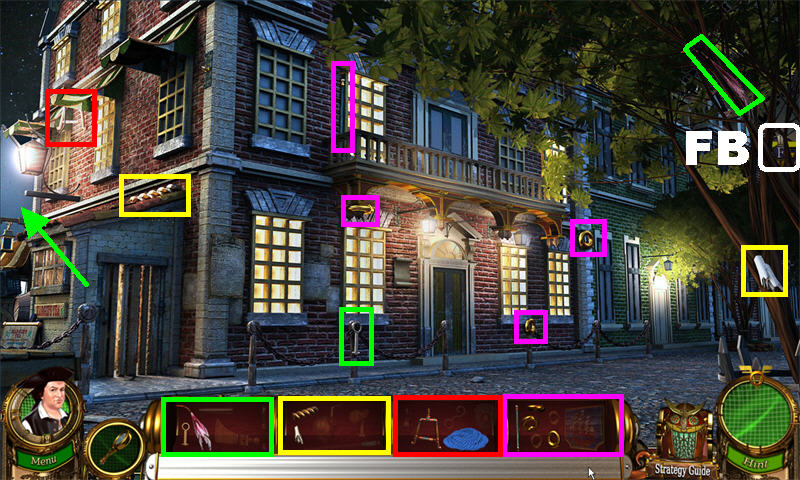
- Place the WHIP on the horse to make it go away.
- Pick up FLUX BADGE 8/10 on the right.
- Pick up highlighted items.
- Go left.

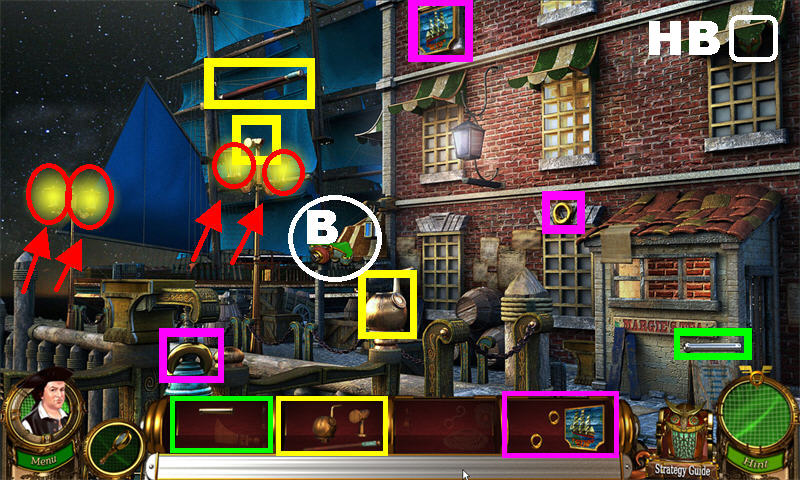
- Pick up HISTORY BADGE 6/10 in the upper right.
- Pick up the highlighted items to assemble the SIGN and the LAMPLIGHTER.
- Extinguish the 4 lamps circled in red with the LAMPLIGHTER.
- Exit by the section circled in white (B).

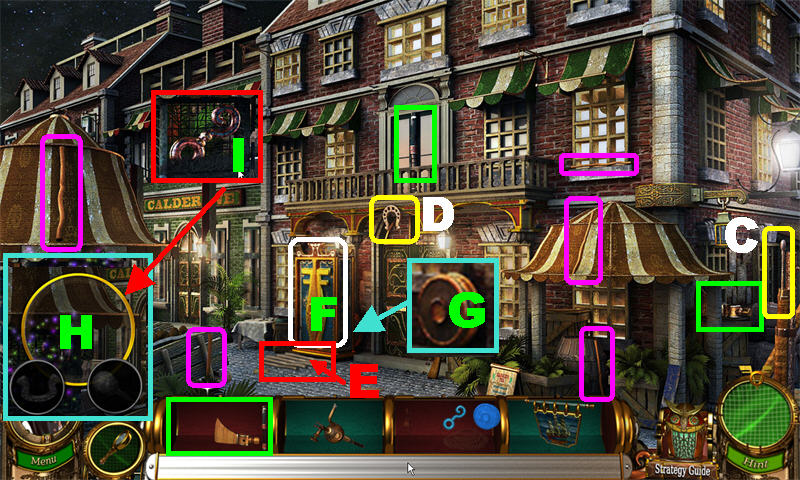
- Pick up the items marked in green to assemble the AXE.
- Pick up the RAMROD (C) in the lower right.
- Pick up the HORSESHOE (D) in the center.
- Pick up the 5 ROLLERS marked in purple and place them on the ground (E) in front of the cabinet (F) marked in white. Wait for the sparkle to appear before you click the rollers in place, otherwise they will not stick.
- Move the cabinet after the rollers have been placed; pick up the PIECE OF PULLEY (G) behind it.
- Click on the Cage Recipe Puzzle (H); place the HORSESHOE and the RAMROD in the circles.
- Pick up the PIECE OF PULLEY (I) on the cage.
- Go right twice.

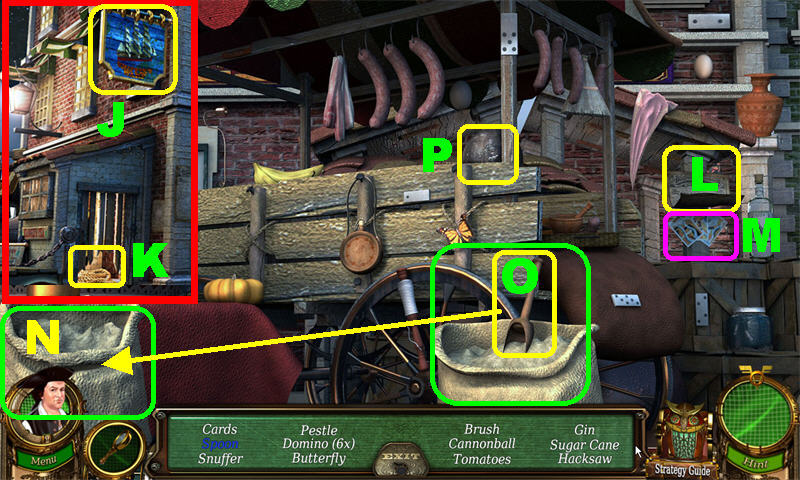
- Place the SIGN (J) in the upper left.
- Break down the shed door with the AXE; pick up the PULLEY PIECE (K) inside.
- Go left, center, left, and left again.
- Play the Hidden Object Scene on the left.
- Lift the paper (L) in the upper right; pick up the CARDS (M).
- Pick up the SCOOP (O) on the right sack and place it in the left sack (N) to eliminate it from your list.
- The CANNONBALL (P) will be added to inventory.

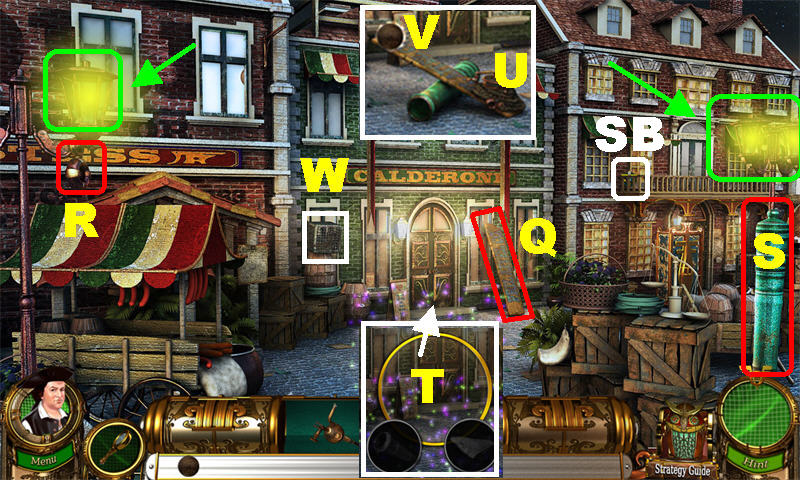
- Pick up SECRETS BADGE 8/10 on the right balcony.
- Pick up the BOARD (Q) by the door.
- Pick up the last PULLEY PIECE (R) in the upper left.
- Pick up the green CANNON (S) in the lower right.
- Open the Recipe Puzzle (T) by the door; place the CANNON and the BOARD in the circles.
- Place the PULLEY (U) and CANNONBALL (V) on the catapult.
- Knock down one of the crates (W) attached to the pulley.
- Extinguish the 2 lights in the lamps, marked in green, with the LAMPLIGHTER.
- Pick up the FLUX FUEL CELL on the sparkling crate; place it in the owl.
- You will be transported back to the Apollo Room.

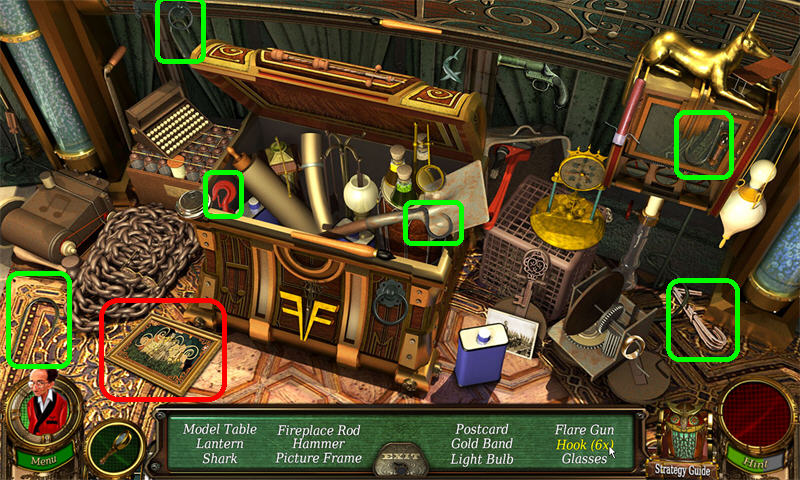
- Zoom into the sparkly area on the right to trigger a Hidden Object Scene.
- The 6 HOOKS are marked in green.
- The PATTERN will be added to inventory.
- Zoom straight ahead for the Apollo Machine.
- Place the FUEL CELL and the PATTERN into the machine to trigger a puzzle.

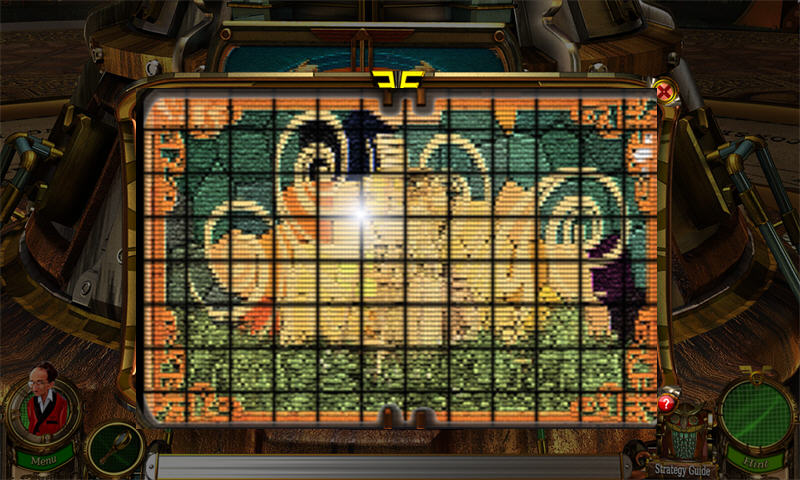
- Rotate the tiles until they form the image shown on the screenshot.
Chapter 10: Mansion Bedroom

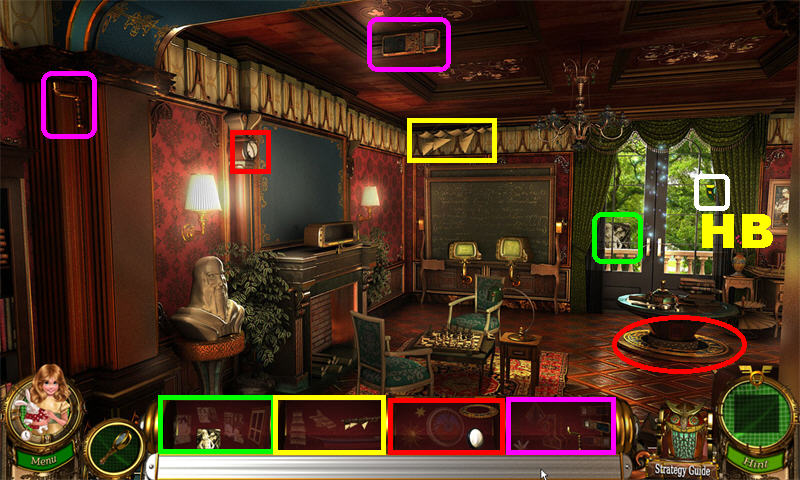
- Go left.
- Pick up HISTORY BADGE 7/10 in upper right.
- Pick up the highlighted items.
- Play the Hidden Object Scene on the right.

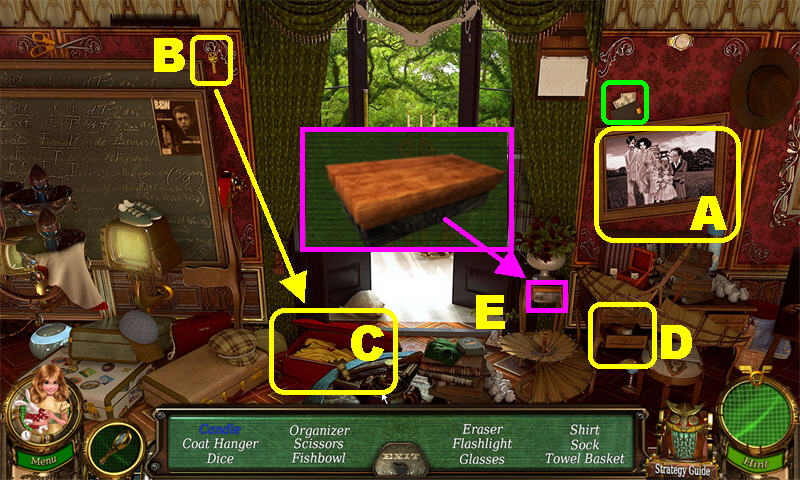
- Click on the painting (A) in the upper right; pick up the WALLET behind it.
- Pick up the KEY (B) in the upper left and use it to open the red suitcase (C); pick up the SHIRT inside.
- Open the drawer (D) on the right; pick up the CANDLE inside.
- The ERASER (E) will be added to inventory.
- Go right.

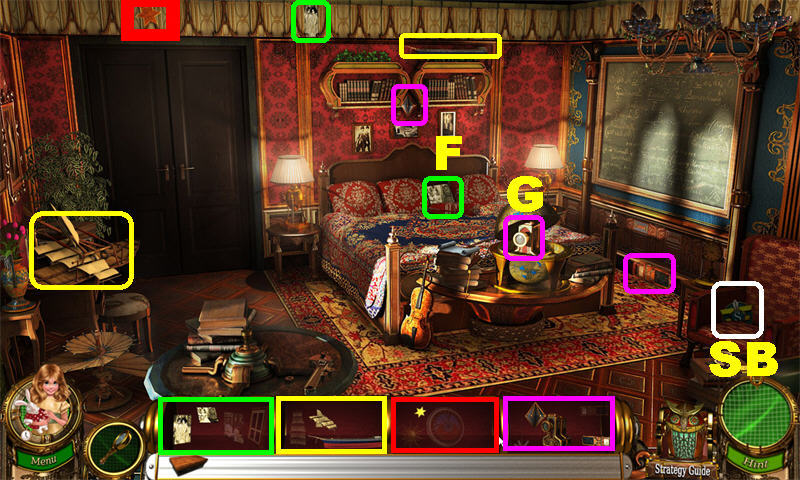
- Pick up SECRETS BADGE 9/10 on the chair in the lower right.
- Move the pillow on the bed and pick up the PIECE OF PICTURE (F).
- Open the GLOBE by the bed and pick up the PIECE OF PROJECTOR (G) inside.
- Pick up the highlighted items.
- Go down twice.

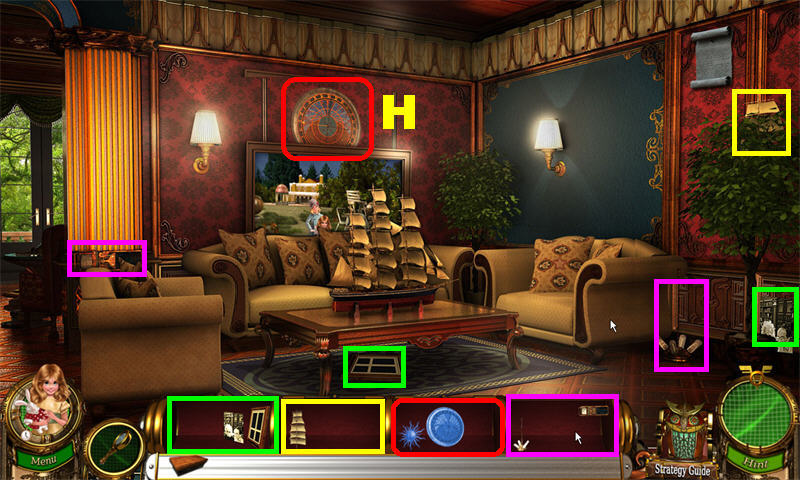
- Pick up the highlighted items to assemble the BOAT, PICTURE, and PROJECTOR.
- Place the BOAT on the table to drop the picture on the wall; pick up the PIECE OF CLOCK (H) on the back wall.
- Go left and then right.

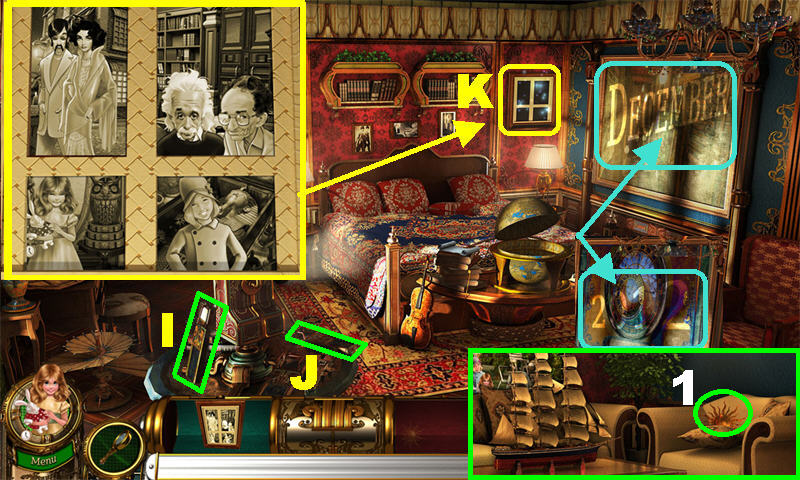
- Clean the chalkboard with the ERASER.
- Place the PROJECTOR on the round table.
- Click on the CARTRIDGES (I and J) to view the images on the chalkboard, showing “December” and “2012.”
- Place the PICTURE (K) on the right side of the back wall to trigger a puzzle.
- Place the PHOTOS in their appropriate spots. Please look at the screenshot for the solution. Note the symbols at the bottom of the frame.
- Exit the room and go down.
- Move the pillow (1) on right chair; pick up the last PIECE OF CLOCK.
- Go left.

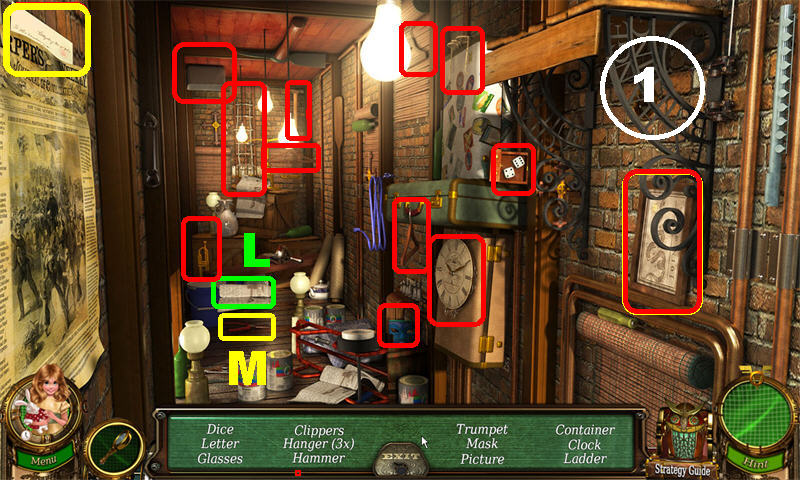
- Place the CLOCK on the board to trigger a puzzle.
- Using the clues from the projector, change the numbers to 12212012.
- Zoom into the sparkly area at the bottom of the projector to trigger a Hidden Object Game.


- Lift the newspaper (L) on the ground; pick up the CLIPPERS (M).
- Click in the upper right sparkly area (1) to view a cut scene.
- The MILLS INVITATION will be added to inventory; place it in the owl.
Chapter 11: Lincoln 2

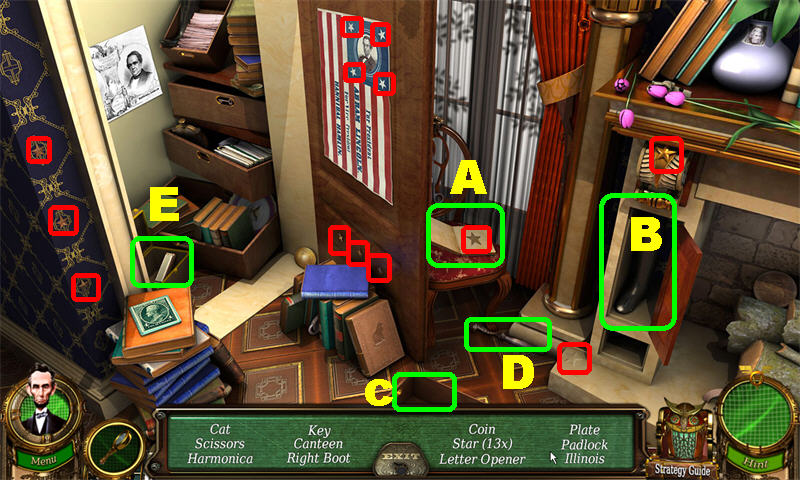
- Click on the right door to trigger a Hidden Object Game.
- The 13 STARS are marked in red. Open the book (A) on the chair and pick up the STAR.
- Open the cabinet (B) on the right and pick up the RIGHT BOOT.
- Move the drawer (C) on the floor and pick up the LETTER OPENER (D).
- Open the box (E) in the closet and pick up the HARMONICA.
- The LETTER OPENER will be added to inventory.

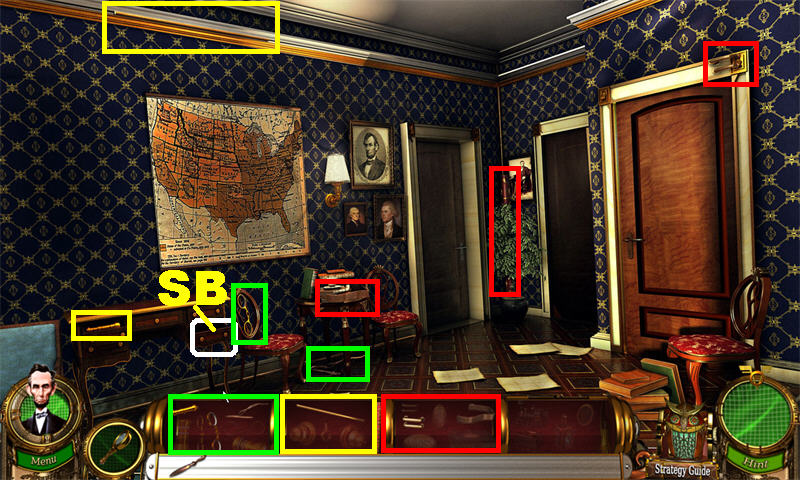
- Open the right drawer to pick up SECRETS BADGE 10/10.
- Open the LEFT DRAWER (F); pick up the PIECE OF BINOCULAR.
- Pick up the highlighted items.
- Go left.

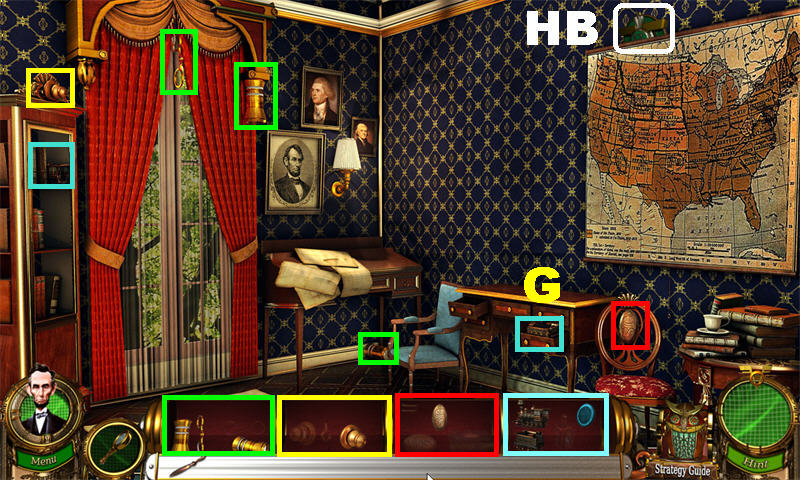
- Pick up HISTORY BADGE 8/10 in the upper right.
- Open the bottom right drawer (G); pick up the PIECE OF TRAIN.
- Pick up the highlighted items.
- Go left.

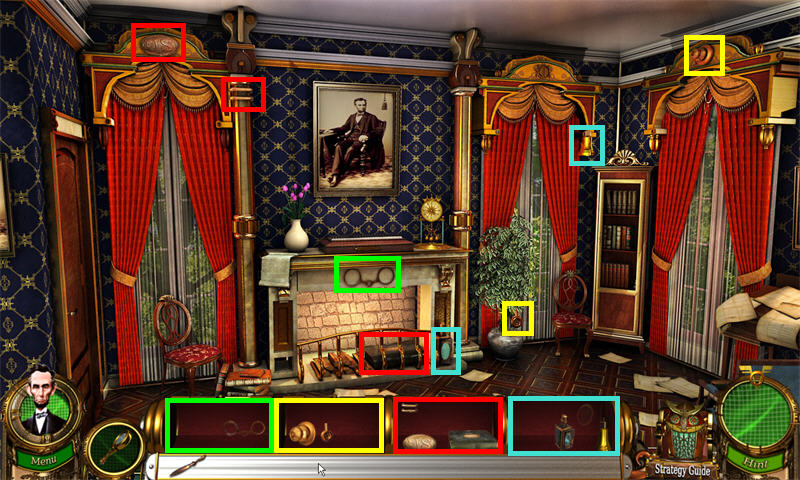
- Pick up the highlighted fragments to assemble the BINOCULARS, SATCHEL, and MAP.
- Go right.

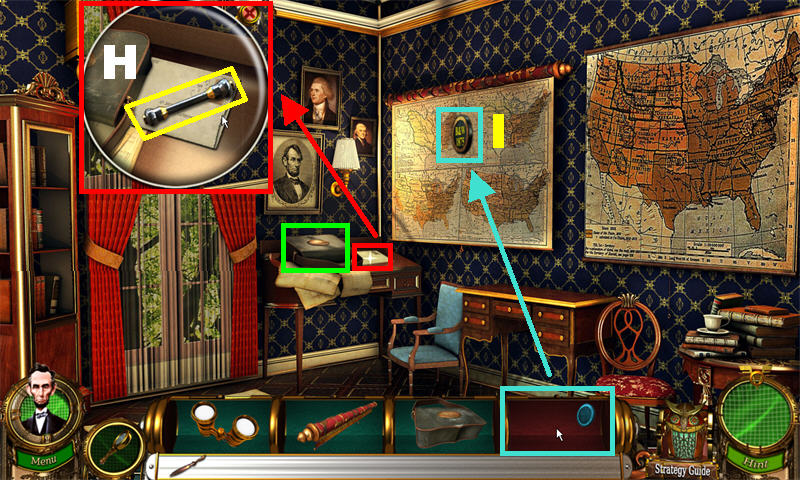
- Place the SATCHEL on the desk; click on the letter that appears next to the satchel.
- Open the letter with the LETTER OPENER; pick up the SAFE HANDLE (H) inside the letter.
- Place the MAP on the right side of the wall; click on the map to open it.
- Pick up the last PIECE OF TRAIN (I) on the map.
- Go left.
- Place the TRAIN over the fireplace to open the safe above it.
- Place the SAFE HANDLE on the safe; click on the safe door to open it. Pick up the KEY in the safe.
- Go left.
- Unlock the sparkly door with the KEY.

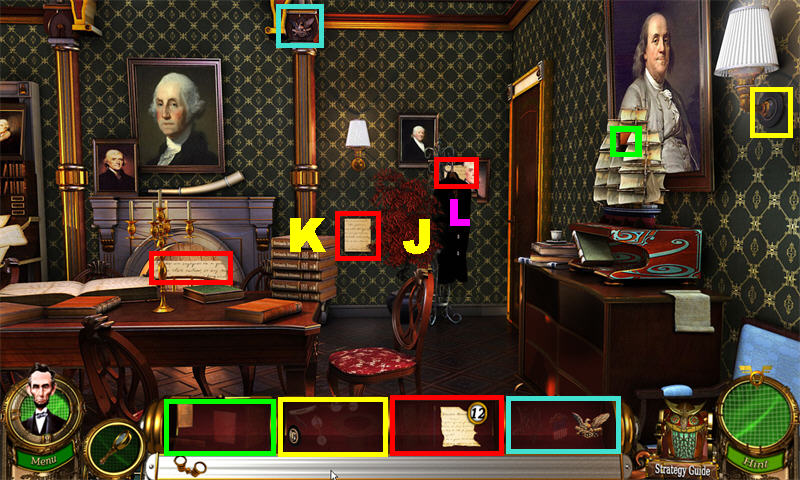
- Pick up the highlighted items.
- Move the red plant (J); pick up the PIECE OF ADDRESS (K) behind the plant.
- Place the BINOCULARS on the coat; pick up the PIECE OF ADDRESS (L) above the coat.
- Go left.

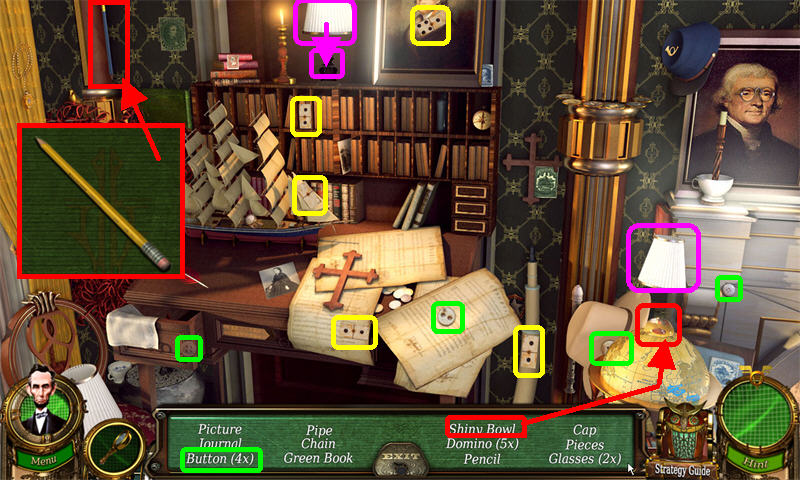
- Click on the Hidden Object Scene on the right.
- Move the lamp shade in the lower right and pick up the SHINY BOWL below it.
- The DOMINOES are marked in red; the BUTTONS are marked in green.
- Move the lamp shade above the bookcase and pick up the JAR below it.
- The PENCIL will be added to inventory.

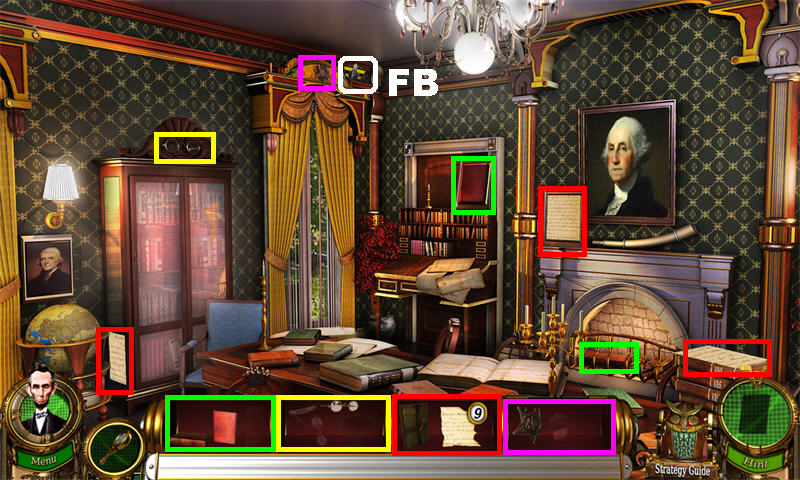
- Pick up FLUX BADGE 9/10 in the upper center.
- Pick up the highlighted items.
- Go left.

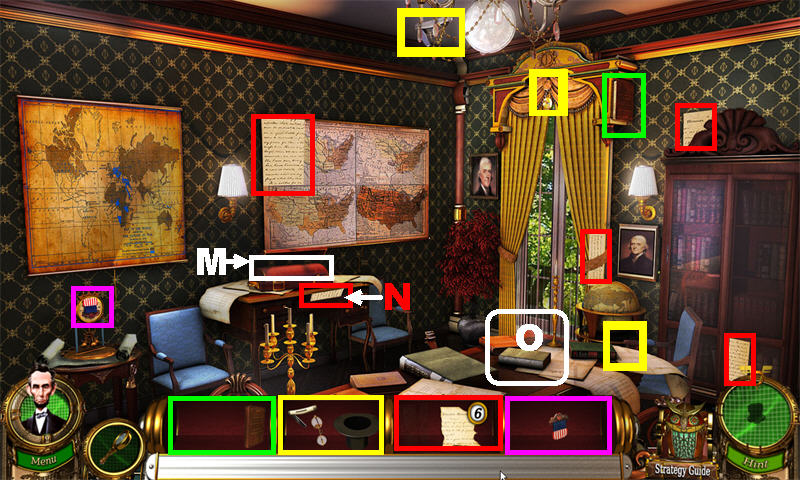
- Pick up the highlighted items to assemble the BOOK, EFFECTS, and MEDAL.
- Place the MEDAL in the briefcase (M) on the desk for the PIECE OF ADDRESS to appear; pick up the PIECE OF ADDRESS (N) below the briefcase.
- Place the EFFECTS (0) on the table.
- Go right twice.

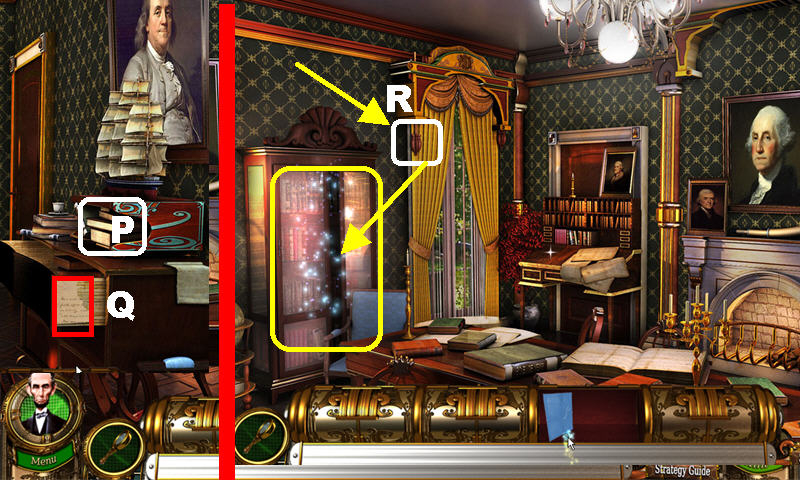
- Place the BOOKS (P) on the table to unlock the drawer below it.
- Pick up the PIECE OF ADDRESS (Q) on the side of the drawer.
- Go left.
- Click on the button (R) in the upper left side of the curtains to trigger a Hidden Object Scene.

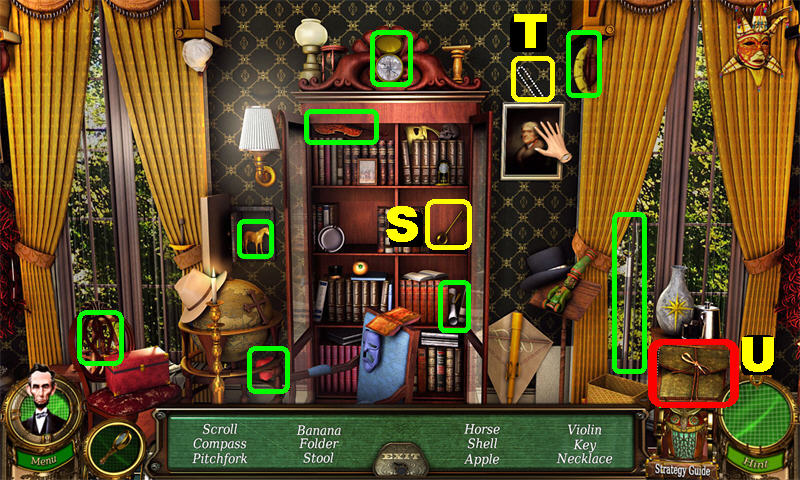
- Move the books on the right shelf; pick up the KEY (S).
- Click on the small portrait in the upper right and pick up the NECKLACE (T).
- The FOLDER (U) will be added to inventory (this will complete the address).

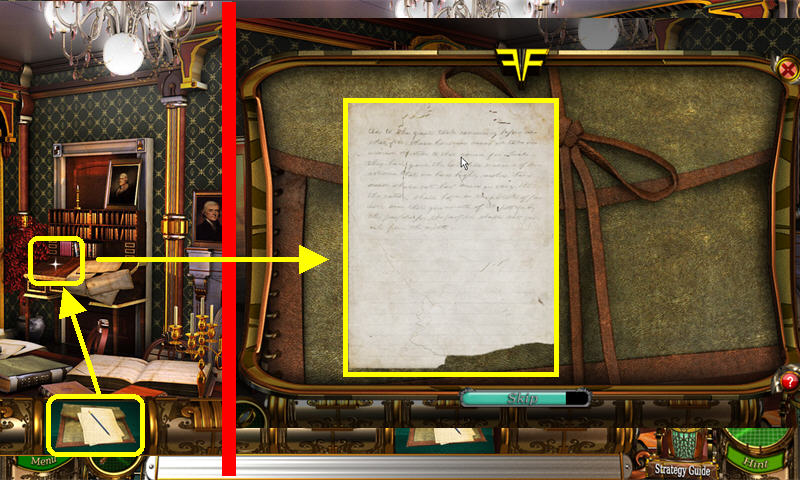
- Place the ADDRESS on the desk to trigger a puzzle.
- Reassemble the Address as shown on the screenshot.
- The FIFE will be added to inventory; place the FIFE in the owl.
Chapter 12: Boston Ship

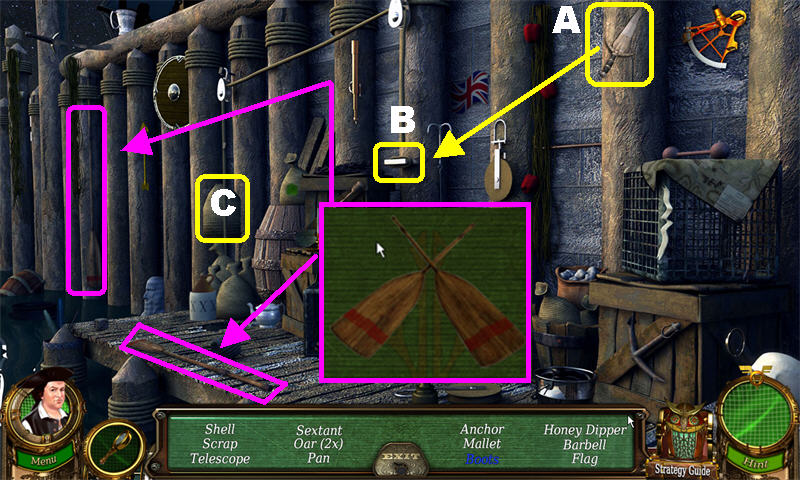
- Click on the Hidden Object Scene on the crates.
- Pick up the DAGGER (A) in the upper right and use it to cut the ROPE (B); pick up the BOOTS (C) on the left.
- The OARS will be added to inventory.

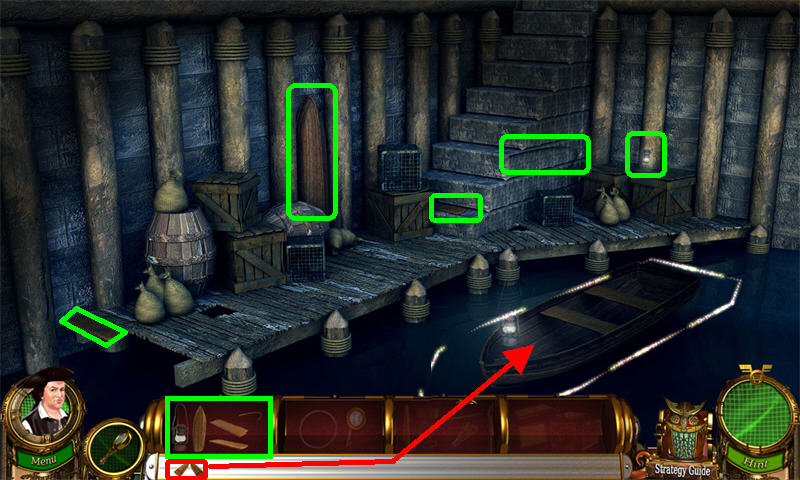
- Pick up the highlighted items to assemble the DINGY.
- Place the DINGY in the water.
- Place the OARS in the dingy to access the next scene.

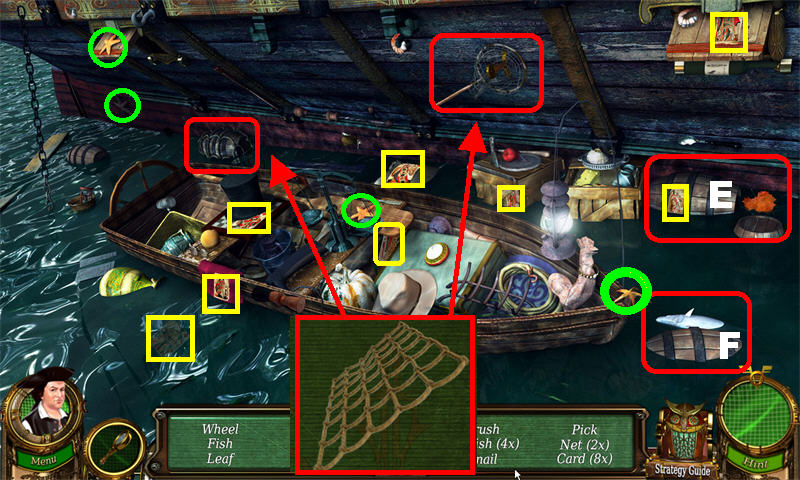
- Click on the boat to trigger a Hidden Object Scene.
- Open the barrel (E) on the right; pick up the LEAF.
- Open the barrel (F) on the right; pick up the FISH.
- The 8 CARDS are marked in yellow.
- The 4 STARFISH are marked in green.
- The NET will be added to inventory.

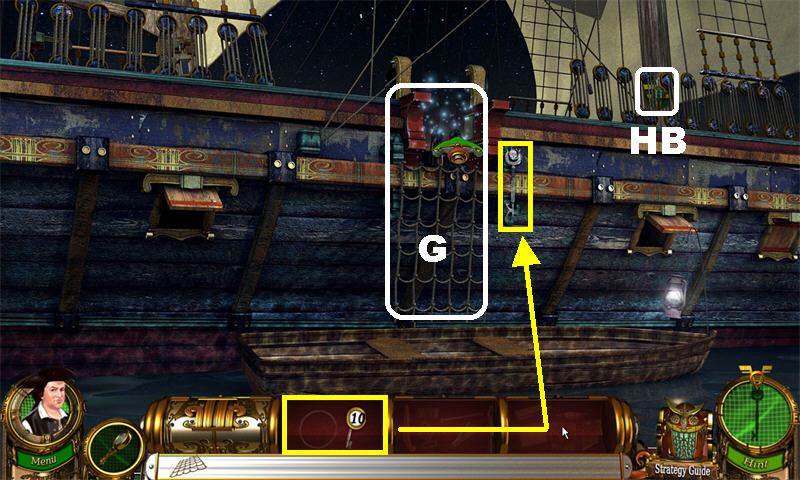
- Pick up HISTORY BADGE 9/10 in the upper right.
- Pick up the PIECE OF KEY marked in yellow.
- Place the NET (G) on the side of the boat.
- Go inside the boat.

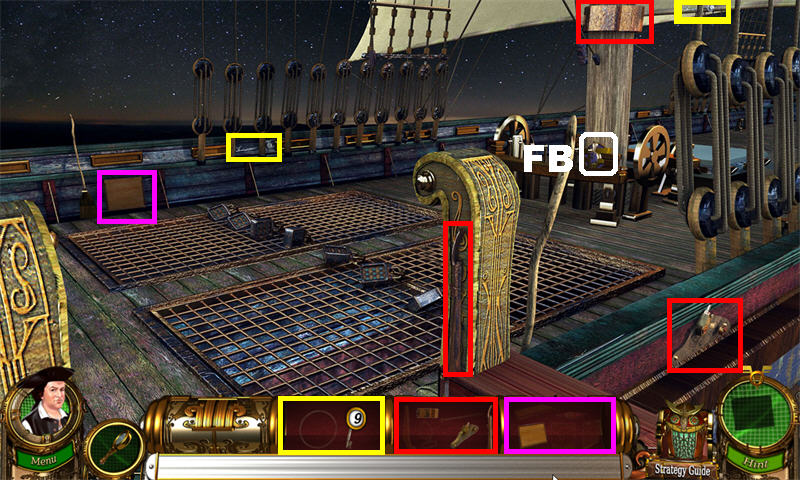
- Pick up FLUX BADGE 10/10 on the right.
- Pick up the highlighted items.
- Go left.

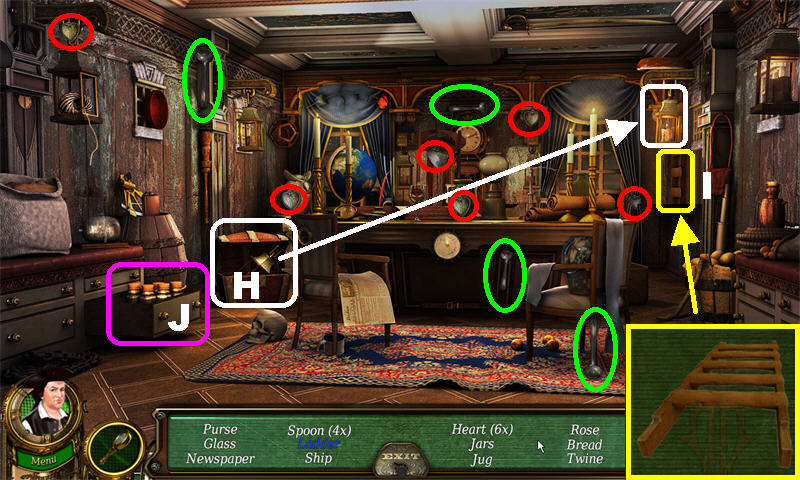
- Open the Hidden Object Scene on the left.
- Open the chest (H) on the left; pick up the LANTERN and place it in the upper right hook to illuminate the area. Pick up the LADDER (I) below the lantern.
- Open the bottom right drawer (J); pick up the JARS inside.
- The 6 HEARTS are marked in red.
- The 4 SPOONS are marked in green.
- The LADDER will be added to inventory.

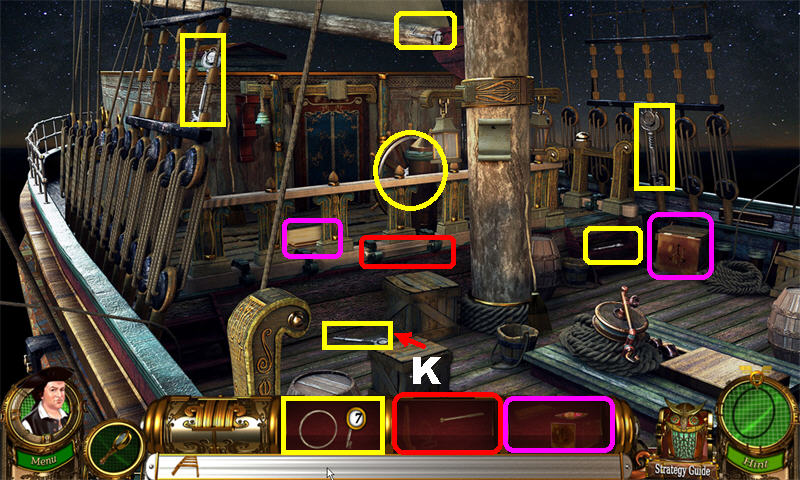
- Click on the crate (K); pick up the PIECE OF KEY.
- Pick up the highlighted items.
- Go right twice.

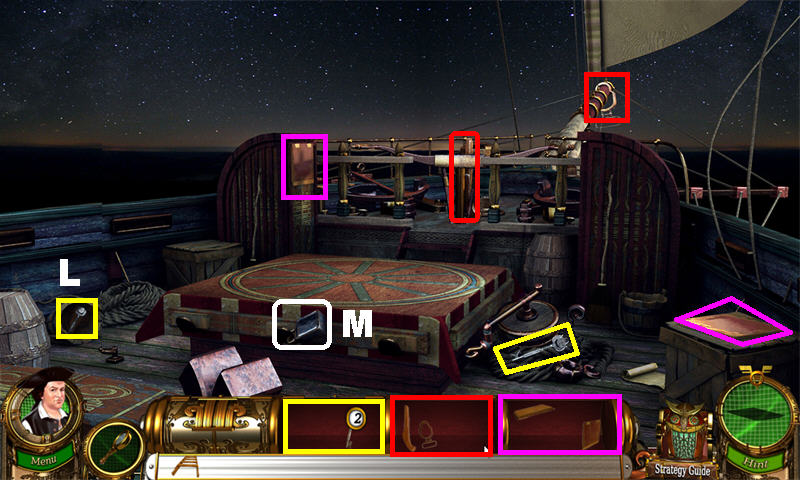
- Tip over the bucket (L) in lower left; pick up the PIECE OF KEY.
- Pick up the highlighted items to assemble the KEYS, PISTOL, and TEABOX.
- Break the lock (M) with the PISTOL to open the hatch.
- Place the LADDER in the hatch.
- Go left.

- Unlock the hold with the KEYS to trigger a Hidden Object Scene.
- The 9 HATCHETS are marked in yellow.
- Move the shield in the center; pick up the CHEST (N) below it.
- Move the box (O) in the upper center; pick up the hatchet.
- The HATCHET will be added to inventory.
- Go right and inside the hatch.

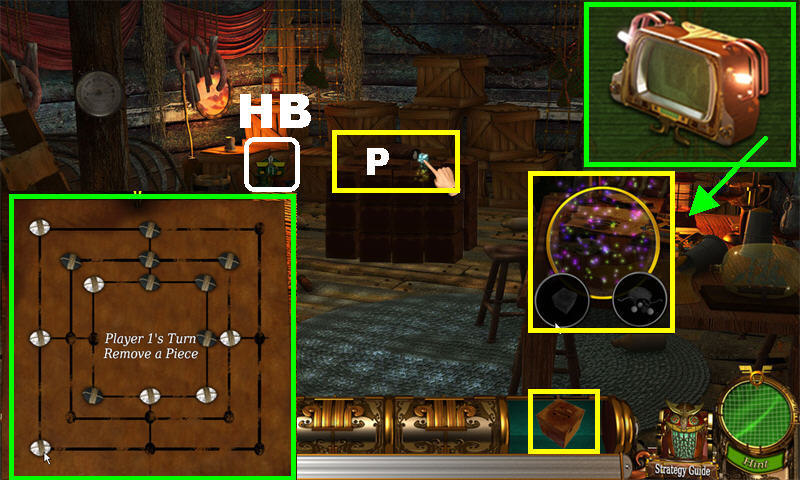
- Pick up HISTORY BADGE 10/10 on the crates on left.
- Break the crates (P) in the upper center with HATCHET; pick up the MARBLES.
- Click on the Morris Recipe Puzzle on the right; place the MARBLES and TEABOX in the circles to trigger a puzzle.
- The solution is random.
- Pick up the CLUE inside the box after the puzzle has been solved.
- You are taken back to the Apollo Room.
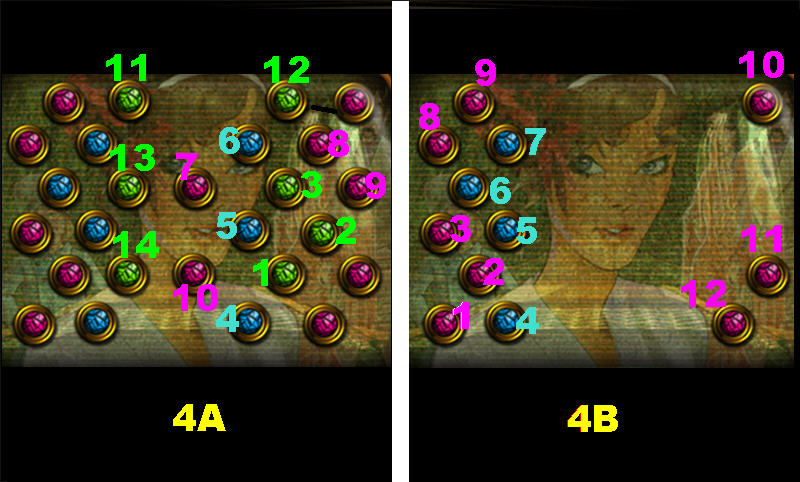
- Eliminate the atoms in the puzzle. You have to beat 4 rounds of this puzzle.
- You may have to click quickly when you have to eliminate groups of 3 or more.
- Click on the atoms in the order shown in the screenshots and the following directions:

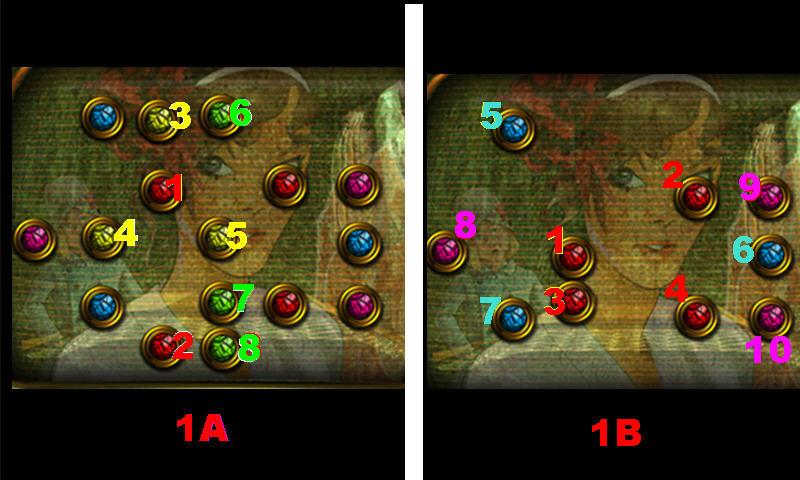
Red (1, 2): let the atoms connect, then deactivate
Yellow (3, 4): let the atoms connect, then deactivate
Start with Yellow #5, then click on 3 and 4 to eliminate them
Green (6, 7, 8)
- Right Side (1B)Red (1, 2, 3, 4)
Blue (5, 6, 7)
Violet (8, 9, 10)

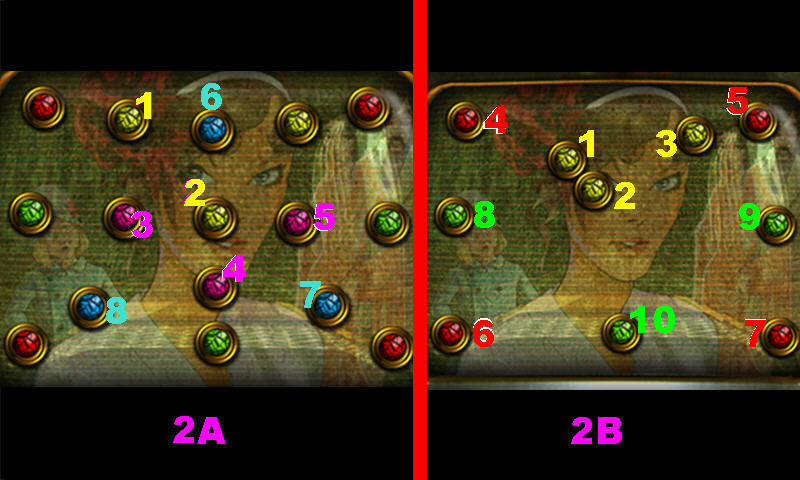
Yellow (1, 2): let the atoms connect, then deactivate
Violet (3, 4, 5)
Blue (6, 7, 8)
- Right Side (2B)Yellow (1, 2, 3)
Red (4, 5, 6, 7)
Green (8, 9, 10)

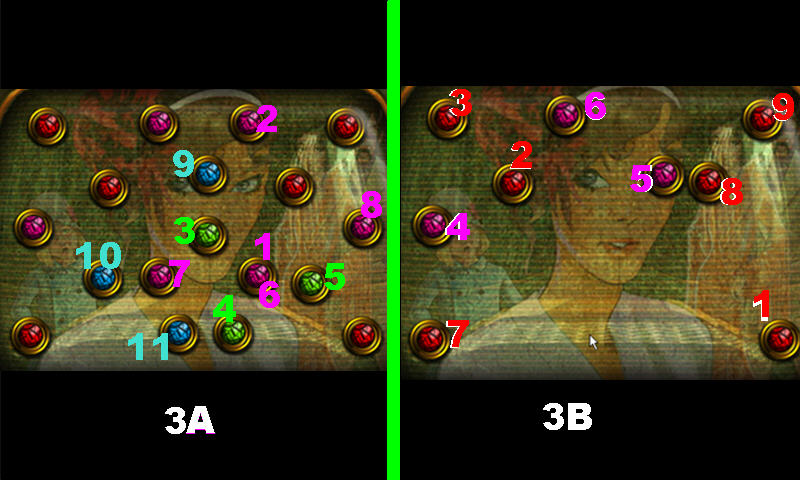
Violet (1, 2): let the atoms connect, then deactivate
Green (3, 4, 5)
Violet (6, 7, 8)
Blue (9, 10, 11)
- Right Side (3B)Red (1, 2, 3)
Violet (4, 5, 6)
Red (7, 8, 9)


Green (1, 2, 3)
Blue (4, 5, 6)
Violet (7, 8, 9, 10)
Green (11, 12, 13, 14)
- Right Side (4B)Violet (1, 2, 3)
Blue (4, 5, 6, 7)
Violet (8, 9, 10, 11, 12)
- Congratulations! You have completed Flux Family Secrets: The Rabbit Hole!
List of Badge Locations
- The following is a complete list of all the Badge locations. They are divided by chapters; the images can be found in the screenshots throughout the guide:
Chapter 1: (FB) In the upper right side of the entrance
Chapter 1: (HB) In the left side of the second room
Chapter 1: (SB) In the upper center of the third room
Chapter 2: (HB) In the upper right side in the first room
Chapter 2: (FB) Above the fireplace, below the painting
Chapter 3: (FB) On the wall above the fireplace
Chapter 3: (SB) Above Lincoln’s large picture
Chapter 4: (FB) In the upper the right side of room with the chest
Chapter 4: (SB) On the left railing in the scaffolding area
Chapter 5: (SB) On the barrel in the first scene
Chapter 5: (FB) On the end of a log in the backyard
Chapter 5: (HB) Indoors, behind the piping
Chapter 6: (SB) In the room with the Masonic wall hanging
Chapter 6: (FB) In the upper right side of the bar
Chapter 7: (SB) In the first scene, on top of the right crate
Chapter 7: (HB) Behind the chair backing in the room with the small cabinet
Chapter 8: (SB) In the upper left side of building
Chapter 8: (HB) In the upper right side of the Quadricycle room
Chapter 8: (FB) On the fence in the backyard
Chapter 9: (FB) In the upper right side of the first scene
Chapter 9: (HB) In the upper right side of the alley (below awning)
Chapter 9: (SB) On the balcony, in the upper right side of catapult scene
Chapter 10: (HB) On the glass door in the fireplace room
Chapter 10: (SB) In the lower right corner of the bedroom (on the chair cushion)
Chapter 11: (SB) In the bottom right desk drawer in the first scene
Chapter 11: (HB) Above the large map
Chapter 11: (FB) Above the curtains in the room with Washington’s picture
Chapter 12: (HB) In the upper right side of the boat (second scene)
Chapter 12: (FB) Behind the wheel area on the deck
Chapter 12: (HB) On the left side of the cargo hold






 Committed: Mystery at Shady Pines Walkthrough, Guide, & Tips
 Haunted Legends: The Undertaker Walkthrough, Guide, & Tips
 Love Chronicles: The Spell Walkthrough, Guide, & Tips
 The Mysterious Past of Gregory Phoenix Walkthrough, Guide, & Tips
 Love Chronicles: A Winter's Spell Walkthrough, Guide, & Tips