Surface: Mystery of Another World Walkthrough, Guide, & Tips
Surface: Mystery of Another World Walkthrough

Welcome to the Surface: Mystery of Another World Walkthrough!
After your son, Bobby, mysteriously disappears, it’s up to you to find him in Surface: The Mystery of Another World!
Whether you use this document as a reference when things get difficult or as a road map to get you from beginning to end, we’re pretty sure you’ll find what you’re looking for here.
This document contains a complete Surface: Mystery of Another World game walkthrough featuring annotated screenshots from actual gameplay!
We hope you find this information useful as you play your way through the game. Use the walkthrough menu below to quickly jump to whatever stage of the game you need help with.
Remember to visit the Big Fish Games Forums if you find you need more help. Have fun!
This walkthrough was created by prpldva, and is protected under US Copyright laws. Any unauthorized use, including re-publication in whole or in part, without permission, is strictly prohibited.
General Tips

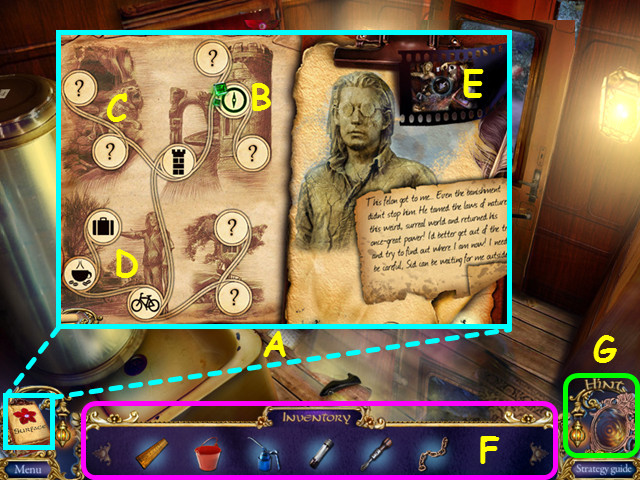
- Hidden Object Scenes and mini-games are often randomized – your solution may vary.
- Hidden Object Scenes will be referred to as HOS in this walkthrough.
- Items listed in white are hidden or require additional steps or inventory items.
- The journal will collect your notes and has an interactive map (A).
- The emeralds show your current location (B).
- Question marks indicate unexplored areas (C).
- Select a previously visited area to travel there (D).
- You can also replay certain videos (E).
- Your inventory is in the bottom panel – press on an item to select it for use (F).
- The inventory panel auto-hides, move your mouse down to reveal the panel.
- Hints are unlimited, but you must wait for the hint meter to refill (G).
Chapter 1: The Kidnapping

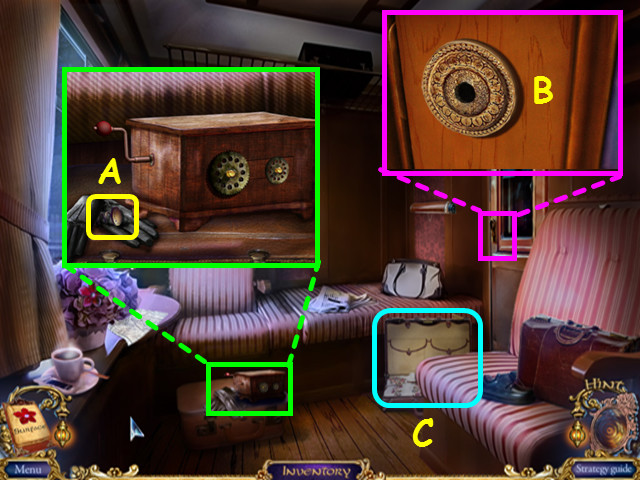
- Look at the jack-in-the-box and take the SUITCASE BUTTON (A).
- Note the missing door handle (B).
- Select the suitcase for a HOS (C).

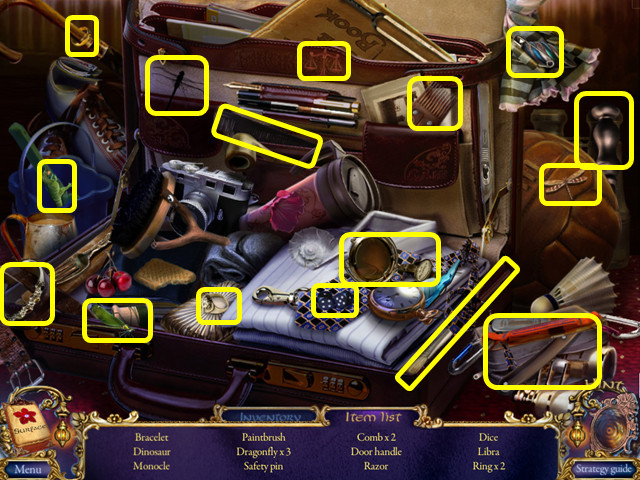
- Locate all the items on the list.
- You will earn the DOOR HANDLE.
- Look at the door and use the DOOR HANDLE on the door.
- Walk right to the train vestibule.

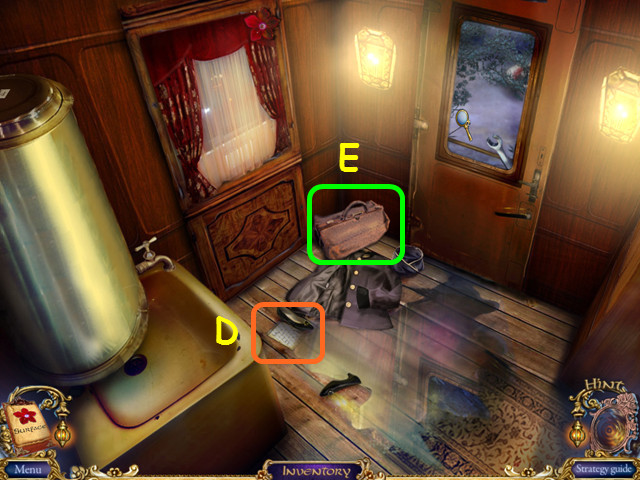
- Read the page (D).
- Look at the conductor’s bag for a mini-game (E).

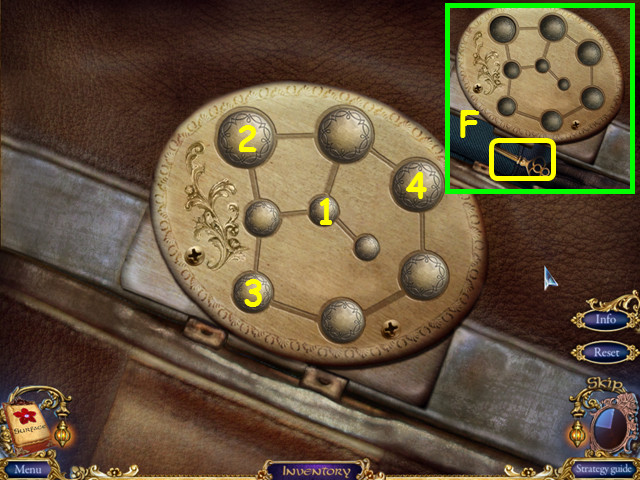
- Place the SUITCASE BUTTON in the hole to trigger the mini-game.
- Push all the buttons down to open the case; pressing a button will affect neighboring buttons attached with lines.
- Press the buttons in numerical order (1-4).
- Take the KEY (F).
- Walk down to return to the train compartment.

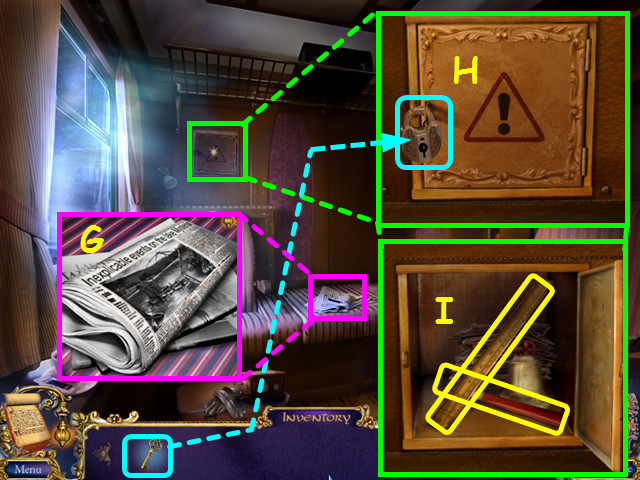
- Look at the newspapers and read the top one (G).
- Look at the compartment and use the key on the lock (H).
- Take the RULER and the HAMMER (I).
- Walk right to the train vestibule.

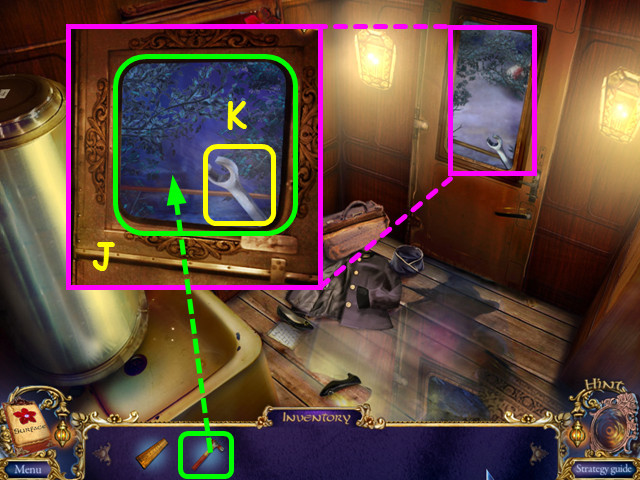
- Look at the door window and use the HAMMER to break the glass (J).
- Take the WRENCH (K).
- Walk forward to outside the train.

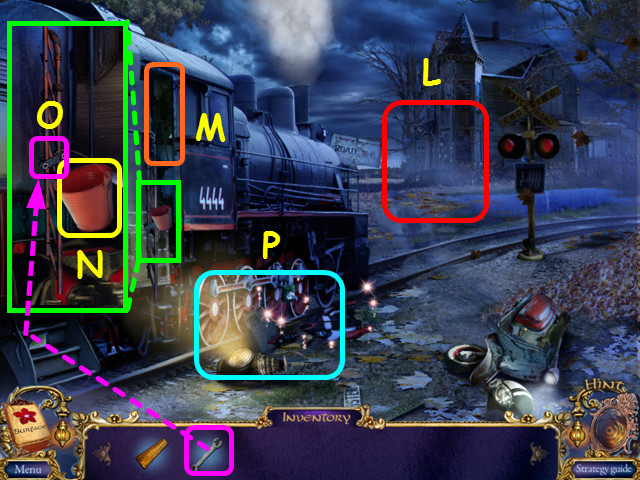
- Note the path to the front of the old house (L).
- Note the entrance to the train engine room (M).
- Look at the ladder and take the bucket (N).
- Use the WRENCH on the bar to open the ladder (O).
- Select the area by the wheels for a HOS (P).

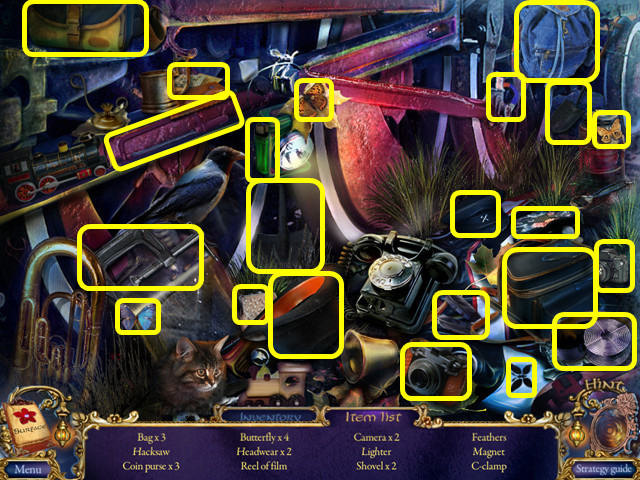
- Locate all the items on the list.
- You will earn the MAGNET.
- Enter the train engine room.

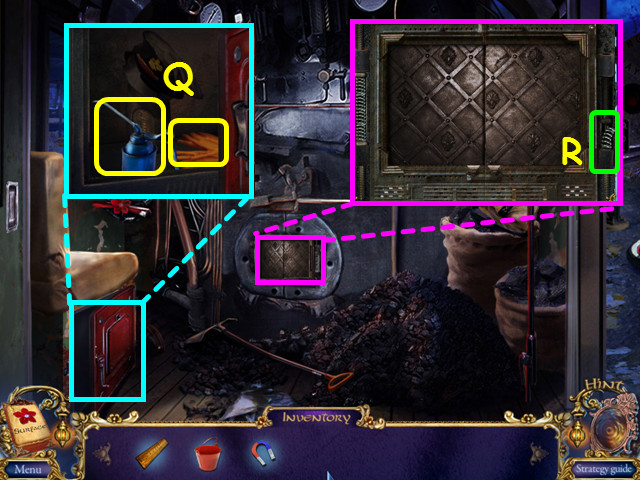
- Look in the compartment; take the OIL CAN and RUBBER GLOVES (Q).
- Look at the furnace and remove the broken spring (R).
- Walk down, then go forward to the front of the old house.

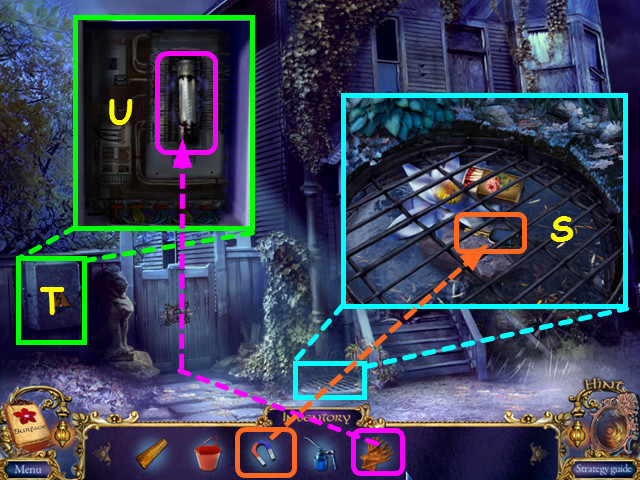
- Look at the drain and use the MAGNET to get the KEYS to the SCOOTER (S).
- Look at and open the power box (T).
- Use the RUBBER GLOVES to take the FUSE (U).
- Walk down to the outside of the train.

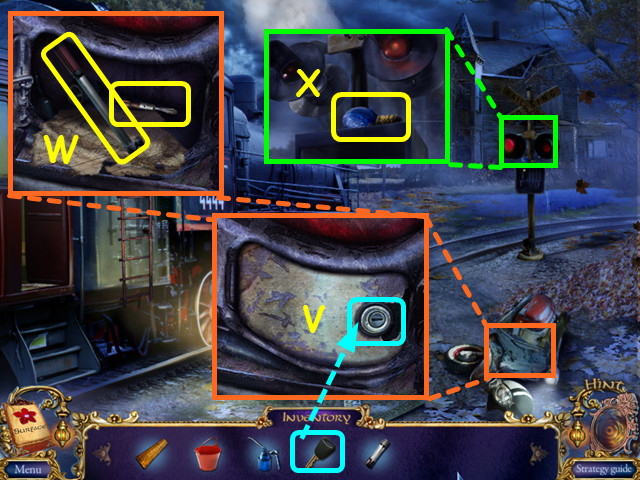
- Look at the scooter and use the KEYS to the SCOOTER on the lock (V).
- Take the SCREWDRIVER and the PUMP (W).
- Look at the railroad signal and take the UV LIGHT (X).
- Return to the front of the old house.

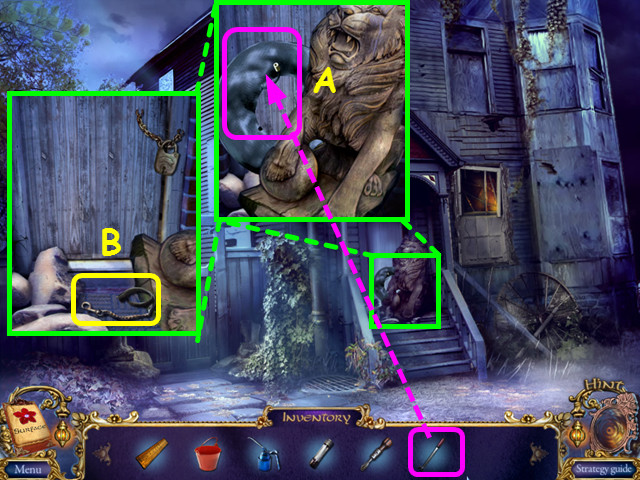
- Look at the porch and use the PUMP on the inner tube (A).
- Take the CHAIN (B).
- Return to the train vestibule.

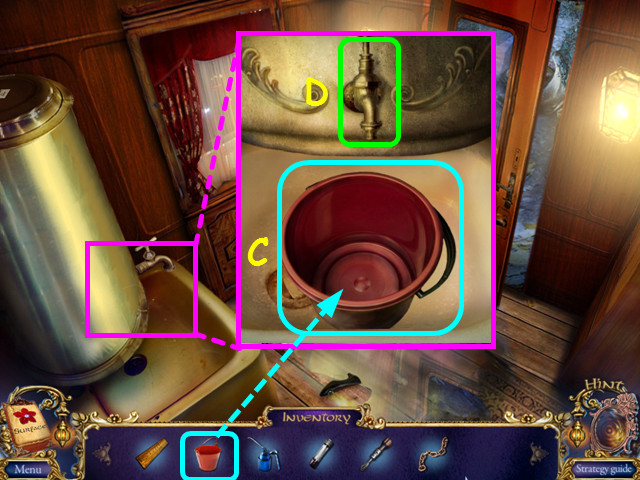
- Look in the sink and place the BUCKET inside (C).
- Turn on the tap to fill the bucket (D).
- Take the BUCKET of WATER.
- Walk down to the train compartment.

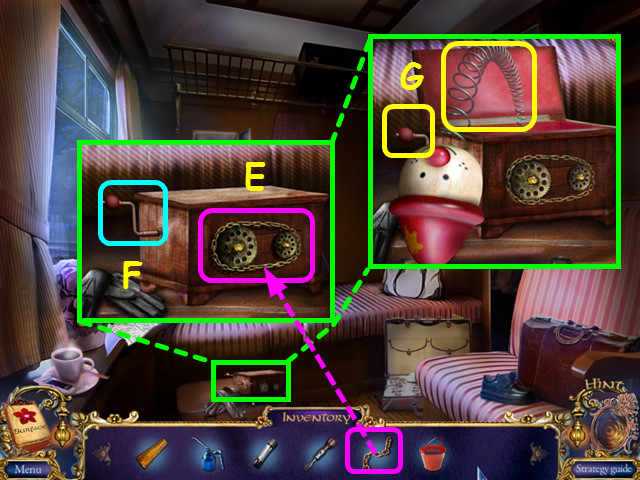
- Look at the jack-in-the-box and place the CHAIN on the gears (E).
- Turn the handle (F).
- Take the SPRING and the HANDLE (G).
- Return to the train engine room.

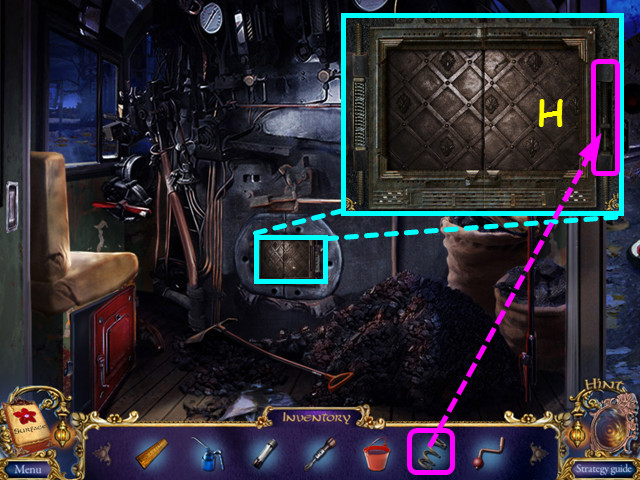
- Look at the furnace and place the SPRING on the right (H).
- This will trigger a mini-game.

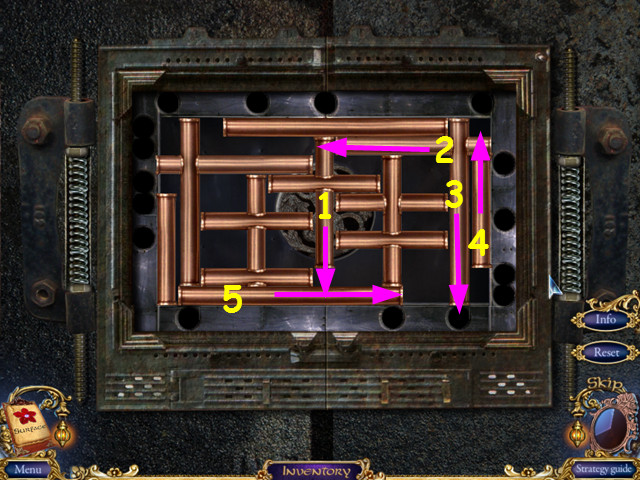
- Slide all the bars into the holes along the edges.
- Select a bar, then choose a direction arrow to move each bar.
- The first 5 moves are shown here (1-5).

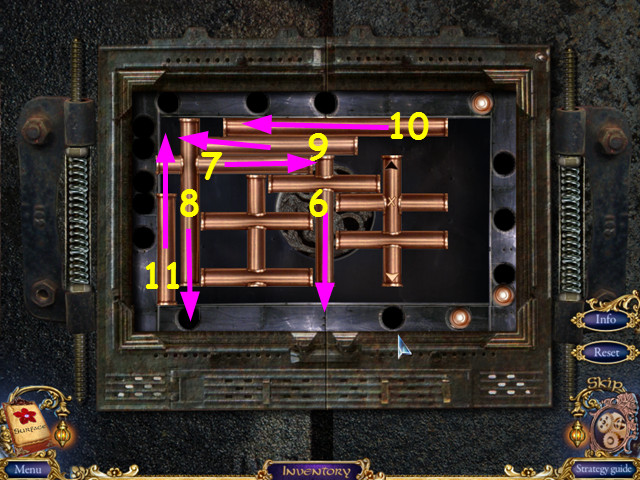
- Continue moving the bars into the holes.
- Moves 6-11 are shown here.

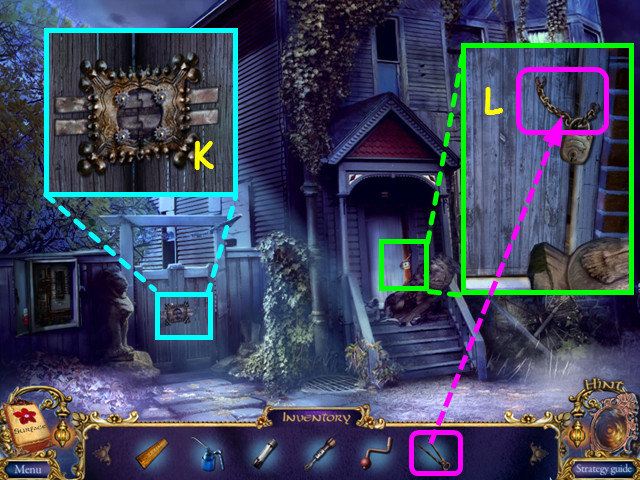
- Continue moving the bars into the holes.
- Moves 12-15 are shown here.

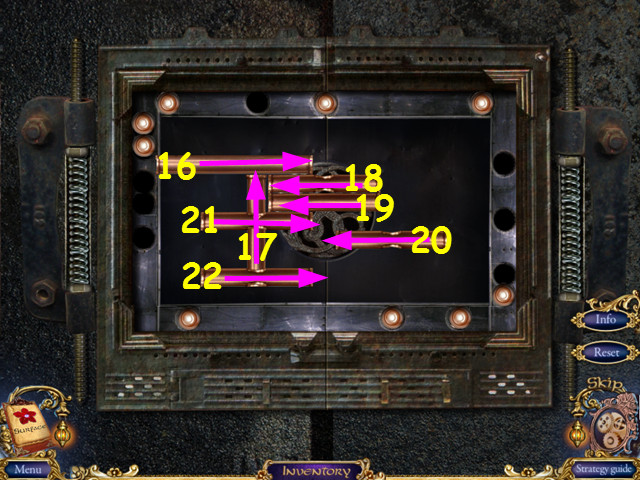
- Continue moving the bars into the holes.
- Moves 16-22 are shown here.

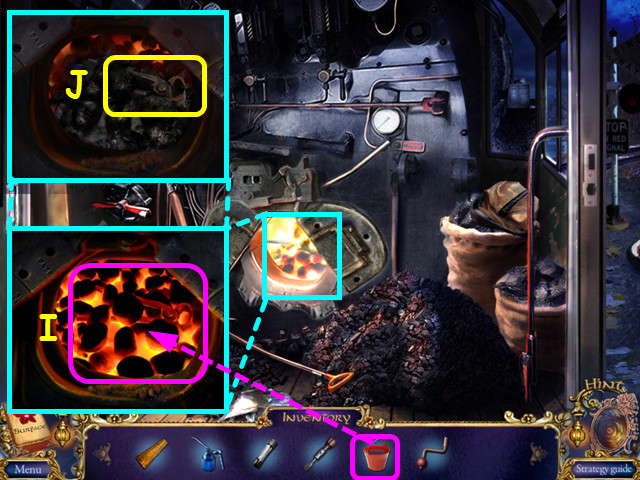
- Look in the furnace and use the BUCKET of WATER on the coals (I).
- Take the NIPPERS (J).
- Return to the front of the old house.


- Note the lock on the gate (K).
- Look at the front door and use the NIPPERS to cut the chain (L).
- Enter the house.

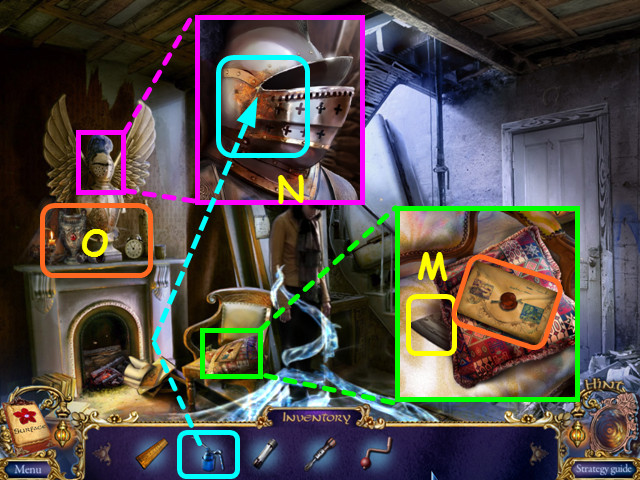
- Look at the chair, take the letter, move the pillow, then take the 1/3 MYSTERIOUS ELEMENT (M).
- Look at the helmet and use the OIL CAN on the rust then open the helmet visor (N).
- Select the mantle for a HOS (O).

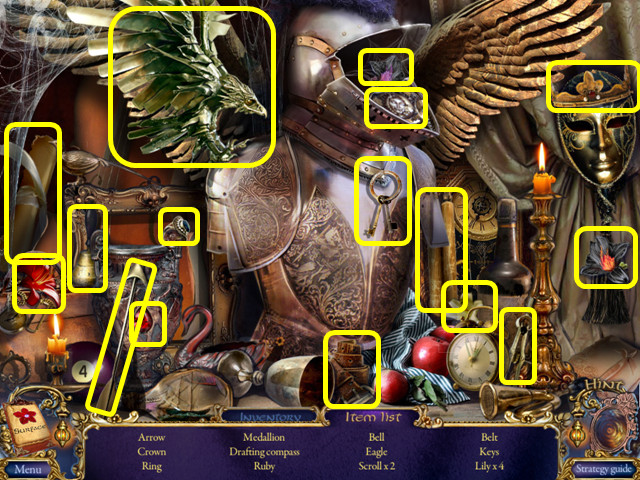
- Locate all the items on the list.
- You will earn the MEDALLION.
- Exit the house, look at the gate and use the MEDALLION on the lock.
- Walk through the gate to the backyard.

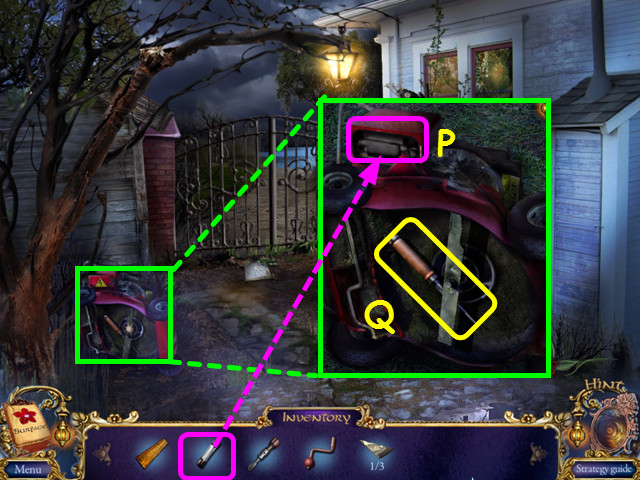
- Look at the lawnmower, open the power cover and place the FUSE inside (P).
- Take the ICE PICK once it falls (Q).
- Return inside the house.

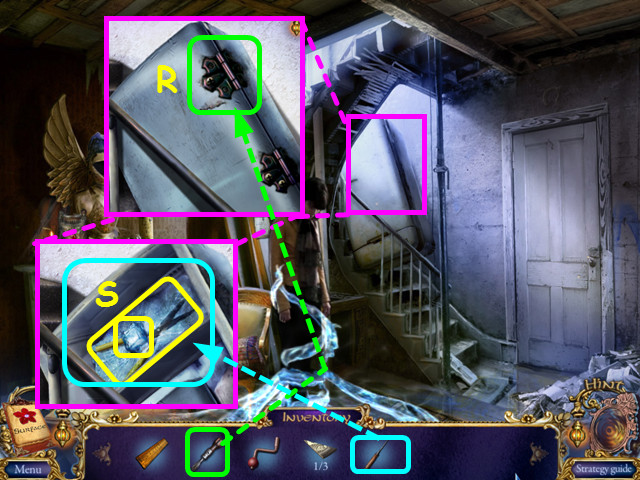
- Look at the refrigerator and use the SCREWDRIVER on the hinges (R).
- Use the ICE PICK on the freezer then take the ICE and the GARDEN SHEARS (S).
- Return to the backyard.

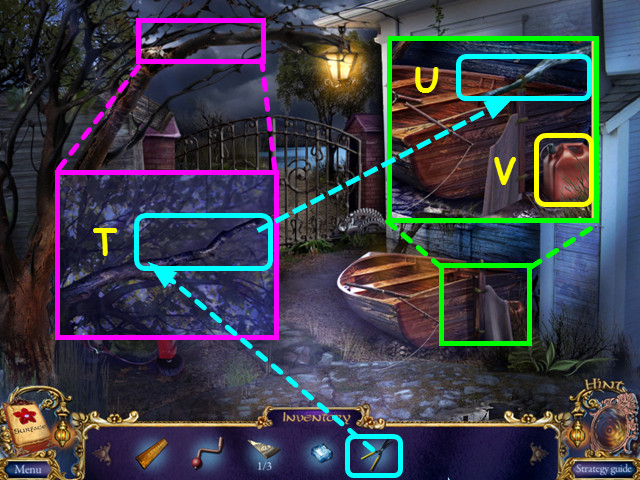
- Look at the tree; use the GARDEN SHEARS to cut the branch then take the STICK (T).
- Look at the boat and use the STICK on the rudder (U).
- Take the GASOLINE (V).
- Return to the main room of the house.

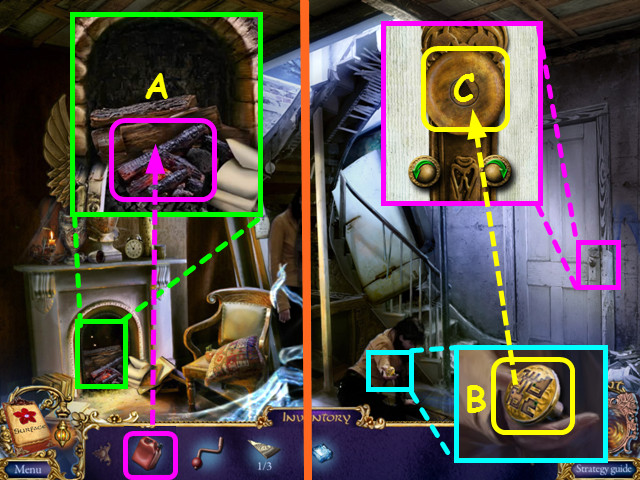
- Look at the fireplace and use the GASOLINE on the embers (A).
- Take the KNOB from Kira (B).
- Look at the door and place the KNOB into the hole for a mini-game (C).

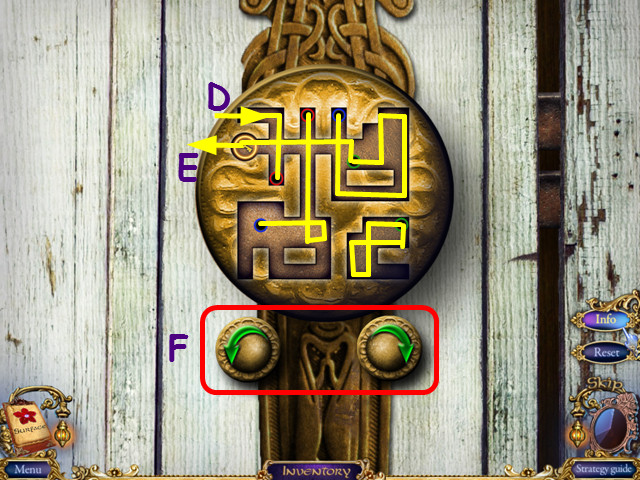
- Move the yellow ball (D) through the labyrinth to the key (E).
- Use the 2 buttons (F) to rotate the knob left or right.
- Should the ball fall into a colored hole, it will exit from the 2nd hole of the same color.
- Select the right or left button in this sequence: R-L-Rx8-L-R-Lx3-Rx2.
- Enter the bathroom.

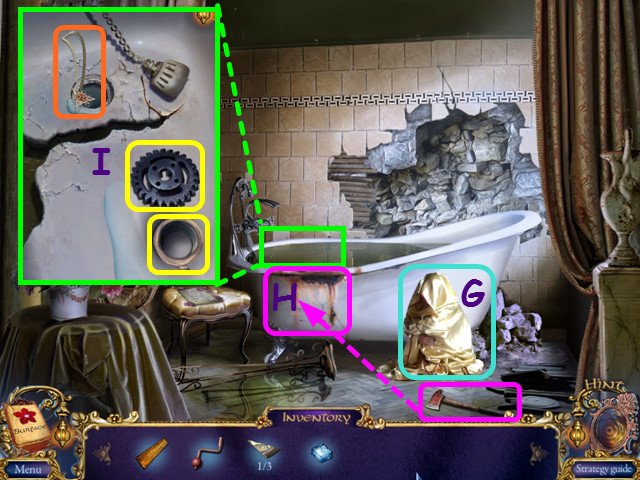
- Talk to the boy (G).
- After Kira and the boy are taken, take the AXE (H) and use it on the rusty side of the bathtub.
- Look inside the bathtub; take the COG WHEEL and TAPE then try to take the necklace (I).
- Return to the backyard.

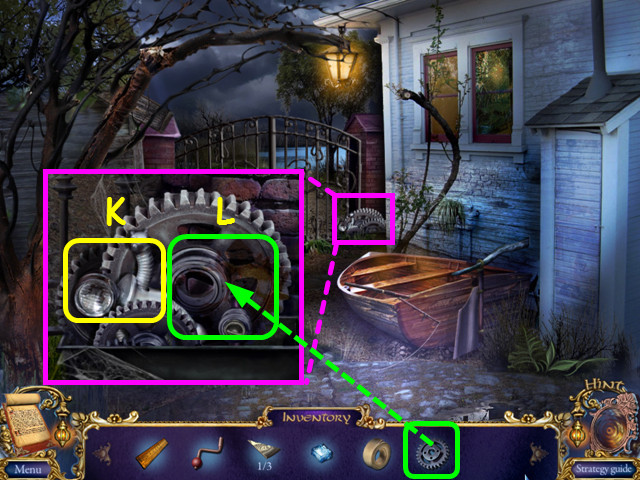
- Look at the gate control and take BOBBY’S TOY (K).
- Place the COG WHEEL into the gate control (L).
- Walk forward to the lakeshore.

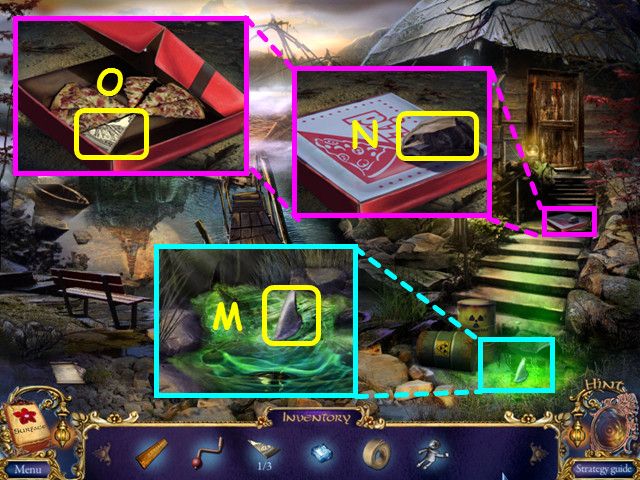
- Look at the chemical spill and take the IRON FIN (M).
- Look at the pizza box and take the STONE (N).
- Look inside the pizza box and take the 2/3 MYSTERIOUS ELEMENT (O).

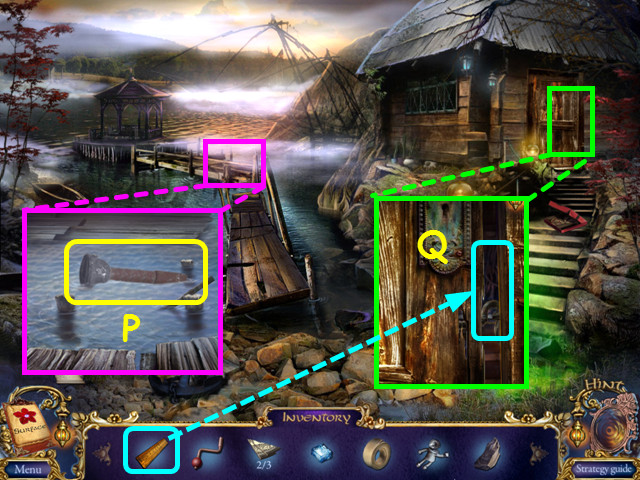
- Look at the old bridge and take the PLUNGER (P).
- Look at the fishing hut door and use the RULER to open the latch (Q).
- Enter the fishing hut.

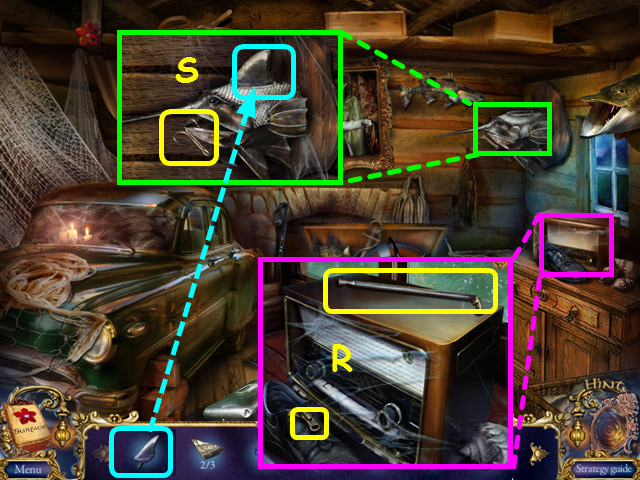
- Look at the radio; take the ZIPPER PULL and the ANTENNA (R).
- Look at the fish head, place the IRON FIN atop, then take the HOOK (S).

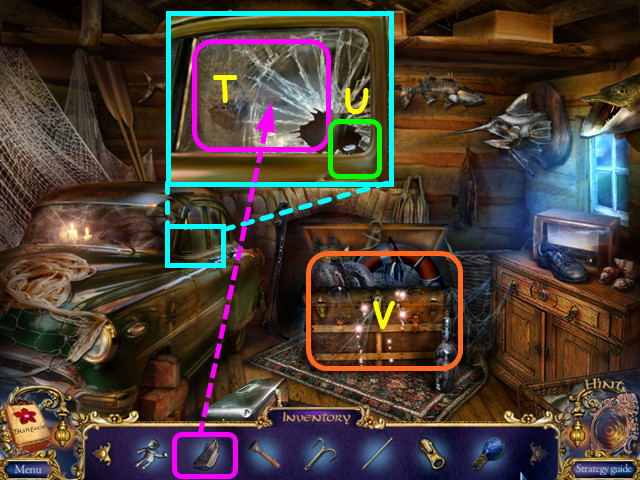
- Look at the car door and use the STONE to break the glass (T).
- Pull up the button to unlock the door (U).
- Select the chest for a HOS (V).

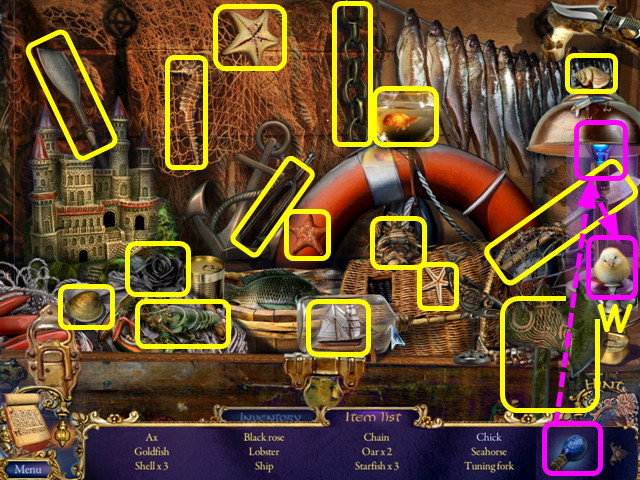
- Locate all the items on the list.
- Place the UV LIGHT in the lamp to hatch the chicken (W).
- You will earn the TUNING FORK.
- Enter the old car.

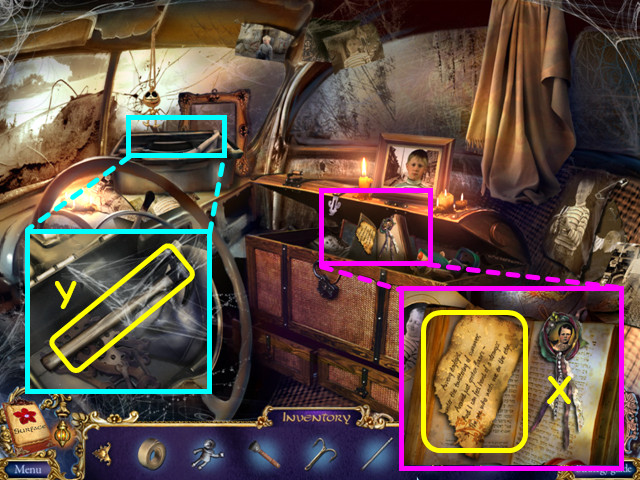
- Look in the toy chest and take the PAPER WITH A VERSE (X).
- Look in the bin and take the HAMMER (Y).
- Return to the train engine room.

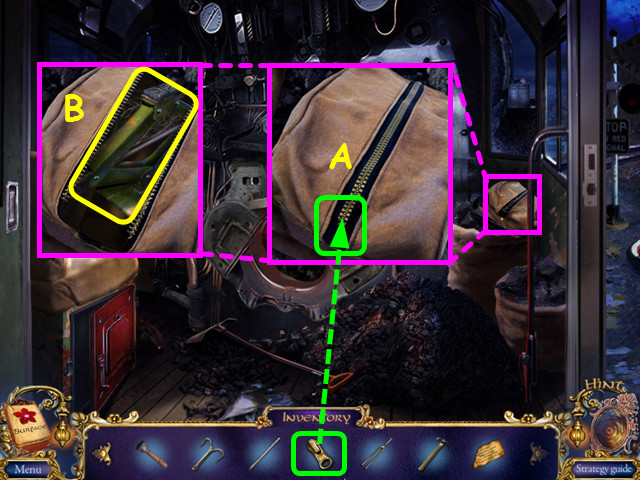
- Look at the bag and place the ZIPPER PULL on the zipper (A).
- Take the JACK (B).
- Exit the train engine room.

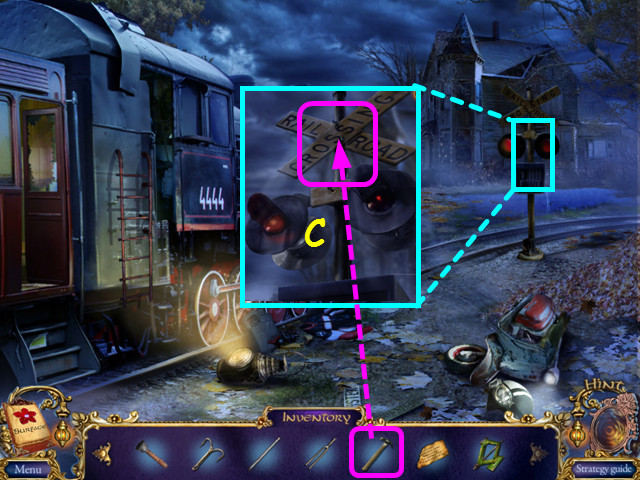
- Look at the railroad crossing signal and use the HAMMER to get the NAIL (C).
- Return to the bathroom.

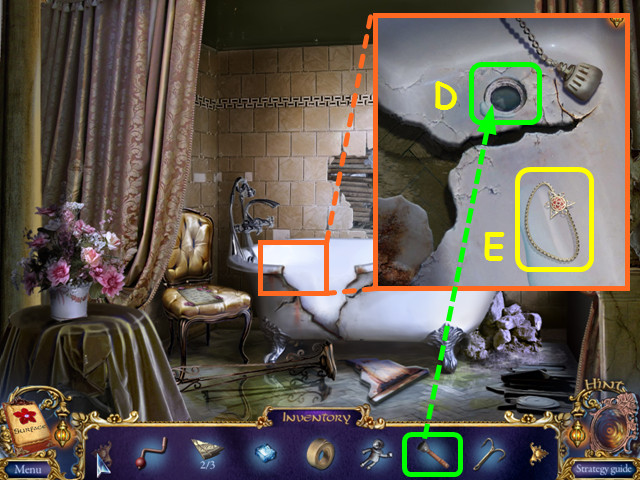
- Look in the bathtub and use the PLUNGER on the drain (D).
- Take the MEDALLION (E).
- Exit the house and walk to the backyard.

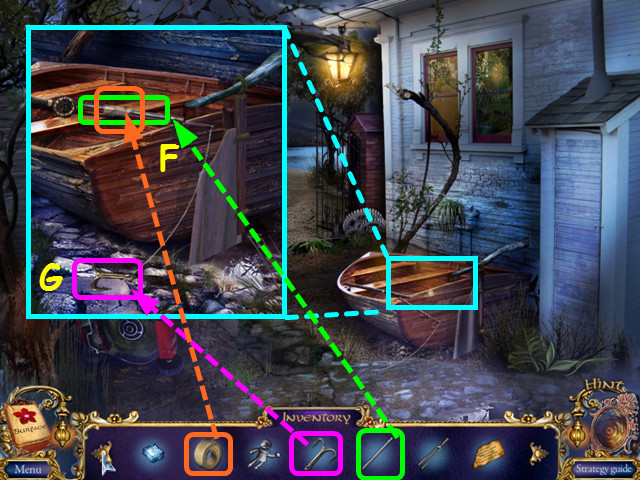
- Look at the boat and place the ANTENNA along the rod, then add the TAPE (F).
- Place the HOOK on the line the take the ROD (G).
- Walk forward.

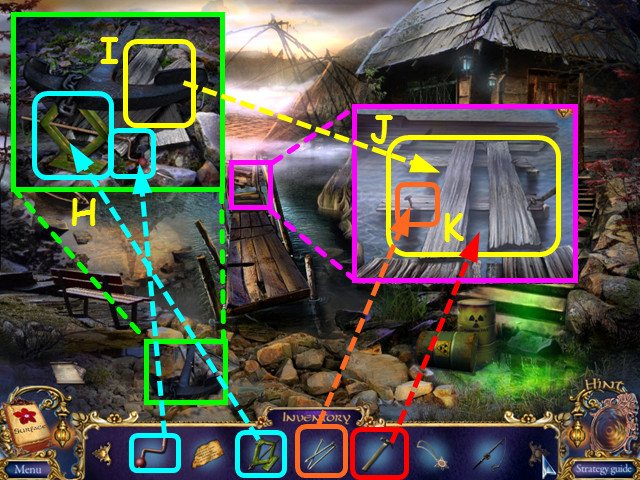
- Look at the anchor; place the JACK underneath then add the HANDLE (H).
- Take the PART of BRIDGE (I).
- Look at the old bridge and place the PART of BRIDGE on the posts (J).
- Use the NAIL on the boards then use the HAMMER on the nails (K).
- Walk forward to the mysterious platform.

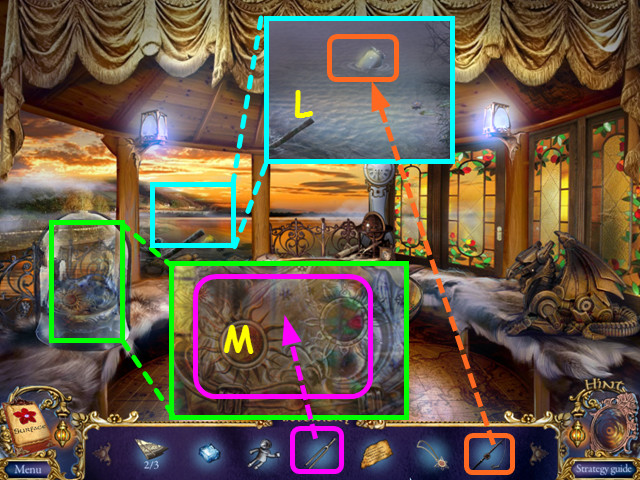
- Look at the shore and use the ROD to retrieve the JAR (L).
- Look at the glass dome and use the TUNING FORK to break the glass (M).
- Walk down once.

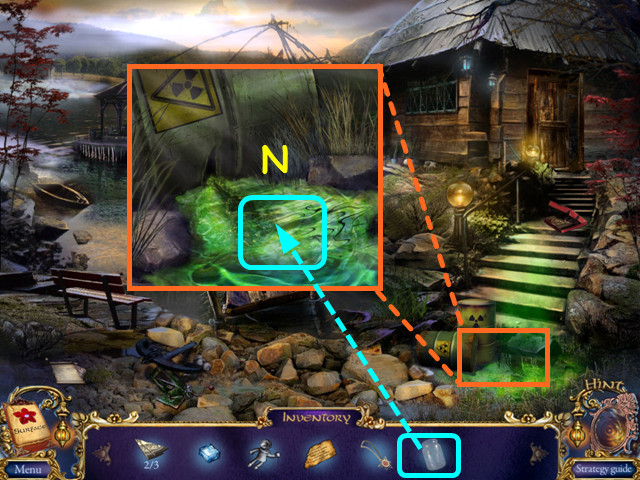
- Look at the barrel and use the JAR on the spill to get the JAR WITH ACID (N).
- Walk down twice to the front of the old house.

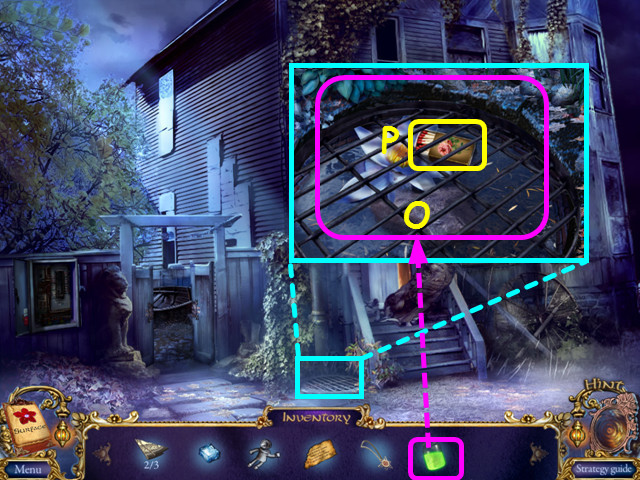
- Look at the drain and use the JAR WITH ACID on the grill (O).
- Take the MATCHES (P).
- Return to the mysterious platform.

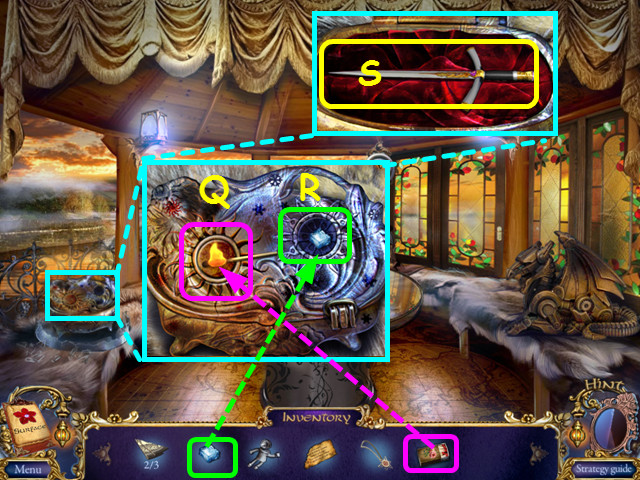
- Look at the chest and use the MATCHES on the sun symbol (Q).
- Place the ICE on the snowflake symbol (R).
- Open the chest and take the ELEGANT KNIFE (S).
- Return to the fishing hut.

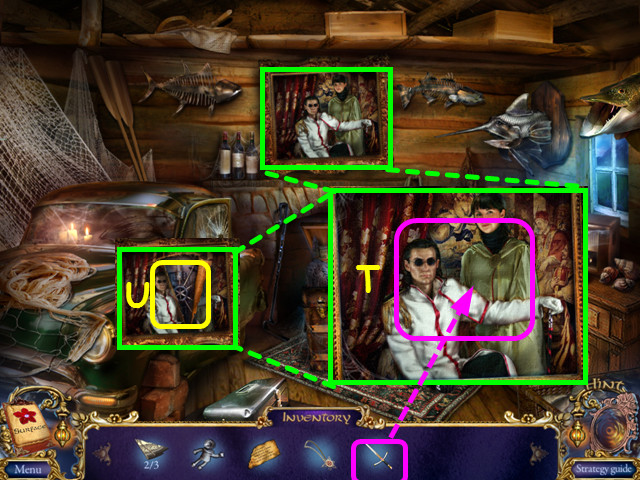
- Look at the painting; use the ELEGANT KNIFE to cut it open (T).
- Look at the dial under the painting for a mini-game (U).

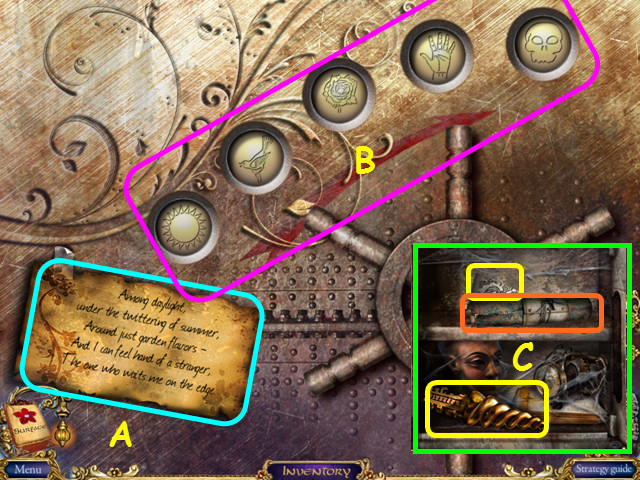
- Place the PAPER WITH A VERSE on the torn paper (A).
- Read the verse to determine the order of the symbols.
- Select each symbol to change it to the correct one.
- The solution is shown here (B).
- Look inside the safe: read the scroll, take the 3/3 MYSTERIOUS ELEMENT, and the HORN (C).
- Return to the mysterious platform.

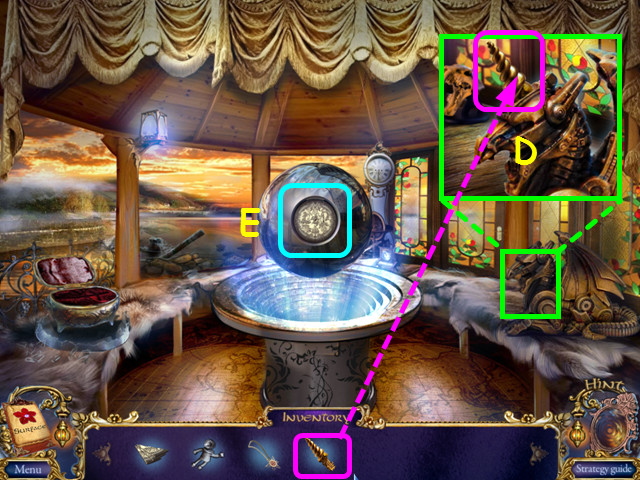
- Look at the dragon and place the HORN on his head (D).
- Select the dragon head to activate the sphere.
- Select the sphere for a mini-game (E).

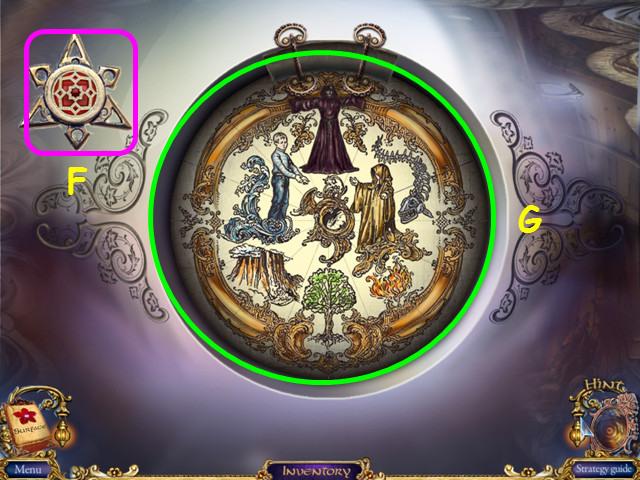
- Place the MEDALLION in the upper left slot (F).
- Place the 3 MYSTERIOUS ELEMENTS into the center to activate the mini-game.
- Restore the picture by swapping the pieces (G).
- Select 2 pieces to swap positions.
Chapter 2: Captured

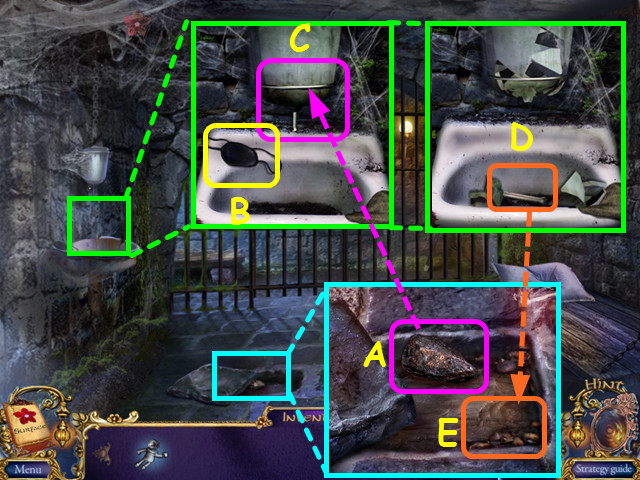
- Look at the floor and take the STONE (A).
- Look at the sink and take the EYE-PATCH (B).
- Use the STONE to break the soap dispenser (C).
- Take the IRON ROD (D), then sharpen it on the floor to make the SHANK (E).

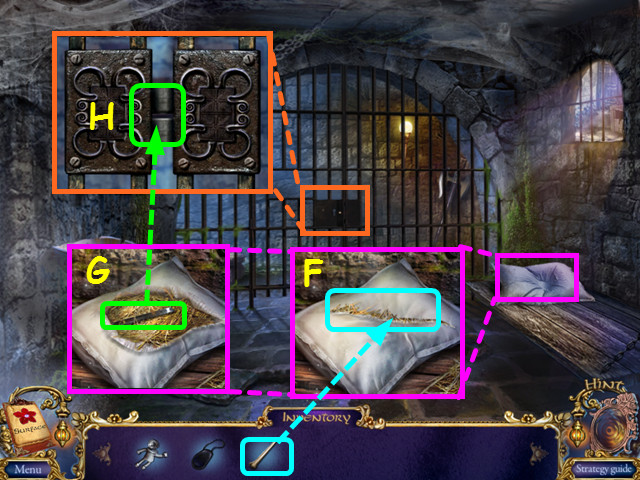
- Look at the pillow then use the SHANK to cut it open (F).
- Pull open the pillow and take the SAW (G).
- Look at the cell door and use the SAW to cut open the lock (H).
- Walk forward.

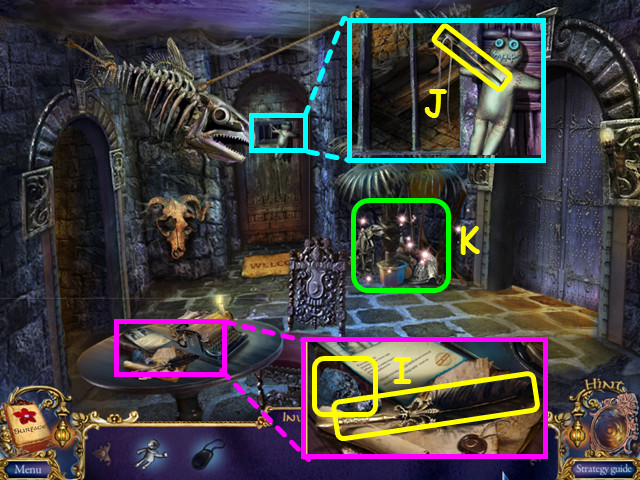
- Look at the table; take the FLINT and the PEN (I).
- Look at the cell window and take the NEEDLE (J).
- Select the palm tree for a HOS (K).

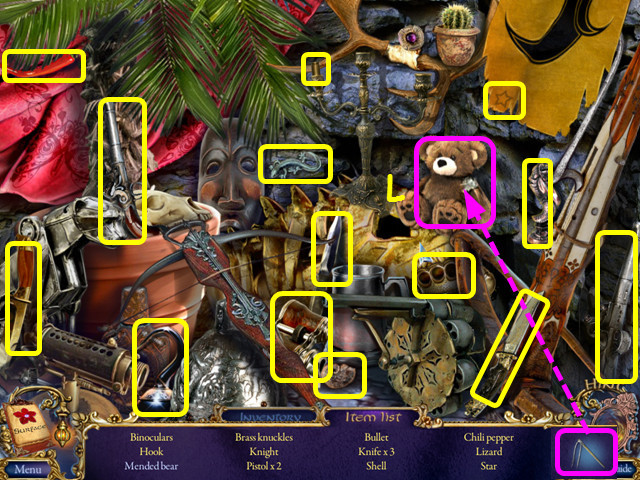
- Locate all the items on the list.
- Use the NEEDLE on the bear to make the mended bear (L).
- You will earn the HOOK.
- Walk left to the archive storage.

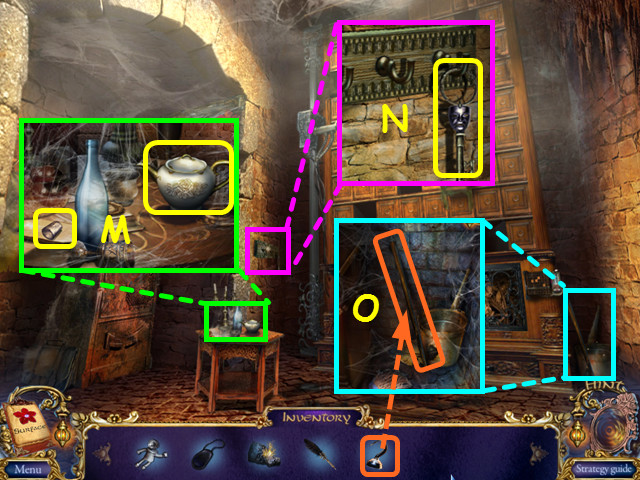
- Look at the table; take the 1/4 CORKS and the TEAPOT (M).
- Look at the key rack and take the MASK KEY (N).
- Look in the corner; use the HOOK on the stick to make the GAFF (O).
- Walk down twice to return to the dungeon.

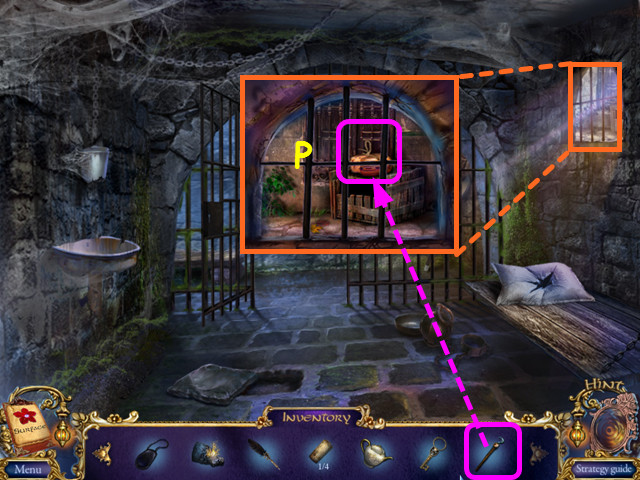
- Look out the window and use the GAFF to take the CHEESE (P).
- Walk forward to the guardroom.

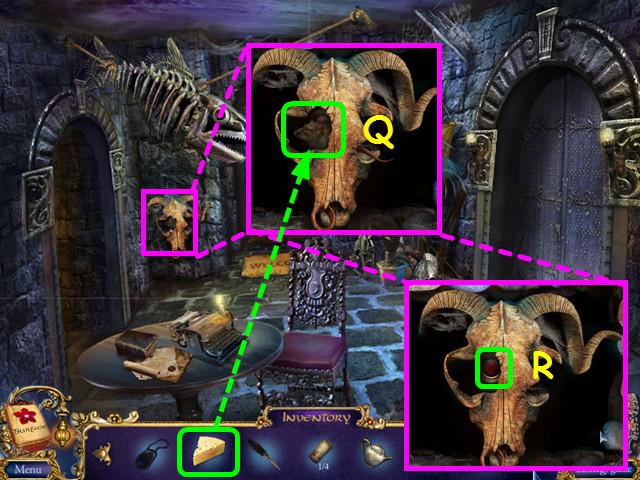
- Look at the skull on the wall and give the CHEESE to the rat (Q).
- Press the button to activate a mini-game (R).

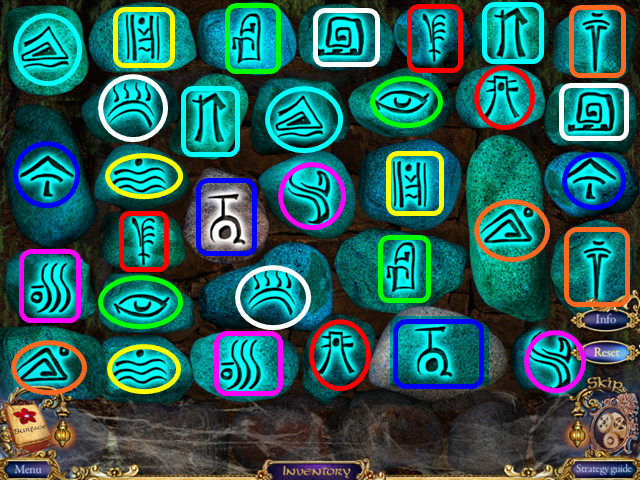
- Find the matching pair of symbols by selecting the stones.
- Press 2 stones with matching symbols to keep them turned up.
- Should the symbols not match, the stones will turn back over.
- Walk forward to the secret passage.

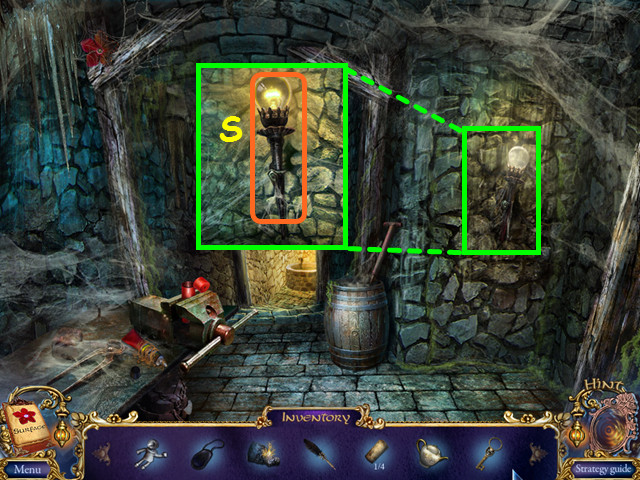
- Look at the torch; pull it off the wall to reveal an opening (S).
- Walk forward into the opening.

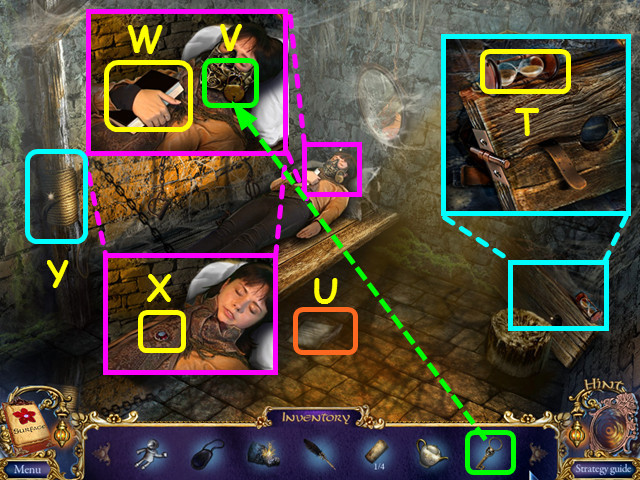
- Look at the stock and take the HOURGLASS (T).
- Read the page on the floor (U).
- Look at Kira and use the MASK KEY on the MASK; you will earn the LOCK (V).
- After Kira talks to you, take the BLACK BOOK (W).
- Under the book, find the RUBY (X).
- Look at the rope on the beam for a mini-game (Y).

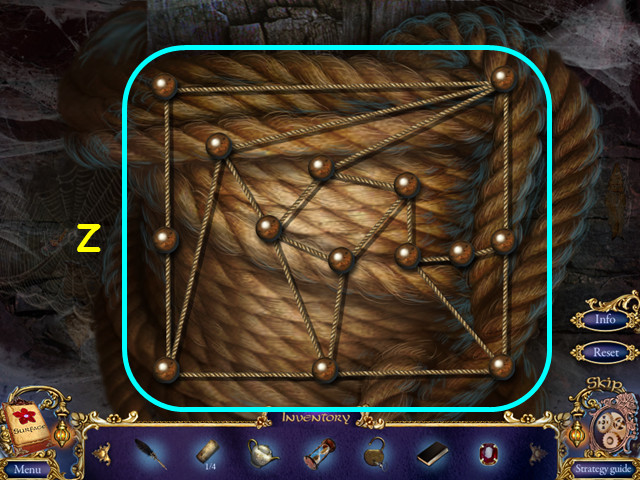
- Untangle the ropes so that none cross each other.
- Press, hold and drag the beads to move the ropes.
- Our solution is shown here (Z).
- You will earn the ROPE.
- Exit Kira’s Cell.

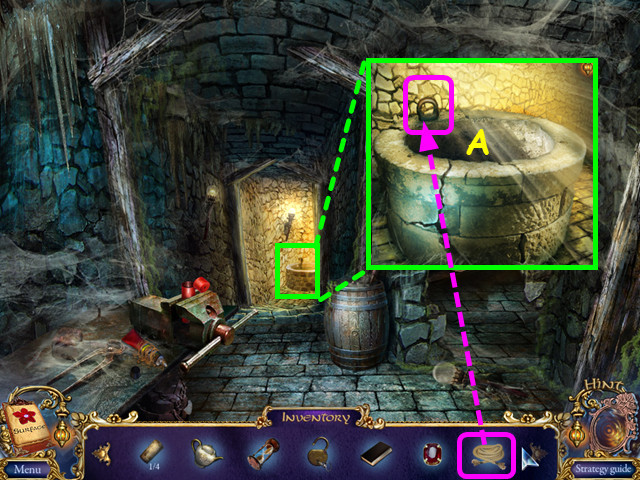
- Look at the well and use the ROPE on the ring (A).
- Climb down into the well into the sewer system under the dungeon.

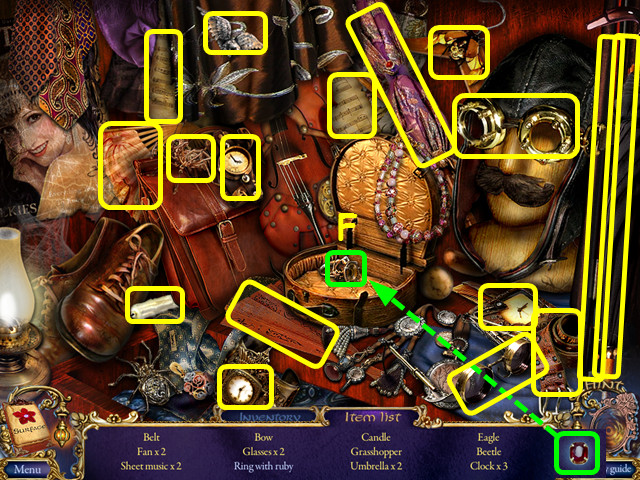
- Look at the skeleton and take the HANDKERCHIEF (B).
- Look at the rock and take the WICK (C).
- Take the LADDER (D).
- Look at the wardrobe for a HOS (E).


- Locate all the items on the list.
- Use the RUBY on the ring to make the ring with ruby (F).
- You will earn the CANDLE.
- Walk down twice to the guardroom.

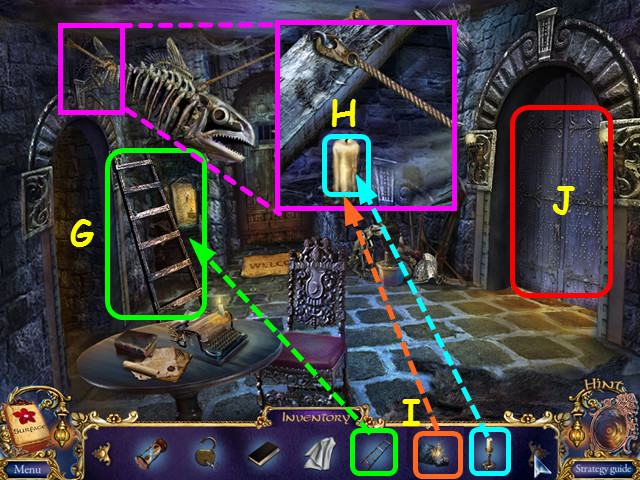
- Use the LADDER on the fish skeleton (G).
- Look at the fish skeleton and place the CANDLE under the rope (H).
- Use the FLINT on the candle (I).
- Walk right to the square (J).

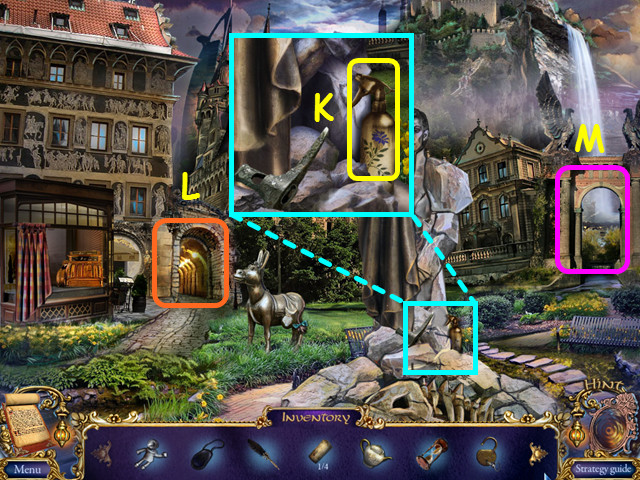
- Look at the base of the statue and take the WEED KILLER (K).
- Note the path to the street near the library (L).
- Take the right path to the canal (M).

- Look at the shrubbery and use the WEED KILLER on the vines (N).
- Take the SCISSORS HALF (O).
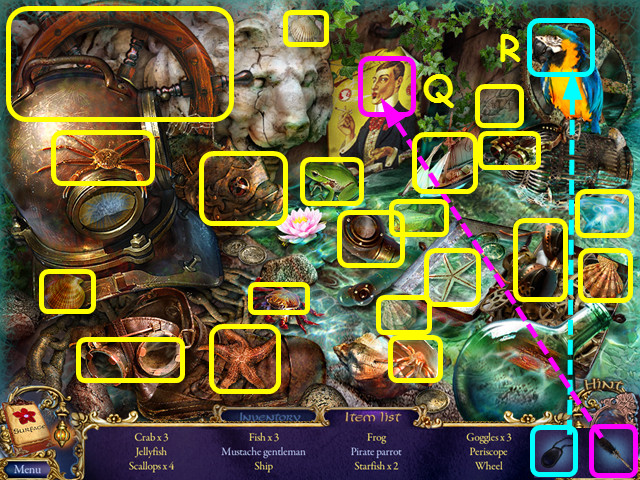
- Select the area by the water for a HOS (P).


- Locate all the items on the list.
- Use the PEN on the man to draw the mustache (Q).
- Use the EYE-PATCH on the parrot to make the pirate parrot (R).
- You will earn the WHEEL.
- Walk forward to the city wall.

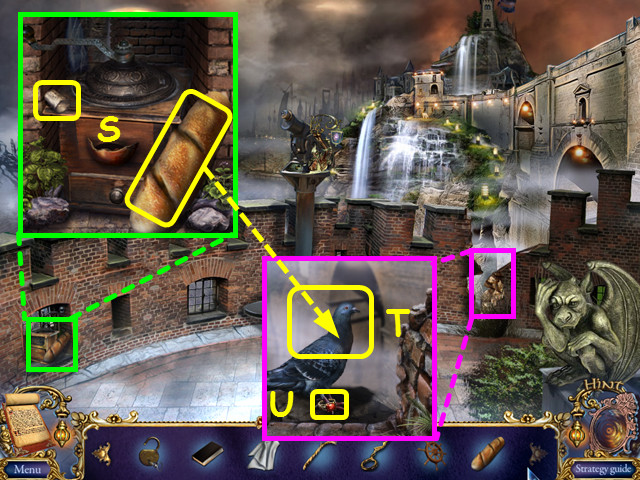
- Look at the grinder; take the 2/4 CORK and the BREAD (S).
- Look at the hole in the wall and use the BREAD on the pigeon (T).
- Take the RING (U).
- Walk down 3 times, then go left to the archive storage.

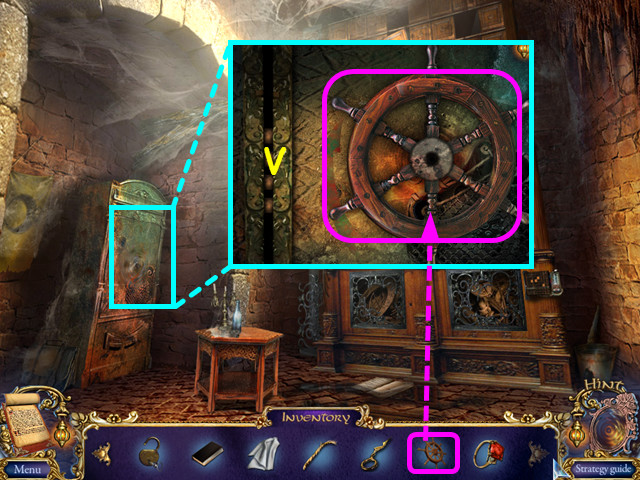
- Look at the cabinet and use the WHEEL on the front (V).
- Turn the wheel to open the lock.
- Look in the cabinet for a HOS.

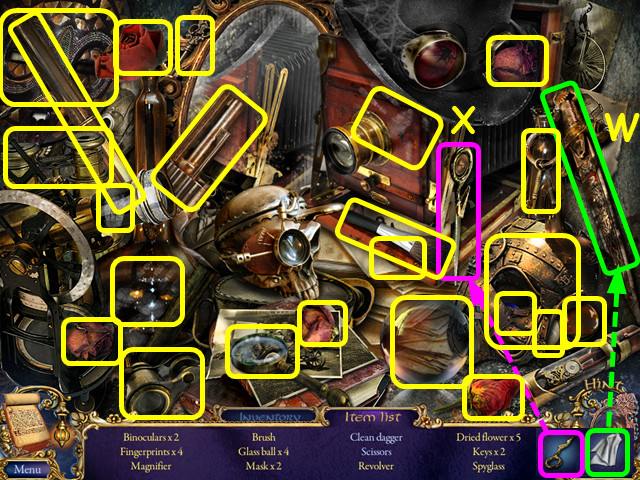
- Locate all the items on the list.
- Use the HANDKERCHIEF on the dagger to get the clean dagger (W).
- Use the SCISSORS HALF on the other half to make the scissors (X).
- You will earn the SCISSORS.
- Return to the square and walk forward to the street near the library.

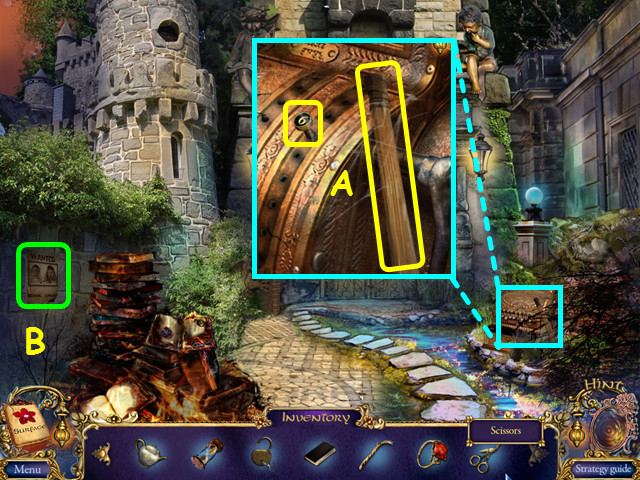
- Look at the cash register; take the BUTTON and the STICK (A).
- Look at and take the wanted poster (B).
- Walk down to the square.

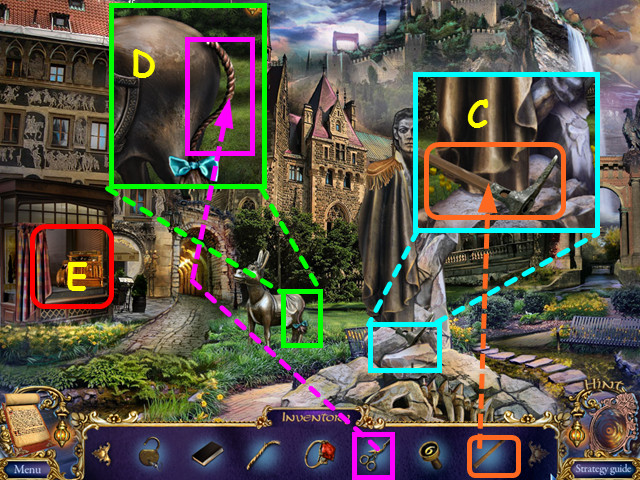
- Look at the base of the statue; place the STICK on the pick head to make the PICKAX (C).
- Look at the donkey and use the SCISSORS to cut the TAIL ROPE (D).
- Look at the cash register for a mini-game (E).

- Place the BUTTON in the hole to trigger the mini-game (G).
- Place the math symbols (H) so the numbers form an equation that equals the number in green (I).
- Solve for the horizontal and the vertical equations.
- Return to the sewer system under the dungeon.

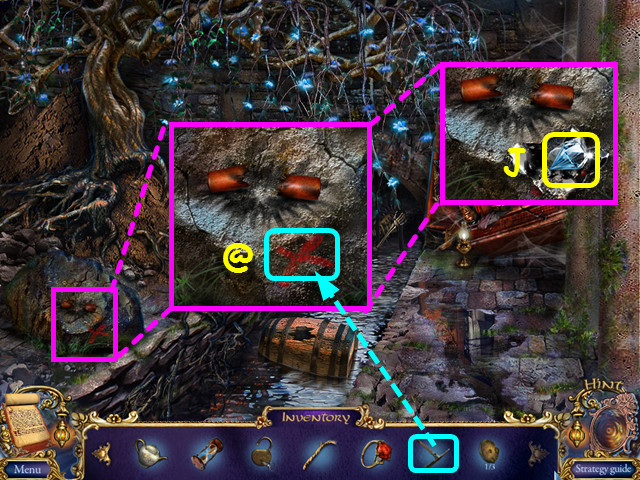
- Look at the rock and use the PICKAX on the red X (@).
- Take the DIAMOND (J).
- Return to the square and walk forward to the street near the library.


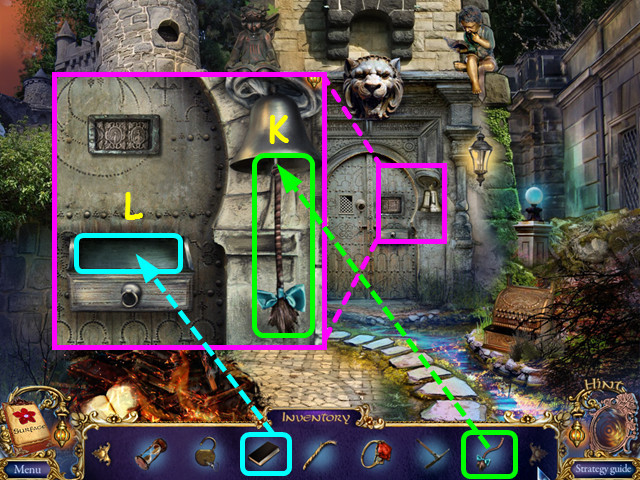
- Look at the door and place the TAIL ROPE on the bell (K).
- Pull on the tail rope to ring the bell.
- Once the librarian opens the drawer, place the BLACK BOOK inside (L).
- Walk forward to enter the main room of the library.

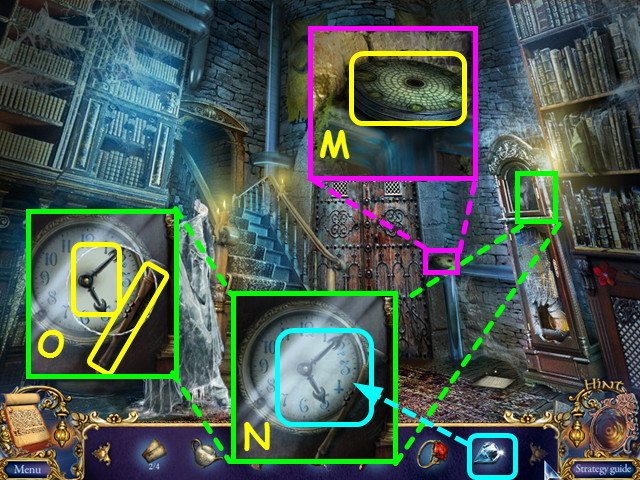
- Look at the pipes and take the 1/3 REEL (M).
- Look at the clock and use the DIAMOND to cut a hole in the glass (N).
- Take the CLOCK HANDS and the FLUTE (O).
- Return to the secret passage.

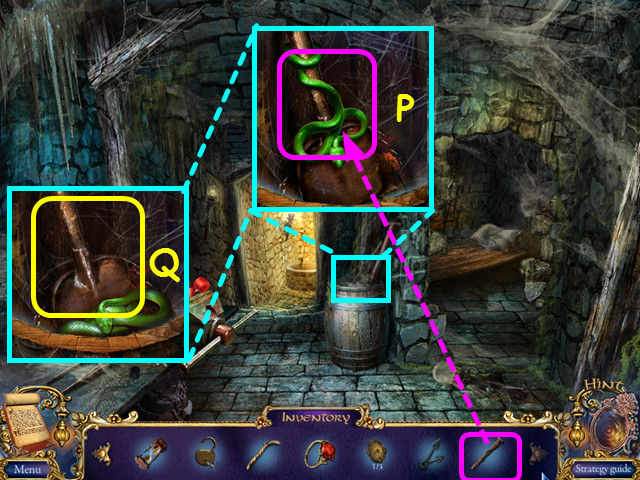
- Look in the barrel and use the FLUTE on the snake (P).
- Take the SHOVEL (Q).
- Climb down the well to the sewer area.

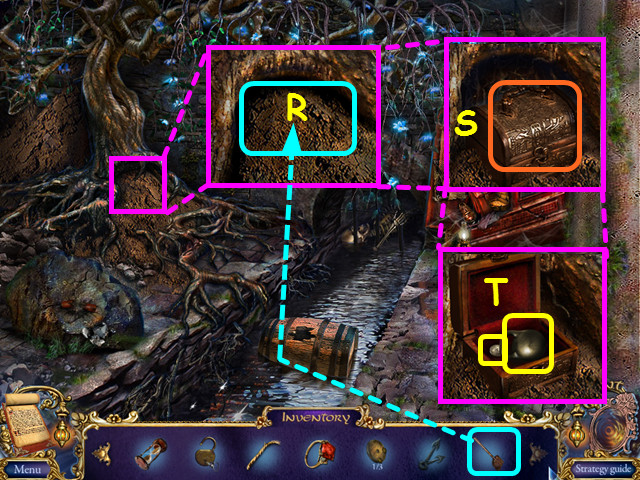
- Look at the base of the tree and use the SHOVEL on the dirt (R).
- Open the chest (S).
- Take the COIN and the WEIGHT (T).
- Return to the main room of the library.

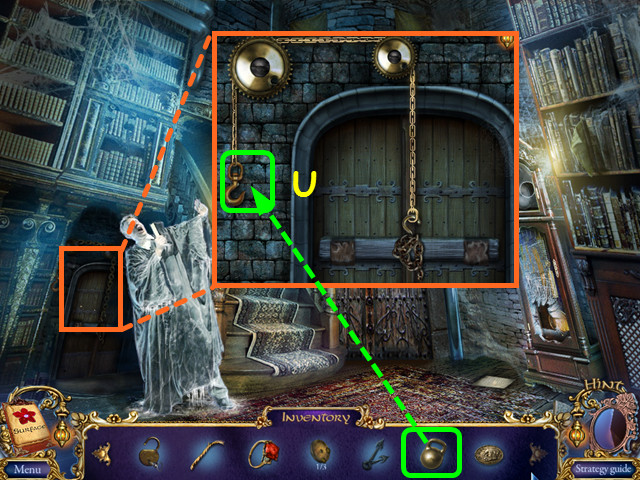
- Look at the door to the kitchen and hand the WEIGHT on the hook (U).
- Enter the library kitchen.

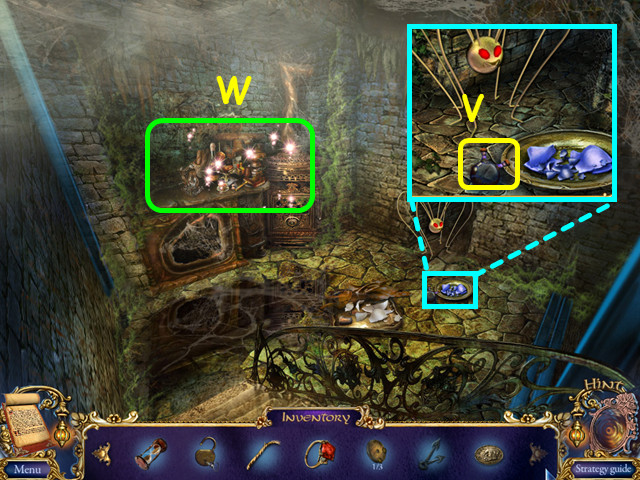
- Look at the plate near the mechanical spider and take the VESSEL (V).
- Select the counter for a HOS (W).

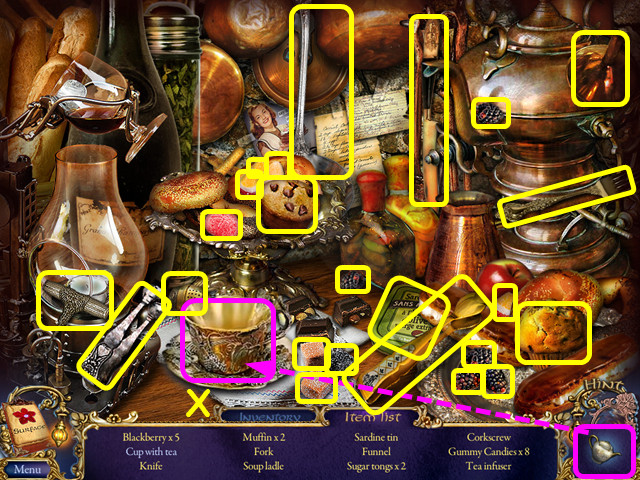
- Locate all the items on the list.
- Use the TEAPOT on the cup to make the cup with tea (X).
- You will earn the CORKSCREW.
- Return to the sewer.

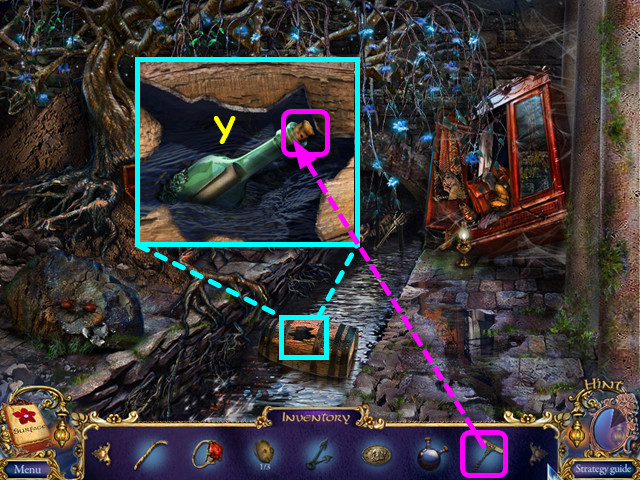
- Look at the barrel and use the CORKSCREW to take the CORK (Y).
- Return to the canal area and select the machine on the right for a mini-game.

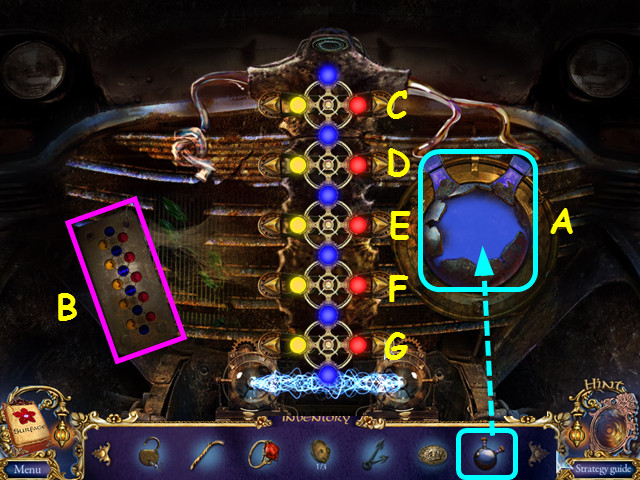
- Place the VESSEL in the space on the right (A).
- Rotate the rings in the center to match the diagram on the left (B).
- Push the arrows on the left or right of each ring to rotate the rings.
- Our solution is: C-E-Dx2-C-Ex2-D-Ex2-G-Fx2-E-Gx2-F.
- Take the BULB WITH FLASH.
- Return to the library kitchen.

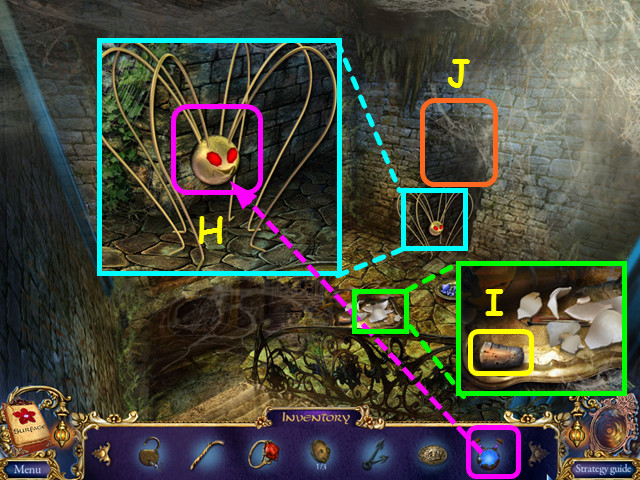
- Look at the mechanical spider and give it the BULB WITH FLASH (H).
- Look at the tray and take the 4/4 CORK (I).
- Walk down the hall to the corridor of three deaths (J).

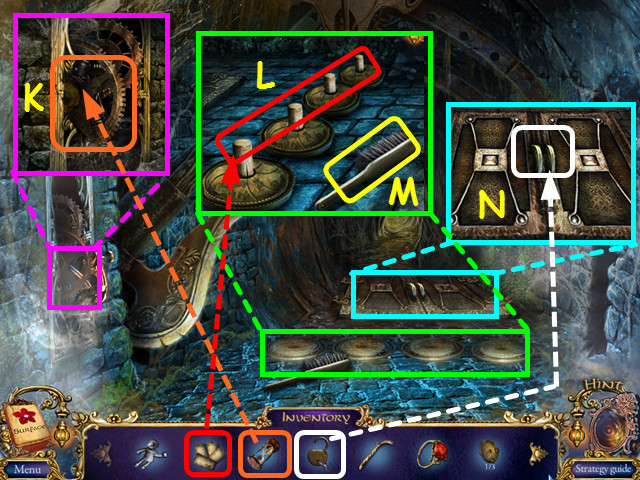
- Look at the gears and use the HOURGLASS to jam them (K).
- Look at the fire holes and use the 4 CORKS to seal them (L).
- Take the BROOM (M).
- Look at the doors and use the LOCK to keep them closed (N).
- Walk forward to the library catacombs.

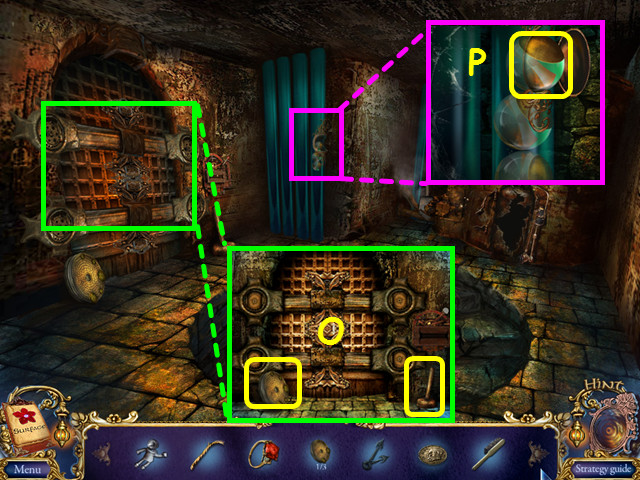
- Look at the gate; take the 2/3 REEL and the HAMMER (O).
- Look at the tubes and take the PNEUMO CAPSULE (P).
- Return to Kira’s cell.

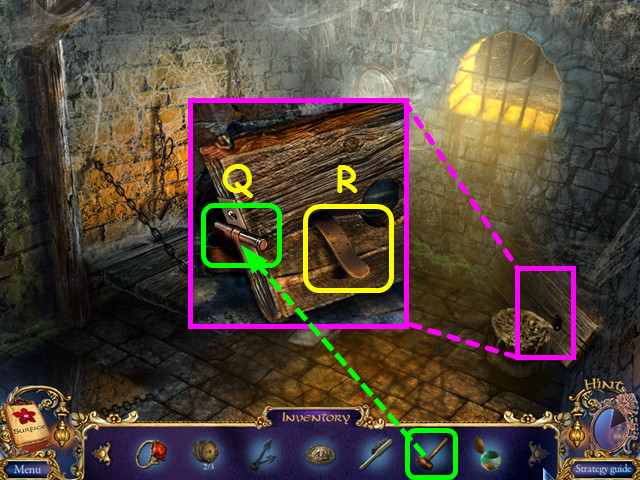
- Look at the stockade and use the HAMMER on the latch (Q).
- Take the BELT (R).
- Return to the library catacombs.

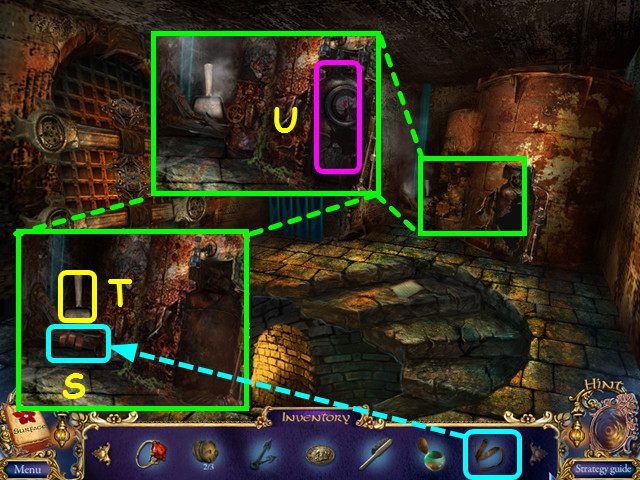
- Look at the steam pipe and place the BELT over the leak (S).
- Take the SCOOP (T).
- Remove the rusty tank (U).
- Walk down twice to the library kitchen.

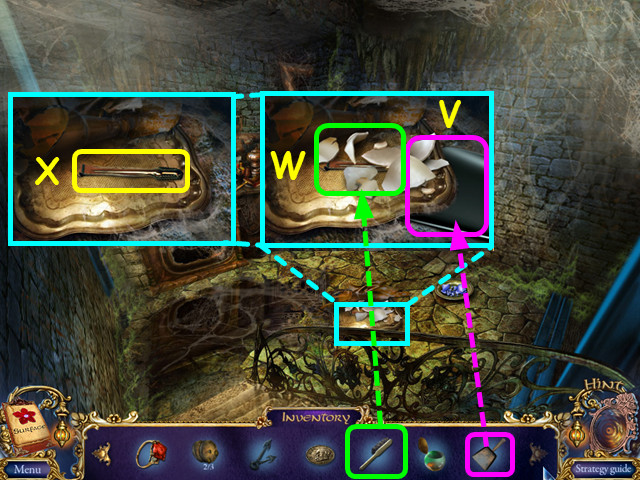
- Look at the tray and place the SCOOP at the right edge (V).
- Use the BROOM to sweep up the PIECES of GLASS (W).
- Take the TWEEZERS (X).
- Walk to the street near the library.

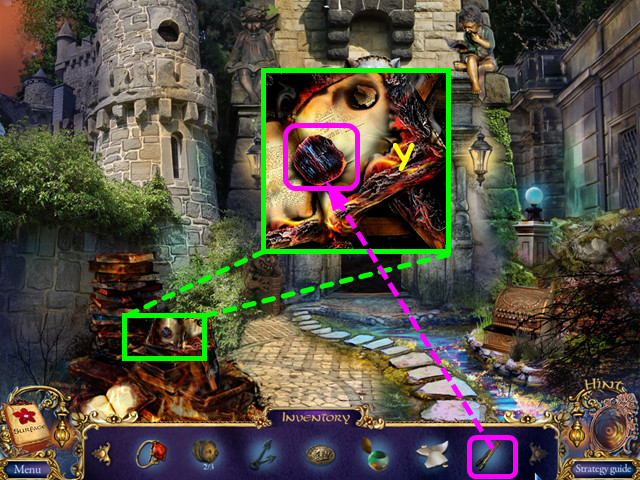
- Look at the burning books and use the TWEEZERS to collect the COAL (Y).
- Travel to the city wall.

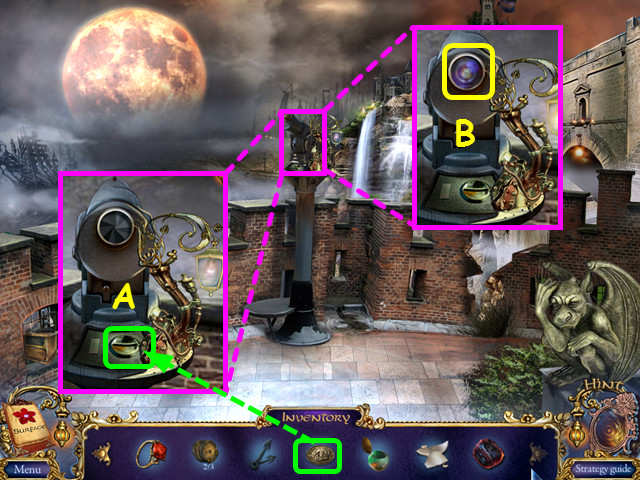
- Look at the telescope and place the COIN into the slot (A).
- After the cut-scene, look again at the telescope and take the LENS (B).
- Return to the library catacombs then go down to the cellar.

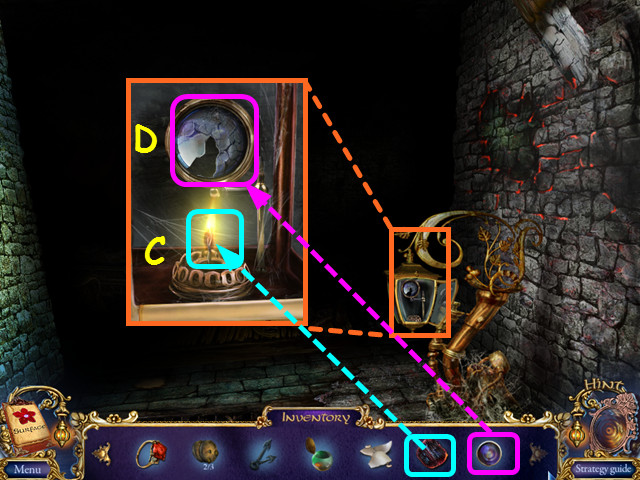
- Look at the lamp and use the COAL to light the flame (C).
- Use the LENS to replace the broken one (D).

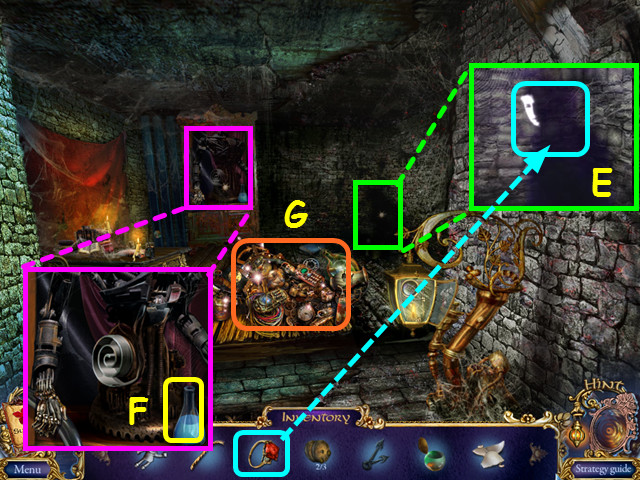
- Look at then talk to the shadow man and give him the RING (E).
- You will earn the GOLD.
- Look at the mechanical dummy and take the SOLVENT (F).
- Select the junk pile for a HOS (G).

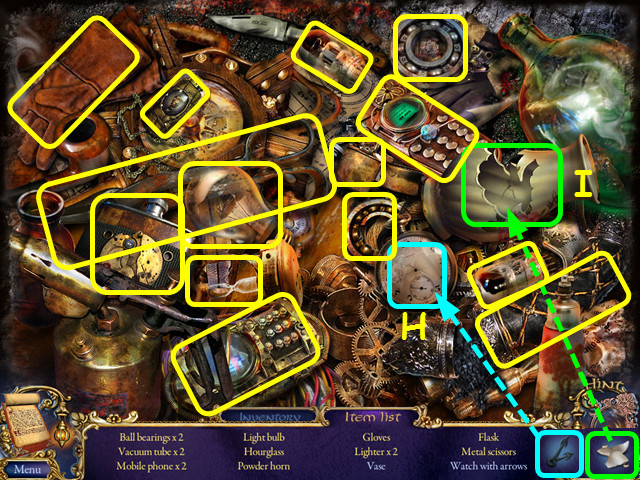
- Locate all the items on the list.
- Place the CLOCK HANDS on the watch to make the watch with arrows (H).
- Place the PIECES of GLASS on the broken vase to make the vase (I).
- You will earn the POWDER.
- Return to the secret passage.

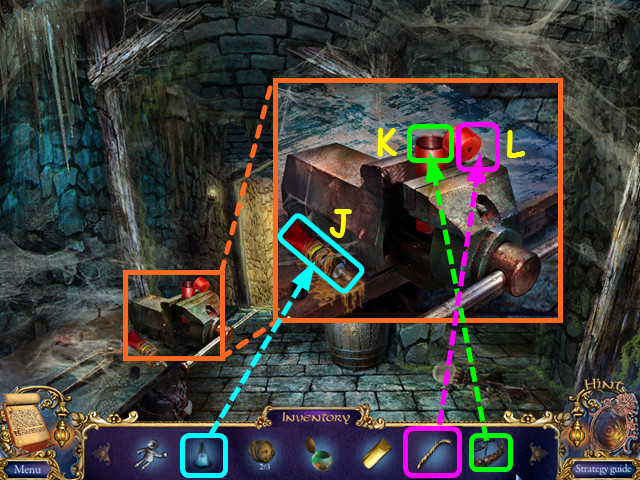
- Look at the vice; use the SOLVENT to take the GLUE (J).
- Use the POWDER on the red tube (K) then place the WICK at the end (L).
- Take the DYNAMITE.
- Return to the city wall.

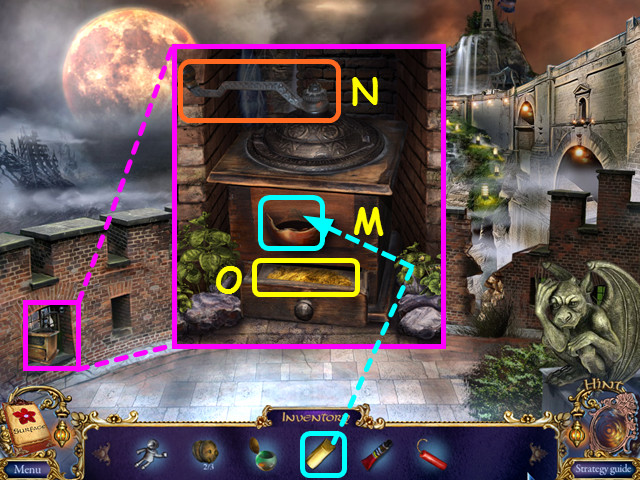
- Look at the grinder and place the GOLD into the slot (M).
- Turn the crank to grind the gold (N).
- Take the GOLD POWDER from the drawer (O).
- Return to the library cellar.

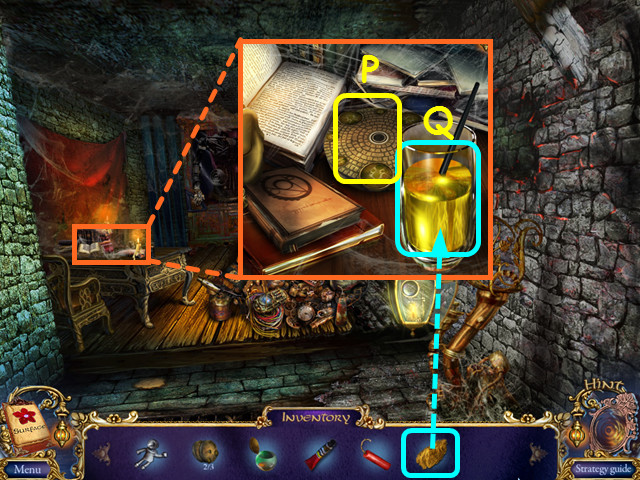
- Look at the table and take the 3/3 REELS (P).
- Place the GOLD POWDER into the glass then take the GOLD PAINT (Q).
- Return to the square.

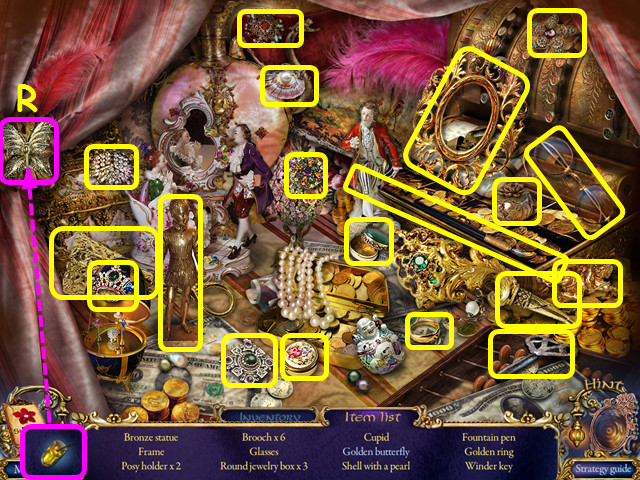
- Select the area by the cash register on the left for a HOS.
- Locate all the items on the list.
- Use the GOLD PAINT on the butterfly to make the golden butterfly (R).
- You will earn the WIND-UP KEY.
- Return to the main room of the library then go up the stairs to the librarian’s office.

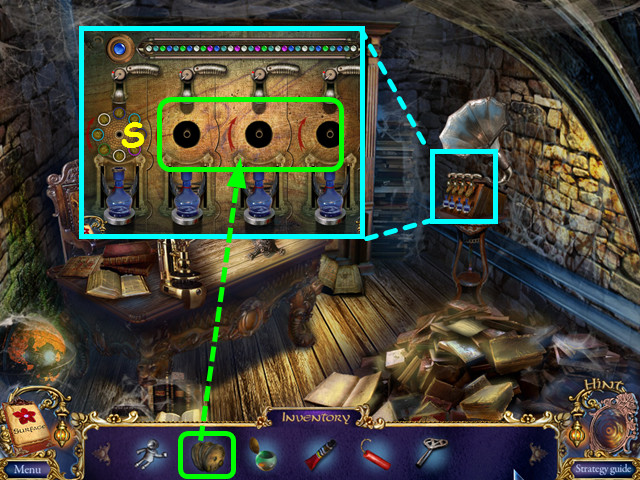
- Look at the machine on the right and place the 3 REELS on the device (S).
- This will trigger a mini-game.

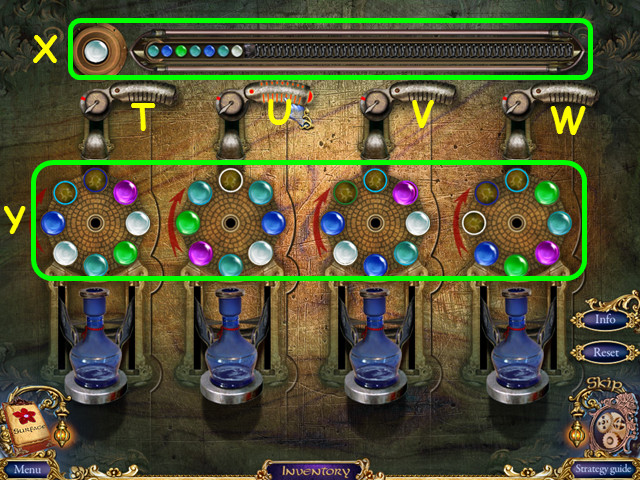
- Pull the 4 levers (T-W) to drop the colored drops from the upper bar (X) so they fill the discs over the bottles (Y).
- You must put the correct colored drops on each disc as indicated by the colored rings on the discs.
- Our solution was: T,T,T,T,W,U,U,V,V,W,W,V,V,V,V,T,W,U,W,U,U,T,U,U,U,V,T,V,W,W,T, and W.

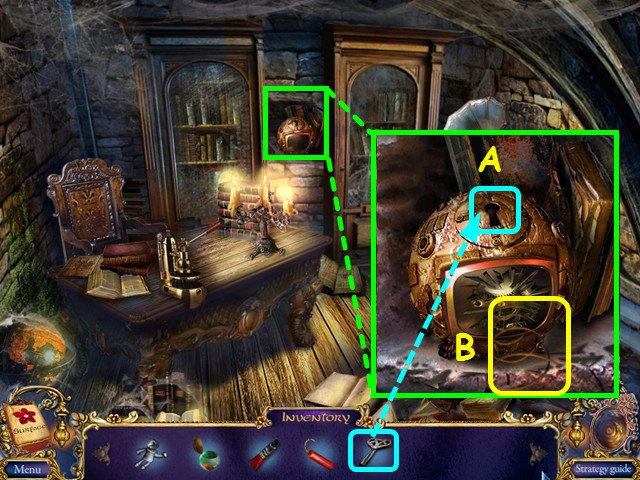
- Look at the sphere and use the WIND-UP KEY ion the keyhole (A).
- Take the SPRING (B).
- Return to the library cellar.

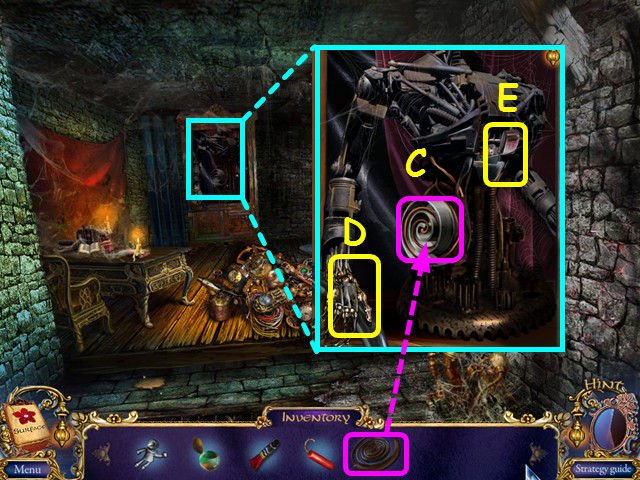
- Look at the mechanical dummy and place the SPRING into the coil (C).
- Take the MECHANICAL ARM (D) and the LIGHTER (E).
- Travel to the archive storage.

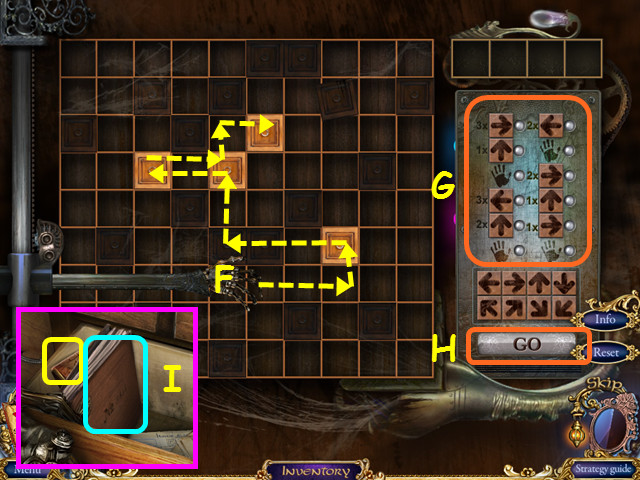
- Look at the tall cabinet for a mini-game, then place the MECHANICAL ARM on the bar (F).
- Drag the arrows to the sequencer (G) then push the GO button (H).
- The path needs to land on all 4 boxes.
- Take the notebook and the PASS (I).
- Return to the librarian’s office.

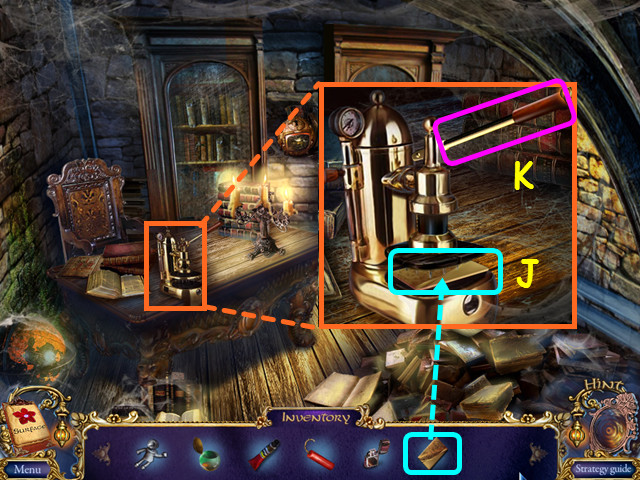
- Look at the puncher on the desk and place the PASS inside (J).
- Pull the handle and you will get the PUNCHED PASS (K).
- Walk to the library catacombs.

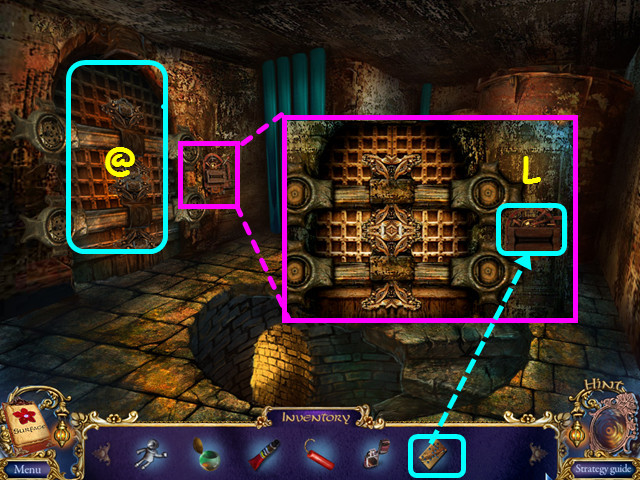
- Look at the card reader and use the PUNCHED PASS on the slot (L).
- Walk left to enter the control room (@).

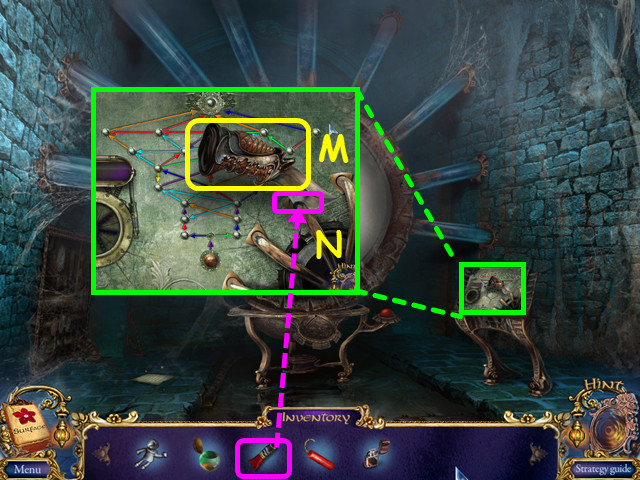
- Look at the pedestal and take the KNIFE (M).
- Use the GLUE to repair the hole (N).

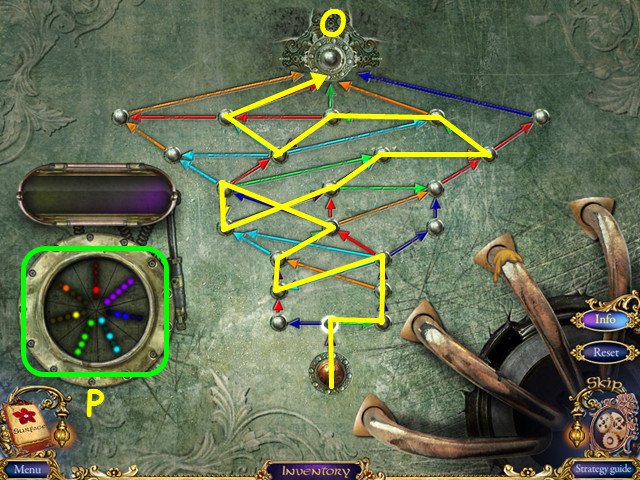
- Move the brown ball through the arrows to the top (O).
- The lighted points show the possible paths you can take; select the lighted points between arrows to move.
- Your path must include as many arrows in each color as indicated by the dots in the circle (P).

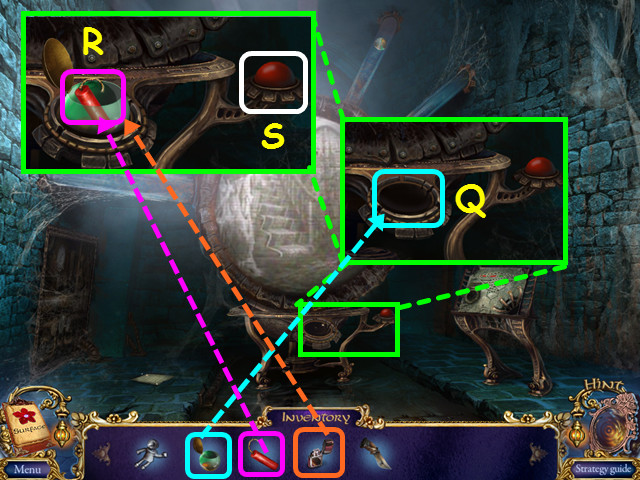
- Look at the center control and place the PNEUMO CAPSULE into the holder (Q).
- Place the DYNAMITE into the pneumo capsule then use the lighter on the fuse (R).
- Press the red button (S).
- Return to the main room of the library and walk forward to the tower roof.

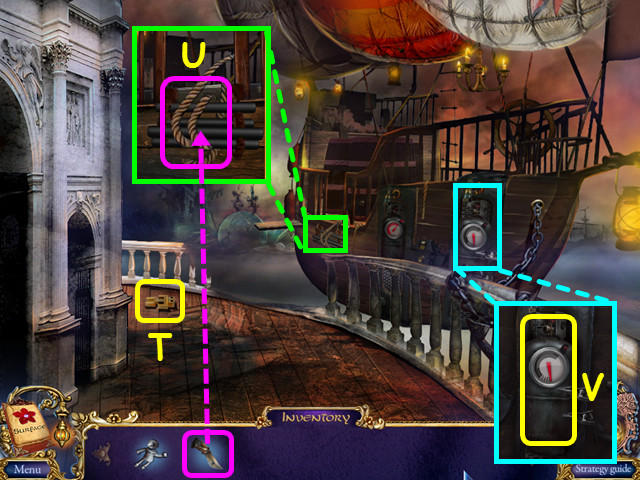
- Take EYA’S TOY (T).
- Look at the ladder and use the KNIFE to cut the rope (U).
- Look at the side of the ship and take the TANK (V).
- Return to the library catacombs.

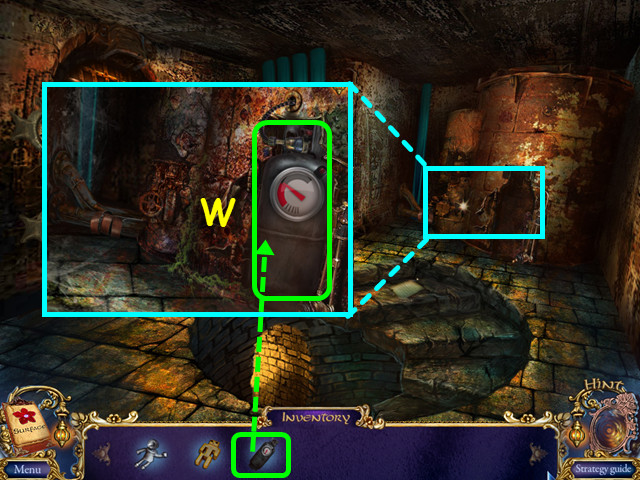
- Look at the boiler area and place the TANK into the niche (W).
- The tank will fill and go into your inventory as the TANK WITH GAS.
- Travel to the tower roof.

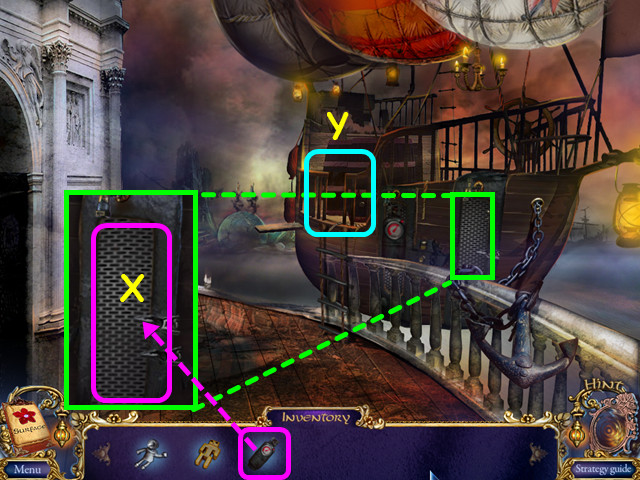
- Look at the side of the ship and place the TANK WITH GAS into the holder (X).
- Board the ship (Y).
Chapter 3: The Perishing Lands

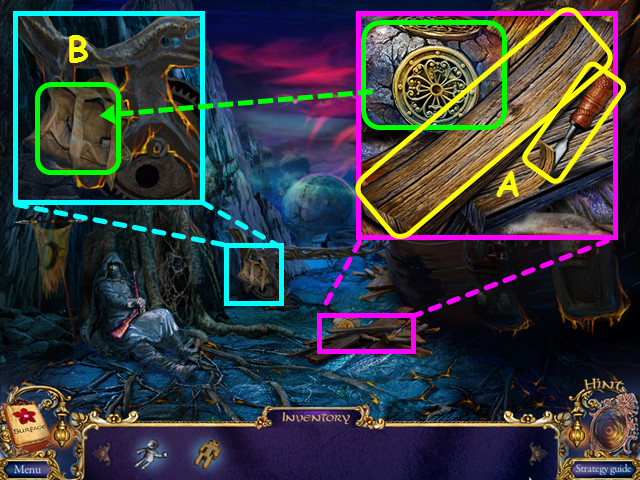
- Look at the woodpile; take the STONE, BOARD, and the CHISEL (A).
- Look at the turnstile and place the STONE in the bag (B).
- Walk forward to the temple entrance.

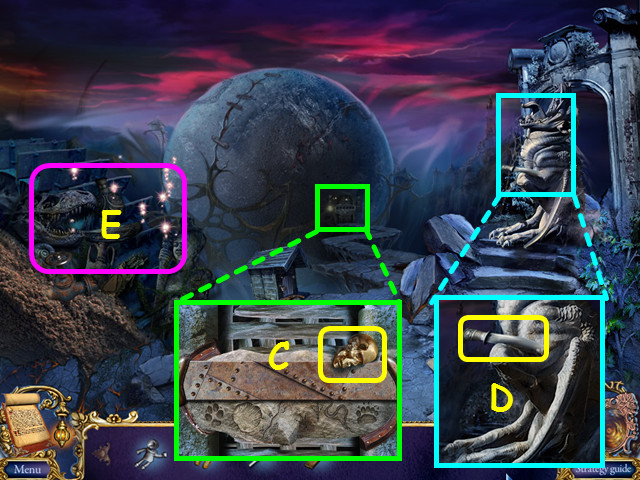
- Look at the sphere temple and take the SKULL (C).
- Look at the statue and take the RITUAL KNIFE (D).
- Select the waterwheel area for a HOS (E).

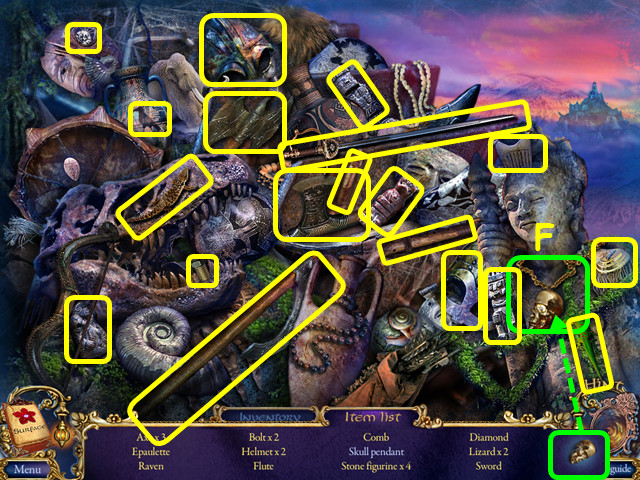
- Locate all the items on the list.
- Place the SKULL on the chain to make the skull pendant (F).
- You will earn the RAPIER.
- Walk down to return to the crashed airship.

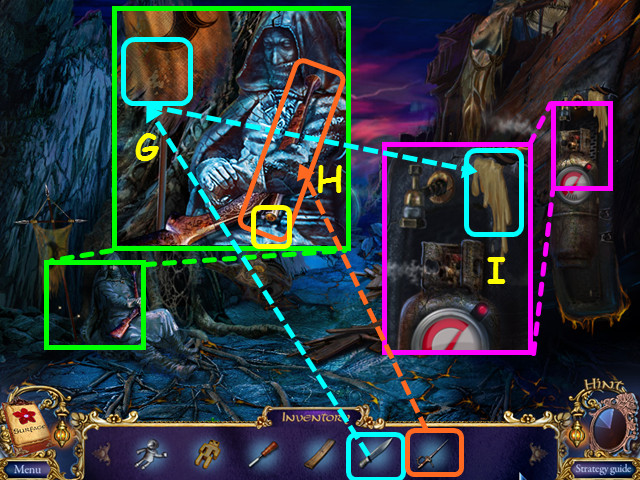
- Look at the warrior and use the RITUAL KNIFE to cut a FLAG FRAGMENT (G).
- Use the RAPIER on the rifle to release the BULLET (H).
- Take the BULLET.
- Look at the tanks and use the FLAG FRAGMENT on the oil to get the OILED FLAG FRAGMENT (I).
- Walk forward to the temple entrance.

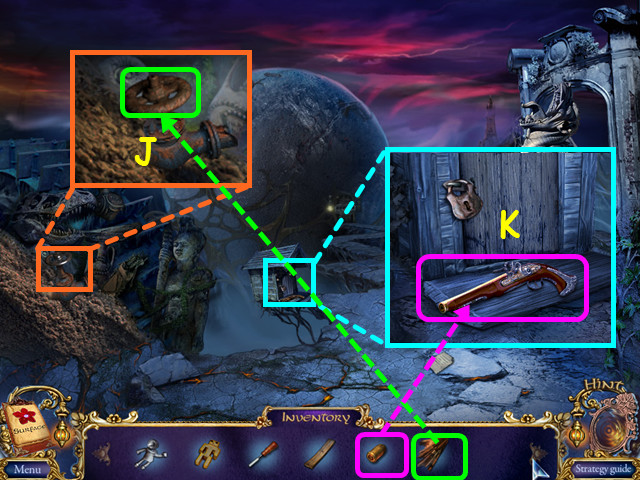
- Look at the pipe and use the OILED FLAG FRAGMENT on the rusty valve (J).
- Take the cleaned VALVE.
- Look at the dog house and load the BULLET into the MUSKET, then take it (K).
- Return to the crashed airship.

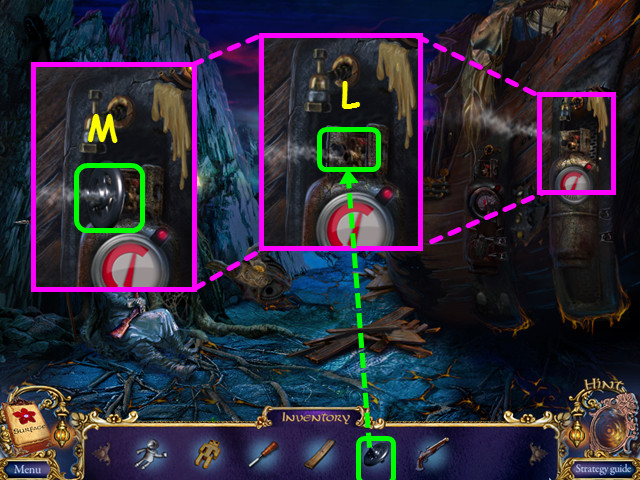
- Look at the leaking tank and place the VALVE on the stem (L).
- Turn the valve to stop the leak then take the TANK WITH GAS (M).
- Walk forward to the temple entrance.

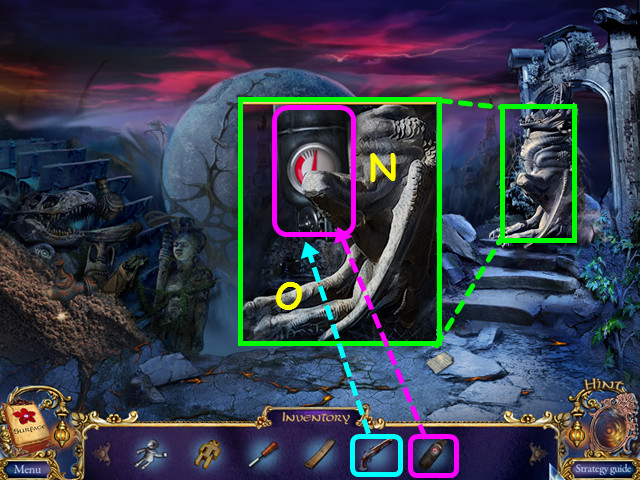
- Look at the statue and place the TANK WITH GAS next to it (N).
- Use the MUSKET on the tank (O).
- Walk right to behind the temple.

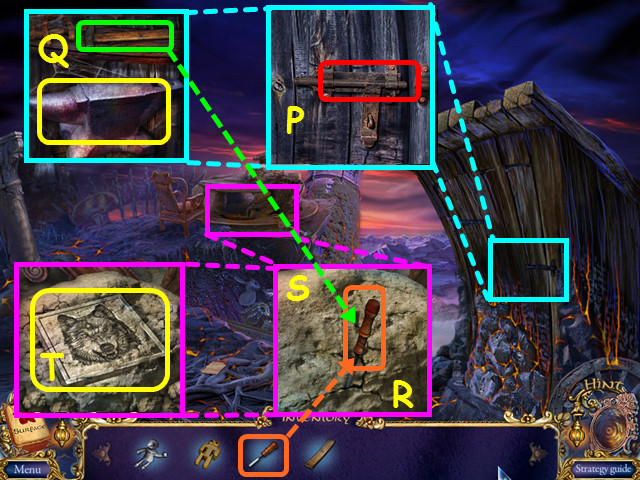
- Look at the outhouse and open the latch (P).
- Take the ANVIL and the MALLET (Q).
- Look at the stone on the table and use the CHISEL on the crack (R).
- Use the MALLET on the chisel (S).
- Take the STONE TABLET (T).
- Walk down then look at the sphere for a mini-game.

- Place the STONE TABLET in the upper left square to trigger the mini-game (U).
- Move each stone tablet into the square above each animal’s paw print (V).
- Enter the temple.

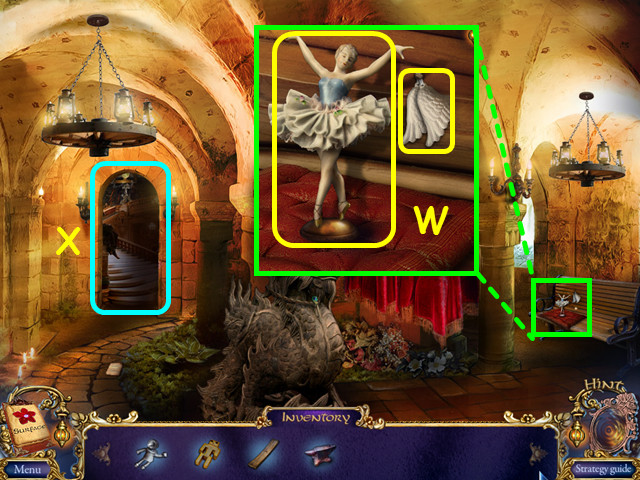
- Look at the bench; take the SMALL WINGS and the BALLET DANCER (W).
- Walk forward to the turtle floor (X).

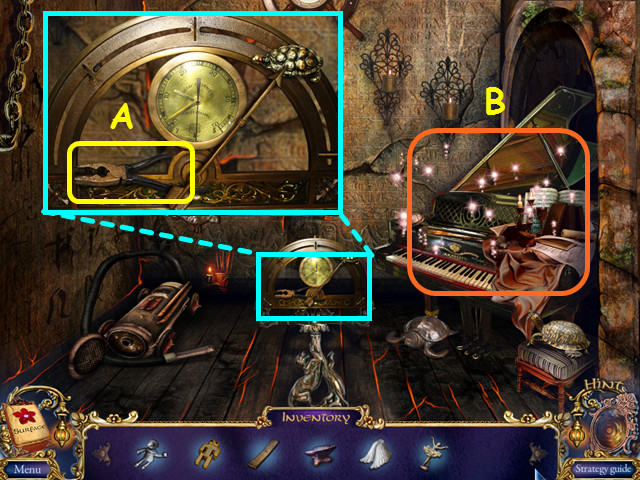
- Look at the control and take the PLIERS (A).
- Note the piano has a HOS (B).
- Return to the area behind the temple.

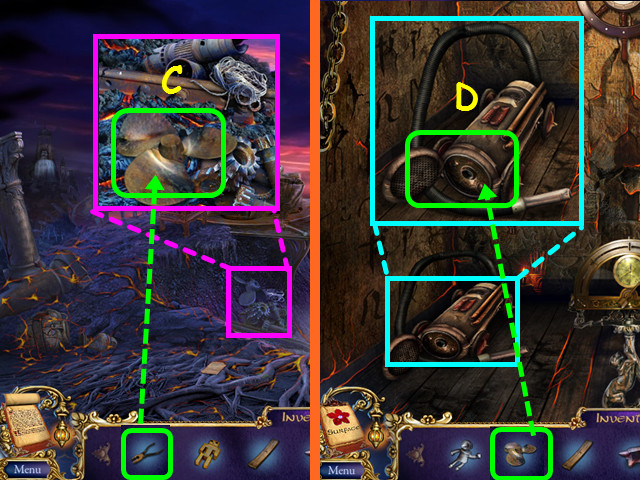
- Look at the junk pile; use the PLIERS to repair the PROPELLER then take it (C).
- Return to the turtle floor.
- Look at the machine on the floor and use the PROPELLER to repair it; take the LEAF BLOWER (D).
- Walk down to the temple.


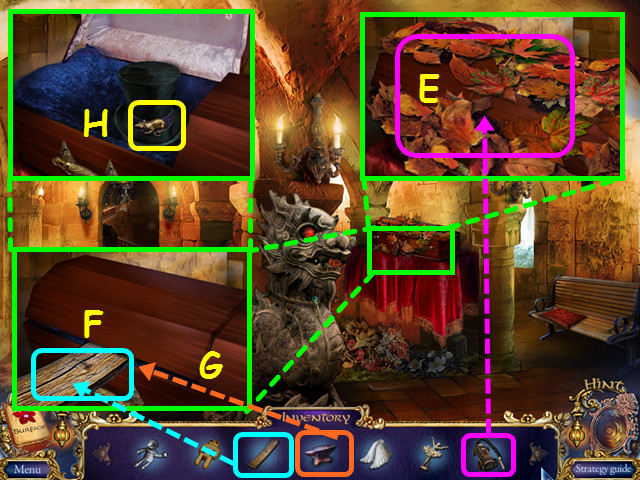
- Look at the coffin and use the LEAF BLOWER on the leaves (E).
- Place the BOARD in the coffin opening (F) then drop the ANVIL on the board (G).
- Take the METAL RAT (H).
- Return to the turtle floor.

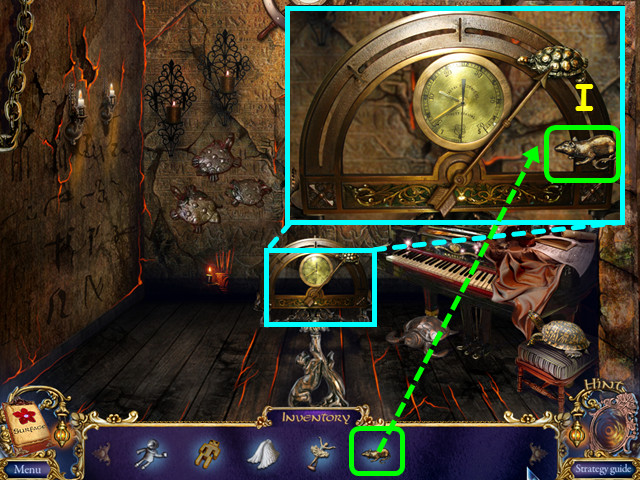
- Look at the control and place the METAL RAT on the arc (I).
- Press on the rat to travel to the rat floor.
- Walk right to the ritual room.

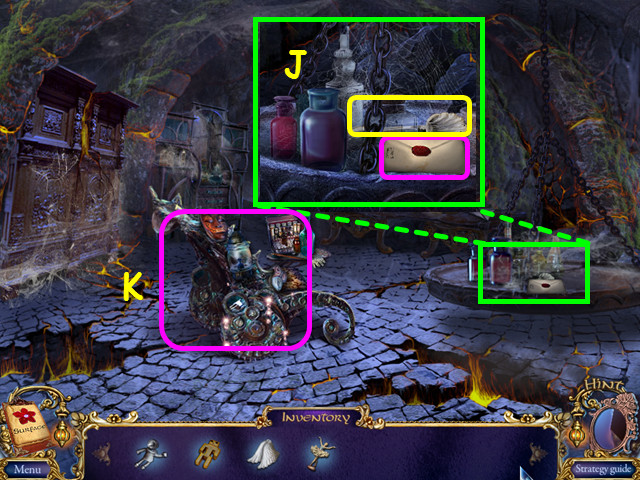
- Look at the table and take the letter and the SCALLOP SPOON (J).
- Note the cart is a HOS (K).
- Exit the room then walk left to the forge.

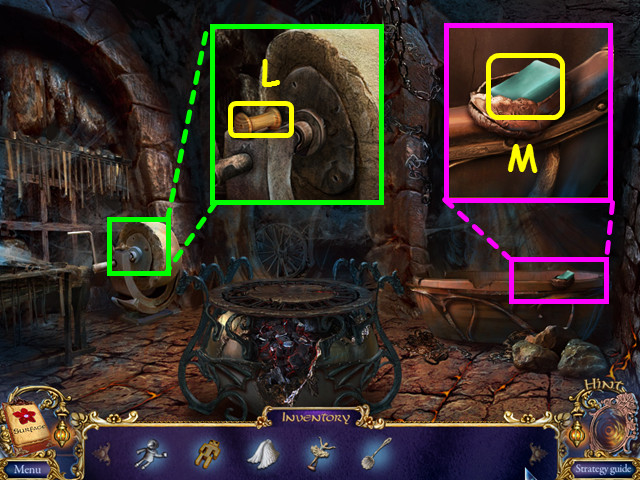
- Look at the grindstone and take the EMPTY SPOOL (L).
- Look at the bathtub and take the SOAP (M).
- Exit the room, look at the lift control and select the turtle.
- Select the piano for a HOS.

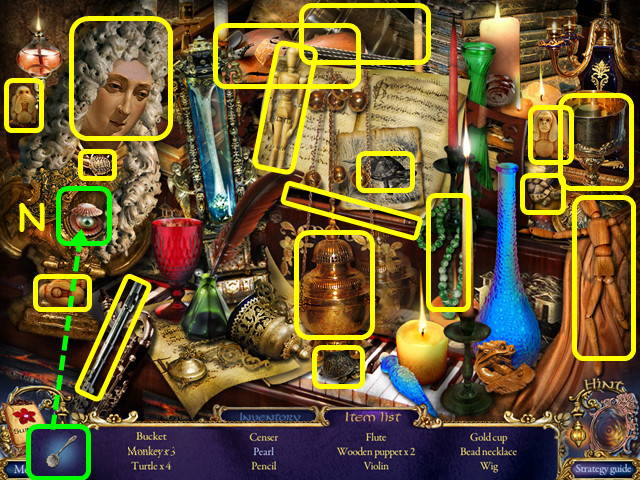
- Locate all the items on the list.
- Use the SCALLOP SPOON to open the shell and find the pearl (N).
- You will earn the BUCKET.
- Return to the area behind the temple.

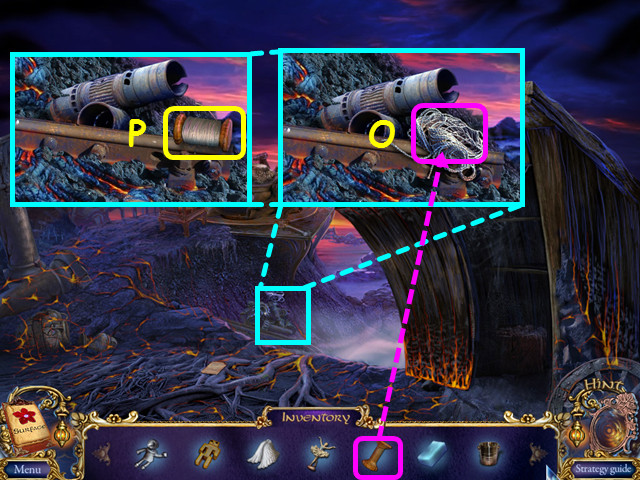
- Look at the debris and use the EMPTY SPOOL on the twine (O).
- Take the TWINE SPOOL (P).
- Walk down once to the temple entrance.

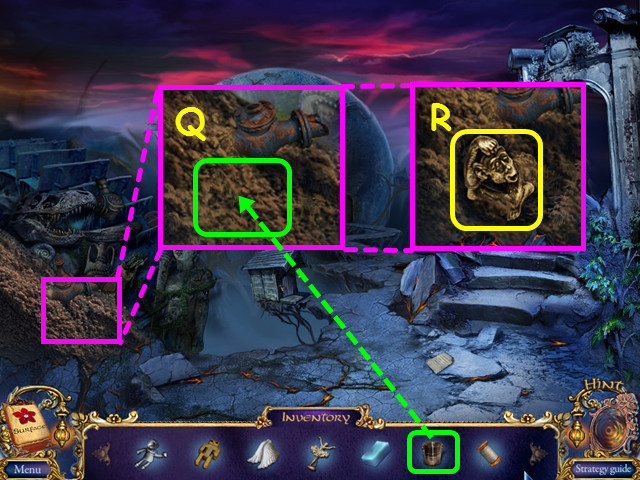
- Look at the sand and use the BUCKET to get a BUCKET WITH SAND (Q).
- Take the METAL MONKEY (R).
- Return to the turtle floor, look at the control and place the METAL MONKEY on the arc.

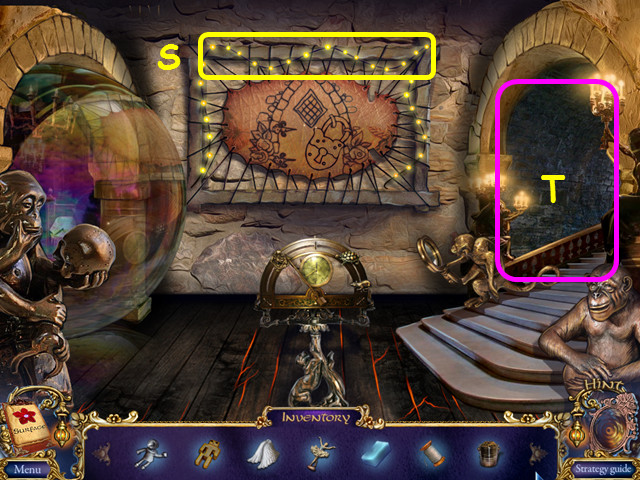
- Look at the wall hanging and take the CHRISTMAS LIGHTS (S).
- Walk right to the entrance to the conference hall (T).

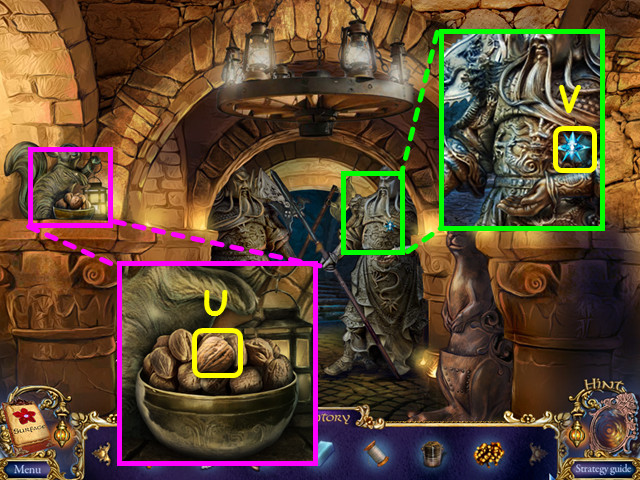
- Look at the squirrel and take the NUT (U).
- Look at the right statue and take the SMALL STAR (V).
- Return to the monkey floor, look at the control and select the rat.
- Walk right to the ritual room and select the cart for a HOS.

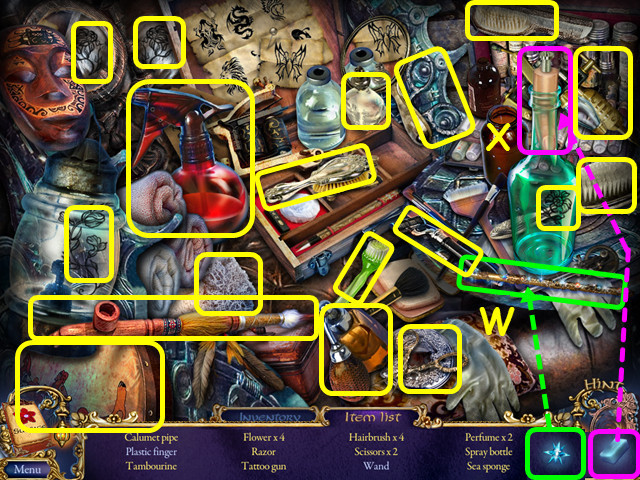
- Locate all the items on the list.
- Use the SMALL STAR on the jeweled stick to make the wand (W).
- Use the SOAP to loosen the plastic finger (X).
- You will earn the TATTOO GUN.

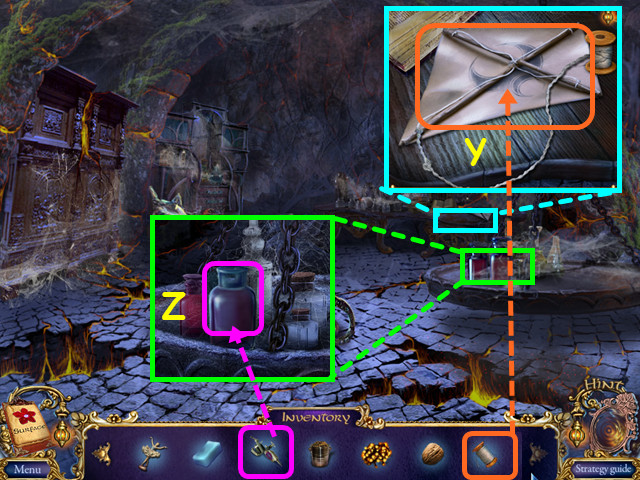
- Look at the table in the rear; use the TWINE SPOOL on the KITE and take it (Y).
- Look at the front table and use the TATTOO GUN on the jar to get the TATTOO GUN WITH PAINT (Z).
- Return to the monkey floor.

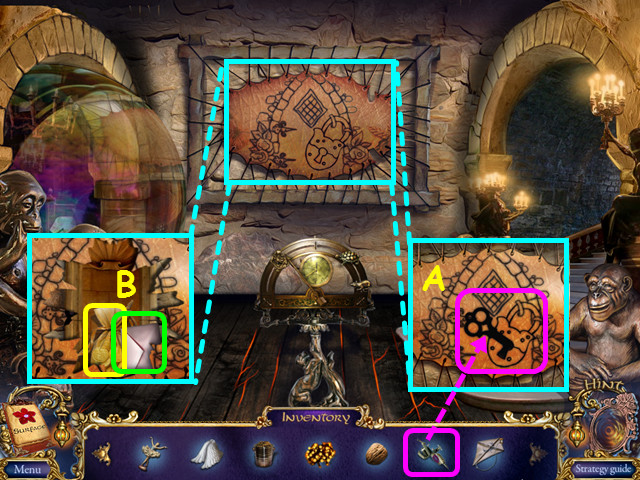
- Look at the wall hanging and use the TATTOO GUN WITH PAINT on the lock (A).
- Take the letter and the SACK WITH MONEY (B).
- Walk to the right.

- Look at the statue on the right and place the SACK WITH MONEY into his hand (C).
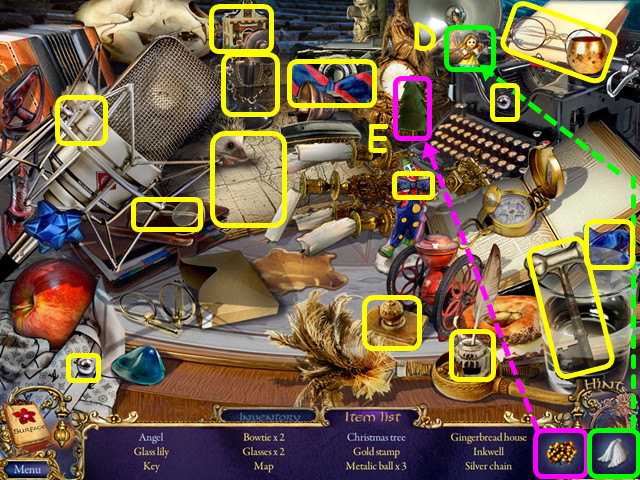
- Walk forward to the conference room then select the table for a HOS.


- Locate all the items on the list.
- Place the SMALL WINGS on the figure to make the angel (D).
- Place the CHRISTMAS LIGHTS on the tree to make the Christmas tree (E).
- You will earn the SMALL KEY.
- Return to the temple entrance.

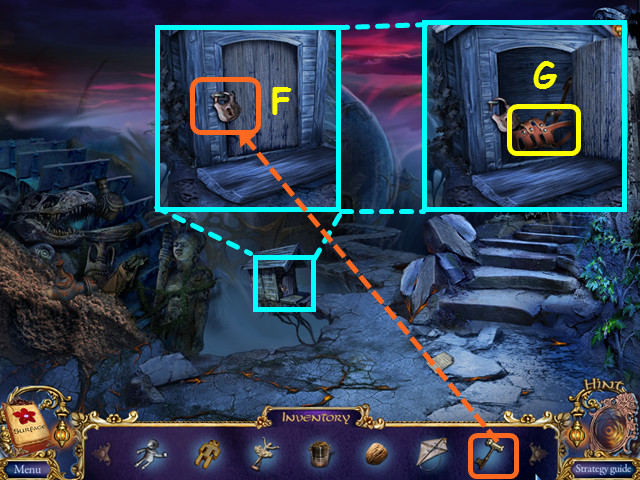
- Look at the dog house and use the SMALL KEY on the lock (F).
- Open the door and take the MUZZLE (G).
- Enter the temple.

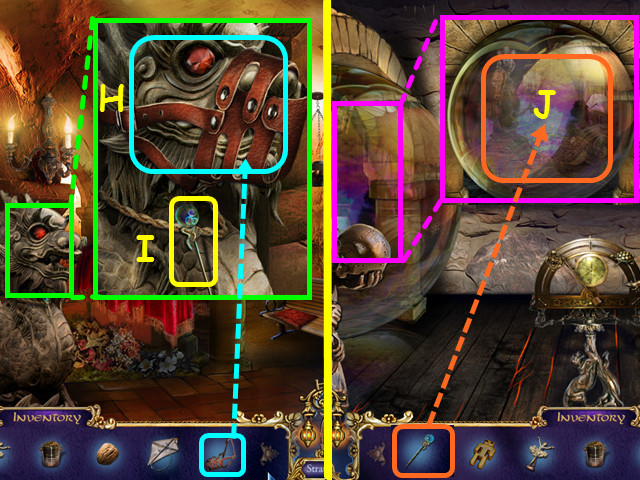
- Look at the statue and use the MUZZLE on the jaws (H).
- Take the MONK’S NEEDLE (I).
- Return to the monkey floor.
- Look at the bubble on the left and use the MONK’S NEEDLE to pop it (J).
- Walk left to the Monk’s chamber.

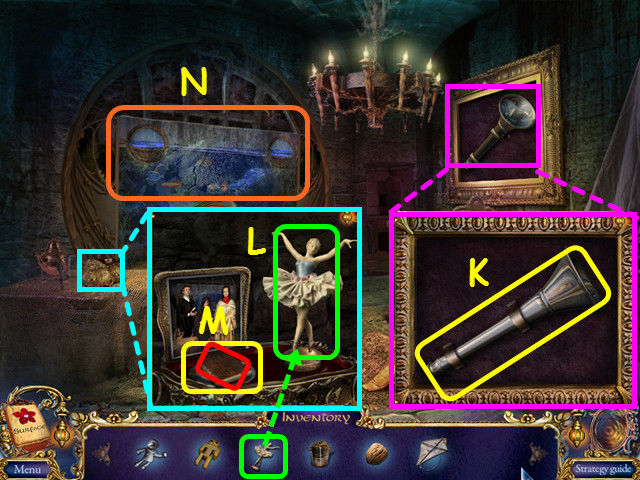
- Look at the frame and take the PIPE (K).
- Look at the music box and place the BALLET DANCER on the right (L).
- When the left side opens, take the book and the HOLOGRAPHIC DISC (M).
- Note the aquarium (N).
- Return to the conference hall.

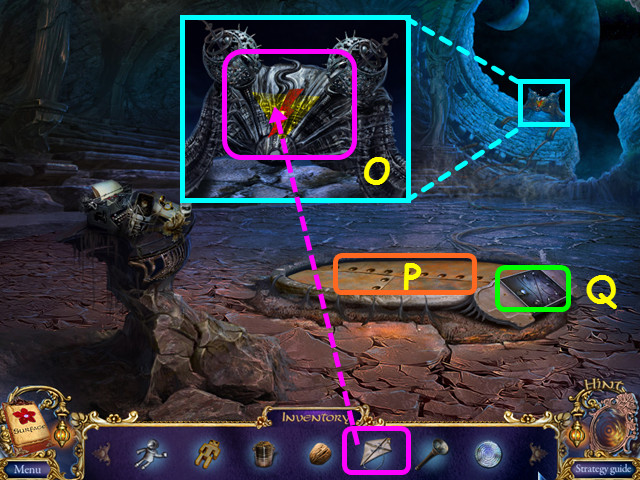
- Look at the generator and use the KITE on the machine (O).
- Note the projector doors (P).
- Select the projector control for a mini-game (Q).

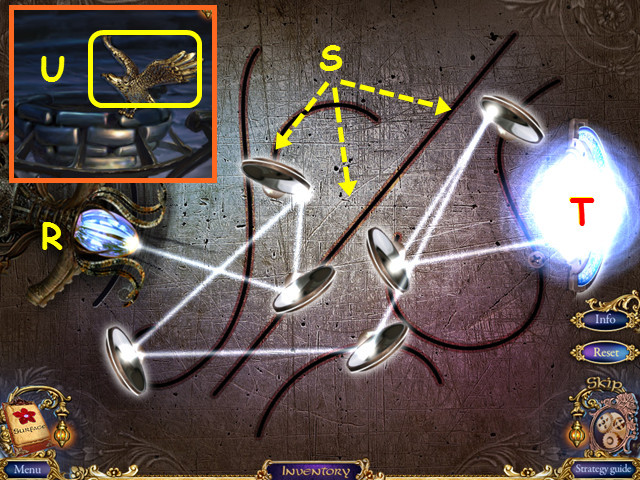
- Place the HOLOGRAPHIC DISC onto the panel to trigger a mini-game.
- Move the light source (R) and the reflectors (S) to bring the light to the disc on the right (T).
- Look at the projector and take the METAL BIRD (U).
- Return to the monkey floor; look at the control and place the METAL BIRD on the arc.

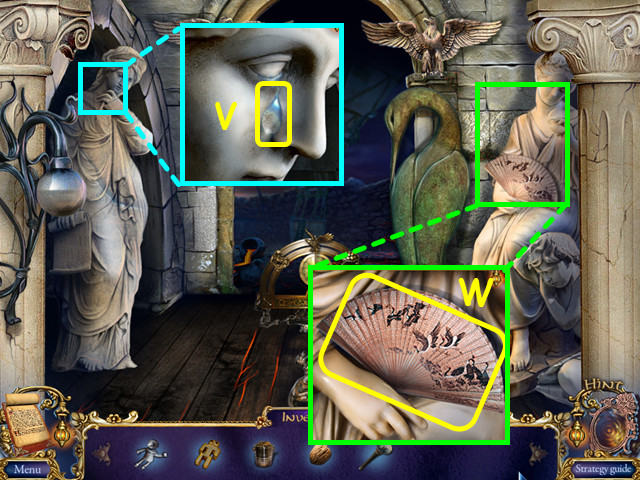
- Look at the left statue and take the TEAR (V).
- Look at the right statue and take the FAN (W).
- Walk forward to the landing ground.

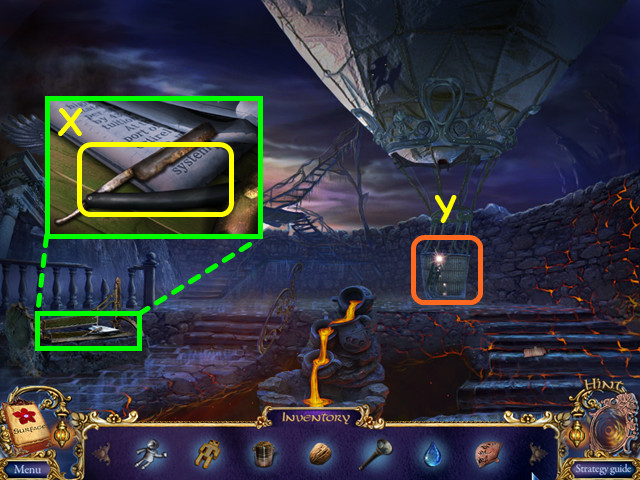
- Look at the bench and take the BLUNT RAZOR (X).
- Select the balloon basket for a HOS (Y).

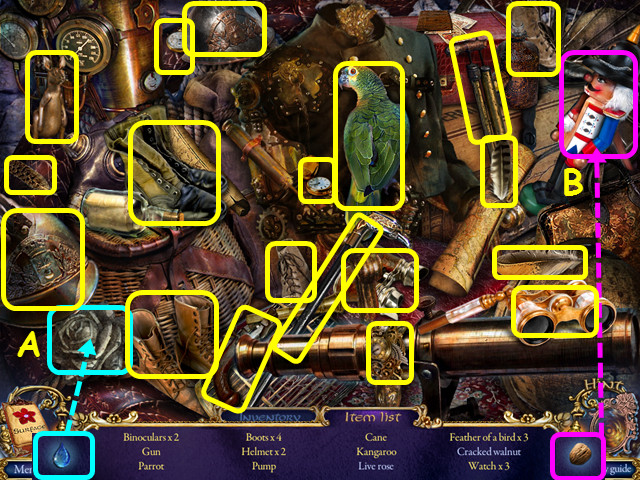
- Locate all the items on the list.
- Use the TEAR on the rose to get the live rose (A).
- Use the NUT on the nutcracker to get the cracked walnut (B).
- You will earn the BABY KANGAROO STATUE.
- Return to the entrance to the conference hall.

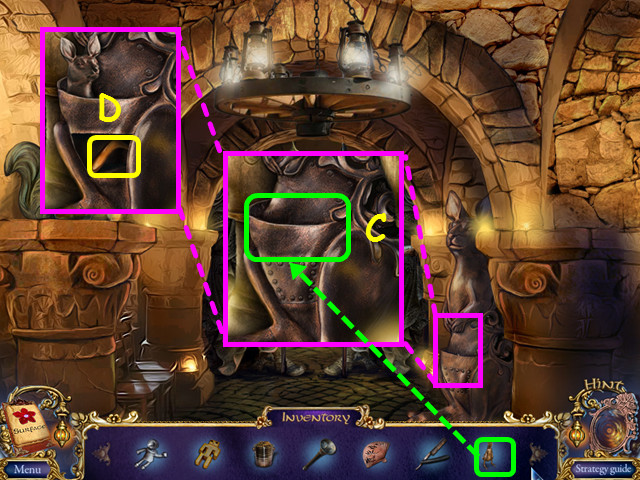
- Look at the kangaroo and place the BABY KANGAROO STATUE into the pouch (C).
- Take the BOOMERANG (D).
- Return to the forge.

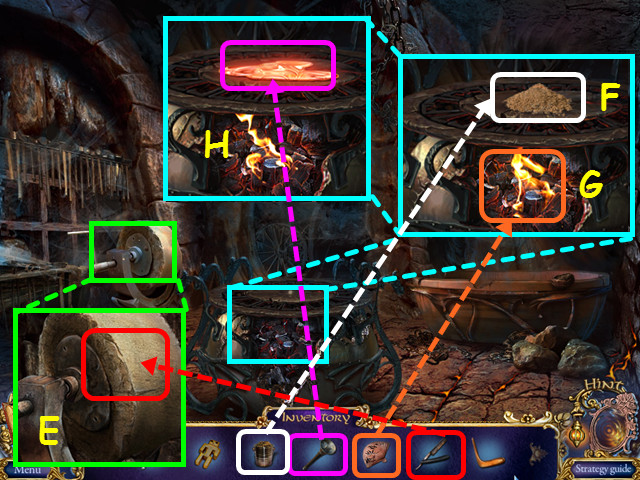
- Look at the grinding stone and use the BLUNT RAZOR on it to get the SHARP RAZOR (E).
- Look at the forge and pour the POT WITH SAND on top (F).
- Use the FAN on the coals (G).
- Once the sand melts, use the PIPE on the molten glass (H).
- You will make the LAMPSHADE.
- Return to the crashed airship.

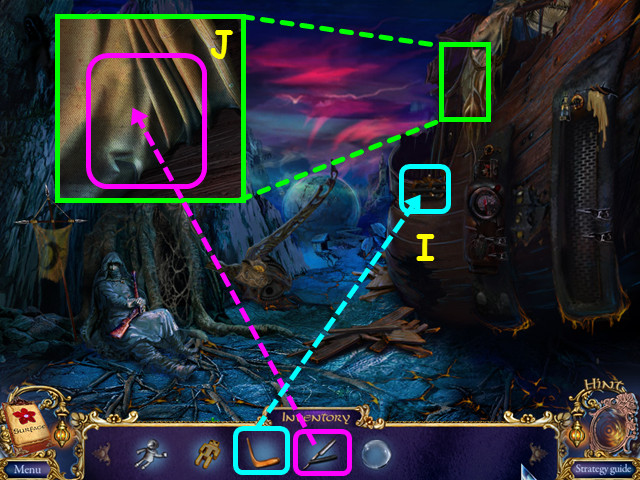
- Use the BOOMERANG on the ladder (I).
- Look at the balloon and use the SHARP RAZOR to cut a PATCH (J).
- Return to the rat floor.

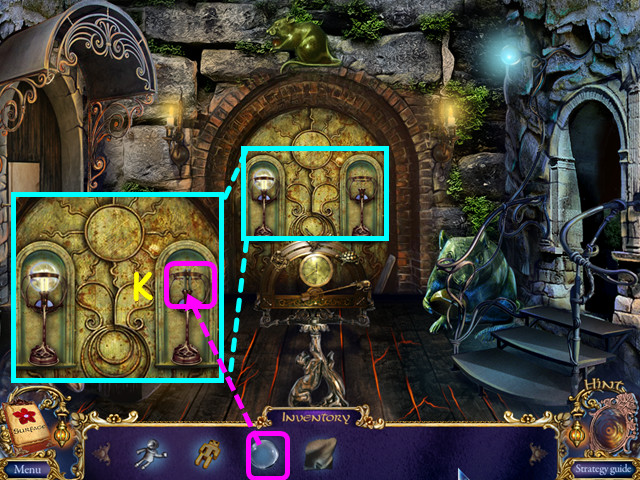
- Look at the golden door and place the LAMPSHADE in the right holder (K).
- Walk forward to the experiment room.

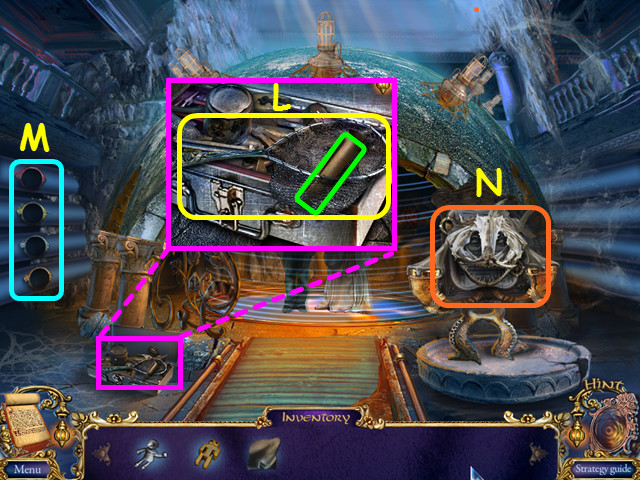
- Look at the case; take the scroll and the NET (L).
- Note the pipes (M).
- Note the controls (N).
- Return to the Monk’s chambers.

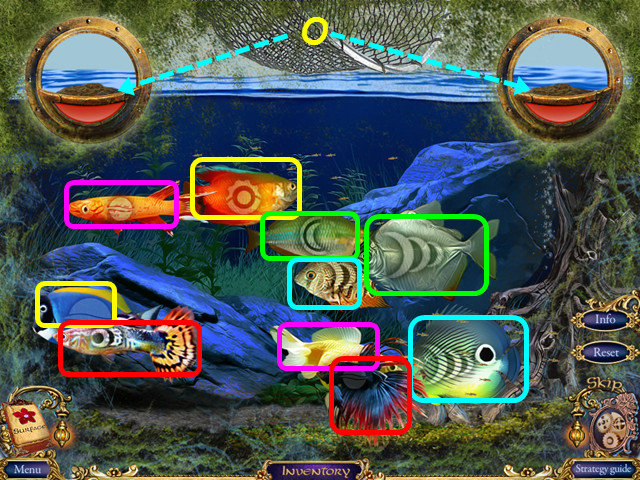
- Look at the aquarium and use the NET on it to trigger a mini-game.
- Select pairs of fish that have matching symbols on both sides.
- You can send fish to the feeding bowls to see the other side (O).
- The pair marked in red are not a match and will be removed automatically by the game.
- You will earn the WHITE FISH, YELLOW FISH, RED FISH, and the ORANGE FISH.
- Return to the experiments room.

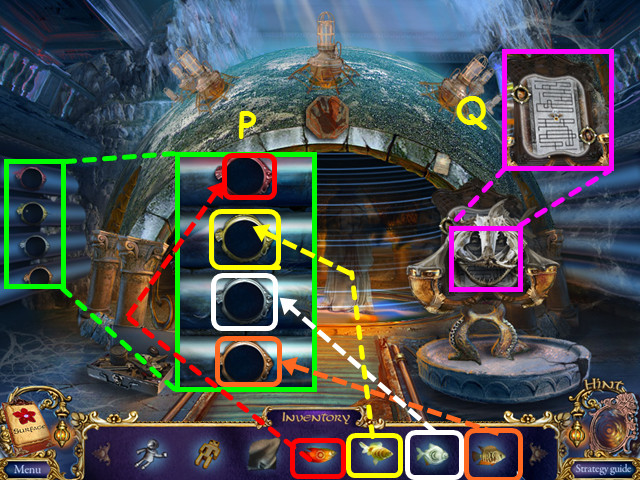
- Look at the pipes and place the colored FISH into the matching colored pipe (P).
- Look at the control console for a mini-game (Q).

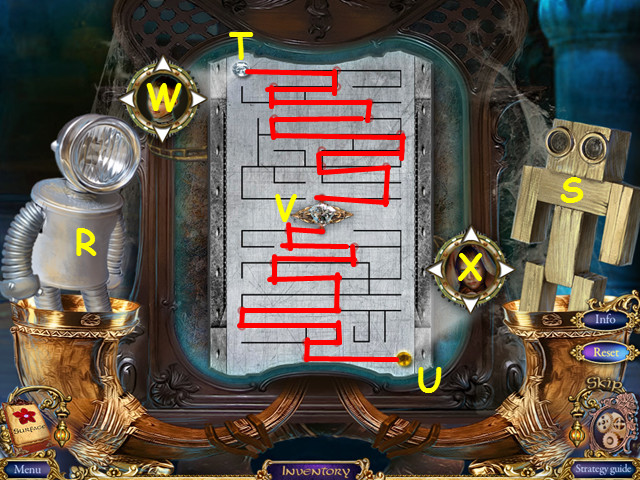
- Place BOBBY’S TOY in the left cup (R) and EYA’S TOY in the right cup (S).
- You need to move the silver (T) and gold (U) balls to the center (V) at the same time.
- Select the arrows around one boy’s icon to move its ball; the other ball will mirror the others movements and stop when the controlled ball does.
- With the two icons labeled (W) and (X) and using U, D, L, and R for up, down, left or right, our solution is: XL, WD, WL, WD, XL, WD, WL, XU, WR, XU, WL, XU, XL, WD, and WL.

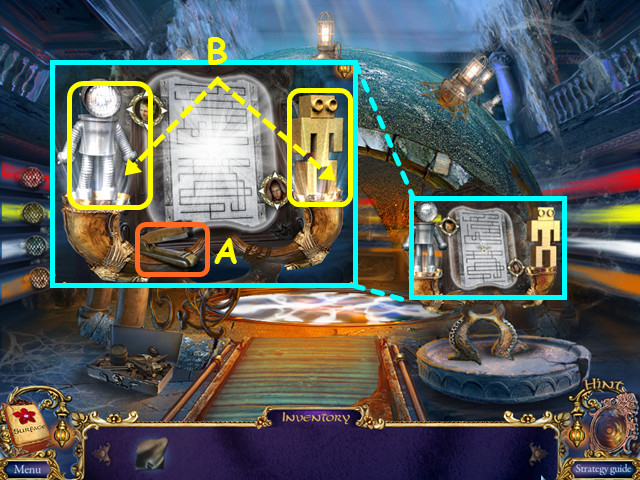
- Look at the control and take the STAPLER (A).
- Take the 2 toys to make the LIVE TOYS (B).
- Return to the landing ground.

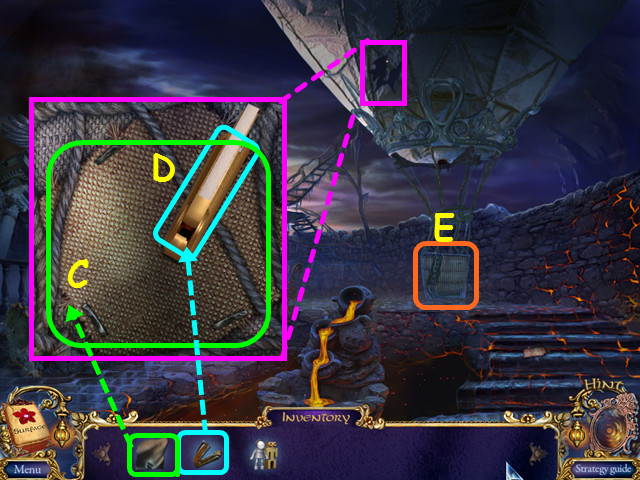
- Look at the hole in the balloon and place the PATCH on it (C).
- Use the STAPLER to secure the patch (D).
- Enter the basket to leave (E).
Chapter 4: The Spring of Life

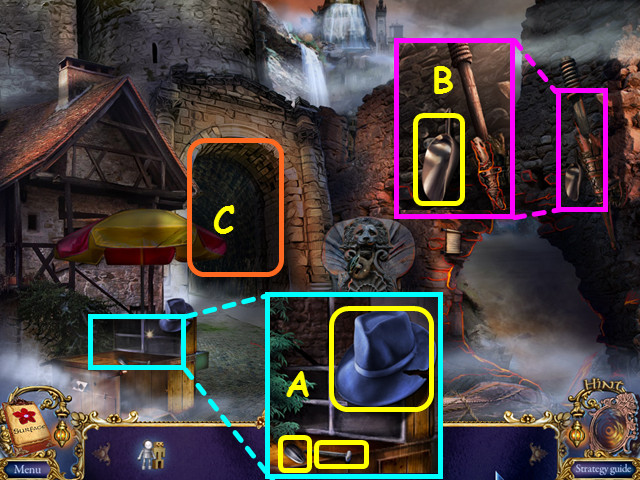
- Look at the stand; take the SUNFLOWER SEED, the 1/4 NAIL, and the TORN HAT (A).
- Look at the torch and take the SHOVEL (B).
- Walk forward to the arch (C).

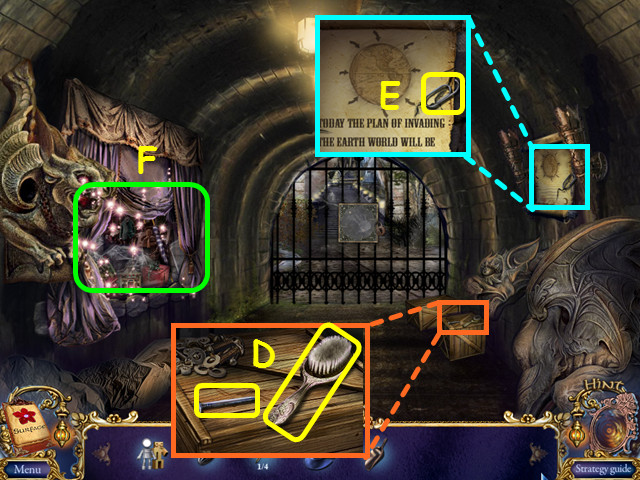
- Look at the crate, take the 2/4 NAIL and the HAIRBRUSH (D).
- Look at the poster and take the PAPER CLIP (E).
- Note the HOS scene on the left (F).
- Walk down to the arch entrance.

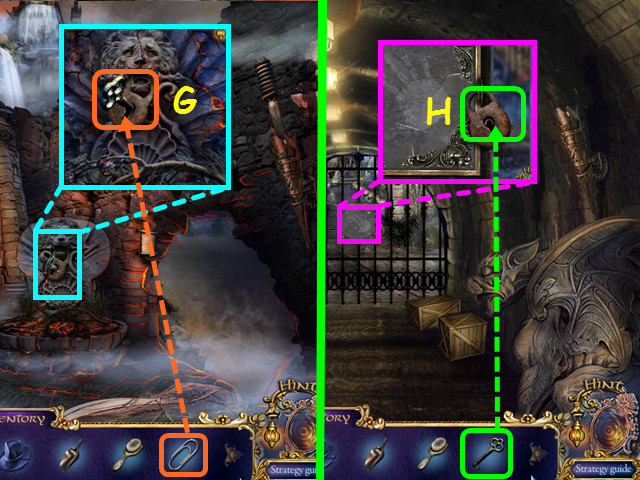
- Look at the fountain and use the PAPER CLIP on the lock to get the GRATING KEY (G).
- Enter the arch, look at the grating and use the GRATING KEY on the lock for a mini-game (H).

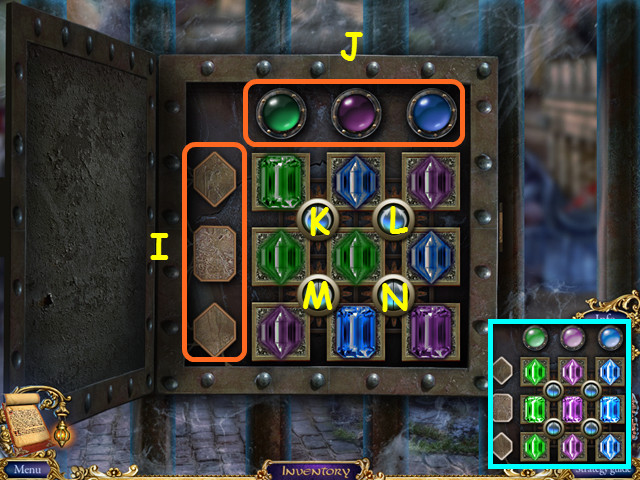
- Press the blue buttons to rotate the gems to the correct location.
- Note there are 2 halves to the buttons; the right side rotates counterclockwise and the left side rotates clockwise.
- They must be in the correct row for their shape (I) and the correct column for their color (J).
- With right and left indicating the side of the button to press, our solution is: M-right, K-right, M-right, K-left, L-right, M-left, L-right, N-right, and L-left.
- Walk forward to the main street.

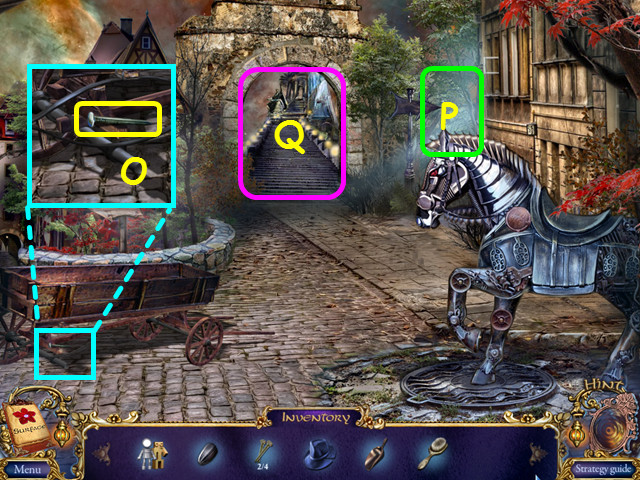
- Look at the cart and take the 3/4 NAIL (O).
- Note the path to the Park of Statues (P).
- Walk forward to the entrance to the Spring of Life (Q).

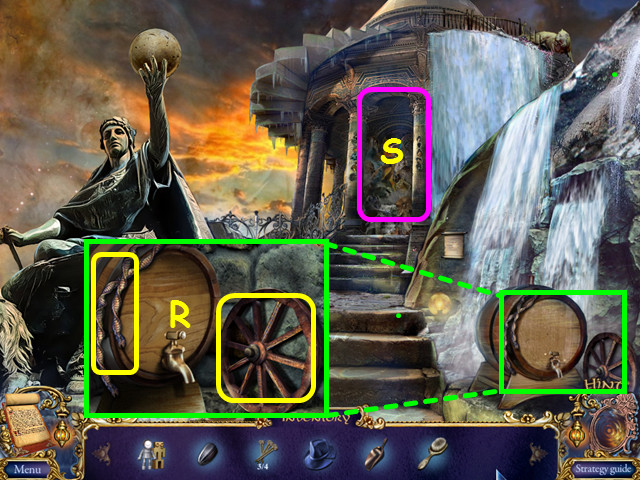
- Look at the barrel; take the CART WHEEL and the ROPE (R).
- Note the entrance blocked by statues (S).
- Walk down to Main Street.

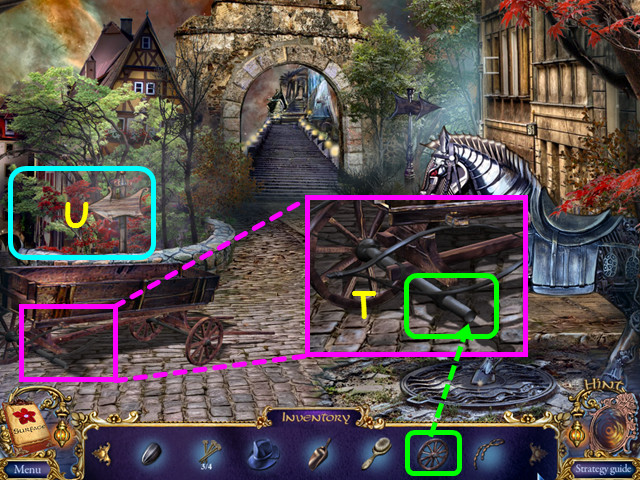
- Look at the cart and place the CART WHEEL on the axle (T).
- Walk left to the path to the lower city (U).

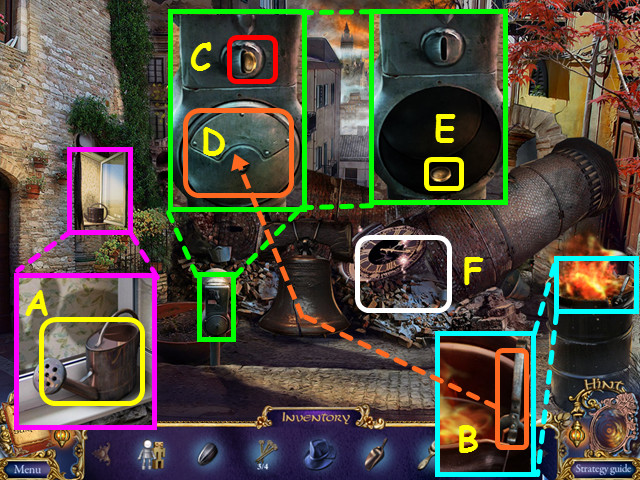
- Look at the window and take the EMPTY WATERING CAN (A).
- Look at the barrel and take the OPENER (B).
- Look at the parking meter and try to take the coin (C).
- Use the OPENER on the meter (D), open the meter and take the COIN (E).
- Select the clock debris for a HOS (F).

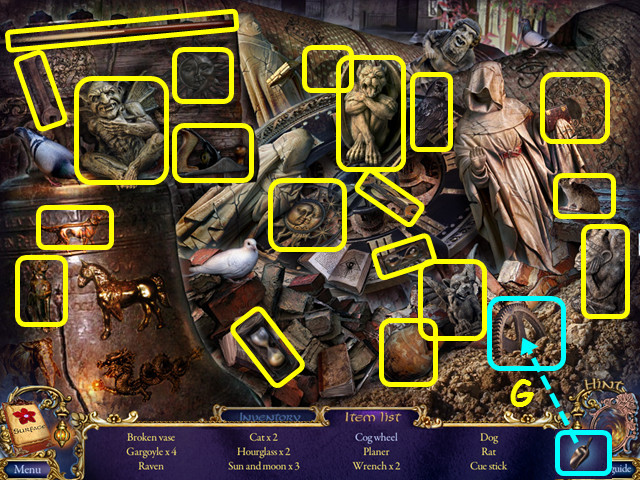
- Locate all the items on the list.
- Use the SHOVEL to dig out the cogwheel (G).
- You will earn the CUE STICK.
- Return to the entrance to the Spring of Life.

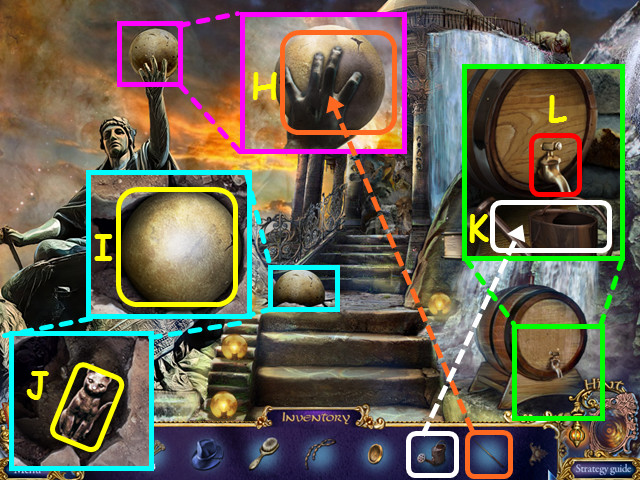
- Look at the statue’s hand and use the CUE STICK to knock the ball from his hand (H).
- Look at the stairs; take the CANNONBALL (I) and the CAT BADGE (J).
- Look at the barrel and place the EMPTY WATERING CAN under the spigot (K).
- Turn on the spigot (L) and take the FULL WATERING CAN.
- Return to Main Street then go right to the Park of Statues.

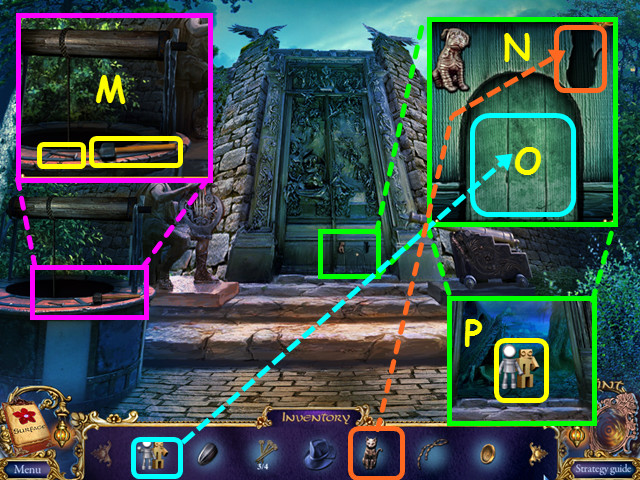
- Look at the well, take the 4/4 NAIL and the HAMMER (M).
- Look at the base of the gate and place the CAT BADGE into the niche (N).
- Place the LIVE TOYS into the opening (O).
- Once the gate opens, take the LIVE TOYS (P).
- Walk forward to the dried pond.

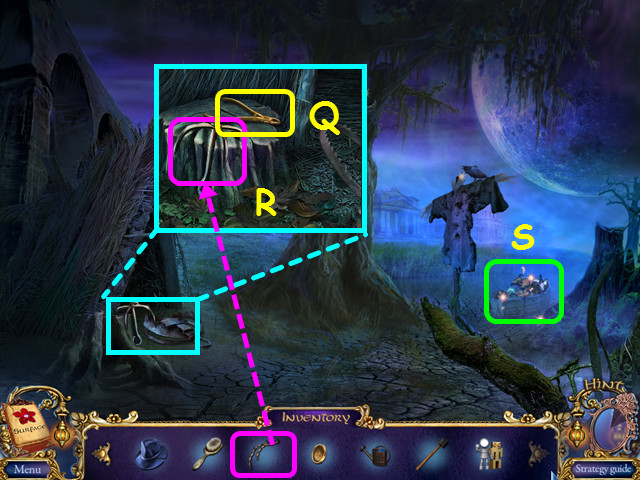
- Look at the hut and take the NIPPERS (Q).
- Use the ROPE on the hook, then take the GRAPNEL (R).
- Select the boat for a HOS (S).

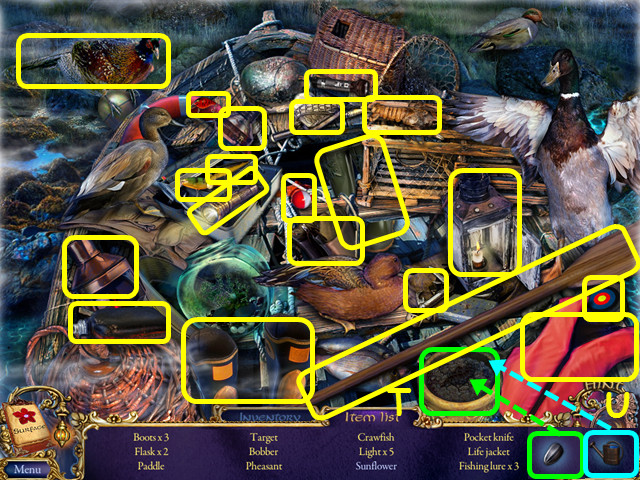
- Locate all the items on the list.
- Plant the SUNFLOWER SEED in the pot (T), then use the FULL WATERING CAN (U) to make the sunflower.
- You will earn the TARGET SIGN.
- Walk down once.

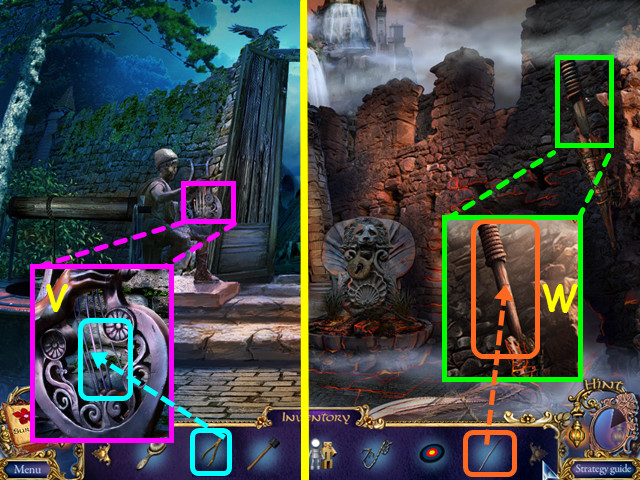
- Look at the harp and use the NIPPERS to take the STRING (V).
- Return to the Arch entrance.
- Look at the torch and use the STRING to cut down the TORCH (W).
- Walk forward twice then go left to the path to the lower city.

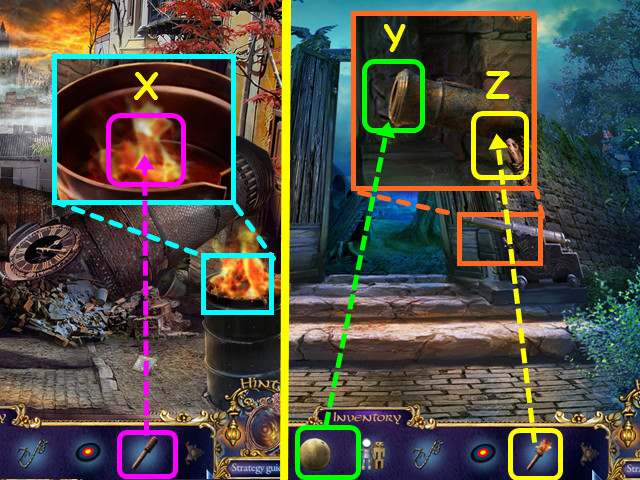
- Look at the barrel and use the TORCH on the flames to get the BURNING TORCH (X).
- Return to the Park of Statues.
- Look at the cannon and place the CANNONBALL in the end (Y).
- Place the BURNING TORCH on the side of the cannon (Z).
- Look at the cannon again for a mini-game.

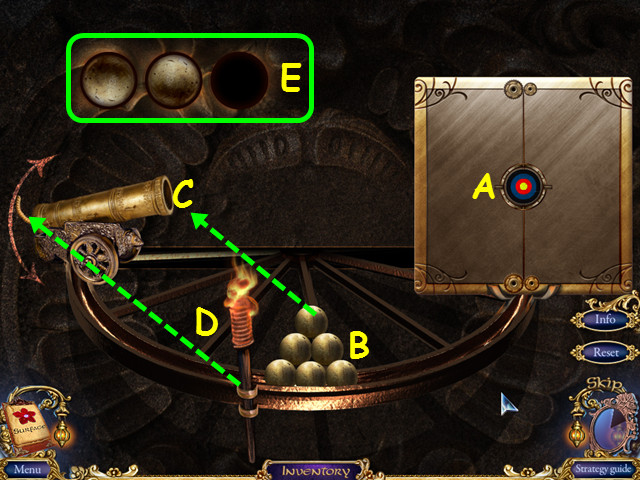
- Place the TARGET SIGN in the circle on the right to trigger the mini-game (A).
- You must hit the target 3 times; each hit will make the next more difficult.
- Place a cannonball (B) into the cannon (C), tilt to aim then use the torch on the cannon to fire (D).
- The next 2 shots will require you to time your shots based on the movement of the target.
- After your first hit, the target will start moving up and down.
- After your second hit, the target will move all over.
- The circles in the upper left will track your progress (E).
- Should you miss the target 6 times in a row, the mini-game will reset.
- Walk forward to the dried pond.

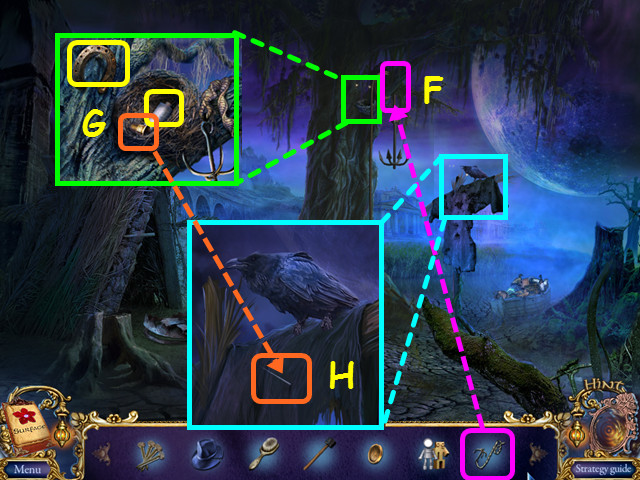
- Use the GRAPNEL on the tree limb (F).
- Look in the nest; take the HORSESHOE, THREAD, and THIMBLE (G).
- Look at the scarecrow and use the THIMBLE to get the NEEDLE (H).
- Return to Main Street.

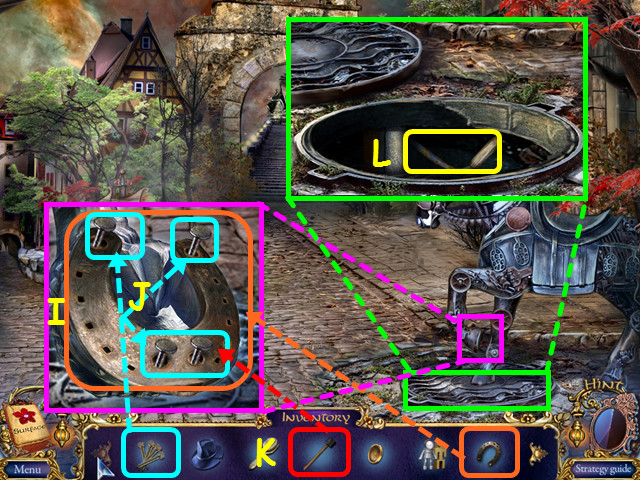
- Look at the horse’s hoof and place the HORSESHOE on top (I).
- Place the 4 NAILS on the horseshoe (J), then use the HAMMER on the nails (K).
- Look at and open the sewer hatch; take the WELL HANDLE (L).
- Walk right the Park of Statues.

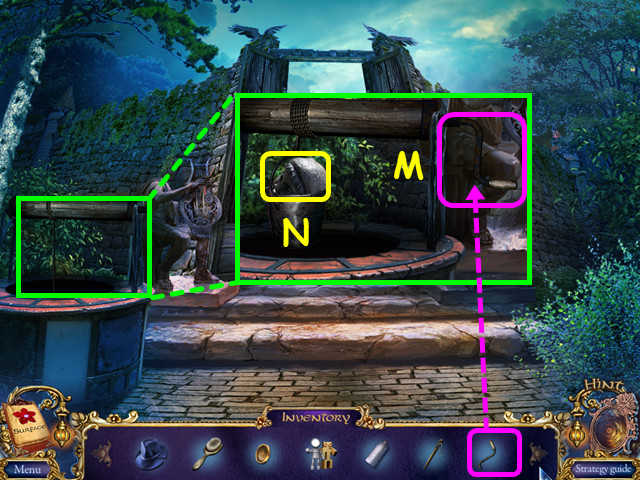
- Look at the well and place the WELL HANDLE on the right (M).
- Turn the handle to raise the bucket.
- Take the STATUE HEAD (N).
- Return to the entrance to the Spring of Life and look at the statues blocking the way.

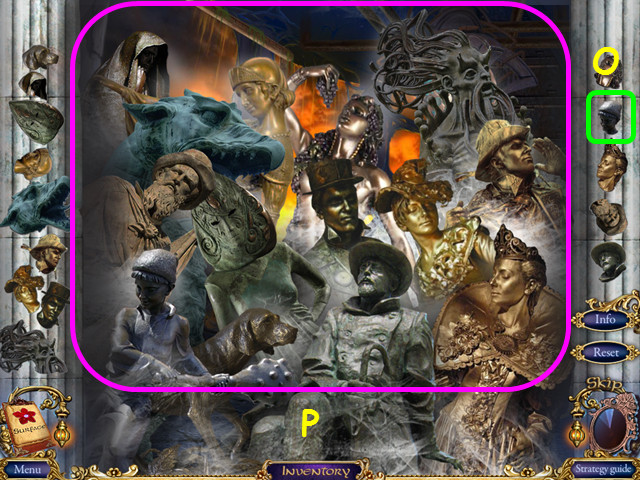
- Place the STATUE HEAD on the right column to trigger a mini-game (O).
- Place each head on the correct statue; our solution is shown here (P).
- Heads will lock in place when correct.
- Walk forward to the Spring of Life.

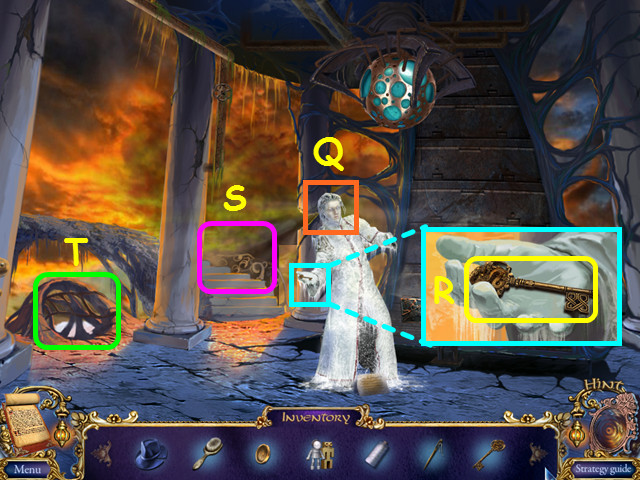
- Look at the face of the frozen man (Q).
- Look in his hand and take the DUNGEON KEY (R).
- Note the path to the entrance to the top of the city (S).
- Walk to the entrance to the dungeon (T).

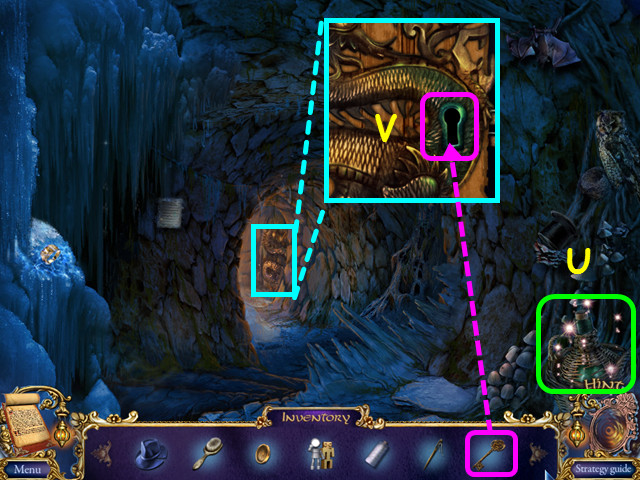
- Note the debris on the right for a later HOS (U).
- Look at the dragon and use the DUNGEON KEY in the lock (V).
- Walk forward to the dungeon.

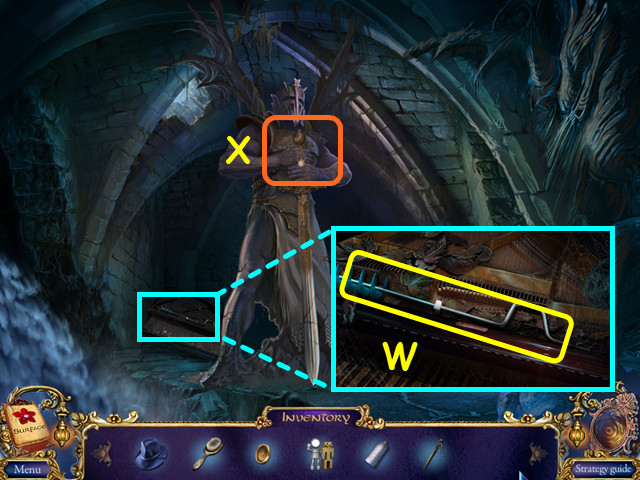
- Look at the piano and take the ICE DRILL (W).
- Note the statue is missing 3 rings for a mini-game (X).
- Walk down twice, then go forward to the entrance to the top of the city.

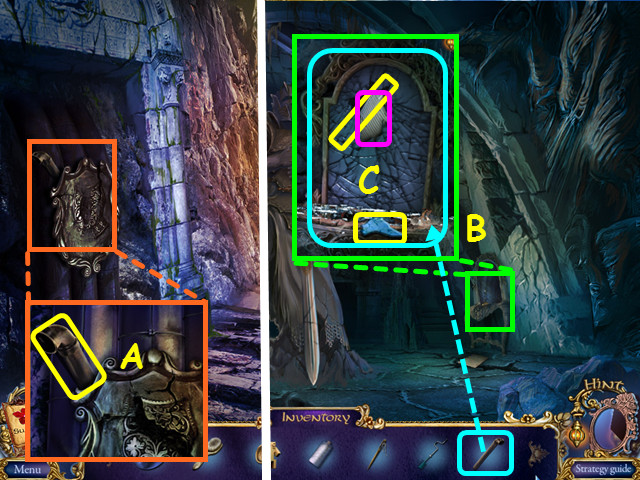
- Look at the crest and take the PIPE PIECE (A).
- Return to the dungeon.
- Look at the vanity and use the PIPE PIECE to break the mirror (B).
- Take the MIRROR SHARD, note and ILLUSIONIST’S WAND (C).
- Return to the path to the lower city.

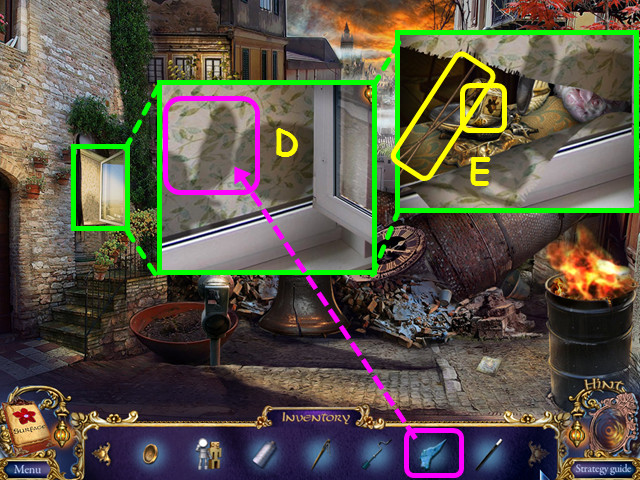
- Look at the window and use the MIRROR SHARD to cut the cloth (D).
- Take the KNITTING NEEDLE and the RING ALPHA (E).
- Return to the arch and select the display window on the left for a HOS.

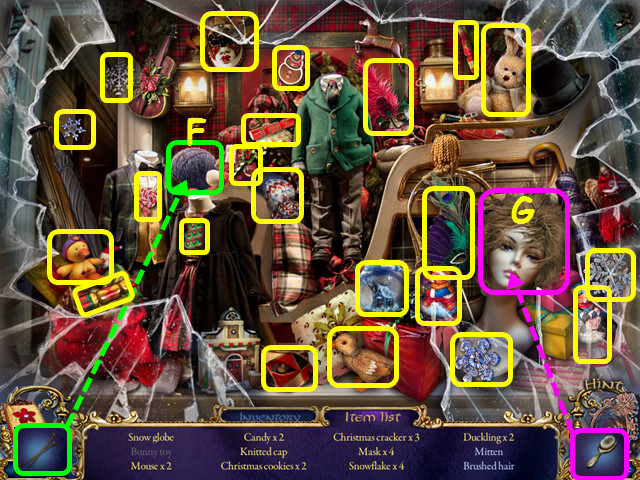
- Locate all the items on the list.
- Use the KNITTING NEEDLE on the yarn to make the mitten (F).
- Use the HAIRBRUSH on the wig for brushed hair (G).
- You will earn the SNOW GLOBE.
- Return to the entrance to the top of the city.

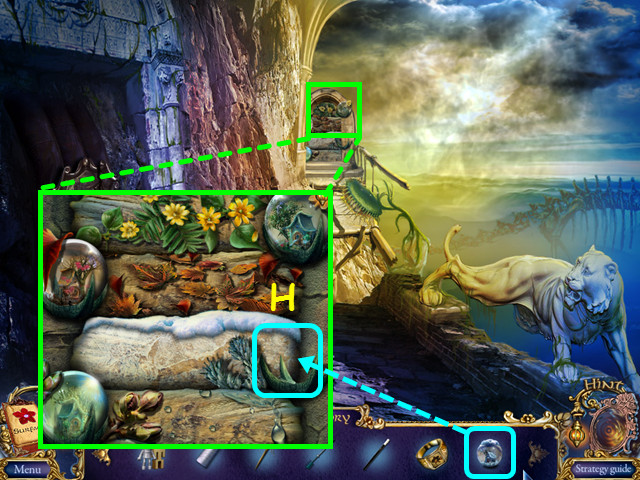
- Look at the seasons door and place the SNOW GLOBE in the holder (H).
- Walk forward to the top of the city.

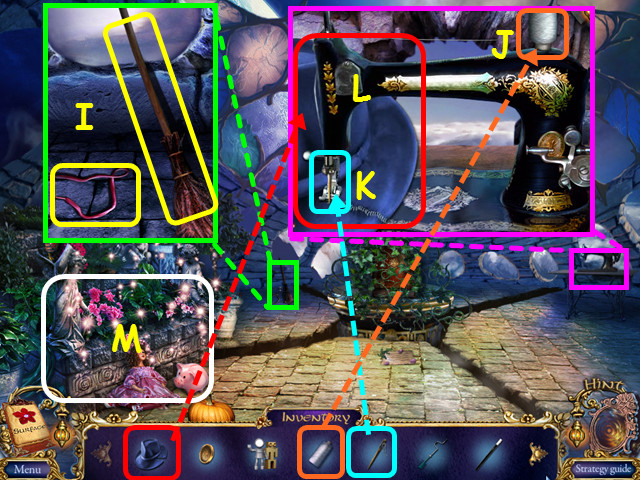
- Look in the back; take the BROOM and the SHOELACE (I).
- Look at the sewing machine and place the THREAD on the spindle (J).
- Place the NEEDLE into the holder (K).
- Use the TORN HAT on the left end of the machine to make the MENDED HAT (L).
- Select the garden area for a HOS (M).

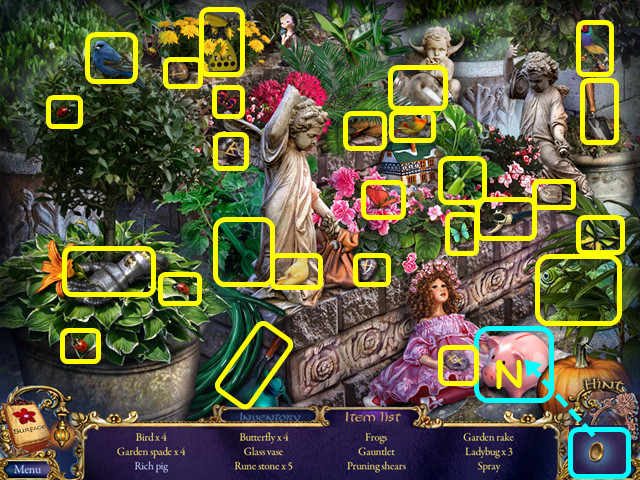
- Locate all the items on the list.
- Use the coin on the bank to make the rich pig (N).
- You will earn the GAUNTLET.
- Return to the arch entrance.

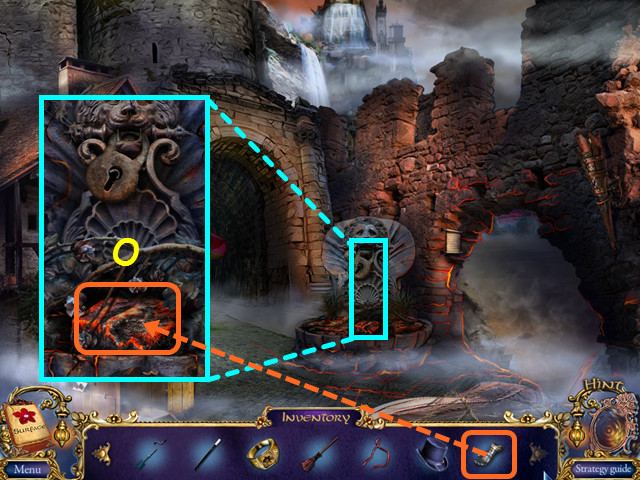
- Look at the fountain and use the GAUNTLET to collect DEAD SOIL (O).
- Travel to the dried pond.

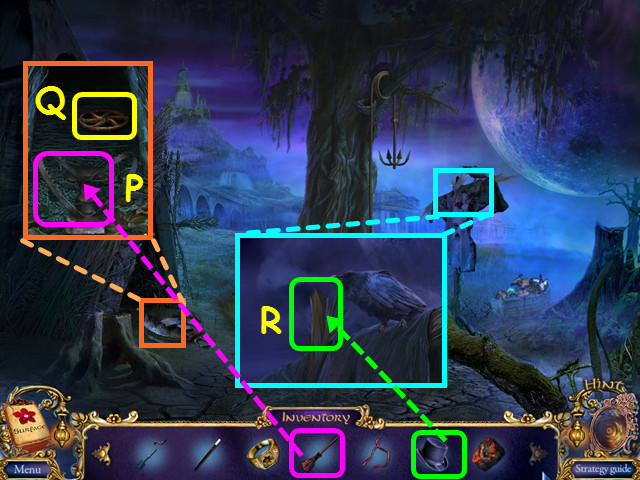
- Look in the hut and use the BROOM on the trap (P).
- Take the VALVE (Q).
- Look at the the scarecrow and place the MENDED HAT on top (R).
- You will earn a FEATHER.
- Return to the top of the city.

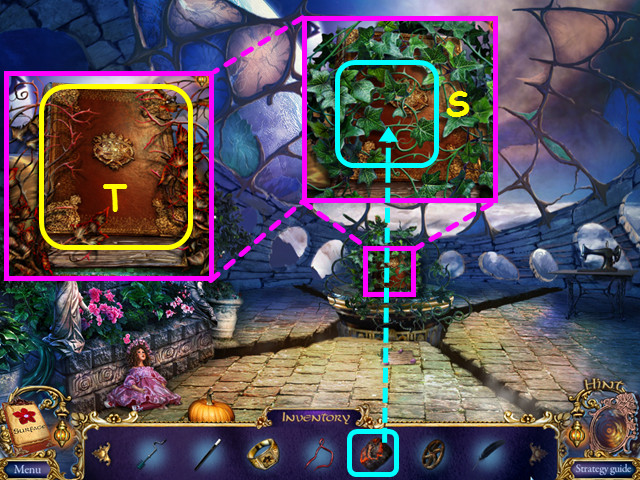
- Look at the center platform and use the DEAD SOIL on the vines (S).
- Take the THICK BOOK (T).
- Walk down once.

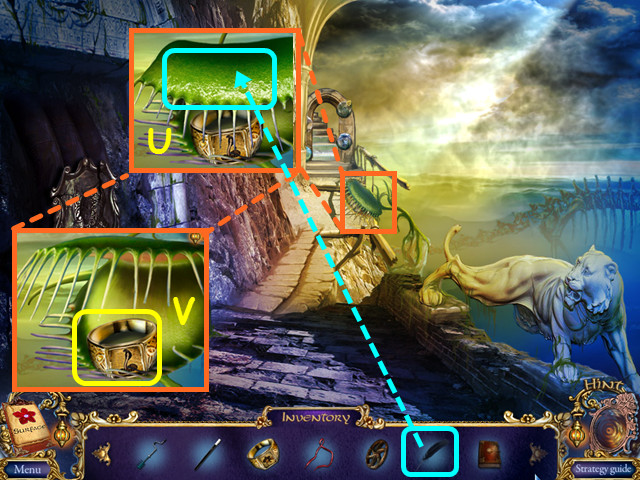
- Look at the plant and use the FEATHER to make it open (U).
- Take the RING SNAKE (V).
- Return to the entrance to the dungeon.

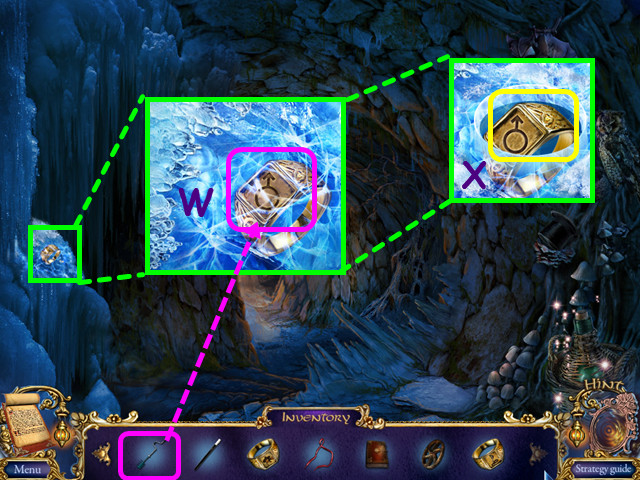
- Look at the ice on the left and use the ICE DRILL to make a hole (W).
- Take the RING MALE (X).
- Walk forward to the dungeon and select the statue for a mini-game.

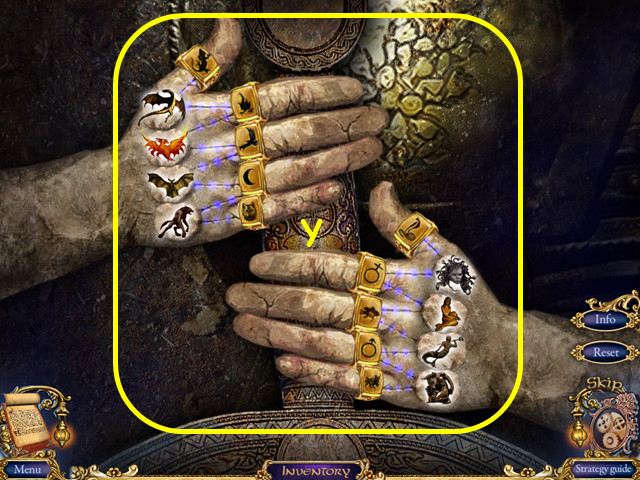
- Place the 3 RINGS onto the fingers to activate the mini-game.
- Move the rings so that they are connected to mythical creatures with the same trait.
- Select 2 rings to swap locations.
- The 2 lines on a creature will glow when the correct rings are connected.
- Our solution is shown here (Y).
- Take the SWORD from the statue.
- Walk down twice to the Spring of Life.

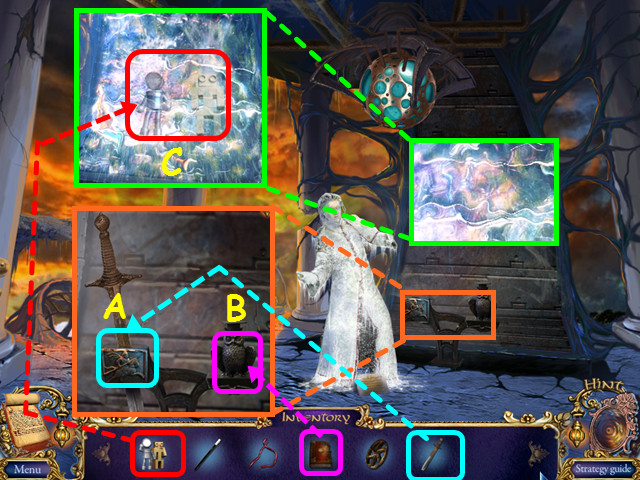
- Look at the stand; place the SWORD on the left (A) and place the THICK BOOK on the right (B).
- Once it begins to flow, look at the waterfall and place the LIVE TOYS inside (C).

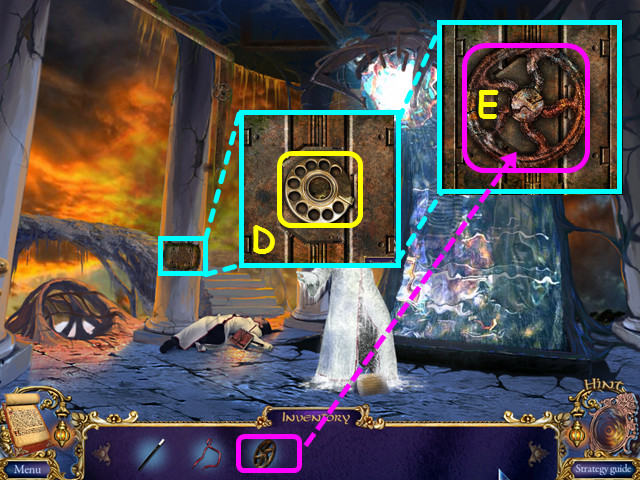
- Look at the panel on the column and take the TELEPHONE ROTOR (D).
- Place the VALVE on the stem, then turn the valve for a mini-game (E).

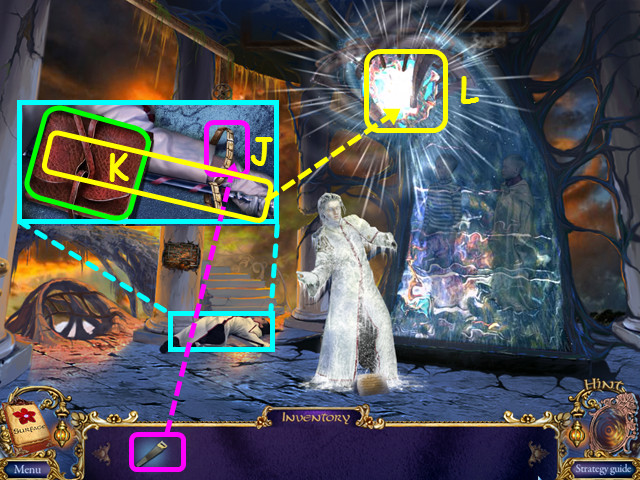
- Turn the red arrows to direct the colors from the left to the right same colored receptacle.
- Two colors cannot use the same hub.
- Our solution is shown here (F).
- Walk left to the entrance to the dungeon.

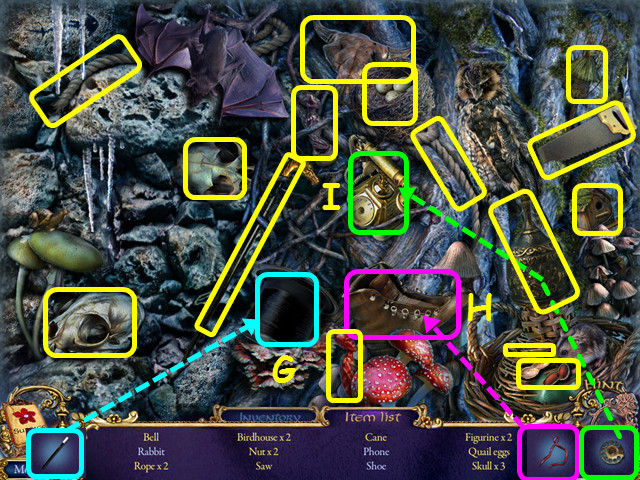
- Select the debris on the right for a HOS.
- Locate all the items on the list.
- Use the ILLUSIONIST’S WAND on the hat to find the rabbit (G).
- Use the SHOELACE on the shoe (H).
- Place the TELEPHONE ROTOR on the phone (I).
- You will earn the SAW.
- Walk down once.


- Look at Sid and use the SAW on the gold chain (J).
- Take the journal and the CANE (K).
- Use the CANE on the ball of light (L).
- Congratulations! You have completed Surface: Mystery of Another World Standard Edition!





 Haunted Legends: The Stone Guest Walkthrough, Guide, & Tips
 Dark Parables: Queen of Sands Walkthrough, Guide, & Tips
 Life Quest™ Walkthrough, Guide, & Tips
 Doors of the Mind: Inner Mysteries Walkthrough, Guide, & Tips
 Tesla's Tower: The Wardenclyffe Mystery Walkthrough, Guide, & Tips