Haunted Hotel: Charles Dexter Ward Walkthrough, Guide, & Tips
Haunted Hotel: Charles Dexter Ward Walkthrough

Welcome to the Haunted Hotel: Charles Dexter Ward Walkthrough
Enter the abandoned hotel and find your missing twin!
Whether you use this document as a reference when things get difficult or as a road map to get you from beginning to end, we’re pretty sure you’ll find what you’re looking for here.
This document contains a complete Haunted Hotel: Charles Dexter Ward game walkthrough featuring annotated screenshots from actual gameplay!
We hope you find this information useful as you play your way through the game. Use the walkthrough menu below to quickly jump to whatever stage of the game you need help with.
Remember to visit the Big Fish Games Forums if you find you need more help. Have fun!
This walkthrough was created by Margie B, and is protected under US Copyright laws. Any unauthorized use, including re-publication in whole or in part, without permission, is strictly prohibited.
General Tips

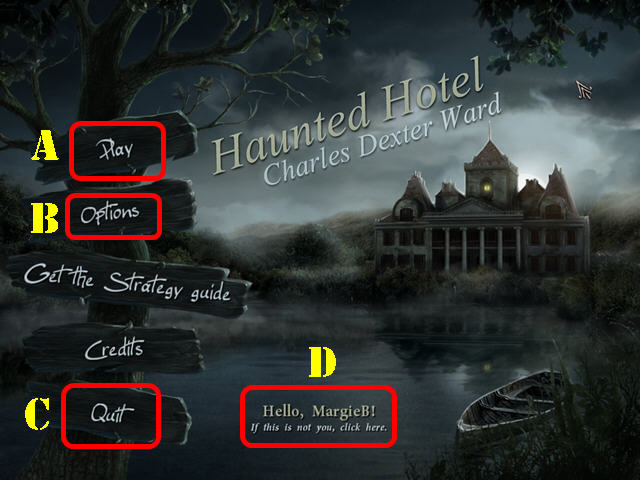
- This is the official Strategy Guide for Haunted Hotel: Charles Dexter Ward Standard Edition!
- Select ‘Play’ (A) to begin your adventure.
- Choose ‘Options’ (B) to adjust screen size, volume, and cursor.
- Select ‘Quit’ (C) to exit the game.
- Select ‘If this is not you, click here’ (D) to manage your player profiles.
- Inventory items will stay in inventory until no longer needed.
- Select ‘INFO’ in the upper right corner of each scene to read the Missing Pages you picked up during the game.
- In this guide we will refer to Hidden Object Scenes as ‘HOS’.
- Select the hint in a HOS and then on a name on the list to find that item. The lists in HOS are random; your lists may not match ours.
Day 1
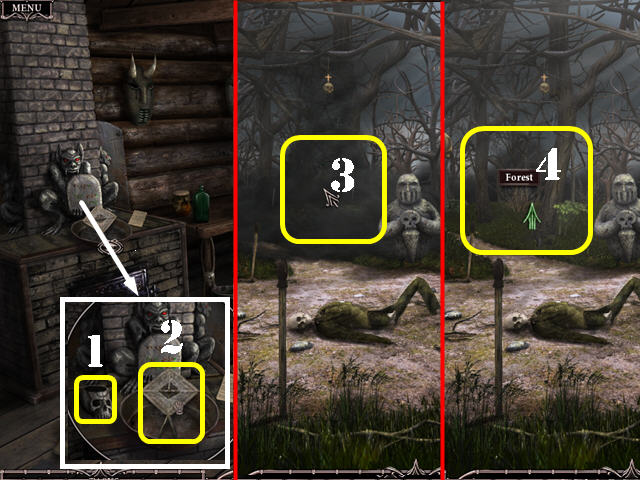
- Play the HOS in the fountain.
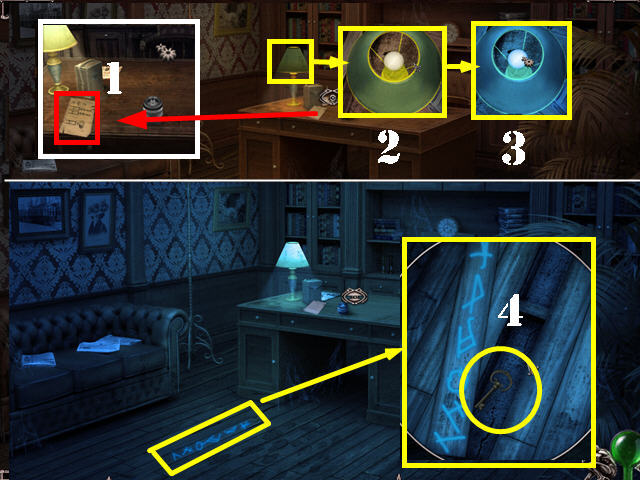
- Find the listed items to obtain the METAL CROSS (1).
- Go forward; touch the door and walk down. Charles will appear by the fountain briefly.
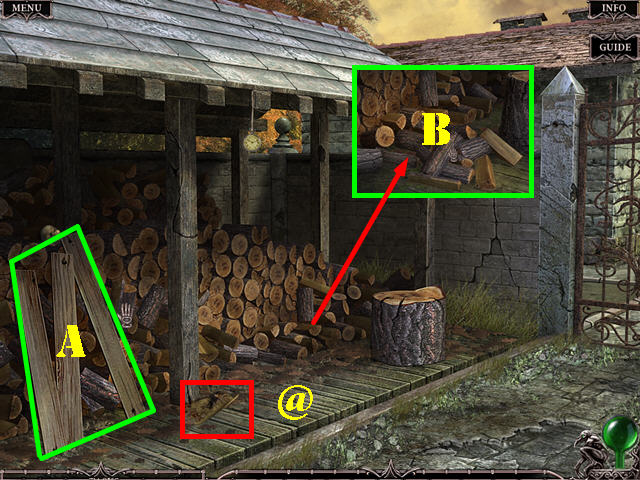
- Head left and examine the wood pile.
- Take the BOARDS (A).
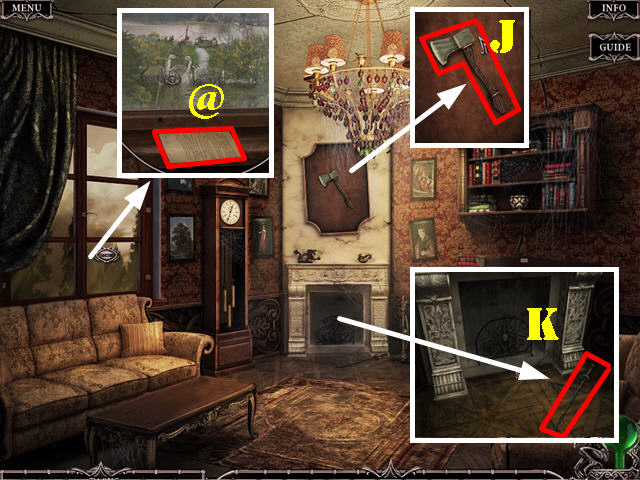
- Look at the Missing Page (@).
- Examine the logs; take the FIREWOOD (B).
- Return to the Courtyard and go right to the Patio.
- Look at the bush and take the STONES (C).
- Examine the window.
- Knock over the birdhouse (D); zoom into it and take the HOOK (E).
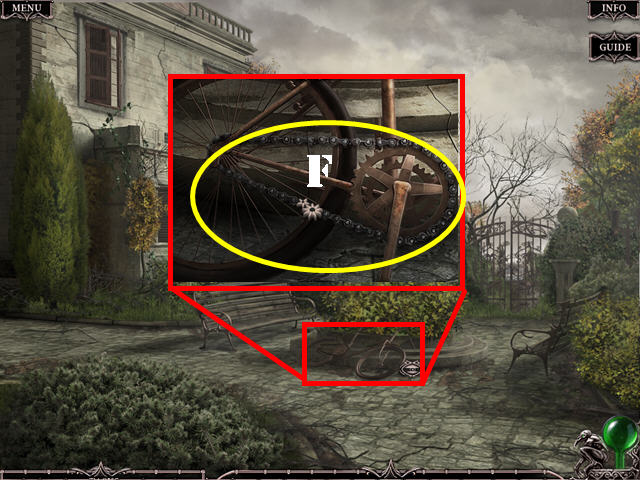
- Examine the bushes; you must find a way to get rid of the snake (F).
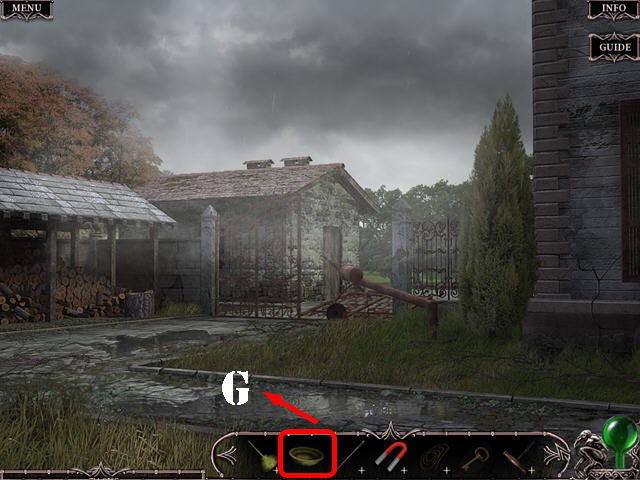
- Exit this scene and go through the gate to access the Swing.
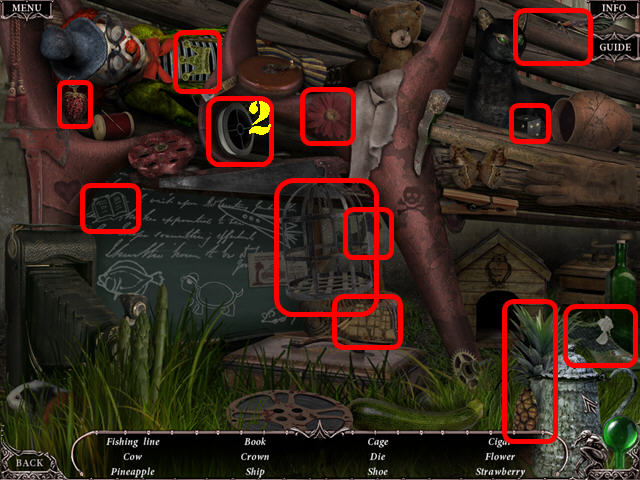
- Play the HOS by the pole.
- Find the listed items to obtain the FISHING LINE (2).
- Look at the grass; take the POLE SPIKES (G).
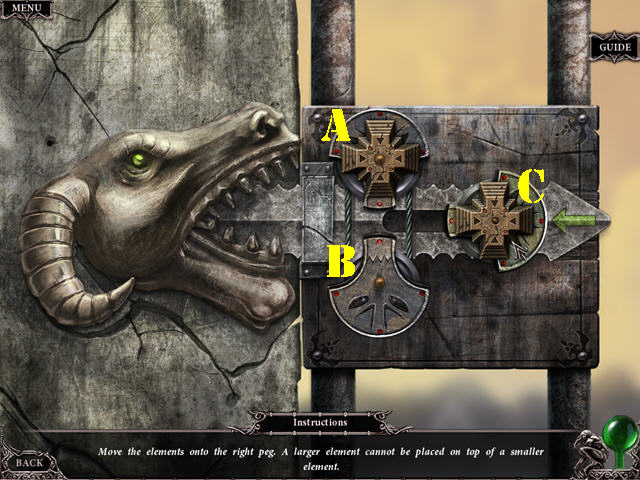
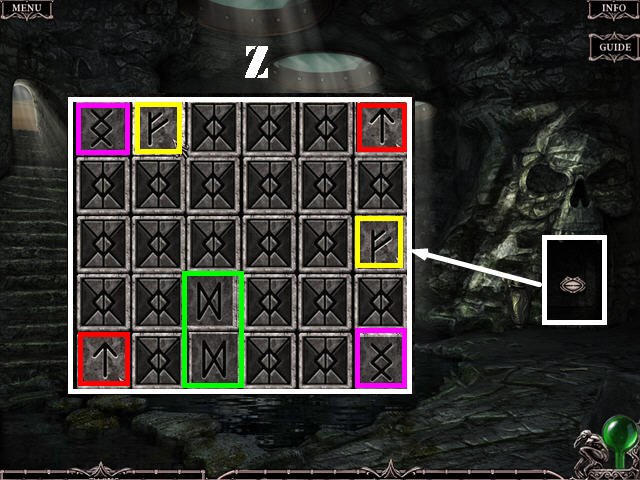
- Examine the gate; put the METAL CROSS on the lock to activate a puzzle (H).
- Move the crosses from the upper left to the right platform.
- Move one cross at a time; crosses cannot be placed on a smaller cross.
- Drag the cross you wish to move to another platform.
- Labeling the 3 platforms A, B, and C, move the top cross in the stack in the following order: A to C, A to B, C to B, A to C, B to A, B to C, A to C, A to B, C to B, C to A, B to A, C to B, A to C, A to B, C to B, A to C, B to A, B to C, A to C, B to A, C to B, C to A, B to A, B to C, A to C, A to B, C to B, A to C, B to A, B to C, A to C.
- Go through the gate to access the Ferry.

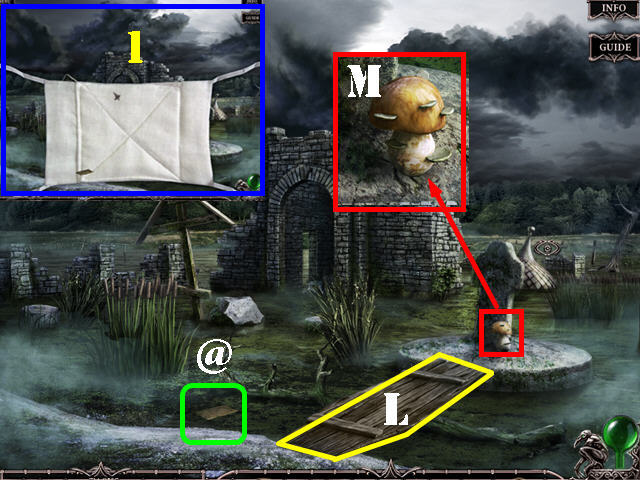
- Touch the crow (I) to make it fly away with the key.
- Look at the sign (J).
- Walk down.
- Use the STONES on the crow to make it drop the key (K).
- Take the KEY (L).
- Go through the back gate.
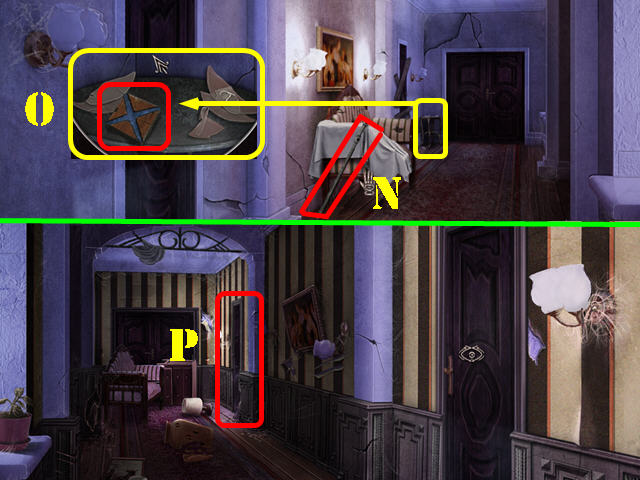
- Use the KEY on the red box and zoom into it (M); take the INSULATION TAPE (N) and the PLIERS (O).
- Go right to the Generator.
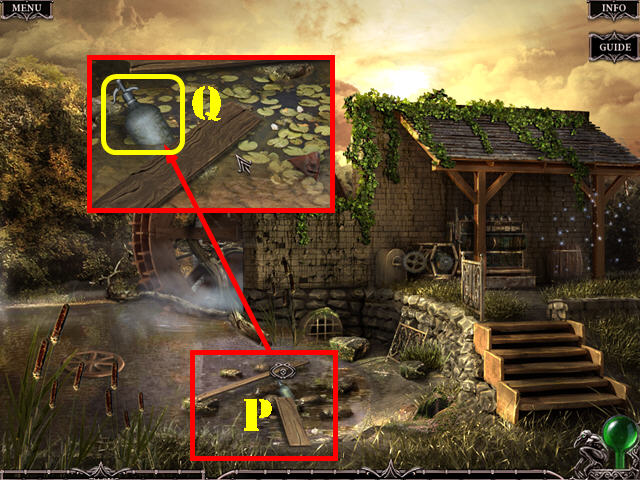
- Put the BOARDS on the stones in the water (P).
- Zoom into the boards and take the SELTZER BOTTLE WITH WATER (Q).
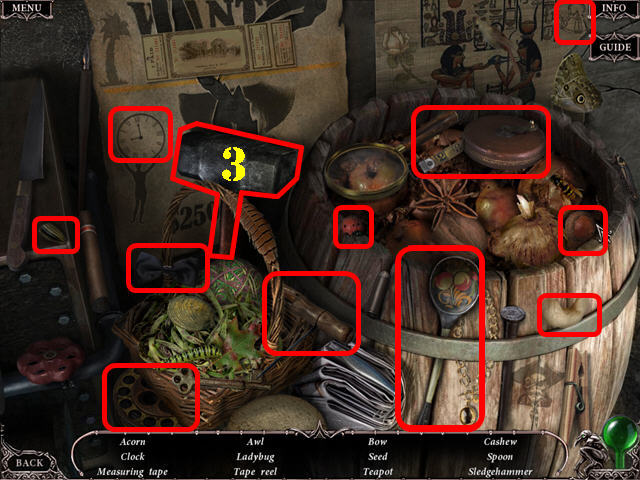
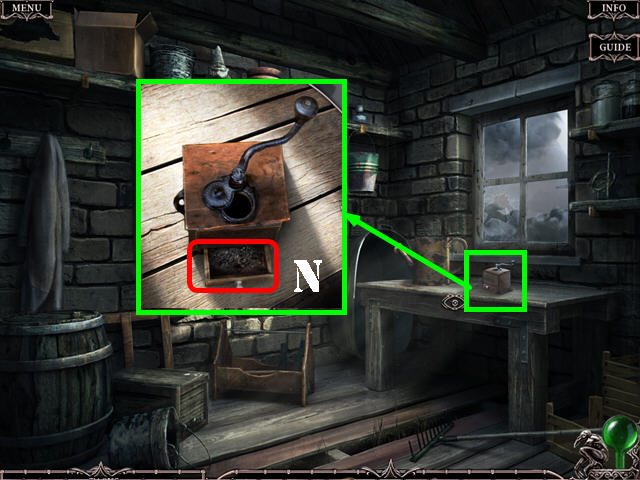
- Play the HOS by the barrel.
- Find the listed items to obtain the SLEDGEHAMMER (3).

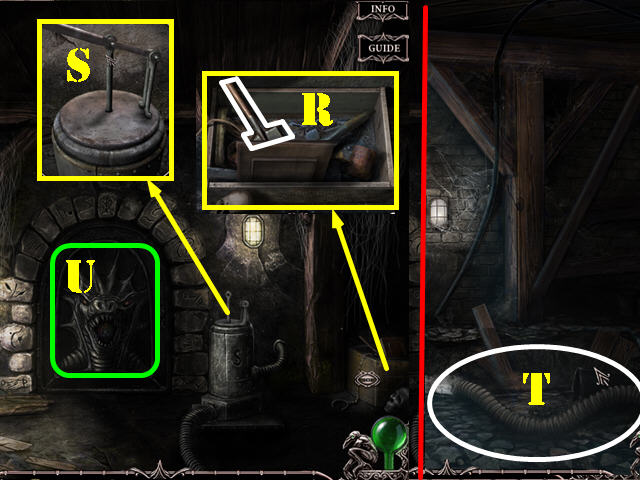
- Go back to the Courtyard and make a left to reach the Electrical pole.
- Put the POLE SPIKES on the pole so you can climb it (R).
- Combine the PLIERS and the INSULATING TAPE in inventory (S) to create the INSULATED PLIERS.
- Examine the top of the pole and open the box (T); put the INSULATED PLIERS on the wires to activate a puzzle.
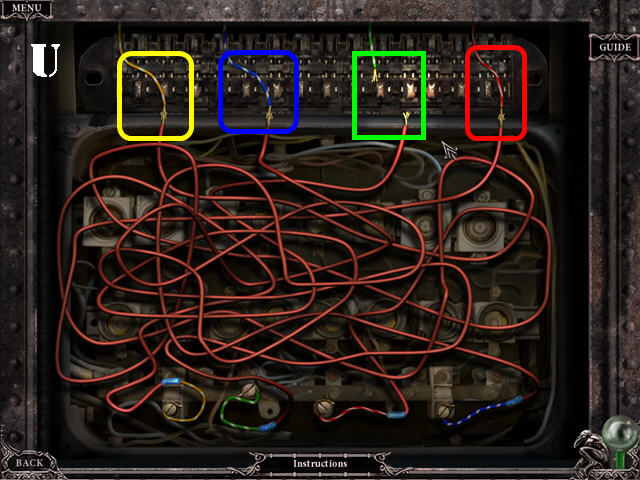
- Connect the top colored wires with their matching counterparts. Follow the path of the bottom wires to see where they lead to and then connect it with its matching wire.
- Select two matching wires (a colored one from the top and a red one) to connect them to each other.
- See the screenshot for the solution (U). Solving this puzzle restores the electricity to the hotel.
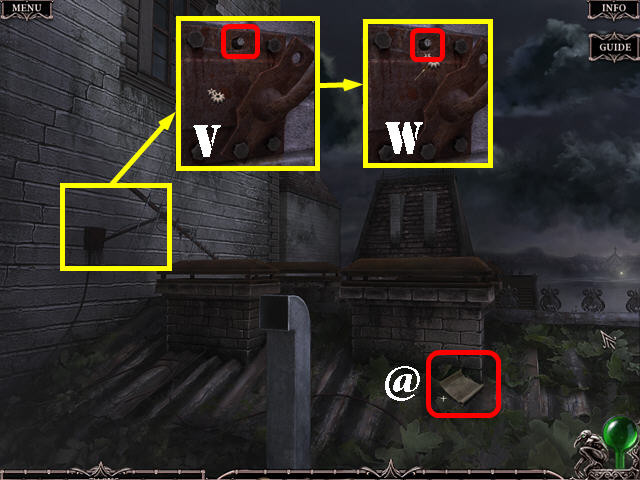
- Go back to the Courtyard; and go towards the entrance.
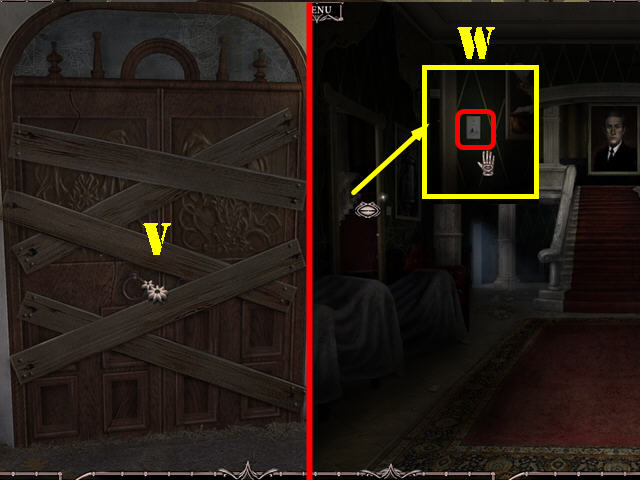
- Remove the 5 boards with the SLEDGEHAMMER (V).
- Go through the door to access the Lobby.
- Examine the left wall and flip on the light switch (W).
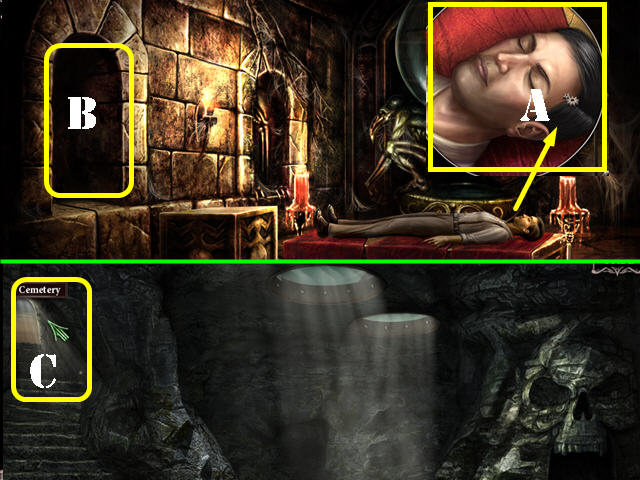
- Go up the stairs; a piece will of the ceiling will fall off. Go through the left door to access the Hallway.
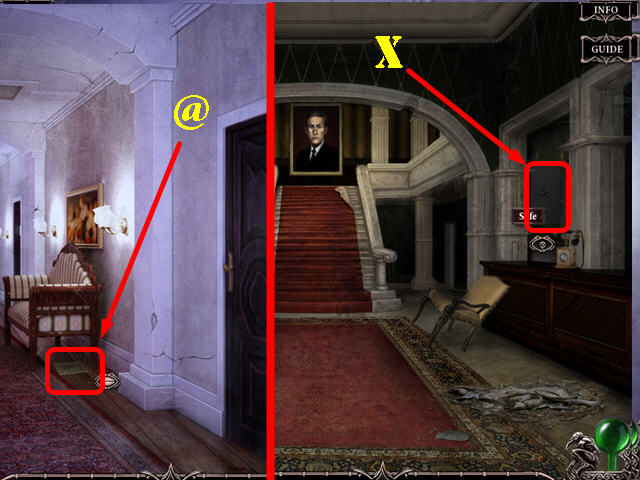
- Read the Missing Page (@).
- Go back down to the Lobby.
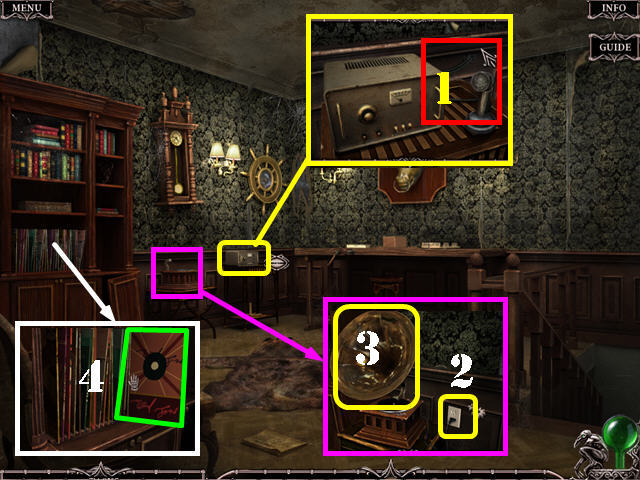
- Examine the safe to activate a puzzle (X). Note: the safe will not be visible unless you visit the second floor first.
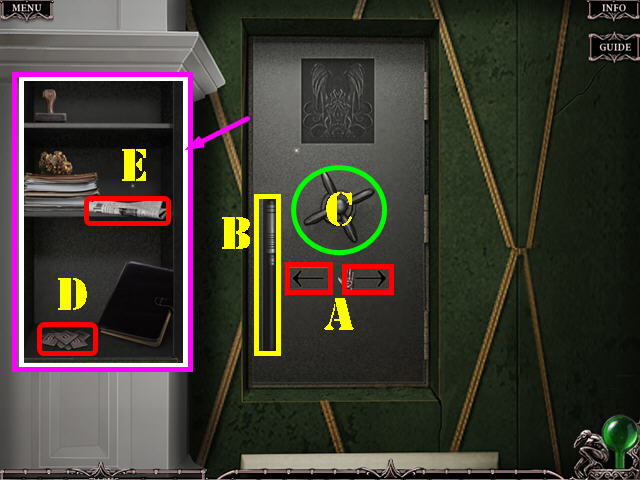
- Use the arrows (A) to move the lock (B) all the way to the top.
- The solution to opening the safe is random.
- Turn the handle after you solve the puzzle, to open the safe (C); take the NUMBERED TILES (D) and the NEWSPAPER (E).
- Exit the safe.
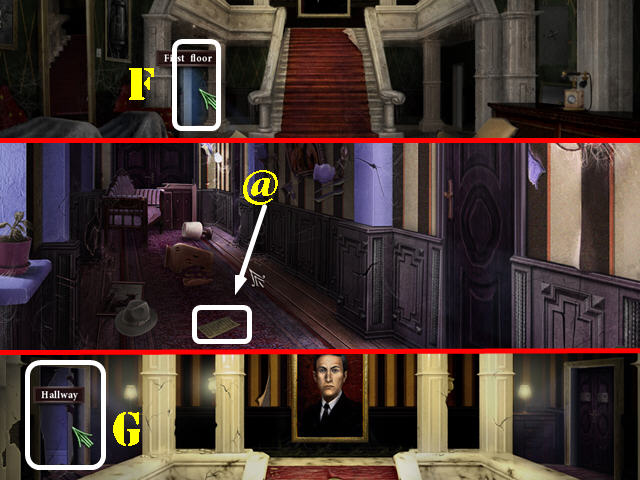
- Go through the door on the far left to access the first floor (F).
- Read the Missing Page (@).
- Go back to the second floor and go through the left door (G).
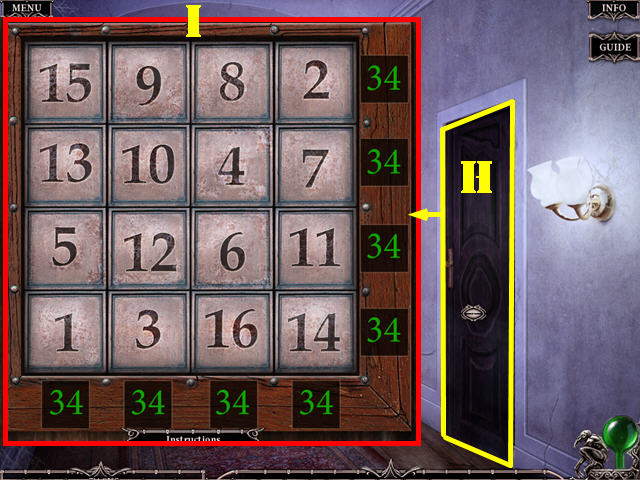
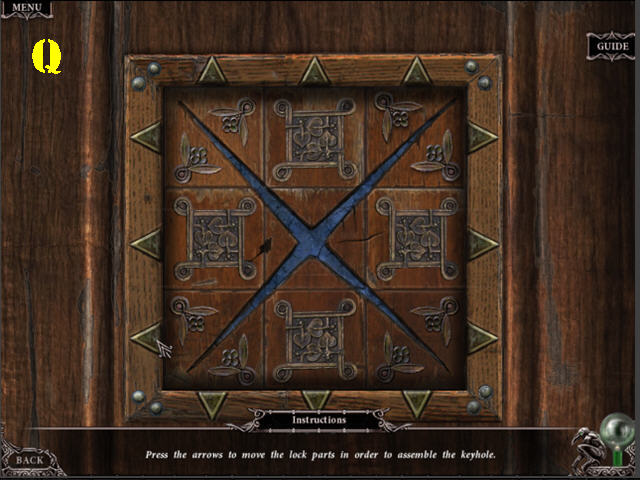
- Look at the right door and put the NUMBERED TILES on it to activate a puzzle (H).
- Select 2 numbers to swap their positions.
- Arrange the numbers so that each row and each column adds up to 34.
- Please look at the screenshot for the solution (I).
- Enter Curwen’s room.
- Examine the window and read the Missing Page (@).
- Examine the frame and take the AXE (J).
- Examine the fireplace and take the POKER (K).
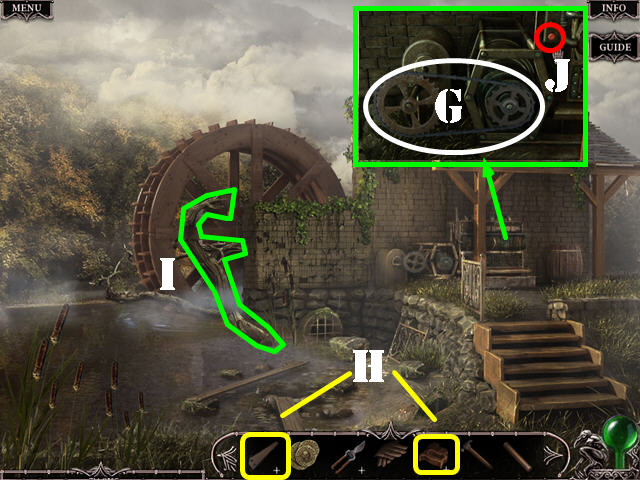
- Return to the Generator.
- Combine the FISHING LINE and POKER to create the FISHING ROD PART. Combine the FISHING ROD PART and the HOOK in inventory to create the FISHING ROD (L).
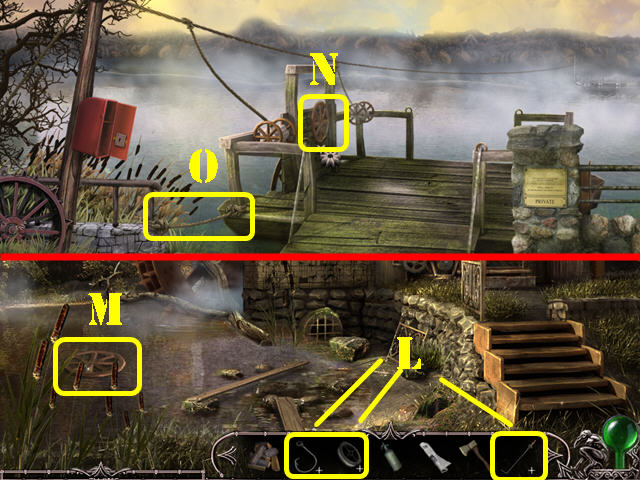
- Use the FISHING ROD to retrieve the FERRY WHEEL from the water (M).
- Walk down.
- Put the FERRY WHEEL on the Ferry (N).
- Cut the ferry mooring with the AXE (O) to activate a puzzle.
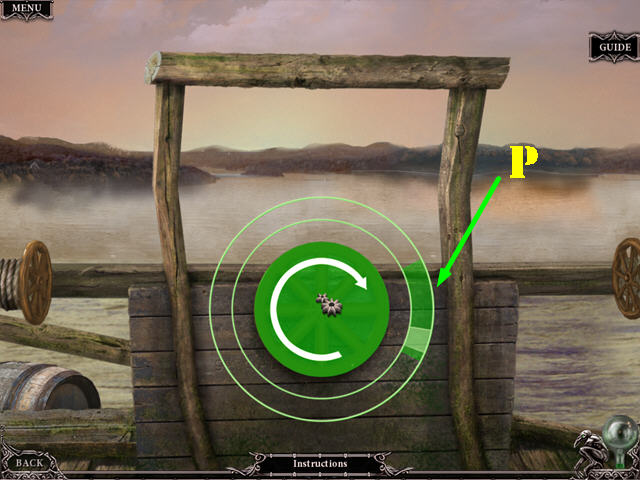
- Press on the wheel when the rotating square hits the green zone (P).
- You must repeat this step 6 times to get to the other side.
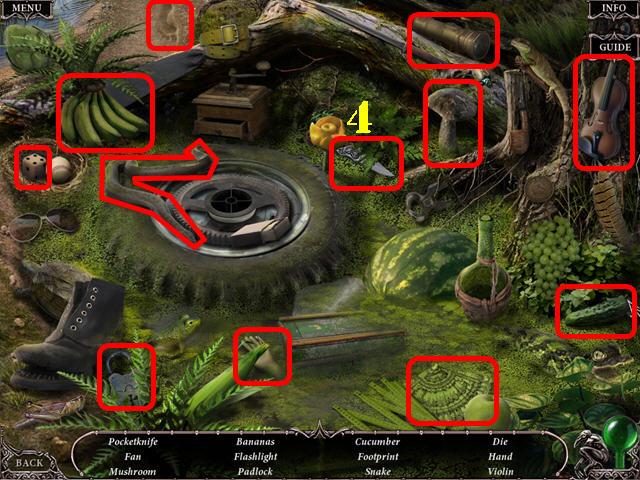
- Play the HOS in the lower right corner.
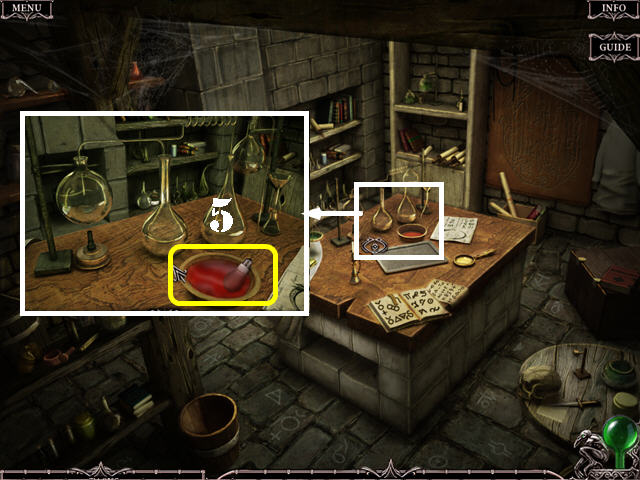
- Find the listed items to obtain the POCKETKNIFE (4).
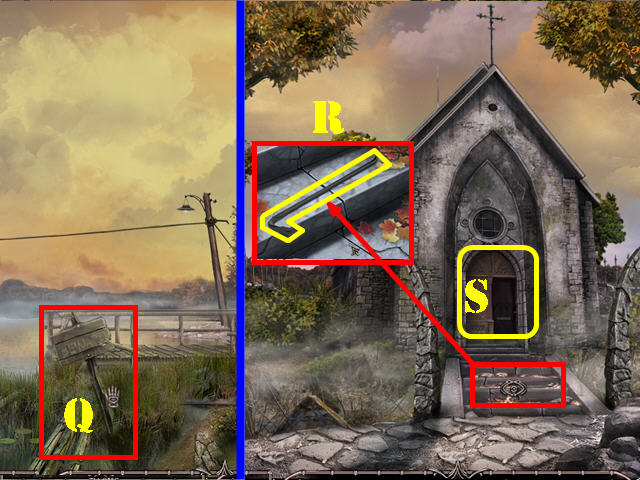
- Take the WOODEN SIGN (Q).
- Go right.
- Examine the steps and take the CROWBAR (R).
- Enter the Crypt (S).
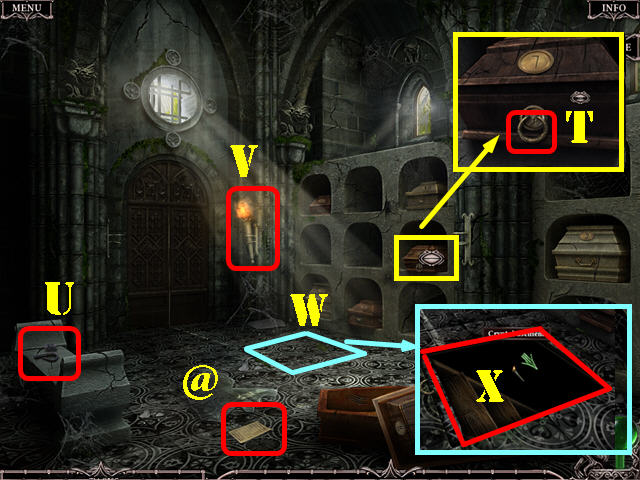
- Read the Missing Page (@).
- Examine the coffin; take the HATCH RING (T).
- Take the FLINT (U).
- Light the torch with the FLINT (V); take the TORCH.
- Examine the floor (W); press on it once and attach the HATCH RING to the hook.
- Take the TORCH and go down to the Crypt basement (X).
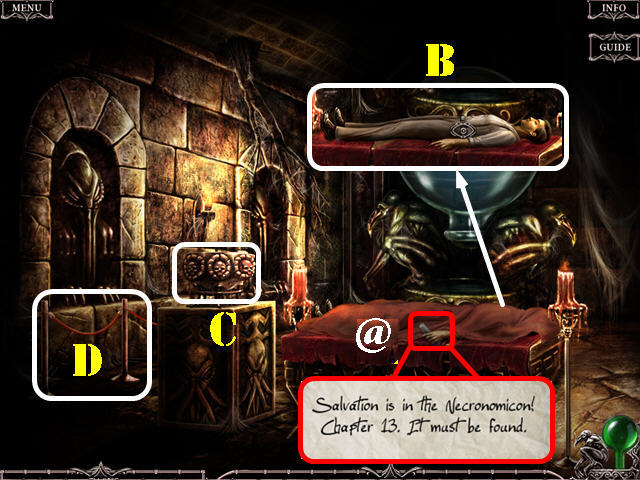
- Read the Missing Page (@).
- Remove the sheet to discover Charles (B).
- Take the RITUAL BOWL (C) and the ROPE FENCE (D).
- Walk down.
- Examine the window; use the ROPE FENCE on the window and go through it (E).
- Walk down to the Ferry Dock.
- Examine the bridge; use the CROWBAR to remove the BOARD (F).
- Go right to the Crypt entrance.
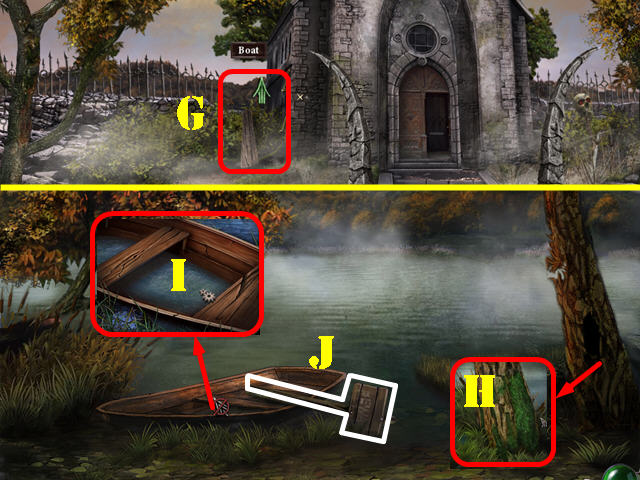
- Use the BOARD on the bushes and go forward towards the boat (G).
- Examine the base of the tree; remove the MOSS with the POCKETKNIFE (H).
- Examine the boat; remove the water in the boat with the RITUAL BOWL (I).
- Put the MOSS in the hole in the boat to patch it up.
- Put the WOODEN SIGN on the boat (J). The electricity in the hotel is off again.
- Take the boat to the other side.
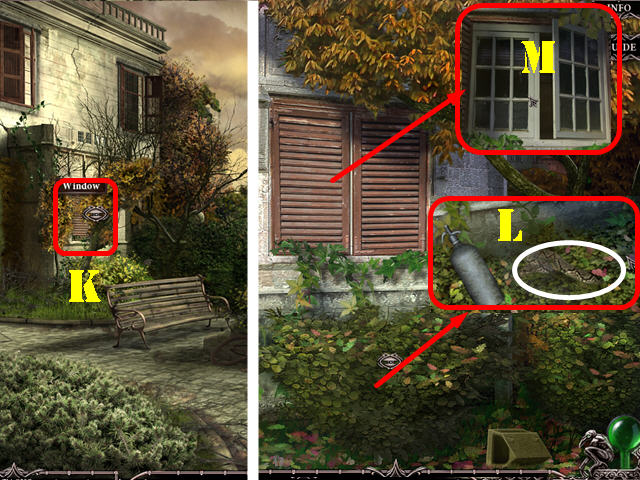
- Return to the Patio.
- Zoom into the hotel window (K).
- Examine the bush below the window and use the SELTZER BOTTLE WITH WATER on the snake (L).
- Examine and open the shutters.
- Use the POCKETKNIFE to open the windows (M).
- Go through the window to enter the Kitchen.
- Examine the top cabinet, take the first CANDLE STUMP (1); open the door and take the SPIRIT (N).
- Examine the bottom cabinet; open the door and take the second CANDLE STUMP (2).
- Zoom into the mantle and take the third CANDLE STUMP (3).
- Examine the shelf; take the fourth CANDLE STUMP (4) and the BORIC ACID (O).
- Examine the cupboard; take the fifth CANDLE STUMP (5) and the MATCHES (P). Open the drawer; take the sixth CANDLE STUMP (6) and the CANDLEWICK (Q).

- Take a closer look at the table; read the recipe (R) and take the PAN (S).
- Put the SPIRIT in the burner (T). Put the PAN on top of the burner and place the 6 CANDLE STUMPS into the pan (U).
- Light the burner with the MATCHES and take the PAN WITH WAX.
- Put the CANDLEWICK in the bowl and cut it with the POCKETKNIFE (V). Pour the BORIC ACID into the bowl with the cut candlewicks and take the 3 CANDLEWICKS.
- Put the first CANDLEWICK into the candle form (W) and pour the PAN WITH WAX into it. Press on the CANDLE in the form and take it from the table. Put the CANDLE into the candleholder (X).
- Put the second CANDLEWICK into the candle form (W) and pour the PAN WITH WAX into it. Press on the CANDLE in the form and take it from the table. Put the CANDLE into the candleholder (X).
- Put the third CANDLEWICK into the candle form (W) and pour the PAN WITH WAX into it. Press on the CANDLE in the form and take it from the table. Put the CANDLE into the candleholder (X).
- Light the candles with the MATCHES to get the CANDELABRA.
- Go through the door to access the Lobby. You can only go through the door if you have the candelabra.
- Return to Curwen’s room upstairs.
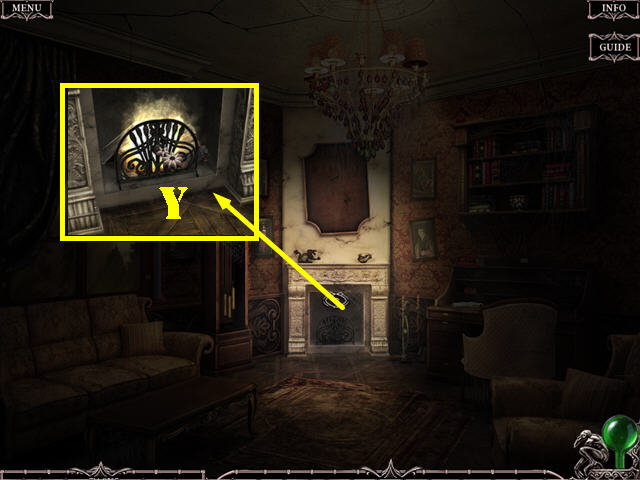
- Zoom into the fireplace.
- Put the FIREWOOD, NEWSPAPER, and CANDELABRA in the fireplace (Y).
Day 2
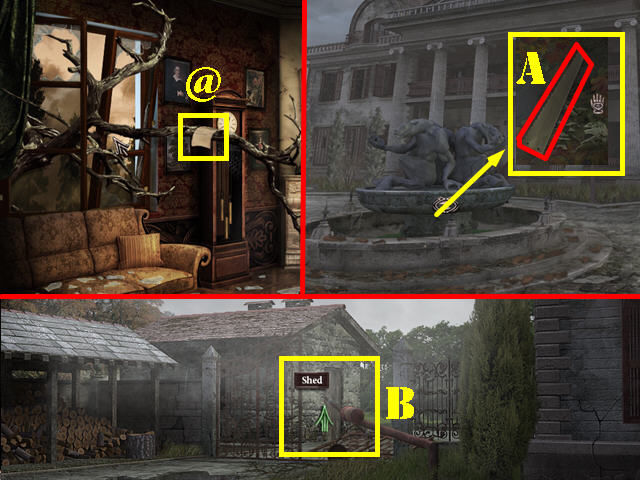
- Touch the window and a tree will crash through it; read the Missing Page (@).
- Exit the hotel; examine the fountain and take the SAW (A).
- Go left; the pole will crash through the gate. Go through the gate to access the Shed (B).
- Play the HOS on the shelf next to the window.
- Find the listed items to obtain the COINS (5).
- Zoom into the shelf; take the RUSTY SHEARS, the SAW HANDLE, and the GLOVES (C).
- Examine the toolbox; take the METAL PIN and the HAMMER (D).
- Look under the table; take the INSECT SPRAY and the SPRAYER (E).
- Go back to the Patio.
- Zoom into the bicycle; get the CHAIN with the GLOVES (F).
- Return to the Generator.
- Zoom into the motor and put the CHAIN on it (G).
- Combine the SAW and the SAW HANDLE in inventory to create the SAW (H).
- Use the SAW on the log blocking the wheel (I).
- Zoom into the motor again and press the red button (J). The power supply to the hotel has been restored.
- Go back to the left Hallway on the second floor.
- Zoom into the blinking light and take the PUZZLE PIECE (K).
- Walk down.
- Examine the right door and put the PUZZLE PIECE on it to activate a puzzle (L).
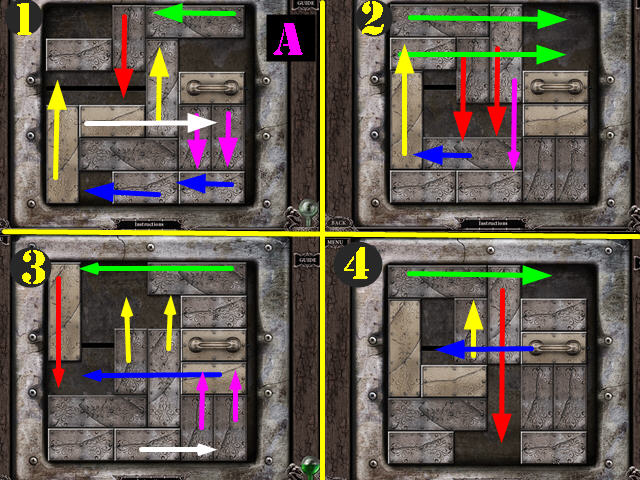
- Slide the blocks out of the way so the latch can go all the way to the left.
- Please look at the two screenshots for the solution (A and B). Follow the arrows in this order: Red, Green, Yellow, Blue, Purple, and White.
- Take the PUMP HANDLE (N).
- Zoom into the area next to the back door; take the PUZZLE PIECE (O).
- Go back down to the Lobby and go through the left door.
- Zoom into the far right door; put the PUZZLE PIECE on it to activate a puzzle (P).
- Use the arrows to switch the squares around until you form the correct image.
- This puzzle is random. See the screenshot for the final solution (Q).
- After you solve the puzzle, you will automatically fall through the floor.
- Examine the crate and take the SHOVEL (R).
- Look at the pump; add the METAL PIN and the PUMP HANDLE to it (S). Now it pumps air only, you must check the other side of the hose.
- Walk down to the Elevator.
- Press on the hose (T).
- Walk down.
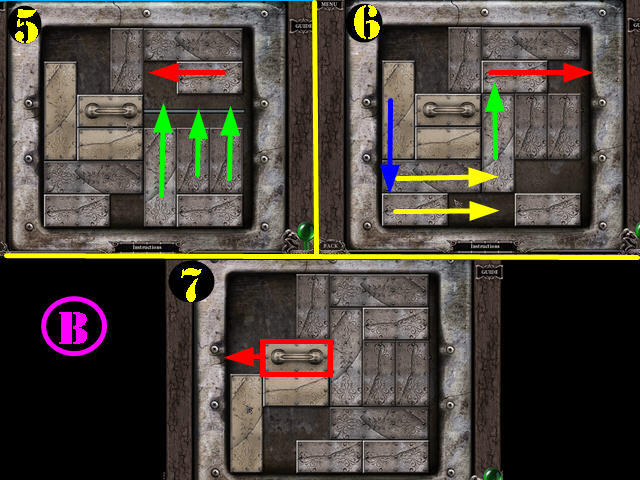
- Examine the door to activate a puzzle (U).
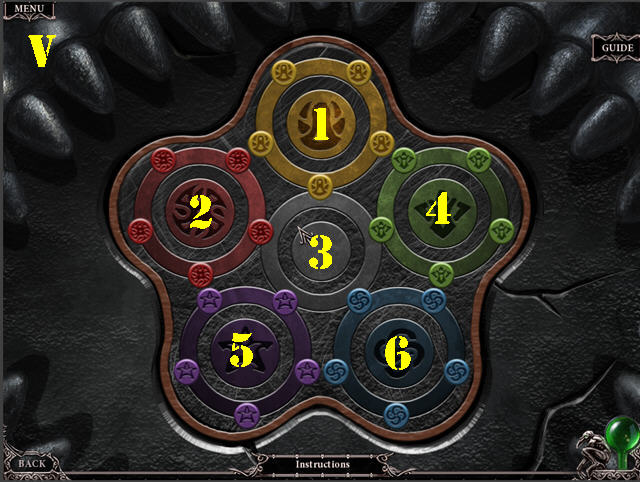
- Put the small circles into their matching circles by rotating the rings. Press in the center of the rings (1-6) to rotate them.
- This puzzle is random. Please look at the screenshot for the solution (V).
- Go forward to the Alchemy room.
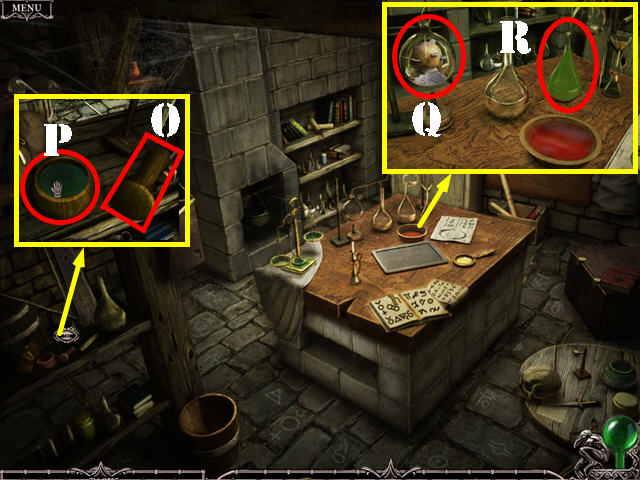
- Examine the shelf; take the OIL (W) and the RED PAINT (X).
- Look at the niche on the side of the table; take the BOWL (Y) and the FIXER (Z).
- Exit the Alchemy room and go up the left steps to reach the Back room.

- Examine the ladder by the bookcase; take the LADDER and the TRAYS (A).
- Examine the mantle; take the DEVELOPER (B).
- Examine the desk; take the ROPE (C).
- Go to the left Hallway on the second floor.
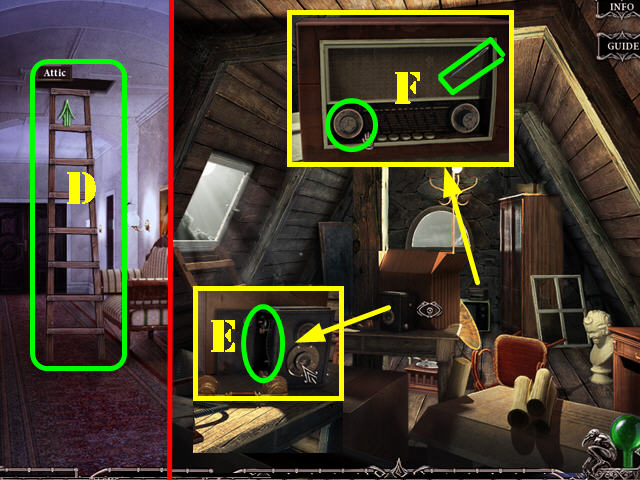
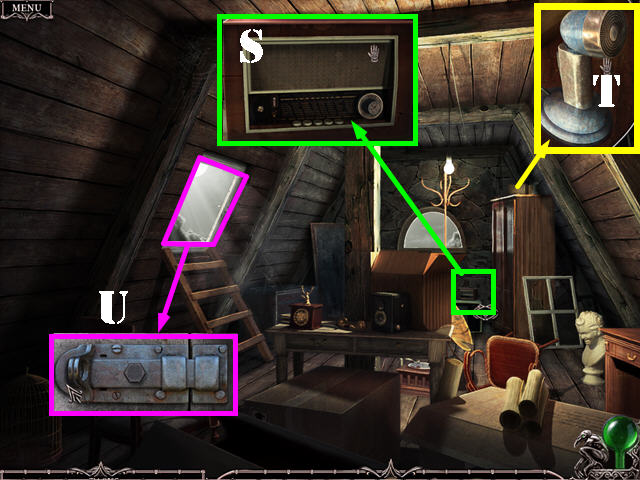
- Place the LADDER below the hatch and go up to the Attic (D).
- Examine the camera; open the compartment and take the FILM (E).
- Look at the radio; take the BUTTON and the NEEDLE (F).
- Go back down to the Pump room.
- Pump on the handle (G); the water has been removed from the pit.
- Walk down to the Elevator.
- Touch the board to place it over the gap (H).
- Take the Missing Page (@).
- Zoom into the Elevator panel; put the BUTTON on it (I). Press the button and go to the Tower room.
- Examine the transmitter; take the MAGNET (J).
- Take a closer look at the package; read the Missing Page (@).
- Open the package with the POCKETKNIFE and take the UV BULB (K).
- Zoom into the door in the lower right; slide the latch (L). Walk down and go to the left Hallway on the second floor.
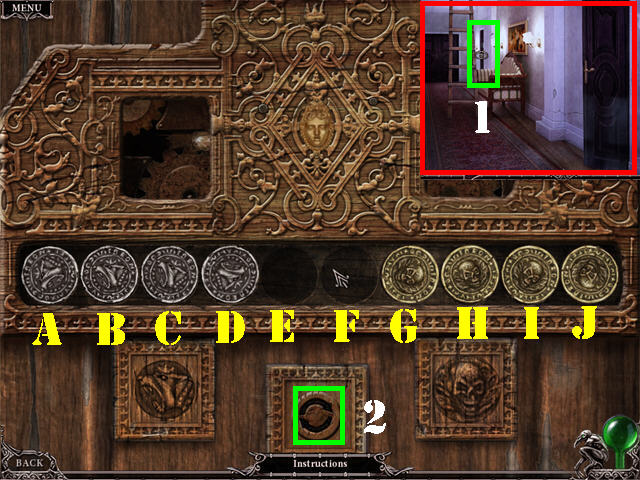
- Zoom into the far right door (1) and put the COINS on the mechanism to activate a puzzle.
- Select the Reset Button (2) if you need to start over.
- To solve the puzzle, press on the coins in this order: D, C, B, A, G, E, D, F, H, I, G, E, C, B, D, F, H, J, B, D, F, H, I, G, H, E, G, C, E, D, F, and E.
- Zoom into the desk and look at the instructions (1).
- Examine the lamp; take the LIGHT BULB (2) and put the UV BULB on the lamp (3).
- Look at the symbols on the ground; break the floor with the HAMMER and take the KEY (4).
- Go back to the Alchemy room next to the Pump room.
- Zoom into the table.
- Put the RED PAINT in the bowl (5). Dip the LIGHT BULB into the bowl and take the RED BULB.
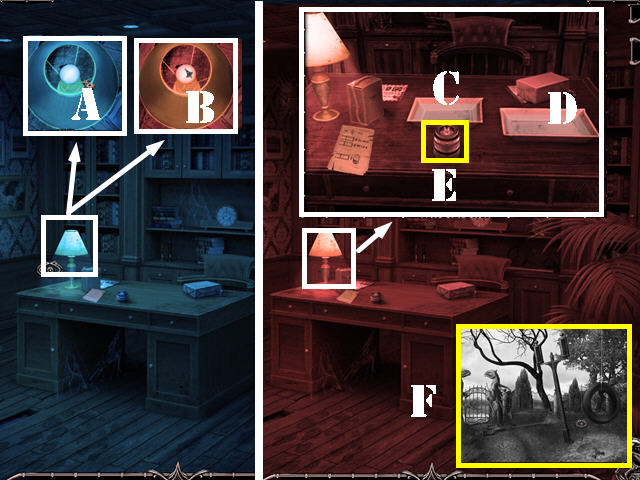
- Return to the Study on the second floor.
- Zoom into the table lamp; swap the existing bulb (A) with the RED BULB (B).
- Zoom into the table; put the TRAYS on the table.
- Add the DEVELOPER to the left tray (C).
- Add the FIXER to the right tray (D).
- Put the FILM into the developer tray and take the HALF-DEVELOPED FILM.
- Put the HALF-DEVELOPED FILM into the FIXER tray and take the DEVELOPED FILM.
- Put the DEVELOPED FILM on the lens (E). Touch the lens to view the picture (F); there is something buried below the swing.
- Go back to the Kitchen (first floor, right door).
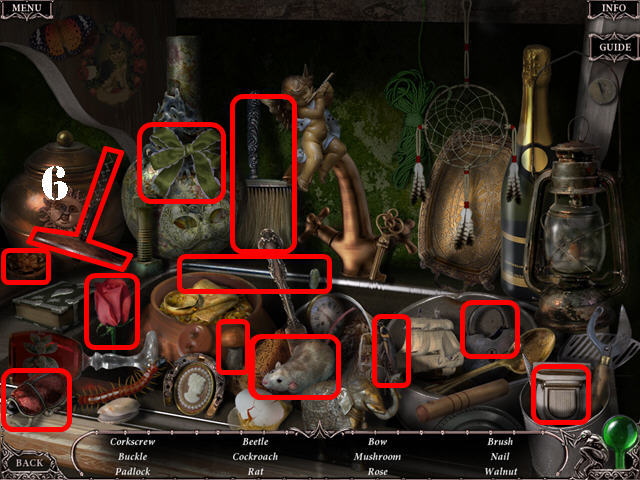
- Play the kitchen sink HOS.
- Find the listed items to get the CORKSCREW (6).
- Go back to the Electrical pole outside.
- Use the BOWL in the water to obtain the BOWL OF WATER (G).
- Go back to Curwen’s room on the second floor.
- Zoom into the desk drawer; unlock it with the KEY and take the CORKED BOTTLE (H).
- Combine the CORKSCREW and the CORKED BOTTLE (I) in inventory to create the CORK.
- Combine the MAGNET and NEEDLE in inventory to create the MAGNETIZED NEEDLE. Combine the MAGNETIZED NEEDLE with the CORK (J) in inventory to create the CORK WITH MAGNETIZED NEEDLE.
- Zoom into the desk; read in the instructions (K).
- Put the BOWL OF WATER on the table.
- Put the CORK WITH MAGNETIZED NEEDLE in the bowl and take the COMPASS (L).
- Exit the hotel and go back to the Swing.
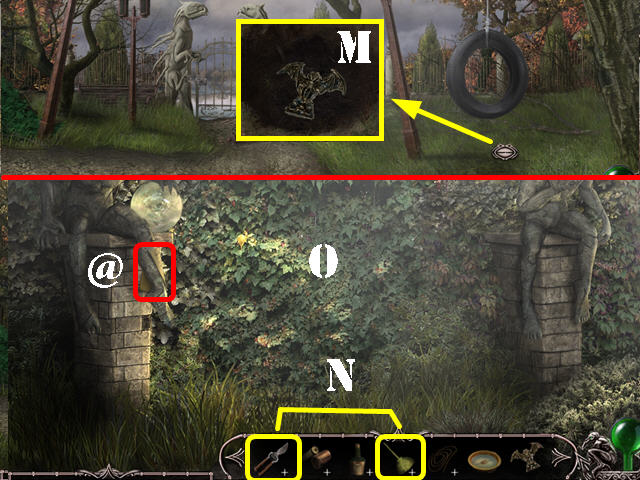
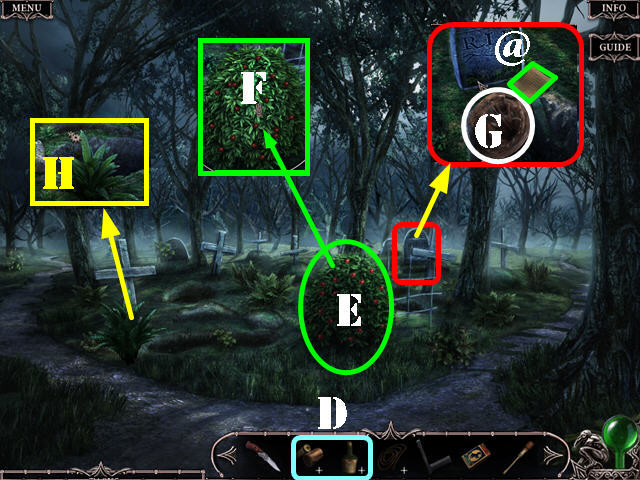
- Examine the grassy area below the swing; use the SHOVEL in the dirt and take the STATUETTE (M).
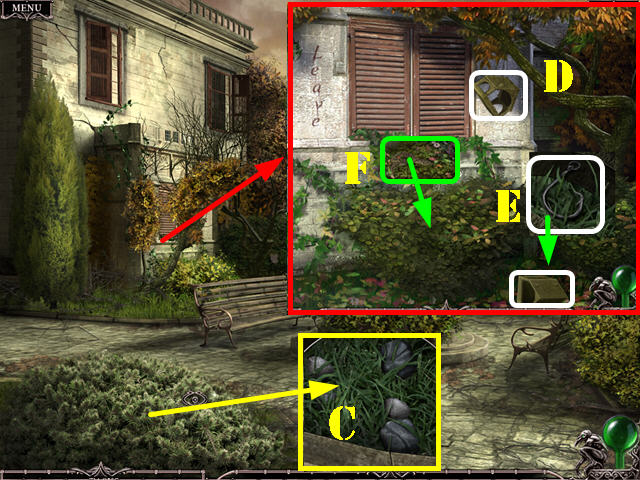
- Go left to reach the Garden.
- Read the Missing Page (@).
- Combine the RUSTY SHEARS and the OIL in inventory (N) to create the OILED SHEARS.
- Cut the plants with the OILED SHEARS (O).
- Take a closer look at and take CHARLES’S HANDKERCHIEF (P).
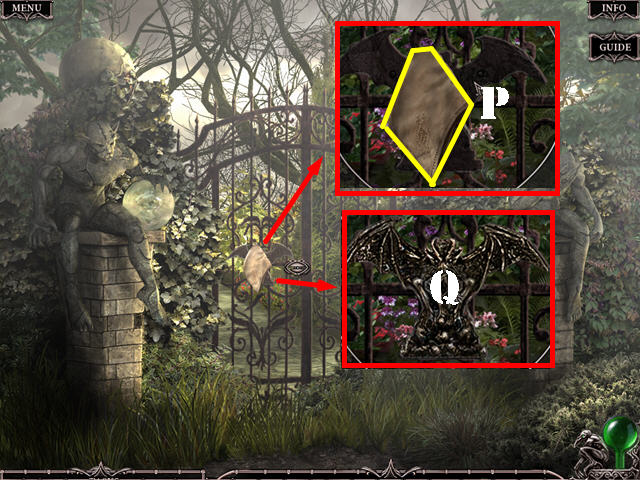
- Put the STATUETTE in the recess on the gate (Q).
- Open the gate and go through it to reach the labyrinth.
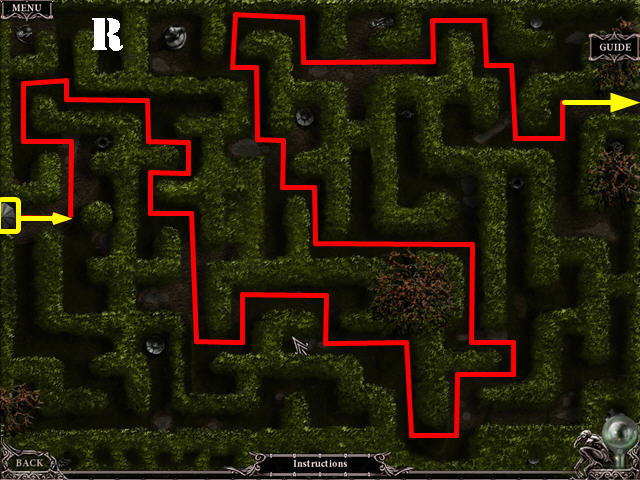
- Your goal is to reach the exit in the upper right.
- Press on the path to make your character move to that spot.
- Please look at the screenshot for the solution (R).
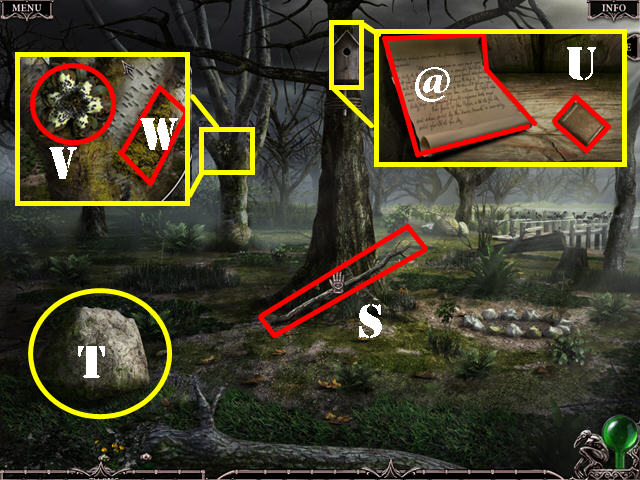
- Take the LONG BRANCH (S).
- Use the LONG BRANCH on the large stone to move it closer to the tree (T).
- Examine the birdhouse on the tree; take the LIGHTER (U) and read the Missing Page (@).
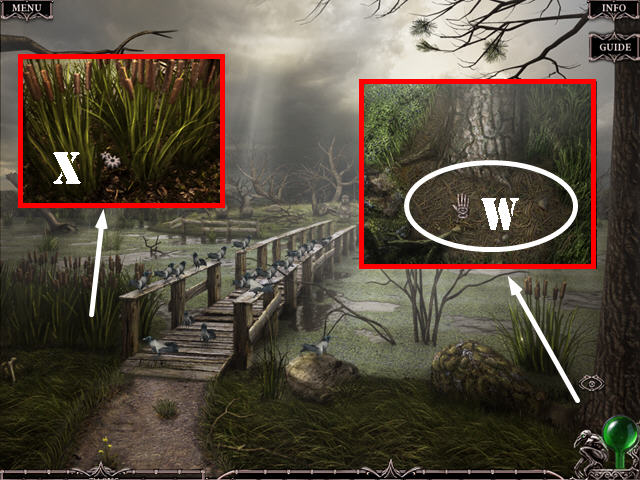
- Examine the left tree; take the GREEN FLOWER (V) and take the MOSS using the POCKETKNIFE (W).
- Go right towards the Bridge.
- Examine the base of the tree; take the PINE NEEDLES (W).
- Examine the reeds on the left; cut the REEDS with the POCKETKNIFE (X).
- Walk down.
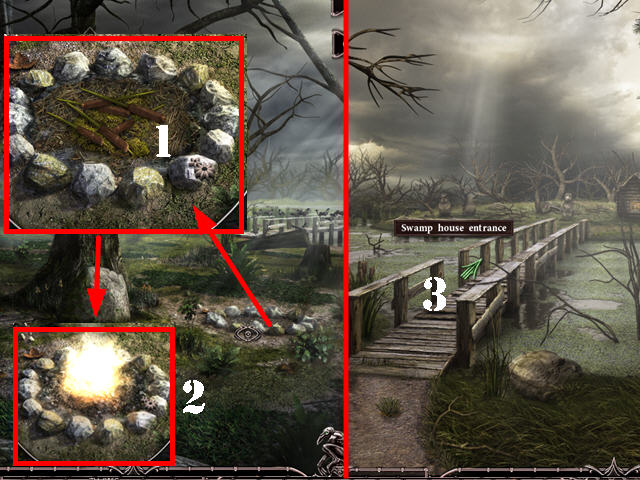
- Examine the fire pit; put the PINE NEEDLES, REEDS, and MOSS in the pit (1).
- Use the LIGHTER in the pit to start a fire (2). Starting the fire makes the birds leave the bridge area.
- Go right to the bridge and cross it to go to the Swamp house entrance (3).
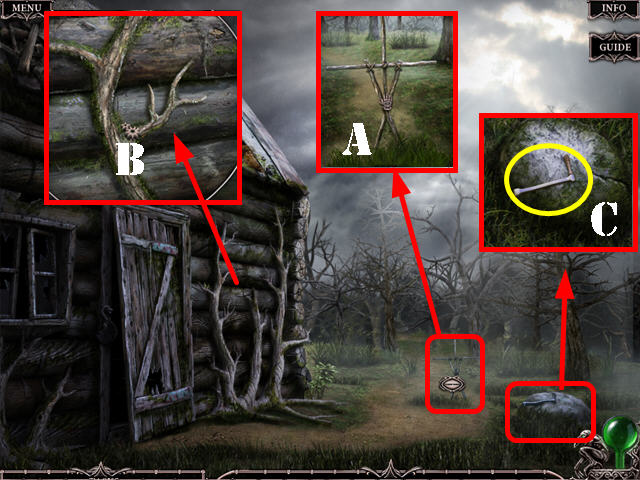
- Examine and take the TALISMAN FRAME (A).
- Look at the side of the house; cut the ROOT with the POCKETKNIFE (B).
- Examine the stone and take the GRASS MILL HANDLE (C).
- Go into the Swamp house.
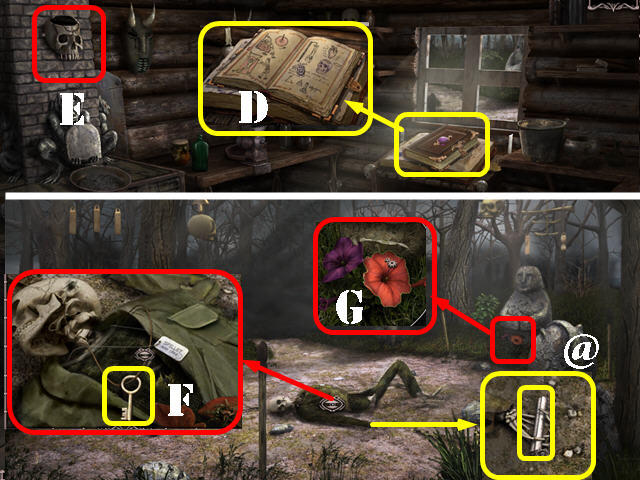
- Look at, open, and read the Necronomicon book (D).
- Take the ASH FORM (E).
- Walk down and go forward to the Swamp house glade.
- Examine the skeleton and take the KEY (F).
- Examine the skeleton’s hand and read the Missing Page (@).
- Examine the statue; take the RED AND PURPLE FLOWERS (G).
- Go back to the Swamp house.
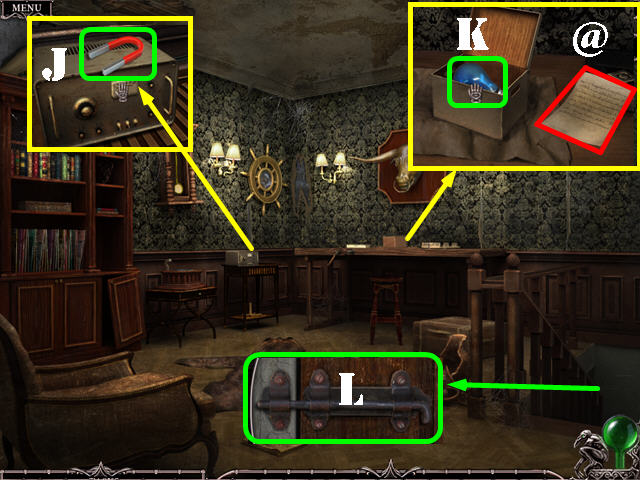
- Zoom into the briefcase; unlock it with the KEY; take the PHONE HANDLE and read the Instructions (H).
- Examine the table; put the GRASS MILL HANDLE on the grinder (J).
- Put the RED AND PURPLE FLOWERS plus the GREEN FLOWER into the grinder (K).
- Press on the handle and take the FLOWER JUICE (L).
- Examine the bowl above the fireplace; read the instructions (M).
- Put the FLOWER JUICE in the bowl (N) to trigger a puzzle.
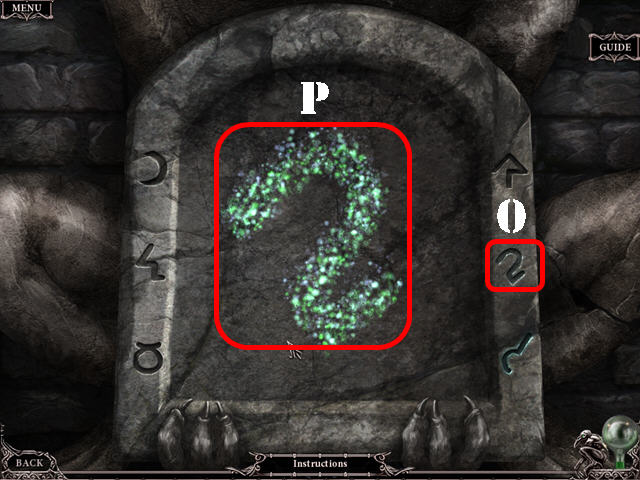
- Trace the flashing symbols on the side of the stone (O) into the center of the stone (P). Always start tracing from the lit section on the stone.
- Trace the 6 symbols to solve the puzzle.
- Examine the bowl above the fireplace again; put the TALISMAN FRAME and CHARLES’S HANDKERCHIEF in the bowl (Q).
- Cut the handkerchief with the POCKETKNIFE to obtain the SMALL HANDKERCHIEF.
- Walk down 3 times.
- Combine the ROOT and the ASH FORM in inventory (R) to create the SKULL WITH ROOT. Combine the SKULL WITH ROOT and the SMALL HANDKERCHIEF (S) in inventory to create the SKULL WITH ROOT AND HANDKERCHIEF.
- Examine the fire pit; put the SKULL WITH ROOT AND HANDKERCHIEF and take the ASH (T).
- Go back to the Swamp house.
- Examine the bowl above the fireplace; put the ASH on the mantle (1) and take the TALISMAN (2).
- Walk down and go forward.
- Use the TALISMAN on the black smoke (3) and go forward to the Forest.
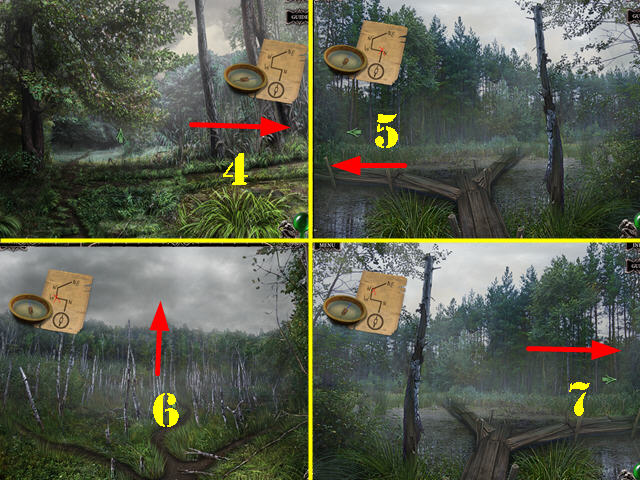
- Use the compass to travel through the Forest.
- Go right (4), left (5), forward (6), and right (7).
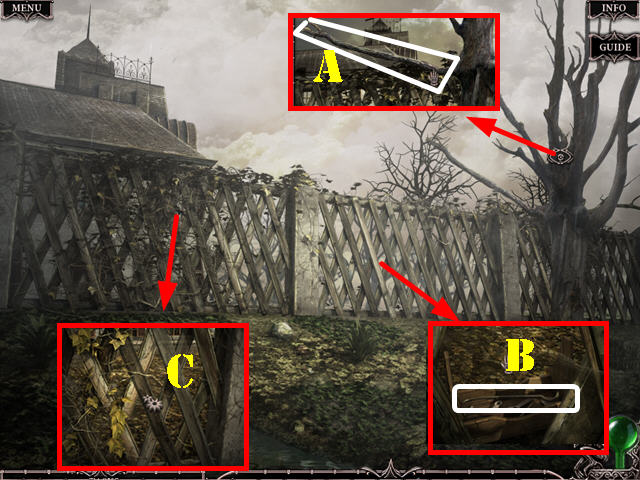
- Examine the tree; take the BRANCH (A).
- Examine the right side of the fence; use the BRANCH to move the toolbox closer and then take the CROWBAR (B).
- Examine the left side of the fence; remove the boards with the CROWBAR (C).
- Go through the fence to reach the Courtyard.
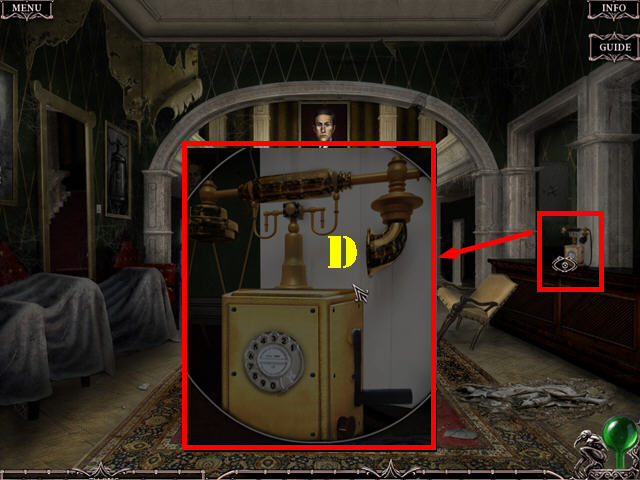
- Examine the phone in the Lobby; put the PHONE HANDLE on it (D).
Day 3
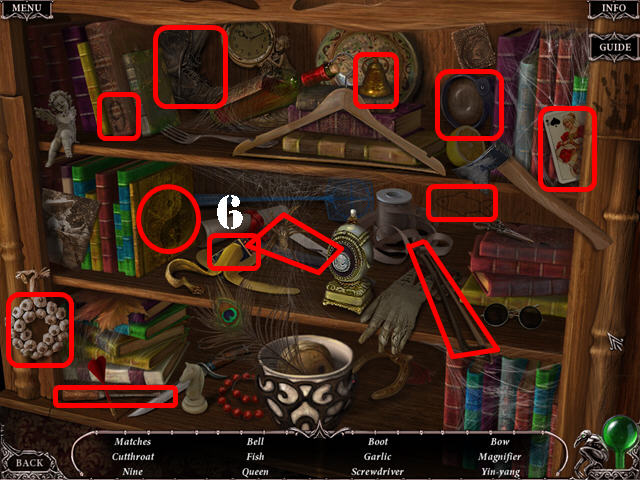
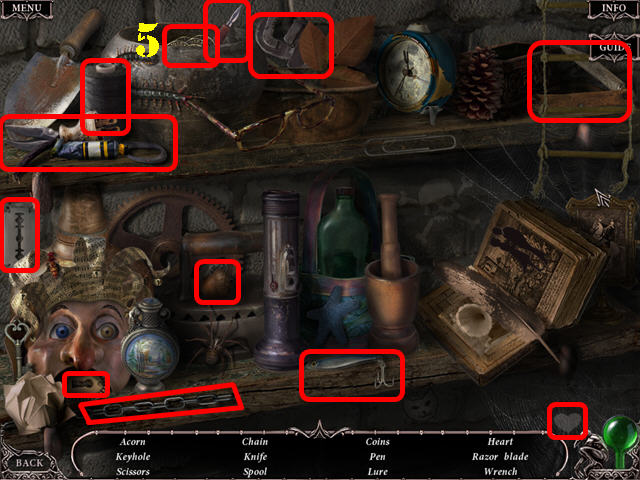
- Play the shelf HOS.
- Find the listed items to obtain the MATCHES (6).

- Go back to the Shed.
- Play the shelf by the window HOS.
- Find the listed items to obtain the WOODEN DISK (7).
- Go back to the left Hallway on the first floor.
- Examine the right door (A) and put the WOODEN DISK on it to activate a puzzle.
- Rotate the rings until you form the correct image.
- Please look at the screenshot for the solution (B).
- You will automatically enter the Library after you solve the puzzle.
- Read the Missing Page (@).
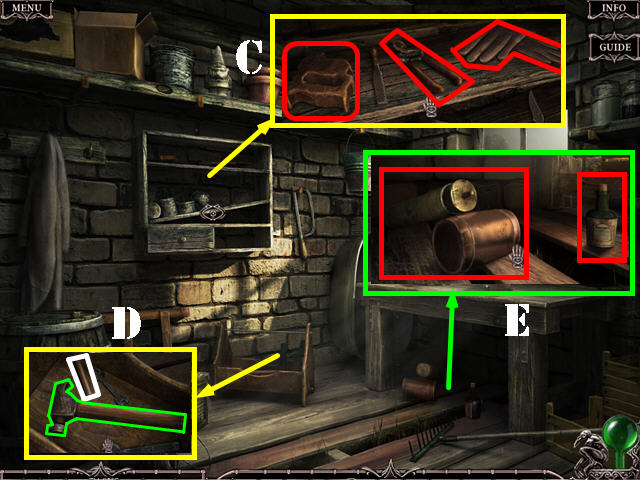
- Examine the shelf; take the SYRINGE (C) and the SURGICAL MASK (D).
- Examine the bottom of the bookcase; take the SCREWDRIVER (E) and the BROOM (F).
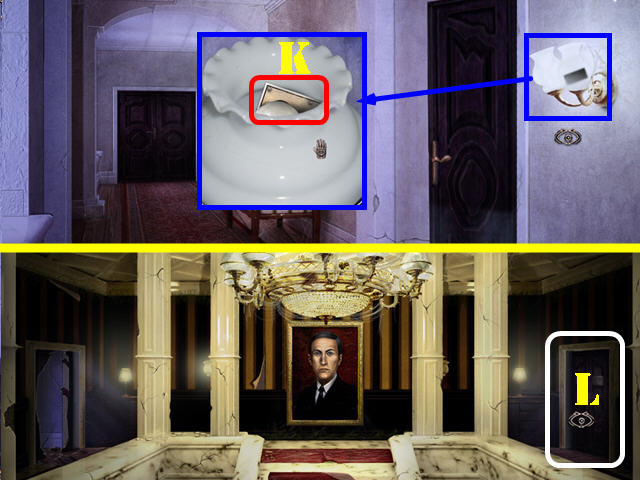
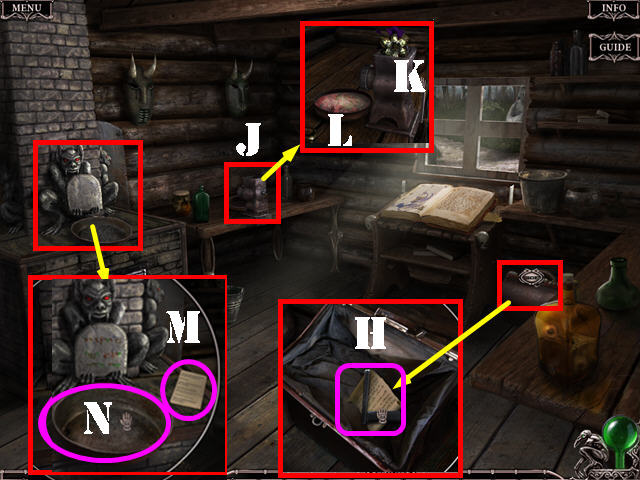
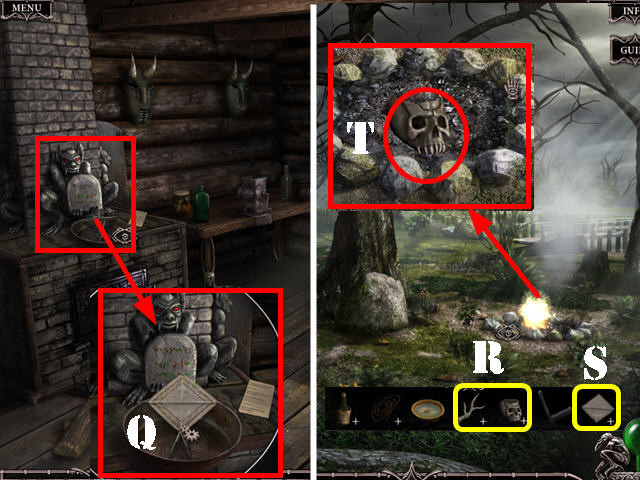
- Zoom into the chandelier; use the BROOM to get the FOUNTAIN SKULL (G).
- Exit the hotel.
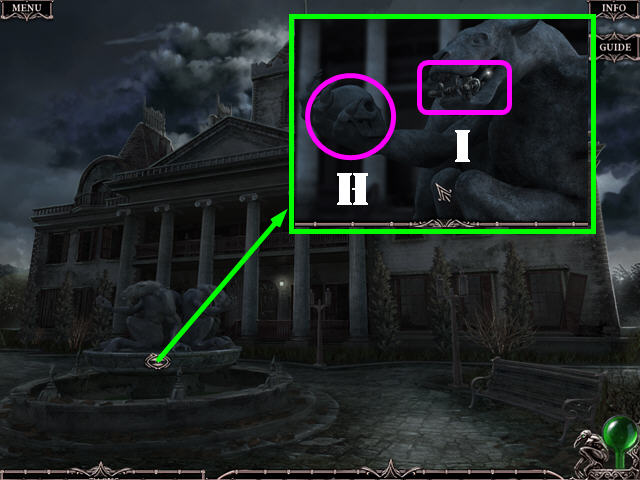
- Examine the statue in the fountain; put the FOUNTAIN SKULL in its hand (H) and take the CROSS KEY (I).
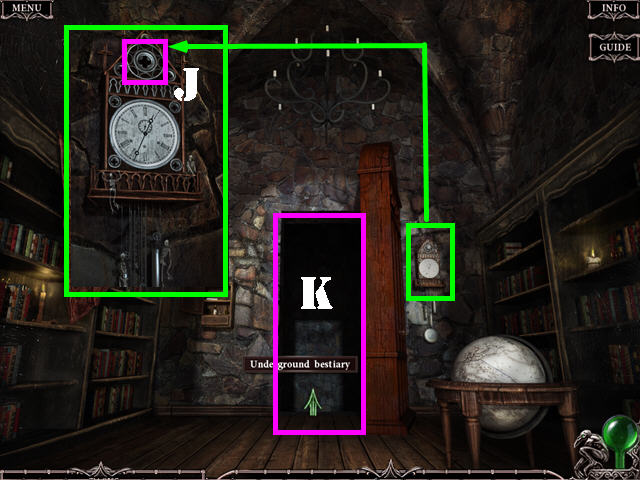
- Go back to the Library.
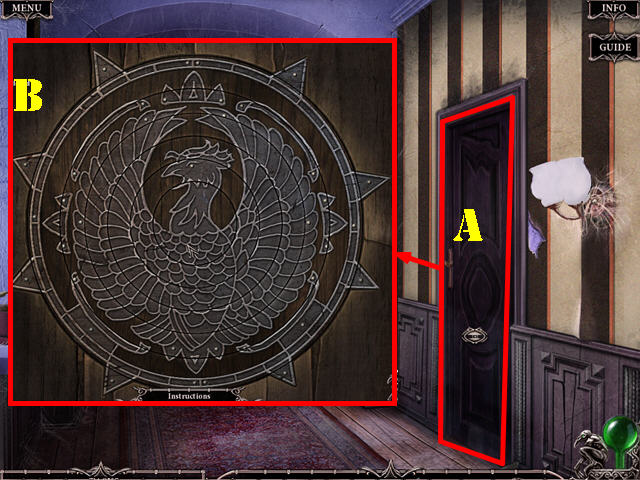
- Examine the clock; use the CROSS KEY in the lock (J).
- Go through the secret passage to access the Underground Bestiary (K).
- Read the Missing Page (@).
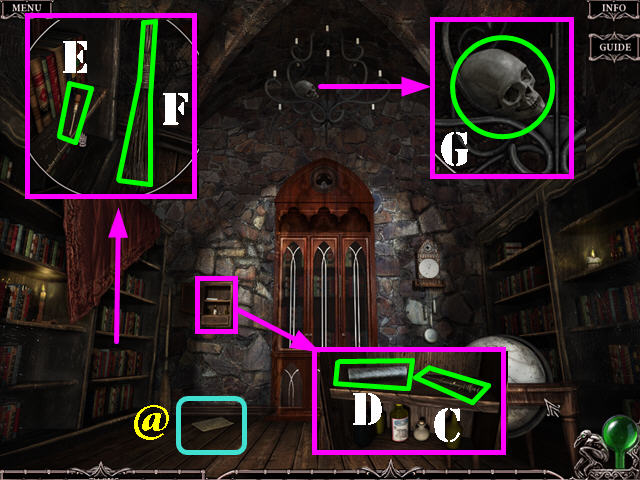
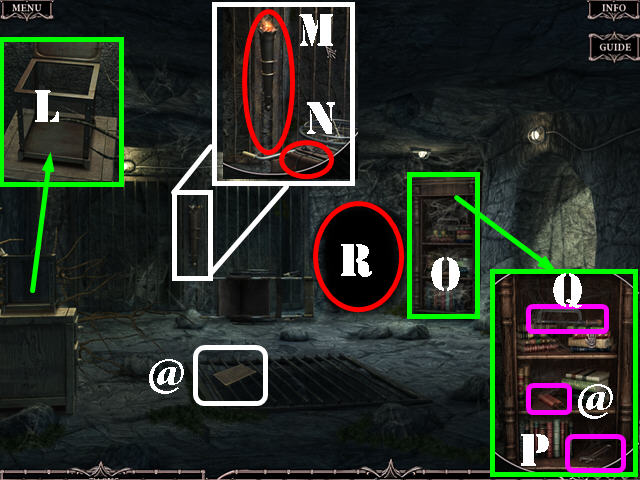
- Examine the stand; take the SEALED CONTAINER (L).
- Zoom into the torch; light it with the MATCHES. Take the TORCH (M) and the POWER PLUG (N).
- Zoom into the bookcase; remove the cobwebs with the BROOM (O).
- Read the Missing Page (@).
- Take the WRENCH (P) and the HACKSAW (Q).
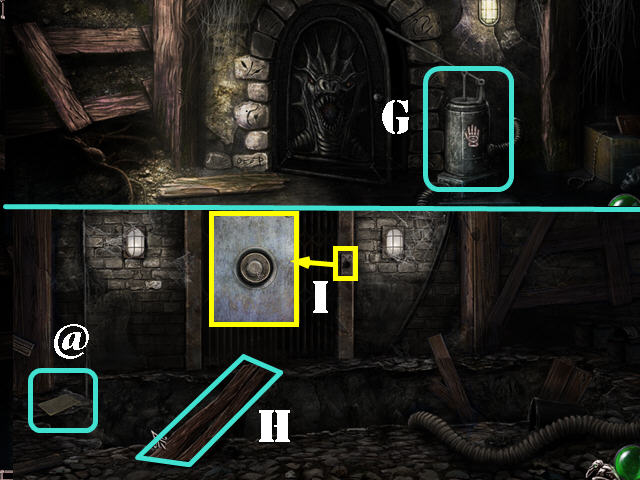
- Use the TORCH in the dark tunnel (R). Go through the tunnel to access the Underground Mortuary.
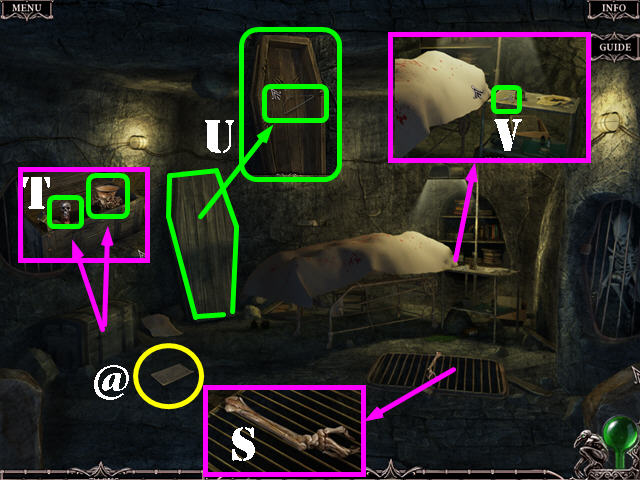
- Read the Missing Page (@).
- Examine the grate; take the SKELETON ARM (S).
- Look at the chest and open it; take the DEAD WATER VIAL and the AROMA LAMP (T).
- Zoom into the coffin; take the COFFIN LID and then the METAL HANGER (U).
- Look at the body; take the SMALL SCISSORS from the tray (V).
- Walk down and go right to access the Underground River.
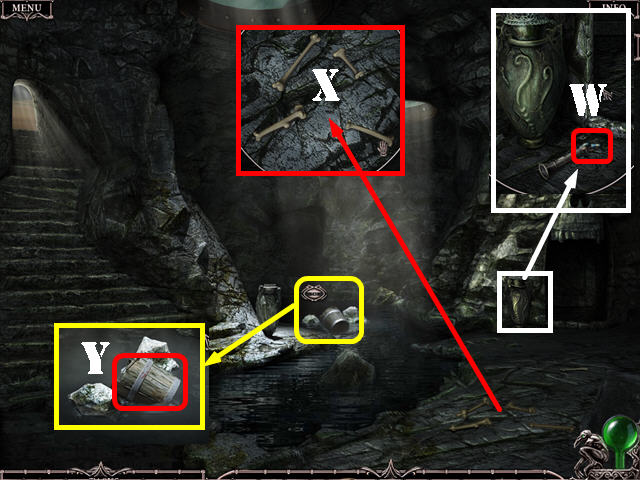
- Examine the vase and take the BATTERIES next to the flashlight (W).
- Examine the ground; take the SMALL BONES (X).
- Examine the bucket; use the SKELETON ARM on the BUCKET (Y).
- Zoom into the right door to trigger a puzzle.
- Select any 2 tiles to see what is behind them; find matching pairs to eliminate them from the board (Z). The solution is random.
- You will be taken back to the Crypt Basement as soon as you solve the puzzle.
- Zoom into Charles’ head; cut off some of Charles’ HAIR with the SCISSORS (A).
- Go left to the Underground River (B) and take the steps on the left (C) to reach the Cemetery.
- Combine the INSECT SPRAY and the SPRAYER in inventory (D) to create the FULL SPRAYER.
- Use the FULL SPRAYER on the bugs around the bush (E).
- Zoom into the bush and take the BERRIES (F).
- Examine the grave; take the HORN (G) and read the Missing Page (@).
- Zoom into the LEAVES; cut them with the POCKETKNIFE (H).
- Go right towards Dead Water.
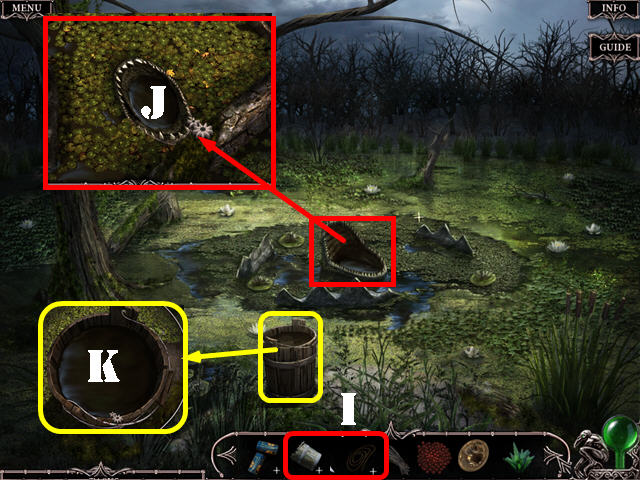
- Combine the BUCKET and the ROPE in inventory (I) to create the BUCKET WITH ROPE.
- Examine the swamp; use the BUCKET WITH ROPE in the swamp to fill it with water (J).
- Zoom into the bucket; put the DEAD WATER VIAL in the bucket (K) to obtain the DEAD WATER.
- Walk down and go left towards the Old Church.
- Apply the SURGICAL MASK anywhere on the scene (1).
- Read the Missing Page (@).
- Put the COFFIN LID on the ground (L).
- Examine the statue; use the SEALED CONTAINER on the MUSHROOM (M).
- Go back to the Shed.
- Examine the table; put the SMALL BONES in the grinder.
- Turn the handle and take the GROUND BONE (N).
- Go back to the Alchemy room.
- Zoom into the left shelf; take the PESTLE (O).
- Put the BERRIES and the LEAVES in the mortar.
- Use the PESTLE in the mortar and take the OIL (P).
- Zoom into the table; put the MUSHROOM, HAIR, and the GROUND BONE in the evaporator (Q).
- Light the evaporator with the MATCHES.
- Use the SYRINGE in the beaker to get the SYRINGE WITH ELIXIR (R).
- Go back to the Attic.
- Look at and take the RADIO WITHOUT BATTERIES (S).
- Examine the top of the armoire; take the MICROPHONE (T).
- Zoom into the window; use the WRENCH to remove the SCREW (U).
- Go through the window to access the Roof.
- Read the last Missing Page (@).
- Examine the antenna; use the HACKSAW on the bolt (V).
- Use the SCREWDRIVER on the screw (W).
- Put the SCREW in the hole and fasten it with the WRENCH.
- Go back to the Tower room (go to the right hallway on the second floor and go through the left door to reach it).
- Examine the transmitter; put the MICROPHONE next to it (1).
- Look at the phonograph; put the POWER PLUG in the socket (2).
- Put the HORN on the phonograph (3). Touch the phonograph and it will ask you for a record with an invocation spell.
- Examine the bookcase; take the VINYL RECORD (4).
- Zoom into the phonograph; put the VINYL RECORD on the turntable.
- Go back to the Crypt basement (go through the Library’s secret door on the first floor to the Underground bestiary; right to the Underground river and through the right door to the Crypt Basement).
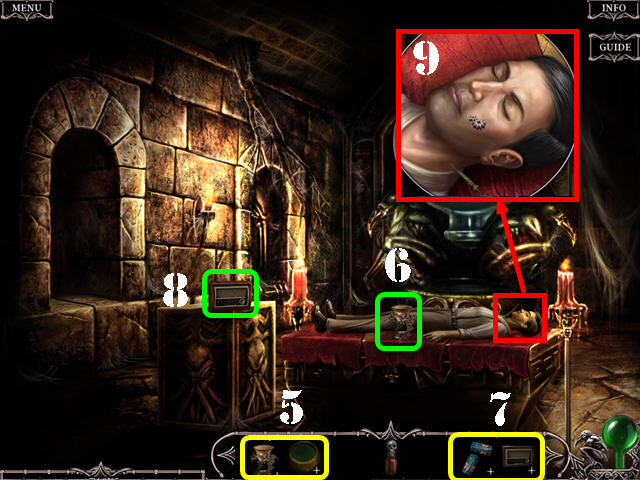
- Combine the OIL and the AROMA LAMP in inventory (5) to create the FULL AROMA LAMP.
- Put the FULL AROMA LAMP next to Charles (6). Light the aroma lamp with the MATCHES.
- Combine the BATTERIES with the RADIO WITHOUT BATTERIES in inventory (7) to create the RADIO.
- Put the RADIO on the stand (8). Add the METAL HANGER to the radio.
- Zoom into Charles’ face and put the DEAD WATER on it, followed by the SYRINGE WITH ELIXIR (9). Note: some items may remain in your inventory at the end of the game.
- Congratulations, you have completed Haunted Hotel: Charles Dexter Ward Standard Edition!


 PuppetShow: Return to Joyville Walkthrough, Guide, & Tips
 Creepy Tales: Lost in Vasel Land Walkthrough, Guide, & Tips
 Reincarnations: Awakening Walkthrough, Guide, & Tips
 Final Cut: The True Escapade Walkthrough, Guide, & Tips
 Secret Mission: The Forgotten Island Walkthrough, Guide, & Tips