Order of the Rose Walkthrough, Guide, & Tips
Order of the Rose Walkthrough

Welcome to the Order of the Rose Walkthrough
This crafty killer leaves puzzles at the scene of his crimes. Can you solve them before you’re too late?
Whether you use this document as a reference when things get difficult or as a road map to get you from beginning to end, we’re pretty sure you’ll find what you’re looking for here.
This document contains a complete Order of the Rose game walkthrough featuring annotated screenshots from actual gameplay!
We hope you find this information useful as you play your way through the game. Use the walkthrough menu below to quickly jump to whatever stage of the game you need help with.
Remember to visit the Big Fish Games Forums if you find you need more help. Have fun!
This walkthrough was created by Nathaniel A., and is protected under US Copyright laws. Any unauthorized use, including re-publication in whole or in part, without permission, is strictly prohibited.
General Tips:

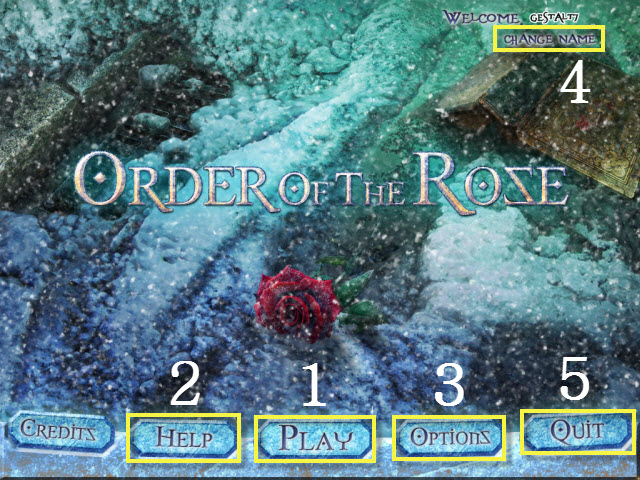
- This is the Official Guide for Order of the Rose.
- Select Play (1) to begin the game.
- Select the Help button (2) for additional help in the game.
- The Options Menu (3) will allow you to adjust your cursor, screen size, and sound levels.
- Select Change Name (4) to edit your profiles.
- Exit the game here (5).
- Throughout the guide, we will use the acronym ‘HOP’ for Hidden-object puzzles.
- Certain items in scenes require an extra step to reveal an item. They will be noted in green.
- Sometimes a HOP or step will not become available until a journal entry has been added. Please refer to the guide to see if you have missed any of these steps.
- There are two difficulty levels: Casual and Expert.

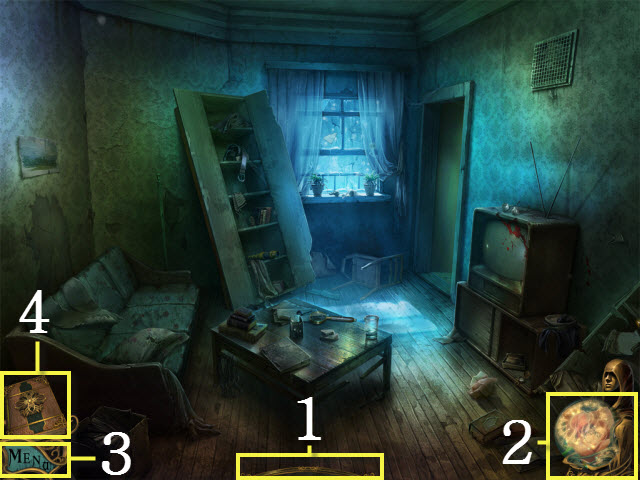
- The Inventory items are stored here (1).
- The Hint button will offer hints and allow you to skip puzzles, but will take some time to recharge (2).
- Selecting the Menu button will bring up the Options, Help, and allow you to exit the game (3).
- The Journal will show your current tasks and clues (4).
Chapter 1: First Blood

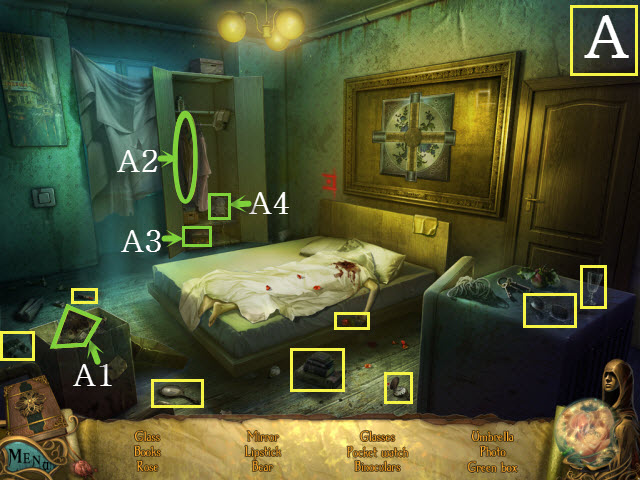
- Find the listed items (A).
- Open the box to get the photo (A1).
- Open the closet door to get the umbrella (A2); move the dress to get the green box (A3) and the bear (A4).

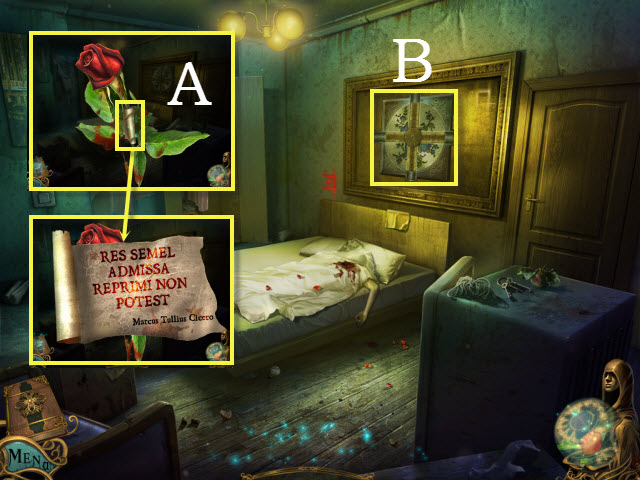
- Examine the rose with a note; open the note and take it (A).
- Examine the painting (B).
- Walk down to the living room.

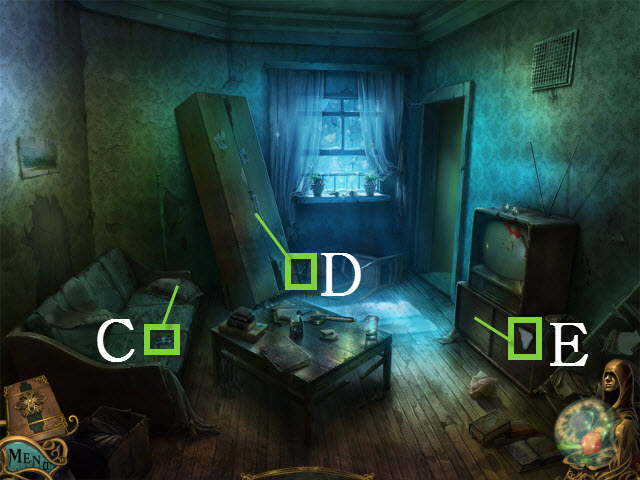
- Move the pillow; take the 1/2 VALVE (C).
- Close the closet; take the SAFE HANDLE (D).
- Close the cabinet door; take the PIECE OF PAPER (E).
- Walk right twice to the bathroom.

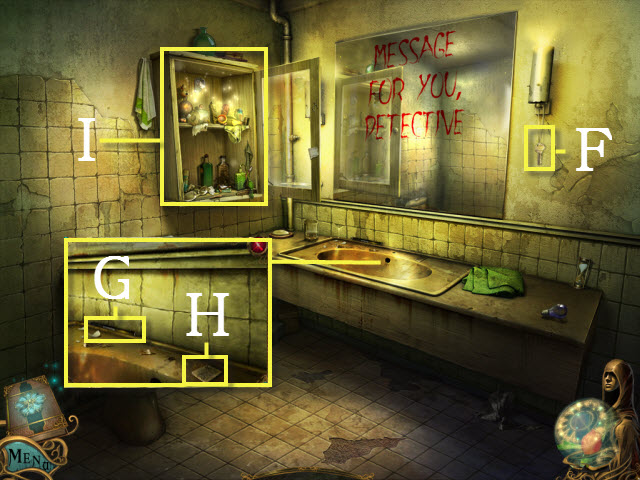
- Take the TOOLBOX KEY (F).
- Examine the sink; take the PENCIL (G) and the 1/8 PUZZLE PIECE (H).
- Open the cabinet; examine the shelf to activate a HOP (I).

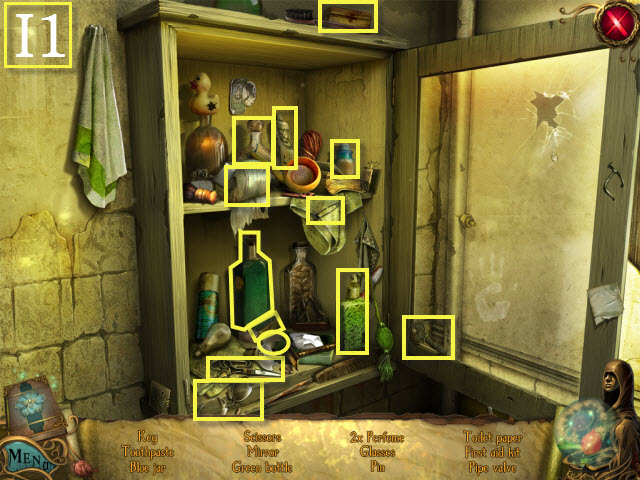
- Find the listed items (I1).
- You will receive the PIPE VALVE.
- Walk down twice to the living room.

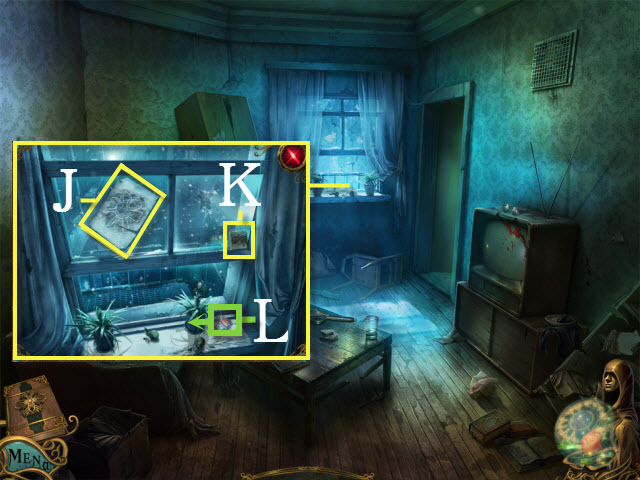
- Examine the window and combine the PIECE OF PAPER with the piece of paper; use the PENCIL on the hidden message and select it (J).
- Pick up the 2/8 PUZZLE PIECE (K).
- Move the pot; take the FIREBOX KEY (L).
- Walk down.

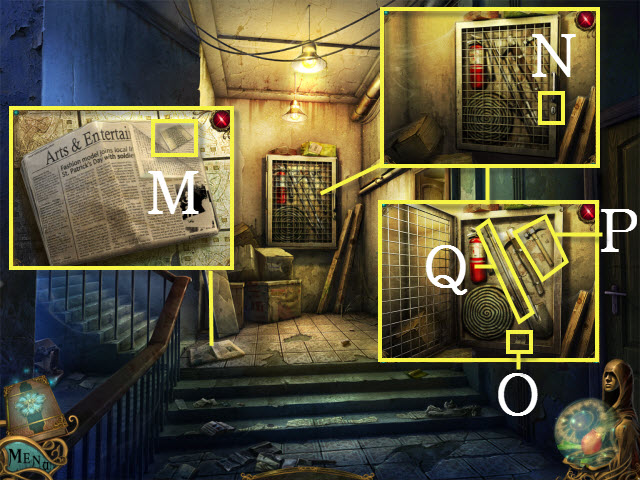
- Examine the newspaper; move the scrap of paper and take the 3/8 PUZZLE PIECE (M).
- Examine the firebox; use the FIREBOX KEY on the lock (N).
- Take the 4/8 PUZZLE PIECE (O), the HAMMER (P), and the CROWBAR (Q).
- Walk down to the street.

- Examine the mailbox; take the 5/8 PUZZLE PIECE (R).
- Take the LADDER (S).
- Walk right to the alley.
- Close the trash dumpster; take the TAP FIXTURE (T).
- Examine the toolbox; use the TOOLBOX KEY on the lock (U).
- Open both latches to activate a HOP.

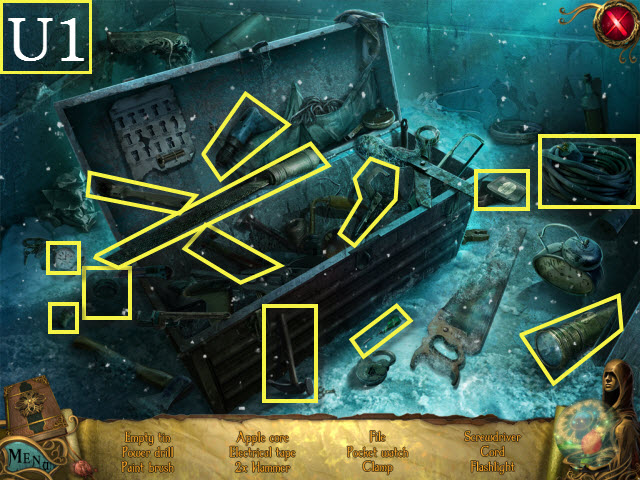
- Find the listed items (U1).
- You will receive the FLASHLIGHT.
- Return to the bedroom.
- Look under the bed; use the FLASHLIGHT on the scene to activate a HOP.

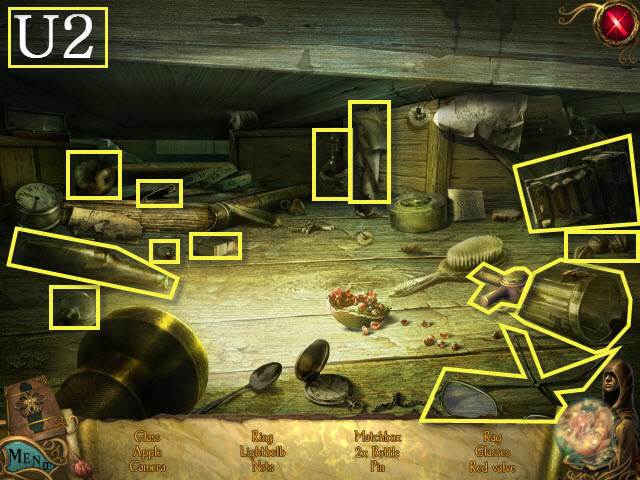
- Find the listed items (U2).
- You will receive the 2/2 VALVE.
- Walk right.


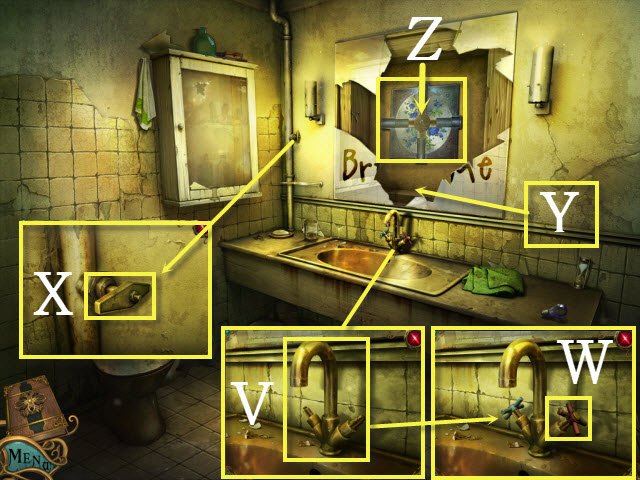
- Examine the sink; place the TAP FIXTURE on it (V).
- Place the 2/2 VALVES on the taps; select the hot water valve (W).
- Close the cabinet.
- Examine the pipe; place the PIPE VALVE on the pipe and then turn it (X).
- Use the HAMMER on the mirror (Y).
- Examine the strange mechanism (Z).
- Open the cabinet; examine the shelf to activate a HOP.

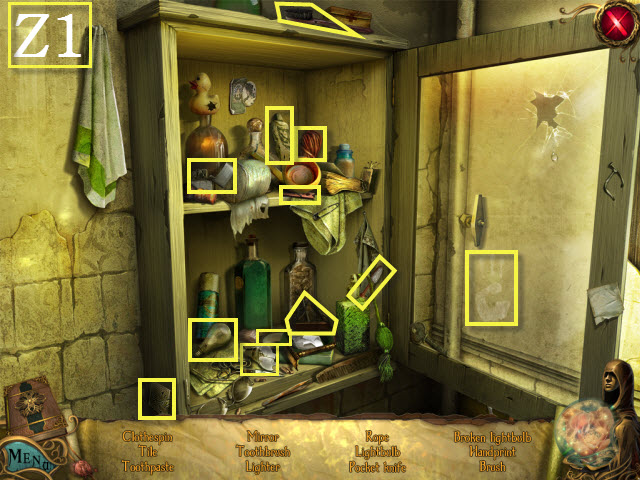
- Find the listed items (Z1).
- You will receive the 6/8 PUZZLE PIECE.
- Walk down.
- Look under the bed to activate a HOP.

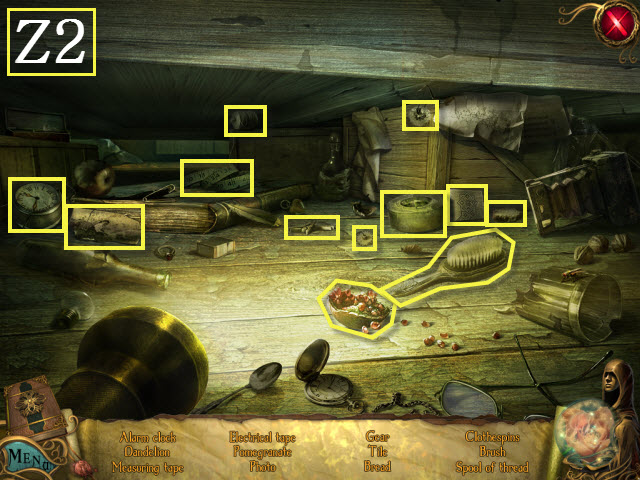
- Find the listed items (Z2).
- You will receive the 7/8 PUZZLE PIECE.
- Return to the alley.

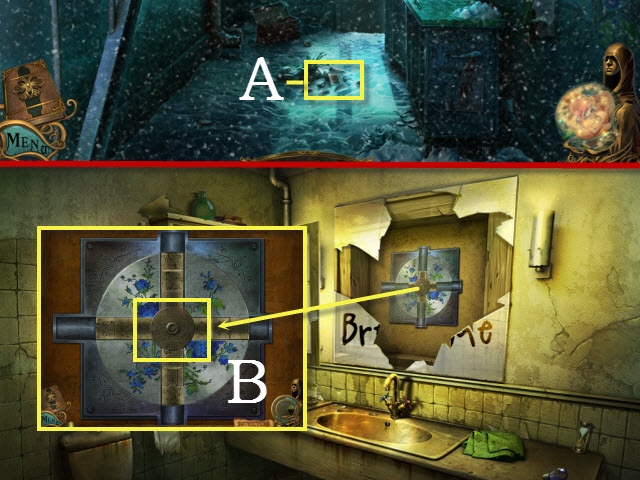
- Pick up the 8/8 PUZZLE PIECE (A).
- Return to the bathroom.
- Examine the strange mechanism; place the 8/8 PUZZLE PIECES on it to begin a puzzle (B).

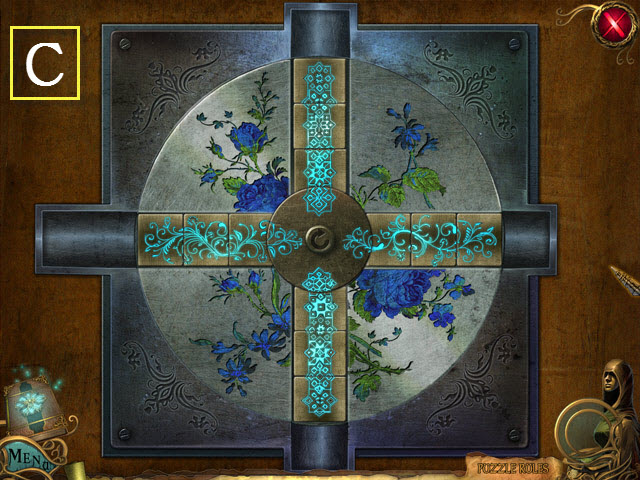
- Align the designs so that they match the center dial.
- Use the sides to move the tiles from one row to another; select the middle dial to rotate them.
- Please look at the screenshot for the solution (C).

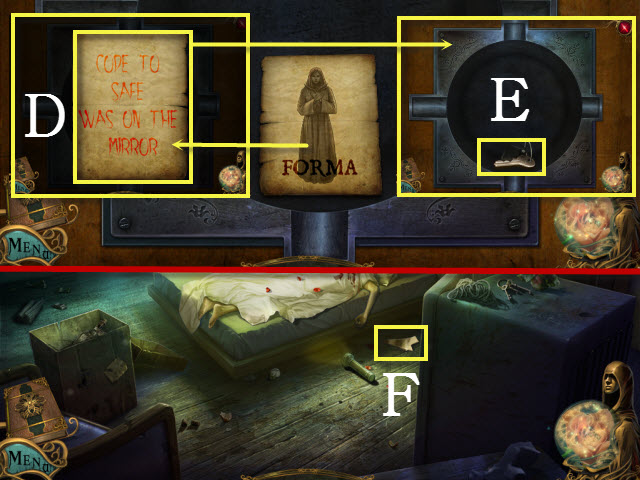
- Examine the old paper and rotate it; take the message (D).
- Take the MAILBOX KEY (E).
- Walk down.
- Take the 1/13 MIRROR SHARD (F).
- Walk right.

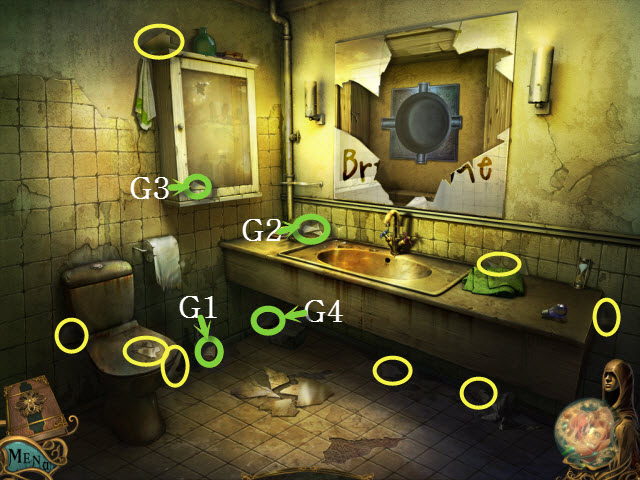
- Find the remaining 12/13 MIRROR SHARDS.
- Move the bottle to get a MIRROR SHARD (G1).
- Move the cup to get a MIRROR SHARD (G2).
- Close the cabinet to get a MIRROR SHARD (G3).
- Move the box to get a MIRROR SHARD (G4).

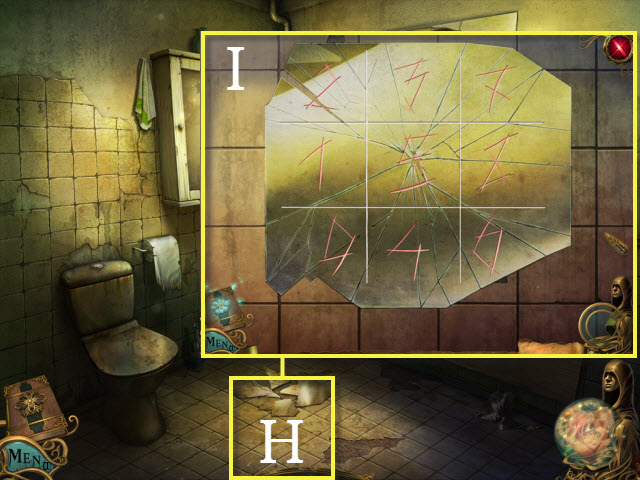
- Examine the mirror; place the 13/13 MIRROR SHARDS on it to activate a puzzle (H).
- Arrange the pieces to form a completed image. Left-click to drag pieces; double left-click to rotate them.
- Please see the screenshot for the solution (I).
- Return to the living room.

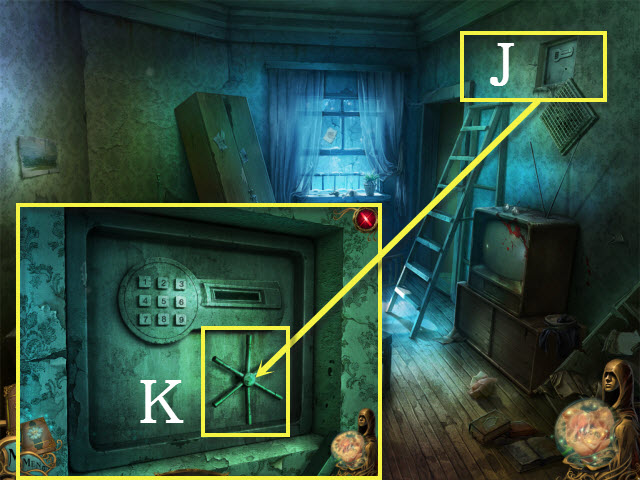
- Use the LADDER and then the CROWBAR on the vent (J).
- Examine the safe; place the SAFE HANDLE on the handle slot to begin a puzzle (K).
- Enter the code: 4, 1, 2, 8, 5, 9, 3, 6, and 7.
- Turn the handle to activate a HOP.

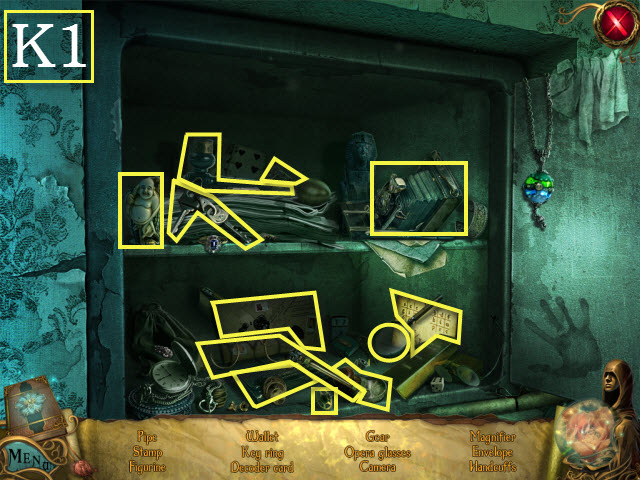
- Find the listed items (K1).
- Take the decoder.
- Walk right.

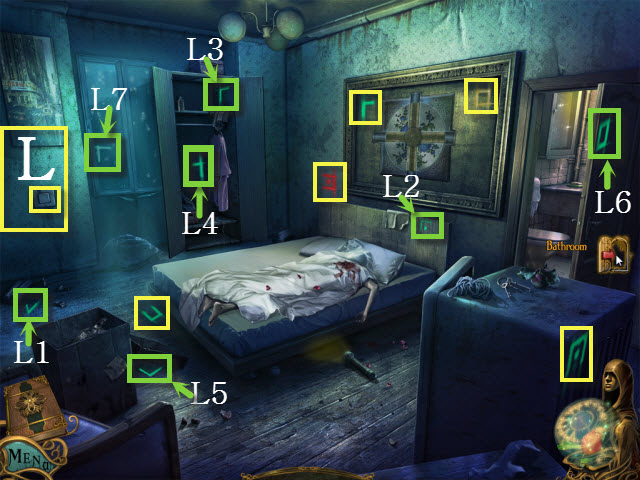
- Turn the switch off (L).
- Find the 14/14 SYMBOLS.
- Move the newspaper to reveal a SYMBOL (L1).
- Move the rag to reveal a SYMBOL (L2).
- Open the closet to reveal a SYMBOL (L3); move the dress to reveal another SYMBOL (L4).
- Open the box to reveal a SYMBOL (L5).
- Touch the SYMBOL behind the door (L6).
- Move the rag to reveal a SYMBOL (L7).

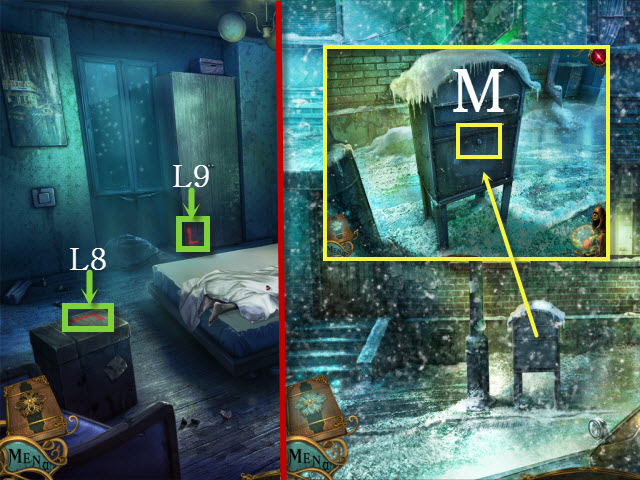
- Close the box to reveal the 13/14 SYMBOL (L8).
- Close the closet to reveal the 14/14 SYMBOL (L9).
- Return to the street.
- Examine the mailbox; use the MAILBOX KEY on the lock (M) to activate a HOP.

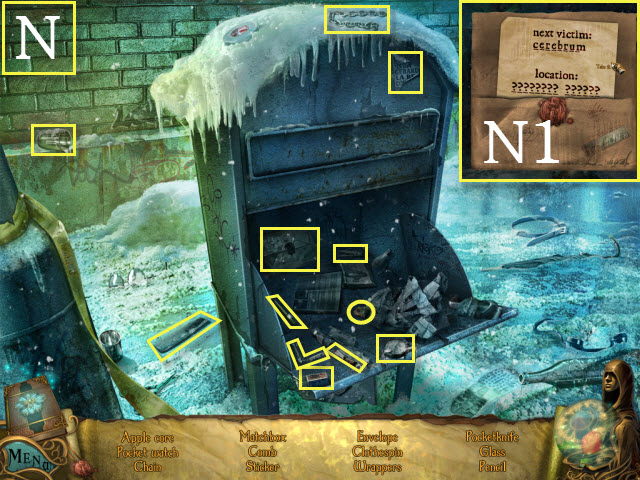
- Find the listed items (N).
- Open the envelope; examine the letter to begin a puzzle (N1).

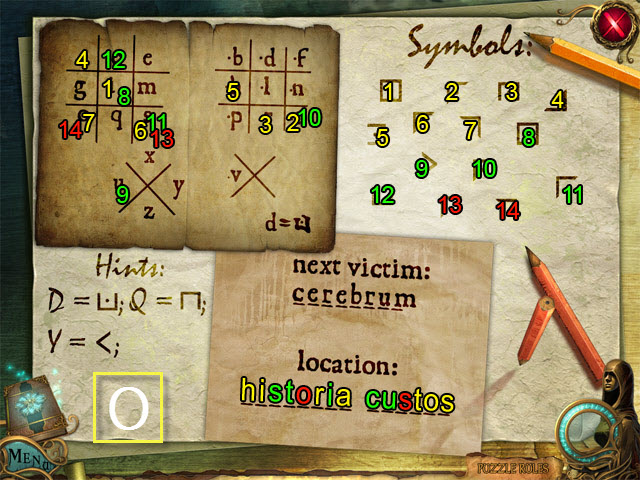
- Match the letters with their corresponding symbols to solve the puzzle.
- Please see the screenshot for the puzzle solution (O).
- Walk right to the street.
- Examine the car.
- Walk down.
- Examine the desk to activate a HOP.

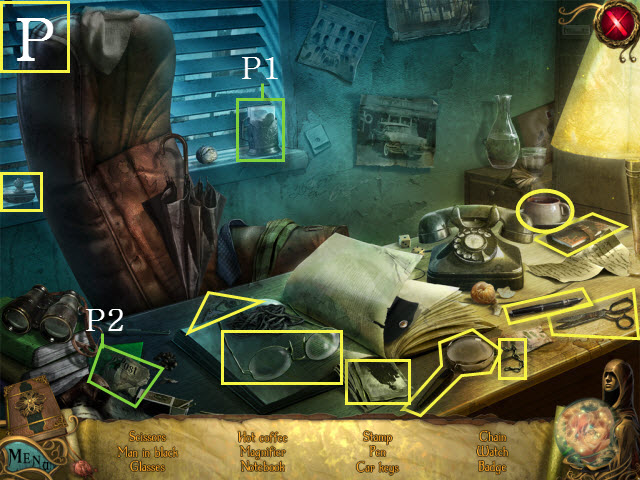
- Find the listed items (P).
- Move the glass to get the watch (P1).
- Move the piece of paper to get the car keys (P2).
- You will receive the CAR KEYS.
- Walk right.
Chapter 2: Spear

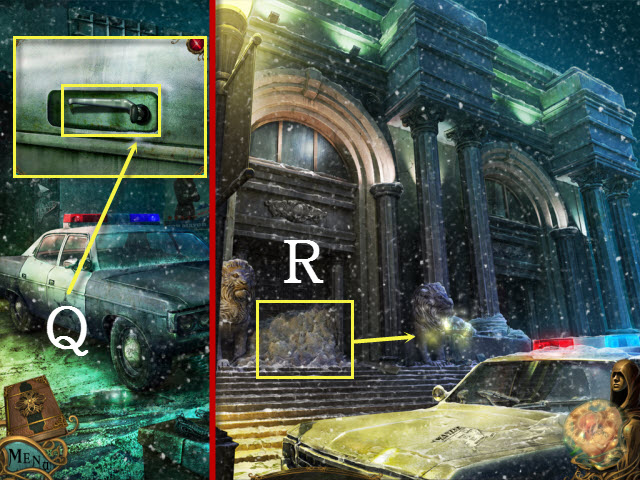
- Examine the car; use the CAR KEYS in the key slot and then turn the handle (Q).
- Enter the police car.
- Look at the pile of snow (R).
- Examine the lion to activate a HOP.

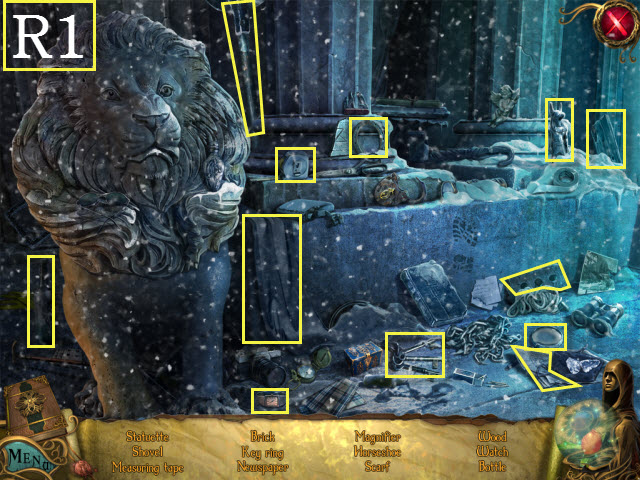
- Find the listed items (R1).
- You will receive the SHOVEL.

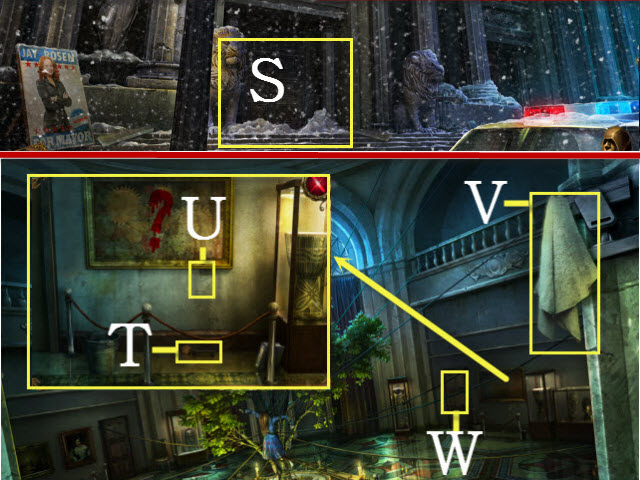
- Use the SHOVEL on the pile of snow (S).
- Enter the museum.
- Examine the picture; take the KEY (T) and the 1/8 STONE PIECE (U).
- Take the RAG (V).
- Use the KEY on the door (W).
- Walk right to the library.

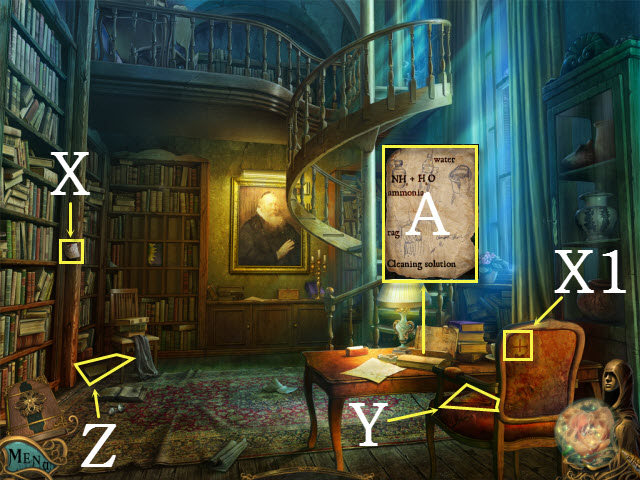
- Collect the 1/8 and 2/8 SYMBOLS (X, X1).
- Take the 2/8 STONE PIECE (Y).
- Pick up the 1/5 STAIR PARTS (Z).
- Examine the recipe; take it (A).
- Walk down.
- Examine the victim to activate a HOP.

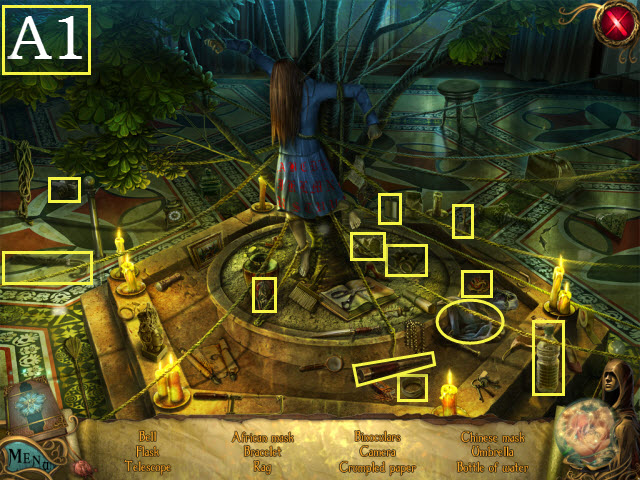
- Find the listed items (A1).
- You will receive the BOTTLE OF WATER.

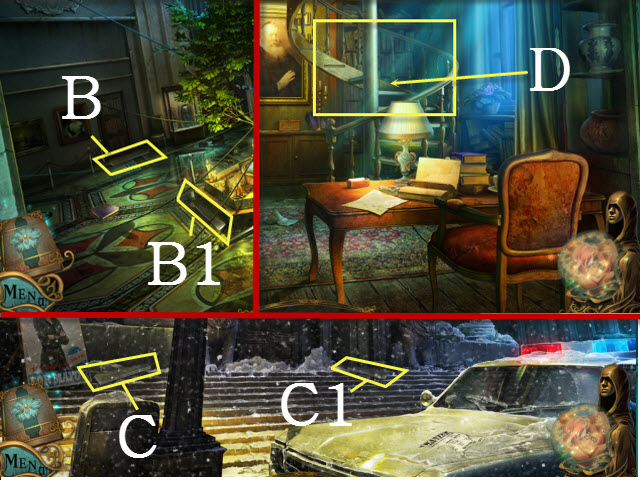
- Pick up the 2/5 and 3/5 STAIR PARTS (B, B1).
- Walk down to the street.
- Pick up the 4/5 and 5/5 STAIR PARTS (C, C1).
- Return to the library.
- Place the 5/5 STAIR PARTS on the broken stairway (D).
- Walk upstairs to the upper library.

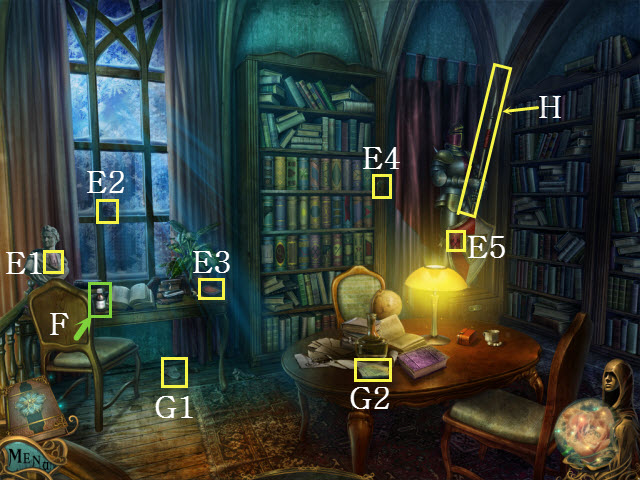
- Pick up the 3/8, 4/8, 5/8, 6/8, and 7/8 SYMBOLS (E1-E5).
- Move the chair; pick up the AMMONIA (F).
- Pick up the 3/8 and 4/8 STONE PIECES (G1, G2).
- Take the SPEAR (H).
- Walk down twice.

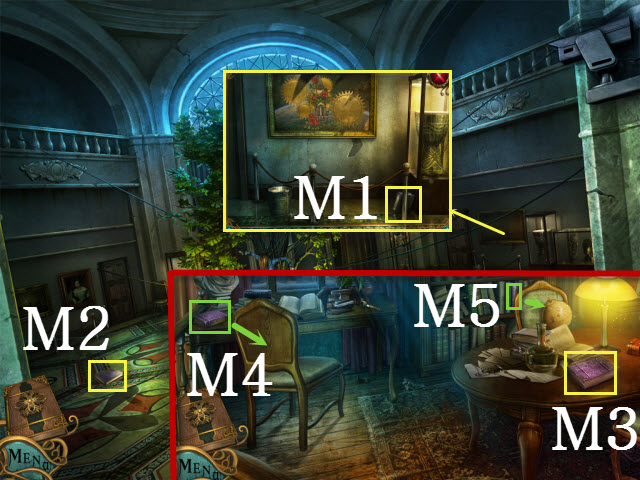
- Examine the picture; use the BOTTLE OF WATER and then the AMMONIA on the empty bucket (I).
- Use the RAG on the bucket; use the RAG on the strange picture (J).
- Walk right.
- Examine the bookshelf; take the 5/8 STONE PIECE (K).
- Pick up the 1/8 and 2/8 BOOKS (L1, L2).
- Open the shelf; take the 3/8 BOOK (L3).
- Walk down.


- Examine the picture; take the 4/8 BOOK (M1).
- Pick up the 5/8 BOOK (M2).
- Return to the upper library.
- Pick up the 6/8 BOOK (M3).
- Move the chairs; take the 7/8 and 8/8 BOOKS (M4, M5).
- Walk downstairs.

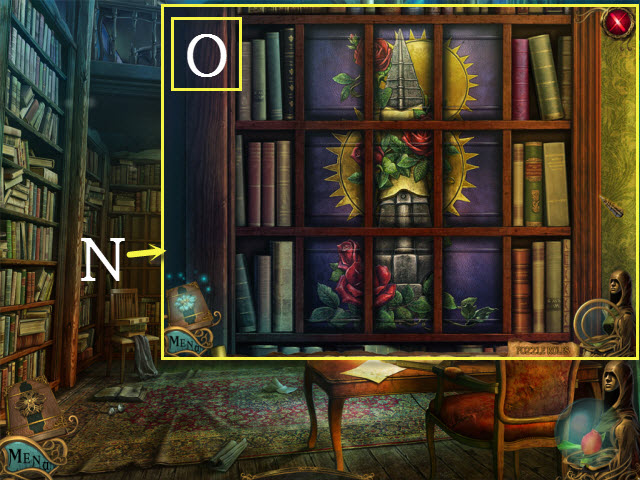
- Examine the bookshelf; place the 8/8 BOOKS on it to begin a puzzle (N).
- Align the books to create a completed image; left-click to swap a book and double left-click to rotate it.
- Please see the screenshot for the solution (O).

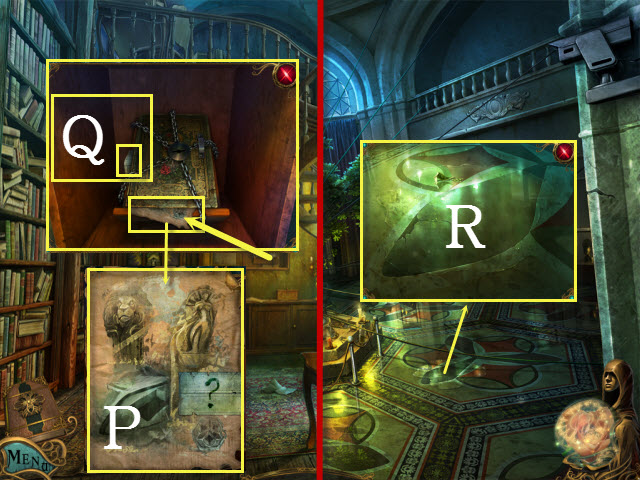
- Examine the book; select the paper and take it (P).
- Take the 6/8 STONE PIECE (Q).
- Walk down.
- Examine the stone inlay (R).
- Open the closet to begin a HOP.

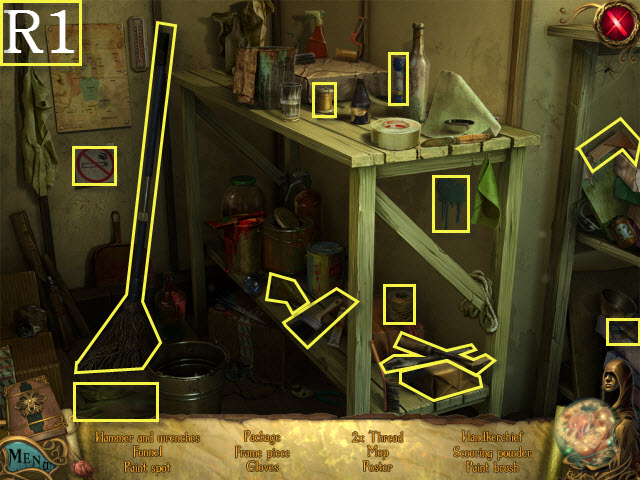
- Find the listed items (R1).
- You will receive the MOP.

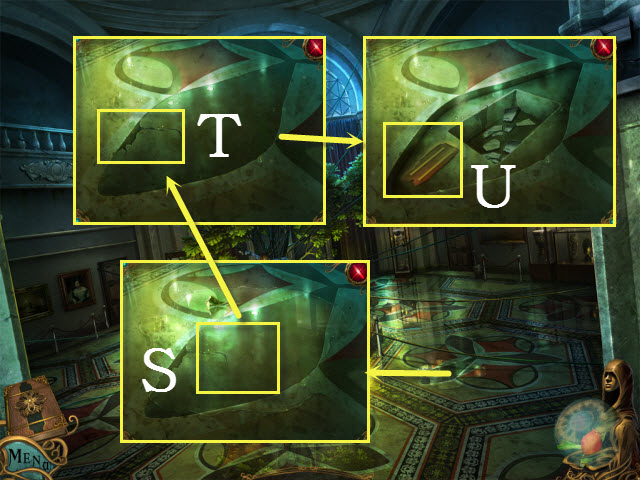
- Examine the stone inlay; use the MOP on the puddle (S).
- Examine the stone inlay; use the SPEAR on the crack (T).
- Examine the stone inlay; take the 8/8 SYMBOL (U).
- Walk down.
- Examine the lion to activate a HOP.

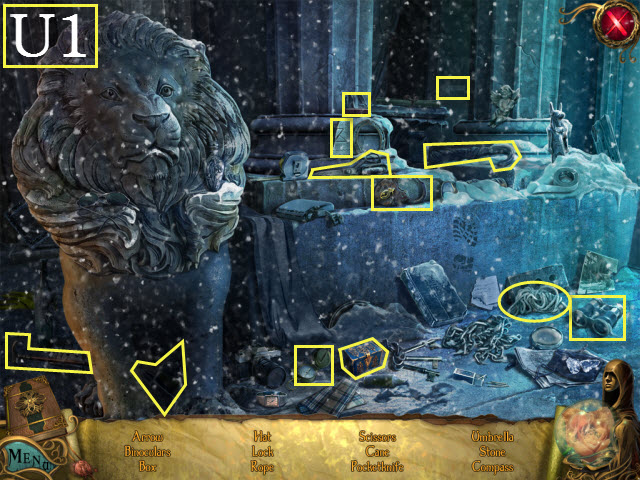
- Find the listed items (U1).
- You will receive the 7/8 STONE PIECE.

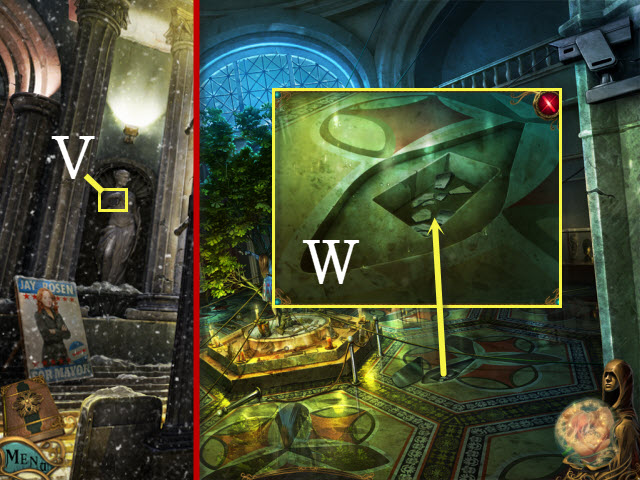
- Take the 8/8 STONE PIECE (V).
- Walk forward.
- Examine the stone inlay; place the 8/8 STONE PIECES on it to begin a puzzle (W).

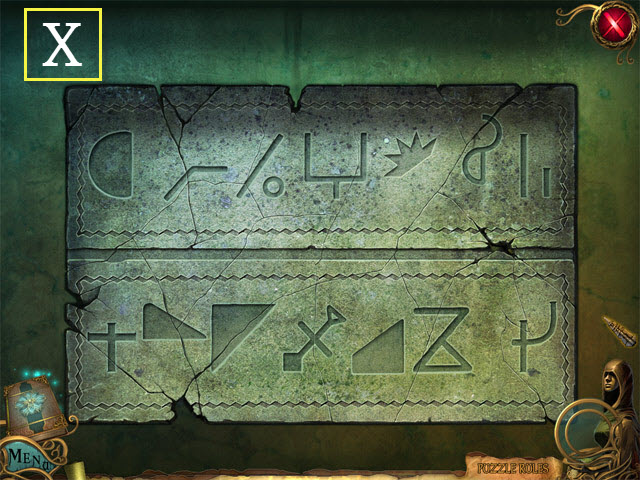

- Put the pieces together to create a completed image; hold left-click to drag each piece and single left-click to rotate them.
- Please see the screenshot for the solution (X).
- Return to the upper library.
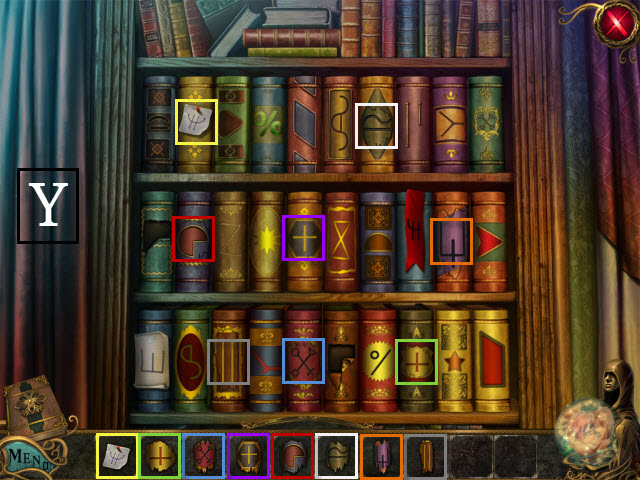
- Examine the bookshelf; place the 8/8 SYMBOLS on the books to begin a puzzle (Y).

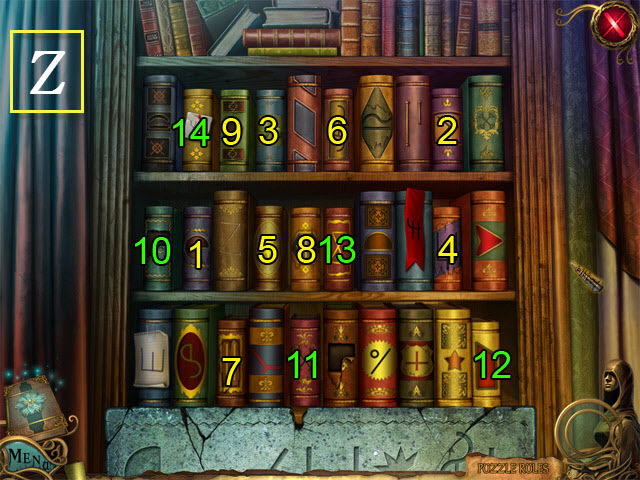
- Select the books in the same order as they appear on the stone plate by matching their corresponding symbol fragment.
- Please see the screenshot for the solution (Z).

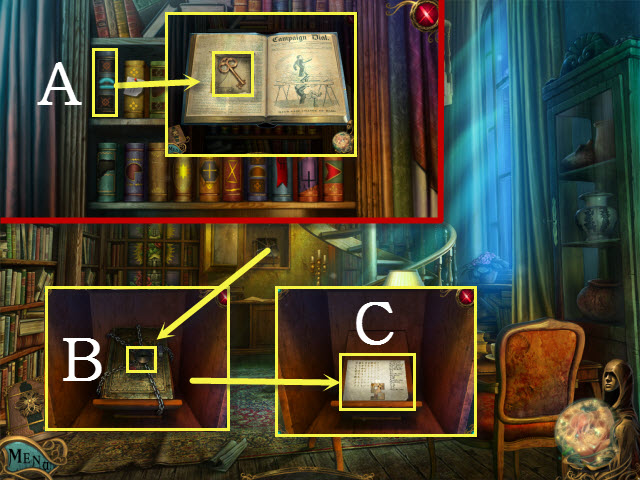
- Examine a book with a secret; open it and take the KEY (A).
- Walk downstairs.
- Examine the book; use the KEY on the lock (B).
- Open the book; examine the papers and take them (C).
- Walk down.
- Examine the victim to activate a HOP.

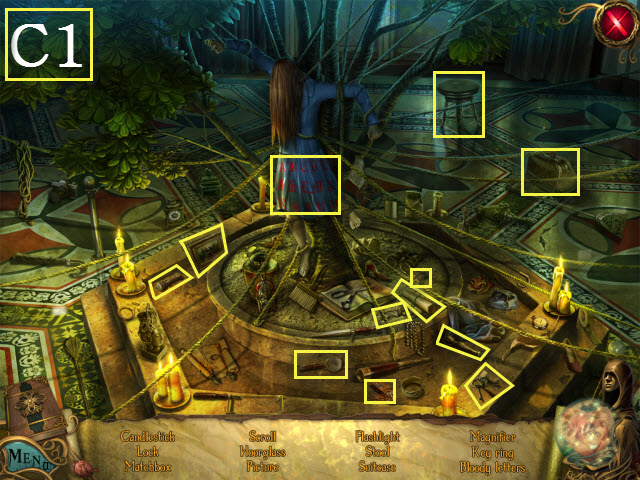
- Find the listed items (C1).
- You will receive the bloody letters.
- Examine the desk to begin a puzzle.

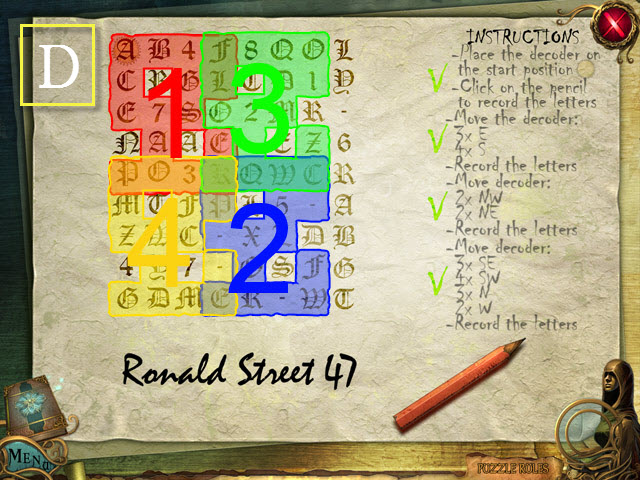
- Use the pencil to decode the message by following the steps shown on the decoder.
- Please see the screenshot for the solution (D).
- Walk right and enter the police car.
Chapter 3: The Killer’s Wake

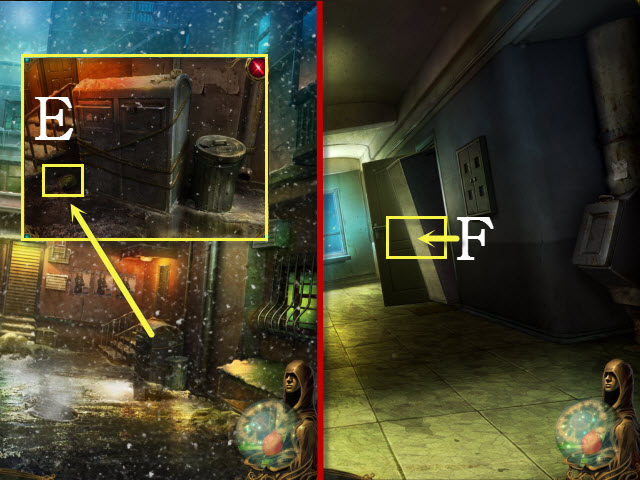
- Examine the trashcan; take the WHEEL (E).
- Walk right to the corridor.
- Examine the cabinet; select it (F).
- Walk down.
- Examine the old car to activate a HOP.

- Find the listed items (G).
- Close the car door to get the hammer (G1).
- You will receive the JACK.
- Walk right.

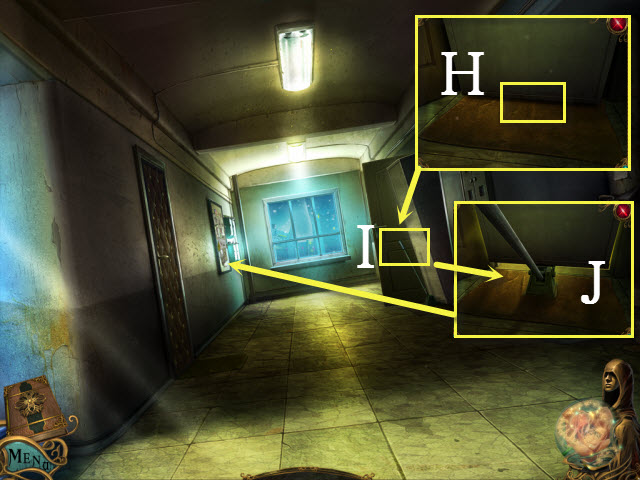
- Examine the cabinet; use the JACK on it (H).
- Push the JACK three times (I).
- Examine the cabinet (J).
- Examine the mailboxes to activate a HOP.

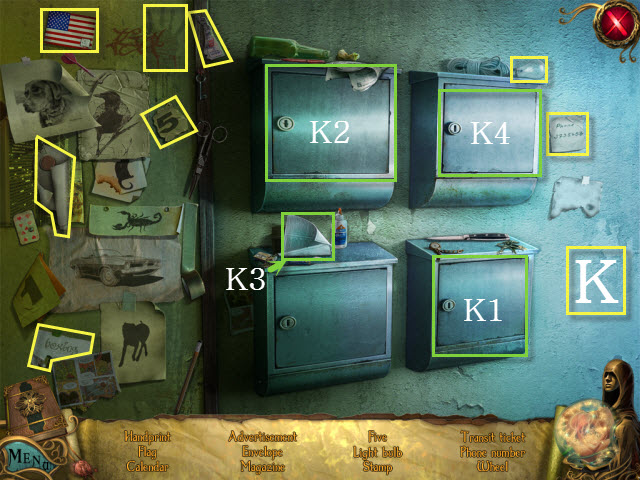
- Find the listed items (K).
- Open the mailbox to get the envelope (K1).
- Open the mailbox to get the calendar (K2).
- Move the paper to get the wheel (K3).
- Open the mailbox to get the magazine (K4).
- You will receive the WHEEL.

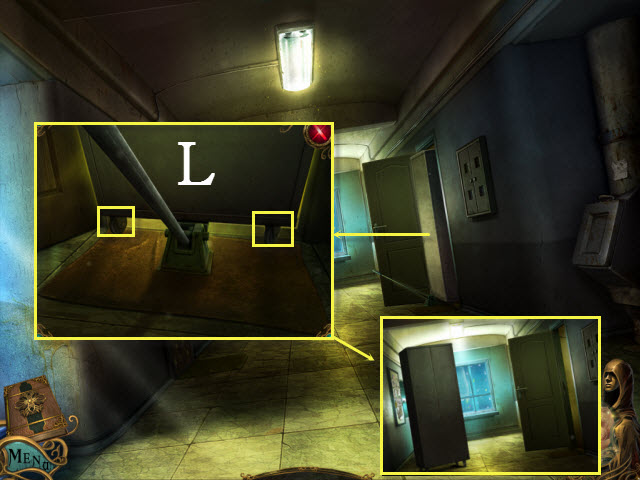
- Examine the cabinet; place the WHEELS on the wheel slots (L).
- Pull the cabinet twice and walk right to the apartment room.

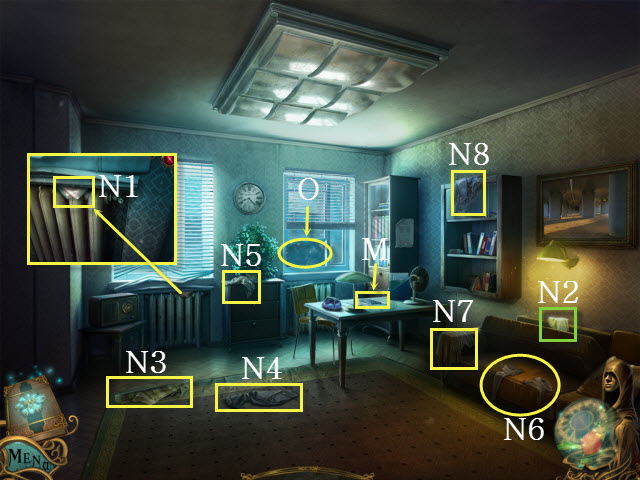
- Examine the notepad and take it (M).
- Examine the radiator; take the 1/8 CLOTHING (N1).
- Move the sofa cushion; take the 2/8 CLOTHING (N2).
- Collect the 3/8, 4/8, 5/8, 6/8, 7/8, and 8/8 CLOTHING (N3-N8).
- Pull up the blinds; open the window and place the clothing on it (O).
- Go down to the street and enter the police car.
Chapter 4: Subway


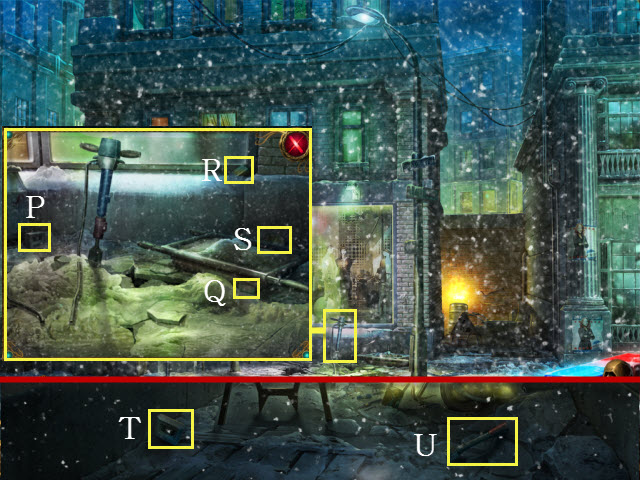
- Examine the jackhammer; take the 1/3 FUSE (P), the 1/3 ELECTRONIC PART (Q), the BATTERY (R), and the SAW BLADE (S).
- Walk forward.
- Pick up the 2/3 FUSE (T) and the HANDLE (U).
- Examine the wheelbarrow to activate a HOP.

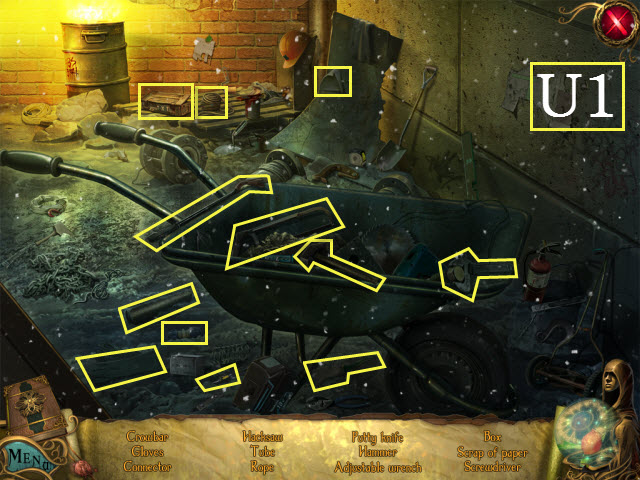
- Find the listed items (U1).
- You will receive the CONNECTOR.
- Walk down.

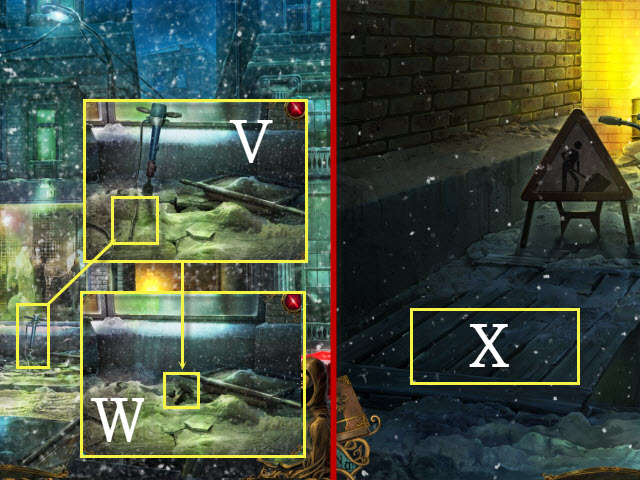
- Examine the jackhammer; place the CONNECTOR on the broken wire (V).
- Take the HAMMER (W).
- Walk forward.
- Use the HAMMER on the boards (X).
- Walk downstairs to the subway gates.

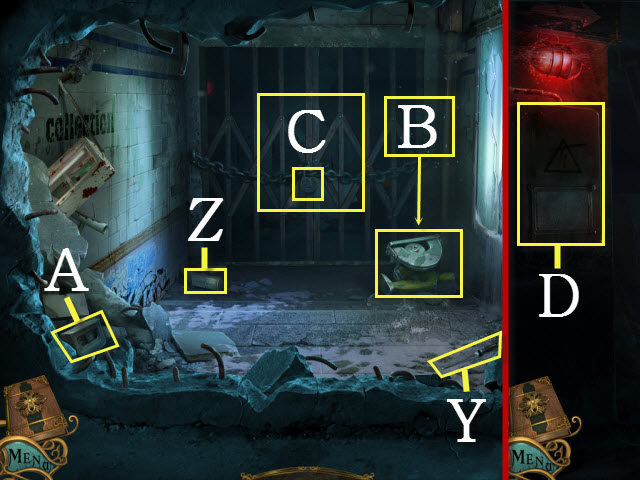
- Pick up the FILE (Y), the 2/3 ELECTRONIC PART (Z), and the 3/3 FUSE (A).
- Place the BATTERY and the SAW BLADE on the saw (B); take the CIRCULAR SAW.
- Use the CIRCULAR SAW on the lock (C).
- Walk forward.
- Examine the circuit box; select it (D).
- Walk down twice.
- Examine the wheelbarrow to activate a HOP.

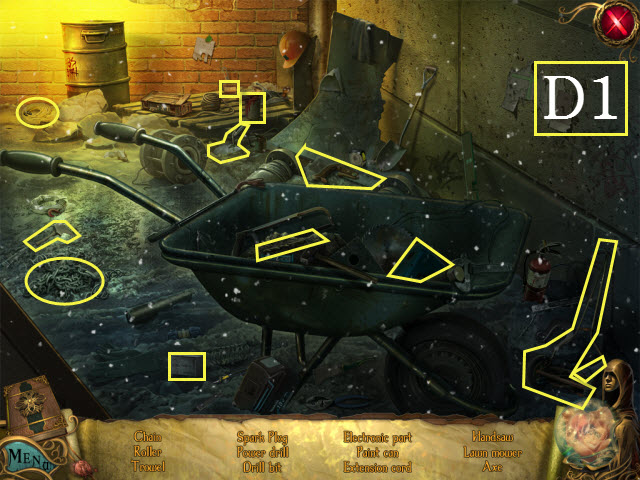
- Find the listed items (D1).
- You will receive the 3/3 ELECTRONIC PART.
- Walk forward twice.

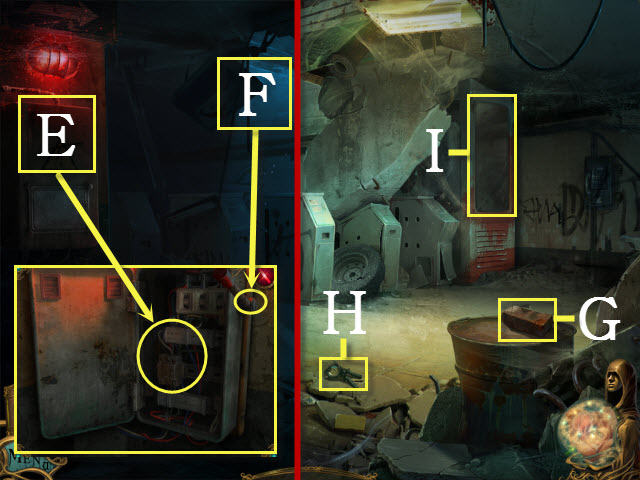
- Examine the circuit box; place the 3/3 ELECTRONIC PARTS and the 3/3 FUSES on the sockets (E).
- Place the HANDLE on the handle slot and pull the handle (F).
- Take the BRICK (G) and the CABLE CUTTER (H).
- Use the BRICK on the subway cab (I).
- Examine the subway cab to activate a HOP.

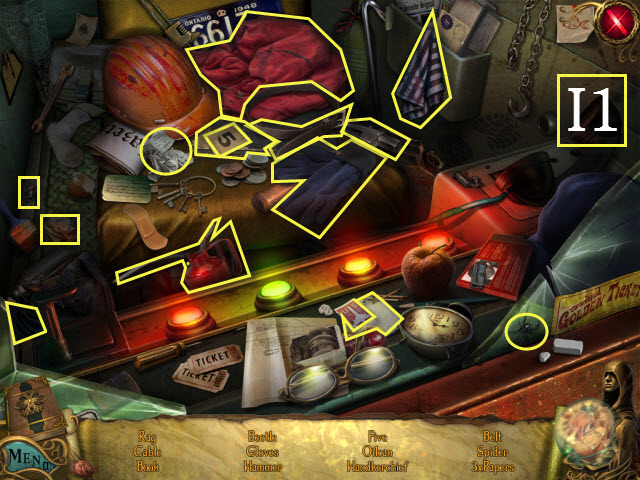
- Find the listed items (I1).
- You will receive the OILCAN.

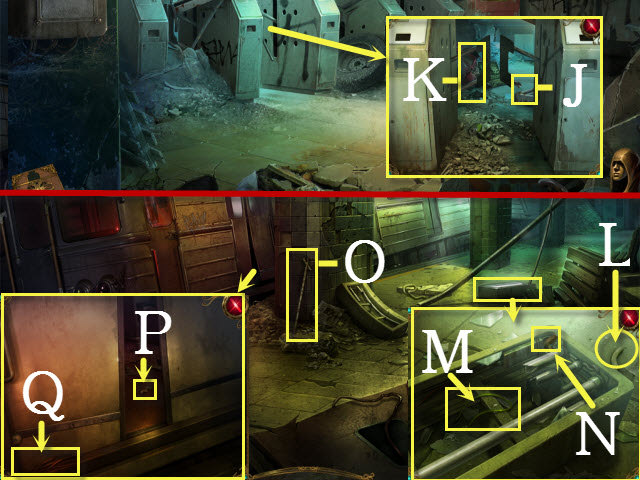
- Examine the turnstile; use the FILE on the right arm (J).
- Use the OILCAN on the left arm (K).
- Walk forward.
- Examine the light; use the CABLE CUTTER on the cable (L) to get the 1/5 WIRE (M) and the HANDLE (N).
- Pick up the STICK (O).
- Examine the slightly open cab; use the STICK to get the KEY (P).
- Take the 2/5 WIRE (Q).

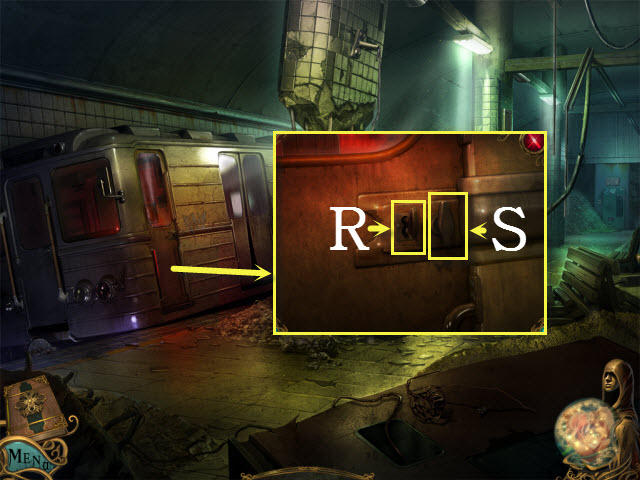
- Examine the subway cab; place the KEY in the keyhole (R) and the HANDLE on the slot (S).
- Turn the key and the handle.
- Enter the subway cab.

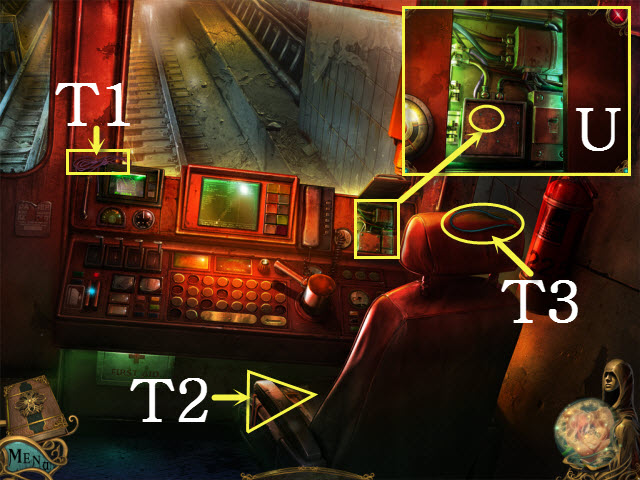
- Take the 3/5, 4/5, and 5/5 WIRES (T1-T3).
- Open the compartment and examine the circuit box; place the 5/5 WIRES on the electrical panel to begin a puzzle (U).

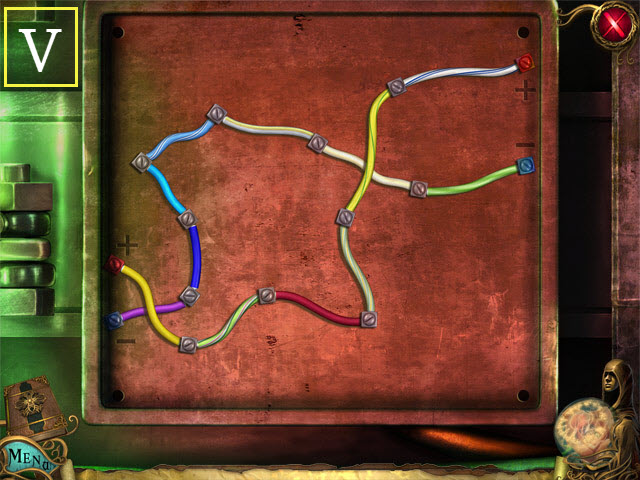
- Arrange the wires so that they create a pathway between the blue and red circuits.
- Please see the screenshot for the solution (V).
- Walk down twice.
- Examine the subway cab to activate a HOP.

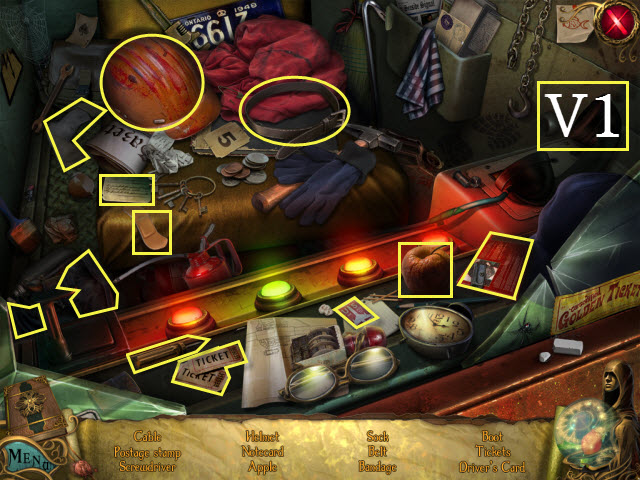
- Find the listed items (V1).
- You will receive the DRIVER’S CARD.
- Walk forward twice.

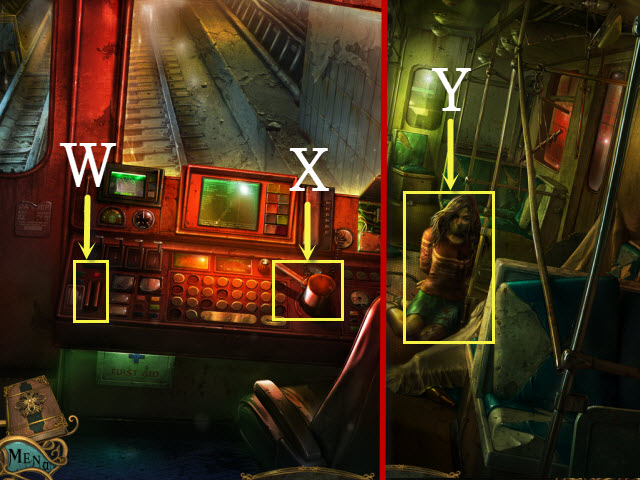
- Place the DRIVER’S CARD in the scanner (W).
- Turn the door release (X).
- Walk down and then right to the subway car.
- Select the victim (Y).

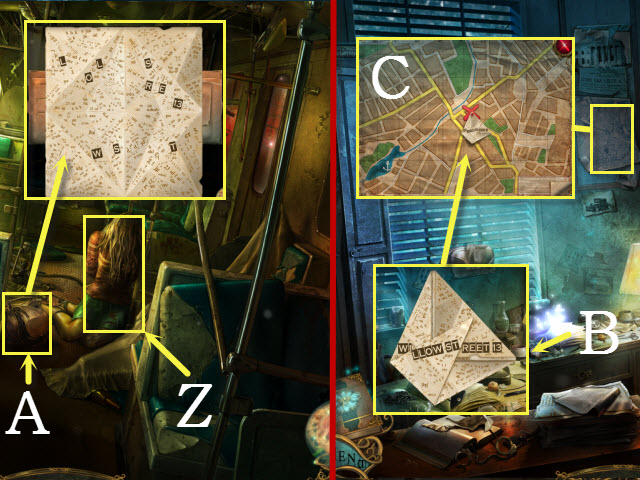
- Look at the victim (Z).
- Examine the victim’s bag; select the note and take it (A).
- Examine the desk; fold the note five times (B).
- You will receive the ADDRESS.
- Examine the map; place the ADDRESS on the map (C).
- Walk right and enter the police car.
Chapter 5: Secret Order

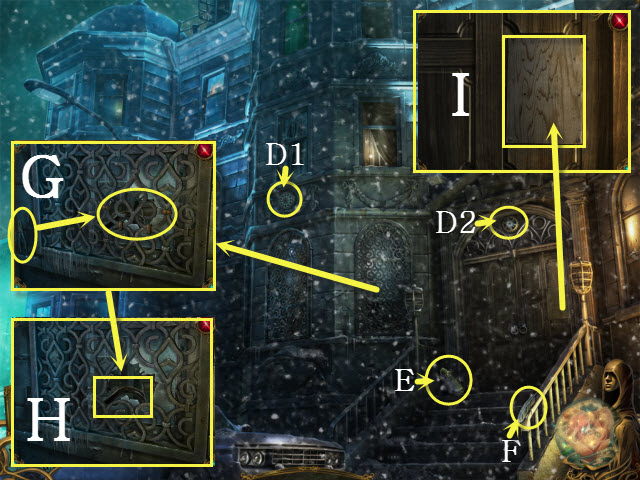
- Pick up the 1/8 and 2/8 GEARS (D1, D2).
- Pick up the SHOE (E).
- Pick up the FEATHER (F).
- Examine the window; pick up the WIRE CUTTER and use it on the staples (G).
- Take the CROWBAR (H).
- Examine the door; use the CROWBAR on the board (I).

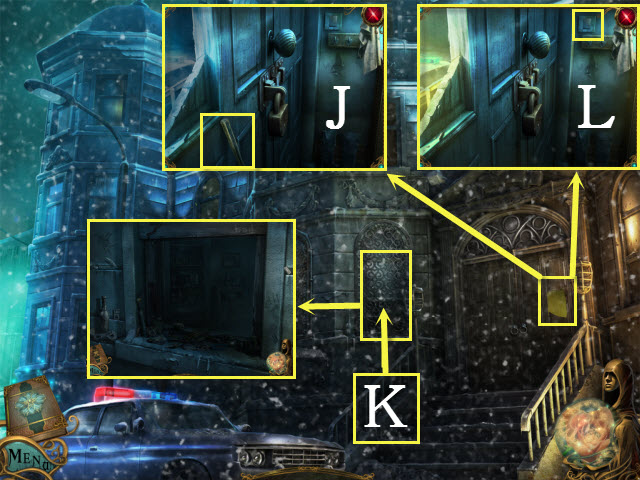
- Examine the door; pick up the HAMMER (J).
- Use the HAMMER on the window grate (K).
- Examine the window.
- Examine the door; use the SHOE on the switch (L).
- Examine the window to activate a HOP.

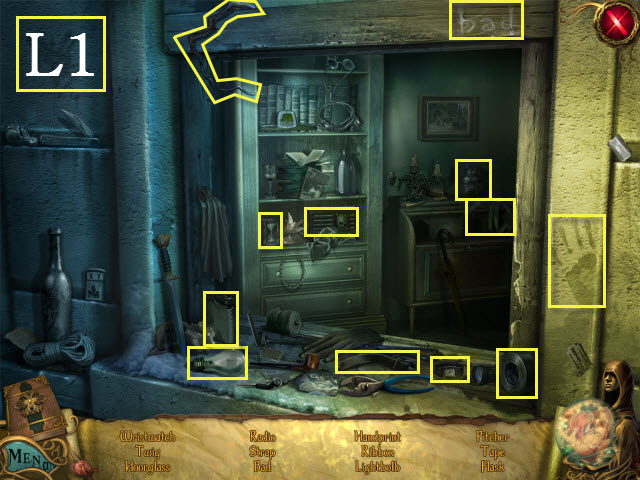
- Find the listed items (L1).
- You will receive the FIRE IRON.

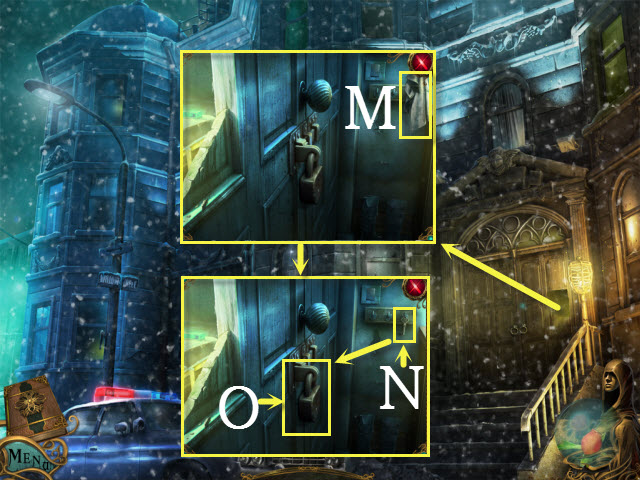
- Examine the door; use the FIRE IRON to get the RAG (M).
- Use the FIRE IRON to get the KEY (N).
- Use the KEY on the lock (O).
- Walk forward.

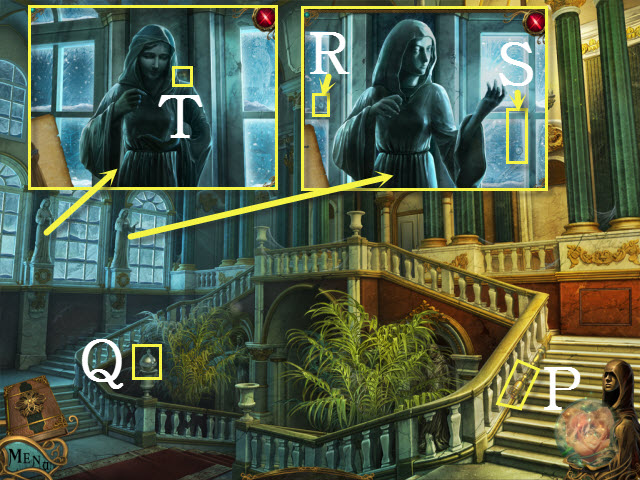
- Pick up the SCEPTER (P).
- Take the ORB (Q).
- Examine statue of enlightenment; take the 3/8 GEAR (R) and the MONOCLE (S).
- Examine statue of knowledge; take the 4/8 GEAR (T).
- Walk downstairs.

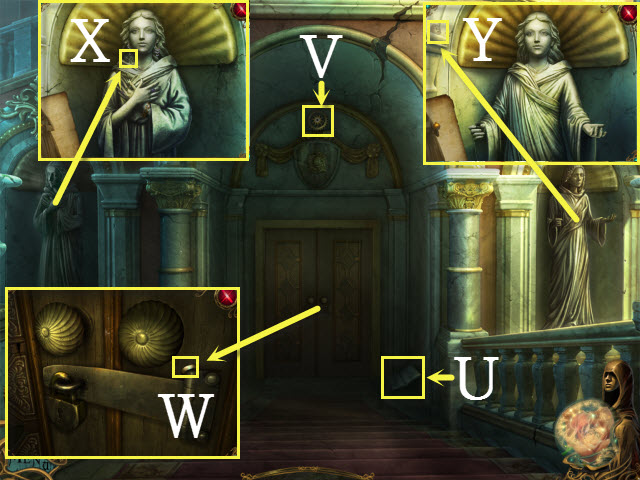
- Take the BOOK (U) and the 5/8 GEAR (V).
- Examine the locked door; take the RING (W).
- Examine statue of beauty; take the 6/8 GEAR (X).
- Examine statue of dominion; take the 7/8 GEAR (Y).
- Walk down and then upstairs.

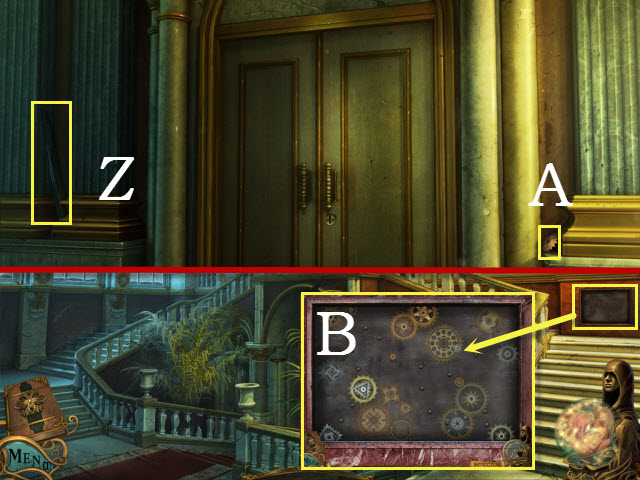
- Pick up the FIDDLESTICK (Z) and the 8/8 GEAR (A).
- Walk down.
- Open the panel and examine the mechanism; place the 8/8 GEARS to begin a puzzle (B).

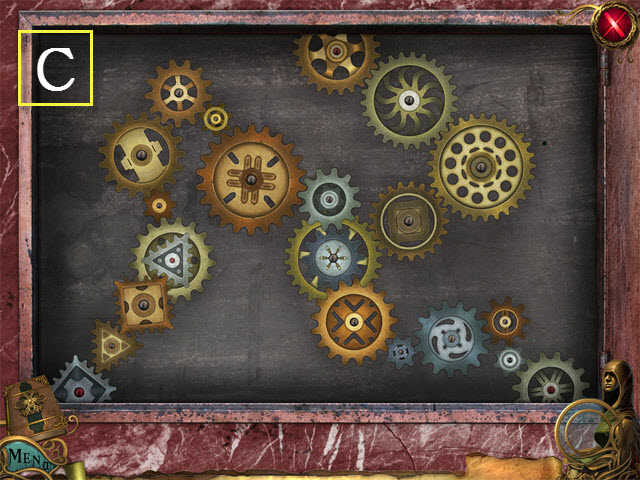
- Arrange the gears on the pivots so that they touch one another and can rotate.
- Please see the screenshot for the solution (C).

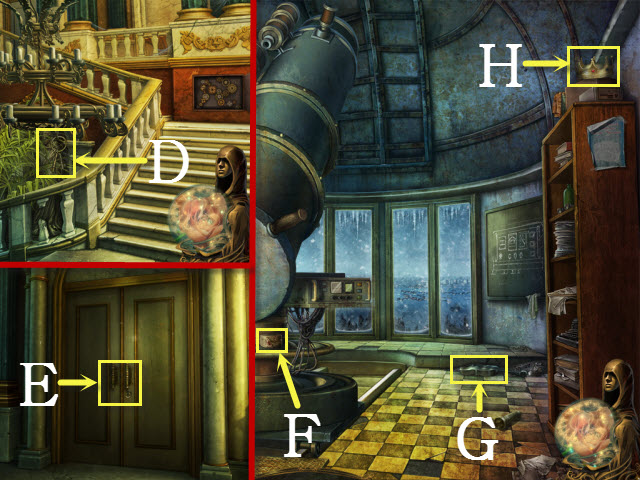
- Take the KEY (D).
- Walk upstairs.
- Use the KEY on the closed door (E).
- Enter the observatory.
- Pick up the BRACELET (F), the VIOLIN (G), and the CROWN (H).
- Walk down twice.

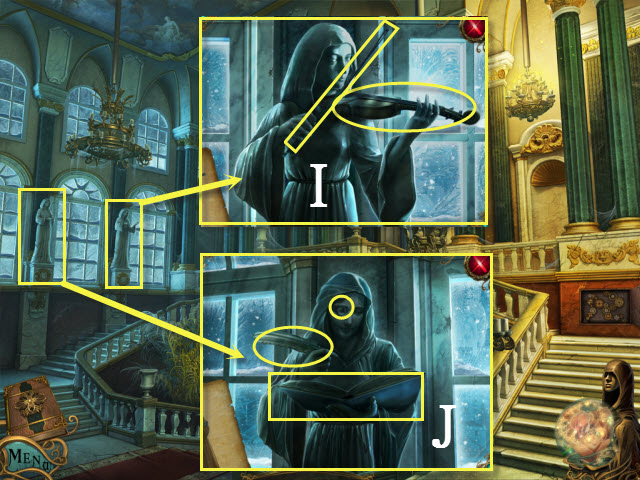
- Examine statue of enlightenment; place the VIOLIN and the FIDDLESTICK on it (I).
- Examine the statue of knowledge; place the MONOCLE, the FEATHER, and the BOOK on it (J).
- Walk downstairs.

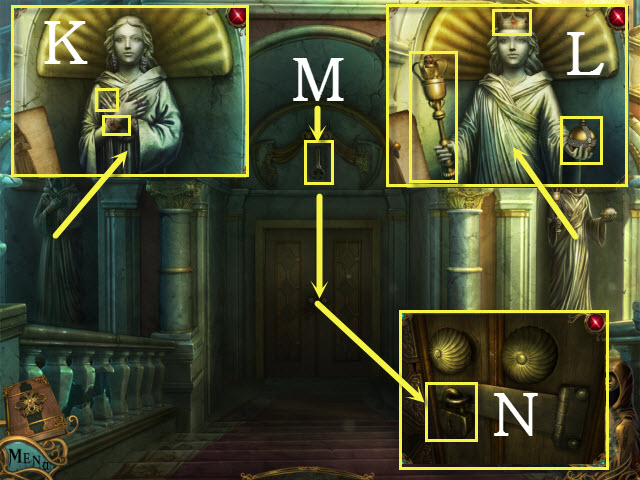
- Examine the statue of beauty; place the RING and the BRACELET on it (K).
- Examine the statue of dominion; place the CROWN, the SCEPTER, and the ORB on it (L).
- Take the KEY (M).
- Examine the locked door; use the KEY on the padlock (N).
- Walk forward twice.
- Select the floor to begin a puzzle.

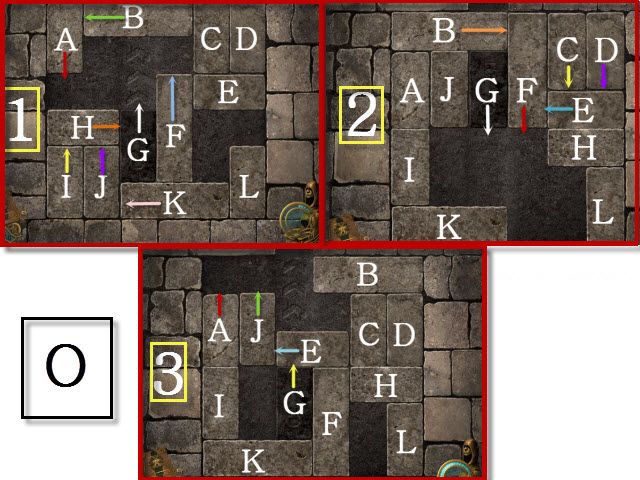
- Slide the blocks out of the way to make a clear path for the key.
- To solve the puzzle, follow the steps (1-3). Drag the tiles as far as they can go in their corresponding directions: A, B, F, G, H, I, J, K, G, F, E, C, D, B, A, J, E, and G.
- Walk forward.

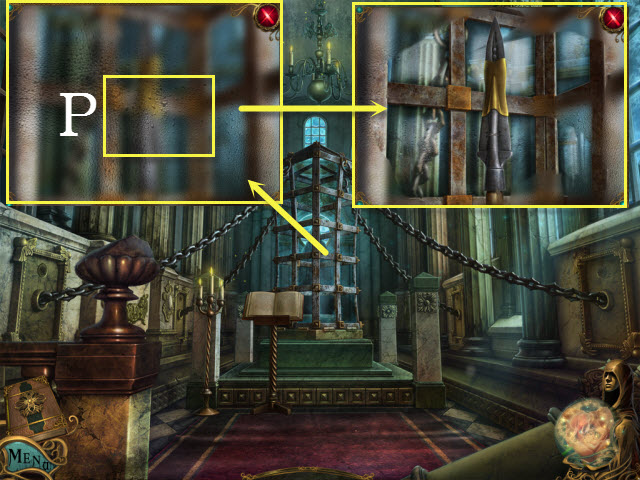
- Examine the cell; use the RAG on it (P).
- Return to the street and enter the police car.
Chapter 6: Wilted Rose

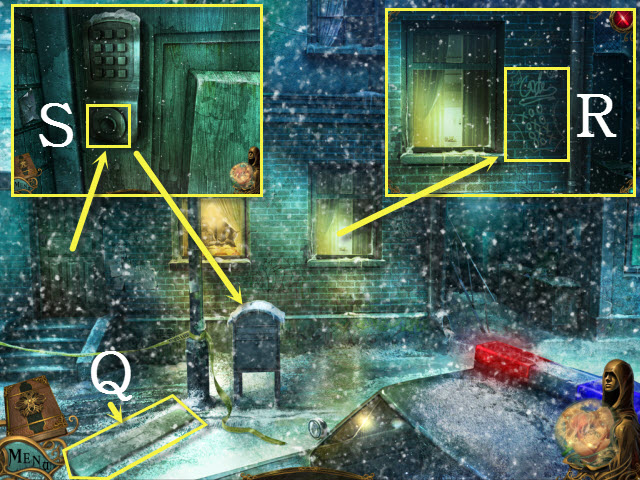
- Pick up the 1/5 STAIRS (Q).
- Examine the window; select the code (R).
- Examine the closed door; look at the handle slot (S).
- Examine the mailbox to activate a HOP.

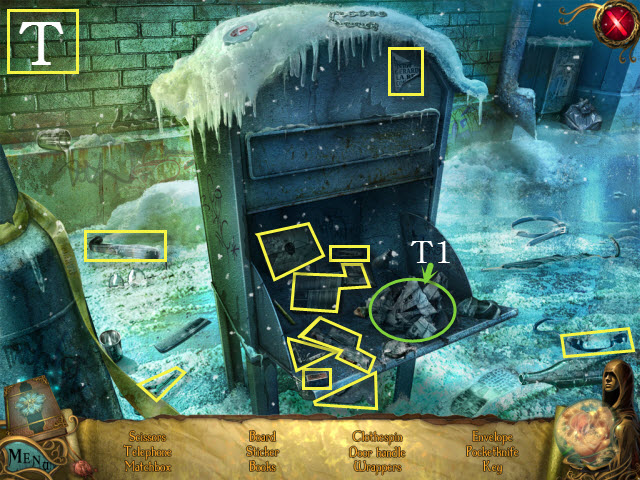
- Find the listed items (T).
- Move the newspaper to get the key (T1).
- You will receive the DOOR HANDLE.
- Walk forward to the alley.

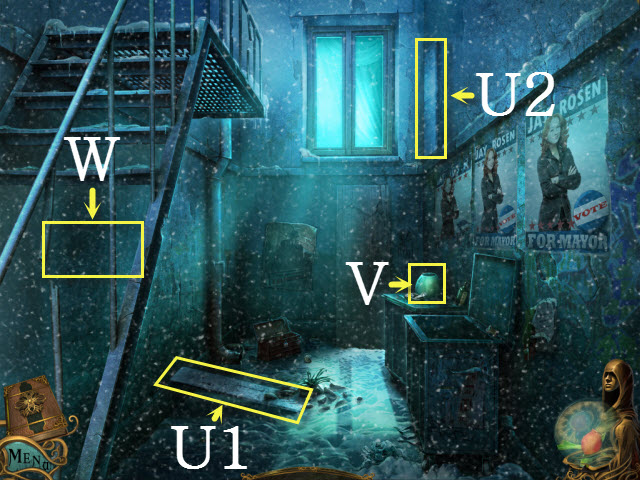
- Pick up the 2/5 and 3/5 STAIRS (U1, U2).
- Pick up the LAMPSHADE (V).
- Examine the fire escape (W).
- Walk down.

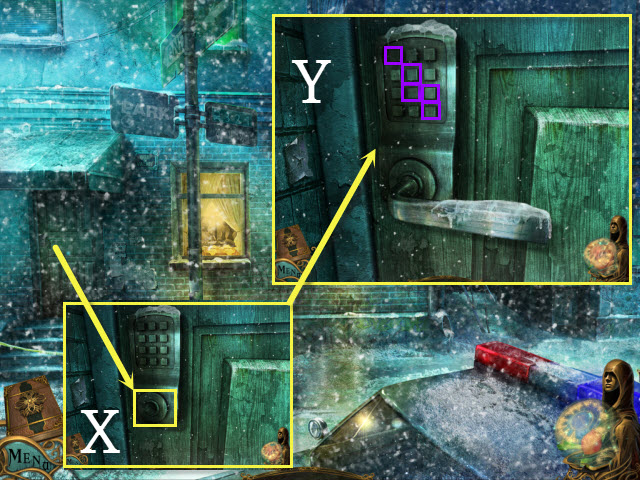
- Examine the closed door; place the DOOR HANDLE on the slot (X) to begin a puzzle.
- Please see the screenshot for the solution; select the buttons shown in purple (Y).
- Enter the corridor.

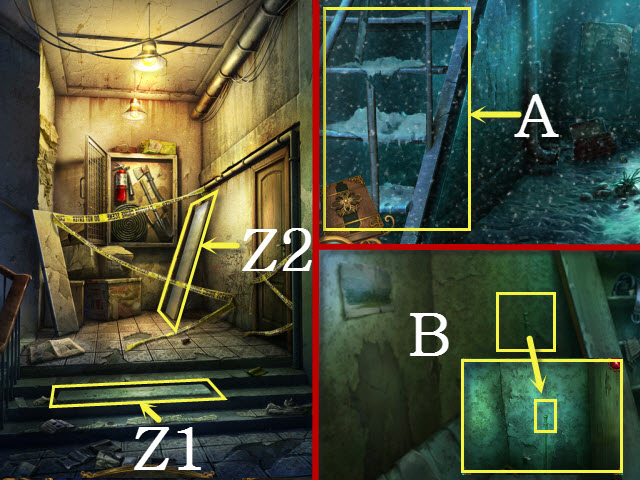
- Take the 4/5 and 5/5 STAIRS (Z1, Z2).
- Return to the alley.
- Place the 5/5 STAIRS on the fire escape (A).
- Walk upstairs.
- Examine the lamp and select it (B).
- Walk right.
- Examine under the bed to activate a HOP.

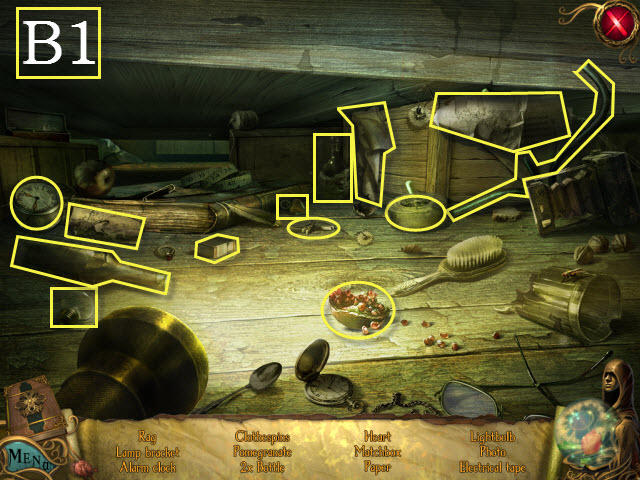
- Find the listed items (B1).
- You will receive the LAMP BRACKET.

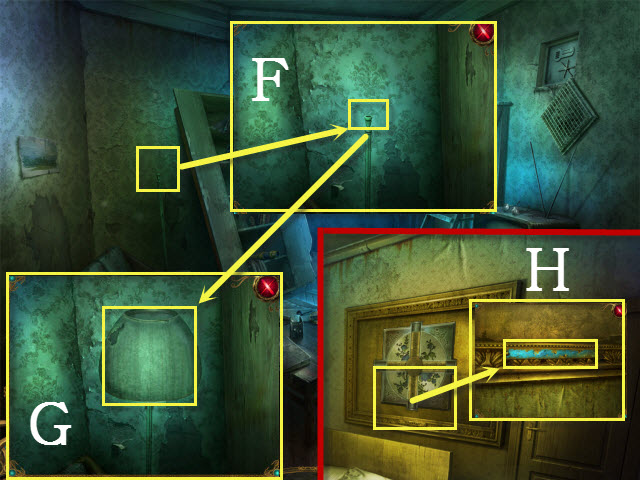
- Examine the painting; look at the inscription (C).
- Walk right.
- Pick up the LIGHTBULB (D).
- Examine the sink; take the TOOTHPASTE (E).
- Walk down twice.


- Examine the lamp; place the LIGHTBULB, the LIGHT BRACKET, and the LAMPSHADE on it (F).
- Select the lamp (G).
- Walk right.
- Examine the painting; place the TOOTHPASTE on the inscription (H).
- Walk right.
- Examine the shelf to activate a HOP.

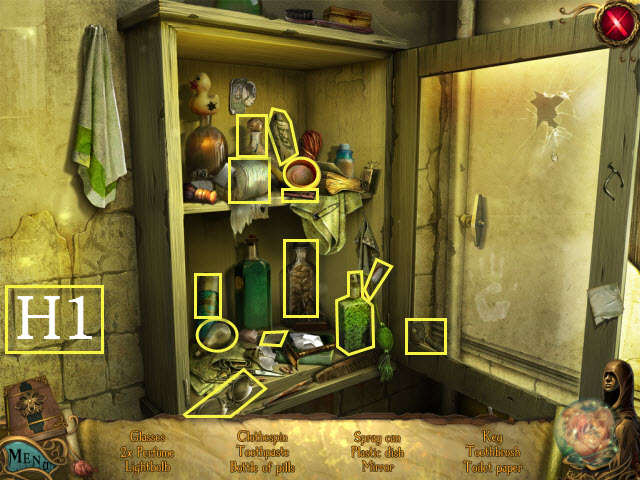
- Find the listed items (H1).
- You will receive the TOOTHBRUSH.
- Walk down.

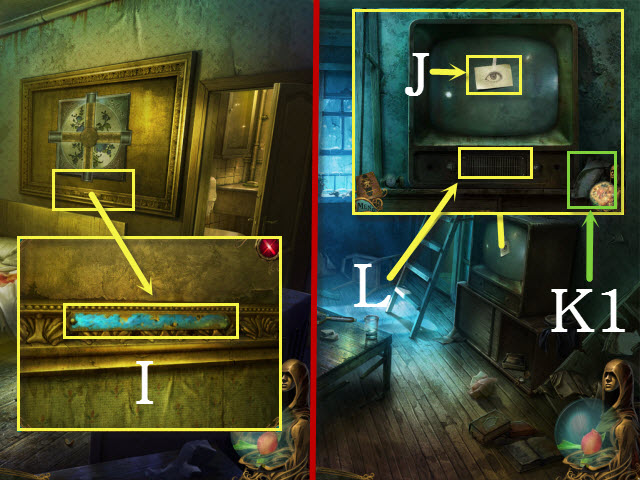
- Examine the inscription; use the TOOTHBRUSH on the toothpaste (I).
- Walk down.
- Examine the TV; take the note (J).
- Move the rag to get the KNOB (K1).
- Examine the panel (L).
- Examine the safe to activate a HOP.

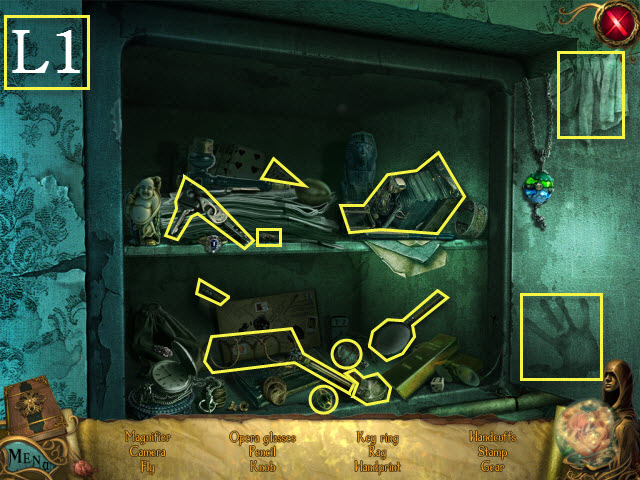
- Find the listed items (L1).
- You will receive the KNOB.
- Return to the alley.
- Examine the toolbox to activate a HOP.

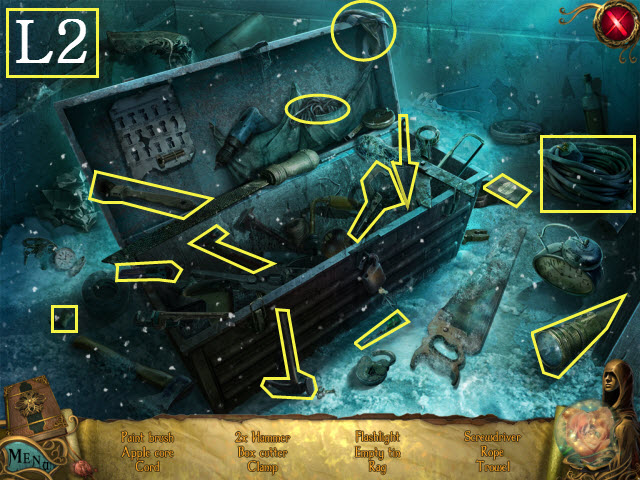
- Find the listed items (L2).
- You will receive the SCREWDRIVER.
- Walk upstairs.

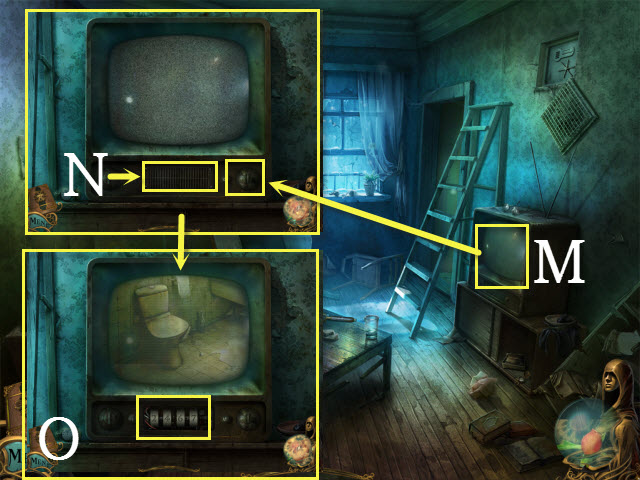
- Examine the TV; place the KNOBS on it (M).
- Use the SCREWDRIVER on the four screws (N).
- Enter 2, 4, 6, and 7 (O).
- Return to the bathroom.

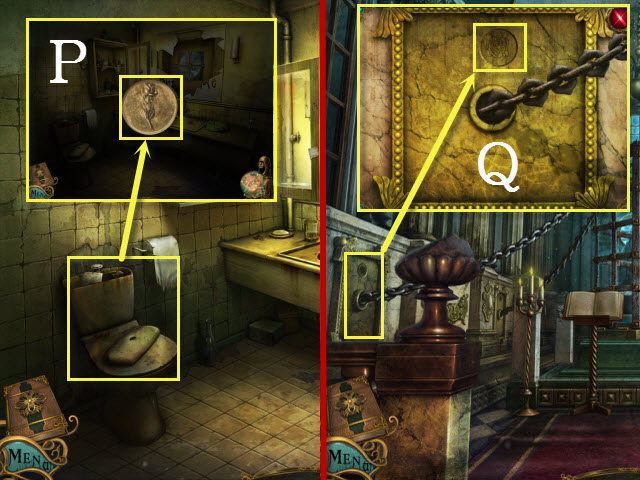
- Open the toilet tank; examine it and take the ROSE COIN (P).
- Examine the chain of beauty; place the ROSE COIN in the niche (Q).
- Walk down.
Chapter 7: Closed Book

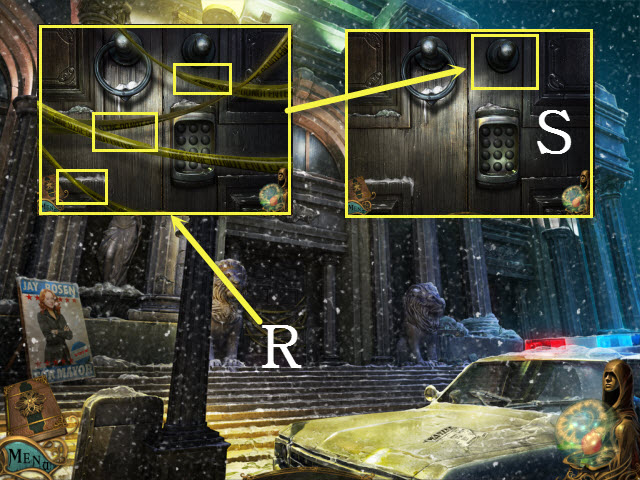
- Examine the museum door; remove the police tape (R).
- Look at the missing knocker (S).
- Examine the lion to activate a HOP.

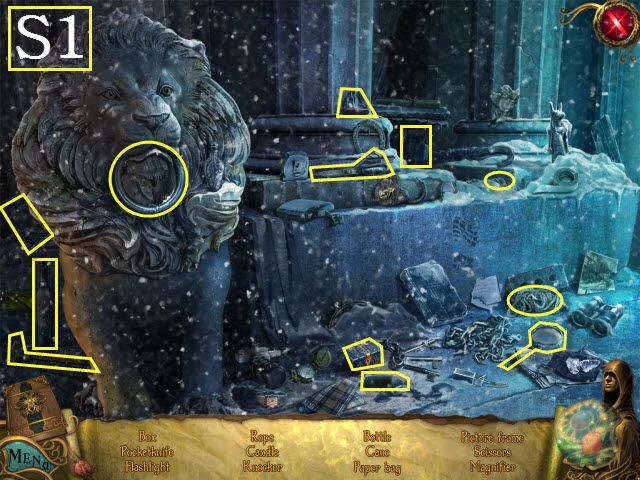
- Find the listed items (S1).
- You will receive the KNOCKER.

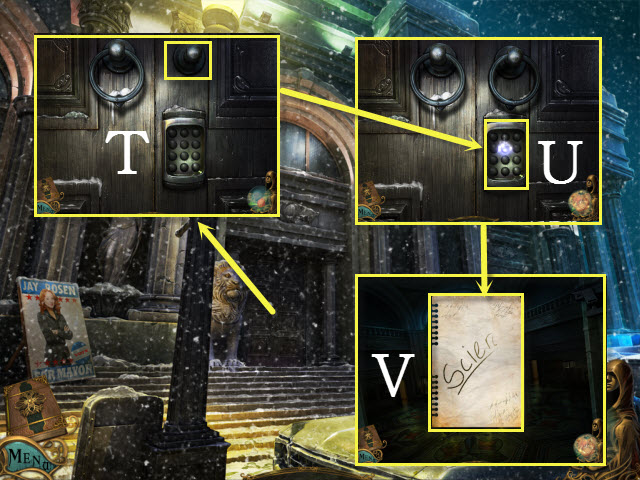
- Examine the door; place the KNOCKER on it (T).
- Touch the keypad (U).
- Enter the museum.
- Take the notepad (V).
- Enter the police car.

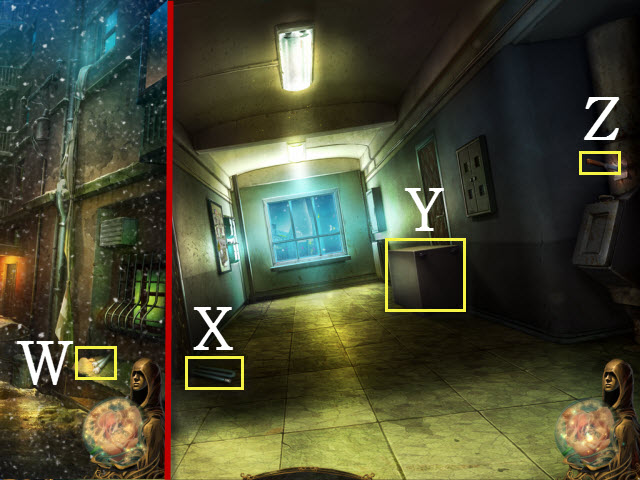
- Take the LIGHTBULB (W).
- Walk right to the corridor.
- Pick up the LIGHTBULB (X) and the KNIFE (Y).
- Examine the cabinet (Z).
- Walk down.
- Examine the old car to activate a HOP.

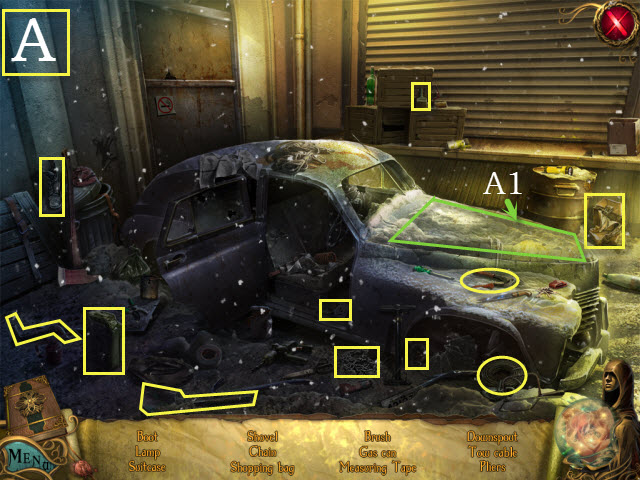
- Find the listed items (A).
- Open the hood to get the shopping bag (A1).
- You will receive the TOW CABLE.

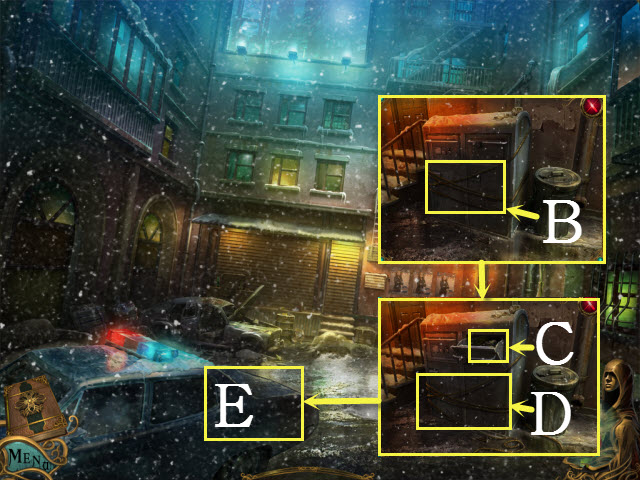
- Examine the trash can; use the KNIFE on the rope (B).
- Pick up the RADIO KNOB (C) and the ROPE (D).
- Place the TOW CABLE with the car (E).
- Walk right.

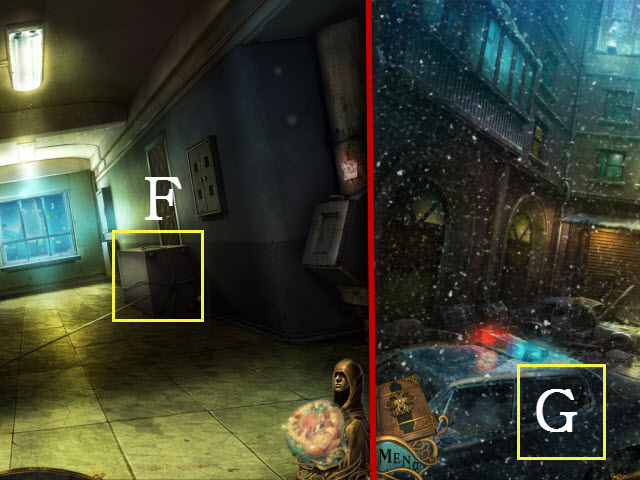
- Use the ROPE and then the TOW CABLE on the cabinet (F).
- Walk down.
- Select the car (G).
- Walk right and enter the apartment.

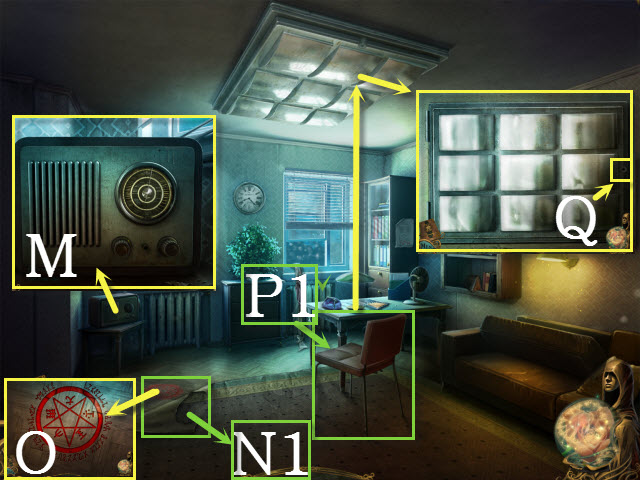
- Examine the radio; take the VALVE (H).
- Examine the radiator; place the VALVE on the hub and then rotate it (I).
- Take the RADIO ANTENNA (J) and the AUDIO DIAL (K).
- Take the LIGHTBULB (L).


- Examine the radio; place the RADIO ANTENNA, the AUDIO DIAL, and the RADIO KNOB on it (M).
- Move the carpet (N1); look at the mark on the floor (O).
- Move the chair and examine the lamp (P1); look at the lock (Q).
- Walk down.
- Examine the mailboxes to activate a HOP.

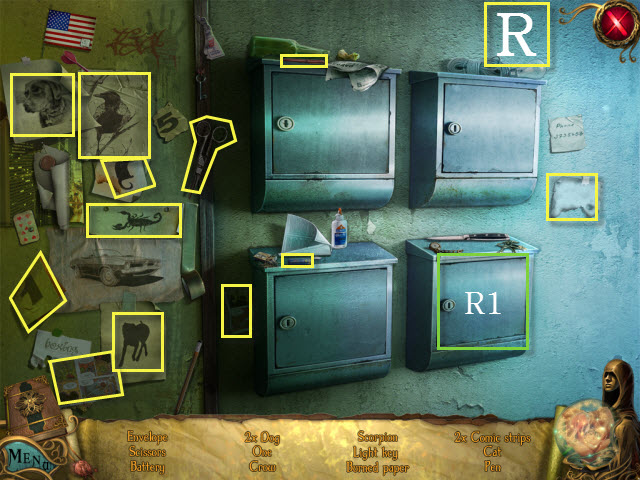
- Find the listed items (R).
- Open the mailbox to get the envelope and the light key (R1).
- You will receive the LIGHT KEY.
- Walk right.

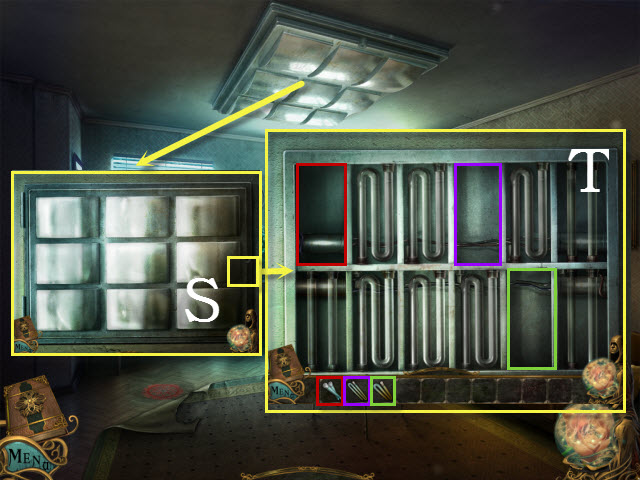
- Examine the lamp; use the LIGHT KEY on the lock (S).
- Place the three LIGHTBULBS in the spaces (T).
- Return to the street.
- Examine the old car to activate a HOP.

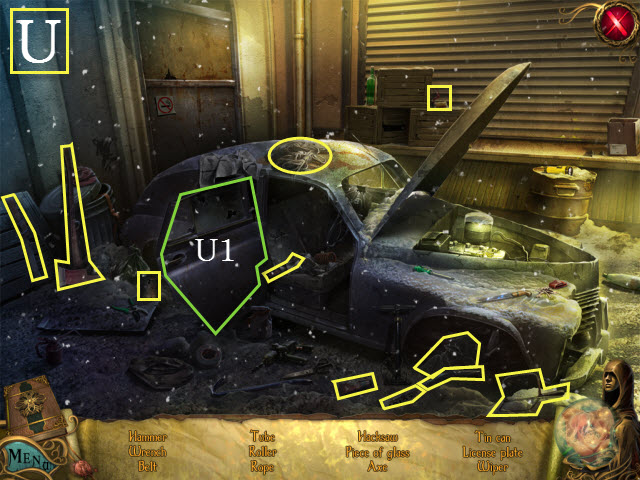
- Find the listed items (U).
- Close the car door to get the hammer (U1).
- You will receive the AXE.
- Walk right twice.

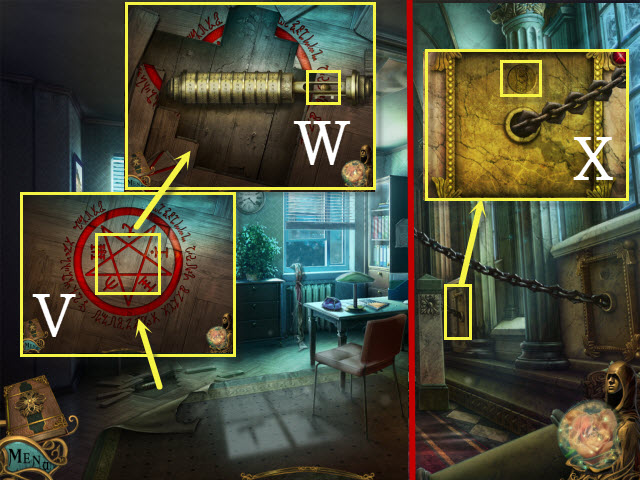
- Examine the mark on the floor and use the AXE on the secret compartment (V).
- Examine the mark on the floor and open the cryptex; take the COIN OF KNOWLEDGE (W).
- Examine the chain of knowledge; place the COIN OF KNOWLEDGE in the niche (X).
- Walk down and then forward twice.
Chapter 8: Silent Scream

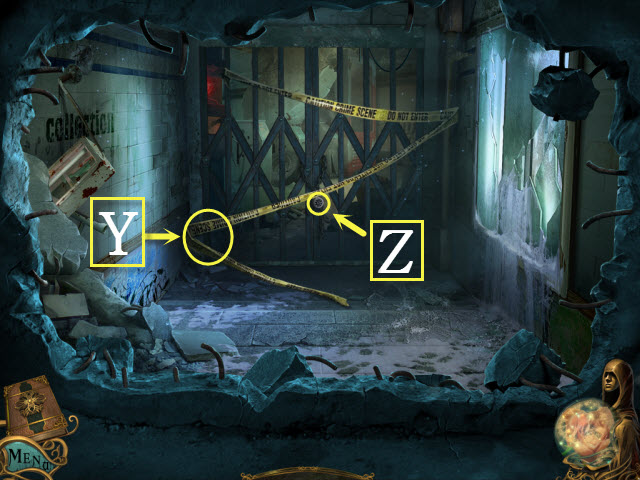
- Remove the police tape (Y).
- Examine the lock (Z).
- Walk down.
- Examine the wheelbarrow to activate a HOP.

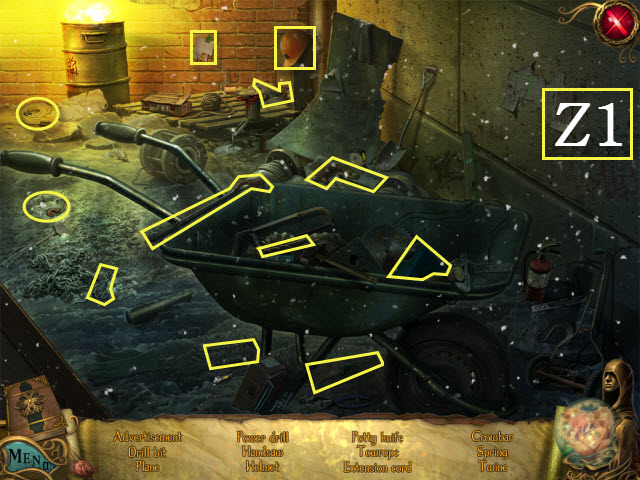
- Find the listed items (Z1).
- You will receive the CROWBAR.
- Walk forward.

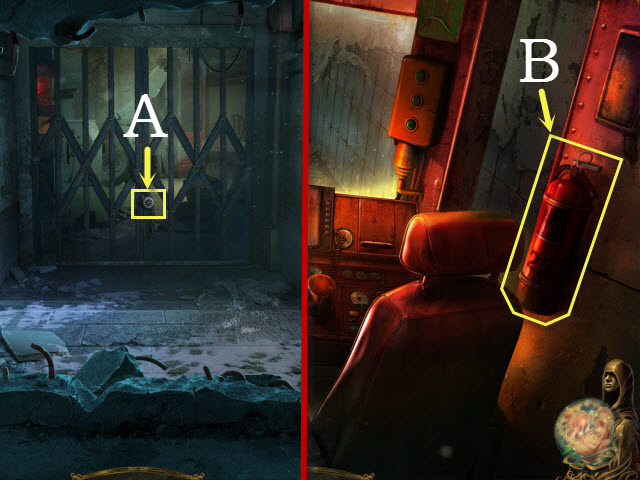
- Use the CROWBAR on the lock (A).
- Walk forward twice and enter the subway cab.
- Take the EXTINGUISHER (B).
- Walk down and enter the subway car.

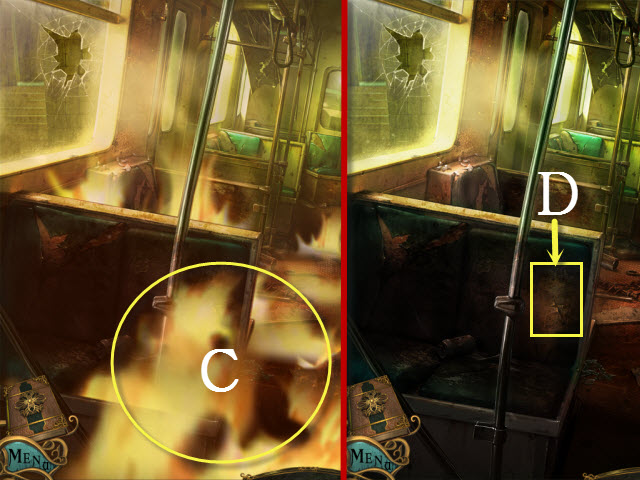
- Use the EXTINGUISHER on the scene (C).
- Examine the hole (D).
- Walk down twice.
- Examine the subway cab to activate a HOP.

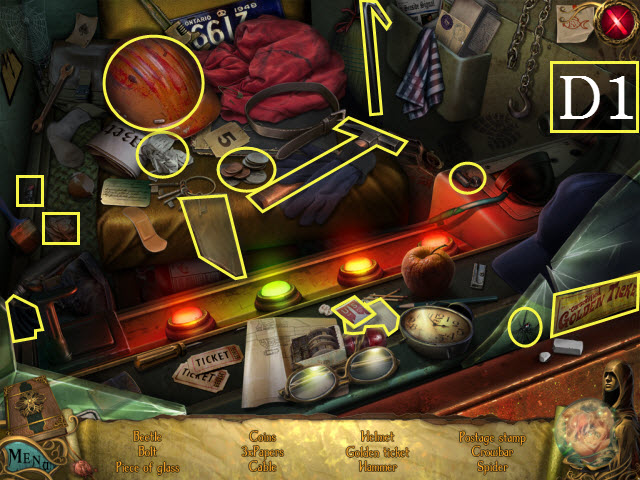
- Find the listed items (D1).
- You will receive PIECE OF GLASS.
- Walk forward and enter the subway car.

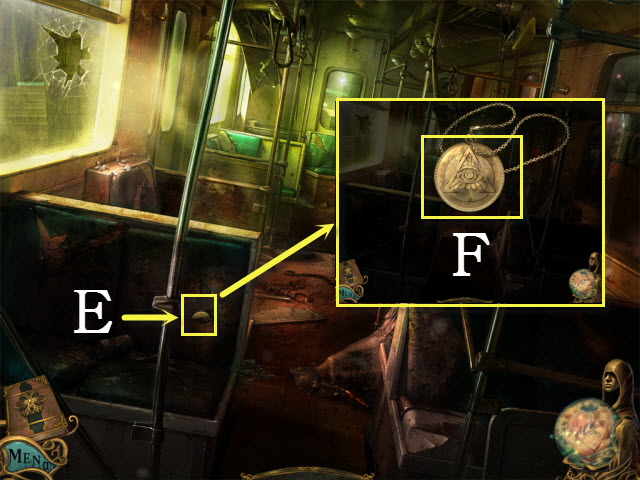
- Use the PIECE OF GLASS on the hole (E).
- Examine the hidden item; take the COIN OF ENLIGHTENMENT (F).
- Return to the street and enter the police car.
Chapter 9: Deadly Game

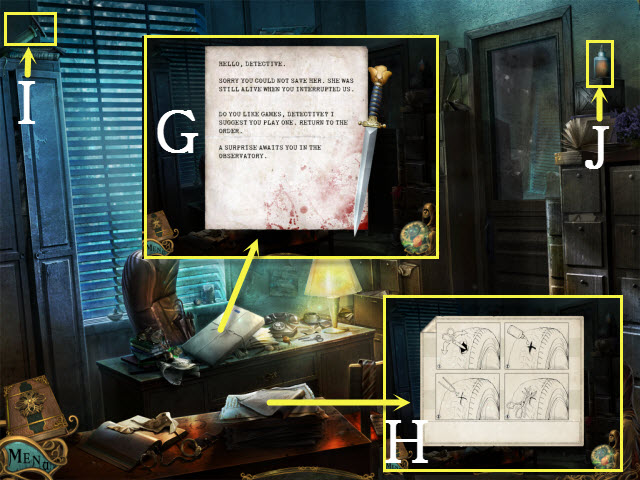
- Examine the package and select the note (G).
- You will receive the 1/6 KNIFE.
- Examine the car manual and take it (H).
- Take the PUMP (I).
- Take the GLUE (J).
- Walk right.

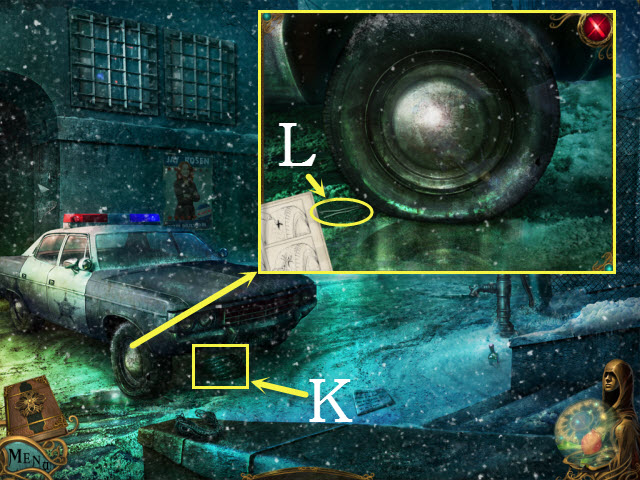
- Pick up the HOSE (K).
- Examine the wheel; take the RUBBER BAND (L).
- Walk down.
- Examine the desk to activate a HOP.

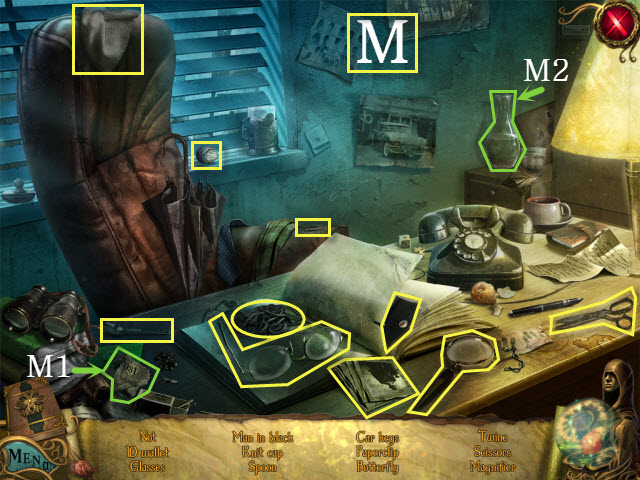
- Find the listed items (M).
- Move the piece of paper to get the car keys (M1).
- Move the bottle to get the butterfly (M2).
- You will receive the SCISSORS.
- Walk right.

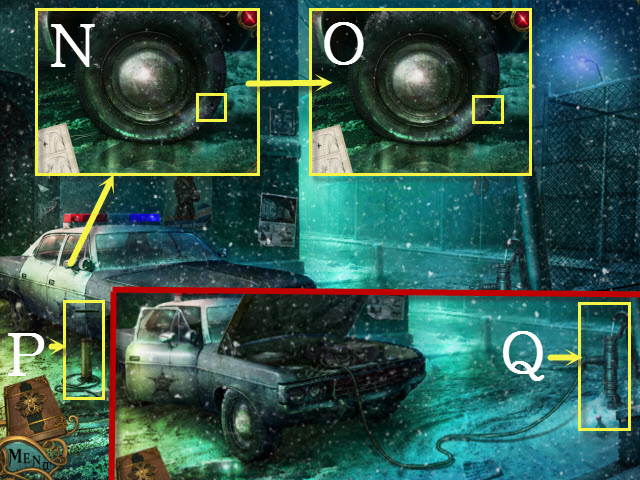
- Examine the wheel; use the SCISSORS, the GLUE, and then the RUBBER BAND on the hole (N).
- Use the SCISSORS on the rubber band (O).
- Place the PUMP with the wheel (P); select the pump.
- Enter the police car.
- Open the car hood.
- Use the HOSE on the water pump (Q); select the pump.
- Close the hood and enter the police car.

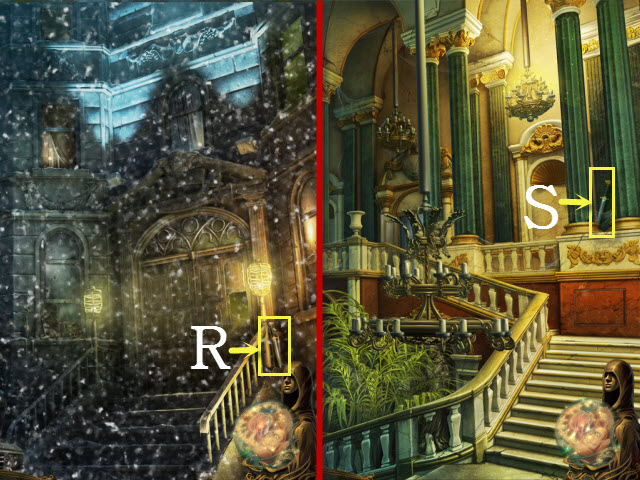
- Take the 2/6 KNIFE (R).
- Walk forward into the building.
- Pick up the 3/6 KNIFE (S).
- Walk downstairs and then walk forward.

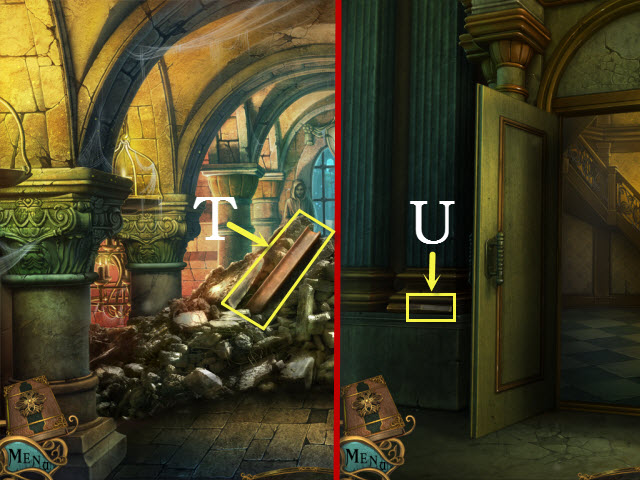
- Take the RAIL (T).
- Walk down twice and then walk upstairs.
- Take the 1/2 TOOLS (U).
- Walk forward.

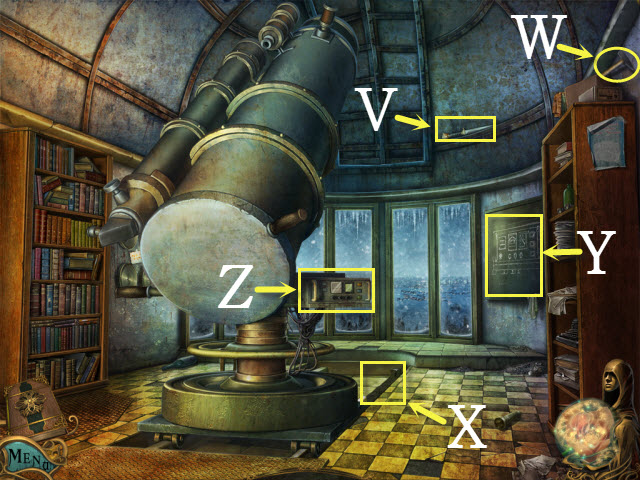
- Take the 4/6 KNIFE (V).
- Take the 2/2 TOOLS (W).
- Select the broken rail and then place the RAIL on it (X).
- Examine the chalkboard (Y).
- Examine the control panel to begin a puzzle (Z).

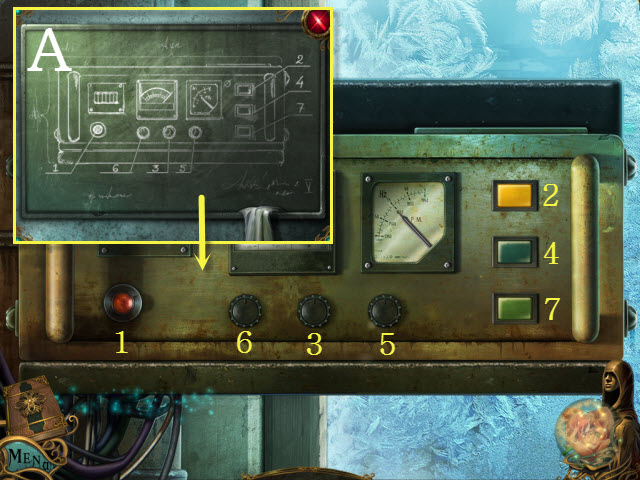
- Follow the steps (1-7) to solve the puzzle (A).
- Examine the control panel to begin a puzzle.

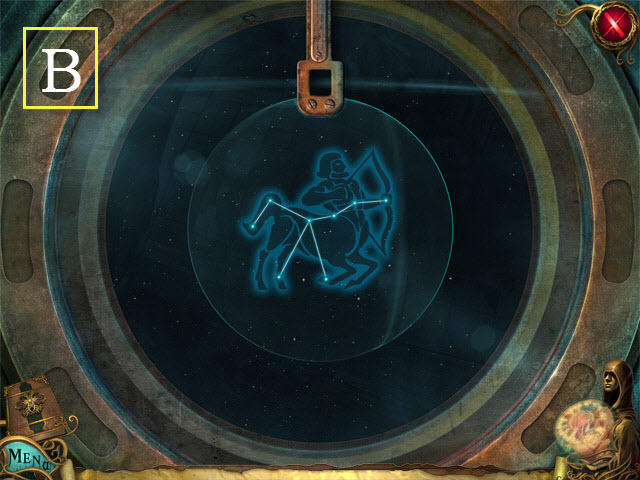
- This puzzle is random. Drag the points until they align with the correct constellation. The arrow will guide you towards the target; hold down left-click to move.
- Please see the screenshot for one possible solution (B).

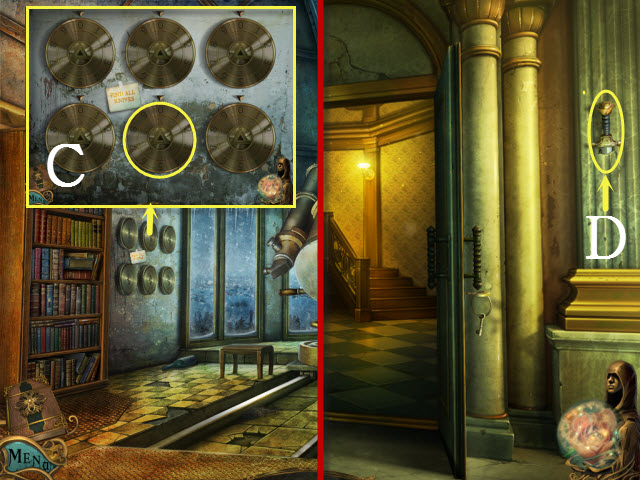
- Examine the brass dials; select the dials (C).
- Walk down.
- Use the 2/2 TOOLS to get the 5/6 KNIFE (D).
- Return to the street.
- Examine the window to activate a HOP.

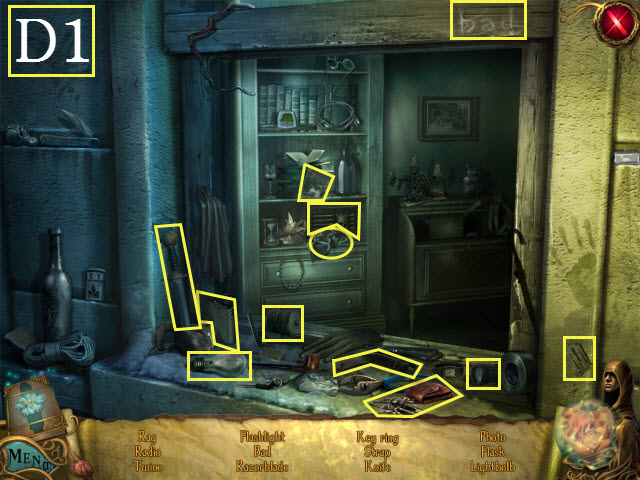
- Find the listed items (D1).
- You will receive the 6/6 KNIFE.
- Return to the observatory.

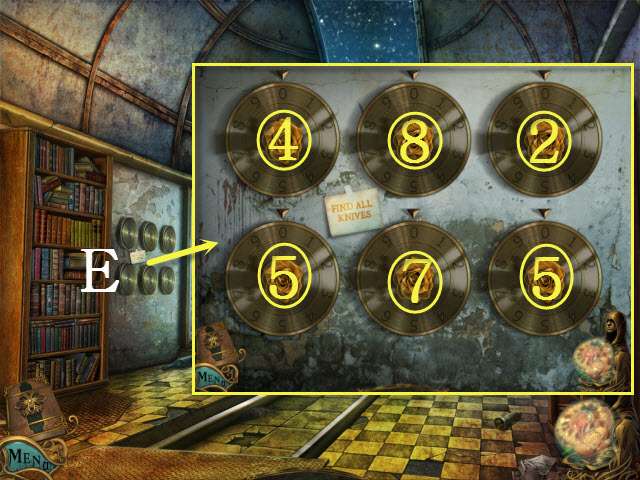
- Examine the brass dials; place the 5/5 KNIVES on them to begin a puzzle (E).
- Top row: 4, 8, and 2. Bottom row: 5, 7, and 5.
- Please see the screenshot for the solution.
- Walk left.

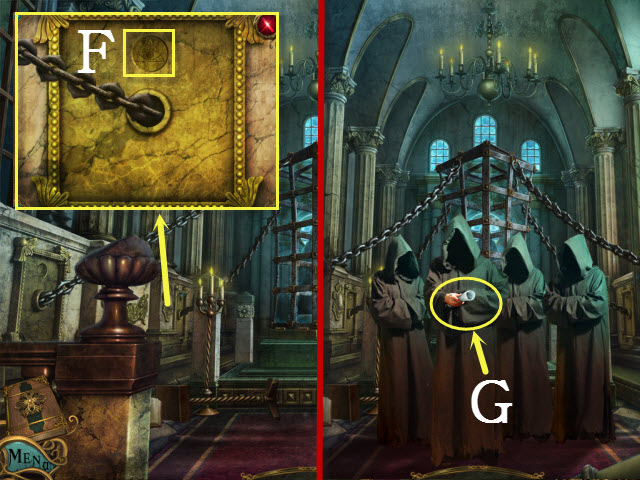
- Examine the chain of enlightenment; insert the COIN OF ENLIGHTENMENT into the niche (F).
- Select the tap (G).
- Congratulations! You have completed Order of the Rose.


 Brink of Consciousness: Dorian Gray Syndrome Walkthrough, Guide, & Tips
 Time Relics: Gears of Light Walkthrough, Guide, & Tips
 Reflections of Life: Equilibrium Walkthrough, Guide, & Tips
 Angela Young 2: Escape the Dreamscape Walkthrough, Guide, & Tips
 Christmas Stories: Hans Christian Andersen's Toy Soldier Walkthrough, Guide, & Tips