Final Cut: Homage Walkthrough, Guide, & Tips
Final Cut: Homage Walkthrough

Welcome to the Final Cut: Homage Walkthrough
Will you heed the director’s final casting call?
Whether you use this document as a reference when things get difficult or as a road map to get you from beginning to end, we’re pretty sure you’ll find what you’re looking for here.
This document contains a complete Final Cut: Homage game walkthrough featuring annotated screenshots from actual gameplay!
We hope you find this information useful as you play your way through the game. Use the walkthrough menu below to quickly jump to whatever stage of the game you need help with.
Remember to visit the Big Fish Games Forums if you find you need more help. Have fun!
This walkthrough was created by Margie B, and is protected under US Copyright laws. Any unauthorized use, including re-publication in whole or in part, without permission, is strictly prohibited.
General Tips
- This is the official guide for Final Cut: Homage!
- This guide will not mention each time you have to zoom into a location; the screenshots will show each zoom scene.
- Hidden-object puzzles are referred to as HOPs in this guide. Items listed in green or red, are hidden or require additional actions to locate. Interactive items in HOPs are color-coded.
- Mini-games and HOPs are sometimes randomized; your solution may vary.
- We will not mention when things have to be moved in HOPs; the screenshots will show where each item is located.
- This guide will give step-by-step solutions for all puzzles which are not random. Please read the instructions in the game for each puzzle.
- You must use the different projectors in the scenes to travel to some locations.
- Mini Hidden Object puzzles are referred as MHO.
- Mini-Games are referred to as MG.
Chapter 1: Wolf Family Mansion


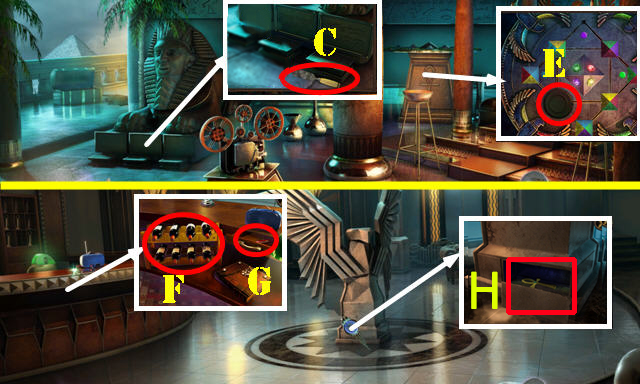
- Talk to Harris.
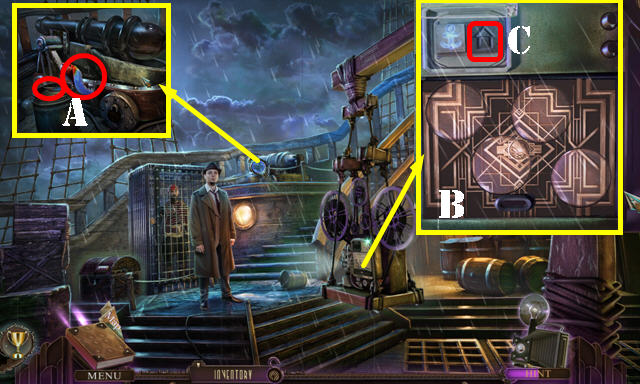
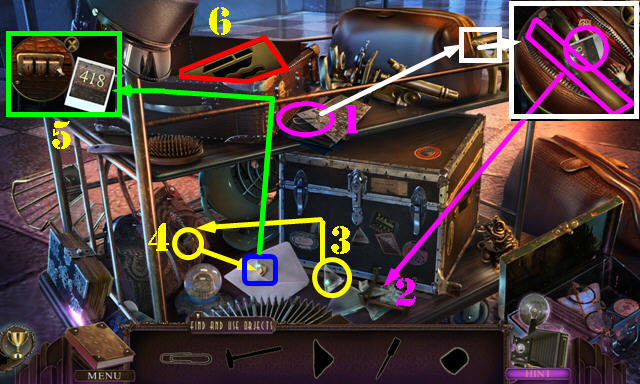
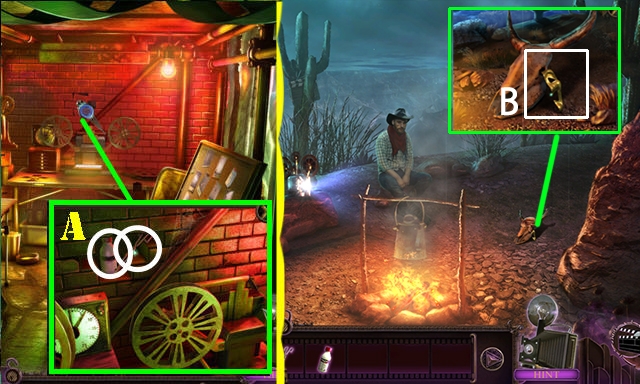
- Take the TAPE RECORDER; flip it. Remove the cover and flip the two batteries (A). Give the TAPE RECORDER to Harris.
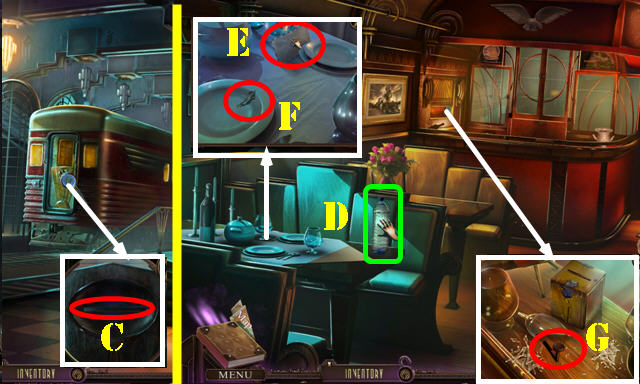
- Sign for the package (B) and touch it. Take the ENVELOPE (C).
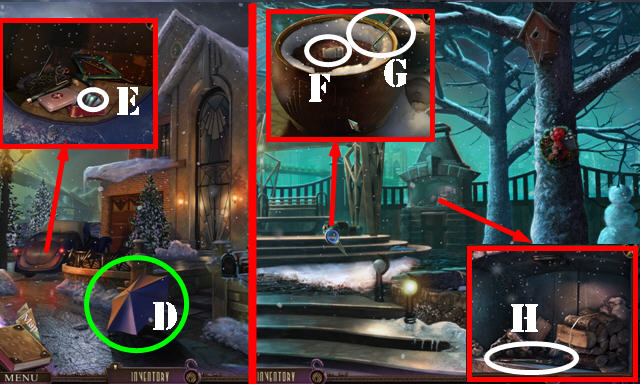
- Open the ENVELOPE and read the letter; Take the ODD COIN (D).
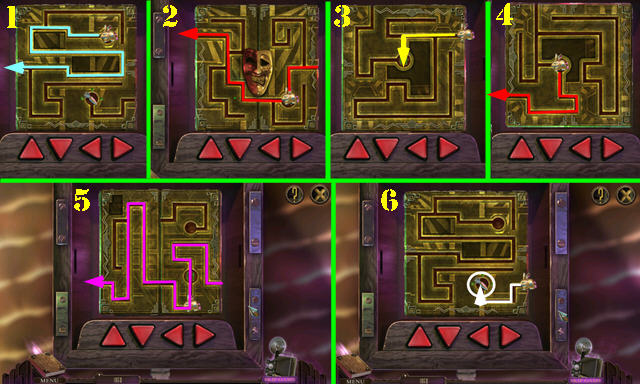
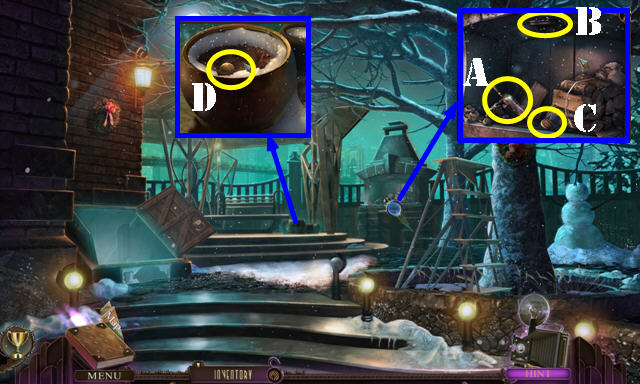
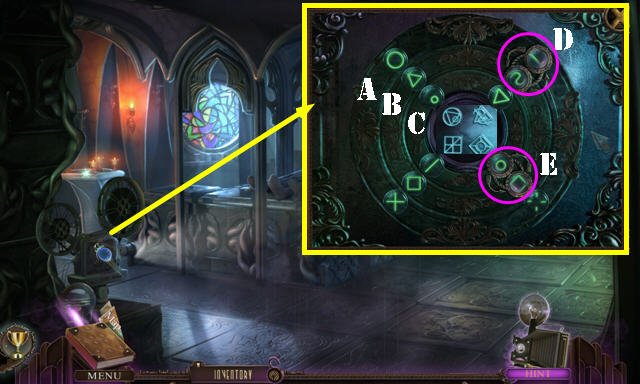
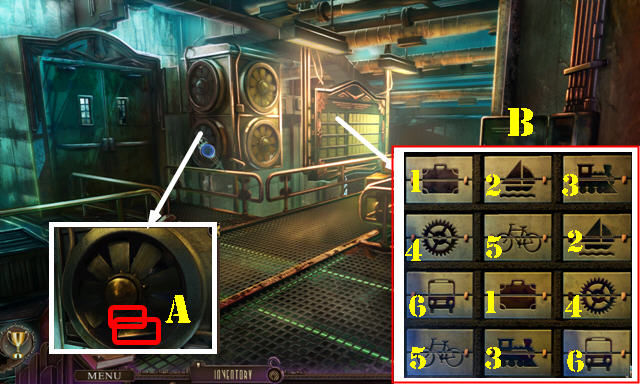
- Place the ODD COIN on the lock (E) to get the PADLOCK. Open the box for a puzzle.
- Solution (1-6).
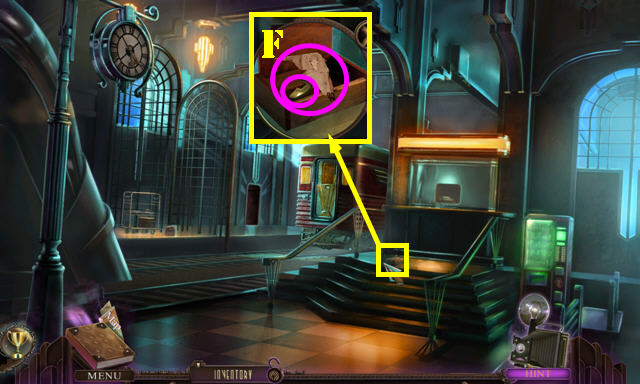
- Take the DISC 1/2 and the ADDRESS.
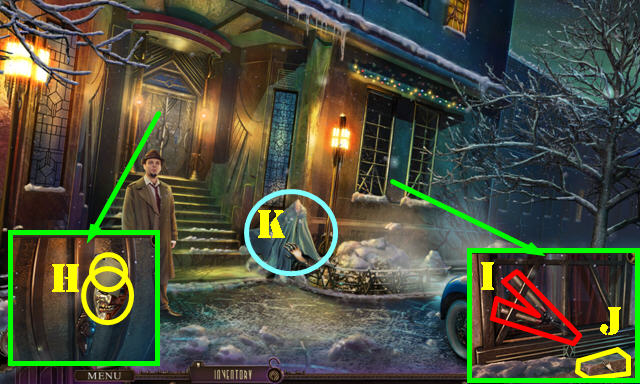
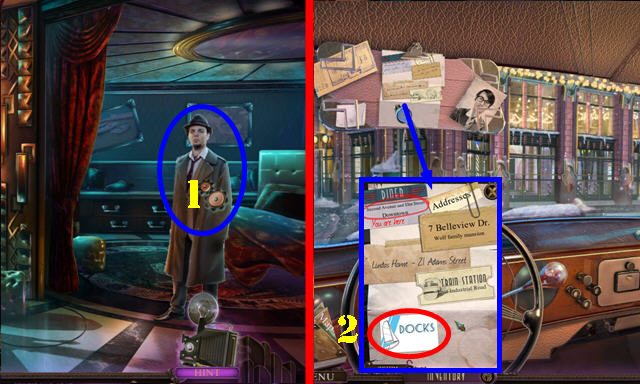
- Go through the door and enter the car.
- Take the map (F); open the paper; place the ADDRESS on it and touch it (G).
- Exit the car once it stops.
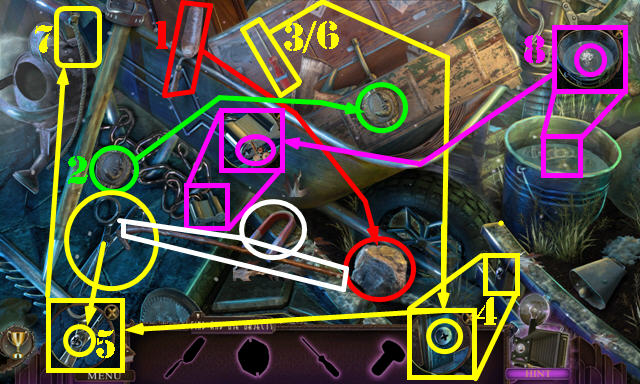
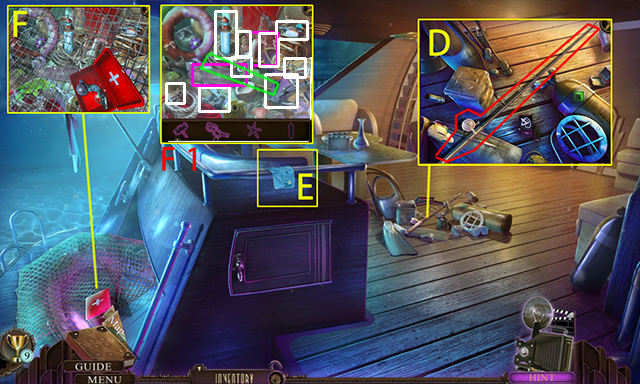
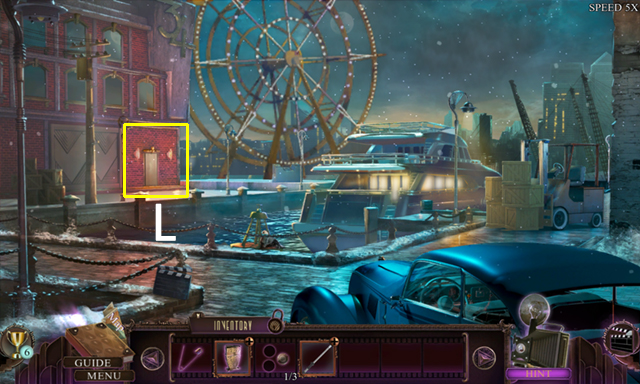
- Read the note; remove the mask (H).
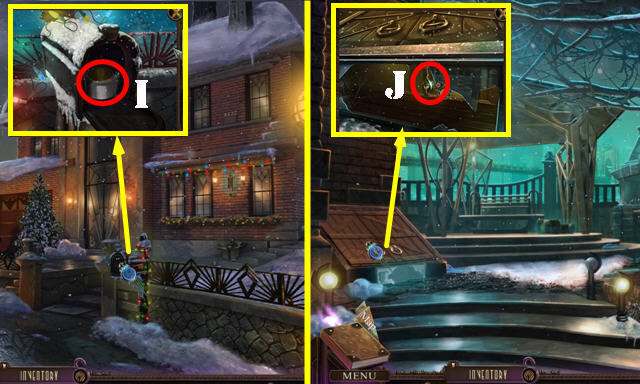
- Take the PRUNING SHEARS (I). Remove the snow; take the BRICK (J).
- Remove the sheet to activate a HOP (K).
- Play the HOP. Follow steps 1-7.
- Place the rope and the magnet (white) on the pole (white). Use the fishing rod to get the key; use the key on the lock (8).
- Take the CHAIN.
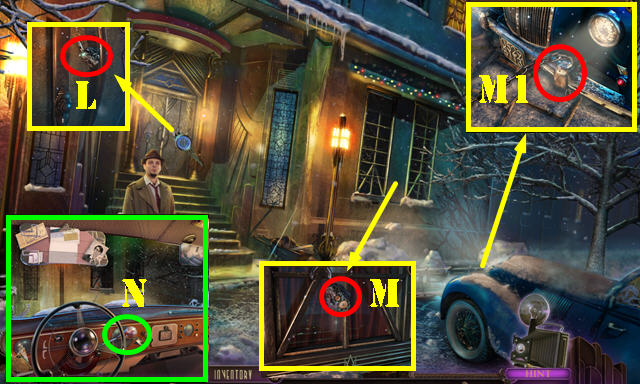
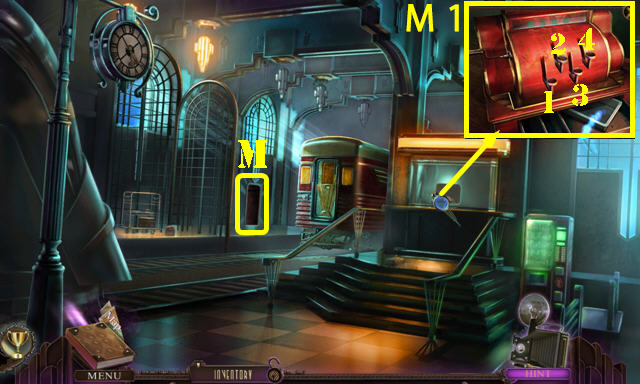
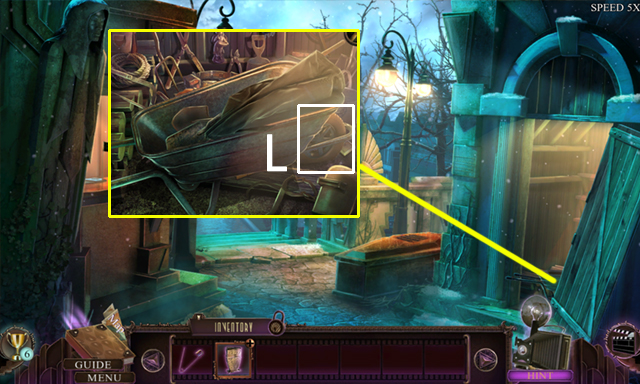
- Use the BRICK on the HOOK and then take it (L).
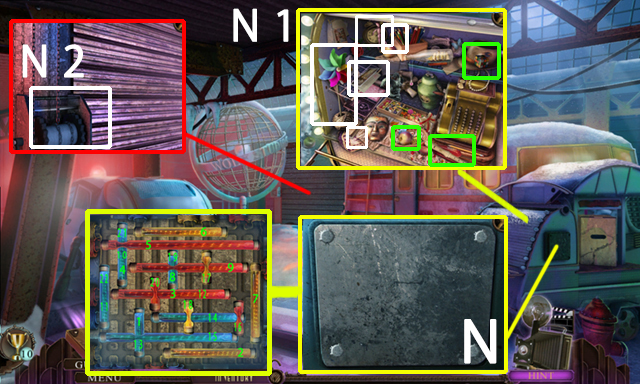
- Place the HOOK and attach the CHAIN to it (M). Place the PADLOCK (M1).
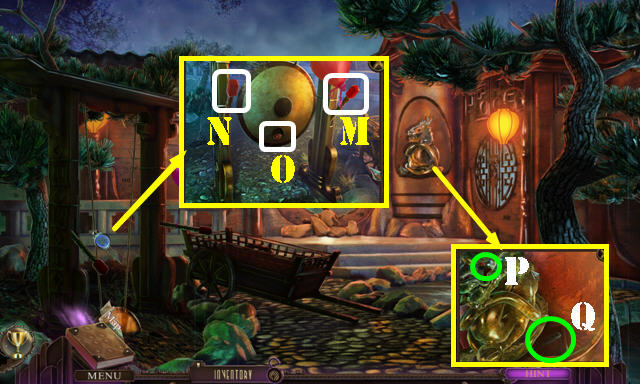
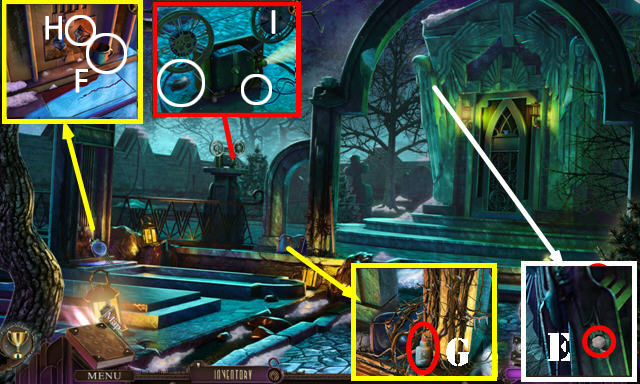
- Enter the car; pull the lever (N).
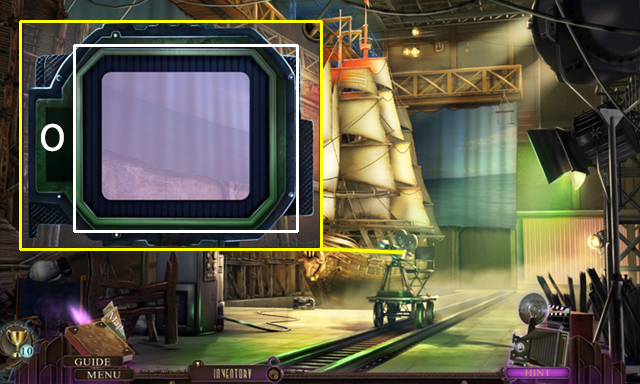
- Exit the car; go through the window and pull the curtain.

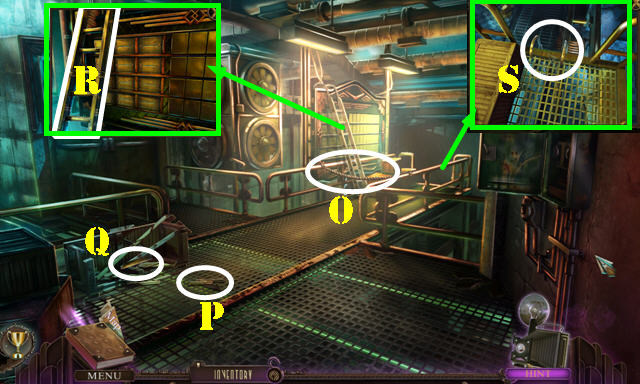
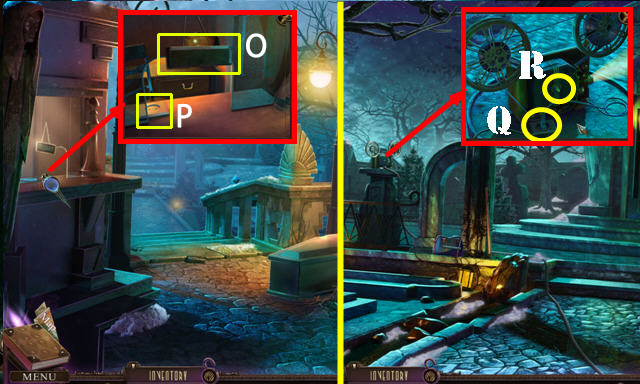
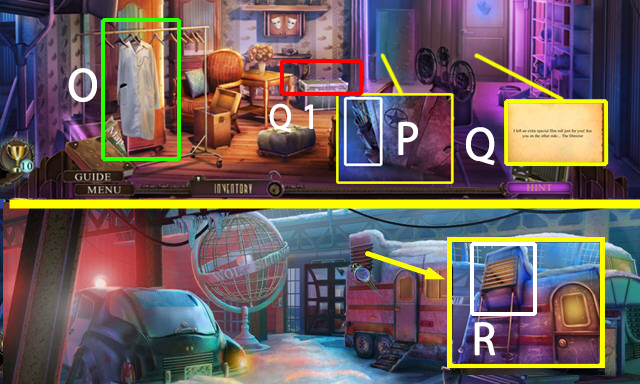
- Touch the projection (O).
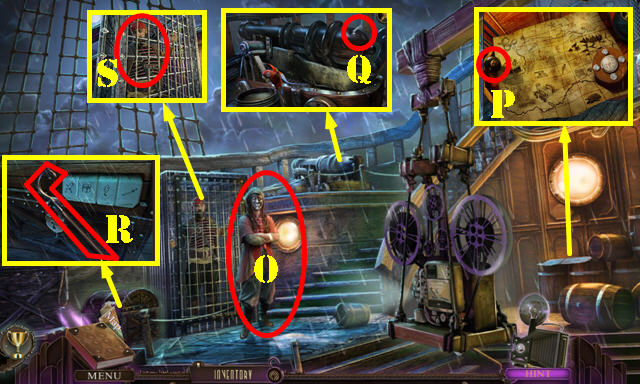
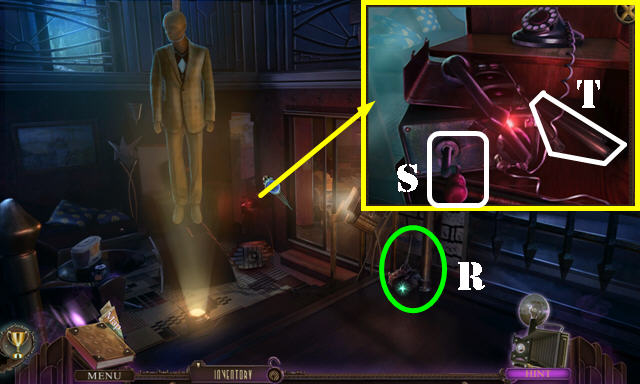
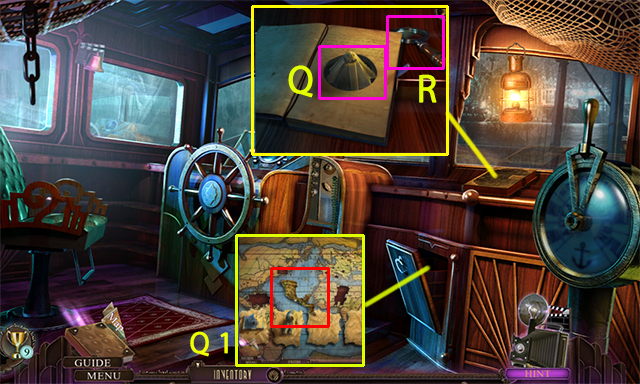
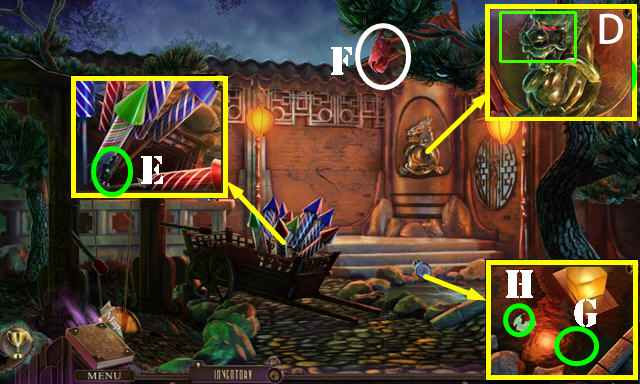
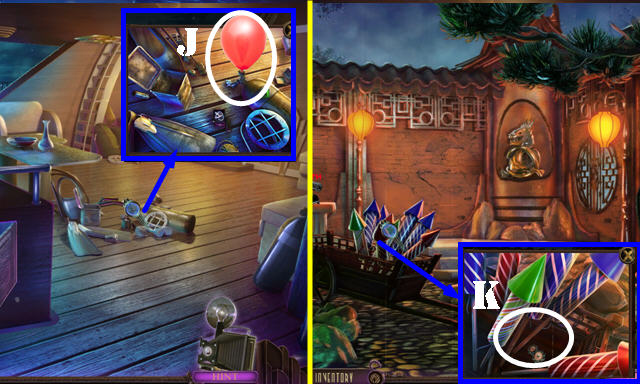
- Take the POOL BALL (P), WICK (Q), and FISHING POLE (R).
- Talk to the pirate (S).
- Use the PRUNING SHEARS on the net in the upper-right corner; enter the Recreation room.
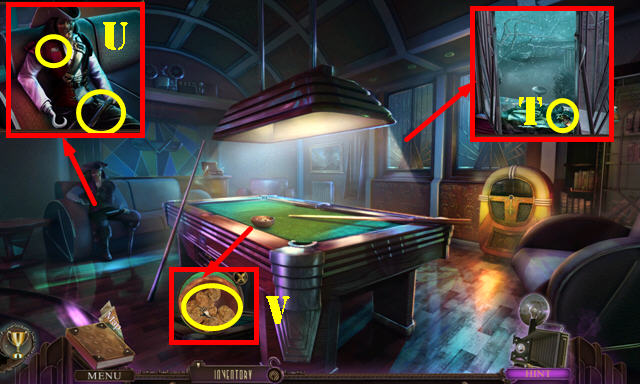
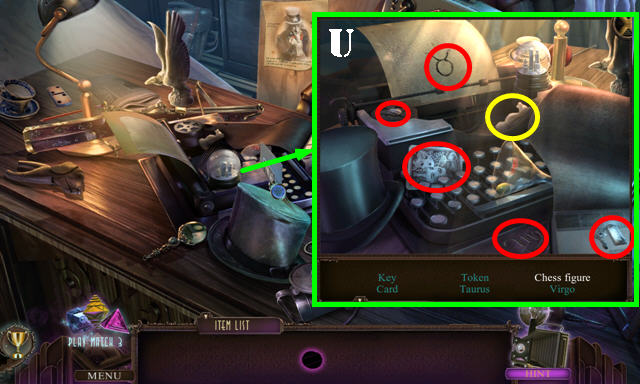
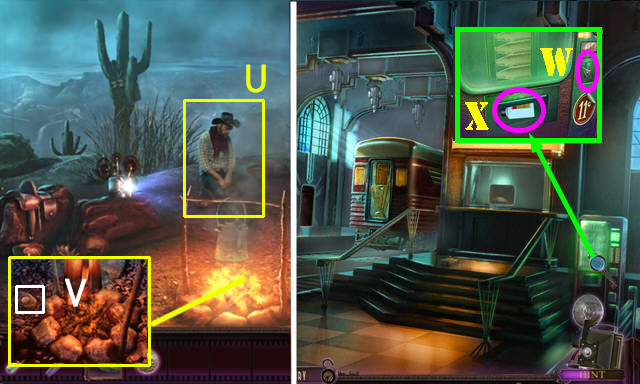
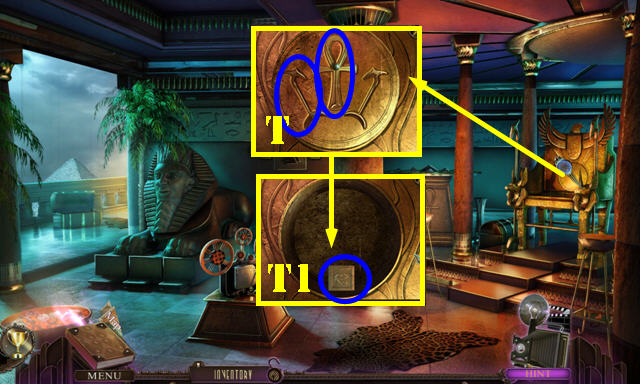
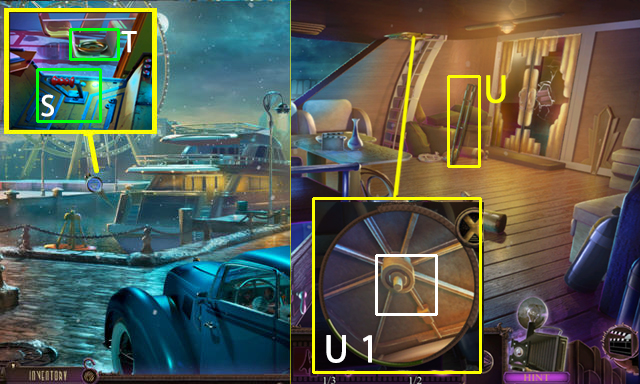
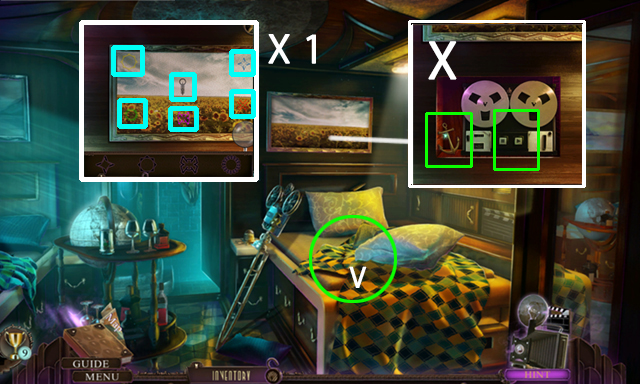
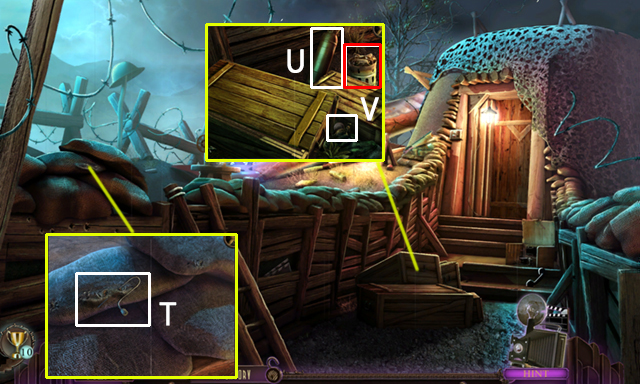
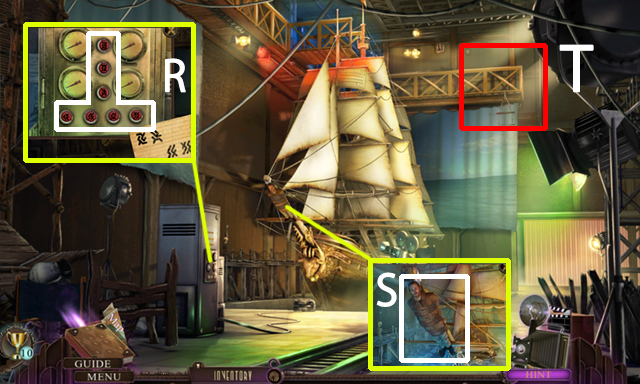
- Open the window; use the FISHING POLE on the sack and open it. Use the PRUNING SHEARS on the fabric; take the FLINTLOCK (T).
- Take the DISC 2/2 and FLINTLOCK PISTOL (U).
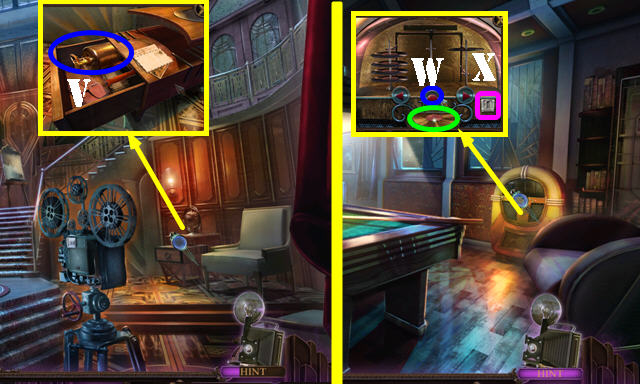
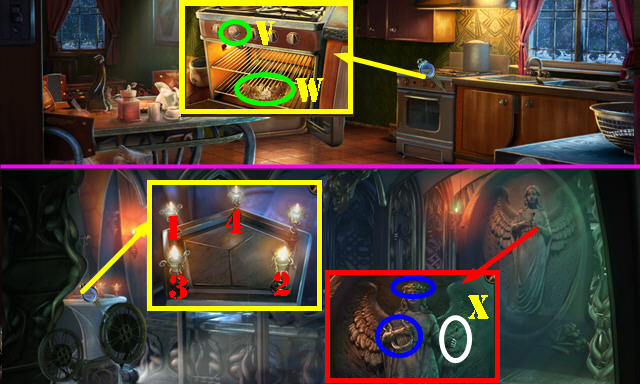
- Touch the CRACKERS and take them (V).
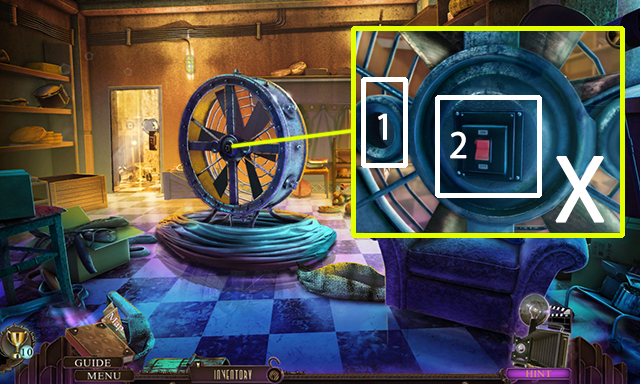
- Take the CUE CHALK (W); place the POOL BALL for a puzzle.
- Arrange the balls in order: 1-8 (X). Take the note (Y).
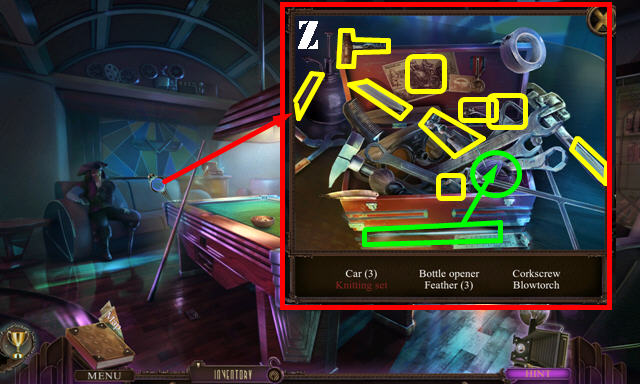
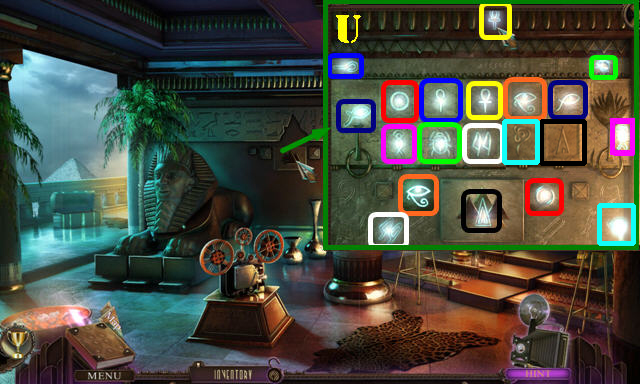
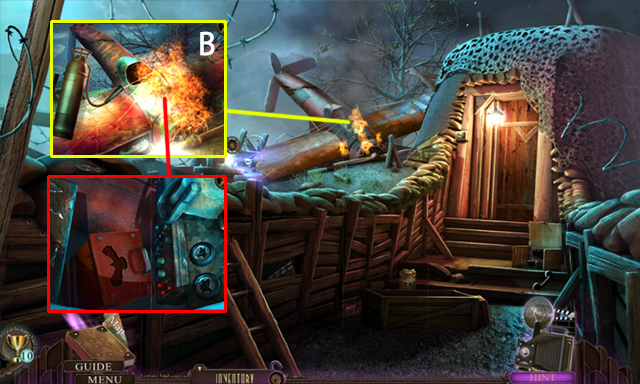
- Play the HOP (Z).
- You receive the BLOWTORCH.
- Walk down.
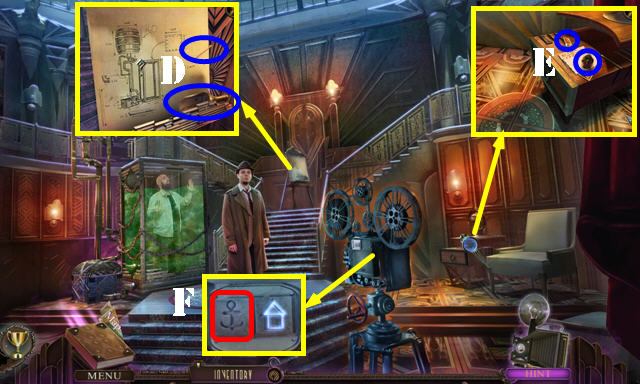
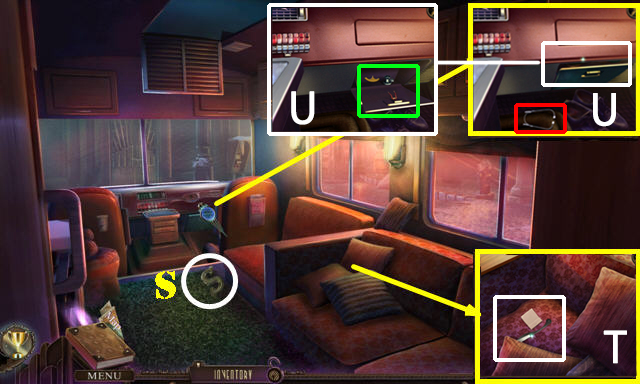
- Give the CRACKERS to the parrot; take the FEATHER (A).
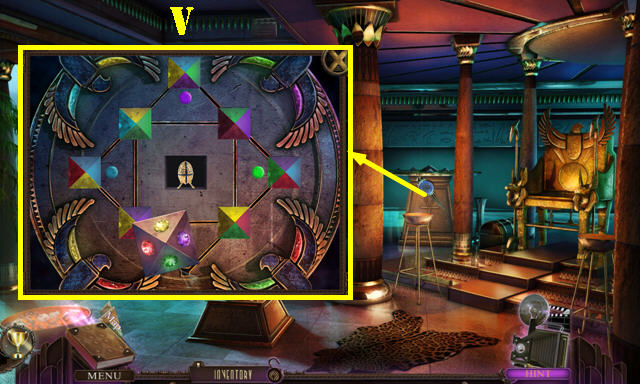
- Place the 2 DISCS for a mini-game.
- Solution (B). Press the button to reach the Foyer (C).
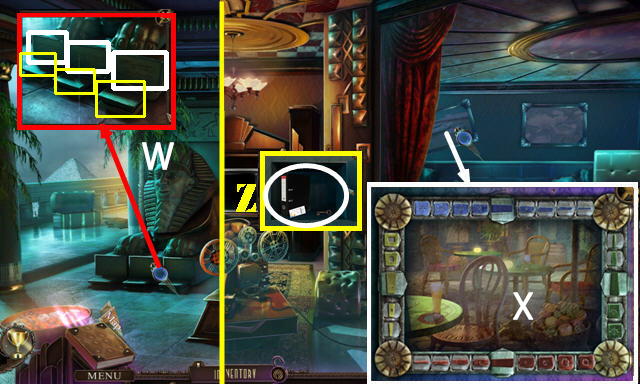
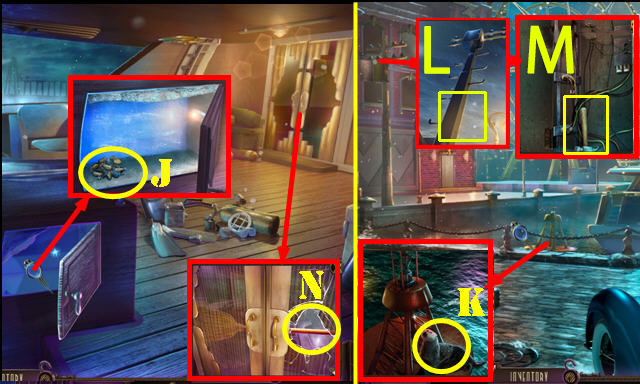
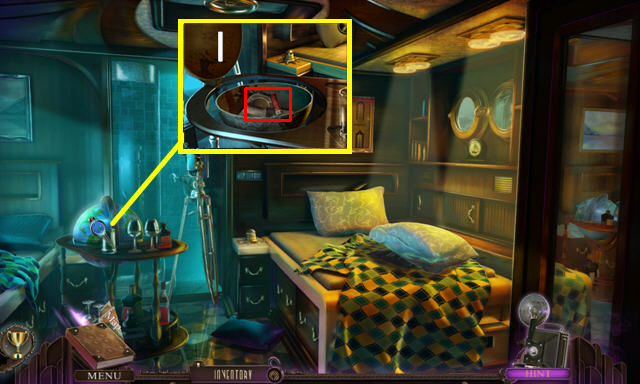
- Take the SCOOP and NEEDLE (D).
- Grab the INKWELL and MATCHES (E).
- Return to the Foyer deck (F).
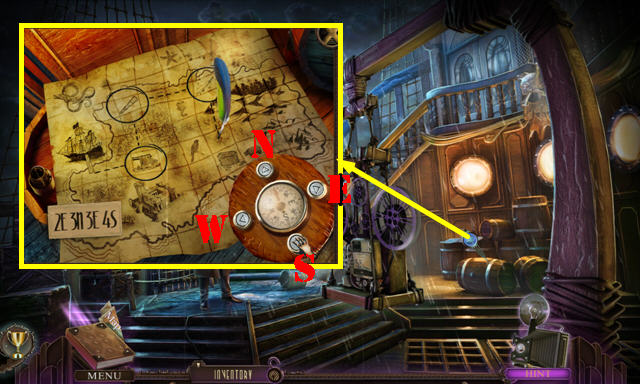
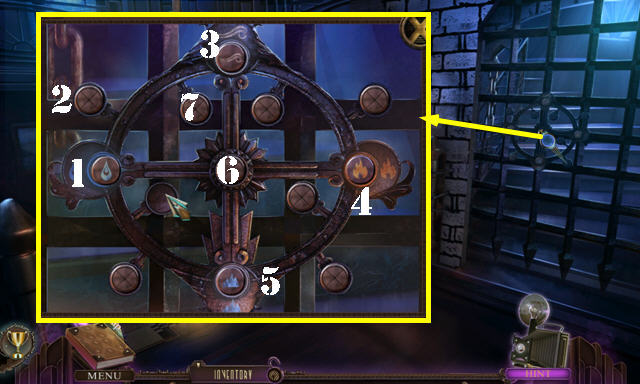
- Put down the INKWELL and FEATHER for a puzzle.
- Solution: Ex2, Nx3, Ex3, Sx4.
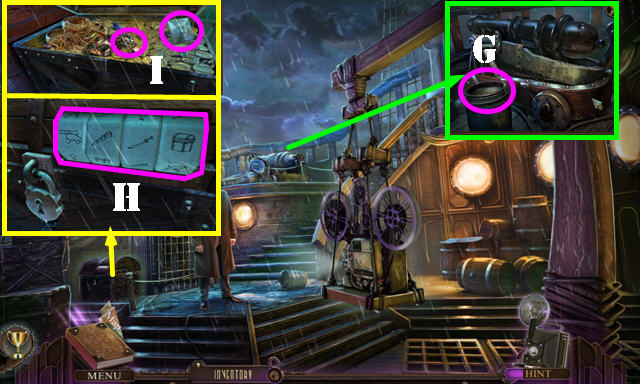
- Use the SCOOP to get the SCOOP OF GUNPOWDER (G).
- Change the symbols (H).
- Take the STAINED GLASS and VALVE HANDLE (I).
- Return to the Foyer.
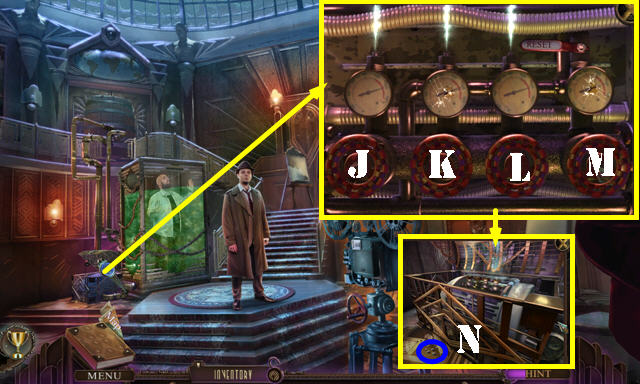
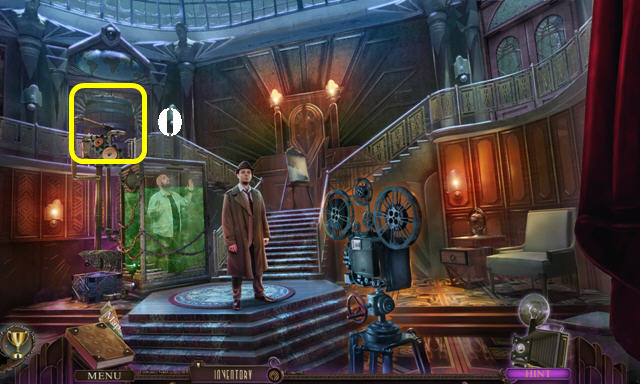
- Place the VALVE HANDLE for a puzzle.
- Solution: J, K, L, M, J, L, M.
- Take the STEEL PELLETS (N).
- Place the FLINTLOCK, SCOOP OF GUNPOWDER, and STEEL PELLETS in the FLINTLOCK PISTOL (inventory).
- Use the FLINTLOCK PISTOL on the barrel (O).
- Touch the barrel; enter the Study.
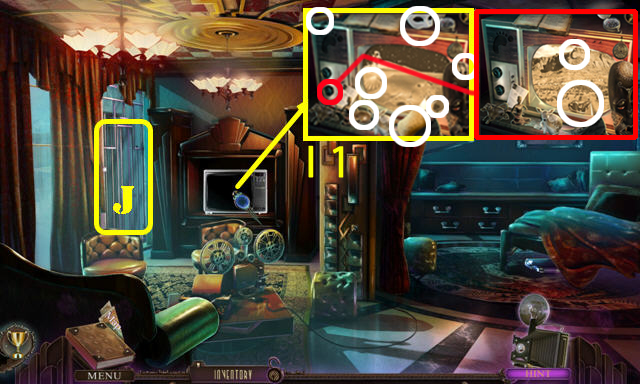
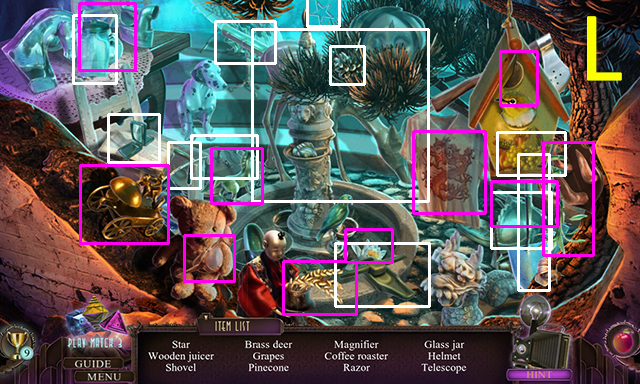
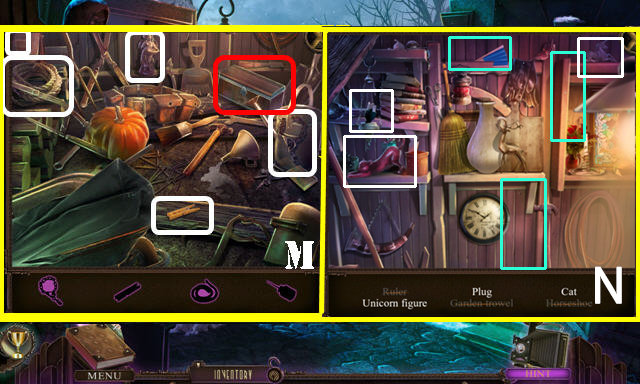
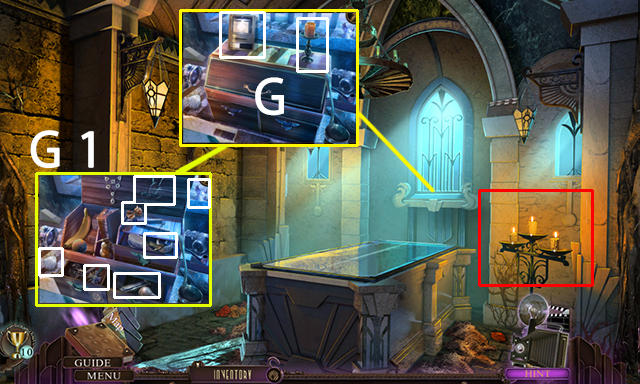
- Open the box for a HOP.
- Take the PAPERWEIGHT (P) and ICEPICK (Q).
- Place the WICK on the lantern and use the MATCHES on it. Place the STAINED GLASS on the lantern (R).
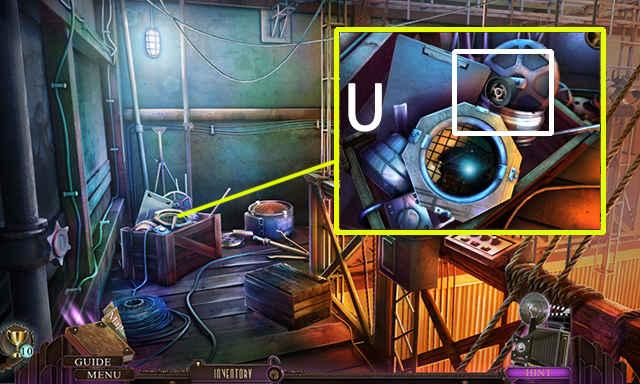
- Open the book; take the JUKEBOX BUTTON (S).
- Play the HOPs (T, U).
- You receive the JUKEBOX TOKEN.
- Walk down.
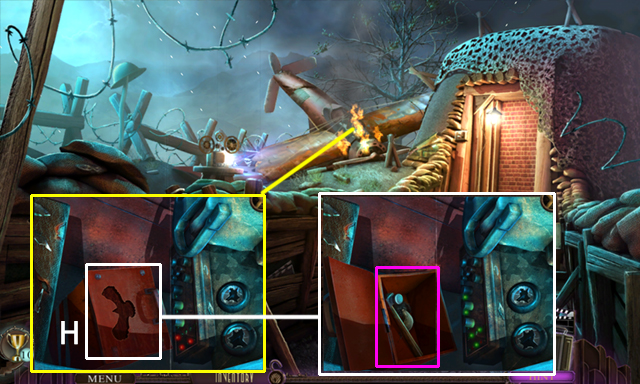
- Place the ICE PICK on the drawer and then use the PAPERWEIGHT on it; take the GAS CAN (V).
- Go to the Recreation room.
- Place the JUKEBOX BUTTON (W) and JUKEBOX TOKEN (X).
- Press the button; take the GOLDEN RECORD (green).
- Return to the Study.
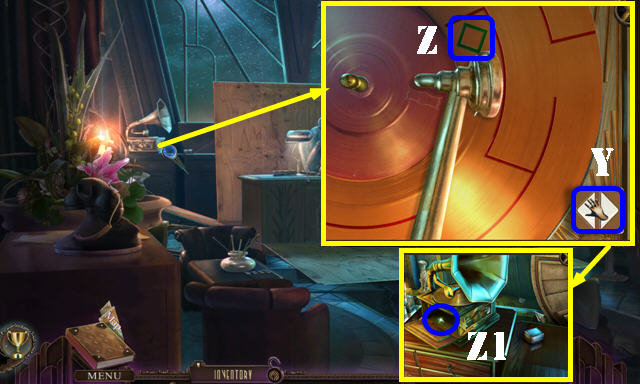
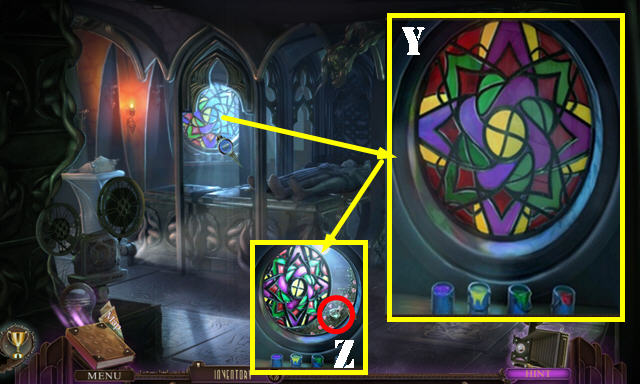
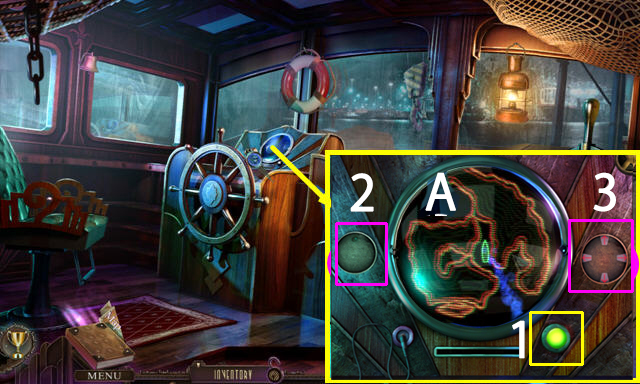
- Remove the record. Place the GOLDEN RECORD and NEEDLE on the phonograph.
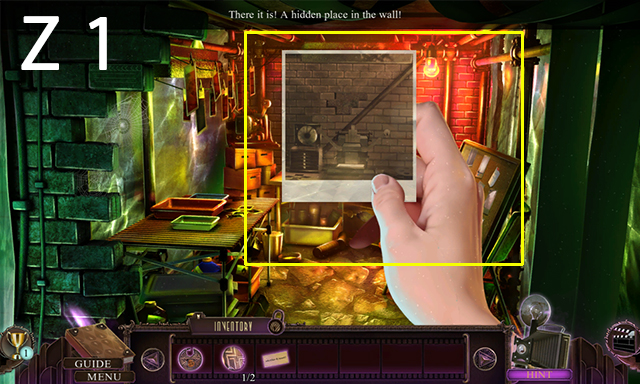
- Use the buttons (Y) to move the needle left and right without hitting any of the grooves. Win once you get to the diamond (Z).
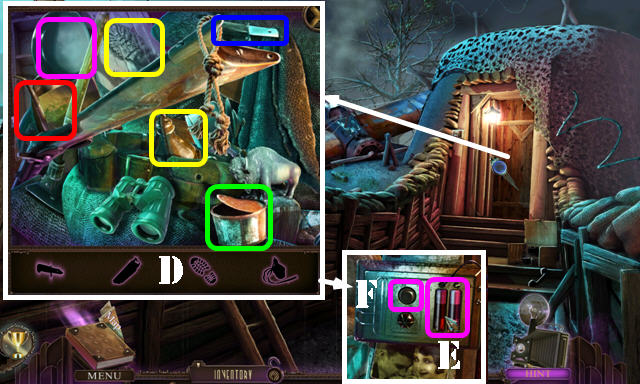
- Take the NOZZLE (Z1).
- Return to the Foyer deck.
- Use the GAS CAN on the BLOWTORCH; attach the NOZZLE (inventory).
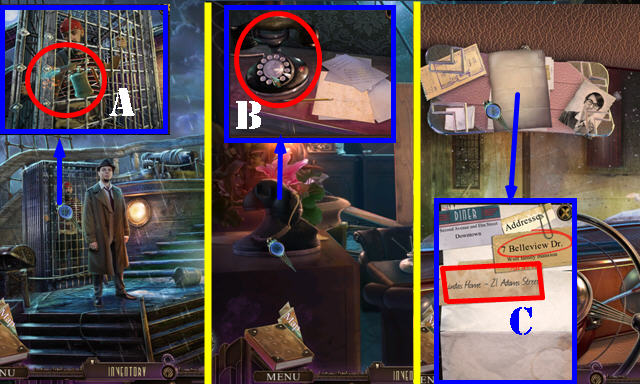
- Use the BLOWTORCH on the cage (A).
- Return to the Study.
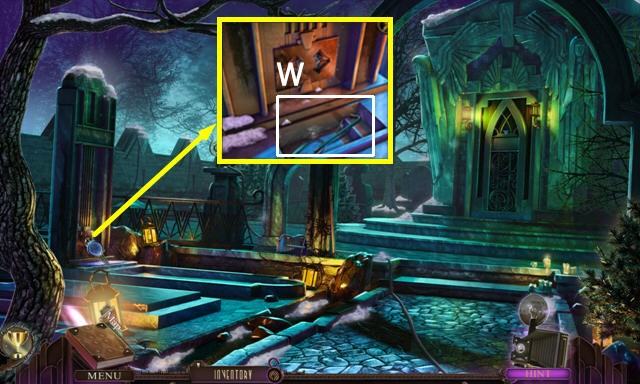
- Answer the phone to get LINDA’S ADDRESS (B).
- Walk down three times.
- Take the note; place LINDA’S ADDRESS (C) and touch it. Exit the car once it stops.
Chapter 2: Linda’s Place

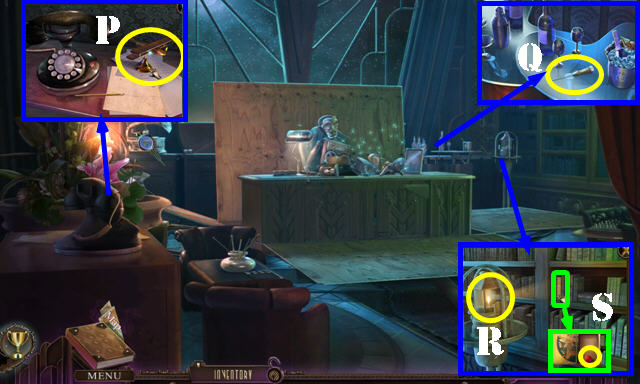
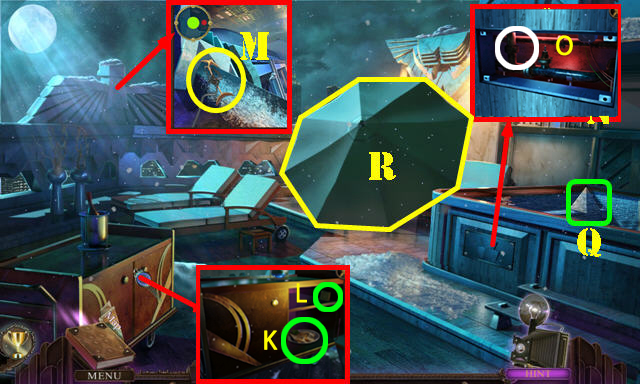
- Take the UMBRELLA (D).
- Open the trunk and then the box; take the SAFETY PIN (E).
- Go to the Backyard.
- Take the LIGHTER (F), ANTENNA (G), and BARBECUE FORK (H).
- Walk down.
- Use the BARBECUE FORK on the mailbox; take the ADHESIVE TAPE and PAPER (I).
- Use the ADHESIVE TAPE on the UMBRELLA (inventory).
- Return to the Backyard.
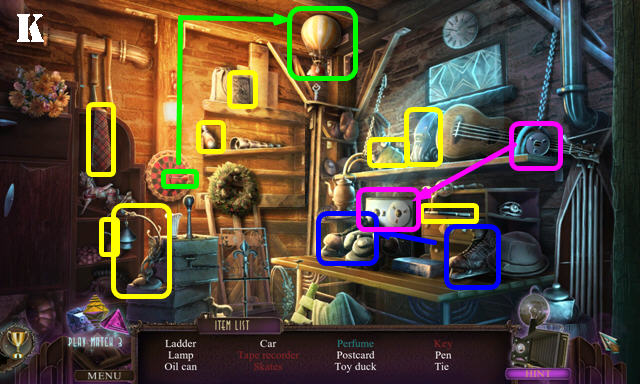
- Use the UMBRELLA on the hook (J); open the doors for a HOP.
- Play the HOPs (K, L, M).
- You receive the LADDER.
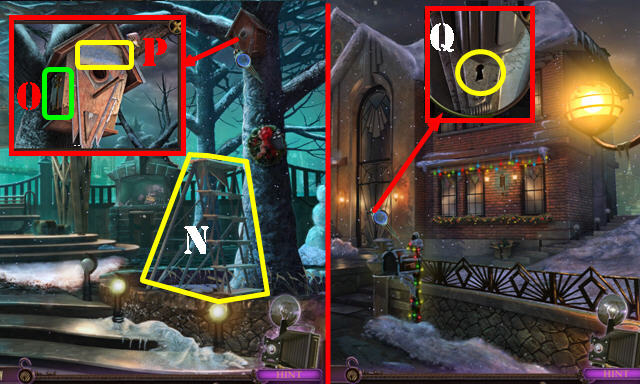
- Place the LADDER (N); take the KEY (O).
- Place the PAPER (P) and use the CUE CHALK on it. Rub the cue chalk on the paper for a clue.
- Walk down.
- Use the KEY in the lock; turn the key and enter the Living room (Q).
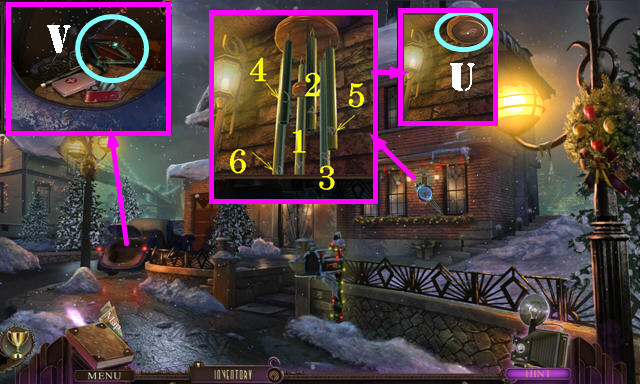
- Take the DUSTER (R), CRANK (S), and CHIMES (T).
- Walk down.
- Place the CHIMES for a puzzle.
- Solution: 1-6.
- Take the SYMBOL 1/4 (U).
- Place the CRANK on the jack; take the CAR JACK (V).
- Return to the Living room.
- Place the CAR JACK on the door; turn it four times (W). Go into the Kitchen.
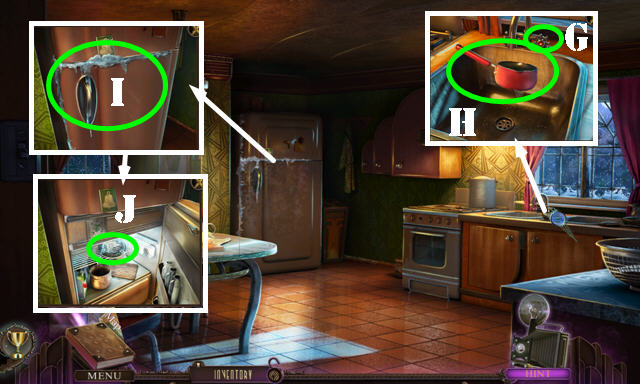
- Take the POT (X).
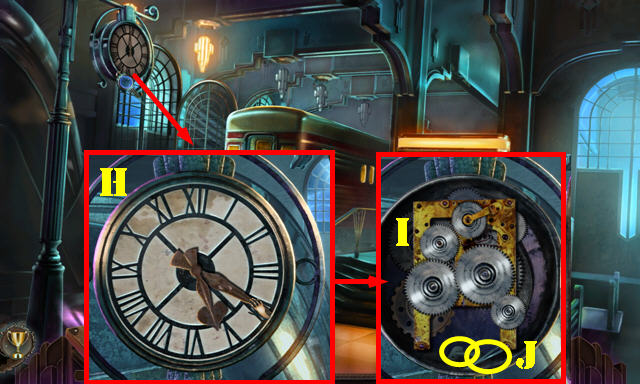
- Pull the drain plug; take the SYMBOL 2/4 and CLOCK KEY (Y).
- Play the HOP (Z).
- You receive the WOODEN HANDLE.
- Go to the Backyard.
- Place the WOODEN HANDLE; take the SPADE (A).
- Use the DUSTER in the hole (B); take the SYMBOL 3/4 (C).
- Use the SPADE in the dirt 3x; take the SYMBOL 4/4 (D).
- Return to the Living room.
- Place the 4 SYMBOLS in the slots for a puzzle.
- Solution: 1, 2, 3, 1, 4, 5, 6, 3, 7.
- Go up the steps to the Bedroom crypt.
- Take the ROSE 1/4 (E) and FAUCET HANDLE (F).
- Return to the Kitchen.
- Place the FAUCET HANDLE (G); put down the POT to get the POT OF HOT WATER (H).
- Use the POT OF HOT WATER on the fridge (I). Pull the handle; take the PROJECTOR DISC (J).
- Return to the Bedroom crypt.
- Place the PROJECTOR DISC on the projector for a puzzle.
- Solution: C, Ax2, D, Ax2, Cx2, B, E, Cx2, Bx3, Ax3, D, A, Bx3, D, B.
- Press the switch.

- Take the LIGHTER FUEL (L).
- Move the books; take the RADIO KNOB (M).
- Open the drawer; take the PAINT TUBE (N).
- Play the HOP (O).
- You receive the CANDLE EXTINGUISHER.
- Take the photo fragment (P).
- Use the SAFETY PIN in the lock; take the ROSE 2/4 (Q).
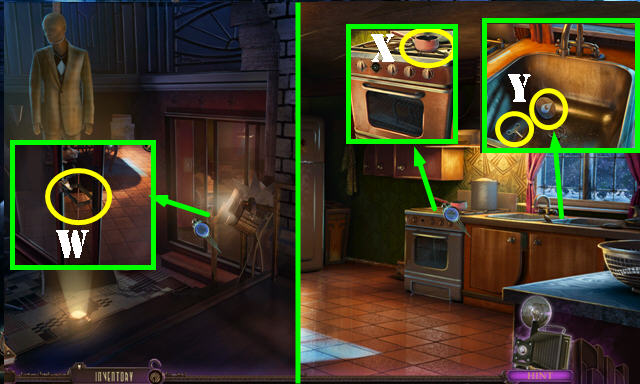
- Use the CLOCK KEY on the clock; take the STOVE KNOB (R).
- Use the LIGHTER FUEL in the LIGHTER (inventory).
- Walk down.
- Place the ANTENNA and RADIO KNOB on the radio for a puzzle.
- Solution: S, T, U, T, U, T, U.
- Take the ROSE 3/4 (@).
- Go to the Kitchen.
- Place the STOVE KNOB on the stove (V); take the FLOWER WREATH (W).
- Return to the Bedroom crypt.
- Use the CANDLE EXTINGUISHER in this order: 1-4.
- Take the HARP.
- Place the HARP and FLOWER WREATH to the statue (blue); take the MAKEUP BRUSH (X).
- Place the PAINT TUBE in the glass and put down the MAKEUP BRUSH for a puzzle.
- Solution (Y).
- Take the ROSE 4/4 (Z).
- Return to the Kitchen.
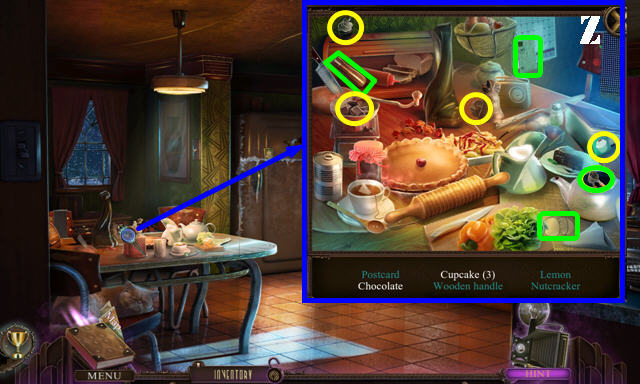
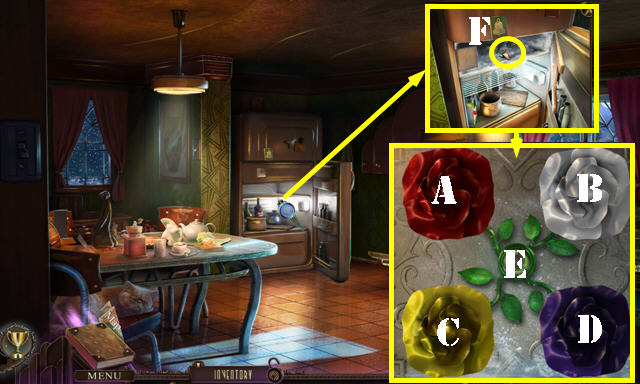
- Place the 4 ROSES on the plaque inside the refrigerator for a puzzle.
- Solution: Cx3, Dx3, Ex2, A, C, Dx3, B, Ex3, A, C, Dx3, Bx2, E.
- Take the ANTIDOTE (F).
- Return to the Bedroom.
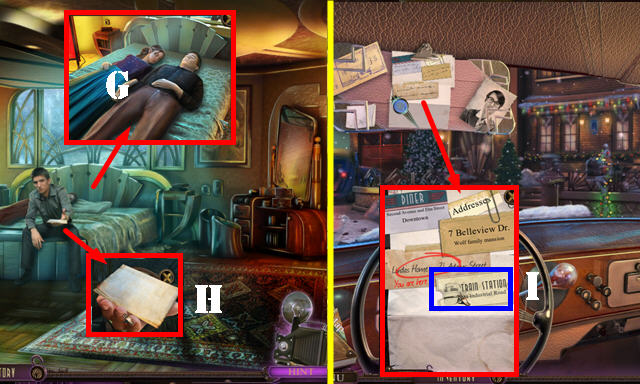
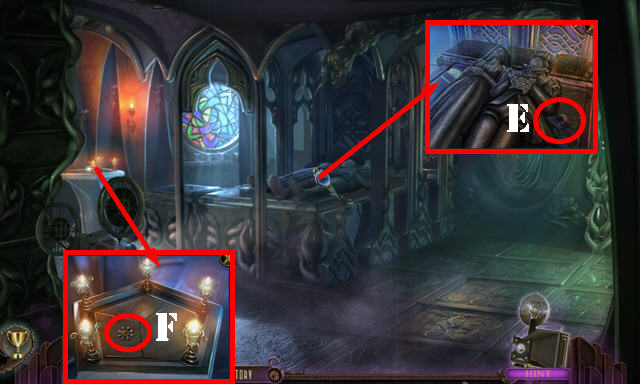
- Use the ANTIDOTE on the couple (G).
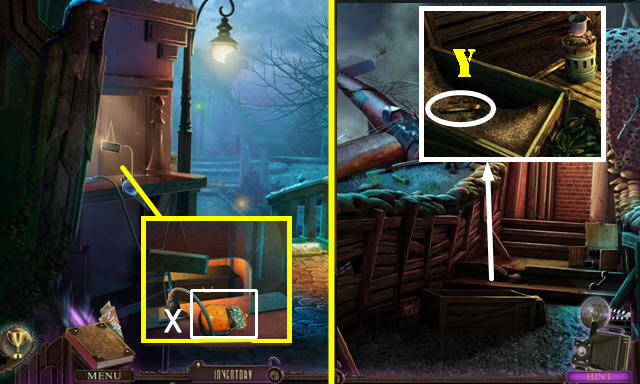
- Open the letter to get the TRAIN DEPOT ADDRESS; take the note (H).
- Return to the Car driveway.
- Place the TRAIN DEPOT ADDRESS and touch it (I). Exit the car once it stops.
Chapter 3: Train Depot


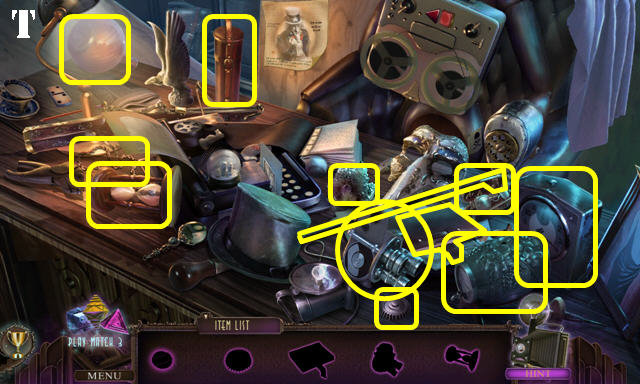
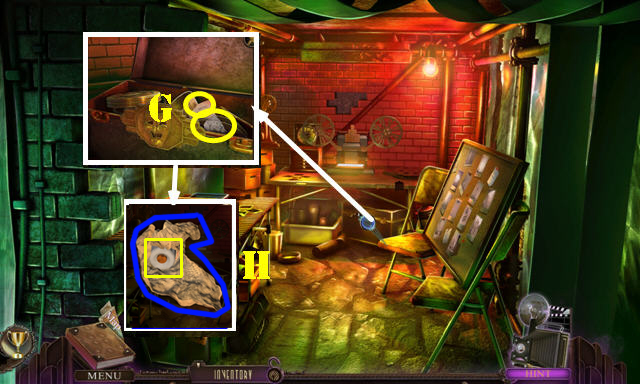
- Take the SMALL ROCK (J).
- Remove the cloth; break the glass with the SMALL ROCK. Take the PAINTBRUSH and METALWORKING FILE (K).
- Use the METALWORKING FILE on the gate. Open the gate; push the button (L).
- Use the LIGHTER on the scene.
- Take the HATCHET (M). Touch the bricks (purple) for a puzzle.
- Solution (N). Press the button (red).
- Touch the ROPE, then take it (O).
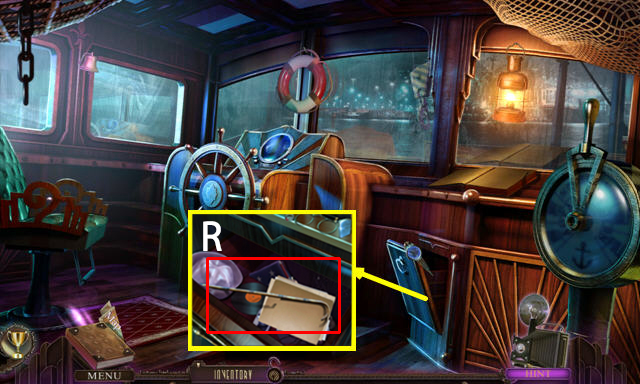
- Use the HATCHET on the crate; touch the debris. Take the SHORT PLANKS (P) and DEPARTURE BOARD 1/4 (Q).
- Place the SHORT PLANKS and then the ROPE on the ladder. Take the LADDER (R).
- Place the LADDER; go down to the Train depot (S).
- Play the HOP (1-6).
- You receive the DEPARTURE BOARD 2/4.
- Take the IRON BAR (U).
- Take the note (V), DEPARTURE BOARD 3/4 (W), TRAIN TICKET (X) and card (Y).
- Walk down.
- Use the IRON BAR on the fan. Take the DEPARTURE BOARD 4/4 and TICKET PUNCHER (A).
- Place the 4 DEPARTURE BOARDS on the board.
- Solution (B): take the clue and the COG.
- Place the TRAIN TICKET on the TICKET PUNCHER. Punch it 3x and take the PUNCHED TRAIN TICKET (inventory).
- Return to the Train depot.
- Place the PUNCHED TRAIN TICKET (C). Enter the Dining car.
- Take the WATER BOTTLE (D).
- Open the envelope to get the FILMSTRIP 1/2 (E). Take the CLOCK HAND (F).
- Use the PAINTBRUSH on the shards; take the REGISTER BUTTON (G).
- Walk down.
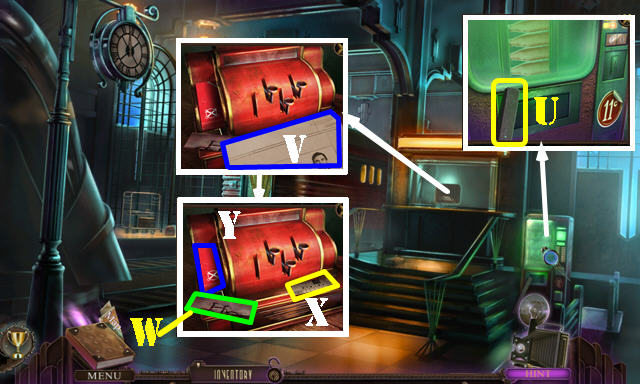
- Place the CLOCK HAND on the clock; change the time to 5:20 (H). Place the COG on the mechanism for a puzzle. Solution (I).
- Take the TRIANGULAR KEY and TWEEZERS (J).
- Return to the Dining car.
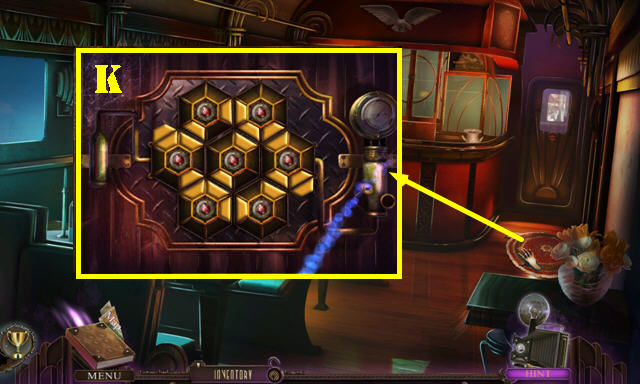
- Move the rug; place the TRIANGULAR KEY in the lock for a puzzle. Solution (K).
- You receive the REGISTER CRANK.
- Play the HOP (L).
- You receive the MOUSE TOY.
- Walk down.
- Place the REGISTER BUTTON and the REGISTER CRANK on the register for a puzzle (M1).
- Solution: 3 and 4. You receive the DIME.
- Enter the Darkroom (M).
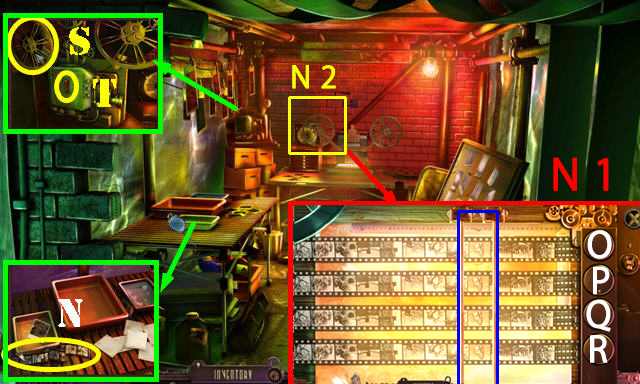
- Take the FILMSTRIP 2/2 (N).
- Place the 2 FILMSTRIPS on the editing machine for a puzzle(N1).
- Move the knobs in this order until the image on the blue line appears in that section: O, Q, P, R.
- Take the FILM REEL (N2).
- Place the FILM REEL on the projector (S); push the button (T) to travel to the Darkroom camp.
- Talk to the man (U); give him the WATER BOTTLE to get the TOKEN BASE.
- Take the CENT (V).
- Return to the Train depot.
- Place the DIME and CENT in the slot (W); take the DEVELOPING LIQUID (X).
- Return to the Darkroom.
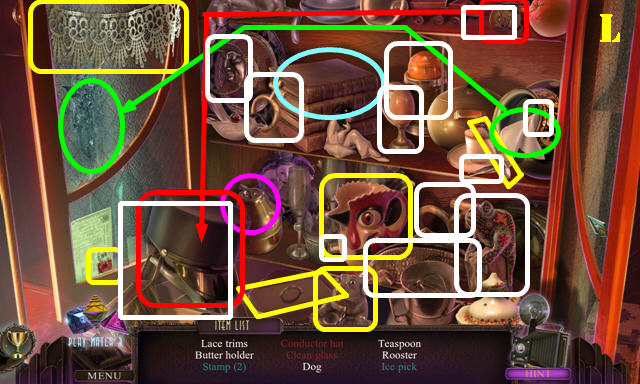
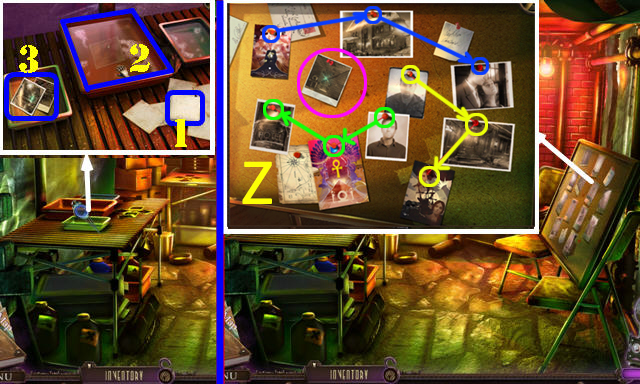
- Place the DEVELOPING LIQUID in the tray (2). Use the TWEEZERS on the undeveloped photos (1); touch it and take the PHOTOS (3).
- Place the PHOTOS on the board for a puzzle. Solution (Z).
- Take the photo (purple).Align the picture with the wall to find the secret compartment behind the bricks. (Z1)
- Remove the bricks; take the RUST REMOVER and TONGS (A).
- Return to the Darkroom camp.
- Use the TONGS on the snake; take the TRAGEDY HALF (B).
- Return to the Dining car.
- Use the RUST REMOVER on the lock. Open the box; take the WIND-UP KEY and SCISSORS (C).
- Place the WIND-UP KEY on the MOUSE TOY (inventory).
- Return to the Darkroom camp.
- Use the SCISSORS on the button; take the LASSO and TRAIN ORNAMENT 1/2 (D).
- Use the MOUSE TOY on the owl; take the TRAIN ORNAMENT 2/2 (E).
- Return to the Train depot.
- Place the 2 TRAIN ORNAMENTS on the box; take the photo fragment and COMEDY HALF (F).
- Place the TRAGEDY HALF and COMEDY HALF on the TOKEN BASE to get the MASK TOKEN (inventory).
- Return to the Darkroom.

- Place the MASK TOKEN in the slot; take the note and CRUMPLED PAGE (G).
- Open the CRUMPLED PAGE; take the FUSE and PHONE BOOK PAGE (H).
- Return to the Catwalk.
- Place the FUSE in the mechanism (I).
- Walk down twice.
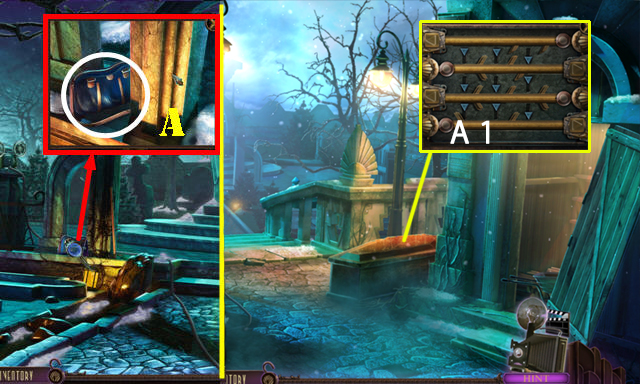
- Touch the Hotel address (J) and exit the car once it stops. Enter the Hotel lobby.
Chapter 4: Franklin Tower Hotel


- Take the ELECTRICAL TAPE (K). Open the phonebook and place the PHONE BOOK PAGE on it (green).
- Dial 260889 (L); take the RECEPTION BOOK KEY (M).
- Take the WINE BOTTLE 1/3 and NEWSPAPER (N).
- Flip the radio; take the POWER CABLE (P).
- Use the RECEPTION BOOK KEY in the lock; open the book, move notes and take the PENTHOUSE SYMBOL (Q).
- Fan out the PENTHOUSE SYMBOL and take it.
- Place the PENTHOUSE SYMBOL (R); press the top button.
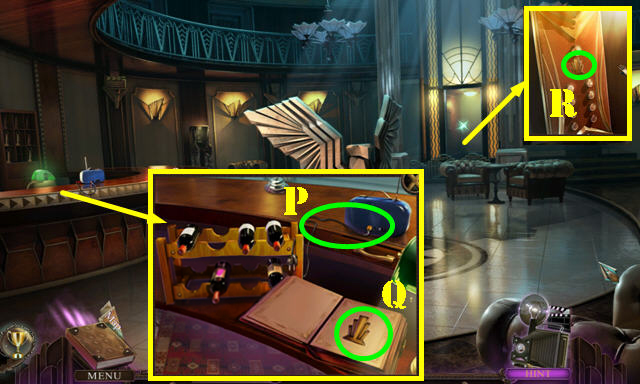
- Open the cabinet; take the WINE BOTTLE 2/3 (T).
- Take the WINE BOTTLE 3/3 (U). Touch the briefcase (V).
- Open the briefcase; take the photo fragment, play the tape and take HIEROGLYPH 1/4 (W).
- Pull the plug (X).
- Use the ELECTRICAL TAPE on the wire (white), take the wrench (blue) (Y). Plug the plug back in (X). Place the POWER CABLE on the table, attach it to the extension cord’s socket, and then push the switch (green) to reach the Palace.

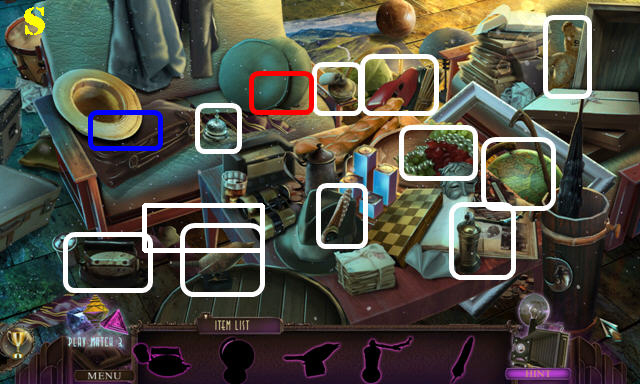
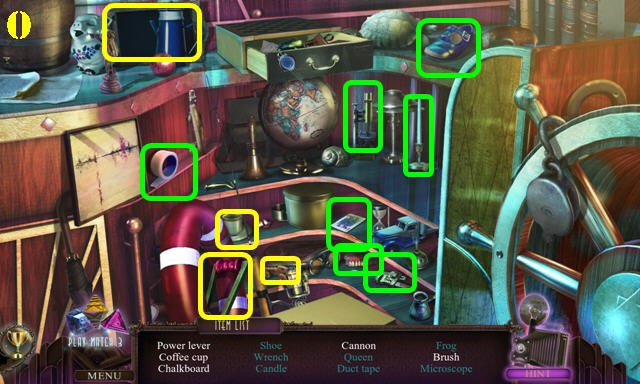
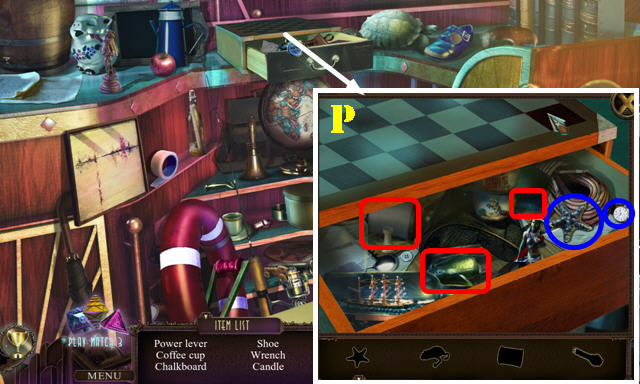
- Play the HOPs (A-B).
- You receive the HIEROGLYPH 2/4.
- Take the CHISEL (C) and TV KNOB (E).
- Return to the Hotel lobby.
- Place the 3 WINE BOTTLES on the rack (F); take the SWISS ARMY KNIFE (G).
- Use the CHISEL on the stone; take the ANKH (H).
- Return to the Penthouse suite.
- Place the TV KNOB on the TV; Play MHO (I). Solution (I1)
- You receive the SPONGE
- Go out to the Terrace (J).
- Use the CHISEL on the doors;Take the HIEROGLYPH 3/4 (L) take the SALMON MEAL (K).
- Use the LASSO on the scepter and shoot the target; take the SCEPTER (M).
- Use the SWISS ARMY KNIFE on the screws (pull out the right tool for each screw). Use the WRENCH on the pipe (O);
- Take the PYRAMID (Q).
- Touch the umbrella for the HOP (R).
- Play the HOP (S).
- You receive the CLEANING LIQUID.
- Return to the Palace.
- Place the ANKH and SCEPTER in the slots (T). Take the HIEROGLYPH 4/4 (T1).
- Place the 4 HIEROGLYPHS on the wall to activate a puzzle.Solution: color-coded (U).
- Take the GOLD BAR.
- Place the PYRAMID for a puzzle. Solution (V).
- Take the DECORATIVE EGG.
- Clean the plates (white) with the cleaning liquid and the sponge. Place (yellow) the DECORATIVE EGG, GOLD BAR, and SALMON MEAL; take the WOODEN BLOCKS (W).
- Return to the Penthouse Suite.
- Place the WOODEN BLOCKS for a puzzle. Solution (X).
- Take the YACHT LEASE and EVIDENCE FOLDER (Z).
- Give the EVIDENCE FOLDER to Harris (1).
- Return to the Car.
- Place the YACHT LEASE on the visor and then touch the Docks (2). Exit the car once it stops.
Chapter 5: Boat Dock
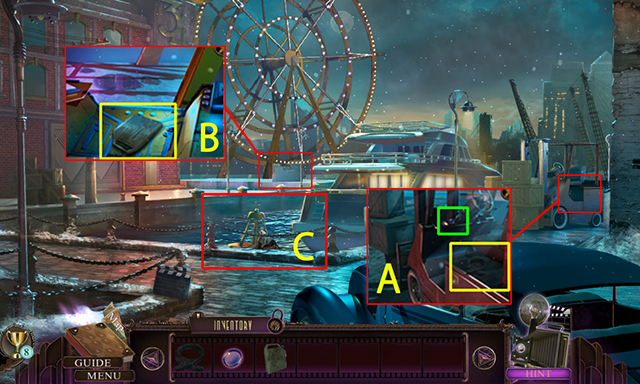
- Take the LENS (green) and SHORT HOSE (yellow) (A).
- Take the CANISTER (B).
- Take the FUNNEL (C).
- Open the gas tank; place the SHORT HOSE (G). Place the CANISTER on the hose to receive the GAS CANISTER.
- Open the gas tank; place the FUNNEL and pour the GAS CANISTER into the tank (H).
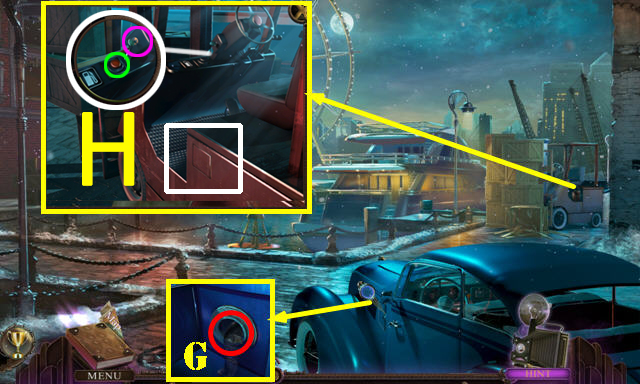
- Pull the handle (purple); push the button (green).
- Play the HOP.
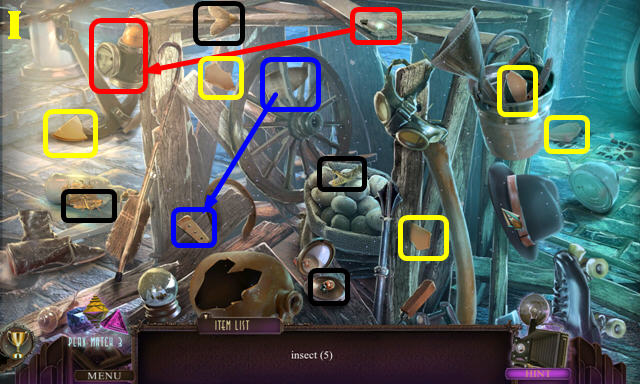
- You receive the SCRAPER.
- Go to Yacht deck.
- Take the FISHING POLE (red) (D).
- Take the RUBBER GLOVES (E).
- Open the box; take the FISHING REEL and EMPTY FLARE GUN(F); Remove the net and play the HOP (F1); you receive the SHORT PADDLE.
- Put the FISHING REEL on the FISHING POLE (inventory)
- Open the door. Use the SCRAPER on the ice; take the MUSSELS (J).
- Walk down.
- Give the MUSSELS to the seal (K); take the IRON PEGS.
- Place the IRON PEGS on the pole (L); open the box. Use the RUBBER GLOVES on the wires; take the HAMMER (M).
- Return to the Yacht deck.
- Break the glass with the HAMMER; move the broom handle and go through the door (N).
- Play the HOPs (O-P).
- You receive the POWER LEVER.
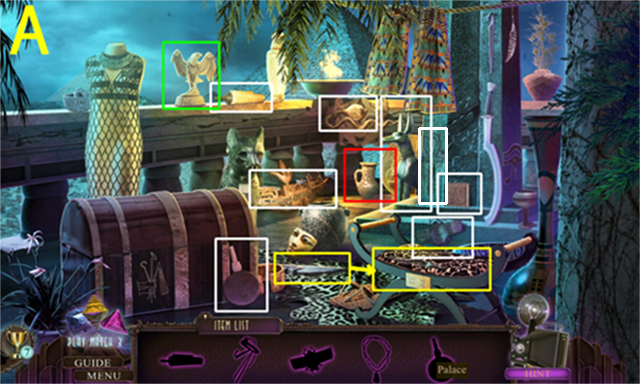
- Open the book, take MAGNIFYING GLASS FRAME(R) and FIGURINE 1/3(Q).
- Place the LENS in the MAGNIFYING GLASS FRAME (inventory) to get the MAGNIFYING GLASS.
- take the CONTINENT PLATE 1/2 (Q1)
- Walk down twice.
- Place the POWER LEVER (S) and pull it; take the HATCH HANDLE (T).
- Return to the Yacht deck.
- Take the TRIPOD LEG 1/2 (U)
- Place the HATCH HANDLE (U1); go up.
- Move the pillows; take the HEADPHONE EARPIECES (V).
- Use the MAGNIFYING GLASS on the painting, play the HOP, solution (X1). Play the tape and take the ANCHOR SYMBOL (X).
- Walk down.


- Place the ANCHOR SYMBOL; take the AUDIO CABLE (Y).
- Place the AUDIO CABLE on the HEADPHONE EARPIECES (inventory); take the HEADPHONES.
- Return to the Bridge.
- Place the HEADPHONES on the sonar. Flip the switch (1) to activate a puzzle.
- Use the left knob (2) to adjust the size and the right knob (3) to move the arrows. Solution (A).
- Take the FISHING LINE, put the FISHING LINE in the FISHING POLE (inventory).
- Return to the Cabin.
- Open the porthole and use the FISHING POLE on the bucket. Take the TRIPOD LEG 2/2 and BUCKET (B).
- Place the TRIPOD LEGS on the projector, press the switch (red) to access a new location (C).
- Take the LACE (D) and FIGURINE 2/3 (E).
- Use the SHORT PADDLE to get the FLAT BALLOON (F).
- Use the BUCKET in the water to get the FILLED BUCKET (G).
- Use the SHORT PADDLE on the continent; take the CONTINENT PLATE 2/2 (H).
- Return to the Cabin.
- Place the 2 CONTINENT PLATES on the globe; take the BRONZE DISC 1/2 and FLARE CARTRIDGE (I).
- Place the FLARE CARTRIDGE in the EMPTY FLARE GUN (inventory) to get the FLARE GUN.
- Walk down.
- Place the FLAT BALLOON on the tank; take the BALLOON (J).
- Place the LACE on the BALLOON (inventory); take the HELIUM BALLOON.
- Return to the Courtyard.
- Use the FLARE GUN on the fireworks (K). Throw the FILLED BUCKET on the fire to activate a HOP.
- Play the HOP (L).
- You receive the BRONZE DISC 2/2.
- Place the HELIUM BALLOON on the lever (M); flip the other lever (N) and place the 2 BRONZE DISCS.
- Take the JADE EYE (O).
- Place the JADE EYE in the socket (P); take the FIGURINE 3/3 (Q).
- Return to the Bridge.
- Place the 3 FIGURINES on the map and finish MG; Move the map, take the WALKING CANE. Take the MEDICAL RECORD (R).
- Take the car back to the Train station and then exit the car.
Chapter 6: The Cemetery
- Play the HOP (A).
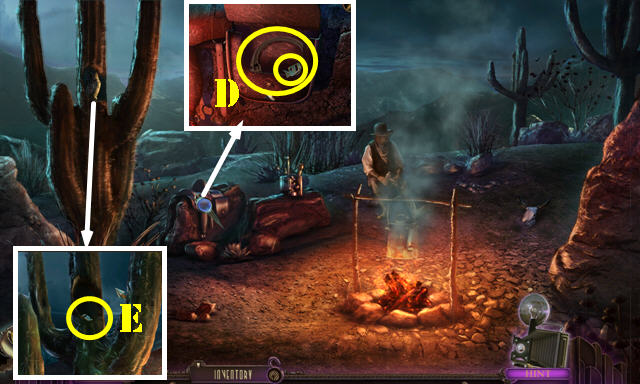
- You receive the FAULTY AIR PUMP.
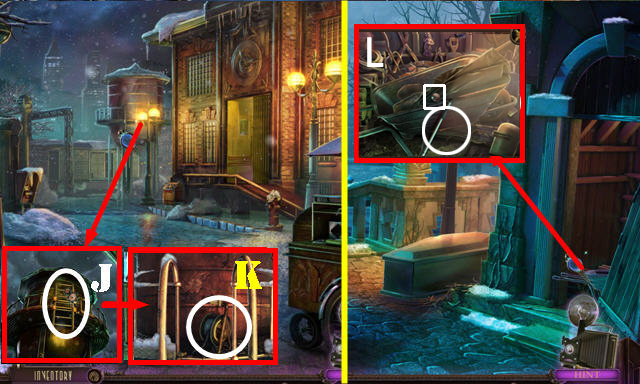
- Pull the ladder with the WALKING CANE (J); take the BROKEN EXTENSION CORD (K).
- Go to the Graveyard entrance, Take the WOODEN HANDLE 1/3 and TELESCOPE POLE (L)
- Go to Graveyard lane.
- Touch the statue; take the BALL OF CLAY (E).
- Clean the snow and take the METAL CUP (F).
- Use the BALL OF CLAY on the plaque (H); take the CLAY MOLD.
- Take the WOODEN HANDLE 2/3 and the RUBBER PATCH. (I)
- Take the GLUE (G), fix the FAULTY AIRPUMP with the RUBBER PATCH and the GLUE (inventory).
- Walk down.
- Use the AIR PUMP on the tire; move the cart to activate a HOP (L).
- Play the HOPs (M-N).
- You receive the PLUG.
- Place the PLUG on the BROKEN EXTENSION CORD (inventory) to get the EXTENSION CORD.
- Move the sign (O). Plug in the EXTENSION CORD (P).
- Go to the Graveyard lane.
- Plug in the cord (Q); flip the switch (R).
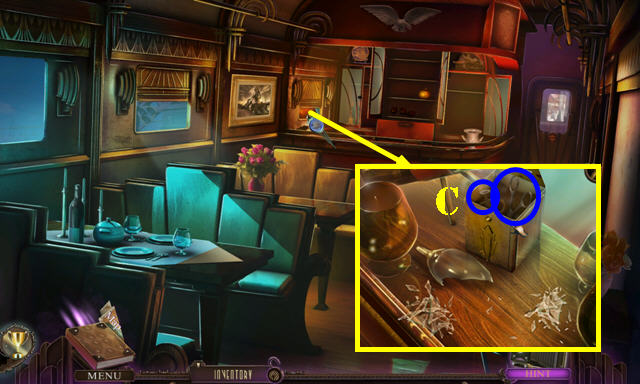
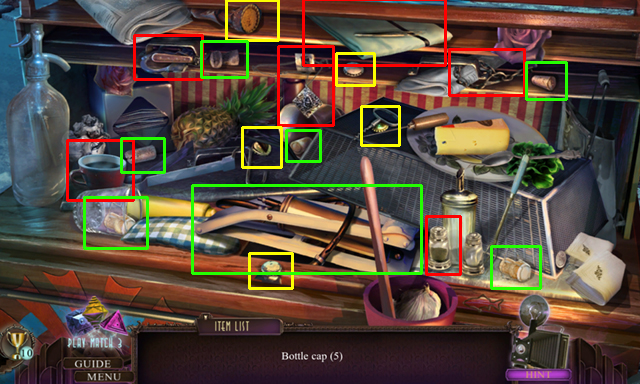
- Tear the bag; take the BULLET TIPS and the PAINT ROLLER HANDLE(T).
- Move the crate; take the FIRE EXTINGUISHER (U) and WOODEN HANDLE 3/3 (V). Touch the burner to light the fire. (red).
- Place the METAL CUP on the burner; place the BULLET TIPS and CLAY MOLD in the cup to get the METAL PLAQUE PART.
- Place the PAINT ROLLER HANDLE on the TELESCOPE POLE; take the HOOK (inventory).
- Return to the Graveyard lane.
- Put the METAL PLAQUE PART in the slot; remove the brick; take the CROWBAR and HOSE (W).
- Place the HOSE on the FIRE EXTINGUISHER (inventory).
- Walk down.
- Use the HOOK on the purse; open it and take the EAGLE EMBLEM 1/2 (X).
- Return to the Great War Trench.
- Use the CROWBAR on the crate; remove the hay and take the BOX CUTTER (Y).
- Return to the Graveyard lane.
- Use the BOX CUTTER on the weeds; open the purse (A), take the PLAYER and take batteries out.
- Go to Graveyard entrance and put the WOODEN HANDLES on coffin and play MG. Take the BLOOD PRESSURE METER and the FUSE COIL (A1).
- Go to Great war trench and use the FIRE EXTINGUISHER on the fire (B); move the debris.
- Zoom into the door and play the HOP (D).
- You receive the HAND DRILL
- Place the BATTERIES (E). Press the button (F).
- Return to the Graveyard lane; Enter the Mausoleum.
- Take the CANDLE and SLIDE VIEWER from the box on the window (G), open the box and play the HOP to get the EAGLE EMBLEM 2/2 (G1).
- Light the CANDLE using the candelabra (red); You receive the LIT CANDLE.
- Return to the Great War Trench.
- Place the EAGLE EMBLEM on the box; Open the box; Take the EXPLOSIVE POWDER (H).
- Go back to Graveyard lane, enter the Mausoleum.

- Put the EXPLOSIVE POWDER on the wall, attach FUSE COIL and light it up with LIT CANDLE (J)
- Move the chandelier and the glass pieces, touch the coffin(K); talk to Michael to get the SLIDES.
- Use the SLIDES on the SLIDE VIEWER (inventory).
- Return to the Docks.
- Enter the Studio atrium (L).
Chapter 7: The Studio
- Use the HAND DRILL on the bolts, solve MG to activate MHO.(N)
- Play MHO (N1).
- You receive the COG STOPPER.
- Use the COG STOPPER on the door and enter the Cafeteria set (N2)
- Take the COSTUME (O), GOLF CLUB (P), and note (Q).
- Take the LETTER F from the box (Q1).
- Take the WATCH and BLOOD PRESSURE CUFF from the COSTUME (inventory).
- Walk down.
- Use the GOLF CLUB on the vent; go through it (R).
- Take the LETTER S (S).
- Move the pillows; take the TOBACCO PIPE CLEANER and the BOOK OF MATCHES (T).
- Open the BOOK OF MATCHES (inventory) to get the MATCH; use the MATCH on the POCKET WATCH (inventory) to get the WOODEN SLOT.
- Take the BLOOD PRESSURE CUFF and put it on the BLOOD PRESSURE METER (inventory)
- Take the EARPIECE (red);Take the BLOOD PRESSURE METER and put it on the dashboard (white)
- to open the glove compartment, take the CHEST PIECE and the GOLDEN FILM REEL 1/5 (U).
- Walk down.
- Place the letter S and letter F (V);
- Take the STAR PLATE and the GOLDEN FILM REEL 2/5 (V1)
- Use the TOBACCO PIPE CLEANER on the trunk of the car to activate MHO(W). Play the HOP(W1)
- You receive the WIRE CUTTER.
- Return to the Cafeteria set.

- Use the WIRE CUTTER on the wires; open the paper; take the STETHOSCOPE TUBE (X).
- Put the WOODEN SLOT on the box; open the box and take the GOLDEN FILM REEL 3/5 (Y).
- Combine the EARPIECE, STETHOSCOPE TUBE, and CHEST PIECE to create the STETHOSCOPE (inventory).
- Put the STAR PLATE on the locker and take the GOLDEN FILM REEL 4/5. (Z)
- Go to Travel trailer.
- Move the rug and put the STETHOSCOPE on the safe to activate MG
- Play MG ( solution A); Take the Photo Fragment and the GOLDEN FILM REEL 5/5 (A1)
- Return to cafeteria set.
- Place the GOLDEN FILM REEL on the door; go through it (F).
Use the MATCH on the scene.
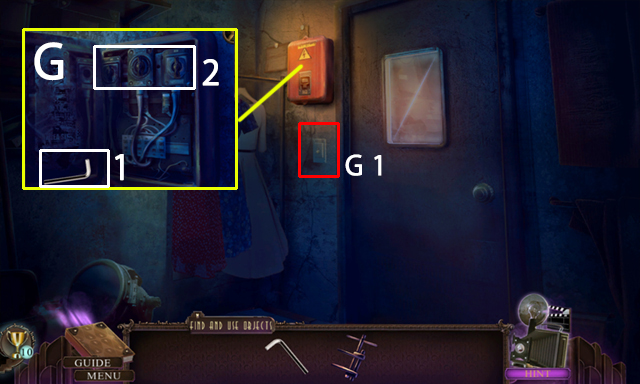
Open the fuse box, take the HEX KEY (1) and turn on the switches (2) (G); Turn on the light (3) (G1);
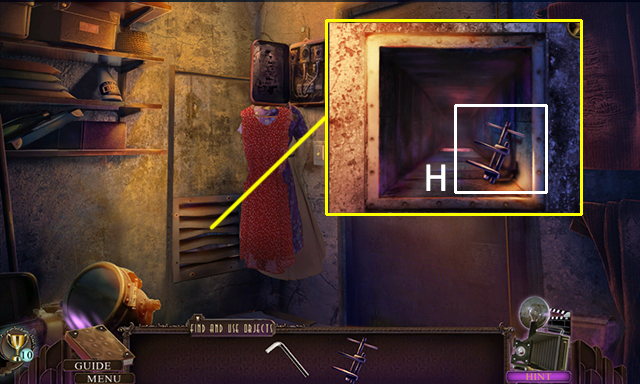
Move the dresses and use the HEX KEY on the vent cover and take the CLAMP TOOL (H).
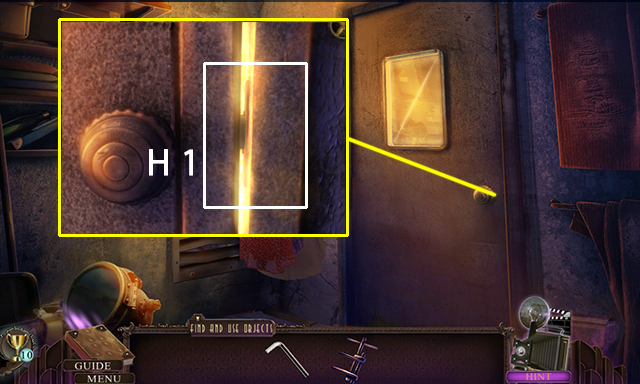
Use the CLAMP TOOL on the door (H1)
Move forward to enter the Foyer deck set and move forward again to enter the Prop room.
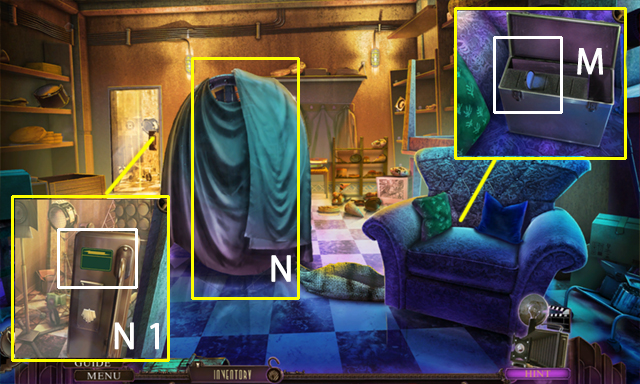
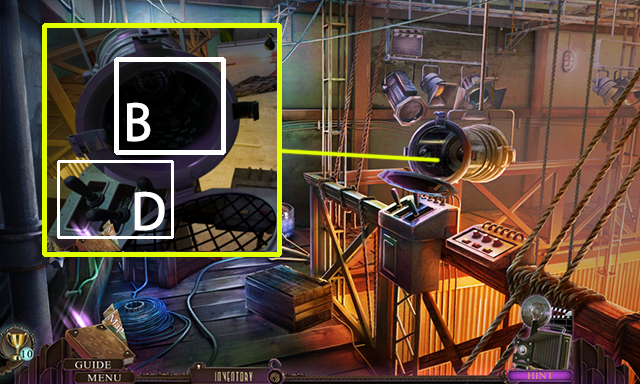
- Open the case on the chair; take the CAMERA FILTER (M).
- Remove the cloth and take the HOOK and note from the FAN (N).
- See the note on the door lock (N1).
- Go back to Foyer deck set.
- Put the FILTER in the camera to activate HOP (O)
- Play the HOP (Q).
- You receive the SHIP CONTROL COMBINATION.
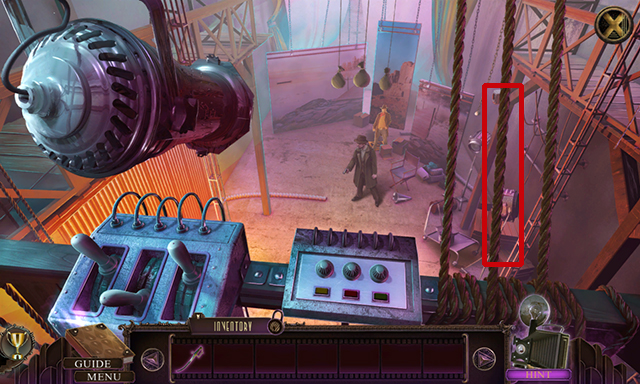
- Solve the puzzle to bring the ship down(R) Free Collins and take the ROPE (S).
- Put the ROPE and the HOOK (inventory) together; Take the GRAPPLING HOOK
- Use the GRAPPLING HOOK. Go up to the Studio catwalk (T).
- Take the COPPER COIL (U).
- Return to the Prop room.

- Place the COPPER COIL (1) in the slot and flip the switch (2) to activate a HOP (X).
- Play the HOP (Y).
- You receive the SWORD PROP.
- Take the REFLECTOR LIGHT BULB (Y1)
- Go to Studio catwalk.
- Place the REFLECTOR LIGHT BULB (B).
- Flip the switch 4 times (D).
- Use the SWORD PROP on the rope (red).
- Congratulations, you’ve completed Final Cut: Homage.


 Agency 33 Tips and Tricks, Guide, & Tips
 Azada: In Libro Walkthrough, Guide, & Tips
 Tales of Terror: Crimson Dawn Walkthrough, Guide, & Tips
 Weather Lord: Following the Princess Walkthrough, Guide, & Tips
 Sacra Terra: Kiss of Death Walkthrough, Guide, & Tips