Castlevania: Lords of Shadow collectibles guide.
In Castlevania: Lords of Shadow there are Life Magic Gems, Light Magic Gems, Shadow Magic Gems, Relics and Brotherhood Arcs. This guide will help you find them all. Also there may be some minor spoilers in the guide so try not to go down much further then the level you’re on. Those of you hunting trophies/achievements will need a Castlevania: Lords of Shadow guide. I hope you all get everything you need out of this guide.
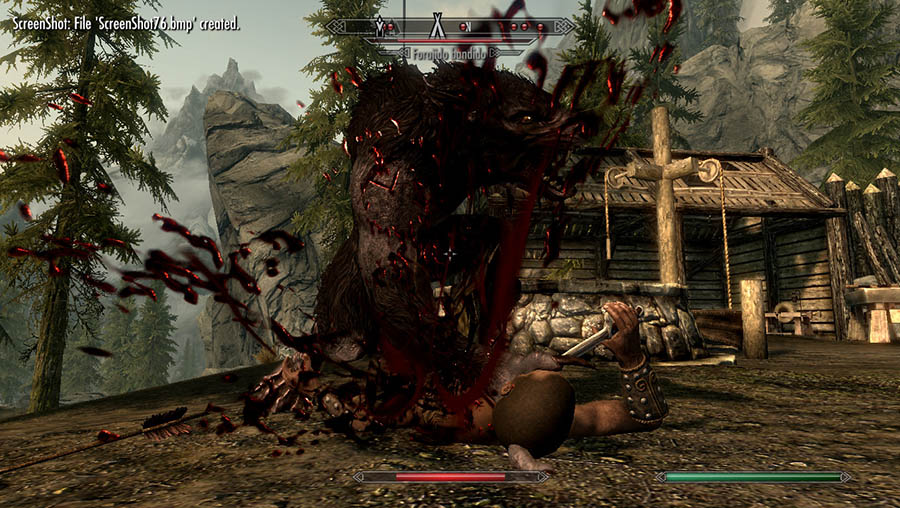
Hunting Path – Life Magic Gem – After fending off a couple Lycan riders you’ll get knocked off your horse. Turn around and backwards a bit and you should see the downed brother. Loot him and get your first Life Magic Gem.
The Dead Bog - Life Magic Gem x4, Relic, Ark – The first Life Magic Gem is at the start of the level once you load in go to the left and search the knight. The second Life Magic Gem is after you first encounter the Goblins. Take the right swamp path and once your get out there will be a cave on the right go in and there is the knight. The third Life Magic Gem is on the opposite path from where you first fought the Goblins. Go left down the swamp path and once oyu fight more Goblins jump the downed tree to the right and the knight will be on the Island. The last Life Magic Gem here is after you beat the boss. Once you start jumping the broken stairs you’ll see it.
The Relic here is unmissable(Hook tip) and the Ark is right after you beat the boss.
Pan’s Temple - Life Magic Gem, Ark – The Life Magic Gem in this level is in a hidden path to the right of the skull looking stone and the third run.
The Ark is on the left before you go to the Fairy Door(You can’t get it until you have the Seraph Shoulders)
Oblivion Lake – Life Magic Gem, Relic – Once you load in go to the statue at the edge of the lake and find your Life Magic Gem.
You get the Light Magic Medallion once you beat the boss.
Chapter 2
Enchanted Forest - Ark, Light Magic Gem – Early in the level you will see a waterfall. Go behind it and you’ll see the door that has the Ark(You need Shadow Magic in order to get it though)
Once you arrive at the ruins take the path to your right under a tree and near the Goblins. You’ll see a downed knight loot him to get your Light Magic Gem.
Underground Caves – Light Magic Gem, Relic – You will see a wooden totem to the left which you have to get through in order to grab the Light Magic Gem. You need the Relic, Spiked Chain, to get it which you will acquire in this level.
Labyrinth Entrance – Light Magic Gem, Ark - During the level you will have to balance on some wooden beams. After you finish that part take the stairs on the right to the end and get your Light Magic Gem.
Once you get to the ruins break the wall to the right for your Ark.(Requires the Cyclone boots to get in)
Waterfalls of Agharta – Light Magic Gem x2, Relic – After you control the giant spider and take down the tree finish it off and you will get the first Light Magic Gem. Later in the level you will use a big Troll to push a rock over. After you do this jump the gap and take the tunnel on your right. Go under the waterfall and get your second Light Magic Gem.
The Relic you get here is the Shadow Magic Medallion which is unmissable if you beat the level.
Agharta – Shadow Magic Gem x2, Ark, Life Magic Gem – Once you tame the first Warg jump the gap and take the path to the left. There will be a small area to the left and your Shadow Gem will be there.
By the Warg there is an Ark. You have to smash the statue in order to get to it. (You need the Dark Gauntlet)
Once you get the third scroll of the dead knight take the stairs to the right and you’ll get your Life Magic Gem.
Once you tame the second Warg check on the side of the second gap and you should see your second Shadow Magic Gem.
Dark Dungeon – Light Magic Gem, Shadow Magic Gem x2 – You’ll be doing some rappelling in this level and as you get to the bottom you can drop off or swing out. Do not drop and swing out from the wall and jump to the ledge on the left for your Life Magic Gem.
During the level you have to find Runic Keys once you start that take the left path. You will see a small cave soon after you get the key on your right. You Shadow Magic Gem is there. Towards the end you’ll climb a wall. You should see a platform below you. Shift to your left drop down and get your second Shadow Magic Gem.
Sanctuary Entrance – Shadow Magic Gem, Light Magic Gem, Ark – Before you get your second shard walk towards the screen and you should see the downed knight. Get your Light Magic Gem there.
There is a crank in the area with the second shard and you have to use it. (Requires Stake)
Shortly after your second shard you’ll see a ledge above you on the wall. Climb it and grab your Shadow Magic Gem.
Sanctuary of Titans – Shadow Magic Gem – You have to run past the Titan and you should see the knight on the right of the screen.
The Black Knight – Relic – Dark Gauntlet
Chapter 3
The Three Towers – Ark, Relic, Shadow Magic Gem x3, Light Magic Gem, Life Magic Gem – There is a jumping part in this level and on the last island is the Ark(Requires Sprint)
Relic – Fairies ( Unmissable if you beat the level)
Once you get towards the temple you’ll see a downed knight. Go to him and grab you Shadow Magic Gem.
At that same knight look to your left and see that you can bring down part of the wall. Do so follow the path and get your Light Magic Gem.
After taming the Warg and climbing up you’ll come to a room with three exits. The right exit holds your Shadow Magic Gem.
After you climb some of the ruins head towards(most likely) your second fairy and reach the top, Go towards the edge is not quite visible yet and you should see the knight. Loot him and get your Life Magic Gem.
After you get one of your fairys you’ll use your chain to drop down a wall. As you go down you’ll notice part of the wall is broken. Go inside loot the knight and get your Shadow Magic Gem.
The Dark Lord of the Lycans – Relic – Beat this boss and acquire the Cyclone Boots.
Chapter 4
Mountain Fortress – Life Magic Gem, Shadow Magic Gem, Light Magic Gem x2, Ark – Once you get to the first split path take the right path to find the knight with your Life Magic Gem.
Once you use your sprint jump to hop the broken bridge you should see a breakable wall to your right. Use the shoulder dash and collect your Shadow Magic Gem.
After you clear the second sprint jump gap you should see a place for the chain grip. Climb up and take the wall to the right and keep heading up to get your Light Magic Gem. Hopefully you’ve been finding the scrolls because at the end of the hallway where you found your third one theres a pillar that can be knocked back with your Falcon (Gauntlet) punch! Follow the path and you’ll find your second Light Magic Gem.
Relic – There’s a gate that requires the Stake to open. Come back once you acquire it and get a fairy upgrade.
The Crow Witch – Light Magic Gem, Shadow Magic Gem, Ark, Life Magic Gem – Once you enter the monastery head up the stairs that you see and get your Light Magic Gem.
Once you get outside you can take two paths. Drop down and head to the left. Follow it to a cave and you will find your knight and the Shadow Magic Gem.
At a point in the level the curtains come to life and you have to fight them. After you beat the second round of them head up the stairs and you can see the Ark across the gap.(Need the Cyclone boots and Seraph shoulders to get to it.)
In the same room you have to use your chain to climb up to the top floor. Once you get there head to the right and out onto a balcony and you will get your Life Magic Gem.
Chapter 5
Veros Woods – Life Magic Gem x2, Shadow Magic Gem – After you defeat your first wave of Snow Goblins break the wall to the right and get your first Life Magic Gem. After you make it to their camp go through and you’ll see a breakable wall on the left. Break it and get your second Life Magic Gem.
Now head back to the place you broke the wall on your left and break the wall on your right. You should see the knight and get your Shadow Magic Gem.
Wygol Village – Ark, Shadow Magic Gem, Relic - Right when you load in you should see stairs to your right and a wall to break down. Break it and your Ark is there. (Requires Seraph Shoulders)
During the Ghoul fight you have to cover up three holes. After you make it to the third one you should see the knight to the right of the hole. Get your Shadow Magic Gem there.
Relic – Stake – You can’t miss this if you beat the level.
Abby Catacombs – Life Magic Gem, Light Magic Gem – Once you get to the room with the massive gears and get to the right side, run toward the camera and take the path on the left to get your Life Magic Gem.
Once you get to the courtyard you have to rotate a thing in the middle. Rotate it 90 degrees and warp yourself into a room with a knight and your Light Magic Gem.
Abby Library – Light Magic Gem x2, Shadow Magic Gem – Follow the path down and once you can choose left or straight take straight and find your Light Magic Gem. During the level you have to use a sunlight beam to open doors. Once you make it to the second beam follow it to the right till it ends. You should see a bookcase you can go behind and you will find your second Light Magic Gem.
Once you enter the third room with the beam of light you should see a set of stairs leading to a pillar. Go down the stairs to find you Shadow Magic Gem.
Abbey Tower - Life Magic Gem x2, Relic – After you break a wall(right after your first encounter) go through the wall and go towards the camera. You should see the knight and get your first Life Magic Gem. You will have to do some climbing in this level and once you reach the second climbing part go left instead of right and you will find your second Life Magic Gem.
Relic – Holy Water Flasks – Can’t be missed if you beat the level.
Castle Sewers – Shadow Magic Gem – Instead of going through the gate take the sewage in the beginning of the level towards the right to find your Shadow Magic Gem.
Chapter 6
Castle Courtyard – Life Magic Gem – After you fight the Skeletons and the Warg you should see a magic fountain and a breakable door near it. Break the door and acquire the Life Magic Gem.
Maze Gardens - Life Magic Gem, Light Magic Gem, Shadow Magic Gem – On the right side of the gardens you will see a statue. Tear it down and get your Life Magic Gem.
Head left from where you start in the level until you reach a breakable wall. Bust through the wall and get your Light Magic Gem.
Head right at the start of the level and you should see a downed bridge. Once you acquire the spider mount use it to make a web bridge. Cross it and get your Shadow Magic Gem.
Castle Hall – Life Magic Gem, Ark, Light Magic Gem – Once you make it to the third hall there is a wall you can climb up on the left. Do so and get your Life Magic Gem.
The Ark is in the small area with the three magic masks. In order to get it you will need the Seraph Shoulders.
During the level you will have to play a chess like game. After you finish look by the upper right section of the board and get your Light Magic Gem.
Refectory – Shadow Magic Gem x2, Life Magic Gem – After beating the Ghouls and taking there path down you will come to an intersection. Head towards the camera once you get there and you can get your Shadow Magic Gem.
Once you get the Evil Butcher Key go back to the room where you get the feed for the ghouls and open the locked door. You will get your Life Magic Gem there.
The final room with the 6 masks puzzle there will be a wall on the right that you can climb. Do so and take the beams towards the camera to get your second Shadow Magic Gem.
Chapter 7
Balcony – Shadow Magic Gem x2, Light Magic Gem – During the level you have to work you way across some wooden beams and while your doing that you should see the dead knight. At the end of the beams hop of the ledge towards your right then head left and you will get your Shadow Magic Gem.
You’ll have to hang from the roof with your chain at one point. During this you will see an open window below drop down and you will get a scroll. In the room next to this you will get your Light Magic Gem.
Once you make it to the puzzle room you will see a large pile of junk covered by a large red cloth. Behind it is your second Shadow Magic Gem.
Electric Laboratory – Light Magic Gem, Life Magic Gem – You will enter some room switch electricity in this level. Once you enter the second room punch the closest switch and head left to get your Light Magic Gem.
During the level you will have to fight a Mechanical Monster(Monstrosity) and kill it. After you do so in the far right corner you will find your Life Magic Gem.
Chromatic Observatory – Life Magic Gem, Light Magic Gem, Shadow Magic Gem – Once you make it to the green room, after crossing the gap, you should see a dead knight to the right. The camera switches but you can still get your Life Magic Gem.
You have to use a green and blue lenses to create cyan and light up the cyan seal. The giant metal armor will move and underneath will be a Light Magic Gem.
Once you get in the white room (Combine all lenses to get the white key) use the white key on the lock and get your Shadow Magic Gem.
Chapter 8
Outer Wall – Shadow Magic Gem, Life Magic Gem – After you go up the wall and pass the health fountain take a left. You should see the corpse which has your Shadow Magic Gem.
Once you enter the last room of the level you will see a lion(maybe tiger?) statue. Go to it and you will see the downed knight and your Life Magic Gem.
Clockwork Tower – Light Magic Gem, Life Magic Gem – At the start of the level you will cross two beams to make it to a platform on the other side. Jump to the left once you get there and you’ll see the knight and your Light Magic Gem.
At a point in the level you will have to climb some ledges that are electrocuted. Once you get to the top go to the left and drop down onto a platform and get your Life Magic Gem.
Olrox – Shadow Magic Gem – During the fight with Olrox he will open up Iron Maiden. The fourth one he opens up will have your Shadow Magic Gem.
The Throne Room – Light Magic Gem, Relic – Once you load in climb the stairs and about halfway to the top you’ll see the Light Magic Gem.
Relic – Seraph Wings – Beat the boss and you get this.
Chapter 9
Bones Forest – Shadow Magic Gem x2, Light Magic Gem, Life Magic Gem – Once you load in head left and you’ll see the dead knight and your Shadow Magic Gem.
Go behind the portal you used to come into this level and you will see your Light Magic Gem.
Once you encounter the Headless guys and get to their camp take the left path out. You will see a gap and a ledge. Jump it and you’ll enter a camp with your Shadow Magic Gem.
The Chupacabra will take your powers in this level (Yes its annoying) and once he does look to the right and you will see a ledge you can climb. Do so head to the right and get your Life Magic Gem.
Woes Moor – Shadow Magic Gem, Light Magic Gem x2, Life Magic Gem – Once you load in head towards the camera and you’ll see the Shadow Magic Gem.
You’ll find a destroyed barn and a scarecrow. Enter the barn and you will get your Life Magic Gem.
At the back of the level you’ll see a large barrier that you can take down with your spiked chain. Do so and climb the stairs to get your first Light Magic Gem. Soon you’ll find a second barrier that has a wagon wheel as part of it. Break that barrier and behind it if your second Light Magic Gem.
The Music Box – Light Magic Gem, Life Magic Gem – Take the green cylinder and use it on the device to your right. It will open a path where a dead knight is. Your Light Magic Gem is there but right after you get it you will die(Don’t worry it auto saves once you get it)
Head north three times then left. Use Red, Blue, Magenta, then Yellow then you will get your Life Magic Gem.
Chapter 10
Titan Graveyard – Light Magic Gem x2, Life Magic Gem, Shadow Magic Gem – Follow the lower path left and you will come across a dead Titan. Climb it and drop to the other side and get your first Light Magic Gem.
Right before you use a rune to move the Titans arm now but don’t. Run down the arm and get your Life Magic Gem first.
You’ll jump on to a fallen Titan soon after. Go to the front of the Titan and get your Shadow Magic Gem.
You have to activate one of the two rune slots and the Titan’s arm will rise. You have to climb it and jump off it to reach the next area and your second Light Magic Gem.
Fire Cemetery – Light Magic Gem, Life Magic Gem x2 – Once you hit the fork in the road take a right and you will see a huge gap with a knight on the other side. Drop down and climb the wall on the other side to get your Light Magic Gem.
Once again your dealing with the pesky Chupacabra. After he drains you take a left and you’ll see the knight and your first Life Magic Gem. Once you enter the puzzle area go to the back. You will see a little nook and inside is your second Life Magic Gem.
Crematory Oven – Shadow Magic Gem – Instead of heading up and exiting the oven shimmy to the right and get your Shadow Magic Gem.
Chapter 11
Necromancer’s Abyss – Shadow Magic Gem x2, Life Magic Gem, Light Magic Gem – If you’ve followed thus far you will finish the rest of your gems here.
You’ll come to a calender puzzle and solve it. Run to the left side and drop down to get your first Shadow Magic Gem.
After you take out the Reapers for the first time run left towards the camera. You drop down and find your last Life Magic Gem.
After beating the Necromancer head to the portal on your right. In the next area take the left portal and use the hook point and jump to the ledge with the last Light Magic Gem.
Once you get towards the end of the level you will teleport right next to a health fountain. Go left down the steps and at the bottom you will get your final Shadow Magic Gem.
So there you have it all the collectibles in Castlevania: Lords of Shadow. I hope this guide helped you all power up your Belmont for hopefully not the last time.