Move into the lift and stand on the weighted plate to move up. Be careful as you move into the next room, as there's a Wheelchair Blunder waiting there. Unlike the first Wheelchair Blunder who only had a basic gun, this one has a mini-gun that he won't hesitate to use. If he doesn't start shooting as you approach the opening into the room, walk slowly out into the room and then duck back into the hallway to bait him to shoot. Once his first round is done, quickly run over to kill him. He has very little health and goes down easily once you get close. Open the chest at the end of the room to find a Communion rune (increase Blood Vial limit).
Head up the stairs to the side of the room to see a bridge. Several Henchmen (two with guns) are in the room directly across the bridge. When they see you, they will run out to attack or start shooting. If you have problems reaching the room to kill them, you can move out slightly to get their attention and one or two will chase you back into the room where you can kill them in smaller numbers, then quickly run across the bridge to avoid the gunfire.
Kill any remaining Henchmen in the room, then open the chest on the far left side to find a Bloodtinge Gemstone (2). You have now entered the Healing Church Workshop.
Head back outside and circle around to the right to find an Imp at the end of the walkway. When you attack it will most likely fall down to the area below. Don't worry, you need to drop down there anyway. Kill the Imp, then head down the path and into the next room. Make your way across the makeshift wooden bridge.
When you reach the other side, look down to line yourself up with the bridge below, then drop down. Move to the area with the wooden barrels and drop down again. You'll take a small bit of damage, so make sure you're not close to death.
Look for the bronze casket against the wall. If you stand by that and move toward the edge, you will see an item below. The item sits on a narrow beam, so you need to be careful here. Line up with the item and drop down. Once again, you'll take a small amount of damage when you drop. Search the dead body to find a Madman's Knowledge.
Move over to the wall and look down. You will see the faint signs of another wooden bridge down below. Make sure you're at full health, then drop down. You will lose approximately 50 percent of your health when you do this. Now stand near the middle of the bridge and drop down again to the next bridge. Move near the wall and drop down once more to the final bridge, then drop down to the floor below.
Toward the doorway there's a Werebeast. Luckily it's facing the door and seems to be sleeping. Sneak up behind it and use a Charge Attack followed by a critical strike. If that doesn't kill it, you should only need a few more attacks to finish it off. Killing the Werebeast nets you a Beast rune (boost effect of beast transformation).
Open the door behind the Werebeast and head down the path. Go down the alley to the left to find a corpse in the corner. Right next to corpse are two Crazed Crows that can be difficult to see. Kill the Crows and then search the body to obtain a Rumpled Yharnam Hat (head attire) and Sweaty Clothes (chest attire).
Continue around the corner to find stairs straight ahead with the path also curving to the right. A Hound may attack from the direction of the stairs, so be ready for it. Turn to the right to see a Death Dealer near the end of the path standing at the top of another set of stairs.
Be very, very careful because a Death Dealer is dangerous to attack at your present level. It has a long reach, inflicts a large amount of damage, has a special move that pulls you toward it and once you've inflicted enough damage, it enters a rage mode in which it moves almost as fast as you do in a full sprint. If you get killed by a Death Dealer you will wake up in a cell in Yahar'gul, Unseen Village. It's an area that you shouldn't be in until the end of the game. If you get caught, jump down to the end of this article to find a short section on how to escape Yahar'gul, Unseen Village and get back to Hunter's Dream.
Slowly sneak up behind the Death Dealer and use a Charge Attack followed by a critical strike. It's likely that will only drop it to roughly 50 percent health. You can continue to attack while it initiates rage mode, but don't stay too long because a Hound and two Henchmen are very close by and will likely notice you by now. If you need to run, head for the room where you fought the Werebeast. The Hound and Henchman will follow you, but the Death Dealer will not be able to get through the doorway.
Kill the other enemies, then wait a moment for the Death Dealer to reset its position (it won't take long). Use the same tactic of sneaking up behind it to land a second Charge Attack and critical strike. If that doesn't finish it off, it won't take much more to do so.
Across the courtyard where you fought the Death Dealer is a corpse. Search the body to find another Madman's Knowledge. Two more Henchmen patrol the path ahead. Kill them, then head to the right and down the stairs. A Leech Warlock waits for you here. These are also deadly creatures. They use a magic attack that stuns you if you're too close or fail to dodge it, then they grab you and inflict a tremendous amount of damage as well as taking Insight from you. If you dodge the initial magic attack, they shoot multiple magic projectiles in your direction which also need to be dodged. To defeat them, you need to move in, attack a few times and then quickly move away and dodge the magic attacks before trying to attack again.
Sneak up behind the Leech Warlock and land a Charge Attack into a critical strike. If that doesn't kill it, use the strategy above or run away until it resets, then go for another Charge Attack. Even after it resets, it will not regain health. Kill the Leech Warlock, then search the body nearby to find a Fire Blood Gemstone (3) (fortify weapons).
Head back up the stairs the way you came and continue down the path and into the lift ahead to return to a different area of the Cathedral Ward.
When the lift stops, search the body ahead to find a Thick Coldblood (6), then drop down into the courtyard below to engage three Gravekeepers. If you're fearful about engaging three at once, wait until one move around the corner before you drop down. They all walk around this area, so make sure you have killed all three before you venture too far.
Pull the lever to the right of the gate ahead to open the gate. Ignore the corpse for now and kill the Gravekeeper on the other side of the gate. Search the corpse to find a Wooden Shield (off-hand item). If you go down the stairs ahead you'll reach the cathedral where the Cathedral Ward lamp is located. For now, turn around and climb up the ladder to the right to find a corpse that holds six Numbing Mist (prevents HP restoration).
Collect the items and go back down the ladder and head up the stairs to the left of the balcony you previously dropped down from. At the top is a body that holds a Thick Coldblood (5). Continue up the next flight of stairs to find another body that holds six Blood Vials. An Axe Reaper patrols the stairs ahead. If it's facing your direction, go back down the stairs and head down the path to the right to loop around to the bottom half of the stairs and get behind the patrolling Axe Reaper.
Be careful because there's also a Hound and another Gravekeeper that lurk in this area. If you continue past the stairs you'll find the Hound, while the Gravekeeper patrols the stairs. Near the base of the stairs on both sides are corpses holding one Thick Coldblood (5) each.
Once you've figured out your angle of attack and cleared the enemies surrounding the Reaper, don't bother with a Charge Attack on the Reaper's back or gunshots if you have a normal pistol. The Axe Reaper is immune to both. Lucky for you the Reaper is also very slow. Wait for it to swing, then dodge behind it and go to town. You have plenty of time to attack the Reaper each time you dodge an axe swing. Just be careful because the axe has a very long range.
With the first Axe Reaper down, make note of the gate near the base of the stairs. There's a lever that opens the gate, but you need to run a little errand first. You will come back here, so remember the location.
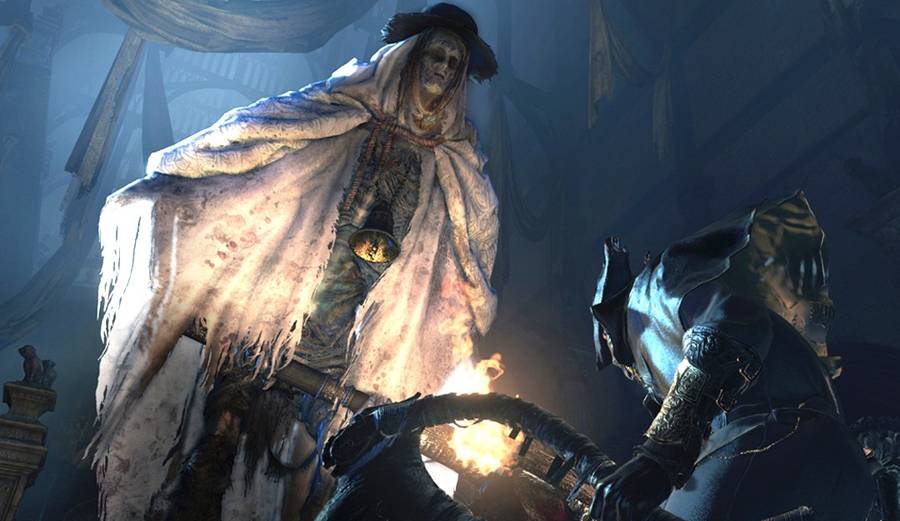
Head up the stairs until you're close to the top. Two Gravekeepers wait on the last flight of stairs just above. Both have long wooden pitch forks that have deceptive range. Don't worry about getting behind them for a Charge Attack and critical strike, but try to separate them by throwing a Pebble at one and waiting at the base of the stairs for it to chase after you. With both enemies down, head up to the top of the stairs and through the door to begin the boss battle against Vicar Amelia.
Vicar Amelia has a wide variety of attack that can be devastating if they hit you. Fortunately for you, all of them are frontal attacks. As long as you stay close to Vicar Amelia and stick to her back as much as possible, you won't have any trouble with this boss battle.
It's extremely important to always stay away from Vicar Amelia's front side. Throughout the beginning of the battle she uses wide swiping attacks that cover a decent range in front of her body and can even hit you to the side if you're too far towards her front. She'll also try to grab you, which leads to massive damage, but once again, the grab only hits if you're standing close to Vicar Amelia and directly in front of her.
If you keep your distance she'll use one of several moderately long-range attacks that involve slamming her fists to the ground creating a shockwave of sorts, or simply jumping toward you with an attack. If you stay close to her you won't have to worry about either of these assaults.
She'll pause periodically to grab the talisman in her hand. Lay into her when this happens. She'll glow and it may seem as though she's about to use an area attack that hits all around her, but as long as you're behind her you are not in danger.
As long as you stay behind Vicar Amelia you only have to worry about her turning around. She'll do this from time to time, but if you're paying attention you can dodge to either side and then easily move around to her back again to continue your assault.
Once Vicar Amelia is down, inspect the item on the pedestal at the end of the hall to trigger a cut-scene, then activate the Grand Cathedral lamp.
If you're killed by a Death Dealer you will end up in Yahar'gul, Unseen Village, which is a very high level area. Follow this short guide to get back to Hunter's Dream.
Head out the door to the right, then into the next room to the right. There's a dead body here that holds a Thick Coldblood (6). Continue down the stairs in the far left corner. There's a corpse on the far side of the room at the bottom. Search it to find a Frenzied Coldblood (7), then talk to the woman cowering in the far right corner if you wish, although she won't say much.
Go back up the stairs and head to the far left side of the room where you first appeared. Make your way up the stairs on either side then o through the doorway at the midpoint. Go down the next set of stairs to engage the two Old Hags at the bottom. These are the lower tier of creatures in this area and easy to defeat, but they move quickly, so be ready.
There's a cell to the left and another cell to the right. Both have several Henchmen laying on the ground that will wake up and attack if you get close enough. Take them all down and search the two corpses here to find six Blood Vials and 10 Quicksilver Bullets.
In the next room you'll find two Death Dealers. You probably don't want to engage them because they're the whole reason you're stuck in this place. Instead, go back to the stairs and continue to the top. More Death Dealers await up here, but there's also a lamp just behind you when you reach the top of the stairs. Quickly move over to the lamp to activate it and head back to Hunter's Dream.
If you're looking for more strategy, return to our awesome Bloodborne guide, full of tips to defeat each boss. If you want to continue your journey, allow us to help you explore Hemwick Charnel Lane and find the Rune Workshop Tool to gain access to the Memory Altar in Hunter's Dream!