In this simple step by step tutorial we will create a new piece of armor. We will also briefly touch the subject of using templates.
To make a new armor piece, follow the steps below:
1) Open Skyrim Creation Kit and make sure your mod/plugin file is loaded
2) Click on Items->Armor
3) Sort by name. Scroll down to "Steel Boots of Resist Fire"
4) Right Click on the item and duplicate it.
5) Right Click on the copy, and Edit it

6) You should see the follwing fields:
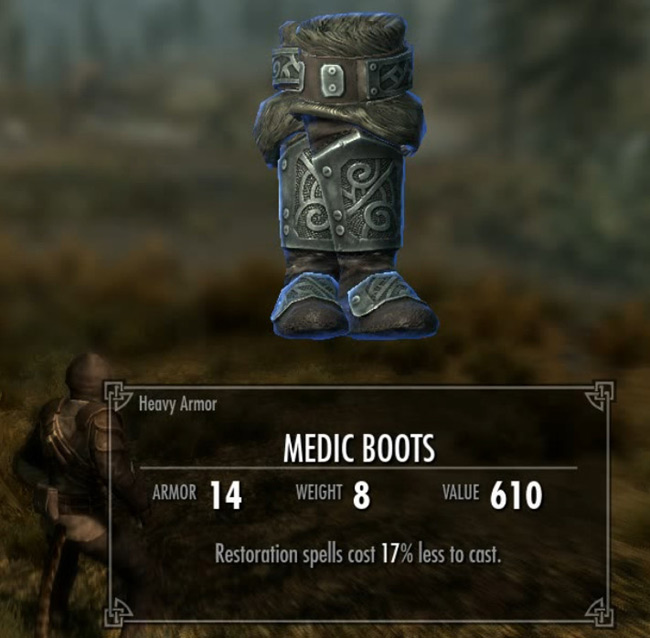
ID: This is the internal ID for the armor (Not visible to the player). Change to "medicBoots".
Name: Name of armor. This is what the player sees in the inventory. Change to "Medic Boots"
Value: Gold value of the armor. Feel free to increase or decrease.
Enchanting: This is the enchantment on the armor. Scroll down to EnchArmorFortifyRestoration03 and select it. 01 is the lowest magnitude enchantment, while 06 is the highest
Template Armor: This determines the template on which the armor is based on. ArmorSteelBootsA is currently selected. Having a template selected disables most of the other fields such as the armor rating. To unlock the other fields, you can set the template to "None". But using a template has many advantages. We will focus on templates later, but to make it short, let's say you created 100 different types of steel boots based on a steel boot template. Later you decide that you want to increase the armor rating of all your steel boots armor. You could then just go and increase the armor rating in the template, and it would apply to all the pieces based on that template. If you had not used a template, you would have had to go change the armor rating individually in all 100 pieces!
Weight: How much the armor weighs
Type: Light or Heavy armor (or none)
Armor Rating: How well the armor protects
Equip Type: For armor it is either NONE or SHIELD
Block Bash Impact Data Set: Determines interaction with environment.. Ignore for now.
Alternate Block Material: Material type when blocking. Ignore for now.
Pickup Sound: Determines what kind of sound the armor makes when you pick it up.
Putdown Sound: Determines what kind of sound the armor makes when you drop it.
Add Destruction Data: Used to set destruction stages. Ignore for now.
Ragdoll Constraint Template: system of applying new Havok constraint and rigid body data to an existing skeleton. Ignore for now.
Playable: Whether Item can be equipped by a player. Should be checked.
Has Platform/Language Specific Textures: Leave this box unchecked.
Race: Use to limit armor to specific race. If you are creating playable armor, you should select "DefaultRace".
Biped Object: The part of body this piece of armor protects. Options here will be different if you change the "Race" field. For DefaultRace, options are head,hair,body,hands,forearms,amulet,ring,feet,calves,shield,longhair,circlet,ears.
Male/Female: Specify world models and images for male and female characters. Ignore for now.
Models: Lists associated ArmorAddons. Ignore this field for now.
Description: Enter a description for this item to override default description.
Keywords: Keywords associated with this armor. Ignore for now.
Scripts: Papyrus scipts associated with this armor. We will get to scripting in our expert tutorials. For now, ignore this field.
Click ok, then save your plugin file.
7) Load the game and bring up the console. Type "help medic" to look up the code for your new armor
8) Type in player.addItem <Code Goes Here> <Quantity to add>
For example: "player.addItem 02003325 1"
Item should be added to your inventory. Open inventor, and under "Apparel", examine the new armor piece. Verify it's stats and that it has the enchantment you specified.

This concludes the tutorial on creating armor pieces using the Skyrim Creation Kit.


 Sleeping Dogs Easy Drug Bust Guide - GamersHeroes
 Final Fantasy XIII-2 Faeryl Boss Walkthrough
 Where To Turn In Monster Trophies In The Witcher 3
 Minesweeper Tips and Tricks
 Dark Souls Easy Humanity Guide