War of the Roses is not the simplest game out there. It’s on the level of Mount and Blade, which makes it a mildly difficult game when it comes to PvP. Aside from directional combat and blocking you also have types of armor, different weapons, Perks and more. In other words, you have countless different possibilities but that does not always translate into effectiveness. You could have a bowman in heavy armor, but a bow might be less optimal than a crossbow. You could have a a longsword for a sidearm but that does not mean that you will kill enemies in heavy armor. There are many different tid-bits here and there so the purpose of this short guide is to help you a bit, if you need the extra help. Some of this knowledge might be “common” to experienced players but if you are new this will help you greatly.
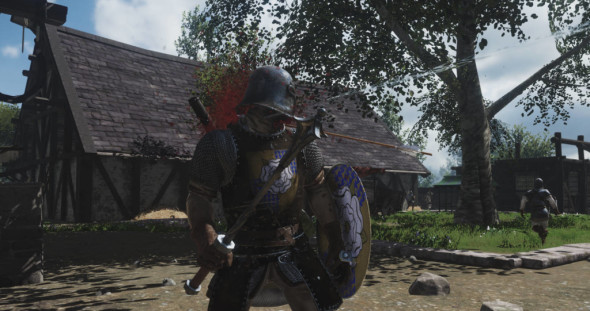
Having a fancy armor, crest and a barded horse does not translate into skill. Heavy armor is very common, due to its price. Even if it looks fancy once you figure out how to beat it no fancy crest will scare you away.
1. Range – Range is not only about ranged combat. It is also about close combat. When it comes to bows and crossbows, bows tend to cause less damage the further away the target, past a certain point. Furthermore, depending on your upgrades, types of bolts/arrows and perks your shots could drop sooner so you will need to angle your shots accordingly to hit your target. While it is tempting to always hit headshots, especially with the crossbow that could insta-kill, it is sometimes easier to just get a body shot. Even if you do not knock down an enemy you could at least wound them to the point where they have to hide, thus subtracting one enemy from the front.
The other side of Range, as mentioned above, is Close Combat. Due to the number of different weapons you might note that certain types of weapons have different range, but this also translates into effective range. Let me put it in perspective. Let us say you have a long pike, and you are facing an archer. A smart archer would parry your attack and then, literally, hug you. When you try to swing when the archer is this close you will most likely be unable to wound the archer at all. Mainly polearm weapons are least effective against targets up close. Each weapon appears to have its own “effective range” where a vertical swing can cause the most damage. The best way to figure out this effective range is to experiment, not only during PvP (battles and duels) but if you need a moment for yourself you can load up a practice map, stand in front of a dummy or even a fence, and smack away at it. You will not only notice how different weapons had different effective range, but also that each type of attack has a slightly different range as well. I would say that in the case of the fence testing any bladed weapons on it is better, because they will create clear slash-marks on the wood. When doing a vertical swing this also helps you practice how close and where an enemy has to stand so that you can hit him.
2. On Healing – If you are new to the game you might find this more informative than an experienced player. As you might had realized there is an HP based system in the game. Each player has 100 HP. If a player is knocked below, I believe, 10 HP he goes into bleeding and after ten seconds, regardless of damage, will be knocked out (you still get the kill credit if this happens). A player who is knocked out can be revived by a friendly, or executed. While still bleeding a player can bandage himself or somebody else might bandage him.
There are different perks influencing how quickly you can bandage yourself and others. There are also perks allowing for you to revive others more quickly. All in all, if you wanted to be a self-healing medic it’s possible. Defensive perks is where you can find the necessary Perks associated with your own well-being and bandaging. It should be noted that only when you use the armor perk can you chose beneficial self-healing perks. One of the most useful perks for self-healing is regenerative, that shortens the time it takes you to bandage up. All the “Medic” support perks are in the support perks under surgeon. Barber surgeon and sterilized bandages are two highly useful sub-perks of the surgeon. Barber surgeon allows for quicker revives while sterilized bandages heal a player fully when you revive or bandage them.
There is a “but” to all of this, oblivious. This Perk eliminates bleeding and any special effects associated with damage. However, you cannot heal yourself, nor can anybody else bandage you (you can still be revived). What is the purpose of such a perk? How can you stay alive? The simplest answer is the courage banner officer perk. When used this creates an area heal-effect that works on all the people in your squad. If there is no squad with an officer to offer such a bonus you can always set yourself as a squad leader of a new squad, so that you (and anybody who joins you) can benefit from healing. It should be noted that the banner’s heal effect is very limited. You will not recover from a near-death experience with a single banner use. However, the healing banner is capable of taking you out of bleeding. If you were just barely pushed into bleeding then the healing effect has a chance to healing you back to normal (but it will not take much to put you back into bleeding).
3. Bows vs Crossbows – If you want range then you have two obvious choices, bows and crossbows (you also have some very primitive firearms, but those are better at close range). The choice feels rather simple. Bows will always have a harder time with penetrating heavy armor than crossbows. Unless you use a special arrow tip, or if you target an armor’s weak spot (or if the enemy forgets to close his visor). Certain bow types are better suited for damage rather than rate of fire or arrow drop but some bows are far superior to others. Overall though, when it comes to comparing bows and crossbows, the bow will always fire faster than a crossbow. If you are not a good shot, or if the odds are simply against you though, it will be hard to wound anybody.
The other complication of the bow is how long do you have to pull it for maximum strength. A crossbow, once prepped, will always fire with equal effectiveness. A bow, when prepared to fire, is most effective when the two lines on the aiming reticule meet together. Beyond that and before that the shot will be weaker. A crossbow has a longer reload time, but if you play the mini-game well, and hook your crossbow efficiently, you could fire just as quickly as a bow. However, you have to remain stationary to reload a crossbow. If you get shot you will lose any reload progress. Furthermore, if you put away your crossbow and take out your sword you will have to reload your crossbow all over again (unless you have the correct upgrade). In close combat this makes the bow superior, because you will have enough time to fire at the enemy, and move back, multiple times while the crossbow can at best have a single shot.
Both the bow and crossbow are good at what they do. If you want an easier firing experience though I recommend the crossbow over the bow. The bow needs more practice and a good aim, while a crossbow can easily penetrate almost any piece of the enemy’s armor.
Previously you had arrows to the knee, now through the neck.
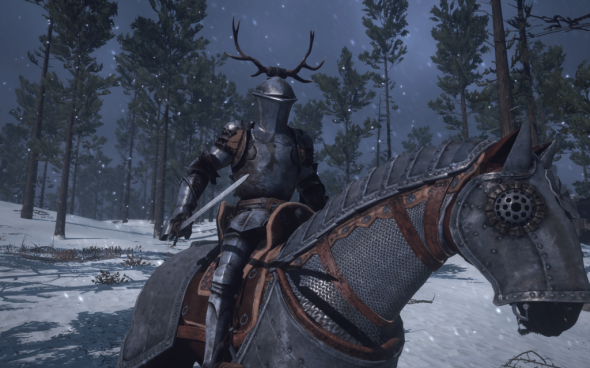
4. Horses – When it comes to riding on horseback be aware of a few simple rules. A horse with barding is always slower than its non-armored variant, and can gallop for shorter. However, the added protection allows a horse to survive for much longer, be it against archers or spears. If you play a knight, that is to say you rely on the charge with a lance or other heavy weapon you will prefer an armored, if slower, horse, because the added protection will allow you to survive during a charge. Personal experience has shown me that an unarmored horse could die from a single accurate blow to the head. While an armored horse could suffer the same fate (from a crossbow, for example) it is much less likely.
When it comes to moving around the most important thing to remember, especially when you lose momentum, is that a charge can be initiated even when you stand perfectly still. By holding down shift your horse will spring to life, and if you had a prepared lance or swing you will benefit from a full charge when doing such a brief one. It should be noted that when you charged/galloped and then stopped you will not be able to do so again until your bar fills up. This is VERY important to remember when you want to jump behind a wall. Your horse can only jump when you gallop. If you try to press the space bar while not galloping your horse will simply stop in place. So, if you are as yet inexperienced with your horse, you could end up charging, jumping over the wall and then releasing the gallop. You cannot jump over the wall again until the bar fills up (this could be a few seconds) and if you miscalculated and you are about to get mobbed your could be in a very deep pickle. Do not stop a gallop unless you are absolutely certain it is safe.
Remember that you can always summon a new horse when your old one is too wounded or dead, by holding down C. Make sure you do not stand too close to any physical obstacles (such as rocks) or your call will be halted.
Lances are destroyed if you dismount your horse with your lance out, or if your horse is killed when you held a lance. If you do not want to lose your lance chose your sidearm, then dismount.
Lastly, I was always curious whether the courage banner officer perk can actually heal your horse, while you are on it. I could not find any evidence supporting this but I have a certain nagging feeling that it might be the case. While the effects of the courage banner are small if you are a good rider and manage to evade most shots/spears/attacks your horse could survive for a good chunk of the battle.
5. Types of Attack – Each weapon has four different types of attack. Two side slashes (left and right), a powerful overhead swing and what can be an under-handed swing or stab (depends on the weapon type). Each weapon performs differently during these different attacks. Most players use vertical slashes, as they are the easiest. Most weapons, such as hammers and axes, also benefit the most from side attacks. An overhead swing is the hardest to pull off, since the enemy has to stand not only in front of you, but the correct distance away. Even if you miss the head you could hit the shoulders, although in most cases the shoulder plating will stop any damage. The thrust, among polearm weapons and blades, is most effective when you need a longer-range attack and when you face armored opponents. Heavy armor is especially resistant to swords, but if you thrust a sword you will be able to do decent damage. While the thrust might not be the most powerful attack it can pierce any type of armor, and do a little bit of damage.
Certain types of weapons are better against different types of armor. Normally blades are only any good against lighter and medium armor. Heavy armor tend to deflect swords easily, though certain blades, with the right upgrades, can perform adequately against heavy armor. Blunt and piercing weapons (such as the horseman hammer) have the advantage of working very well against heavy armor. Blunt weapons tend to work very well against all types of armor, and their faster attack speed allows them to be used very effectively at close range. They lack the range of polearms though, and as such are much harder to use against, for example, cavalry.
It should be noted that most weapons, when used on horseback during a charge, will do far more damage than they normaly could. A swing from a sword will have a much easier time punching through heavy armor. Holding that in mind, it is very hard to use a mace effectively while on horseback. You would have to ride very closely to an enemy to hit them.
Certain weapons also could have two types of attack. The horseman hammer, for example, can use the blunt tip (by default) or the sharp spike (alternate attack type). By pressing Q you can see whether your knight shifts his weapon around, thus changing the type of attack.
Bonus Tip #1 – Blocking is a very useful skill you can develop while playing the game. It is easy to learn how to block simple attacks, but is there a way to block a footman’s charge or shield bash? Yes, and it’s very simple. The low block (you tend to use it to stop a thrust attack) will stop a charge or shield bash (this does not work for a cavalry charge however). Anybody who charges at you this way when you have a low block prepared will recoil from you, giving you a chance at a quick riposte. The problem is when you face more than a single opponent, and you cannot maintain a low block. Shields perform a “low block” when used, so any charge or shield bash against a ready shield will also recoil.
Bonus Tip #2 – It is inevitable that during a battle you will lose your shield or weapons. How do you get them back, if you do not want to die? Bandages. When you bandage yourself up any lost weapons and shield will reappear on your person. I might be wrong here but any damage weapons or shield that is put away (shields can be put away by pressing the 4 button) will also regain any lost durability/health when you bandage yourself. It is important to note that your weapon and shield must be PUT AWAY. The weapon you hold in your hand will still be damaged after you bandage yourself. Swap to the dagger or sidearm if you did not use them so that your main weapon can be “healed”.

 Anarchy Reigns Guide - Stage 1 Black Side Mission Guide - GamersHeroes
 Fire Emblem: Awakening Guide - Premonition Invisible Ties Guide - GamersHeroes
 9 Games for PC Like Final Fantasy Tactics
 Castlevania: Lords of Shadow 2 – Achievement List
 Dark Souls 2 Weapon Scalings and Infusion Calculations