In March 2007, a little-known developer called GSC released a game that had been in development for almost six years. S.T.A.L.K.E.R.: Shadow of Chernobyl was immediately hailed as a success by fans, who overlooked a range of bugs and other quirks and enjoyed its immersive post-apocalyptic atmosphere. Over time, STALKER (we can now do without the periods) improved through the release of a series of official patches and unofficial mods. GSC has decided to capitalize on STALKER's success by releasing a standalone expansion entitled STALKER: Clear Sky. Using much of the same game assets and locations as the original, Clear Sky is a prequel to the original story, and attempts to provide STALKER fans with more of the same, but with a range of enhancements.

For the most part Clear Sky does exactly what you'd expect. It is an enhanced version of what players came to experience in STALKER: Shadow of Chernobyl. There are no dramatic changes as such, and for many fans this will be of comfort. The upgraded X-Ray Engine 1.5 adds two new 'Enhanced Dynamic Lighting' graphics modes, one of which supports DirectX 10. This allows new effects such as volumetric lighting (god rays), volumetric smoke, wet surfaces, soft particles, soft water, and steep parallax mapping. What all this means is that the Zone looks much more realistic and detailed than ever before. However the older DX9 and DX8 rendering modes remain for those who need the extra performance.
Similarly, the gameplay remains much the same, however there are enhancements including the new 'Faction Wars' feature which allows players to align themselves with a particular faction if they wish, and fight to defend or obtain control of particular areas. Of course you can also simply ignore the factions and let them fight it out between themselves. Weapons modification and repair is also improved, allowing the player to create a range of custom weapons, and repair them when they become damaged, rather than simply being forced to throw them away.
Unfortunately though, just as with the original STALKER upon its release, a range of quirks, annoyances and bugs are currently par for the course in Clear Sky. The degree to which patches and mods iron out these problems remains to be seen, but there is a great deal of hope given that GSC did release several patches for STALKER, and importantly, there is an established and experienced modding community able to provide mods which significantly alter the game to suit individual tastes. For the moment the first few patches have ensured that the game is in a playable, if not perfect, state.

Since STALKER: Clear Sky is not dramatically different to the original STALKER in many respects, much of the customization and tweaking advice in Clear Sky is the same as that in Shadow of Chernobyl. However because there are two entirely new rendering modes, a whole range of additional settings and new tweaks, as well as tweaks which no longer work in Clear Sky, I've written this guide to allow users to fully understand and customize Clear Sky thoroughly to better meet their needs.
Note: This guide refers to the latest English version of STALKER: Clear Sky Version 1.5.10. Make sure to refer back to this guide often for updates.
Before getting into any game-specific settings and tweaks, this section covers the obligatory system optimization information I include in all my guides. If you've followed this advice recently, you can skip this section.
Many people report problems with this game and in almost all cases these are due to general system issues and not the game itself. With that in mind I strongly urge you to take some time and follow the advice below if you truly want this game, and indeed every other game you own, to run at its fastest and most trouble-free.
The place to start is with the TweakGuides Tweaking Companion. It is the complete system optimization guide for Windows users. Designed for novice and advanced users alike, it is written in plain English to help you genuinely understand all aspects of Windows and your PC. The guide covers every major topic, from the correct installation of Windows and critical drivers and software, through to recommendations for every significant setting and feature, all the major performance and convenience tweaks and customizations, as well as detailed troubleshooting advice. There are also links to a range of reliable free applications which can enhance your system and give you viable alternatives to purchasing commercial software. There are separate versions available for Windows XP, Windows Vista and Windows 7.
If you've ever wondered what common graphics and display settings like FPS, VSync, Refresh Rate, Antialiasing and Anisotropic Filtering are, and how they really work, then check out my Gamer's Graphics & Display Settings Guide for all the details in an easy to understand format. The guide also gives you a rundown on exactly how a game goes from a being a set of files on your hard drive to a 3D image on your screen, including relevant performance tips.
Finally, if you run an ATI or Nvidia graphics card, I have written two comprehensive guides which you should check out: the ATI Catalyst Tweak Guide and the Nvidia Forceware Tweak Guide. These guides cover absolutely everything about the latest graphics drivers, how to set them up correctly, as well as advanced tweaking, overclocking and benchmarking tips. They're a must-read for configuring your graphics card correctly.
The above information really will serve you well in the long run, not just in this game. If you don't optimize your system and keep everything updated and maintained correctly you will keep running into "mysterious" problems time and time again. Do yourself a favor and when you get a chance spend an afternoon or two optimizing your machine the right way with the guides above.
The next section goes into more detail about specific troubleshooting tips which address common performance issues with the game.

This section contains specific troubleshooting tips which address many of the common problems experienced by Clear Sky players. I can't stress enough the importance of taking the time to go through the checklist of advice below if you're having a problem with the game.
Official Support: If you have a problem with the game, the first place to check is the Readme.txt file found in your \Program Files\Deep Silver\S.T.A.L.K.E.R. - Clear Sky directory, paying close attention in particular to the game's hardware requirements. An electronic copy of the Clear Sky User Manual can be also be found in the same directory, which you should read through for gameplay tips. If you can't find your issue listed, try checking the Official STALKER: Clear Sky Forums. If nothing helps, you can try contacting Official Tech Support via this Feedback page, or using the details provided at the end of the ReadMe.txt file or your user manual. Obviously also make sure to read through this guide (along with linked resources) carefully as typically many problems are resolved or reduced by configuring your system properly and understanding how the game and Windows work.
Known Bugs & Issues: There are a range of known issues with Clear Sky, many of which are resolved with the latest official patch (See page 4 for details). However some game bugs may still remain to be fixed, and some bugs and quirks are unfortunately part of the game's design. Many of these can only be fixed via official patches, however some gameplay oddities/annoyances have been 'resolved' through unofficial modifications (again, see page 4 for details). Don't assume however that every problem or crash you have is a bug - some quick reading of the official forums will tell you whether something is likely to be an actual bug or not, and whether there are existing workarounds or fixes due to be incorporated in upcoming patches. I've played this game and tested it continually for hours on end without a single crash, so the game is not so bugged as to constantly crash and glitch.
Startup Problems: The English (Western Europe, Australia, North America) version of STALKER: Clear Sky uses the TAGES copy protection system as noted on page 4 of the guide. This system is not harmful, however it can cause problems with the way the game loads up, because it incorporates a disk check. At times the game may not detect your DVD in the drive; this is usually solved by retrying to launch the game, or reinserting the DVD in the drive. More importantly however, sometimes when you launch the game, it will open in a window rather than in fullscreen mode, and become unresponsive. To prevent windowed mode, right-click on the Clear Sky launch icon, select Properties, and in the Run box change the setting to 'Maximized' and click Apply then OK. If the game becomes unresponsive during launch, wait a while and it should still launch OK, but if not, bring up Task Manager (CTRL+ALT+DEL) and end the game process. Unfortunately it appears that these problems are a side-effect of the TAGES system.
Lag/Framerate Issues: Clear Sky is very similar to Shadow of Chernobyl, however the new 'Enhanced' rendering modes are relatively system intensive, and many people will find that they get quite low framerates when trying to run the game with either of the 'Enhanced Fully Dynamic Lighting' DX9 or DX10 renderers. The result of low framerates is a feeling of 'lag' - a lack of responsiveness in control over your character. Firstly, to measure your actual Frames Per Second (FPS), use a free utility like FRAPS, and note that anything less than around 20FPS will usually result in feelings of lag at various times, especially when you dip into the low teens in FPS. There are no magic fixes - the only real solution to this issue is to raise your average framerates by reading this guide and lowering relevant settings as necessary, as well as general system optimization as covered on page 2 of this guide. However there is one very important workaround to getting better performance in the new Enhanced modes - it relates to the 'Sun Rays' setting and is discussed in detail in the Conclusion section of this guide.
Stuttering: Stuttering is something common to many games, and is simply loading pauses as new information is being loaded up from your hard drive into RAM and/or into the graphics card's Video RAM. Unfortunately Clear Sky follows in Shadow of Chernobyl's footsteps to some degree in having noticeable pauses and stutters as you wander the game world. However unlike SoC, I don't recommend using the -noprefetch switch (See the Advanced Tweaking section), as it's likely to make the stuttering and pauses even worse. Aside from general system optimization, including disabling background programs (see below), to reduce the stuttering you should try lowering your Texture Detail setting as well as disabling Dynamic Music, and also lower your Shadow Quality and Anisotropic Filtering settings as these will help reduce the amount of data that is constantly being loaded up.
Background Programs: Disable all background applications - especially virus, trojan and spyware scanners and messaging utilities. These applications can and do use up valuable CPU resources, take up precious RAM, cause memory conflicts and crashes to desktop, but most importantly they interfere with read/writes to your hard drive effectively slowing it down and causing even more in-game stuttering and longer loading times. Full instructions on how to identify your startup programs and services and how to correctly disable unnecessary ones are in my TweakGuides Tweaking Companion (TGTC). The TGTC also covers a more performance-orientated approach to the use of malware scanners in the PC Security chapter.
Overclocking: If you've overclocked any components on your system and are having problems such as sudden crashes, reboots and graphical anomalies, the first thing to do is set everything back to default speeds and try running the game. If you don't experience the same problems at default speed, or they're reduced in severity, then your overclock is the primary culprit. Either permanently reduce your overclock and/or increase cooling to regain stability. Don't assume that because other games run with stability, even the original STALKER, that Clear Sky will work fine as well - especially if you're using one of the new Enhanced rendering modes.
That's just a basic rundown of troubleshooting tips. Read the remainder of this guide, as well as the relevant TweakGuides Tweaking Companion, for more specific settings and tweaks which can help improve your performance and resolve any problems.
Official Patch
STALKER: Clear Sky has already received several patches, bringing the English version of the game up to Version 1.5.10 - the version number of your game is shown on the bottom left of the main menu screen. Note that there are three different versions of the International update for the non-Russian version: a retail version for boxed copies, a version for downloaded copies, and for those who purchased Clear Sky using Steam, you should update directly within Steam. Make sure to use the correct update method, or if in doubt, check for updates directly from within the game (see further below). The latest patch contains some bug fixes and multiplayer-related anti-cheat improvements.
Importantly you can use saved games made under any previous version from 1.5.04 upwards after applying this patch, you don't need to restart the game from the beginning. However the patch will reset all your settings, and also lose any custom changes you have applied to the user.ltx file. You will need to readjust your settings and reapply all the advanced tweaks from scratch (don't just copy your old user.ltx over the new one).
To check for an update to your copy of Clear Sky at any time, you can do one of the following: either start the game, click the Options button, and under the Game tab click the 'Game Updates' button to automatically check for any new updates; or go to the main Options menu which opens when the DVD is inserted into your drive (or run the AutoStarter.exe file on the DVD) and click the 'Updates' button.
I will always post details of and links to the latest patch here when it is released, so check back here regularly if you want notification of an update and to find out about the impacts it has on the game.
Copy Protection
The International (European, North American and Australian) versions of STALKER: Clear Sky use the TAGES copy protection system, while the Russian version of the game uses the Star-Force copy protection system. The game requires that the DVD be kept in the drive while playing, and TAGES also installs two system driver files called atksgt.sys and lirsgt.sys. Note that there are know startup problems due to TAGES, such as the system not recognizing the game DVD at times or opening the game in windowed mode - see the Troubleshooting Tips section for more details of workarounds.
Modifications
As modders have already demonstrated with Shadow of Chernobyl, STALKER's X-Ray Engine is capable of being heavily modified, and since Clear Sky is based on the upgraded X-Ray Engine 1.5, it is also similarly highly moddable. The basic instructions on mod creation and mod use in Clear Sky are much the same as in the original STALKER.
If you want to try your hand at modding, to modify game files, you will first need to extract the game's various assets from .db archive files held under the \Program Files\Deep Silver\S.T.A.L.K.E.R. - Clear Sky directory - you can use this Clear Sky Database Unpacker to extract/unpack the .db file contents. Once the files have been extracted to their relevant subdirectories under the main Clear Sky directory, they can be edited or modified as desired.
To allow modified files to work with Clear Sky, you will first need to edit your fsgame.ltx file found under the \Program Files\Deep Silver\S.T.A.L.K.E.R. - Clear Sky directory. Open this file with a text editor like Notepad, and find the following line:
$game_data$ = false| true| $fs_root$| gamedata\
Change the false to true, i.e.:
$game_data$ = true| true| $fs_root$| gamedata\
This will tell Clear Sky to first load up any game asset files which exist in the appropriate subdirectory under \Program Files\Deep Silver\S.T.A.L.K.E.R. - Clear Sky, before attemping to load them up from the archived .db files. In other words this allows you to use modified files, and have Clear Sky recognize and load these instead of the original versions stored in the db files. If you've downloaded a mod, follow the directions which come with each mod as to where the modified files should be placed. Typically all you need to do is just extract the mod contents to the main directory above and it will create the appropriate subdirectory.
Some of the more useful mods which you may like to try in Clear Sky include:
Float32 Shader Mod - Float32 makes the graphics more realistic by adding better lighting and sharper surface effects for example, and can also improve performance. Note that some elements of previous versions of Float32 have already been incorporated into the game engine by GSC.
Update: The original site of the Float 32 mod has gone down permanently. While the mirror above should be safe to use, Float 32 may not function properly on the latest version of Clear Sky.
Speed Up Time Mod
No Loading Disk Mod
Weight Mod
Carry Mod
Real Weapon Names Mod
Obviously many more mods will come out as existing STALKER modders get to work on Clear Sky. Keep an eye on places like:
Filefront STALKER Mods
The Official STALKER: Clear Sky Mods Forum
Oblivion Lost Mods Forum
The next section of the guide looks at the In-Game Settings for STALKER: Clear Sky.
In this section I provide full descriptions, comparitive screenshots and some recommendations for STALKER: Clear Sky's in-game settings, allowing you to determine your personal balance between image quality and performance. While I try to note the general performance impact of each setting, it is impossible for me to give exact performance impacts as this depends on a range of variables including your specific hardware combination and your other game and system-wide settings in combination.
To access the in-game settings start the game and on the main menu screen select Options. The various settings available are covered in detail below:
Video
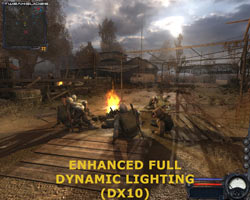
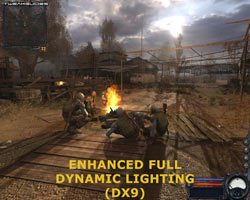
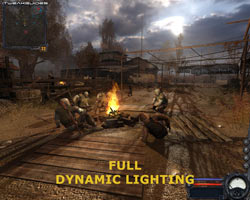
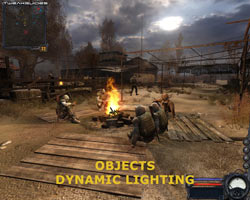

Render: This setting determines the renderer used for generating the game's graphics, and hence has a major impact on the overall visual quality and performance in the game. The options include (from lowest to highest): Static Lighting, Objects Dynamic Lighting, Full Dynamic Lighting, Enhanced Full Dynamic Lighting, Enhanced Full Dynamic Lighting (DX10). Note that the first three modes were available in the original STALKER, but the two 'Enhanced Full Dynamic Lighting' modes are new to Clear Sky, and the DX10 render mode in particular is only available in Vista when using DX10 hardware. Screenshot comparisons of all five are provided above, and each is explained in detail further below:
Update: As of the 1.5.06 Patch, there is also a DirectX 10.1 option which can be enabled on graphics cards which support it when using Enhanced Full Dynamic Lighting DX10 mode. Use of the DX10.1 renderer may improve performance and image quality - see the updates below and on the next page for details.
Importantly, while these rendering modes can affect performance greatly, the impact also depends on the other relevant settings you have enabled. For example whether you've enabled or disable one or more of the Shadow-related settings, such as Sun Shadows, can have a major bearing on the performance and visual impact of any of the dynamic lighting modes. As noted above, you can also individually enable or disable particular settings in the Advanced section of the Video Options, though some settings are unavailable when using certain modes. Note: Make sure to read the Conclusion section of this guide for important information about graphics performance in Clear Sky.
Furthermore, there are a range of advanced variables which can help you to customize the appearance of lighting in the game. For example you can use the r2_gi variable to turn on a more realistic (but FPS-draining) Global Illumination lighting method; you can customize the appearance of HDR using the r2_tonemap_middlegray variable; you can change how glossy surfaces appear under lighting using the r2_gloss_factor variable; and you can add motion blurring by using the r2_mblur command along with the -mblur switch. Some of these settings will not function properly under the new Enhanced modes in Clear Sky, while there are also additional settings to tweak the appearance of the new features of the enhanced mode, such as using the r2_dof_ and r3_dynamic_wet_surfaces_-based settings to adjust Depth of Field and Wet Surfaces effects respectively to better suit your tastes. See the Advanced Tweaking section for more details of all these.
Quality Settings: You can choose from one of four predefined quality settings here (Minimum, Low, Medium, High, Maximum), which in turn will adjust the Advanced graphics settings (covered further below) accordingly. I do not recommend using a preset as you will get much better results customizing the advanced settings individually to suit your own preferences. See the Advanced settings further below for details.
Resolution: This setting allows you to choose the resolution for the game, as shown in pixel width by pixel height. The options shown are restricted to those supported by your particular combination of monitor and graphics card. The higher the resolution chosen, the more detailed the image but the lower the performance of the game. For more details and tips on resolution see this page of my Gamer's Graphics & Display Settings Guide.
Gamma, Contrast, Brightness: These sliders control the overall brightness and definition of the image on screen. They have no impact on performance so set to suit your taste.
Full Screen: If enabled (lit), runs the game in full screen mode which is recommended for maximum stability. If unticked, the game will run in a window which may improve performance if a low resolution is also chosen. Again, windowed mode is generally not recommended as it can cause problems with Windows resource management. Note that if you want the window to be centered in Windowed mode, you can use the -center_screen switch - see the Advanced Tweaking section for details.
[Advanced]
The following settings are available when you click the Advanced button at the bottom of the screen. It is strongly recommended that you adjust them individually rather than using the 'Quality Settings' preset above.
Note: Depending on the Render mode you have enabled, certain Advanced settings will not be available to be changed (see above). So if a setting appears unable to be changed, it is because you are not using a high enough render mode.
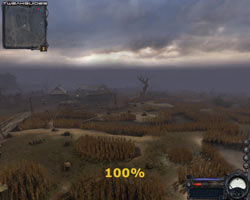
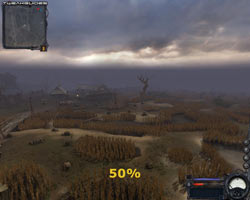
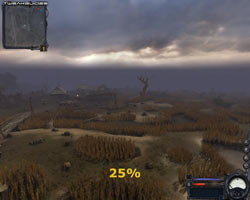
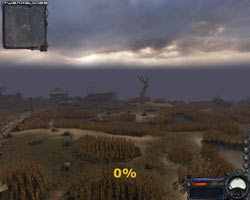
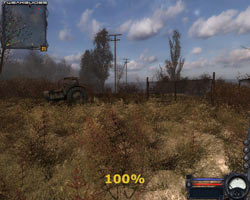
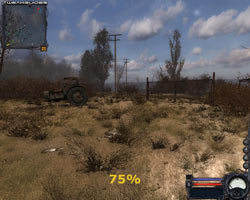
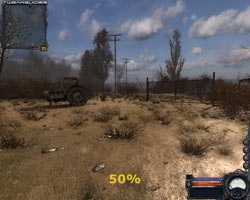
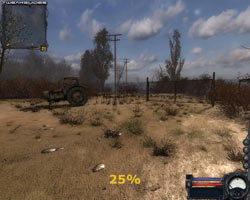
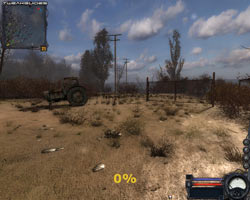
Vision Distance: This slider determines the maximum viewable distance in the game world. As viewing distance is lowered, FPS rises because less of the game world has to be rendered. As the screenshot comparisons above show, the practical difference between the 100% and 50% points along the slider is insignificant. In fact even at 25% only a barely noticeable reduction in the far distance is discernable. The main visual impact is between the 25% and 0% point on the slider - at 0% there is a clear drop in visibility, although even then it's not major. If you're after a few extra FPS with no noticeable drop in image quality, set this slider around the 50% or even 25% mark. Any lower may place you at a slight playing disadvantage since even the use of binoculars won't extend your viewable distance, and hence you may miss seeing some distant enemy or distant buildings/objects.
Object Detail: This slider changes the Level of Detail (LOD) on objects in the game world. As the slider is moved to the left, fewer polygons are used to construct these objects, which can improve performance. However in practice the only noticeable difference is when the slider is actually reduced at or close to 0% - trees further away will become generic-looking blobs and lose their detailed branches. While changing this setting can help improve FPS particularly in large outdoor areas, it is not a major factor in affecting performance. You can further change the LOD level by using the r2_ssa_lod_a and r2_ssa_lod_b commands - see the Advanced Tweaking section.
Texture Detail: This slider controls the quality of the textures used in the game. Textures are the images which cover the surface of every object in the game world. The further to the right this slider, the more detailed those textures will be. An animated screenshot comparison of the various positions on the slider can be seen by clicking this link: ClearSky_Textures.gif (1.8 MB). Aside from the detailing on the tree, pay attention to the detail on the ground to at the base of the tree, and the mound of rubbish on the right side. The main impact of using more detailed textures is not so much a drop in FPS, but an increase in loading times and stuttering/loading pauses during the game. This is particularly true for those with graphics cards that have lower amounts of Video RAM. Importantly, if you change this setting, to see its correct impact you need to quit and restart STALKER otherwise no visible change will occur.
Anisotropic Filtering: Anisotropic Filtering (AF) is explained in more detail on this page of my Gamer's Graphics & Display Settings Guide. Essentially it is a method of making textures sharper as they recede into the distance. This slider controls the sample rate of AF used, up to 16x AF. Most recent graphics cards can enable a reasonable level of AF, such as 2x or 4x, which provides a good level of image quality without any real drop in FPS, however the further to the right you go on the slider, the more noticeable the FPS impact becomes. You can also use the r1_tf_mipbias or r2_tf_mipbias variable (depending on which renderer you're using) to increase texture clarity - see the Advanced Tweaking section.
Antialiasing: Antialiasing (AA) is a method of reducing the jaggedness of lines in 3D graphics. It is explained in more detail on this page of my Gamer's Graphics & Display Settings Guide. However Clear Sky's game engine uses a form of rendering called Deferred Shading which effectively means that in the DX8 and DX9 modes it can't support proper Multisampling Antialiasing which would remove all the jagged outlines in the game world, regardless of which type of graphics card you have. Thus the Antialiasing option has no real impact on performance or image quality - unless you use it under DirectX 10 mode, at which point it does reduce jaggedness, but only on world geometry such as buildings, boxes, objects, NPCs; unfortunately it does not reduce jaggedness on foliage such as bushes and trees - you need to enable the 'Antialias A-tested objects' option for that to occur. It also comes at a very steep performance cost. For DX9 mode you can instead use the r2_aa command to enable and customize a fake form of blurred AA - see the Advanced Tweaking section for details.
Update: As of the 1.5.06 patch, if Antialiasing is enabled, you can also access the new 'Antialias A-tested objects' option to also apply MSAA to transparent objects like foliage. See this option on the next page for more details.
Grass Detail Density: This slider controls how thick the presence of grass is in outdoor areas. Grass can cause a noticeable drop in FPS while wandering around outdoors, since it is present in many areas. As seen in the screenshot comparison above, lowering the slider from the far right (100%) to around the 75% mark thins out the grass dramatically, though it still leaves some grass coverage for a noticeable boost in FPS. By around 50% most grass is gone, and by 25% or less a few small patches are left. Note that this setting affects grass and small bushes, not all foliage (e.g. the tall reeds in the swamp are unaffected by this setting). Note further that you may need to quit and restart Clear Sky to see the impact of changing this setting.
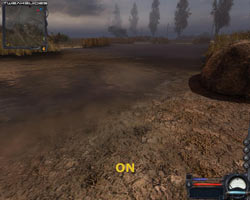
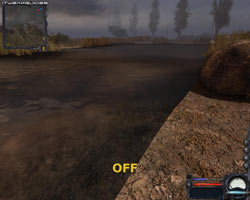
Sun Shadow: When enabled, the Sun is a dynamic light source (depending on your Renderer chosen - it has no impact in Static Lighting mode), and as such all objects can cast shadows from their exposure to the sun. While this greatly enhances the realism and atmosphere of the game, it can also greatly reduce performance. See the screenshot comparison above for the visual impact of changing this setting.
Lighting Distance: This slider controls the visibility distance of lighting sources in the game. Experimenting with this setting I found no real visual impact as the slider position was changed. However my FPS did improve slightly from lowering this slider, so it can be a useful little performance boost with no noticeable drop in image quality.
The next page continues the descriptions of Clear Sky's In-Game Settings.
Shadow Quality: This slider determines the appearance of shadows cast from dynamic lights in the game, with the higher the quality the lower your FPS. The difference between the lowest and highest setting on this slider is difficult to capture in a static screenshot - in general the difference is not major, the most noticeable effect being that low quality shadows are blockier and slightly less distinct, and tend to shimmer more as they move. Note that you can further customize shadow quality by directly choosing shadow map resolution sizes with the -smap1536, -smap2048, -smap2560, -smap3072, and -smap4096 command line switches covered in the Advanced Tweaking section.
NPC Flashlights: If this option is enabled, Non-Player Characters (NPCs - i.e. any computer-controlled characters) can use flashlights similar to the one you have. While this increases realism, in scenes with multiple flashlights and in particular with dynamic lighting enabled it also reduces FPS. If you find heavy combat scenes are becoming quite 'laggy', you may want to disable this option, but note that this also makes finding the enemy slightly harder at night or underground, since you can't track them or see them approach just by their torchlight.
Disable Detail Textures: Not available unless you use the Static Lighting render mode, this option allows you to enable or disable Detail Textures, which are an extra layer of detailing on the surfaces of some objects, only visible when examined close up. For example with this option unticked (i.e. Detail Textures enabled), looking closely at a stone wall will show very fine grain; with it disabled the wall is much smoother. Disabling Detail Textures can be useful in further improving performance on very old or slow graphics cards.
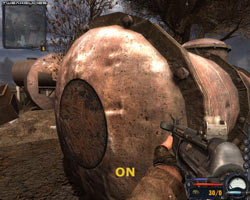
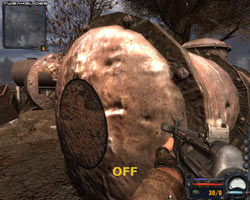
Detail Bump: This option controls the use of Bump Mapping to enhance the realism and depth on detailed surfaces such as on pitted stone rocks or metal-covered objects. As the screenshot comparison above shows, when enabled, the rusted metallic surface exhibits a lot more detailing than when it is disabled. This comes at the cost of some performance, so it can be disabled to improve FPS if needed without a major drop in realism. Note that the general appearance of surfaces is also affected by the Textures, Detail Textures, and Steep Parallax settings.
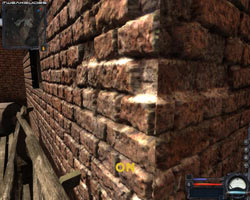
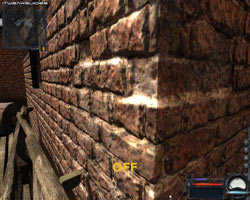
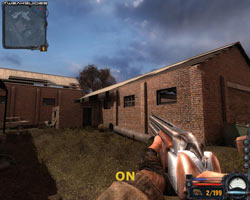
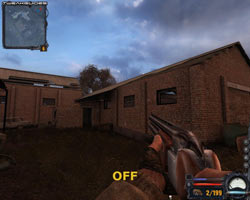
Steep Parallax: Parallax Mapping is a technique to improve bump mapped surfaces even further, making them seem deeper and more realistic. Steep Parallax mapping makes the depth of the surface even more pronounced. In Clear Sky the most noticeable impact of this setting is on brick walls, as the screenshot comparison above shows: when switched On, the bricks clearly have more depth, although this may come at a slight reduction in FPS. You must quit and reload your game for a change in this setting to come into effect.
Sun Quality: This setting controls the overall quality of sunlight in the game. In practice I found very little visual difference when altering this setting between High, Medium and Low (even with a full restart of the game between each change). However performance was noticeably better as the setting was lowered, so you may wish to lower this setting for a performance boost without any real degradation in image quality. You will need to quit and restart the game for changes in this setting to be implemented.
Update: As of the 1.5.06 patch, a new 'Ultra' option is available for the Sun Quality setting, allowing even better image quality.
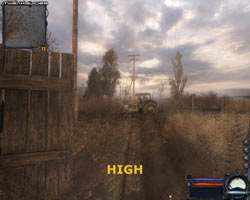


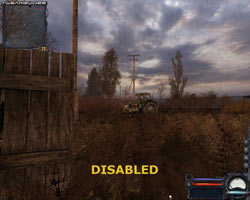
Sun Rays: Only available in the new Enhanced Full Dynamic Lighting modes, this option controls the general quality of Sun Rays, also called 'God Rays' by some people. The screenshot comparison above shows the difference in image quality at High, Medium, Low and Disabled - the only truly noticeable difference is when it is Disabled, otherwise the other three settings look much the same. Performance improves noticeably however the lower you take this setting, especially during the early morning when these rays are visible and hence performance is at its slowest. This setting is very important - just setting this option to Low for example can mean the difference between unplayable and playable FPS in early morning scenes. You will need to quit and restart the game for changes in this setting to be implemented.
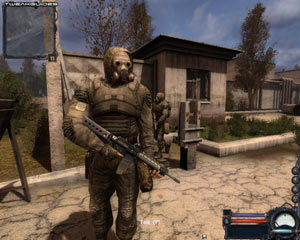
SSAO: SSAO is Screen Space Ambient Occlusion, a technique used to make a scene much deeper, richer and hence more realistic. In practice this means that shadowing and depth effects in particular are visually improved, although sometimes the difference can be subtle. As SSAO is increased using this setting, it can noticeably reduce performance due to the extra processing requirements on your graphics card. An animated screenshot comparison of SSAO at High vs. SSAO Disabled is provided to demonstrate the clearest difference: ClearSky_SSAO.gif (640 KB). Note in particular that with SSAO Off, the entire scene is lighter and more 'flat'; with SSAO at High, everything from the background scenery, to the ground, to the Stalker in the middle of the scene have more depth and substance. However obviously if you really need the extra performance, then lowering this setting or even disabling it altogether can be a quick way to gain FPS without totally ruining image quality. You will need to quit and restart the game for changes in this setting to be implemented.
Soft Water: This option controls whether the edges of bodies of water in Clear Sky have softly blended, realistic edges at the cost of some performance, or hard unrealistic edges. The screenshot comparison above shows the difference. You will need to quit and restart the game for changes in this setting to be implemented.
Soft Particles: Similar to the Soft Water setting above, this setting controls whether particle effects such as smoke and dust are more subtly blended with their surrounding environment, as opposed to having hard edges In practice if you find that you are getting slowdowns in foggy/smokey areas, as well as during heavy combat, you should disable this setting. You will need to quit and restart the game for changes in this setting to be implemented.
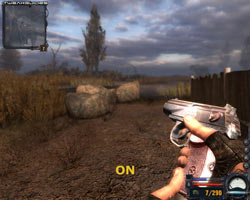
Depth of Field: If enabled, when you go to reload your weapon for example, because your focus is supposedly on your gun, the background will be slightly blurred in a custom Depth of Field effect. The screenshot above shows how this effect works, blurring the background slightly as the foreground and your weapon remain in focus. It may reduce FPS slightly when in effect, but more importantly it can also be distracting and make visibility difficult if you are trying to spot enemy positions while reloading, so you may wish to disable it for that reason. Alternatively you can customize the Depth of Field effect, even apply DoF permanently to the game, using the various r2_dof_ settings as covered in the Advanced Tweaking section. You will need to quit and restart the game for changes in this setting to be implemented.
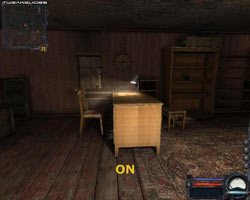
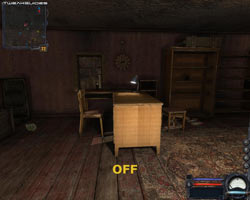
Volumetric Light: Volumetric lighting gives light sources greater volume, making them look richer and interact more realistically with objects, casting appropriate shadow lines. The most prominent example of volumetric lighting in Clear Sky is the way sunlight streams through branches and other solid objects as 'God Rays'. However this setting doesn't actually affect those sunlight rays, they are controlled by the Sun Rays setting (see further above). Instead this setting controls the light rays from other light sources, as shown in the screenshot comparison above. When disabled it can improve performance in areas with light sources. You will need to quit and restart the game for changes in this setting to be implemented.
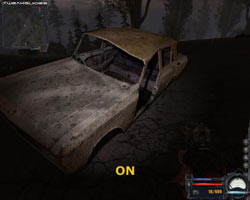
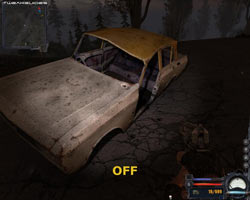
Wet Surfaces: When enabled, this effect greatly increases the realism of wet surfaces, at the cost of a slight drop in performance. As the screenshot comparison above shows, during rain, when enabled, water covers the car body with a slick sheen that runs down the right side, and displays raindrop splashes on the hood; when disabled the car has no real sign of water coverage. This effect really does make a noticeable difference during rain, covering all manner of surfaces with realistic water flows and shine, and is generally worth the minimal drop in performance. Note that you can customize the way this effect looks using the r3_dynamic_wet_surfaces settings as detailed in the Advanced Tweaking section. You will need to quit and restart the game for changes in this setting to be implemented.
Volumetric Smoke: This effect, when turned on, allows smoke to flow more realistically, and react dynamically with the environment. For example a fan blowing through smoke makes the smoke go through realistic patterns of movement. It is difficult to capture in a screenshot, so see this YouTube Video to better examine how it works. Enabling this option comes at the cost of performance loss in areas where smoke is visible, so if you notice severe slowdowns in smoke or fog-filled areas, turn this setting off. You will need to quit and restart the game for changes in this setting to be implemented.
Update: The following two settings were added as of the 1.5.06 Patch:
Antialias A-tested Objects: This option can only be accessed in DX10 mode when the Antialiasing option (see previous page) has been set to anything other than disabled. When Multisampling Antialiasing (MSAA) is being used, this option allows you to enable and use either DirectX 10 or DirectX 10.1 style MSAA on alpha-tested objects (i.e. objects with transparent portions, such as foliage). This can help to greatly reduce the jagged appearance of Clear Sky's environment by smoothing grass and trees, however it comes at an additional performance cost. If your graphics card is capable of DX10.1, then this is the recommended mode as it should improve performance and image quality as well when using this option.
Use DX10.1: If your graphics card supports DirectX 10.1, then you can enable this option, which should help to improve performance when in DX10 mode. If available to you, I recommend testing to see the impact of this option, though remember that a restart is required to implement it properly.
Vertical Sync: Video Synchronization (VSync) is the synchronization of your graphics card and monitors' abilities to redraw an image on the screen a number of times each second, measured in Hz. It is explained in plain English on this page of my Gamer's Graphics & Display Settings Guide. When VSync is enabled your maximum FPS will be capped at your monitor's maximum refresh rate at your chosen resolution, and more importantly in some areas your FPS may drop by as much as 50% if the graphics card has to wait to display a whole frame. Furthermore enabling VSync can increase feelings of 'mouse lag'. You can counter the FPS drop of VSync by enabling Triple Buffering, but this can cause additional mouse lag as well. On balance I recommend leaving VSync disabled.
Frequency 60Hz: If disabled, this option allows your Refresh Rate to exceed 60Hz. If you run a CRT monitor then you can disable this option, as most CRT monitors can easily exceed a 60Hz refresh rate which can both help to improve FPS if VSync is enabled, and reduce eye strain as well. If you run an LCD monitor however, it can remain lit - in practice it makes little difference for LCD monitors; see the link above to understand why.
Sound
SFX, Music Volume: These sliders control the volume level of the Special Effects (SFX), and any Music in game, such as that played in the main menu. Setting these sliders to the far left does not turn remove music or sound effects, so it has no impact on performance. See the Advanced Tweaking section if you wish to actually disable the loading of all sounds, e.g. to troubleshoot a sound problem.
EAX: You can enable Environmental Audio (EAX) on sound cards which support this functionality - it appears to be EAX 2.0, which most sound devices will support. When enabled, sound effects will become more realistic in 3D space, but it may also reduce performance slightly and can cause audio glitches on some systems.
Dynamic Music: If switched on, the game will automatically switch to more 'dynamic' music style whenever dramatic things occur, such as when you are in combat. In my opinion the dynamic music is not particularly good or suitable, however it is up to personal taste as to whether you enable it; the performance impact is negligible.
Sound Device: This option determines the sound renderer that Clear Sky will use. The usual options include Generic Software, Generic Hardware and your specific sound device. Generally speaking it is better to select your actual sound hardware as that provides the best quality audio, and the performance impact should not be great. In practice however some sound devices may exhibit glitches or cause other problems, including crashes, so you may have to revert back to Generic Software if this is the case.
If you are having audio problems, first make sure you're running the latest audio driver for your sound solution. Then you may want to try switching the audio renderer under the Sound Device box, either to see if performance and/or functionality improves, or to see if it resolves your audio problems. If that doesn't work, for further troubleshooting first make sure your OpenAL version is the latest by checking here - download and compare the file versions of the existing OpenAL32.dll and wrap_oal.dll files under your \Program Files\Deep Silver\S.T.A.L.K.E.R. - Clear Sky directory. Finally, you can experiment with the snd_ variables, as well as the -nosound switch, covered in the Advanced Tweaking section to see if sound is the source of the problem. If nothing else works, then either a new patch from the game's developers, or new audio drivers, or both, may be required.
Note that unlike Shadow of Chernobyl, Clear Sky doesn't seem to have a DirectSound capability; the -dsound switch no longer works. Clear Sky runs on OpenAL audio, which also means that full hardware acceleration is possible under Vista without requiring something like Creative's ALchemy.
Game
Difficulty: You can select from four different difficulty levels in the drop box here. In order of easiest to hardest these are: Novice, Stalker, Veteran and Master. The higher the setting, the fewer useful objects can be found in the game world, and the greater the probability that the enemy will hit you when firing on you. For example at Novice level, the enemy only have a 20% chance of hitting you, while at Master they have a 50% chance of hitting you with each shot. You can also adjust the difficulty on the fly, so if you find a particular area too hard then turn down the difficulty temporarily.
Show Crosshair: If enabled, shows a crosshair on the screen. This is recommended as it obviously makes aiming weapons much easier. You may wish to turn off the crosshair when taking screenshots however.
Dynamic Crosshair: If enabled, the crosshair will change shape depending on the weapon you currently have equipped and your movements. For example using a shotgun will provide a wider crosshair, since the shotgun has a wider spread. If you're moving around, dynamic crosshairs will also resize to represent reduced accuracy. In general you should only disable this if you find it to be a distraction.
Show Weapon: If enabled, your currently equipped weapon is shown in front of you on the screen. Disabling this option will remove the displayed weapon, which can help improve FPS and visibility, but may also cause confusion if you momentarily forget which weapon you have currently equipped.
Crosshair Target Distance: If enabled, the distance in meters to the object highlighted under your crosshair will be shown in the crosshair. If you find this annoying or unrealistic, disable the option here.
NPC Identification: If enabled, the NPC currently under your crosshair will be identified, including whether they are friendly (green), neutral (yellow) or hostile (red), their name, and the faction to which they belong. While generally best kept enabled, especially at the start of the game, you may wish to disable this for greater realism or to increase difficulty.
Controls
Mouse Sensitivity: This slider determines how sensitive your in-game movements will be to your mouse movements. Set to suit your taste as it has no impact on performance. Keep in mind that any 'laggy' feel or lack of responsiveness you experience from the mouse in the game is primarily due to low framerates. Aside from adjusting the various graphics settings to improve your average framerate, also try disabling Vertical Sync and Triple Buffering, as well as changing your Render mode to a lower one.
Invert Mouse: If enabled, pushing your mouse forward will make your character look down, and pulling your mouse back will make him look up. If disabled, the opposite will occur. Set to suit your taste, has no impact on performance.
The remainder of the controls here are fairly self-explanatory and can be set to suit your particular preferences. Note that you can change your key configuration, and bind both documented and undocumented actions by firstly using the bind_list command to see all bindable actions, and then using the bind command either in the Command Console, or in your User.ltx file. For example to bind the jump function to the J key, type bind jump kJ in the console, or edit the appropriate line in User.ltx. See the Advanced Tweaking section for details.
Whenever you change any of the in-game settings, click the Use button at any time to put them into effect. Note again that many settings require that you quit and restart the game for them to be implemented properly, even though this is often not noted by the game after you've changed the setting. To be absolutely certain that your settings are correctly implemented, always quit and restart after applying any changes.
The next page starts our look at STALKER: Clear Sky's many Advanced Tweaking opportunities.
There are a range of options which are not accessible via the normal in-game settings, and can only be changed via advanced tweaking. This section looks at these settings and what the major ones do. There are three primary ways to access and alter advanced settings in STALKER: Clear Sky - the in-game console, the user configuration file, and the command line switches. Each of these is covered in a relevant section of its own on the following three pages. We start with the User.ltx file on this page.
User.ltx Settings
Your personal settings and keyboard configuration for Clear Sky are held in a file called User.ltx, found under the \Documents and Settings\All Users\Shared Documents\STALKER-STCS directory in Windows XP, or the \Users\Public\Documents\STALKER-STCS directory in Windows Vista. This file is automatically loaded up each time Clear Sky starts, and the values in it are implemented by the game's X-Ray engine at that time.
Fortunately you can open it with a text editor like Windows Notepad and alter the values in it, but before making any changes make absolutely sure to create a backup copy of it first. When you open the file you will see a range of settings, most of which are the same as the Console Commands covered on the next page. You can alter any of the values shown and save the file, and the changes will be implemented upon next starting up Clear Sky. Also note that typically if you change a command using the Command Console, the change will be written to User.ltx, so that's typically a quicker way to alter User.ltx - see the next section for more details.
Important Notes:
The list below covers the major settings in alphabetical order and details what they do:
bind [action, key] - These are your control bindings usually set under the in-game Controls options (See In-Game Settings section). To see the full list of bindable actions, use the bind_list console command first, and bear in mind that any key assigned to an action needs to have the letter k in front of it. For example to assign the space key to the jump action, you need to use bind jump kspace.
cam_inert [0.0 - 1.0] - Controls the camera inertia, which basically determines how laggy your view will be. It should be left at 0, as values closer to 1.0 make the viewpoint laggier for no real benefit. If you're looking to disable head bobbing/swaying, see the Mods section on page 4.
g_always_run [on,off] - By default when you move forward, your character is actually running all the time. If this setting is changed to Off, your character will walk forward by default. This is slightly more silent, but obviously slower. Note that neither is to be confused with Sprinting, which is a very fast form of running triggered by pressing another key.
hud_info [on,off] - This setting allows you to remove all the Heads Up Display (HUD) elements when set to Off, which can be useful for taking screenshots for example. It only appears to disable the NPC Identification function on the HUD in Clear Sky however, you can't turn off the HUD entirely.
Renderer Settings: An important note regarding the renderer settings below with r1_ r2_ or r3_ prefixes - they only have an impact under certain Render options (See In-Game Settings section). Any setting starting with r1_ only works under the 'Static Lighting' (DX8) renderer; any setting starting with r2_ works in every mode except Static Lighting, though a few may not work properly in the 'Enhanced Full Dynamic Lighting' modes - this is usually noted; any setting starting with r3_ only works in the 'Enhanced Full Dynamic Lighting (DX10)' mode. As with the in-game Advanced graphics options, some of these settings require a full restart of the game to come into effect.
r1_dlights [on,off] - Controls whether dynamic lighting is enabled using the Static Lighting renderer. Since Static Lighting already removes all dynamic lights, the only effect disabling this option has is to remove your torchlight. This may be useful if you have a very low-end graphics card and find that you're still getting slowdowns.
r1_dlights_clip [10.000 - 150.000] - Determines the distance before dynamic lights have no impact on the environment. Since the Static Lighting renderer already removes dynamic lights, this option has little to no impact except perhaps on the distance of your torchlight.
r1_glows_per_frame [2 - 32] - Appears to control the maximum number of light sources, but in practice I've found little performance or visual impact when changing this setting.
r1_lmodel_lerp [0.000 - 0.333] - This setting controls the Linear Interpolation (Lerp) of the lighting model. As the value is increased, it brightens some textures (e.g. look at your own gun while changing this setting), but the change is otherwise not significant.
r1_ssa_lod_a [16.000 - 96.000] - Controls the general Level of Detail (LOD) for the game world, with the higher the value, the greater the detail and visibility of objects in the distance, but at a cost of a slight drop in FPS.
r1_ssa_lod_b [16.000 - 64.000] - This option is similar to the one above, however it appears to control the LOD for certain types of objects within the game world. Once again the higher the value the greater the detail at the cost of some FPS.
r1_tf_mipbias [-0.500 - 0.500] - Controls the mipmap LOD bias, which in effect determines how clear textures are in the distance. Greater negative values make distant textures far crisper and clearer, but at the cost of reduced FPS and also an increased shimmering effect. Greater positive values make things blurrier and reduce detail, but may improve FPS. This allows you to control texture clarity and crispness in addition to the in-game Anisotropic Filtering slider.
r2_aa [on,off] - This setting controls whether a blur-shader form of fake Antialiasing is enabled in the game or not. It is not the same as the Antialiasing slider in the game, and is not a real form of Antialiasing. It does not reduce the actual jaggedness of outlines; it masks them by blurring the screen at the cost of some FPS - you can get much the same effect (without the FPS drop) by running an LCD monitor in a non-native resolution for example. Given the in-game Antialiasing slider doesn't work unless you're in DX10 mode, and AA usually cannot be forced by using your graphics card's control panel either, this is an alternative form of allowing you to reduce jaggedness, particularly on foliage in the game. You can control the level of blur used with the r2_aa_ parameters below. Note that using this setting in DX10 mode currently results in major visual glitches.
r2_aa_kernel [0.300 - 0.700] - This setting controls the overall blur effect used for the fake Antialiasing if the r2_aa option is enabled. The higher the value, the greater the blur effect used. Enabling fake AA and setting this option to 0.3 provides a reasonable fake AA effect without too much blur for example.
r2_aa_break [0.000000 - 1.000000,0.000000 - 1.000000,0.000000 -1.000000] - This setting appears to control the distance at which the fake AA effect operates. The higher the values used, the further away the effect will be implemented. However because the values are vector-based, setting them all to maximum doesn't necessarily ensure the best result. Experiment to see which values suit your needs (e.g. r2_aa_break 0.000000,1.000000,0.000000 gives sharp close imagery and blurred distance imagery)
r2_aa_weight [0.000000 - 1.000000,0.000000 - 1.000000,0.000000 - 1.000000] - This setting provides more precise control over the strength of the blurring effect. The higher the values used, the more blurring will be implemented, but again note the values are vector-based.
r2_allow_r1_lights [on,off] - Enabling this option appears to enhance existing lighting with DX8 lighting. This results in unrealistically bright lighting effect and a drop in FPS, so there should be no reason to implement it.
r2_dof [0.000000 - 1.000000,0.000000 - 1.000000,0.000000 - 1.000000] - This setting controls the degree of the Depth of Field effect, however it is better to experiment with the individual components of depth of field using the r2_dof_far, r2_dof_near and r2_dof_focus settings below, as they have the same impact. You can then use this setting to commit the changes.
r2_dof_far [0.000 - 10000.000] - This setting controls the extent to which the Depth of Field is applied to the general scene. Note that it does not just apply to periods when DoF is prominent, such as when reloading your weapon - it applies to the game at all times. Lowering this setting from its default of 600 will increase the general bluriness of distant scenery, creating a form of permanent DoF effect.
r2_dof_focus [-10000.000 - 10000.000] - This variable is central to the way the rest of the r2_dof_-based settings work, as they take their permissable values from what this is set to. The lower this value is taken from its default of 1.4, the smaller the area of your vision which is 'in focus'. This is most noticeable if you alter the r2_dof_far and r2_dof_near settings to implement permanent depth of field.
r2_dof_kernel [0.000 - 10.000] - This setting controls the overall level of blur in the depth of field effect. At a value of 0, no depth of field is visible at any time regardless of how you change the r2_dof_-based settings. Higher values make the blurring effect become more prominent when depth of field is used.
r2_dof_near [-10000.000 - 10000.000] - Similar to the r2_dof_far setting, this setting controls the level of blurring on objects closer to the character - the higher the value of this setting above the default of -1.25, the more blur there is on nearby objects (e.g. your gun) at all times.
r2_dof_sky [-10000.000 - 10000.000] - Again, much like r2_dof_far and r2_dof_near, this setting permanently applies a depth of field effect to the sky. Higher values above the default of 30 result in greater blurring of the sky.
r2_gi [on,off] - Disabled by default, this setting appears to control whether Global Illumination is used, a form of lighting which is more realistic, in that lit surfaces then indirectly reflect on and light up other surfaces. There are a range of global illumination parameters starting with r2_gi_ you can use to alter the effect if it is enabled, such as r2_gi_refl which controls the reflectivity of lit surfaces. However enabling global illumination can noticeably reduce FPS. Also note that it doesn't appear to work correctly in the two 'Enhanced Full Dynamic Lighting' modes.
r2_gloss_factor [0.000 - 10.000] - This setting appears to control the specularity of objects, that is how much they shine and reflect light. The higher the value used, the greater the general gloss on surfaces, at the cost of some FPS. For the most part the default value provides a good level of realistic gloss, though you may wish to fine-tune it.
r2_ls_bloom_fast [on,off] - This option controls whether an enhanced form of Bloom lighting effect is used in the game. If this option is enabled the enhanced bloom effect will be turned on and will appear quite exaggerated - everything will appear much brighter and hazier. Performance is not greatly affected by this setting. The game already uses HDR lighting by default in everything but the Static Lighting renderer, so this setting merely enhances the existing bloom effect of the HDR, it doesn't replace HDR with Bloom. Note however that you don't need to turn this option on to use the various r2_ls_bloom_ settings below. See below as well as the In-Game Settings section for more details.
r2_ls_bloom_kernel_b [0.010 - 1.000] - Most noticeable if fast bloom is enabled (though fast bloom is not required for it to work), this option appears to control the overall level of haziness associated with the bloom effect. The higher the value, the more blurring/haziness will be used in the game world's lighting.
r2_ls_bloom_threshold [0.000 - 1.000] - This setting controls the level of the lighting effect used throughout the game by default, whether or not you have the r2_ls_bloom_fast option enabled. Higher values reduce the brightness of the bloom effect used along with the HDR, such that at 1.000 the game appears similar to the DX8 lighting (but with dynamic lights). You can experiment with altering this value, both with and without fast bloom to achieve a desirable result. For example try Fast Bloom on and a value of 0.350 for this setting to arrive at a slightly more atmospheric look in the game world.
r2_ls_depth_bias [-0.500 - 0.500] - This setting determines how far the visible light from light sources shines. Lower values increase the depth/boundary of the light cast, any values above 0 essentially clip (remove) the light cast totally. Best left at its default setting.
r2_ls_depth_scale [0.500 - 1.500] - Similar to the setting above, the practical impact of changing this setting is alter the effect of light cast from light sources, and the resulting impact on shadows. Lower values reduce shadowing - this is best kept at its default.
r2_mblur [0.000 - 1.000] - This option controls motion blurring in the game. However to have it function, you will first need to apply the -mblur command line switch to the Target box of your STALKER: Clear Sky launch icon properties, and then you can see the effects of changing this variable. A value of 1.0 for example shows noticeable blurring as you turn around, while a value of around 0.1 provides a minor amount of blurring wth no real drop in FPS. Experiment to see what suits you best. Note that motion blur does not appear to work properly in either of the 'Enhanced Full Dynamic Lighting' modes.
r2_parallax_h [0.000 - 0.500] - This setting appears to control Parallax Mapping, a technique used to further improve the appearance of depth on surfaces. However in my experimentation changing this setting had no visual or performance impact.
r2_ssa_lod_a [16.000 - 96.000] - Controls the Level of Detail (LOD) for the game world, with the higher the value, the greater the detail and visibility of objects in the distance, but at a cost of a slight drop in FPS.
r2_ssa_lod_b [32.000 - 64.000] - This option is similar to the one above, however it appears to control the LOD for certain objects. Once again the higher the value the greater the detail at the cost of some FPS.
r2_ssao_blur [on,off] - This option appears to be related to adjusting the impact of the SSAO setting which can be turned on or off using the in-game settings. However in practice I have not found any noticeable image quality or performance differences when enabling or disabling this option, even after a reboot and in various applicable render modes.
r2_sun [on,off] - This setting controls whether the Sun is enabled as a light source or not, hence it is the same as the 'Sun Shadows' in-game setting. However if the Sun is enabled, there are also a range of settings starting with r2_sun_ you can use to control various aspects of the Sun's lighting and appearance. Only the more practical of these is covered below.
r2_sun_depth_far_bias [-0.500 - 0.500]
r2_sun_depth_far_scale [0.500 - 1.500]
r2_sun_depth_near_bias [-0.500 - 0.500]
r2_sun_depth_near_scale [0.500 - 1.500]
These settings essentially control the level of detail of the shadows cast by the sun, and the boundary of the sun's light and shadow areas. Higher values result in more areas of shadow, negative values result in less shadow. The defaults are generally recommended.
r2_sun_far [51.000 - 180.000] - This setting seems to control the overall degree to which the sun impacts on the environment; higher values appear to increase shadow strength and the reach of sunlight at a potential drop in FPS.
r2_sun_lumscale [-1.000 - 3.000] - Determines the level of luminosity (brightness) of the sun's light, with values of zero or below essentially turning off the Sun.
r2_sun_lumscale_amb [0.000 - 3.000] - This setting controls the ambient (indirect) lighting caused by the Sun. Lower values result in darker overall visuals, higher values brighten up the surrounding area without increasing the direct light from the Sun.
r2_tf_mipbias [-0.500 - 0.500] - Controls the mipmap LOD bias, which in effect determines how clear textures are in the distance. Greater negative values make distant textures far crisper and clearer, but at the cost of reduced FPS and also an increased shimmering effect. Greater positive values make things blurrier and reduce detail, but may improve FPS. This allows you to control texture clarity and crispness in addition to the in-game Anisotropic Filtering slider. Note that this setting appears to have no effect in DX10 mode.
r2_tonemap [on,off] - This option controls whether Tone Mapping is used in Clear Sky. Tone Mapping will help improve the appearance of the HDR used in the game, reducing contrasts and highlighting details as necessary to keep the image more realistic. It is recommended that you keep this option enabled, as disabling it gives no real boost to FPS. With tone mapping enabled, you can alter the appearance of the HDR in the game by using the settings further below. The r2_tonemap_middlegray setting in particular has the most noticeable impact on the HDR effect.
r2_tonemap_lowlum [0.000 - 1.000] - This setting controls the effect of tone mapping on darker areas. The higher this setting, the darker the overall appearance of HDR will be. In general it is best left at its default.
r2_tonemap_middlegray [0.000 - 2.000] - This setting has the most discernable impact on HDR, and as its value is raised, the HDR effect because more prominent and rich. For example try a value of 1.2 to see the HDR in Clear Sky look more like that used in games like Oblivion.
r3_dynamic_wet_surfaces_far [30.000 - 100.000] - This setting controls the appearance of wet surfaces further away from your viewpoint. Higher values above the default of 30 make distant wet surfaces more visible and detailed, which may reduce FPS but increase realism.
r3_dynamic_wet_surfaces_near [10.000 - 70.000] - Similar to the setting above, this setting appears to control the appearance of wet surfaces closer to the viewer. Higher values above the default of 10 progressively remove detail and wetness on nearby surfaces, which can increase FPS at the cost of realism.
r3_dynamic_wet_surfaces_sm_res [64 - 2048] - This setting appears to control the resolution of the wet surfaces effect, which essentially determines how realistic the effect appears. Higher values above the default of 256 increase the resolution and translucency of detailing in wet surfaces with a slight drop in performance.
r3_gbuffer_opt [on,off] - This setting appears to control a form of potential rendering optimization for DX10 mode. If set to on it may improve performance, however it is likely it has been disabled by default because it can cause glitches, crashes or due to other bugs. In my testing it didn't appear to cause any problems, but it also didn't seem to improve performance or image quality either. You can experiment to see if it helps you.
r3_msaa [st_opt_off,2x,4x,8x] - This setting appears to control whether Multisampling Antialiasing is used in DX10 mode, and is the same as the in-game Antialiasing drop-down box when in DX10 mode (introduced as of the 1.5.05 patch). When set to Disabled in the in-game settings, it has a value of st_opt_off. When enabled, you can choose a particular sample rate such as 2x or 4x Antialiasing to apply. Note that any changes to this setting require a restart of the game before you will see proper MSAA being applied to geometry (but not foliage) - and only in DX10 mode.
The following settings starting with r__ are not specific to any particular render mode, and work under all modes.
r__supersample [1 - 8] - This setting is the same as the in-game Antialiasing slider, with the value used equal to the sampling rate of AA to be applied - e.g. a value of 8 = 8x AA. However it is important to note that for the most part Antialiasing appears to have no impact in Clear Sky in all but the DX10 render mode, and even then the r3_msaa setting must be On for it to work. In modes other than DX10 you can use the r2_aa setting instead to apply a form of blur Antialiasing.
r__tf_aniso [1 - 16] - This setting is the same as the in-game Anisotropic Filtering slider, with the value used equal to the sampling rate of AF to be applied - e.g. a value of 16 = 16x AF. However you can also use the r1_tf_mipbias (for Statitc Lighting mode) or r2_tf_mipbias (for the other modes except DX10) setting to give you further control over texture clarity and crispness.
r__dtex_range [5.000 - 175.000] - This setting controls the distance at which Detail Textures are visible. Detail Textures are the fine level of detailing and grain shown on certain surfaces such as rocks and walls when viewed close up. The higher the value, the further away you will be able to see these detail textures, at a possible cost in performance.
r__wallmark_ttl [1.000 - 300.000] - This setting controls the length of time in seconds in which decals ('wall marks') are shown on the screen before they fade away (i.e. their 'time to live' or ttl). For example raising the value increases realism at the cost of some performance, particularly during heavy combat scenes, as more decals are left visible for longer.
rs_stats [on,off] - When set to On, displays a range of game statistics, including the Frames Per Second (FPS) counter in the top left corner of the screen. In most cases though it is easier just to use the free Fraps utility to measure framerate in Clear Sky.
snd_acceleration [on,off] - This setting controls whether hardware accelerated sound is used in the game when on, or whether software sound is used when off. It should correspond to the option you choose under the Sound Device option in the in-game Sound settings.
snd_cache_size [4 - 32] - This setting controls the size of the sound cache, a portion of memory used to hold sound effects for quicker loading. A setting of 4 equates to an 8MB cache, while the maximum value of 32 is equal to a cache of 64MB in size. In general you should set this to the highest value possible (32), so that more sounds are cached and there is less in-game loading/stuttering.
snd_efx [on,off] - This option is meant to enable or disable sound effects, however changing this setting, even after the use of the snd_restart command or a restart, appears to have no impact.
snd_targets [4 - 32] - This setting appears to determines the number of audio channels used, with the greater the channels specified, the more distinct sounds you can hear, but the lower your overall performance.
vid_mode [WxH] - Controls the Resolution used for the game, as set under the Resolution option in the in-game settings. Here however you can try setting a custom resolution by entering it in the correct WxH format (e.g. 1280x960 or 640x480) - as long as your monitor supports it. Note that you will have to use the vid_restart console command to implement the change if using this command in the console.
wpn_aim_toggle [0, 1] - This setting controls whether when you zoom in to aim your weapon (Right Mouse Button by default), you either need to hold down the relevant button to remain zoomed (0), or the weapon remains zoomed until you again press your zoom button (1).
That covers all the major settings in User.ltx which appear to have some practical worthwhile function. After extensive testing of all the variables, some of the more interesting-sounding commands seem to have no impact whatsoever, so that is why you may see them missing from the list above. If you believe an important working setting has been omitted, or any of the descriptions above are inaccurate, please Email Me with details (please, no guesses), so I can keep this list as up-to-date and accurate as possible.
The next page continues the Advanced Tweaking by examining the Console Commands.
Console Commands
The command console in STALKER: Clear Sky can be opened and closed at any time by pressing the '~' key (the key below ESC). This console is an area which allows you to enter a range of commands, for the purposes of adjusting the game engine's parameters. Most console commands are also used in the User.ltx file as covered on the previous page. So the best method to implement an advanced feature is to first test a command in the console, fine tune the value you may wish to use for that command, then if you wish to use it permanently, edit your User.ltx file accordingly if the change hasn't already been stored there (see below).
The procedure to use a console command is simple - enter the relevant command followed by a space, then the appropriate value. For example entering the following command in the console:
r2_tf_mipbias 0.5
Tells the game engine to assign a value of 0.5 to the variable r2_tf_mipbias. The impact of this change should be immediately visible on screen. If you just want to know what the current value of a command variable is, enter its name without any added value (e.g. just enter r2_tf_mipbias to see its current value).
Importantly: Entering new values for variables in the console will usually automatically write the change to your User.ltx file, meaning it will be implemented permanently and used each time you start Clear Sky. So make sure to backup your User.ltx first before messing around in the console, and ideally first check the current value for a variable and note it down before testing new values in case you want to quickly get back to the original value.
The full list of console commands for Clear Sky is provided further below in alphabetical order, along with descriptions wherever possible. Some important things to note about this list:
_preset [Minimum, Low, Default, High, Extreme] - Same as the in-game Quality Settings option.
ai_use_torch_dynamic_lights [on, off] - Same as the in-game NPC Flashlights option.
beclient -
bemsg [0,1] -
beserver -
bind [action,key] - Binds an action to a particular primary key.
bind_console
bind_list - Lists current key bindings.
bind_sec [action,key] - Binds an action to a secondary key.
cam_inert [0.000,1.000] - Controls camera inertia.
cam_slide_inert [0.000,1.000]
cdkey
cfg_load [filename.ltx] - Loads a configuration file with the specified name from the same directory as User.ltx.
cfg_save [filename.ltx] - Saves current configuration to a new .ltx file with the specified name in the same directory as User.ltx.
chat
check_for_updates
cl_cod_pickup_mode [0,1]
cl_dynamiccrosshair [on,off] - Same as in-game Dynamic Crosshair option.
cl_voteno
cl_votestart
cl_voteyes
clear_log New
demo_play [demoname] - Plays back a pre-recorded timedemo.
demo_record [demoname] - Records a timedemo.
demo_set_cam_position [0.000000,1.000000][0.000000,1.000000][0.000000,1.000000] - New
disconnect - Exists current game to main menu.
flush - Creates log of actions under the \STALKER-STSC\logs directory.
g_always_run [on,off] - Toggles always run/always walk.
g_autopickup [on,off]
g_backrun [on,off]
g_corpsenum [0,100]
g_dynamic_music [on,off] - Same as in-game Dynamic Music option. New
g_eventdelay [0,1000]
g_game_difficulty (gd_novice,gd_stalker,gd_veteran,gd_master) - Same as in-game Difficulty option.
g_kill
g_restart
g_restart_fast
g_swapteams - Swap team for artefacthunt game.
get_server_address - Lists server's IP address.
help - Lists all console commands.
hide - Hides console. New
hud_crosshair [on,off] - Same as in-game Show Crosshair option.
hud_crosshair_dist [on,off] - Same as in-game Crosshair Target Distance option.
hud_info [on,off] - Same as in-game NPC Identification option.
hud_weapon [on,off] - Same as in-game Show Weapon option.
input_exclusive_mode
list_actions - Lists all bindable character actions.
load [savename] - Loads the saved game with the name specified.
load_last_save - Loads last saved game
main_menu - Takes you straight to the game's main menu screen.
mm_mm_net_srv_dedicated [on,off]
mm_net_con_publicserver [on,off]
mm_net_con_spectator [1,32]
mm_net_con_spectator_on [on,off]
mm_net_filter_battleye
mm_net_filter_empty [on,off]
mm_net_filter_full [on,off]
mm_net_filter_listen [on,off]
mm_net_filter_pass [on,off]
mm_net_filter_wo_ff [on,off]
mm_net_filter_wo_pass [on,off]
mm_net_player_name [String]
mm_net_srv_gamemode [st_deathmatch,st_team_deathmatch,st_artefacthunt,st_capture_theartefact]
mm_net_srv_maxplayers [2,32]
mm_net_srv_name [String]
mm_net_srv_reinforcement_type [0,2]
mm_net_use_battleye [on,off] -
mm_net_weather_rateofchange [0.000,100.000]
mouse_invert [on,off] - Same as in-game Invert Mouse option.
mouse_sens [0.050,0.6000] - Same as in-game Mouse Sensitivity option.
name [String] - Sets your Player Name.
net_cl_clearstats
net_cl_icurvesize [0,2000]
net_cl_icurvetype [0,2]
net_cl_interpolation [-1.000,1.000]
net_cl_log_data [on,off]
net_cl_resync
net_compressor_enabled [0,1]
net_compressor_gather_stats [0,1]
net_compressor_status [info,info_full,on,off]
net_dbg_dump_ export_obj [0,1]
net_dbg_dump_import_obj [0,1]
net_dbg_dump_update_read [0,1]
net_dbg_dump_update_write [0,1]
net_dedicated_sleep [0,64]
net_sv_clearstats
net_sv_gpmode [0,2]
net_sv_log_data [on,off]
net_sv_pending_lim [0,10]
net_sv_update_rate [1,100]
ph_frequency
ph_iterations [15,50]
quit - Exits game to Desktop.
r1_dlights [on,off] - Toggles dynamic lights, only impacts on torchlight.
r1_dlights_clip [10.000,150.000] - Sets dynamic light clip range.
r1_fog_luminance [0.200,5.000] - New
r1_glows_per_frame [2,32] - Controls maximum number of light sources.
r1_lmodel_lerp [0.000,0.333] - Controls the Linear Interpolation of lighting.
r1_no_detail_textures [on,off] - Same as in-game Disable Detail Textures setting. New
r1_pps_u [-1.000,1.000] - Controls Per Pixel Shader functionality.
r1_pps_v [-1.000,1.000] - Controls Per Pixel Shader functionality.
r1_ssa_lod_a [16.000,96.000] - Controls Level of Detail in game world.
r1_ssa_lod_b [16.000,64.000] - Controls Level of Detail in game world.
r1_tf_mipbias [-0.500,0.500] - Controls mipmap LOD bias which affects texture clarity.
r2_aa [on,off] - Toggles fake Antialiasing blur effect.
r2_aa_break [0.000000,1.000000][0.000000,1.000000][0.000000,1.000000] - Controls extent of fake AA.
r2_aa_kernel [0.300,0.700] - Controls overall blurriness of fake AA.
r2_aa_weight [0.000000,1.000000][0.000000,1.000000][0.000000,1.000000] - More precisely controls bluriness of fake AA.
r2_allow_r1_light [on,off] - Allows DX8 lighting under DX9 lighting model.
r2_detail_bump [on,off] - Same as in-game Detail Bump setting. New
r2_dof [-10000.000000,10000.000000][-10000.000000,10000.000000][-10000.000000,10000.000000] - Controls Depth of Field effect. New
r2_dof_enable [on,off] - Same as in-game Depth of Field setting. New
r2_dof_far [0.000,10000.000] - Controls Depth of Field effect on distant objects. New
r2_dof_focus [-10000.000,10000.000] - Determines area of Depth of Field which is in focus. New
r2_dof_kernel [0.000,10.000] - Controls overall level of Depth of Field blur. New
r2_dof_near [-10000.000,10000.000] - Controls Depth of Field effect on nearby objects. New
r2_dof_sky [-10000.000,10000.000] - Controls Depth of Field effect on the sky. New
r2_exp_donttest_shad [on,off] - New
r2_gi [on,off] - Toggles Global Illumination.
r2_gi_clip [0.000,0.100] - Controls Global Illumination clip distance.
r2_gi_depth [1,5] - Controls Global Illumination shadow depth.
r2_gi_photons [8,256] - Controls Global Illumination effect.
r2_gi_refl [0.001,0.990] - Controls Global Illumination reflectivity.
r2_gloss_factor [0.000,10.000] - Sets level of Specularity/gloss of objects.
r2_ls_bloom_fast [on,off] - Toggles enhanced Bloom effect.
r2_ls_bloom_kernel_b [0.010,1.000] - Determines level of haze from HDR/Bloom effect.
r2_ls_bloom_kernel_g [1.000,7.000]
r2_ls_bloom_kernel_scale [0.500,2.000]
r2_ls_bloom_speed [0.000,100.000]
r2_ls_bloom_threshold [0.000,1.000] - Controls overall level of the lighting effect used.
r2_ls_depth_bias [-0.500,0.500] - Controls how far visible light sources shine.
r2_ls_depth_scale [0.500,1.500] - Controls the impact of lighting on shadows.
r2_ls_dsm_kernel [0.100,3.000]
r2_ls_psm_kernel [0.100,3.000]
r2_ls_squality [0.500,1.000] - Same as in-game Shadow Quality option.
r2_ls_ssm_kernel [0.500,1.000]
r2_mblur [0.000,1.000] - Controls Motion Blur effect. Only works if -mblur switch is also enabled, doesn't work in Enhanced Full Dynamic Lighting modes.
r2_parallax_h [0.000,0.500] - Controls Parallax Mapping which affects texture surface depth; not the same as Steep Parallax.
r2_slight_fade [0.200,1.000] - Same as in-game Lighting Distance option.
r2_soft_particles [on,off] - Same as in-game Soft Particles option.
r2_ssa_lod_a [16.000,96.000] - Controls Level of Detail in game world.
r2_ssa_lod_b [32.000,64.000] - Controls Level of Detail in game world.
r2_ssao [st_opt_off,st_opt_low,st_opt_medium,st_opt_high] - Same as in-game SSAO option. New
r2_ssao_blur [on,off] - New
r2_steep_parallax [on,off] - Same as in-game Steep Parallax option. New
r2_sun [on,off] - Same as in-game Sun Shadow option.
r2_sun_depth_far_bias [-0.500,0.500]
r2_sun_depth_far_scale [0.500,1.500]
r2_sun_depth_near_bias [-0.500,0.500]
r2_sun_depth_near_scale [0.500,1.500]
r2_sun_details [on,off]
r2_sun_far [51.000,180.000] - Controls strength of sunlight. New
r2_sun_focus [on,off]
r2_sun_lumscale [-1.000,3.000] - Brightness of Sun's light.
r2_sun_lumscale_amb [0.000,3.000] - Brightness of ambient light from Sun.
r2_sun_lumscale_hemi [0.000,3.000]
r2_sun_near [1.000,50.000]
r2_sun_near_border [0.500,1.000]
r2_sun_quality [st_opt_low,st_opt_medium,st_opt_high] - Same as in-game Sun Quality option. New
r2_sun_shafts [st_opt_off,st_opt_low,st_opt_medium,st_opt_high] - Same as in-game Sun Rays option. New
r2_sun_tsm [on,off]
r2_sun_tsm_bias [-0.500,0.500]
r2_sun_tsm_proj [0.001,0.800]
r2_tf_mipbias [-0.500,0.500] - Controls mipmap LOD bias which affects texture clarity.
r2_tonemap [on,off] - Toggles Tone Mapping effect for the HDR lighting.
r2_tonemap_adaptation [0.010,10.000]
r2_tonemap_amount [0.000,1.000]
r2_tonemap_lowlum [0.000,1.000] - Controls effect of tone mapping on darker areas.
r2_tonemap_middlegray [0.000,2.000] - Controls overall look of HDR effect.
r2_volumetric_lights [on,off] - Same as in-game Volumetric Light option. New
r2_wait_sleep [0,1]
r2_zfill [on,off]
r2_zfill_depth [0.001,0.500]
r2em [0.000,4.000]
r3_dynamic_wet_surfaces [on,off] - Same as in-game Wet Surfaces option. New
r3_dynamic_wet_surfaces_far [30.000,100.000] - Controls Wet Surfaces effect on distant objects. New
r3_dynamic_wet_surfaces_near [10.000,70.000] - Controls Wet Surfaces effect on nearby objects. New
r3_dynamic_wet_surfaces_sm_res [64,2048] - Controls resolution of Wet Surfaces effect. New
r3_gbuffer_opt [on,off] - Controls potential g-buffer optimization. New
r3_msaa [st_opt_off,2x,4x,8x] - Determines whether MultiSampling AA is allowed in DX10 mode, and the sample rate. New
r3_volumetric_smoke [on,off] - Same as in-game Volumetric Smoke option. New
r__detail_density [0.200,0.600] - Same as in-game Grass Density option.
r__dtex_range [5.000,175.000] - Controls distance at which Detail Textures are visible. New
r__geometry_lod [0.100,1.200] - Same as in-game Object Detail option.
r__supersample [1,8] - Same as in-game Antialiasing option.
r__tf_aniso [1,16] - Same as in-game Anisotropic Filtering option.
r__wallmark_ttl [1.000,300.000] - Determines length of time decals remain visible. New
ra
renderer [renderer_r1,renderer_r2a,renderer_r2,renderer_r2.5,renderer_r3] - Same as in-game Render option.
rs_c_brightness [0.500,1.500] - Same as in-game Brightness option.
rs_c_contrast [0.500,1.500]- Same as in-game Contrast option.
rs_c_gamma [0.500,1.500]- Same as in-game Gamma option.
rs_cam_pos [on,off] - New
rs_fullscreen [on,off] - Same as in-game Full Screen option.
rs_refresh_60hz [on,off] - Same as in-game Frequency 60Hz option.
rs_stats [on,off] - Toggles display of game engine statistics, including FPS.
rs_v_sync [on,off]- Same as in-game Vertical Sync option.
rs_vis_distance [0.400,1.500]- Same as in-game Vision Distance option.
save [savename] - Saves the current game under the name specified (default is quicksave).
screenshot [1] - Saves a JPG screenshot under the \STALKER-STCS\screenshots directory.
snd_acceleration [on,off] - Toggles hardware sound acceleration.
snd_cache_size [4,32] - Sets size of sound cache.
snd_efx [on,off] - Toggles Sound Effects on or off.
snd_restart - Restarts the sound engine; should be used after altering any snd_ variables.
snd_targets [4,32] - Sets the maximum number of channels for audio.
snd_volume_eff [0.000,1.000] - Same as in-game SFX Volume option.
snd_volume_music [0.000,1.000]- Same as in-game Music Volume option.
start
stat_memory - Toggles the display of memory-related statistics for the game engine.
sv_activated_return [0,1]
sv_addmap
sv_anomalies_enabled [0,1]
sv_anomalies_length [0,180]
sv_artefect_respawn_delta [0,600]
sv_artefact_returning_time [0,300] New
sv_artefact_spawn_force [0,1]
sv_artefact_stay_time [0,180]
sv_artefacts_count [1,100]
sv_auto_team_balance [0,1]
sv_auto_team_swap [0,1]
sv_banplayer [name]
sv_banplayer_ip [IP]
sv_bearercantsprint [0,1]
sv_changegametype
sv_changelevel
sv_changelevelgametype
sv_client_reconnect_time [0,60]
sv_console_update_rate [1,100]
sv_dedicated_server_update_rate [1,1000]
sv_dmgblockindicator [0,1]
sv_dmgblocktime [0,600]
sv_dump_online_statistics
sv_dump_online_statistics_period [0,60]
sv_forcerespawn [0,3600]
sv_fraglimit [0,100]
sv_friendly_indicators [0,1]
sv_friendly_names [0,1]
sv_friendlyfire [0.000,2.000]
sv_hail_to_winner_time [0,60]
sv_invincible_time [0,60] New
sv_kick
sv_listmaps
sv_listplayers
sv_listplayers_banned
sv_max_ping_limit [1,2000]
sv_nextanomalyset
sv_nextmap
sv_pda_hunt [0,1]
sv_prevmap
sv_reinforcement_time [-1,3600]
sv_remove_corpse [-1,1]
sv_remove_weapon [-1,1]
sv_return_to_base
sv_returnplayers [0,1]
sv_rpoint_freeze_time [0,60000]
sv_setenvtime
sv_setweather
sv_shieldedbases [0,1]
sv_show_player_scores_time [1,20] New
sv_spectr_firsteye [0,1]
sv_spectr_freefly [0,1]
sv_spectr_freelook [0,1]
sv_spectr_lookat [0,1]
sv_spectr_teamcamera [0,1]
sv_startteammoney
sv_statistic_collect [0,1]
sv_statistic_save
sv_status
sv_teamkill_limit [0,100]
sv_teamkill_punish [0,1]
sv_timelimit [0,180]
sv_unbanplayer_ip
sv_vote_enabled [0,255]
sv_vote_participants [0,1]
sv_vote_quota [0.000,1.000]
sv_vote_time [0.500,10.000]
sv_votestop
sv_warm_up [0,3600]
texture_lod [0,4] - Same as in-game Texture Detail option.
unbind [action] - Unbinds any primary keys from the specified action.
unbind_console
unbind_sec [action] - Unbinds any secondary keys from the specified action.
unbindall - Unbinds all keys from all actions.
vid_mode [WxH] - Same as in-game Resolution option.
vid_restart - Restarts the graphics engine.
wpn_aim_toggle [0,1] - Toggles Weapons Zoom aiming. New
For the most part all the useful and most important console commands are described above and in much more detail on the previous page, especially the commands new to Clear Sky. However if a description for an important command is missing or wrong, please Email Me with the details (please, no guesses). In general I've left some of the more obvious and/or less useful console commands without a description, and of course there are a few commands for which I don't know the precise functionality.
The next page completes the Advanced Tweaking with Command Line Switches.
Command Line Switches
There are a range of additional commands you can execute when first launching Clear Sky called Command Line Switches. These 'switches' are commands which are passed on to the game's main executable file xrEngine.exe, telling the engine to do certain things as the game launches. To use a command line switch, go to your STALKER: Clear Sky launch icon, right-click on it and select Properties. Then in the Target box, one space after the last character, insert the switch(es) you wish to use, each separated by one blank space. For example:
"C:\Program Files\Deep Silver\S.T.A.L.K.E.R. - Clear Sky\bin\xrEngine.exe" -noprefetch -noshadows
The switches -noprefetch and -noshadows used above prevent prefetching of data and also disable all non-Sun shadows in the game engine. These would otherwise not be possible to do using the in-game settings. You can disable them at any time simply by removing the relevant switch from the launch icon, or creating a second launch icon without the switches and using that to launch the game whenever you don't wish to enable a certain switch.
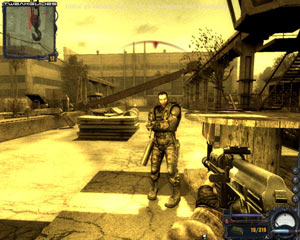
Importantly: Some switches have no discernable impact, or simply cause the game to crash while loading. Furthermore some switches which were present in Shadow of Chernobyl are no longer present in Clear Sky, most notably -nointro and -dsound. Suggested usage instructions for the most useful switches are spread throughout this guide.
The full list of Command Line Switches for Clear Sky is provided below in alphabetical order.
-_g
-batch_benchmark
-bug
-build
-center_screen - Centers the game window when running in windowed mode.
-debug_ge
-depth16
-designer
-demomode [ ]
-disasm
-ebuild
-editor
-file_activity - Records file activity in the console during the game.
-fsltx
-gloss
-gpu_nopure - Switches the GPU state from Pure Hardware to simply Hardware mode.
-gpu_ref - Switches the GPU state to Reference mode.
-gpu_sw - Switches the GPU state to Software Renderer.
-i
-keep_lua
-launcher
-load [savegame] - Loads specified saved game on startup.
-ltx [filename.ltx] - Loads and executes specified filename.ltx configuration file.
-mblur - Allows the r2_mblur command to function correctly if used.
-mem_debug
-mt_cdb
-nes_texture_storing
-netsim
-no_call_stack_assert
-no_occq
-nodf24
-nodistort - Removes distortion effects, e.g heat haze around fires and warping near anomalies.
-nojit
-nolog - Disables logging.
-nonvs
-noprefetch - Disables prefetching. Games load faster, in-game stuttering may increase or drop.
-noshadows - Disables shadows from dynamic light sources (excluding the Sun). May improve FPS.
-nosound - Disables all sound in the game.
-overlay [directory path] - Forces a different directory for saved games/profiles/config file.
-pure_alloc
-psp - Enables third person view mode, but has bugs.
-r2 - Forces the game to start with Full Dynamic Lighting DX9 Renderer.
-r2a - Forces the game to start with Objects Dynamic Lighting DX9 Renderer.
-r4xx - Forces the game to start with Static Lighting DX8 Renderer.
-silent_error_mode
-sjitter - Enables Shadow Jittering to soften shadow edges.
-skinw
-smap1536
-smap2048
-smap2560
-smap3072
-smap4096
The above switches set the Shadow Map size, which affects all shadow quality, similar to the in-game Shadows Quality setting. Here you can specify even higher quality shadow map resolutions (i.e. smap2048, smap3072 and smap4096) which improve image quality but reduce FPS.
-ss_tga - Forces all in-game screenshots to be taken in both .JPG and high quality .TGA format.
-start [ ]
-sunfilter
-svcfg
-swap_on_compact
-tsh
-tdemo
-tdemof
-techdemo
-tune
-x86
-xclsx
Once again, if you have definite knowledge of what a switch does (please, no guesses), and it is something which would be quite useful to most people, then please Email Me with the details and I will update this list accordingly so everyone can benefit.
The next page brings the guide to a conclusion with a range of useful tips.
This section brings the guide to a conclusion, but has some important tips and tweaks, so it should not be skipped.
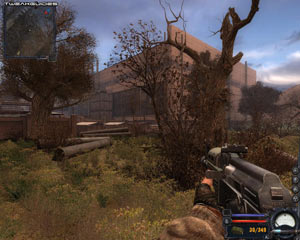
Disabling Introductory Movies
If you find the introductory movies/logos which play at STALKER: Clear Sky's startup annoying, unfortunately unlike the original STALKER: Shadow of Chernobyl, you can't simply use the -nointro command line switch to disable them; this option has been removed from Clear Sky. However there is a way you can skip these movies using a small modified ui_movies.xml file. Follow these instructions:
1. Download the following file (right-click on it and 'Save Target/Link As'): ClearSky_NoIntro.zip (2 KB).
2. Extract the contents of the .zip file directly to your \Program Files\Deep Silver\S.T.A.L.K.E.R. - Clear Sky directory and it should create the appropriate subdirectories and place the file in the right location. If it doesn't and you need to create the subdirectories manually, or if you want to double check if it's correctly located, it should look like this:
\Program Files\Deep Silver\S.T.A.L.K.E.R. - Clear Sky\Gamedata\configs\ui\ui_movies.xml
3. Once the file is in the right location, you will need to make a small edit to your fsgame.ltx file found under the \Program Files\Deep Silver\S.T.A.L.K.E.R. - Clear Sky directory using a text editor like Notepad. This is necessary for the game to recognize and use this modified .xml file. Full details on what you should do are at the bottom of Page 4 of this guide, however briefly it just involves changing the following line in the file:
$game_data$ = false| true| $fs_root$| gamedata\
Change the false to true, i.e.:
$game_data$ = true| true| $fs_root$| gamedata\
Close and save the file, and once all the above is done, the next time you launch STALKER: Clear Sky, it will eventually open at the main menu, bypassing any startup movies. Thanks to Jonas Beckman for preparing this modified file.
Performance Issues
One of the very first things that STALKER: Clear Sky players will experience if they choose to use either of the new 'Enhanced Full Dynamic Lighting' modes is much lower framerates than they ever expected. Clear Sky seems at first to be as system-intensive as Crysis, if not more, when it doesn't necessarily look quite as good in many respects. You might think that the additional DirectX 10 effects might account for this performance hit, however in practice even the DX9 version of the 'Enhanced Full Dynamic Lighting' mode has much the same performance. The reason is relatively straightforward in terms of the source of the slowdowns: the 'god rays' visible in the early morning scene at the start of the game are almost entirely to blame for the major drop in performance on even high-end machines.
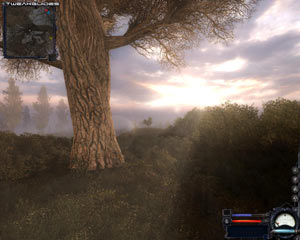
While it is a spectacular effect to be sure, unfortunately it doesn't really warrant almost halving your FPS. What's even more odd is that whether these rays of sunlight are visible or not, your performance will remain much lower than usual from between around 6:00am to 8:00am every morning in the game. This appears to be as much a bug as anything else, because even when the rays disappear, performance will continue to be low for a further few minutes until suddenly, once the Sun reaches a certain point in the sky, it's almost as though a magic switch is flicked and your FPS dramatically improves with no obvious change in visual quality.
Fortunately, as covered in the In-Game Settings section of this guide, there is a workaround to this dramatic slowdown which doesn't sacrifice much in the way of image quality: simply lower your 'Sun Rays' setting in the Advanced graphics options. Lowering it to Medium or Low will noticeably improve your framerate, and although it does thin out the sun ray effect slightly, it's nothing noticeable, and it makes early mornings playable again for most people. If absolutely necessary, disable this effect altogether, as it is by far the most performance-sapping option in the new Enhanced render modes.
Because of the undue performance impact of Sun Rays, I don't recommend adjusting your other graphics settings or trying to measure your general performance until after around 8:00am, as otherwise the effect of the sun rays will mean your results will not be representative of how the game runs 90% of the time. In general the game will perform quite well in DX10 mode using maximum settings (except Antialiasing) at a reasonable resolution on an 8800GT or higher, as long as you lower Sun Rays, along with a few other minor tweaks or changes of your choice as covered in this guide.
Also note that for some reason, unlike Shadow of Chernobyl, in Clear Sky you will need to quit and restart the game to implement a change in most of the graphics settings, even when this is not noted by the game itself. Everything from changing the Grass Density slider to adjusting the Sun Quality setting will require a quit and restart, so don't get confused if you change a setting and don't see any immediate impact; quit and restart to see the impact. This is very annoying to be sure but there is no way around it at the moment.
DirectX 9 vs. DirectX 10
A common question people will have regarding Clear Sky is what the difference is between DX9 and DX10 mode. This is a relatively simple question to answer: the new DX9 and DX10 'Enhanced Full Dynamic Lighting' modes are very similar in visual quality and performance, except for the following enhancements which are only possible in DX10 mode:
The above settings are explained fully - along with comparitive screenshots - in the In-Game Settings section, as well as a comparison of all the render modes, so check there for more details. In short if you hear people say that the DX10 mode in Clear Sky has no real benefit, this is not actually true. The Wet Surfaces effect in particular makes a significant difference to image quality and realism during the rain, and is a worthwhile addition in DX10 mode. Aside from the Wet Surfaces comparison picture on page 6, check out the picture of the Stalker on the first page of this guide - it was taken in the rain in DX10 mode, and that helps make it look much more realistic. For those with high-end graphics cards, the ability to apply proper Multisampling Antialiasing is also a handy feature that's not possible in DX9 mode. So if DX10 mode is available to you - i.e. if you run Clear Sky under Vista with a DX10-capable graphics card - then I strongly recommend giving it a try, as the visual improvements over DX9 mode are worth it, at minimal performance cost.
In general however, the DX9 'Enhanced Full Dynamic Lighting' mode is already quite good, even the original 'Full Dynamic Lighting' mode in Clear Sky still holds up quite well visually. And of course there are a range of tweaking options as covered in the Advanced Tweaking section of this guide which allow you to further improve the quality in all the available render modes.
The one major drawback to both the new DX9 and DX10 'Enhanced Full Dynamic Lighting' modes in my opinion is that they don't allow the use of Motion Blur using the -mblur command line switch along with the r2_mblur variable. In both cases enabling motion blurring results in glitches. This is unfortunate as use of motion blurring in Shadow of Chernobyl made the game much nicer visually, but sadly it only works in 'Full Dynamic Lighting' mode at best in Clear Sky.
Update: As of the 1.5.06 patch, DX10 mode now also allows the ability to apply MSAA to foliage, which greatly reduces the jaggedness of grass and trees in Clear Sky. If your graphics card supports DX10.1 mode, you can now also enable support for this render path to improve quality and also potentially improve performance in DX10 mode as well.
Clear Sky & Dual Core CPUs
In testing STALKER: Clear Sky on a dual core CPU, I've found that it doesn't seem to utilize both cores completely; at best it seems to use around 60% of both cores. This is confirmed by performance reviews such as this one. This is unfortunate, but is not surprising given the original STALKER: Shadow of Chernobyl did not properly utilize dual core CPUs either. What this means in practical terms is that Clear Sky is highly dependent on your graphics card, not your CPU.
Measuring FPS, Taking Screenshots & Capturing Movies
If you want to measure FPS or take screenshots in STALKER, you can use the rs_stats on console command to bring up an FPS/Statistical display, and you can use the F12 key or the screenshot console command to take screenshots, which will then be stored under your \STALKER-STCS\screenshots directory in .JPG format (or use the -ss_tga command line switch to take them in both .JPG and high quality .TGA format).
However if you wish to do all of the above, and also capture in-game movies in .AVI format in a much easier way, you can use the free FRAPS utility instead.
Recording Demos & Benchmarking
The demo_record console command allows you to record custom timedemos for benchmarking purposes. Use the demo_record [demoname] command in the console, and the game will begin recording your demo - you can then use left mouse button to move the camera forward, right mouse button to move it back, and A and D to move the camera left or right, W or S to move it up or down. You must press SPACE to regularly append key frames, and then press ESC when you want to finish recording. The demo is saved with the .xrdemo extension under your \STALKER-STCS\savedgames\ directory. To play it back, first load up the relevant saved game you used to record the demo, then type demo_play [demoname].
Now to play back a time demo in Clear Sky, launch the game and load up the saved game under which you recorded the demo above. Next open the console and type demo_play [savename]. The game will run through a preset demo, and at the end you will have to open up the console to see the minimum, maximum and average FPS figures for the demo run.
Conclusion
That brings the STALKER: Clear Sky Tweak Guide to a conclusion, and I hope you've found some useful pieces of information in this guide. If you believe there are any significant tips or tweaks missing from this guide, please Email Me with the details and I will look into it further, updating the guide as required. Unfortunately I can't provide personal tech/tweak support and I also don't provide permission for the guide to be reproduced elsewhere for several reasons.
In any case, thanks for taking the time to read the guide, and until next time take care!


 Call Of Duty Modern Warfare 3 Goalpost Intel Guide
 Batman Arkham City Enigma Conundrum Walkthrough
 Pokemon X & Y Guide: Elite Four Guide
 10 FUN THINGS TO DO IN YANDERE SIMULATOR
 iPhone Appointment