
Might & Magic is one of the oldest franchises in PC Fantasy gaming, along with the Dungeons & Dragons and Ultima series, dating back to the 1980s. And just like these famous RPG games, it has a vast array of followers who have grown very familiar with the medieval fantasy world of M&M. Dark Messiah of Might & Magic, while continuing much of the traditions of Might & Magic, is a bit of a departure from the series in that it uses a 3D first person RPG format, similar to The Elder Scrolls IV: Oblivion, and downplays the RPG elements quite a bit.
Having mentioned Oblivion, it must be noted that the comparisons are unavoidable, as although these games differ from each other in many ways, the genre of highly immersive, complex first person RPGs is still only populated by a few choice entries - of which Dark Messiah and Oblivion are two of the most prominent. Indeed if you like Oblivion, it's likely you will also take kindly to Dark Messiah, but it's important to note that unlike Oblivion, Dark Messiah has a much more structured linear storyline and does not have the massive world freedom of Oblivion. To me this is a bit of a drawback for the game, but I suppose it's a matter of taste.
Dark Messiah is based on a modified version of the Source Engine by Valve, which powers several other very popular games including Half Life 2, CounterStrike: Source and Day of Defeat: Source. This engine is extremely versatile and is used to great effect in this game, with atmospheric sound and graphics, and highly detailed creatures and characters with excellent AI. But unfortunately it also inherits the Source engine's infamous Stuttering problem which is due to the way the engine handles data loading. Along with this issue comes a few other bugs and glitches which have caused players some frustrations.
There are no magic fixes to these problems, but I've prepared this guide to help people resolve these issues as much as possible and get the game to a playable state. There are several differences between the way the Source engine works in Dark Messiah and other Source games, so I've retested all the commands originally found in my Half Life 2 Tweak Guide, added several important new ones unique to Dark Messiah, refined descriptions to be clearer, and grouped together at least a dozen commands which can help reduce stutter. Also included are a range of general troubleshooting tips, and of course details of all the in-game settings and what they actually do in terms of performance and visual quality. Give the guide a go and see if it can help you.
Note: This guide refers to the latest version of Dark Messiah of Might & Magic Version 1.0.2 SP & 1.04 MP. Make sure your refer back to this guide often for updates.
Before getting into any game-specific settings and tweaks, this section covers the obligatory system optimization information I include in all my guides. If you've followed this advice recently, you can skip this section.
Many people report problems with this game and in almost all cases these are due to general system issues and not the game itself. With that in mind I strongly urge you to take some time and follow the advice below if you truly want this game, and indeed every other game you own, to run at its fastest and most trouble-free.
The place to start is my free TweakGuides Tweaking Companion. It is the complete system optimization guide for Windows users. Designed for novice and advanced users alike, it is written in plain English to help you genuinely understand all aspects of Windows and your PC. The guide covers every major topic, from the correct installation of Windows and critical drivers and software, through to recommendations for every significant setting and feature, all the major performance and convenience tweaks and customizations, as well as detailed troubleshooting advice. There are also links to a range of reliable free applications for optimizing and maintaining your system, as well as to important resources for finding out even more about Windows and your PC. There are two separate versions: one for Vista and one for XP.
If you've ever wondered what common graphics and display settings like FPS, VSync, Refresh Rate, Antialiasing and Anisotropic Filtering are, and how they really work, then check out my Gamer's Graphics & Display Settings Guide for all the details in an easy to understand format. The guide also gives you a rundown on exactly how a game goes from a being a set of files on your hard drive to a 3D image on your screen, including relevant performance tips.
Finally, if you run an ATI or Nvidia graphics card, I have written two comprehensive guides which you should check out: the ATI Catalyst Tweak Guide and the Nvidia Forceware Tweak Guide. These guides cover absolutely everything about the latest graphics drivers, how to set them up correctly, as well as advanced tweaking, overclocking and benchmarking tips. They're a must-read for configuring your graphics card correctly.
The above information really will serve you well in the long run, not just in this game. If you don't optimize your system and keep everything updated and maintained correctly you will keep running into "mysterious" problems time and time again. Do yourself a favor and when you get a chance spend an afternoon or two optimizing your machine the right way with the guides above.
The next section goes into more detail about specific troubleshooting tips which address common performance issues with the game.

This section contains specific troubleshooting tips which address many of the common problems experienced by Dark Messiah players. I can't stress enough the importance of taking the time to go through the checklist of advice below if you're having a problem with the game.
Official Support: If you have a problem with the game, the first place to check is the Readme.txt file found in your \Program Files\Ubisoft\Dark Messiah of Might and Magic directory. Importantly, note the system requirements for this game, as if you do not meet them, you will have a lot of problems. If you're having issues with the game see the Ubisoft Support Centre. If you can't solve your problems at all using this guide or the resources throughout, you can post on the Official Ubisoft Forums.
Windows Vista Users: If you're having problems running this game under Windows Vista, first make sure that you're using the latest Vista graphics and audio drivers for your hardware, and the latest version of this game (see page 4 for patch details). Next, make sure you don't change your UAC settings after the game has been installed, as due to Virtualization this can change the location of the game files and settings. If you can't launch the game successfully when UAC is enabled, you will need to run the game with full Admin privileges. To do this either right-click on the launch icon and select 'Run as Administrator', or right-click on the launch icon, select Properties and under the Compatibility tab tick 'Run this program as an administrator' then click OK. I strongly recommend that you refer to the TweakGuides Tweaking Companion for Windows Vista for more information - in particular check the 'Gaming in Vista' section of the Graphics & Interface chapter; the UAC section of the PC Security chapter; and the 'Personal Folders' and 'Directory Junctions & Symbolic Links' sections of the Windows Explorer chapter. These will tell you how you can fix game-related issues and also explain the relevant differences of Vista.
Steam Issues: Steam is an online distribution/validation/updating software which is generally required for Dark Messiah to work and remain updated, especially if you want to play Dark Messiah Multiplayer. If you're having issues with Steam, check out Steam Support, and also make sure to check out the Steam section on page 4 of this guide for important information on installing and updating Dark Messiah, whether you have the retail or the Steam version of this game.
SecuROM Launch Issues: Dark Messiah uses the SecuROM copy protection system. This is a system known to have certain issues, particularly on PCs which have any virtual disc emulators or specific types of disc copy software. The only real solution is to uninstall such software if you keep having launch problems. If launch errors keep happening, or if you have specific error messages, see the SecuROM FAQ. If nothing else works, send an email to SecuROM Support or run the game through Steam (See page 4 for details).
Known Bugs & Issues: Arkane Studios has admitted to several known bugs with the game - note that stuttering is not really one of them; see further below to understand why. However a large number of bugs have been fixed in the latest patches so I recommend you install these - see Page 4 for details. Some solutions for common bugs are below:
Obviously there are more bugs that will need to be fixed, but for the moment the only real solution for many bugs will be further patches. Again, most stuttering and even crashing issues are not bugs as such, see below for details.
Stuttering/Audio Looping/Loading Issues: By far the number one problem with Dark Messiah is the existence of long loading times, combined with lots of in-game stuttering/hitching and audio looping. These are basically due to the way the Source engine upon which Dark Messiah is based tries to load texture and audio data up 'on the fly' as you move through a level. It has been a problem with the Source engine since Half Life 2 was released two years ago, and is detailed here and here. As such, it is not a 'bug' unique to Dark Messiah, and it is unlikely to be totally patched out of the game since it is a part of the game engine and if it were going to be repaired it would have been by now. Valve have released many 'stutter fixes' with mixed success, so it has not gone unnoticed, but it is essentially an unfixed problem.
On systems with lower amounts of RAM (i.e. 1GB or less), combined with slower hard drives and sub-optimal configurations, the stuttering becomes really pronounced. This is particularly true in Dark Messiah because it uses much higher quality (and many more) textures than other Source games like Half Life 2, so as you walk around a level, whenever new objects, sounds or world data need to load up, your system pauses momentarily to load these from your hard drive into RAM (often needing to remove some other information to fit it in if you have low RAM, and this info is written back into your pagefile), and this in turn creates stuttering and/or audio looping while the data is being loaded.
For people who are skeptical of Dark Messiah's massive amount of data, note that the game itself installs almost 7GB of data (right-click on your \Program Files\Ubisoft\Dark Messiah of Might and Magic\ directory, select Properties and look at its Size). Furthermore, when the game is running after a period of time, I've noticed that on my system the mm process in Task Manager takes up to 1.1GB of memory or more! Thus there is a huge amount of data flowing around while you're playing this game, so it is not so much a buggy or badly coded game, it is just very, very detailed and data intensive. Fortunately you can reduce stuttering, although it requires a bit of system optimization and advanced tweaking. You will need to do the following:
Read through the rest of this guide for other methods of improving overall performance and reducing stutter, but in general the higher the settings in Dark Messiah, and the less RAM you have, the more stutter you will experience. I strongly recommend that if you can afford it, you upgrade to 2GB of RAM as this is now almost the 'standard' amount for recent games like Dark Messiah, BF2142 and Oblivion given they are very data-rich. A faster hard drive (a newer 10,000RPM or SATAII 7,200RPM model) is also advised if you want to truly be rid of stutter, but obviously this can cost quite a bit.
Crashes to Desktop: Crashes to desktop usually occur in any game when there are problems with the way the system is managing memory, and it has to instantly abort the game - thus it is cleared of RAM and you're dumped back to your desktop. Follow the general tips in this guide to optimize Dark Messiah as this will improve performance and stability, but also note that you will need to optimize your system to improve its stability, and in particular if you're overclocking you must wind back or remove your overclock. Even if you're not overclocking, check your system temperatures to make sure it is not overheating under the strain of the game, as that also leads to a great deal of instability. It is possible to get Dark Messiah to a stable state on your PC; most crashes to desktop are related to system-specific sub-optimal conditions and are not a game bug. Dark Messiah brings these out more than other games because it is incredibly memory-intensive.
Defragging: As mentioned above, it is vital that you make sure that after installing Dark Messiah (and all relevant updates through Steam) that you defragment your hard drive. It is particularly recommended that you use a third party disk defragmenter like Diskeeper or PerfectDisk as these do a much better job of defragmenting the very large .gcf files which Dark Messiah uses to store its data. If you do not defragment your drive properly then you will greatly increase the stuttering issues in this game, so it is a must-do.
Virus Scan: Do a full scan of all your files using the following excellent (and free) tools: AVG Virus Cleaner for viruses, A-Squared for trojans, and Ad-Aware SE for spyware/adware. Viruses, trojans and spyware can cause unexplained behavior, general file corruption and system slowdown, and can also steal your CD Key. It's best to make sure your system isn't infected before moving on to any other other optimization measures. However make sure to disable any background scanning programs once you're done (See below).
Background Programs: Disable all background applications - especially virus, trojan and spyware scanners and messaging utilities. These applications can and do use up valuable CPU resources, take up precious RAM, cause memory conflicts and crashes to desktop, but most importantly they interfere with read/writes to your hard drive effectively slowing it down and causing even more in-game stuttering and longer loading times. Full instructions on how to identify your startup programs and services and how to correctly disable unnecessary ones are in my TweakGuides Tweaking Companion. This is a very important step you should not miss.
Overclocking: If you've overclocked any components on your system and are having problems such as crashes, reboots and graphical anomalies, the first thing to do is set everything back to default speeds and try running the game. If you don't experience the same problems at default speed, or they're reduced in severity, then your overclock is the primary culprit. Either permanently reduce your overclock and/or increase cooling to regain stability. Don't assume that because other games run with stability, or even other Source games like Half Life 2 work fine at a particular speed that Dark Messiah will do the same: Dark Messiah is a very strenuous delicately balanced game which is using a custom-enhanced version of the Source version. It is not advised that you overclock your system while playing this game.
That's just a basic rundown of troubleshooting tips. Read the remainder of this guide for more specific settings and tweaks which can help improve your performance and resolve any problems.

Official Patch
Dark Messiah of Might & Magic has received a new 1.02 Singleplayer patch which resolves many of the games bugs. Arkane has also released a 1.04 Multiplayer patch solely through Steam. You can download and apply the latest standalone singleplayer patch to the retail version of the game, or you can update both retail and Steam versions via Steam if they are installed through Steam - see the Steam section further below for details of how best to do this. Theses patch contain a large number of very important fixes and changes, so I strongly recommend all Dark Messiah players update to the latest version particularly if you're experiencing any issues with the game.
As details of updates and patches become available I will update this section and the rest of the guide accordingly, so stay tuned.
Steam
Ubisoft, the distributors of Dark Messiah of Might & Magic, have teamed up with Valve, the developers of the Source engine upon which Dark Messiah has been developed, to allow the game to be distributed via the Steam online distribution system as well as through normal retail channels. For more details of how Steam works, and to troubleshoot any Steam issues you may have see the Steam Support Page.
The Steam application is required to run whenever you run the Multiplayer aspect of Dark Messiah. However if you purchased a normal retail DVD copy of Dark Messiah, you don't have to run Steam at any time to run the Singleplayer aspect of the game. But there is a bug in the retail version of the game such that if you install the multiplayer component along with the singleplayer component of the game, after installation Steam will launch and commence redownloading a major portion of the entire singleplayer portion of the game again. As mentioned in the patch section above, I recommend that you do install Steam and allow it to update your singleplayer game files as these updates are necessary, however to save it from redownloading existing files, follow these steps:
1. Close down Dark Messiah and close the Steam client so it is not displaying in your System Tray.
2. Go to your Program Files\Ubisoft\Dark Messiah of Might and Magic\mm\ folder and highlight and copy all the .gcf files.
4. Restart Steam while online - Steam will now update your Dark Messiah singleplayer component more quickly as it needs to download/update fewer files now.
In general it is recommended that you allow the game to be updated by Steam as often as possible. You don't need to keep Steam running all the time to do this, but make sure to check this page for notification of major updates, and also regularly restart your Steam client while online to see if any updates are required - they will download and install themselves automatically if any exist.
As a final note, make sure to defragment your drive after updating via Steam, and to make absolutely certian that all your game files are valid and working properly, in Steam right-click on your game name under My Games, select Properties>Local Files>'Verify integrity of game cache'. This will run a check to make sure all your game files are sound, and that nothing has been corrupted.
No-CD Patch
Dark Messiah uses the SecuROM copy protection, which normally requires that you keep the DVD in the drive while playing if you've purchased the DVD edition. This is very annoying, however it doesn't harm performance as such. There are a couple of problems inherent to SecuROM but these are discussed in the Troubleshooting Tips section. In general while you can use a No-DVD to play Dark Messiah singleplayer, I can't mention any details of where to get it for legal reasons. However you can run the game without the DVD in the drive if you use Steam - see below.
Steam versions of the game don't have a disk check, but require that you verify and install your copy of the game over the Internet, and Steam needs to be running for the Multiplayer component in particular to work on all versions. Even if you bought the DVD edition, you can install/download the entire singleplayer component through Steam and this will then allow you to run the game through Steam without requiring a DVD in the drive.
Mods
As mentioned in the introduction, Dark Messiah of Might & Magic is powered by the Source Engine from Valve. This engine has proven to be highly modifiable, and thus there is absolutely no reason why DMOMM will not get some mods of its own in the future. I will list any prominent mods in this section as they are released.
The next section of the guide covers the In-Game Settings for Dark Messiah.

In this section I provide full descriptions and some recommendations for Dark Messiah's in-game settings, allowing you to achieve a good balance between visual quality and performance. I note the performance impact of each setting, although bear in mind that it is impossible for me to give exact performance impacts because it all depends on your specific hardware combination and your other game and system-wide settings.
To access the in-game settings start DMOMM and on the main screen select the Options item. The various items under Options are covered in detail below:
Keyboard
You can assign the various game commands to specific keys on your keyboard here. Highlight the command you wish to change, double-click on it or click the 'Edit Key' button and press the key or mouse button you wish to replace it with. If you want to remove a key from a function without replacing it with another key, highlight the function and click the 'Clear Key' button. You can return to the default key assignments by pressing the 'Use Defaults' button. None of the keyboard assignments affect performance, so set to suit your taste.
Advanced: The Advanced button leads to an important additional setting: the 'Enable developer console' option. If enabled, you can open and close the in-game console at any time by pressing the '~' key (the key under ESC). Access to the console is critical in allowing you to use the advanced tweaks later in this guide, so I recommend you tick this option and see the Advanced Tweaking section for more details. It has no impact on performance either way and shouldn't get in your way if enabled.
Mouse
Reverse Mouse: If ticked, this option means that when you push the mouse forward, your character will look down, and vice versa. This has no impact on performance so set to suit your taste.
Mouse filter: If ticked, this option attempts to smooth your mouse movements by averaging the movements over two frames. If you find the mouse movements are too jerky, enable this setting, but in general I recommend it be left unticked. Note that this setting does not resolve mouse lag, and might actually make it worse - see Mouse Sensitivity below.
Mouse Sensitivity: This slider allows you to adjust how sensitive your mouse is to movements. The greater the sensitivity slider (the higher the number shown), the more sensitive your mouse is to your movements. Set it to suit your taste, and note that while this setting has no impact on performance, if you are experiencing a 'laggy' mouse which is not being resolved by using this slider, then you will need to reduce your graphics settings in order to increase your average framerate - mouse lag is almost always due to low framerates. You can also try the 'Max frames to render ahead' tweak as detailed here.
Audio
Game Volume, Music Volume: These sliders allow you to adjust the general volume of sound effects, voices and music in the game (Game Volume), and the background/menu music by itself (Music Volume). These have no impact on performance, and setting either slider to the far left (0) will not remove sounds from memory, so set to suit your taste.
Speaker Configuration: This drop down box allows you to select the number of discrete audio channels Dark Messiah will provide for your speakers. You must make sure that the number/type of speakers chosen do not exceed that connected to your system, otherwise you may experience audio glitches and/or missing sounds. On some systems with a 7.1 or 5.1 speaker setup, you may find better audio performance from choosing the '4 Speakers' setup or even '2 Speakers'. The less the number of speakers (channels) chosen here, the better your performance since more audio channels require more audio processing which is shared by the CPU and your Sound Card. For most systems the 2 Speaker setup provides the most trouble-free sound performance.
Note that changing the speaker configuration here will also change your default Windows speaker configuration under Control Panel>Sounds & Audio Devices to match, so keep this in mind if you notice your sound output sounds different for other games or in your media player for example. Also note that to minimize problems you should disable any additional special effects in your sound card's control panel. On the Audigy range of cards for example this involves going to your SoundBlaster AudioHQ or Creative Audio Console, opening the EAX Control Panel and clicking the 'All Effects Off' button to disable additional EAX effects. You might also want to disable CMSS 3D effects as well.
Sound Quality: This setting controls the quality of the audio effects used in the game. The options are Low, Medium and High, and in experimenting with this setting I found that the general sound quality (sample rate) remains the same for each setting level. At High however the audio has additional special effects which affect its pitch and ambience, while at Medium and Low the audio becomes progressively less rich. There are additional reverberations and more of a 'depth' to sound effects at High compared to Medium or Low. Striking a sword against a metal surface for example has a richer and more satisfying sound to it at the higher quality setting. In reality though the quality difference between the various levels is quite subtle (but it is there), so if you need to boost your performance and help reduce stuttering I recommend Medium or Low. Alternatively if you want to improve the atmosphere of the sounds even further see the dsp_enhance_stereo command in the Advanced Tweaking section.
Captioning: This option lets you select whether or not the game shows captions for the hearing impaired or for translated text in foreign language editions for example. 'No Captions' provides the best performance and is recommended for those who don't require any captioning/subtitle functionality. 'Subtitles (dialog only)' is recommended only for those who want text subtitles for spoken dialog in the game, and there is a mild performance hit.
Video
Resolution: The resolution box allows you to select the resolution for the game, as shown in pixel width by pixel height. The higher the resolution, the more detailed the image due to the larger number of pixels used, but the greater the performance impact on your machine. For more details of resolution see my Gamer's Graphics & Display Settings Guide. Dark Messiah can be a strenuous game, and if you find your FPS is low regardless of your other settings, consider lowering your resolution a notch or two. Note that only the resolutions supported on your graphics card/monitor combination are shown here. Also note that the Aspect Ratio setting (see below) affects the resolutions shown in this box. To set a custom resolution, see the Advanced Tweaking section.
Display Mode: You should be able to select whether to run Dark Messiah 'Full Screen' or Windowed mode here, however the option is fixed at 'Full Screen'. This is primarily because in windowed mode there will be problems because of the way Windows manages memory for applications which run in windows as opposed to running full screen in the foreground. Dark Messiah needs to be run in full screen mode for maximum stability, and furthmore if you ALT-TAB out of the game this will further increase instability.
Aspect Ratio: There are two possible settings under this section: 'Normal (4:3)' and 'Widescreen 16:9'. The aspect ratio is the ratio of the width to the height of a display. The traditional ratio for most monitors and standard TVs is 4:3, and this is the recommended (and only) choice for most people. A Widescreen (16:9) aspect ratio is the display ratio for a standard Widescreen TV or Widescreen monitor which is much wider than it is tall. Note that as you change the aspect ratio, the list of available resolutions under the Resolutions drop-down box will change, since you are changing the width to height ratio of the display. Note that 16:10 is not officially supported in Dark Messiah, so if you want to try using it, or If you set the wrong aspect ratio and can't get into your display settings again, see the r_aspectratio command in the Advanced Tweaking section.
Adjust Brightness Level: Click this button and use the Gamma slider to adjust the overall brightness of the onscreen image in Dark Messiah. As the setting recommends, you should ideally be able to see all three lines of text, with the 'Barely Visible' text exactly that. This setting has no effect on performance, the main aim is to make sure the game image is not too washed out and not too dark. The default setting is 2.2 for CRT monitors and 1.7 for LCD monitors, however there is no particular recommended setting as this is also influenced by your monitor's brightness and contrast settings.
The next section continues the In-Game settings by covering the Advanced video functions.

Advanced
Several of the settings under this section have a major impact on image quality, performance and stability in Dark Messiah of Might & Magic, so they deserve your full attention. By default the game recommends particular settings based on your system specifications - these are denoted by a * next to them. The recommended settings are not too bad, however there is still scope to use the information below to modify them further to suit your tastes and improve performance as well as increasing stabiliy and reducing stutter.
Model Detail: This setting controls the number of polygons used for objects in the game. There are three settings: Low, Medium and High - and the differences between the three levels are virtually unnoticeable. You can see an animated screenshot comparison by clicking this link: DMOMM_ModelDetail.gif (660KB). Note that there is no real difference at all between the three shots, only the red railings, the ropes to the right and the wood to the left lose a bit of detail. I've confirmed this in many areas of the game - it appears that in Dark Messiah the model detail consistently uses high polygon counts regardless of this setting, and only a few non-essential pieces of scenery lose their details if this is lowered. If you need additional FPS then the Low setting provides the best performance without any noticeable drop in image quality, so it is ideal to use. Also note that in heavy combat scenes where there are a lot of highly detailed monsters and NPCs, if you're struggling for performance you should also consider using the violence_hgibs and violence_agibs commands to have corpses quickly vanish and thus keep FPS from dipping too low - see the Advanced Tweaking section.
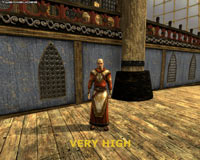
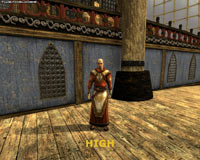
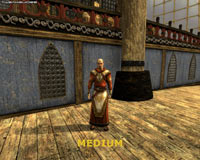
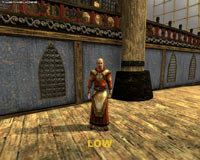
Texture Detail: Textures are the 2D images used to create the detailed surfaces of all 3D objects in the game. The settings here are Low, Medium, and High. Update: As of the 1.02 Patch onwards, Very High has been added. In fact what has happened is that Low and Medium have remained the same, while High has been renamed Very High, and a new intermediate setting called High has been created. The new High setting still uses Medium textures for scenery, but High textures for NPCs. To see the difference between these texture detail levels, see the screenshot comparison above. Note the gradual loss of detail in the surfaces of the wooden floor, the NPC's clothes and the blue wall. You can also see an animated screenshot comparison of a different scene which highlights the differences more clearly by clicking this link: DMOMM_TextureDetail.gif (907KB). Note the loss in detail of the text on the stone surface in particular, and the surface of the floor as well. For the most part the difference between the High and Medium settings is not noticeable as only NPCs are slightly more detailed at High, but High is probably a good choice as a balance between performance and visual quality. The difference between Very High and High/Medium is not major, but Low is noticeably blurrier than both.
Important: The Texture Detail setting is of critical significance to Dark Messiah, and is the cause of much of the long loading times and stuttering issues in the game (See Troubleshooting Tips section for details). Unlike older Source games like Half Life 2, Dark Messiah uses a lot of very rich, varied and detailed textures for object, character and environment surfaces. The higher the texture setting, the higher the resolution and size of these images used for surfaces, and hence the longer they take to load up from your hard drive, take up more space in memory, and as you wander around they will constantly load up, causing stutter and pauses. On some systems this constant swapping of data also leads to crashes to desktop. So on systems with less than 2GB of RAM and/or slow hard drives and/or a graphics card with only 128MB of Video RAM I strongly recommend using the High or Medium texture setting or even lower. This, combined with the stuttering tweaks on page 8 of the guide, and also turning off Auto Save (See In-Game Settings), will help reduce much of the stuttering. Fortunately the Medium setting does not differ greatly from the High setting, so using it will not radically reduce realism in the game. Finally, note that the mat_picmip 1 setting often quoted as a fix for stutter is exactly the same as setting in-game Texture Detail to Medium, as that is what that command variable controls - see the Advanced Tweaking section.
Shader Detail: This option can either be set to Low or High, and theoretically controls the level of the special effects drawn by shaders, which are complex graphics functions supported by your graphics card's hardware that allow for special visual effects in the game. However after exhaustive testing in Dark Messiah I have yet to tell the difference between the Low and High setting as they appear to result in identical visuals and special effects. If you want the best performance for no real image quality drop, select Low.
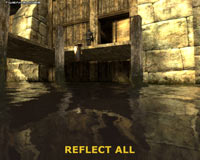
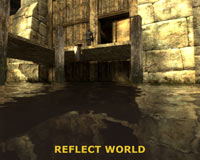
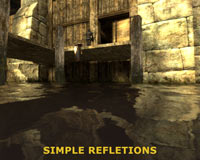
Water Detail: This setting controls the realism of the water in the game by determining how complex the reflections on the surface of water are. The options are: 'Simple reflections', 'Reflect world', and 'Reflect all' - see the screenshot comparison above to see the difference. Note that Reflect All reflects all objects as accurately as possible including the background, the NPC and the corpse, and the large crate on the right; Reflect World only reflects static world objects, not dynamic objects such as NPCs or moveable objects - thus the reflection does not show the NPC, the corpse or the crate; Simple Reflections also reflects only major static objects but with less complexity, however it actually still looks quite realistic. If you want the best image quality select Reflect All, however if you want a good compromise of performance and image quality I recommend Simple Reflections, particularly as reflections are a major source of FPS drops around water areas.
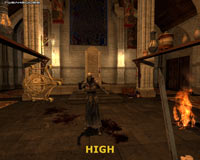
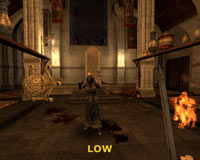
Shadow Detail: This option can be set to Low or High. At the Low setting, most of the dynamic shadows available at High are disabled and replaced with static shadows - see the screenshot comparison above. Note the shadows of the shelves and of the NPC itself. Low provides the best performance, particularly in areas with multiple lights and multiple objects, but can seem a bit unrealistic as sometimes shadows don't fall in the right places relative to light sources, and NPCs get blob shadows. However given the Low setting still provides for some shadows, and in particular replaces the performance-draining complex shadows that NPCs cast, it is worth using if you need the FPS.
GFX Detail: This setting supposedly controls the general graphics (gfx) detail in the game world, and can be set to either Low, Medium or High. Once again after a great deal of careful examination of screenshots at different levels, it is difficult to see any visual or performance difference at all when altering this setting. However there is one noticeable difference - at High there appears to be an additional heat-haze/blur effect on Sareth's hand when he has the Flame Arrow spell activated for example. It's very subtle, and may reduce performance on older graphics cards, so unless you want small touches like this, set this option to Medium or Low for no real drop in image quality. Furthermore the setting appears to be broken, as no matter how many times I set it High, it returns back to Medium when I next check it in my options. Try using the mm_fxquality_level 2 command in the Advanced Tweaking section if you want to force this to stay at High.
Update: As of the 1.02 Patch onwards this setting should be fixed and will 'stick', however if it doesn't use the method above to force it remain as chosen.
Antialiasing Mode: The options here are None, 2x, 4x and 6x. Antialiasing (AA) is described in my Gamer's Graphics & Display Settings Guide, but basically it is the smoothing of jagged lines. The higher the sample rate of Antialiasing used, the smoother jagged lines in the game will appear, but the greater the performance hit. The precise performance impact depends on your graphics hardware - newer graphics cards generally take much less of a performance hit from AA than older cards - and the higher your display resolution, the greater the negative performance impact of Antialiasing. In general if you're struggling for FPS Antialiasing is one of the first things you should disable. Regardless of whether you choose to use Antialiasing or not, I strongly recommend that you set Antialiasing in your graphics card's control panel to 'Application Preference', and then set the AA level in DMOMM, otherwise there may be conflicts.
Filtering Mode: The options here are Bilinear, Trilinear, Anisotropic 2x, Anisotropic 4x, Anisotropic 8x and Anisotropic 16x. Texture filtering determines how clear textures remain, especially as they fade into the distance - the higher the texture filtering mode used, the clearer distant textures will appear, particularly when viewed at sharp angles. More details and some examples are at the bottom of this page of my Gamer's Graphics & Display Settings Guide. Bilinear and Trilinear texture filtering are very similar in appearance, with Trilinear providing a slightly greater performance hit for a tiny improvement in image quality. Anisotropic Filtering is more advanced, and can improve the clarity of distant textures quite a bit. In general the performance impact from Anisotropic Filtering should be minimal on most graphics cards, but a high level of AF combined with a high resolution will certainly reduce FPS. For most people I recommend Anisotropic 2x or 4x as being a good balance of performance and image quality. As with Antialiasing, I strongly recommend that you set Anisotropic Filtering in your graphics card's control panel to 'Application Preference' first before using DMOMM's in-game Filtering Mode setting. Forcing AF in the control panel may conflict with the setting here and cause problems.
Wait for Vertical Sync: Vertical Synchronization (Sync) is the synchronization of your monitor and graphics card's abilities to draw a certain number of frames per second on the screen. The full details of VSync are covered in plain english in my Gamer's Graphics & Display Settings Guide. In simple terms I recommend everyone disable VSync, as when it is enabled not only does it cap your maximum FPS to your monitor's refresh rate, it can also actually halve your overall FPS. If Vertical Sync is disabled, your FPS will improve, however you may notice some screen 'tearing' - the top and bottom portions of the screen sometimes being slightly out of alignment, particularly during fast turning motions. This causes no damage to your monitor, and is usually unnoticeable, however should you find the tearing unbearable enable VSync, but be aware of the sharp performance drop.
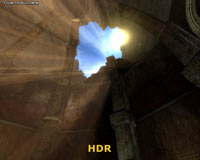
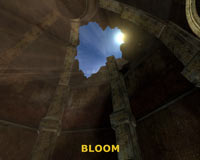
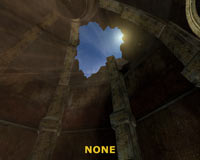
High Dynamic Range: This option allows users to set the type of special lighting used in the game. When set to Full, High Dynamic Range (HDR) lighting is used, utilizing Shader Model 2.0 (SM2.0) effects to create dynamic contrasts in lighting throughout the game. Most lights will appear far more bright and glarey when looked at, and more importantly the perception of lighting changes dynamically, so that walking into a dark room after being in bright light for example will mean the room will momentarily appear darker than normal before the light normalizes again - to simulate your eyes adjusting. This option is the most realistic but also has a greater performance hit than the other options here. Bloom lighting is often mistaken for HDR, however the difference is that although it can look similar, Bloom is not dynamic and also has less of a performance hit than HDR. If you select None, neither of these lighting effects will be used and the game lighting will appear a bit more 'dull', but will increase your FPS. Screenshot comparisons of all three are shown above.
Hardware/Software DirectX Level: This section at the bottom of the Advanced Options box shows you the maximum level of Hardware and Software DirectX support your graphics card can provide in DMOMM. Since the game requires a graphics card which can support DirectX9.0, you should see 'DirectX v9.0' or 'DirectX v9.0+' here for both, and you won't be able to alter them here. In particular your Software DirectX Level setting should always show 'DirectX v9.0' since you must run the latest release of DirectX 9.0c for the game to operate properly (See Troubleshooting Tips section for details). However you can reduce the Hardware DirectX Level used by the game in order to gain performance or provide support for older graphics cards at the cost of image quality or graphics glitches - see the -dxlevel and mat_dxlevel commands in the Advanced Tweaking section.
Make sure once you've changed any of these settings to click OK, then click the Apply button back on the main options box to put them all into effect.
Gameplay
Crosshair: This option controls whether a crosshair is shown whenever you equip a bow - if unticked no crosshair is shown for the bow, but the main circular crosshair will remain. Set to suit your taste, and if you want to disable the circular Stealth crosshair as well, see the mm_hud_displaystealth command in the Advanced Tweaking section.
HeadBobbing: If enabled, your character's view will bob up and down and side to side as you move around. If this bothers you, or indeed adds to motion sickness, you should disable this. In general I find the bobbing in the game a bit excessive and unrealistic, so I'd recommend unticking this option for most people.
Always Display Inventory Belt: If ticked, a transparent 9-item wide 'inventory belt' is displayed at all times at the bottom of the screen. This is handy for seeing which current items are bound to which particular numerical key (shown in the bottem right of each item's box). However if you don't use the belt you can untick it here to remove it - the performance impact is negligible so set to suit your taste.
Auto Save: If ticked, the game will regularly create an autosave point at key areas/events throughout the game. This is useful if you forget to save manually, however unfortunately the autosave feature also causes noticeable in-game stutter whenever it is triggered. In general I strongly recommend disabling the auto save option (untick it) to reduce stutter, and getting used to manually autosaving less frequently by pressing F6, or by pressing ESC during a game and creating a new save point.
The next section deals with Advanced Tweaks which can be used to further customize Dark Messiah's performance and functionality.

Dark Messiah of Might & Magic is based on a modified version of the highly configurable Source Engine - the same engine used in games like Half Life 2, CounterStrike: Source and Day of Defeat: Source. This means that there are a very large number of advanced settings available for you to alter and experiment with, beyond those included in the in-game settings. This section provides details of exactly how to do that, and lists the major command variables which will prove most useful to us in tweaking Dark Messiah. It's very important that you read this section carefully to ensure that you apply these tweaks correctly.
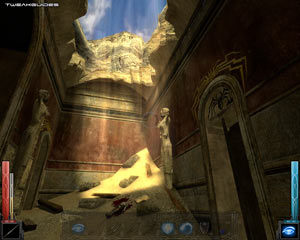
There are four main ways in which you can implement custom command variables (or cvars) in Dark Messiah: In the game's Console; through Config (.cfg) files; in the Steam Launch Options box; or in your game icon's Target box. These various methods usually result in the same outcome for each command, however they provide flexibility in the ways in which you can test, add, edit and remove cvars for the game. The way to access and use each method is covered below. Make sure you read through this information carefully otherwise the tweaks in the Advanced Tweaking section will not function correctly if at all:
Command Console
To enable the Dark Messiah Command Console (or 'console' for short), you will first need to go into the in-game options, and under the Keyboard tab, click the Advanced button and tick the 'Enable developer console' option. Now you can open and close the console at any time by pressing the '~' key (the key under ESC). The Dark Messiah console is a window into the game's Source engine. It allows you to see a range of information about the game and you can also use it to change the way the engine behaves.
Config Files
Dark Messiah holds many of the settings you select in the in-game options - along with a range of other custom variables - in a file called config.cfg, which can be found in your \Program Files\Ubisoft\Dark Messiah of Might and Magic\mm\cfg directory, or under \Program Files\Valve\Steam\SteamApps\[Username]\dark messiah might and magic single player\mm\cfg for those playing via Steam. This file can be opened and edited using any text editor, such as the Windows Wordpad. The config.cfg file is very important, so you should first create a backup of it before you edit it or apply any other advanced tweaks.
While you can add, edit and remove commands directly in config.cfg, it is recommended that instead you create an entirely new file for adding custom commands. To do this, in the same directory as config.cfg, right-click in an empty area and select New>Text Document. Rename this new text document to autoexec.cfg (not autoexec.cfg.txt), and you can now insert all your custom commands into this config file. By default the Source engine looks for autoexec.cfg at startup, and if it finds it, it will automatically load and execute all the valid commands. Importantly: In Dark Messiah the engine appears not to automatically execute autoexec.cfg in singleplayer mode, so you must add the line +exec autoexec.cfg to your DMOMM launch icon - see further below for more details.
For multiplayer, an autoexec.cfg file will be detected automatically, but must be inserted under the \Program Files\Valve\Steam\SteamApps\[Username]\dark messiah might and magic multiplayer\cfg\ directory.
Steam Launch Options
Dark Messiah of Might & Magic doesn't require Steam to be running when playing singleplayer, but it does require it for multiplayer, so this tip is more for DMOMM multiplayer. You can add various command variables into the launch options for Dark Messiah, ensuring that they are activated each time the game is launched. To do this, launch Steam and under the 'My Games' tab right-click on the relevant Dark Messiah entry and select Properties. In the Properties box which opens, click the 'Set Launch Options' button. You can now enter command variables in this box and they will be executed whenever Dark Messiah is launched from Steam. For Dark Messiah singleplayer the method below should be used.
Dark Messiah Icon Properties
Similar to the way you can add command variables to the Steam Launch Options for Dark Messiah multiplayer, you can add them to the Dark Messiah singleplayer startup by editing the icon used to launch the game. Right-click on the launch icon for Dark Messiah and select Properties. Under the properties, you can enter command variables in the Target box. For example:
"C:\Program Files\Ubisoft\Dark Messiah of Might and Magic\mm.exe" -novid -heapsize 1048576 +map_background none +exec autoexec.cfg
The above command line variables and parameters will launch Dark Messiah with a memory allocation of around 1GB (-heapsize 1048576), the game will also start without playing the introductory videos (-novid), will also load faster by not having the background animation in the main menu (+map_background none), and executes a custom autoexec.cfg file upon launch. You can add as many parameters and variables as will fit in the Target box, simply make sure you put a single space between each command.
Command Line Parameters
Command line parameters are commands which can only be used in the Target box of your Dark Messiah launch icon (or in the 'Set launch options' box of Steam). They cannot be used in the game's console or in your autoexec.cfg file. These are not the same as command variables which are covered on the next page, however both can be used in the command line, and the most useful of these commands are as follows:
-heapsize [Kilobytes]: This command tells Dark Messiah to allocate the specified amount of additional RAM in kilobytes to the game system heap, where it can be accessed by the game to store more game nformation and hence reducing loading pauses and stuttering. The default heapsize is 256MB (262144), however given the fact that Dark Messiah is a hugely data-intensive game (See Troubleshooting Tips for details), you should allocate a fair bit of RAM for this value. I don't recommend exceeding half your physical RAM (e.g. for 2GB of RAM set a heapsize of 1048576), and remember that 1024 KB = 1MB and 1024MB = 1GB when doing your calculations.
-console: Starts the game quickly with the console open. However this method of fast startup for DMOMM is not recommended, the best way is to add +map_background none to the command line instead, as this prevents the background image from loading up in the game's main menu, speeding up loading time and further reducing memory usage.
-width [pixels] -height [pixels]: Using these two commands you can set a custom resolution in Pixel Width x Pixel Height (e.g. -width 640 -height 480 starts Dark Messiah with 640x480 resolution). Make sure you choose a resolution supported by your monitor and with the correct ratio of width to height for your screen, otherwise the game will crash while loading or black screen.
-dxlevel [version]: Using this command allows you to restrict Dark Messiah into only using the specified DirectX version for shaders. For example, use -dxlevel 70 to force Hardware DirectX7.0 level support for shaders. This means a reduction in image quality but an increase in performance. Other values include -dxlevel 80, -dxlevel 81 and -dxlevel 90. Note that this is only useful if you choose a DirectX version which is lower than the current one supported by your graphics card. Note further that at DirectX 7.0 Dark Messiah exhibits a lot of visual glitches, whereas DirectX 8.1 is a good compromise of performance and image quality. The most noticeable differences are in a reduction/removal of shader effects like HDR, Bloom, shiny surfaces, spell effects, etc. If you can live without these, or if your graphics card is simply too slow or too old to support full DirectX 9.0 effects, then try this method. Note that forcing a dxlevel means it remains in effect - even if you remove this paramater - until you either use the autoconfig command parameter further below at least once to clear it, or manually force Dark Messiah to another DirectX level. Also see the Hardware DirectX Version option under the In-Game settings for more details.
-refresh [Hz]: Specifies the refresh rate the game will use upon loading. This is normally not required as your system should already use the optimal refresh rate at your chosen resolution. However if this is not the case you can force it to a specific refresh rate (e.g. -refresh 85). Make absolutely certain that the rate you are trying to apply does not exceed your monitor's capabilities at your chosen resolution otherwise you will get a crash or a blackscreen, especially if you change resolutions and forget to change this option.
-novid: Prevents the introductory videos from playing when loading up the game, speeding up startup time. This does not prevent in-game videos from playing, so it is safe to use.
-autoconfig: Not to be confused with an autoexec.cfg file, this parameter resets all the performance and video-related settings back to their default, ignoring any customized config settings. Use this option to clear any semi-permanent changes you've made, such as changes to the dxlevel, then remove it once done. If you leave it in your command line it will prevent customized config options in files like autoexec.cfg from working.
Notice that all of the command line parameters above have a '-' in front of them. This is because strictly speaking, these are command line parameters, not normal command variables (cvars). If you want to run any of the command variables listed on the next few pages in your icon's Target box, or in Launch Options, you can do so but you must add a '+' sign in front of them (instead of a '-'). For example, if you want to use the exec command to execute a config file at startup, you will actually have to put the command into the Target/Launch Options box in the following way:
"C:\Program Files\Ubisoft\Dark Messiah of Might and Magic\mm.exe" +exec mytweaks.cfg
In the example above, when you start the game the contents of the file mytweaks.cfg (which should be in the same directory as config.cfg will be executed.
The simple rule for using commands in the command line is that aside from the few command line-specific commands listed further above, all other command variables, such as those listed on the following pages, require a '+' sign in front of them if used in the Target box or Steam's Launch Options. Note that you must also place a single space between each separate command, and no " " (quote) marks are required around the commands. If you're after other command line paramaters, check this full list of Command Line Options.
Using Command Variable Tweaks - The Best Method
In general, the majority of the command variables you will be using will be inserted into a config file after first being tested in the console. To use a command variable in the game's console, open the console and simply type the name of the command variable. This will show you the current setting for the variable as well as its default setting. If you want to change a command variable's value, simply type the name of the variable, then a space, then the value you want to assign it. Some command variables don't require a value, and can be run simply by entering their name and pressing return. You can use the cvarlist, find, help and revert commands to search for and learn more about specific commands (See Common Commands under the Command Variables list on the next page for details of these commands).
Once you've tested the effects of specific variables in the console, if you only want to change a few you can insert them directly into your game icon's Target box or Steam Launch Options box as detailed further above. However in most cases it is better to create an autoexec.cfg file and insert all your custom command variables one under the other in that file. Note that when using command variables in autoexec.cfg, you don't need to use any '-', '+' or " " signs around the command. Simply enter the command name, followed by a space, and the value you want to assign it, just as if you were entering it into the console. However if you decide to edit or insert any settings into the config.cfg file (not recommended), you will need to use "" marks around the value assigned to any command variable. In general you should avoid editing config.cfg and use autoexec.cfg for your tweaking. Remember however to add +exec autoexec.cfg to your launch icon's target line to make it work though. An example of an autoexec.cfg file's contents is provided below to show you what it should look like:
cl_forcepreload 1
sv_forcepreload 1
r_fastzreject 1
cl_smooth 0
This autoexec.cfg file will help reduce stuttering, but it just an example. The major reason why I don't provide 'pre-tweaked' config files in my guides is that I have no way of knowing your image quality and performance preferences, not to mention precisely which hardware is on each system. There are very few commands which give extra performance without any visual quality impact and which work for all systems. Therefore I strongly urge you to take the time to read, test and compile your own list of custom command variables. It is very important to understand what you're doing rather than just being told what to do, otherwise when you inevitably run into problems you won't have any idea of what exactly is causing it or how to fix it.
Troubleshooting Command Variable Issues
If you do run into any problems with cvar changes you have made, you should note that many changes you make in the console or in your autoexec.cfg file (or any other config file) may also be recorded in the config.cfg file by the game engine and hence become 'permanent', even if you delete or alter other config files. You can either search through config.cfg and alter or delete the cvar there, or you can restore your backed-up version of config.cfg to undo all your changes. However that doesn't work for certain variables and parameters, so you will need to either go into the game's console and type the command variable with the correct value to restore it back. For example, the mat_dxlevel cvar (or the -dxlevel parameter) will change the Hardware DirectX level 'permanently' until you give it a new value, so if in doubt go into the console and change the variable back there, or use the -autoconfig parameter further above to reset things to default.
If on the other hand you find that your commands are not working, first make sure to read through the above instructions thoroughly. If the instructions are followed in detail, I guarantee that the command parameters and command variables shown will work, simply because I have tested them and I know these methods are sound. To see whether you're even using the correct commands, enter the command in the console with your chosen value, then just type the cvar name again (with no value). It should show the new value against the cvar - if not, then the command is either not being used properly, the value you want to apply is invalid, or you may not be able to change it due to your hardware capabilities. Also note that cheat commands (denoted by (cheat) next to them on the list in the following pages) can often only be enabled if the sv_cheats 1 command is first used.
In the case of the command parameters which can only be used in an icon's Target box such as heapsize, you can open the console immediately after Dark Messiah has started up and you should see some indications of their implementation. With Heapsize for example, once you open the console after Dark Messiah has just loaded you will see the amount of memory allocated to the game at the top of the console text - it should match the heapsize you set.
That covers the methods for applying advanced tweaks in Dark Messiah. The next few pages list the actual command variables which can be used.

Command Variables
This section lists out all of the major command variables for Dark Messiah grouped by general function, and provides descriptions for each of them. The list does not even remotely cover every possible command variable as there are over 2,800 of them. I have refined the list to only include those which I believe are the most relevant and useful to the average player. Many command variables are designed primarily for use by the developers in debugging the game for example, or appear to have no impact on the game at all, and so have been omitted. If you want a complete up-to-date list of every command variable in Dark Messiah of Might & Magic, use the cvarlist command below. To save you time, I provide the entire list of 2,800+ cvars in a convenient form for you to download: DMOMM_Cvarlist.zip (45KB).
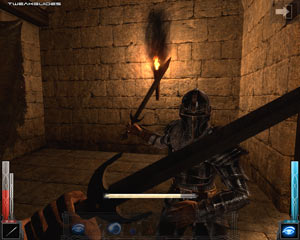
Some important things to note about this list:
Common Commands
cl_showfps [0,1,2] - Draws a Frames Per Second (FPS) counter at the top of the screen. 0=off, 1=FPS, 2=Smoothed FPS. In general the smoothed fps counter is best for viewing framerates
cvarlist [string] - If entered by itself this command generates a list of all the command variables (cvars) in DMOMM. If one or more characters are also entered, cvarlist will list all commands starting with those letter(s).
help [cvar] - Provides any available help text for the specified cvar.
find [string] - Finds cvars with the specified string in their name or help text.
revert [cvar] - Reverts a cvar back to its default value.
differences - Shows all the cvars which are not at their default values, listing those which have been changed either through the in-game menus or via advanced tweaking.
exec [configfilename] - Executes all valid commands within the specified configuration file. The file must be a plain text file with the name [filename].cfg and reside in the same directory as config.cfg.
clear - Clears all text from the console.
autosave - Saves the current game to the autosave slot. Will not work if autosave is completely disabled as per the instructions in the Conclusion section.
save [savename] - Saves the current game under the savename specified.
load [savename] - Loads a game from the specified savename file.
reload - Reloads the most recent saved game.
restart - Restarts the game on the same level.
kill - Kills your character.
flush - Flushes the cache memory. Can resolve graphical anomalies such as texture glitches while playing.
map_background [mapname] - Runs a map as the background to the main menu. To use no map, use the mapname none (or any other non-existent map name).
jpeg [filename, quality] - Takes a screenshot as a .jpg with the specified filename using the quality % specified (e.g. jpeg snapshot 51 saves a screenshot as snapshot.jpg with 51% quality). If no quality is specified the default as set by jpeg_quality will be used (see below). Screenshots are saved to the \Program Files\Ubisoft\Dark Messiah of Might and Magic\mm\screenshot\ directory.
jpeg_quality [percentage] - Specifies the default quality percentage for screenshots taken with the jpeg command (see above). The normal default is 90%
version - Shows the current version of the game's main executable. The version number of the Dark Messiah executable is effectively the version number for the entire game. To see the exact build number and Source Engine build, simply open the console and it's always displayed at the top.
quit, exit - Using any of these commands exits the game and returns to the Desktop. Note the misspelled version of quit (quti) works as well.
Binding Commands
bind [key, command] - Binds the stated command to the specified key (e.g. bind Z console binds the Z key to opening the command console).
bindtoggle [key, command] - Same as the bind command, except the assigned key can be used to both turn the command on and off (e.g. bindtoggle F cl_showfps 2 means the F key will toggle the FPS counter on or off).
unbind [key] - Removes any bindings from the specified key.
unbindall - Removes bindings from all keys.
alias [aliasname, command] - Gives a command a short name (e.g. alias taunt echo I am your new King! changes 'taunt' into a command which spits out "I am your new King" when used). Use alias as a shortcut for long or complex command strings.
key_findbinding [command] - Find the key bound to the specified command.
key_listboundkeys - Lists all the keys which currently have a binding.
Performance Commands
[Stuttering-Related Settings]
The settings below will help reduce stuttering in conjunction with the in-game settings, but to understand why stuttering occurs in Dark Messiah please read the Troubleshooting Tips section first.
mat_forcemanagedtextureintohardware [0,1] - If set to 1, attempts to force texture information into your Video RAM at the start of a level, alleviating any stuttering in the game. This setting was introduced a while ago by Valve to fix stuttering in the Source engine, however it can also reduce performance without necessarily reducing stuttering/hitching on some systems. I generally recommend that this be left set at 1, however you can try setting this to 0 to improve performance and see if it noticeably adds to stuttering on your system - if so then set it back to its default of 1.
Update: As of the 1.02 Patch onwards the system attempts to automatically determine the 'best' setting for this option. However it is still worth checking and altering it to suit your needs.
cl_forcepreload [0,1] - If set to 1 forces all information to preload, reducing loading pauses and stuttering by not loading information on the fly, but can increase level loading times. I recommend this be set to 1 to reduce in-game stuttering.
sv_forcepreload [0,1] - If set to 1, forces server-side preloading, once again reducing loading pauses. I recommend this be set to 1 to reduce stuttering.
datacachesize [0 - 128] - Determines the amount in MB to allocate to the game's general data cache. The default is 32MB, and the maximum is 128MB. I recommend setting this to at least 64MB for 1GB of RAM or 128MB for 2GB of RAM as it should help in reducing stuttering, though it will add to initial load times.
Update: This command can apparently cause strange white textures to appear in the game on some systems, so if you experience this please undo this tweak.
mat_compressedtextures [0,1] - This should always be set to 1 to ensure that compressed textures are used, reducing video memory usage and thus reducing hitches and stutter. If you have a graphics card with 512MB of VRAM or more, you can set to 0 to improve texture appearance at the cost of performance, potential instability and added stuttering/hitching.
mod_forcedata [0,1] - If set to 1, forces all model data into cache while loading. This should not be set to 0 unless troubleshooting, as preloading models greatly helps reduce stuttering.
r_fastzreject [-1,0,1] - If set to 1 activates a fast z-setting algorithm which takes advantage of hardware fast z reject for improved performance. If set to -1 detects your default hardware setting for this option. Initially I recommend setting this to 1, and if you see any problems then set to -1.
cl_smooth [0,1] - If set to 1 attempts to smooth the view after prediction errors, however this can increase stuttering and so I recommend that it be set to 0.
cl_smoothtime [seconds] - Time over which to smooth the view after prediction errors. If cl_smooth is enabled, experiment with values to see which gives the best results. If cl_smooth is disabled (as recommended) has no impact.
sv_footsteps [0,1] - If set to 1, player footsteps can be heard, if set to 0 no footsteps are emitted from the player. Should normally be left enabled for realism, however set to 0 to disable this if you want to try to boost performance slightly and reduce stutter even further.
snd_mixahead [value] - Set between 0.0 and 1.0, the higher the value the less stuttering and more synchronized sound will be, but performance may be reduced. A value of 0.5 to 0.7 will help reduce stuttering in the game at the cost of some FPS the closer this value gets to 1.0. Note that altering this value can cause a quest bug in Chapter 5, so reset it to its default of 0.1 for the duration of that chapter.
snd_async_fullyasync [0,1] - If set to 1, sound may go slightly out of synch with actions at times but you will experience reduced loading pauses and stuttering.
mem_force_flush [0,1] - If set to 1 forces the cache to be flushed on every allocation, which is not necessarily optimal but can reduce memory-related errors and crashes. Set this to 1 if troubleshooting such problems, otherwise set to 0.
[General Graphics Settings]
mm_fxquality_level [0-2] - This command controls the in-game GFX Quality setting (See In-Game Settings), with a value of 0 being Low, 1 = Medium, 2 = High. However if this command doesn't stick at High in the in-game settings, you can try forcing it to = 2 by inserting it into your autoexec.cfg.
r_aspectratio [0,1,2] - Determines the aspect ratio of the screen display (See In-Game Settings). A value of 0 is 4:3, 1 is 16:9, and 2 is 16:10.
mat_dxlevel [dxversion] - Determines the shader version for special effects applied to materials. Options include 70, 80, 81, 90 and 95 (e.g. mat_dxlevel 81). This is similar to the -dxlevel switch in the Advanced Tweaking section on page 7. Using shader versions lower than the highest level supported by your card will improve performance at the cost of varying degrees of image quality loss (depending on the shader version used). In general DX 7.0 shaders in Dark Messiah will have a lot of visual anomalies and color glitches; DX 8.1 seems to be a good compromise between image quality and performance for those with older cards, but may be unstable.
fps_max [Framerate] - Sets a maximum framerate cap, preventing your FPS from going any higher. Note this setting is not the same as VSync, nor does it dynamically alter image quality to attempt to keep your FPS near the FPS cap. The default is 300 which is fine, however lowering this to match your refresh rate, or an even lower value, may help reduce wild FPS fluctuations which in turn will improve the appearance of smoother framerates.
mat_bumpmap [0,1] - When set to1 enables bump mapping which makes flat 2D textures appear three dimensional. If disabled, textures will be loaded without bumpmapping and will appear far less realistic, however performance will be improved.
mat_specular [0,1] - If set to 1, uses specular lighting which adds shinyness to the surfaces of objects. If set to 0 materials will not have specular lighting applied to them for a performance boost but a slight drop in image quality.
mat_blur [0,1] - If set to 0 disables certain blur effects in the game, which can improve performance and/or reduce annoyance.
mat_bloomscale [0 - ?] - Determines the level of brightness of Bloom, even if HDR is enabled. At levels above 0 the bloom effect increases saturation and brightness. The default is 1 when Bloom/HDR are enabled, but reducing this to 0.5 for example can increase realism. Experiment to see what suits your tastes.
mat_disable_bloom [0,1] - If set to 0 disables the Bloom effect, even if HDR is enabled. This can reduce the saturation effect of HDR and may also boost FPS slightly.
r_drawdecals [0,1] - Decals are impact/scorch/blood marks on walls, surfaces and characters, made from weapons and spells. If set to 1, decals are drawn. If set to 0, all decals are removed improving performance but greatly reducing realism (cheat).
r_decals [number] - Specifies the maximum number of decals possible at any one time. The higher this number, the greater the potential for getting slowdowns during large combat scenes as large numbers of decals are generated. Reducing this setting can improve performance in such situations, without totally losing all decals.
r_drawmodeldecals [0,1] - If set to 1, decals can be drawn on models, which are pretty much everything excluding walls and floors. If set to 0 these decals will be disabled, improving performance during combat for example, but reducing realism.
r_drawparticles [0,1] - If disabled, particle effects - which includes smoke, dust, some spell effects and explosions - will not be drawn. This can greatly improve performance around such effects at the cost of realism.
mat_clipz [0,1] - If set to 1, uses an optimization technique to reduce what is drawn on screen for a performance improvement. Note that some Nvidia FX card owners may need to set mat_clipz 0 to fix rendering problems.
r_farz [-1,0,1] - Controls the far clippling plane, which determines what is not rendered when it is determined not to be visible to the character. A value of -1 is normal, higher values can result in normally visible objects suddenly disappearing from view (cheat).
r_drawRain [0,1] - If set to 1, rain effects will be rendered, however if set to 0 no rain will be drawn. This improves performance in levels where there is visible rain, however realism is reduced (cheat).
r_maxdlights [number] - Determines the maximum number of dynamic lights visible on the screen. The larger this maximum, the more chance of slowdowns during scenes with multiple dynamic light sources. Reducing this value can improve performance in scenes with multiple dynamic lights, such as in heavy combat.
fog_enable [0,1] - If set to 0, will disable fog in areas which normally have fog, which may improve performance at the cost of realism.
fog_enable_water_fog [0,1] - If set to 0, removes all underwater fogging which can cause water to become clearer, but may reduce performance and reduce realism as well.
r_WaterDrawReflection [0,1] - If set to 0, disables all reflections on top of water. This will boost performance quite noticeably in areas with water at the cost of some realism.
r_WaterDrawRefraction [0,1] - If set to 0, disables all refraction - that is images which appear distorted under the water. This will boost performance at the cost of realism, however you may experience some graphical anomalies on the water or even in the sky for some reason.
mat_drawwater [0,1] - If set to 1, all water is rendered. Setting this to 0 can remove water for a major performance boost in water areas at the cost of realism (cheat).
cl_detaildist [range] - Determines the range at which detail props are shown (e.g. grass). The higher the value, the lower your performance as more add-on details are shown. Reducing this setting can increase performance, and increasing this setting will improve image quality, but in Dark Messiah the difference is usually not noticeable.
lod_Enable [0,1] - If set to 1, allows the Level of Detail (LOD) of objects to be gradually reduced the further they are from the player. This should be set to 1 for maximum performance, or 0 for maximum image quality. The difference is usually not visible.
lod_TransitionDist [range] - The distance at which the lod is reduced on objects. The higher this range, the lower your performance but the better distant objects will appear.
r_lod [-8 to 8] - Determines the rate at which level of detail (lod) is stripped from objects as they recede away from the player. The lower the value, the more detail remains visible on objects as they progress into the distance, reducing performance but increasing image quality. In most cases the visual difference is not significantly noticeable.
mat_softwarelighting [0,1] - If set to 1, uses only software-supported lighting though certain areas will show glitching, however this may increase performance on systems with slow graphics cards and fast CPUs.
mat_filterlightmaps [0,1] - If set to 1, static lightmaps are rendered correctly. If set to 0, all areas of pre-rendered lighting will be blocky and unrealistic, but performance may be improved slightly at the cost of realism.
mat_filtertextures [0,1] - If set to 1, textures are rendered smoothly. If set to 0, textures will be blocky and unrealistic (similar to the original Doom) but performance will be improved.
mat_mipmaptextures [0,1] - If set to 0 disables mipmap textures, which harshens distant textures and also seems to reduce performance, therefore should be set to 1 at all times.
mat_showlowresimage [0,1] - If set to 1, loads extremely low resolution blocky textures in place of the normal ones for a significant performance boost at the cost of a great deal of realism.
npcarx_noblood [0,1] - If set to 1 disables most blood effects when fighting with monsters or humans. This may provide a slight performance improvement, however it reduces realism so it's mainly for those who prefer not to see blood. You can also use the arxnpc_decapitatebloodamount 2 command to remove all blood and gore instead.
violence_agibs [0,1] - If set to 0 disables most gore when monsters are hit. Importantly, disabling this also makes monster bodies vanish very quickly after death which can improve performance but reduce realism.
violence_hgibs [0,1] - If set to 0 disables most gore when human enemies are hit. Disabling this can improve performance but also makes human bodies and various world debris disappear quickly after being killed/damged.
[General Sound Settings]
dsp_off [0,1] - If set to 1, disables the audio DSP (Digital Signal Processing) in Dark Messiah. This may improve performance, especially if you're having audio-related issues, but will noticeably reduce the richness of audio effects.
dsp_enhance_stereo [0,1] - If set to 1 enhances the DSP stereo effect, making the environmental sound richer and more atmospheric for a slight performance hit.
snd_digital_surround [0,1] - If set to 1 enables digital surround sound, however this only works if supported by your hardware and speaker configuration, and will reduce performance slightly if enabled.
dsp_slow_cpu [0,1] - If set to 1, reduces the quality of dsp sound effects, improving performance on systems with slower CPUs.
The next section continues the command variable listing.

Gameplay/View Commands
cl_drawhud [0,1] - If set to 0 the Heads Up Display (HUD) - all the information elements overlaid on the main game screen - will be removed, which is useful for taking nice screenshots for example.
mm_hud_display_lifemana [0,1] - If set to 0, removes the Health and Mana bars from your HUD.
mm_hud_displaystealth [0,1] - If set to 0, removes the Stealth indicator - the white circle in the center of your screen.
mm_hud_stealth_reversed [0,1] - If set to 1, your Stealth indicator circle will be all white when visible, and will darken as you become more stealthy, which is the reverse of its normal behavior.
mm_objectives_displaytime [seconds] - The number of seconds to show updated objectives popups on the screen. The default is 8 seconds, but you can lower this if the objective popups annoy you, or increase it if you find you're missing seeing them.
thirdperson - Transfer you to third person view, showing your character in the center of the screen. Note that his head will be missing as it is not normally rendered (cheat).
firstperson - Returns you to first person view.
centerview - Centers the character's view on the middle of the screen (only when bound to a key).
default_fov [angle] - Determines the default Field of View (FOV) in the game. Default is 85 (cheat). Decreasing this creates a 'zoom' effect, increasing it creats a 'Fish Eye' effect.
Demo Commands
[Note: The demo functionality currently appears to be broken in Dark Messiah]
record [demoname] - Starts recording a demo of the current gameplay under the specified filename. The demo will be saved as demoname.dem in the \Program Files\Ubisoft\Dark Messiah of Might and Magic\mm directory along with all its associated files.
stop - Stops recording the current demo.
demoui - Opens/closes a small demo user interface which looks like a media player, but makes the opening and playing of demos much easier, including the capability to FF, REW and skip to specific points in the demo.
playdemo [demoname] - Plays back a pre-recorded demo of name demoname.dem.
stopdemo - Stops playback of the currently playing demo.
demopause - Pauses playback of the currently playing demo.
demoresume - Resumes playback of the currently paused demo.
startmovie - Starts recording movie frames, stored in the \Program Files\Ubisoft\Dark Messiah of Might and Magic\mm\SAVE directory as .tga files.
endmovie - Stops recording movie frames.
Benchmarking Commands
timedemo [demoname] - Plays the specified demo and reports performance information upon completion, including frames played, time taken, average FPS and FPS variability. Also records the information in a file called sourcebench.csv in your \Program Files\Ubisoft\Dark Messiah of Might and Magic\mm directory.
timedemoquit [demoname] - Plays the specified demo as per the timedemo command and then exits the game to desktop.
bench_start [filename] - Starts benchmarking your current gameplay and writes information to the specified file in .csv format.
bench_end - Ends any benchmarking.
bench_showstatsdialog - Shows a dialog box displaying the most recent benchmarking results.
bench_upload - Uploads the most recent benchmarking stats to the Valve servers.
benchframe [framenumber] - Takes a snapshot of the specified frame of a timedemo.
perfvisualbenchmark - Runs a series of benchmarks on the current scene. Note that after this has run, you may notice some glitches and control issues which are resolved with a restart of DMOMM.
perfvisualbenchmark_abort - Stops the benchmarking and prints the results for various aspects of the rendering system in average FPS in the console.
Information & Diagnostic Commands
mat_wireframe [0,1] - Displays materials in wireframe form (cheat).
cache_print - Shows the amount of memory currently used by various items in the game's data cache.
developer [0,1,2] - If set to 1 shows Developer messages in the top left corner, if set to 2 shows more detailed information.
mat_show_texture_memory_usage [0,1] - If set to 1 shows a small box at the top right with the current amount of texture memory used (in KB) to render the visible scene.
mat_reloadtextures - Reloads all textures in the current level which can help resolve graphical glitches, but which may take some time to do.
mat_info - Shows material system information.
mat_reloadmaterial - Reloads all materials which can take quite a while but may resolve any temporary graphical glitches.
perfui - Opens/closes a user interface which allows easy access to performance tools.
soundinfo - Shows information about the current sound output device.
soundlist - Lists all known sounds.
snd_restart - Restarts the sound system which can take a while but may clear any temporary audio glitches.
snd_profile [0,1] - If set to 1, shows dsp usage stats in the console.
stopsound - Stops all sound effects currently playing.
stopsoundscape - Stops all soundscapes currently playing.
Cheat Commands
[Note: The sv_cheats 1 command must be used for most cheat commands work]
sv_cheats [0,1] - Toggle. Enables the use of cheat commands in single player or on a multiplayer server if set to 1. Not all cheat commands seem to require this in Dark Messiah.
god - Toggle. The player becomes invulnerable.
noclip - Toggle. The player can fly and move through solid objects.
notarget - Toggle. The player becomes invisible to NPCs (Non-Player Characters).
ai_disable - Disables all Artificial Intelligence (AI) for NPCs and puts them into their idle animations. Can be used to test the performance hit of AI, or to freeze NPCs for screenshots. Use ai_disable again to re-enable ai for NPCs.
buddha - Toggle. Player can take damage but won't die.
map [mapname] - Starts playing on the specified map. Map names are usually in the form of Level number_Chapter Letter, e.g. L04_B for Chapter 4 part B.
mm_npc_create_[npctype] - Creates an NPC of the given type, for example mm_npc_create_lich will create a Lich in front of the character. Note that created NPCs which are enemies will be hostile to the character.
Multiplayer Commands
[Note: Below is an abbreviated list with mainly useful commands. For a full list, see the top of page 8 and make sure to check all the commands starting with sv_, net and
mp in particular]
addip [ipaddress] - Add an IP address to the ban list.
banid [userid] - Add a user ID to the ban list.
changelevel [mapname] - Change server to the specified map.
cl_allowdownload [0,1] - Client downloads customization files.
cl_allowupload [0,1] - Client uploads customization files.
cl_cmdrate [packets/sec] - Max number of command packets sent to server per second.
cl_lagcompensation [0,1] - Perform server side lag compensation of weapon firing events.
cl_rate [bytes/sec] - Max bytes/sec the host can send data. Default is 10,000.
cl_resend [seconds] - Delay in seconds before the client will resend the 'connect' attempt.
cl_timeout [seconds] - After this many seconds without receiving a packet from the server, the client will disconnect itself.
cl_updaterate [packets/sec] - Number of packets per second of updates requested from the server.
clientport [port] - Host game client port. Default is 27005.
connect [serverip] - Connect to specified server.
disconnect - Disconnect game from server.
hostport [serverip] - Host game server port. Default is 27015.
ip - Overrides IP for multihomed hosts.
kick [username/userid/userslot] - Kick a player by slot, userid or name.
killserver - Shutdown the server.
listid - Lists banned users.
listip - List IP addresses on the ban list.
writeid - Writes a list of permanently-banned user IDs to banned_user.cfg.
writeip - Save the ban list to banned_ip.cfg.
maxplayers [playernumber] - Change the maximum number of players allowed on this server.
mp_allowNPCs [0,1] - Allow NPCs on the server if set to 1.
mp_allowspectators [0,1] - Toggles whether the server allows spectator mode or not.
mp_chattime [seconds] - Amount of time players can chat after the game is over.
mp_disable_autokick - Prevents a userid from being auto-kicked.
mp_fraglimit [frags] - Frag limit for deathmatch games.
mp_friendlyfire [0,1] - If set to 1, friendly fire is enabled.
mp_timelimit [minutes] - Game time per map in minutes.
mp_weaponstay [0,1] - If set to 1, weaponstay is enabled.
net_fakelag [milliseconds] - Lag all incoming network data (including loopback) by this many milliseconds (cheat).
net_fakeloss [percentage] - Simulate packet loss as a percentage of total packets.
net_graph [0,1,2,3] - Draw the network usage graph if set to 1 (More details of usage here).
net_maxfragments [bytes/packet] - Max fragment bytes per packet.
net_showdrop [0,1] - Show dropped packets in console if set to 1.
net_start - Initializes multiplayer network sockets.
password [password] - Current server access password.
ping - Display ping to server.
rate [bytes/sec] - Max bytes/sec the host can receive data. Default is 20000.
rcon [command] - Issue an rcon command.
rcon_password [password] - remote console password.
removeid [userid] - Remove a user ID from the ban list.
removeip [userip] - Remove an IP address from the ban list.
retry - Retry connection to last server.
say [string] - Display player message.
say_team [string] - Display player message to team.
slist - List servers on your LAN.
spec_player [playername] - Spectate player by name.
sv_allowdownload [0,1] - Allow clients to download files if set to 1.
sv_allowupload [0,1] - Allow clients to upload customization files if set to 1.
sv_alltalk [0,1] - Players can hear all other players, no team restrictions if set to 1.
sv_filterban [0,1] - Set packet filtering by IP mode.
sv_lan [0,1] - Server is a lan server (no heartbeat, no authentication, no non-class C addresses, 9999.0 rate, etc.).
sv_maxunlag [seconds] - Maximum lag compensation in seconds.
sv_maxrate [rate] - Max bandwidth rate allowed on server, 0 = unlimited.
sv_minrate [rate] - Min bandwidth rate allowed on server, 0 = unlimited.
sv_maxupdaterate [updates/sec] - Maximum updates per second allowed.
sv_minupdaterate [updates/sec] - Minimum updates per second allowed.
sv_password [password] - Server password for entry into multiplayer games.
sv_specnoclip [0,1] - If set to 1, spectators cannot fly through objects.
sv_timeout [seconds] - Number of seconds without a message from a client before client is dropped.
sv_voiceenable [0,1] - Enable voice on the server.
users - Show user info for players on server.
The commands above are what I consider the most useful and most important for Dark Messiah of Might & Magic based on my personal testing. Once again, if you want the full list see the top of page 8 for details. Most of these commands are identical to those used in other Source engine games like Half Life 2 or CounterStrike: Source, but I've retested all of them as far as possible and the descriptions above should all be accurate for DMOMM. However I need your feedback and corrections if I am to maintain the accuracy of this list, so please Email Me if you have any corrections/additions. Please remember that commands that can be changed in-game, as well as obscure or less helpful commands are not included in the list above.
The next section of the guide covers some very handy tips and tweaks, and brings the guide to a conclusion.

This page finalizes the guide by spelling out a couple of handy tips and tweaks before bringing the whole thing to a conclusion.
Speeding Up Startup Time
While this is covered under the relevant command variables in the Advanced Tweaking section, I thought I'd spell this one out here for those that may have missed it. You can greatly speed up the time it takes to load up Dark Messiah, also reducing memory usage at the same time by doing the following (See the Advanced Tweaking section for details):
1. Go to your Dark Messiah singleplayer launch icon, right-click on it and select Properties. If you are running the game through Steam, instead right-click on the game's name under My Games, select Proprties and then click on the 'Set launch options'.
2. In the Target box, after the last " mark, add a single space then add the following text:
-novid +map_background none
Then click OK and you're done. Using this launch icon will mean the game loads much faster. The first command skips the startup videos, and the second one removes the animated image of the mage and smoke in the background of the main menu screen.
Dual Core Issues
The Source engine as it currently stands is not optimized to take advantage of dual core or hyperthreading CPUs. However if you have an AMD Dual Core CPU, to prevent any problems make sure to download and install the AMD Dual Core Optimizer. This can resolve slowdowns and strange/skipping stuttering on AMD Dual Cores. Intel Dual Core CPUs do not require this fix, however if you still believe you have Dual Core related issues with Dark Messiah, see the Task Manager chapter of the TweakGuides Tweaking Companion for further fixes.
Taking Cool Screenshots
Dark Messiah really does have some detailed and beautiful scenery and characters. If you want to take some amazing screenshots of these, here's a way you can do it. Note that all the commands below are detailed in the Advanced Tweaking section of the guide. Load up your favorite level then open up the console and type the following commands:
sv_cheats 1
god
noclip
cl_drawhud 0
The above commands will remove the HUD overlay, and turn on God mode (so you can't get hurt) and also disable clipping, meaning you can fly around the map. To place an NPC into a specific location for a shot, you can then use the various mm_npc_create_ commands - type cvarlist mm_npc_create in the console and you'll quickly see a list of the monsters/NPCs you can summon with the relevant commands. For example to summon a lich, aim your crosshair towards the location where you want it to spawn, then type mm_npc_create_lich and it will appear. Note that NPCs which are usually hostile will start attacking you, so use the ai_disable command to freeze them in place (you can freeze/unfreeze them using ai_disable again).
Now all that remains is to stage the shot you want, and then either use FRAPS (see below), or type jpeg in the console, or bind the jpeg command to a particular key e.g. Bind F10 Jpeg to bind it to the Function 10 key, and you will take a screenshot saved to your Program Files\Ubisoft\Dark Messiah of Might and Magic\mm\screenshot\ directory. You can even specify the quality of the Jpeg images using the jpeg_quality command, e.g. jpeg_quality 60 to set 60% quality. In general anything over 51% quality looks fine.
Benchmarking, Video Capture and Screenshots
To run benchmarks of the game's performance see the Benchmarking section on page 9, although note that the demo record/playback commands appear broken at the moment. To take screenshots of the game, use the jpeg [filename, quality] command as detailed on page 8. However to make both of these much easier to do, and to allow you to easily capture fullscreen video of the game, I recommend the FRAPS utility. The free version does all this, allowing up to 30 seconds of video capture.
Conclusion
Well that brings this guide to a close, and although I was able to complete it relatively quickly because of my earlier work on the Half Life 2 Tweak Guide, I can promise you that I had to spend quite a lot of time retesting everything as Dark Messiah is not exactly the same as Half Life 2, and various things have changed or have been added - from the in-game settings to the command variables. Some of the in-game settings in particular proved very troublesome to work out as they appear to have no effect. As always, please Email Me if you want to give me feedback or have any corrections/suggestions/additions for the guide, however please keep in mind that I can't provide personal tech or tweaking support. I hope you've found the guide useful.
Until next time, take care!

