Once upon a time, a game called Prince of Persia made platform gaming popular. The idea that our hero could not only fight, but also climb, swing and jump from one precarious perch to the next soon caught on thanks to The Prince. At first it was all done in two dimensions, and then simple 3D, but in 2003, Ubisoft Montreal released Prince of Persia: Sands of Time, which took the whole deal to a glorious new level, complete with beautiful graphics and fluid animation.
But why am I going on about Prince of Persia? Because it's the game that laid down the foundations for Assassin's Creed - basically if you like the Prince of Persia series, especially The Sands of Time and The Two Thrones, then you'll love Assassin's Creed. Altair (Al-Tahir), the protagonist of Assassin's Creed, shares a great deal of his fighting, climbing and jumping style with The Prince. Similarly, the game world has a PoP look and feel to it, albeit with much more depth and detail. And the gameplay can best be described as fun, in much the same vein as the PoP series.

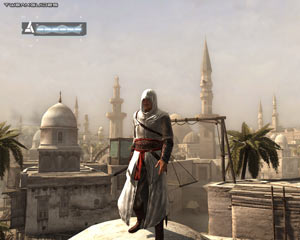
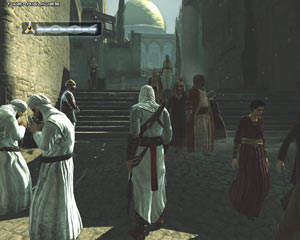
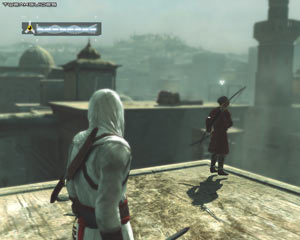
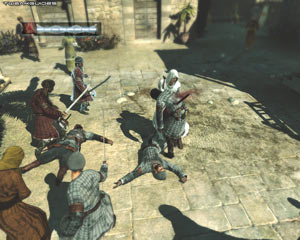
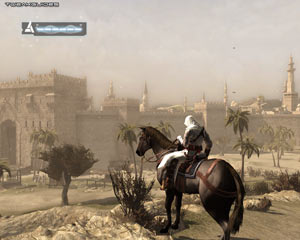
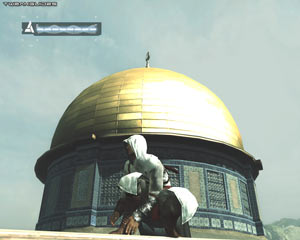
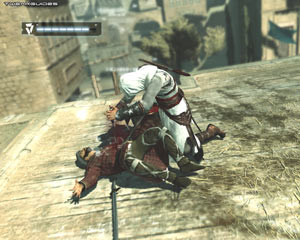
Comparisons with Prince of Persia aside, what does Assassin's Creed have to offer? For starters it has very immersive and attractive graphics; there's no denying it's a pretty, atmospheric game. The gameplay sacrifices a great deal of realism and complexity but in return ensures that things keep flowing along smoothly. You can wander large crowded city environments filled with all the sights and sounds you'd expect, or travel long stretches of open road on a galloping horse. It has visually exciting combat and assassinations. You shouldn't mistake it for an RPG or an FPS, but if you're keen for some unsophisticated, straight-up action and adventure, then Assassin's Creed should satisfy your needs.
Despite clearly being a console port, Ubisoft has invested some effort to ensure that the game hasn't wound up like so many bad ports we all know and hate. As a result, Assassin's Creed is fairly optimized for PCs, and runs fairly well despite its very steep minimum requirements. However it does display signs of some odd design choices, again courtesy of its console heritage. The game manual is pretty much useless in explaining what all the settings do, and of course doesn't cover any advanced tweaking, so instead I've compiled this guide, giving every player all they need to know about how to configure the game properly and tweak it to suit their needs, as well as a range of troubleshooting tips. There are no magic fixes, but plenty of good information should you wish to avail yourself of it.
Note: This guide refers to the latest version of Assassin's Creed, Version 1.02. Make sure to check back regularly for updates.
Before getting into any game-specific settings and tweaks, this section covers the obligatory system optimization information I include in all my guides. If you've followed this advice recently, you can skip this section.
Many people report problems with this game and in most cases these are due to general system issues and not the game itself. With that in mind I strongly urge you to take some time and follow the advice below if you truly want this game, and indeed every other game you own, to run at its fastest and most trouble-free.
The place to start is with the TweakGuides Tweaking Companion. It is the complete system optimization guide for Windows users. Designed for novice and advanced users alike, it is written in plain English to help you genuinely understand all aspects of Windows and your PC. The guide covers every major topic, from the correct installation of Windows and critical drivers and software, through to recommendations for every significant setting and feature, all the major performance and convenience tweaks and customizations, as well as detailed troubleshooting advice. There are also links to a range of reliable free applications which can enhance your system and give you viable alternatives to purchasing commercial software. There are separate versions available for Windows XP, Windows Vista and Windows 7.
If you've ever wondered what common graphics and display settings like FPS, VSync, Refresh Rate, Antialiasing and Anisotropic Filtering are, and how they really work, then check out my Gamer's Graphics & Display Settings Guide for all the details in an easy to understand format. The guide also gives you a rundown on exactly how a game goes from a being a set of files on your hard drive to a 3D image on your screen, including relevant performance tips.
Finally, if you run an ATI or Nvidia graphics card, I have written two comprehensive guides which you should check out: the ATI Catalyst Tweak Guide and the Nvidia Forceware Tweak Guide. These guides cover absolutely everything about the latest graphics drivers, how to set them up correctly, as well as advanced tweaking, overclocking and benchmarking tips. They're a must-read for configuring your graphics card correctly.
The above information really will serve you well in the long run, not just in this game. If you don't optimize your system and keep everything updated and maintained correctly you will keep running into "mysterious" problems time and time again. Do yourself a favor and when you get a chance spend an afternoon or two optimizing your machine the right way with the guides above.
The next section goes into more detail about specific troubleshooting tips which address common performance issues with the game.

This section contains specific troubleshooting tips which address many of the common problems experienced by players. I can't stress enough the importance of taking the time to go through the checklist of advice below if you're having a problem with the game.
Official Support: The first place to look for official support details is in the Readme.txt file in your \Program Files\Ubisoft\Assassin's Creed\Support\Readme directory, as it contains important details like the minimum hardware requirements for the game, as well as known issues. Next, you should check the Official Ubisoft Support Site for more details of known issues and solutions. Finally, you can get community tech support via the Official Assassin's Creed Forums - see in particular this thread.
The game also runs a detection application both the first time you start the game, and any time you wish if you run the Detection.exe file found under the \Program Files\Ubisoft\Assassin's Creed\Detection directory. Click on the boxes in the left column and the minimum requirement is shown at the bottom of the screen. If the program detects that you do not meet all the minimum requirements, you will have problems running the game, or may not be able to run it at all.
The Latest Graphics Drivers: One of the easiest ways of gaining performance in Assassin's Creed, as well as resolving any problems you may be having, is to use the latest available graphics drivers for your system. See my ATI Catalyst Tweak Guide or Nvidia Forceware Tweak Guide for details on where to download the latest graphics drivers and how to install them 'cleanly'. Make sure to grab the latest drivers, even if they're (official) beta drivers.
Audio Problems: Many people are experiencing audio-related issues with Assassin's Creed. This guide has a range of fixes you can try - see the Audio section of the guide, as well as the Advanced Tweaking section for more details.
Black bars: Assassin's Creed renders its graphics output in 16:9 widescreen format, a sign of its console heritage. This cannot be changed within the game, however there is a tool which can fix this for those running in DX9 mode - see the Resolution setting under the In-Game Settings section of the guide for full details.
Freezing/Stuttering/Crashes: For users experiencing noticeable freezing/stuttering or odd crashes, you should keep in mind that Assassin's Creed is very stressful on most every system. It maxes out both cores of dual core CPUs, it pushes the GPU quite hard, and even seemingly "stable" systems will experience crashes unless correctly configured. I strongly urge you to take the time to go through the TweakGuides Tweaking Companion to be certain you have an optimal and stable system setup. In my many hours of playing and testing Assassin's Creed, I have not crashed once, so it is not normal for the game to crash on all systems. However there is one specific fix you can try which may help - it appears that preventing the game executable from regularly (and unnecessarily) accessing the Internet can help stability and performance. If you're using the Windows Firewall, open it (Control Panel>Windows Firewall), then under the Exceptions tab untick both the Assassin's Creed DX10 and Assassin's Creed DX9 exceptions - these are not necessary whatsoever. Only the Assassin's Creed Update exception needs to be left ticked, so that the game's updater can contact its server at startup. If that doesn't work, try removing your network cable altogether, reboot and try playing the game.
Defragmenting: Assassin's Creed is a large game, and as with most games these days, it is very important that you run a defragmentation program after installing the game (and any patches or drivers) to reduce stuttering and loading issues. The normal Windows defragmenter is fine, however to get an even better result consider a commercial defragmentation package. More details are in the Drive Optimization chapter of the TweakGuides Tweaking Companion. Defragmenting is a critical step in reducing in-game stuttering.
Background Programs: The game's developers recommend that you disable all background applications - especially virus, trojan and spyware scanners and messaging utilities. These applications can and do use up valuable CPU resources, take up precious RAM, cause memory conflicts and crashes to desktop, but most importantly they interfere with read/writes to your hard drive effectively slowing it down and causing in-game stuttering. Full instructions on how to identify your startup programs and services and how to correctly disable unnecessary ones are in the TweakGuides Tweaking Companion. This is an important step you should not miss as it has a major impact on the smoothness of the game.
Overclocking: Assassin's Creed can be sensitive to overclocking. If you've overclocked any components on your system and are having problems such as crashes, reboots and graphical anomalies, the first thing to do is set everything back to default speeds and try running the game. If you don't experience the same problems at default speed, or they're reduced in severity, then your overclock is the primary culprit. Either permanently reduce your overclock and/or increase cooling to regain stability. Don't assume that because other games run with stability at a particular speed that Assassin's Creed will do the same.
Heat Issues: Because Assassin's Creed can be quite stressful on both the CPU and GPU, even if you don't overclock your system you will have to keep a close eye on your temperatures, especially under full load, to make sure that your system doesn't crash or experience graphical anomalies through excessive heat. Many of the crashes that I've seen are to do with overheating systems - you will need to ensure plenty of air runs through your case and all your components are free of dust buildup so that your system remains cool under load.
I cannot urge you strongly enough to follow the advice on this, and the previous page. Make absolutely sure that you take the time to go through the completely free downloadable PDF TweakGuides Tweaking Companion, because that alone will make the biggest different to the stability, performance and smoothness of Assassin's Creed. I realise most of you are after a patch or a tweak which will make all these steps unnecessary, but the reality is that most PC game problems are caused by sub-optimal system conditions on individual PCs, not inherent game bugs. It may be boring to go through the TGTC for example, but it will give the biggest rewards to those who do, both in terms of performance and stability.
The remainder of this guide goes into more specific settings and tweaks which can help you better understand how the game works, and in turn improve your performance and customize it to suit your needs.
Official Patch
Ubisoft has released the 1.02 Patch for Assassin's Creed. This patch contains a range of fixes, adds official support for Windows 64-bit, and fixes any DirectX 10.1 issues on ATI HD3000 series graphics cards by removing DX10.1 support, which in turn may reduce performance in DX10 mode on those cards.
Note that if you launch the game via the Launcher, it will automatically check for updates and patch the game to keep it updated. I will have more details of future patches here, so check back regularly.
Copy Protection
Assassin's Creed is protected by the SafeDisc copy protection system, which means you need to keep the game DVD in the drive during play. You might also have to disable any virtual drives as this can conflict with SafeDisc. Furthermore some DVD drives may require a firmware update to be able to prevent read errors - see your drive manufacturer's site for details of how to update the firmware. Hopefully Ubisoft will remove the disk check from the game in a future patch, but given it's a single player game with no multiplayer component, it's unlikely this will occur.
Mods
Assassin's Creed is a game originally designed for console and ported over to PC. As such it's unlikely there will be many, if any, mods for the game. There are no modding tools available, hence the customization options are limited. However as with other console-derived games, there is the possibility that people can design some basic mods for the game, particularly to address minor annoyances such as the black bars or the lengthy exit process (one such fix is already listed under the Resolution setting in the In-Game Settings section). If I hear of any major mods I will list them here.
The next section starts our look at Assassin's Creed's In-Game settings in detail.
This section contains full descriptions and recommendations for all of Assassin's Creeds major in-game settings. You can use these to get a good balance between image quality and performance on your machine, however I can't give you precise performance impacts or specific instructions on what to turn on or off. It all depends on your particular hardware combination, and more importantly your personal taste for the trade-off between performance and image quality.
To access all the in-game settings, during an active game press ESC and select Options, then refer to the relevant sections below. Make sure to click the Apply button any time you change a setting if it is available.
Profiles: Before changing any settings, you will have to create a new profile, or select an existing one to continue with. It is important to understand that the game automatically saves your progress regularly as you reach certain points and achieve certain tasks, and this is saved against your profile. By default your profile and saved games are found under the Documents and Settings\Username\Application Data\Ubisoft\Assassin's Creed\Saved Games directory in Windows XP, and \Users\Username\AppData\Roaming\Ubisoft\Assassin's Creed\Saved Games in Windows Vista. Each set of profile files is identified by a string of numbers - to see which set of numbers relates to which profile, open a file ending in .hdr with a text editor like Notepad, and the name of the profile which corresponds to that numberical string will be shown. Note that the profiles/saved games are interchangable with all modes of Assassin's Creed; you can move them between XP and Vista, and also use the same profile in either DX9 or DX10 mode within Vista.
Graphic
Resolution: This option lets you choose the resolution of the game image, measured in pixels wide by pixels high. The higher the resolution, the more detailed the image on screen, but the lower your performance. For more details see the Resolution section of my Gamer's Graphics & Display Settings Guide. The number of resolutions available here are limited by what both your graphics card and monitor can handle. There are some important things to note about Resolution in Assassin's Creed:
You will also notice that each resolution has a particular Refresh Rate shown (a number in Hz), and this is described in more detail in the Refresh Rate section of my Gamer's Graphics & Display Settings Guide. Note: If you wish to set a different resolution and/or refresh rate than is allowed here, you can do so by changing the DisplayHeight, DisplayWidth and RefreshRate .ini variables covered in the Advanced Tweaking section.
Vertical Sync: This option controls whether Vertical Synchronization (VSync) is enabled or disabled in Assassin's Creed, and is described in more detail in the VSync section of my Gamer's Graphics & Display Settings Guide. It is strongly recommended that you set VSync to Off for the highest performance, however if you find that 'tearing' is annoying you too much, you can enable it, but you should then also enable Triple Buffering as described here to offset the negative performance impact.
Brightness: This slider simply controls the overall level of brightness in the game. Set it to suit your taste, it has no performance impact.

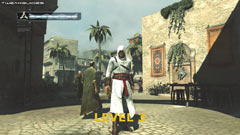
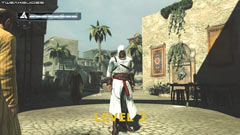
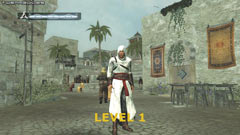
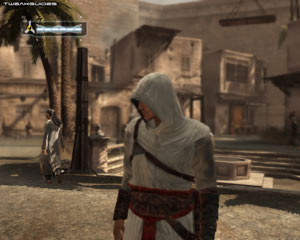
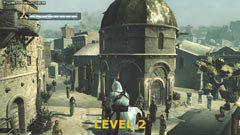
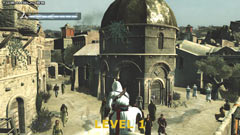
Graphic Quality: This option controls the overall level of graphics quality in the game. There are four levels available, with higher values providing better image quality at the cost of performance. A screenshot comparison of each of the four levels is provided above, and the significant differences are described below:
Obviously, unless you're absolutely struggling for performance, Level 1 is not recommend whatsoever. Even though it provides a significant jump in performance over Level 2, it also significantly reduces the atmosphere and visual quality of the game. Note that you can individually customize which effects are used by using the Particle, LODBlend, Clutter, Layers, Anisotropic, AlphaTest, AdvancedDynamicLighting, and ShadowMapSize .ini variables in the Advanced Tweaking section if you want to come up with a custom blend of graphics and performance for yourself.
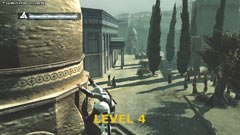
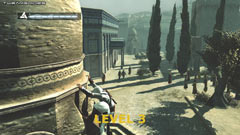
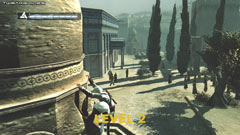
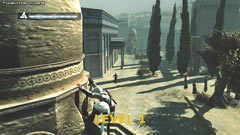
Level of Detail: This setting controls the overal Level of Detail (LOD) in the game, particularly with regards to the way NPCs appear, both the detail in their features and the number which are visible in the distance. As this setting is lowered, more details are removed, but performance will improve. A screenshot comparison of each of the four levels is provided above, and the significant differences are described below:
In general, changing the Level of Detail slider by itself will not dramatically affect the overall draw distance on Assassin's Creed. In large outdoor areas, even when looking into the far distance at LOD Level 1, you will still see most of the same objects and details as at LOD Level 4, with the exception of a few distant trees and bushes. The most significant impact of this slider actually comes in reducing the visible number and complexity of other characters, which in turn can noticeably boost performance in crowded areas, at the cost of visual quality and atmosphere. The .ini variables the Level of Detail slider affects include DistanceLOD, MaxNPCLODLevel, SmallObjectsCullDistanceModifier, MediumObjectsCullDistanceModifier, DistanceLODEnabled and ProcessBoneModifiers - see the Advanced Tweaking section for more details.
The next page continues the In-Game Settings descriptions.

Shadows: This setting controls the quantity and draw distance, not the quality of shadows in the game - for the setting which actually affects overall shadow quality, see the Graphic Quality setting on the previous page. Note that if Graphic Quality is set to 1, all shadows are disabled, so changing this setting won't have much impact. When this option is set to 3, all shadows are shown; when set to 2, most shadows up to around middle distance are much lighter, and all shadows at longer distance are removed; when set to 1, all but fixed shadows are completely removed, including cloud shadows. A screenshot comparison is provided above, demonstrating the impact. By lowering or removing shadows in this way you can gain a great deal of performance, particularly in crowded scenes, but this obviously comes at the cost of realism and atmosphere. Note that shadow quality will differ between DX9 and DX10 mode - see the DX9 vs. DX10 section on the next page.
Multisampling: This setting controls the level of Multisampling, which is a form of Antialiasing (AA), an effect designed to reduce the jagged or 'stair-step' edges on objects in the game world. At Level 1 there is no AA applied, which provides the best performance but the most jaggies; At Level 2 some AA is applied, it looks most likely to be 2x AA - this smooths out many jagged lines to a degree and reduces the 'sparkle' effect of distant jaggies; at Level 3 it appears 4x AA is being applied, which greatly reduces/removes jaggedness from the game, at the cost of a noticeable hit in performance. An animated screenshot comparison of the general impact of the three levels of Multisampling is shown in this close-up portion of the game screen: AC_Multi.gif (448KB) - note in particular the obvious impact on the roofline at the top left.
Importantly, it seems that at higher resolutions, typically above 1600x, Assassin's Creed automatically disables access to Multisampling (i.e. it is fixed at 1 on the slider and greyed out, which equals no AA). I suspect this is because the combination of a high resolution plus Multisampling AA would require a great deal of Video RAM, which in turn could cause a great many problems on most systems, so it's been disabled. You have several options if Multisampling is disabled for you:
Whatever you do, don't try to force Antialiasing via your graphics card's control panel, as aside from not working, forcing any graphics options on Assassin's Creed via the graphics control panel can result in glitches and performance issues in the game.
PostFX: This setting controls certain post-processing special effects applied in Assassin's Creed. Setting this option to Off will improve performance, but it does not disable special effects like Bloom or Depth of Field; however it does noticeably reduce the intensity of Bloom lighting, and removes motion blur. In general the difference is not always very noticeable, however to see it more clearly, click this animated comparison: AC_PostFX.gif (301KB) - note the change in intensity of bloom in the sky in particular. You might wish to disable PostFX if you find the motion blur during horse riding annoying, or want to dim down the overall Bloom effect of lighting for example. Note that if the Graphic Quality setting (see previous page) is set to 1, PostFX is not accessible.
Audio
SFX Volume, Music Volume, Voice Volume: These sliders control the volume of the overall game world and special effects; the music volume; and the voice volumes respectively. They have no impact on performance, so set to suit your taste
If you are having audio problems in Assassin's Creed, particularly with audio glitches or missing sound, this is probably due to the game's use of EAX/DirectSound. The use of EAX can cause problems, particularly on sound cards which provide minimal EAX support, such as onboard audio. You can try one or all of the following to see if it helps (try them in the order shown):
1. Make absolutely certain you have the latest audio drivers for your sound device, and they are cleanly installed - see the Driver Installation chapter of the TweakGuides Tweaking Companion for links and details.
2. Make sure to disable any additional EAX or CMSS effects in your sound card's control panel.
3. If running Windows XP go to the Windows Control Panel> Sounds and Audio Devices> Audio> Advanced> Performance tab and move the 'Hardware Acceleration' slider to the first notch from the far left (i.e. Basic Acceleration).
4. Edit your DARE.ini file to reduce or increase the value of the NB_AUDIBLE_VOICES variable; also try setting DISABLE_OPTIMISATION to =TRUE - see the Advanced Tweaking section for more details of these.
5. Go to your \Program Files\Ubisoft\Assassin's Creed directory and backup the eax.dll file there, then replace it with this one: eax.dll.
In the end however, if the steps above don't work, then it's likely you will either have to wait for newer audio drivers from your sound device manufacturer, or a patch from Ubisoft to fix this aspect of the game.
Gameplay
Vibration: Unless you have connected a controller which is capable of vibrating to your system, this option will not be available. If available you can set it to On or Off based on whether you want the controller to vibrate.
Blood: If set to On, allows the appearance of blood in the game, such as when slashing an opponent with your sword. If set to Off, all blood is removed. Has no significant impact on performance, set to suit your taste.
High Profile Toggle: If set to On, whenever you press your High Profile button (e.g. the right mouse button on a keyboard/mouse setup), it will remain enabled until you click it again. If set to Off, High Profile mode will only be in effect as long as you are actually holding down the relevant button. Set to suit your taste, has no performance impact.
Target Lock: If set to On, Target Lock will only remain in effect as long as you're holding down your Target Lock button (e.g. the F key on a keyboard/mouse setup). If set to Off, Target Lock will remain active until you press the Target Lock button again. Again, no performance impact so set to suit your taste.
Crowd Density: This setting controls the maximum number of NPCs (non-player character) visible at any one time. There are three levels: Min, Med and Max, and the lower the setting, the potentially higher your performance will be. At the Minimum setting, only a total of 80 NPCs can exist at the same time; at the Medium setting 90 NPCs are allowed at most; and at the Maximum setting up to 105 NPCs are possible at the same time. In practice changing this setting won't greatly affect the number of people you see on the streets of most cities, because there will probably only be around 20-30 people visible at any one time. However you should notice a difference in larger outdoor areas or when vieiwng the city from above for example. Note that the Level of Detail setting (see previous page) will have a greater impact on how many NPCs you can see. Note further that you can manually adjust the maximum number of NPCs by changing the MaxNumNPCs .ini variable as covered in the Advanced Tweaking section.
HUD Elements
These settings control which aspects of your Heads Up Display (HUD) are shown on screen. In general none of them have any performance impact, so you should change whether they're displayed or not for a combination of gameplay and personal taste reasons.
Control HUD: Your Control HUD is the set of buttons and actions shown at the top right of your on-screen HUD. They constantly change depending on whether you're in Low or High Profile mode, as well as in various circumstances. Typically you can turn this element off once you get the hang of how to use the various controls in different situations.
Weapon Icon: Your Weapon Icon is displayed in the lower left corner of the HUD, and shows your currently equipped weapon, as well as available weapons when you press a numeric key (1 - 4). After a while of playing you shouldn't need this item displayed.
Sync Bar: The Sync Bar is the long thin bar shown at the top left of the HUD, and displays your current Sync Status (basically your Health), along with the Social Status/Soldier Awareness Indicator at the far left end of the bar. Generally it is best to keep this HUD component enabled, as it constantly provides valuable information on how vulnerable you might be to attack.
GPS System: The GPS System is the small map shown in the bottom right corner of the HUD, and provides markers which show your currently available objectives as well as other game world features. You can view a larger map at any time by pressing the TAB key by default. This element can make navigating the game world and finding objectives much quicker, but this also makes the game easier in some ways.
Since Assassin's Creed doesn't have a difficulty setting of any kind, by enabling or disabling certain HUD elements you can in effect alter the difficulty of the game. For example if you disable the Sync Bar and/or the GPS system HUD elements in particular, you will make the game much more challenging and immersive - you will instead have to pay much more attention to your environment, interact more, and use things like Eagle View and the full map to find objectives. Furthermore, given a large portion of the screen is already taken up by black bars on most displays, having the screen further obscured by HUD elements is not desirable, so disabling as many as you can helps you see more of the visuals.
Camera
These settings control the way the control camera responds to movements. None of them have any performance impact so set to suit your taste.
Invert X Look: If set to On, this option means moving your mouse left will make your character look right, and vice versa.
Invert Y Look: If set to On, pushing your mouse forward will make your character look down, and pulling your mouse back will make him look up
Look X,Y Sensitivity: These settings control how sensitive the camera movements will be to your mouse movements. The X Sensitivity controls the speed with which the camera moves left to right; the Y Sensitivity controls the speed for up and down camera movements.
Importantly, if you are experiencing 'mouse lag' at any time, namely the feeling that your mouse is laggy or less responsive in the game, then you will need to ensure that your Frames Per Second (FPS) are sufficiently high. Download and run the FRAPS utility in the background to measure your FPS (note that FRAPS may have some glitches in Assassin's Creed), and any time you get around 20FPS or less, it is likely you will experience an increase in mouse/control lag. You will have to change your settings to increase your average framerate, particularly during combat and in heavy crowd scenes. You can also try changing your 'Maximum Pre-Rendered Frames' option available in the 174 or newer Nvidia Forceware - see this page of the Nvidia Forceware Tweak Guide; or for ATI users, change the 'Flip Queue' setting using ATI Tray Tools, as covered on this page of the ATI Catalyst Tweak Guide. A value of 2 or 1 for these settings may help reduce mouse lag, but in the end low FPS almost always results in unavoidable mouse lag.
Customize Controls
The options in this section allow you to choose how to configure your controls - set everything to suit your taste, nothing has any impact on performance. Assassin's Creed has a range of controls which appear to be quite confusing at first, but they become more intuitive to use over time.
The next page concludes the In-Game Settings section.
DirectX 9 vs. DirectX 10
Assassin's Creed is yet another title in recent times to offer the ability to run in DirectX 10 mode. I won't cover the requirements and technical advantages of DirectX 10 here - refer to the Graphics & Interface chapter of the TweakGuides Tweaking Companion for Vista for all the details. Basically DirectX 10 mode can only be run under Windows Vista, so if you're running Windows XP Assassin's Creed will automatically run only in DirectX 9 mode, while in Vista you get the option of both DX9 or DX10, though by default it automatically runs in DirectX 10 mode.
To manually choose which mode to run the game in under Windows Vista, unfortunately you cannot use the normal trick of right-clicking on the game icon in Games Explorer and choosing the mode, as the option doesn't exist. Instead, you should create separate desktop icons for launching Assassin's Creed in DX9 and DX10. Go to your \Program Files\Ubisoft\Assassin's Creed directory and right-click on the AssassinsCreed_Dx9.exe file, and select Send To>Desktop; do the same thing for the AssassinsCreed_Dx10.exe file. You can now use these desktop icons to launch the game in the relevant mode as desired. If you're running the Steam version of the game, you need to backup the DX10 .exe to another location and then delete it from the main game directory, then rename the DX9 .exe file to the same name as the DX10 .exe - the game will now run in DX9 mode when launched.
Below we look at the performance and graphics quality of the game in all three: DX9 XP vs. DX9 Vista vs. DX10 Vista. I ran the game on my XP/Vista dual boot on this system. For all three modes the exact same in-game settings were used (everything at maximum), along with identical settings in the graphics card control panel (everything at the highest possible quality, no additional AA/AF). I've used both a static scene with no moving objects, as well as a typical city scene with some NPCs. Because the game does not allow restoring specific save points, the scenes may vary slightly in composition and/or angle. FPS is shown at the top right of each shot, but is also reproduced for easy reference:
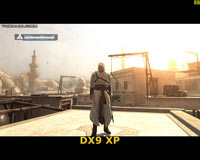
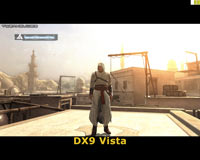
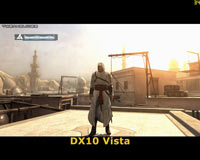
FPS Results - DX9 XP: 46, DX9 Vista: 33, DX10 Vista: 34
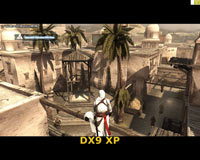
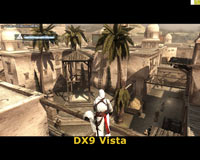
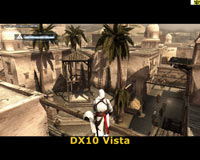
FPS Results - DX9 XP: 37, DX9 Vista: 26, DX10 Vista: 26
XP DX9 vs. Vista DX9: In the first set of comparisons, all three modes look pretty much identical in terms of image quality. However performance is clearly superior in XP DX9 mode. In the second set of shots, XP DX9 and Vista DX9 modes look identical, save perhaps for slightly better antialiasing in Vista DX9 - examine the flat wooden roof at the middle right of the screen, it appears slightly less jagged in Vista DX9 mode. However Vista DX9 is also noticeably lower in FPS than XP DX9, so any tiny image quality benefits come at the cost of framerate.
DX9 vs. DX10: In the second set of shots we start to see some noticeable differences between DX9 and DX10 mode. The significant difference is in the shadows - the DX10 shot is slightly darker and richer than both the DX9 shots, despite the same Brightness level in all three (5/10 on the slider), mainly because the shadows are darker. DX10 mode also seems to have different shadow quality to DX9 mode - compare the shadows on the palm fronds, they're much more detailed in DX10 mode. Furthermore, look at the shadows on the building to the far left, especially under the dome and around the windows - there are less glitches visible. Indeed in a range of other places in the scene, there are less shadow glitches in DX10 mode, though there are different glitches visible in DX10 mode, such as the horizontal shadow lines on the two palm fronds on the left of screen for example. It should be noted that both DX9 and DX10 mode in Assassin's Creed have an identical maximum shadow map resolution of 1024x, which is what all shots above are using, so any difference is in the way they're rendered in each mode.
What the screenshots don't show too well is that in DX10 mode, the implementation of Bloom and Multisampling also results in slightly better image quality. It's very subtle, but it does seem that DX10 mode provides that extra edge in the visuals. However it is by no means highly noticeable - the only real difference is in the shadow quality as demonstrated above.
Importantly, note that the performance differences shown above are indicative only. Generally speaking, XP DX9 mode should be faster than Vista DX9 or DX10 mode on most systems, however the actual level of difference between all three modes will vary based on the system being used. The developers of Assassin's Creed have stated that DX10 mode is supposed to be faster than DX9 mode in Windows Vista, and also provide greater potential for improvement via driver optimizations. Again, whether this is what you experience or not will depend on your system, as Assassin's Creed is both CPU and GPU-intensive, and if one or the other is slower on your system, it can bottleneck your results, depending on your resolution and settings.
Update: Assassin's Creed actually supports the new DirectX 10.1. This was first noted by Rage3D in this article, and has been confirmed by Ubisoft here. The implementation of DX10.1 only benefits people with Vista SP1 and a DX10.1 graphics card (i.e. ATI HD3000 series or newer), and as explained in the link above, much of the additional performance benefits in DX10.1 come from the fact that it removes a render pass, though this appears to have no visible impact on image quality.
As of the 1.02 Patch, Ubisoft has removed DX10.1 support ostensibly to prevent glitches, and this may reduce performance in DX10 mode on ATI HD3000 series cards or newer. At the moment Ubisoft has stated that they have no plans to reincorporate DX10.1 support for Assassin's Creed in the future.
The next section begins our look at the Advanced Tweaking possible in Assassin's Creed.
Assassins' Creed is, at its heart, a console port - that means it was designed for gaming consoles, and "ported" over to PC. As with most console ports, this means that it has far less options for advanced tweaking than made-for-PC titles like Crysis or STALKER, precisely because it was never really designed to be extensively tweaked or modified by the end user. Still, this doesn't prevent you from being able to do some advanced tweaking and customize the game further to suit your specific needs. In particular, advanced tweaking allows you to 'mix and match' various settings which would otherwise not be possible if only using the in-game options. The in-game Graphic Quality slider for example controls over 8 different variables at once, so say you want to choose Level 2 on the Graphic Quality slider for better performance, but wish to maintain high resolution shadows - you can do so via advanced tweaking as described below.
There is only one main way to access advanced tweaks in Assassin's Creed, and that's via the game's initialization (.ini) files which are found under the following directories:
Windows XP: \Documents and Settings\Username\Application Data\Ubisoft\Assassin's Creed
Windows Vista: \Users\Username\AppData\Roaming\Ubisoft\Assassin's Creed
The two .ini files are Assassin.ini which holds all the in-game settings related to graphics and gameplay, and DARE.ini which holds all the audio-related variables. You can open and edit these files using a text editor such as Windows Notepad, but make sure to back them up first before making any changes.
Below we look at all the main .ini variables and what they do. Note: any variable which can be completely adjusted using the in-game settings is not covered (e.g. the PostFX or VSynch variables), and furthermore, any variable which appears to have no visual and/or performance impact is also excluded. Importantly: If you adjust these .ini files, do not go back into the in-game options as this may reset many of the variables back to default settings, and thus your changes won't be implemented.
Assassin.ini
[Player]
LastUsedProfile=1207889740
The value for this variable records your last used profile in the game. The number corresponds with the saved game and associated profile files found in your Profile directory (See the Profile section of the In-Game Settings for details). Remember, you can match profile numbers to profile names by opening the relevant .hdr file with a text editor to see what the profile name is for that string of numbers.
[Graphics]
DisplayWidth=1280
DisplayHeight=1024
These two lines determine the width and height of the display resolution used for the game. While you can set the resolution in the in-game Resolutions setting under Graphic Options, if you want to try setting a custom resolution, alter these lines - but make sure the Refresh Rate (specified below) is supported by your monitor and graphics card at your chosen resolution.
RefreshRate=60
This option determines your refresh rate in Hz at your chosen resolution. Typically it can be set using the in-game Resolutions setting under Graphic Options, however you can try forcing a different refresh rate here as long as you are certain your monitor supports it. If your monitor doesn't suppor the refresh rate your game may not start, or may start with a black screen.
ShadowDistance=4
This variable is normally controlled by the in-game Shadows setting under Graphic Options. It determines the distance at which shadows are visible. At Shadows Level 3, this variable =4, at Shadows Level 2, this variable = 2, and at Shadows Level 1 this variable =0 (i.e no shadows). If you wish to have better control over the shadow distance, you can manually set the value here, e.g using a value of 3 or 1, which is not possible by using the in-game settings. Altering shadow distance can have a noticeable impact on both the image quality and performance in the game.
ShadowMapSize=1024
This variable determines the resolution, and hence overall quality, of shadows in the game. The higher the value, the less pixellated, and the more detailed shadows will be, at the cost of some performance. It is normally controlled as part of the in-game Graphic Quality setting found under Graphic Options. However if you wish to set a value other than the specific values determined by that setting (i.e. 1024, 768, 640 or 512), you can do so here. For example, you can use values lower than 512 (such as 256 or 128) to improve performance at the cost of image quality. Note that it appears that 1024x resolution is the maximum possible, higher values seem to have no impact on shadow quality.
Multisampling=1
This variable controls Multisampling Antialiasing (AA), and can be adjusted using the Multisampling setting as described in the In-Game Settings section. The main reason you would want to adjust this setting in the .ini file is if you don't have access to it in the in-game options because you've set a high resolution. A value of 0 for this variable = no AA, 1 = 2xAA, and 2 = 4xAA. Higher values appear to be ignored.
DistanceLOD=0
This variable determines the detail of objects visible in the distance. The higher the value, the fewer objects will be visible at distance, which may improve performance in large outdoor areas. It is normally controlled as part of the Level of Detail slider in-game setting. At Level of Detail 4 and 3, this variable =0, and at Level of Detail 2 and 1 it =2. In practice altering the setting won't greatly affect most distant objects, mainly just trees and bushes, but it may provide a few extra FPS.
MaxNPCLODLevel=5
This setting controls the level of detail on all NPCs (Non-Player Characters), with the higher the value, the more detailed the features, clothing and general figure of NPCs - whether near or far from Altair - at the cost of performance. Normally you can control this variable through use of the Level of Detail in-game setting, whereby Level of Detail Level 4 = a value of 5 for this variable, Level 3 =3, Level 2 =2 and Level 1 =1. However here you can set a value of 4 if you wish, which is otherwise not possible in the game. Note that setting a value of 0 for this variable causes major glitching in the game.
SmallObjectsCullDistanceModifier=1
MediumObjectsCullDistanceModifier=1
These variables appear to control the distance at which certain sized objects are removed from view, however visually the impact is difficult to tell. They are controlled as part of the Level of Detail in-game setting, and at progressively lower levels of detail, these variables rise in value - e.g. at Level of Detail 1 on the slider, SmallObjectsCullDistanceModifier=5, and MediumObjectsCullDistanceModifier=3. A value of 1 for each should provide the highest quality.
MaxSearchTimePerFrame=2000
After testing this variable in both XP and Vista, I'm unclear as to precisely what it does. I do note however that in my XP, this variable =2000, while in my Vista it =10000, both using exactly the same settings (everything at maximum). If anyone knows exactly what this setting does, please Email Me with the details so I can update the guide.
Update: Based on further feedback, the value for this variable seems not to differ by OS, rather it seems to differ on various systems for other reasons which are not clear.
Fullscreen=1
This variable controls whether Assassin's Creed starts up in fullscreen (=1) or windowed (=0) mode. Fullscreen mode is always recommended for optimal performance and minimal problems - especially under Windows Vista where fullscreen applications automatically disable the desktop and thus improve performance. However if you find the game starting up in windowed mode even if you don't want it to, make sure this option is set =1 and if that doesn't work, press ALT+Enter to force the game to switch to fullscreen mode.
Particle=1
This variable is normally controlled as part of the Graphic Quality in-game setting, and is automatically enabled at Graphic Quality Levels 3 and 4. It determines whether particle effects such as smoke, dust and moving clouds are used. When set to =0, all particle effects are disabled, which can noticeably improve performance at the cost of some realism.
LODBlend=1
This variable is normally controlled as part of the Graphic Quality in-game setting, and determines how smoothly the level of detail transition is made as distant objects come closer. For example with LODBlend=0 (disabled), additional details on buildings will suddenly popup into view as you walk closer to them, rather than blending in more smoothly when LODBlend=1 (enabled). Disabling this option can improve performance but will reduce realism and can be particularly annoying if you constantly notice the LOD transitions.
Layers=1
This variable is normally controlled as part of the Graphic Quality in-game setting, and determines whether additional 'decorative layers' are applied to the game world. These are minor graphical touches, such as additional pathways in the cobblestone streets (See screenshot comparison of Level 1 vs. Level 2 Graphic Quality in the In-Game Settings section for an example). If disabled, the visual impact is not particularly noticeable, but then neither is the performance impact, so this is best kept enabled unless truly struggling for FPS.
Anisotropic=1
This variable is normally controlled as part of the Graphic Quality in-game setting, and determines whether Anisotropic Filtering (AF) is enabled or not - see the bottom of this page of my Gamer's Graphics & Display Settings Guide for more details. If set to 1, Anisotropic Filtering is enabled and improves visual quality at the cost of some performance; if set to 0, AF is disabled. Values higher than 1 seem to have no additional impact on image quality.
DistanceLODEnabled=0
This variable is normally controlled as part of the Level of Detail in-game setting, and essentially determines whether the texture streaming system in Assassin's Creed is enabled or disabled. If set to =1, texture and detail streaming is enabled, which can result in anything beyond a short radius outside Altair's immediate vicinity being virtually barren and with minimal surface detail. Then as Altair moves around, textures and details will stream or pop into view. This can improve performance, but completely reduces immersion, and can also create some glitches.
AdvancedDynamicLighting=1
This variable is normally controlled as part of the Graphic Quality in-game setting, and determines whether advanced dynamic lighting is applied to the game world. If disabled (set to =0), this effectively removes all shadow and surface effects, making the game world bland, monotonous and unrealistic, as well as resulting in some glitches.
[Performance]
MaxNumNPCs=105
This variable determines the total number of NPCs which can exist at any one time, and is normally controlled by the Crowd Density in-game setting. However here you can alter this value beyond that allowed by the in-game settings. The minimum working number is 60 here (as opposed to 80 when set to Crowd Density Min in the game), the maximum working number is 105, the same as the Crowd Density Max setting.
The next page concludes the Advanced Tweaking for Assassin's Creed.
DARE.ini
[Renderer DS3D Options]
DS3D_CACHE_SIZE=2097152
This is the cache used specifically for temporarily storing DirectSound3D audio in the game. It appears to be a value in Bytes, as 2097152 Bytes equals exactly 2048 KB, which is exactly 2MB in total for the cache. By increasing this value, you may be able to reduce stuttering or prevent small pauses prior to audio loading at various points in the game. Try a value of 4194304 (4MB) or even 8388608 (8MB) to start with and see if improves overall performance for you. In fact if you increase the number of channels with the NB_AUDIBLE_VOICES variable below, I recommend increasing the cache size as well.
NO_OPTIMISATION_SOUND_CARDS=
This line appears to be designed to specify certain sound cards which automatically cause audio optimizations to be disabled when detected. If the line is blank in your .ini, it is best to leave it blank.
DISABLE_OPTIMISATION=FALSE
If this variable is set to =TRUE by default on your system, then Assassin's Creed has detected that your audio device is incapable of all the advanced audio functions such as EAX Reverb and has disabled them - you should leave this =TRUE in such cases, unless you want to troubleshoot. If this variable is FALSE and you're experiencing audio glitches in the game which no other method can resolve, set this variable =TRUE and restart the game to see if helps fix your issues. As always, make sure your audio drivers are completely up to date, as a new driver may improve compatibility with Assassin's Creed.
[Sound Manager Options]
NB_AUDIBLE_VOICES=48
This .ini variable determines the maximum number of voices, or channels, which the game will use. Different sound cards have different capabilities when it comes to the maximum number of audio channels they can support, and some older or lower-end sound devices can only support 32 channels, while most standalone sound cards from the past few years can support at least 64 channels (e.g. Audigy 2 and above), and even 128 channels (e.g. X-Fi series). If you find you are missing some sound effects or voices during gameplay, you can experiment with this variable, either raising it from its default of 48 to 64 for example, or lowering it to something like 32, to see if this fixes your audio issues. Note that altering the number of audio channels may also help with some stuttering problems, again depending on your audio device.
Console and Command Line
At the moment I have not been able to find any way to access the in-game console, nor any method of applying working command line tweaks to the game's launch icon. If anyone has found a method which is actually tested and works, please Email Me with details for inclusion in the guide. There are a range of commands available in the game's main executable file, however as I say none of these will work no matter how I apply the commands. I suspect the console has been deliberately disabled in the game, and the syntax for applying command line tweaks seems to be more complex than just using a - or / in front of the command name in the Target box of the DX9 or DX10 .exe launch icon.
The next page brings the guide to a conclusion with some important tips.
This section deals with several important performance and convenience tips and advice. Do not skip this section, as this information can be just as useful as any tweak.
Skipping the Introductory Movies
One of the great annoyances of Assassin's Creed is that you can't skip through the startup movies/logos each time you begin the game. There is however a way you can remove them to speed up your startup time. Go to your \Program Files\Ubisoft\Assassin's Creed\Videos directory, and rename all the .bik files there, although I recommend leaving LoadingScreen.bik, otherwise you will face a long black screen on loadup with no indication of how far loading has progressed. Alternatively, instead of renaming the relevant .bik files, you can just create a new folder under the Video directory and move the movie files there. In any case once you do this, the next time you start the game it will reach the main menu much more quickly.
Quitting the Game Faster
Assassin's Creed's rather comedic requirement of clicking eleven buttons/keys just to exit the game surely ranks as one of the dumbest design decisions ever made. Let me elaborate - to exit an active game at any time you need to do the following: Press ESC> Select Exit Memory >Click Yes >Select Exit Animus >Press ESC >Select Quit Game >Click Yes >Press Any key or button >Select Profile >Select Exit >Click Yes. I really hope that Ubisoft patches the game to fix this absurd situation, clearly another sign of the game's console heritage which they seem to have been too lazy to fix for the PC. However for the moment there is a quick way to exit - press ALT+F4 and the game instantly quits.
Bear in mind however that this is not a perfect solution. Assassin's Creed automatically saves your game at certain points, and more importantly, holds all your save data in a single .sav file under your profile directory - see the Profile setting under the In-Game Settings section for details. This means that should you ALT+F4 at the wrong time, such as during a save, you risk corrupting your saved game file, and this could be disastrous, requiring you to start the game all over again. So make sure you don't see any save icon when quitting this way, and usually best done once you're at the Animus screen.
A further consideration is that quitting the game via ALT+F4 appears to leave the game's audio system active at times (i.e. it will not exit the audio system properly), which can result in residual background noise, and/or may conflict with other games you launch afterwards. Typically this problem goes away if you relaunch Assassin's Creed and then shut it down normally, but keep this in mind.
Assassin's Creed Soundtrack
If you enjoy the music in Assassin's Creed - and it's certainly excellent and atmospheric - then you can download some of the tracks from the official soundtrack by Jesper Kyd for free. In MP3 format, you can download the following two tracks:
City of Jerusalem
Jerusalem Horse Ride
In .WAV format you can download 5 other tracks in from the Official Ubisoft Assassin's Creed Soundtrack site - the "password" is Target (case sensitive). If you like this sampler of music from the game, I recommend you buy the full album.
Measuring FPS, Taking Screenshots & Videos, Benchmarking
Assassin's Creed has no built-in method of measuring FPS, taking screenshots or capturing videos. The best way to do all of the above is to use the free FRAPS utility. Measuring FPS with FRAPS provides no performance hit, but capturing videos can reduce your FPS to a noticeable extent while recording. A sample video of my Assassin's Creed gameplay as captured by FRAPS is here: Gameplay Video. You can also benchmark the game using a set walkthrough a particular section of the game and measure the minimum, maximum and average FPS results again using FRAPs.
Note that at the moment, FRAPS can glitch when displaying the framerate on top of the black bars in Assassin's Creed. This has no impact on performance, but a new version of FRAPS should fix this.
Conclusion
That brings this guide to a conclusion. Assassin's Creed is essentially a console port, so tweaking options aren't many and varied, but I've tried to cover all the information any player of the game would need to be able to get the most out of the game, so hopefully I've achieved that in this guide. As with all of my other guides, I'll be making sure to keep the guide fully updated, so be sure to check back on it regularly. I must stress that unfortunately I can't provide any tech or tweaking support/advice, and I also don't provide permission for the guide to be reproduced or translated elsewhere for several reasons.
Anyway I hope you've found the guide useful, and until next time, take care!


 7 Alternative Services Similar To Steam
 Thief Walkthrough Chapter 7 : The Hidden City – How to Beat Thief-Taker General
 Pokemon X & Y New Pokemon Special Evolution Guide - GamersHeroes
 Far Cry 4 Weapon Unlockables Guide
 Lords of the Fallen guide: Worshiper boss battle