

Written by Matthew Armitage
The average consumer PC is filled with moving parts that make noise and vibration, once you start to enter the performance side of computing where adequate cooling is a must, you’ll begin to notice PCs start to make a decent amount of disruptive noises and vibrations. For some, the extra noise made from a performance PC is fair trade off for the power they have at their disposal. This is all well and good if you’re just gaming and all noise is cancelled out by a set of loud speakers or headphones, but for those that use their gaming PC for work as well then it can become an issue especially if you doing some sound recording. This guide will list a number of options that you can use to reduce the amount of noise and/or vibration your PC emits to help find that good performance to noise ratio.
Place your hand on the side of your PC and you can feel a slight vibration coming of the side of the case. For those that have their PC case on their desk, you may be able to feel this vibration through the surface of your desk top. All the cooling fans in your case are spinning at high speed to do their best to keep the components of your PC running at their optimal temperature. One fan on its own may not seem like it would produce much vibration, but a combination of multiple fans, a power supply and some hard drives all add up. To reduce this effect there are a number of anti-vibration products that you can use. This is a good place to start because the majority of these components are cheap to buy and fairly straight forward to install.
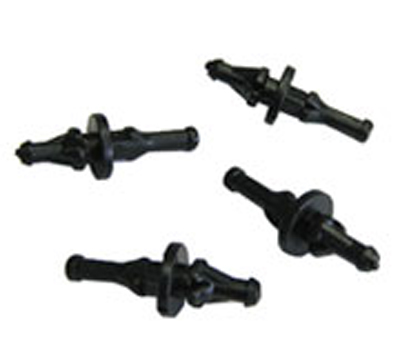
Anti-vibration screws: These rubber screws replace the screws holding the chassis cooling fans to your case, they prove a soft vibration absorbing mounting point, so that any vibration produced by your cooling fans will not be transferred through the metal of your case. Installation is very easy, all that needs to be done is to remove the existing metal screws and literally pop in these replacement rubber items.
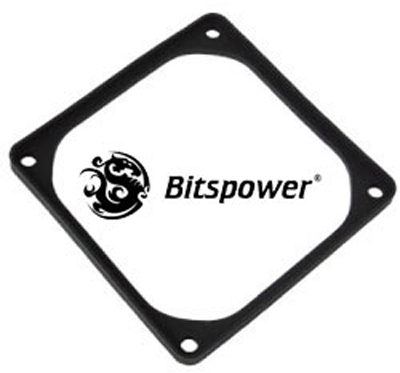
Anti-vibration Gasket: Providing similar results as the anti-vibration screws the anti-vibration gasket is an alternative for when anti-vibration screws cannot be installed (probably more useful for those with cooling radiators such as H50). Installation requires the removal of the cooling fan/s and reinstalling the fan, but with the rubber gasket sandwiched between the fan and the mounting point.
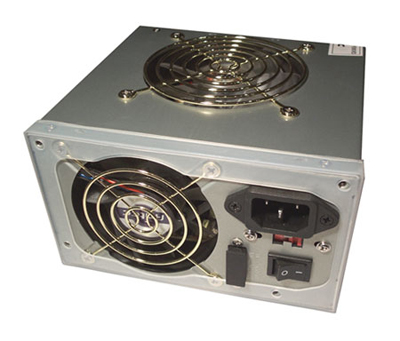
Anti-vibration Power Supply Gasket: Using the same principal as the fan gasket mention above the PSU gasket slips over the mounting point of the PSU to help absorb vibration caused by the cooling fans within the PSU. These days new cases are coming out more feature packed so it’s not uncommon to see a similar anti-vibration system pre-installed, so you may or may not have to bother with this part. Installation is straight forward but depending on your case it maybe a little fiddly. There’s no need to unplug any internal wires, but the main power lead has to be removed for safety reasons. Remove the four mounting screws hold the PSU in place, slide the PSU back far enough to place the gasket on then reverse the process.
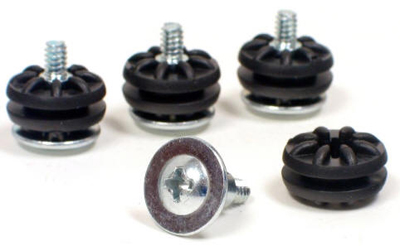
Anti-vibration Hard Drive Screws:The average mechanical hard drive spins at 7200RPM and you can tell when your computer is furiously accessing information off that drive from the sound it makes. Anti-vibration Hard Drive Screws can be fitted to the four mounting points of a 3.5” hard drive. Once again it’s a simple case of replacing the standard with these screws that have rubber insulators on them, just ensure that rubber grove in the in insulator is the only part making contact to your computer’s hard drive cage. This is just one of the many options available for reducing the noise and vibration caused by mechanical hard drives; alternatively you can replace the entire hard drive cage with an aftermarket unit that features anti-vibration mounts throughout its construction. This is also another feature that is becoming more common with new PC cases - especially ones that feature toolless design hard drive mounts - so it’s something to think about if you’re in the market for a new PC case.
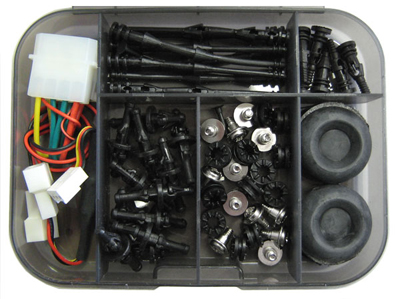
Anti-vibration Kit: To save some time collection all the anti-vibration parts available there are a few kits on the market that will take care of most of the things you would need. If you have a few fans in your case then something like this might prove to be more cost effective.

Rubber Case Feet: If you have you PC case sitting on your desk then there’s a good chance that you can feel some of the vibrations through the surface of your desk, this is more apparent with cases that have plastic or metal feet. There are a number of replacement case feet you can buy for your case ranging from basic rubber feet right through machined aluminum feet with rubber inserts. If you are after a cheap solution then the obvious choice would be something like a generic rubber feet kit, the more fancy options are for those that are into case modding. Speaking of which pretty much every item that has been listed so far is available in multiple colours or UV reactive material, so you can also look good while reducing noise and vibrations. Installation will vary in difficulty depending on the case you have, sometimes it might be as simple a removing a few screws or it could involve you removing a lot of internal components depending on accessibility.
The main noise maker with most PCs is fan noise, reducing the vibration cased by fans is one step but you still have the fans spinning at high RPM producing noise. Reducing the speed of these fans can drastically reduce the amount of noise your PC emits. Yes your overall cooling efficacy will be reduced somewhat but there are a number of ways that you can work around this to still have a cool running PC without having to listed to high speed fans.

Fan replacement: If you’re not worried about spending some money to have a silent running PC then one of the best options is to replace all you standard case fans with silent running units. There’s a few brands on the market that offer silent running fans that still manage to move a decent amount of air. Noiseblocker, Nexus, Yate Loon serve this purpose, just to name a few. These fans are designed to give maximum air flow at low RPM so you get the both of both worlds. If your case has numerous fan mounting locations it would be recommended to install fans in those locations as well. Basically if you are removing the one high speed fan from your case and replacing it with a low speed silent version then it’s best to add another one in there to assist with air flow. Again installation will vary from case to case, usually the installation of a rear exhaust fan is pretty straight forward, same with a side mounted fan, for a front mounted intake fan it usually involves removing the front shroud. If you are unfamiliar with disassembling your PC case then it’s best to refer to the owner’s manual.

Fan Controller: If changing out all your fans for silent versions is out of the question then you can slow down the speed of your current fans with a fan controller. Remember it’s not necessary to have your fans spinning at full speed if your computer isn’t doing much work. Using a fan controller you can increase the speed of your fans to keep temperatures in check while gaming or rendering, and you can dial the speed back down when you are doing light duties such as word processing or browsing the web. Fan controllers come in plethora of different sizes and designs, prices range from a few dollars for a basic single fan controller right up to a 100 dollar mark for multi fan controller with LCD readout. Depending on which model you decide on installation will vary and you’ll have to refer to the installation guide provided. Each fan controller will require a power source from your power supply, and for each fan that you intend to control to be connected to the fan controller. The major differences between each unit will be the mounting location of the fan controller unit.
A cheaper and simpler alternative would be to use Fan Power Reducer and these can be ideal if all you are interested in doing is slowing down a noisy fan. However if you choose to use a power reducer then you won’t have the option to easily adjust the speed of your fan/s. These reduces use a power resistor to drop the voltage going to a fan, they plug in line with the fans power source so essentially you just plug them in and leave it as is.

Performance CPU Coolers: The standard CPU cooler that comes with CPUs are mass produced items that are designed to keep the CPU within safe operating temperatures. The attached fan is controlled via the motherboards BIOS and when CPU load is high the fan speeds up to a high audible level. Aftermarket CPU coolers are usually affiliated with those that like to overclock their CPUs to get maximum performance but you can also use them to help reduce the amount of noise your PC emits. Thanks to their more efficient design cooling is achieved without the need for high speed fans, if you don’t venture into overclocking you can pretty much run one of the coolers at their lowest fan speed setting. The number of aftermarket CPU coolers that are available is just mind boggling so if this is new territory to you I suggest that you spend a little time researching which cooler suits your application. As for installation, replacing a stock CPU cooler for an aftermarket one can be a daunting task, as each cooler is different and may require the removal of the entire motherboard. Manufactures provide you with an installation guide on how to mount the cooler to your CPU socket but the overall task can be difficult for anyone that hasn’t attempted this before.

Performance GPU Coolers: Using the same principal as the above mentioned CPU coolers an aftermarket GPU cooler will provide better cooling efficiency for your graphics cards. This is an area that you probably don’t want to venture into unless you’re a very serious about achieving a silent PC. These GPU coolers are aimed at overclockers that want to get the most out of their graphics card but unlike a CPU cooler you run the risk of voiding the warranty of your graphics card due to the fact that you have dismantle the graphics card. The average graphics card can make one hell of a noise when at their maximum fan speed but a GPU cooler like pictured above will do a better job at lower fan speeds.

Sound Deadening Material: As seen in many applications from automotive manufacturing to high end electronics, the fitment of sound deadening material does a great job of creating a sound absorbing barrier against unwanted noise. This material can be bought in various sizes and thicknesses, and companies like Lian LI offer complete kits consisting of pre-cut sections. Installation is quite simple and all you have to do is measure and cut out pieces to fit your case. To save yourself some time I strongly suggest you purchase a sound deadening material that has an adhesive backing. There are a few PC cases available that already have some sort of sound absorbing material pre-fitted which maybe something to consider if you are looking for a new PC case.
Well that about covers it, you can choose to use some or all of what’s listed in this article and if you have any questions please feel free to ask on our forums. Speaking from personal experience I’ve tried everything on this list except for the GPU cooler, and it has done wonders for keeping my PC quiet, even though there’s some gear in there that needs good air flow.


 Top 5 Best Open World Games of 2014 for PC, PS3, And Xbox
 . Plays August 12, 2012
 Battlefield Hardline map tips: The Block, Growhouse & Hollywood Heights
 Minecraft Parody - The 21 Best Minecraft Song Parodies
 Why the Sherlock Holmes games are the anti