The tier 10 German heavy tank Maus is truly the behemoth of World of Tanks. This tank packs a ton of weight, armor, and size into a slow hard hitting package. This World of Tanks Maus guide will break down the Maus into firepower, armor, mobility, miscellanous attributes, and tactics to use. Starting off is a quick video outline the Maus’ strengths, weaknesses, and also provides two games of gameplay with commentary.
While the Maus has the least amount of damage per minute of any tier 10 it still has a serviceable gun when combined with it’s armor and HP. At 490 damage per shot for a tier 10 heavy the Maus has above average alpha and it can easily get a shot off and then go into “protective mode” while a higher DPM tank bounces off of it. If the Maus driver does a good enough job at focusing on tanking damage first it can greatly diminish their damage per minute. One thing the Maus lacks is it’s penetration which for a tier 10 is a tad low when you factor in the aim time and overall accuracy. While it’s AP can damage any tier 10 with aiming it has trouble with landing well aimed shots at range. This leads to APCR coming into play which has slightly better penetration but against well protected tanks like a T110E3 or another Maus it still is not enough considering the bad accuracy.
Many might dismiss the Maus solely based on it’s bad DPM or accuracy/penetration but in the end it’s battle effectiveness still is very tough to beat when played correctly. The Maus will neither flank and out DPM a tank in a slugging match not should it. Instead it will set up in a defensive spot in mind and deflect most incoming shells while using it’s gun to slowly chip away at the enemy in between their shots. While it is hard to actually do this in some matches it is a proven tactic that works and when done well can be impossible for an enemy to overcome without help.
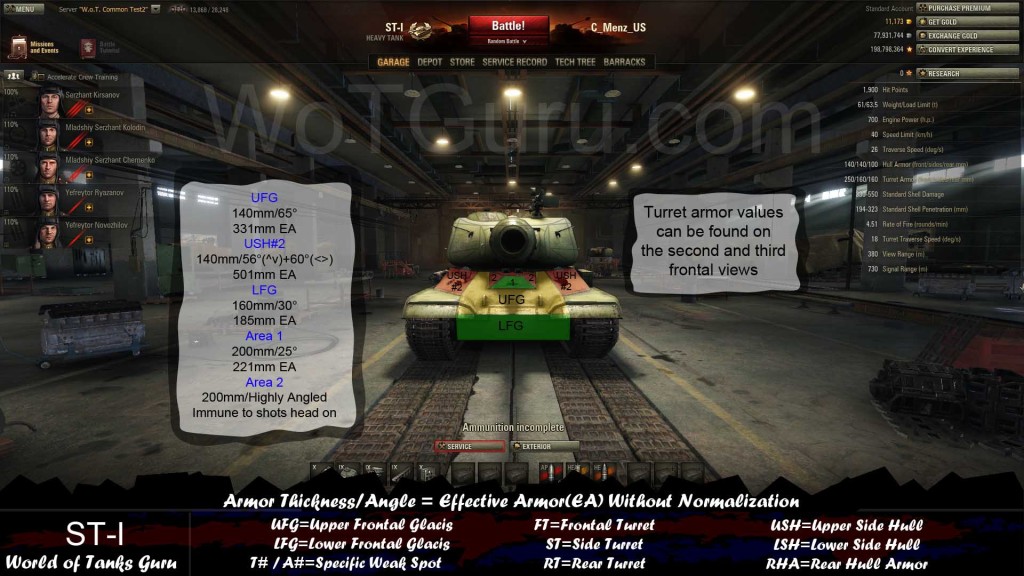
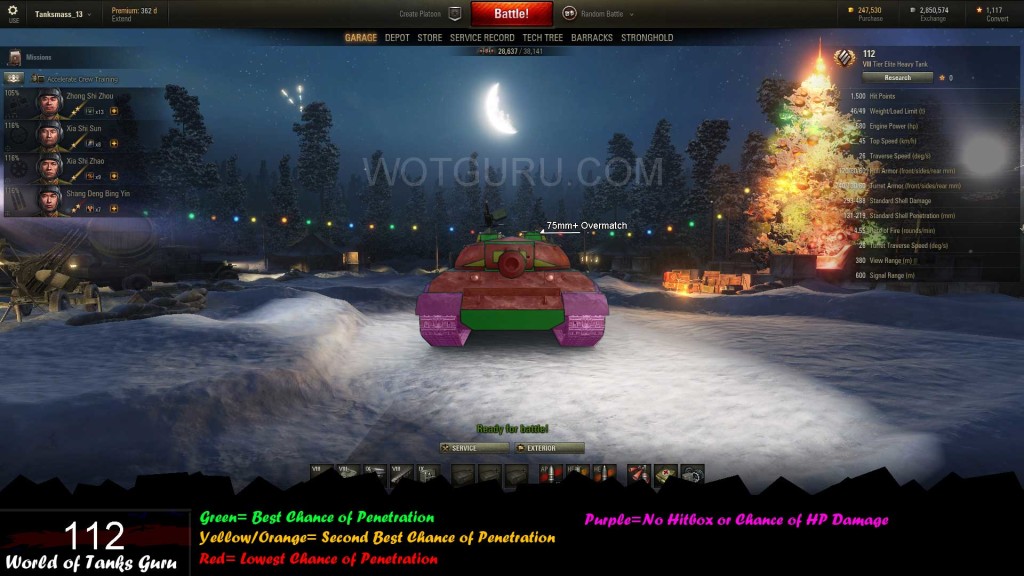
For a full armor guide click on the link below where the Maus is broken down into specific areas and effective armor values are listed.
The Maus might be large and weigh a lot but the armor it has is some of the best in the game. Not only does it have great frontal armor but it also has excellent side, rear, and turret armor. Most armor in World of Tanks gets it’s effectiveness from some level of angling. The Maus’ armor however primarily gets it’s effectiveness from it’s sheer thickness which gives you many more options of how you can position your tank. Learning how to angle the Maus’ hull and it’s turret will turn your armor into something that will easily soak up 8,000 plus damage per match. Make sure you not only angle your hull heavily but also to angle your turret when you are not firing(since your turret cheeks are weak). Unless you learn how to angle and to exploit it you will easily be gunned down by tier 10 tanks. The weak spot guide linked about will give you a general sense of how much you should angle your Maus.
Another maneuver to learn is how to side scrape since the Maus’ turret is located towards the rear of the tank. To do this you can either watch videos of players driving the Maus or figure it out yourself. Simply place the front armor of the Maus into some sort of cover(like a building). Then slowly back up and angle the Maus in a way that the rear of the tank sticks out of cover until you can poke your turret/gun out to fire on an enemy. Try to keep the side armor at a 70 degree or higher shoot since it will allow you to bounce almost anything thrown at your tank. Doing this will make you invincible except for shells that might hit your turret front or artillery splash. Since the Maus’ turret is strong when angled you can simply point your gun back into cover to cover up the weak frontal turret armor.
The Maus is known for it’s mobility but not in a good way. It’s listed top 20 km/h speed is very slow and while the Maus is faster than it could be it beats driving a T95. This very slow speed stays consistent when it comes to level ground or going uphill. The only changes come with the hull traverse when you are on soft ground(like a swamp) where the turning gets abysmal and it feels like ants are turning your tank. One key aspect of understanding your low speed is that you cannot get to some normal areas on the map to begin a match. You also must plan each route and keep in mind of any open areas or areas where enemies can get shots on your large side profile. One last feature of the Maus’ mobility is that you need to think at least a minute ahead and keep an eye on other flanks more-so than usual since you cannot get anywhere quickly.
The view range of the Maus being at 400m might seem like a high enough value to be a positive but when you combine it with it’s size and camouflage values it simply isn’t enough in most cases. The gun depression while it isn’t terrible is a huge downside when you factor in the very tall hull which does not allow the Maus to effectively fight on uneven terrain or shoot short tanks that are close to it. You will want to keep in mind that if you do not have much support that you cannot allow tanks to side hug you since you are unable to hit some of them. While the gun depression has a maximum value of -8 degrees due to the height of the Maus it feels more like -4 degrees. One last aspect of the Maus is it’s large 68 piece ammunition rack that allows you to carry a good amount of all three shells. Having a selection of AP, APCR, and HE at your disposal gives you flexibility to deal with any situation.
Stationary: 1.43%
Firing While Stationary: 0.26%
Moving: 0.86%
Firing While Moving: 0.16%
After Shooting: 2.877
Turret Traversing: 0.077
Turret Traversing Full Speed: 1.23
Hull Moving: 0.211
Hull Moving Full Speed: 4.22
Hull Traversing: 0.211
Hull Traversing Full Speed: 3.16
Hard Ground: 1.055
Medium Ground: 1.247
Soft Ground: 2.014
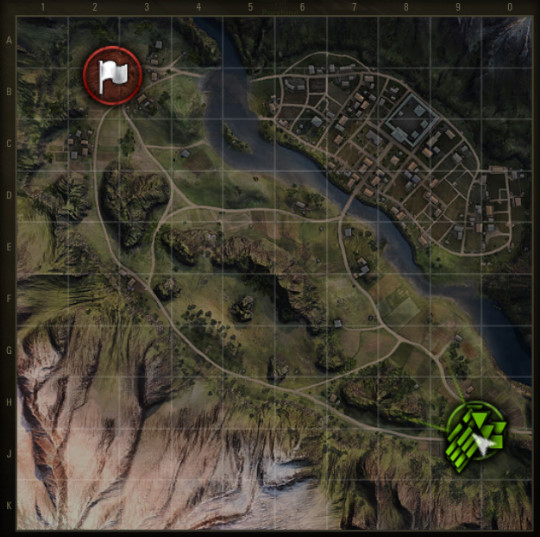
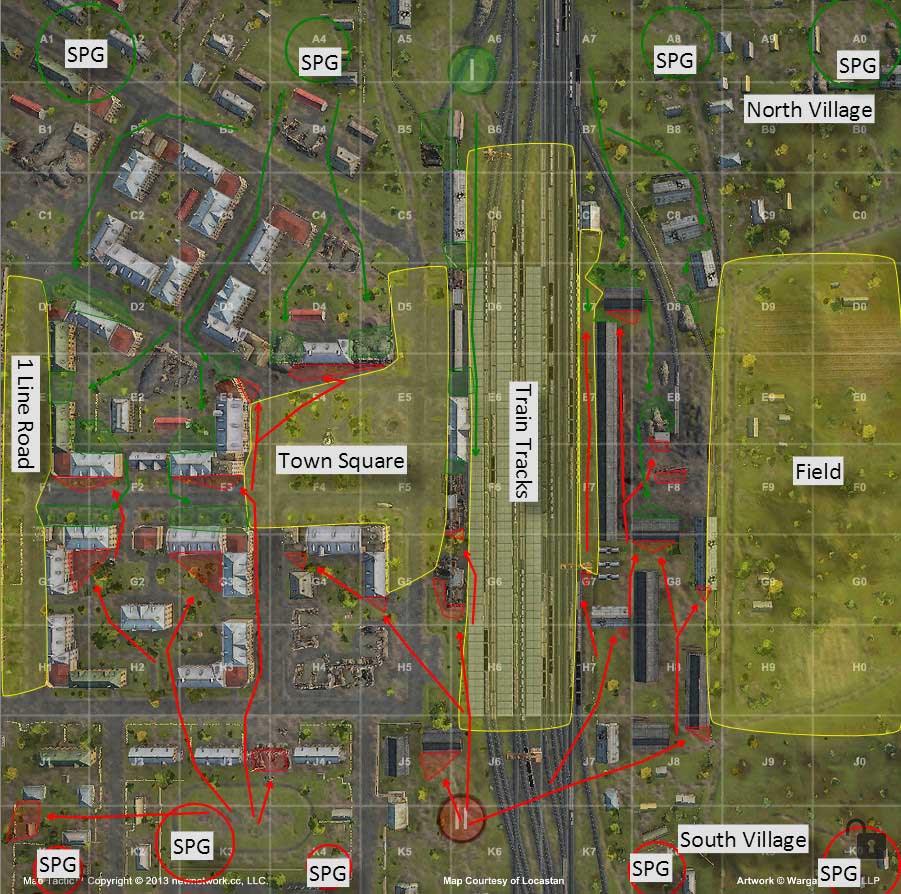
Playing a Maus is a balance between tanking damage and moving between cover without being caught in the open under fire. Doing damage is a secondary thing in some cases and often times it is better to set up in a position to deflect damage before stopping to fire on an enemy. At the start of a match you want to figure out a location to either lead a push to help your team avoid taking damage on tanks suited for dealing damage or in an area to stop the enemy from advancing. This all depends on how your team is set up and the map and is hard at first to get right most of the time. Typically you will want to start out by simply going to an area that you can be part of the battle fast and that still allows you to help other flanks(or your base) if needed.
This World of Tanks guide will be updated with additional information and videos when they become available.
 Weak Spot Guide: T95 - World of Tanks Guru
 Weak Spots Guide: Type 59 - World of Tanks Guru
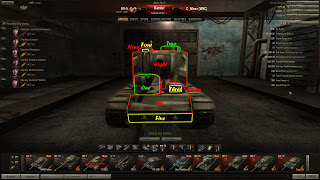 Weak Spot Guide: KV-5 - World of Tanks Guru
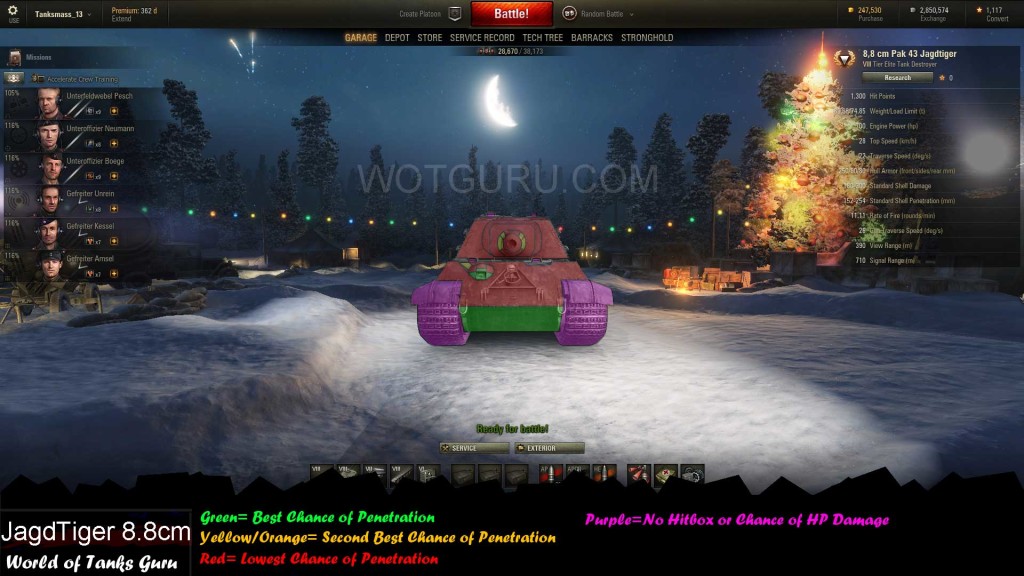 Weak Spot Guide: Jagdtiger 8.8 cm Pak 43 - World of Tanks Guru
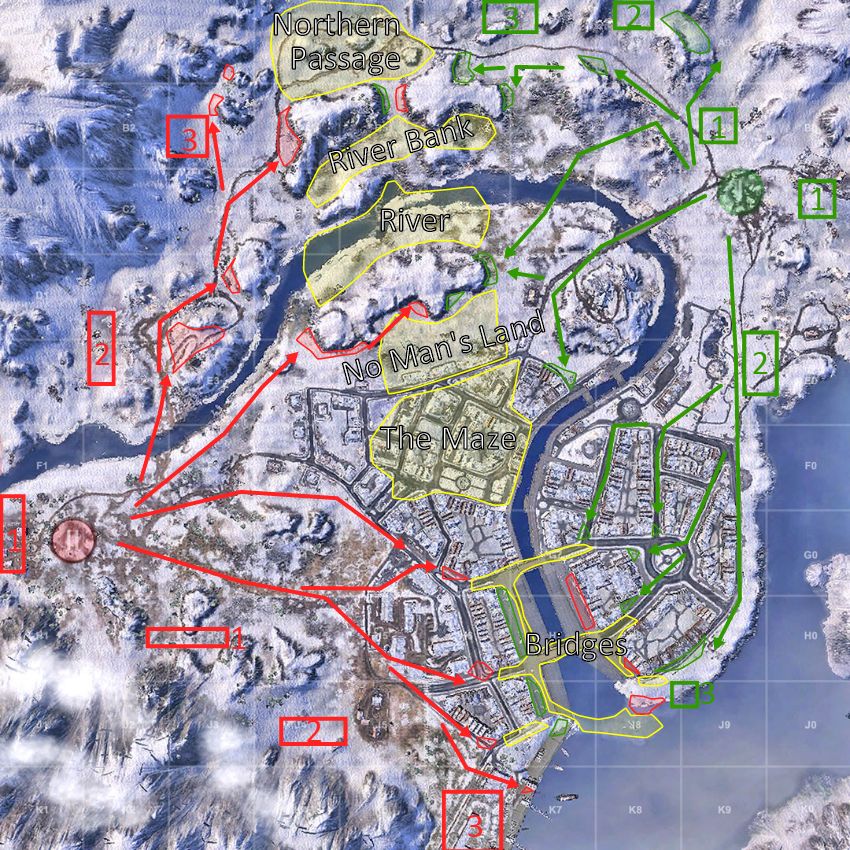 Map Strategy: Windstorm - World of Tanks Guru