
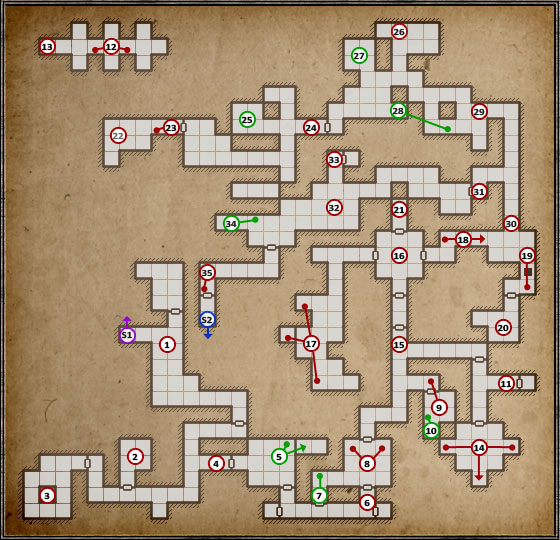
Legend of Grimrock guide
This guide to Legend of Grimrock contains a throughout solution, together with descriptions of secrets like Crystals of Life or Iron Doors. The guide is based on maps, on which secrets and all the steps required to solve a given level have been placed.
Piotr "MaxiM" Kulka
Translated to English by Jakub "cilgan" Lasota

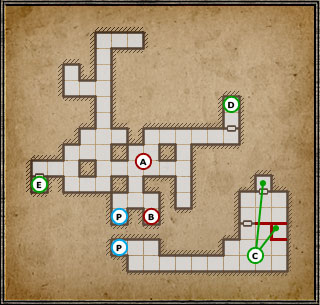
A typical point on the map, necessary to proceed further or offering supplies/equipment.

A secret.

Stairs leading down.

Stairs leading up.

Secret stairs leading to hidden areas, either on lower or higher levels.
Branches and arrows going from the points make finding buttons/levers and direction you need to head easier. If there are multiple branches available, the proper order can be found in the description.

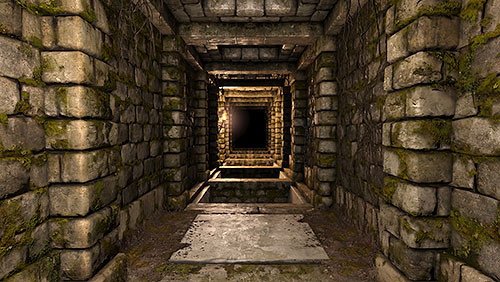
The first level of Grimrock is more of an introduction, serving as a way of familiarizing you with the game mechanics and explaining the game nuances. It's pretty much the whole game in a nutshell, as you will come across every element used in the further puzzles here. You will also encounter a couple enemies, but no one particularly scary or dangerous.

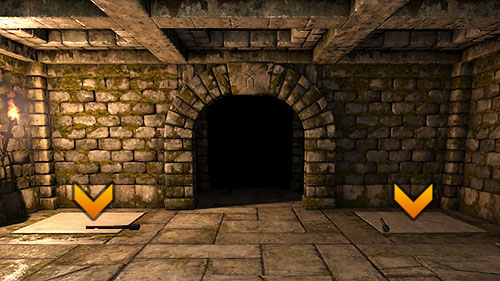
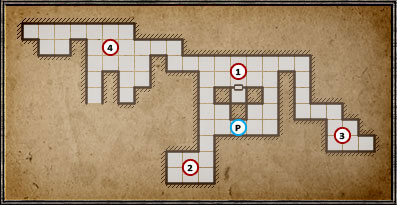
You'll be placed beside the very first secret right away. In order to reach it, turn around and on the left wall you will find a broken stone, the smaller part of which is a button. Press it to open a wall behind which there's a Shuriken and Lurker Boots. Both might be very handy for a Rogue in your team. If the darkness makes it difficult for you to find the hidden button, you should start off by heading to point (2).

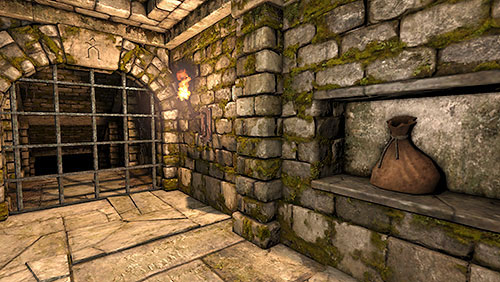
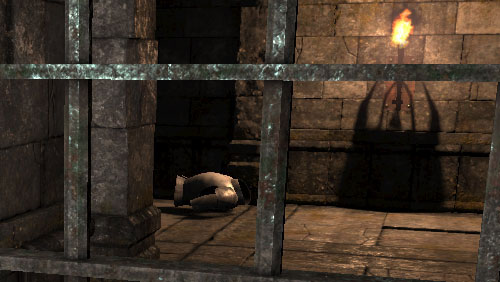
Take the torch from the handle by the bars and give it to one of your party members. Torches burn out after some time, so collect more as you go through the underground. Taking the torch from the handle will also cause a grate to open.

In order to open the bars here, just pull the chain with a handle on the right side.

Here you will find some equipment useful for your warrior. First off there are two clothes (a very weak item, but nonetheless an armour) in the corridor branch and additionally a mace in the niche in the eastern wall. The next grates can be unlocked with the very distinctive lever.

At this spot you will come across one of the most common puzzle element in Grimrock. The locked grates in front of you become unlocked as you step on the pressure plate on the floor and become locked again once you step off it. To prevent that from happening, just place an item of choice on it. The game will suggest you use the nearby rock, through take into account that rocks are also weapons and therefore you should use the recently collected torch and leave the rock for your Rouge to use as weapon.

Here you will find the Brass key to the gate before which you will soon stand.

Use the key on the gate found in this corridor (pull it from the inventory and let go on the lock), but make sure you've collected the rock beside the pillar before going through.

Here you will come across an easy puzzle, with a hint in the form of runes found on the wall. Press them and a "loose rock" writing will appear. Inside the niche with the torch you will find a broken stone (just like in point 1 - all look alike). After pressing it the wall will open, behind which you will find an Iron key, necessary for point (9).

Here's the gate for which you need the Iron key. Use it on the lock fond on the wall beside the grates.
Here you're in for your first, easy fight with a Giant Snail. One of your warriors should already have a mace and your Rogue a Shuriken and two Rocks. You mage isn't quite helpless as well, as his first spell - Fireburst - is ready to use. Kill the Snail, collect the items found in this room (Leather Boots, Leather Pants, Knife) and a torch.

In order to open this grate, just pull the lever found on the right wall.

Inside the alcove in this room you will find a Throwing Knife for your Rogue.

On your way to this room you will have to fight two more Slimes (remember to collect the meat they leave behind). Inside the room itself you will find a Loincloth, Sandals, Rock and a Baked Maggot on a stick.

In this nook you will find a Rock and some Bread.

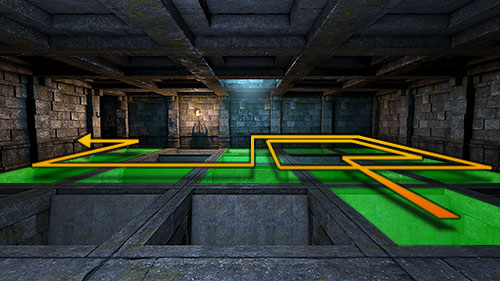
Open the gate and approach the hatch in the floor. It's open and therefore you cannot cross it to the other side. In order to fix this, just throw any throwable weapon (Shuriken, Knife, Rock) onto the other side and as it falls onto the pressure place the hatch will close and make it possible for you to cross it. There, you will find the Iron key used to open the gate. Pick up the item you've thrown and don't worry about falling down, as at the bottom there's a portal which will take you to the other side of the hole. The health you lose because of the fall is minimum and doesn't matter right now.

Here's the gate which the Iron key which you have just found fits.

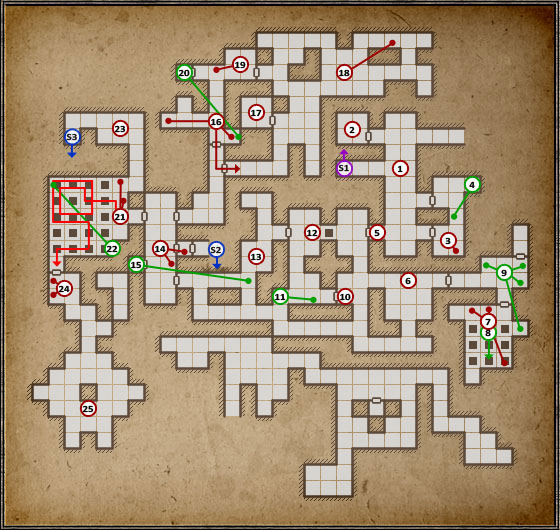
Here you will come across the first of the more complicated puzzles. The hint on the wall across the door suggests bringing back sight to the sculpture beside the door. In order to do that, you will first have to find its eyes.
After placing the jewels into the sculpture's sockets (After returning from point 23), the gate will open and you will be immediately attacked by the strongest enemy yet - a Skeleton Warrior. Kill it and you can take the jewels back from the sockets. One of them will be needed for uncovering a secret at the end of the game.

Don't enter the room after opening the grates, as you might be pinned by the four Herders inside. Instead stay on your side of gate and eliminate them one at a time. In case you need to regenerate, just lock the grates and take a nap for a while. After eliminating all of them, search the room for two Grim Caps, a Rock and Tar Bead, needed for alchemy (we will get there eventually).

Inside the locked cell you can find the first "'eye" of the statue - the Blue Gem. In order to open the cell, use the lever found in the northern recess. Collect the gem and note the rectangular button on the wall on the right.

The button in the cell (19) opens the room in which you will find a Dagger, Tar Bead and two Cave Nettles - another alchemy ingredient. The Dagger is a successor to the blunt knife that one of your characters has been using up until now.

Cross the room with the statue, following the corridor to the hatch at its end. In order to lock it, just pull the lever in the very corner of the corridor. You can (but don't have to) jump into the hole in the floor, where after fighting a Snail you can find the Peasant's Cap and a Rock. You can take the portal back to the upper level. If you don't want to jump down for those items now, you will be able to collect them at the very beginning of the second level.
On the other side of the hatch there's a single snail. Kill it and head to point 22.

At this place, kill another Snail and collect the items found in the room: another Loincloth, Tattered Cloak, Rock and the Scroll of Fireburst.

Return to the pressure plates found on both sides of the grates. Stand on the plate found on your side for the grate to open and two Snails to appear.
On the other side you will find another Blue Gem, though there's still one problem left. Trying to leave the cell will end up with the grate locking. In order to unlock it again, you have two possibilities.

The first of them is placing any item (e.g. a burned torch) on the plate inside the cell and pressing the button hidden on the cell wall.
The second method implies putting the item through the locked grate and placing it on the plate on the other side, at the same time standing on the plate in the cell. This method will let you recover the item used as weight.
You can now return to (17) and place both gems into the statue's sockets.

If you have lost a party member while fighting the Skeletons, don't worry about it and take care of the Iron Door in front of you.
The Iron Door and at the same time a secret and a collectible, as they count to the end statistics. In the alcove on the left side of the door you will find an enigmatic hint on how to open them. In order to do that, you will need to find two buttons hidden in the chamber's walls - one on the right side of the door and the second on the left side of the alcove with the Scroll. On the other side of the Door you will find the Whitewood Wand for you mage and a Scroll with its description.

Here you will find possibly one of the most important items in the game - the Crystal of Life.

Clicking on the Crystal will recover full life and power to each party member, as well as resurrect the dead. Inside the alcove beside the Crystal you can find a scroll with its description.

These stairs lead down onto the next level of Grimrock. Before going down however, you can find the Scroll of Poison Cloud beside the alcove.
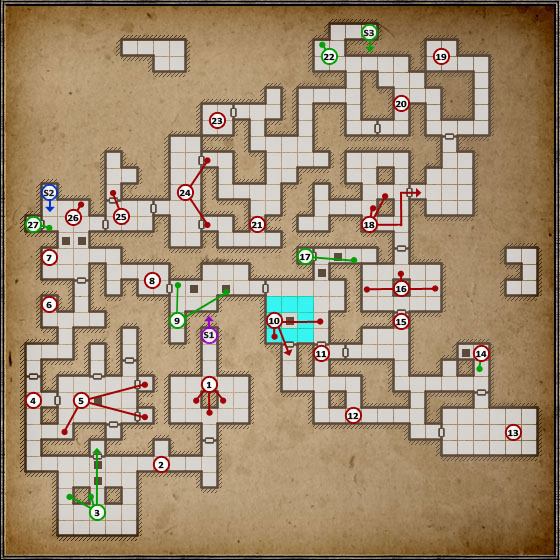
The second level starts showing what going through Grimrock is really about. It will only get more difficult from now on, the enemies tougher, puzzles more complex and resources more rare. But don't worry, as more powerful items and higher levels will follow. The rest is described in this guide.

Right after entering this level you will note a room in the north. If you haven't jumped down one of the hatches during the previous level, now is the chance to collect the items found here: the Peasant's cap and a Rock.

After the fight in the corridor you will reach a cell, inside which you will find Dublet (armour), Dagger and a piece of Mole Jerky - yummy ;]

Before opening the gate leading to this room, make sure you're ready for a quite difficult fight. Inside you will come across a new type of enemy, a smaller variation of the Herder, which however is more dangerous than its larger type. Small Herders spit poison, so it's best to attract them one at a time and keep at distance, avoiding their attacks if only possible.
On the floor in this room you can find a number of items: a Machete, Compass and the Iron Key to (4).

Open the gate with the key found in the previous point.

In the corner of this room you can find a secret. In order to open it, you need to put the torch in the marked handle. Inside the newly unlocked room you will find the Iron Basinet. It's a heavy armour, equipping which requires the skill of using such items.

By following this corridor you will reach a locked cell on the left side, inside which you can find some items, though the entrance to which is hidden inside the next room. You can however reach some of them through the grates. The first item is the Sandmole Hide Vest and right beneath it there's a key to the door at the end of the corridor.

After entering the room, turn into the dead corridor on the left (you can find a Rock inside). On the marked wall you will find a hidden button which opens access to a cell with Poison Arrows.

In order to get out of this room, you need to place an item of choice on the plates found on both sides of the door.

Inside the corridor leading to this cell you will encounter yet another enemy - the Crowern.
In order to reach the cell, you will need to use a little trick. The hint on the wall suggests that you need to throw away your weapon before entering. You however don't need to get rid of any of your party member's weapon. Just place any weapon you aren't using anymore in the alcove beside the grate. After killing the Snails found inside the cell, collect the Grim Cap and Iron Key to one of the Doors in (15).

Inside the "no weapon" room there's also a secret which you can reach after pressing a stone on the wall in the corner. Inside you can find the Pointy Shoes.

Follow the corridor to a teleport behind grates. Open it and use the teleport to reach point (12).

Can be found in an isolated part of the level with nothing but locked cells. Inside one of them there's a Skeleton and a Sack in another. On the left wall, between your targets, there are two buttons which activate teleports inside the cells. Teleports move items between adjoining cells, in a clockwise pattern. In order to get the Sack and afterwards the Skeleton out of the cells, you need to alternate between pressing the buttons until the content of the cells is moved to the nook at the end of the corridor. Inside the Sack that you've teleported you can find Bread, a Leather Cap and the second Iron Key to the Doors at (15). The Sack itself can also be used as place to store your items, e.g. alchemy ingredients or scrolls.

This teleport takes you back to the main part of the underground. In case you have any difficulties with the Skeleton you let out of the cell, you can use it to quickly evacuate and recover.

Inside this seemingly empty chamber you will encounter a trap, though a worthwhile one. In the middle of the room there's a pressure plate - as you enter it, the door behind you will lock and Skeletons will start coming from the walls. The first to open will be the wall opposite to the door (pointed with the arrow). Approach it at once and get rid of the Skeleton in the nook as soon as possible. With some luck, you will be able to kill it before its friends come to help. Immediately hide in this nook, so that the other two enemies cannot push you to a corner and attack from two sides. This way you will be able to eliminate them one at a time. After getting rid of them, search the nooks for the Tattered Cloak, Bone Amulet (important later on) and the Scroll of Ice Shards. In order to get out of this room, pull all three levers inside the nooks.

Having both Iron Keys, go through the two Doors standing in your way.

Inside this room you will come across the enjoyable Crystal of Life and a door, for which you need two more keys. In order to obtain them, you will have to explore both corridors leading east and west of the Crystal.

After defeating the Crowerns in the western tunnels, look for the rectangular button on the wall beside the torch in the south-west corner. It will open the hidden room in the north-west, inside which you can find a button which opens the last room in the north. One more Crowern will fly out of it. In the last room you will find one of the needed Brass Keys and a Throwing Knife.

Inside the eastern corridor you will come across a teleport which moves you back one square, preventing you from moving onwards. In order to get pass it, you need to find a button hidden one the opposite wall and head backwards (!) right after pressing it, towards the temporarily deactivated portal. The deactivation time is so short that you don't have time to turn around.

In order to get to the other side of the trapdoor, just throw any item you want onto the pressure plate on the other side. If you fall into the hole, you will find a single Grim Cap and a teleport leading back.

At the end of the corridor you will meet Crowern and find the second Brass Key to the gate from point 16, a Hand Axe and a Cave Nettle.

Having both Brass Keys, you can open the gate leading to the portal.

Inside this room you can find an alcove with the Scroll of Poison Bolt.

In order to open the gate, find the button hidden on the southern wall.

On your way deeper into the underground you will encounter a door which can be opened with the button beside. Look out however, as at the same the wall right behind you will open as well and Herders will come out of the room there (including one Small). If you want to avoid getting pinned down, back out following the corridor you used to get here right after pressing the button and eliminate the enemies one at a time.

Inside the room from which the Herders came you will find a Sling which throws Rocks which much higher force and you should have some of them with you.

In this room you will find a Brass Key and a lever which opens a secret room (27), from which more Herders will come.

After eliminating the enemies who came out of this room, search it to find a Phalanx Helmet, Leather Pants, Tar Bead and a Skull. Skulls are unique items which count for the end statistics. Additionally it's an item which enhanced the damage dealt by minotaurs with Head Hunter status.

Inside the hall beside the last secret you will another one, though the button which opens the room can be found beside the pillar nearby point (29). Inside the room there's a Treasure (one of seven), in the form of the Golden Chalice.

Inside this corridor (beside a button used for the secret above), you will find a Grim Cap, Cave Nettle and Nomad Boots. Apart from that you will also find a lock on which you can use the Brass Key which you've found before.

Here you can find the lever which opens the passage to the starting area of the tunnel.

This door can be opened by standing on the pressure plate for a bit. After opening it, you will be attacked by a Skeleton.

After reaching this large room, you will be attacked by a group of 4 Skeleton Warriors.

The group of enemies acts just like your team, they move together but deal and receive damage separately. Thanks to that, bombs and some AoE spells work well against them. At this point you should really consider training fighting 2x2 squares, so that you're ready for further fights with such groups.

At this spot you will find the second Iron Door in Legend of Grimrock. In order to open them, you need to wait a dozen seconds or so while standing on the pressure plate beside the sculpture on the wall. After the door opens, a Skeleton group will come out, so back out to the main chamber to have room for dodging.
Behind the Iron Door you will find three Fire Bombs (which by the way are great against such groups of enemies) and complete another secret.

Inside the same room you can find yet another secret. Just look for the button in the wall opposite to the entrance to open a short corridor, inside which there's a single Skeleton and a Wooden Box. Boxes (just like Sacks) increase the capacity of your inventory, but weight a bit themselves. Inside this Box you will find a Healing Potion, Leather Brigandine and the Scroll of Poison Shield.

It's the end of this level. Beside the stairs you will find a Sack with the only Mortar and Pestle in the whole game (essential in alchemy), together with some ingredients and a Scroll. In order to open the grate blocking the stairs, just pull the torch out from the handle.

Stairs to level 1.

Stairs to level 3.
Just like the previous level, the difficulty goes up here as well. By the end, the newly gained alchemy skills will prove very useful and the ability to quickly return to the Crystal of Life in the middle of the underground will save you watching the loading screen quite a bit. All that is caused by poisonous Spiders which inhabit this part of the underground.

You will be greeted by a "light" puzzle. In order to open the door found on your way, you need to remove the torch from the wall and instead put three torches into the pillar in the middle of the room. Inside the alcove opposite to the recently opened door you will find the Frost Bomb.

Inside this corridor you will come across a Crowren and additionally a Skeleton Archer with frost arrows will start shooting at you. Quickly get rid of the Crowren and go around the wall (look out not to fall into one of the trap doors, at least not now) to eliminate the Archer. Fighting him is very easy, if only you have some space to avoid his arrows.

Inside this room you will also find the first secret. The wall in the middle has two pillars connected by walls, which can be picked up. For that, you first need to find the rather obvious button on the west side of the wall. After pressing it, one of the walls will raise and uncover a small room with a Shuriken and another button on the opposite wall.
After pressing it, another wall between the pillars will raise, letting you throw an item above two trap doors into the alcove, inside which a grate has also raised. When the item falls down on the other side, the trap doors will lock and you will be able to cross them to the other side to collect the Bow and Arrows - a treasure for your Rogue.
That's however still not all. Pick up the item from the pressure plate and jump down to one of the trap doors. You will find yourself inside a corridor with Slimes. Kill them and look around to find a Skull for the minotaur and the Tar Bead. In order to get out of the trap, just pull the lever found there and a teleport which can take you back up will appear.

On the intersection you will notice two doors. The one leading north require a key and the eastern one only pressing a button. Go through the one leading east.

Right after going through the gate, you will have to stand on a pressure plate which will shut the door behind you and cause a few Skeletons to appear.
Don't worry, as there's a wonderful way to fight them - in the middle of the room there's a trap door activated by putting an item or just standing on it. All the Skeletons will try to approach you through there, so just throw them down one after another into the underground which you've visited at point (3). In the end you can jump down yourself and eliminate them one after another without the risk of being pinned down, or just leave them there for all eternity (though it's a waste of experience points). You would kill the first with your own weight by jumping onto its head.
After dealing with the Skeletons, you will still have to search through all the corridors joining in this room. Inside of them you will find two Tar Beads, a Baked Maggot, Flask, Cave Nettle and what's most important - the Brass Key to the gate from point 4. Now you just have to pull the lever found in the room and return to point (4) by following the newly unlocked passage.

In this alcove you will find the Toorum's Note. It's a story item which gives you hints on going through the underground and a collectible which counts for the end statistics.

By heading further north you will reach the Crystal of Life. Remember this place, as you might have to return here rather often, especially that the Crystal not only replenishes health, but also clears the body of poison. It's much more economical than creating antidotes one after another.
Behind the Crystal, on the other side of the trap door you will find stairs leading down onto the next level - unfortunately the road leading to them is still long. If you want, you can jump into one of the trap doors now to find Leather Greaves.

From now on you should expect Spiders everywhere and the first one right behind the corner. Remember that their poison works until the poisoned stands, though it's slow enough for to take an antidote or head back to the Crystal of Life.

Inside the next room with two trap doors you will find a secret - and in fact three. In order to reach it, you have to press the rectangular button on the wall beside the first trap door. It will cause the trap doors to lock for about 5 seconds. In this time you have to quickly press the metal button above the second trap door. Afterwards a corridor with a teleport leading to a secret room will open opposite to the first button. Inside it you will find a Shuriken and the Tome of Health (permanent +25 HP for the character who reads it).
Time for another 2 in 1 secret. After using the teleport to return to the corridor with the trap doors, jump into one of them. In the area where you landed you should find a pressure plate (A). Place any item on it. Stand opposite to the door (B) and put an item on the plate on the other side of the grate. Use the button (C) to activate the teleport behind the grate and place one more item on the plate behind the grate (D). The gate (B) will open and on the other side you will find a Serpent Bracer which gives you protection form poisons (it will come in very handy!).
In order to find the secret-in-secret here, press the button once again (C) and return to the re-activated portal where you found the Bracer. You will be taken to a secret alcove (E) inside of which you can find the Scroll of Invisibility. Pull the lever to return to the main room and onto level 3 using the portal (F). Phew...

Inside this room there will be a puzzle with portals which move along the marked light-blue path, following a counter-clockwise pattern. Before the entrance, behind a grate, you will find a useful Rock.
There are two moving portals, divided by three squares. Start off by following one of the portals until you're in a position in which you can throw/shoot something and the pressure plate <1> to cause the trap door to lock <2>. The portals cannot reach you here. Step onto the trap door, take a breath and prepare an item to place on the pressure plate <3> when there's no moving teleport on it. It will open the gate <4> through which you will have to run very quickly, as it will stay open just for a few seconds.

Here you will find a lever which can permanently open you a passage through the "portal" puzzle. Of course the portals unfortunately won't be deactivated, so you still will have to avoid them if you want to head back through here (e.g. to the Crystal of Life).

Here you will come across a collapsed corridor with spider eggs beside it. Destroy them to find more arrows for the Rogue.

Follow the corridors through (11) and (15) to this room, killing spiders on your way. Behind the door opened with a chain there's one of their hatching points, meaning lots of eggs and spiders protecting them. It would be probably best to stay in the door, kill one spider ad a time to close the door in case you need to regenerate/take an antidote/return to the Crystal of Life. After this fight comes to an end, head inside, destroy the eggs and collect the items found inside the room: two Bloodrop Blossoms, Sandmole Hide Vest, Loincloth, Longsword and what's most important - the Iron Key needed for the door at point (15). Now pull the lever beside the locked door in the north and move onwards.

This place is at the same time a puzzle needed to move on and a small secret. Place anything "as sacrifice" on the pressure plate and press the brass button by the grates. In return, a second Iron Key, Silk Hose and the item that you placed as sacrifice. Now, in order to receive the secret present, place the Hose that you have just received as sacrifice and in return you will get the Nomad Mittens (and the Hose as well, clean and unused).

Having both Iron Keys, you will be able to open the locks by the door and move to the next puzzle.

At this spot there's a pillar similar to the one at point (1). The puzzle itself is similar as well, but works the other way round and instead of placing torches on the pillar, you need to place two into the walls around and the very last into the pillar itself, from the side of the locked door. However before you place the torch on the pillar, note that after you place two torches on the walls, a secret passage connected with another secret will open up.
After paying a visit to the Iron Door, place the third torch into the handle on the pillar.

Now, that you have opened the secret tunnel, inside of it you should find a lever which will open the Iron Door found nearby the room with the moving portals. In order to reach them, you need to return there (10) and take the weight off the pressure plate in the west. You will therefore lock the trap door which prevented you from approaching the door before. Inside you will find the Huntsman Cloak and beside the door itself a Nettle.

Just like with other puzzles on this level, you will not only have to be clever here, but also fast. Start off by pressing the rectangular, stone button on the northern side of the first pillar. It will open a shortcut needed to move on and free one Spider. Afterwards press the small metal button on the western side of the same pillar and quickly run to the gate which will open for a few second, following the path marked on the map. On the other side of the gate there will be a metal button which opens them permanently.

Here you will find another "pantry", with a Boiled Beetle and Grim Cap on the floor.

In the spot marked on the map, there are Leather Gloves lying on the floor and a group of Spiders roaming beside.

On the floor beneath the torch you will find another Toorum's Note which warns you of the Spiders. At this moment you should head the sound of an opening door. A secret has opened just now (22), but more on that further on. Start off by collecting the Round Shield found behind the corner, to the south.

Now return back to around point 20. A couple Spiders came out of the unlocked secret area, including one which has a key to a secret at the end of the level - Gold Key. Look for it after killing each one of them. After reaching the room itself (22), collect the Tar Beads found there and look around the nearby wall for a hidden button which opens a passage to a set of stairs (S3) leading into an isolated area of the underground. More on that in the description of Level 4.

In the nook just east of this room there's a Grim Cap. Inside the room itself you can find a Wooden Box with some alchemy ingredients, Scroll of Shock, Fire Bomb and a Mole Jerky. Apart from that you will also find an unfinished alchemy recipe for the Sulphurous Potion. The ingredients are, Blood Drop Blossom and the last, unlisted one is the Cave Nettle.

Behind the two grates you will find another Spider hatchery. Proceed just like in points 13. Open the gate, kill one Spider and close again to regenerate. I'd suggest using this tactic by the northern door. After killing all the Spiders, you will find one Nettle by the eggs.

In order to open the door here, you will have to solve an easy puzzle. By the door there's a hole into which the energy sphere spitted by the statue found inside the corridor, behind grates, must fall. When you stand on the pressure plate before the grate, the statue will spit a sphere. In order to raise the grates and let the sphere reach the destination, you will need to place something on the plate and step sideways. When the grate opens, you will be able to enter the corridor behind the statue to find a Baked Maggot.

On the other side of the freshly opened door you will find yourself in the well-known room with the Crystal of Life, though on the other side of the trap door. In order to open the passage between the two parts of the room you just need to pull the nearby lever. Here you will also find a Leather Cap and another Toorum's Note.

You still have one thing to do on this level. Right beside the stairs there's a door with a golden lock. Open it using the Golden Key which you have found by the corpse of one of the Spiders nearby the secret at point 22. Inside the room you will find the Knoffer Mace and Ring Boots.

Return to level 2.

Descent to level 4.

Descent to the secret part of level 4.
This level resolves more around puzzle than fighting, though there will be some of it as well. Here you will also find the description of a secret part of the tunnels, the entrance to which can be found on level 3.

There won't be much fighting on this level, but the first and one of the most difficult will welcome you right away. After pressing down the plate, you will be attacked by two Adult Herders. During the fight with them, look out for toxic clouds which they spit and be constantly on the move. If you lose a part of your team but manage to defeat them in the end, don't worry. One of the Herders will drop an Iron Key which fits into the lock beside the gate leading deeper into the tunnel. Alternatively you can also return to the 3rd level and use the Crystal of Life.

Inside this room, on the shelves, you will find a Scroll, another Flask and a Grim Cap.

This chamber is the central point of the whole underground. The portals here lead to four puzzles which you need to solve to get out of here. Start off by dealing with the two groups of Skeleton Archers and then note the four pillars here. There's a text fragment and a shelf on which you need to place a second fragment so that they create a whole. Strolls with the missing parts can be found at the end of each puzzle waiting for you. The fragments connect with each other in the below order:
After you solve the scroll puzzles, new corridors (24) and (25) will open, from which a swarm of Scavengers will appear. It's best to retreat to the Crystal of Life right after placing the last scroll (26) and lure single enemies/small groups there. Take a nap after each fight (as allowed by the monsters) and keep on fighting, using the Crystal if any of your team members should fall.
Notice: after you let out the Scavengers, the portals in the central part of the hall will be turned off!

This is a portal leading to your first mission: Beast Gardens and Menagerie.
The order in which you complete quests doesn't really matter - I choose a clockwise order.

Inside this room you will have to fact an easy puzzle. In front of you there will be a locked gate with a button on its left side and a well-known hole on the right. Behind you, on the right side, there's a demonic statue which spits magic missiles when you press the button by the door. You just need to quickly block the missile's path after pressing the metal button, as otherwise it would close the door once again.

Inside the main chamber of this challenge you will find three cells with a pressure plate inside. On the walls marked on the map you can find buttons which open the cells. Your task is lore luring one Skeleton Warrior into each cell (they keep on appearing endlessly until you solve the puzzle). With all three occupied, the door in the southern wall will open (it's quite possible you will be attacked by Crowers). Before leaving this room, look around for plants in the alcoves and an enigmatic drawing nearby the northern cell (a curiosity regarding the secret part of this level). There's also a secret here, more on which later on.

Inside the southernmost cell there's a button hidden in the wall. Press it to open the northern alcove in the northern corner, where you can find Leather Boots, Bread and Ring Gauntlets.
At this place paths from each of the four challenges meet. The portal in the middle will take you back to the central hall (3) and scrolls lying around are the missing pieces of text which you need. You will come across a few Crowers here, though you should be able to easily eliminate them.

Another portal and another challenge inside: The Catacombs.

In the area where you show up you should see three opened trap doors which block your way to the next scroll. In order to close them, you need to find three pressure plates and take weights off of them. You will some across Skeletons of both kinds and the weights you will find on the plates are useful collectibles themselves. The last "weight" are Skeletons themselves, locked inside the western cell which you can open with the nearby lever. Here you can also find another Toorum's Note (beside the south-east pillar) and a Crossbow Quarrel, which will soon prove very useful (inside the alcove in the north).
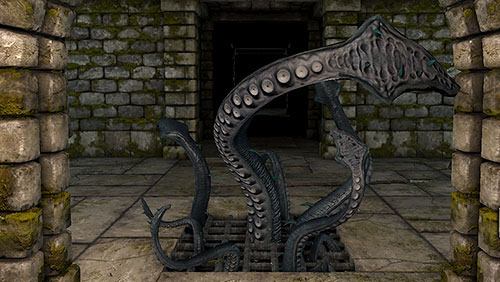
After heading through the portal in this part of the underground you will be attacked by a Tentacle, a powerful but stationery enemy.

Inside the same cell inside which the last pressure plate is, you will find a button on the wall which can open a secret. Inside there's a Sack (inside a Burrow Rat Shank, Tar Bead and Leather Gauntlets) and beneath it a Bone Amulet.

The next secret is an alcove with a stone button marked on the map. After pressing it, you will first have to face a group of Skeletons which you have freed this way. After killing them, press the button once again and quickly head towards the marked room, as it opens only for a short while. Inside you will find the Flarefeather Cap and a Fire Bombs.

The next dungeon with a challenge, this time more logical and memory-oriented: Trails of Thought.

After entering this room you need to move in a strictly defined way in order to reach its other side. First you need to reach the button which opens the locked door and afterwards reach the door itself. If you stand on the wrong plate, you will have to start from the beginning.
To make things easier, I numbered the plates like a phone keyboard. The proper order in such case is: 8 > 5 > 2 > 3 > 6 > 5 > 8 > 9 > 6 > 5 > 8 > 7 - this way you will reach the button. After pressing it, follow the path: 4 > 5 > 8 > 7 > 4 > 5 > 8 > 9 > 6 > 5 > 2 > 3 to get to the door.

Start off with the secret found in this room. On the wall on the right there's a hidden button which open the alcove in the corridor before the door. Inside you will find the Venom Edge.

Here we have a puzzle a bit similar to the last one, but luckily much less complicated. In order to lock all trap doors in a given order (beginning from behind the gate): front, back, right, left. On the shelf above the last trap door you will find a key to the nearby door. Head inside the corridor on the other side.

Here there's a secret thanks to which you can open the Iron Door on this level (25). Below the portal on the "crossroad" (8) there's a trap door. Press the button hidden in the alcove and run towards the portal which is temporarily turned off and the trap door opened. You will fall onto the lower level where you can find the Gear Key. The description of the level can be found at point (28).

The last challenge on this level is Time and Tide.

As the name suggests, this challenge is about good sense of time and movement. The first task is very easy. Inside the alcove you will find a Throwing Knife, in case you don't have anything to throw. Stand on the pressure plate before the opened trap doors and you should hear ticking - three ticks to be exact. Instead of a fourth tick, a portal will appear above the second trap door for a fraction of a second. Feel the moment and throw anything at the portal, more or less half a second after the third tick. The item will be moved to the pressure plate on the left side and the trap doors (apart from the last one) will close.

The portal above the locked trap doors can be used to reach the secret room behind the grates. Place an item on the "ticking plate" and stand on the second trap door. Inside the secret area you will find the Book of Infinite Wisdom.

The next mission requires much more feeling and a bit of luck.
First of all save your game and prepare a throwing weapon or one to shoot with, as it will be necessary here. After pressing the pressure plate on the floor, the trap doors will start locking and opening after around a second. You need to plan each move so that you can cross the whole corridor using them. After reaching the room a pressure plate on the other side of an opened trap door, shoot/throw something onto the plate to open the door and quickly get through it. It might require some training and the Crowern flying in the area makes thing even more difficult. If it stands in your way and you cannot kill it with one or two hits, you're sure to fall onto the lower level (28). Then it's best to load your game and try again, as the Crowern follows a different path each time. Kill it when you reach the other side, as you will head through this path once again to find a secret.

This secret is much easier if you have already gone through the trap doors once, killed the Crowern and left yourself an open gate at the end of the corridor. Once again head to point (21), but this time look right when you're on the second trap door and press the button there. It will open a branching in the tunnel. Turn right into the newly opened passage, look right, quickly take the Chitin Mask and keep following the closing trap doors.

Inside this corridor you will find a Battle Axe on the wall and two alchemy plants growing from the floor.

Inside the next corridor you can find one more plant and a lever which reactivates the portals in the main hall.

It's the door for which you need the Gear Key obtained in point (17). Use the key on the gear-shaped lock and inside you will find the Chitin Greaves.

Inside the room with the Crystal of Life you will also find a Frost Bomb and a Burrow Rat Shank.

Return onto the third level and use the previously found stairs (S3). You will reach an otherwise inaccessible part of level 4 known as the Slime Dungeon. The name isn't random, as you will meet new enemies - Slimes - here.
The mini-map doesn't show grates which create an easy labyrinth of corridors here, but I marked them with dark red. Carefully examine this underground, searching for plant resembling cabbages. The Slime Bell is a new ingredient needed for alchemy. Thanks to it you can brew an antidote.
(A) - at this spot you can find the another Treasure, the Golden Deity Figure.
(B) - here you can find the Green Gem, needed to open the door at point (C). In order to open the secret room, you will have to press the stone button on the nearby wall.
(C) - in order to enter this room, you will first have to "feed" and demonic statue sticking out of the wall. To do that, just place the Green Gem into its mouth. Inside you will find a prize for crossing the Slime Dungeon - a Crossbow, Poison Quarrel and Poison Bomb. As you leave the dungeon, don't forget to take the Green Gem with you.

This part is technically a piece of level 5, ale practically it's still level 4.
(1) - you can reach this part of the underground by jumping into one of the trap doors at point (8). Here you will find a Baked Maggot, a previously locked secret (17) and a portal to the main hall.
(2) - in order to get here, you will have to jump through the trap door at point (10). Here you can find the Tar Bread and two Quarrels. To leave this room, you will have to locate a stone button on the wall.
(3) - jumping down the hole at point (16) you will reach a room where two Slime Bells grow. In order to leave the trap, use the button on the southern wall.
(4) - The trap door at (19) leads to the western part of this underground and only some alchemic plants can be found here. In order to get out, you need to pull the lever by the eastern wall.
Note the armour visible behind the grates in the southern corridor - you will return here again, but from another place.
(P) - Portal leading back to the main hall (3).

Stairs to level 3.

Stairs to level 5.

Stairs to level 3.
This level is rather balanced when it comes to the battle - puzzle ratio, which doesn't necessarily mean it's easy. New enemies who are sure to cause you some problems and test the skills that you have gained until now will appear. Apart from that, the scenery changes to a bit more civilized one.

You begin the adventure in a corridor with the first puzzle waiting for you. The eastern branch is a dead end, filled with debris.

Visit this cell first and you will find two more Quarrels and the Scroll of Fire Shield.

Inside this seemingly empty room, find a button on the wall to open a passage to the adjoining cell. Inside of it, on a shelf, you will find a key to the door in point (5) and a Box. The Box contains some food and alchemic herbs and what's most important - the Scroll of Light.

Inside the passage between the cells you should find a hardly visible button on the wall, which can open a secret room with the Scaled Cloak.

In order to open this door, use the Iron Key which you found in the cell.

Inside this room you should find one of the two dragon statues. Their setup isn't random, but we will get back to that in point (15). Take two Breads from the shelves here, as well as a Shuriken from the corridor in the south. The corridor leading west is collapsed, so you will need a key to venture deeper.

Inside this room you will have to solve a puzzle resembling one of the challenges on the previous level. Take a look around the walls and you will see three metal buttons - two on your side of the pit and one on the opposite. In order to safely reach the alcove on the other side, you will have to press the buttons in the proper order, so that the trap doors create a bridge.
I have marked the buttons on your side with 1 and 2 and the opposite button with 3. The proper order in which you need to press them is 1 > 3 > 1 > 2 > 3. Pressing the last button will make going back impossible, though you will reach the alcove with the Iron Key. Unfortunately, as only you take it, two small rooms will open above the trap doors, out of which a Crowern (piece of cake) and a Wyvern, which is a far difficult variety of the flying reptiles, will jump out. The situation is made worse by the fact that you have a very limited space to manoeuvre. You need to lure the Wyvern as close to you as possible, or else it will attack you from afar and you won't even be able to reach it.
After defeating both reptiles, press button 3 once again and return to the northern part of the trap door. Take the herbs from the room beside the buttons and press 1 to close the trap door above the second opened room, where you can find Toorum's Note regarding a secret which can be found in the next room (9).

Before returning to the corridors however, jump down into one of the trap doors. Here you can find a secret, though take a rest and regenerate your strength, as you will have to fight the same set of reptiles as before. Luckily here you have much more space to avoid the Wyvern's attacks. Once you're done sleeping, find the button hidden on the right wall beside the portal. Behind you a room with the enemies as well as a secret will open. Inside you can find the Lightning and Fire Bombs.

Inside the room beside the trap doors puzzle you have probably noticed a lever and two buttons - one beside the grate behind which the puzzle was and one by the wooden door. In order to open the wooden door, you will need to proceed as follows: pull the lever down, press the button by the grate, pull the lever up and down several times (pulling it up in the end) and press the button by the wooden door. Two Herders - Small and Adult, so both highly toxic - will come out. Inside the secret room there's a Conjurer's Hat for you mage and some food.

The Iron Key from point (7) opens this door. Be ready to fight Crowerns and Wyverns at once. Don't worry if part of your team dies, as there's a Crystal of Life right beside.

Right behind the door you will find a button hidden on the wall. Pressing it will grant you access to the alcove, inside which you can find a great weapon for your Rogue: the Fist Dagger. Note the herbs growing right beside the hidden button.

Crystal of Life. Jump into the trap door beside it to find another Toorum's Note.

After you enter this corridor, you're in for your first, rather unpleasant meeting with the Giant Crab. Luckily the Crystal of Life is nearby. After the fight, take a look inside the northern alcove to find the Ring Greaves between some bones.

A descent to the next level can be found here, though it's locked by two gates for which you need two Ornate Keys. You can gain one of them by heading east and the other one in the west. Behind the barrels by the door to the side corridors you can find a Toorum's Note, enigmatically explaining how to open the Iron Door in this room.

In order to reach the content guarded by the Iron Door, you need to take a rest in the spot marked on the map, beside point (13). At this point the sights of two dragon statues cross (you will come across the second one at point (19)). After a short nap, the door will open and one the other side will find the Lurker Vest.

Head to the eastern corridors. Here, a timed puzzle awaits you. Prepare a rock or another throwing weapon and pull the lever by the grate. At the end of the western corridor there's a pressure plate - quickly throw a rock on it and run towards the newly opened door in the east. Don't worry if the alcove beside the pressure plate doesn't appear on your map, as it opens only after a few failed attempts of solving this puzzle. Inside you will find only a hint.

As the way back to the main corridor is temporarily cut off, this room will be the safest place to stay. Collect the resources found inside and note that you can lock yourself inside and therefore safely rest.

These corridors will at first look completely differently on your map. Further elements will successively open as you travel through them. However be very careful while doing so. Each time you hear the sound of a wall opening, retreat closer to point (17) where you have more space to fight and eventually rest. Each opening tunnel will let out a monster, e.g. a Giant Crabs or Adult Herders. Lock yourself inside the cell (17) after each fight and regenerate before returning to the tunnels. Once all the tunnels are opened, collect the herbs growing in the nooks, Fire Bombs (right beside (17)) and the Warhammer found on the shelf in the marked spot. After searching the corridors, return to point (19).

Inside the room with the dragon statue there's the first Ornate Key. In order to return from there to the main part of the underground, pull the lever by the wall, quickly run into the familiar corridor (16) and pull the lever found there.

After you pull the lever at (16), immediately return to the room with the dragon. If you make it in time before the ticking stops, you will find an open cage and inside a secret with some Arrows and the Huntsman Cloak.

In the western part of the corridors you're in for a task requiring reflex and a bit of good memory. The button on the wall on your right launches a series of trap doors, which eventually close and open again after some time. Beside there's also a lever which reverts their movement. Switch the lever and start the mechanism.
Start off by taking a closer look at the track which is created by the trap doors closing (marked on the mini-map) and afterwards head along this moving "bridge".

On your way to the other side of the trap doors you might have noticed a rather well visible button on the wall - if you press it while walking along the trap doors, you might be able to reach a small shelf with the Brace of Fortitude. Grab it quickly before you fall through the trap door which will open soon. On the lower floor you will have to fight your way through a couple types of Skeletons. Search the room after the fight to find some herbs and food.

On your way up the stairs (from the room with the trap doors) you will find a Boiled Crag Beetle and another Bow. Pull the lever to return to point (21).

Here you will find another button and a lever controlling the trap doors. You will need them on your way back from (25).

Start off by defeating the Giant Crab here and rest. The chamber seems empty, but only seemingly. Behind the pillar with statues you will find the second Ornate Key. If you have ever seen an Indiana Jones movie, you will probably guess what will happen after you take the key - the room will be filled by enemies coming from the newly opened corridors. You can avoid this as cunningly as Indiana would, putting an item on the shelf before taking the key. However it's probably not worth it, as by fighting here you will gain quite a lot of experience and additionally find some herbs and Lightning Bombs in the open alcoves. Return to point (14). On your way you are sure to note that various groups of Skeletons wander the corridors - kill them all for additional experience and use both keys to reach the lower level.

Stairs to level 4.

Stairs to level 6.

Stairs to the room above the trap doors (level 6).
"Trapped" is by far the longest and hardest level up to now. As the name suggests, you will be trapped here right after going through the first gate. You will free yourself only after crossing the level to the other side, which is when the stairs to level 5 will be unlocked again. Be sure you have everything you need before exiting the stairs and be ready for some tough fight. Make sure to keep all your party members alive at all cost, as for some time reviving them will be impossible.

Right after crossing the threshold of this level you will be attacked by three Spiders. If you immediately turn right after entering the main hall, you will be able to get across the gate at (17), lock yourself there and eliminate the Spiders from there one at a time, as well as safely rest.
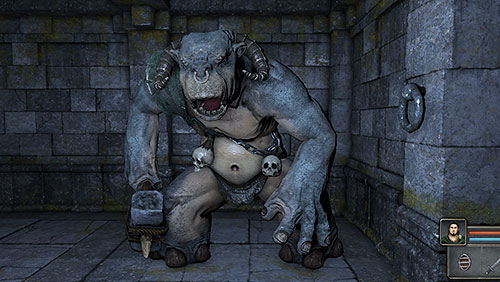
Regardless of how you defeated the Spiders, rest at (17) before the somewhat epic fight with the new enemy - Ogre. He's circling around the room and once angered, he won't let you go. The fight will be long and demanding, so full health, energy and a bunch of Healing Potions are welcomed. After you win, the dead Ogre will leave behind the Ogre Hammer and a Sack with some food and a Gold Key, needed for one of the three prizes waiting for you at the end of this level.

In this room you will have to eliminate a few Spiders and in return you can find a weapon for your Warrior inside the corridor from which they came (Cutlass).

Inside this room there's an interesting secret. Cross the corridors once in accordance with the hints on the map and a stone will appear before you. Cross them once again and the stone will be replaced by a Skeleton. Do it once again to finally solve the secret and receive a Sack with the Speed Potion and the recipe for it.

This room from now on will be your emergency "pantry", or rather Snail farm. They keep on respawning here, so you don't need to worry about food. Just don't forget to lock the door once you exit, or else they will spread throughout the whole level and eat the lettuce;)

A puzzle with portals awaits you here, one that can cause some confusion easily, though luckily for you, not with this guide.
All portals have been marked on the mini-map with blue and two others will be covered further on. Start off by locating the button on the wall (without entering any portal). After pressing it, the portal marked as red will (right beside where you're headed) will be deactivated. Now enter the portals in the order: 1, 2 and 3. At this point you should reach an alcove, inside which the first of four Round Keys is.

Inside the alcove beside the key you will find another button in the wall. Press it and enter portals 4 and 5. The portal marked as green will be deactivated, so you will be able to reach the second alcove and find one of the most interesting artefacts: the Spirit Mirror Pendant, which increases the rate at which the wearer gains experience.

Having the Round Key, you will be able to reach the Crystal of Life and finally catch some breath. From now on you will be able to fight with more confidence, as you have a revival point nearby. The Crystal room can also be locked, so it's a good place to sleep.

Inside the small room beside the Crystal of Life you can find a teleport which will start to move you between a couple rooms at a fast pace. You will stay in each room for about a second. The one which should interest you is the one with the wooden door and a chain with which you can open it. Inside there's a Snail - not a powerful enemy, but you will only have time for 1 or 2 hits with each jump. After killing it, run into the room with the lever during the next jump and switch it.
Head back into the portal and you should note that the grate which was previously blocking access to the room with the Giant Crab has opened. Kill the Crab and collect another Round Key. You will be able to use it to open the first gate south of the Crystal of Life and take the Antidote recipe Scroll found on the other side.

Now, having access to the Crystal of Life, you will be able to approach this secret without much risk. Place a torch in the handle which you can find inside the alcove north of the Crystal room. Three squares further north a new corridor will open, inside of which there's a Skeleton and two Fire Bombs.
On the left wall you should find a stone with a carved runic sign. Press it and the corridor will open even more. You will find yourself inside a small room with a portal which you cannot go though. Place an item inside the portal (put it down, don't throw) and a gate will open on the other side. Behind it you will find a good item for the Mage - the Orb of Radiance.
Unfortunately the biggest trouble is just waiting for you. After you pick up the Orb, you will be trapped inside the room with two Crabs, which will additionally most likely pin you down inside the narrow corridor, without leaving any space to manoeuvre. You need to give it everything you've got to avoid seeing the GAME OVER screen. It's a good idea to freeze the Crab which you fight with bombs/spells. If you managed to retreat from the Orb corridor fast enough, you might be able to return to the main room after killing the first Crab and therefore defeating the second will be just formality.
In order to leave this room after the fight, find the runic stone again and press it.

These corridors are full of single Skeletons which appear here from time to time. You're in for a similar task as on level 4, i.e. leading the Skeletons to a given target.

On the walls inside one of the corridors you will find a hidden button which opens the alcove in the north. Inside it you should find (surprise) more Skeletons, a Heavy Shield and Ring Boots.

Behind the pillar, a bit further south you will find one more button. It opens the room in the south, freeing two Archers and containing a prize: the Frostbite Necklace.

This part is a bit tricky. In the marked spot on the floor you will find a pressure plate which however cannot be held down with any item, but only with the weight of a body - not necessarily your. The plate grants access to a room with yet another Round Key, though as fast as you step off it, the room will start to close and you won't be able to reach it on time.
Here the endless wave of Skeletons starts to make sense. Lure at least one of them to the plate, stand on it yourself, wait until you hear that the room has opened completely, quickly let the Skeleton take your place and run towards the room. Inside there's a group of Skeletons waiting for you, as well as some herbs and the key.
In fact you're now in possession of all the Round Keys necessary to leave this level, but yet another key waits for the persistent, together with a prize.

After eliminating the Crabs lurking in this area, you can jump down into the trap door right now or first solve the other puzzle on this level. A full description of this multi-part secret can be found in point (21).

In this inconspicuous corridor you will find a big threat and quite a secret right beside. At the end of the corridor there are two items necessary to reach the further part of this level.
On the floor in front of you, you should see a pressure plate - don't stand on it just yet, as it will turn on a demon statue which will start spitting fireballs. Start off by locating the button on the right side of the corridor. It will open an alcove which you will be able to jump into to avoid the fireball. Step onto the pressure plate and immediately retreat to the freshly opened alcove. After the fireballs passes by, run deeper into the corridor, press the button on the left and immediately run back to the alcove. The last button has opened yet another alcove, right beside the statue. At the right moment, run towards it. From here it will be much easier to take the Scroll of Fireball and the Fire Blade from beneath the statue.

The newly opened alcove is a secret as well. Inside it you can find yet another hidden button which opens a secret staircase inside the previous alcove. You can use them to reach a spot which you have already seen in the secret part of level 4, but a grate has been blocking access there. Collect the Plate Cuirass and Plate Gauntlets - yummy.
Unfortunately nothing comes free. You will come across Uggardians, capable of casting fireballs, for the first time. These guys are no joke - they're tough, fast, levitating (trap doors don't work on them) and their attacks hurt, hurt pretty badly. If your Mage can use Fire Shield, now might be a very good time to use it.

In order to safely get to the other side of this trap door, you first need to do two things. Firstly throw something at the demon statue visible on the other side and immediately move back, as the item will fall onto a pressure plate and cause a fireball to be casted at you. Afterwards you will have to either cast a Fireball or shoot the Fire Blade at the statue - both will get the job done, closing the trap door and letting you pass.

Here you will have to fight two Uggardians found in the neighbouring room. Start attacking them from afar - at best with arrows/bolts and ice missiles. Fighting them in a bigger room isn't a good idea, as you might easily fall into one of the trap doors there.

Here you can find the last Round Key, but reaching it will require quite some reflex. Both pillars here have buttons on them (one of the eastern and four on the western).
Each button closes one trap door, giving you access to the next button for a couple seconds, which closes the next door and so on. The proper track and the order (starting with the button on the eastern column) have been presented on the mini-map. You need to be really fast not to fall down. When you finally reach the shelf with the key, don't pick it up at once. In order to create a way back, pull out the torch from the handle and one of the trap doors creating the bridge will close. Now take the key and quickly retreat to the room at point (18), as you will be attacked by another Uggardian.
Note that jumping into whichever trap door will take you to the main (least "secret") part of the secret (21).

It's not the end of this chamber. The first secret found here will require you to follow the whole red track once again, though this time it will be prolonged by two additional buttons (green track on the mini-map). The time limit is even strict than last time, but the prize is well worth it. After you press the last button, a hidden room will open and another Uggardian will come out. After killing it, you will find the Ring Mail and Sword of Nex - a great weapon for your swordsman and at the same time the key to a secret (22).

Jumping into this trap door will end up with landing at a seemingly dead end with a cage ((E) on the map below), from which a crustacean is smiling at you sincerely - wait a bit and the cage will open. After the fight, collect the third out of seven Treasure in the game - the Crown of Kings.
As seen on the map, this secret is pretty much a dungeon of its own - a two level one. In part (A) - which you can also access through trap doors at points (17) (18) and (19) - you will find only Crowerns, Wyverns and some items: two Tar Beads, a Wooden Box (containing a Healing Potion and an Antidote) and a couple Peasant Breeches and Sandals. On the nearby shelf (A) you will also find a scroll with a hint on how to find the Crown, but you've already don't that.
The trap door at (B) will take you even lower, where quite the prize awaits you.
Point (C) contains a small puzzle and there are also some Frost Bombs lying nearby. You will come across an iron door with some Scavengers on the other side. To open it, place any item you like on the pressure plate behind the grates, but precisely where I marked. Kill the lizards and head inside. Being on the other side, pick up the item that you put on the plate. This way you will close the gate and open a secret alcove which hides the Full Helmet (heavy armour). To get out of here, repeat the process with putting weight on the plate and use the nearby (P)ortal to return onto the upper level. The portal at part (A) will take you back to level 6.
There's still one more secret left in this underground (D), accessible only by jumping into the trap door at point (14) on level 6. Here you will find the Lurker Pants and a Shuriken.
The order at which you discover the rooms found here is entirely up to you.

Inside the nook behind the demon statue you should easily find a familiar block with a runic sign. Press it and a corridor leading to the "Fighter's Challenge" - a secret very worthy of your time and at the same time one of the hardest fights in the game - will open. The corridor and stairs will lead you to a demon statue, though you shouldn't approach it just yet. If you have the Sword of Nex with you, the statue will teleport you to a large room, inside which a vast amount of Scavengers awaits you. If you think you've seen enough of them by the end of level 4, you're very wrong - here, there's 10x more of them.
Before teleporting, you should rest, regenerate, prepare a tactic and as many Healing Potions as you can. If you have a Speed Potion, give it to your best and fastest warrior - it will come in handy.
After teleporting, you will find yourself in the very middle of the Scavengers group. Fight your way through them with everything you've got and use any breach there is to reach the corner of the room. I would advise doing so normally, but in this case it's the only way to protect your back and therefore the weakest party members. Don't worry even if 3 of your party dies - I finished this challenge having one, barely living warrior - you don't need anything more. If you can't handle this fight, just let go. You will be able to return here anytime with higher level characters. If you managed to survive, congratulate yourself and search the room for the Gold Key and some Bombs lying on the ground. The Gold Key can be used to open the only door found here, behind which you will find the excellent Shield of Valor.
A teleport will appear in the middle of the room, which will take you back to the upper level, but don't use it just yet! On the western wall of this room you will find a hidden button which opens a secret alcove containing the fourth Treasure, the Ancient Apparatus. It's a prize well worth the effort. Now head back up, hug the Crystal of Life and be ready for some more prizes.

If you have gathered all the Round Keys, you should still have one left. It fits the Iron Door here, behind which you can find the Chitin Mail (second to last part of the whole).

In the end, there's still one gift waiting for you. The Gold Key that the Ogre at the beginning of the level had fits all the doors here, though you can choose only one. Inside the cells, you can find:
The choice is up to you, though keep in mind that the Tome of Fire is by far the most precious item.
After reaching the end of this level, the door to level 5 will also be unlocked.

Stairs to level 5.

Stairs to level 6.

Stairs to the secret basement at level 5.
Stairs to "Fighter's Challenge"

Stairs to level 5 (available only as a way back after falling from 5).

This level is a walk in the park compared to the previous one. You will have to face some demanding enemies here, but they're not all that dangerous this far into the game. The puzzles are less frustrating as well, through still interesting. A moment of relief after being imprisoned on level 6.

You begin the adventure in the Chambers inside corridors with multiple Slimes. Inside the first room (opened with a nearby button) you will find Toorum's Note, hidden beneath a cloth on the ground. There's also a secret here, more on which can be found below (3).

Some more Slimes, a Grim Cap and an alchemy herb.

In order to open this alcove, you will have to complete a very easy activity, i.e. open all the doors in rooms (1) and (2), apart from the southern ones in (2). Inside the alcove you will find the Ring Greaves, Throwing Knives and a Battle Axe.

The northern part of the tunnel is collapsed, so the only possible way is through the door into the western chamber. Here you will find the Maze of Shadows - an easy puzzle with quite a bit of prizes to collect. In order to get through this labyrinth, you will have to move only along the unlit squares, avoiding the light of the torch. I won't draw the track, as you shouldn't have problems with such an easy puzzle this far in the game. Just remember that entering the light takes you back to the entrance door.
Inside the niches in this labyrinth you will find two Slime Bells) used at alchemy.

The Scroll of Darkness can be found here - it's a spell opposite to Light.

On this pillar you can find the Hardstone Bracelet. Right beside, by the northern wall you should also find Toorum's Note regarding this part of the underground.

In this (seemingly) dead end you will find a Wooden Box with a big supply of food inside. There's also a hidden button here which will let you reach a double secret.

Press the button in the wall at (7) and the wall will raise, giving you access to a portal (marked with green) which will take you to a secret room with Herders. After killing them, search the room for Throwing Axes, Crossbow Quarrels and food.
On one of the walls you will also find a stone with a carved rune. Press it and another wall will raise, behind which you can find some Frost Bombs.
This room is the official target of your trip through the "shadows". The grate, controlled by the nearby lever, will let you use this nook as a safe spot should you need to run away from the further corridors.

This area is swarming with Uggardians, additionally it's rather narrow and therefore it's hard to avoid their fireballs. It's best to lure them to point (9) and eliminate one at a time there. Jump into the trap door here to reach a secret containing the Bracelet of Tirin. The nearby portal will take you back upstairs.

In order to reach the room behind the door you will have to firstly stand on the pressure plate in the adjoining room. After doing so, immediately return to the door and kill the Slime there. Be quick, as inside the room with the plate the walls have opened and let out more Slimes. After killing all of them, collect the Iron Key found behind the open door and search the neighbouring room for the Diviner's Cloak.

Use the Iron Key you have found on the lock here and the trap door blocking your way will lock, giving you access to the next puzzle.

Inside this corridor and on the other side of the trap door you will see two demon heads which, as you have probably guessed, spit projectiles. Beside the grate you should see a metal button and a "socket" for the projectiles mentioned above. The second socket is on the other side of the grate. There's also an open trap door there.
In order to open the grate and close the trap door, you will have to proceed as follows: press the metal button, quickly make space for the incoming projectile by heading towards the trap door (10) and immediately jump back onto the square with the button right after the grate opens. This way the second projectile will close the trap door.

Here you're in for some more Slimes. Beside the pillar in the corner of the room there's a Throwing Axe.

Here you can find the Crystal of Life and an interesting item lying nearby - the Fire Torc.

Inside the first room you will have to solve an easy puzzle using the demon head, socket and of course a light projectile.
You will find two pressure plates here. The first one opens the grate and the second shoots a projectile from the demon head. Stand on the first one and wait for the gate to open completely, quickly stand on the plate below the grate and immediately return onto the previous one. As the projectiles hits the socket, two more rooms will open and you will be attacked by Uggardians.
Inside the room behind the grate you will find a rare treat for the Mage - the Shaman Staff and Scroll of Invisibility lying below the demon head. The second room hides another Toorum's Note and a lever opening the wooden door leading to the corridor beside point (14).

Inside the room with two portals and trap doors. Jump down and you will find yourself in a peculiar, though dangerous room, the floor of which is almost completely filled with pressure plates. Each place releases a poisonous projectile from the demon head found on the other side of the room. Move carefully through the plates so that you're not killed before reaching the other side of the room. There you will find the Boots of Valor (part of a set).
Beside the demon heads you will find a lever which frees Spiders and Crabs from behind the grate in the spot where you landed. Defeat them, search the alcoves from which they headed out in search of food and use the portal to return upstairs.

A portal which takes you to the other side of the room, to point (19).

A portal which takes you to point (20).

Inside the alcove in the northern wall of this room there's a bag containing some alchemy ingredients. Use the portal to return to point (19).

Here you can find a rather easy secret. On the walls there are five levers which need to be arranged in the below order:
1 - up
2 - however
3 - down
4 - however
5 - down
Placing levers 1, 3 and 5 in the right position will be confirmed by a click. After you set them all correctly, you will be able to take the Assassin's Dagger - a great weapon for the Rogue.

Inside this room you will find an easy puzzle, which however requires good reflex. The floor here is entirely made from trap doors which keep closing and opening because of the demon head which spits projectiles into the socket on the other side.
In order to cross this room to the other side and open the door, you will have to head into the middle of the room when the trap doors close and therefore block the path of the projectile. Approach the projectile socket and while looking at it, move left at the right moment, press the button on the wall and immediately move right. Uggardians will fly into the room, so it would be best to retreat to the starting point at (21) and kill them there, without having to worry about the trap doors.
After dealing with the enemies, return to the room with the trap doors and once again block the projectile with your own body. Turn around towards the corridor which you used to come here and to the left of the entrance you will find a not-so-secret secret - a shelf with the Bracer of Fortitude. Stand beside the socket and while looking towards the item, quickly run to grab it at the right moment and immediately return afterwards.
If you want, you can also fall down through the trap doors - below there's an Ogre, which however shouldn't be too much of a threat at this stage of the game, yet still provide some experience points for your party. Inside this basement you will also find a Heavy Shield, a Milkreed and a Crossbow Quarrel. You can use the stairs to head back up.

At this spot you will find a very good, heavy weapon - the Flail. First however you will have to defeat a Tentacle and an Uggardian.

Nearby the room with the Flail you will find a runic stone on the wall. Press it and quickly run south through the corridor to reach a room with a staircase. It leads to a secret part of the lower level - the Dismantler's Vault, inside which one of the most powerful weapons in the game can be found.

On the shelf beside the stairs there's another Skull, one of five which you can find. Of course give it to your Minotaur.

In the end there's still the Iron Door, opening which requires some reflex and dexterity.
Once you enter the room, the demon heads on the other side will start spitting light projectiles. If whichever reaches its socket, you will be immediately taken back to the door and will have to start from the beginning. Face the demon statues and block the incoming projectiles with your own body and keep in mind that they will gradually gain speed. When the statues finally stop, the Iron Door will open, granting you with the Chitin Boots (last part of the set!) and the Scroll of Enchant Fire Arrow.
Stairs leading to level 6.
Stairs leading to level 8.

Stairs leading to the basement below the room at point (22).

Stairs to the secret part of level 8.
The Vault is a completely optional level which you can pass in just a minute, heading from one staircase to the next one. Nonetheless, the treasures found here count to the end statistics (and you want to get 100%, right? ;)) and will also help you, especially the Dismantler sword which I have mentioned before. It's a very powerful weapon and it's worth to explore the Vault just for it.

For starters, you will be greeted by a shelf with the Scroll of Shock Shield and some alchemy plants.

On the wall in the first room you will find a button which grants access to a very special snack - a piece of cake. Apparently, "the cake is not a lie" in this game ;] You will also find some herbs and a Grim Cap here.
Right behind the corner you will find the Crystal of Life. In the marked spot (behind the grate) there's another Toorum's Note, with hints on how to reach the secret part of this level.

Right beside the stairs to the next level you will find the Iron Door. In order to open them, you will need the Gear Key which can be found deeper into the crypt, at point (11).
Behind the door you will find the Helmet of Valor (another piece of this set) and the Frost Quarrels.

You will reach this chamber by using secret stairs at point (24) on the previous level. Luckily the architects of this place have through about a shortcut and on the wall you can find a lever which opens a passage to the Crystal of Life.

At this spot you will come across a trap. Right after entering this corridor, stop by the warrior statue and wait for the walls to rise, freeing an Ogre and Uggardian. Defeat the latter one first and then move to the Ogre, which shouldn't be hard thanks to the specifics of this corridor.
On the newly unveiled wall you will find a metal button which opens the grate to the next tunnel.

After the grate rises, lightning projectiles will start to fly from the end of the corridor in short bursts.
In order to safely cross this corridor, you will have to run to the nearest grate between the projectiles, pull the chain, return to the beginning while avoiding the projectile and run through the open grate to the next room before another one reaches you.

Uggardians and Spiders roam this room. If you want, you can lure them to the corridor so that the lightning bolts kill them, though it would be a waste of experience.
On the pillar beside point (9) there's a level which opens the wooden door found in corridor (7), opening the passage to (10) and freeing more Uggardians and a Spider.

After clearing the rooms, search the nearby walls for buttons which open the alcoves with pressure plates. Hold down the plates with something and the walls in the marked spot will rise. There you will find the Plate Gauntlets and Plate Boots.

If you haven't done it yet, kill the enemies here and pull the lever to open one more wooden door in the "electric corridor", leading to point (12).

Before leaving point (10), find the button hidden in the wall. It opens a tunnel at the end of the electric corridor right beside the demon head (you will find Lightning Bombs beside it). Inside there's an Ogre to defeat, in return for which you will receive the Lightning Rod and the Gear Key which opens the Iron Door at point (4).

In these corridors you will find some more Uggardians and Spiders. Inside the room in the eastern branch there are Throwing Axes and in the western a Toorum's Note and Frost Arrows.

These corridors are populated by Uggardians and Ogres. Defeat them one at a time, luring into the square room at point (12) if needed. Here you can also find some Tar Beads, Bread and Lightning Bombs.

Your target is the teleport which will take you to point (15). However before entering it, take a rest, stock up on Healing Potions, Antivenoms and cast a Poison Shield on your party if possible.

On the other side of the portal you will be attacked by a band of Herders of all types. Move all the time and try to use ranged weapons and spells if possible, which should help you avoid the poisonous clouds and getting surrounded by enemies. Don't worry - this fight isn't even a quarter as hard as the last meeting with Scavengers in similar circumstances.
After the fight, search the room for another Skull (marked as green) and two Brass Keys. Use one of the keys to open the grate guarding the portal and head to point (16), where you will need to make use of the second key to open a wooden door.

In this corridor you will find four pressure plates (marked with red dots) which you need to hold down with some items. Leave the plate right beside point (16) for the end - that way you won't be surrounded by enemies who will be let out in the middle of the bigger room. After the fight, pull the lever by the pillar to open a passage to the next room.

Here, a whole bunch of Uggardians and Spiders await you again. Defeat them one after another and afterwards search the floor to find: two Shurikens, a Knife, Bread and some Mole Jerky (only some butter is missing).

On the western pillar and beside the northern door at point (17) you will find hidden buttons - both open a passage in which you can find a Wooden Box and Axes and Quarrels inside.

You've seen this room numerous times through the grates beside the Crystal of Life and the mysterious stairs. A Spider can be found here, which with its weight pulls down the pressure plates and causes lightning bolts to be fired at you.
Luckily it's a very easy task. Equip your party with throwing weapons and prepare ranged spells. Afterwards just keep following the Spider and attack it from a distance.
With the Spider dead, find a lever beside the grate which will open a passage to the Crystal of Life. You can also jump into one of the trap doors, where you will find a Snail, Bread and Axes. Use the portal to get back upstairs and press the two marked buttons on the walls. They will open a passage to a crypt and let you regain your throwing weapons which you used to kill the Spider.

The crypt, finally. However wait a bit before picking up the sword and search for a button in the corner of the room. It will open an alcove, inside which you will find the next treasure: the Golden Dragon.

Time to get the desired loot, the best sword in the game - the Dismantler.
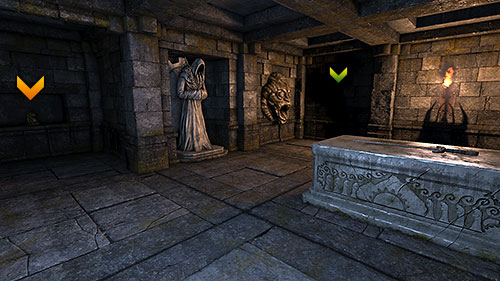
Do however note the demon heads around the crypt - to avoid getting killed by them, act as a real adventurer would and place something in place of the sword before picking it up. Afterwards you will be able to safely take it and head to level 9.

Stairs to level 7.

Stairs to level 9.

Secret stairs to level 7.
The Goromorg Temple consists of two levels. The first one contains quite interesting puzzles and introduces two new enemies. If you want, you will be able to level up the characters in your party.

At the very beginning of the temple, note the new environment element here - banners on the wall. Rip off all that you come across (by attacking them), as many of them hide some minor or even quite valuable collectibles. Behind the alcove covered by the banner marked on the map you will find Bread.

Inside this room an Uggardian which will leave an Ornate Key (need further on) after dying awaits you. In order to get inside, rip off the banner by the door and press the button behind it. Inside you will find two scrolls - one of them contains hints on the puzzle by the end of this level.

The first bigger puzzle in the Temple is the "Checkered Room". The name itself implies what you will have to do.

Out of nine pressure plates found here, hold down four with any items you like, as seen above (I used some old Toorum's Notes).

Inside the Armory there's another Uggardian waiting for you, but also some nice items: Arrows, Lightning Bombs, a Long Sword, an Iron Basinet and a Ring Mail.

Inside the Armory, there's also a secret to be discovered. Destroy the boxes in the northern alcove and another one will open in the south. One more Uggardian will come out of it and after you defeat it you will be able to collect the almost-best axe in the game, coming under the name of Norja.

A quite tricky puzzle awaits you here, though with this guide it will be no challenge. Move along the corridor slowly, one square at a time. When you note that the walls have strangely changed (chains and metal rings which appear on them are a good determinant), turn around 180 degrees and carefully head forward. The whole trick here is that the corridor turns around unexpectedly at some points, so you would just walk along three squares all the time.

The hard part begins here, so be sure to regenerate, prepare Healing and Energy Potions and maybe some helpful items (bombs, throwing items etc.). These corridors are inhabited by a new type of enemy, the Ice Lizards, which additionally keep respawning here. It has its good sides, as the meat they leave behind is heavy but very satiating and the experience is also quite good. In case you would have to run away, you can return here and close the door behind you. Remember not to get surrounded by the Lizards, as it might end pretty badly.

A small secret can be found here. In order to open it, locate the button on the wall behind the corner. Here you will find an interesting item - the Pit Fighter Gauntlets. Apart from that, you can also collect two Bombs from here.

In order to open this door, you will have to switch the lever at the marked spot. Behind the door there's one of the items which you need to take to continue onwards. In this case it's the Scroll of Lightning Bolt.

At this spot you will find a handy item - the Circlet of Wall, which increases the wearer's strength - by the wall. In the north-east corridor there are Lightning Bombs.
The concentration of Lizards will be highest in this area, so one of them will probably drop the Gold Key needed for the Treasury. It's also possible that you will find it anywhere between points (7) and (11).

Here you will finally be able to take a rest from the unending wave of blue lizards. Lock both gates behind you and take the herbs from the eastern and western ends of the corridor.

A portal-oriented puzzle awaits you here. Open the gate with the Ornate Key and be ready to fight a couple Uggardians (the door will lock behind you after you head inside). After the battle, take a look around the room. Three portals can be found here, with number assigned to them. Head through any one and by the feet of the statues in the middle a scroll with a hint ("III - II - I - III") will appear. What it means is that you need to enter the portal in this order: 3 > 2 > 1 > 3. This way you will reach the next point on the map.

Here you will face a dexterity puzzle. Firstly, you will end up on a pressure plate, right before two trap doors out of which one keeps closing and opening. In order to reach it, you will need to place something on the plate you're standing on. After doing it, stand on the locked door and note the grate on the left. behind it, there's another pressure plate on which you need to place something and do it fast enough not to fall down when the second trap door opens again (if you however do fall, skip to point (14) as you will return here either way). Afterwards enter the newly opened corridor and pull the lever. Note the flicking portal on the other side of the automatic portal. Feel the moment so that you can cross the temporarily closed trap door and not hit the portal, or else it will take you back to before the trap. On the other side you will find another lever and a passage to a second item which you need to take from the pedestal to move on. This time it will be an Ornate Key.
Once you're done with point (13) and (14), return to the portal which you used to get here and return to (12). In the marked place, you will find a hidden button which opens the door of the chamber.

If you haven't fallen into the basement in the previous point, do it now as another secret - and a quite good one at the same time - can be found here.
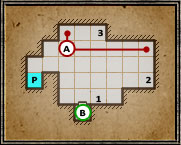
To solve this puzzle, you will need three torches and two stones.
In order to open grate (B), you need to place three torches into the empty handles on the walls of the basement (1, 2 and 3). Once you do it, take a look around and find a place on the ground where the shades cross and create a darker spot (A). Stand on it and throw a stone east and then north. Voila, the grate becomes open and in return you will receive the Cuirass of Valor.
In order to return upstairs, just use the portal (P).

This long corridor is the older and meaner brother of the one at point (6). This time you need to cross it square after square according to the hint on the scroll which you have found at point (2). To make things easier, I have drawn the proper track on the mini-map. After you cross the corridor properly once, you will be able to move through it freely.

In these corridors you will come across more Uggardians. In the marked room in the north-east you will find another Toorum's Note and a stone (hold it for later).

Inside this slightly bigger room you will come across a new enemy, known as Shrakk Torr. It's a rather annoying enemy who can spread poison, but two of them shouldn't be a problem. After the fight, tear off the banner in the marked spot to find the Lurker Hood (the last part of the set).

This door can be opened only with the button on the wall, which has been marked on the map. After getting inside, collect the Book of Infinite Wisdom. It's the last item you needed to collect from the shelf to move on.

The walls of the room will rise, changing this series of nooks into an intersection, from which you will have easy access to each part of the level. Afterwards stand on the pressure plate to open the door beside it and don't forget to take the Sulphurous potion from the shelf.

A Crystal of Life, finally. Apart from it, there's also a puzzle which blocks further way. In order to solve it, put the following items on shelves marked as A, B, C and D:
A - Key
B - Arrow
C - Stone
D - Skull
After you place the right items on the right shelves, you will hear a lick and the gate to the further part of the underground will open. Right behind it you will find a scroll with congratulations on your progress.

Here you will also come across a Treasury, similar to the one from level 6. You have found the Gold Key which opens a selected lock while fighting the Ice Lizards.
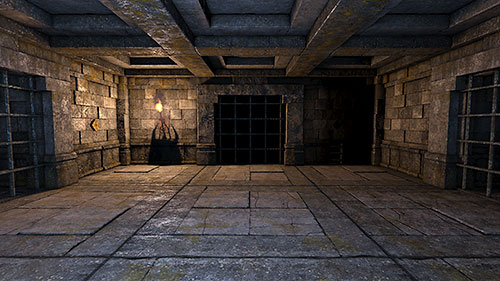
Here's what you can find behind the gates:

The last collectibles on this level can be found behind the Iron Door. In order to open them, just place a Bone Amulet (you should have two) on the nearby shelf. Behind the door you will find the most powerful artefact for the mage: the Zhandul's Orb.

Now you just need to cross the spiral corridor in which two Ogres await you. It's best to lure them into charging and keep backing out towards the entrance, attacking with all you've got, at best from a distance. You can also lure the Ogre into the Treasury and finish it off normally there.
The second Ogre might cause you more trouble, as the door will close behind you. Though if you're fast enough, you might be able to open it with the marked button on the wall. After the fight, it's time to descent into the next part of the Temple.

Stairs to level 8.

Stairs to level 10.
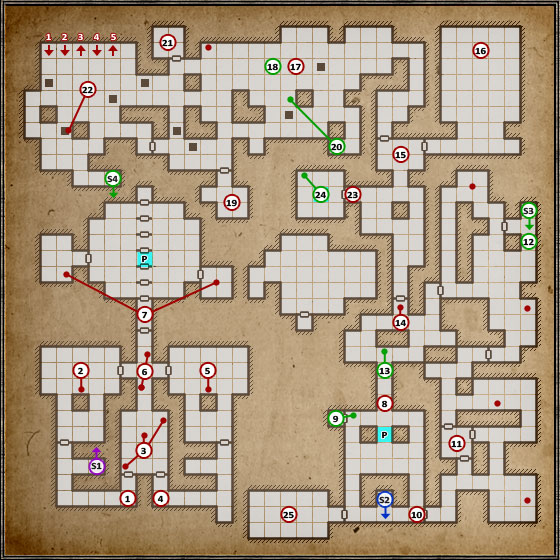
Goromorg Temple II has more interesting, though not necessarily demanding puzzles, though the new enemies you meet here will be a big enough challenge. The Goromorgs are mages who look like bastard sons of Cthulu and Tonberry. They are very dangerous enemies who can use magic of any kind, though they're rather easy to trick. On this level you will also finally "meet" with Toorum.

On the shelf in the nook you will find the first Round Key needed to solve the puzzle at point (6). It fits the round lock at (2).

Tear off the banner from the pillar in this room and use the Round Key on the round lock. The western wall will rise, letting out the Lizards and "mosquitoes".
After the fight, note the demon head in the newly opened part of the room.

In this room there's a passage to the second key you need. Put some weight on the pressure plate found in the middle of the room and the grate blocking access to the shelf will open (1). In order to reach the key at point (4) you need to tear off the banners from the wall - behind them you will find two shelves and on one of them a Red Gem. Take the rock from one shelf onto the other and the grate to the next key will rise.

After taking the Round Key, take a look into the southern alcove to find Toorum's Note. In the north there's a lever which open room (5) from this side.
When you pull the lever, the walls behind you will raise freeing some mosquitoes, Uggardians, but most importantly giving access to the alcove in which the Gauntlets of Valor are.
As you can all rooms now, return to point (3) for the Red Gem.

This room can be accessed either from point (4) or (6). I'd recommend firstly opening the gate of the room found at (6), killing the "mosquito" found inside, crossing the corridor though (4) and getting inside after pulling the lever by the door.
Just like in room (2), tear off the banner, use the key and kill the monsters from behind the raising wall. On this side you will find a socket for the light projectiles spitted by the demon head in the room (2).

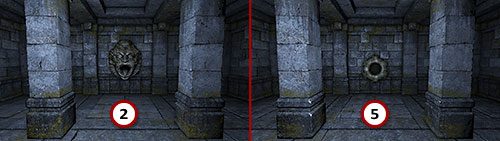
The trick in this point is to shoot the lightning orb from point (2) so that it hits the socket at point (5). The projectiles can be shot with the button hidden beneath the banner south of the intersection. The problem is that the button at the northern wing (also hidden beneath a banner) opens one door, at the same time closing the other. You need to find the right moment, so that the projectile doesn't hit the locked grate. When you manage to pull it off, the gate leading to point (7) will open.

As you enter this corridor, the gates will consecutively start rising, creating a long tunnel. At its end there are two demon heads with a pressure plate between them - don't press it, as the statues would let out a poisonous cloud.
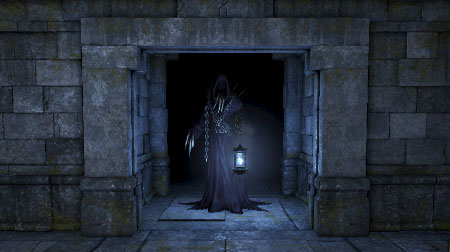
Right after the gates, the walls will start going up as well, changing the tunnel into a vast room. Immediately retreat to point 2 or 5, or else you will be quickly surrounded by the Goromorgs mentioned before. They're easiest to eliminate one at a time, by luring each one into the smaller rooms. Their magic is really powerful and you can see the GAME OVER screen after just a dozen or so second when fighting a couple of them at the same time. My tactic will let you avoid dying during this fight, as well as all other with these monsters.
After the fight, take a look into the eastern room behind the grate to find Crossbow Quarrels. In case you need to, you can lock yourself here and take a nap. In the western room you will find Throwing Axes and food, but above all a lever activating a teleport in the middle of the big room. Beside the teleport, a few Goromorgs will also appear.

After the fight at point (7), go through the portal to reach the Crystal of Life.

At this spot you will come across the last Iron Door in the game. Opening it won't be a problem, if only you've collected the Red Gem from point (3). Tear off the banner beside the door and place a rock on the shelf found there. Behind the door you will find the most powerful ranged weapon in the game: the Crookhorn Longbow and also Throwing Axes.

Right beside there are stairs leading to the next level, though you still have things to do on this one. Using the door here, you will reach a corridor full of mosquitoes and Goromorgs. Inside the corridors, you will find some herbs, bombs and other collectibles which I have marked on the mini-map with red dots.

This place will be your "safe haven" in the corridors, as you can lock yourself behind a heavy door here and rest. On the shelf in this room you will also find the Greaves of Valor - the last element of this powerful heavy armour set.

Jump into the trap door here and you will end up in a small dungeon inhabited by Giant Crabs. After defeating them, search each corner thoroughly in search of herbs and bombs. Return upstairs using the stairs here (S3) and you will end up on the other side of the trap door which you jumped into.
The prize for your effort will be the Shield of the Elements, giving you splendid defence against... the elements, of course.

The next secret can be found in the secret room behind the Crystal of Life. Find the button on the marked wall and collect another Toorum's Note, Fire Quarrels and a couple herbs. You will also gain access to the Crystal of Life on this side of the tunnels.
Right beside the secret you will also find a Full Helmet lying on the ground nearby.

The door in this tunnel open after putting weight on the pressure plate. Unfortunately, each time you stand on it, a lightning bolt will be launched from across. Avoiding this problem is however easy - place an item on the plate and wait for the bolt to hit the wall and you will be able to cross the corridor north.

This intersection is another "safe haven" before the fights that await you. The gate found here lead to keys which will be needed to open the door at point (23).

Inside this vast room known as The Shrine you won't meet any enemies at first, though it will change soon enough. On the pedestal by the northern wall you will find the first of two Ornate Keys which you need. Pick up the key and immediately retreat to the entrance, as the room will fill up with Goromorgs and Tentacles will also start attacking you through the grates in the floor. Eliminate the Goromorgs one at a time, luring them into room (15) and dealing with the Tentacles afterwards.
Of course as usual, you can avoid the fight completely by placing something in place of the key.

"The Caverns" is a big, open area inhabited by Ogres and Scavengers. While you fight them, look out not to fall into one of the numerous trap doors here - time will come for that. One of the Ogres will drop a bag full of alchemy ingredients. In the point which I've marked with a red dot you will find another Toorum's Note, plus there are some other items lying about.

Every trap door in "The Caverns" leads to the same basement, though only one into its secret part.
By jumping into the marked trap door, you will land at point (A), from which a short walk will take you to the most powerful Mace in the game: the Icefall Hammer. Right after you collect it, the room will fill up with Crabs and all types of Herders, so make good use of the weapon you've collected. After the fight, you will be able to rest and search the recesses to find Throwing Knives and herbs.
Use the door beside (A) to reach part (C), where all other trap doors in The Caverns lead. On your way, collect the last Skull for the Minotaur which can be found inside the alcove south of point (A). In this part of the dungeon you will have to fight your way through a band of Slimes. In the alcoves of this part of the dungeon you will find bombs, herbs and food. The stairs at (S4) will take you back to The Caverns.

Inside this room you will find another Toorum's Note and a couple Scavengers.

Time to meet with Toorum himself. In order to enter this room, press the button found on the marked pillar.
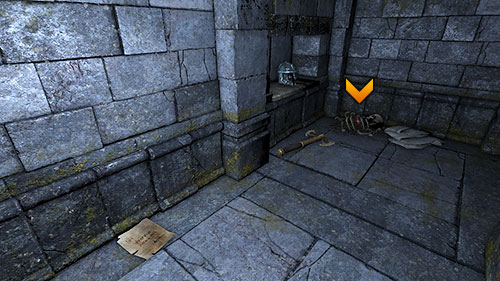
As you can see, Toorum - who managed to get so deep into Grimrock, while you find it challenging with a four-man party - has eventually become a victim of this dungeon. You will find his remains, two last paged of his notes, the Phalanx Helmet and the Ancient Axe - the most powerful weapon of such type in the game.
Toorum's soul is still trapped inside his remains - use them on the Crystal of Life to free the fallen hero's soul. That's however not all! From now on, Toorum will be a playable character. More on that in the Gameplay Modes chapter.

Inside this room you will come across the Ice Lizard (a great source of food) and find a couple Throwing Axes.

This room contains the second Ornate Key which you're searching for. Unfortunately, the road to it is blocked by an open trap door.
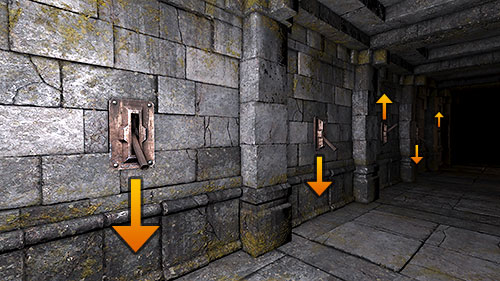
In order to close it, you will need to put five levers found on the northern wall in the right order (the Toorum's Note and the arrangement of the columns found before the levers are hints). The proper order (from left to right) is as follows: down, down, up, down, up.
After you pick up the key, you will need to face more Goromorgs who appear in various parts of the level.

Use both Ornate Keys on the locks beside the door. The portal on the other side of the door will take you to point (25).

However before entering the portal in the above room, examine the marked wall to find a button which turns off the portal and opens a trap door beneath it.
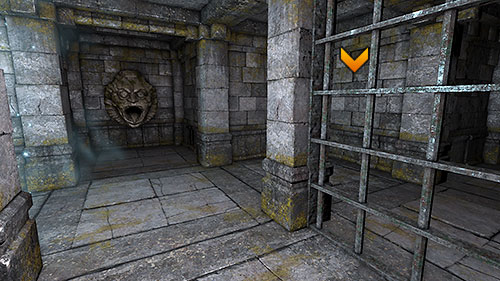
After jumping down, you will reach a small dungeon in which you can find the Scaled Cloak and a bag with herbs and food. Don't however pick up any of them until you neutralise the demon head looking at them, as it would shock you with lightning otherwise. On the wall opposite to the return portal you will find a button which locks the statue behind the wall.

In this richly decorated room you will find the Prison Key needed in the further part of the game. After collecting it, head to the lower level using the stairs (S2), as there's nothing left to do here.

Stairs to level 9.

Stairs to level 11 and 12.

Stairs to the secret basement.

Stairs to the basement at (18).
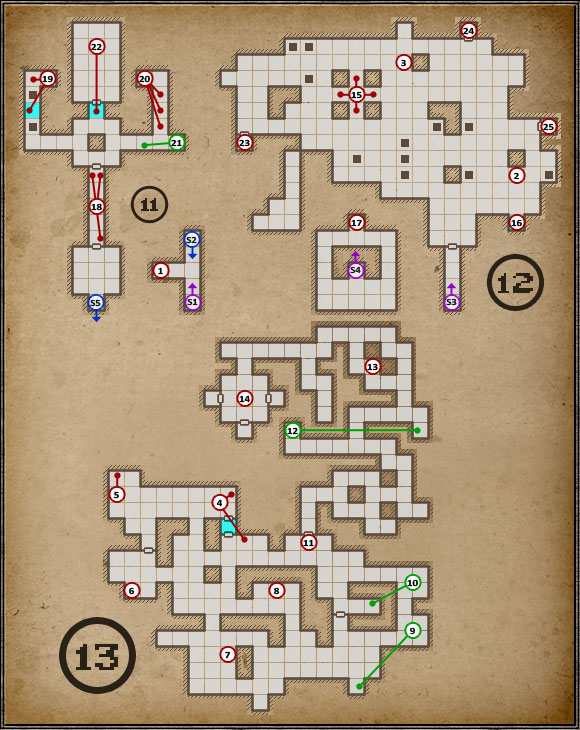
I've assembled the three last level of Grimrock into one. I did it because in fact, these three levels altogether create one dungeon of average size. The player (intentionally, by accident or out of necessity) keeps jumping between the levels with trap doors and portals, as such is the construction of the end-game. By connecting the descriptions, we will avoid chaos caused by jumping between given pages of the guide and unnecessary references.

This part of level 11 is merely a passage between level 10 and 12. Inside the alcove between the stairs you will only find a scroll informing that this level is locked. You can return to this point to catch a breath between the fight on the lower level, though only for a certain amount of time.

The beginning of level 12 brings Goromorgs patrolling the whole area. The phantoms keep respawning here, so you can use this fact to train your characters - it's the last chance to do it more or less easily.
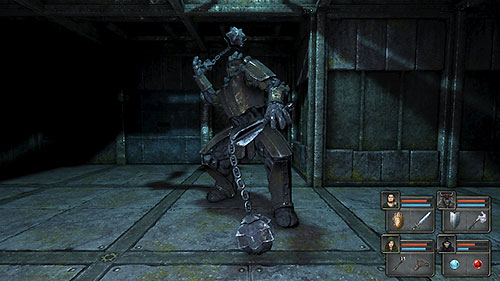
As you approach the pillars at point (15) you will be attacked by a new type of enemy, i.e. four Wardens. These constructions are the toughest beasts thus far, so lure them out one at a time. Their fighting style is very similar to the Ogres, so your tactic should be identical. Pretty much every time you fight them, a Goromorg will also be somewhere nearby, so try to get away from him until you defeat the golem - fighting them both can end very badly.

At this spot there's a trap door which will take you to the desired point on level 13. Of course you can use any other trap for this (and it might come in handy later on numerous times), but to keep a certain order I choose this one.

By using the trap door at point (3) you will end up right here. Level 13 is full of Shrakk Torrs, Tentacles, Giant Spiders and also some Giant Crabs by the end. You will also find food and herbs which you're probably running out of, so take a look inside each alcove and check each piece of rubble.
For starters, press but button on the wall beside to open access to a portal which leads back to level 12. The second button used for the same purpose can be found beside the portal, on the other side.

Here you will find the first part which you need to turn on the broken machine at point (15).

Steel Gear
Right beside, on the northern wall there's also a button which you need to press to open the door at (11).

On the shelf in this room there's another item needed for the machine.

Ore
Nearby there's a Sack with some Torches inside. By going further east, you will also find the Ring Gauntlets right beside the door.

On the next shelf, there's the third required component.

Infusor

The last part is inside the wide corridor.

Bladed Gear

Inside the south-east alcove there's a button on the wall. It opens the first of the secret room on this level. You will find some food there, as well as Fire Bombs.

In the dead end behind the grate there's another button which opens a secret room. Inside you will find a Wooden Box with alchemy ingredients.

You have opened this area at point (5), so it should be waiting for you wide open. Inside the corridors here you will come across Spiders and at the end Crabs as well.

To open the room here, you first need to find the button on the wall of the nook on the other side of the corridors. The second to last Treasure in the game can be found there: the Globe of Tetharion.

Crabs will start appearing in this area. One of them will drop a Gold Key, so keep your eyes opened.

Finally, a Crystal of Life. You might need to use it a couple of time during the upcoming final battle. Remember that you can return here from level 12 at any moment by using one of the trap doors.
That's not all! As you can see, the last Treasury can be found here as well. If you've killed all the Crabs, you are sure to have the Gold Key which you need to open one of the three grates. Here's what awaits you behind given gates:
After using the treasury and Crystal, head to the portal at point (4) and return to level 12.

Time to repair the machine between the four pillars. In order to do that, you just need to put the proper components (the ones you've found on level 13) into their places. Take a good look where you put each part, as it will be very important during the next fight. Make sure to save your game before repairing the machine and leave nothing behind on the previous levels, as you will be cut off from them. If you've missed some secrets or collectibles on level 1-11, this is the last chance to get them.
The below screenshots show exactly which item fits which slot:
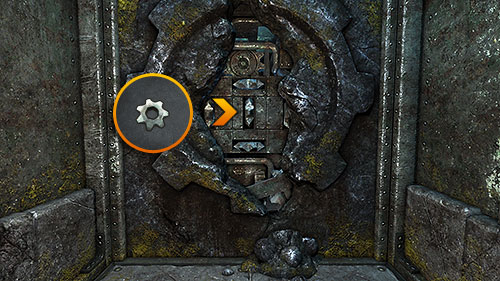
East: Bladed Gear
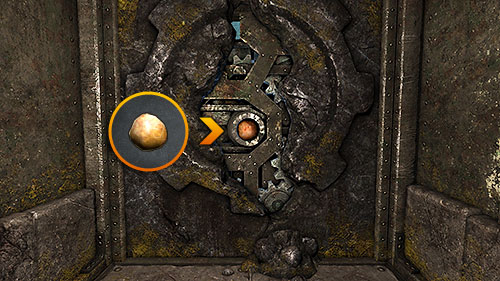
North: Ore

West: Gear
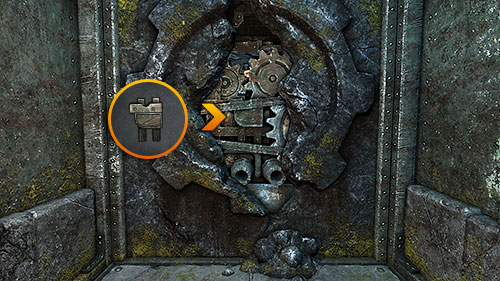
South: Infusor
After placing all the items in the proper sockets, the machine known as Undying will come to life and out of gratitude will want to squash your whole team. Additionally, the whole 12th level will be flooded by monsters which you've come across on the above levels. To the south of the pillars, at point (15), Ice Lizard Steaks and Prison Keys needed to open the rooms at (24), (25) and (26) will start appearing. It's completely optional, though highly suggested.
At this point you won't be able to hurt the demonic "cube". Run to the newly opened portal at point (16).

The portal will take you to a previously inaccessible part of level 11, where you will find a weapon which will let you take the cube apart again.

You will land here after going through the above portal. It's a peaceful place there nothing threats you. You can leave the battlefield at any moment by using the portal and regenerate your strengths here before the next attempt. Head to the stairs (S4).

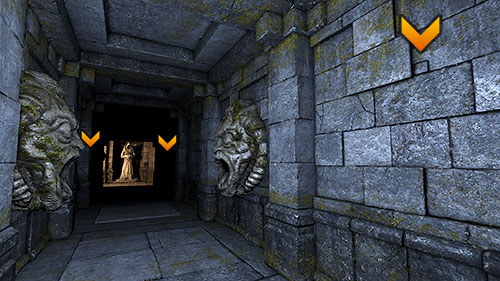
Here you will come across a suspicious corridor with a pressure plate in the middle. Press it and the corridor will lock from both sides and filled with poison. In order to safely get though, you need to find three buttons on the walls of the corridor: one by the entrance and two by the exit. The poison cloud will make finding them more difficult, so I have a suggestion: before stepping on the pressure plate, place the mouse at the spot where the first button is. Afterwards step onto the plate sideways (without moving the mouse), quickly return to the button and press it, head to the end of the corridor (still without moving the mouse) and press the two other buttons. Each one of them is precisely in the same spot on the screen.

After crossing the wretched corridor, take a rest in the room with a pillar in the middle. On the other side there's a locked door, for which to open you will need two Ornate Keys found at (20) and (21).

Inside the corridor leading to the first key you will come across two opened trap doors. In order to open the first one, you first need to throw an item onto the pressure plate on the other side of both trap doors. The thing is made harder by the portal which keeps activating and deactivating. You need to throw/shoot at the platform when the portal is deactivated, or else the item will be moved back.
After closing the first trap door, get onto it and examine the western door beside the portal to find a hidden button there. Feel the moment at which the portal turns off, quickly approach the button and press it before the portal returns to the starting position. Both trap doors will be closed after you do it, so you should easily reach the key.
If you fall into an open trap door while doing so, as below there's only a single mosquito and a portal leading back up.

The second key is protected by demon heads with three pressure plates beneath them. You can access the key without any problem, the trap activates after you take it. The way back will be far more dangerous, as stepping onto each pressure plate causes the head above it to launch a projectile. To avoid getting hit, use any item you want to activate the plates before you step onto them.

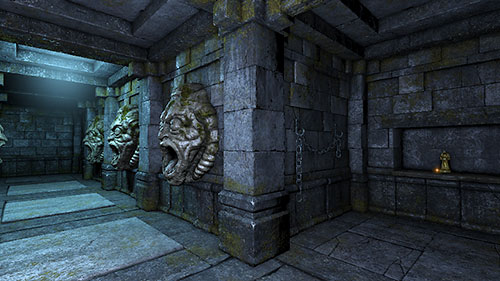
Before leaving this corridor, examine the southern wall to find a stone with a carved runic symbol. Press it and in return you will receive the last Treasure of Grimrock: the Goromorg Miniature.

Use the keys to open the gate at (19) and enter the Tomb on the other side. Apart from two Scrolls the room seems empty, but only seemingly.
Take the torch from the wall and turn off the light you use and the Weapon of Power, the only weapon capable of dismantling the cube on level 12 will appear on the pedestal. Pick it up and a portal which can take your team back onto the battlefield will appear behind you.
Fighting The Undying One should now be just formality. Equip your party with ranged weapons, at best enhanced with lightning (bombs, wands etc.). Mages should use Lightning, as the boss is most vulnerable to this kind of magic.
In the first phase of the battle, the cube will truly be undying. You will need to take out the items which you have placed yourself just recently. Use the Weapon of Power to stun The Undying One for a short while and take out the items in order by clicking on a given component and throwing it away. The screens at point (15) should make recognizing the parts easier. Other monsters will attack you as well, though the keep respawning so you shouldn't even bother with attacking them. The only exception is when a monster blocks your route.
After you take out all four parts, the cube will start glimmering with orange light and from now on it won't be immortal anymore. Destroying it shouldn't take you too much time - a couple bombs, spells, projectiles from the Weapon of Power should get the job done. Just remember to stay away from it and don't let the monsters push you to a corner. Remember that in case a member of your party dies, you can jump down onto level 13 by using any trap door you like and use the Crystal of Life. Also nothing stands in the way of retreating from the battle to heal up by using the portal at point (16).
After the fight, Try Undying One will stop, throw some sparks and fall into pieces. You will just need to dodge the enemies for a bit longer until the ending cutscene starts and credits roll afterwards. Congratulations, you have finished the Legend of Grimrock.

As I have mentioned fore, keys to the below items will appear in various places during the battle.
From my observations, it seems that they most often appear around the trap door south of point (15). They're rather hard to notice, as the metal they're made from is the same colour as the whole room. Additionally, they sometimes are hidden below Lizard Steaks, so keep your eyes open!
The most important room here might in fact be number (24), as inside you can find the Lightning Rod, useful during the boss fight.

Inside this room you can find a Sack with Healing Potions.

The last room hides four Lightning Bombs, also useful in the final fight.

Stairs to level 10.

Stairs to level 12.

Stairs to level 11 and 10.

Stairs to The Tomb of Designers on level 11.

Stairs to level 12.


 Leisure Suit Larry: Reloaded Game Guide & Walkthrough
 Lost Planet 3 Game Guide & Walkthrough
 Life is Strange Game Guide & WalkthroughLegend of Grimrock Game Guide & Walkthrough
 LittleBigPlanet Game Guide & Walkthrough