Calavera: Day of the Dead Walkthrough, Guide, & Tips
Calavera: Day of the Dead Walkthrough
Welcome to the Calavera: Day of the Dead Walkthrough
Hop aboard to cross the border between life and death!
Whether you use this document as a reference when things get difficult or as a road map to get you from beginning to end, we’re pretty sure you’ll find what you’re looking for here.
This document contains a complete Calavera: Day of the Dead game walkthrough featuring annotated screenshots from actual gameplay!
We hope you find this information useful as you play your way through the game. Use the walkthrough menu below to quickly jump to whatever stage of the game you need help with.
Remember to visit the Big Fish Games Forums if you find you need more help. Have fun!
This walkthrough was created by SeverineSnape, and is protected under US Copyright laws. Any unauthorized use, including re-publication in whole or in part, without permission, is strictly prohibited.
General Tips
- This is the official guide for Calavera: Day of the Dead.
- There are three difficulty modes: Casual, Advanced and Hard.
- Use the Hint button for extra help or for skipping mini-games in Casual and Advanced modes.
- Select Menu to pause the game, return to the main menu or change screen and sound options; you can also use this button to review your current achievements and view the Sugar Skulls you’ve found.
- The Map is interactive and can be used to quickly move between locations; in Casual mode locations with available actions are marked with a yellow exclamation mark.
- Move your cursor to the bottom of the screen to pull up the Inventory Bar; you can choose to lock the inventory so it stays on screen.
- Throughout the guide, we will use the acronym ‘HOP’ for Hidden-object puzzles.
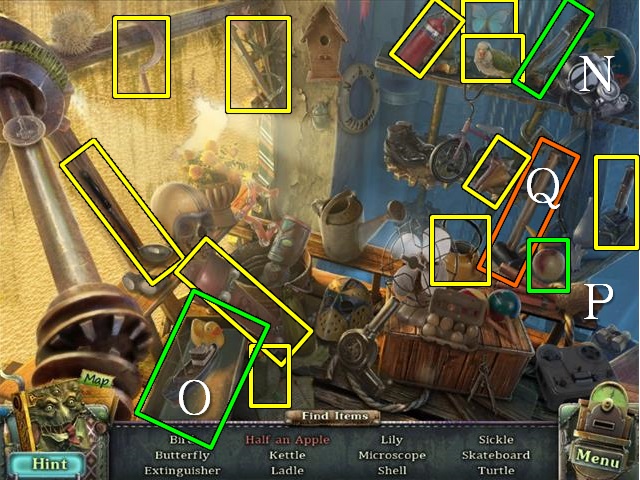
- HOP items listed in red require an extra action to find; these items will be marked in green in the screenshots.
- After you’ve located all items on the list, you’re asked to find one more item, which will go into your inventory; these items are marked in orange in the screenshots.
- Mini-games can be reset by exiting the game and restarting it.
Chapter 1: The Station

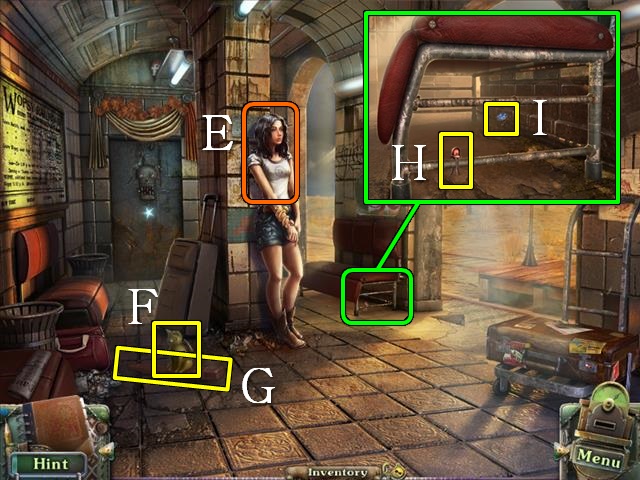
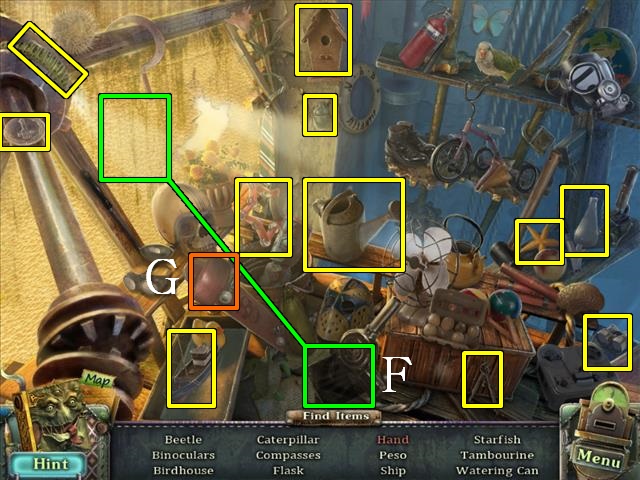
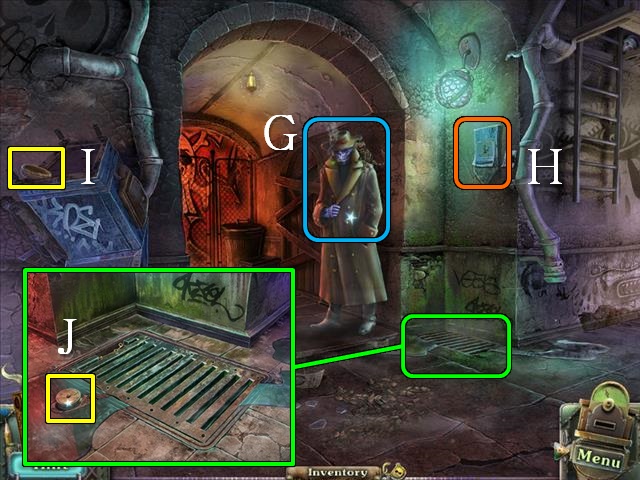
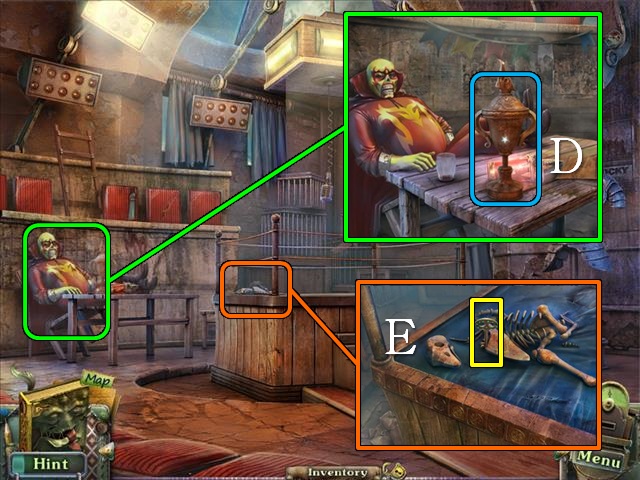
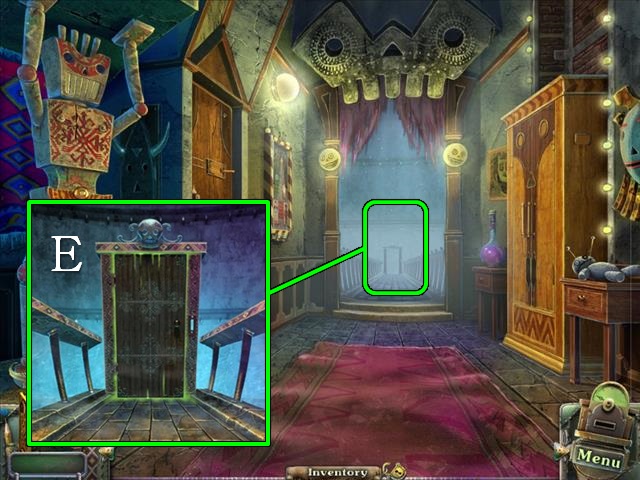
- Talk to Carolina (E).
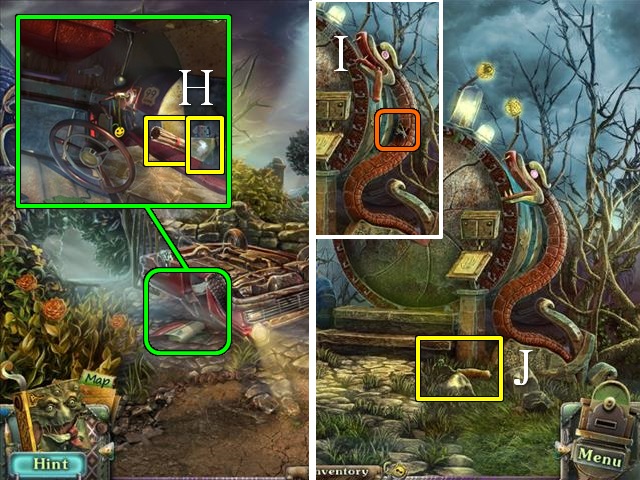
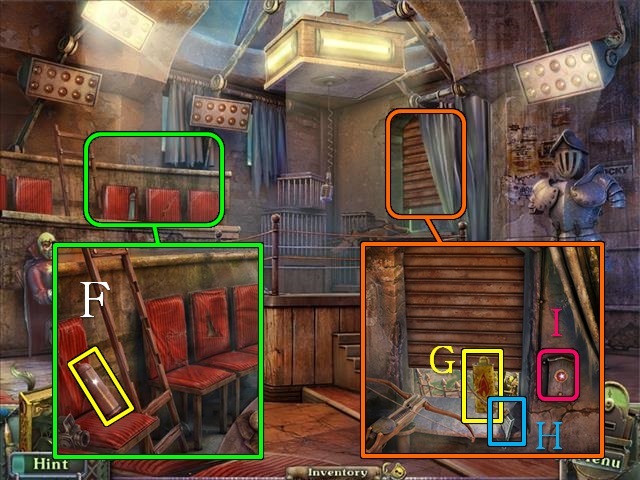
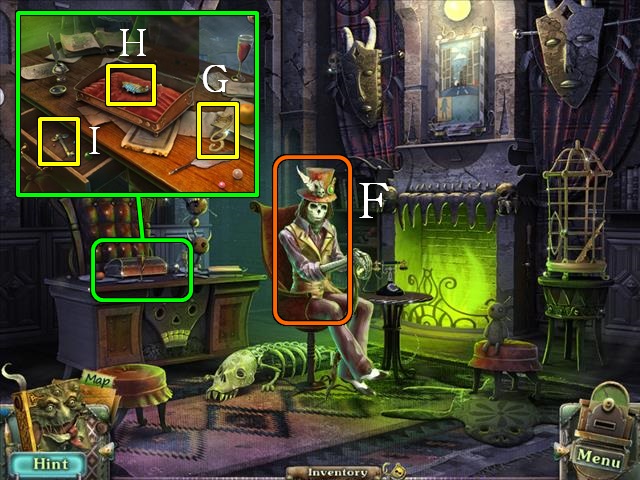
- Pick up the TOY CAT (F) and the CHAIR LEG (G).
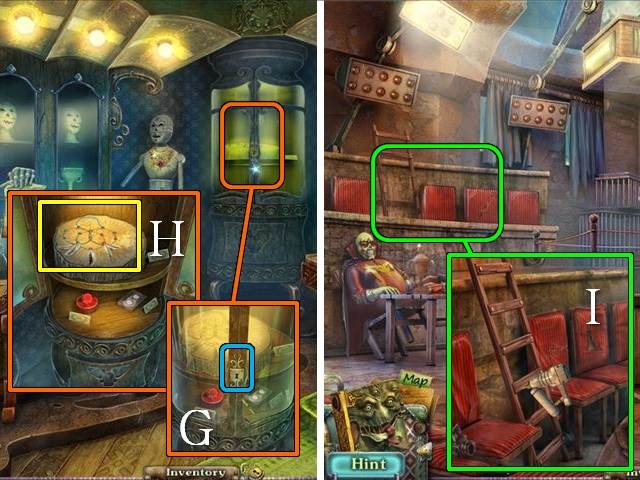
- Look under the bench; pick up the first DIODES (1/7) (H) and use the CHAIR LEG to get the EYE (I).
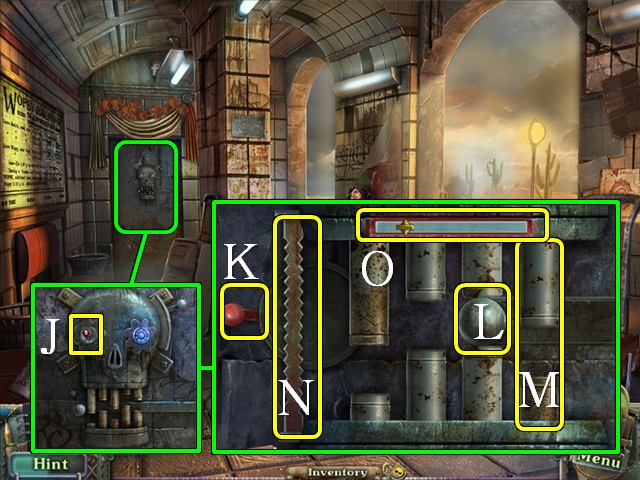
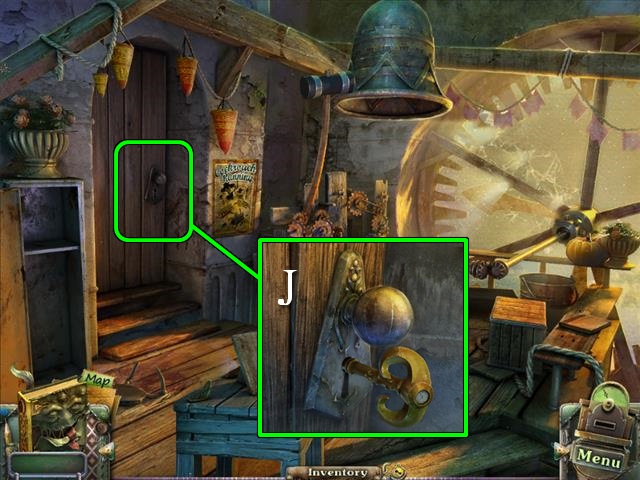
- Zoom into the door; take the DIODES (2/7) (J) and put the EYE in the eye socket to activate a mini-game.
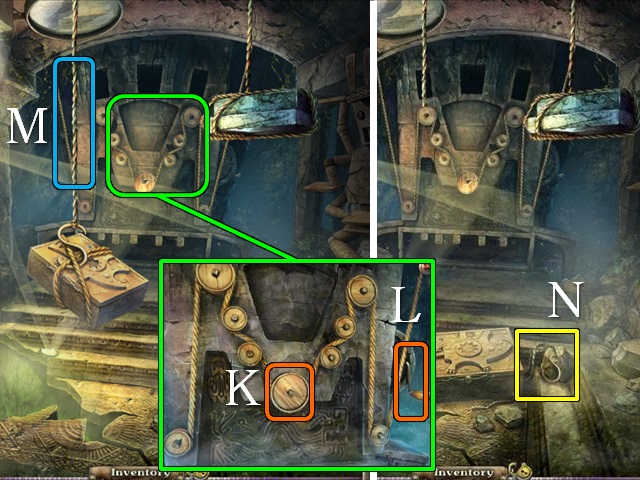
- Use the lever (K) to move the bolt (L) and metal pins (M) up and down so the bolt can slide backward through the gaps in the pins.
- The bolt may never touch the jagged metal bar (N).
- The slider (O) shows how much time you have left.
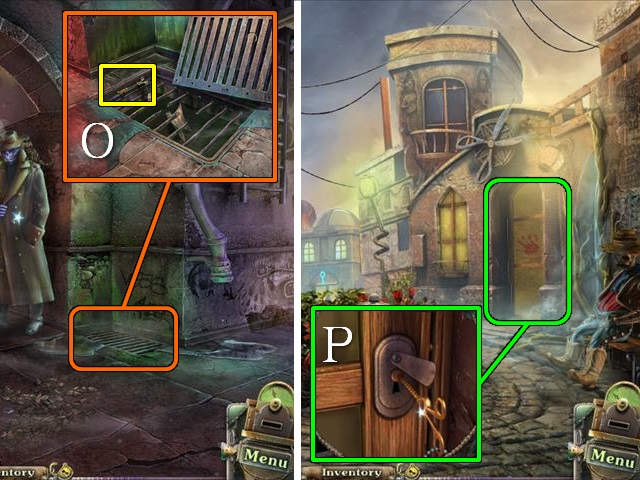
- Go through the door.
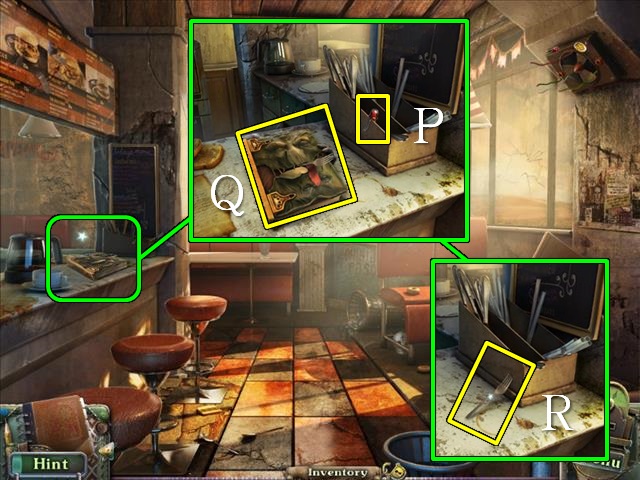
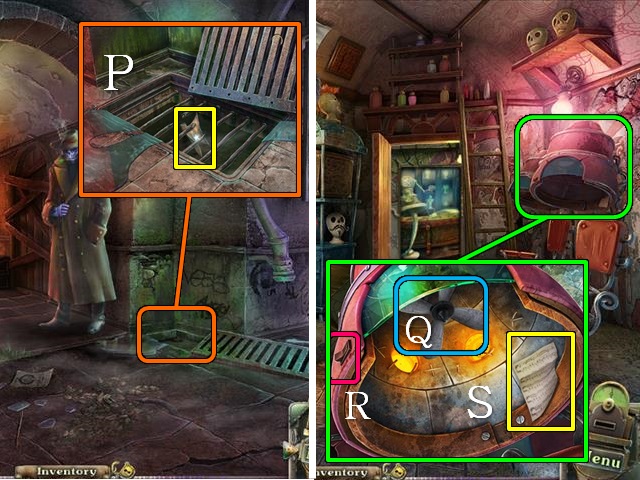
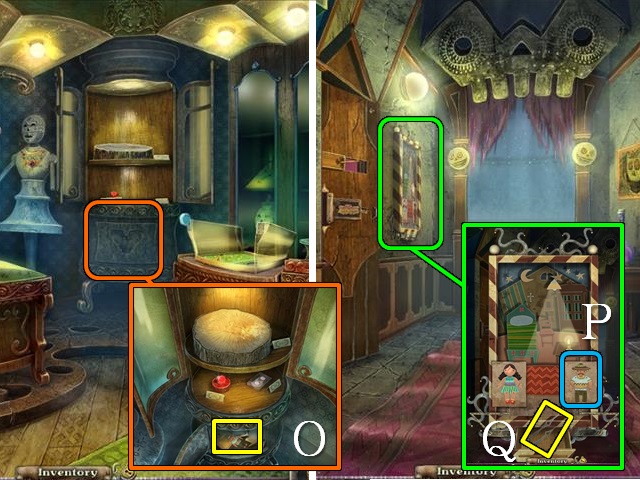
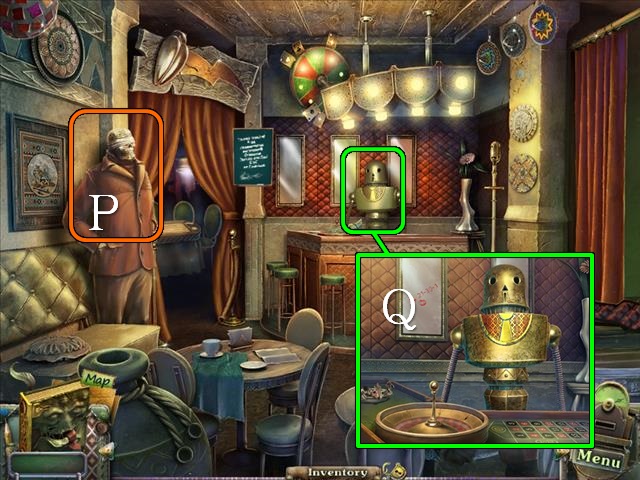
- Zoom into the counter; take the DIODES (3/7) (P) and pick up the book (Q).
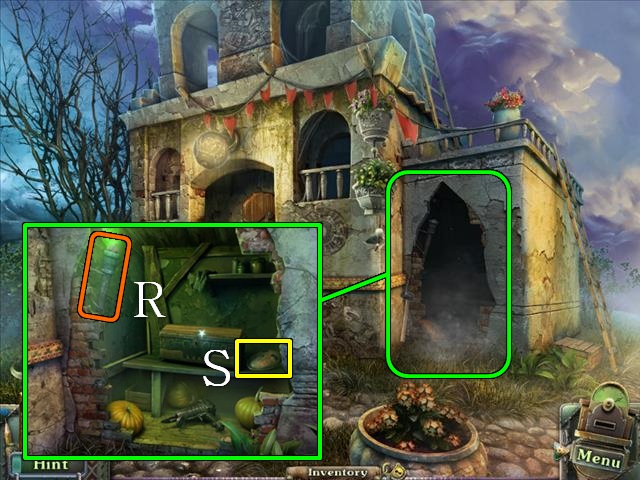
- Pick up the FORK (R).
- Walk down.
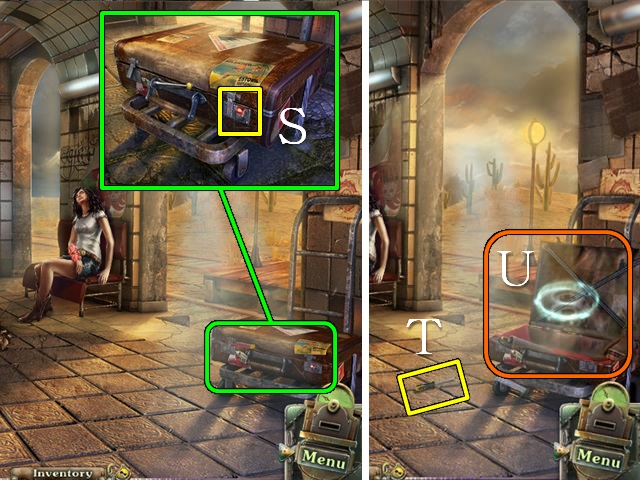
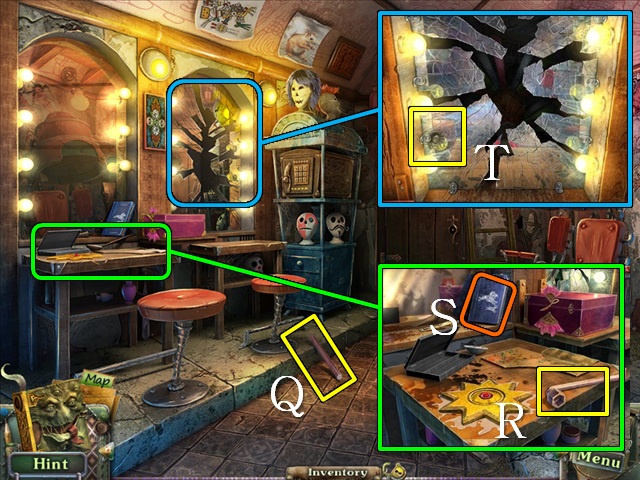
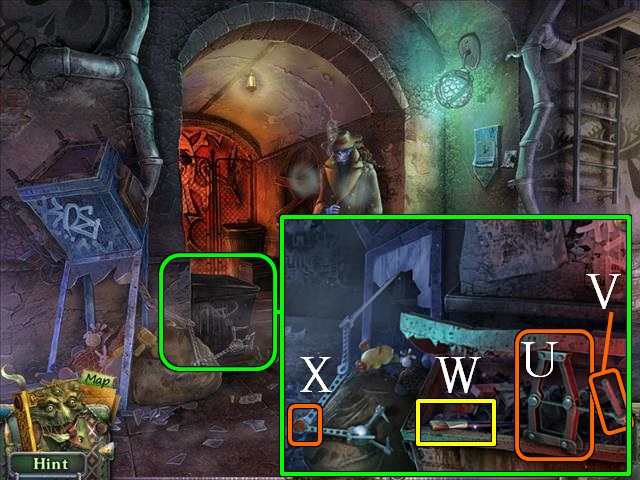
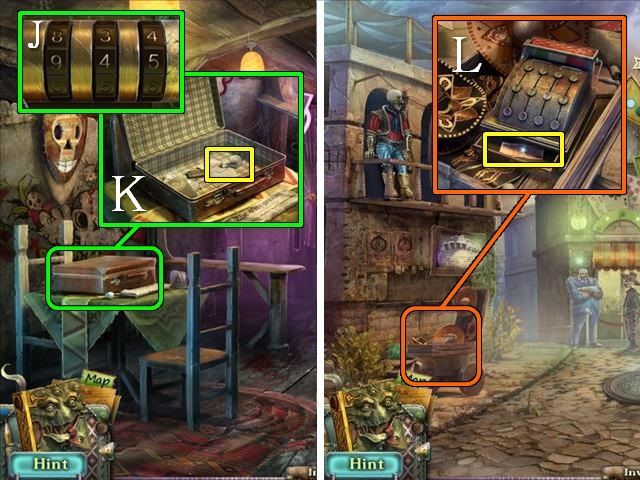
- Zoom into the suitcase; take the DIODES (4/7) (S) and use de FORK to open the suitcase.
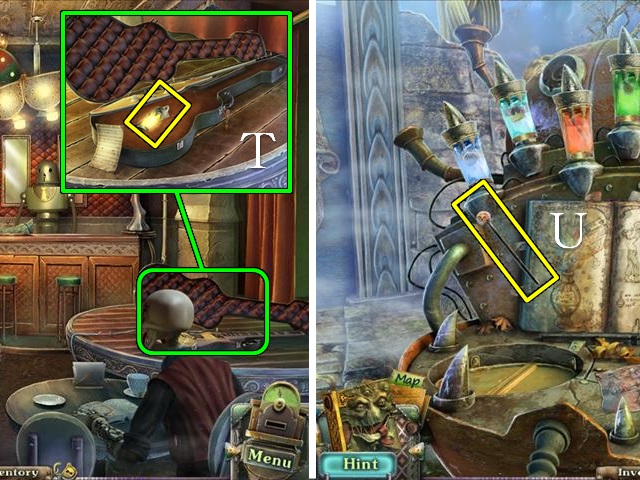
- Pick up the SCREWDRIVER (T).
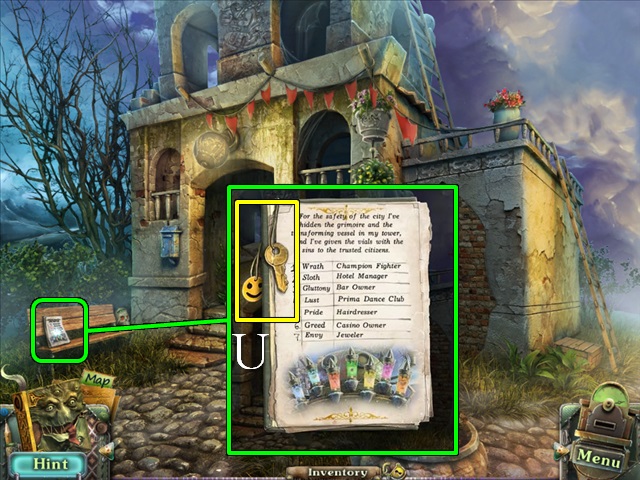
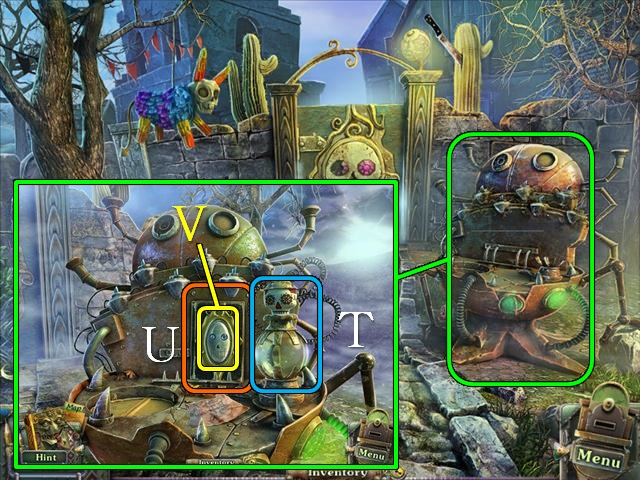
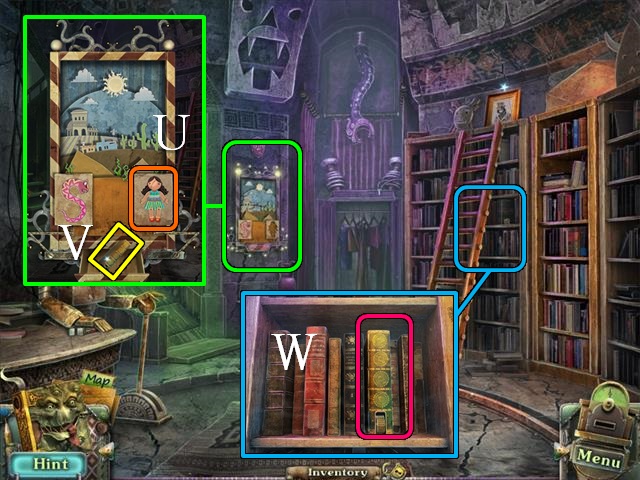
- Zoom into the suitcase again for a HOP (U).

- Remove the pages of the calendar until you find the Number Three (V).
- You will receive a COIN (W).
- Go forward.
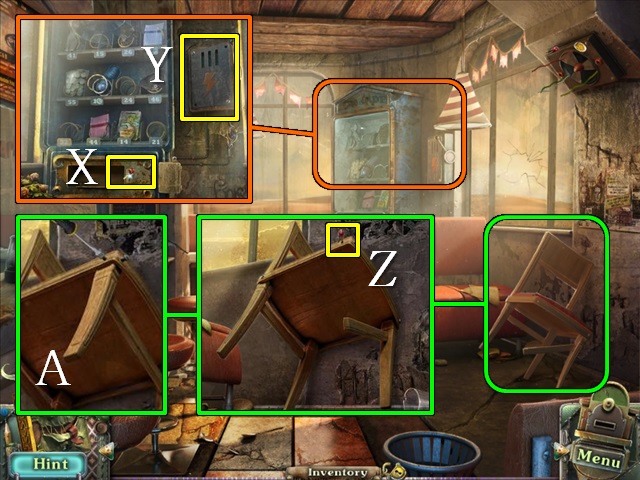
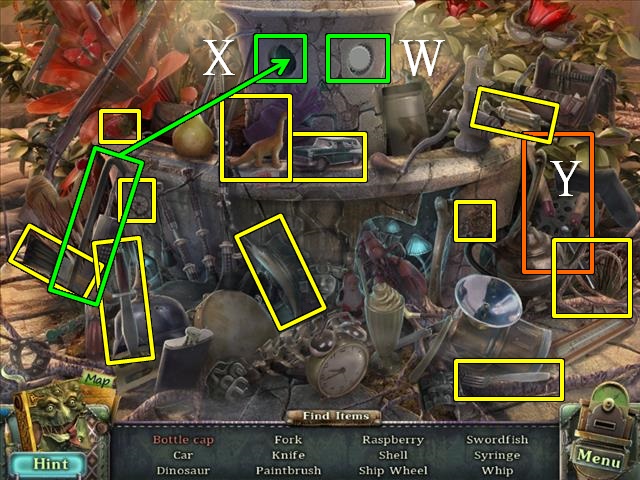
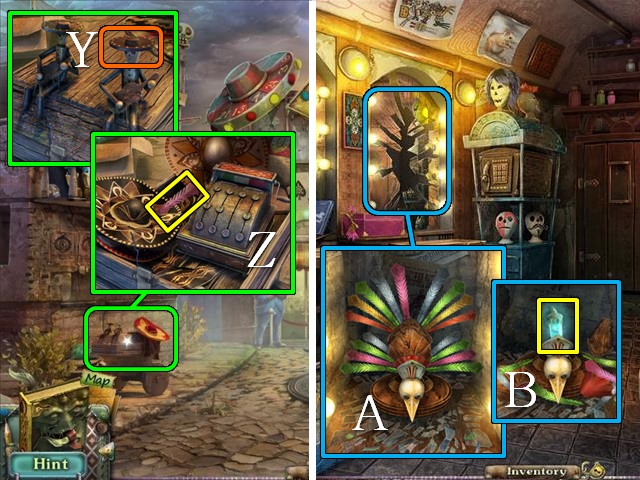
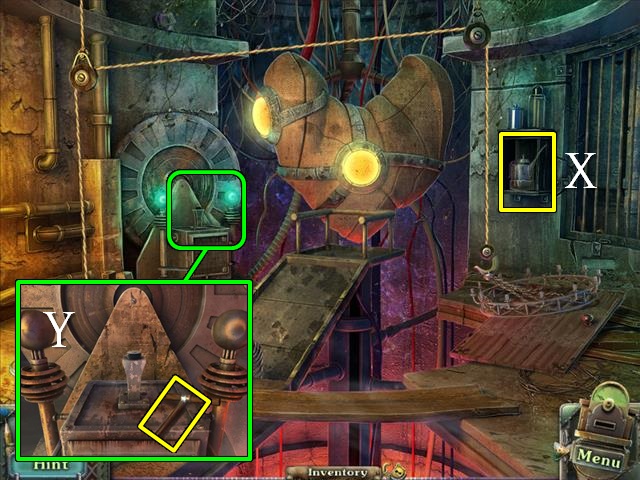
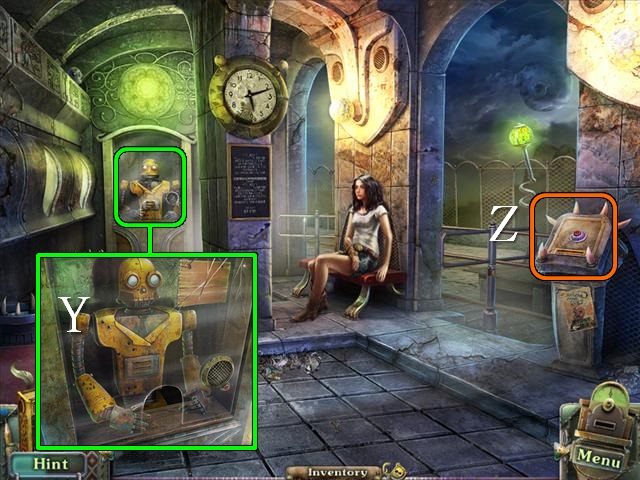
- Zoom into the vending machine and take the DIODES (5/7) (X); use the SCREWDRIVER to remove the SCREWS from the power box (Y) and pick them up.
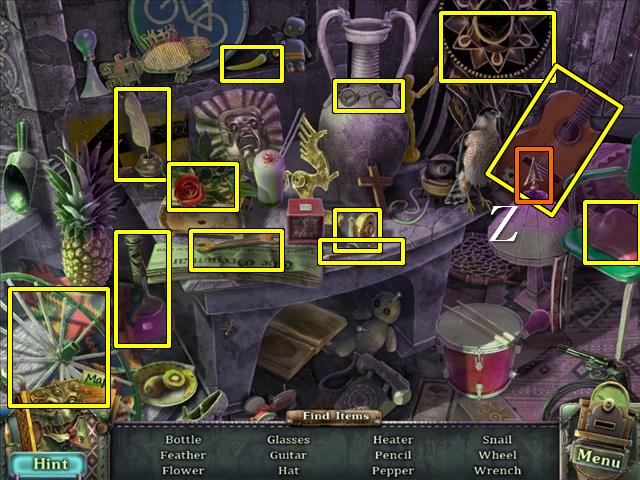
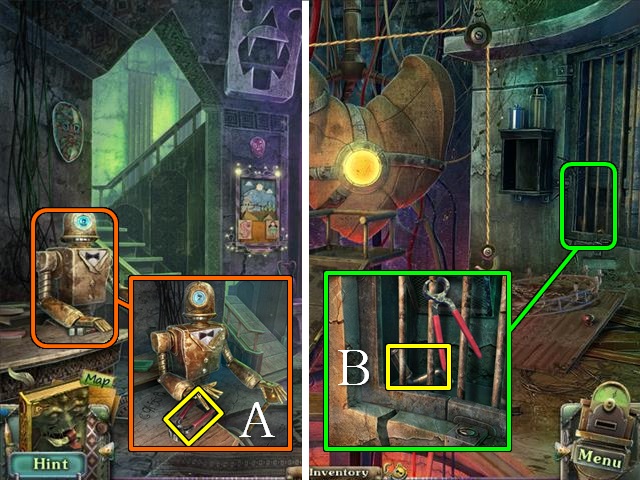
- Zoom into the broken chair and take the DIODES (6/7) (Z); put the CHAIR LEG on the chair, put the SCREWS on the leg and use the SCREWDRIVER to tighten them (A).
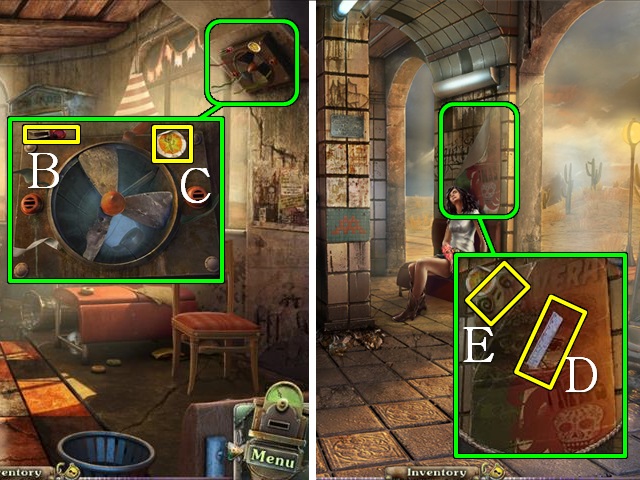
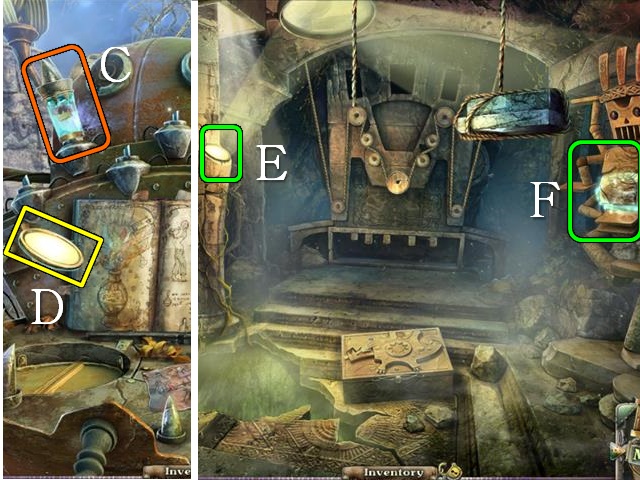
- Zoom into the vent and take the DIODES (7/7) (B) and the STICKER (C).
- Walk down.
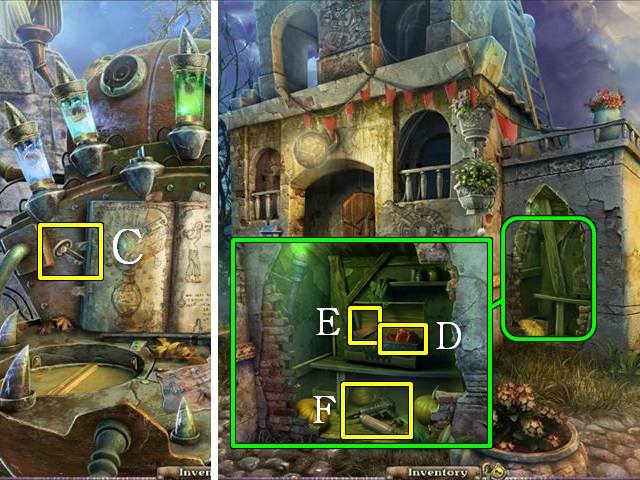
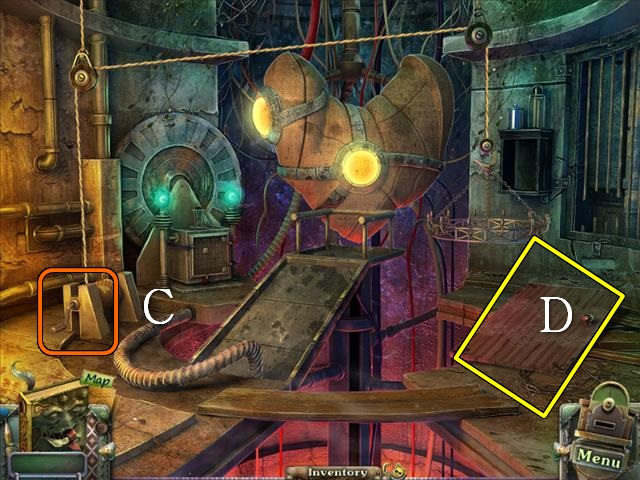
- Zoom into the poster and fix it in place with the STICKER; take the RULER (D) and note the code in the corner (E).
- Walk forward.
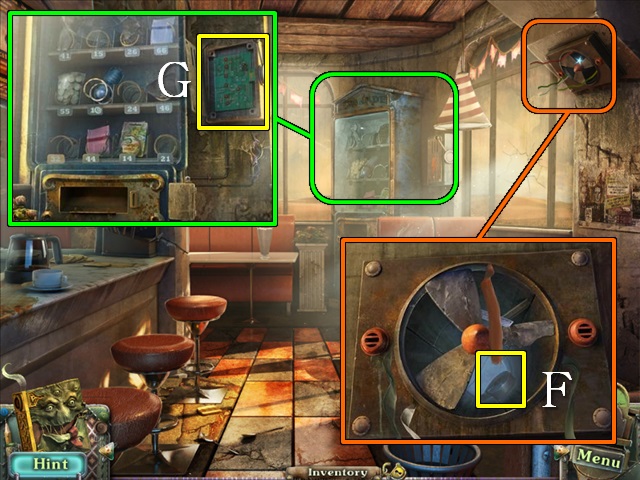
- Zoom into the vent and stop it with the RULER; take the ELECTRICAL TAPE (F).
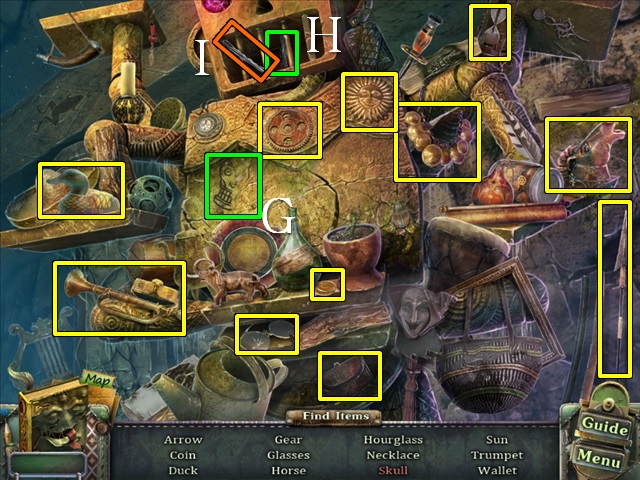
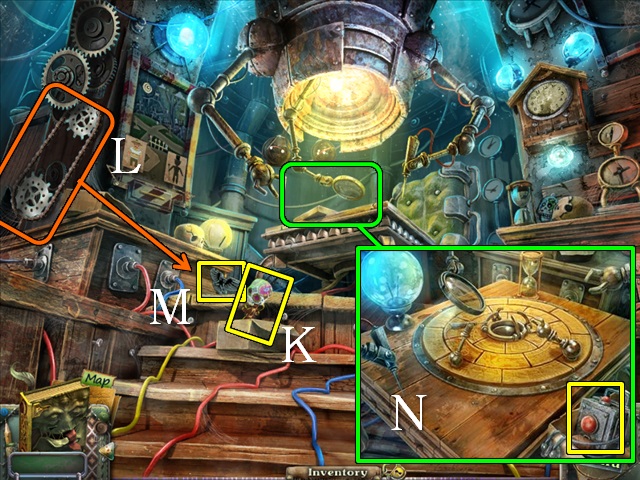
- Zoom into the vending machine; take the metal cover from the power box and put the DIODES (7/7) on the electrical panel to trigger a mini-game (G).
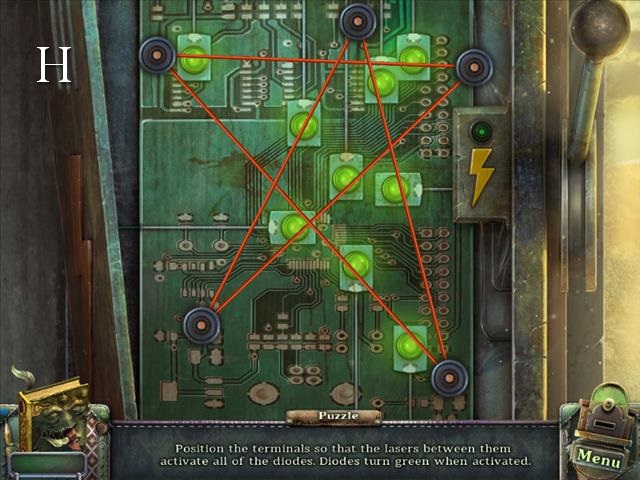
- Move the pins around until all diodes are activated by the laser beams.
- Please look at the screenshot for the solution (H).
- Bundle the wires together and put ELECTRICAL TAPE around them (I).
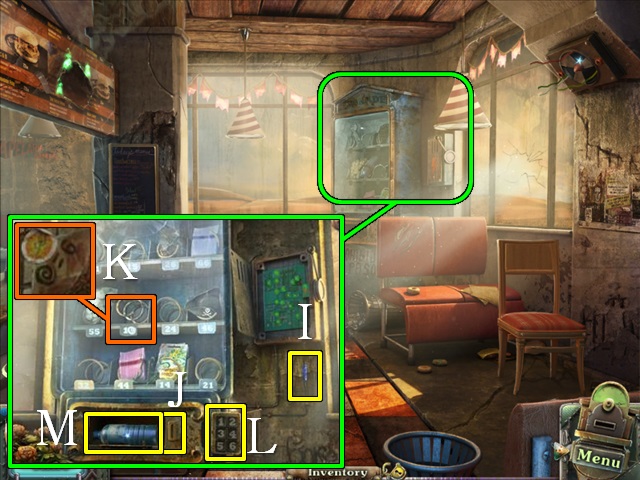
- Put the COIN in the slot (J) and push it down; enter 16 (K) into the keypad (L) and pick up the WATER BOTTLE (M).
- Walk down.
Chapter 2: The Land of the Dead
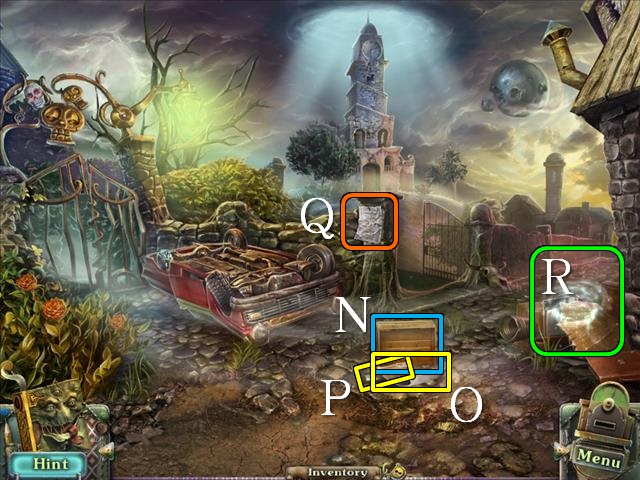
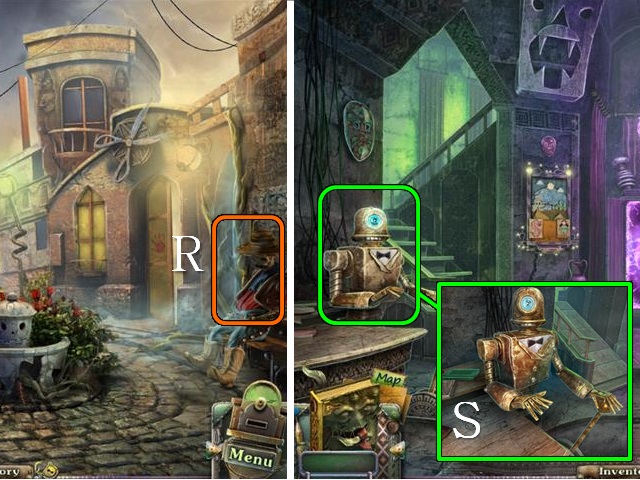
- Move the crate (N) and take the map (O) and the RAILROAD CROSSING BAR (P).
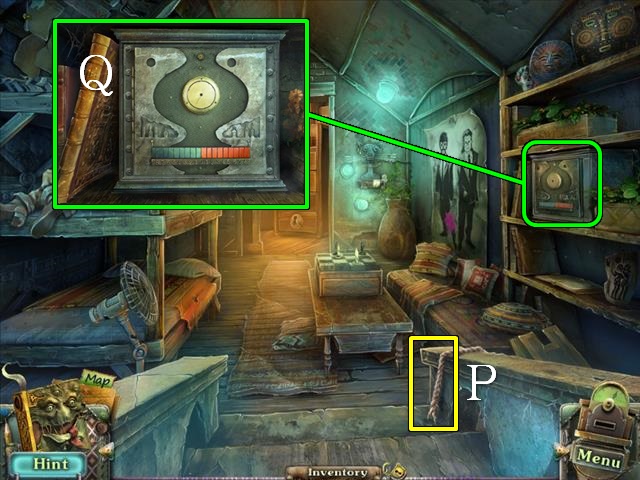
- Read the notice on the wall (Q).
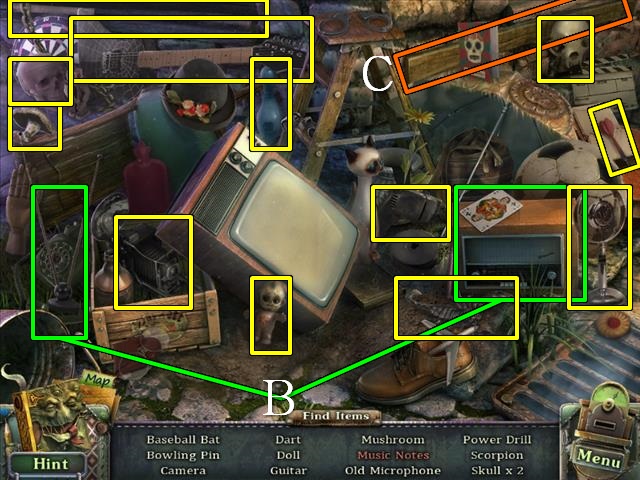
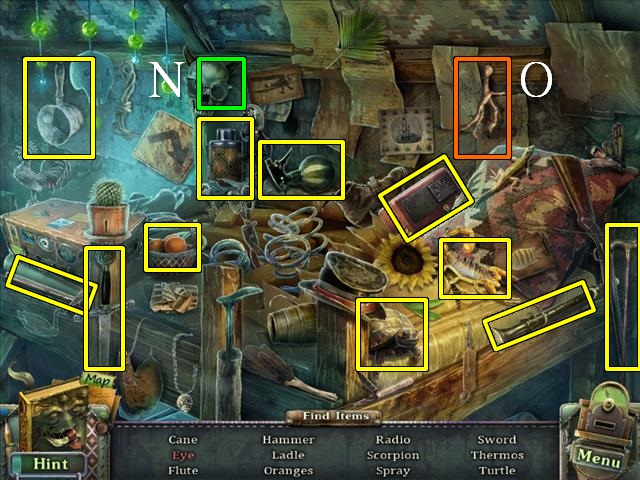
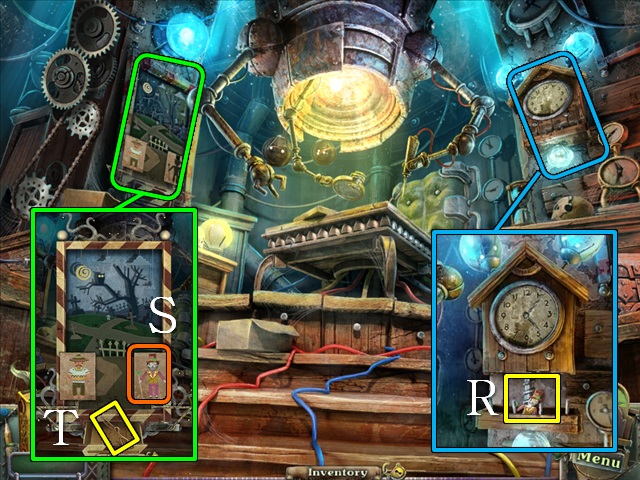
- Play the HOP (R).
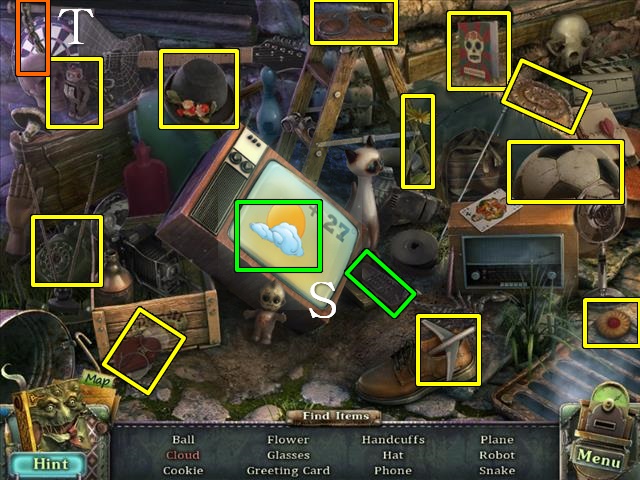
- Use the remote control on the TV several times until you find the cloud (S).
- You will receive a CHAIN (T).
- Walk forward to the Tower Entrance.
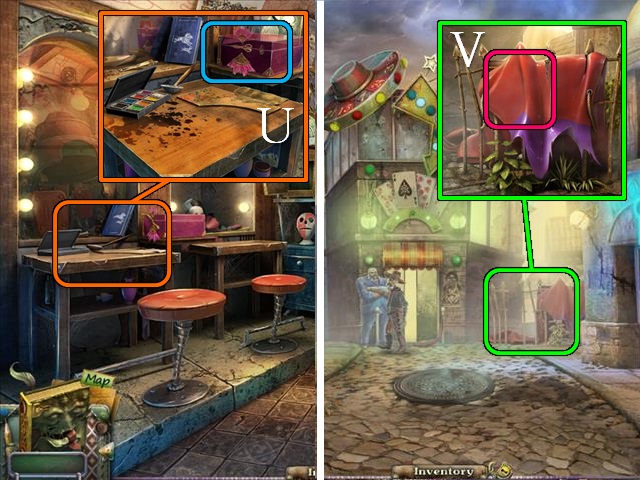
- Zoom into the newspaper and take the CAR KEYS (U).
- Walk down.
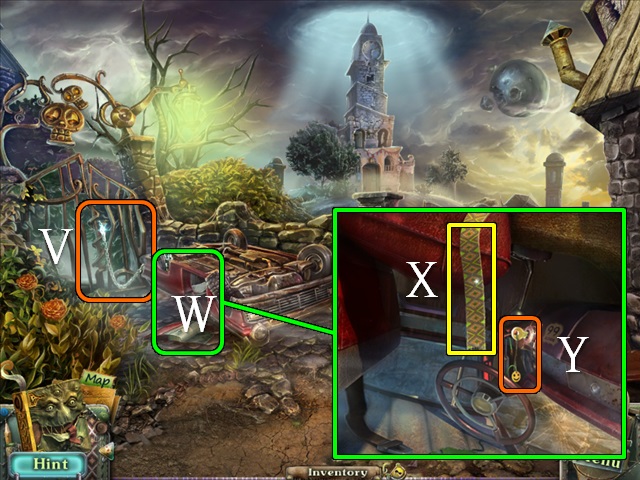
- Put the CHAIN on the gate and attach it to the car (V).
- Open the car door with the RAILROAD CROSSING BAR (W).
- Zoom into the car, take the RIBBON (X), put the CAR KEY in the ignition (Y) and start the car.
- Go through the gate to the Transformation Altar.
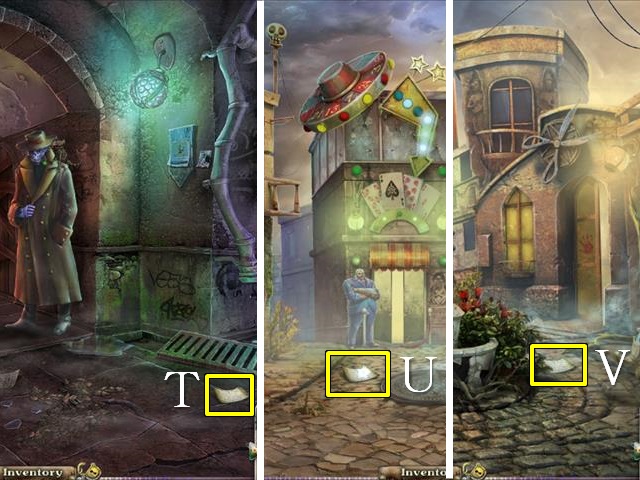
- Zoom into the broken glass and put the RIBBON on the shard to make a KNIFE (Z).
- Zoom into the roots of the tree (A) and us the WATER BOTTLE on the soil; use the KNIFE to cut off both METAL LEAVES (2/2).
- Walk down.
- Play the HOP.
- Put the antenna on the radio to find the music notes (B).
- You will receive a PLANK (C).
- Walk right to the Manor Gates.
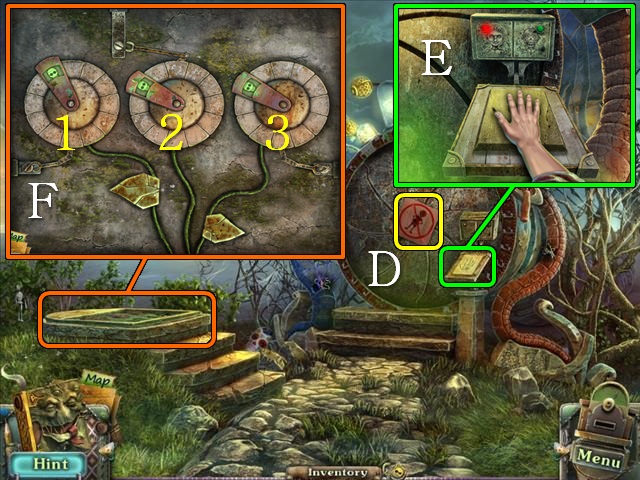
- Read the notice on the gate (D).
- Zoom into the control panel and put your hand on it (E).
- Zoom into the platform and put the METAL LEAVES (2/2) on it to trigger a mini-game (F).
- Rotate the wheels to line up the skulls behind the metal frames; you can both move the wheels and the frames, but the different components all affect each other.
- Although the starting point for this puzzle is random in each game, the following solution works every time:
- Turn wheel 1 until the skull on that wheel is lined up, then line up wheel 2, wheel 1, wheel 3, wheel 2, and wheel 1.
- Do not touch the metal frames, but turn the wheels only!
- Go down the ladder into the Tomb.
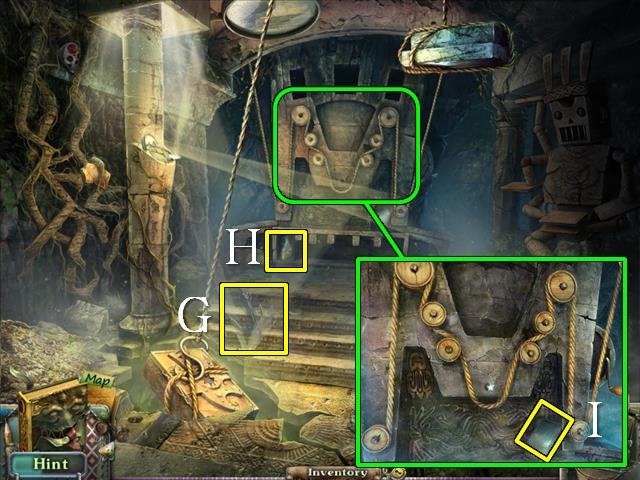
- Pick up the GRAPPLING HOOK (G) and the OIL (H).
- Zoom into the pulley mechanism and take the SNAKE SCALE (I).
- Walk down.
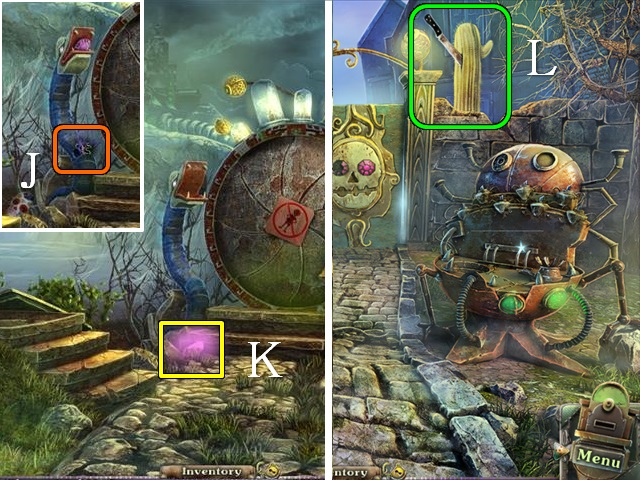
- Put the SNAKE SCALE on the left snake (J) and pick up the CRYSTAL (K).
- Go to the Transformation Altar.
- Use the GRAPPLING HOOK on the machete to trigger a mini-game (L).
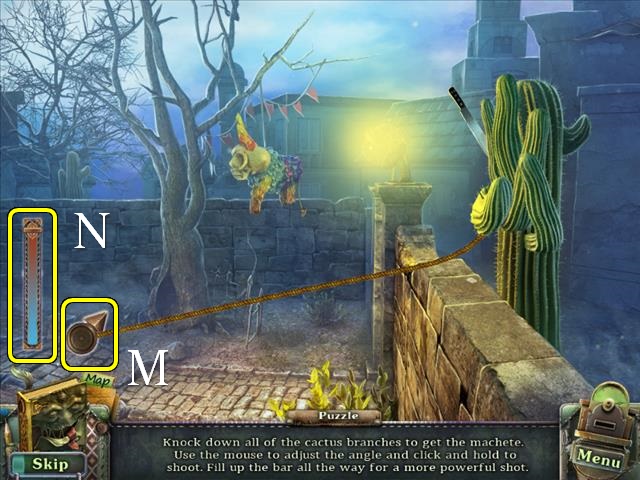
- Remove all the branches from the cactus to get to the machete; aim the arrow (M), hold down the mouse button to charge to full power (N), then release to shoot.
- You will receive the MACHETE.
- Go to the Tomb.
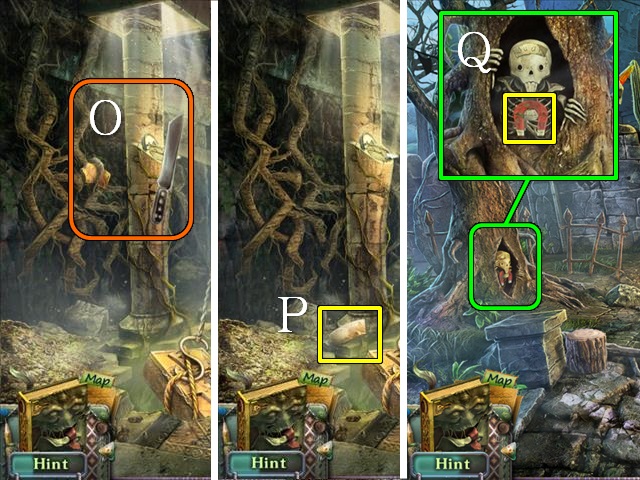
- Use the MACHETE on the roots (O).
- Take the PLATE PART (P).
- Go to the Transformation Altar.
- Zoom into the tree roots and put the PLATE PART on the creature’s head; take the MAGNET (Q).
- Go to the Tower Entrance and up the ladder to the Clock Tower Top.
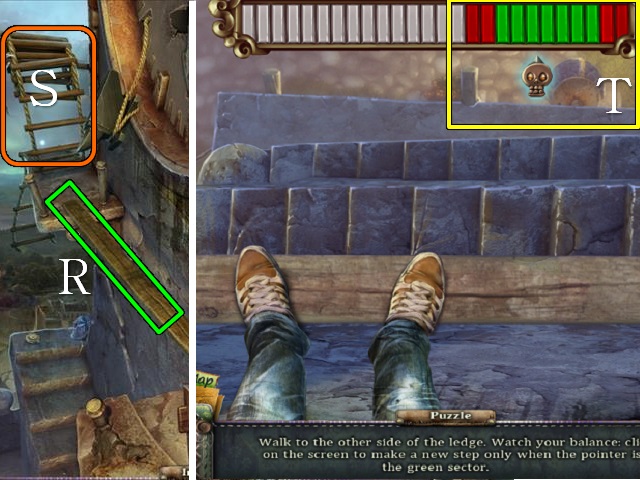
- Put the PLANK over the gap (R).
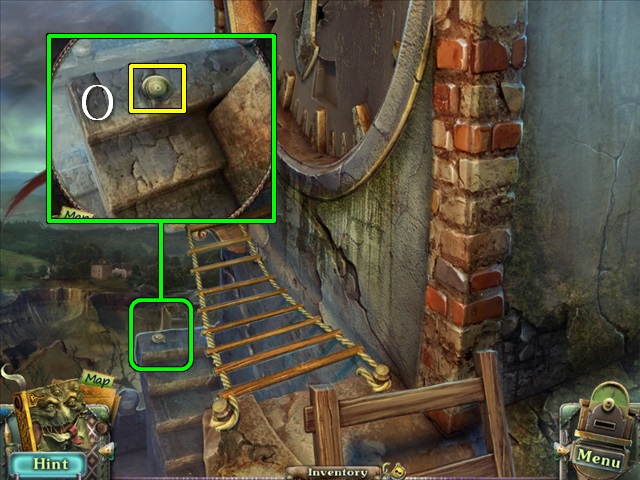
- Zoom into the rope ladder for a mini-game (S).
- Press on the screen when the arrow is in the green zone to move along the plank; if you press when in the red, you will step one place back (T).

- Use the MACHETE to drop the anvil (U).
- Take the GEAR (V).
- Walk down.
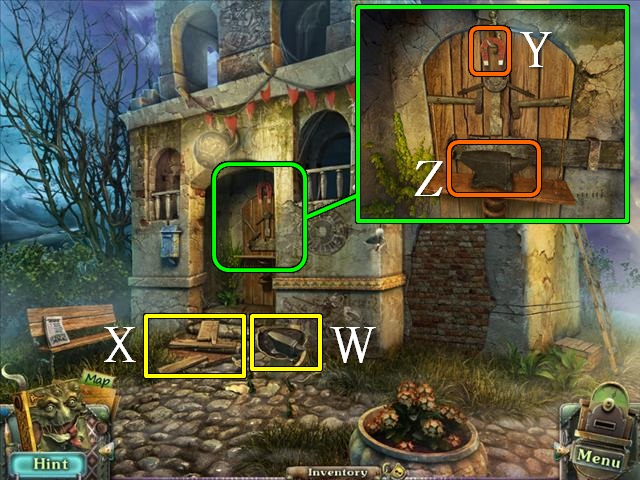
- Pick up the ANVIL (W) and the PLANKS (X).
- Zoom into the door; place the MAGNET on the hook (Y) and the ANVIL on the ledge (Z).
- Go into the Clock Tower.
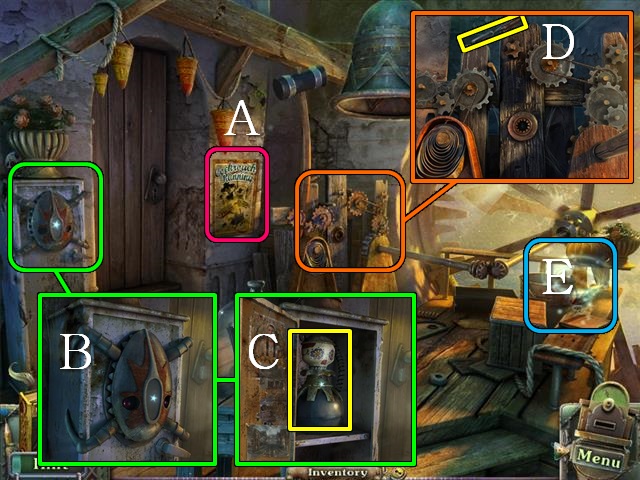
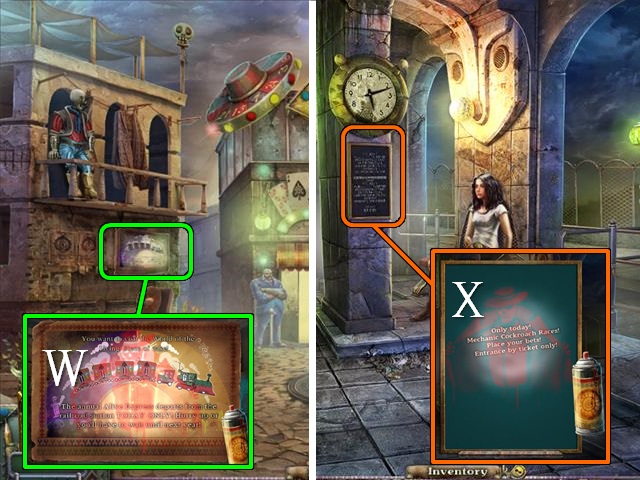
- Read the poster (A).
- Zoom into the lock on the locker (B) and put the CRYSTAL on it.
- Open the locker and take the VESSEL (C).
- Zoom into the gear mechanism and take the CHISEL (D).
- Play the HOP (E).
- Put the x-ray on the curtain to find the hand (F).
- You will receive a SNAKE SCALE (G).
- Go to the Main Square.
- Zoom into the car and use the CHISEL to open the glove compartment; take the LIGHTER and the INCENSE (H).
- Go to the Manor Gate.
- Put the new SNAKE SCALE on the snake on the right (I).
- Pick up the CRANK (J).
- Go back to the Clock Tower.
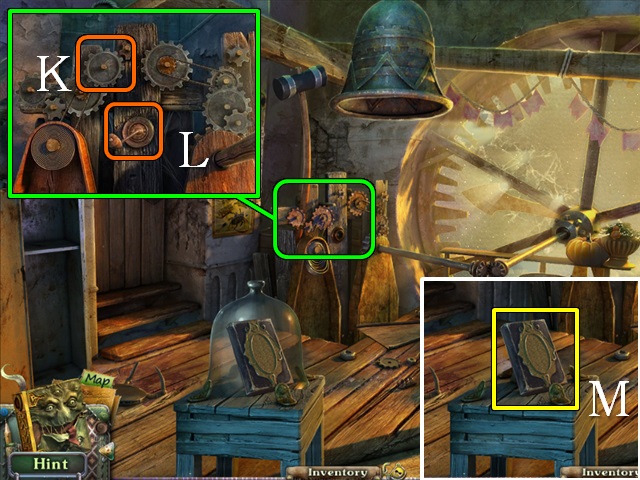
- Zoom into the mechanism and put the GEAR (K) and the CRANK (L) on it; turn the crank.
- Pick up the GRIMOIRE (M).
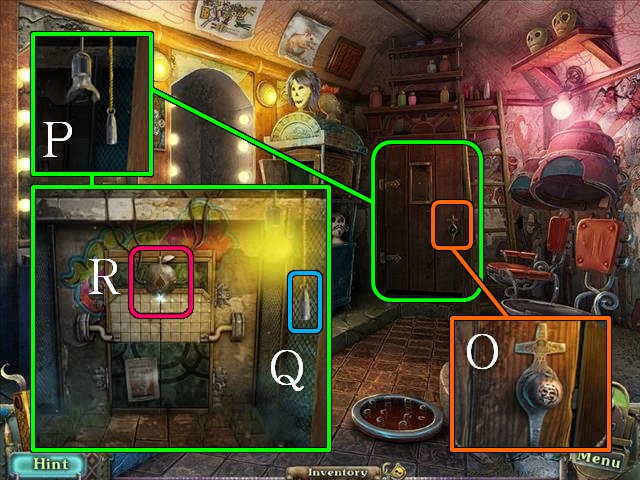
- Play the HOP.
- Pick up the knife (N), wash it in the trough (O) and use it to cut the apple (P).
- You will receive a SLEDGEHAMMER (Q).
- Walk down.
- Use the SLEDGEHAMMER on the brick wall.
- Zoom into the gap; put the OIL on the torch (R) and light it with the LIGHTER; take the SKELETON KEY (S).
- Go to the Transformation Altar.
- Zoom into the altar and read the notice; put the VESSEL in the holder (T).
- Zoom back into the altar and put the GRIMOIRE on the shelf (U).
- Zoom back into the altar and put the SKELETON KEY on the grimoire (V); activate the key.
- Go through the gate.
Chapter 3: The Town of Pecados
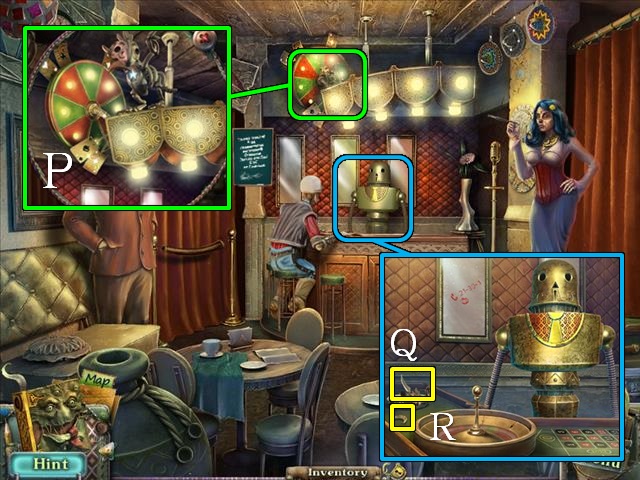
- Zoom into the fountain to play a HOP.
- Push the bottle cap (W) through the hole with the crowbar (X).
- You will receive PRUNERS (Y).
- Talk to the skeleton on the bench (Z).
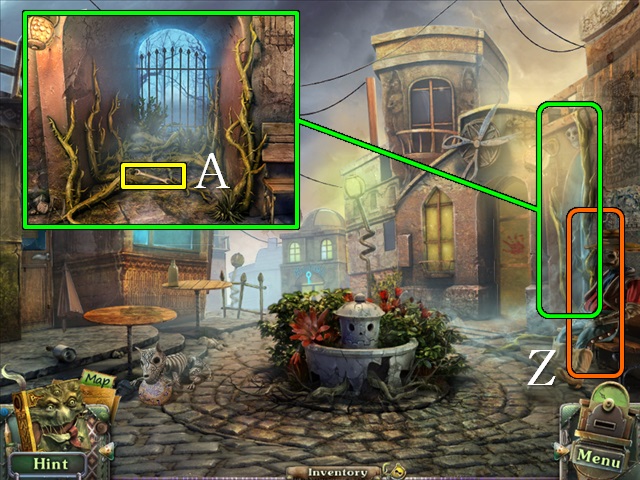
- Zoom into the alleyway; use the PRUNERS to remove the vines and take the WRENCH (A).
- Move forward.
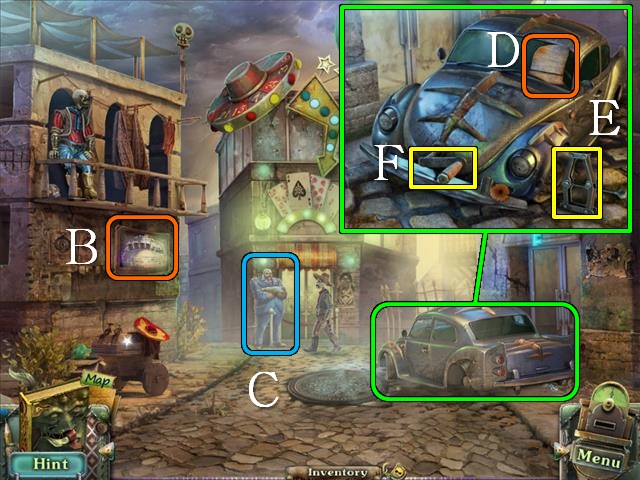
- Read the notice (B) and talk to the bouncer (C).
- Zoom into the car and read the notice (D); take the CAR JACK (E) and use the WRENCH to remove the HANDLE (F).
- Go left to the Gateway.
- Talk to the vendor (G) and read the notice (H).
- Pick up the BRUSH (I).
- Zoom into the drain and take the PULLEY (J).
- Go back to the Tomb.
- Zoom into the pulley mechanism and put the PULLEY on it (K); turn the handle (L).
- Cut the rope (M) with the PRUNERS.
- Pick up the HOOK (N).
- Go to the Gateway.
- Zoom into the drain, remove the grate with the HOOK and take the BARBER’S KEY (O).
- Go to Street No. 1.
- Zoom into the door of the Hair Salon, put the BARBER’S KEY in the lock and turn the key (P).
- Go through the door.
- Pick up the JACK HANDLE (Q).
- Zoom into the make-up table, take the BOX WRENCH (R) and look at the book (S).
- Zoom into the broken mirror and remove all the glass shards.
- You will receive a SOMBRERO (T).
- Go to the Gateway.
- Zoom into the container, put the CAR JACK under the lid (U), put the JACK HANDLE (V) on the jack, open the container and take the PAINTBRUSH (W); use the BOX WRENCH (X) to remove the bolt and take the GRABBER.
- Go to Street No. 2.
- Zoom into the cart and put the SOMBRERO on the puppet (Y); take the FEATHER (Z).
- Go to the Hair Salon.
- Zoom into the broken mirror and put the FEATHER on the peacock (A); pick up the PRIDE VIAL (B).
- Go to the Transformation Altar.
- Zoom into the altar and put the PRIDE VIAL on one of the pins (C); take the COMPACT MIRROR (D).
- Go to the Tomb.
- Put the COMPACT MIRROR on the pillar (E).
- Play the HOP (F).
- Finish drawing the skull (G) with the charcoal (H).
- You will receive a HAIRPIN (I).
- Go to the Hair Salon.
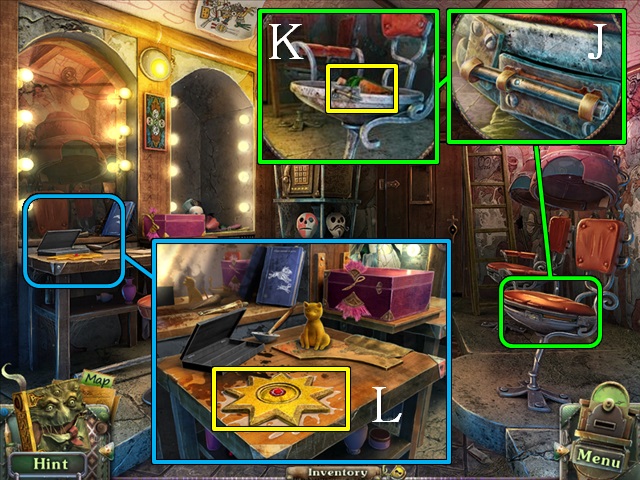
- Zoom into the chair and then zoom into the bolt (J); use the HAIRPIN to move the bolt, remove the seat and take the SOLVENT (K).
- Zoom into the make-up table, put the TOY CAT and the PAINTBRUSH on it and use the SOLVENT to take the SUN (L).
- Go to the Tomb.
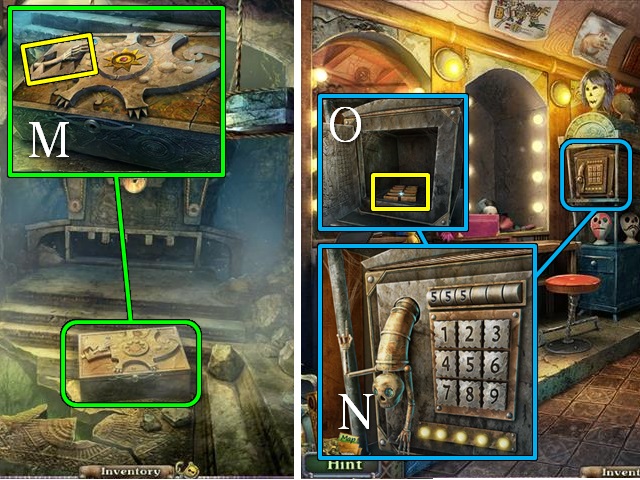
- Zoom into the stone chest and put the SUN on the lock; take the SKELETON HAND (M).
- Go to the Hair Salon.
- Zoom into the safe and put the SKELETON HAND on it to trigger a mini-game (N).
- Guess the three-digit number sequence on the safe, the skeleton will show if the number is higher or lower than what you just entered.
- The solution is random.
- Take the MAKE-UP PAINTS (O).
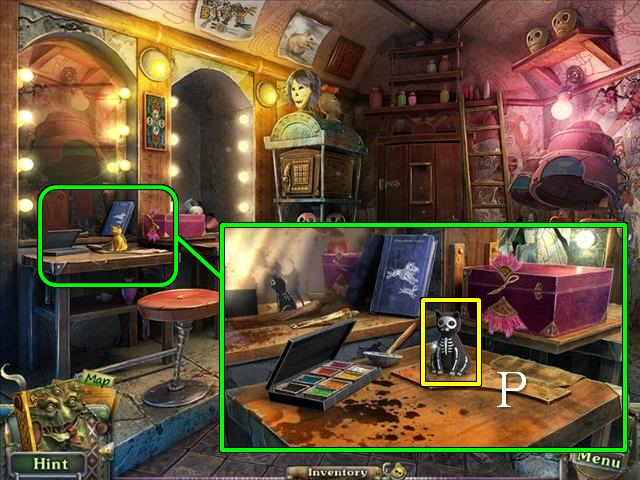
- Zoom into the make-up table and put down the MAKE-UP PAINTS.
- Take the SKELETON CAT (P).
- Walk down to Street No. 1.
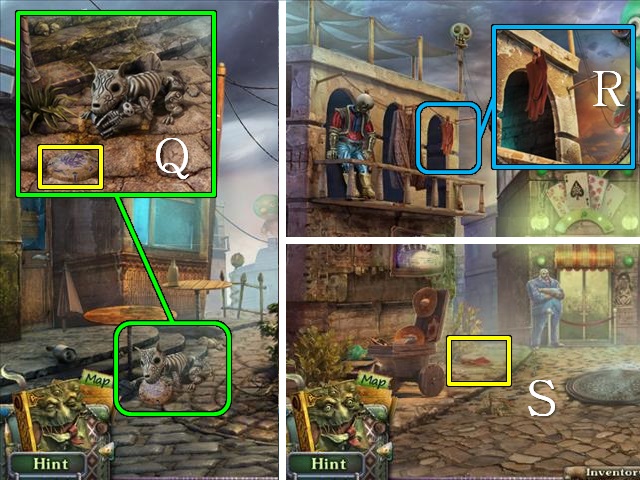
- Zoom into the dog and give him the SKELETON CAT; take the FLYING DISC (Q).
- Go to Street No. 2.
- Zoom into the washing line and use the FLYING DISC to knock down the glove (R).
- Pick up the GLOVE (S).
- Go back to Street No. 1.
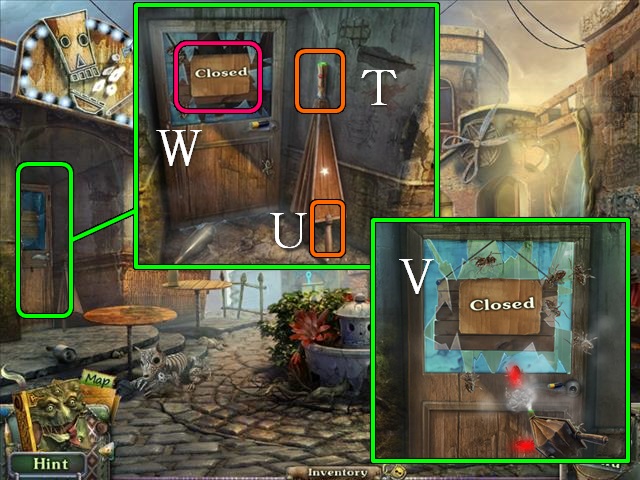
- Zoom into the door, put the INSENCE on the bellows and light it with the LIGHTER (T); put the HANDLE (U) on the bellows and push it to trigger a mini-game.
- Use the bellows to blow smoke on the cockroaches; you need to hit a cockroach several times to remove it (V).
- You will receive a BATTERY.
- Use the GLOVE to turn the ‘closed’ sign (W).
- Go through the door into the Bar.
Chapter 4: The Deadly Sins
- Zoom into the bar and take the MATCHES (X); turn over the remote control (Y) and put the battery in it to receive a REMOTE CONTROL.
- Use the REMOTE CONTROL on the TV twice and wait until you see a phone number (Z).
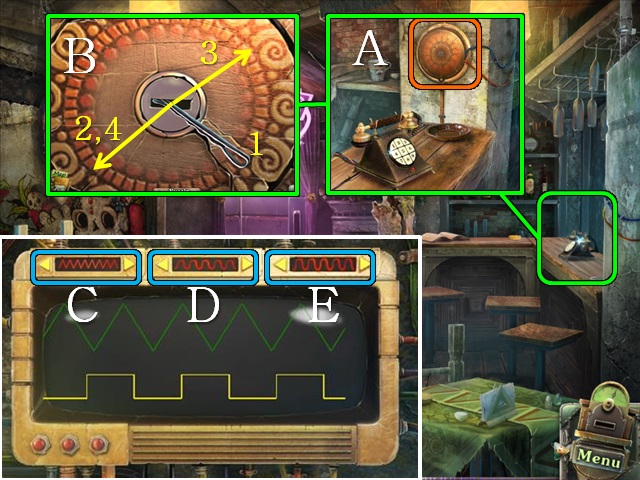
- Zoom into the phone and then into the power box (A); put the HAIRPIN in the lock to trigger a mini-game.
- Move the hairpin around slowly until you find a spot where the lock starts to shake, then hold down your mouse button to slide the hairpin further in; do this four times until the lock opens.
- The four positions are indicated in the screenshot (B).
- You’re instantly taken to another mini-game.
- Use the buttons at the top of the device to make the top line match the bottom line; the buttons of control C change the waveform, the buttons of control D change the wavelength and the buttons of control E change the amplitude of the wave.
- Take the GLUTTONY VIAL (F).
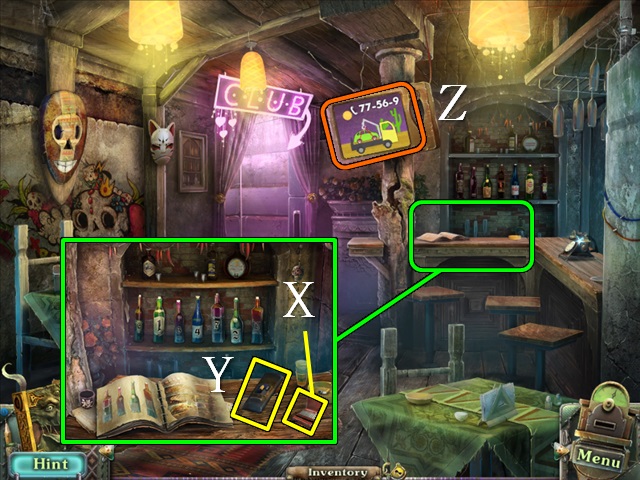
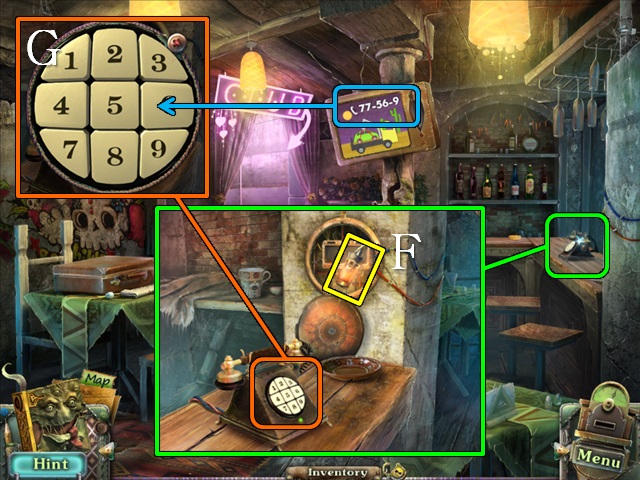
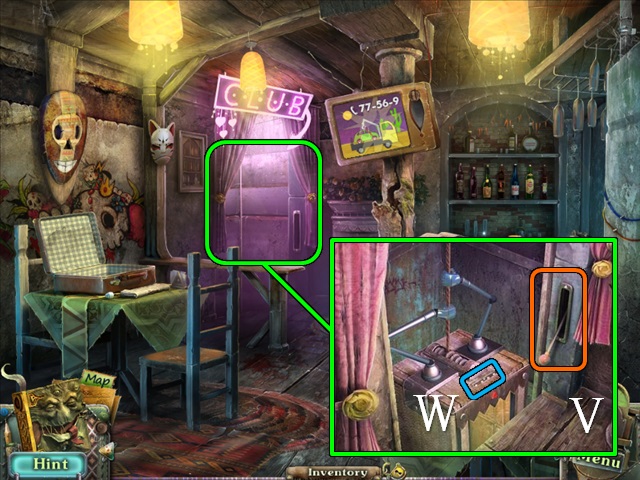
- Zoom into the phone and dial 77-56-9 (G).
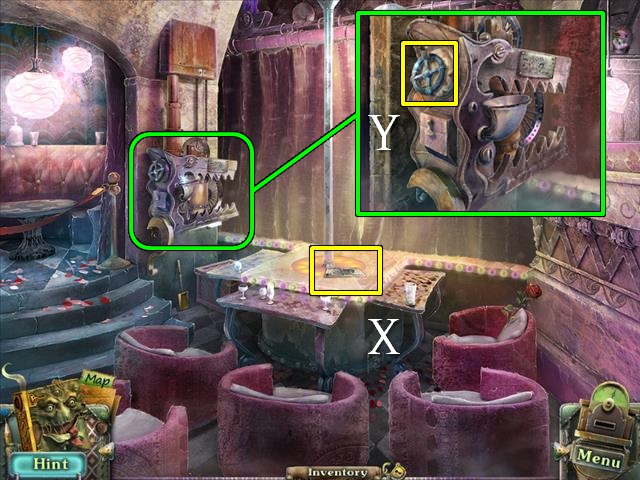
- Go to the Transformation Altar.
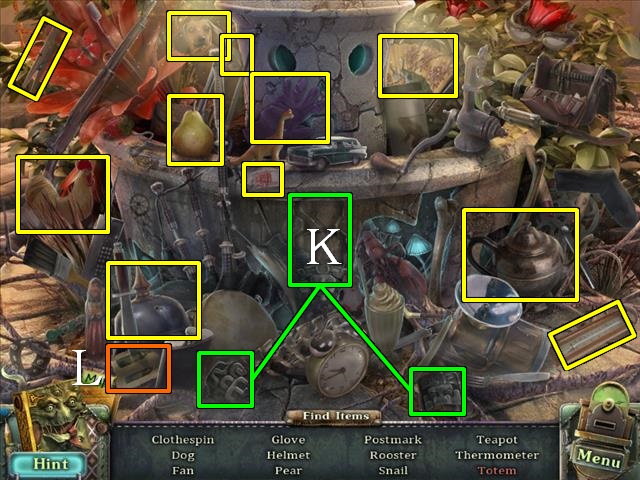
- Zoom into the altar and put the GLUTTONY VIAL on one of the pins; take the COMBINATION LOCK GEAR (H).
- Go to the Bar.
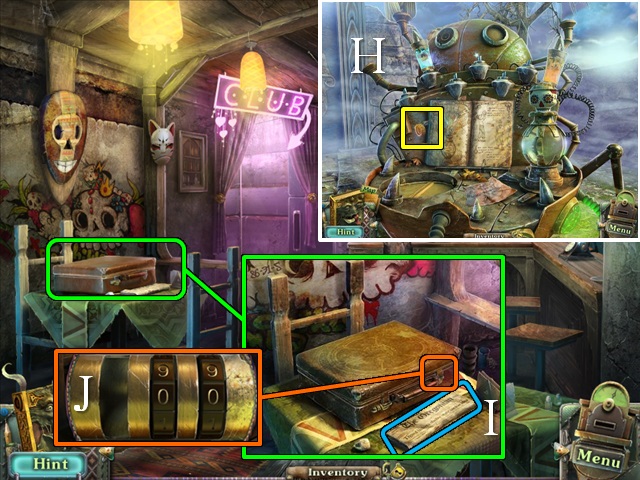
- Zoom into the suitcase and read the newspaper (I); then zoom into the lock and put the COMBINATION LOCK GEAR on the suitcase (J).
- Go to Street No. 1.
- Zoom into the fountain for a HOP (this is only available if you’ve placed the combination lock on the suitcase).
- Find the two pieces of the totem and put them on the fountain (K).
- You will receive a PAGE (L).
- Go to the Bar.
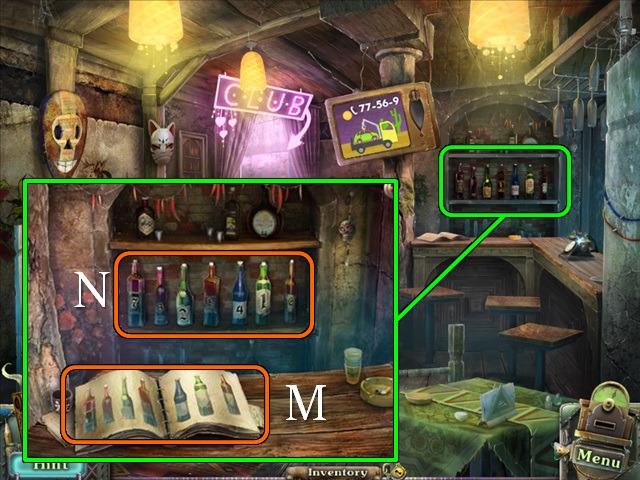
- Zoom into the bar and put the PAGE on the book (M), then rearrange the bottles on the shelf according to the book (N).
- Go to the Clock Tower Top.
- Zoom into the ledge and use the GRABBER to grab the SAFE DIAL (O).
- Go to Street No. 2 and into the Pecados Hotel.
- Pick up the LACE (P).
- Zoom into the safe (Q) and put the SAFE DIAL on it to trigger a mini-game.
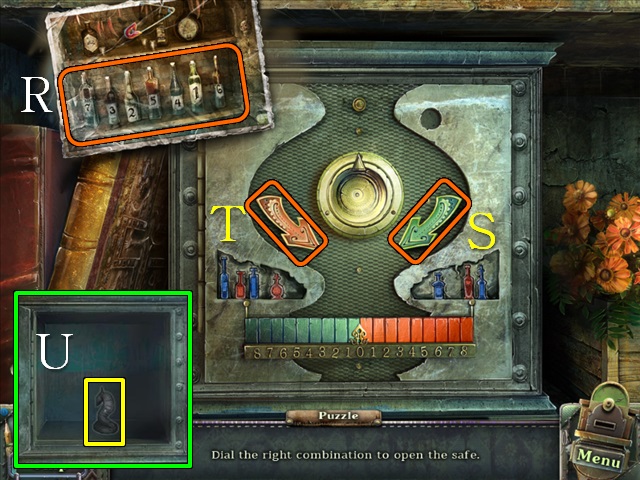
- Enter the safe combination according to the number sequence on the bottles (R); alternatingly use the green (S) and red (T) arrows to enter the numbers.
- Enter green 7, red 3, green 2, red 5, green 4, red 1, green 6.
- Take the KNIGHT (U).

- Zoom into the chess board (V) and put the KNIGHT on it to trigger a mini-game.
- Move the chess pieces to the squares with pictures of knights to the same color; when you select a knight, the squares it can jump to will light up.
- Move the black knight on A1 to B3 and then to D2.
- Move the black knight on A2 to B4, to C2, to A1 and then to B3.
- Move the white knight on A4 to C3, to A2, to B4, to C2, and finally to A1.
- Take the AMETHYST and the SLOTH VIAL (W).
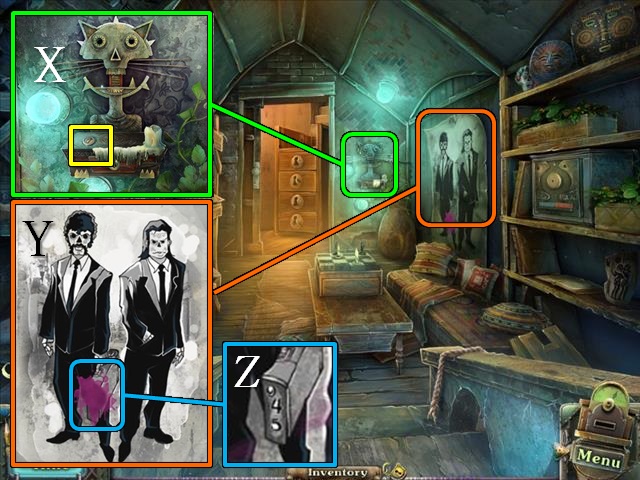
- Zoom into the little shrine on the wall and take the CASH REGISTER BUTTON (X).
- Zoom into the poster (Y), dissolve the stain with the SOLVENT and then clean it off with the BRUSH; note the combination (Z).
- Go to the Transformation Altar.
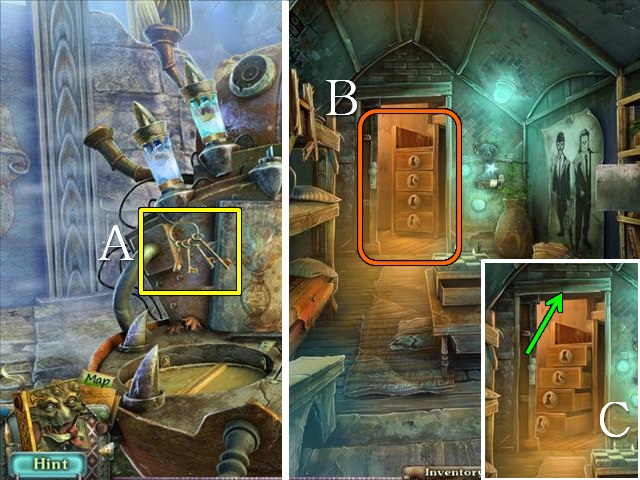
- Zoom into the altar, put the SLOTH VIAL on the pins and take the KEYS (A).
- Go into the Pecados Hotel.
- Unlock the drawers (B) with the KEYS.
- Go up the steps to the Fight Club (C).
- Talk to the Champion and try to take his trophy (D).
- Zoom into the ring and take the SMALL KEY (E).
- Zoom into the seats and take the AIR TANK (F).
- Zoom into the window and take the FUEL (G); put the LACE on the silver plate (H), then hit the red button (I).
- You will receive a SILVER PLATE.
- Go to the Bar.
- Zoom into the suitcase; enter 945 into the lock (J) and take the LIGHT BULB (K).
- Go to Street No. 2.
- Zoom into the cart, put the CASH REGISTER BUTTON on the register and take the PAPER MONEY (L).
- Go to the Gateway.
- Give the PAPER MONEY to the vendor.
- Play the HOP.

- Use the button on the side of the watch to move the hands to 12 hours (M).
- You will receive a DOOR HANDLE (N).
- Go to the Hair Salon.
- Zoom into the back door, put the DOOR HANDLE in the hole and turn the handle (O).
- Zoom into the door; remove the old light bulb (P), place the new LIGHT BULB and pull the cord (Q); put the AMETHYST on the door (R) for a mini-game.
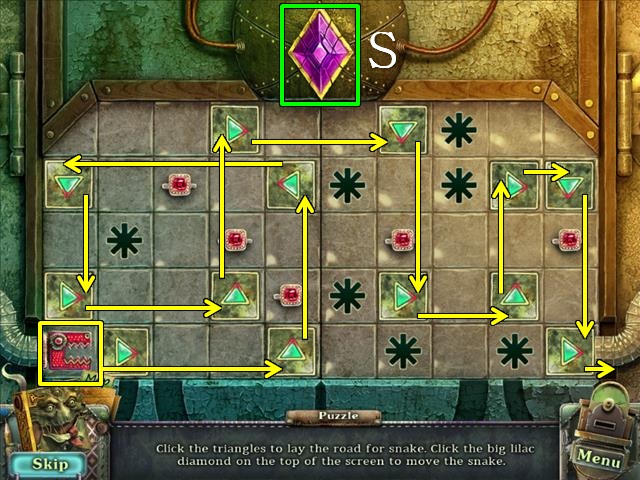
- Turn the arrow tiles to make a path across the board for the snake, collecting all rings and avoiding the black stars.
- The red corners of the arrows indicate the direction in which the snake will go.
- When you’ve set the path, hit the purple diamond (S) to move the snake across the board.
- Go through the door to the Jewelry Store.
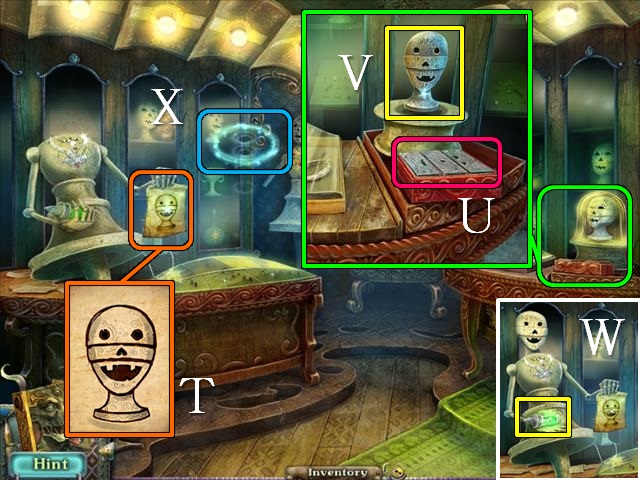
- Look at the paper in the dummy’s hand (T).
- Zoom into the table and put the SILVER PLATE on the red box (U); press the three plates until the head resembles the one in the picture, then take the DUMMY HEAD (V).
- Put the DUMMY HEAD on the dummy and take ENVY (W).
- Play the HOP (X).
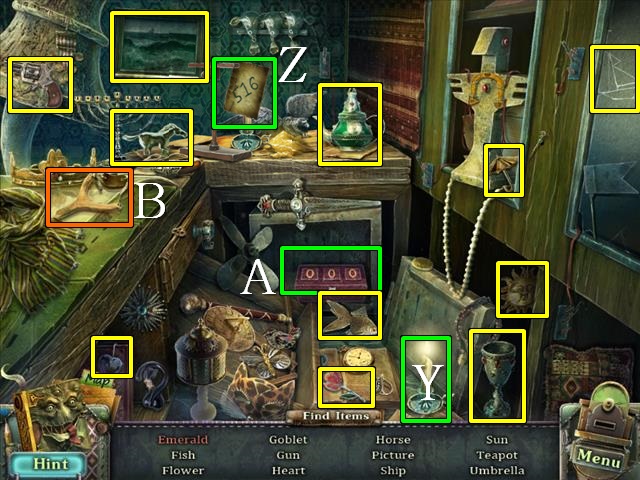
- Put the candle (Y) behind the piece of paper (Z) to get the code 516 and enter the code into the locked box (A) to find the emerald.
- You will receive a SLINGSHOT (B).
Chapter 5: The Casino
- Go to the Transformation Altar.
- Zoom into the altar, put ENVY on it and take the CHEST KEY (C).
- Go to the Tower Entrance.
- Zoom into the hole in the wall, open the chest with the CHEST KEY and take the GEMS (D) and the IRON BEAK (E); put the AIR TANK on the nail gun and pick up the PNEUMATIC NAIL GUN (F).
- Go to the Jewelry Store.
- Zoom into the cabinet and open it with the SMALL KEY (G); put the GEMS on the top shelf and take the DREAM CATCHER (H).
- Go to the Fight Club.
- Zoom into the seats, put the PLANKS on the ladder and nail them down with the PNEUMATIC NAIL GUN (I); take the LADDER.
- Go to the Pecados Hotel.
- Hang the DREAM CATCHER next to the sleeping man (J).
- Zoom into the sleeping man and take the CASINO INVITATION (K).
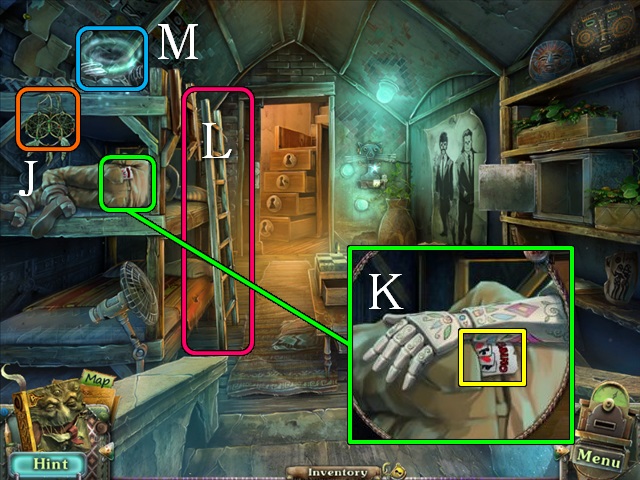
- Put the LADDER up against the bed (L).
- Zoom into the top bunk for a HOP (M).
- Move the sunglasses to find the eye (N).
- You will receive a PAW (O).
- Go to Street No. 2.
- Give the CASINO INVITATION to the bouncer.
- Go into the Casino.
- Zoom into the bird and shoot it down with the SLINGSHOT (P).
- Zoom into the croupier and take the SPURS (Q) and the METAL CRESCENT (R).
- Go to the Jewelry Store.
- Play the HOP.
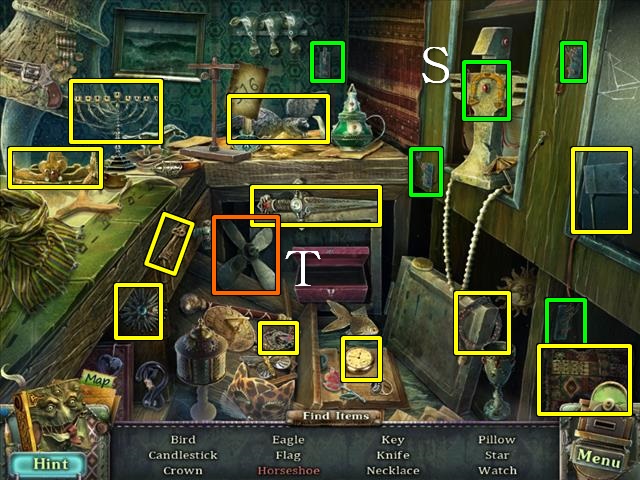
- Flick the four switches (green) to release the horseshoe (S).
- You will receive a FAN (T).
- Zoom into the table, open the locked display cabinet with the METAL CRESCENT (U) and take the WIRE CUTTERS (V).
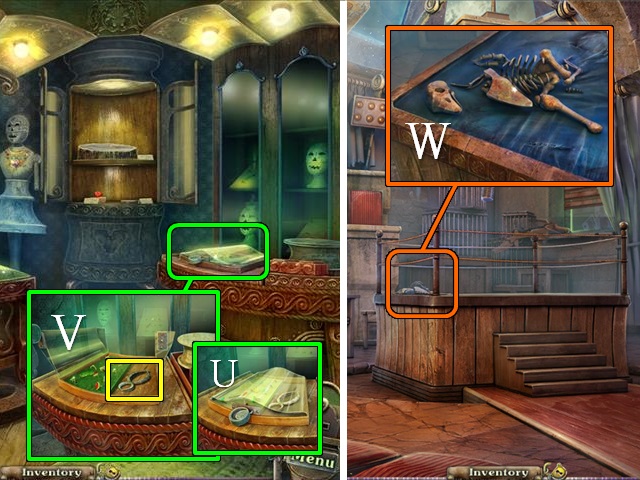
- Go to the Fight Club.
- Zoom into the ring and put the PAW on the skeleton to trigger a mini-game (W).
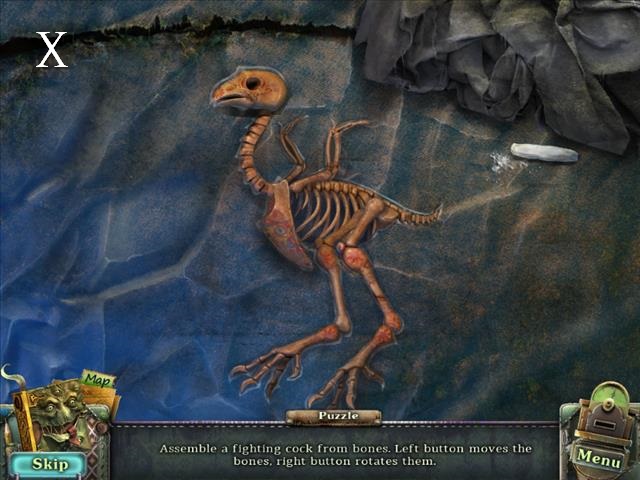
- Reassemble the chicken skeleton (X); use the left mouse button to pick up and drop pieces and the right mouse button to rotate them.
- Zoom into the ring again and put the METAL BEAK and SPURS on the skeleton.
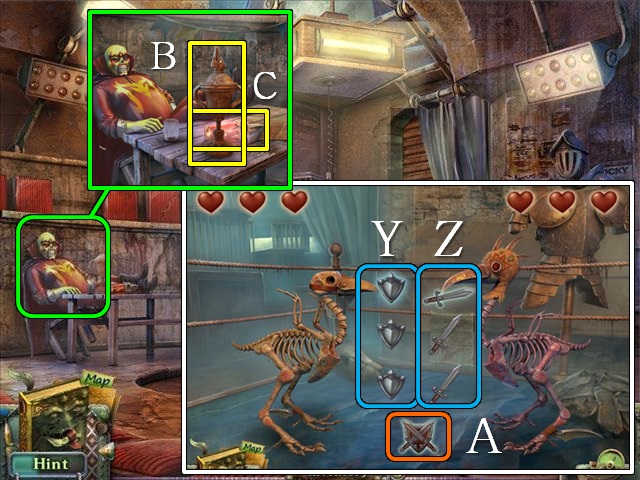
- Talk to the Champion to trigger a mini-game.
- Select a shield (Y) and a sword (Z) for your defense and attack, then hit the button A to fight; the player who first loses all three lives loses.
- The solution is random, and you’re likely to lose a couple of times; if you lose, put the metal beak and spurs back on the skeleton and talk to the Champion to fight again.
- After you win, zoom into the Champion and take the TROPHY (B) and the WRATH VIAL (C).
- Go to the Casino.
- Use the WIRE CUTTERS to cut the microphone wire (D).
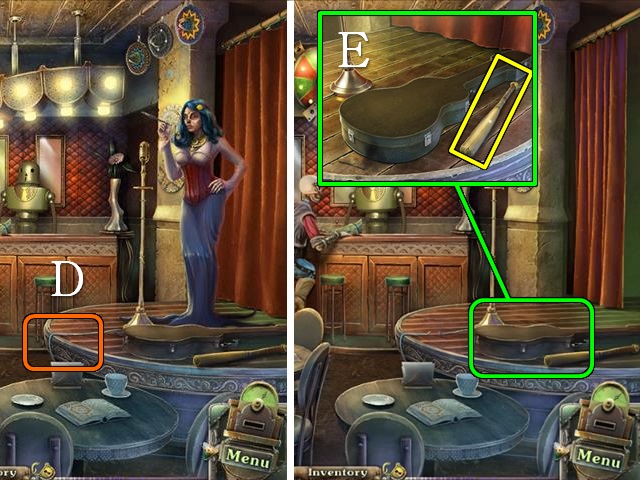
- Zoom into the stage and take the BASEBALL BAT (E).
- Go to the Transformation Altar.
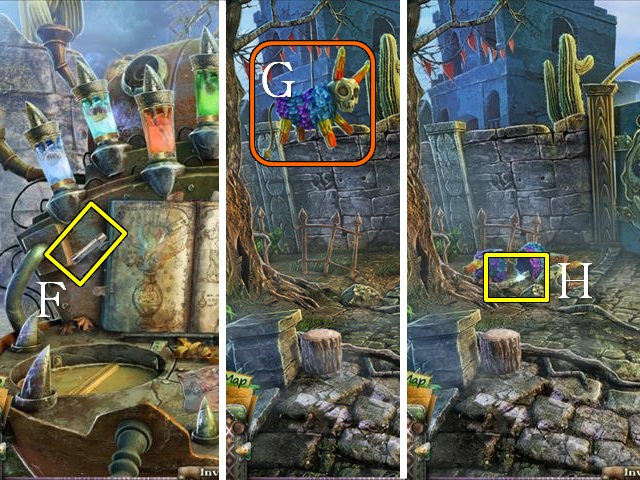
- Zoom into the altar, put the WRATH VIAL on it and take the FUSE (F).
- Hit the piñata with the BASEBALL BAT (G).
- Take the CASE KEY (H).
- Go back to the Casino.
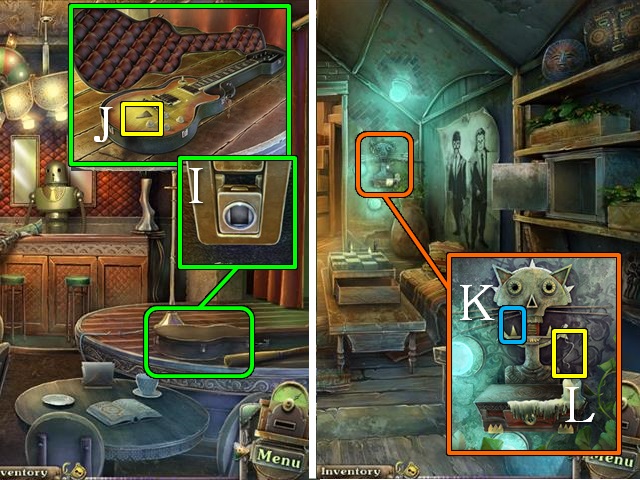
- Zoom into the stage and open the guitar case with the CASE KEY (I); take the FANG (J).
- Go to the Pecados Hotel.
- Zoom into the little shrine on the back wall, put the FANG (K) on it and take the STRING (L).
- Play the HOP.
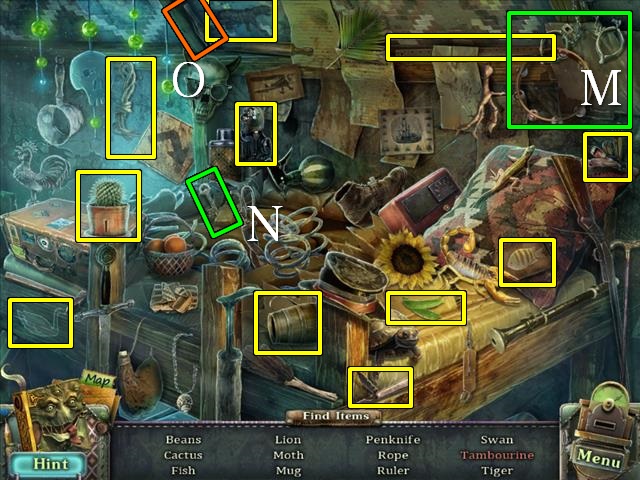
- Unlock the handcuffs (M) with the key (N) to get the tambourine.
- You will receive TWEEZERS (O).
- Go to the Gateway.
- Zoom into the drain and use the TWEEZERS to take the WET PAPER SHEET (P).
- Go to the Hair Salon.
- Zoom into the dryer, put the FAN on it (Q) and switch it on (R); dry the WET PAPER SHEET and take the SHEET MUSIC (S).
- Go to the Casino.
- Zoom into the stage and put the STRING and SHEET MUSIC on the guitar; take the GREED VIAL (T).
- Go to the Transformation Altar.
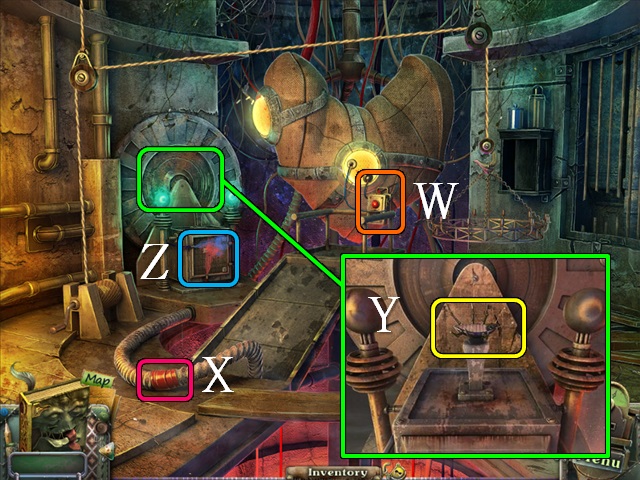
- Zoom into the altar, put the GREED VIAL on it and take the LEVER (U).
- Go to the Bar.
- Zoom into the elevator shaft, put the LEVER in the slot and push it down (V).
- Put the FUSE on the top of the elevator (W).
- Take the PAPER MONEY (X).
- Zoom into the machine and take the VALVE (Y).
- Go to the Gateway.
- Give the PAPER MONEY to the vendor.
- Play the HOP.
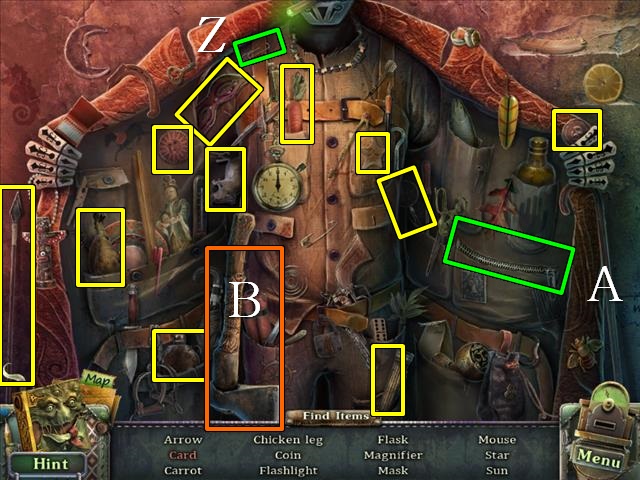
- Put the paperclip (Z) on the zipper (A) to find the card.
- You will receive an AXE (B).
- Zoom into the drainpipe, put the VALVE (C) on it and turn the valve; put the TROPHY under the stream of water (D) to receive a TROPHY WITH WATER.
- Go to the Transformation Altar.
- Use the AXE on the chopping block (E) and pick up the FIREWOOD (F).
- Go to the Night Club.
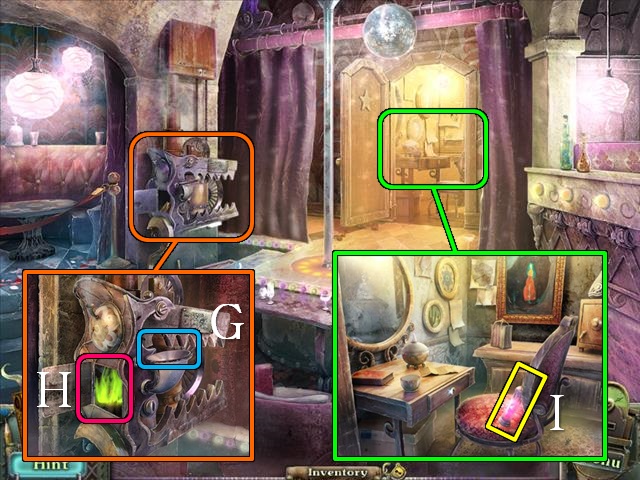
- Zoom into the device and pour water from the TROPHY WITH WATER down the shoot (G); open the side panel (H), put the FIREWOOD in it, pour the FUEL over it and light it with the MATCHES.
- Zoom into the dressing room and take the LUST VIAL (I).
- Go to the Transformation Altar.
- Zoom into the altar and put the LUST VIAL on it.
Chapter 6: The Baron’s Manor
- Go to the Manor Gates.
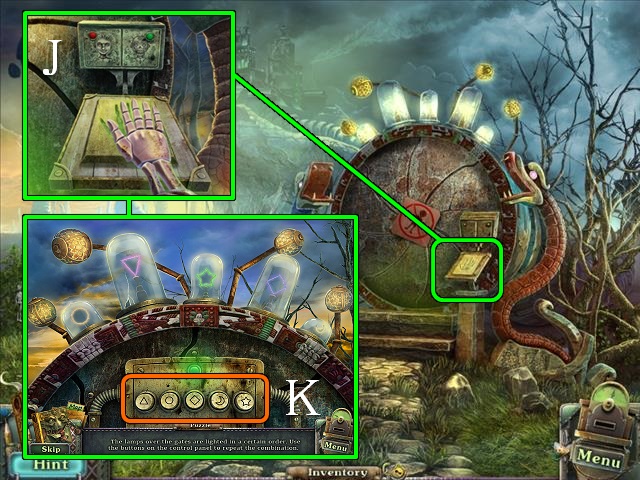
- Zoom into the control panel and put your hand on it for a mini-game (J).
- Repeat the sequence of the lamps by pressing on the buttons with matching symbols (K); each sequence is the same as the previous, with one symbol added to it.
- The full sequence is circle, star, diamond, moon, star, and triangle.
- Go through the tunnel.
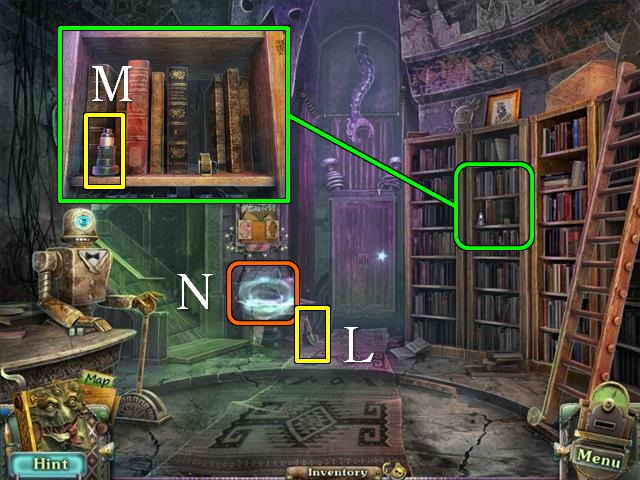
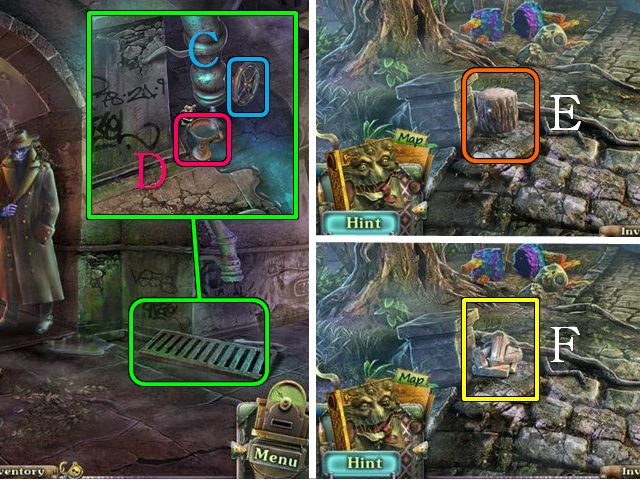
- Pick up the SHOVEL (L).
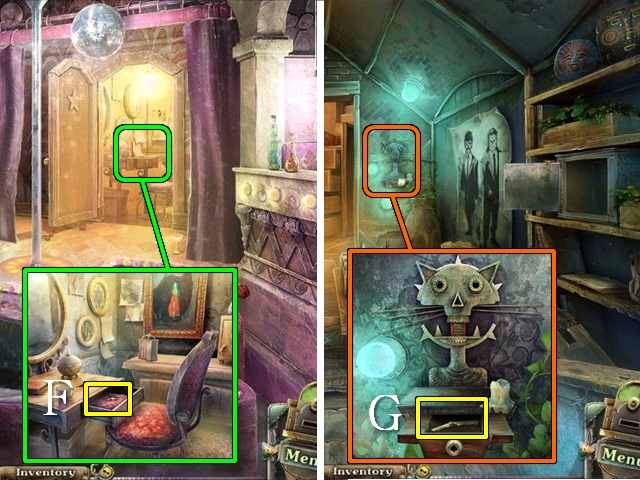
- Zoom into the bookcases and pick up the EYEPIECE (M).
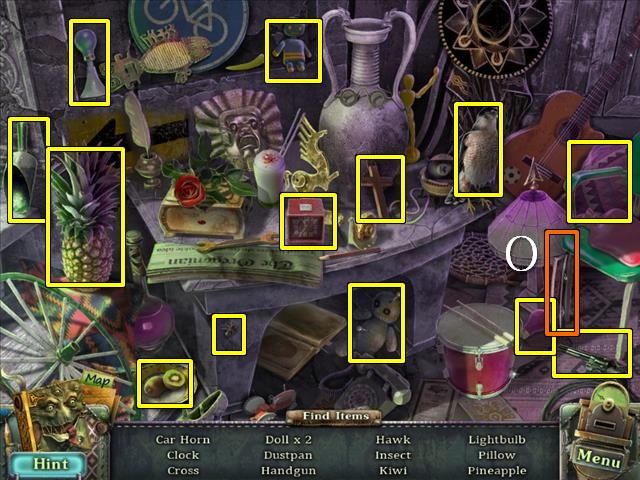
- Play the HOP (N).
- You will receive a RAIL (O).
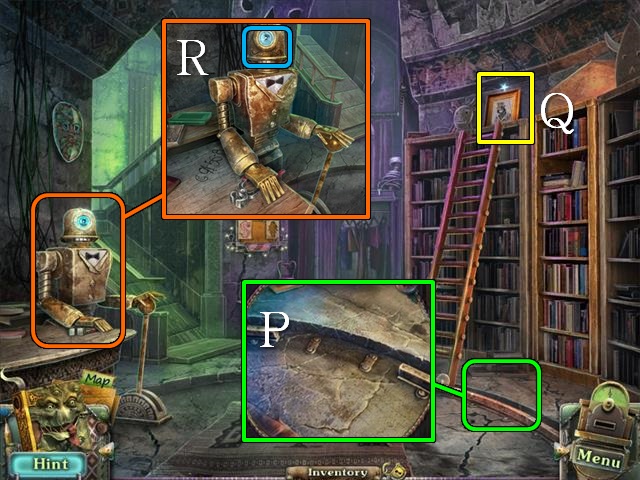
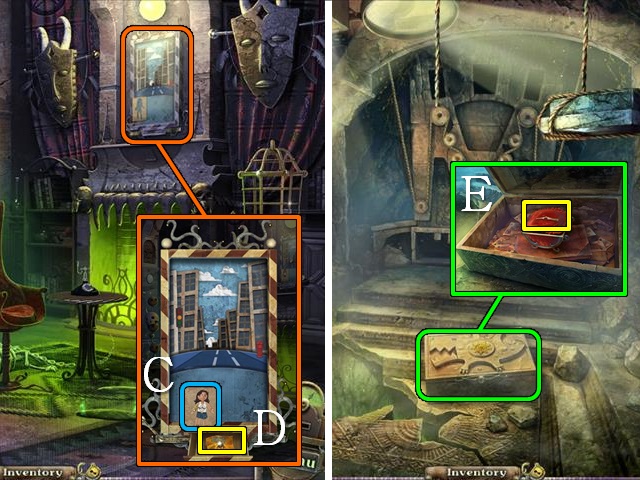
- Zoom into the floor and put the RAIL in the gap (P).
- Take the BARON’S PORTRAIT (Q).
- Zoom into the robot and show him the BARON’S PORTRAIT (R).
- Go up the stairs.
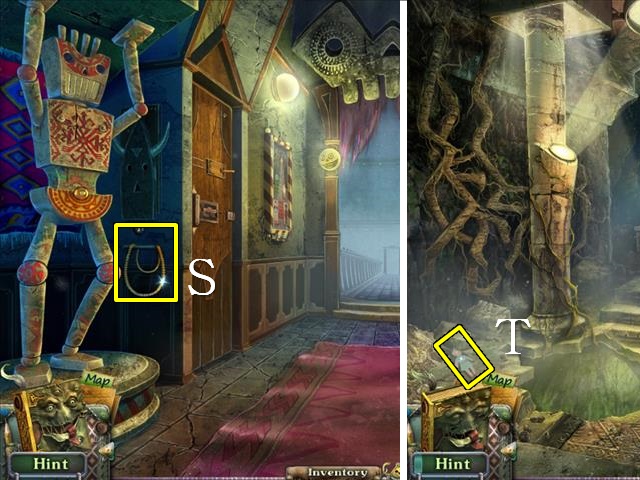
- Grab the CHAIN (S).
- Go to the Tomb.
- Use the SHOVEL to dig up the dirt; take the GIRL FIGURE (T).
- Go to the Manor Lobby.
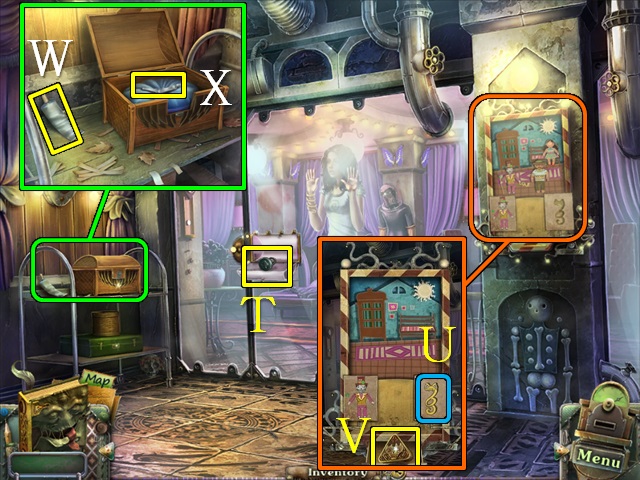
- Zoom into the collage, put the GIRL FIGURE on it (U) and take the BOOK (V).
- Zoom into the bookcase, put the BOOK in the slot (W) and pull it to reveal a hidden passage.
- Go into the passage.
- Pick up the OIL CAN (X).
- Zoom into the device on the left and take the CROSSBOW CRANK (Y).
- Walk down.
- Play the HOP.
- You will receive an ARROW TIP (Z).
- Zoom into the robot and use the OIL CAN on his hand; take the PINCERS (A).
- Go into the Basement.
- Zoom into the cage and use the PINCERS to remove the bars (B).
- You will receive an ELEVATOR CRANK.
- Put the ELEVATOR CRANK on the pulley system (C) and hoist up the chandelier.
- Take the DOOR (D).
- Go to the Corridor upstairs.
- Zoom into the door in the back and put the DOOR in the gap (E).
- Open the door and go through it.
- Talk to the Baron (F).
- Zoom into the desk and take the SNAKE FIGURE (G); open the display box to take the COCKROACH BODY (H), and open the drawer to take the WATCHMAKER’S KEY (I).
- Go to the Clock Tower.
- Zoom into the door; put the WATCHMAKER’S KEY in the lock (J) and turn to open.
- Go through the door to the Clockmaker’s Office.
- Take the BONE KEY (K).
- Put the CHAIN around the gears (L) and pick up the METAL BIRD (M).
- Zoom into the table and take the STARTER (N).
- Go to the Baron’s Room.

- Zoom into the birdcage and then into the lock; open the lock with the BONE KEY (O) and take the PLATE (P).
- Walk down once.
- Zoom into the left door and put the PLATE on the lock (Q) to trigger a mini-game.
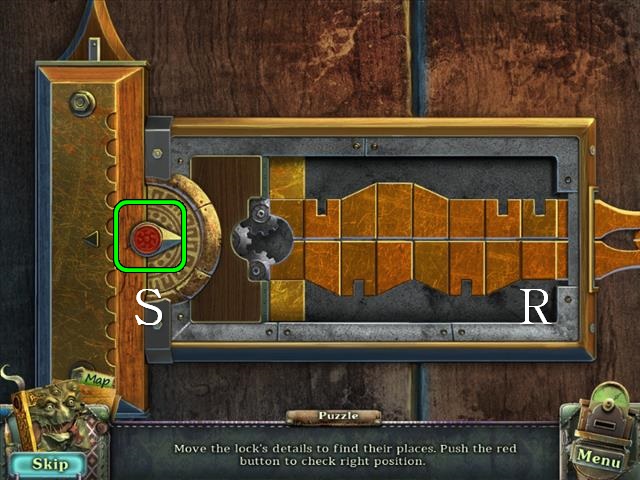
- Move the pieces of the lock around to find the correct combination (R); push the button to check the combination (S).
- Go through the door.
- Talk to Carolina.
- Take the BARON’S RING (T).
- Zoom into the collage, put the SNAKE FIGURE on it (U) and take the CUPBOARD HANDLE (V).
- Zoom into the trolley, take the GLUE (W), open the box with the BARON’S RING and take the COCKROACH LEG (1/6) (X).
- Walk down to the Corridor.

- Zoom into the cabinet, open it with the CUPBOARD HANDLE (Y) and take the WOMAN FIGURE (Z); use the BARON’S RING on the box (A).
- Take the COCKROACH LEG (2/6) (B).
- Go into the Baron’s Room.
- Zoom into the collage, put the WOMAN FIGURE (C) on it and take the RACE TICKET (D).
- Go to the Tomb.
- Zoom into the stone box, open it with the BARON’S RING and take the COCKROACH LEG (3/6) (E).
- Go to the Night Club.
- Zoom into the dressing room, open the drawer with the BARON’S RING and take the COCKROACH LEG (4/6) (F).
- Go to the Pecados Hotel.
- Zoom into the shrine, melt the candle wax with the MATCHES, open the drawer with the BARON’S RING and take the COCKROACH LEG (5/6) (G).
- Go to the Fight Club.
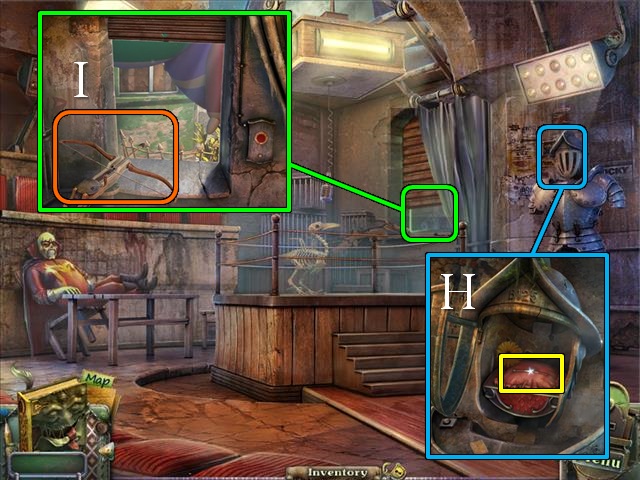
- Zoom into the suit of armor and open it with the BARON’S RING; take the COCKROACH LEG (6/6) (H).
- Zoom into the window, put the CROSSBOW CRANK and ARROW TIP on the crossbow and shoot it (I).
- Go to the Clockmaker’s Office.
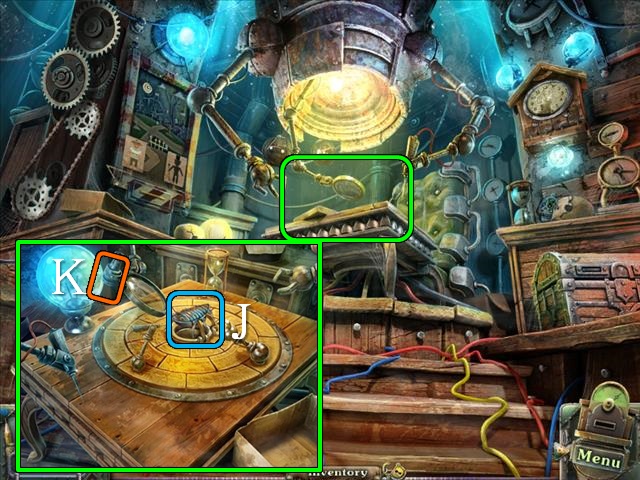
- Zoom into the table, put the COCKROACH BODY in the holder and put the COCKROACH LEGS (6/6) on the body (J).
- Attach the EYEPIECE to the magnifying glass (K) to trigger a mini-game.
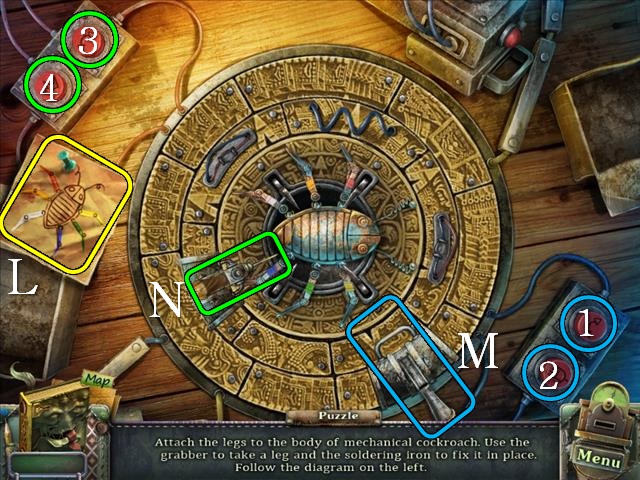
- Attach the legs to the cockroach according to the example (L).
- Use button 1 to rotate the grabbing arm (M) and button 2 to grab and release legs; use button 3 to rotate the soldering iron (N) and button 4 to solder it in place.
- You can either place all legs and then attach them, or do everything one leg at a time.
- You will receive a MECHANICAL ROACH.
- Go to the Jewelry Store.
- Zoom into the display cabinet, open it with the METAL BIRD and take the MAN FIGURE (O).
- Go to the Corridor.
- Zoom into the collage, put the MAN FIGURE on it (P) and take the CLOCK HANDS (Q).
- Go to the Clockmaker’s Office.
- Zoom into the clock and put the CLOCK HANDS on it; take the BARON FIGURE (R).
- Zoom into the collage, put the BARON FIGURE on it (S) and take the HALF OF SCISSORS (T).
- Go to the Hair Salon.
- Zoom into the make-up table and put the HALF OF SCISSORS on the box (U) to receive SCISSORS.
- Go to Street No. 2.
- Zoom into the balloon and use the SCISSORS to cut a PATCH (V).
- Go to the Basement.
- Put the STARTER on the heart (W).
- Put the GLUE on the burst pipe, followed by the PATCH (X).
- Zoom into the device on the left and put the MECHANICAL ROACH on it (Y).
- Zoom into the pipes under the device for a mini-game (Z).

- Rotate the pipe pieces so the purple gas goes to the purple exit and the red gas goes to the red exit (A).
- You will receive a CHARGED COCKROACH.
- Go to the Casino.
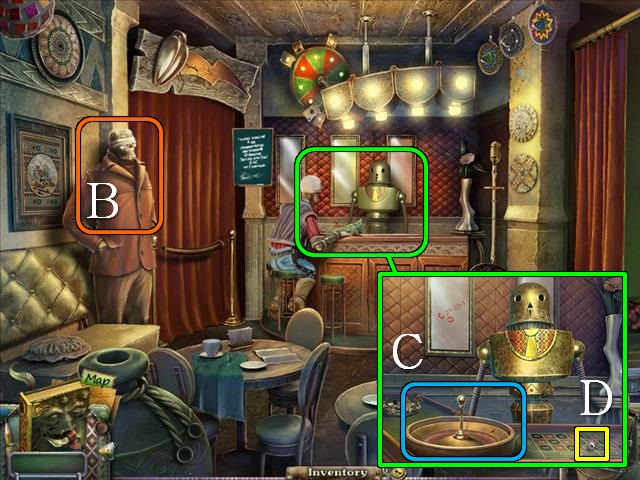
- First talk to the bouncer (B), then give him the RACE TICKET; he will give you a BETTING CHIP.
- Zoom into the roulette table; put the BETTING CHIP on the roulette wheel (C) and take the EYE (D).
- Give the EYE to the bouncer, then give him the RACE TICKET again, followed by the CHARGED ROACH for a mini-game.
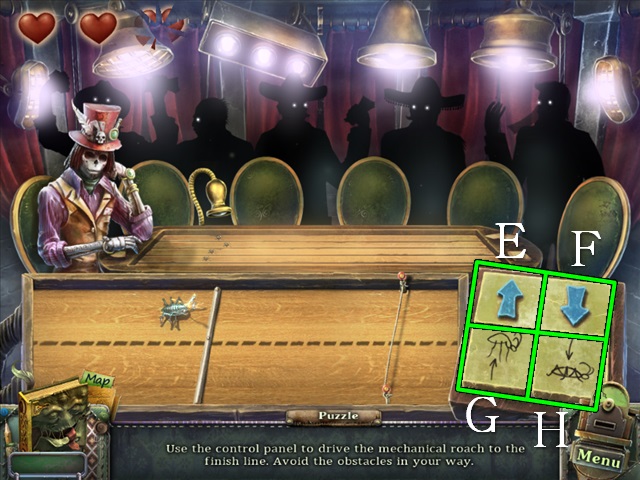
- Race your cockroach to the finish line without losing your three lives.
- The up (E) and down (F) arrows move the cockroach up and down the tracks to avoid obstacles.
- The jump button (G) allows him to jump over sticks and the duck button (H) allows him to duck under strings; you need to time your jumps and ducks to just before the cockroach reaches the obstacle.
- You will receive a CRYSTAL.
- Go to the Manor Lobby.
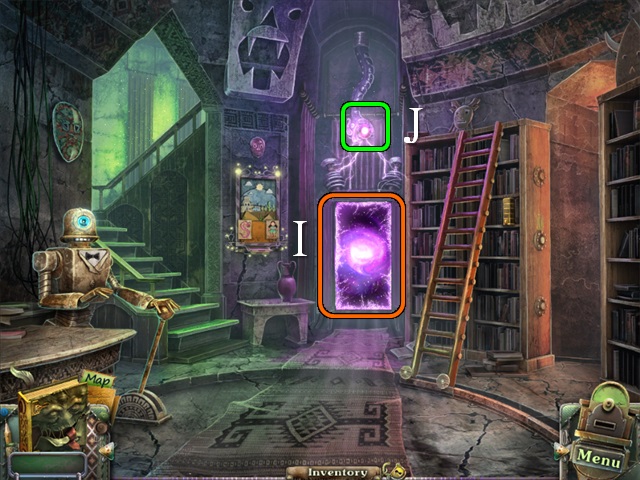
- Open the door (I).
- Put the CRYSTAL in the snake’s mouth (J) and go through the portal.
Chapter 7: The Vendor’s Tasks
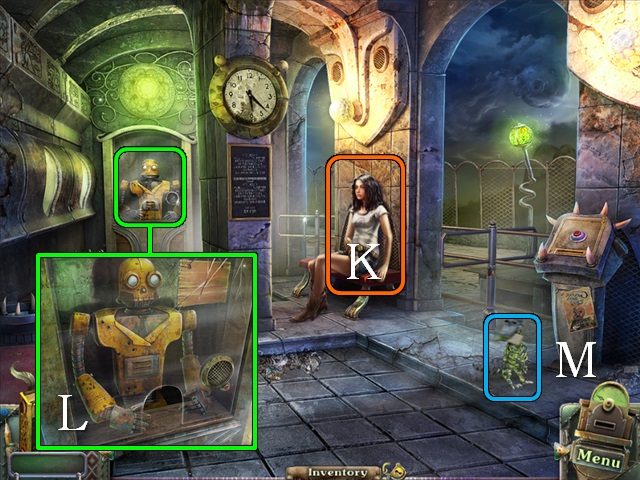
- Talk to Catalina (K).
- Talk to the robot in the ticketing booth (L); he will give you PESOS (1/4).
- Take the note from the creature (M).
- Go to the Gateway.

- Talk to the vendor (N), he will give you the VENDOR’S MARK.
- Go to Street No. 2.
- Show the VENDOR’S MARK to the bouncer (O) in return for the MONEY BAG (1/5).
- Go into the Casino.
- Show the VENDOR’S MARK to the bouncer (P) in return for the MONEY BAG (2/5).
- Zoom into the croupier robot (Q) and show him the VENDOR’S MARK in return for the MONEY BAG (3/5).
- Go to Street No. 1.
- Show the VENDOR’S MARK to the man on the bench (R) for the MONEY BAG (4/5).
- Go to the Manor Lobby.
- Zoom into the robot (S) and show him the VENDOR’S MARK for the MONEY BAG (5/5).
- Go back to the Gateway.
- Give the MONEY BAGS (5/5) to the vendor in return for PESOS (2/4).
- Pick up a SHARE (1/3) (T).
- Go to Street No. 2.
- Pick up the SHARE (2/3) (U).
- Go to Street No. 1.
- Pick up the SHARE (3/3) (V).
- Return to the Gateway.
- Give the SHARES (3/3) to the vendor.
- He will give you more PESOS (3/4) and a SPRAY.
- Go to Street No. 2.
- Zoom into the notice board and use the SPRAY on it (W).
- Go to the Station.
- Zoom into the notice board and use the SPRAY on it (X).
- Go back to the Gateway.
- Talk to the vendor for your final PESOS (4/4).
- Go to the Station.
- Zoom into the ticket booth (Y) and give your PESOS (4/4) to the robot; you get a TRAIN TICKET.
- Put the TRAIN TICKET in the machine (Z).
- Congratulations, you have completed Calavera: Day of the Dead.


 Emma and the Inventor Walkthrough, Guide, & Tips
 Twisted Lands: Origin Walkthrough, Guide, & Tips
 Nightmare Realm: In the End... Walkthrough, Guide, & Tips
 The Surprising Adventures of Munchausen Walkthrough, Guide, & Tips
 Theatre of Shadows: As You Wish Walkthrough, Guide, & Tips