Haunted Legends: The Secret of Life Walkthrough, Guide, & Tips
Haunted Legends: The Secret of Life Walkthrough

Welcome to the Haunted Legends: The Secret of Life Walkthrough.
You’ve traveled the world in search of a cure for your deadly illness, and you’ve finally found it! But it won’t be easy to get – are you up to the task?
Whether you use this document as a reference when things get difficult or as a road map to get you from beginning to end, we’re pretty sure you’ll find what you’re looking for here.
This document contains a complete Haunted Legends: The Secret of Life game walkthrough featuring annotated screenshots from actual gameplay!
We hope you find this information useful as you play your way through the game. Use the walkthrough menu below to quickly jump to whatever stage of the game you need help with.
Remember to visit the Big Fish Games Forums if you find you need more help. Have fun!
This walkthrough was created by Amanda Barrera, and is protected under US Copyright laws. Any unauthorized use, including re-publication in whole or in part, without permission, is strictly prohibited.
General Tips
- This is the official guide for Haunted Legends: The Secret of Life.
- This guide will not show when you have to zoom into a location; the screenshots will show each zoom scene.
- Hidden-object puzzles are referred to as HOPs. This guide will not show screenshots of the HOPs, however, it will mention when an HOP is available and the inventory item you’ll collect from it.
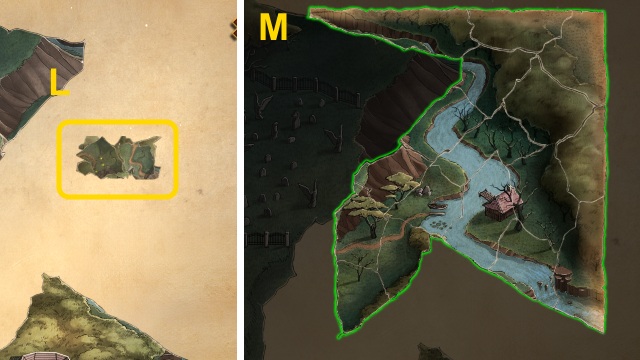
- Use the Map to fast travel to a location.
- There are multiple ways to play through this game; this guide shows one way the game can be played.
Chapter 1: The Secret of Life

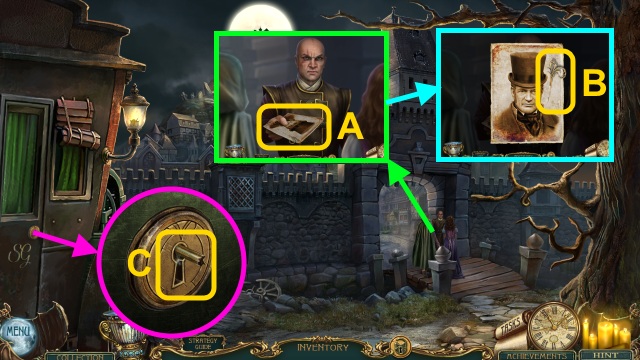
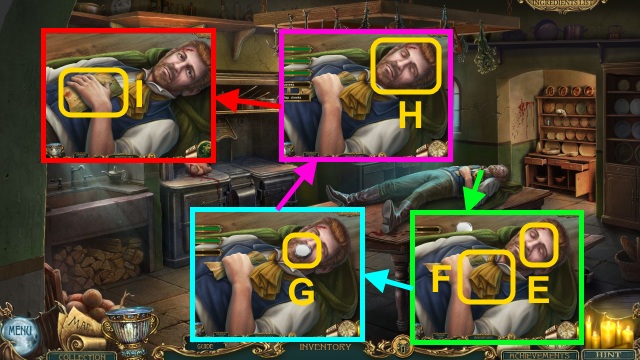
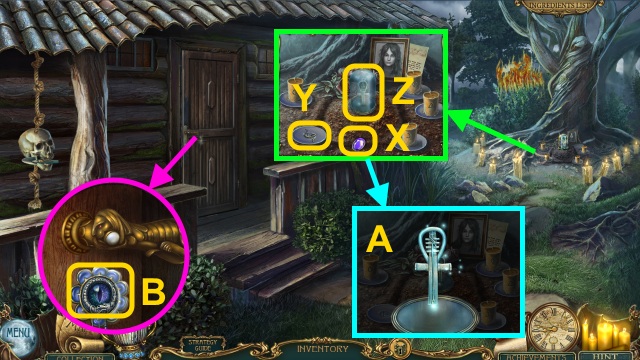
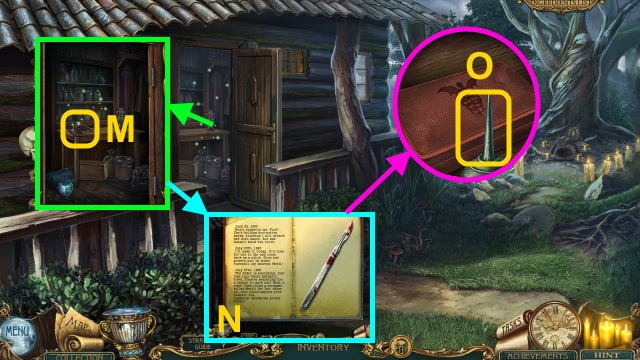
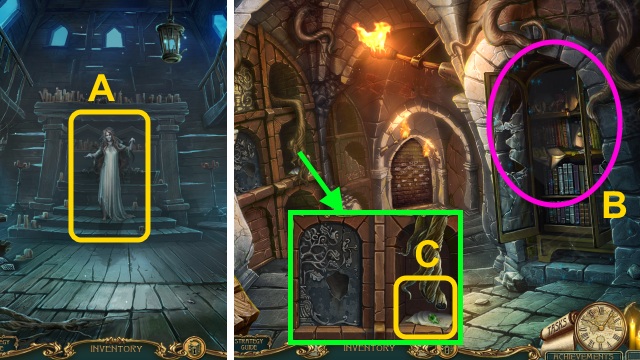
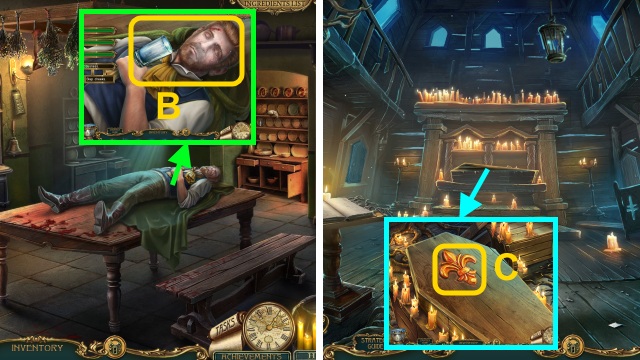
- Talk to the man; examine the picture (A).
- Take the PIN (B).
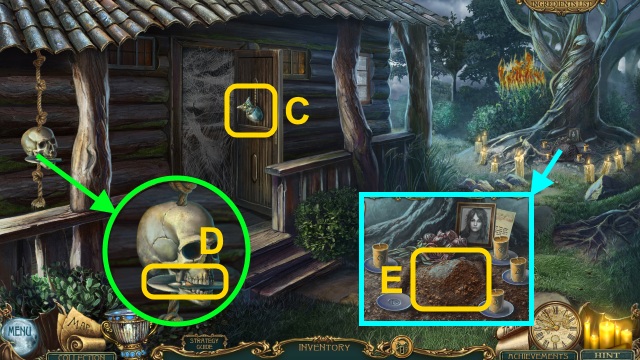
- Remove the metal (C); use the PIN.
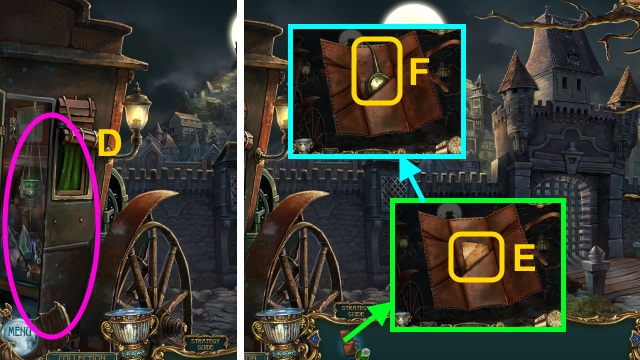
- Play the HOP to receive the POUCH WITH MAP (D).
- Open the POUCH WITH MAP; take the Map (E) and the OIL (F).
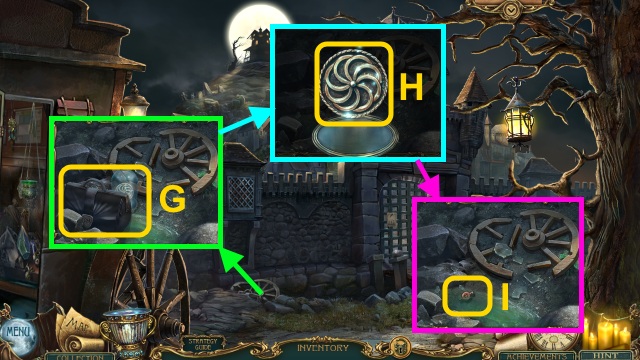
- Take the BAG; examine the case (G).
- Break the glass; take the Symbol (H).
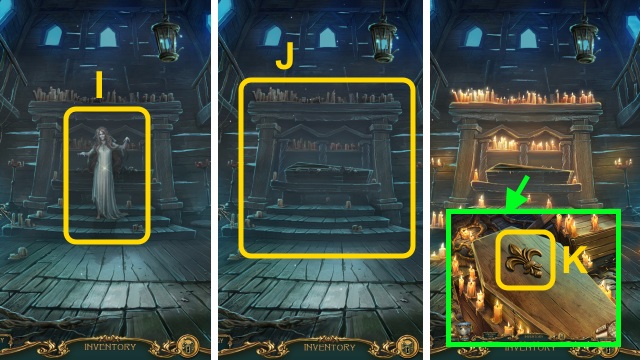
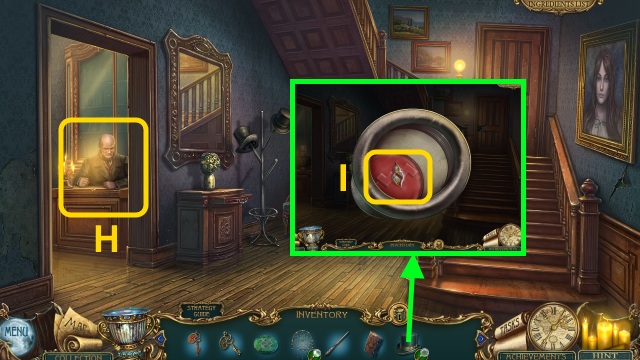
- Take the KNOB (I).
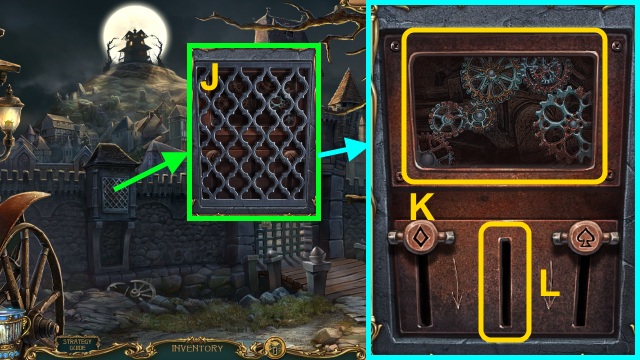
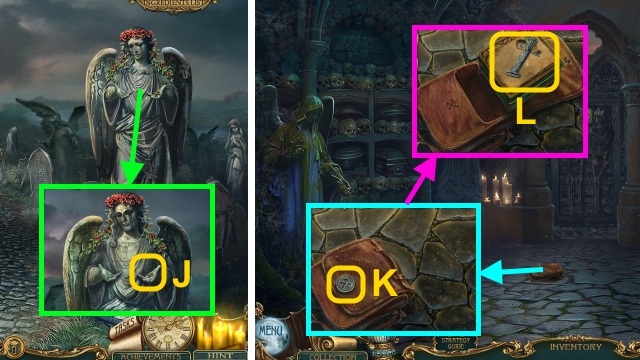
- Remove the grate (J).
- Place the gears; use the OIL (K).
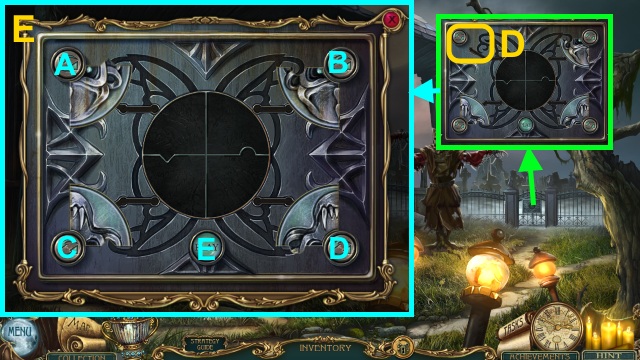
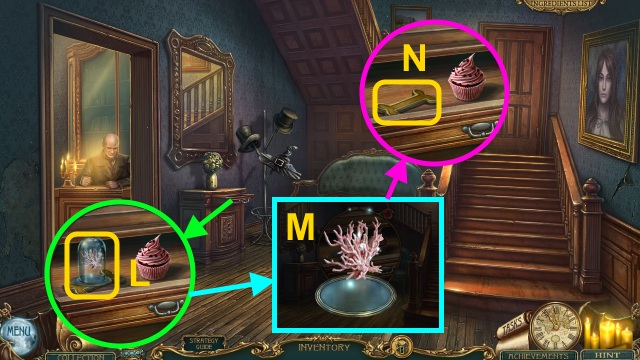
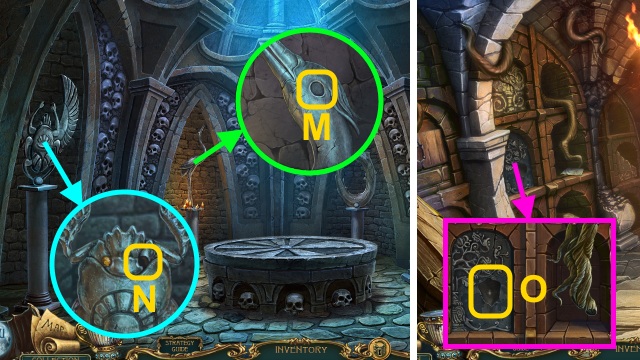
- Place the KNOB for a mini-game (L).

- Solution (M): Ax2-Cx2-B.
- Walk right.
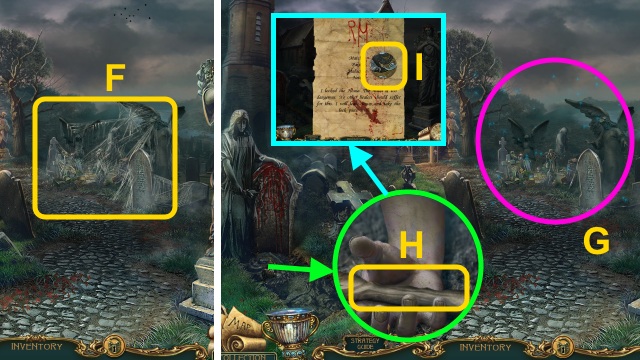
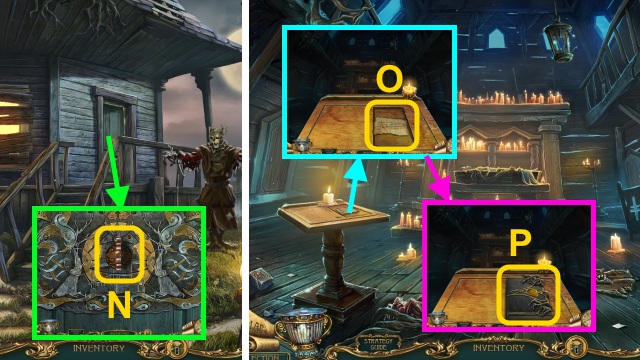
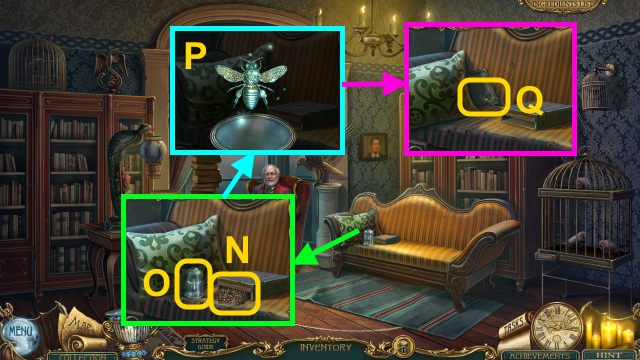
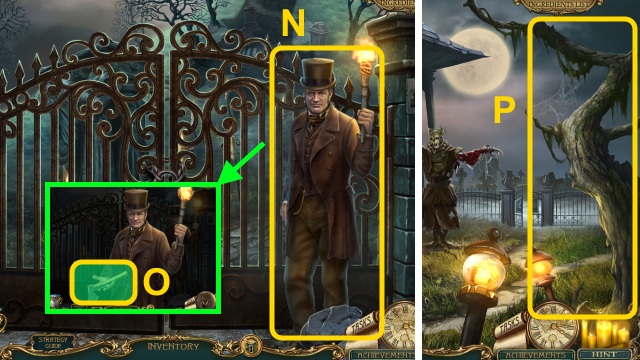
- Talk to the Elder (N); select ‘No.’
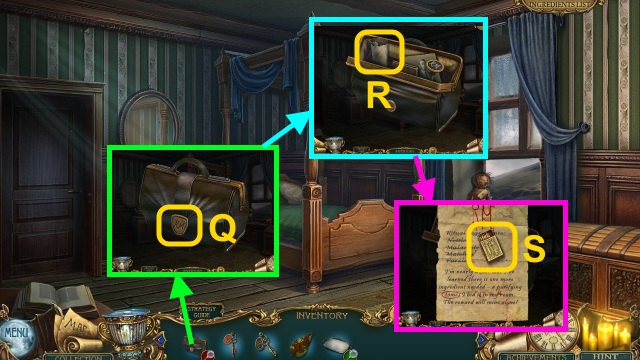
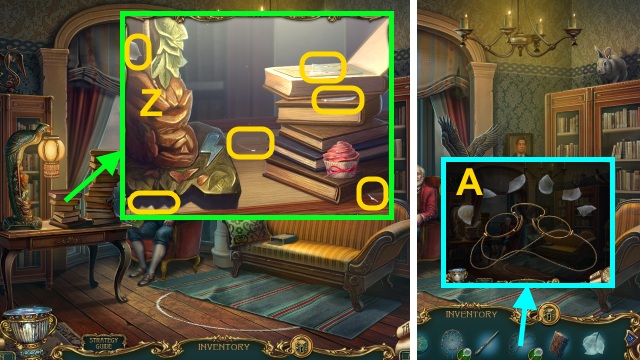
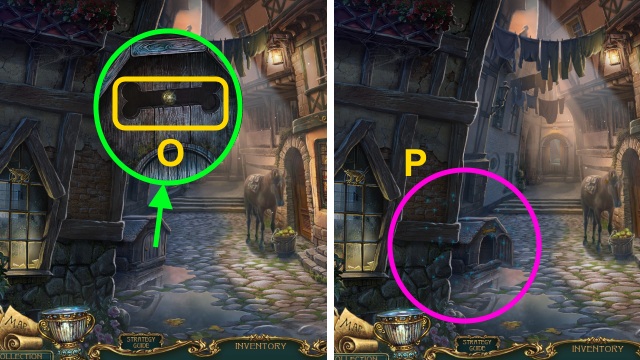
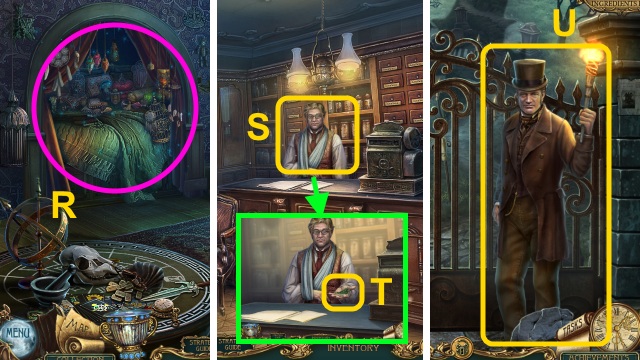
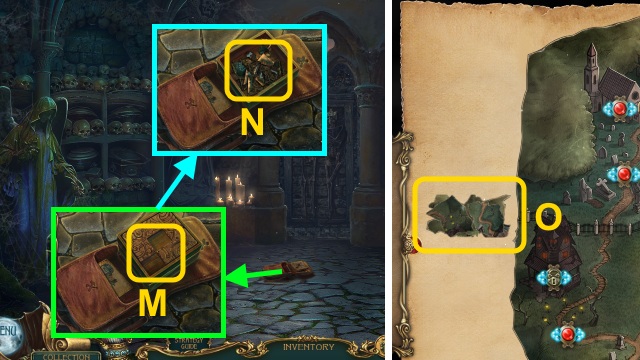
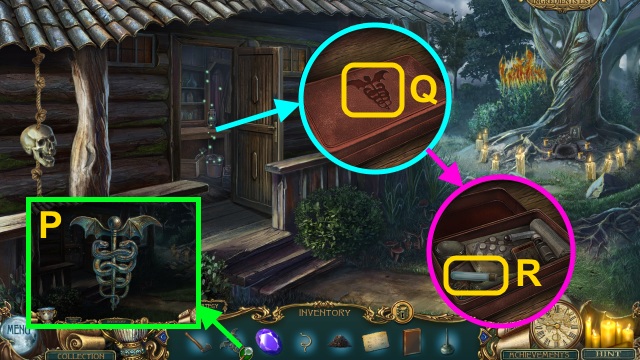
- Take the SHEARS (O) and BUTTERFLY SKETCH (P).
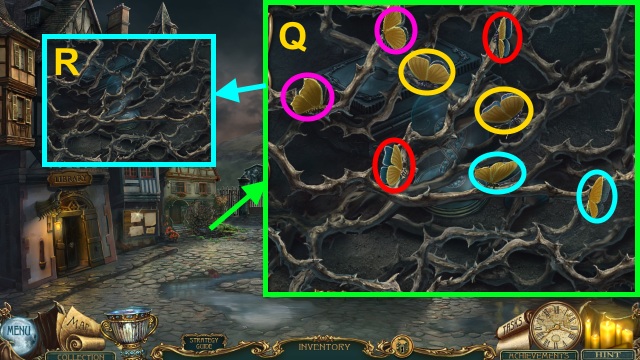
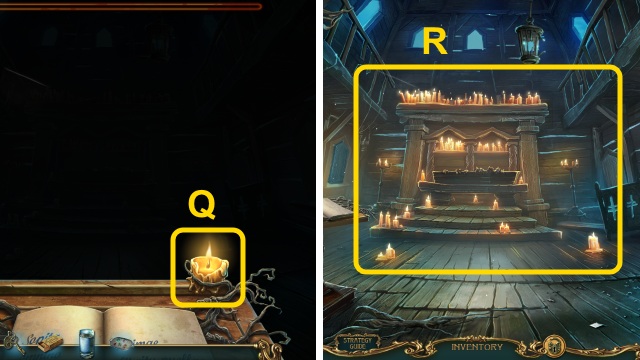
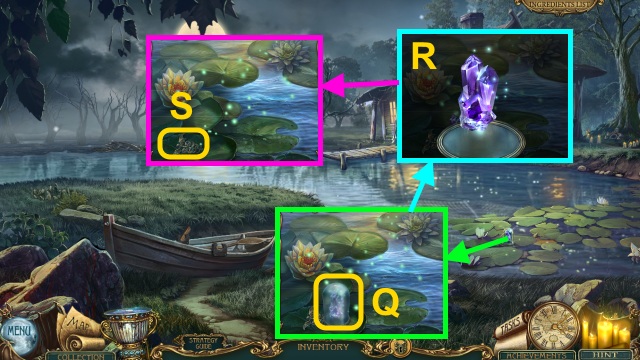
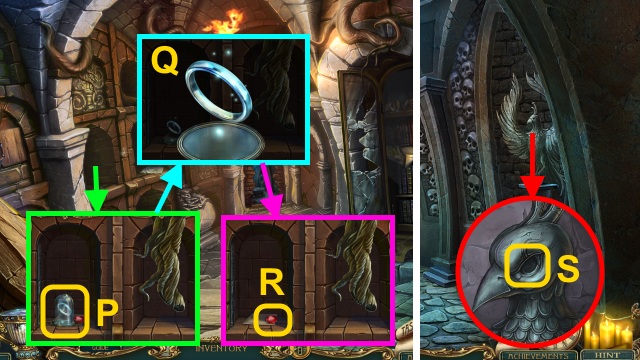
- Examine the thorns for a mini-game; solution (Q).
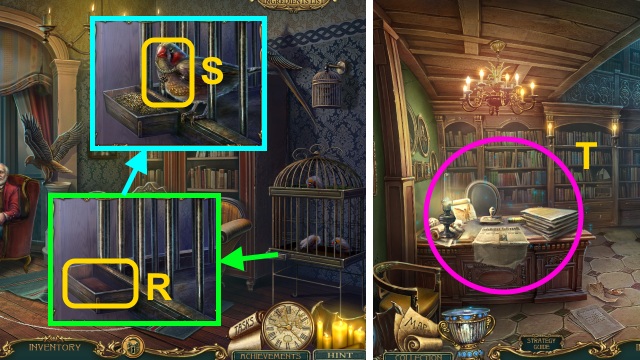
- Use the SHEARS (R).
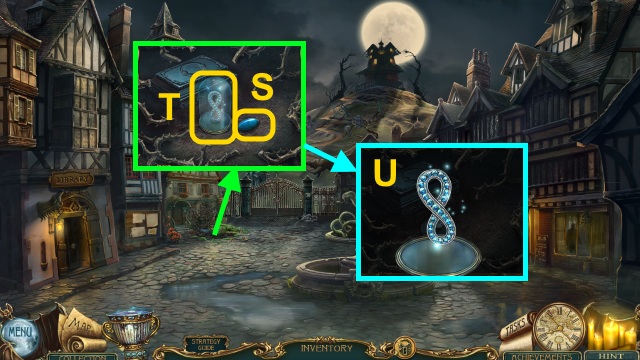
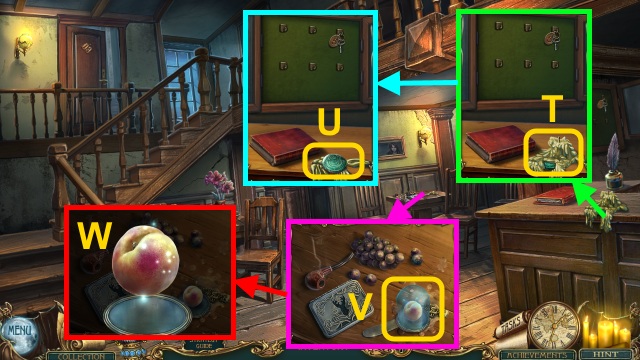
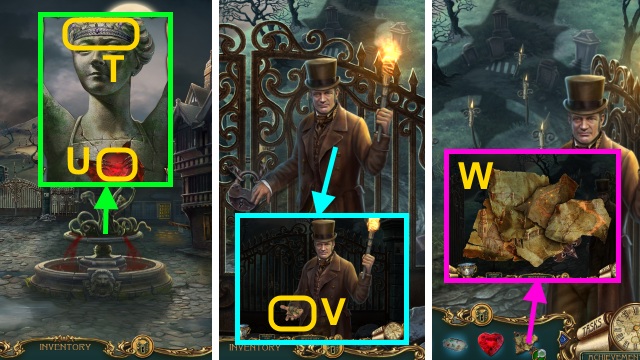
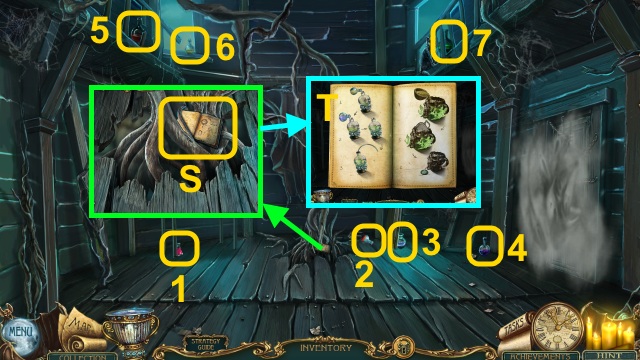
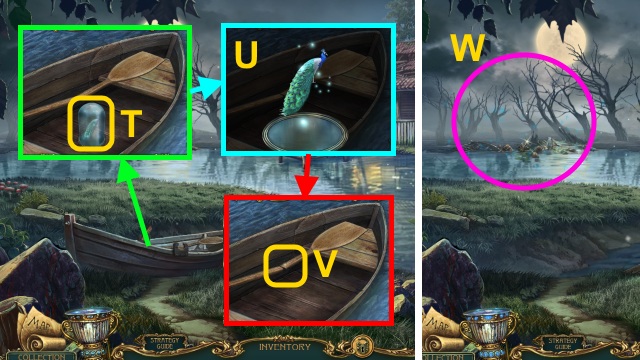
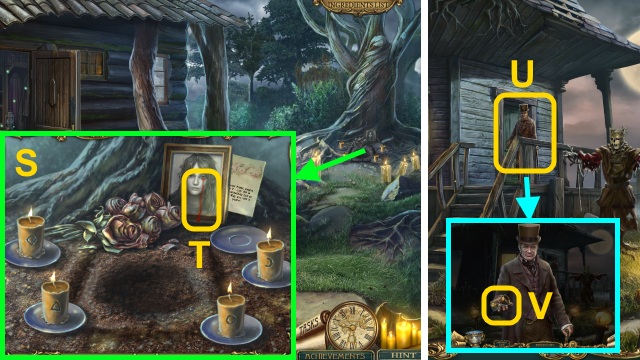
- Take the TINY GEM (S); examine the case (T).
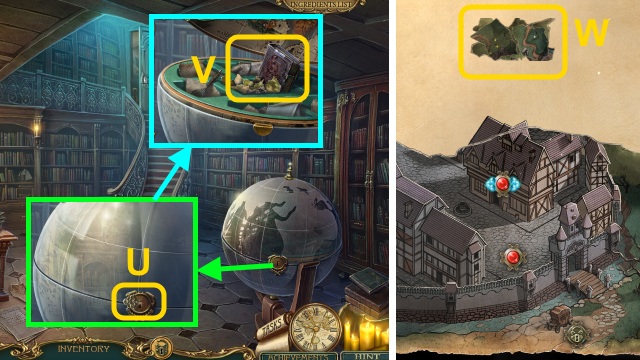
- Break the glass; take the Symbol (U).
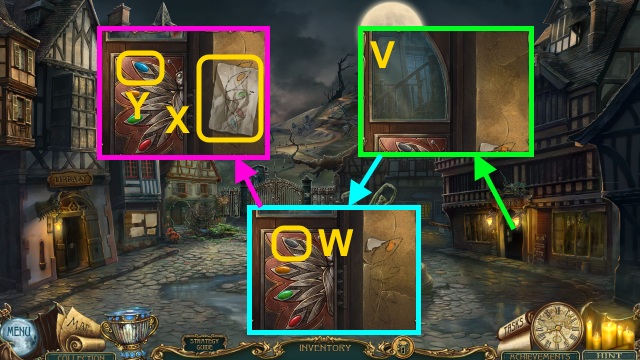
- Examine the door (V).
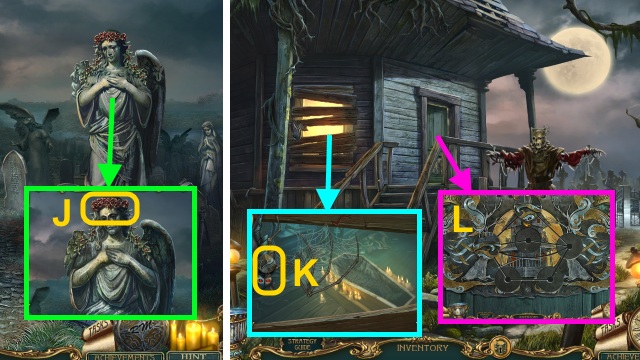
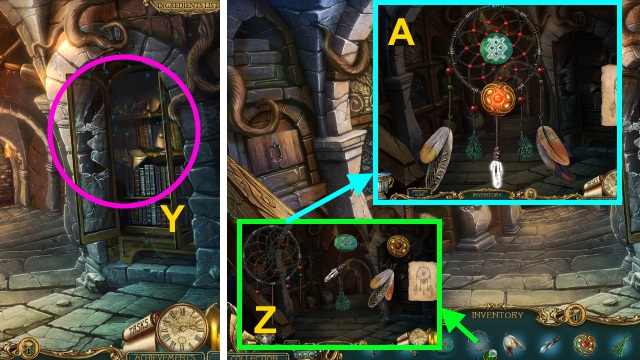
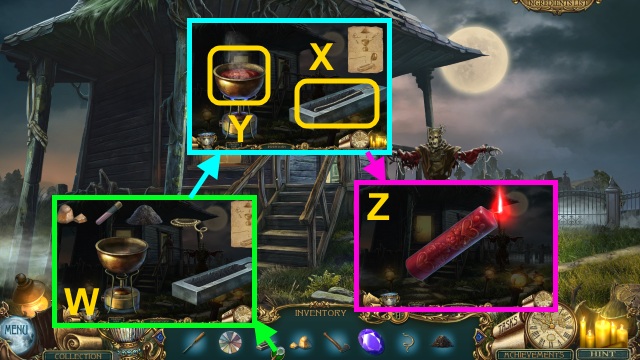
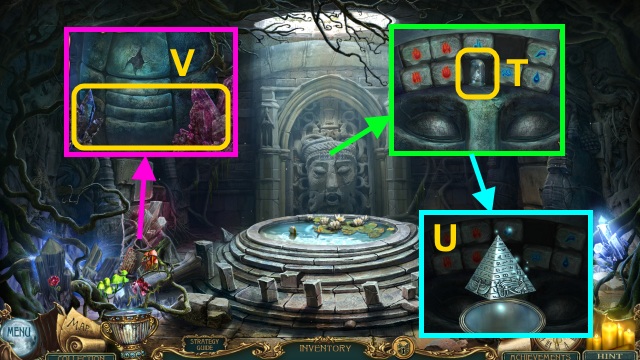
- Examine the butterfly (W); place the TINY GEM (X) and BUTTERFLY SKETCH for a mini-game (Y).
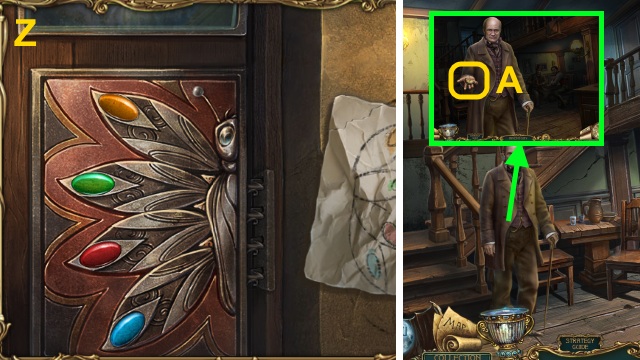
- Solution (Z).
- Go forward.
- Talk to the Elder; take the SUN HALF (A).

- Take the NIPPERS (B).
- Examine the number; examine the hole (C).
- Walk down.
- Use the NIPPERS; receive the MOON HALF (D).
- Walk right.
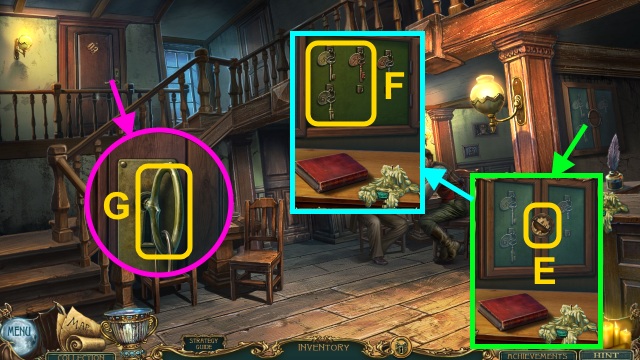
- Place the SUN HALF and MOON HALF (E); open the case.
- Take the ROOM 3 KEY, ROOM 4 KEY, and ROOM 6 KEY (F).
- Use the ROOM 3 KEY (G).
- Walk left.
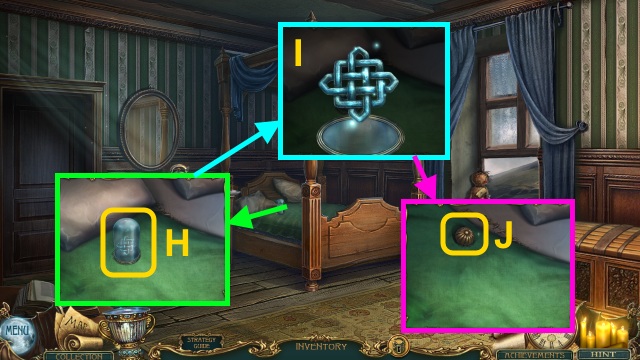
- Examine the case (H); break it.
- Take the Symbol (I).
- Move the pillow; take the HANDLE (J).
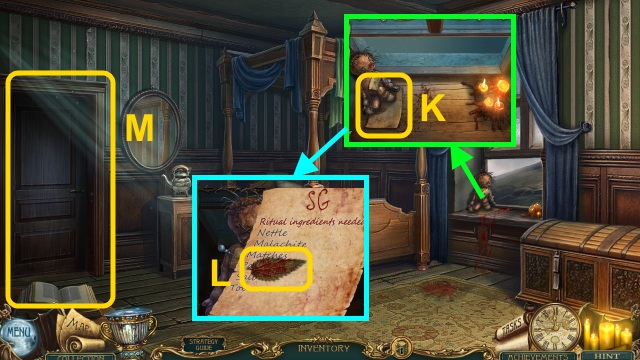
- Read the list (K); take the NETTLE (L) and List.
- Open the door (M).
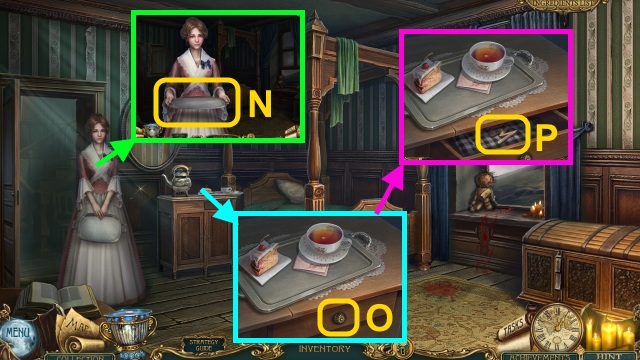
- Talk to Lisa; take the SILVER TRAY (N).
- Place the HANDLE (O); open the drawer.
- Take the MONOGRAM (P).
- Place the MONOGRAM on the bag (Q); open it.
- Open the note (R); take the MATCHES (S).
- Walk down.
- Use the MATCHES (T); take the MALACHITE (U).
- Examine the case (V).
- Break the glass; take the Symbol (W).
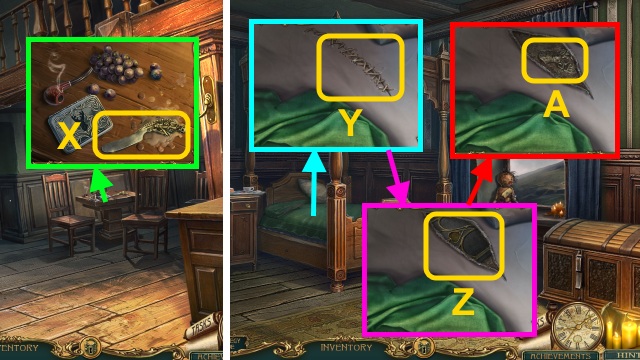
- Take the KNIFE (X).
- Walk left.
- Move the sheets; use the KNIFE (Y).
- Take the PURIFICATION BOOK (Z).
- Take the DEER EMBLEM (A).
- Walk down.
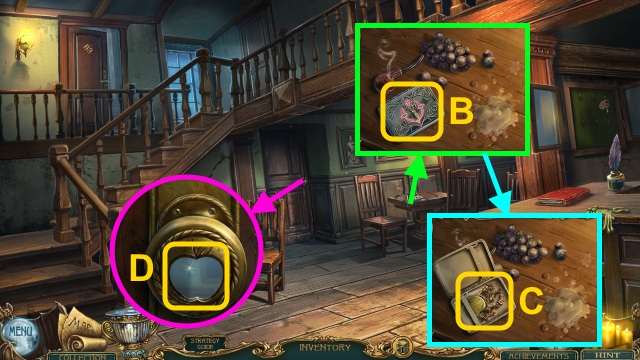
- Place the DEER EMBLEM (B); open the case.
- Take the GOLDEN APPLE and TOBACCO (C).
- Examine the handle; place the GOLDEN APPLE (D).
- Walk forward.
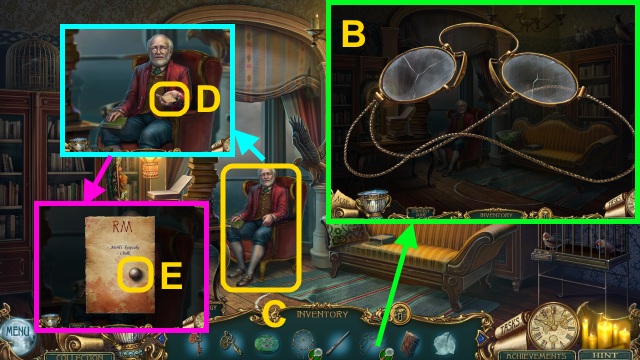
- Examine the man (E); examine the scarf (F).
- Use the mirror (G).
- Examine the man 3x (H).
- Take the TIARA SKETCH (I).
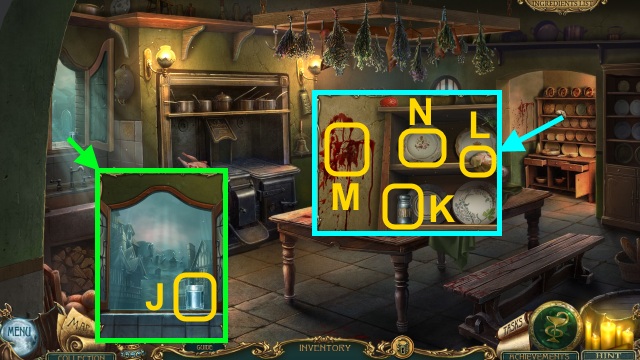
- Take the WATER (J).
- Take the SALT (K).
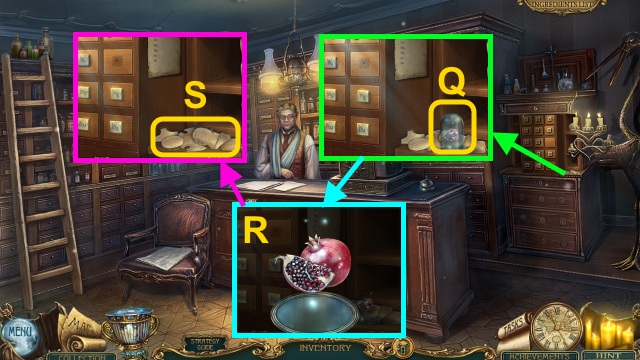
- Use the cloth (L) on the blood (M); move the plate (N).
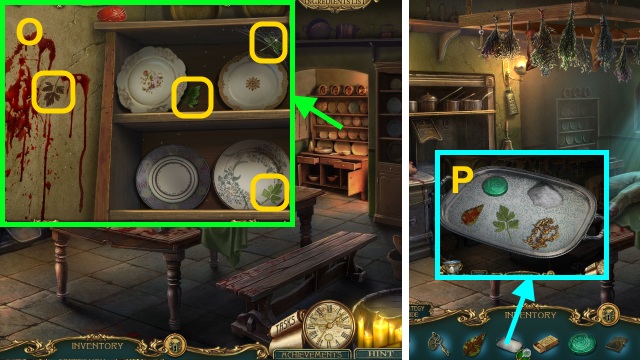
- Gather the leaves (O); receive the PARSLEY.
- Place the NETTLE, MALACHITE, TOBACCO, SALT, and PARSLEY on the SILVER TRAY (P); take the INGREDIENTS.
- Walk down twice.
- Talk to the Elder; take the TIARA (Q).
- Combine the TIARA HINT and TIARA for a mini-game (R).
- Solution (S).
- Take the TIARA.
- Place the TIARA (T); take the PURE HEART (U).
- Walk forward.
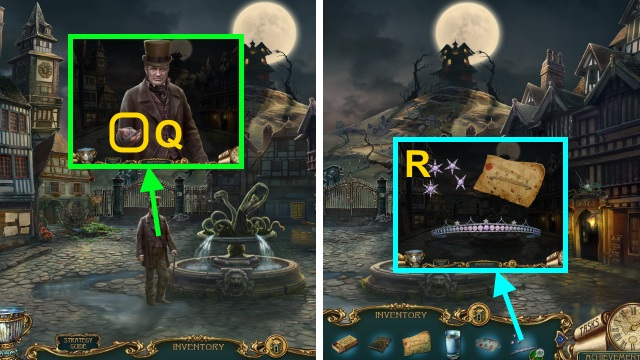
- Talk to the Elder; take the KEY AND MAP (V).
- Examine the KEY AND MAP; take the Map and HOUSE KEY (W).
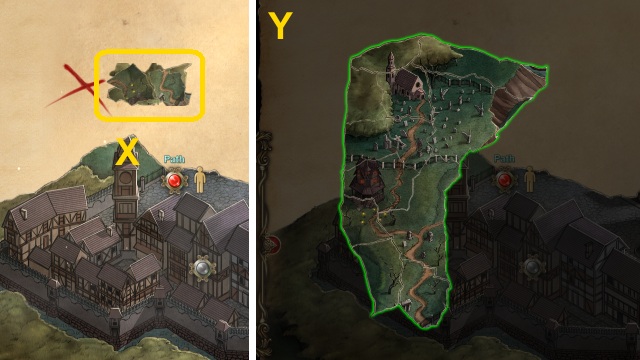
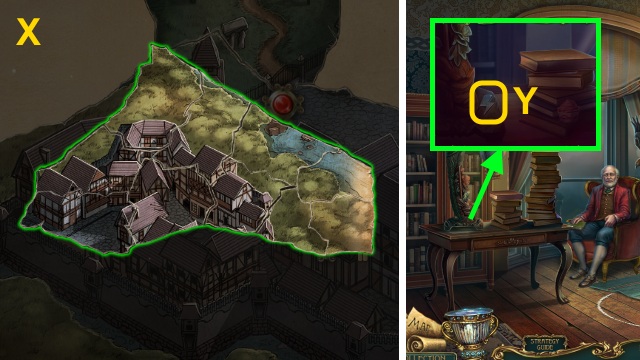
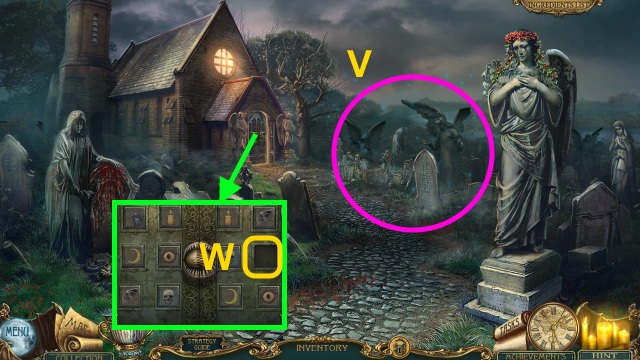
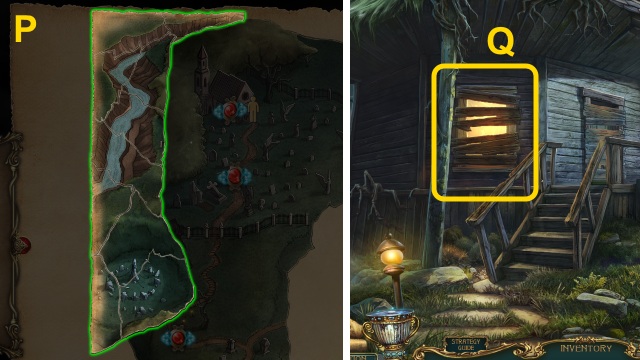
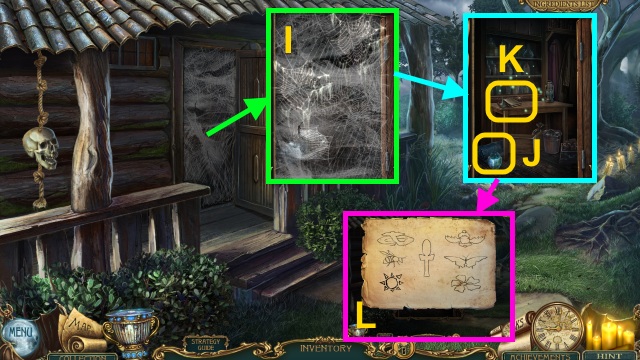
- Open the Map; examine the scraps for a mini-game (X).
- Solution (Y).
- Walk forward.
Chapter 2: The First Night
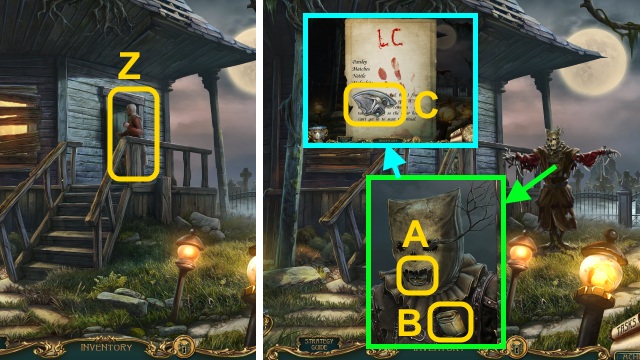
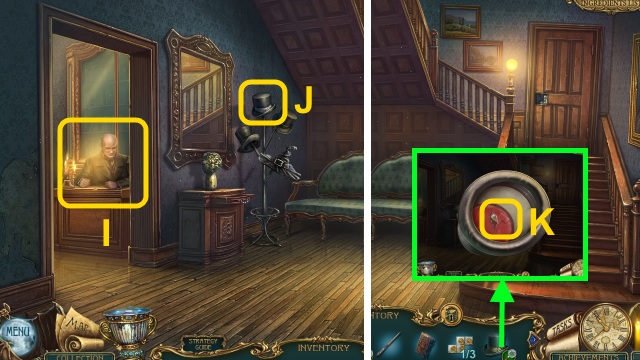
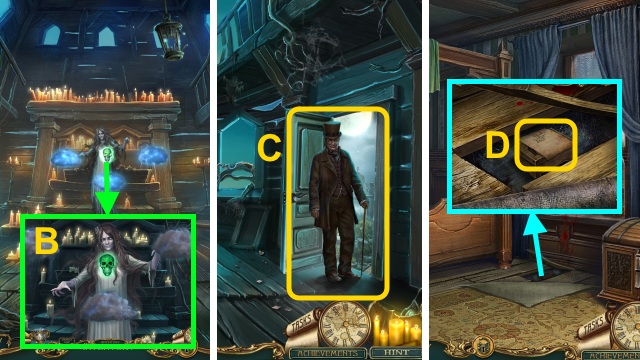
- Examine the man (Z).
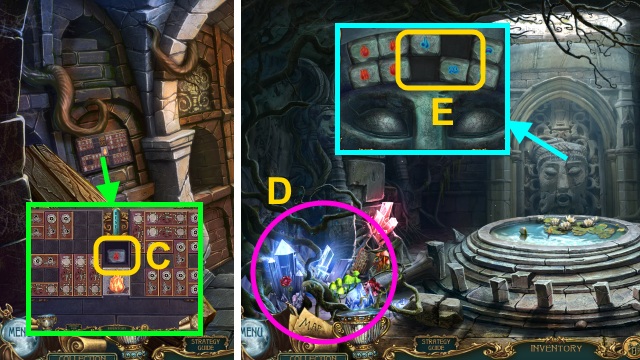
- Open the mouth; take the SILVER CHIP (1/3) (A).
- Open the paper (B); take the SKULL-PICTURE PART (C).
- Place the SKULL-PICTURE PART for a mini-game (D).
- Solution (E): Ax3-C-Dx3-E.
- Walk right.
- Use the MATCHES (F).
- Play the HOP to receive the RUBY EYE (G).
- Open the hand; open the paper (H).
- Take the SILVER CHIP (2/3) (I).
- Pour the WATER (J).
- Walk down.
- Place the RUBY EYE; take the SILVER CHIP (3/3) (K).
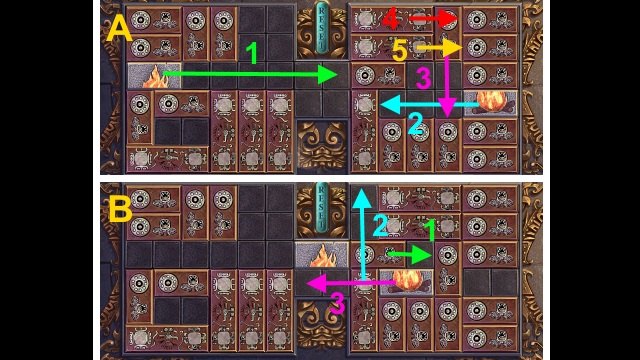
- Place the SILVER CHIP (3/3) for a mini-game (L).
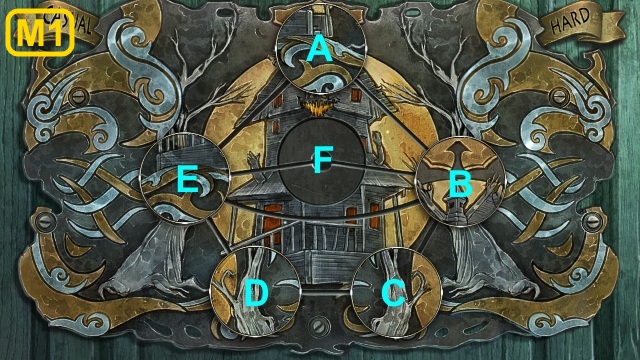
- Casual Solution (M1): E-A-B-C-D-E-F-B-C-D-E-F.

- Hard Solution (M2): D-B-F-I-H-D-G-A-D-B-A-D.
- E-F-B-C-J-F-E-D-A-B-D-E-F-I-H-D-E.
- Use the HOUSE KEY (N).
- Walk forward.
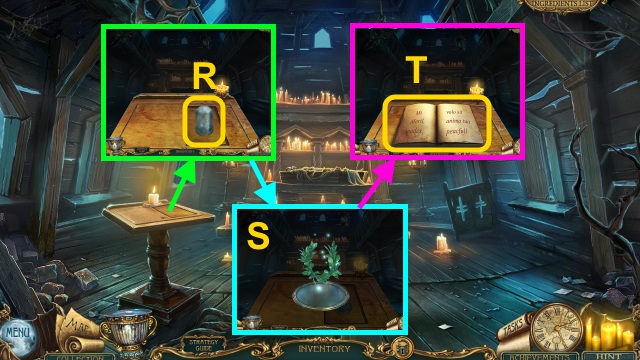
- Read the note (O); place the PURIFICATION BOOK.
- Place the PURE HEART (P).
- Use the MATCHES (Q).
- Light the candles (R); examine the altar.
- Go down.
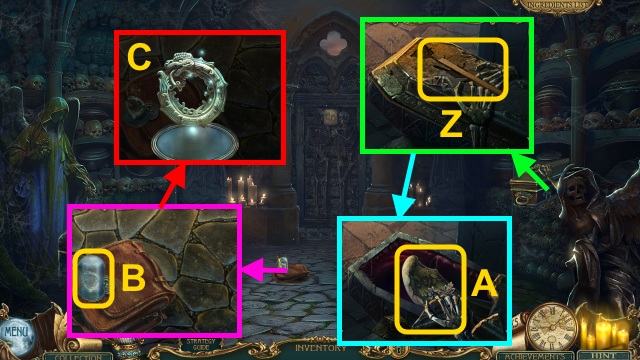
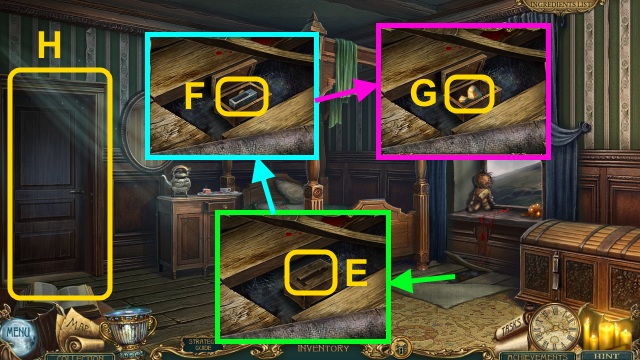
- Take the CROWBAR (S); read the book.
- Take the RECIPE (T).
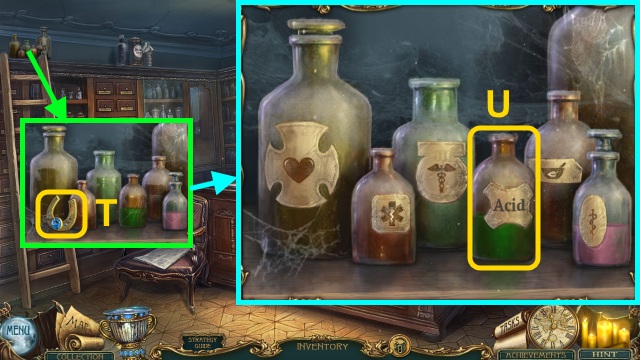
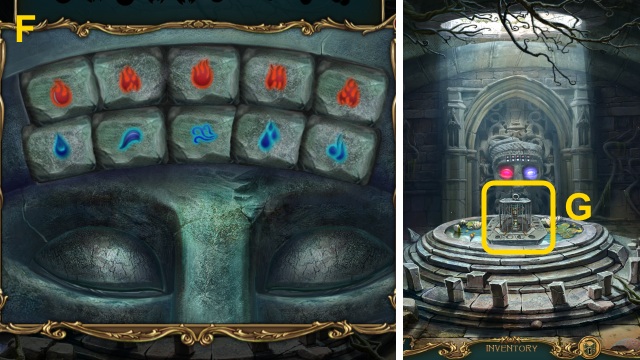
- Gather the bottles ( 1-7).

- Take the RING (U); examine the case (V).
- Break the glass; take the Symbol (W).
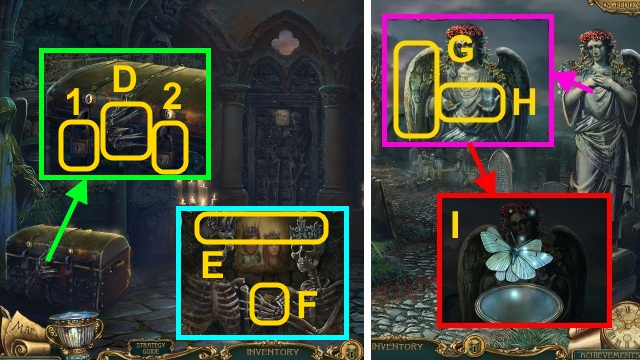
- Place the INGREDIENTS (X) and RECIPE (Y).
- Pour the ingredients; use the pestle (Z).
- Pour the bottle (A); examine the malachite (B).
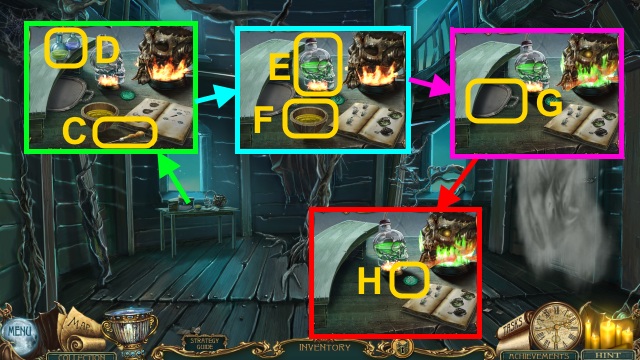
- Use the chisel (C); pour the bottles (D).
- Examine the cap to close the flask (E); pour the mixture (F).
- Place the tray (G); take the SILVER AMULET (H).
- Go down.
- Use the SILVER AMULET (I).
- Use the MATCHES (J).
- Take the LILY (K).
- Go down.
- Use the SILVER AMULET (L).
- Use the LILY (M).
- Talk to the Elder (N).
- Walk right, then go to Room 3.
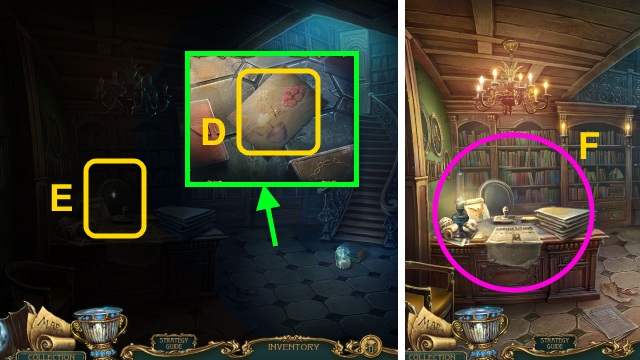
- Move the carpet (O).
- Read the note (P); use the CROWBAR.
- Examine the case (Q).
- Break the glass; take the Symbol (R).
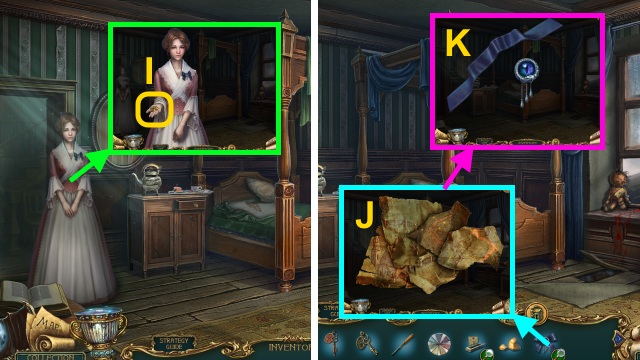
- Take the BROKEN AMULET; read the letter (S).
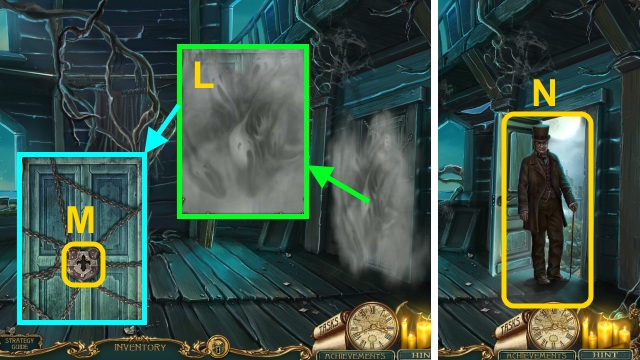
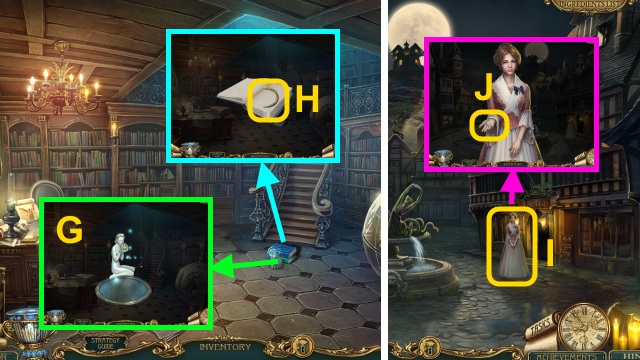
- Open the door (T).
- Talk to Lisa (U); select ‘Yes.’
- Take the LAMP (V) and PLAY BUTTON (W).
- Walk down twice.
- Place the RING and PLAY BUTTON for a mini-game (X).
- Solution (Y).
- Walk left.
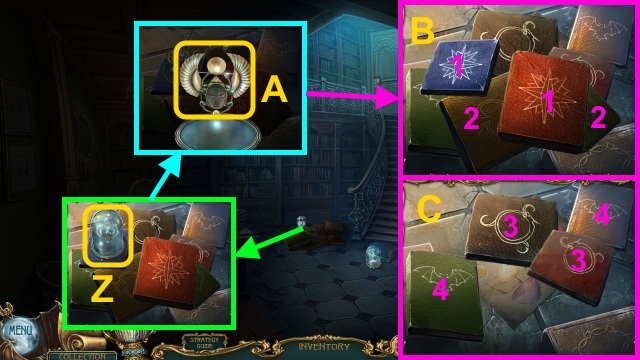
- Examine the case (Z).
- Break the glass; take the Symbol (A).
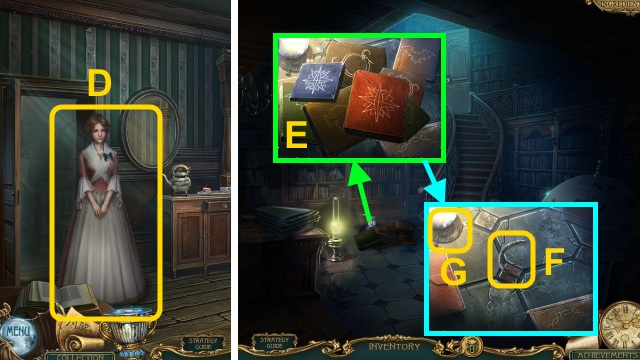
- Match the books (B-C).
- Take the RECIPE (D).
- Place the LAMP (E).
- Play the HOP to receive the LETTER OPENER (F).
- Examine the case; break the glass (G).
- Take the Symbol.
- Open the book; take the GOLDEN SNAKE (H).
- Walk down.
- Give the RECIPE (I); take the SILVER SNAKE (J).

- Place the GOLDEN SNAKE and SILVER SNAKE (K).
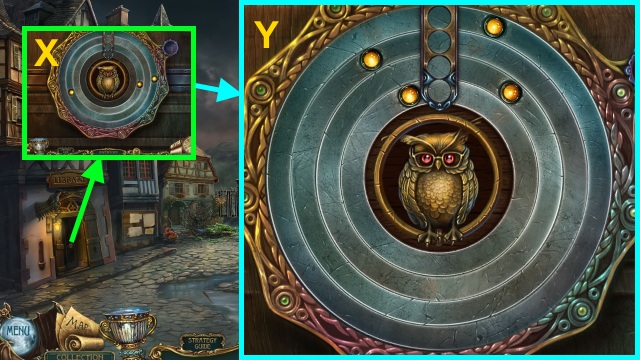
- Open the box; take the OWL KEY (L).
- Walk left.
- Open the lock; use the OWL KEY (M).
- Walk forward.
- Use the LETTER OPENER; take the SEEDS (N).
- Examine the case; break the glass (P).
- Take the Symbol.
- Move the pillow; take the BROKEN GLASSES (Q).
- Give the SEEDS (R); select ’2.’
- Take the CURLY KEY (S).
- Walk down.
- Play the HOP to receive the LIGHTNING (T).
- Use the CURLY KEY (U); take the Map and RITUAL BOOK (V).
- Open the Map; select the scraps for a mini-game (W).
- Solution (X).
- Walk forward.
- Place the LIGHTNING; press it (Y).
- Open the book; gather the glass (Z).
- Receive the GLASS SHARDS.
- Combine the BROKEN GLASSES and GLASS SHARDS (A).
- Place the shards (B); take the GLASSES.
- Talk to the man (C); give the GLASSES.
- Take the note (D); open it.
- Take the METAL BALL (E).
- Walk down twice, then between the buildings to the right.
Chapter 3: The Second Night
- Examine the case; break the glass (F).
- Take the Symbol.
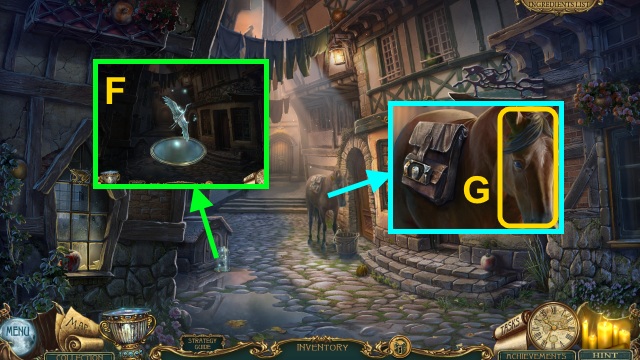
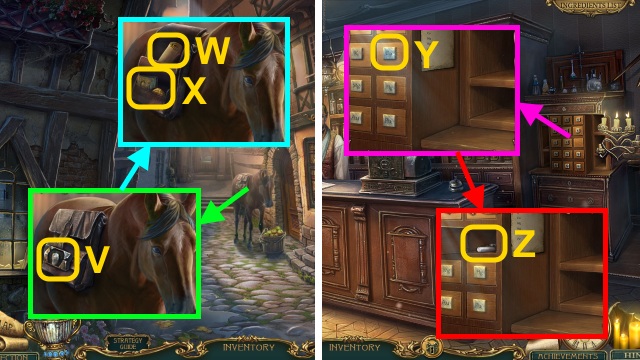
- Examine the horse (G); select ‘Yes.’

- Gather the apples (1-10).
- Place the METAL BALL (H).
- Walk forward.
- Talk to the Elder (I); select ‘She… attacked me.’
- Receive the ANIMAL TILES (1/3).
- Take the HAT (J).
- Use the LETTER OPENER on the HAT; take the ANIMAL TILES (2/3) (K).
- Examine the case (L); break the glass.
- Take the Symbol (M).
- Take the BONE (N).
- Walk down.
- Take the COIN (1/3); place the BONE (O).
- Play the HOP to receive the ANIMAL TILES (3/3) (P).
- Walk right.
- Examine the case (Q); break it.
- Take the Symbol (R).
- Take the LABELS (S).
- Take the JEWELED HORSESHOE (T); use the LABELS.
- Arrange the labels; take the ACID (U).
- Walk down.
- Place the JEWELED HORSESHOE (V); open the bag.
- Read the note (W); take the COIN (2/3) and CALCIUM TILE (X).
- Walk right.
- Place the CALCIUM TILE (Y); press it.
- Take the CHALK (Z).
- Walk down, then forward.
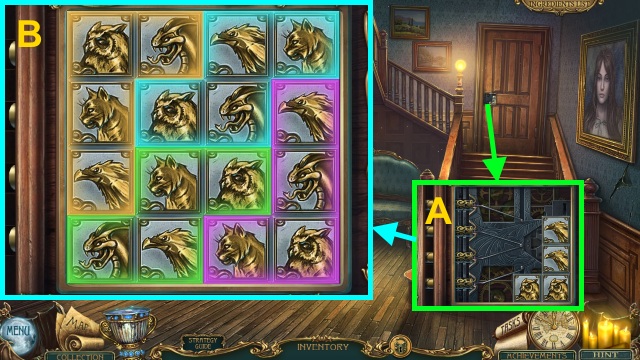
- Place the ANIMAL TILES (3/3) for a mini-game (A).
- Solution (B).
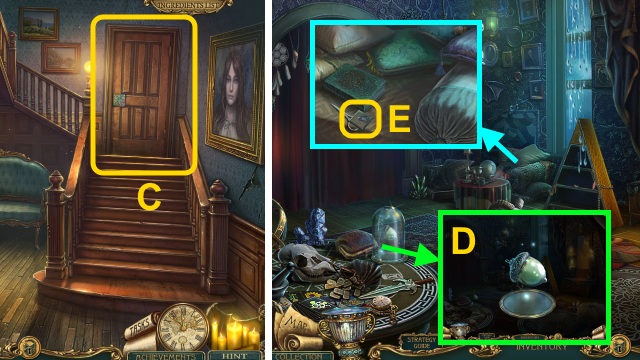
- Open the door (C).
- Walk forward.
- Examine the case; break it (D).
- Take the Symbol.
- Move the pillow; take the RAVEN TILE (E).
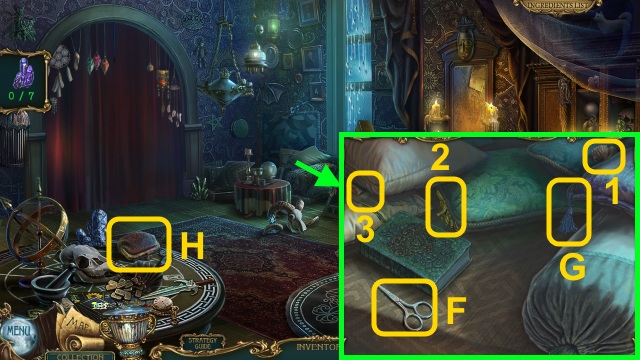
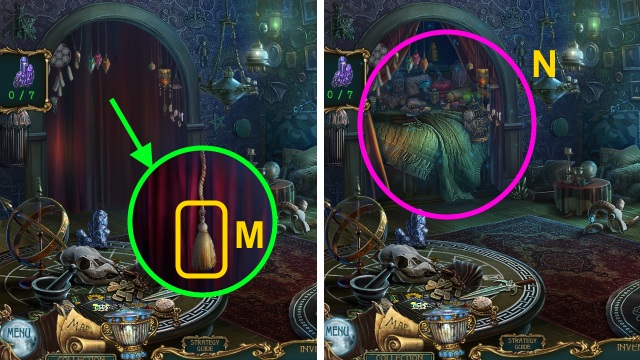
- Use the scissors (F) on the tassel (G); gather the tassels (1-3).
- Receive the TASSEL.
- Take the PURSE (H).
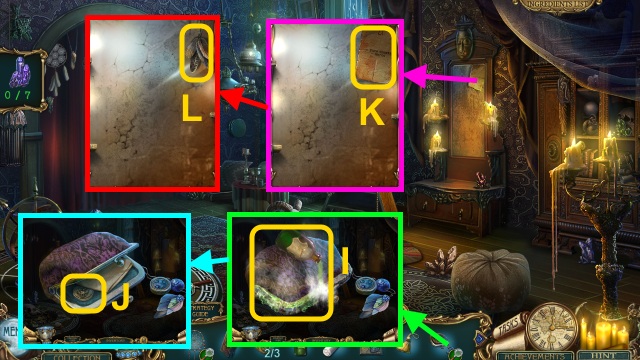
- Use the ACID on the PURSE (I); open it.
- Take the COIN (3/3) (J).
- Take the note (K) and FEATHERS (L).
- Place the TASSEL (M); pull it.
- Play the HOP to receive the CRYSTAL DIAGRAM (N).
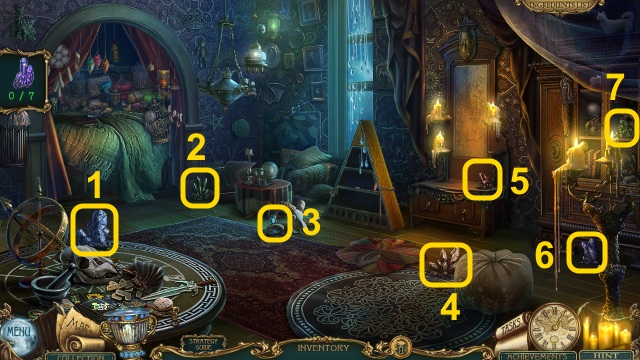
- Gather the crystals (1-7).
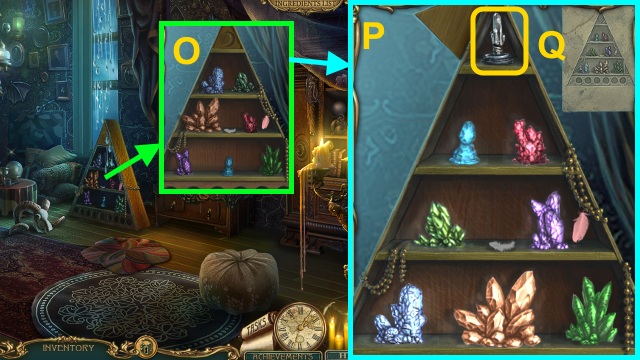
- Place the CRYSTAL DIAGRAM for a mini-game (O).
- Solution (P).
- Take the PURE QUARTZ (Q).
- Play the HOP to receive MERIL’S BROOCH (R).
- Go to the Apothecary.
- Talk to the man (S); give the COIN (3/3).
- Take the HERBS (T).
- Go to the Winding Path.
- Talk to the Elder (U).
- Walk forward, then right.
- Play the HOP to receive the STONE ROSE (V).
- Place the RAVEN TILE for a mini-game (W).

- Solution (X).
- Walk forward.
- Talk to Gavin (Y).
- Take the RULER; place the STONE ROSE (Z).
- Open the case; take the ANGEL WING and FLOWER CROWN (A).
- Examine the case (B); break it.
- Take the Symbol (C).
- Take the THORN CROWN (D).
- Use the ROOM 4 KEY (1) and ROOM 6 KEY (2); open the chest.
- Place the FLOWER CROWN and THORN CROWN (E); take the PICTURE PART (1/2) (F).
- Walk down.
- Place the ANGEL WING (G).
- Take the PICTURE PART (2/2); examine the case (H).
- Break the glass; take the Symbol (I).
- Take the TOOL CREST (J).
- Walk forward.
- Place the TOOL CREST (K).
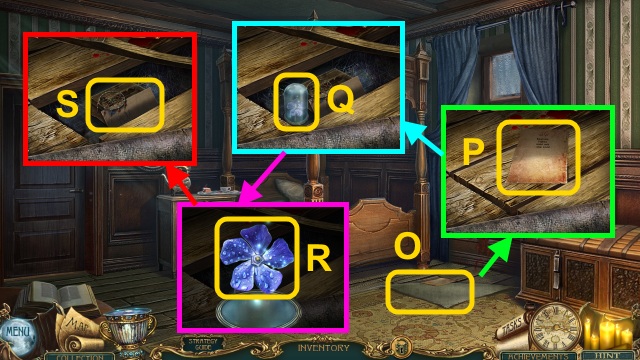
- Examine the box; take the CANDLE EMBLEM and note (L).
- Place the PICTURE PART (2/2) (M).
- Open the box; take the Map and CROWBAR (N).
- Open the Map; select the scraps for a mini-game (O).
- Solution (P).
- Walk down twice.
- Use the CROWBAR 3x (Q).
- Walk forward.
- Examine the case (R); break the glass.
- Take the Symbol (S).
- Place the RITUAL BOOK; open it (T).
- Use the CHALK on the book.
- Go down.

- Pour the ACID (U).
- Go forward.
- Take the CHISEL (V).
- Use the RULER; take the RAINBOW STONE (W).
- Use the RULER (X).
- Play the HOP to receive the INSTRUCTIONS (Y).
- Combine the BROKEN AMULET, SILVER AMULET, FEATHERS, PURE QUARTZ, MERIL’S BROOCH, HERBS, and INSTRUCTIONS (Z).
- Repair the amulet; take the PROTECTIVE AMULET (A).
- Go down twice.
- Use the PROTECTIVE AMULET for a mini-game (B); solution is random.
- Go down.
- Open the door; talk to the Elder (C).
- Walk right; go to Room 3.
- Read the note (D).
- Place the CANDLE EMBLEM (E); take the CANDLE MAKING KIT (F) and WAX (G).
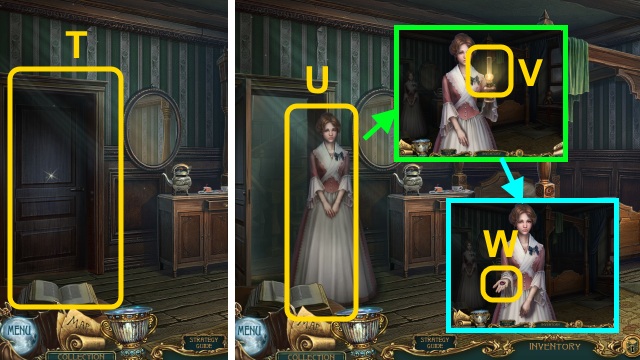
- Open the door (H).
- Talk to Lisa; take the BROOCH (I).
- Examine the BROOCH; take the Map (J).
- Remove the ribbon; take the BROOCH PIN and RIBBON (K).
- Open the Map; examine the scraps for a mini-game (L).
- Solution (M).
- Walk down twice, then forward.
Chapter 4: The Final Night
- Talk to the Elder (N); select ‘Yes.’
- Take the AXE (O).
- Walk forward.
- Use the AXE (P).
- Walk right.
- Examine the case (Q); break it.
- Take the Symbol (R).
- Take the RUSTY CADUCEUS (S).
- Examine the case (T); break it.
- Take the Symbol (U).
- Tie the RIBBON (V).
- Play the HOP to receive the BROOCH FRAME (W).
- Go forward.
- Take the SAPPHIRE (X) and WICK (Y); examine the case (Z).
- Break the glass; take the Symbol (A).
- Place the BROOCH FRAME and BROOCH PIN (B); open the door.
- Take the BOTTLE (C).
- Take the SHOVEL (D).
- Use the SHOVEL (E); receive the GRAVE SOIL.
- Walk down.
- Use the BOTTLE (F); collect ten fireflies.
- Take the FIREFLIES (G).
- Play the HOP to receive the BROOM (H).
- Go forward.
- Use the BROOM (I) and FIREFLIES (J).
- Examine the paper (K); take the DIAGRAM (L).
- Read the book (M); take the EVIDENCE (N).
- Take the OIL (O).
- Combine the RUSTY CADUCEUS and OIL (P); take the CADUCEUS.
- Place the CADUCEUS (Q).
- Take the TEST TUBE (R).
- Arrange the candles (S).
- Use the TEST TUBE (T); receive the BLOOD.
- Walk down twice.
- Give the EVIDENCE (U).
- Take the MELTING POT (V).
- Combine the CANDLE MAKING KIT, WAX, WICK, GRAVE SOIL, BLOOD, and MELTING POT (W).
- Place the wick (X); put the wax, soil, and blood in the burner (Y).
- Pour the wax; examine the candle.
- Take the RED CANDLE (Z).
- Walk forward.
- Use the RED CANDLE (A).
- Go down, then forward.
- Play the HOP to receive the CRANE (B).
- Use the AXE; take the EMERALD and HANDKERCHIEF (C).
- Place the DIAGRAM for a mini-game (D).
- Solution (E).
- Walk forward.
- Examine the case (F); break it.
- Take the Symbol (G).
- Place the EMERALD (H).
- Take the TOPAZ (I); place the RAINBOW STONE.
- Use the CHISEL and stone (J).
- Take the ACORN; place the CRANE (K).
- Place the SAPPHIRE (M).
- Place the TOPAZ (N).
- Walk down.
- Place the ACORN (O).
- Examine the case (P); break the glass.
- Take the Symbol (Q).
- Take the RUBY (R).
- Walk forward.
- Place the RUBY (S).
- Go forward.
- Examine the case (T); break the glass.
- Take the Symbol (U).
- Use the HANDKERCHIEF 2x (V).

- Play the HOP to receive the TURTLE SHELL (W).
- Walk down twice.
- Place the TURTLE SHELL for a mini-game (X).
- Take the FIRE BRICK (C).
- Go forward twice.
- Play the HOP to receive the WATER BRICK (D).
- Place the FIRE BRICK and WATER BRICK for a mini-game (E).
- Solution (F).
- Examine the cage for a mini-game (G).
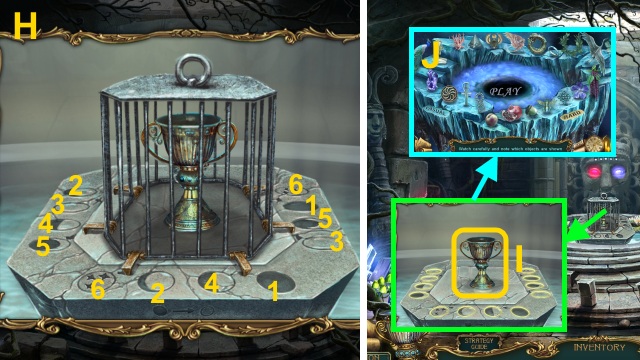
- Solution (H).
- Remove the cage; take the Grail for a mini-game (I).
- Solution is random (J); you receive the SECRET OF LIFE.
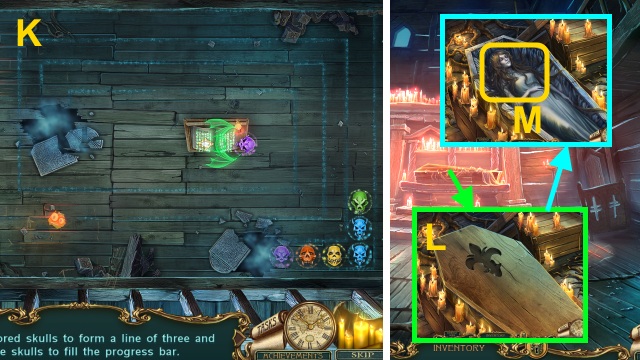
- Select ‘Stay and fight the witch’ for a mini-game; shoot the skulls (K).
- Open the coffin (L); use the SECRET OF LIFE (M).
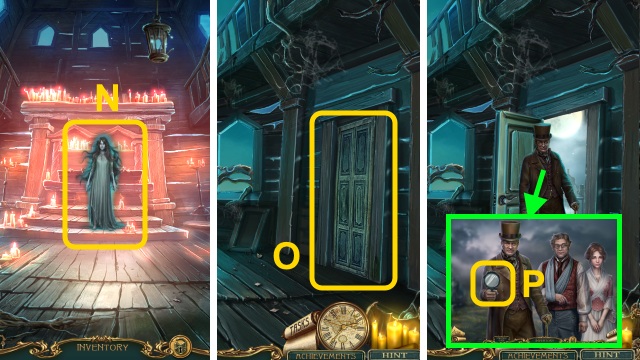
- Talk to Meril (N).
- Walk down.
- Open the door (O).
- Talk to the Elder; take the Mirror (P).
- Congratulations! You have completed Haunted Legends: The Secret of Life.
Other Choices
- Some choices you make in the game can change gameplay. The following choices most effect how the game is played.
- You can use the WATER on the unconscious man in the Kitchen (B).
- If the WATER is not used before entering the Hall, it must be used on the coffin (C).
- If you select ‘No’ when you talk to Lisa in Room 3, she will not give the LAMP (D).
- Complete the book mini-game in the Library (E); take the SILVER SNAKE (F) and LAMP (G).
- You will not receive the RECIPE.
- If you select ‘She did not stir all night’ when you talk to the Elder in the Elder’s House, he will not give you the ANIMAL TILES (1/3) (H).
- Take ANIMAL TILES (1/3) and (2/3) from the HAT (I).
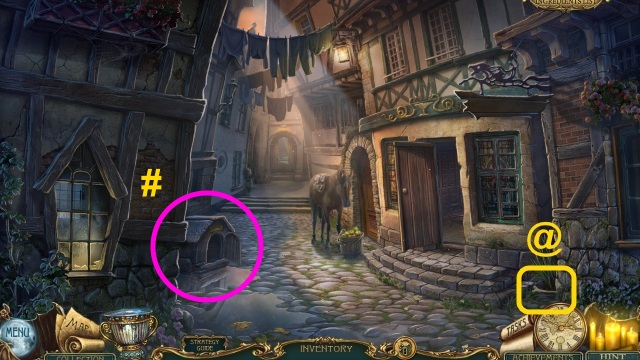
- If you wake the dog in the doghouse HOP (#), you will need to take the bone (@).
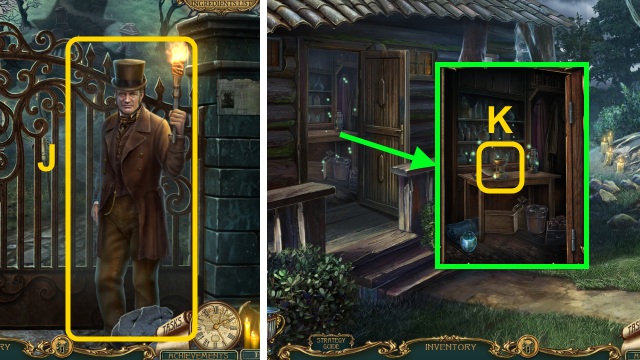
- If you select ‘No’ when you talk to the Elder at the Winding Path (J), you will find the BURNER at the Secret Cabin (K).
- You will not receive the EVIDENCE.

- If the ROOM 4 KEY and ROOM 6 KEY are not used in the Crypt, they must be used in the Hidden Chamber (L).


 Maestro: Music from the Void Walkthrough, Guide, & Tips
 Eternal Journey: New Atlantis Walkthrough, Guide, & Tips
 Sister's Secrecy: Arcanum Bloodlines Walkthrough, Guide, & Tips
 Life Quest™ Walkthrough, Guide, & Tips
 Chronicles of Mystery: The Legend of the Sacred Treasure Walkthrough , Guide, & Tips