Ruinberg is one of the more urban based maps in World of Tanks currently. More than half of the map is covered with buildings but at the same time leaves enough openings to not feel as closed off as a map like Himmelsdorf. This map is split into 3 main areas which will be referred to as the city, the city edge, and the field. Each is vital to a team succeeding and requires it’s own tactics to be played without dying very quickly.
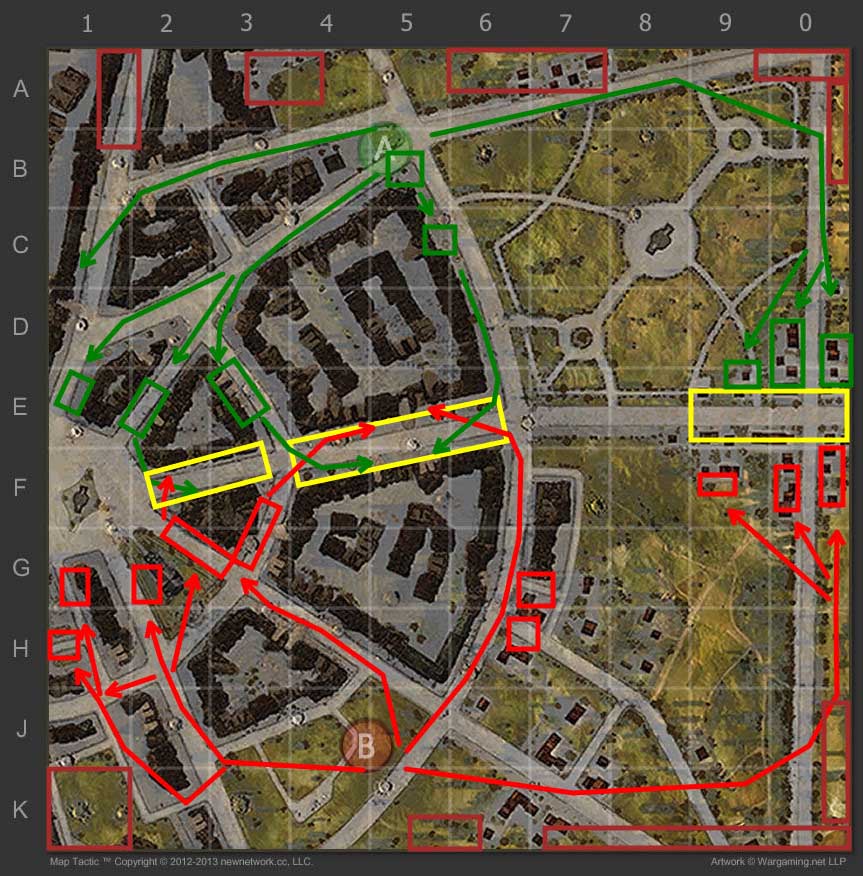
The red routes are initial routes/locations used for side two on the map while the green routes/locations are for side one. Yellow refers to “shared” locations that are typically engagement areas which are fought over by both teams. Solid routes are initial routes taken from the spawn to the front lines.
This map you see below was drawn up using MapTactic which is a very easy to use tool for making strategies for World of Tank maps. It works directly in your browser and has no cost to use it.
Side 1 on Ruinberg starts off in the northern section of the map. This starting spot has a shorter route to reach the center line road which runs from F2->E6->E0. This allows tanks pushing into the field(D0) or along the edge of town(E6) to get there faster than side 2 can. The only downside is that this side has less cover in the field section meaning that those going these routes need to commit fully. The city section for this side is largely the same as the other side and provides no clear advantage.
For those tanks who do not take the routes on the eastern side of the map you will most likely find yourself in the 1-3 lines. These areas are decent defense location against aggressive enemies but at the same time can be easily flanked since each road is isolated.
Setting up in the marked areas in E1/E2/E3 are the best locations to push for at the start of the match if you are in a slower tank(sub 35 km/h). Those in slightly faster heavies, mediums, etc. should push into F2/F3 in the highlighted yellow area and secure this location. This road will prevent the enemy from advancing and also allows forces here to support the center city road. Once here killing any enemy advance is easy with support and then slowly working the enemy down should be a breeze.
This area in the city can be entered either through F6 or E3. Pushing into here should be done as soon as possible as it is very easy to defend once a team has tanks set up inside of it. From here you will want to push to the opposite wall and either focus east or west depending on where the main force of the enemy is. This road will provide good SPG protection and allow you to support whichever flank needs the help.
The edge of the city can be a decent spot to set up for heavy tanks or tank destroyers. SPGs set up in the southeast corner can hit you here so be careful but if your team has a large force in the 9/0 lines you will be able to push up along with them in relative safety.
The field area on Ruinberg is an excellent spot for light and medium tanks. Heavies “can” make it out here but are very large targets for opposing tanks set up in the edge of the city and also for SPGs. Having a decent force of mediums/lights that can spot for friendly SPGs while slowly taking out enemies who pop out of cover works wonders.
Keep in mind once you push below F0 you will be very exposed to any enemy tanks set up either west or south. Moving slowly and smartly here is the best option.
Being a city map position is crucial to getting good shots down the roads. A1 will provide shots down the 1 line. A3/A4 are the safest locations but limit shots into the city. A5/A6/A7 is more open to scouts darting across the middle but allows you to hit the F3/G3 area. Setting up in A0/B0 behind a strong field group will allow you to stay hidden(bushes) and get shots into the city that the enemies are not prepared for.
Side 2 on Ruinberg starts off in the southern section of the map and shares many of the same tactics seen by side 1.
Like side 1 those tanks who do not find themselves in the eastern part of the map usually end up in the 1-3 lines. Setting up in the 1 line on this side has a bit more cover/options and is easier to fire out of than the northern side. The G2 locations are useful for holding off both E1/E2. And setting up in F3/G3 will see you focused on enemies heading south through E3.
Like previously stated before having tanks push into F2/F3(yellow box) quickly will give your team the upper hand by giving you a great position to defend and push from. This side has an easier time reaching this area by heading from G2 into F2. From here pick enemies off in the E2 road and you will split their forces in half. Side 2 rewards aggression more than side 2 in the city.
Entering this area in the city is more difficult for this side since the route along the edge of the city is longer than the other side. Instead head into this area(unless if you are in a very fast tank) through F3 since it is much safer if you get there quickly. After that it plays the same way as previously stated and supporting either flank is available.
Unlike the northern part of the map the city edge on the southern side has more cover from outside fire. Setting up here is smart if your team does not send many tanks into the 9/0 field area since this area will prevent yourself from being flanked. These areas in G6/H6 should only be used in situations like this since their usefulness depends on the enemy advancing across the F line south.
The southern side of the field town provides the same amount of cover as the northern side and the same routes. Beware of being shot from E6 since it can hit some areas in F9. Spot and let arty work down enemies advancing and push smartly. Advancing north of the E line will open up enemy SPGs and defenders to fire upon you from the west or north.
Setting up in K1 will provide shots into the 1 line, C3, and the field. K5/K6 allow SPGs to fire into D3/D3 and also the field. The rest of the K line/0 line will provide shots into the town as well that people do not defend against and also allow you to hit the edge of the city/entire field area.
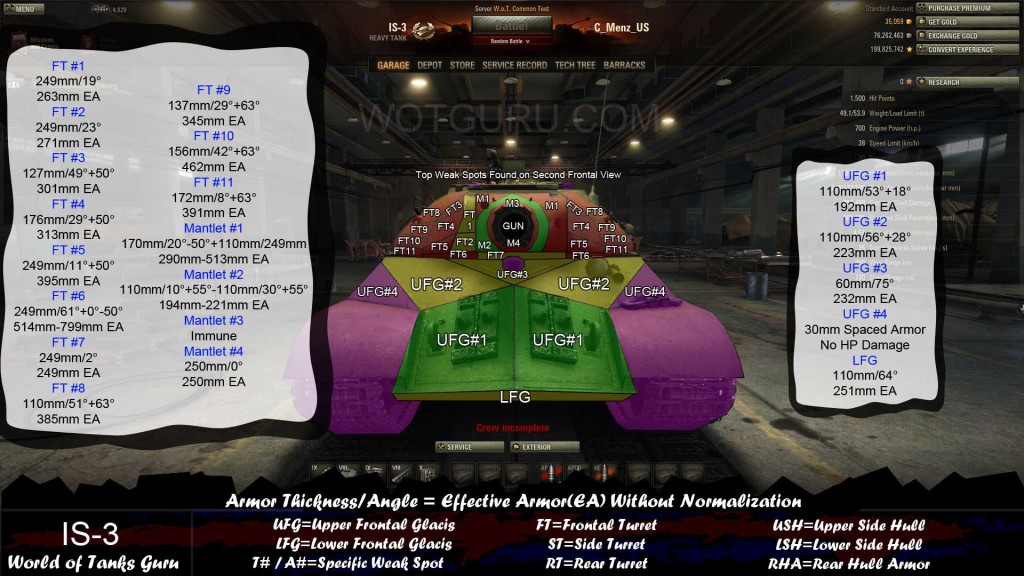 Weak Spot Guide: IS-3 - World of Tanks Guru
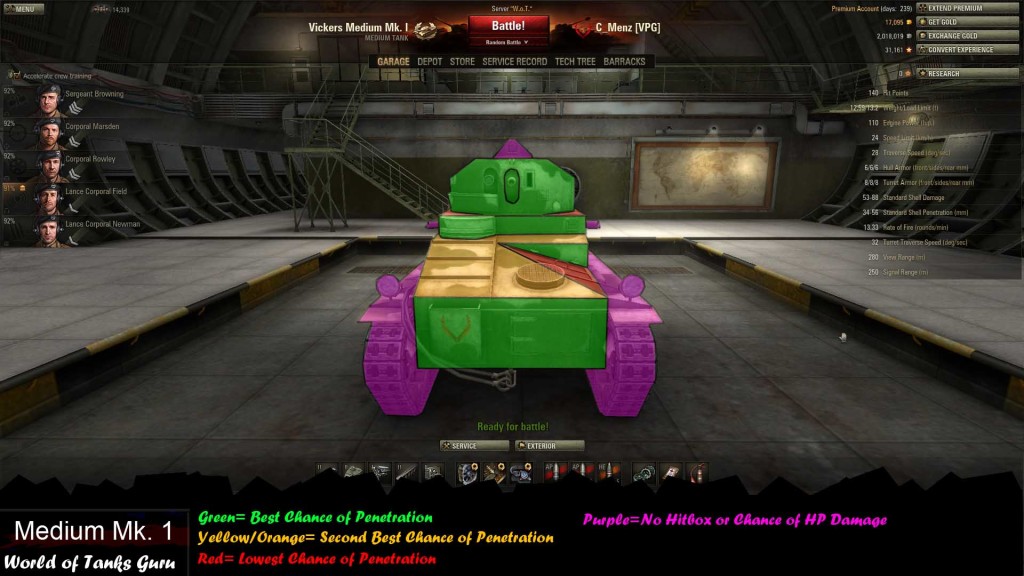 Weak Spot Guide: Vickers Medium MK 1
 Weak Spot Guide: 113 - World of Tanks Guru
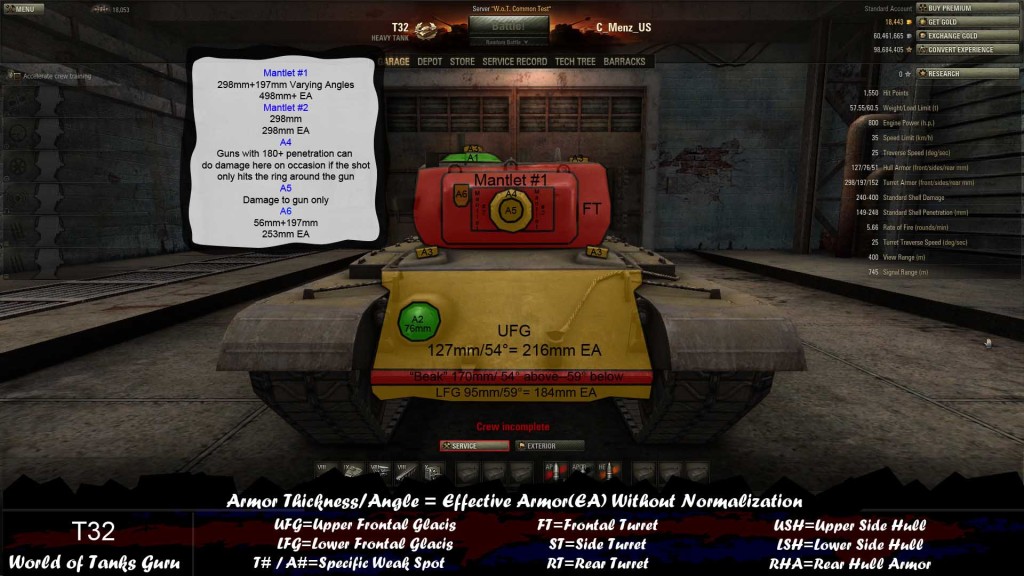 Weak Spot Guide: T32 - World of Tanks Guru
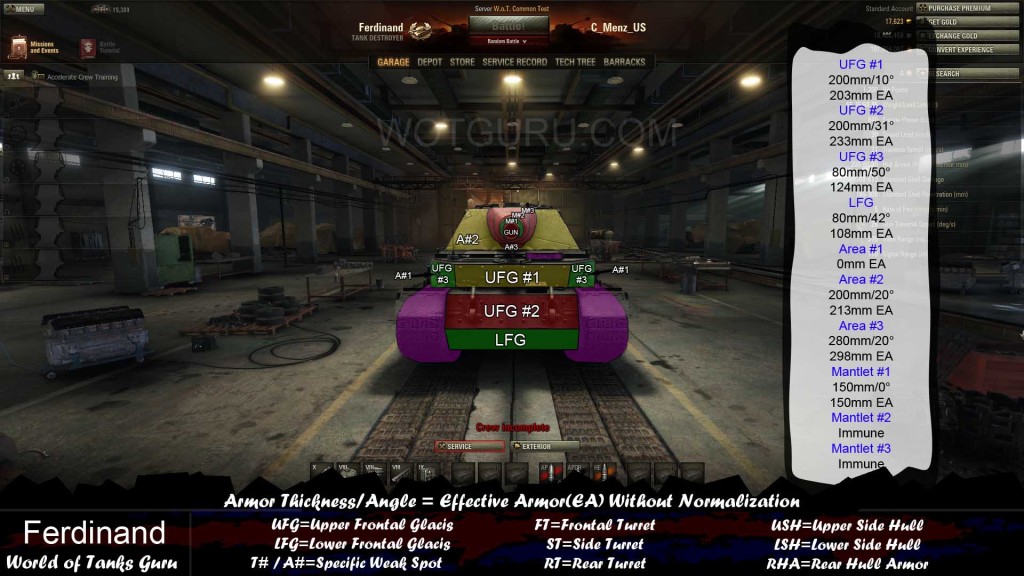 Weak Spot Guide: Ferdinand - World of Tanks Guru