Since Redshire has been reworked it has become a very difficult map to play aggressively on since many places have been made more bumpy and hard to move through quickly. The river especially has been designed to provide a bit more cover, however it is now extremely difficult to pass through in many locations quickly. The changes have made this map even more defensive/campy compared to before but there are still areas to gamble on to make that push for your team.
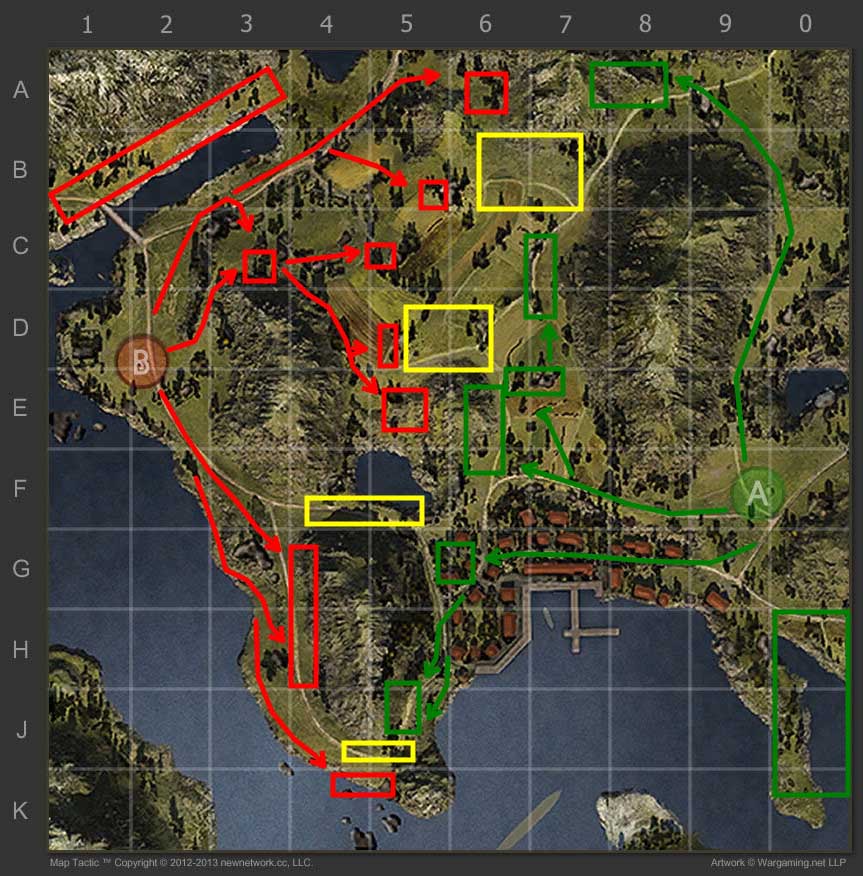
The red routes are initial routes/locations used for side two on the map while the green routes/locations are for side one. Yellow refers to “shared” locations that are typically engagement areas which are fought over by both teams. Solid routes are initial routes taken from the spawn to the front lines.
This map you see below was drawn up using MapTactic which is a very easy to use tool for making strategies for World of Tank maps. It works directly in your browser and has no cost to use it.
http://maptactic.com/
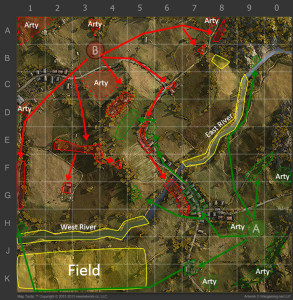
Many tanks enter but few survive in the southern field area. This area is usually highly contested but is very difficult for both sides to actually push through without an overwhelming number advantage. Heavy tanks should avoid this area since you are open to side shots the entire way through the field, hilly terrain makes engagements difficult, and there is no hard cover from artillery. Light and medium tanks should dart through here and attempt to get into a position to spot and then run if you are outnumbered. For side 1 this area is great for arty to support as well as the overlooks that can fire into here with relative ease.
The rework of the map made the rivers provide a bit more cover with higher banks on many areas but also made them more difficult to pass through. It is however possible to drive on the edge of the water but below the bank for most tanks to pass through into the 1 line as long as the enemy team does not have 3+ arty. The river also makes a good “plan b” for people being torn to shreds in the field to escape through.
A favorite spot for many since the buildings here provide cover from most incoming fire. From here you can also shoot northwest to hit enemies on the ridge of fire west into the field. A great defensive position if you team isn’t pushing west into the field but a horrible campy position if you don’t support your team as they push forward.
This spot is great for tanks with good gun depression and provides good cover from fire coming from the 1-4 lines. However it is extremely vulnerable to fire from the 5 line east and many know to counter this area now. This is a good spot to dart out to, get some spotting/quick shots off and then re-position elsewhere if the enemy starts to notice you.
One of the more riskier routes to take but a very effective one. Starting at G7 you can play defensive and support both sides of the map or you can make the commitment to push north and screw with the enemy. Pass just right of the bridge(going over it will see you dead) and stick to the right side of the buildings. Here you will only receive fire in between buildings and from tanks located in the 6/7/8 lines.
As you push you will draw the enemies attention and will force the people in the 3/4/5 line to focus on you and not on your allies. You also will be spotting them for your team/arty. The main counter to this is not knowing when to move to the next building since the further north you go the more vulnerable you become. High risk, high reward.
Many venture to this spot and sit up here to “support” but in the end they either die without contributing much or hide until the rest of their team is dead. This base on Redshire does not have a good hill near it’s base to support from since you are easily spotted which forces you back into cover.
The only time people are needed here is if pushing up to the B9 is not an option and you need some sort of defense on this side of the map.
Driving through the river is rather sluggish since the terrain is horrible for all tanks so it is critical to drive along the edge. Keep your tracks out of the water but keep your tank below the raised banks to provide protection. The river provides decent protection against SPG fire and allows slower tanks a safe passage up north.
Mediums and light tanks(or other tanks with 40 km/h+ speed) can make it up to this location before the enemy does. Sometimes enemy scouts will dart through before you reach here and if so you will want to duck into the river at C8 and get into cover.
However, if you can make it to B9 you put yourself in a good defensible position since you can sit on the corner looking at B8, fire, and then back into safety. This spot provides a good staging area for the eventual push into B8.
Scouting from the south is slightly more limited than the side 2 on Redshire. Initially heading out to the small hill north of the East River(E6->D7->C8) provides some good quick spots for your artillery and hill campers to fire upon. I find that scouting the north is more helpful than the south since you can let your team know if there is a large northern push which can catch your team off guard.
If this spot isn’t for you then going to G5 or doing a run down the K line also helps catch tanks out ahead of the main pack of the enemy team heading to the field.
Later on in the match you will want to refocus on the 4/5/6 lines since by mid-game they are usually less defended than other places. A scout can easily slip through, distract the enemy, and possibly kill enemy SPGs.
Most SPG players set up in the back of the base in K9/J0 which is often watched by enemy SPGs. Alternatively K7 allows you to shoot into B7/A8 with relative ease. H8/H9 allows you to fire and then run forward into a house to prevent yourself being countered, and F0 provides the least amount of shots on the map but is the safest if your team is stuck close to the base in the north and south.
Much like side 1 this side also has a ridge close to the base however it has both large boulders and trees unlike the other side. This allows tanks to stay hidden if positioned correctly and have shots from the 5 line to the 0 line. Only 2-3 tanks at most should be up here and usually ones with good accuracy.
For slower tanks or players who want to hang back a bit without sitting in D4 there is a secondary ridge located further south. Here in E2/E3 tanks can allow their teammates to spot enemies in the field further south and can fire on targets from K1 over to K7.
Heavy tanks can still make a run out to the farm house in G2 which has cover for 1-2 tanks. This position is for tanks with accuracy not suited for E2/E3 and allows them to fire on any enemy tanks looking to push through the field north.
The 1 line can either be defended or pushed through. There is limited covered scattered from E1 down to H1 and can be defended somewhat easily since you have plenty of support from both friendly SPGs and also from the ridges. You can also choose to push down into K1 if you are bold enough.
Pushing through the field is a balance between spotting and evading enemy SPG/sniper fire. Usually I focus more on spotting/surviving and less on destroying the tanks near me unless they push into my position. Use the many hills as cover and simply peak over, retreat, and repeat.
The river provides some cover and also breaks enemy sight on your tank in most cases. Just keep in mind to not drive in the water and to stick on the side of the bank to retain some speed.
Like side 1 the center of the map can be a very effective route to take if you are aggressively cautious(if that makes sense). Enemies will be in G5 which need to be taken out before you pass E5. After that advancing on the west side of the central road down into G6 will grab the enemy’s attention. From here you want to spot and try to stay alive by moving between the river and town. Your teammates will have shots so stay patient and slowly move south when support catches up to you.
The northern part of the map plays almost identical to side 1 from this side. There are great positions to defend from tanks pushing through B8 in C6, B7, and A8. Eventually you will want to push through B8 and get over to C0. If you are fast and have back up then doing it at the start does work if you can make it into B0/C0 and into some cover. Once you reach the 0 line you are relatively safe from SPG fire and also from enemies on their base ridge.
You can also take the river since it provides SPG cover and forces enemies on the ridge to move out of cover to hit you.
Scouting this side of the map is a bit easier since you do not have to cross the river until later in the match. Doing a quick scout in E6->D7->C8) will allow your tanks on the ridge and SPGs to rain hell down on tanks heading up to B9. Generally I will scout here until the enemy starts to focus on me.
Alternatively you can scout in the F4 area and also in the F2/G2 area without stopping. I do not like going into the field in scouts since you will be receiving a lot of incoming fire and also cannot escape quickly since you must re-cross the river on the way back
Most arty players will tuck into A1 or A3 which provide good shots but are focused on by enemy SPGs. I find that staying in C3/C4 in the wide open allows you great shots and then after you fire you simply move forward on the backside of the hill to prevent yourself from being countered.
D1 is a good spot to move to after your first few shots if the eastern flank is falling and it will allow you to move down the 1 line. A8 is a great spot if your team taking the C0 position and allows you to hit the backside of a lot of locations in K7, G5, and the southern town.

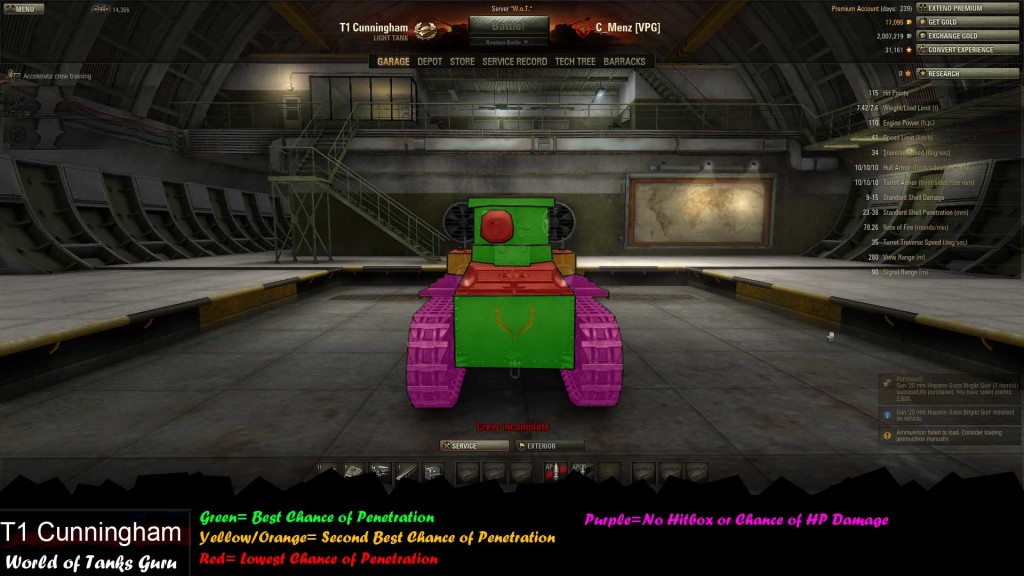
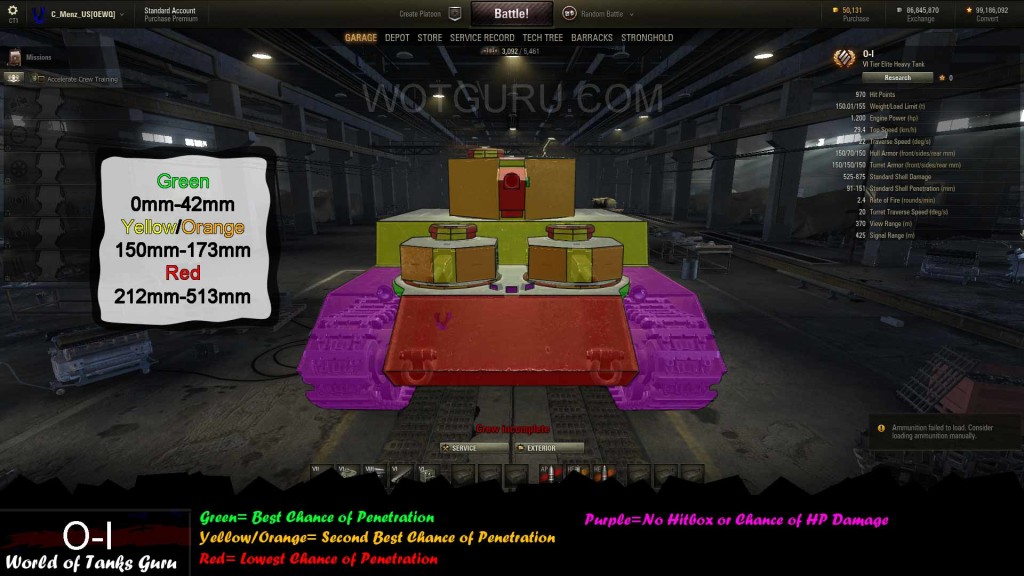 Weak Spot Guide: O-I - World of Tanks Guru
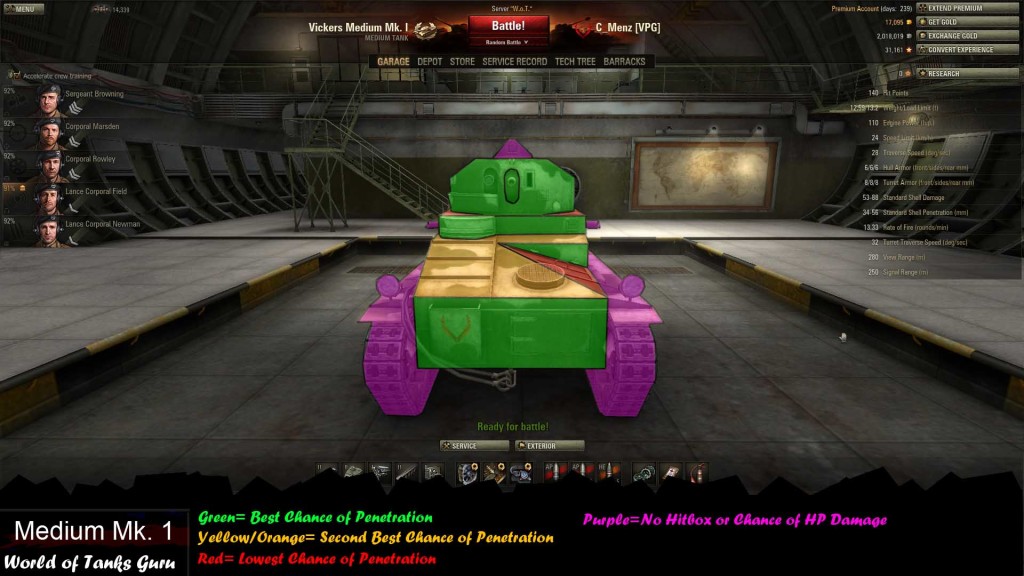 Weak Spot Guide: Vickers Medium MK 1
 Weak Spots Guide: Type 59 - World of Tanks Guru
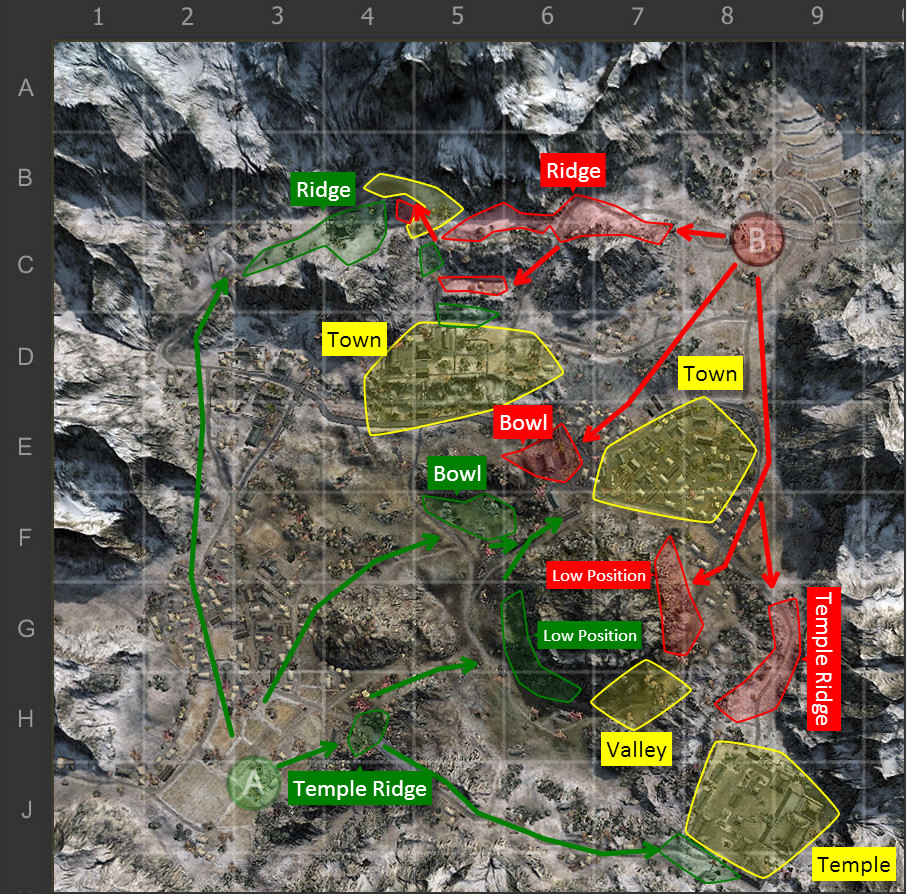 Map Strategy: Sacred Valley - World of Tanks Guru
 Tank Guide: T95 - World of Tanks Guru