Province is a very small map and only available for tier 3 tanks and lower in World of Tanks. Originally Province was available for any tier and for matches tier 5 and higher the map was simply to small to function properly. When Province was reworked it was changed to only allow tier 3 tanks and under since the map plays best with the lower view range and sizes low tier tanks have. The layout of Province features two ridges running north to south on both edges of the map where tanks start and the bases located in the valley below. Since the map is very small it is easy to be seen anywhere outside of the initial spawn area which leads to many quick matches if one team gets obliterated early on. Usually the best approach for a team is to have most tanks stationed on their ridge semi-close to the initial starting area and then tanks with good mobility and/or armor scout ahead to allow easy shots on enemies.
The images below were created using MapTactic which is a great World of Tanks tool for creating strategies on any map for clan wars, tournaments, and eSports.
http:///
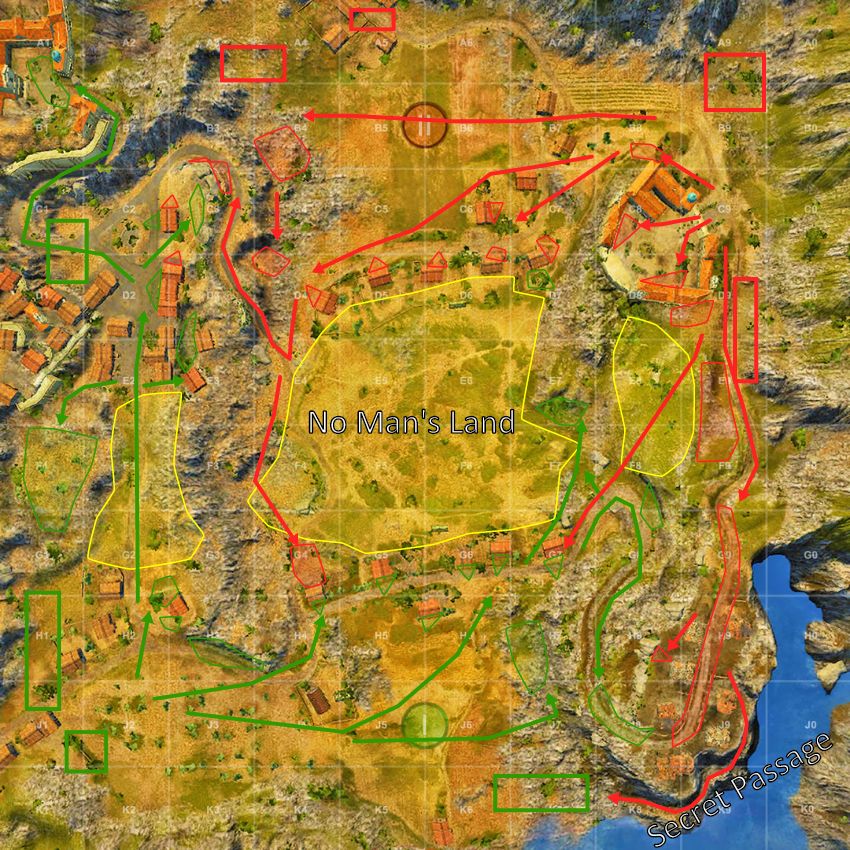
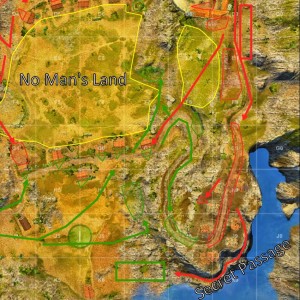
There are a few different map indicators to know to understand what each image is showing you. Rectangles/squares that have no filler are artillery placements, and areas filled in with either red/green are good positions to setup at the start of the match and/or proceed to after your initial location. Routes are indicated by solid lines with arrows at the end of them and provide a general path to take that will get you to a location quick and safe. Finally, yellow areas are places where early on in the match you will want to avoid since you will take a lot of fire if you stop anywhere inside of the yellow outlined areas.
This area of your team’s ridge is where you will start and you are faced with the option of heading north along your ridge, sticking around this area, or heading downhill towards your flag. There is a small house in the H2/H3 area that provides good cover and enough room for two tanks to position next to and from here you have good shots at most of the enemy team located on the opposite ridge. Do not stay anywhere other than near the building since if you head closer to the edge of the ridge you will be seen and will die very quickly from enemy tanks position on the opposite ridge. This area shouldn’t have more than 2 tanks near it since it doesn’t provide enough cover and while the firing lanes are great they are not very good if the enemy gains a ton of map control.
One other small area is in F1/G2 along the edge of the map and can be used in special circumstances. There is not that much cover here however you are outside of the enemies render range from the opposite ridge so they cannot hit you(but enemy SPGs can). This area can be useful if the enemy has started to push towards your side of the map and you are stuck on the ridge. 9/10 it isn’t useful to head up here, but it can be useful in close matches late in the game.
Moving further north from your initial starting area is the northern section of your ridge. Be careful pushing up here because you will most likely be seen at F2 and even if you continue through the buildings enemies can hit you through the gaps. Heading up here is important since if you do not then enemies can easily push up the path leading to the top of the ridge. Focus on sticking behind the buildings for cover and do not push your luck by trying to spot close to the edge of the ridge since you will take a lot of return fire.
There is a path that leads to a elevated courtyard starting in C1 and ending in A1/B1. You are exposed heading up this path but can make it in a fast tank without to much issues. In this area you have great shots at enemies in B8 and other areas that otherwise would be very difficult to hit. Keep in mind that if you get up to this location it is very hard to get out of and usually Province matches are very short so this spot has limited uses.
If you decide not to stay on your friendly ridge then the only other option is to head into the valley where your flag is located. One thing to keep in mind on this side is that in K8 there is a “secret passage” that enemies can use to flank you. While you do not need to defend it in most matches, since many players do not know about it, it is something you should keep in the back of your head. If you are choosing to stick around you flag then choosing an area in the 7 line will provide you the best cover from enemy tanks, otherwise stick to the backside of a building for cover.
In the valley you need to worry about incoming shots from other enemies located in the valley near their base, from tanks in C3, and also from tanks on the enemy ridge. It can be difficult to find a safe spot and also be able to do damage to enemy tanks without taking a ton of damage. The best approach for a tank without a ton of armor is to use small bushes to spot for other friendly tanks and to pop in and out of cover. If you want to push to the enemy’s side of the valley then it is best to head up the 7 line along the bottom of the ridge since it provides the most cover.
Starting in G7 and ending in J8 there is a path that leads to the top of the enemy ridge. If you head here in a fast tank, which at tier 3 most tanks are, you can make it without taking any damage. On the other hand if you are not capable of getting there quick then keep in mind that as you climb your rear armor is facing enemy tanks that are in the valley. Make sure you can climb up safely or else you risk dying a quick and annoying death without being able to do anything about it.
When(or if) you reach the top then you only need to worry about enemy tanks in front of you on the ridge. Proceed to push north by using the buildings for cover and spot enemies so that your friendly tanks sitting back on the ridge can pick them off for you.
Artillery placement on Province is limited since it is a very small map and there are few places worthwhile to go. Starting off you can either setup at the edge of the map so you are not seen and from here have great shots at most of the map. From this area you will struggle to hit enemy tanks in the 2/3 line, in the valley, and also tanks hiding behind buildings on the opposite ridge. Alternatively you can dart down into K7/K8 near the “secret passage” exit and have great shots on enemies trying to push up to your ridge and also any enemies in the valley. You run the risk of being popped if enemies use the secret passage so it is a risk to go down here.
The last option is for later on in matches if there are a lot of enemies hold up in the northeast corner of the map or on their ridge in general. Carefully push up the 2 line as close to the edge of the map as possible and place yourself in C1 to get a different angle on enemy tanks. Remember that crossing from G2->E2 runs the risk of you being seen so decide whether or not it is worth the risk before going.
Unlike team 1 your initial starting area has a large building and courtyard that provides great cover from incoming fire. Staying on top of the ridge and setting up in B8 you have great shots at enemies from the 3 line and up on the enemy ridge. You can also head into the courtyard area to either setup for shots south or for shots west. In the courtyard you will be seen by enemy tanks so only head here if you have good frontal armor since you will take incoming shots. The last area to move to is at the south end in D8/D9 at the corner of the building since you have even better shots at enemy tanks located on the opposite ridge.
Further south in E9/F9 you can use the bank on the ridge combined with a tank with good gun depression to take shots and to peek in and out. This area is a little more dangerous since you will be seen easier but it can catch enemies off guard if they are shelling the areas around the buildings/courtyard you start near.
Moving to the southern section of the ridge on team 2 is a lot safer than team 1 since there is a raised bank that protects you from incoming shells and hides you from view. Continue down to the buildings and rocks in H8/H9 and then you can either choose to stay here and fire on enemies across the ridge or to head down the secret passage.
In J9 there is a steep slope that can be difficult at first to navigate down but the rewards are well worth learning how to use this pathway into the enemy base. Position yourself at the top of the slope close to the ridge and not near the water. Next, head down the slope and once you are past the top slam on brakes/reverse to slow your decent. Guide yourself down and if you survive this initial slope you are golden. After this simply drive along the secret passage to K8 where you have a small hill you need to peek over to see any enemies. Once you are here you can either rush out to kill enemies or dart down to the K6 building to provide cover from enemy tanks located on their ridge.
The valley plays very similar to the other side on Province except for there is no secret passage to worry about on this side. For the best cover push over to the bottom of the enemy ridge or place yourself behind buildings for cover.
Like team 1 you also have a pathway to the enemy ridge on this side that starts in the top of E4. Unlike the other side this path is more exposed and harder to climb since you will be taking a lot more incoming fire since the entrance is less protected. If you make it to the top then start out by spotting enemy tanks for your allies to take out. After any enemies are taken out then slowing navigate your way down and continue the process all the way down the ridge.
Like the other team on Province this side is limited as far as artillery placement is concerned. You can stick around the initial starting area and from here you have good shots across most of the map or you can push down into the valley. From the valley you get better shots into the enemy flag area and can hit enemies in the 6/7 lines very easily. I wouldn’t suggest pushing far down your friendly ridge since it doesn’t provide anything useful, but pushing down to D9/E9 is not out of the question.
 Weak Spot Guide: KV-4 - World of Tanks Guru
 Tank Guide: T95 - World of Tanks Guru
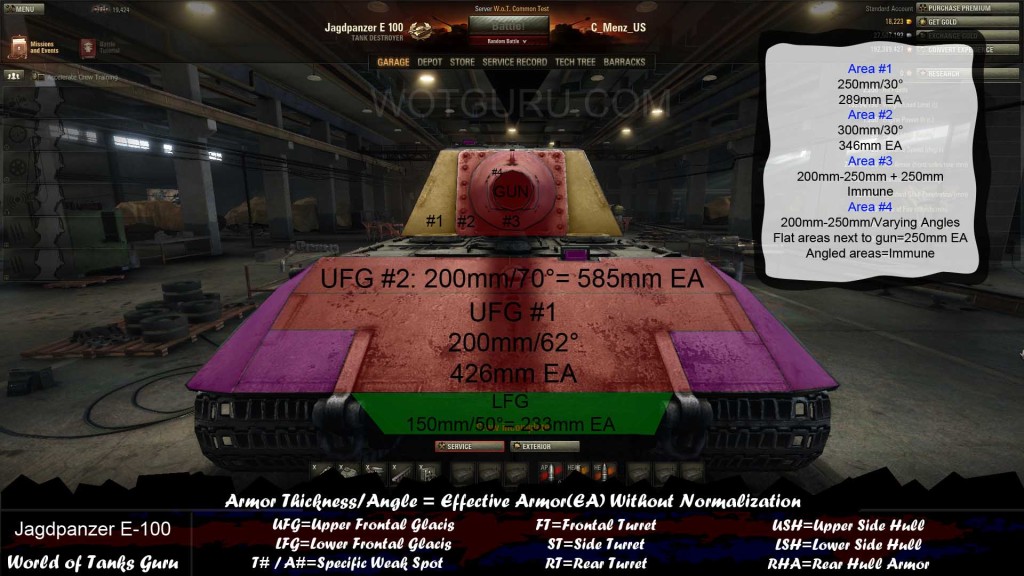
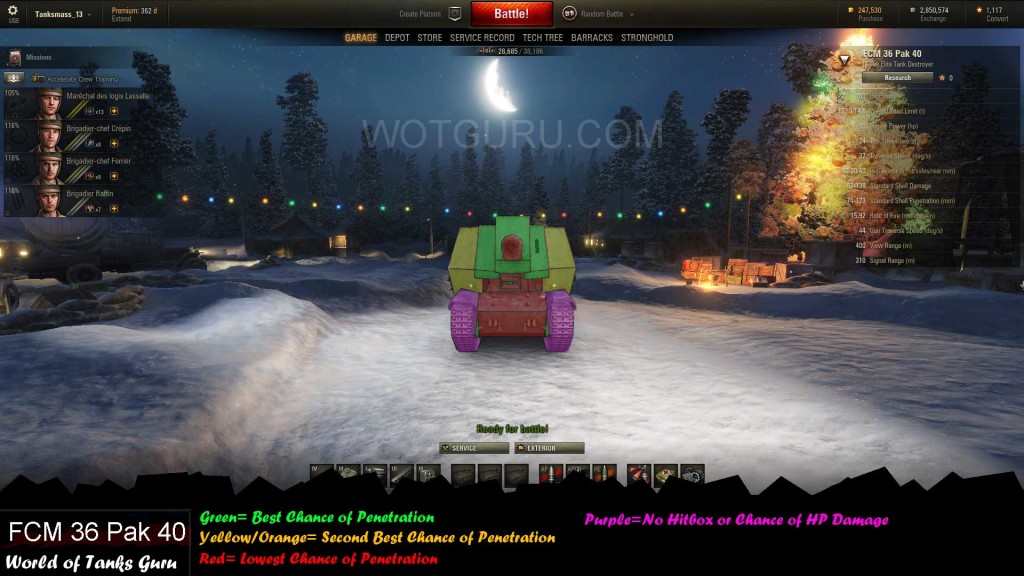 Weak Spot Guide: FCM 36 Pak 40 - World of Tanks Guru
 Weak Spot Guide: 113 - World of Tanks Guru
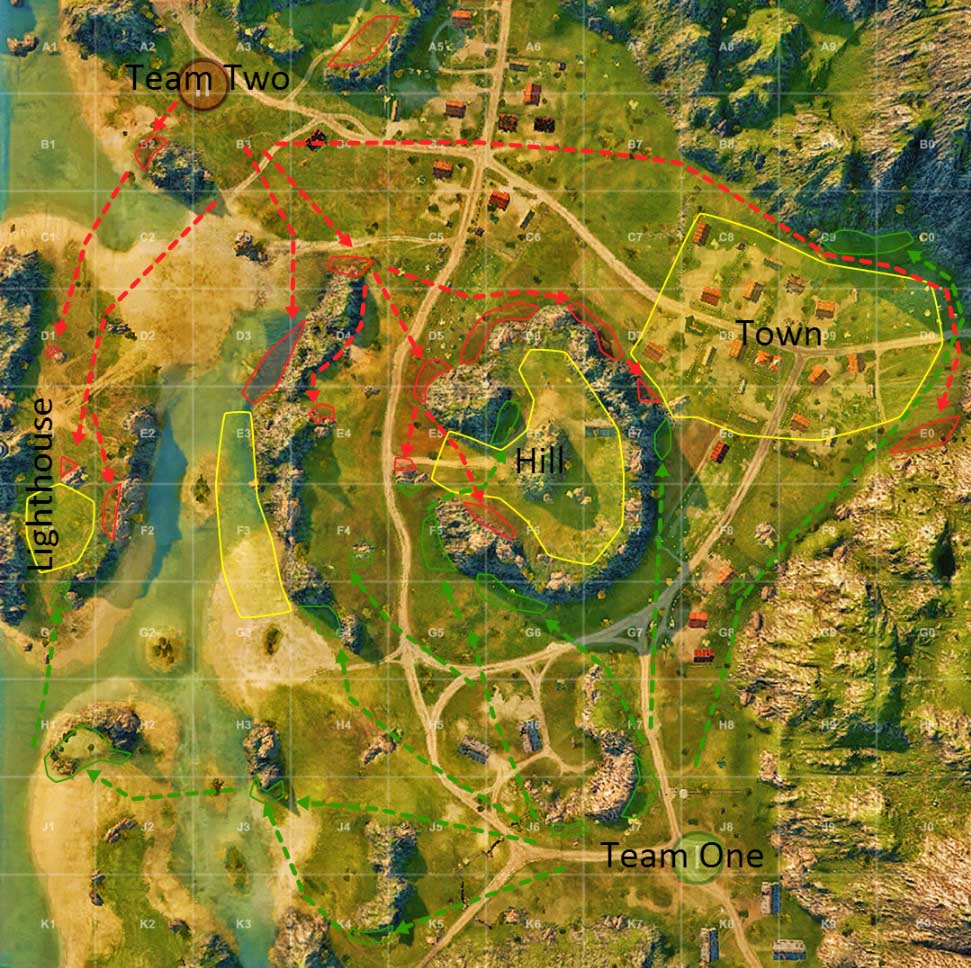 Map Strategy: Mines - World of Tanks Guru