
The Resonance game guide contains a complete walkthrough and detailed solutions of puzzles. Descriptions also include:
Resonance is a Point & Click adventure game with a captivating story, absorbing characters and puzzles that will challenge our brain cells. Professionally written dialogues are its additional strengths. It's an engaging choice even for players not typically interested in these types of games.
Michal Rutkowski
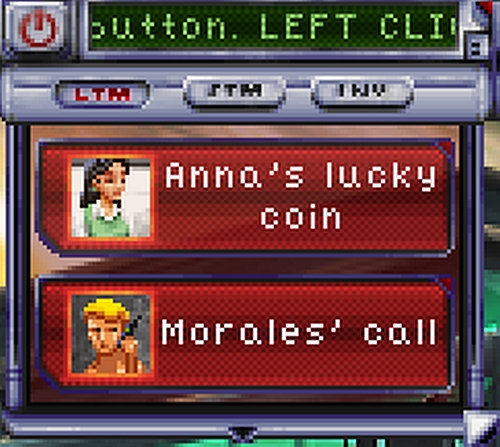
LTM: short for Long term memory. Important information and events are automatically saved here. Choose a memory to view it again. Memories stored in LTM can be used during conversations.
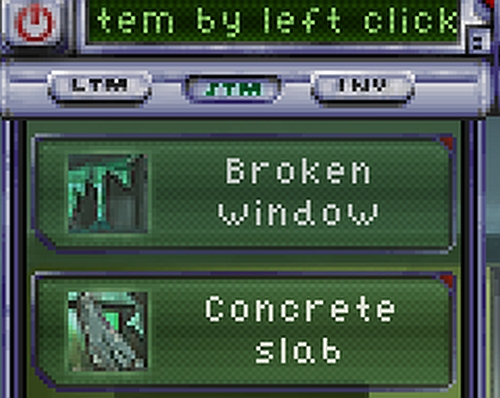
STM: Short term memory. This is where we can put interactive objects to use later during conversations. To place an object here, drag it on the STM window and it will open automatically.
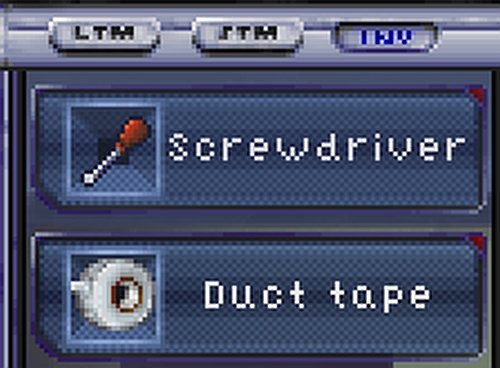
INV: once picked up, usable items are put here. Sometimes an item has to be dragged over an interactive object, other times you need to combine two of them together to create a new one. Items from this menu are indicated in blue.
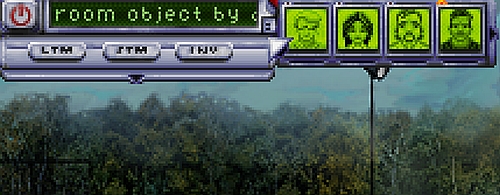
Character Selection Menu: this is where you select the character you want to play with in a current moment. Other characters can only follow you after selecting the Follow me command during a conversation.
RMB/LMB: short for the right and left mouse buttons. The left mouse button enables interaction with a selected element. Holding the left mouse button on an item will move it. The right mouse button provides additional information about a selected item, for example a number on a locker.

Orange: serves as a label for usable interactive objects (for example, a Terminal).
Brown: characters and persons which appear in the game are indicated in brown.
Circle/square/arrow: if on one screen there are several usable items, they are indicated by different markings. In the text, they're put in brackets beside the object's name.
Points: your actions are awarded with points. A large number of points is optional. Some require a proper action. It's not possible to score the maximum number of points after the first play. The counter is in the upper right corner of the screen.
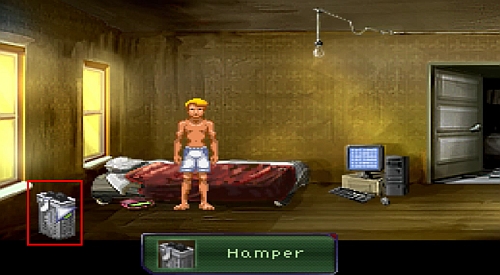
You start the game as Ed, in his apartment. You'll we woken up by the ringing of a cell phone, which you have to find. Click on the Hamper.

Pants will slide out of the basket - use LMB to find the phone. Unfortunately, the battery will run out. Move right into the kitchen.
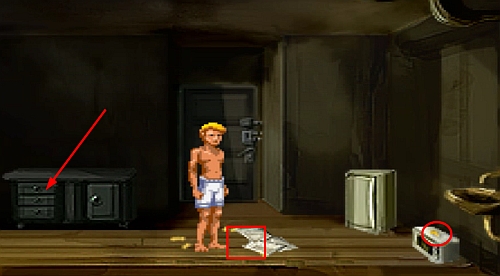
Pick up Papers (square) from the kitchen floor, a take the Key from the microwave (circle). Approach the drawer indicated by the arrow (Drawers).
Choose INV from the upper left corner menu. Click and hold LMB on the Key from the pull-down menu, and move it on Drawers. This way you'll open it. Click on Drawers again to get a battery (Phone battery).

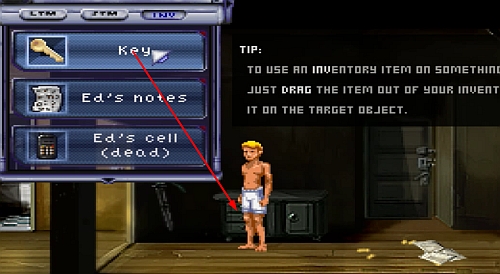
Open INV once more and drag the Phone battery on Ed's Cell. Open INV again and click on Ed's Cell. A new menu will appear - choose Check the caller ID. Then Call Dr. Morales.

In his call, the doctor will ask you for a solution to equations. Open INV and click LMB on Ed's notes (the papers you've picked up from the kitchen floor). This way you'll put them in the dialogue window (square).
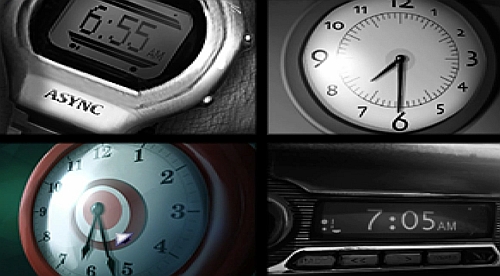
After the conversation you'll be free to pick one character out of four, depending on the selected hour.
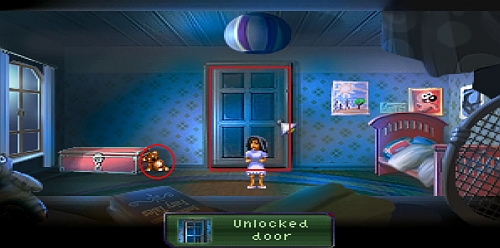
Click on the Unlocked door (square) to close it and slow down the monster that's chasing you. Then, click on Senor Bear (circle).
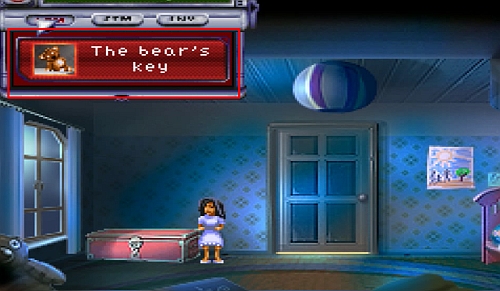
The LTM option in the menu should be now highlighted in red. Select The bear's key. You'll see a short memory.
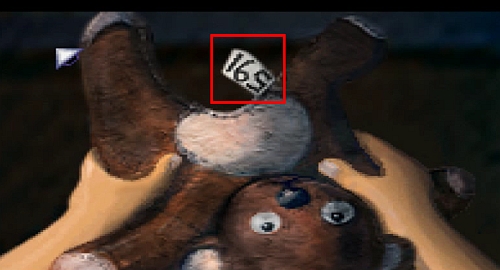
Open INV and click RMB on Senor Bear. There will be a code on the bear's tag. The bear is upside down, and so is the code. The correct one is 591.
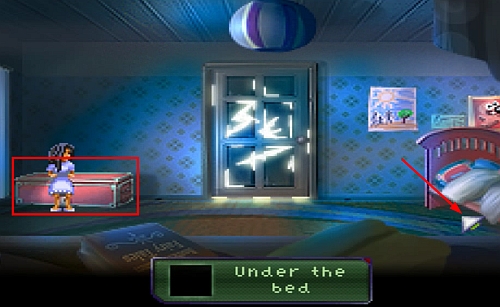
Click on the Chest (square), enter 591 and open it (Open Chest). Another memory will appear in the LTM menu - Uncle Javi's Gift, and in INV - 365 Pesos. Now, go Under the bed (arrow).
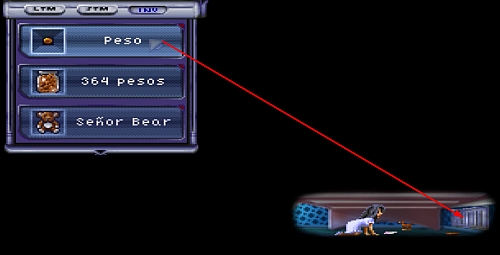
Open INV and click on 365 Pesos, so that Peso could appear in INV. Use LMB to drag Peso on the Vent cover (arrow). After a short while you'll wake up in Anna's apartment.
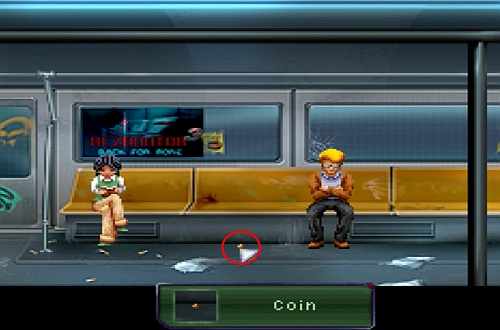
As soon as you gain control over Ed, pick up the Coin from the floor.
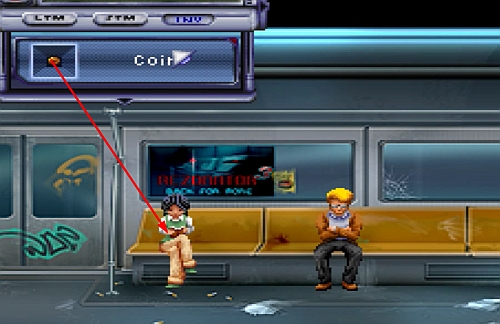
Open INV and drag the Coin on Anna. Choose Twenty year's during the conversation, and then End the conversation.
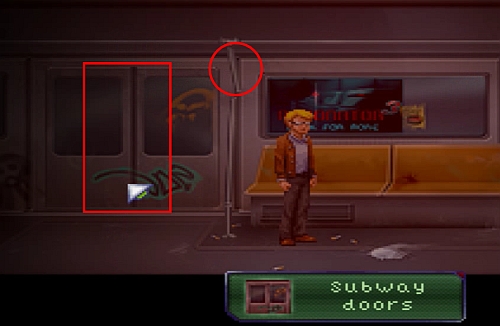
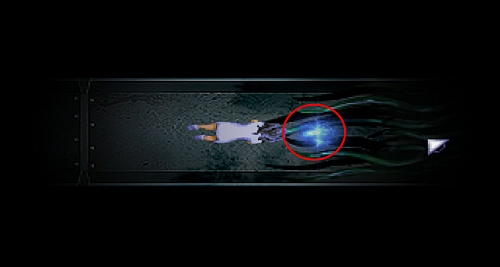
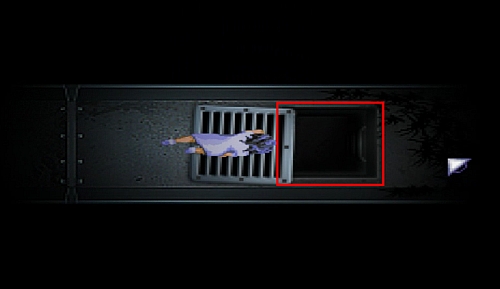
When the lights go out in the subway car, move left and click on the Subway door (square). You'll make a slit in the door. Then, click on the Loose bar (circle).
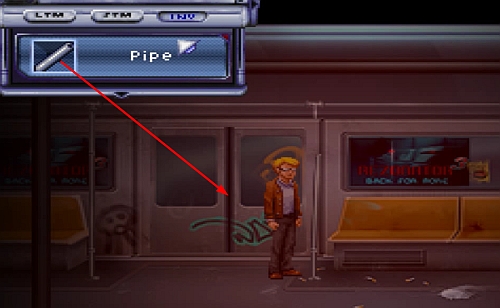
Choose Pipe from the INV and drag it on the slit in between the doors (Subway door). You'll open it. Click on the Darkness behind it to go outside and complete this stage.
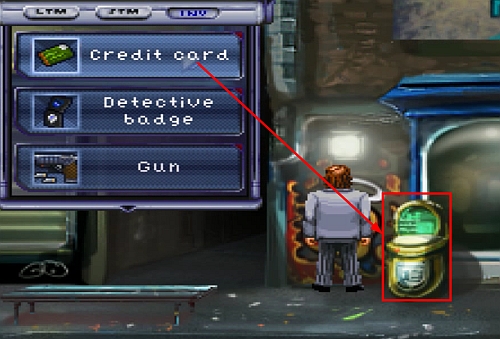
Once you have control over Bennet, go left. After passing a demolished car (Stripped car), you'll stop by a newspaper vending machine (Newspaper vendor - square). Open INV and click RMB on Bennet's wallet. A Credit card will appear in INV - drag it on the Newspaper vendor with the LMB. You'll get a Newspaper.
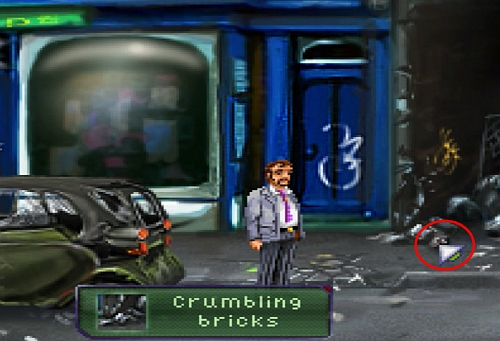
Go back a little to the right. There are Crumbling bricks in the pile of junk.
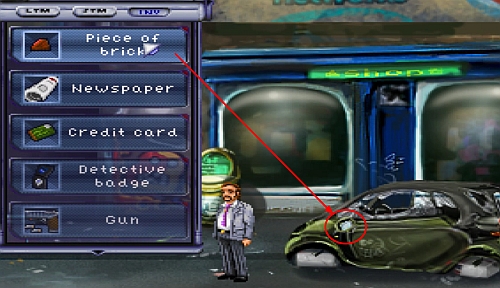
Return to the Stripped car and move the Piece of brick from INV on the Car mirror (circle). Pick up the Car mirror from the street.
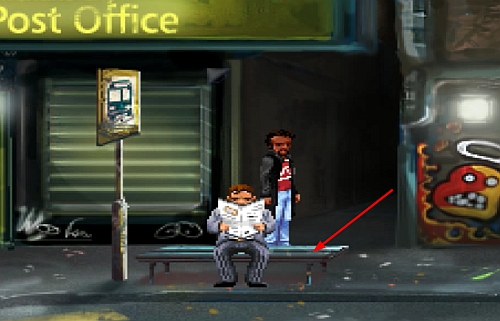
Again, move right and click on the Bench (arrow) to sit on the bus stop. Open INV and drag the Piece of brick on the Car mirror. A Shard of mirror will appear in INV - move it on the Newspaper. This is how you get an advanced spying equipment Newspaper with mirror. Use RMB on it.

Watching the suspect in the mirror, note down the code (number of knocks: 2 times, 1 time, 3 times).
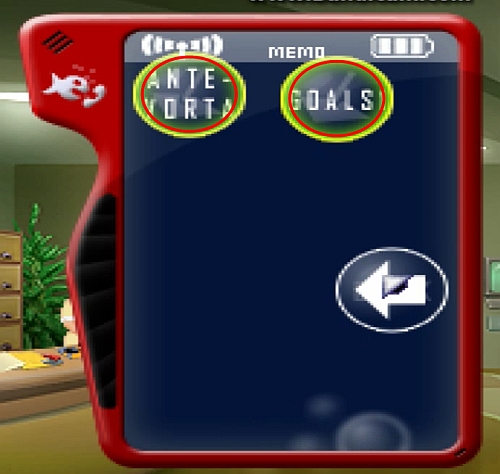
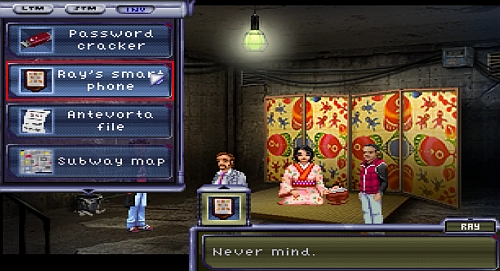
Open INV and choose Ray's smartphone with RMB. Select MEMO. Familiarize yourself with GOALS and ANTEVORTA. Close the phone window (Close Phone in the lower right corner).
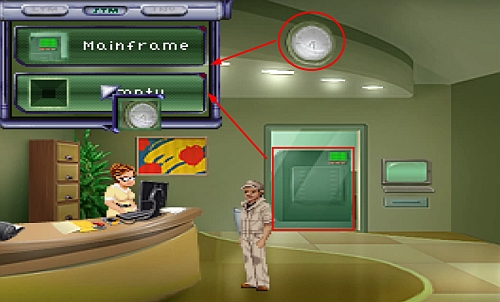
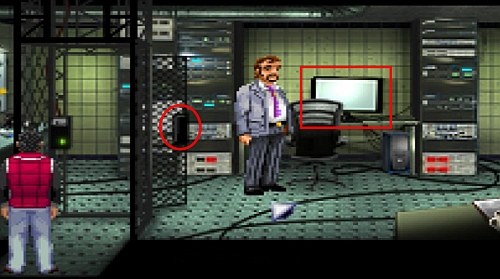
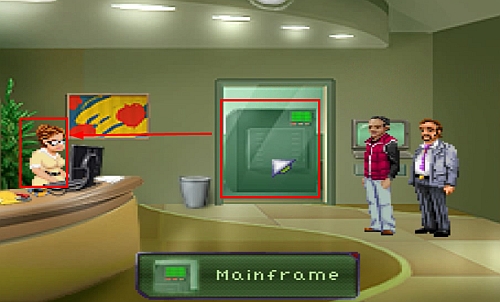
Now click and hold LMB on the Mainframe (square) and drag it to STM. Do the same with the Cloak (circle). Talk to the receptionist Emma. During the conversation, choose Mainframe from STM, and then What she's doing right now. Still taking, select the Cloak, again from STM.
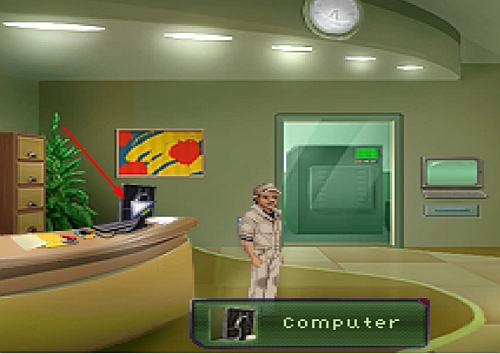
When Emma leaves the room, click on the Computer.
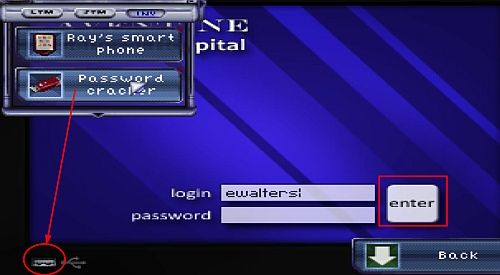
Open INV and drag the Password cracker on the USB port in the computer (circle) to learn the password to Emma's account. The password will be entered automatically, click Enter (square).
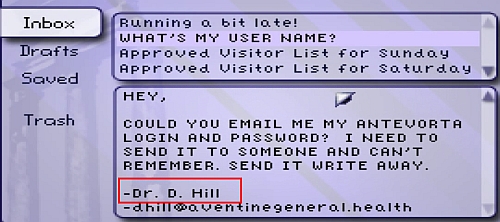
Open the e-mail titled What's my user name from the Inbox folder. At the end of the message you'll see Emma's boss' initials and his last name. The name is generated randomly, so you can see a different one. In my case it's Dr. D. Hill.
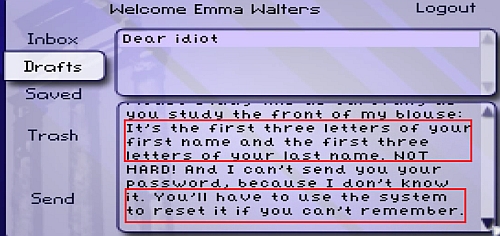
Move to the Drafts folder and open Dear idiot. You'll learn that the login consists of the first three letters of the name and the first three letters of the last name, and that the password can be reset. Log out of Emma's account (Logout - upper right corner of the screen).

Now, in the login window, put the first letter of Emma's boss name and the last name you've seen in What's my user name. In my case, it's dhill. Again, use the Password cracker on the USB port to learn the password to Emma's boss account. Then click Enter.
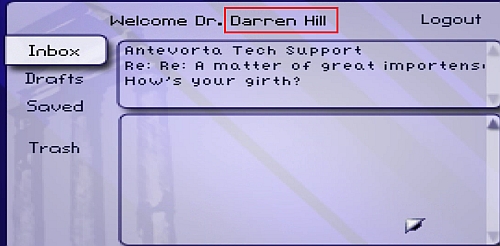
On top of the screen you'll see the doctor's full name and last name, so remember it. Afterwards, log out and leave the computer (Back - upper right corner of the screen).
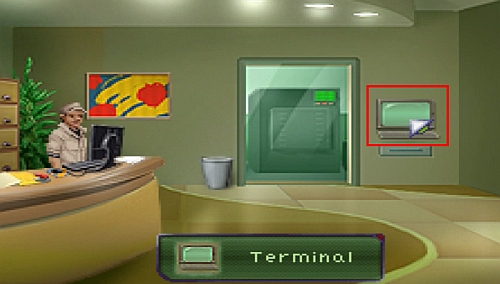
Approach the Terminal on the wall.
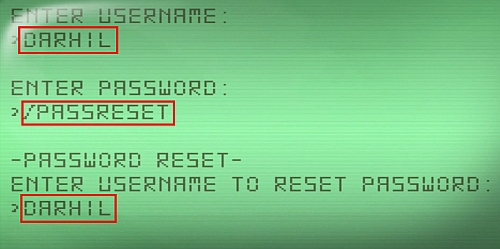
In ENTER USERNAME put the first three letters of the doctor's name and last name which were shown on the top of the doctor's account screen. In my case it's DARHIL (from Darren Hill) and press Enter. Put anything in ENTER PASSWORD because you don't know the password yet. You'll be informed that entering /HELP will activate a window with available commands. Once again, enter the three first letters of the doctor's name and last name in ENTER USERNAME, and enter /PASSRESET in ENTER PASSWORD. You'll be asked to confirm the USERNAME again to reset the password.
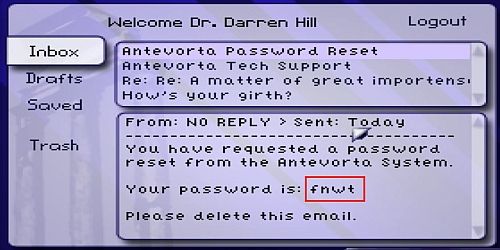
Leave the Terminal go back to the Computer. Enter the doctor's password to log in again (if you don't remember it, use the Password cracker on the computer's USB port or check Ray's smartphone to get it). In the Inbox folder there's Antevorta Password Reset e-mail. That's where the new password is (once again it's random, so write it down or remember it).
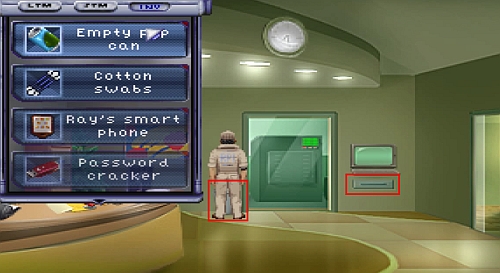
Before going back to the Terminal, approach the Trash can where you'll find an Empty pop can. Take Cotton swabs from the Drawer under the Terminal.
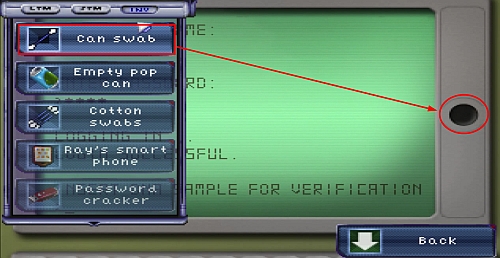
Now, click on the Terminal in order to approach it. Enter the first three letters of the name and last name as the USERNAME and the password from the Antevorta Password Reset e-mail. You'll be asked to place a DNA sample. Open INV and move Cotton swabs on Empty pop can with LMB to receive a Can swab. Now move Can swab on the DNA sample slot (Circular indentation).

Enter /HELP in ENTER COMMAND, and then /SEARCH. There will be three options. Select the first one (press 1 on the keyboard, and then Enter).
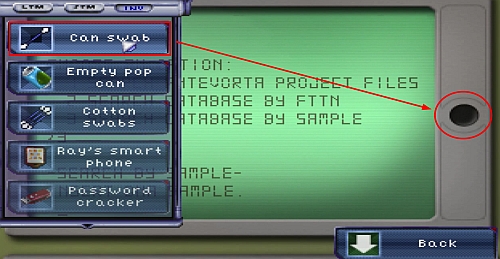
When ENTER SEARCH CRITERIA appears, type ABATRA (these are the information you're looking for). You'll get data on the document code - remember them or note them down (in my case it's AZ346). Type /SEARCH again. Select option number 3 this time. Once more, move the Can swab on the DNA sample slot. A new memory, DNA database, will appear in LTM - select it.
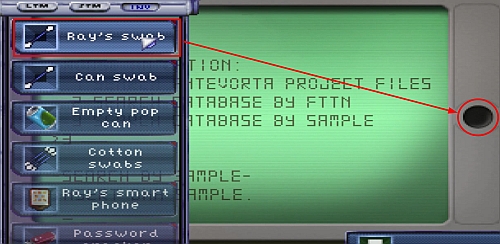
Again, type /SEARCH and select option 3. Drag Cotton swabs on Ray's smartphone. You'll receive Ray's swab - drag it on the DNA sample slot. Leave the Terminal.
Approach the drawers (Drawer - arrow). In total, there are four drawers marked by letters and digits. Recall the document code and search the drawer in the range that matches your letters and digits (you can see the range by clicking RMB on a drawer). When you find the right one, type the document code (in my case it's AZ346).
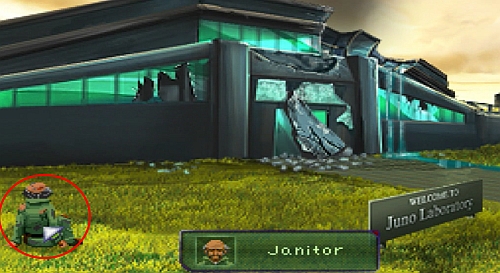
Talk to the Janitor. The conversation can be aborted if you get bored with the story. Afterwards, head for the building.
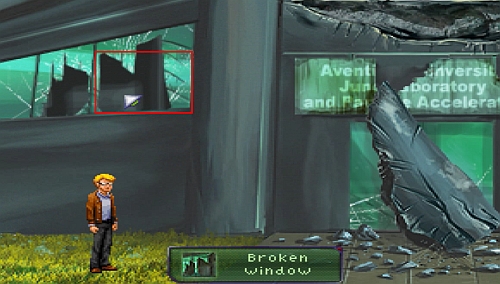
Drag the Broken window to STM. Go back to the janitor.
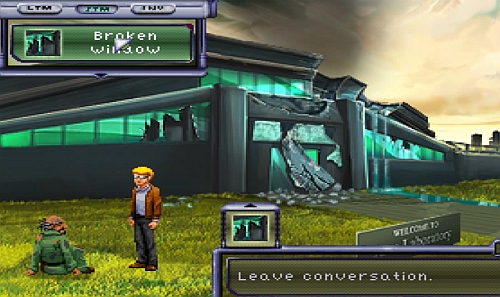
While talking to the janitor, click LMB on the Broken window in STM to ask for help in getting inside the building. This is when detective Bennet appears - talk to him and select the Follow me option. With him right behind you, go back in front of the building

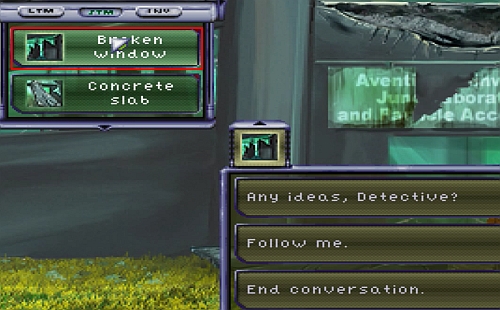
Drag the Concrete slab to STM and talk to Bennet about the building. When he attempts to move the slab blocking the way, click LMB on the Concrete slab to help him. You'll move the slab together. Unfortunately, you won't be able to go through the main door.
Talk to Bennet and use the Broken window in STM for the policeman to help you get inside.

Inside, move the Maintenance door (square) and the Valve (circle) to STM. When you do it, go outside.
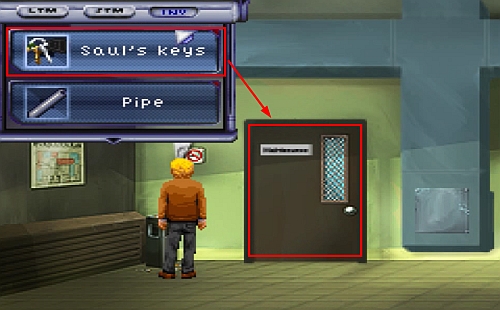
Return to the janitor and use the Valve and the Maintenance from STM during the conversation. You'll receive Saul's key. Go back in front of the building and ask Bennet to help you get inside again (Broken window in STM). There, drag Saul's keys over the Maintenance door.
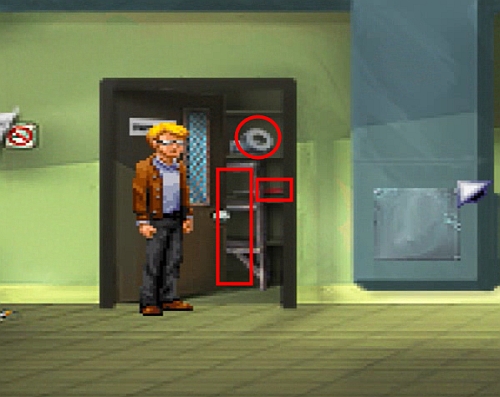
You'll find: Duct tape, Screwdriver and Step ladder behind it.
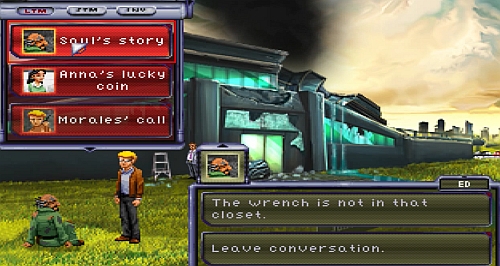
Before entering the building with Bennet, return to the janitor and talk to him. Use the wrench is not in that closet dialogue option. Now use Saul's story from LTM. You'll receive a Monkey wrench. Go back to Bennet, choose Follow me and click LMB on the Broken window.
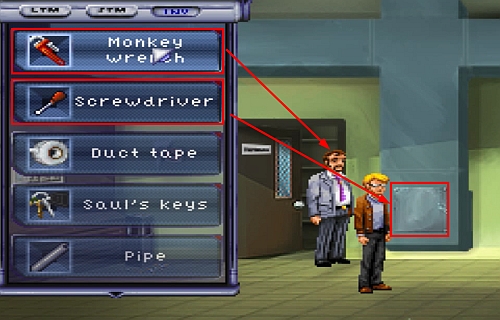
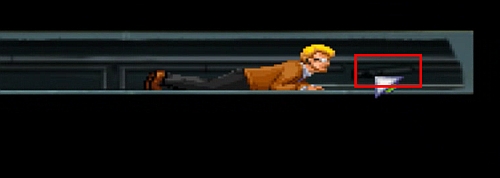
In the building, drag the Monkey wrench from INV on Bennet to give it to him. Now drag the Screwdriver on the Ventilation access (square).
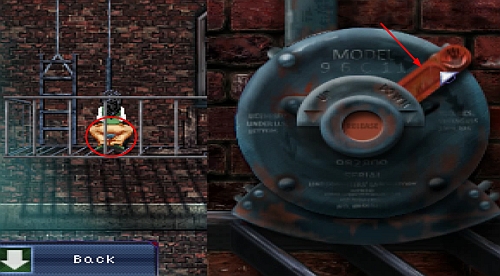
When you open the ventilation access, go in there as Ed (click on the opened Ventilation access). Move right towards the water leak (LMB on Water leak). In the menu, switch to Bennet. Use the Monkey wrench on the Valve (circle). Select Turn it to the right. The water flow will be changed. Switch back to Ed.
In the shaft, click on the Rusty pipe to remove it. Drag the Pipe you've found in the subway in the place of the removed one (Missing pipe). Use the Duct tape in the same place. Switch back to Bennet.
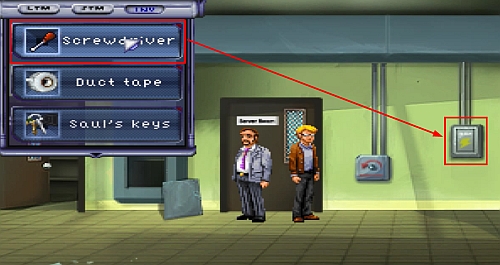
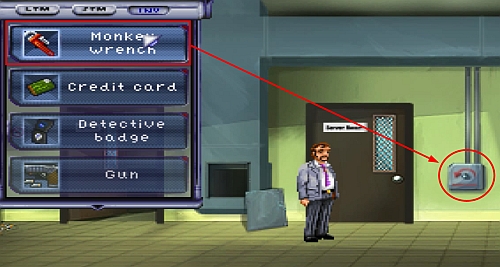
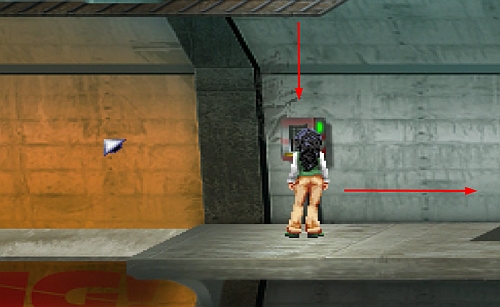
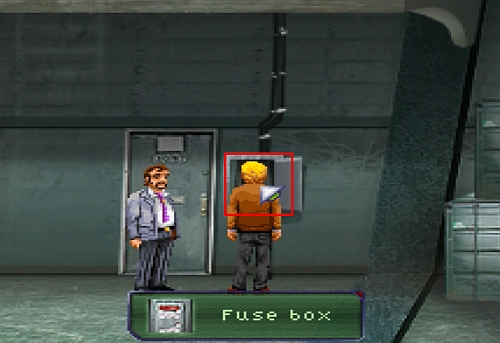
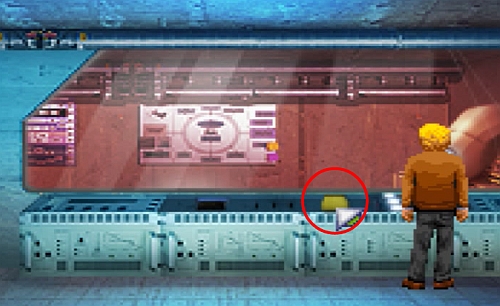
Use the Monkey wrench on the Valve again, but this time select Turn it to the left. As Ed, exit the shaft. In INV, move the Screwdriver on the Fuse box. When you open the flap on the box, click LMB on the Fuse box again.
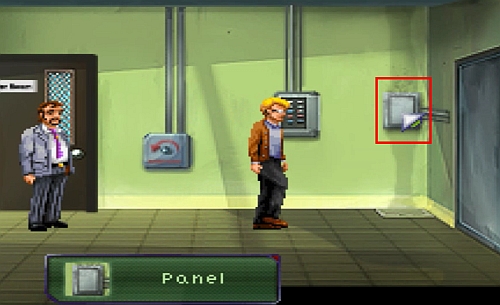
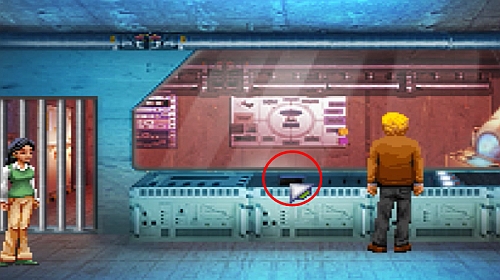
Now click LMB on the Panel to approach it. Click on the Panel cover to open the flap.
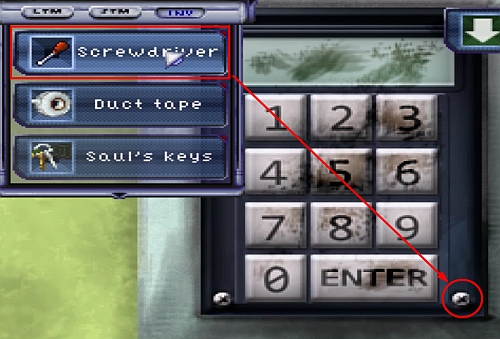
Drag the Screwdriver over the panel's screws (Screw - circle) to remove the panel.
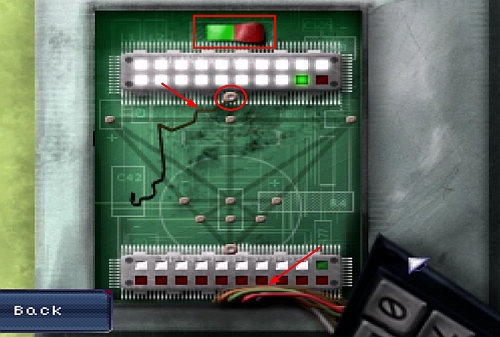
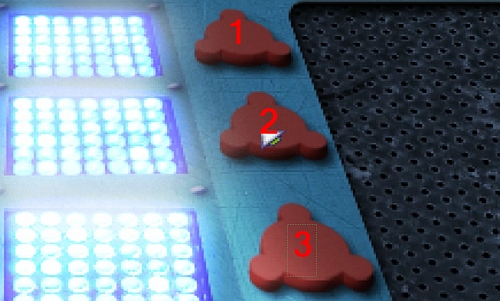
Begin by pressing the Power switch (rectangle on top). Remove the Burned wire (upper arrow). Drag the Loose wires (lower arrow) on the Primary pin (circle) and click LMB to hook them.
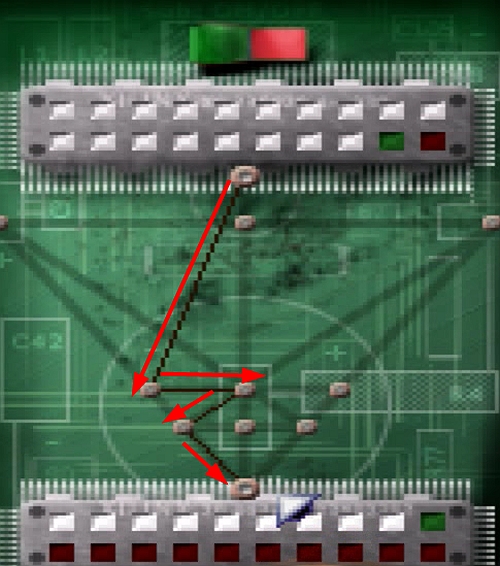
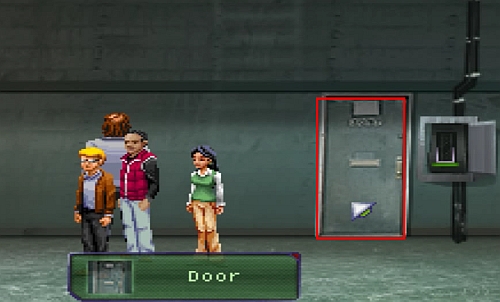
Now you need to direct the wire the way it's presented on the screen. To leave the wire on the Pin, you need to move it around it. When you do it, press the Power switch. The door will be opened.
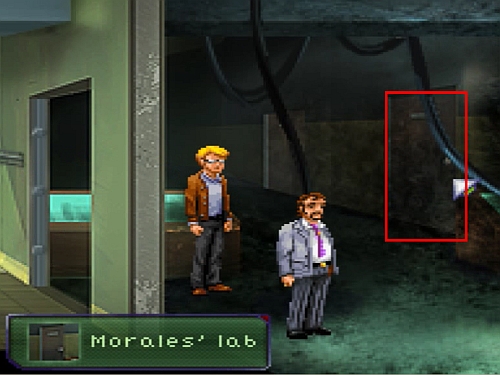
Talk to Bennet and select Follow me. Enter the door leading to Morales' lab.
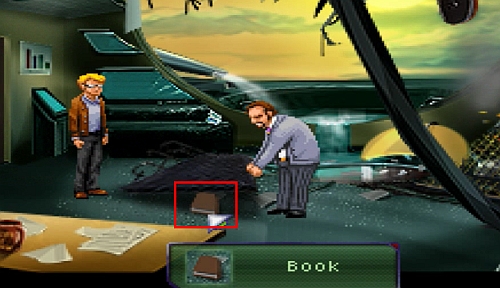
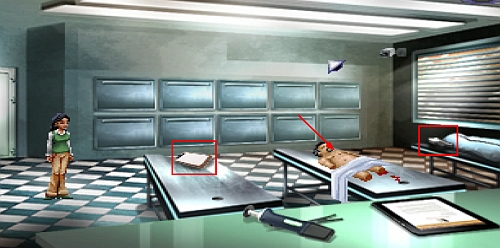
Place the Metal beam in STM and use it in the conversation with Bennet (or you can simply drag the Metal beam on Bennet). When the detective lifts the metal piece, pick up the Book which was crushed under it.
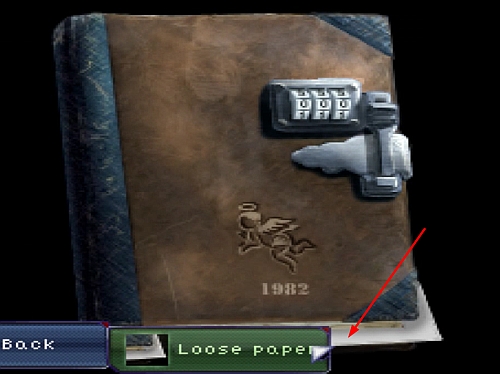
Open INV and click RMB on Morales journal. Take the Loose paper from between the pages.
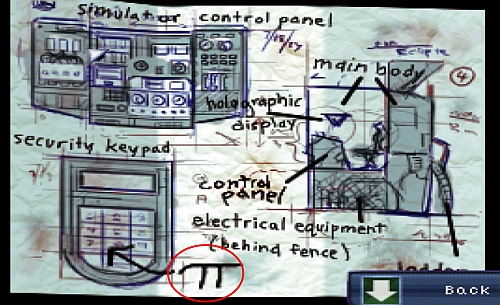
Open INV again and examine the Loose paper. Notice the pi symbol (circle) which has been assigned to the security keypad.
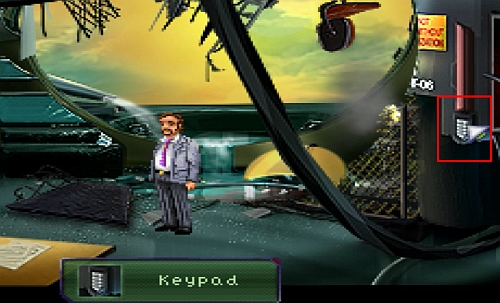
Approach the Keypad and enter 3141 (which equals pi) to rescue the doctor.
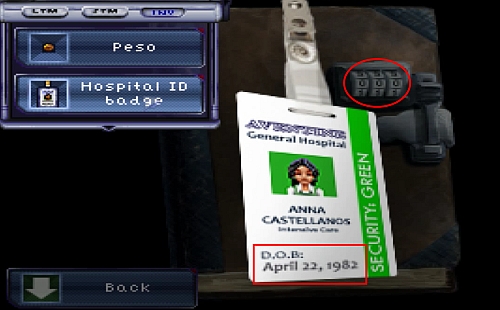
When Ed shows the journal to Anna, open INV and click on the Hospital ID badge. Notice Anna's birth date (square). Type 422 (the month and day of her birthday) on the journal's lock (circle) to open it. You'll find a note which says not to trust the police. Bennet will join the conversation. Select I have no idea. Ray will also appear in the hospital, which will be added to the LTM.
After the conversation, you'll once again find yourself in Anna's nightmare. The whole nightmare is a labyrinth, which additionally changes the camera angle. It consists of three levels; on each of them there is a LTM memory. There is Hansel and Gretel on the first, Where's mama on the second, Papa in the third. You don't have to unlock all of them if you're not interested in acquiring the achievement.
You move to another level by falling down a shaft.
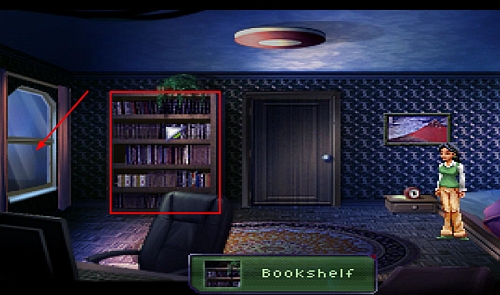
After finding the exit from the third level, you'll wake up in Anna's apartment. A new memory will appear in LTM (The cypher), but you won't have time to see it because someone had broken into the apartment. Click on the Bookshelf, select Push the shelf, then Right. You'll lock the door. When you do it, click on the Window (arrow) to get on the fire escape.
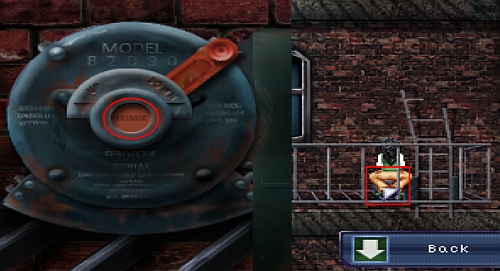
Go down the Ladder on the left. Click on the Mechanism (square). Press the button in the middle of the mechanism (circle) to receive the Mechanism handle. Go back up the ladder.
Use the ladder on the left to climb up even higher. Move the Mechanism handle on the Mechanism (circle). Now hold LMB on the lever (arrow) and start moving it counter clockwise to achieve maximum altitude. Afterwards, use it to get on the roof.
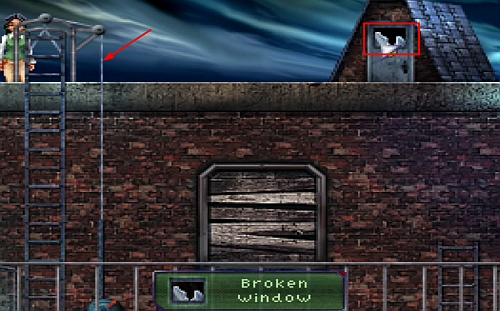
Click on the Broken window (square) to receive Broken glass. Move Broken glass from INV on the Rope (arrow).

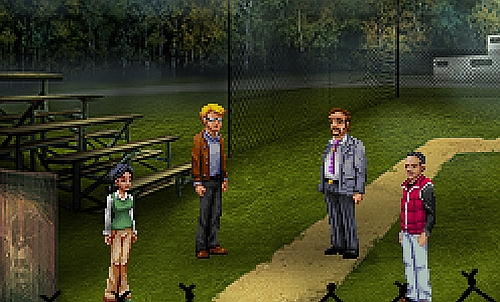
Click and hold LMB on the piece of glass and start moving it up and down so as to cut the rope before the burglar reaches the top. When you do it, Bennet and Ed will appear. You'll find yourself on baseball fields. Select I trust Bennet during the conversation, then Ask about Morales research. If you want, you can also ask about other matters, or simply choose Cut to the chase. This is when Ray appears on the fields. First, select You look familiar, and then choose the Ed & Anna at hospital memory from LTM. The next morning you'll have control over all characters.
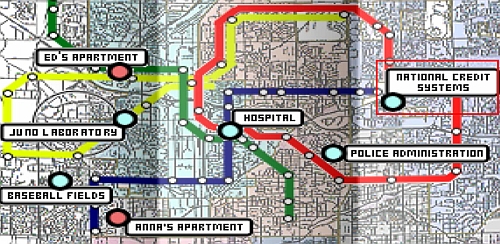
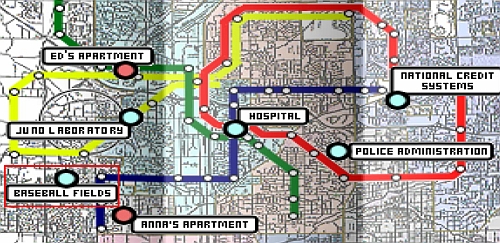
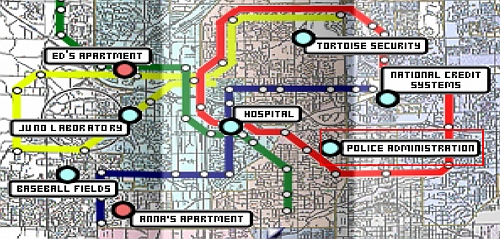
Select Ray. Leave the fields and go to National Credit System.
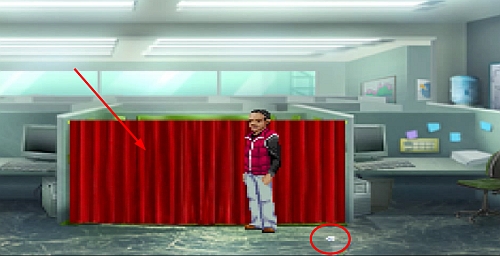
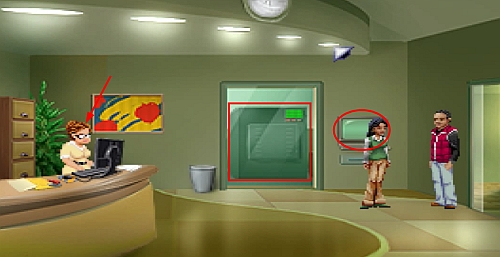
There, click on the Red curtain (arrow). During the conversation, use Get financial info from LTM. You'll be informed that you need FTTN and 10 000 $. When the conversation ends, pick up the Empty Pill bottle (circle) from the floor. In INV, click RMB on the item to learn that the prescription on the label is ascribed to our informant Ozzy.
Leave the building and go back to the baseball fields. As Ray, drag Cotton swabs from INV on Anna. Take control over Anna and have Ray follow you (Follow me).
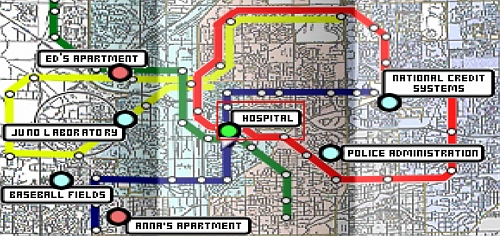
Go (Anna and Ray) to the Hospital.

Go inside (Hospital entrance). In the elevator, select the 2nd floor (ICU). Go left and click RMB on the Patient folder (square). Remember the ID of the patient in BED F (8468E). Now click on AutoPharm (arrow).
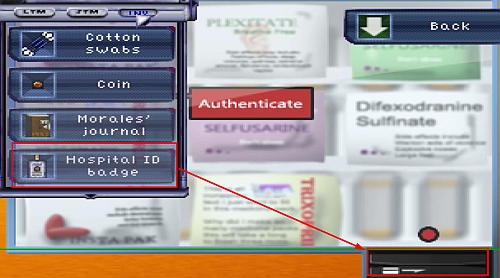
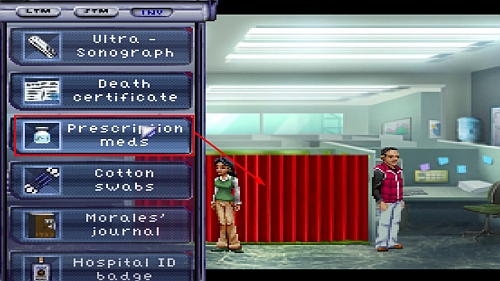
Move the Hospital ID badge from INV on the Card reader. Enter the ID you saw on the patient's chart: 8468E. Select Confirm. You'll receive Prescription meds in INV. Go back to the Elevator.
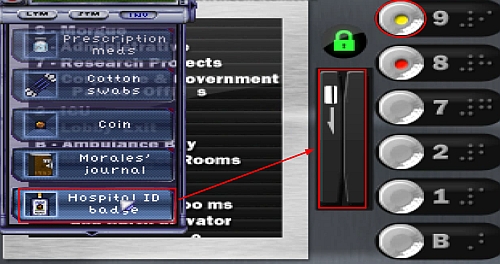
Use the Hospital ID badge on the Card reader and select the 9th floor (Morgue). Make sure Anna has Cotton swabs in INV.
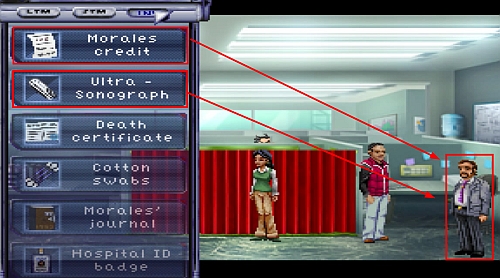
Pick up the Death certificate (left square) and the Ultra-Sonograph (right square). You can talk to the deceased (Morales body - arrow). Eventually, use Cotton swabs on Morales body to receive Morales swab. Go back to the elevator and select the 7th floor (Research Projects).
Give Morales swab to Ray. Take control over Ray. Talk to the secretary Emma (arrow) and select the Mainframe indicated by the square from STM (or drag Mainframe on Emma). Now you can use the Terminal (circle).
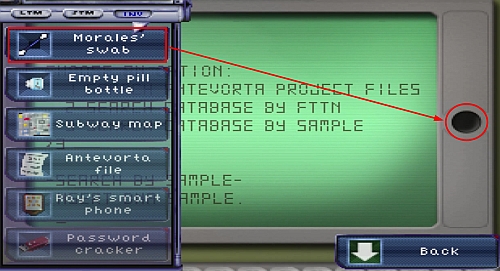
Enter /SEARCH, then choose option number 3. Place Morales swab in the DNA slot. You'll receive Morales' FTTN number (Morales FTTN). Talk to Anna and select Follow me. Go back to the elevator and select the 1st floor. (Lobby exit). Go to National Credit Systems.
As Ray, click on the Red curtain and give Morales FTTN to Ozzy during the conversation. Now as Anna drag the Prescription meds on the Red curtain. You'll receive Morales credit report. When you click RMB on it, a new location will be added to the map - Tortoise Security. Now switch to Bennet.
As Bennet, go to the Police Administration.
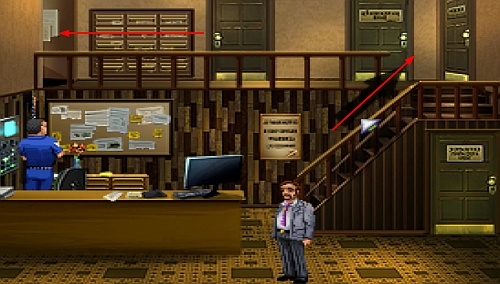
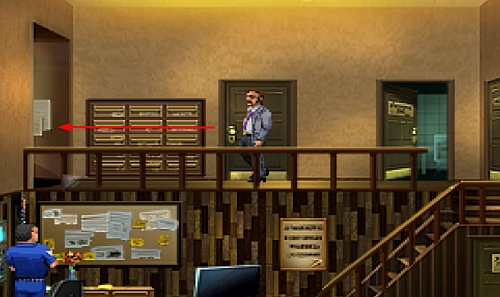
Go up the stairs, and then left.

Talk to Officer Johnsen. He'll soon ask you to approach the City archive (square). Do it, and when the screen with Scan Index Finger shows, click on the window below LMB sign. Access to the data will be rejected. Now click RMB on the Certificate (arrow). The information on Tortoise Security will show again. Place City archive in STM and leave the building. Go to National Credit systems.
Move the Ultra-Sonograph and Morales credit report from Anna's INV on Bennet.
As Bennet, go to Tortoise Security.
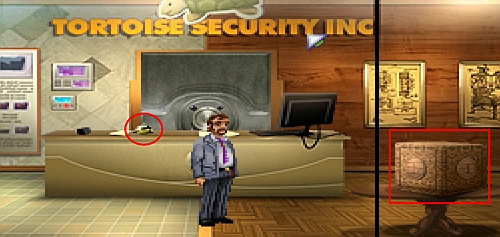
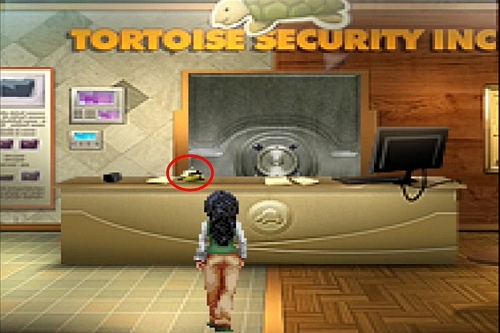
Inside, press the Bell (circle) for Tortoise to appear. Ask him all available questions. Afterwards, drag the Ultra-Sonograph on the Ornate safe (square).
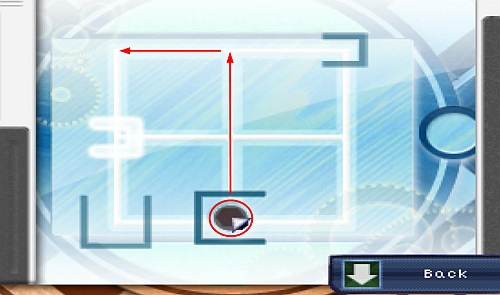
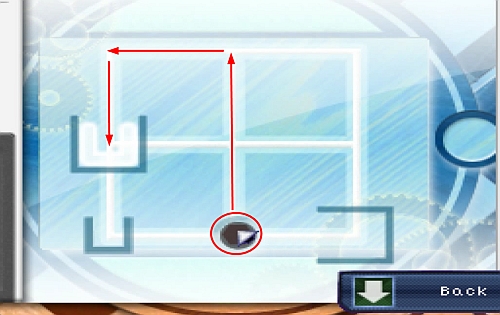
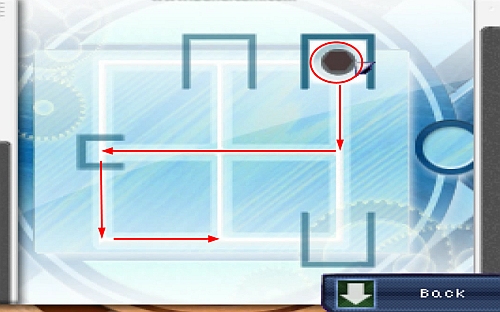
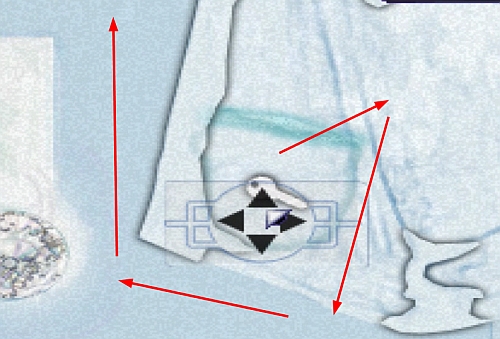
Blue
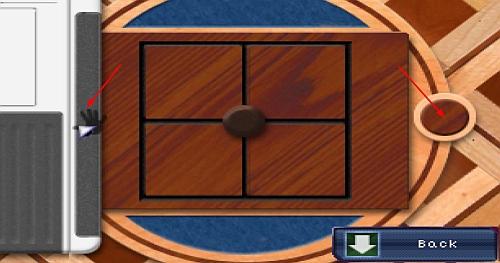
The puzzle has four parts. Let's start with Blue. First, click and hold LMB on the element on the left (left arrow) and drag it over to the right (right arrow).
Now move the circle in the middle (indicated by a circle) clockwise so as to reach the red square on the screen .
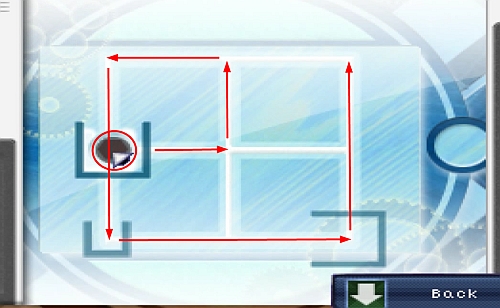
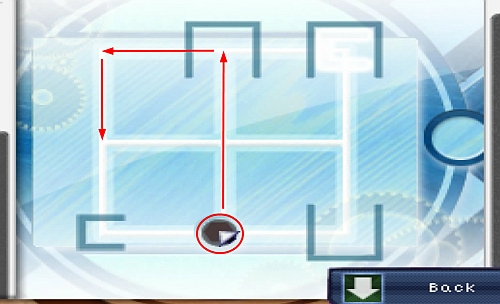
Green

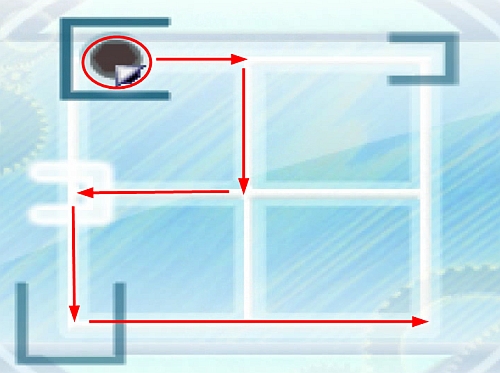
Again, start by extending the element on the left to the right. Then, move the circle from the middle of the puzzle to the square on the last screen.
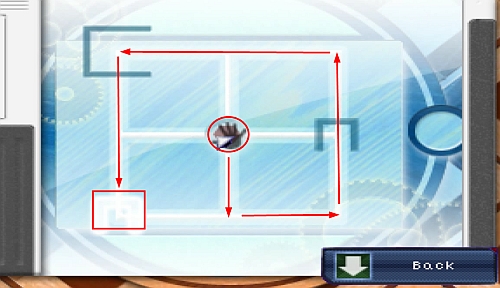
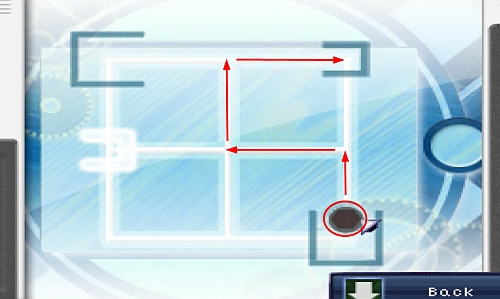
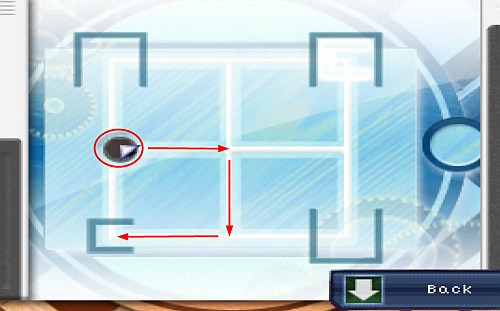
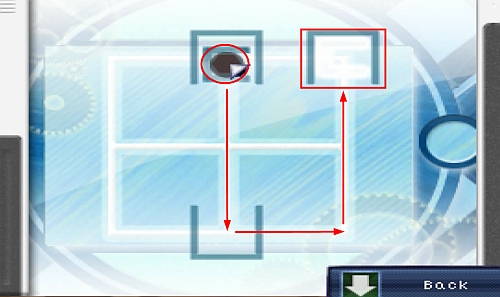
Yellow
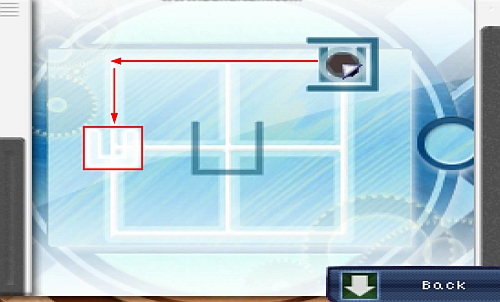
Once again, to reach the exit (the square on the screen) move the circle as instructed on the screenshots.
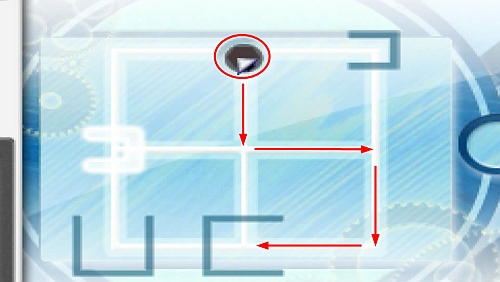
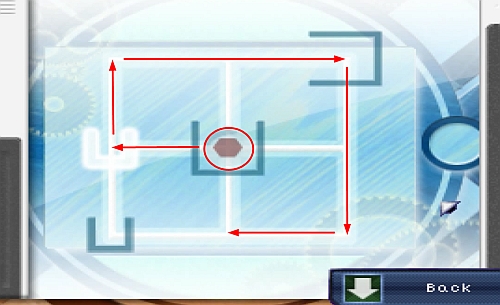
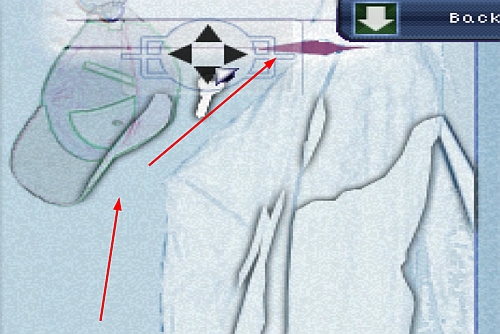
Red
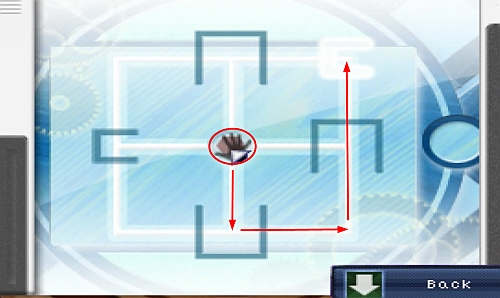
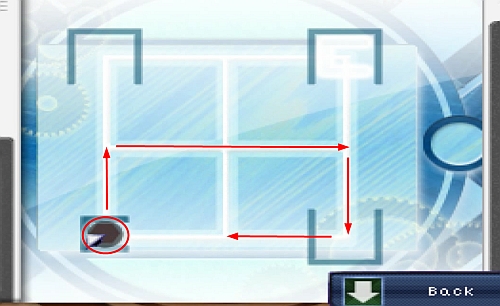
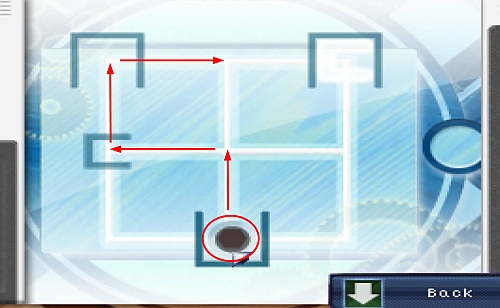
Same as before, move the circle as the arrows tell you towards the exit on the last screenshot.

When you sove the puzzle, talk to Tortoise about the City archive from STM. You'll receive a Master keycard. Now, during the conversation, use Morales credit from INV. You'll learn that in order to get further information you need to deliver Morales' Death certificate and Morales will to Tortoise. Go to National Credit Systems, where Anna and Ray should be waiting for you. Talk to them and select Follow me. Together, go to Police Administration.
After entering the building, drag the Master keycard from Bennet's INV on Ray's INV. If you want to go upstairs, you'll need to choose which character to take with you. Select Bring Ray. When Ray enters the interrogation room, go left as Bennet.
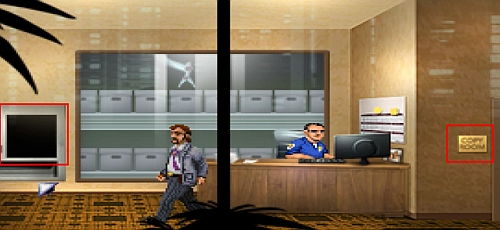
Add the Copy room (right square) to STM. The talk to Johnsen about Get will and death certificate from LTM. Approach the City archive (left arrow). Press LMB on the window below Scan Index Finger. You'll receive Morales will. Now talk to Johnsen about the Copy room from STM. Switch to Anna when the option appears.
Move the Security panel on the policeman Berry to drag him into a conversation. Switch to Ray.
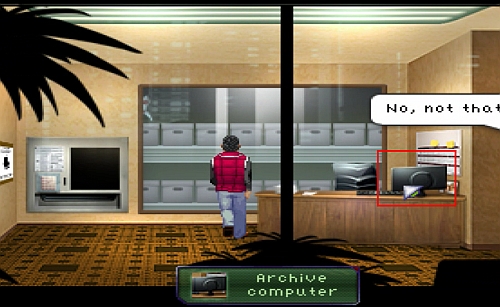
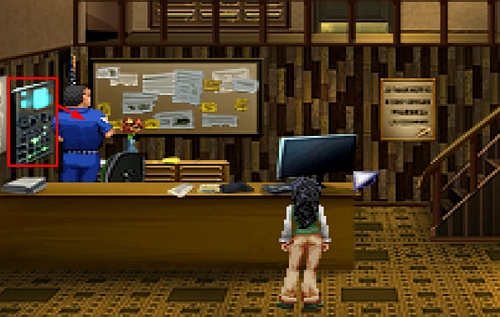
Go left where Bennet is distracting Johnsen's attention in the Copy room. Use the Archive computer.
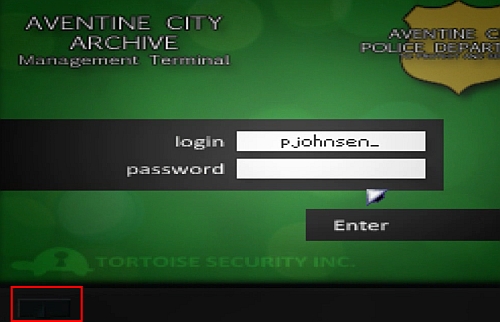
Use the Password cracker on the USB port to hack into Johnsen's account. First, you need to remove the port's flap (the rectangle in the lower left corner). When you learn the password, press Enter.
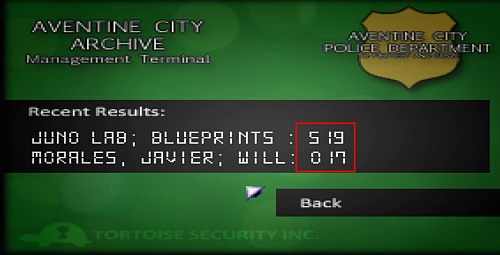
Select Recent Documents. Note down the designations for Blueprints and Will (in my case it's S 19 and O 17). Leave the computer.
Move the Master keycard on the City archive. Choose Retrieval Arm Manual Alignment.
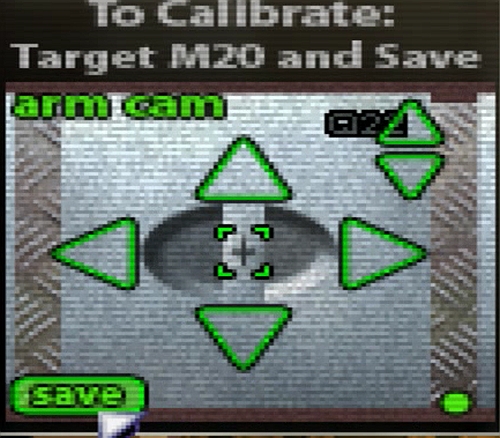
Now you need to recalibrate the extension arm. Set it on the archive (using the green arrows) which matches the difference between the letters and digits from Blueprints and Morales will found on Johnsen's computer, to M 20. In my case, the codes are S 19 (for Blueprints) and O 17 (for Morales will). The difference between O and S is +4 letters (including Q). The difference between 17 and 19 is +2. So, you need to set the arm on the archive Q (M + four letters = Q) 22 (20+2=22). When you've found the proper archive, hit SAVE. Remember to include letters such as Q and X in the summation and substraction.

When you're finished, go back to the main hall with the policeman Berry, who'll send you to the interrogation room. Take control over Bennet. Click on Interrupt in the lower right corner to leave the Copy room. Once again, ask Johnsen for Get will and death certificate from LTM. Approach the City archive and click LMB on the window below Scan Index Finger again. You'll receive Lab blueprints. Return to the hall and go downstairs where Anna is waiting. Give her Morales will from Bennet's INV. Now, as Anna, go to Tortoise Security.
Click on the Bell (square). When Tortoise shows up, use the Death certificate and Morales will from INV during the conversation. When it turns out that the data you're looking for have been stolen, you'll receive a Security cam picture. Now go back, with everyone, to the Baseball fields.
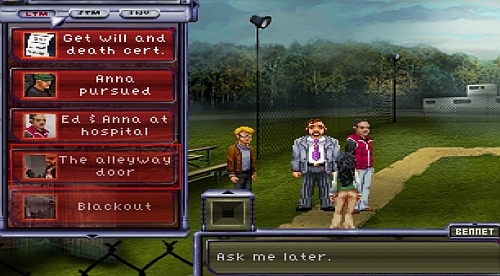
There, as Anna, talk to Bennet and use the Security cam picture. Then, select The alleyway door from LTM.
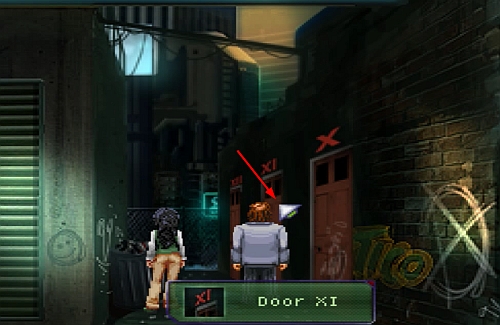
Anna and Bennet will go to the alley you've been watching previously. Click LMB on the middle door (Door XI) and choose: Knock twice, Knock once, Knock three times, Stop knocking. The door will open and Bennet will go inside. There, after a short conversation with a girl, you'll receive a Paper swan. You'll be automatically moved to the Baseball fields.
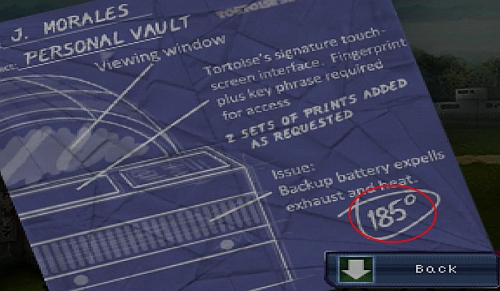
There, click on the Paper swan in Bannet's INV. It'll turn out to be to Vault plans - click RMB on them. Notice the temperature indicated by the circle on the blueprint. Switch to Ed. While talking to Anna, select Angelo's Grave from LTM. After the scene at the cemetery and going back to the Baseball fields, go to Juno Laboratory as Ed.
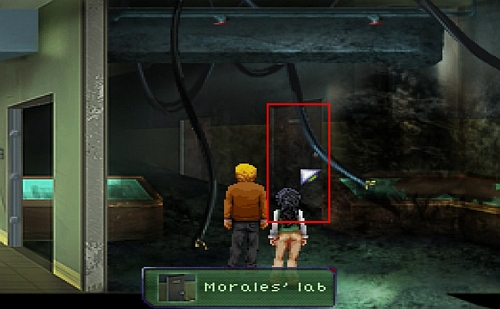
There, go inside and head for Morales lab.
Approach the Terminal. Then, select Touch to Start, Utilities, and Thermal Scan.
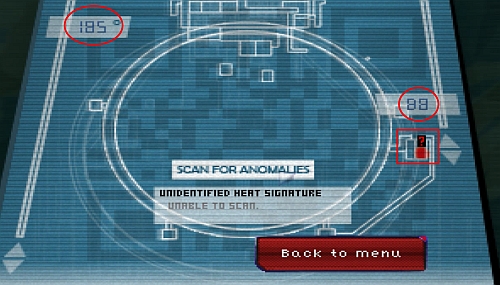
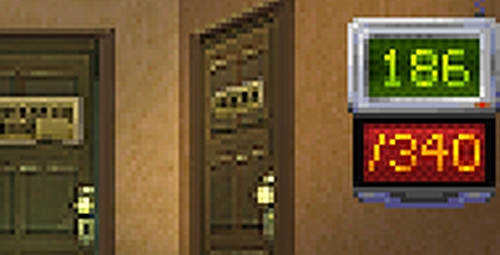
Set the left slider on 185 degrees (left circle), and the right one on B8 (right circle). Now press SCAN FOR ANOMALIES. A question mark should appear on the map, indicates by the square on the screen. You'll be moved to the Baseball fields, and then back to Juno laboratory.
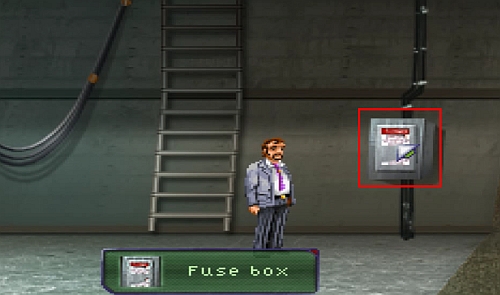
You'll learn from a conversation that Ray and Anna don't have any metal objects on them, so they can go under the super magnet safely. Select Bennet. Go right and pass the ladder. There is a Fuse box to just to the right of the ladder. Click LPM twice on the Fuse box (first time to open the flat, the second time to turn off the power in the switch above).
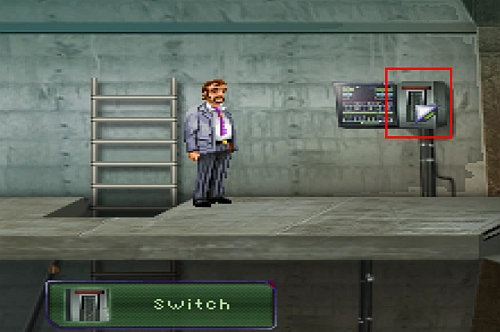
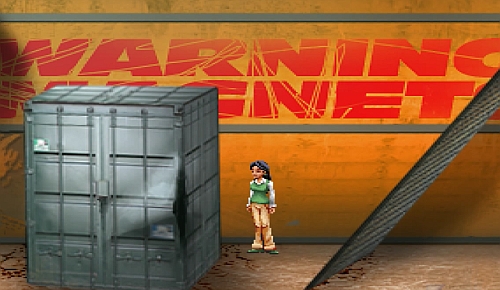
Climb the ladder and press the Switch. The container blocking the way will be lifted.
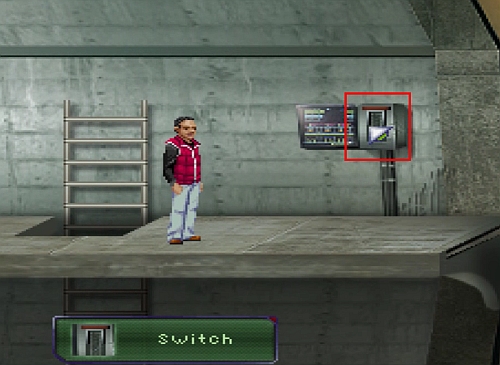
Now take control over Anna. Talk to Ray and select Follow me. Lead the two of them to the right until you reach the second ladder. As Ray, climb up and use the second lever (Switch). The second container and the plank will be lifted up.
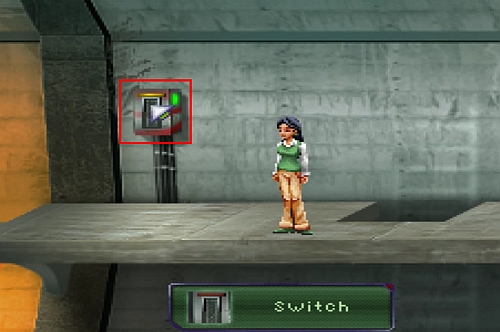
As Anna, proceed to the right until you reach a Door and a Fuse box. Click on the Fuse box twice to restore the power in the third switch.
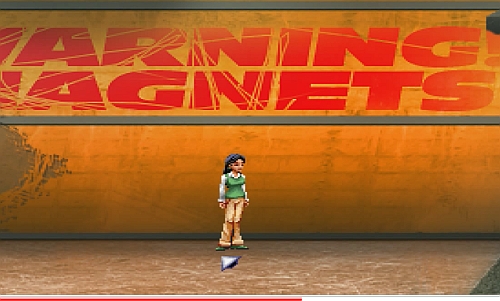
Now go back left and place Anna exactly as seen on the screen, under the letter N on the writing on the wall (otherwise she'll be crushed by objects pulled in by the magnet).
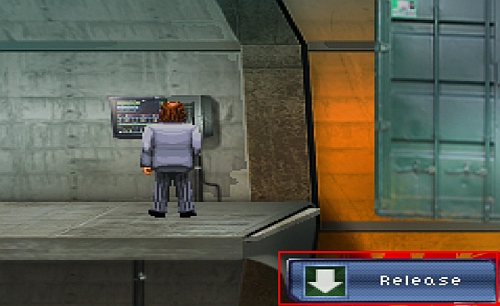
When Anna is safely in position, switch to Ray. Select Release (upper right corner). The container and the plank should fall on the ground without hurting Anna.
Switch to Bennet also select Release. The first container will drop to the ground.

Select Anna. Climb up the sloping plank.
Select Ray. Again, turn the magnet on by pressing the Switch. The container and the plank will be lifted up. Switch to Anna and use the third switch as seen on the screen. Two planks will appear - the first above the container, the second under it.
Take Anna a little to the right, because the plank that is about to drop down is right above her head.
Take control over Ray and click Release on the second switch. Both magnets should be active now, with the first container on the ground under the horizontal plank, and the second on the plank. Take control over Ed, go up the ladder to Bennet and have him follow you (Follow me). Take both of them across the plank to the right, down the ladder, and further right to the Fuse box by the door.
Take control over Ray and click on the Switch to activate the magnet. Go back to Ed and turn the power off (click on the Fuse box by the door). The planks should retract. Go back to Ray and select Release. The container and the plank will land on the ground. Again as Ed turn the power on by using the Fuse box by the door. The planks will appear. As Anna, walk left across the plank to Ray. Select Ed and click on Fuse box again (the planks will retract).
Select Ray and activate the magnet (Switch). Switch back to Ed and turn the power on to move the planks forward again. As Ray, select Release, talk to Anna and choose Follow me. Climb down the ladder to the left of the Switch, and then go right to Ed and Bennet. Talk to all of them, select Follow me and use the Door.
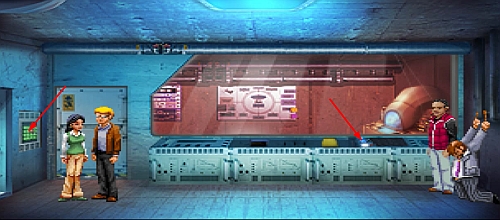
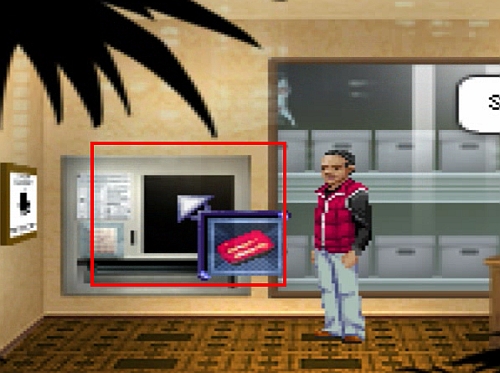
After the cutscene you'll have control over Ed. Click on the Door controls (left arrow). The door beside the panel will open, but the way forward will still be blocked by Bars. Approach (LMB) the Fuse panel (right arrow).

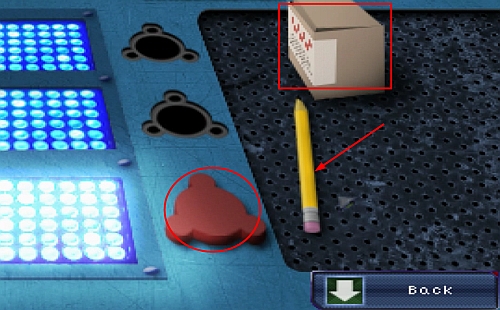
Take the Small box (square) and the Pencil (arrow) from the console, but don't touch the Fuse slot (circle) yet. Leave the console and open INV. Click on the Small box to receive a Fuse.
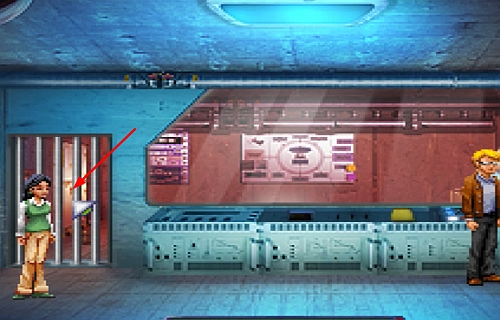
Take control over Ray. Move the Pipe from his INV to Ed. Switch back to Ed and open his INV. Drag the Duct tape on the Pipe to receive a Pipe with tape. Approach the Bars.
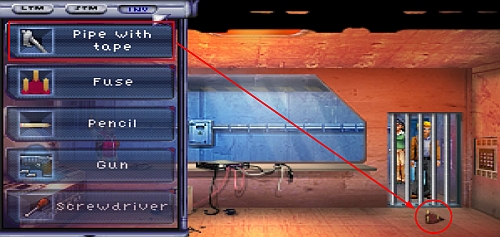
Use the Pipe with tape to reach the Fuse.
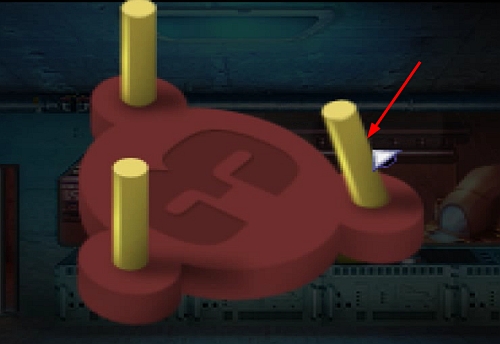
Click RMB on both Fuses in your INV. The Fuse marked by No. 3 has a Bent pin - click on it to straighten it.
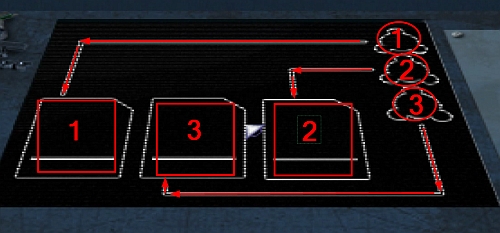
Approach the Fuse panel again. Take the Fuse out of the Fuse slot. With three Fuses in INV, check their numbers (RMB). Place them accordingly in the Fuse slot, as presented on the above screen.
Now approach the Pad of paper.

Open INV and move the Pencil on the Pad of paper. The pencil will be placed by the notebook. Click and hold LMB on the Pencil, and then use it to reveal the code 3132 2133.
Approach the Small code panel.
Now you need to use the three buttons (indicated by squares) which correspond to the Fuse numbers you've previously used on the Fuse panel (circles). If you inserted the Fuses as instructed on the previous screenshot, press the buttons in the following order: 3 1 3 2 2 1 3 3. If you do it properly, the Bars will be lifted.
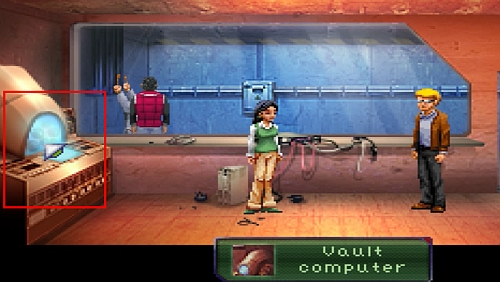
You'll have control over Anna. Approach the Vault computer. Then click on Touch to Start. You need to enter the Key Phrase which you don't know yet.

When you have control over little Anna, click on the Stairs. After the cutscene you'll be moved to the cemetery.
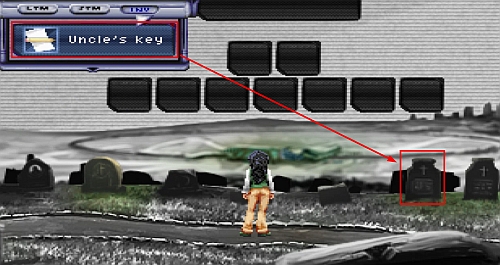
Open INV and drag Uncle's key on Father's grave.
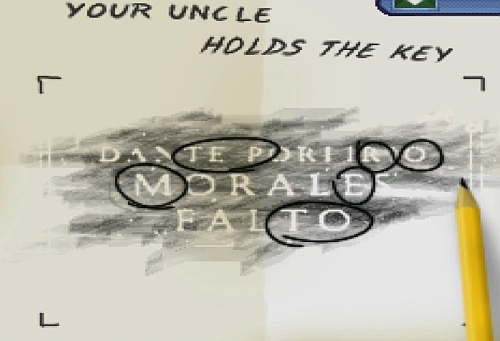
Again, take the pencil and use it on a piece of paper to copy the letters from the tombstone to the paper. The letters in circles form Key Phrase. Select Back.
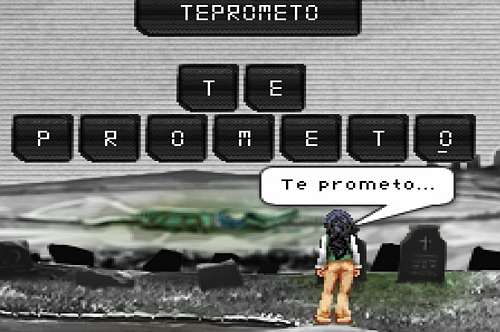
Use the keyboard to enter the Key Phrase, which is TE PROMETO. Go back to the computer screen and select OK. After a short scene, press Play. You now have a choice: either to Destroy, or Open the Vault. Choose whatever you feel is right (both choice resolve the plot in an identical way).
You'll now have control over Ray. Choose the following dialogue options:
From LTM, select in order:
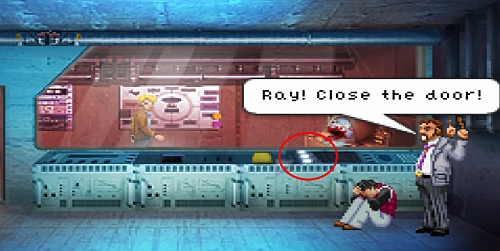
Select the Subway map from INV. When Bennet screams: "Ray! Close the door!", click on the Fuse panel.
The events will move to the baseball fields. When Reggie shows up, use all available dialogue options. When they're over, select The alleyway door from LTM. Next select the Security cam picture from INV. You'll receive a Paper crane. Go to Edgetown.
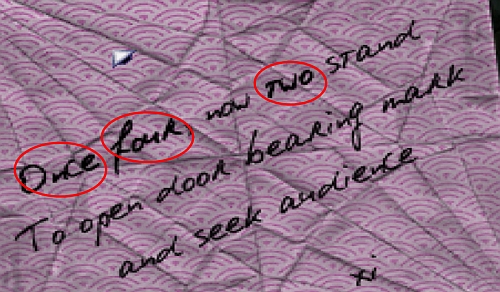
Go into the alley. Try the previous knocking combination on Door XI (Knock twice, Once, Three times, Stop knocking), but this time it won't be of any use. Open INV and click LMB on the Paper crane. You'll receive a Haiku - click RMB on it. The new knocking combination is: Knock once, Four times, Twice, Stop knocking.
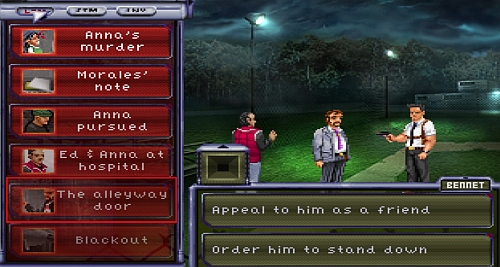
As Bennet, use all available dialogue options apart from Arrest them. Switch back to Ray and select Amul Batra, then choose Ray's smartphone from INV.
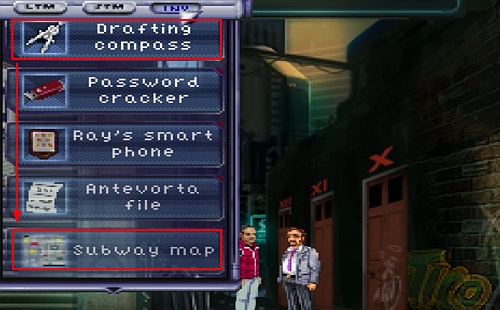
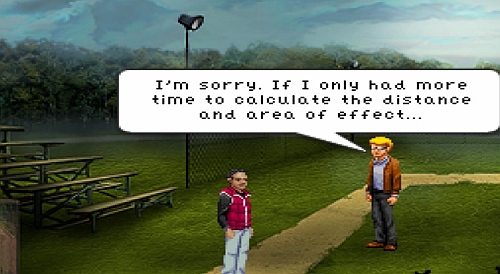
Go back to Bennet and select Arrest them, then choose the Security cam picture from INV. In the conversation, select How do we stop Ed. You'll hear an information about a 4 km distance from Juno laboratory. After the conversation you'll find yourself in the alley again. Switch to Ray. Drag the Drafting compass on the Subway map from his INV.
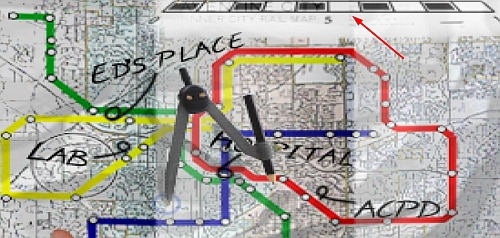
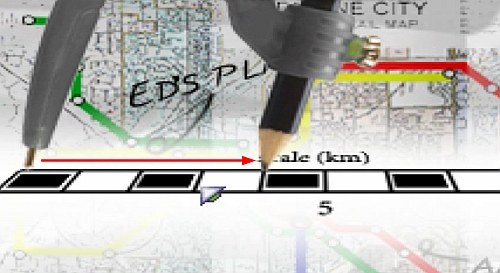
Click LMB on the distance scale on the top of the map (arrow), set in on 4km (as seen on the screen) and go back to the map.
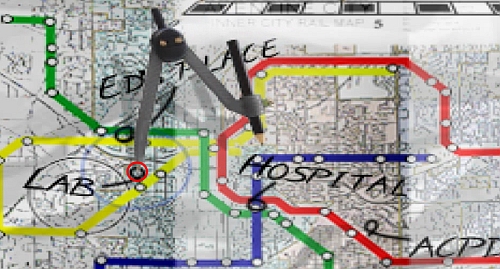
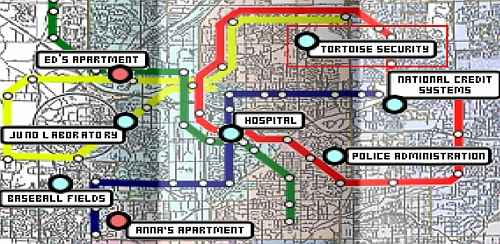
Place the needle in the red circle seen on the screen and click LMB. Ed's apartment will appear as a location. Leave the alley and Edgetown and go to Ed's apartment.
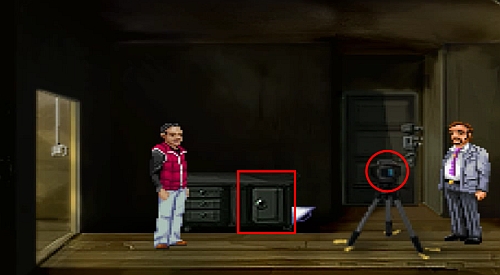
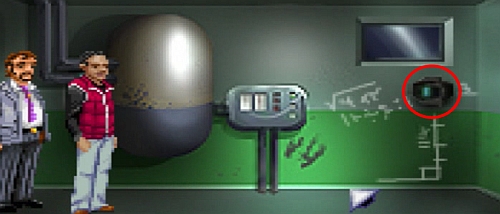
Click on the Cabinet Door (square) and select Take all. Now click on the Camera tripod (circle). Switch to Bennea. Click LMB on the Resonance device B in INV, then select Check text messages.
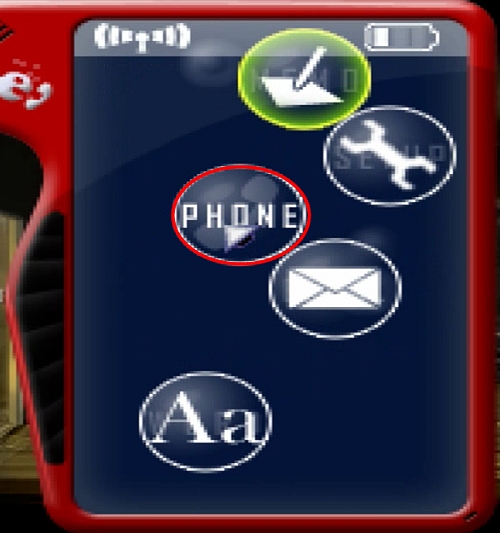
Switch back to Ray. Select Ray's smartphone from INV, choose Phone, and then Reggie's number from LTM. During the conversation select 14A number from LTM. End the conversation and go to the Police Administration.

There, go up the stairs and left. Switch to Bennet and drag the Credit card from INV on the Tech room. Go inside.

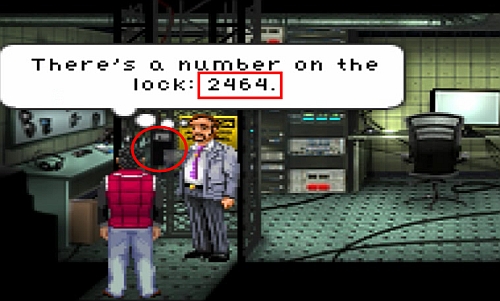
Click RMB on the Electronic lock (circle). You'll see a randomly generated code - remember it (in my case it's 2464). Leave the room and go to the main hall.
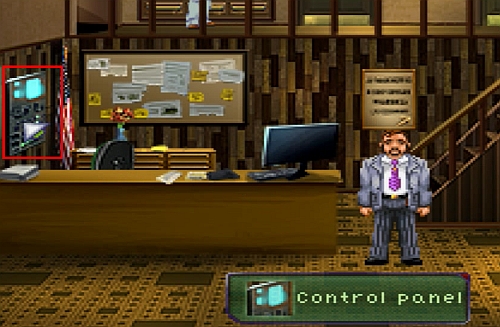
Approach the Control panel.
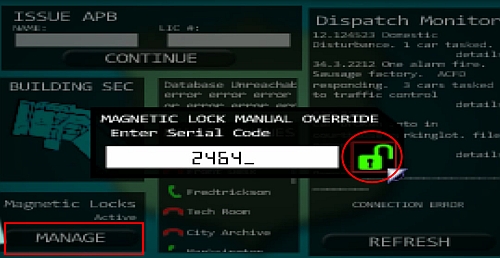
Click on Manage (rectangle in the lower left corner). A window will appear - enter the code you saw on the Electronic lock and press the padlock icon (circle). Go back to the Tech room.
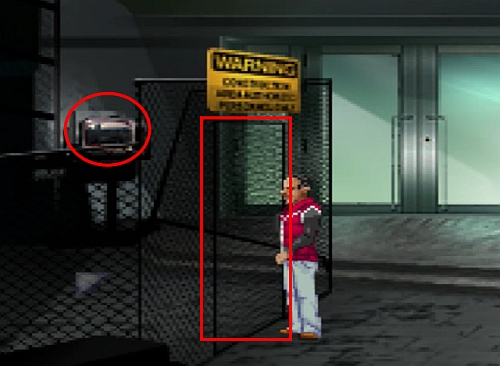
Click LMB on the Electronic lock to open the gate. Approach the Terminal screen (square). Select 14A number from LTM. A new location will appear on the map - Warehouse. Before you go there, switch to Ray (who should have the Screwdriver from Ed's apartment in INV). Move the Screwdriver on the Magnet (circle). You'll receive a Small magnet. Leave the Police Administration and go to the Warehouse.
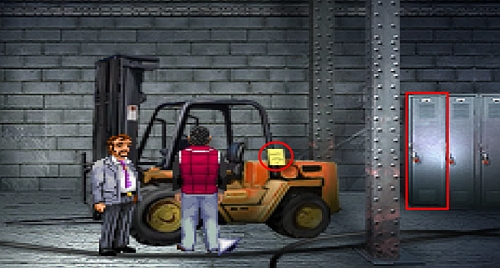
There, Ray will receive a new e-mail which you can read on Ray's smartphone. The note (circle) on the forklift will tell you (click RMB) that the key is in the locker (rectangle) as a guy named Todd. Move the Small magnet from Ray's INV on Bennet's. Now take control over Bennet, who should have the Small magnet and the Ultra Sonograph in his INV. Drag the Ultra-Sonograph on Todd's locker (rectangle).
Extend the element from the left to the right to see what's behind the locker's door. You'll find the key in the pocket of the jacket (circle). Move the Small magnet over the key and start directing it according to the arrows towards the holes on the top of the door. You'll receive a Forklift key.
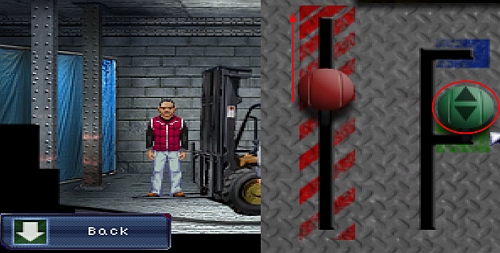
Place Ray as seen on the screen (on the lift's forks). As Bennet, use the Forklift key on the forklift and then click LMB on it (Forklift). Set the green lever as seen on the screen, and then pull the red one up.
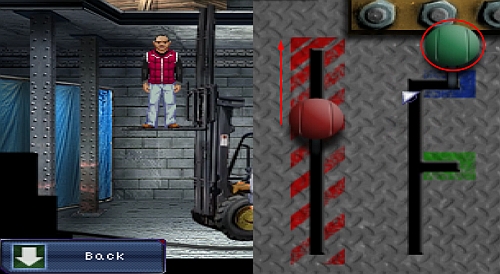
When you can't lift Ray any higher, set the green lever as seen on the screen, and pull the red one up. Ray should reach the upper floor.
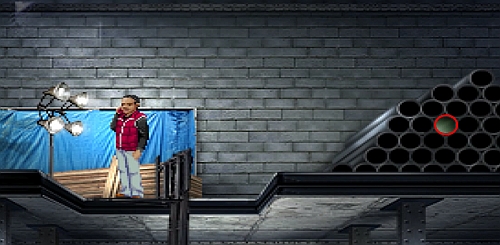
As Ray, select Ray's smartphone from INV and the Phone option. Choose 14A number from LTM. One of the pipes' openings should start glowing, as seen on the screen (random spot). When you find the right opening, click on it to receive a Resonance device A. Now go back to the forks and as Bennet lower Ray down (the process opposite to lifting him up, but this time pull the red lever down).

When Ray is down, take control over him and click on the Resonance device A from INV. Then, choose Check text messages. Cellphone number will appear in LTM. Leave the Warehouse and go back to the Police Administration.
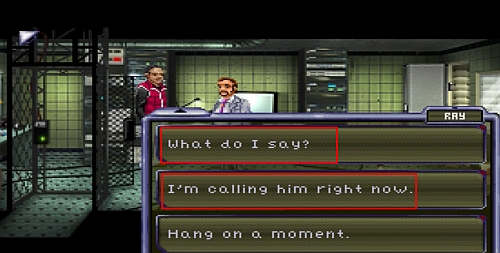
There, go to the Tech room again. Approach the Terminal screen. Select Cellphone number from LTM. It will turn out that you need to call Ed and hold him on the line long enough to trace the number. Select What do I say as soon as it appears, and then I'm calling him right now. During the conversation with Ed choose the following dialogue options:
The conversation will end, but you'll be able to trace the number. Talk to Bennet and select the DNA database from LTM. You'll be automatically moved in front of the hospital.
Go inside and choose the 7th floor in the elevator. Talk to Emma about the Mainframe (move Mainframe on Emma). You'll learn that you need to go to the basement. Go back to the elevator and press B.
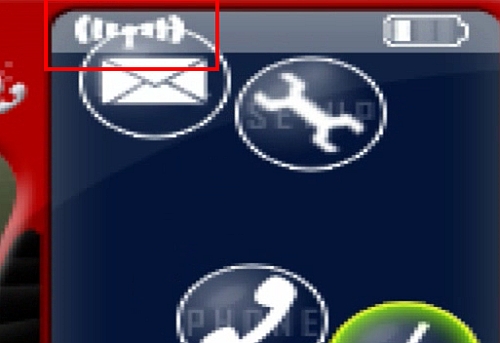
There are a couple of doors there, and the device you're looking for behind one of them. As Ray, approach every door as closely as you can, selecting Ray's smartphone from INV. Notice the smartphone's reception (rectangle). If the reception is full, as on the screen, you're at the right door. Click on it and choose Kick it in.
Inside, click on the Resonance device. You'll receive a Live Resonance device. Go back to the elevator and select the 1st floor.
Outside, click on the Wire gate (rectangle), and then on TV (circle). After the cutscene you'll find yourself on the top of the crane. Now it's time to decide which ending you'll see, depending on the choices you've made.

To see this ending, select the following dialogue options:
As Ray:
As Bennet:
This is when the characters should line the way they're standing on the screen.
As Ray:
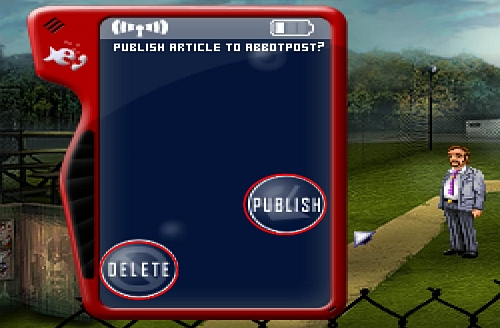
After the cutscene, the events will move to the baseball fields. After the conversation you'll need to decide whether to Delete the article, or to Publish it The choice will only affect the newspaper headlines during the credits.
You'll receive this ending by choosing the following dialogue options:
As Ray:
Then educate me on Antevorta
You're a sociopath
How do we stop them?
Show him the device in your pocket
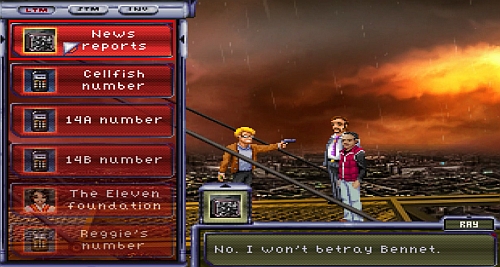
Select News report from LTM.
After the cutscene you'll be moved to the baseball fields. When the dialogue ends, you'll see the credits.


 Risen 2: Dark Waters Game Guide & Walkthrough
 Resistance 3 Game Guide & Walkthrough
 Red Faction: Guerrilla Game Guide & WalkthroughReus Game Guide & Walkthrough
 Rage Game Guide & Walkthrough