Welcome to the guide to Storm of Zehir - the second Neverwinter Nights 2 expansion. I hope that this guide and walkthrough helps you enjoy the gameplay and discover the secrets of Storm of Zehir.
The text has been split into following sections:
Party - where you'll find tips on creating your party, companion descriptions and the information on Adventurers Guild where you can learn party feats.
World Map - rules for moving about the world map, which changed drastically in this expansion, and the descriptions of some of the random encounters.
Trade - the basics rules for managing trade, listings of resource prices in each city and costs for expanding your merchant organization.
Main Quests (The Ship, Samarach, Sword Coast, North Samarach) - descriptions of main story quests.
Locations - location descriptions along with side quests that can be obtained in them.
Brown - quests I.e. quest 12: Shortage
Blue - places, locations I.e. Crypt
Orange - items I.e. short sword +1
100 $ - 100 gold pieces
Green - characters, monsters I.e. Volo, vampires
If a location is marked with (V) or I.e 12. Barrow - Volo, it means, that the location is of interest to Volo and it's tied to the quest you get from him early in game.
Karol "Karolus" Wilczek
At the beginning of the game you will be given to create four characters who from the base for your party. Later in game you will be able to recruit NPCs to join your cause (one or two, depending on whether one of your characters has the Leadership feat). There are quite a few ways to build your party, and there isn't one that's perfect, as much depends on individual preferences and experience. In my opinion, the build suggested by the game, as it is quite effective and universal - fighter, wizard, rogue and cleric. This combination also allows you to make best use of the first NPC you will be able to recruit - Umoja (druid). When creating your characters, consider giving them different alignments, as the use of some of the items depends on your alignment.
Storm of Zehir puts emphasis on skills. They're often used in conversations and on the world map. For instance, one of the traders will offer you a magic ring, but after using dialog option with Spellcraft one of your characters reveals that the item isn't actually magical at all. Merchant will admit that he tried to misguide you and will offer you a lower price for it. This time, Appraise comes in handy, as one of your character realizes that the price is still too high for a genuine ring like this. On the world map, Survival comes in handy, as character with points in this skill moves faster than those without. Do your best to diversify and distribute skills among your characters in such a way, to gain access to as many skills as possible - if you don't have to, don't duplicate the skills - this way you should gain access to most dialog options and be able to solve your problems the way you want to. You can also take a look at the NPC companions that join you early in the game (Umoja, Inshula, Lastri), pick one of them (I recommend Umoja), check what skills he or she has and save on those skills when creating your characters.
You will meet him in Samargol. Talk to him and offer to join your party. Umoja will consult with his dinosaur and agree to join you. His "pet" is a quite powerful, making Umoja, a valuable cohort.
Level: 4
Race: Human
Class: Druid
Character: Neutral Good
Attributes: Strength 12 / Dexterity 14 / Constitution 12 / Intelligence 9 / Wisdom 17 / Charisma 10
Skill points in: Concentration, Listen, Spot, Survival
You will meet her in Samargol. Talk to her for a while and ask whether she wants to join you. You may use Diplomacy and tell her that the ship crashing on the beach and your meeting was no coincidence. She will agree, but will ask you to give her 300 $ for her sister. You can also tell her to check what the cards have to say but it's not a good idea - she will ask for 500 $ if you don't stop her from doing that. You can bargain however, to lower the price to 300 $. While she's reading the cards you may use Bluff or Sleight of Hand to gain her trust - this way, Inshula will join you for free.
Level: 5
Race: Human
Class: Ranger
Character: Neutral
Attributes: Strength 12 / Dexterity 17 / Constitution 10 / Intelligence 9 / Wisdom 14 / Charisma 8
Skill points in: Concentration, Hide, Move Silently, Parry, Search, Survival
You will meet her at the very beginning of the game as the captain of the ship you're on. You will be able to invite her to your party after completing one of the early quests in Samargol (see quest: Missing Personel).
Level: 4
Race: Halfling
Class: Swashbuckler
Character: Neutral
Attributes: Strength 8 / Dexterity 19 / Constitution 12 / Intelligence 13 / Wisdom 10 / Charisma 11
Skill points in: Diplomacy, Lore, Parry, Tumble
You will find him in the Black Market. He and some other gnomes are being held prisoner if you want to free him, you will need to open his cell, provoking the Illithids to attack you. After you kill them off talk to Chir, and he will join you.
Level: 3
Race: Gnome
Class: Wizard
Alignment: Chaotic evil
Attributes: Strength 8 / Dexterity 14 / Constitution 12 / Intelligence 19 / Wisdom 10 / Charisma 8
Skill points in: Concentration, Craft Alchemy, Craft Armor, Craft Weapons, Lore, Spellcraft
You will meet her in the second part of the game on the Sword Coast, in the Crossroads Keep.
Level: 8
Race: Sun elf
Class: Favored Soul
Alignment: Chaotic good
Attributes: Strength 16 / Dexterity 9 / Constitution 10 / Intelligence 13 / Wisdom 10 / Charisma 20
Skill points in: Concentration, Heal, Spellcraft
You will meet him in the Neverwinter tavern. Using Diplomacy you may convince him to join your party for free. Otherwise, you will have to pay a donation of 1000 $.
Level: 8
Race: Half-orc
Class: Paladin
Alignment: Lawful good
Attributes: Strength 17 / Dexterity 10 / Constitution 14 / Intelligence 8 / Wisdom 12 / Charisma 15
Skill points in: Move Silently, Parry
She is in Waukeen temple in Neverwinter. You can hire her for 5000 $ or 3000 $ if you have enough ranks in: Bluff, Diplomacy, Intimidate.
Level: 8
Race: Aasimar
Class: Rogue (Level 6), Shadow Thief of Amn (Level 2)
Alignment: Neutral evil
Attributes: Strength 12 / Dexterity 22 / Constitution 14 / Intelligence 14 / Wisdom 10 / Charisma 10
Skill points in: Appraise, Bluff, Disable Device, Hide, Intimidate, Listen, Lore, Move Silently, Open Lock, Search, Set Trap, Spot, Tumble
You'll find him in West Harbor. You need to complete West Harbor - Path of the Master, to recruit him.
Level: 8
Race: Half-drow
Class: Sorcerer
Alignment: Chaotic evil
Attributes: Strength 10 / Dexterity 20 / Constitution 12 / Intelligence 12 / Wisdom 10 / Charisma 16
Skill points in: Bluff, Diplomacy, Intimidate, Lore, Move Silently, Parry, Spellcraft
You will meet him in a tavern somewhere in the Sword Coast. He will join you during the quest Sword Coast - Price of a Song.
Level: 10
Race: Half-elf
Class: Bard
Alignment: Chaotic good
Attributes: Strength 12 / Dexterity 16 / Constitution 10 / Intelligence 11 / Wisdom 8 / Charisma 20
Skill points in: Concentration, Diplomacy, Lore, Perform, Spellcraft, Use Magic Device
You will find him locked in a cell in Onyx Cave.
Level: 10
Race: Human
Class: Monk
Alignment: Lawful neutral
Attributes: Strength 22 / Dexterity 14 / Constitution 16 / Intelligence 8 / Wisdom 16 / Charisma 8
Skill points in: Hide, Move Silently, Parry, Tumble
You will meet him in Port Llast. He will ask you to solve the undead problem (check Port Llast - Army of the Dead). After completing the quest return to do Port Llast and talk to Septimund. You need a high Diplomacy score to convince him to join you; otherwise he will leave and you'll never see him again.
Level: 13
Race: Human
Class: Cleric (10), Doomguide (3)
Alignment: Lawful neutral
Attributes: Strength 14 / Dexterity 12 / Constitution 14 / Intelligence 12 / Wisdom 22 / Charisma 14
Skill points in: Concentration, Diplomacy, Heal, Lore, Spellcraft
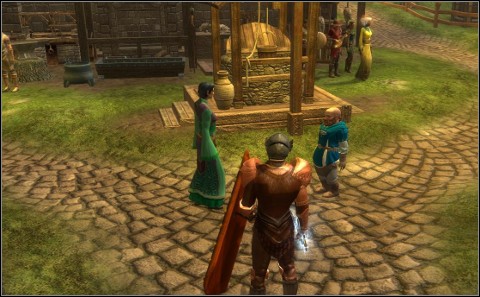
At Crossroads Keep there's a building called Adventurer's Guild. At first, it will be closed, but soon it will open up. You can buy teamwork feats here - feats that affect each character in your party. The guild has four trainers at your disposal: Candril, Daerred, Maxil and Juen. The number of feats you can learn is limited, however, and is equal to 1/3 your current level, rounded down - i.e. on level 12 you can have a maximum of four teamwork feats.
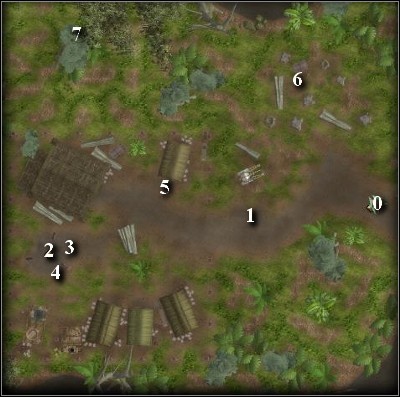
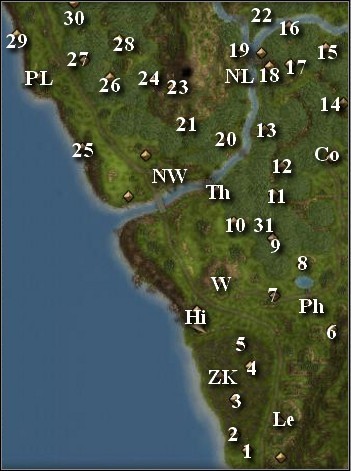
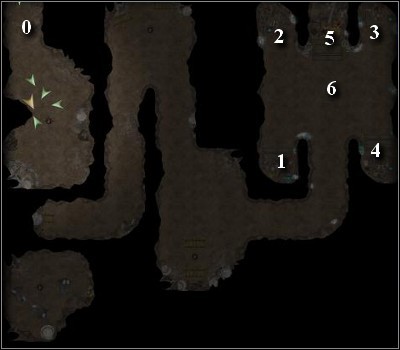
Map of locations with teamwork feat quests.
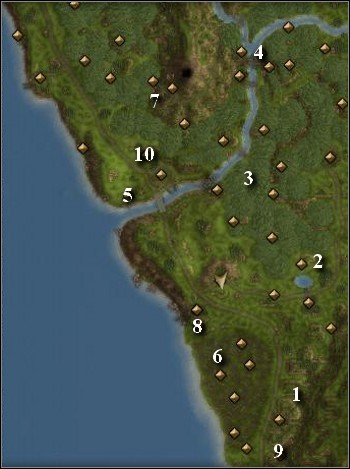
1. Umber Hulk Cave (Foe Hunting) - Volo
2. Elven Tower (Group Trance)
3. Ruined keep (Missile Volley) - Volo
4. Goblin camp (Team Rush)
5. Destroyed camp (Camp routine)
6. Mere of Dead Men (Improved Camp Routine) - Volo
7. Sintalpandax's Lair (Steadfast Resolve) - Volo
8. Dom (Awareness) - Volo
9. Illefarn Outpost (Circle of Blades) - Volo
10. Cemetery (Superior Flank) - Volo
Foe Hunting
Cost: 1000 $
Benefit: Party gains +2 damage bonus vs favored enemy.
Leader requirements: Favored enemy, base attack bonus +4
Requirements for the party: Survival 1+, base attack bonus +4
Quest: You need to go to the Umber Hulk cave, near Leilon and kill all of the monsters inside.

Group Trance
Cost: 1000 $
Benefit: Resting takes 4 hours instead of 8.
Leader requirements: Elf, Half-elf
Party requirements: Concentration 1+
Quest: You need to visit the Elven tower and meditate there.
Missile Volley
Cost: 1000 $
Benefit: Party members get a +1 to their attack with missile weapons when a previous party member attacks with a missile weapon.
Leader requirements: None
Party requirements: Point Blank Shot
Quest: You need to visit the Ruined keep east of Thundertree and kill the golem that lives there.
Buying experience points
You can buy experience points for an NPC companion here, provided that he has less exp than any of the four characters created by you. One experience point costs 1 $. This way you can level up your support characters - it's really useful when you meet an NPC with level lower than your party's.
Fearsome Roster
Cost: 1000 $
Benefit: Enemies with at least three levels less than you will run away from you on the world map.
Leader requirements: Intimidate 8+
Party requirements: Intimidate 1+ or Charisma 13+
Quest: You need to tell Daerred, about one of your achievements.
Improved Fearsome Roster
Cost: 1000 $
Benefit: Enemies with at least two levels less than you will run away from you on the world map.
Leader requirements: Intimidate 12+
Party requirements: Intimidate 2+ or Charisma 14+
Quest: None
Team Rush
Cost: 1000 $
Benefit: Each character in your party will move about the world map as fast as the fastest character in your party.
Leader requirements: Survival 8+, Toughness
Party requirements: Survival 1+
Quest: You will need to visit the goblin camp, north of New Leaf. Inside, you will encounter one enemy, whom you need to kill in order to complete the quest.
Camp Routine
Cost: 1000 $
Benefit: During rest chances that you will be disturbed are lowered by 25%.
Leader requirements: Survival 8+
Party requirements: Survival 1+
Quest: You need to visit the Destroyed camp.
Improved Camp Routine
Cost: 1000 $
Benefit: During rest chances that you will be disturbed are lowered by 50%.
Leader requirements: Survival 12+
Party requirements: Survival 2+
Quest: Head to the Mere of Dead Men, north of West Harbor. Start the fire near a tree and deal with Ghostly Druids, who will interrupt your rest.
Steadfast Resolve
Cost: 1000 $
Benefit: Party receives +2 bonus to will saves vs fear.
Leader requirements: Concentration 8+, Iron Will
Party requirements: Will save +2
Quest: You need to kill a young red dragon in his lair north of Neverwinter.
Awareness
Cost: 1000 $
Benefit: Each party member receives +2 bonus to Listen and Spot
Leader requirements: Listen and Spot 12+
Party requirements: Listen 2+ or Spot 2+
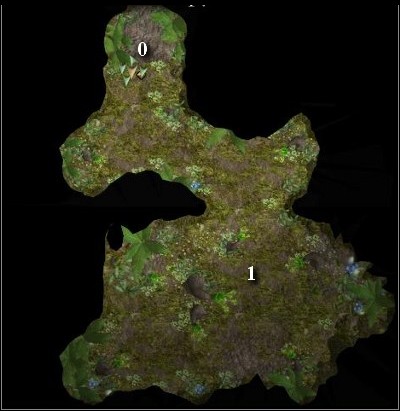
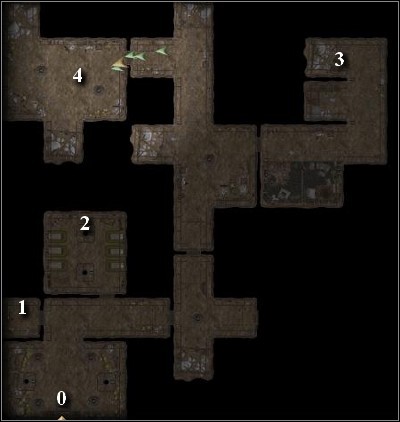
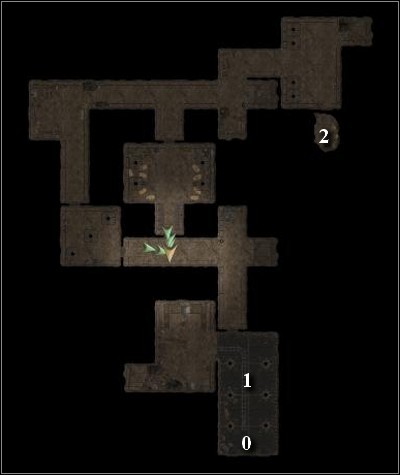
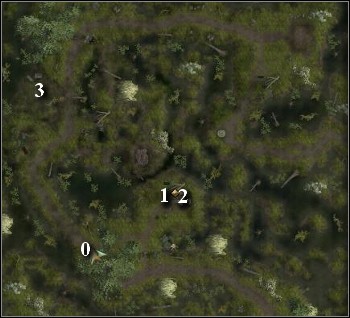
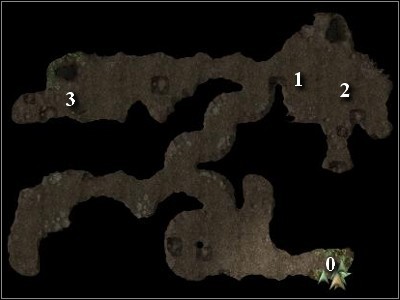
Quest: You need to play hide and seek with three halflings. Visit the house south of Highcliff and find them.
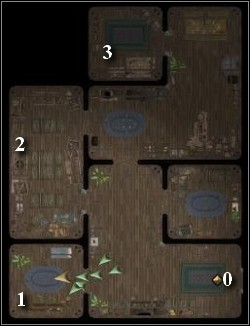
0. World Map
1, 2, 3 - Halflings
Circle of Blades
Cost: 1000 $
Benefit: Attack vs flanked enemy receive a +2 damage bonus.
Leader requirements: Weapon specialization, base attack bonus +6
Party requirements: Weapon Finesse or Sneak attack +1d6
Quest: South of Leilon you will come across a Illefarn Outpost. Go there and kill the necromancer. Residing inside
Superior Flank
Cost: 1000 $
Benefit: Attacks vs flanked enemy receive +2 attack bonus.
Leader requirements: Sneak Attack +4d6
Party requirements: Base attack bonus +3
Quest: Head to the Cemetery north of Neverwinter. Inside, deal with the assassins.
World Map in Storm of Zehir has been completely redone. Instead of clicking on the location you want to reach you need to actually travel there, covering whole distance "on foot". There are monsters wandering about the map all the time, ready to attack you. During your travels you will come across new locations, random encounters and a great deal of items scattered about the map.
Only one character is always visible on the world map. Depending on his skills you may gain various benefits and penalties:
Hide and Move Silently decide whether the nearby creatures will notice you or not.
Listen and Spot are responsible for noticing creatures and people on the map.
Search allows you to notice hidden locations and treasures.
Survival allows you to move faster than normal.
Other skills come in handy from time to time allowing you to find things such as healing herbs (Heal), old trap elements (Craft Traps), magic runes (Spellcraft) etc.
Wandering about the world map you may run into some interesting characters appearing at random all over the map. Below you'll see a list of encounters I met through my game.
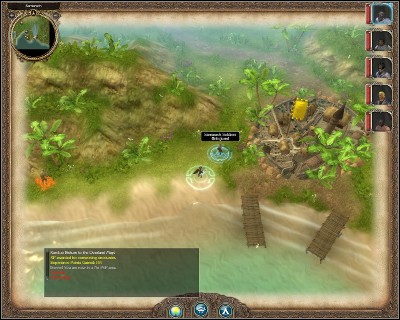
Samarach Soldiers - They will stop you and perform a magic test to check whether came in contact with Yuan-Ti the test, of course will come up positive and you will be forced to pay 2000 $ or fight them.
Charm Peddler - he wants to sell you a magic ring. Using Spellcraft you may learn that this is just plain, non-magical jewelry.
Delirious Hunter - You may heal him and listen how he fought the Demons of Samorlogh.
Diseased Townsfolk - If you want to heal those people you first need to convince them you mean them no harm.
One of Many - Demon feeding on souls. You can fight him or offer him some of your companions, provided that you have an evil character in your party. Each of the companions you offer him gives you a nice experience as a reward. After sacrificing three companions you will receive a feat improving your Strength and Intelligence by one. Another three companions will improve the feat to boost your Dexterity and Constitution by one, and after you feed him a total of 11 companions you will receive a bonus to your Strength, Intelligence, Charisma and Wisdom. If you decide to fight him (prepare for one of the hardest fights in the whole game) on his body you will find an amulet granting Charisma +3, Wisdom +3, spell resistance 12, only usable by Evil characters).
Wood Elf - If you talk to him in a non-aggressive way, he will offer to sell you some valuable items.
Liam Harvestead - This boy has been enchanted by a witch and tied to a tree. You can release him.
Drow and elves - You will come across a group of wood elves and drow. They're fighting and you might help one of the sides. It pays off to help the wood elves, as the drow equipment is more valuable - you will find a +2 plate armor and a cloak granting +2 on all saves.
Strange Gnomes - You can talk to them (what basically gives you nothing) or fight them to get some jewels.
Group of Chickens - You may cast Dispel Magic on them - if you do, they will turn into a group of adventurers. Thankful, they will give you a +3 chain shirt and a dagger +2 dagger, if you use Diplomacy.
Kana - Swordmistress. If you ask her, she will teach you new fighting techniques - you'll gain some experience. If you want to, you can also attack her to get a +3 katana.
Dwarves and Ogres - You will see them fighting. You can aid either side. For helping the ogres you will get a staff (1d4 acid damage, casts Acid Splash and Cloudkill). If you help the dwarves you will get a +1 warhammer.
Christov's Crew - You can talk to him and use Sleight of Hand at the end of the conversation to steal 1000 $. You can also fight him and his crew. By his body you will find a band (Spot +5, casts True Seeing).
Trade is the main source of profit in game. You start off as a unimportant figure and slowly climb towards the top. Towards the end you will grab the reins of a powerful organization bringing a profit of hundreds of thousands gold pieces. Your can start trading as soon as you complete quest 4: Samargol - Job Application, which you are given at the very beginning of the game. From this point on you will be able to buy resources at one city and sell them in another. Early in the game you will only be able to carry 10 resources. Once you reach the Sword Coast the limit will rise to 15. You can buy resources for trade bars. In turn, bars you earn can be exchanged for gold. 1 bar is worth 15 gold pieces. You can make the exchange with Osi Tchaluka (Samargol), and later with Variel (Crossroads Keep). Trade gets interesting once you reach the Sword Coast - resource prices are the same in all cities in Samarach so you can't really trade between them.
There are 11 resources available in Storm of Zehir:
Basic:
Ore, Timber, Skins
They are the most common resources, but for this reason their price is the lowest
Rare:
Cold Iron, Darksteel, Mithril, Adamantine, Zalantar, Ivory, Mead, Salt
Rare and thus expensive.
Samarach
Leilon
West Harbor
Phandalin
Conyb.
New Leaf
Port Llast
Highcliff
Thunder.
Ore
8
6
9
9
15
9
15
6
9
Timber
4
12
6
6
6
3
6
12
3
Skins
10
5
3
1
5
3
5
5
3
Cold Iron
80
80
40
40
40
40
80
80
40
Darksteel
50
50
50
50
50
50
50
50
50
Mithril
200
200
80
80
80
80
200
200
80
Adamantine
300
300
50
50
50
50
300
300
50
Zalantar
130
130
70
70
70
70
130
130
70
Ivory
200
200
100
100
100
100
200
200
100
Mead*
80 / 60
80 / 60
45 / 20
45 / 20
45 / 20
45 / 20
80 / 60
80 / 60
45 / 20
Salt
75
75
50
50
50
50
75
75
50
*There are two kinds of mead, available depending on your choices during West Harbor - Dragon Hunt. If you decide to cooperate with the dragons use the second value.
All throughout Sword Coast you will be able to set up trade outposts from which you will be sending caravans. The more outposts and caravans you have, the more profitable your company will be. Profit, generated in trade bars can be collected from Variel (Crossroads Keep). Be sure to check in with her every once in a while to collect your share. Setting up an outpost in a city may be expensive and may sometimes be tied to some quest. Below you will see the requirements for each of the cities:
Leilon - 300 trade bars and 5 skins
West Harbor - you need to complete West Harbor - Dragon Hunting and kill the monsters
Phandalin - 200 trade bars and 5 ore
Highcliff - 100 trade bars and 5 lumber
Neverwinter - you need to complete (Neverwinter): Trade Outpost
Thundertree - 100 trade bars and 5 ore
Port Llast - 100 trade bars and 5 ore, complete (Neverwinter): Under New Management and get rid of Luskan forces
New Leaf - 800 trade bars and 10 ore, Quest 12: Shortage
Conyberry - 500 trade bars and 10 skins
Caravans can be sent from one trade outpost to another. They generate profit which can be collected by talking to Variel (Crossroads Keep). Caravans can be upgraded to make them more resilient to bandit attacks and more profitable. It pays off to create as many caravans as possible and upgrade them when possible, the expenses you take should be covered pretty quick. If a caravans gets looted by bandits you can approach it and repair it by giving it the amount of resources or trade bars. Below, you will see a table containing the costs for creating caravans (in gold pieces), upgrade costs and the income they produce:
Leilon
To:
Build cost
Profit
First upgrade cost
Profit
Second upgrade cost
Profit
Highcliff
3750
75
7500
112
11250
150
West Harbor
6000
120
12000
180
18000
240
Crossroads Keep
4000
80
8000
120
12000
160
West Harbor
To:
Build cost
Profit
First upgrade cost
Profit
Second upgrade cost
Profit
Leilon
6000
120
12000
180
18000
240
Highcliff
5000
100
10000
150
15000
200
Phandalin
To:
Build cost
Profit
First upgrade cost
Profit
Second upgrade cost
Profit
Crossroads Keep
3500
70
7000
105
10500
140
Conyberry
2500
50
5000
75
7500
100
Crossroads Keep
To:
Build cost
Profit
First upgrade cost
Profit
Second upgrade cost
Profit
Leilon
4000
80
8000
120
12000
160
Phandalin
3500
70
7000
105
10500
140
Highcliff
1000
20
2000
30
3000
40
Thundertree
2500
50
5000
75
7500
100
Neverwinter
2000
40
4000
60
6000
80
Highcliff
To:
Build cost
Profit
First upgrade cost
Profit
Second upgrade cost
Profit
Leilon
3750
75
7500
112
11250
150
West Harbor
5000
100
1000
150
15000
200
Crossroads Keep
1000
20
2000
30
3000
40
Neverwinter
1000
20
2000
30
3000
40
Thundertree
To:
Build cost
Profit
First upgrade cost
Profit
Second upgrade cost
Profit
Crossroads Keep
2500
50
5000
75
7500
100
Neverwinter
3000
60
6000
90
9000
120
Conyberry
8000
160
16000
240
24000
320
Neverwinter
To:
Build cost
Profit
First upgrade cost
Profit
Second upgrade cost
Profit
Highcliff
1000
20
2000
30
3000
40
Crossroads Keep
2000
40
4000
60
6000
80
Thundertree
3000
60
6000
90
9000
120
Port Llast
4500
90
9000
135
13500
180
New Leaf
10000
200
20000
300
30000
400
Port Llast
To:
Build cost
Profit
First upgrade cost
Profit
Second upgrade cost
Profit
Neverwinter
4500
90
9000
135
13500
180
New Leaf
To:
Build cost
Profit
First upgrade cost
Profit
Second upgrade cost
Profit
Neverwinter
10000
200
20000
300
30000
400
Conyberry
8000
160
16000
240
24000
320
Conyberry
To:
Build cost
Profit
First upgrade cost
Profit
Second upgrade cost
Profit
Phandalin
2500
50
5000
75
7500
100
Thundertree
8000
160
16000
240
24000
320
New Leaf
8000
160
16000
240
24000
320
You can also increase your profits by upgrading your organization. Those upgrades can be performed with Variel (Crossroads Keep). Such an investiture is best performed when you have trade outposts in most or all of the cities. Each investiture costs a set amount of trade bars:
1 investiture - 500 trade bars
2 investiture - 500 trade bars
3 investiture - 1000 trade bars
4 investiture - no costs
5 investiture - 5000 trade bars
Possible upgrades:
Propaganda - costs 5 ore, 5 lumber and 5 skins
Chapel upgrade - costs 5 lumber and 5 mithril / Opens the temple at Crossroads Keep.
Greycloaks weapon upgrade - costs 5 zalantar and 5 cold iron
Greycloaks armor upgrade - costs 5 mithril and 5 adamant
Portal upgrade - costs 5 adamant and 5 darksteel / After the upgrade you will be able to teleport from Crossroads Keep to your trade outposts. The travel, however, is still one way.
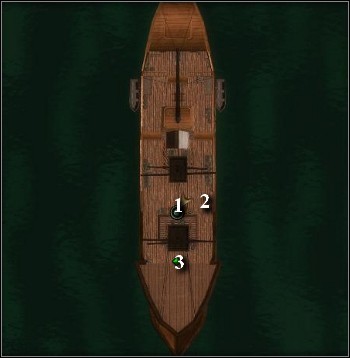
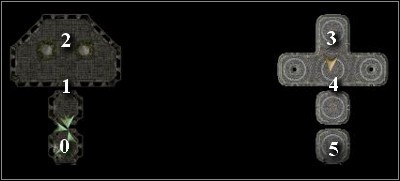
1. Captain Lastri Kassireh
2. Volothamp Geddarm / guide book
3. Below deck / passenger manifest
Your adventure starts on board of the "Vigilant". Start by talking to the captain. She will tell you to fill in the passenger manifest. You will find it right next to the stairs leading below deck - use it, to create three additional characters. Now, you will be able to talk to Volo and read the book besides him. Browsing through each chapter gives you an experience reward. This is pretty much everything you can do at the moment. Head back to the deck and listen to the story.
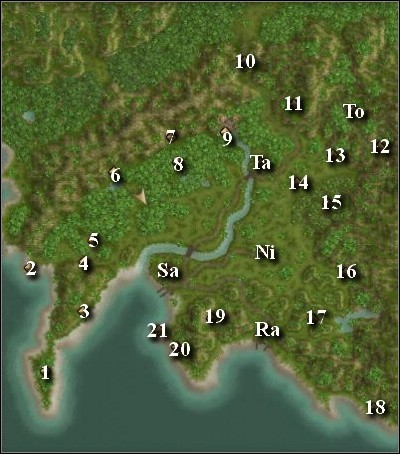
Sa - Samargol
Ra - Rassatan
Ni - Nimbre
Ta - Taruin
To - Torich
1. Ruins - Volo
2. Crypt 1 - Volo
3. Cave - Volo
4. Chokemist cave - Volo
5. Tower - Volo
6. Lantanese lumber camp
7. Shattered Spear Tribe - Volo
8. Ruined temple - Volo
9. Waterfall cave - Volo
10. Viper Temple
11. Haunted mine - Volo
12. Mines of Selgol - Volo
13. Firenewt Cave
14. Crypt 2 - Volo
15. Tempest's Fury - Volo
16. Ogre Cave
17. Singing Caverns - Volo
18. Hut
19. Underdark Black Market - Volo
20. Stone Knives Tribe - Volo
21. Shipwreck
Received: After the wreck
Shipwreck

1. Batiri Goblins
2. Coin of Life
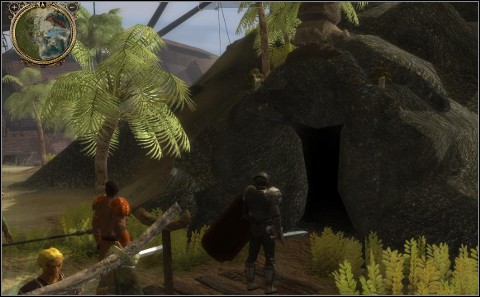
3. Batiri Cave - You will be able to enter it during (Samargol): Missing Personel.
Your ship has wrecked and you along with your companions and few other survivors are stranded on a beach in some unknown land. Just after the landing you will be approached by Volo. Talk to him about the nearby Batiri. During the conversation use your skills to convince the survivors to hand you their weapons. Volo will try talking to the goblins looking for a peaceful solution. Meanwhile it's up to you to search the wreckage for items, such as fireball scroll. The negotiations will prove futile however and you will have to fight the first wave of goblins. After the fight Volo resume the negotiations, which will result in another fight. The one final band of Batiri won't get convinced to leave you be. During this fight a Samarach patrol will appear. They will help you win the fight, then arrest you and the other survivors - resistance is futile. Before surrendering to them, however, look scan the area for salvageable items - among the debris you will find some herbs and a coin of life.
Received: During the conversation with the patrol that arrives during your fight with the Batiri
Talk to one of the members of the patrol and tell them that you are ready to go leave for Samargol. You will be transported to the city where captain Dajos will decide of your fate. During the conversation Sa'Sani will appear, recognizing Volo and siding with you. She will tell you to rest in the tavern, and then come to meet her. Do as she says, and learn that unless you agree to become her associate, you won't be allowed to leave the city limits - this means you don't really have much choice. Agree to complete the quests she gives you. During the conversation be sure to mention that you don't really have any funds - Sa'Sani will give you 2000 $ if properly convinced. After the conversation you will receive a signet, which will allow you to move about the Samarach, freely. It also improves your defense and provides additional hit points.
Received from: Sa'Sani, during your first stay in Samargol
As you first approach Sa'Sani you will overhear her talking to Volo about her missing associates. Talk to her about it to receive a quest which you will be able to complete later in game, once you reach the Sword Coast.
Received from: Sa'Sani, during first visit to Samargol
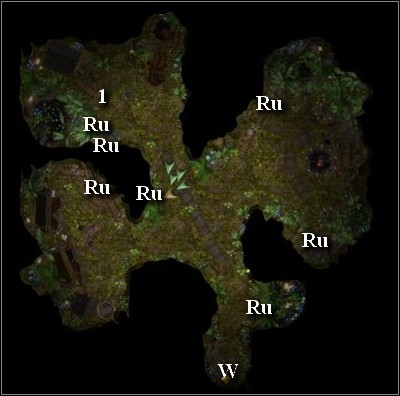
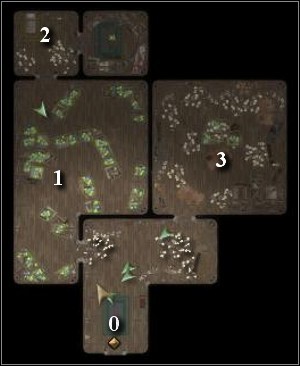
Shipwreck

Ru. Ore
0. World map
1. Bodies
2. Hull
3. Rope
4. Broken weapons
5. Batiri Cave - You will be able to enter it after receiving (Samargol): Missing Personel.
Sa'Sani wants you to recover some of the cargo from the shipwreck. Head over to the wreck and pick up two cargo crates laying near the ship. Return to Sa'Sani and hand over the cargo. After the conversation you will be approached by Osi Tchaluka and teach you about the workings of trade, which becomes available to you from this point on (you will find more on the subject in the Trade section of the guide).
Received from: Sa'Sani, during first visit to Samargol
You need to collect evidence proving that the wrecking wasn't an accident. Head over to the wreck, where you will find four pieces of evidence:
1. Bodies
2. Hull
3. Rope
4. Damaged Weapon
After finding the evidence return to Sa'Sani and inform her of your findings. Your reward will be 2200 $.
Received from: Sa'Sani after completing quest 5: Unnerving Evidence
Stone Knives Tribe (V)
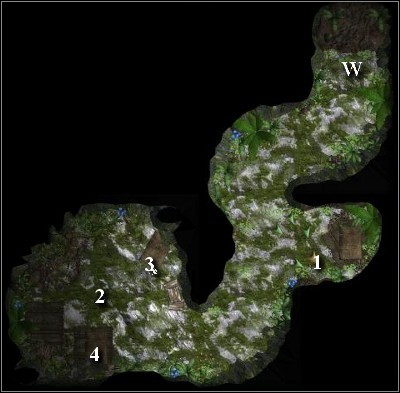
W. Entrance
1. Weapons rack - Arrows +1, karma +1, Onyx spear, Shortbow
2. Tribe chieftain
3. Cage
4. Chest - Jewels, healing potion, Bastard Sword +1
Your objective now is to find the missing crew, including miss captain - Lastri Kassireh. Head over to Stone Knives tribe cave, which is situated near the shipwreck. Inside, clear weapons rack and proceed to the back of the cave where you'll meet the tribe chieftain along with few tribe members. Talk to him and either let him leave in peace or start the fight with the goblins (be sure to loot their bodies afterwards). Empty the nearby chest, then open the cage and release Lastri. For that you will need a key you either Received from the chieftain or picked up from his body. Capitan will return to Samargol, and so should you. Return to Sa'Sani and pick up your reward - 2000 $. You will also be told to visit the tavern where Lastri awaits you.
Received from: Sa'Sani, after completing quest 6: Missing Personnel
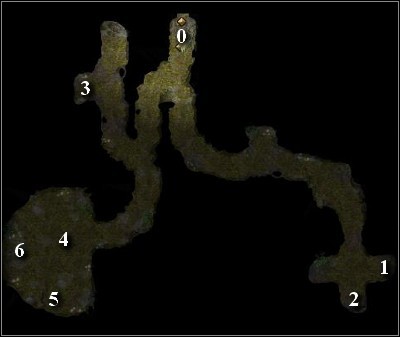
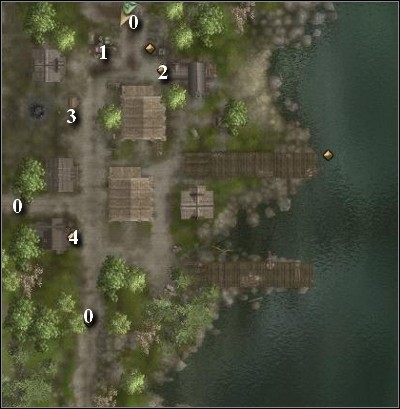
Lantanese Lumber Camp
0. World map
1. Camp entrance/golem
2. Portal
3. Dall Nickleplate
4. Nil Sheafrustle
5. Ahri "Golemkin" (trader)
6. Ghost
7. Mound / ghost's body
From what Lastri Kassireh is saying, the person responsible for the sabotage is Luaire - Sa'Sani's associate. Your mission is to track him down and bring back to Samargol. Head north, to the Lantanese Lumber Camp. Approach the golem standing near the camp entrance and talk to Dall Nickleplate. Then head into the camp where you'll meet up with Dall by the portal. Talking to him will give you insight into the local problems.
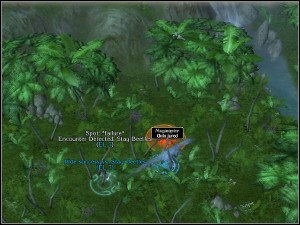
Pesky Dinos
You will need 6 deinonych claws and give them to Dall, in order to prove that you got rid of the problem. If you don't have any on you, go to the world map. There should be a lot of dinos around the camp.
Disturbances
Dall claims that someone is destroying gnome equipment at night. Go outside the camp and wait until dusk. A ghost will appear and you'll have to fight her until her rage passes. She will then tell you that one of the gnomes caused her death. You can either kill the ghost or dig up her body and tell relate the story to Dall.
Missing part
The last problem the gnomes are facing is a missing part. You can use Craft and create the missing part or enter the world map and attack the sick Megaraptor. In its body you'll find the missing piece.
After completing all three quests Dall will give you the poison, used to kill one of the workers.
Received from: Sa'Sani, after completing quest 7: Seeking the Truth
Chokemist cave(V)
0. World map
1. Luaire
Sa'Sani will ask you to find someone to identify the poison, and then to track down Luaire. Approach Vadin'ya and show her the poison. She will identify it and send you to the cave, where the ingredients for the poison were harvested. Leave the city and head to the cave. Inside, you will find Luaire. Conversation with him will end in a fight. After you're done with him, search his body to find: Dagger +1 (additional 1d4 acid damage), magic amulet (armor bonus +1), poison, jewel and some potions. Now return to Sa'Sani, and tell her what's happened.
Received from: Sa'Sani, after completing quest 8: Sabotage
Right after you'll give Sa'Sani news of Luaire's death, captain Dajos will appear, and inform that she has to leave Samargol because of her contacts with the Yuan-Ti known as Luaire. Sa'Sani will try to resolve the matter peacefully and will head to the gnome portal in order to get to the Crossroads Keep. She will also encourage you to follow in her steps. Head over to the Lantanese lumber camp and talk to Dall Nickleplate, then go through the portal.
Crypt (V)
0. World map
1. Sarcophagus - Healing potions
2. Sarcophagus - Armor (armor bonus +2, Heal +2)
3. Sarcophagus - Shield (armor bonus vs humans +2)
4. Sarcophagus - Jewel

Something went wrong and you arrived in a Crypt instead of your destination. You will receive a rather cold welcome from a necromancer and some undead. After killing them you can loot the sacrophagi and leave the area.
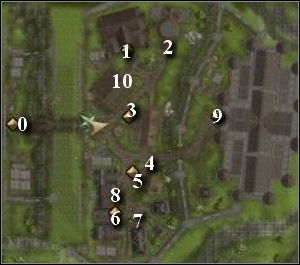
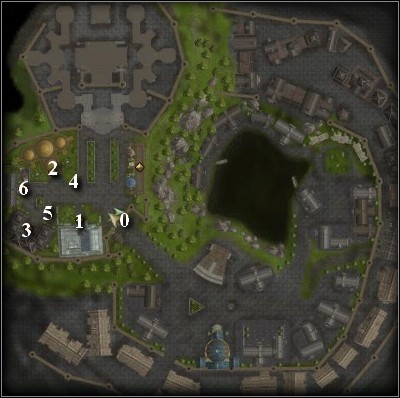
Crossroads Keep
Head north, to the Crossroads Keep. On your entrance, you will run into Sa'Sani talking to Khelgar.
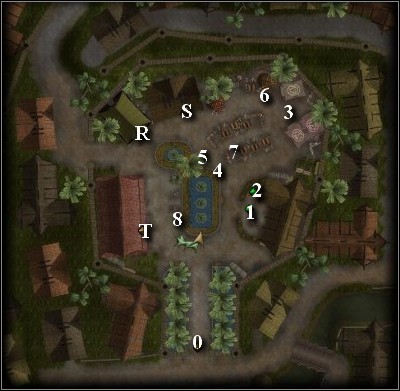
0. World map
T. Tavern
R. Craft workshop
S. Temple
1. Sa'Sani
2. Volo
3. Umoja and his dinosaur Yushai - he may join you.
4. Inshula Sar Mashewe - she can join you.
5. Kwesi - Collects monster trophies, will give you a bag for holding them.
6. Vadin'ya (merchant)
7. Merchant Mendar (merchant)
8. Doomsayer - you can listen to his doomsday prophecies.
Received from: Vadin'ya

Vadin'ya will tell you about a boar - Bal'alak roaming the plains. She wants you to kill it and bring her its tusks. Go north from Samargol, to find your pray. Kill it and take the tusks to Vadin'ya. As a reward you will receive 2500 $.
Received from: Sa'Sani, after completing quest 4: Job Application
From this point on you're a merchant working for Sa'Sani. Because of that there is an exchange you can do with Osi Tchaluka - 100 trade bars can turn into a ring of fire resistance.
Received from: Vadin'ya, after completing (Samargol): Plainsrunner
Mines of Selgol (V)
0. World map
1. Bookcase - Light hammer +1, Jewels
2. Closet - Thieves' Tools +3, magic magnifying glass (detects traps)
3. Skeleton - magic scrolls
4. Overlord - Greataxe of flames +1 (additional 1d6 fire damage), magic amulet (saving throws: poison +1), Chainmail +1, jewel
Vadin'ya wants you to equip her bodyguard with a greataxe which can be found in the mountains. Head to the Mines of Selgol. Prepare for a large number of fights, since the location is controlled by firenewts. Enter the north west room and deal with the overlord. On his body you will find the weapon you need. Return to Samargol and give it to Vadin'ya to get 3000 $.
Received from: Vadin'ya, after completing (Samargol): Heavy Weaponry
Shattered Spear Tribe (V)
0. World map
1. Guards
2. Weapons rack - Spear +1, Arrows +1
3. Weapons rack - Small shield +1, Batiri mace (additional 1d4 damage)
4. Chest - magic amulet (armor bonus +1), jewel, totem, magic scrolls, healing potion
5. Chieftain
Vadin'ya wants you to obtain a jewel which is in possession of a Batiri clan and is stored in their cave. Head over to the goblin cave. By the two guards will halt you, but if you tell them that you wish to talk to their chief they will let you through. On your way there, empty the weapon racks and the chest. Talk to the chief about the jewel. He will agree to trade it if you bring goblins their relic - part of their sacred spear. You will find it in the Ruined temple, south of the tribe cave. If you don't want to resolve the matter peacefully you can kill the goblins and take the jewel from chief's body.
Ruined temple (V)
0. World map
1. Door (open)
2. Door (closed) - Opened with a lever.
3. Door (open)
4. Bookcase - magic scrolls, fragment of the ruins (needed for Samargol: Sightseeing, which you can receive from Volo)
5. Lever - opens door number 2.
6. Large number of yuan-ti
7. Chest - Shattered Spear, 3243 $, arm guard (armor bonus +1), Wand (casts Fireball)
8. Chest - magic scroll
9. Door (closed) - High lock difficulty.
Once you reach the Ruined temple start by visiting the western room. Kill the Yuan-Ti and mechanic spiders, loot the bookcase and then pull the lever. Middle door in the first room will now open. Get through them and prepare for a challenging fight with the Yuan-Ti. After dealing with them loot the bodies - you'll find a scimitar +2 and ring (all saving throws +2). In order to get to the last room you need to open the door, but the DC on picking this lock is pretty high so you might want to use the best thieves tools you got on it. The room behind them is a treasury. Inside, in one of the chests you'll find not only the relic - the shattered spear, but also loads of money and some magic items. Take the spear back to the Shattered Spear Tribe. Give it to the chief, in exchange for the jewel. All you need to do now is return to Samargol and get your 5000 $.
Received from: Lastri Kassireh, after completing quest 6: Missing Personnel
Batiri Cave
W. Entrance
Ru. Ore Shipment
1. Second mate
Talk to Lastri, whom you'll find in the Samargol tavern. She will ask you to find her second mate. She will give you a stone key, which opens the passage to the Batiri cave. Head over to the Shipwreck and use the key. Inside you will find the missing officer, but before you free him, you will need to deal with the goblins. Talk to the officer and convince him to return to Samargol. Thankful for the rescue he will give you a magic amulet, which provides fear immunity. Search the cave and among other things you'll find 7 ore crates. Return to the Samargol tavern and talk to Lastri. She will thank you for your help and offer to join your party.
Received from: Volo, after completing quest 6: Missing Personnel
Volo wants you to tell him about interesting places you've visited during your journeys. From this point on you can tell him about the curious places you've visited (marked with "V"). After moving to the Sword Coast, you will find some new locations to tell Volo about (he will be at Crossroads Keep). Once you tell him about:
5 places, you will receive the Tourist feat (Search +1).
10 - (Search +1, Spot +1)
15 - (Search +1, Spot +1, Listen +1)
20 - (Search +1, Spot +1, Listen +1, Survival +1)
25 - (Search +2, Spot +1, Listen +1, Survival +1)
30 - (Search +2, Spot +2, Listen +1, Survival +1)
35 - (Search +2, Spot +2, Listen +2, Survival +1)
40 - (Movement bonus on all kinds of terrain and Search +2, Spot +2, Listen +2, Survival +2)
Received from: Volo, after completing quest 6: Missing Personnel
Volo is astounded by the talking birds (plain ol' parrots) and wants you to get one for him. Go and talk to Vadin'ya. She will tell you, that she does have a parrot, but she is holding it for another customer. You can only get it, if you bring her another animal. There are two ways of resolving this matter - first, you may buy a snake at the Black Market from Xo'Rill (you can also kill him and just take the Snake) or find an egg west of the Lantanese Lumber Camp. Give the snake or the egg to Vadin'ya, and take the parrot. Bring it to Volo to get 3000 $.
Received from: Volo, after completing quest (Samargol): Pretty Bird
Volo would like to see a fragment from one of the ruins situated north of Samarach. You will find what you need in the Ruined temple on a bookcase. You can get the item during (Samargol): Batiri Bargain. Your reward will be 1400 $ and a magic stone (damage reduction 1).
Received from: Volo, after completing quest (Samargol): Sightseeing
Volo has another interesting quest - he would like to taste a dinosaur steak, made from a megaraptor. Soon-to-be diner is lurking near the waterfall cave. Attack the dinosaur and return to Samarach with the steak. Volo will pay you 1500 $.
Received from: Redfeyer, whom you'll find in the Tavern
Singing Cavern (V)
0. World map
1. Chest - Singing Pendant, Healing potions
2. Arcane Nexus - There's nothing you can do with it now, but it will become a place of interest for (Neverwinter): A Knot in the Weave.
3. Chest - Magic Ring (acid resistance 10)
4. Giant Green Spider
5. Chest - 73 $
6. Mound - 567 $, magic amulet (armor bonus +1), Jewels, crown, empty ale mug
Talk to Redfeyer. He has lost his Singing Pendant in a cave full of spiders and wants you to retrieve it. Head over to the Singing Cavern. Watch out for the bats and spiders and continue down the eastern corridor until you reach a chest with the necklace. You can now explore the rest of the cavern. When you're done, return to Rassatan and head over to the tavern to talk to Redfeyer. He will reward your party with mugs of ale.
In the tavern you'll meet Ottelmar, who is looking for a rare wine. He's heard that it can be bought at the Black Market, but he is too afraid to go there by himself. He will ask you to go there and buy it for him. Go to the Black Market and talk to Zhiir. If you've already completed (Black Market): For Special Customers Only, he will sell you the wine. Zhiir demands for it a hefty sum of 5000 $. Using Lore or Appraise you can lower it to 2500 $. Another option is just killing the Mind Flayers. Before you decide to do that, however, consider whether killing them is worth losing access to their merchandise. After you get the wine return to Ottelmar to get 5500 $.
Received from: Essien, who can be found in the Tavern
Mines of Selgol (V)
0. World map
1. Bookcase - Light Hammer +1, Jewels
2. Closet - Thieves' Tools +3, magic magnifying glass (detects traps)
3. Skeleton - Magic Scrolls
4. Overlord - Greataxe of flames +1 (additional 1d6 fire damage), magic amulet (saving throws vs poison +1), Chainmail +1, jewel
One of the tavern regulars - Essien will tell you that the nearby Mines of Selgol have been overrun by firenewts. Your mission is to reclaim it. Head over to the mines and wipe out the monsters - there are quite a few of them, so prepare for some challenging fights. Once you deal with the firenewts return to Torich and go to the tavern and talk to Essien. He will thank you for your help and will return to work in the mines, which will allow you to buy salt in Torich.
Received from: Essien, who can be found in the Tavern
Mines of Selgol (V)

0. World map
1. Bookcase - Light Hammer +1, Jewels
2. Closet - Thieves' Tools +3, magic magnifying glass (detects traps)
3. Skeleton - Magic Scrolls
4. Overlord - Greataxe of flames +1 (additional 1d6 fire damage), magic amulet (saving throws vs poison +1), Chainmail +1, jewel
One of the tavern regulars - Essien will tell you that the nearby Mines of Selgol have been overrun by firenewts. Your mission is to reclaim it. Head over to the mines and wipe out the monsters - there are quite a few of them, so prepare for some challenging fights. Once you deal with the firenewts return to Torich and go to the tavern and talk to Essien. He will thank you for your help and will return to work in the mines, which will allow you to buy salt in Torich.
Le - Leilon
ZK - West Harbor
Hi - Highcliff
Ph - Phandalin
W - Crossroads Keep
Th - Thundertree
Co - Conyberry
NL - New Leaf
NW - Neverwinter
PL - Port Llast
1. Crypt - Volo
2. Cave in the marshes
3. Dragon Caves
4. Cult in the Marshes
5. Shadow Cult - Volo
6. Phandlin Cold Iron Mine- Volo
7. Night's Rest Inn
8. Crystal Cave
9. Skullsmasher's Cabin
10. Worg Cave - Volo
11. Eldreth Veluuthra Outpost - Volo
12. Undead Barrow - Volo
13. Parrum Rock - Volo
14. Ruined Keep - Volo
15. Illefarn Ruin - Volo
16. Hunter's Cabin- Volo
17. Banite Enclave - Volo
18. Abandoned Mine - Volo
19. Foreign Temple - available during (Neverwinter): Fixing a Hole
20. Forked Tongues Hideout
21. Onyx Cave - Volo
22. Forgotten Crypt - available during (Neverwinter): Fixing a Hole
23. Hot Cave - available during (Neverwinter): Fixing a Hole
24. Gnoll Cave - Volo
25. Pirate Cove - Volo
26. Malarite Hermit Cave - Volo
27. Gothaladreum - Cemetery
28. Forgotten Ruins - Volo
29. Priory of the Depths
30. Arcane Brotherhood Outpost - Volo
31. Bards' Hideout - Volo
Received from: Sa'Sani, after completing quest 9: North bound.
After entering the Crossroads Keep talk to Sa'Sani. She will ask you to meet her in the headquarters. Talk to her again inside to receive next quests.
Received from: Sa'Sani, after completing quest 10: The Next Step.
Sa'Sani wants you to set up a trade outpost in: Highcliff, Thundertree, Leilon, Phandalin or Neverwinter. She will give you 200 trade bars. From now on your trading capabilities are much greater - you can receive your share of income (amount depends on the status of the company) from Variel (more on trade in the Trade section). After setting up an outpost in one of the cities talk to Sa'Sani. She will want you to launch your first caravan between the cities. You can do that by talking to Caravan Guide O'Dell, whom you'll meet near the company headquarters. Purchase a caravan for 1000 $ from now on, you can make decisions on your own.
Received from: Sa'Sani, after completing quest 10: The Next Step
Neverwinter Temple
0. Exit
1. Alanna - She will tell you about the three organizations.
2. Belueth the Calm - She will join you if you pay her 5000 $ or 3000 $ after successful use of Bluff, Diplomacy or Intimidate.
3. Eramus - He can heal you.
4. Jon Archen
5. Aster Merris
6. Jordan Wright
7. Martin Keller
Sa'Sani wants you to head over to Neverwinter and join one of the guilds in order to obtain some information on her missing associates. Visit the city and enter the temple. Inside, you will meet the leaders of three merchant organizations: Jon Archen - Circle of Friends, Aster Merris - Forgotten Lords, Martin Keller - Fated Winds. In order to join one of the organizations you will need to pay its leader 250 trade bars. The choice you make will have little impact on the game - the differences can be seen mostly in (Neverwinter): Under New Management. Circle of Friends wants you to liberate Port Llast from under Luskan occupation. Forgotten Lords want you to restore trade in Port Llast, while Fated Winds want the Luskans to maintain the grasp over Port Llast. After joining an organization talk with its leader about the missing associates. He/She will tell you everything he/she knows and send you to talk to Jordan Wright. He will refuse to talk to you, so you should return to Crossroads Keep and tell Sa'Sani about it.
This quest continues later.
Received from: the representative of the merchant organization you belong to (see Quest 3: Missing Associates)
Forked Tongues Hideout
0. World map
1. Chest - Dagger +2, Studded Leather +3
2. Chest - Sickle +2, Chain shirt +3
3. Chest - Wino x2, magic scroll, Thieves' Tools +10
4. Chest - Potions, Healer's Kit +10
5. Stolen Goods
6. Mikul / Arcane Nexus
The representative of your guild wants you to investigate the shortage of goods in New Leaf. Head to the town and visit its tavern. Inside, talk to the Quartermaster about the shortage of goods. You'll notice he's trying to hide something, but he won't be convinced in any way to tell you what the problem is. Leave the town and head south. You will be attacked by bandits, and on one of their bodies you will find a Snake statue. It starts glowing whenever you approach the bandit hideout. Enter it and deal with the bandits, then kill their leader, Mikul. Once you're done, search the room. You'll find some valuables and an Arcane Nexus (see Neverwinter: A Knot in the Weave). Return to New Leaf and pass the good news to the Quartermaster. Then return to Neverwinter, where you can give the report on what happened.
Received from: the representative of your merchant guild, after completing quest 12: Shortage
It appears that the man you just killed - Mikul belonged to the Fated Winds. Because of that, all three leaders are going to meet in the Tavern in Conyberry. You are to appear as well. Head to the tavern and join the conversation. You will learn that the leader of the Fated Winds cooperated with Yuan-Ti, a group of whom will enter the room and attack. Kill them and return to Crossroads Keep, to tell Sa'Sani what's happened.
Received from: Sa'Sani, after completing quest 13: The Meeting
Sa'Sani has received a message from her missing associates. She is to meet with them in the Night's Rest Inn, near Phandalin. She is afraid that this might be a trap and will ask you to go in her stead. Il'foss and Kizu will await you on the spot. They will give you some interesting information, and then attack you. By their bodies you will find: magic staff (only usable by Evil characters; Intelligence +2; casts Crushing Despair and Create Undead once per day) and Shortsword +3 (poisonous). Now you can return to Crossroads Keep.
Received from: after completing quest 3: Missing Associates and entering the headquarters at Crossroads Keep
Enter the merchant headquarters. Inside, you will meet Khelgar and Variel. Nas'Sirin has been murdered and the murderer is most likely Sa'Sani, who proved to be Yuan-ti herself and used the portal to run to Samarach. Talk to Variel about what she's seen and then head to the portal room, talk to Orias, and return to Samarach.
Received from: Finch in a Tavern
Bard Finch will ask you to talk to sir Nevalle on his behalf. You need to convince him that the bard hasn't stolen the timepiece and thus restore his permit to perform in Neverwinter. In order to take care of that you first need to join one of the merchant guilds (see Quest 3: Missing Associates). Once you do that go to Neverwinter and talk to sir Nevalle. He can be found in a Tavern or just outside of it. Sir Nevalle will tell you to talk with Lady Jeanelle, who is standing out front of the tavern. Approach her and soon you'll learn that Finch is innocent. Take the news to Sir Nevalle, to get Finch cleared of all accusations. Now go talk to the bard who'll thank you and offer to join your party.
Received from: Danleya, in the Tavern
Phandlin Cold Iron Mine(V)
0. World map
1. Daniel Merriwether / Chester Paulson
2. Chest x2 - 600 $, jewel, Potions, adamantine arrows, bolts and bullets, leather armor +2
Danley wants you to investigate the Cold Iron Mining Company. Head over to the mine. Inside, you will be halted by Daniel and Chester. You need to figure out that these two men are really ogre mages using illusions to hide their identities. A dialog line with Spellcraft or Spot will pop up allowing you to see through illusion. If Umoja is in your party he will notice that Daniel and Chester aren't human at the very beginning of the conversation. They will assume their original forms and attack. Take them out and then deal with the orcs swarming the mine. Be sure to loot the chests behind the grating in the north eastern room. Return to Danleya and tell him of your discovery. Your reward will be either 1000 $ or 1500 $ depending on your diplomatic skills. From now on you will be able to buy cold iron in Phandalin.
0. World map
1. Gate / Caryl Nemorem
2. Sheydann Zinn (merchant)
3. Lazlo Buckman
4. CGoodwife Aruna (merchant)
5. Jan Buckman
6. Quarrel
7. Goodwife Aruna - You will find her here during variant 2 of (West Harbor): Whispers in the Marsh.
Received from: Goodwife Aruna
Goodwife Aruna will ask you to find her shawl, which she lost escaping from the lizardmen. You will find it in the Dragon caverns, in one of the chests. Return it to Aruna to receive battle staff +1 (Constitution +2, casts Cure moderate wounds).
Received from: Lazlo Buckman
Dragon Caves

0. World map
1. Hidden passage
2. Chest - Dagger +1, magic amulet (armor bonus +1)
3. Barrel
4. Chest - Aruna's Shawl, relic (acid resistance 5%, saving throws vs disease +1)
5. Statue - Trap. Best left alone.
6. Chest - Potions
7. Weapons rack - shortbow (attack bonus +3, mighty +3, +3 vs insects)
8. Chest - Potion, Wand (casts Magic Missile)
9. Magic Cup - Mephit Guano (Charisma -2, casts Stinking Cloud)
10. Lizardmen Captain - Battleaxe +2, 472 $, key to the prison cell
11. Prison / Tarmas
12. Magic barrier - disappears once the dragons are dead.
13. Chest x2 - magic amulet (casts Hold Person and Hold Monster; immunity to Hold Person), 3000 $, Jewels, Chainmail +2, katana +2, Shortsword +2 (vampiric regeneration +1),
Lazlo will tell you about two black dragons about to attack the town. He will also tell you that the wizard Tarmas has left for the Dragon Caverns some time ago and never returned. Go to the caves. Once inside you will run into Tarmas being escorted out by two warriors. Don't worry about that for now and explore the location paying close attention to the traps scattered throughout the area. Take a close look at the barrel in one of the rooms. Lore will tell you that it comes from West Harbor. Head north. In the last room you will fight some lizardmen. Kill them and take the key from their captain's body. Now go to the cell in the east. Inside you will find Tarmas. Talk to him and give him the key.
Received from: Lazlo Buckman, after completing quest (West Harbor): Dragon Hunt
After you return to West Harbor talk to Lazlo, whom you'll meet by the entrance to the location. He will tell you about his deal with the dragons and will ask you to help fighting them. First one can be found by the town gate. You can resolve the problem two ways: one is make a deal with the dragon and get 5000 $ for killing Lazlo and his men, and the other is to kill the dragon.
Variant 1: A deal with the dragon
Once you killed Lazlo and his men talk to the dragon. It will give you 5000 $, but won't let you into the village. You can unlock the path by fighting it.
Variant 2: Fighting the dragon
During the fight another dragon will appear. Killing the two isn't that much of a problem with the support of Lazlo, Tarmas and two other fighters. After the fight you will receive a new feat: Dragon Slayer (+2 attack bonus and damage bonus vs dragons). Collect the remains and talk to Lazlo. Thankful for your help he will allow you to create a trade outpost in West Harbor.
Received from: Aruna, after completing quest (West Harbor): Deal with the Dragons
Ask Aruna, what's new in the town. You will learn that the half-drow Quarrel seems depressed and needs someone to talk to. Approach him and start a conversation which will soon turn to Ammon Jerro. Using Lore you may tell Quarrel that the warlock most probably resided in Crossroads Keep . Half-drow will head there and you should follow. You will meet him in the keep, besides Khelgar. Talk to him to have him join your party.
Received from: Aruna when you return to West Harbor after some time
Circle of the Mire
0. World map
1. Jan Buckman
2. Sheydann Zinn
3. Weapons rack - Composite Longbow, Scythe +2, poisoned arrows
Aruna will ask you to investigate a cult in the marshes and convince Jan Buckman to leave it. Go to the location she points to and talk to Jan. Try convincing him to leave, but he won't agree. Talk to Sheydann Zinn. You now have two options:
Variant 1: Destroying the cult
During the conversation with Sheydann try to convince Jan that he is being lied to. Sheydann will lose his temper and attack you. Kill him and the cultists and take the scimitar +1 (1d4 additional negative energy damage, saving throws vs poison +1, drains Strength on hit). Once again talk to Jan, who will give you an amulet (cold resistance 10%, Constitution +2, saving throws vs mind-affecting spells -2). Return to Aruna who will give you your reward: gloves (saving throws vs poison +3, regeneration +1, acid resistance 5).
Variant 2: Killing Aruna
Make a deal with Sheydann and tell him you can kill Aruna for him. Return to West Harbor and approach Aruna standing outside the city gates, in a garden. Kill her to get a new feat (+2 bonus vs neutral and good creatures), then return to Sheydann, who will hand you 1000 $.
0. World map
1. Merchant headquarters - your base of operations. Your companions will await you here. Inside you can also meet Sa'Sani, Nas'Sirin, Variel and Volo. North room is at your disposal - you can use the beds to rest. In the west part of the building you'll find workshops and use a portal. At first you will need to pay Orias 2000 $, to get transported to Samarach. Later, you will be able to upgrade the portal to allow you a one-way teleport to your trade outposts.
2. Temple - closed at first, with enough funds you can open it later.
3. Jacoby (merchant)
4. Fariba - collects money for the poor in Neverwinter. You can give her 10, 100 or 1000 $ but there is no effect after doing that.
5. Tavern - inside you will meet the priestess Lender Daija who will heal you for free and a dwarf by the name of Ulweth who plans to hunt some worgs. The barkeep will give you free ale if your Bluff is high enough.
6. Adventurers' Guild
7. Jaris / Alchemists house
8. Orphanage - can be opened after completing (Neverwinter): Think of the Children.
9. Entrance to the keep - upon entering you will run into Soraevora Aeravand, elder elf. She will tell you that she's trying to complete her sacred mission and will offer to join you. Accept her as yet another companion. Inside the keep you'll meet Khelgar. It pays off to talk to him every once in a while as he will have some quests for you.
10. Caravan guide O'Dell - He will appear during (Neverwinter): Sword Coast Trader.
Received from: Volo at the headquarters
Volo came to think that the merchant's life is incredibly fascinating and decided to write a book on merchants. He wants you to talk to six merchants about their lives. You can talk to following merchants:
Jacoby - Crossroads Keep
Goodwife Aruna - West Harbor
Akila - Neverwinter, Thay Enclave
Jon Archen - Neverwinter, temple
Aster Merris - Neverwinter, temple / needs to be paid 100 $
Martin Keller - Neverwinter, temple / needs to be paid 500 $
Tarmas - West Harbor
Paarzeeche - Port Llast
Vadin'ya - Samargol (Samarach)
Received from: Volo in the headquarters after completing (Crossroads Keep): Researching the merchants
Volo now wants you to reach the bandit leader and talk to him. You'll need to look for bandits in the world map, pay them for letting you go and tell them that you want to meet their leader. After doing this a few times a Gang of bandits will appear marked blue instead of red. Approach them ant talk to the leader, then return to Volo to get 2000 $ and ring (acid resistance 20).
Received from: Khelgar, in the keep
Shadow Cult (V)
0. World map
1. magic scrolls
2. Weapons rack x2 - Bastard Sword+1, Tower Shield +2
3. Smithies
4. High Shadow Priest, priests and a vampire/ Arcane Nexus
Khelgar wants you to wipe out remaining shadow cultists hiding south of Crossroads Keep. In the ruins you'll come across various enemies: ghasts, shadow mastiffs, wraiths and rats. Start by going west, paying attention to many traps set in this corridor. Take the magic scrolls scattered on the floor. Then head to the chapel in the north part of the building where a dark ceremony is being performed by some shadow priests lead by High Priest. Kill them and search the bodies. You will find full plate +2, Longsword +2, magic amulet (Wisdom +2), morning star +2 and priest's journal. There is also a Arcane Nexus here - you can collect its energy if you're doing (Neverwinter): A Knot in the Weave. Now head east where you'll find two confused smithies. You won't be able to help them, but you can take the sword and the tower shield from the racks near them. Return to Crossroads Keep and inform Khelgar about your mission to get 1500 $.
Received from: Khelgar, at the keep
Khelgar wants you to convince a group of mercenaries resting in the Tavern to train the Grey Cloaks. Go there and talk to the leader - Nall. Use your conversation skills to convince him to do it , then return to Khelgar.
Received from: Khelgar, in the keep
Bards' Hideout (V)
0. World map
1. Orc Guard
2. Azahr and her bards
3. Chest - Khelgar's Gauntlets (attack bonus +1, additional 1d8 damage vs giants, additional 1d4 damage, Strength bonus +3), magic scroll, jewel, mandolin (once per day casts Cure Light Wounds, Mage Armor, Sleep), flute (once per day casts Sound Burst)
Azahr and her bards have stolen a precious artifact. You are to find them and retrieve it. The thieves can be found in a Cabin, east of Crossroads Keep. Enter it and approach the orc guard. He will recognize you and attack you along with everyone residing in the cabin. Soon, Azahr and her bards will join in. Kill everyone and loot the bodies to find: breastplate +2, Shortsword +2, Chain shirt +2, rapier +2. Open the door to the north west room and open the chest to find the artifact, and some other valuable items. Return to Khelgar and give him the gauntlets for 2000 $. You can also lie to him and keep the item for yourself.
Received from: Jaris, who appears after some time in the game near the Adventurer's Guild
Alchemist's House
0. Exit
1. Room full of explosive chemicals
2. Desk - Violet vial, green vial, alchemist's notes
3. Alchemist's workshop
Jaris wants you to enter his alchemist uncle's house and take care of dangerous chemicals. Enter the house, choose your rogue and take him (and only him) to the west room moving in stealth mode. Sneak to the locked door behind which is a desk with two vials and alchemist's notes. Take everything and go to the room with the alchemists workshop. Use the workshop and use the violet and green vials, then remove a silver vial, and a blue one. The compound has been neutralized. Go outside and inform Jaris. Your reward will be 1000 $ and a magic bag (weight reduction 100%).
Received from: Sa'Sani, after you build some trade outposts in the east
Crystal Cave

0. World map
1. Guard
2. Chest - Gold necklace, silver ring, healer's kit +6, trap, drum
3. Tuka-Akut
4. Hidden passage - You can open it using a nearby lever
5. Lever - opens the hidden passage
6. Chest - 2126 $, magic scroll, light shield +1, shortbow +2, Battleaxe +1
Your caravans are being attacked by bands of trolls, and their leader - Tuka-Akut wants you to pay him for ceasing the attacks.. Sa'Sani sends you over to negotiate but states that you are to negotiate with your sword. Head over to the Crystal cave. Inside you will be halted by a guard. Tell him that you want to talk to the chief and he will let you through. Head north and approach Tuka-Akut. You can solve the situation in three different ways:
1. Use Bluff or Intimidate to provoke a fight between the trolls and ogres. Your enemies will fight each other making the fight easier.
2. Negotiate the price of protection - instead of 10000 $ you should be able to pay 5000 $. Tuka-Akut will then let you go.
3. You can just attack Tuka-Akut and his band.
After the fight there are some things you might want to get from the body of Tuka-Akut: Magic Ring (acid resistance 20), Magic Ring (armor bonus +2) and a jewel. Use the lever to access the chest with some valuable items. Leave the cave, head to Crossroads Keep, and report to Variel.
0. World map
1. Thay Enclave - Inside you will find mage Akila and a merchant with a buying limit of 10000 $ per item.
2. Temple
3. Tavern - if Sir Nevalle is not outside you can find him here.
4. Phineas the Sensate - He appears with the quest (Neverwinter): Sating the Sensate.
5. Lady Jeanelle
6. Trade Outpost
Neverwinter Temple

0. Exit
1. Alanna - will tell you about the three merchant organizations.
2. Belueth the Calm - will join you if you pay her 5000 $ or 3000 $ after using Bluff, Diplomacy or Intimidate.
3. Eramus - he can heal you.
4. Jon Archen
5. Aster Merris
6. Jordan Wright
7. Martin Keller
In order to enter the city you must pay 200 $. You will do that every time you try to enter Neverwinter up to the point you join one of the merchant guilds (see Quest 3: Missing Associates).
Received from: Akila, in Thay Enclave
Talk to the Red Wizard Akila. After a lengthy conversation he will ask you to research the Arcane Nexuses scattered throughout the world. You will receive a special artifact to do that. The list of points of interest for this quest:
Pirate Cove
Arcane Brotherhood Outpost
Banite Enclave
Undead Barrow
Parrum Rock
Shadow Cult
Forked Tongues Hideout
Singing Caverns (in Samarach)
Each time you return to Akila with a charged artifact he will open a chest for you. Each of them contains a magic scroll (using it gives each character in your party 1000 experience). After giving him three artifacts you will receive a new feat (Spellcraft +2). After giving him all six you will receive another feat (Spellcraft +4), and Akila will tell you that he needs to analyze the date you've gathered and ask you to come back later, later being the moment you leave the Viper Temple in north Samarach (you will get there following the main plot).
Received from: representative of your merchant organization (see Quest 3: Missing Associates)
Representative of your merchant organization wants you to set up an outpost in Neverwinter. The matter can be resolved with sir Nevalle- all you need to do is give him 800 trade bars.
Received from: representative of your merchant organization (see Quest 3: Missing Associates)
Representative your merchant organization will tell you about Phineas the Sensate, who needs help in some task. You will meet him outside of the temple. He wants you to bring him some rare resources. Giving him first three will earn you 500 trade bars. Another three will net you the same reward, but due to a bug Phineas won't reward you for the last two (there are total 8 resources available) expecting a third one.
Received from: sir Nevalle after joining on of the merchant organizations (see Quest 3: Missing Associates)
Sir Nevalle is looking for a place to set up an orphanage. Tell him you'll try finding some room in the Crossroads Keep and go there to talk to Khelgarem about your idea.
Received from: the representative of your merchant organization (see Quest 3: Missing Associates)
Your first objective is to restore the trade relations with Port Llast. Head over there and enter the garrison. Inside you will witness a conversation between Rynn Shepherd, and Septimund. The latter can later join your party. Talk to Rynn. He will tell you, that the city is being troubled by two issues: an undead plague and unnatural storms. The storm issue can be solved by completing (Port Llast): The Wrath of Umberlee. Completing the quest will restore the trade in the city. If you want to end the Luskan occupation you can solve the issue straight away by killing Rynn Shepherd and all of the Luskan soldiers in the city. You can however, gain some allies for this fight - one of them is Prioress (see Quest (Port Llast): The Wrath of Umberlee), and the second is the army of the dead (see Quest (Port Llast): Army of the Dead). After dealing with Luskan troops return to the garrison and search Rynn's body for a key. Use it to open the locked door, behind which awaits Haeromos Dothwintyl - Port Llast's leader. Your reward will be a magic seal (AC bonus vs orcs +3, Constitution +2). If before killing the Luskans you haven't completed quests The Wrath of Umberlee and Army of the Dead Haeromos will now ask you to do them.
Received from: Akila, in Thay Enclave, after completing quest (Neverwinter): A Knot in the Weave and quest 15: Sa'Sani's Disappearance and entering north Samarach
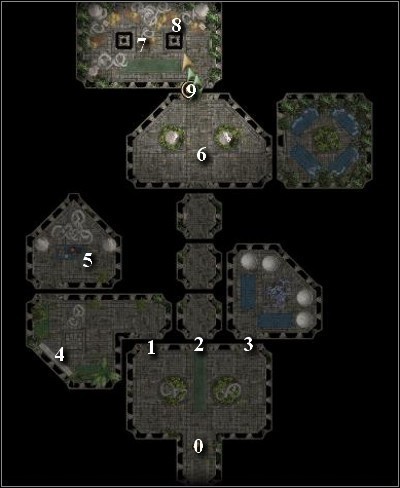
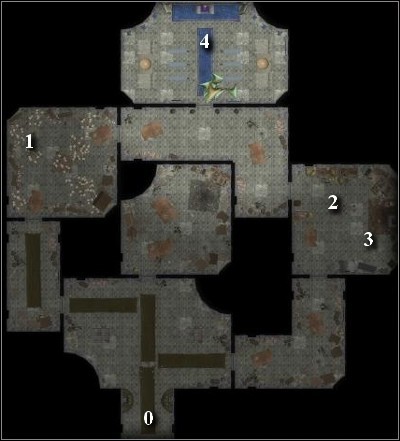
Foreign Temple
0. World map (north Samarach)
1. Shade Champion
2. Portal to the second part of the temple
3. Portal to the first part of the temple
4. Netherese Mystic
5. World map (north Sword Coast)
Akila found the source of the disturbances. It appears that it is a temple in north Samarach. Head over there to check what is the cause of the disturbances. Inside you will be attacked by a Shade Champion. Each time he nears death he gets healed by a stream of magic shooting out from the portal. Send some of your characters to the other side to deal with the mystic, who's been healing the Champion. The exit in the other part of the temple leads to the northern, unavailable up until now part of the Sword Coast. Return to Neverwinter and tell Akila what has transpired.
0. World map
1. Parzeeche (merchant)
2. Garrison
3. Septimund
4. Tavern
Received from: Rynn Shepherde or Haermos Dothwintyl during (Neverwinter): Under New Management
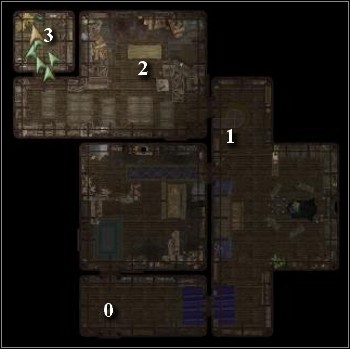
Priory of the Depths
0. World map
1. Reliquary
2. Statue
3. Body - Arrows +3
4. Body - Kukri +2
5. Body - Shuriken +2
6. Body - ice arrows
7. Body - Chain shirt +1
8. Levers - Open the next door
9. Floor pattern
10. Prioress
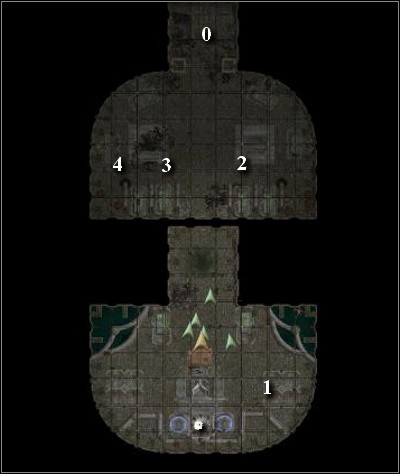
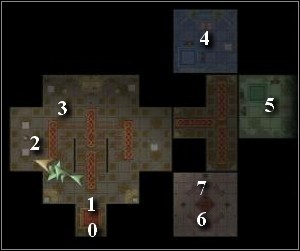
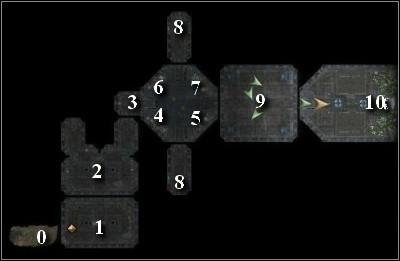
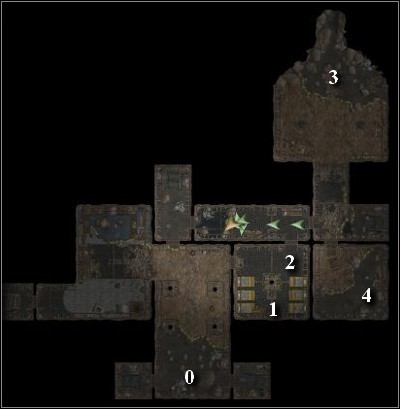
Exit the city and proceed north along the coast. You will come across a new location - Priory of the Depths. Swim inside and enter the first room. In order to get through the first door you need to sue the reliquary and pay 2000 $. Continue on and click on the statue to answer four questions:
1. Who should fear the Queen? - Everyone
2. What's her favored way of dying? - Drowning
3. What's the symbol of Umberlee - Two split waves
4. What does Umberlee rule over? - Seas and oceans
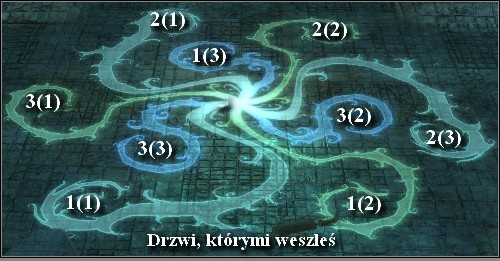
After you give all the right answers the next door will appear to a room with some drowned people. Search their bodies and kill them, once they come to life. Flip the switches and get past the open door. The next room contains a puzzle. There are symbols painted on the floor which you need to activate in the right order. Below, you'll see a depiction of the right order. You will need three characters to stand on the right symbols in the right order. Once all three are in the right spots and the green spheres light up, your characters will be able to move. There are three phases of this puzzle, each ending with the lighting up of the green lights. The first number indicates the phase and the second (in the bracket) is shows the order of pressing - your first character should stand on 1(1), the second on 1(2), and third on 1(3) - once the green lights turn on, all three can move to 2(x) and then to 3(x).
Once you solve the riddle the door leading to the Prioress will open. During the conversation you can decide to kill her (on her body you'll find a Magic Ring granting and additional 2nd level spell slot). You can also pay her the debt made by the Luskans - 6000 $ to make her stop attacking the city or 10000 $ if you want her help in fighting the Luskans. She will wreck the ship with Luskan soldiers on board. Now return to Port Llast and visit the garrison to get your reward of 1000 $.
Received from: Rynn Shepherd or Haermos Dothwintyl during Neverwinter: Under New Management
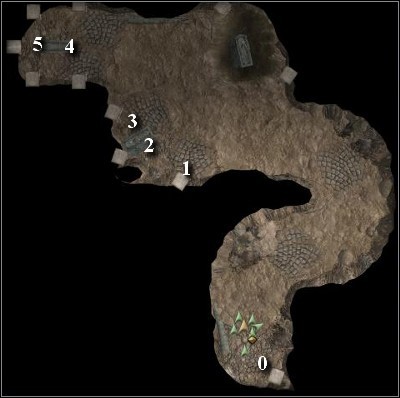
Gothaladreum - Cemetery
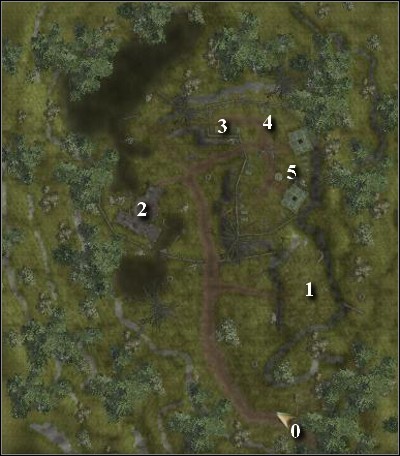
0. World map
1. Ghost of Lord Adreum VI
2. Nya
3. Grave - Plate armor
4. Grave - jewel
5. Grave - Magic Ring (armor bonus +1)
Your quest here is to find the source of the undead plague. During this quest you will be able to add Septimund to your party. He will come in handy, as he is a friend of Nya, whom you'll meet in the cemetery. You will find him near the tavern. He is being attacked by the undead. Help him win the fight and then convince him to help you solve the undead plague. Visit the tavern where a drunkard by the name of Eommar will offer you some interesting and useful information. Leave the town and head east until you come across a Cemetery. Enter it and talk to Nya, after carving your way to her through a number of undead. Nya wants to create an undead army to reclaim Port Llast. You can convince her that this idea is evil to the core and she will leave the cemetery. You can also kill her. If you haven't dealt with the Luskan forces until this point you can use the undead to do it. Talk to Nya. If your party consists of characters specializing in this kind of magic he can summon an army and send it to Port Llast.
If you have no characters with such abilities Nya will send you to the ghost of Lord Adreum VI. Go and talk to him (Septimund will leave you, as he despises collaborating with ghost), remind him who he is and tell him that the time has come for him to help defending Port Llast. Ghost will demand that you first kill all of the undead swarming the cemetery. Do so and return to Lord Adreum to have him send his army to Port Llast. Return to the town and help slaughtering the Luskans.
Received from: Jesentus Parr, w Tavern
Parrum Rock (V)
0. World map
1. Closet - Studded Leather +2, Boots (Constitution +2)
2. Correspondence
3. Ghost
4. Arcane Nexus
Jesentus wants you to head over to the Parrum Rock Mine and wipe out the undead. He also wants you to find the deed of ownership of the mine. Leave the city and head west until you reach the mine. Kill the undead and the ghost in the northmost room. Take a look at the correspondence scattered around on the floor of one of the rooms and collect the energy from the Arcane Nexus if you're doing (Neverwinter): A Knot in the Weave and return to Conyberry. Talk to Jesentus to get a reward of 2000 $.
See Quest 9: North bound.
Enemies: Ogr e Barbarian, Annis - hag, green hags
Loot: Chest - Recipes, throwing axe +1, dire rat tail
See Quest (West Harbor): Deal with the Dragons.
See Quest (Crossroads Keep): Shadow Fading.
See Quest (West Harbor): Whispers in the Marsh.
See Quest (Phandalin): The Cold Iron Mining Company.
This location appears as the main storyline progresses (see Quest 3: Missing Associates).
See Quest (Crossroads Keep): Tribute.
Enemies: Skullsmasher
Loot: Skullsmasher's Body - magic Morning Star +1 (can drain Dexterity on hit; casts Confusion on hit), bracers (armor bonus +4), magic Cloak (+2 armor bonus vs evil characters), Magic Ring (Freedom of Movement), magic amulet (Will Saves +3)
Chest - Potions, 900 $, Arrows +2, longbow +2, Studded Leather +3, magic amulet (bonus AC +2)
There is only one resident in this cabin - Skullsmasher. There are two ways you can deal with him: one is to talk about his past and get a magic scroll and the other is to simply attack him. If you decide to do the latter be sure to take Skullsmasher's equipment and search his chest. You might also want to disarm the traps which trigger at the beginning of combat. There's quite a lot of them here, which means lots of extra experience.
0. Entrance
1. Den Mother
2. Ulweth's Body
3. Shredded scroll
Received: during first encounter with the worgs or upon reaching the cave
Head inside the cave and kill the Den Mother. Be sure to search her body and take the skins. In the cave you will also find Ulweth's body and a mysterious scroll.
Enemies: Rangers and a Cleric
Loot: Chest - magic scroll, Potions
0. World map
1. Coffin - Recipes
2. Sarcophagus - Boots (reflex saves +2)
3. Coffin - magic scroll, Recipe
4. Sarcophagus - magic belt (immunity to Finger of Death and Power Word, Kill)
5. Arcane Nexus
This barrow is haunted by the undead. Kill them and search the coffins and the sarcophagi. Be sure to collect the Arcane Nexus energy if you're doing (Neverwinter): A Knot in the Weave.
See Quest (Conyberry): Parrum Rock.
Enemies: Gargoyles
Loot: Damaged Bookcase - Recipes
Chest - Recipe, Magic Ring (Hide +6), mace +1 (once per day casts Greater Heroism and Mass Cure Serious Wounds)
Start off by looting the bookcase, then destroy it - after it's gone you will see a chest. Take its contents and head back towards the entrance. Gargoyles, that were lining the walls calmly until this moment will now attack you. Kill them and go outside.
Enemies: Spider, Drow
Loot: Drow bodies - Plate armor +2, Cloak (fortitude saves +2)
Enemies: Mad druid and his boars
Loot: Bodies on the ground - Gold, Composite shortbow (mighty +4)
Bookcase - Recipe
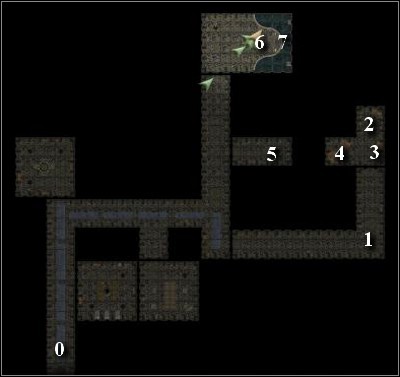
0. World map
1. Statue - Shoots rays at you; can be destroyed.
2. Gold and Chest - 45 $
3. Chest - 142 $, alchemists fire, greater shadow remains
4. Gold and Chest - 642 $, Potion
5. Timothy Arneson - prisoner
6. Banite leaders
7. Arcane Nexus
Received: Upon finding the Enclave
You need to kill all the banites in the Enclave. Expect some heavy fight in a northern room, as the leaders reside there. Before getting there be sure to check the room warded by a magic statue. Destroy it, take the gold and loot the chests. After dealing with all of the banites and their leaders go to release the prisoner. Be sure to collect some energy from the Arcane Nexus if you're doing (Neverwinter): A Knot in the Weave and leave.
Enemies: Duergars
Loot: Duergar bodies - Heavy Crossbow +2
Chest - Recipes
See Quest (Neverwinter): Fixing a Hole.
See Quest 12: Shortage.
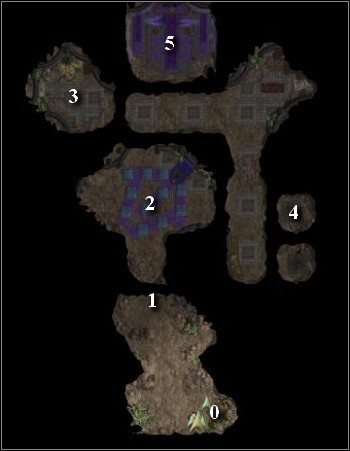
0. World map
1. Onyx door
2. Monks of the Dark Moon
3. Chest x 3: Adamantine katana, magic kukri +1 (Hide and Move Silently +2), 245 $, Jewels, Thieves' Tools +10, trap, magic stone (summons Earth elemental once per day)
4. Cell / Ribmasher - open the cell and release him, and he will join you.
5. Master of the Dark Moon and Divine Champion of Shar
Try to open the onyx door. A menu will pop up from which you should first choose "Read the inscription" and then "Use Darkness". The door will open and you will have to face some monks of the Dark Moon. Unless you manage to successfully Bluff them you will need to fight them. Head over to the west room where you'll find some interesting crates and open one of the cells - a man called Ribmasher is locked inside. Thankful for your help he will join you. Now you can leave the area or fight the monks of the Dark Moon and their master. The fight is rather challenging so you'll need all the buffs you can get if you want to stand a fighting chance against them. Once you deal with them search their bodies to find: Morning Star +2, magic gauntlets +2 (1d6 sonic damage), kama +2.
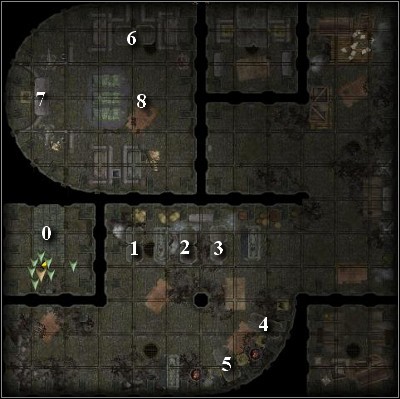
0. World map
1. Sarcophagus - jewel
2. Sarcophagus - Magic Ring (cold resistance 30)
3. Sarcophagus - Sling (attack bonus +1, unlimited ammunition +1d6 fire damage)
4. Sarcophagus - Jewels
5. Sarcophagus - jewel
6. Sarcophagus - staff +3 (armor bonus +2, it can cast Chain Lightning, Fireball and Ghostly Visage)
7. Sarcophagus - Bastard Sword +1, +3 vs Chaotic characters
8. Death Knight
Once inside, you will be attacked by a large number of undead. Deal with them and kill the Death Knight, in the last chamber, then search the sarcophagi to find some valuable and powerful items.
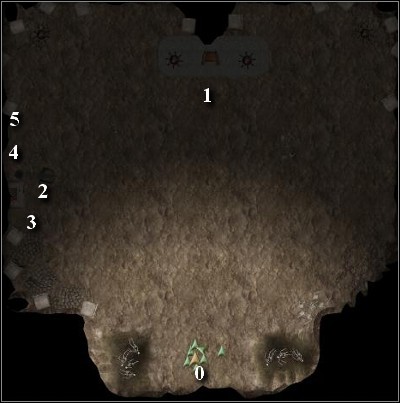
0. World map
1. King Karagg
2. Giant Priest
3. Weapons rack - Scythe +3
4. Weapons rack - Shortsword +1 (poisoned, drains Constitution), Halberd +3
5. Tomes - Recipes
You'll encounter two characters in this cave - first of them is the Giant Priest, whom you can ask about who he is, and the second one is King Karagg. Talking to the King may lead to a fight so if you want to do anything more in this area, attack the giants. Once you deal with them search the King's body to find 9985 $ and magic Boots (Freedom of Movement; casts Stone to Flesh). Take the weapons off the racks and the nearby Recipes and leave.
Enemies: Gnolls
Loot: Chief's Body - Warmace +2
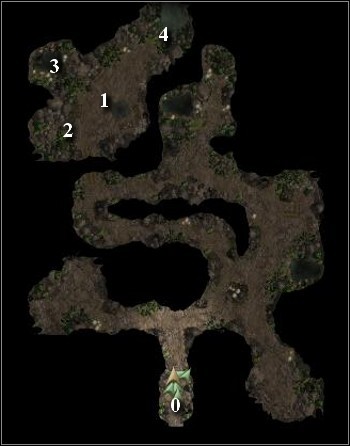
0. World map
1. Pirate commanders
2. Chest - Jewels, rapier +1
3. Arcane Nexus
4. Hostages - Nothing you can do about them.
In this location you will have to fight some pirates. Get through the soldiers to reach their leaders. Talking to them won't change much and will result in a fight. Search the bodies to find: spear +2 (1d4 electricity damage), rapier +2, shortbow +2. Empty the chest and take the energy from the Arcane Nexus if you're doing (Neverwinter): A Knot in the Weave.
Enemies: Mad Hermit, Dire Badgers
Loot: Hermit's body - Battleaxe +3, scale mail +3
Chest - magic scrolls, magic totem
There's a body of some sacrificial ritual's victim, but there's nothing you can do about it.
See Quest (Port Llast): Army of the Dead.
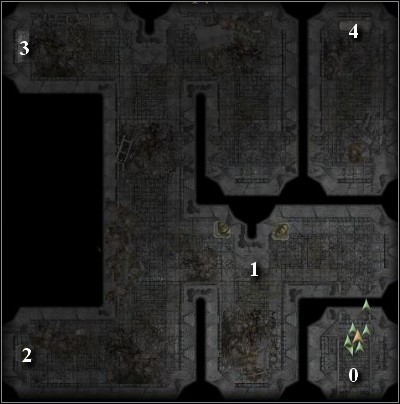
0. World map
1. Golem
2. Chest - Recipes, Robe (Concentration bonus +4, additional 2nd level spell slot for Wizards and Bards)
3. Chest x2 - Jewels
4. Chest - Potions and scrolls
The only enemy in these ruins is a golem. Deal with it, search it's body, then collect all the valuables from the chests.
See Quest (Port Llast): The Wrath of Umberlee.
Ground floor
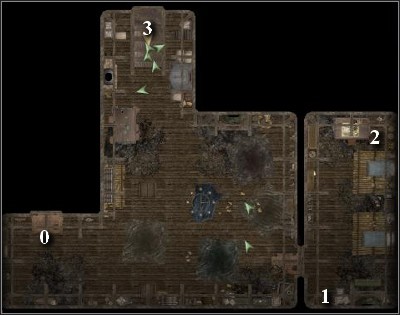
0. World map
1. Chest - Magic bowl (summons Water Elemental)
2. Chest - 500 $, Magic Ring (additional first level spell slot)
3. Door to the second floor
Second Floor
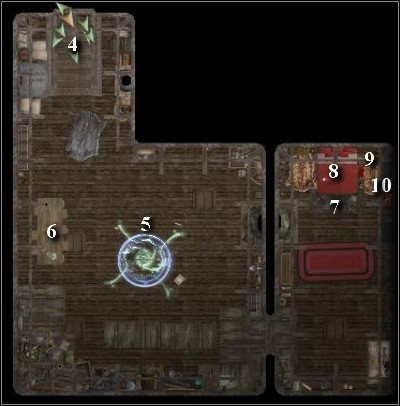
4. Door to the first floor
5. Arcane Nexus
6. Gold - Large amount of gold
7. Chest - 1115 $
8. Gold - Large amount of gold
9. Closet - Robe (armor bonus +1, magic resistance 14, can cast False Life once per day)
10. Chest x2 - Potions, Magic Ring (all saving throws +3)
On the first floor you will be attacked by some pirates supported by two mages. Deal with them and enter the second room. Loot the chests and head upstairs.
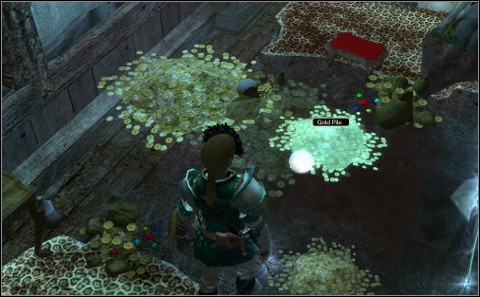
Here you will have to deal with a Pirate Captain, Luskan berserkers and two mages. Kill them and search the room. There is an Arcane Nexus in the middle of the room so be sure to collect its energy if you're doing (Neverwinter): A Knot in the Weave. Beside it there's a large amount of gold scattered on the floor collect it, then search the closet and the chests.
See Quest (Crossroads Keep): The Bard's Tale.
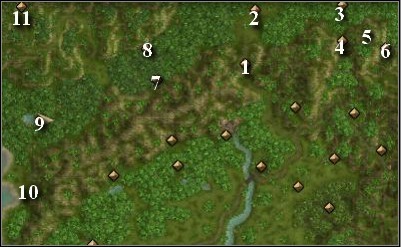
1. Viper Temple
2. Derelict Camp
3. Destroyed temple
4. Foreign Temple
5. Ruins
6. Mine
7. Barrow
8. Yuan-Ti Temple
9. Zecorian's Domain
10. Empty Temple
11. Temple of the World Serpent
Received: after completing quest 14: Murder at Crossroads Keep
After getting through the portal you will find yourself back at the Lantanese Lumber Camp. Talk to Dall about Sa'Sani, and he wil tell you that her tracks lead north-east. Go to the Viper Temple. Inside, you will meet Sa'Sani. During the conversation about two fighting Yuan-Ti factions s you will be attacked by some Yuan-Ti. Deal with them and talk to Sa'Sani. After the conversation is over, Volo will appear. From now on you can meet him both here and at the Crossroads Keep. He has some items for sale.
Received from: Sa'Sani, after completing quest Following Sa'Sani
You need to stop the Yuan-Ti of the house Se'Sehen. In order to do that you need to go to the Temple of the World Serpent and defeat the Yuan-Ti leaders. Before entering the temple rest to regain life and spells.
Temple of the World Serpent
Level 1
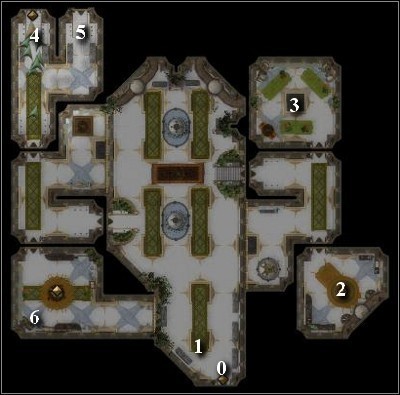
0. World map
1. Madeem
2. Merchant
3. Serpent king Hal'Seh
4. Door to the armory
5. Entrance to Level 2
6. Scrying Sphere
Armory
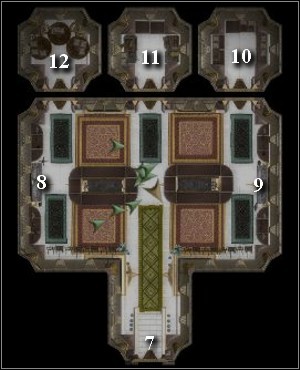
7. Back to Level 1
8. Chest - Longsword +3
9. Chest - Arrows +3, Composite bow (mighty +3)
10 Chest - Cloak (saving throws +3), magic amulet (armor bonus +3)
11 Chest - Chain shirt +3, boots (reflex saving throws +3)
12 Chest - Plate armor +3, heavy shield +3
Right after you enter the temple you need to choose a path to follow - you can either start slaughtering everyone that comes within eyesight or follow a more subtle path. You will be approached by Madeem who will mistake you for a guest they've been awaiting allowing you to get to the final area without fighting. If you manage to reach Level 4 without engaging your enemies you will receive a Master Infiltrator feat (Hide +2, Move Silently +2) you need to avoid the high-up Yuan-Ti, as such meetings will raise an alarm. Also be sure to avoid the traps scattered all throughout the temple. Triggering them may also alert the enemies. Stay away from Hal'Seh. You might want to buy some stuff from the merchant, who's selling some powerful Healing potions. Before leaving approach the scrying sphere, which will allow you to see some interesting moments and places. Now enter the armory, loot it and proceed to Level two.
Level 2
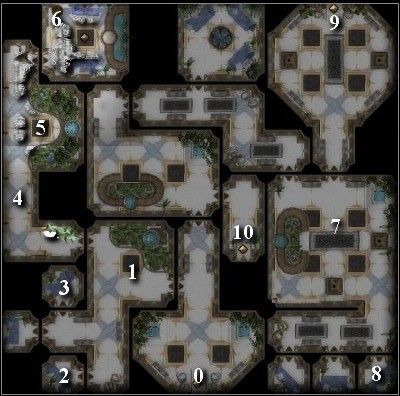
0. Back to Level 1
1. Nessa
2. Chest - 2000 $, coin of life, Magic Ring (armor bonus +3)
3. Chest - Kukri +3, Healer's Kit +10
4. Trapped corridor
5. Golem
6. Chest - Calendar Se'Sehen
7. Serpent Lord Ar'Sulis
8. Chest - Wand (casts czar Cure Critical Wounds), magic amulet (will saving throws +3), Magic Ring (cold resistance 20)
9. Entrance to Level 3
10. Entrance to the library
Library
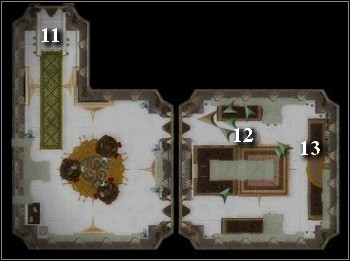
11. Back to Level 2
12. Archivist
13. Bookcase - Powerful magic scrolls
On the second level you should start off by talking to Nessa. If you manage to convince her, she will tell you that there is a Calendar hidden in one of the rooms here and that it should help you reaching the next level. It's not necessary, but you may want to use your rogue skills and send your character to retrieve it. On your way you should be wary not to get noticed by a golem. The corridor is filled with traps which are worth disarming for the experience they provide. Once you get through the corridor approach the chest and take the Calendar. You can now enter the library to pick up some powerful spell scrolls. There is an Archivist, who will recognize you here, but you can convince him that he's wrong unless you want to start a fight. You can also talk to Ar'Sulis and loot some chests. Now head to the door leading to Level three. In order to get through them you need to answer some questions (the answers can be found in the Calendar). Below, you'll see the list of questions and answers:
Winter Solistice - Greengrass
Melting - Midsummer
Highsun - Highharvestide
Leaffall - Midwinter
Marpenoth - Mirtul
Alturiak - Hammer
Elasias - Tarsakh
Kythorn - Ches.
Level 3
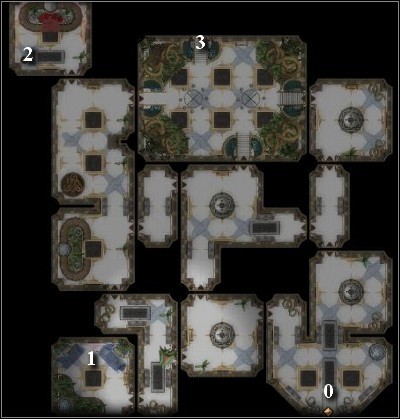
0. Back to Level 2
1. Chest - 10000 $, Bastard Sword +3, Tower Shield +3, Wand (casts Restoration)
2. Switch
3. Entrance to Level 4
On this level each and every Yuan-Ti is your enemy. If you want to sneak to the next level, none of them should notice you. Yuan-Ti can be found mostly in the western part of the area. There's only one patrolling the eastern part. You can sneak past him and get to the next level. You need to pay attention to traps scattered throughout the area and disable them whenever possible. The door to level four are open until you get noticed. If a Yuan-Ti notices you the door will close and you will need to use the switch in one of the western rooms. You might want to consider visiting the room with the chest, as there are some valuable items there. If you don't want to get noticed you can visit the room with your rogue in stealth mode only.
Level 4
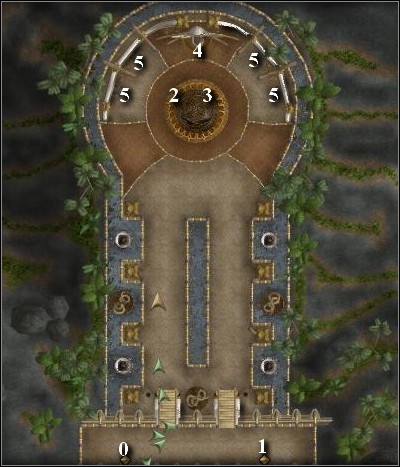
0. Back to Level 3
1. World map - Available only after the fight
2. Zehir's Herold
3. Hierophant N'Safa
4. Zehir
5. Fanatics
You finally reached the final battle (or the second to final, if you decide to deal with Sa'Sani). Be sure that you are prepared for it. Spread the healing potions and coins of life throughout your party and buff your characters. You will listen to a conversation between Zehir and his servants, and the fight will begin. Start by killing the fanatics bombarding you with magic missiles and only after you're done with them you should switch to Herold and the Hierophant. Those two are really tough but killable if you'll keep an eye out on dying characters and use resurrection magic whenever necessary. Summoning spells will be a great help here. After the fight is over you will talk to Zehir himself. You won't be able to face him. You can now leave the area. You have three options now: you can finish the game at this point, continue exploring or return to Sa'Sani. If you decide to return to Sa'Sani you will be given the option of either fighting her, getting her to pay you for her life (50000 $) or making her promise that she won't hurt anyone again. If you decide to kill her, you will find: bracers (armor bonus +8), Magic Ring (armor bonus +3), magic amulet (Wisdom +6), Magic Ring (Freedom of Movement).
See Quest 15: Following Sa'Sani.
The only thing you can do here is examine the area. After looking at the tracks you will notice that there have been both humans and Yuan-Ti around here.
Entrance to this temple has collapsed and there are some Yuan-ti bodies out front. You can examine the bodies using Search to get some Healing Potions and two magic scrolls.
See Quest (Neverwinter): Fixing a Hole.
You'll notice some inscriptions that can be deciphered using Lore.
Enemies: Dwarves, earth elementals
Loot: Chest - Jewels
In this mine you will meet a Brigadier. You can talk to him but it will give you nothing, and the dwarf will ask you out. If you want the jewels from the chest standing by him, you will need to fight some dwarves and earth elementals.
Enemies: Ogre mage
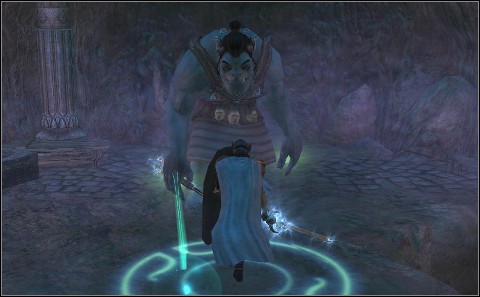
Loot: Ogre mage's body - Battle mace +3, Magic Ring (Fire Resistance 30)
Sarcophagus - 4500 $, Greataxe +3, leather armor +3
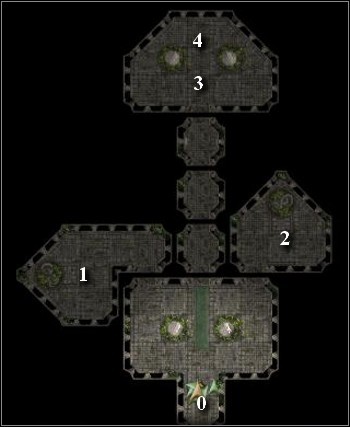
0. World map
1. Erynie
2. Imps
3. Horned Devil, Erynie, Diabolic Yuan-Ti
4. Chest - Jewels, Magic Ring (Fire Resistance 20)
In this temple you will run into a devil. Before you manage to fight him you will need to kill some Erynie and Imps present in both east and west room. Prepare for a rough fight and enter the room with the Horned Devil, Erynie and Diabolic Yuan-Ti. Empty the chest and leave.
In order to enter this area you need to use Spellcraft to neutralize the defences.
Level 1
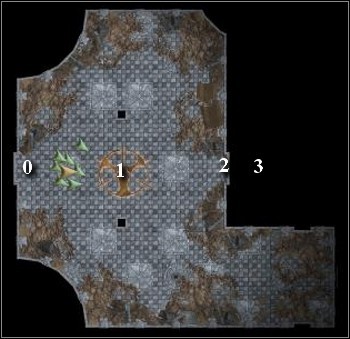
0. World map
1. Giant Skull / Wraiths
2. Closed door
3. Entrance to Level 2
There are some wraiths on this level. Kill them paying attention to the traps scattered throughout the level. You can examine the giant skull but there's nothing you can do about it. Disarm the trap on the door and enter the next level.

Level 2
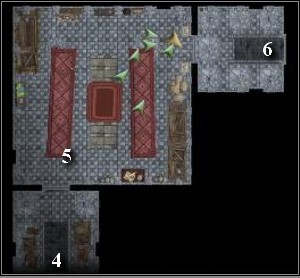
4. Back to Level 1
5. Hell Skeletons
6. Entrance to Level 3
Kill the skeletons, and prepare for a rough fight before going to the next level.
Level 3
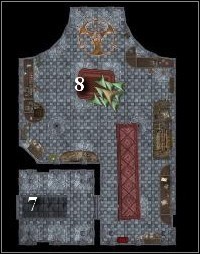
7. Back to Level 2
8. Two Vampire Lords, Lich Zecorian
This level contains what I consider the toughest enemies in the game. The fight that takes place here is extremely difficult so don't be ashamed if you decide to lower the difficulty gauge. Be sure to provide your characters with as much magic and negative energy resistance as you can. After dealing with the undead search their bodies to find: bracers (armor bonus +8), Magic Ring (armor bonus +4), Morning Star +4, Magic Ring (extra fifth level spell slot), Chainmail +4, Halberd +4, Magic Ring (Fire Resistance 20).
There is nothing inside.
See Quest 16: The Fall of House Se'Sehen.


 Need For Speed: ProStreet Game Guide & Walkthrough
 Nightmares from the Deep: The Sirens Call Game Guide & Walkthrough
 Neverwinter Nights 2: Mysteries of Westgate Game Guide & Walkthrough
 Need for Speed Rivals Game Guide & Walkthrough
 Need for Speed Carbon Game Guide & Walkthrough