

You will land in a small pool of water with Ooccoo not far behind. He introduces the place as the sky city of the Oocca. A giant bird then flies by and another Oocca appears. The bird that just flew by is a dragon that has been raging outside the city walls. The Oocca then run off to a nearby shop, which is just west of where you are.
Equip the Zora armor and the iron boots and sink down to the bottom of the water here. There are treasure chests in the southeast and southwest corners which contain some extra bombs and rupees. Take off the boots and Zora tunic and then climb out of the water. Walk to the west but be careful as the wind will blow. There is a deku baba near the door at the end. Just defeat him and continue forward through the door.
There is nothing of great use to purchase in the shop. Just speak with Ooccoo who is on your left and like always, she will come with you. Leave the shop and return to the water in the middle. From here, head north and fight off two deku babas. Keep the iron boots handy if the wind is giving you trouble.
There is another door at the end but it is blocked by a gate. Equip the bow and shoot an arrow at the crystal switch above. You must wait for the wind to stop blowing in order to shoot your arrows. Walk towards the door and as you get close, you should see a cinema of the entire city and it will be labeled the City in the Sky. Go through the door.
Keep in mind that the blocks on the floor that are blue will fall after a few seconds once Link stands on them. Pick up one of the Oocca that are to your right. Then walk to the left of the room and use the Oocca to float over to the lower platform. Drop the Oocca and defeat the helmasaur by first using your clawshot to remove its mask.
You can get to the higher ledge on the right by using the clawshot onto the vines that are on the pillar. Drop to the floor and you will see two Oocca on the wall to the right. Use your clawshot to pull one down from the wall. Then use it to float over to the lower platform at the north end of the room. Defeat two more helmasaurs and then use the ledge at the northeast part of the room to climb up. Go through the door to the north.
Walk forward and Link will encounter a new enemy, a helmasaur king. You cannot pull its mask off so you must attack it from the back. Use the back slice to easily attack and defeat it. Walk to the southeast corner of the room and you’ll see a small balcony with a window. Use the clawshot to hook over to the grating. Walk through the hole in the grating to get back outside.
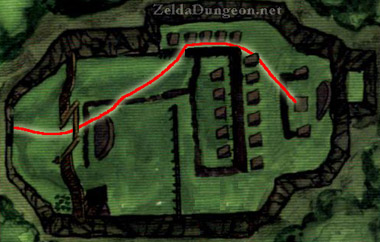
Drop down below and look to the right to discover a spinner slot. Pull out the spinner, and drop it in the hole. Spin it repeatedly and a bridge will appear at a nearby area, stretching to the east. Walk to the north end of the platform and use the clawshot on the ivy to get across the gap. Climb up and then cross the bridge. Be careful as there are plenty of kargaroks that are flying in the air. The wind is also gusting, so the iron boots can be helpful. There are also peahats floating around in the air, but they do not harm Link. Go through the door at the other end of the bridge.
Walk to the east end of the room, jumping across a small gap. Look towards the ceiling of the southeast portion of the room and you’ll see a target. Use the clawshot to grab onto it. Drop down and open the treasure chest to get a small key.
Use the clawshot on the grating that is near the platform you were just at. Jump back over to the door and head through it to get back to the bridge. Run across the bridge and before going through the door, you’ll see the giant dragon appear and break down the bridge. Go through the door.
You are now back in the large center room, which is the center of the city. Use the clawshot to grab onto the ivy on one of the two pillars. Crawl around to the other side and then drop down to the platform in the center of the room. Run across the blue blocks to get to the door at the west end of the room. Go through it.
Turn to your left and follow the path. Defeat the two deku babas and you’ll then notice another spinner slot. Use the spinner and spin it repeatedly to create another bridge, this one extending westward. Be careful of the kargaroks that are flying around as well as the gusty winds. Open the locked door at the end of the bridge.
Turn to your left once you enter and defeat the helmasaur that is nearby. Walk to the end of the ledge and look to the northwest portion of the room. You’ll notice a crystal switch. You cannot hit it with an arrow because of the wind that is blowing. Stand at the corner of the ledge and use the clawshot to hit the switch. One of the wind turbines at the southwest corner of the room will shut off.
Walk to the north end of the room and begin heading west. There is a helmasaur that is in your way, so defeat it using the clawshot and a few sword strikes. Equip the iron boots so that you can walk past the gust from the first wind turbine. The second wind turbine has blue blocks, so you won’t be able to walk across with your iron boots. Use the clawshot and hook onto the ivy that is on the distant pillar. Defeat the third helmasaur in this room and then head through the door at the west end of the room.
Open the treasure chest that is directly to your left to get the dungeon map. We will return to this tall room much later in the dungeon. Return to the previous room.
Link has already shut down the wind turbine in this room by hitting the crystal switch. Now Link can run across the blue blocks and go through the door at the south end of the room.
There are a few keese that are flying around in this room. It’s a good idea to get rid of them as quick as you can because they can get annoying. Once you are close enough z-target them and quickly eliminate them with some arrows. You can also aim from a distance with some arrows.
Run to the south end of the room and jump across the small gap to the platform to the east. Watch out for the gust of air that comes from below and quickly jump over to the west. There is another gust of air coming from below. There is also a tile worm under one of the tiles across the gap. Use the gale boomerang to bring the worm out from under the tile and defeat it. You can also just simply use the target that is on the south wall to hook your way over.
Jump across the gap and defeat another tile worm. You can walk along the wall to the north and head east. Jump down to the lower platform and open the treasure chest to get a yellow rupee. Jump back to the platform along the north wall and head to the west. There is another gust of air as well as a tile worm. Defeat the worm and then jump across the gap when it is safe. Jump onto the blue block to the south and then over to the southwest platform. Go through the door.
The door will seal shut behind you and you’ll see two dinolfos in this room. Jump over to the platform straight ahead and both enemies will jump over as well. Link can use the shield attack followed by the helm splitter to defeat these creatures. Knocking them off the platform with the shield attack will do the trick as well.
Once both are defeated, the door will open up and a gate will open. Face the south of the room and use the clawshot on the ivy. Climb up and use the clawshot on the chandelier that hangs above. This is actually a switch which triggers wind to periodically blow from the center of the room. Lift one of the nearby Oocca and then wait until the wind gust just begins in the center of the room. Quickly jump towards it with the Oocca in hand and the wind will glide you upwards, allowing Link to reach the higher ledge to the north. Go through the door.
Look above and you’ll see a chandelier hanging. Use the clawshot to grab onto it and a gate will open on the side of the room. Behind the gate you’ll notice that there is a treasure chest. Grab the nearby Oocca and jump down to the area below. Use the Oocca and walk into the wind gust and float towards the treasure chest. Open the treasure chest to get a red rupee.
Jump down to the area below and use the clawshot on the target to get back to the platform on the west. Use the clawshot to grab the Oocca you were just using and use it the wind tunnel to fly over to the far right side of the room where you will find another treasure chest. Open it up to get the purple rupee. Use the clawshot on the target that is on the south wall to get over to the nearby platform. Then use the clawshot to bring over the Oocca you just used. Using the Oocca and the wind tunnel, fly through the passage in the wall and turn to the east.
Drop down at the higher ledge here and then like before, use your clawshot on the chandelier. This will activate a wind tunnel at the other end of the room. Lift up the Oocca and use the center wind tunnel to get to the west side of the room. Now use the newly created wind tunnel to get through a crack in the wall. Let go of the Oocca and head through the door to the north.
We are now back in this tall spirally room where we got the dungeon map, but in a different area. Grab the nearby Oocca and fly to the northwest corner of the room and drop down to a lower platform. There are horizontal wind tunnels that can blow you out of the tower, so be careful. The end goal is to reach the west room at the bottom. Use several Oocca as you float to the floors below, eventually reaching the bottom floor. Go through the door to the west.
The door will lock behind you once you enter this room. There is a rather strong fan with a chandelier located right above it. Use the clawshot to get to the chandelier, but because of the gusty wind, you won’t be able to pull it down. Equip the iron boots and the chandelier will drop down. The wind from below will stop, so release the chandelier. Link will fall to the floor below where he will encounter a new creature known as an aeralfos.
These creatures are part of the same family as the lizalfos and dinolfos, except, they can fly. While fighting this creature, watch out for the blue blocks that are around the perimeter of the room. Look closely at the aeralfos and you’ll notice that his shield is actually a clawshot target. Run around the room as you Z-target the aeralfos. Once he is ready to attack, he’ll hold his sword back and shield forward. Use the clawshot and Link will pull the aeralfos closer. Strike at him with several sword slashes and he’ll regain his footing. After a short while, he’ll return to the air. Repeat the same process again until you’ve struck him 7 times with the master sword.
After this, the aeralfos will fly around and leave through one of the windows in the room. This phase is nearly identical to the first phase, except the aeralfos will fly in and out through the four windows in the room. He also floats a bit higher, which means Link cannot always Z-target him, so you’ll have to manually aim a bit if he is too high.
Once he appears from a window he’ll immediately be ready to attack you, so use your clawshot to pull him forward. After several sword slashes he will regain his footing and battle you on the ground. Use the shield attack and helm splitter to attack the aeralfos. After which, he’ll once again fly in the room. After several hits, the aeralfos will finally be defeated.
A gate opens up at the east end of the room and the door from the above room will also open. Run to the east end of the room and use the clawshot on the target at the ceiling. Run over and open the treasure chest to get another clawshot. Link now has two clawshots, making the double clawshot. This will allow Link to hang onto one target, while hooking over to a second target.
Walk over to the west, but don’t fall to the bottom floor. If you look at the ceiling, you’ll notice four targets in the four corners. If you look carefully, you’ll also notice some ivy hanging from the ceiling fan. Use the clawshot on the ceiling target that is just to your right. Now suspend from the clawshot and pull yourself down a bit. Still hanging on the target, use your second clawshot and grab onto the target at the northwest portion of the ceiling. From here, look at the hole in the center of the room and grab onto the ivy with the clawshot. Climb up the ivy and leave through the door to the east.
You are now back in this tall spirally tower, which you must climb using your double clawshots. Begin using your clawshot on the targets along the wall as you climb the room going clockwise. Remember, don’t let go after you grab onto a target. Just hang on and use your second clawshot to get to the next one. Once you pass one of the horizontal wind tunnels, you’ll then have to turn back counter clockwise to keep climbing upwards. From the next target, you can now hook over to a chandelier. Pulling it down will open up a gate at a lower level.
Once you release from the chandelier, the gate will close, and Link doesn’t want that to happen. Remain hooked onto the chandelier and suspend yourself down. Look to the right and you’ll see a door with a target on both sides. Use the clawshot on either of the targets and you’ll get through the passage before the gate closes. Open the door and head east.
This room is actually pretty simple to get through. There are several pillars that are hanging, with many of them having clawshot targets. Just hook from target to target as you make your eastwards. At the end far right, open the treasure chest to get the compass. Go through the door to get back outside.
You are now in an area below the bridge that you extended earlier. There are three deku babas hanging from the gratings that are under the bridge. Use the hawkeye and arrows to defeat them. If you don’t have the hawkeye, you can just defeat them with the clawshot as you go. Use the clawshot and grab onto the grating. Lower yourself down and then hook over to the next grating. Once you reach the last grating, look to your right and you’ll see some ivy hanging down. Hook over to the ivy and then climb up. Go through the door to return to the center of the city.
Run across the blue blocks to the center of the room. Walk over to the east end of the room and use the clawshot to hook over to the ceiling target. From there, grab onto the second target that is above the door at the east end of the room. Go through the door.
With the bridge now out of order, you must use the peahats that are floating above to get past this area. The kargarok enemies are still flying around, so watch out. Just keep z-targeting the peahats as you hook your way across. Go through the door at the other end of the bridge.
Walk to the east end of the room and then claw onto the ceiling target that is further to the north of the two. Lower the chain down and you’ll see a pillar that has a second target. Quickly claw over to the next pillar and continue to get to the southwest corner of the room. Be careful as these pillars will fall once Link grabs onto the targets. Once you reach the southwest corner, allow the pillar to fall and you’ll land on a small platform.
Use the clawshot and pull yourself to the room to the north. Look at the opposite wall and you’ll see two targets. Grab onto the one to your right and you’ll see a treasure chest. Claw onto the nearby target, defeat the deku babas that appear, and open the treasure chest for some extra arrows. Now use the clawshot to grab onto the other target that was on that wall and then grab onto the grating to land in the center of this room. Go through the small hole to the north and then jump down to the platform at the west.
Look at the ceiling and you’ll see two deku babas dangling. Use your arrows to cut them down. Now use the clawshot to hook onto the grating where one of the deku babas was hanging. Lower yourself down and use your second clawshot to hit the crystal switch to your north. This will open a gate along the south wall. Turn around and grapple at the target. From here pull yourself up to gratings and targets until you reach a safe platform.
If you turn to the center of the room you’ll see a small treasure chest. You can jump over to it and open it to get a red rupee. Also, you can jump across the blocks to get to the northwest corner of the room. Be careful as there are two tile worms lurking around. Open the treasure chest to get some extra bombs. Jump back across the blocks and go through the door to the north.
A big baba waits for you in this area as well as three normal deku babas. Defeat the normal ones as usual and then slash at the big baba. Once it is defeated, toss a bomb into the deku like that appears and it will get rid of the whole base of the plant.
Use the clawshot to grab onto the target at the east end of the room. This pillar will start to fall so quickly claw over to the ivy at the north. Start climbing counter-clockwise in this room and you’ll come to some rather narrow ledges. Use your arrows to eliminate the deku baba and the keese that are in your way. There is a small treasure nearby, so open it to get some extra arrows.
Once you pass the deku baba, look around and defeat any nearby keese that are flying nearby. There is a narrow ledge against the wall that Link cannot stand on. Instead, just hang onto it and pull yourself across the gap. There is a deku baba hanging from the ceiling here. Defeat it with an arrow and some sword strikes. Open the nearby treasure chest to get a piece of heart.
Go back across that narrow ledge and then look towards the wall to see a target on a pillar. Grab onto the target and then quickly Z-target a second pillar and grab onto there. From here, use the clawshot to grab onto some ivy at the north end of the room. Look to the center of the room and you’ll see a target. Grab onto it and lower yourself to a safe platform. Defeat the dinolfos that is found here and go through the door to the south to get back outside.
Defeat the few deku babas in this area and then grab onto the peahat that is floating around in the sky. It will carry you southward where Link should grab onto a second peahat. This one will also carry you southward. Once you pass over the wall, release from the peahat. Walk to the east and open the treasure chest that is behind some grass to get some extra rupees.
There is another peahat that you can see moving north and south. Grab onto it when it is moving southward. From here, you’ll see another stationary peahat near a circular platform. Grab onto this peahat and then release. There is a Poe floating around. Transform into wolf Link and defeat it to get the 56th Poe soul.
Transform back into human Link and open the nearby treasure chest to get a purple rupee. Now grab onto the stationary peahat and wait for the other peahat to come nearby. Grab onto this one and it will travel northward. You’ll be heading straight for a wall that has a very narrow space. Link cannot fit through this, but if you lower yourself, the chain will be able to pass through. Once you pass the wall, claw on over to the nearby peahat and continue traveling northward.
Lower yourself and you pass through a second hole in the wall. Drop down to the floor here and defeat two deku babas. Open the nearby treasure chest to get some extra bombs. Grab back onto the peahat when it is moving northward and let it take you to the higher platform. Go through the door.
You are now high above where the east bridge had broken apart earlier in the dungeon. If you look at the map, you are at the northeast portion of this outdoor area. Use the peahats that float above and claw your way westward. Don’t go all the way west though, but instead turn your attention to the southeast and travel across a few peahats. Once you reach the far southeast area, go through the door to get back to this area we were just in.
You are now on a higher ledge on the other side of the room. Open the treasure chest that is nearby to get a piece of heart. Now return through the door. Use the peahats to get to the west side of this outdoor area and then drop down. Go through the door to get back to an area that is just north of the center of the city.
You can walk around this area and defeat the two dinolfos if you’d like. At the northeast portion of the area, you’ll see some ivy hanging down. Use your clawshot and climb up to the platform. Pull out your arrows and shoot the kargaroks that you see just sitting on some of the nearby platforms.
Transform into wolf Link and walk across the tight rope. Transform back into human Link and walk clockwise around the area. There are two walltulas crawling along the ivy here. Use your arrows or slingshot to get rid of them and then climb the ivy. Make your way to the end of the ivy and drop to the platform. Open the nearby treasure chest to get a red rupee.
Transform into wolf Link and walk across two tight ropes. Defeat the Poe that is floating around this area and grab your 57th Poe soul. Transform into human Link and open the treasure chest to get a purple rupee.
Jump off the ledge and return to the ivy at the northeast portion of this area. Climb the ivy and then transform into wolf Link. Walk across the tight ropes and walk counter clockwise around this area. Walk across three more tight ropes and then transform back into human Link. Enter the door to reach the inner portion of this area.
Look over to the ceiling at the east end of the room and use the clawshot to grab onto the chandelier. Equip the iron boots and it will turn off the wind tunnel from below. Drop down and defeat the two helmasaur kings that are running around. Open the treasure chest to get the big key.
Walk down to the southwest side of the room and drop down a small pit. Defeat the two helmasaurs that are found here and open the treasure chest to get a red rupee. Grab onto the grating that is on the ceiling. Grab onto the grating near the north side and lower yourself down below the fan that has been turned off.
Once you’ve lowered yourself all the way, look at the ceiling to the north in the floor below and you’ll see a chandelier. Grab onto it and equip the iron boots. The weight of the boots will cause a fan to turn on, but it is actually blowing out of this room, not in it. Drop down to the bottom of this room and you’ll be in the center of the city once again. Go through the door to the north.
With the fan turned on, platforms with grating will be rotating around. Claw on over to the first spinning platform and from there, just keep grabbing onto the grating as you head across the area. Once you reach the last spinning platform don’t fall down. Grab onto the grating that is near the fan and there is a treasure chest here. Open it to get a red rupee. Now drop down and go through the door.
There are two more aeralfos found in this area. Defeat them just as before by waiting for them to stick their shield out and pulling them towards. Once they are on the ground slash away with your sword until they regain their footing. Then use the shield attack and finish them off with a few more sword slashes.
Grapple onto the grating that is just above the door that you came in from. Then grapple onto the grating that is on the spinning platform. From here, use the second clawshot and hit the crystal switch against the south wall. This will make the platform you are on start to spin. There are a bunch of spinner platforms in this room, so just keep clawing your way to the very top.
The top platform with grating is not spinning. Face the north wall and hit the switch to activate the spinning platform. Grab onto the target that is against the south wall and then use the big key on the big lock. Go through the door and you are drawing near to facing the dungeon boss.
Once you appear in this area, look at the pillar to the right and you’ll see some grating. Grab on over to it and then you’ll see some ivy on the nearby pillar. Grab on over to the ivy and then climb up to the very top of the City in the Sky. A short cinema will take place and that massive dragon that we saw earlier will once again appear. This will begin the battle with the Twilit Dragon ARGOROK. The weather starts to turn a bit gloomy as the battle begins.
At the beginning of the battle, Argorok will fly across around and come sweeping across the platform with the intent of blowing Link off with the burst of wind. He’ll also hover over the middle of the platform and flap his wings, gusting wind towards Link. You can equip your iron boots and the gust will have no effect on Link.
Once Argorok is flapping his wings in the center of the area, you can Z-target its tail. Do so and use the clawshot to grab onto it. If you don’t have them equipped already, equip the iron boots. The weight will bring the dragon crashing to the floor and much of its armor will break. Argorok will then start flying around once again. Argorok will try to blow Link off the cliff, so keep your iron boots handy.
Argorok will eventually land on top of one of those massive pillars. Use the double clawshots and go from grating to grating on the pillars until you reach the top of the pillar. Be careful as Argorok will breathe fire out of its mouth during this phase as well. At the top of the pillars equip the iron boots and target Argorok’s tail. Doing so will bring it crashing to the ground once again. More armor will break off and a weak spot will appear on Argorok’s back. Argorok will then shutter and all of its armor will fall of its body. The rain and thunder begin to set in during this phase. The rain will cause a bunch of peahats to rise into the air, even higher than the massive pillars.
Climb to the top of the pillars and then claw onto the peahats. Argorok will continue to try to breathe fire at you while you are hanging from the peahats. Z-target the peahats and continue swinging across the peahats. Keep going in a circle until Argorok tries to breathe fire. You should be able to get behind him, at which point you can target its weak spot at the back of his body. Grab on over with the clawshot and slash repeatedly with your sword and Argorok will come crashing to the floor.
Argorok will get back up and fly around. Climb the pillars and grab on the peahats once again. After a few hits to Argorok, he will begin to adapt and change his fire breathing strategy. He will now breathe in one direction and then turn around and breathe in another. This will force Link to change directions on the peahats that he is hooking to. After he stops breathing fire and you get behind him, once again target his back and then slash away. Three times on its back slashing away should defeat Argorok.
Afterwards a heart container will fall out of Argorok’s body. The weather suddenly clears and Link is rewarded with the 4th Mirror Shard. After some small talk with Midna, grab the heart container and then leave the City in the Sky.
Midna will transport you to near the entrance of the City of the Sky. Walk behind the giant cannon and target the back of it. The cannon will send Link flying down back to Lake Hylia.


 Harebrained Schemes: From Storage Space to Kickstarter Kings
 Majora’s Mask Walkthrough – Spring, Romani Ranch, Ikana Graveyard –
  Skyward Sword Walkthrough – Eldin Volcano –
  Watch Dogs – Easter Eggs
 A Link to the Past Walkthrough – Desert Palace –