

After briefly speaking with the the spirit Faron, it is now time to leave the Faron Woods. Run over to the area where we met Coro the lantern salesmen. The gate beyond Coro is now open, allowing you to pass into Hyrule Field.
OPTIONAL: There are a few completely optional collectibles that we can acquire here in Hyrule Field. None of this is required to complete the game, and if you’d like to just continue onward in the main quest, just travel to the east towards the wall of twilight to reach the next region. The remainder of section 5.1 will consist of optional content in Hyrule Field.
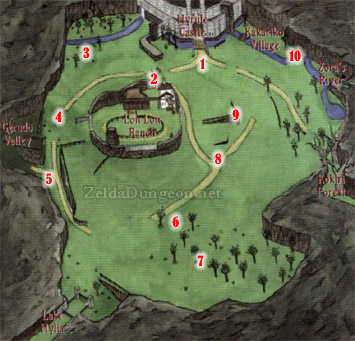
Once you reach the large open Field, follow the dirt path that leads straight ahead towards a bridge. Just before the bridge there is a tree to the right and if you look up into the branches, you can see a piece of heart. Use the Gale Boomerang to snag Piece of Heart #4.
This region also has two Golden Bugs, one of the many collectibles for Link to get throughout his quest. These small bugs can be found during the day, but they shine much bright at night time. From the entrance to Hyrule Field from Faron Woods, again walk along the path heading northward. This time, veer off to the west slightly where the elevation changes. Straight ahead you will find a tree in the distance and a bug can be seen shining. Press A to capture the Male Beetle.
The Female Beetle is also located in the region, found near the northeast corner of the field. The golden bug can be found sitting on a tree trunk, on a higher unreachable ledge. If you follow the pathway at the northeast corner of the field, you should be able to see the bug on the higher ledge. You must walk from north to south in order to see the bug, as it is sitting along on the north side of the tree trunk. Use the gale boomerang to target the bug and pull it back over to you.
While journeying through Hyrule Field, you’ll come across enemy Kargarok, Bokoblin, and a new enemy known as a Bomskit. This enemy will rapidly run around Hyrule Field and if Link draws near, it will lay small explosive eggs as a defense mechanism. For the most part you can just ignore these enemies, but if you do defeat a Bomskit, it will leave worms on the ground that can be captured in a bottle. These worms can be used as a form of bait when fishing later on in the game.
At night time there is also a new enemy known as a Stalhound. It is a boney-dog like creature that is easily defeated with a few sword slashes.
Progress eastward and you will meet up the Postman. He comes and delivers a letter to you and you will bump into him through your quest. This initial letter is actually from the Postman himself and just serves as an introduction to the mail service.
Make your way towards the wall of twilight. Once you draw near, Midna will ask if you are ready to enter, and she will pull you into the twilight realm.
Once you appear, you will be quickly transformed into a wolf. Run ahead and you will find the wooden sword that you previously gave to Talo. Using Wolf Link’s senses, you can pickup the Youths’ Scent. Now when using your senses, you can see the pathway where the children of Ordon were taken.
Follow the pathway straight ahead and you’ll come across three more shadow beasts. Defeat them just as you did before. The bridge that is suppose to be here is missing and Midna will ask that you go and look for it. This serves as an introduction to the warping mechanism. Wherever you previously defeated shadow beasts, a warp portal is now there and using Midna, you can warp while in wolf form. Warp on over the location at the North Faron Woods.
Once you arrive take a look against the nearby and you will find the Kakariko Gorge Bridge right there. Walk up to it and talk to Midna. Warp back over to the Kakariko Gorge, and the bridge will be put back in its place.
Continue following the Youths’ Scent until you reach a gate at the edge of this area. Use your digging ability to get underneath the bridge and then walk forward to enter Kakariko Village.
Once you arrive at Kakariko Village, run ahead and defeat the three shadow beasts to create yet another warp portal. Walk over to the nearby Spring and you will hear from the Light Spirit, Eldin. Just as was the case in Faron, you will be tasked with collecting Tears of Light and Eldin will give you the Vessel of Light.
NOTE: If you are playing the Nintendo Wii or GameCube version of Twilight Princess, refer to the Kakariko Village: Twilight – Wii Version guide for the locations of the Tears of Light, as there are only 12 tears in the HD version, in comparison to 16 that were in the original version.
Glancing at your map, you will see that there are several Shadow Insects inside of the house near the Eldin Spring. Stand at the north end of the house and you will be able to target Midna. Jump up to the top of the building and then walk over to the circle of hay to drop down inside of the building.
Use your senses and you will see the children of Ordon, along with Renado, Barnes, and Luda, some of the residents of Kakariko Village. The group will talk briefly about the events that happened at Kakariko Village which have caused the ground to have to take refuge inside the house. Renado also speaks about a hidden cellar beneath where they are all standing.
Once you regain control of Wolf Link, grab the stick nearby and use the fire to light the sides of the stick. Now run around the perimeter of the room, and as you jump across the gaps, the burning stick will light the candles. Once all four candles have been lit, the statue in the center of the room will move, revealing the entrance to the cellar.
Drop down into the the cellar and run ahead to find the first three shadow insects. Uses your senses to defeat them just as you did before and then collect the tears. Run to the end of the cellar and you’ll see some scaffolding. Speak with Midna and target her to jump out of the cellar.
You will appear at the Kakariko Graveyard and you can explore the area if you’d like, but then head back west to get back to Kakariko Village. Follow the pathway along the west side of the village. The ramp leads upward and you will be able to dash across a gap to reach a wooden ledge. Enter into the building through the opening found here.
Once inside, drop down and you’ll see the shadow insect is in the fireplace. Grab the nearby stick and light it on fire. Then use the flaming stick to light the fireplace, causing the shadow insect to scatter. Defeat the enemy to get Tear of Light #4. Climb the crates and exit the building.
Back outside drop down to the ground floor and make your way to the southeast prat of the village. There is a row of buildings and Wolf Link can jump on top of the building that is at the furthest south of the row. Hope from building to building and you’ll see the third building has a soft rooftop that you can fall through. Inside, you can move the small crate and the shadow insect will scatter. Defeat it to collect Tear of Light #5. Look at the cupboard and target Midna to leap out of the house.
Run to the north part of the village and you’ll find Barnes’ Bomb Shop. There is a small shack just north of the building and Wolf Link can climb on top of it. From here dash with Wolf Link to break the window and enter the shop. Climb the steps and dash into the cupboard, causing it to come crashing down, revealing a shadow insect. Defeat it get Tear of Light #6. Climb the nearby table and exit the shop through the second floor exit.
Continue climbing up and you’ll find the bomb storage building. There is a small hole where Wolf Link can sneak through. Once again there are shadow insects hiding in the fireplace. Again light one of the wooden sticks on fire and then light up the fireplace. This time however, the entire building will start to light on fire. Don’t bother with the insects and just get out of there before you take damage. A quick scene will take place, showing the entire building going down in flames. Left behind are Tears of Light #7, #8, and #9.
Those are all Tears that are found within Kakariko Village and the last 3 are up on Death Mountain. At the north end of Kakariko Village, walk through the gap and enter the Death Mountain region. Climb the short ledge to the side and use Midna to leap up to the higher ledge. You can use your senses to talk to the Goron found here. There are a number of Gorons found throughout the region, as Death Mountain is home of the Goron Race.
The pathway is rather linear, so make your way northward along the trail and you’ll eventually come across the shadow insect. Be careful of the geysers that are blowing fog at you, as it will actually do damage. Once you come across the shadow insect, defeat it quickly, otherwise it will burrow underground. If it does so, just use your digging ability to dig it up, and then defeat it grab Tear of Light #10.
Just next to the shadow insect you will see a strange howling stone. Examine in and Wolf Link will listen to a whistling sound. Press A to howl and replicate the noise that was heard. Hold up to hit the high chord and down to hit the low chord, and press nothing to hit the middle chord. After replicating the sound, it transfer Wolf Link to a strange area where he should howl once again. You will see that same Golden Wolf that we previously ran into in the Faron Regions. Basically, seeing these howling stones and howling the proper tune will cause a golden wolf to appear somewhere in the Overworld, and it will allow Link to learn a new hidden skill. The Golden Wolf appears back at the Ordon Spring and we will travel there in just a bit.
Continue scaling Death Mountain and you’ll eventually reach an open area where there are four Shadow Beasts. One of them is isolated and you should defeat that beast first. Then defeat the remaining three at the same time to cause a warp portal to appear. In the same area there is a shadow insect, so use your senses to defeat it and collect Tear of Light #11.
Just near the tear, stand on the small ledge and use Midna to leap up to the higher platform. Be careful of the geysers as they will prevent Link from progressing. Follow this pathway and you’ll see a slight narrow ramp. Climb the ramp, and again, be careful of the geyser. Target Midna and leap up to the higher ledge. Drop down on the other side of this area and you’ll find the last shadow insect. Defeat it and collect the tear to fill up the Vessel of Light. You will automatically be warped back to the Eldin Spring in Kakariko Village.
Back to the spring, you will revert back to human form and the land around you will return to light. After briefly talking with the Eldin, you will find that your next destination is back up at Death Mountain. After the quick discussion Link walks forward and will meet up with the children of Ordon, as well as the residents of Kakariko. Ranado will tell Link that it is best to bring the children back to Ordon while he sorts out the relationship with the Gorons.
Once you regain control of Link, immediately run back towards Death Mountain. Climb the fence and the first Goron will see you and immediately yell that the lands ahead are forbidden for humans. He will ram into you, causing Link to fall back off the ledge. You cannot progress for now, so head back to Kakariko Village. Immediately upon returning, you will talk with Renado again, and he mentions that Mayor Bo of Ordon might be of use. He also mentions that is probably best to keep the children here at Kakariko for the timing being.
Walk back to the center of town and a scene will take place showing Epona galloping into town. Link will eventually jump onto Epona and will need to settle her down. Following the quick-time events that appear on screen. Pressing Right, then Left, then Right, then Left, and finally A to seize Epona.
NOTE: At this point, you can ride Epona all the way back to Ordon Village. However, there are a few optional goodies to collect along the way. None of this is required at all and you can just skip ahead to Chapter 6 of the guide to progress in the main quest.
Once you leave Kakariko Village, you’ll need to pickup some speed with Epona and leap over the gate. Now that we are in human form here at the Kakariko Gorge, there are a few collectibles for us to get, including two Golden Bugs. It’s worth noting that at this point in the game, time is locked and it will remain daytime here at the Kakariko Gorge no matter how long you wait. The Golden Bugs can be found during daytime, but they shine much brighter and are easier to find at night time.
When running, you may also run into the Postman, depending on whether or not you met up with Ooccoo in the Forest Temple. If you did, Ooccoo will have sent a letter and you will get it at this time.
The first Golden Bug to collect is found at the southeast portion of the Kakariko Gorge. There are four trees in this area, and the bug can found beside the tree that is the second most southern of the trees. It might make its way into the tall grass, so he can be hard to fine. Listen for the bug noise and keep an eye out for its shine. Snatch up the book to get the Female Pill Bug.
Now ride toward the Kakariko Gorge Bridge that we previously saved. Jump off Epona and once you cross the bridge, turn to the right and you will find the Male Pill Bug right there in the opening. This one is a lot easier to find as there is no place for the bug to hide.
Now ride Epona to the west side of the Gorge on the higher elevation portion. If you look towards the gorge, there is a massive rock extending up from within the gorge. If you look carefully at the top of the rock, a piece of heart can be seen. Use the Boomerang to grab the heart piece. This should be Piece of Heart #5, giving you a full heart container.
There is nothing left for us to do in Hyrule Field, so ride back to South Hyrule Field, and then back to the Faron Woods. Continue onward through the woods to get back to the Ordon region. Before heading to Ordon Village, make a pit-stop at the Ordon Spring. If you activated the howling stone in Death Mountain, than the Golden Wolf will be waiting for you here at the Spring and will teach you a hidden skill.
After proving that you’ve perfected the Ending Blow, the Hero’s Shade will teach you the next hidden skill, the Shield Attack. It’s rather simple. After targeting the enemy, just press ZR to stun the enemy, making him vulnerable to simple attacks. Additionally, Link can use the shield attack to repel projectile attacks that are thrown towards him.
With the new hidden skill now learned, make your way back to Ordon Village.


 Skyward Sword Walkthrough – Ancient Cistern –
  Guide: Using USB Storage with the Wii U
 Guide: Tips On How To Become A Squid Hotshot In Splatoon
 Majora’s Mask Walkthrough – Spring, Romani Ranch, Ikana Graveyard –
  Twilight Princess Walkthrough – Cave of Ordeals –