~ Getting Back To Hyrule Castle ~
 If you’ve been following the walkthrough thus far, you’ve already gotten the two Pieces of Heart found in Zora’s River. If you didn’t, you can now use the new found Boomerang to snag them instead.
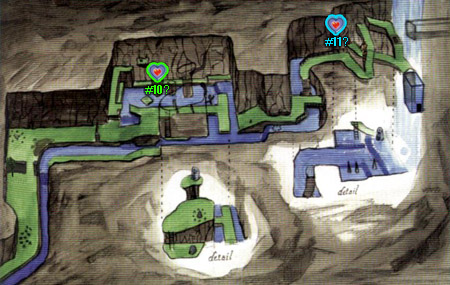
The first Piece of a Heart (#11), is on a little ledge near the waterfall that leads to Zora’s Domain. Just stand on one of the nearby platforms and use the Boomerang to retrieve it. The second Piece of a Heart (#10) is about halfway through this area, on top of a skinny platform in the middle of the water. Use the nearby platform that ramps up to that point to snag it with your Boomerang as well.
If you’ve already done all that and are just trying to get back to Hyrule Field, you can swim along the river (mash the B button to go faster) to get lots of free Rupees and make it in record time.
~ Frightful Encounter ~
Now that we have the three Spiritual Stones, head back towards Hyrule Castle to see Princess Zelda! As you get closer to the castle though, you’ll see that the drawbridge is up, even during the day, and dark clouds begin to loom overhead.
After a short bit, a movie begins and… It’s the dream from the beginning of the game…! The drawbridge lowers and Impa rides out on a white horse, carrying Zelda by her side. The girl tosses the Ocarina of Time at you, which lands in the moat. Turn around Link!
Ganondorf, the King of the Gerudo Thieves plays twenty questions, then zaps Link with some glowy purple and gold stuff when he doesn’t do good at that game. JERK! He rides off laughing maniacally. Well that’s lame… Turns out, he and his Gerudos attacked Hyrule Castle and killed the king. He’s hunting down Zelda so that he can use her to enter the Sacred Realm and claim the Triforce.
When the movie ends, jump into the moat and dive down to get the Ocarina of Time. Ha, you forgot about it didn’t you?! It may take a couple of tries, the water is moving after all… Once you surface with it, (TA-DA!) you’ll get a vision of Princess Zelda teaching you the Song of Time. Oooo, misty! Shing!
You’ll appear next to the drawbridge (It’s magic! You were in the water a second ago…) with Navi scolding you to go to the Temple of Time. That’s our next objective, but there’s lots of goodies you can get right now and you won’t be able to otherwise for a long while. Care to join me in a little hunt?
~ Goodies At The Ranch ~
From Hyrule Field, our first destination is Lon Lon Ranch. Pretty easy to find, as it’s in the very center of the field.
Once you get there, play the Sun’s Song to make it night. There are two Gold Skulltulas that can be found in the wee hours, the first of which is on the farm house. Follow your ears and you’ll see it in the lit up window above. use your Boomerang to snag token #32, then head to the opposite side of the ranch, where the tall skinny structure is in the corner. On the shorter wall that appears to go through the building is our next Gold Skulltula. Once again, use the Boomerang to snag token #33.
~ On The Way To Kakariko ~
Go back out to the Field and work your way towards Kakariko Village. Right after the small bridge, there’s a lone tree off to the left. Lay a bomb near the back side of it (towards the wall) to make a hole appear. Fall in and kill the Big Skulltula along with the Gold Skulltula hiding in the corner. Use the Boomerang to snag token #34.
~ Skulltula Reward: 30 Tokens ~
If you’ve been following the walkthrough thus far, you should have at least 34 Skulltula Tokens. Enter the Skulltula House in the middle of the village and talk to the now uncursed children to “cash in.” You should be able to get the Stone of Agony and the Giant’s Wallet.
~ Grave Digging ~
With that taken care of, we’ll be heading to the Graveyard next. But, the next thing we need to do has to be at night, between 18:00 and 21:00 (right after sunset). The only problem with that is that the Sun’s Song takes you to 00:00, meaning that we need to just play around in Hyrule Field until the right time.
The guard right at the entrance to Kakariko will tell you the time when you talk to him, so that can be handy too. As soon as the wolf howls, run back through town and enter the Graveyard. Once there, run up and to find Dampe, the hunchbacked grave keeper patrolling the area with a shovel.
Heart-Pounding Gravedigging Tour!
 This is an annoying little mini-game. Not only is it a waste of money, but you have to be there at a specific time (between 18:00 and 21:00). You can hang around Hyrule Field to pass the time, and speak with the guard at the entrance to Kakariko to figure out what time it currently is.
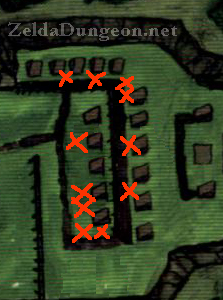
When you do find Dampe in the Graveyard, you can pay him to dig up the ground to hopefully get a snazzy prize. The locations of the prizes are random each time, so it’ll be different each time you enter the area. Just keep trying till you get the best prize. Use the map on the right to figure out where the soft soil locations are.
After you’ve successfully gotten the Heart Piece, you can get Skulltula #35 nearby (while it’s still night). Just follow your ears. There’s just one thing left to do here: Plant a Magic Bean. The soft soil location is on the left side of the area in a corner at the end of some graves. It might be easier to find during the day.
With that taken care of, head back to the Village then go towards Death Mountain. Once on the trail, go to the entrance of Dodongo’s Cavern to find another soft soil spot. Plant another Magic Bean here and go back to Hyrule Field.
~ Secret Room Within The Deku Tree ~
Next up, we have a Gold Skulltula that has evaded us thus far. There’s a mysterious room in the first dungeon of the game that we couldn’t enter before, but now with Bombs and the Boomerang, we can claim this secretive prize! Make your way back to Kokiri and enter the Great Deku Tree.
Once inside, drop down the hole in the center, then climb out of the water and climb up to the higher platform using the “block shortcut” you made ages ago. Crawl through the small hole on the other side of the room and you’ll be in the giant room with the single torch and the Gohma Larva that fall from the ceiling.
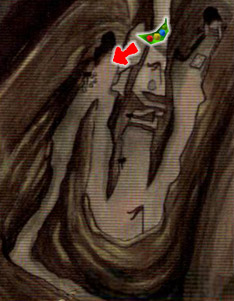
Off to the right of this room is a web we ignored earlier. Use a Deku Stick to burn it down, then place a Bomb in front of the funny looking wall to reveal a door. Enter and turn left to find a Gold Skulltula waiting for you to kill it. You’ll need the Boomerang as well to snag it, which is why we didn’t come here earlier. Retrieve the token [#36] and leave this place.

~ Lost Woods Revisited ~
Kokiri Forest Head to the Shop in Kokiri and swing around behind it. You’ll find a patch of soft soil that’s just begging to have bugs poured on it. This will make a Gold Skulltula appear [#37]. You can plant a Magic Bean if you like, but it’s just used to get extra Rupees later on (worthless in my opinion – so I’m going to skip it). Next up, climb up the vines on the other side of the village and enter that mysterious patch of woods we love so much.
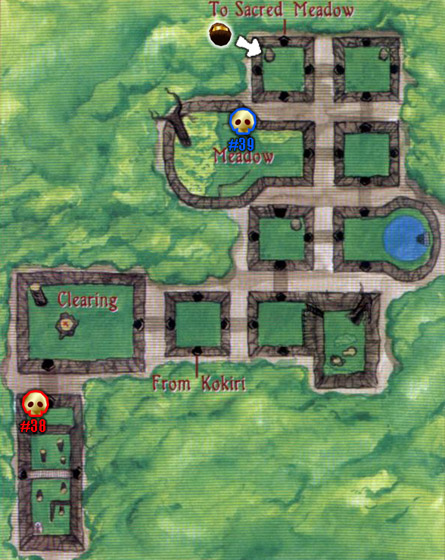
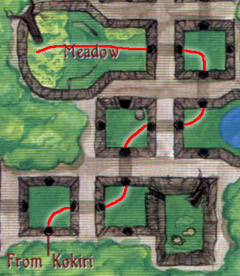
Lost Woods Real quick, make sure you have 40 Rupees, cause we’ll need it to get an upgrade in this area. First up, as soon as you enter, go left two screens to find a patch of soft soil up here. Use a bottle of bugs on it, then quickly swipe the bottle to fill up your bottle again. Kill the Gold Skulltula that pops out for token [#38]. Plant a Magic Bean as long as you’re here to make a nice shortcut for later. If you didn’t get the Deku Stick upgrade down below from earlier, go fight the Business Scrub now and claim the reward.
Next up, from the entrance of the Lost Woods, go right, left, right, left, left. This takes you to a hidden meadow with two Business Scrubs. Kill them if you desire, then use a bottle of bugs on the soft soil here to make yet another Gold Skulltula [#39] appear. Plant a Magic Bean if you’d like a Gold Skulltula later on.
For the last part, go to the complete end of the maze. From the entrance, it’s right, left, right, left, straight, left. This takes us to the final screen which has a boulder. Use a Bomb to blow it up, then fall down the hole. Inside, kill the two Business Scrubs and talk to the one on the left, who’s selling an upgrade for your Deku Nuts for 40 Rupees. Buy it, buy it!
~ Hidden Hole In Hyrule Field ~
Hyrule Field Next, head to the southwest portion of Hyrule Field that leads to Lake Hylia. You’ll have to traverse the wide open field with all its Peahats. I suggest you simply avoid them altogether. When you get there, you’ll see a square blocked in by fences. Climb over the short ones and place a Bomb in the middle of the square to reveal a hole. Kill the Business Scrub inside and buy the Heart Piece [#15] from him for a mere 10 Rupees – heck yeah!
~ Two Things To Do In Lake Hylia ~
Hop back over the fence and head to the right side (facing towards Lake Hylia). There’s a ladder hiding around the corner that you can use to get on top of the wall to get to the lake instead. Why in the world would someone make it awkward like that?! Just get rid of the stupid fences!!
Lake Hylia Run forward to the side of the building straight ahead, the Lakeside Laboratory. Make sure you have a Magic Bean planted in the soft soil next to it. If you’ve been following the walkthrough thus far, you should already have one there. Next, play the Sun’s Song to make it night. Follow the bridge on the right side of the Laboratory and turn around to find a Gold Skulltula hanging out on the side facing the water. Use the Boomerang to snag the token [#40].
~ Goodies At The Gerudo Valley Entrance ~
Hyrule Field After that, make your way to the Gerudo Valley area (west), directly north of where you are (simply follow the wall on your left). I propose you ignore the PeaHat and it’s PeaHat babies it sends after you. Once you get onto the dusty red platform with all its little fences, still in Hyrule Field, you’ll find a circle of stones if you look off to the right. Place a Bomb in the middle to reveal another secret hole.
Inside, you’ll find three different areas you can go into after you get past the cobwebs. At the moment, the only thing at your disposal to do this is Din’s Fire. Burn the one that veils the ninja cow. In your face cow! That spider web didn’t protect you and your stealthy powers from us at all! When you’re done following my example and insulting the bovine ninja, go kill the Gold Skulltula that was hiding behind it, but you’ll need the Boomerang to collect the token [#41]. If you don’t have a bottle of bugs, slash the bushes near the cow and swipe some of the bugs that appear.
Gerudo Valley
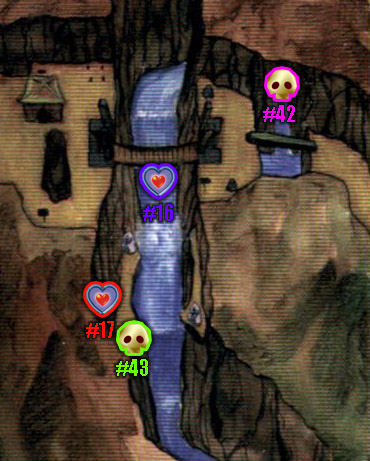
Once inside Gerudo Valley, play the Sun’s Song to make it night. A Gold Skulltula will appear at the mouth of the small waterfall gushing out of the rocks next to the plank bridge. Use your Boomerang to kill it and snag the token [#42].
Next, go up a little further and pickup the Cucco. Now, jump off the right side of the bridge and keep going that way, towards the giant waterfall. The water here flows pretty slow, so you can swim against the current (in other words, don’t feel too bad if you fall in or miss). Our destination is a small hidden hole in the wall behind the waterfall. There’s a ladder leading up to it, so you can just swim up to it and climb the ladder as well. At the top, you’ll find a Piece of a Heart[#16].
Hop down into the water and swim to the nearby platform with a single Gerudo woman wearing white with a cow companion. If you talk to her, she’ll ask you why anyone would want to come down here and not give any explanation as to her own reasons. Use a bottle of bugs on the soft soil behind her to make a Gold Skulltula pop out [#43]. You can plant a Magic Bean if you like, but this one isn’t very important, so I don’t think it’s worth it.
There’s one more Heart Piece to snag here if you’re up for it. Unfortunately, we have to get back up to the top and the only way to do that is to walk. Jump in the river and swim to Lake Hylia, then walk back through Hyrule Field to get to the top. Once you get back here, pick up the Cucco and fly on the left side of the bridge this time. You’ll see there’s a platform across the way that has a lonely crate on it. Land on the platform and roll into the crate to find a Heart Piece [#17].
And that’s it! Our next destination is Hyrule Castle. You can simply Save here and restart your console, or you can walk. You can go the long way, but there is a faster way (though a bit more complicated). Jump in the water and let it take you to Lake Hylia. When you land in the water, turn to your right and climb up onto the land, then circle around and follow the bridge out to a gravestone at the corner where Kaepora Gaebora (the owl) is chillin’. Speak with him to get taken to bridge in front of the Market!
~ Happy Mask Shop ~
This side quest is entirely optional! You can also find it in the Masks section.
You can start doing this side quest as soon as you pass off the letter from Princess Zelda to the guard at the base of Death Mountain. This quest leads to the Mask of Truth, which allows you to talk to the Gossip Stones all over Hyrule. It’s entirely optional, but if you do choose to do it, all you have to do is go to the Happy Mask Shop in the Market, borrow a mask, and find a suitable owner.
~ Keaton Mask ~ The first mask you’re eligible to borrow is the Keaton Mask (10 Rupees), which is a pretty easy one.
The guard at the base of Death Mountain in Kakariko Village spoke of it at length and how he wanted it for his child. Slap it on and talk to him, he’ll give you 15 Rupees for the darn thing.
 ~ Skull Mask ~
The second mask is the Skull Mask (20 Rupees), which would be impossible to find based on just what people say…
For starters, go to the Lost Woods. Now, before we go find the owner of this mask, there’s a little side quest we can do. Go right, left, right, left, left to find the head meadow. Go to the back of this area and walk around where the butterflies are at to find a secret hole.
Inside, put on the Skull Mask and step forward. This will make a bunch of Deku appear who appraise you then follow you around excitedly for a bit. After a moment, they’ll go get their leader and he’ll gift you with the second Deku Stick upgrade. Nice!
~ Spooky Mask ~
The third mask looks just like a ReDead (which you’ll see soon enough, 30 Rupees). It’s also a fairly easy one to do.
Head to the Kakariko Graveyard during the day to find a small kid stomping around with a stick. His life dream is to be like Dampe, the grave keeper and be scary. Somebody needs a hobby… Anyway, flash him the Spooky Mask and he’ll cough up all 30 Rupees without blinking. Sheesh!
~ Bunny Hood ~
This last mask isn’t as obvious… The Bunny Hood (50 Rupees) is simple, but will require you to run around.
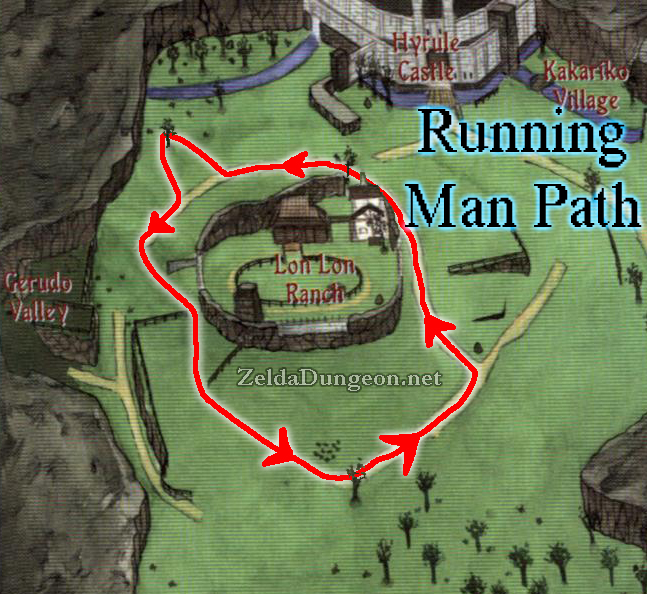
In Hyrule Field, there’s a guy known as the Running Man who is constantly jogging. He starts out in the northeast corner and works his way around the field counter-clockwise, sticking close to the road surrounding Lon Lon Ranch. The easiest way to find him is to enter Hyrule Field from the Market and follow the road leading right. By the time you walk past Lon Lon Ranch, you’ll see him.
Wait until he stops to take a breather (play the Sun’s Song) and talk with him while wearing the Bunny Hood. He’s heard stories of it giving the one who wears it mythical speed and agility. Fork it over and he’ll pay you over 500 Rupees! It’s a real shame, because that’s more than your wallet will allow… If you wait for him to get up, you’ll see him zip away crazy fast! Now why couldn’t it do that for us? If you want to see that, you’ll have to play the sequel to this game. =)
~ Mask of Truth ~
 Return to the Happy Mask Shop and pay up the 50 Rupees that the Bunny Hood was actually worth. The Mask Salesman will then allow you to borrow four new masks. Three of them are just for looks, but the one of interest is the Mask of Truth, which allows you to hear the thoughts of animals, people, and lastly, the Gossip Stones (giggling, time telling stones scattered throughout Hyrule). If you’d like to see all of the Gossip Stone “wisdom,” visit our Gossip Stone section which has them all listed.
Borrow the Mask of Truth for now, and real quick before we continue our journey, we have one last thing to snag. Go back to the Lost Woods and go to the secret meadow, to the Forest Stage. At the start of the Lost Woods it’s: right, left, right, left left. Then fall down into the hole that’s hiding by some butterflies in the back of the area.
Once you get here, wear the Mask of Truth and stand forward on the stage to make the Deku appear. Turns out, they’re terrified of this mask, but will give you a reward anyway (out of fear?) by enhancing your Deku Nuts. Kinda depressing, but cool! =)
~ Opening The Door of Time ~
With the three Spiritual Stones and the Ocarina of Time in hand, we can finally head to the Temple of Time. Go to the Hyrule Town Market go through the stairs between the Happy Mask Shop and the Potion Shop. Once in the gardens, you can talk with the Gossip Stones with your new Mask of Truth to learn some useless information… Moving right along… Round the corner and enter the giant temple.
Head on into the inner chambers of the Temple of Time. Inside you’ll find none other than the Master Sword! This mystical blade has been Link’s trusty companion in many of the other titles, but it’s a little surprising to find it in here. Go ahead and climb up onto the pedestal to claim the evil destroying sword. You’ll witness another scene in which the entire pedestal begins glowing and shimmering with blue light. Sweet!
So it turns out, rather than opening the Door of Time to stifle Ganondorf’s plans, you were within his plans all along. He used you to get to the Sacred Realm. Shortly after a laughing session from your nemesis, you’ll see Link waking up in a fancy blue temple that looks like flowing water.
An old guy introduces himself as Rauru, the Sage of Light. He explains that it was your destiny to pick up the legendary Master Sword and vanquish evil, but you were too young to tackle this inevitable journey, so your spirit was sealed away inside the Sacred Realm for seven long years…
Ganondorf managed to get the Triforce and turn Hyrule into a land of monsters. Stupid head! The only way to overthrow him is to gather the powers of the six sages, one of them standing in front of you right now. After giving you the Light Medallion, he’ll send you back to the Temple of Time to save the other sages.
~ The Last of the Sheikah ~
You’ll appear back in the Temple of Time, and everything’s quiet and dark… Link will start walking away and be surprised to find he’s not alone. Sheik, a character who will be a guide of sorts (to replace the obnoxious owl…) introduces herself. She tells you a little more about the Sages and informs you that she’s fond of poetic legends. After a quick chat, she tells you to go to Kakariko Village before tackling the Forest Temple.

 Darksiders II Guide: Locations of the Book of the Dead Pages
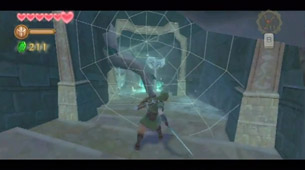 Skyward Sword Walkthrough – Skyview Temple –
 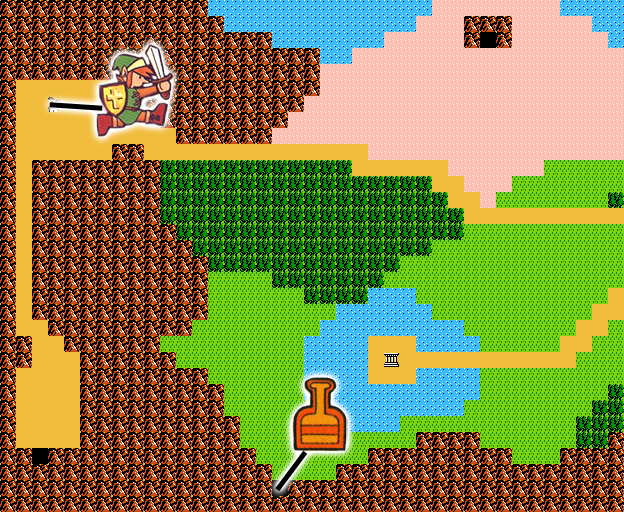 The Adventure of Link Walkthrough – Midoro Palace –
 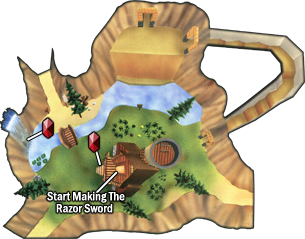 Majora’s Mask Walkthrough – Spring, Romani Ranch, Ikana Graveyard –
  Skyward Sword Walkthrough – Faron Woods –