
Spreaker.com, the popular podcast host and provider of mobile podcasting apps, has released a new professional podcasting app for mobile and desktop. Spreaker Studio has the potential to revolutionize how you record podcasts, but does it fulfil this promise?
The Spreaker service – much like Soundcloud and Audioboom – has so far offered a two-stage dynamic. Podcasters can use the website or a mobile app to record a podcast, and upload the results to the service’s hosting, where they might pay a subscription or get a limited amount of space for free where listeners can stream or download content at their leisure.
While Soundcloud and Audioboom are more suited to standard voice podcasts, however, Spreaker positions itself as the solution for music-based shows, and as such offers a live streaming option in the browser and app. Listeners, meanwhile, can use the browser or basic mobile app to download recorded podcasts and listen to live streams.
The standard Spreaker Radio app – like the website – offers a basic record-and upload or record-and-stream feature for podcasters. If you want more, then it’s time to take a look at Spreaker Studio.
Two versions of Spreaker Studio are available. Mobile podcasters may prefer to head to Google Play or the App Store to grab the smartphone and tablet version.
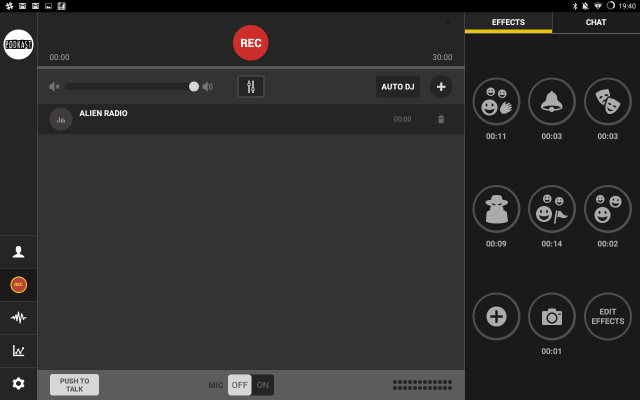
Most of your activity on the mobile Spreaker Studio app is focused around the Record screen, which is split into two panes (and the menu on the left). The main pane is the Playlist, where audio tracks are cued for playback during your show. These can be added from your device or from any cloud accounts you have connected. To record your voice, make sure you have the Mic switched to On, or else hold the Push to Talk button.
On the right, is a twin view panel, Effects and Chat. Effects is essentially a soundboard, where you will find a collection of pre-installed “audience sounds”. Only eight sounds can be stored here, so if you want to add some for your podcast, you’ll need to delete some of these. Use Edit Effects to do this, tapping the X in the corner of the sound you want to drop. The resulting + symbol on the empty effects slots means you can browse your device for a replacement clip and add it here.
The alternative view, Chat, is used for live shows, and enables listeners to give you live feedback.
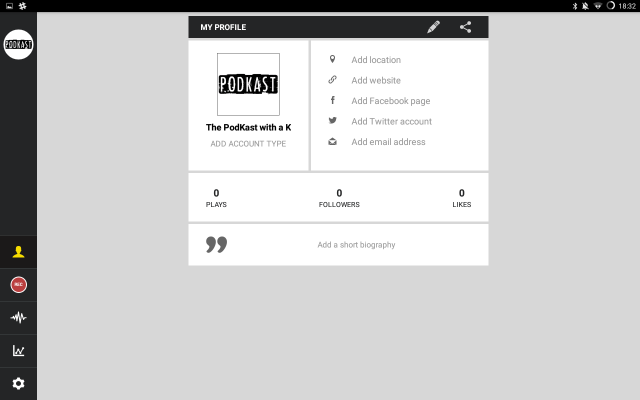
Show promotion can be achieved by adding Facebook and Twitter details. Open the Profile view in the side menu for this, where you can add social networking details as well as an email address, website, location and biography.
The third icon down in the menu lists your already recorded and uploaded tracks, while the fourth collects and displays stats. The settings cog at the bottom provides links to your Spreaker account on the website, where you can adjust account settings, subscription plans and more. Note that new accounts can be created using Twitter or Facebook’s universal sign-in options, although note that in the event of a data breach, this method can prove dangerous.
Spreaker Studio mobile basically makes it possible to schedule and record or stream a radio show from the comfort and convenience of your smartphone or tablet. That is pretty amazing.
For desktop users, Spreaker Studio (available via www.spreaker.com/download for Windows and Mac) is a tool worth having, especially if you podcast or live stream a music-based show, or you take advantage of Skype for interviews or co-hosting. The Effects soundboard is worth switching for alone; as far as Windows goes, soundboard apps are lacking.
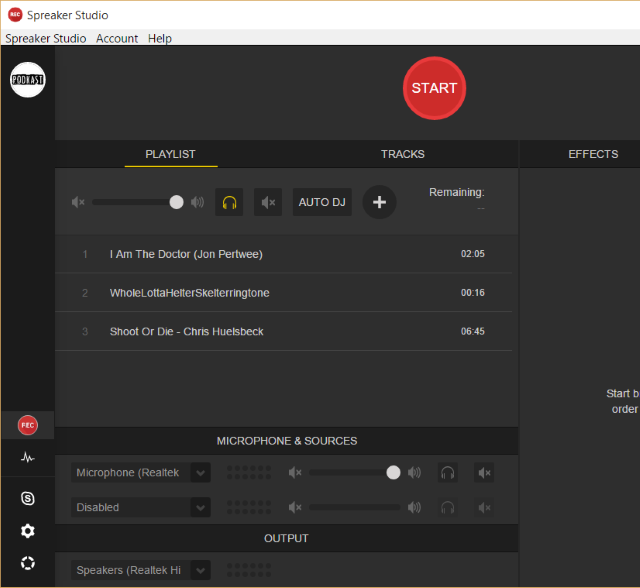
After installation, and following your sign-in with Twitter, Facebook or a newly created Spreaker account, you’ll see the main interface, which like the rest of the app is almost identical to the tablet version. There are differences, however.
Unlike the smartphone and tablet versions, the screen is split into three panes, with a menu bar down the left. As with the mobile Spreaker Studio, the right-hand pane can be switched between effects and chat (although more than eight effects can be loaded up), but here we have additional audio options.
Across the bottom of the screen you will spot the Microphone and Sources, and Output sections. The first section enables you to select a microphone in the first input bank and any other audio device (perhaps a hardware mixing desk) in the second. Meanwhile, the Output section is used to specify your headphones.
The top of the screen differs too. Whereas the mobile version simply has the REC button, here you can switch between two views, Playlist and Tracks. As with the mobile versions, songs can be added here, and these are listed under Playlist. Once added, tracks can be cued manually, or using the Auto DJ feature.
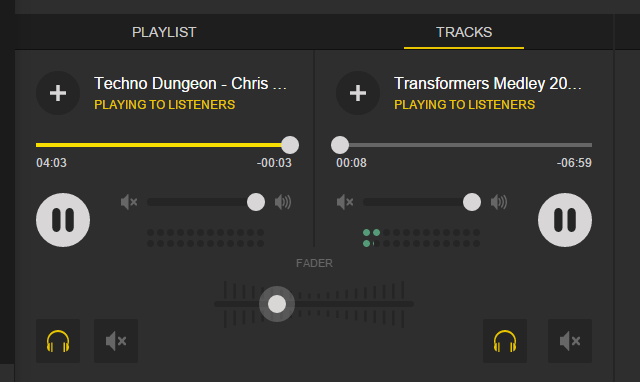
Prefer to go manual? Use the Tracks view, where you can take full control, adding and mixing tracks with a manual fade slider.
One other menu is included in Spreaker Studio. On the left-hand side, you’ll find a pane that can be expanded simply by running your mouse over it. Here, you’ll find information about your Spreaker account at the top, with a collection of options to change the main view.
As useful as all of these additions are in the desktop version, Spreaker Studio comes into its own with Skype integration, accessed via Connect to Skype in the menu, which is made possible thanks to VB-Cable. If you’ve already been using Voicemeeter for your podcasting, then you’ll have this installed already.
Once installed and setup, you’ll be able to bring in Skype contacts, which is ideal for a show with multiple hosts or guests on the phone.
Across the bottom of the app is the virtual mixing desk, a pane for managing input and output device volume. Note that Spreaker Studio gives two audio input sources, enabling you to bring in audio from a secondary external device, such as a physical mixing desk.
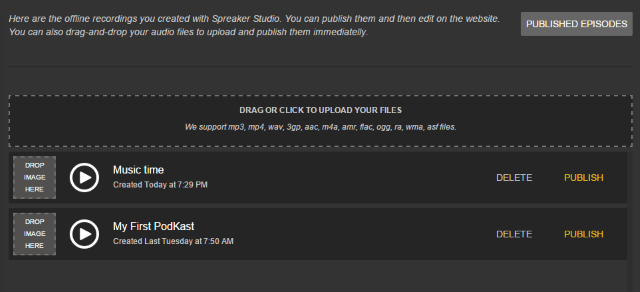
The Drafts & Uploads, screen is accessed via the menu, and is used to manage drafts and upload them to Spreaker. The service supports a vast number of audio file formats (MP3, MP4, WAV, 3GP, M4A, AAC, AMR, FLAC, OGG, RA, WMA, and ASF). Unfortunately, while these can be easily imported into Spreaker, it’s a bit trickier to export a recording made in Spreaker if you’re planning to use only the software.
The app creates MP3 files of your podcasts in C:\Users\Christian\AppData\Roaming\Spreaker Studio\recordings on Windows. From here, you can play back and edit in a third party app, or just upload to your usual podcast host.
Having used Spreaker Studio to podcast just this week, I’m seriously impressed. The Skype integration on the desktop version is excellent, and while a proprietary alternative to VB-Cable might be preferable, the results were great. Having a working soundboard was particularly useful, too.
Will you be using Spreaker Studio for your podcasts? What studio-style app do you use instead? Tell us in the comments!

