DualShock 4 controller is the most advanced controller of the DualShock series. It sports a unique touchpad which made using the DualShock 4 controller much easy and also it could perform a vast number of operation which were not possible with the pervious DualShock controllers.
This guide will help you understand your DualShock 4 controller in detail for a better usage.

Click on the desired links below:
Front view
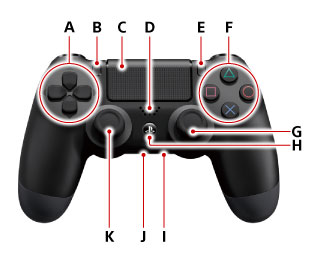
A) Directional buttons
These are used to select options
B) SHARE button
View the menu for Share feature
C) Touch pad/Touch pad button
Press the touchpad for it to function
Lightly touch the touchpad
Tap twice quickly
Drag your finger across the touchpad and lift the finger.
Sharply move your finger across the touchpad to flick
slide your finger across the touchpad.
Do not lift your finger after you touch the touchpad
Place 2 finger on the touchpad and bring them closer to pinch in, take them apart to pinch out.
Press the touchpad button
Press the touchpad button twice quickly
D) Speaker
Audio output
E) OPTIONS button
View options
F) Shape button
Confirm selection
Cancel an operation
G) Right stick/R3 button
Press the stick to use this button.
H) PS button
Displays home screen and wakes the system from standby mode
I) Stereo headset jack
Connect your headset
J) Extension port
K) Left stick/L3 button
Press the stick to use this button.
Top view
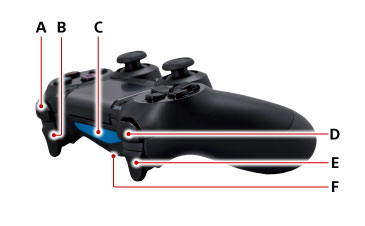
A) R1 button
B) R2 button
C) Light bar
D) L1 button
E) L2 button
F) USB port
Connect the USB cable
When using the PS4 controller for the very first time, on your PS4 machine or on another PS4, press the PS button to select a user. Then you need to move on to device registration or pairing. For that turn on your PS4 then connect your PS4 and the DualShock 4 controller via a USB cable. If you have more than one controller, connect it after completing the registration of the first controller.
Maximum number of 4, DualShock controllers can be used at the same time. After you press the PS buttons on all controllers, a color for the lightbar will be assigned to the user. The first user is blue, second red, third green and the fourth is pink.
Your controller will begin to charge when you connect it to PS4, even when it is in standby mode. Press and hold the PS button for a second to view the charge level.
If you want to charge in standby mode, go to Settings > Power Save Settings > Set Functions Available in Standby Mode > Supply Power from USB Ports and check this option. The lightbar will blink orange when charging in standby mode, it will stop blinking when charging is complete.
It takes upto 2hours to completely charge the controller. The batter life will depend on your usage and the conditions in which it is stored. If you do not use you controller continously, do not forget to charge it atleast once a year.
You can use the on-screen keyboard by moving the cursor with the help of your touch pad. Use the D-pad to return to normal settings.
To adjust the brightness of the lightbar you should have System Software Update 1.70, press the PS button on the controller for a couple of seconds.
Select "Adjust Devices" and press X, then select "Brightness of DualShock 4 Light Bar"
Now you can choose from the three levels of brightness from Dim, Medium, and Bright. You cannot completely turn-off the lightbar.


 Five Reasons You Need To Play XCOM: Enemy Unknown
 PS Vita Trophy Guide: How To Unlock The Hardest Trophies
 Yoshis Woolly World: All amiibo designs in pictures
 Naruto Storm 3 New Ultimate Jutsus Video Guide
 7 Fan
7 Fan