
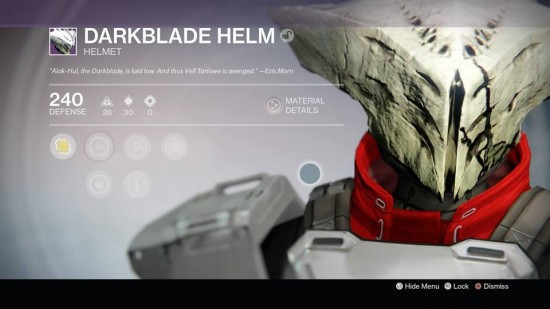
If you haven’t quite unlocked the “A Sunless Cell” strike but are wondering how everyone is getting that demonic looking Hive Darkblade Helm, then it’s a good thing you found this guide. While it’s not a guarantee, there’s a chance that this awesome Titan helmet will drop for you from this mission.
If the Nightfall happens to be the “A Sunless Cell” strike for the week then you’ll also have a chance to unlock a version of this helmet with a higher level defense, and the same goes for the highest level weekly strike playlist.
To start, you’ll need to finish the majority of the Destiny: The Taken King story content. Play all the way through to the “Regicide” mission and slay Oryx. Don’t worry. We’ll see him again in the King’s Fall raid. After that, keep going a little bit. Unlock the Dreadnaught for patrol, which you do by completing the Cayde-6 quest called “Dread Patrol.”
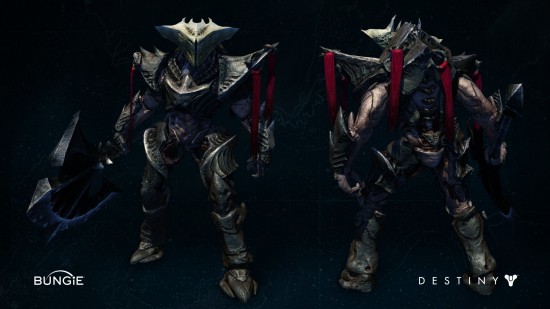
Once you have access to the Dreadnaught, you’ll soon be able to embark on the quest that sends you into the “A Sunless Cell” strike. Apparently, the sunless cell is some sort of Hive prison cell that completely obscures the enemy known as the Darkblade, Alak-Hul from all light. After rebelling against Oryx in defiance, Alak-Hul was sentenced to confinement in this sunless cell and now it’s our job as Guardians to kill him.
Let’s go after him.
You’ll begin the strike on the Dreadnaught. If you’re able to maneuver your way around a battlefield without taking massive damage and dying, then it’s possible to run past the majority of the enemies in the starting location as you proceed towards “The Founts,” which will be marked on your map. If not, then kill them first and proceed. Or kill enough of them to give yourself some safety and then proceed.
You’ll see an opening in the floor leading to another level below. Drop down and slaughter the Hive Thrall and Acolytes in your way. Or if you prefer, you can shoot them from above before you get down there. Or if you’re worried about speed, you can probably run past these guys too. As you proceed, you’ll encounter some shielded Wizards that can be a nuisance which means you might want to bring some solar rockets, or other solar weapon, along for the strike.
This part is pretty straight forward. Just keep following your map and slaying hive as you go. Soon you’ll come to a door that opens when the hive in the room have been defeated. Kill them and keep going until you find yourself in the Asylum. Here, you’ll need to deactivate towers in order to proceed. There are two of them: one on your left and one on your right. You’ll need to jump to them to perform scans but they’re protected by a moat of bottomlessness and moving platforms.
Be careful as you hop across them. There’s no bridge so also be careful not to run straight into the bottomless pit, as you may see me do in the video on the next page. There are also a couple of Shriekers in this area that you might want to take out after clearing some of the enemies from further back. But once you’ve hacked both towers, continue through the door ahead.
Waiting for you is a room full of Taken that you’ll need to defeat. In the first wave, none of them are sporting elemental shields yet, so it shouldn’t be too difficult. In the second wave, you’ll be going up against a void shielded Hive Wizard with a yellow health bar. This might be a good chance to try out your subclass’s new super. But if not, get out some void weapons, bust the shield, kill the Wizard, and then take out the rest of the wave. Don’t be afraid to use the entire room to move around and take cover.
When the room is clear, the door before you will open but again, be careful because there’s an Ogre waiting for you behind it. He’s got no shields and a red bar of health though, so he’s not too tough. Kill him and progress onwards. You can finish killing all of the enemies in the previous room if that’s what you’re into, but it’s not required once the door opens.
When you’re done, proceed along the descending hallway. Now you’re almost at the Darkblade’s cell. But in front of you lies a wall full of shriekers. You enter this area standing above the room and it’s a good idea to start taking out some if not all of these Shriekers before you head down.
While I didn’t notice this at first when playing, it appears that you don’t need to kill all the enemies here. This can be good news because there are many shielded foes among many shriekers. While you can definitely try to slay everything, I opted for clearing the room a little bit and running past the rest. Your call on this one.
When you’re out of the Shrieker room, run down the descending hallway shooting a few thrall along the way. Finally, you’re at the precipice of the sunless cell, ready to face off against the Darkblade. Descend, guardian.
It’s time to fight the Darkblade. When you reach the ground, you’ll be standing in the middle of a dimly lit circle. Just about everything outside of the circle is black darkness, making it almost impossible to see. The not being able to see factor probably the most difficult element of fighting the Darkblade, but it’s not impossible.
For starters, you’re probably not going to be doing a whole lot of long distance combat in this small area, so you can equip something effective at close range. My preference is usually shotgun for secondary weapon but a sidearm also works well here. Fusion rifles are viable, but the charge time might hurt you here. For primary, it doesn’t matter as much. Auto rifles are a good idea for close quarters combat but if you’re more comfortable with one of the other weapon types then you should still be okay. I used a pulse rifle, but it was mainly because it was my weapon with the highest damage at the time.
The best tip for this fight is to be brave enough to step outside of the circle, even if you can’t see for a moment. If you’re standing inside of the circle and facing out, then it’s pretty hard to see through the darkness. There are a few lights if you look hard enough for them, but they don’t provide a great deal of increased vision.
But actually, if you stand outside of the circle but face inwards, it is significantly easier to see the light in the center circle. If you walk out of the circle, you may also find that the Darkblade will kindly walk right into the middle of the circle and wait for you to blast him with rockets.
Did we mention rockets? They’re the preferred choice over machine guns for this battle because you might just have one shot in the dark as opposed to the ability to maintain focused and steady fire from a heavy machine gun.
Besides the darkness factor, part of what makes this strike difficult is the additional enemies that spawn while you fight Alak-Hul. A decent amount of them have yellow health bars, not to mention that there are also hordes of cursed Thralls attacking you. If you can communicate with your fireteam, it might be wise to have one person focus mainly on the additional enemies while the other two inflict damage on the Darkblade. This is a great time to activate heavy damage dealing Supers (the Titan’s Sunbreaker comes to mind), and alongside the rockets, it’s only a matter of time before you’ve defeated the Darkblade.
This strike can be a bit tricky. Even with the map indicators, one can easily get lost on the dreadnaught or not know how to move around in the darkness. To help you out with streamlining the strike experience, I’ve shared my own “A Sunless Cell” completion below.


 Life is Strange (PC) walkthrough
 The Evil Within (PS4) monsters / boss guide
 GTA 5: Most Wanted Fan-Requested Features
 Be The Smartest Person At Work With These Excel Tricks
 Fallout 4: Show No Mercy walkthrough