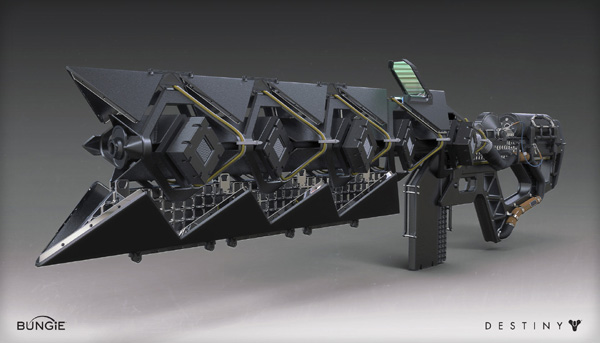
The Sleeper Simulant has finally awoken in Destiny: The Taken King.
If you aren’t aware, the Sleeper Simulant is an Exotic Heavy Fusion Rifle, and is one of the last of the known Exotic weapons to be found in The Taken King expansion.
Bungie made it seem like it was “hidden” somewhere, so there were teams of people on Reddit scouring over lore and grimoire cards, searching in game locations, all looking for any kind of hint to where it might be.. you name it, these guys looked everywhere, only to find out it was just to be released on a specific day. After all of this work, it turns out that it was just a Bungie time-gated quest, which is a little disappointing, but I digress.
Let’s start the hunt, shall we?
The first requirement is that you have to collect four of the Dvalin Fusion Rifle Artifacts and turn them into Banshee. If you’ve played since TTK launched then you’ve most likely already looted them all and turned them in, and there isn’t really a way to track your progress on this part that I know of. The only way I know of is to simply try to remember the last one you received. If it’s been a while, then you’ve probably already turned them all in. Otherwise, look on your item inventory screen and make sure you don’t currently have one down in the quest items section, since a new one won’t drop if you are currently carrying one. You should have noticed if you currently have one however, since it prompts a turn in at Banshee.
Next, you need to complete the First Firewall mission on Earth. Bungie sent out a tweet stating that if you weren’t able to complete it on the day it launched (October 7th, 2015), then it will return “in time.” My guess is that it will return every Armsday (Wednesday), so long as you have turned in all four relics.
The First Firewall mission is fairly straightforward. You travel into Rasputin’s bunker and fight several waves of Knights, and then a final wave with Knights and a large Knight boss as well.
Bring an Arc sniper with you if possible, because you can one-shot the Arc shielded Knights. Sniping as many Knights as you can straight away is the best way to deal with this mission honestly. When they spawn in, they literally spawn in a row and stand completely still for several seconds, so you have ample time to snipe several before they start firing on you.
My strategy was simply to snipe as many as I could until they started firing on me, and then rotate around the room in cover and pick them off one by one. The covered area below helps quite a bit as well, especially if you aren’t able to kill very many Knights at the beginning of the wave.
Keep doing each round the same, and at the fourth wave you’ll get have a boss Knight spawn in with the rest. Beating him will complete the mission, and you’ll receive a quest item called a Curious Transceiver.
If you inspect the Curious Transceiver, you’ll notice that it takes some codes to unlock. I guess I wasn’t paying very close attention to the Knights that spawned in on the previous mission, because apparently they were the trick to this puzzle.
** Spoiler Alert – If you like puzzles and you don’t want spoilers, then I guess you can run that mission again and try to figure it out on your own, but I’m kinda lazy so.. I’ve listed the codes below.
1 2 1 1 2 2 2 1 2
1 2 1 1 2 2 1 1
1 2 2 2 1 2 2 2 1 1
1 2 1 2 1 2 1 1
key: the top row in the transceiver is 1, the bottom row is 2. When you input a code correctly, it will unlock a node to complete it.
(thanks to Reddit posts like this one for cracking these kinds of things)
Once you crack the codes on the Curious Transceiver, you’ll unlock a new mission on Earth called Shadow Call, which you’ll recognize as Cayde’s Stash mission from The Taken King story missions. This time around however, you have a timer of 4 minutes to complete it.
protip: Bring a shotgun or a sword!
The key here is to just rush to the end, and don’t stop for anything. You don’t have a mission marker pointing the way, so just ignore all mobs and keep running. You should be vaguely familiar with the mission still, and there aren’t a whole lot of directions to choose from. There is only one semi-tricky area where you have to do a switch-back, other than that you should have plenty of time to get to the end.
Once you reach the end, you’ll notice an open area with a chest on the floor. Upon opening the chest, several yellow bar Wizards will spawn on the upper platforms. Simply jump up and shotgun/sword them to death to finish the mission and receive the IKELOS Fusion Core.
The core is damaged, and in need of repairs. When you inspect it, you’ll see several nodes that have cryptic descriptions, but looking closely enough you should be able to tell what it’s looking for.
** Spoiler Alert – This is (kind of) another puzzle, so work out the details of the Fusion Core yourself if you like, but I’m going to give the answers below.
Upon completing any of these, you will receive the item listed, and you’ll have to apply that item to the IKELOS Fusion Core. When you inspect the Fusion Core with one of the items, you’ll now see a prompt to make the repair.
To help get the public events completed, you can check out destinypublicevents.com, or there are some apps out there for iPhone and Android as well. Personally, I preferred an app on Android called Destiny Public Events Tracker, because it shows public events more in a “time window.”
If you choose to use destinypublicevents.com, don’t forget the actual time window of about 7 minutes before and/or after the listed time. This is where most people go wrong trying to use this site.
For Earth I primarily stuck to Skywatch, and only bounced quickly to the others between the timer there.
For the Moon, I just bounced between Archer’s Line and Anchor of Light.
Mars kind of sucks, since it’s so spread out. I would suggest bouncing between Buried City, Scablands, and The Barrens. I finally got mine in Buried City, after many “kill this fkn Boss guy” events popping.
After finally completing the IKELOS Fusion Core, it’s time to take it to Banshee, where you awards you with.. nothing.
Yep, it’s time to wait around a bit. Come back tomorrow and you’ll find a new mission waiting for you.
For the final step, you just need to complete a special 300 light level version of the S.A.B.E.R. Strike, which you’ll find flashing at you on Earth.
This strike is pretty rough when playing with randoms and having little to no coordination or communication. There are no special modifiers or anything, and the boss fight is easy, it’s just the Warsat part that can be infuriating. You may want to bring a team into this one, even though matchmaking is available.
If you’re having trouble on the Warsat part, there are some videos floating around showing you how to glitch beneath it using your sparrow. I only suggest doing this if you are failing repeatedly with your random groups and can’t get a fireteam together for it.
Completing this strike will award you the Sleeper Simulant Frame. Take the frame to Banshee, and BAM! You just got yourself the fabled Sleeper Simulant. It’s pretty sweet looking don’t you think?
 Child of Light – Diary Pages Guide
 Battlefield 4 – Tips & Tricks
 Tomb Raider – Secret Tombs Guide
 Infamous: Second Son – DUP Security Camera Locations
 Call of Duty: Ghosts - Achievements & Trophies Guide