Fear for Sale: The 13 keys Walkthrough, Guide, & Tips
Fear for Sale: The 13 keys Walkthrough

Welcome to the Fear for Sale: The 13 Keys Walkthrough
You are the key to solving a chilling supernatural mystery!
Whether you use this document as a reference when things get difficult or as a road map to get you from beginning to end, we’re pretty sure you’ll find what you’re looking for here.
This document contains a complete Fear for Sale: The 13 Keys game walkthrough featuring annotated screenshots from actual gameplay!
We hope you find this information useful as you play your way through the game. Use the walkthrough menu below to quickly jump to whatever stage of the game you need help with.
Remember to visit the Big Fish Games Forums if you find you need more help. Have fun!
This walkthrough was created by Laurie Murphy, and is protected under US Copyright laws. Any unauthorized use, including re-publication in whole or in part, without permission, is strictly prohibited.
General Tips
- This is the official guide for Fear for Sale: The 13 Keys.
- This guide does not mention each time you have to zoom into a location; the screenshots show each zoom scene.
- Hidden-object puzzles are referred to as HOPs. This guide does not show screenshots of the HOPs, however, it is mentioned when a HOP is available and the inventory item collected.
- This guide will give step-by-step solutions for all puzzles that are not random. Please read the instructions in the game for each puzzle.
- Use the map to travel quickly to a location.
Chapter 1: Checking In

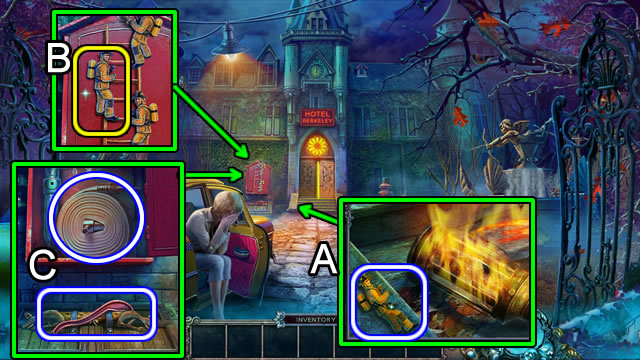
- Speak to the woman; approach the entrance; read the newspaper; take the FIREMAN (A).
- Place the FIREMAN (B).
- Take the FIRE HOSE and LEVER (C).

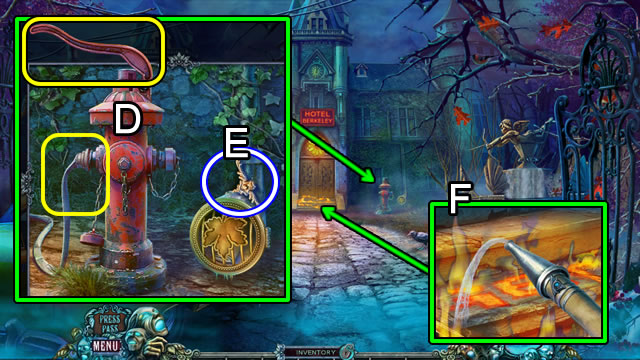
- Attach the LEVER and FIRE HOSE (D). Pick up the SCALE HANGER (E).
- Douse the flames (F) with the hose; open the door and enter the hotel.

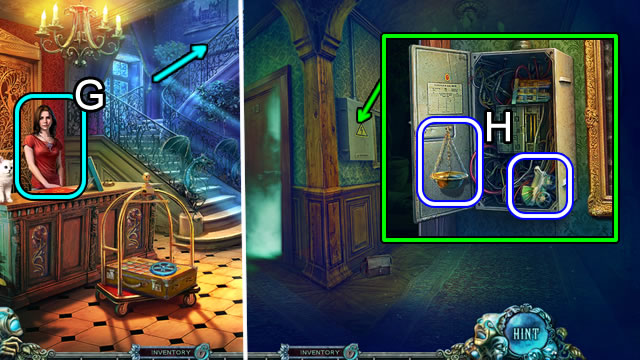
- Speak to the woman (G); follow her up the stairs.
- Open the fuse box; take the LEFT SCALE and BABY CARRIAGE (H).
- Walk down.

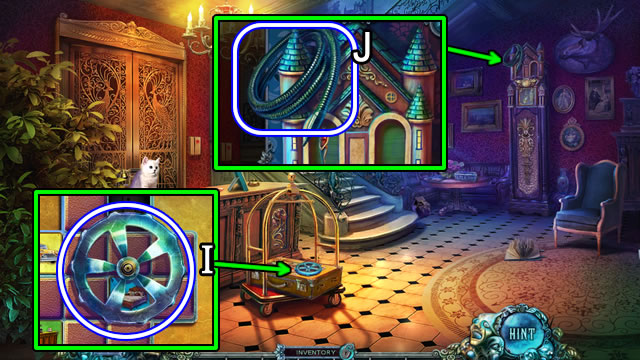
- Pick up the VALVE (I) and grab the HOSE (J).

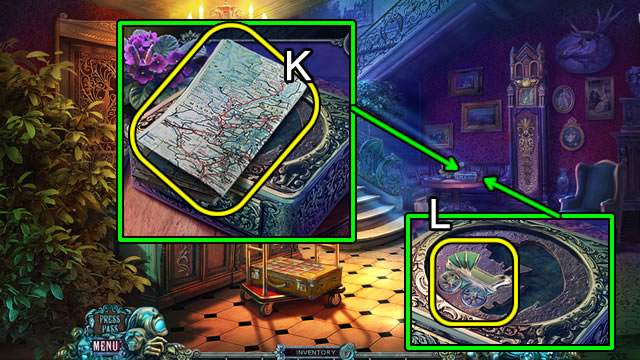
- Take the map (K).
- Insert the BABY CARRIAGE (L) to trigger a fragment HOP; Collect the pieces to complete the box lid.

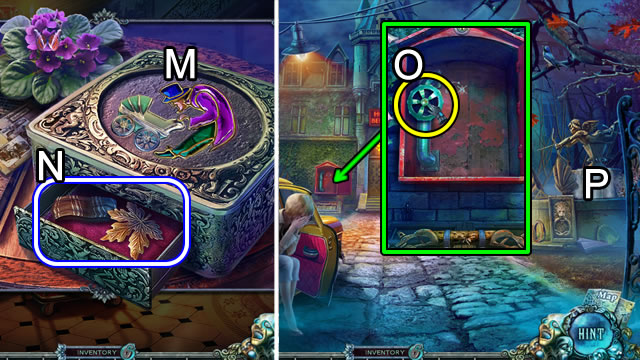
- Take the ELASTIC HEADBAND and LEAF EMBLEM (N).
- Walk down.
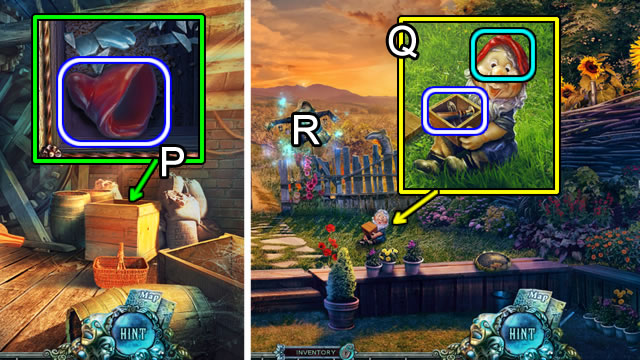
- Attach the VALVE (O); turn to activate a HOP (P).
- Play the HOP; get a MECHANICAL WOODPECKER.

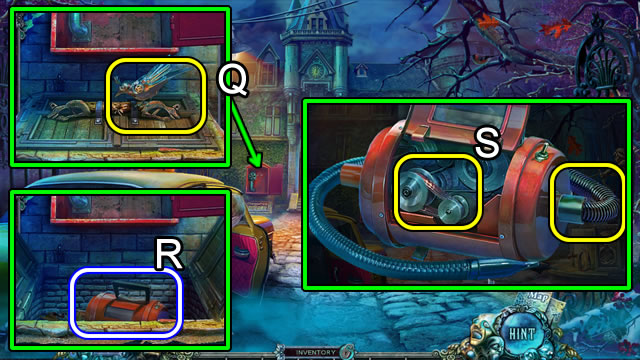
- Use the MECHANICAL WOODPECKER (Q); take the BROKEN LEAF BLOWER (R).
- Select and open the BROKEN LEAF BLOWER to add the ELASTIC HEADBAND and HOSE (S) for a LEAF BLOWER (Inventory).

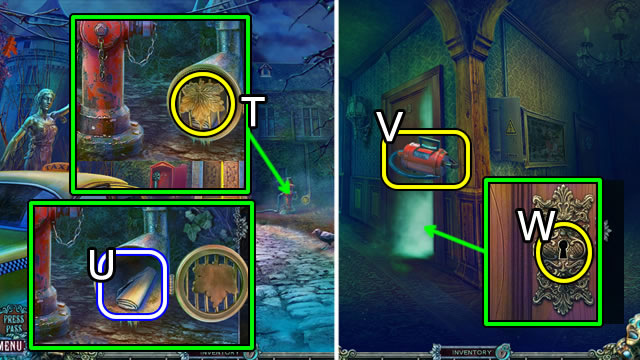
- Use the LEAF EMBLEM (T); take the BUNDLE (U).
- Open the BUNDLE (Inventory); take the LOCKPICK.
- Return to the Hallway.
- Use the LEAF BLOWER (V).
- Insert the LOCKPICK (W) to open a puzzle.

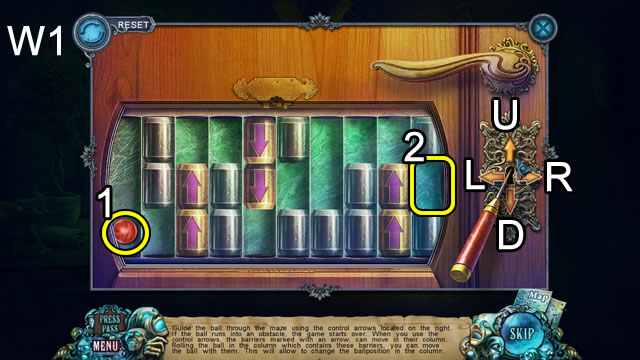
- Use the arrows to guide the ball (1) through the maze to the exit (2).
- Solution: U-D-Rx2-Ux2-Rx2-D-Rx2-U-D-U-D-U-Rx2-Ux2-R.
- Enter the room.

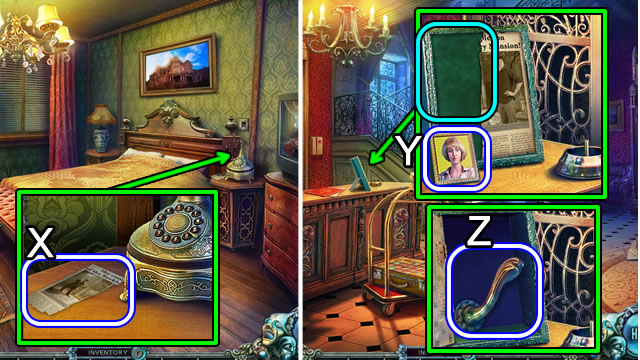
- Pick up the PHOTO HALF (X).
- Walk down twice.
- Take the TILE (Y) and add the PHOTO HALF ; select the picture; take the WINDOW HANDLE (Z).
- Return to Room 13.

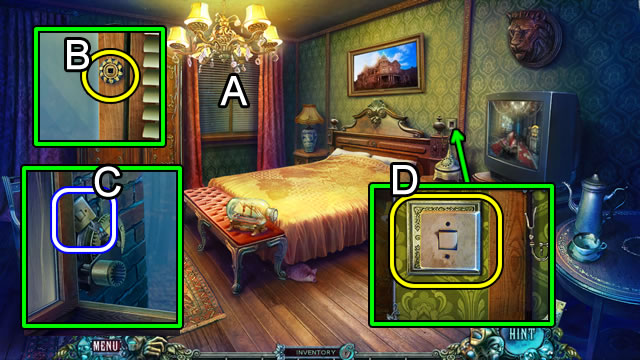
- Open the blinds (A); attach the WINDOW HANDLE (B); take the LIGHT SWITCH (C).
- Use LIGHT SWITCH (D).
Chapter 2: The Nightmare

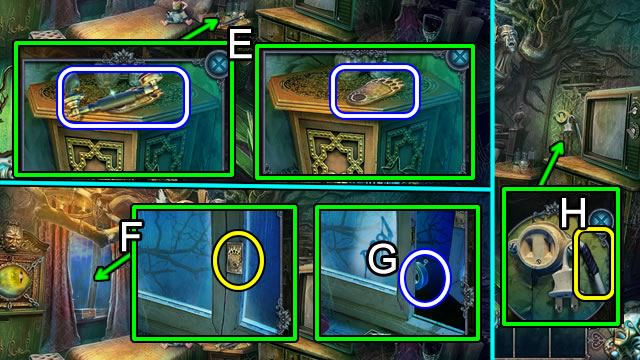
- Pick up the RECEIVER and PAW (E).
- Use the PAW (F). Take the TAPE (G).
- Use the TAPE (H); put the plug in the socket to trigger a HOP.
- Play the HOP to receive a SILVER FEATHER.

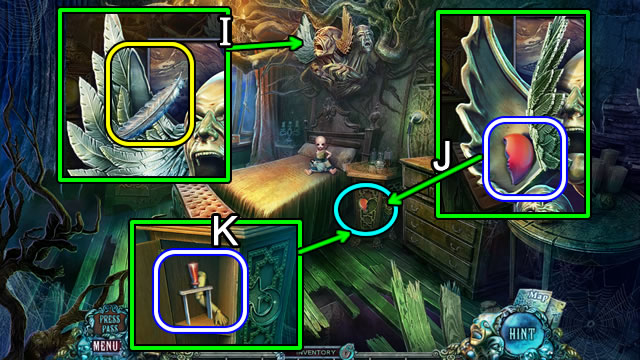
- Use the SILVER FEATHER (I).
- Take and place the HEART HALF (J).
- Grab the BREAKER SWITCH and DOLL’S ARM (K).

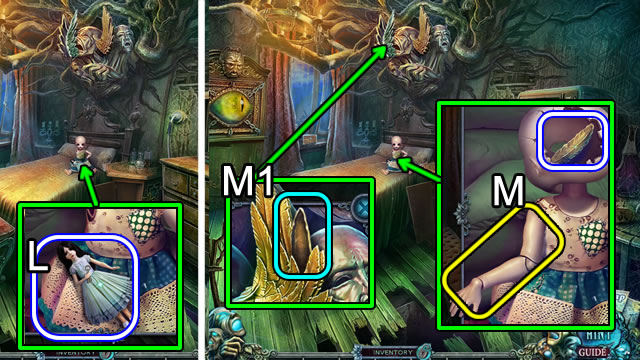
- Take the DOLL (L).
- Attach the mechanical DOLL’S ARM; take the GOLD FEATHER (M).
- Use the GOLD FEATHER (M1); take a FLASHLIGHT.

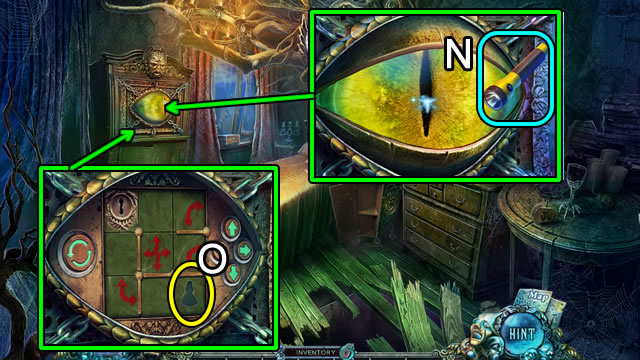
- Select the eye; use the FLASHLIGHT after the reaction (N).
- Place the DOLL (O) to open a puzzle (O1).

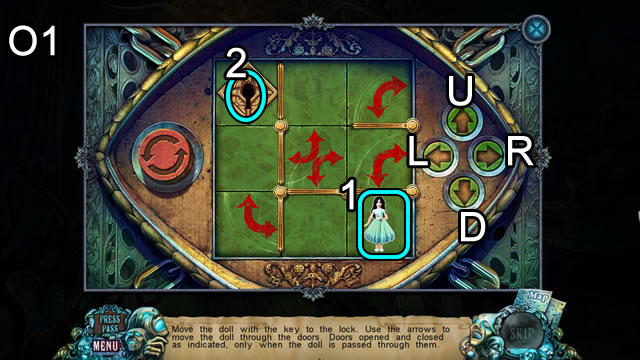
- Move the DOLL (1) through the gates to the keyhole (2) using the arrows.
- Solution (O1): Ux2-L-D-U-R-D-Lx2-U.
Chapter 3: Room 16

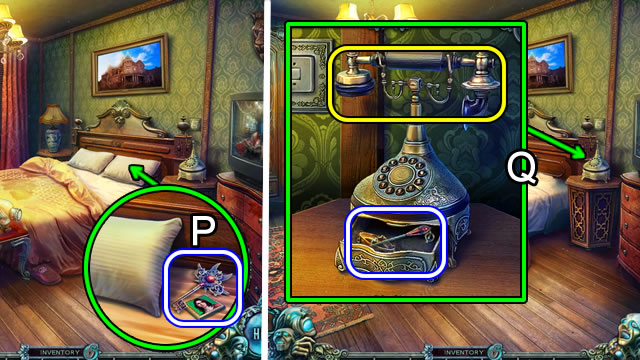
- Move the pillow (P) for a STRANGE KEY and TILE.
- Place the RECEIVER; answer the phone; take the STICKPIN and RIGHT SCALE (Q).
- Walk down.

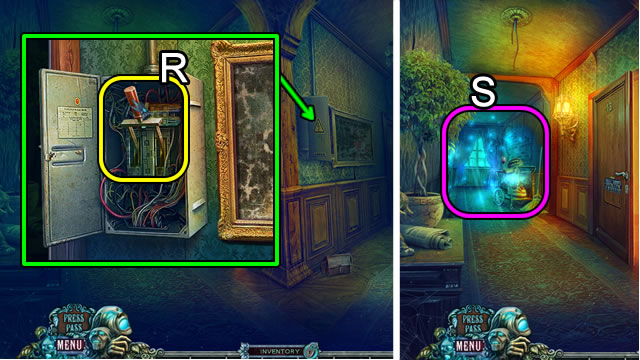
- Place and flip the BREAKER SWITCH (R) to trigger a HOP (S).
- Play the HOP to receive a TILE (Inventory).
- Walk down.

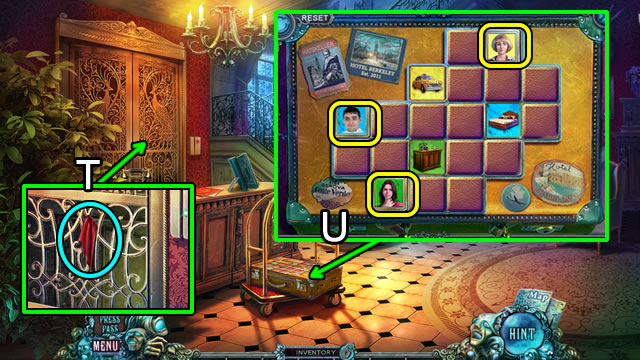
- Take the scrap (T).
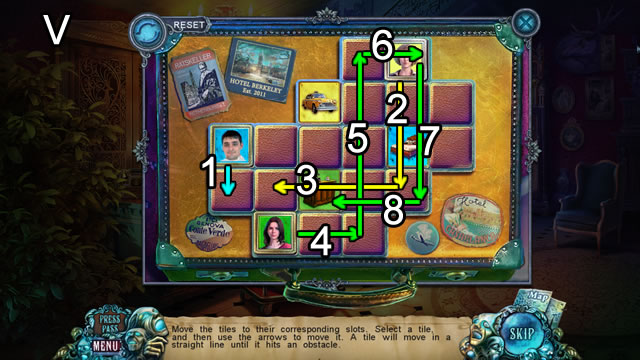
- Add the three TILES (U) to open a puzzle.
- Slide the tiles so the tile background colors match the image background colors.


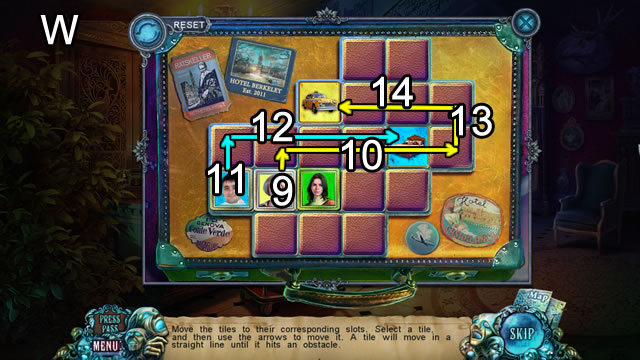

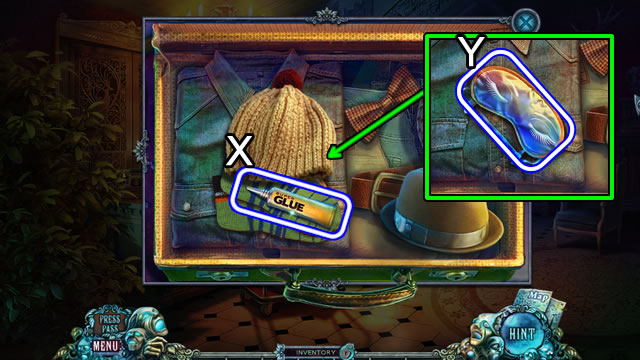
- Take the GLUE (X).
- Move items to find the EYE MASK (Y).
- Walk down.

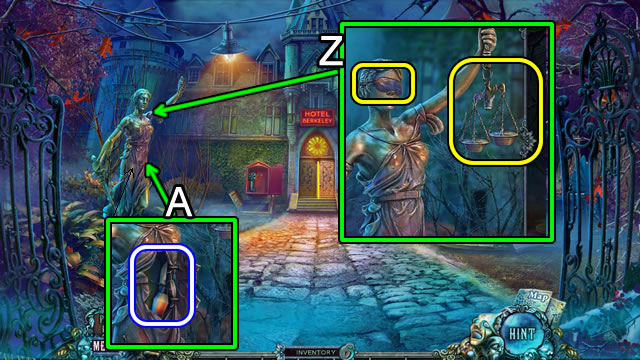
- Add the LEFT SCALE and RIGHT SCALE to the SCALE HANGER for SCALES.
- Use the SCALES and EYE MASK (Z).
- Take the PAINT RESTORER and KNIFE (A).
- Return to the Hallway.

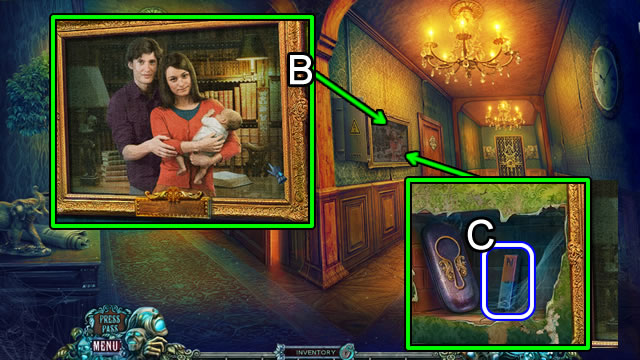
- Use the PAINT RESTORER (B).
- Select the painting and take the MAGNET (C).
- Enter Room 13.

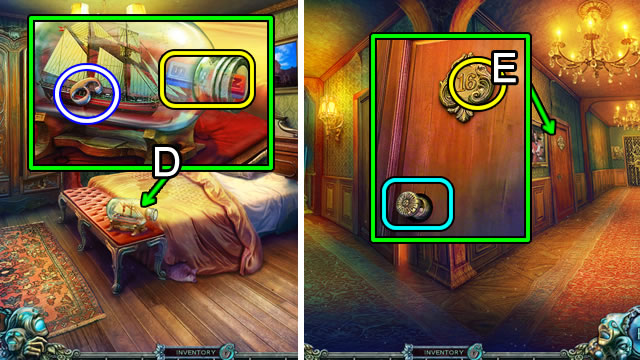
- Use the MAGNET to attract NUMBER 6 (D).
- Walk down.
- Insert NUMBER 6 (E) to pop out the doorknob.
- Enter Room 16.

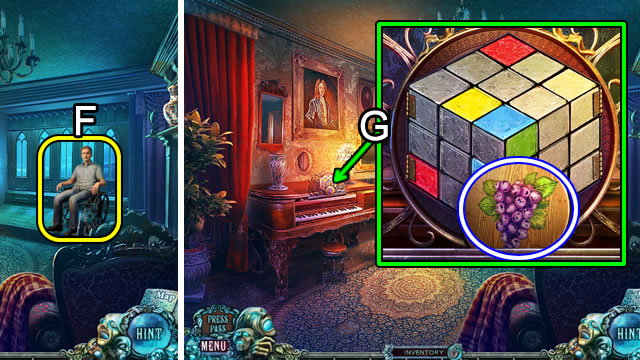
- Speak to the man (F) to receive a CLOSED LOCKET (F).
- Take the GRAPE TILE (G) to open a puzzle.

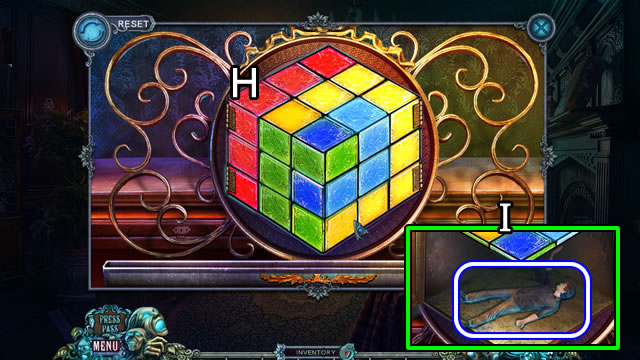
- Solution (H).
- Take the MAN FIGURINE (I).

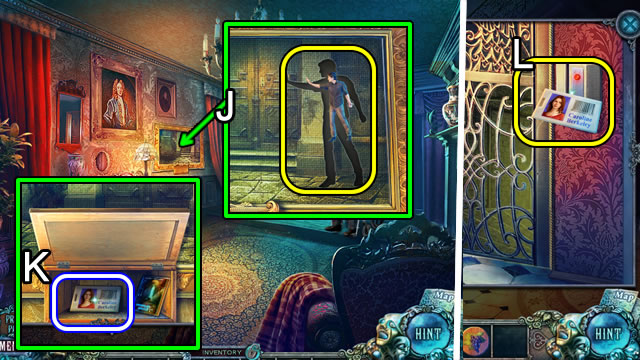
- Use the MAN FIGURINE (J) to trigger a fragment HOP.
- Play the HOP to take a KEY CARD (K).
- Return to the Lobby.
- Use the KEY CARD (L).
- Enter the shaft.

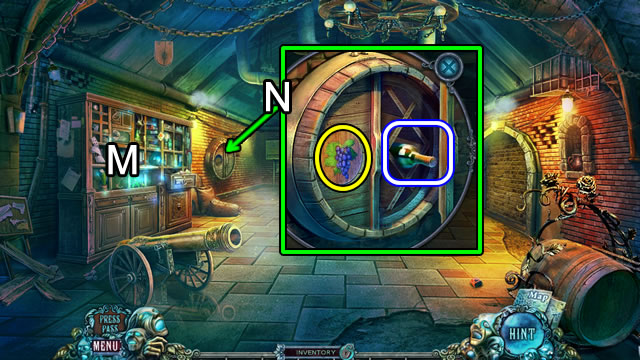
- Play the HOP (M); receive the SAM FIGURINE.
- Use the GRAPE TILE and take WINE (N).
- Walk down.

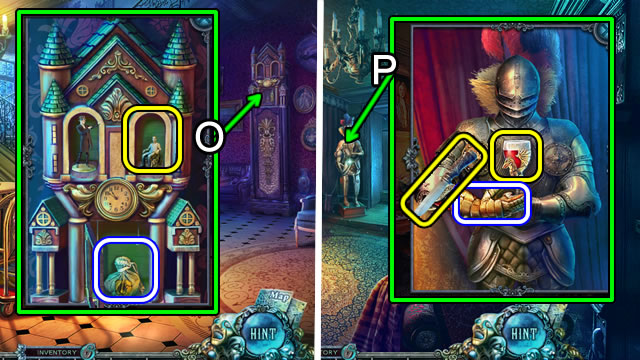
- Place the SAM FIGURINE (O); take the GUNPOWDER.
- Return to Room 16.
- Pour the WINE; use the KNIFE; get the ARMORED GLOVE (P).
- Go to the Boiler Room.

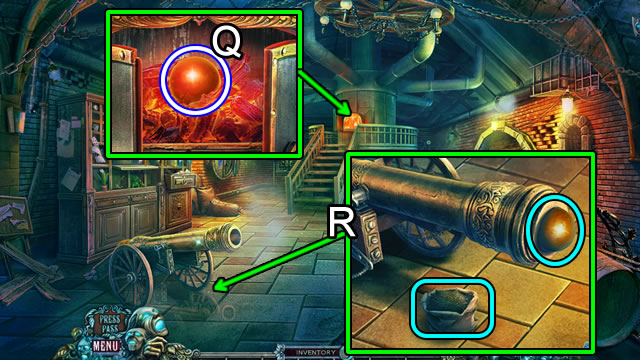
- Use the ARMORED GLOVE to retrieve the CANNONBALL (Q).
- Place the GUNPOWDER; place, then load the CANNONBALL (R) to trigger a puzzle.

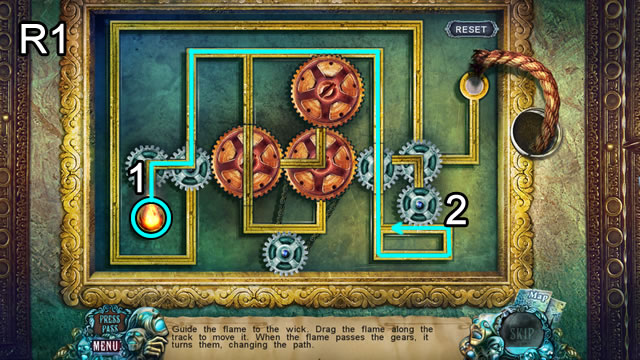
- Solution (R1): Drag the flame (1) along the path; drag down, right, up and left at (2). Repeat (2) moves.

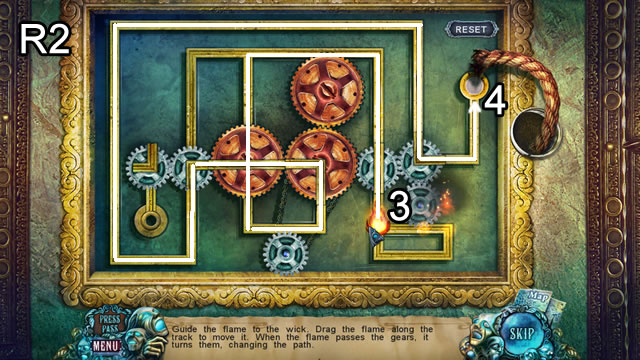
- Complete the path (3) to the wick (4).
- Walk right; speak to the woman.

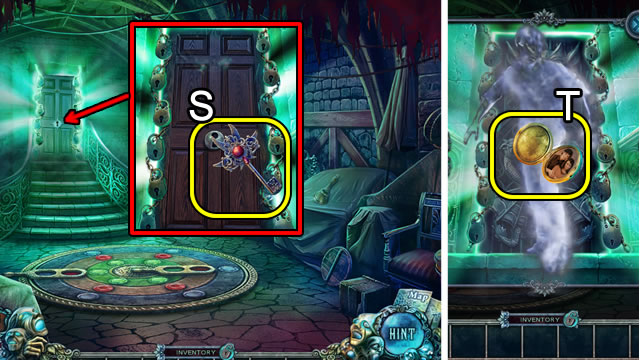
- Attempt to use the STRANGE KEY (S).
- Combine the CLOSED LOCKET and STICKPIN for a LOCKET.
- Give the LOCKET (T).
- Play the HOP; receive a LIBRARY CARD.
Chapter 4: Jack’s Past

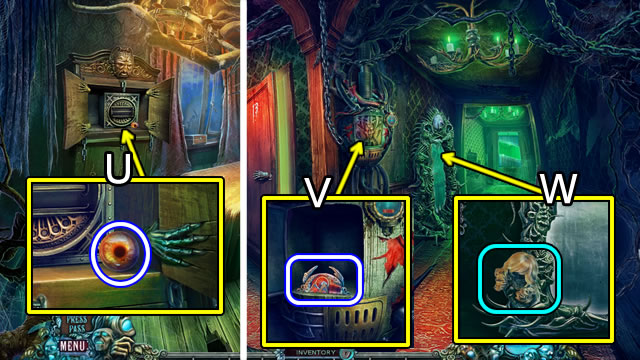
- Grab the EYE (U).
- Walk down; speak to Jack.
- Open the door (V) and take the EMBLEM HALF 1.
- Attempt to take the wig (W); play the fragment HOP.

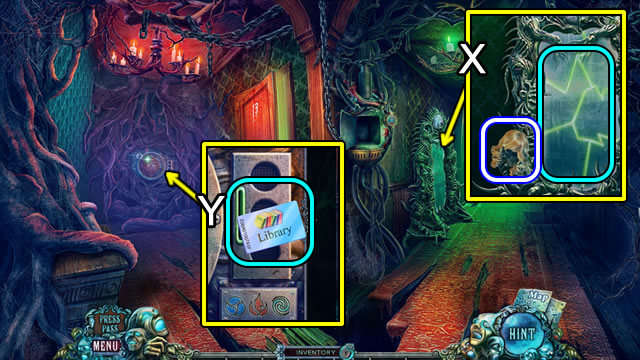
- Use the GLUE; take the WIG (X).
- Trigger a puzzle with the LIBRARY CARD (Y).

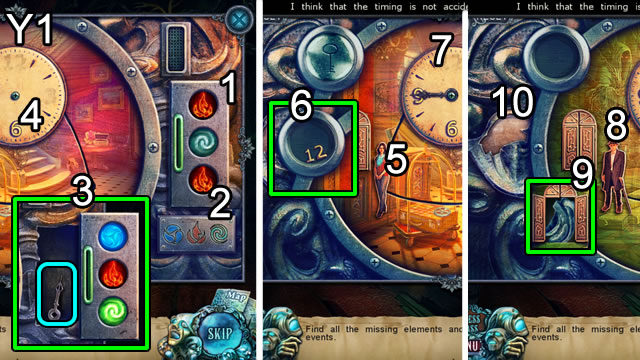
- Solution (Y1): scroll through the buttons (1) to match the pattern (2). Place the clock hand (3) on the face (4). Press the clock rivet (4).
- Touch the woman (5). Put the number (6) on the clock face (7). Press the rivet.
- Touch the man (8). Get the missing piece (9); use it (10) to get the number 3. Repeat the process with the last figure.
- Walk up the stairs.

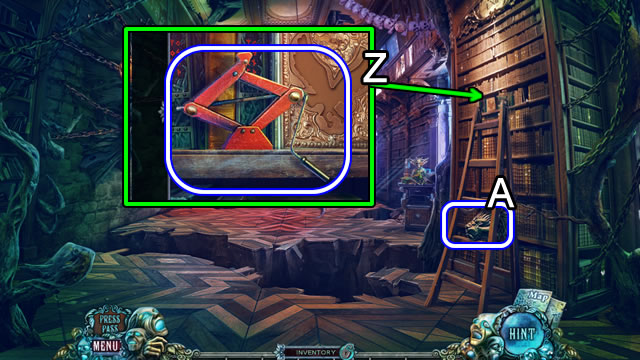
- Get the SCISSOR JACK (Z); grab LION 1 (A).
- Walk down.

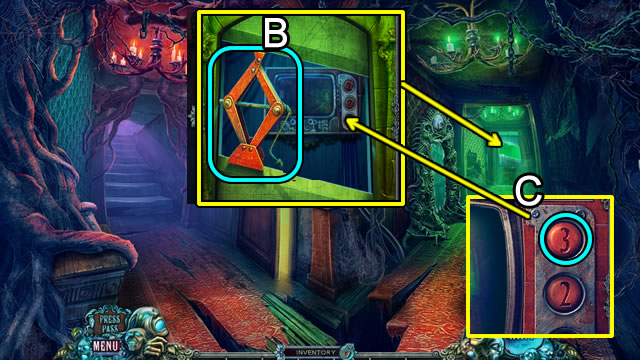
- Use the SCISSOR JACK (B); press button 3 (C).

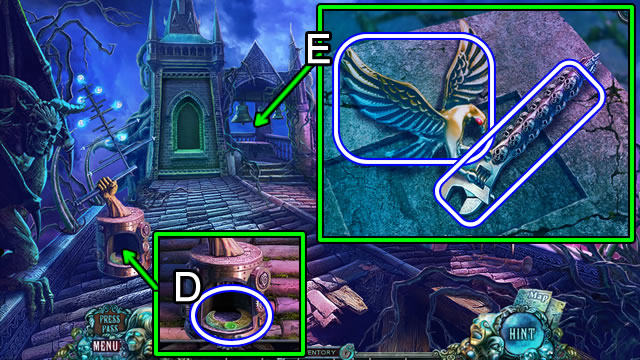
- Grab the HALF-MOON (D).
- Zoom in on the pedestal; take the EAGLE and WRENCH (E).
- Walk down; press button 2.
- Enter Emma’s Nightmare room.

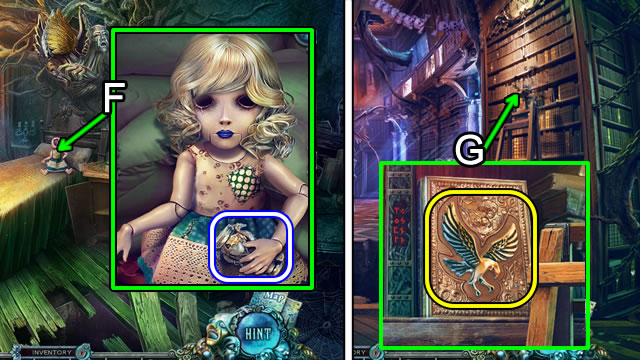
- Use the WIG; take the HOURGLASS (F).
- Exit the room; go up the stairs.
- Place the EAGLE (G).

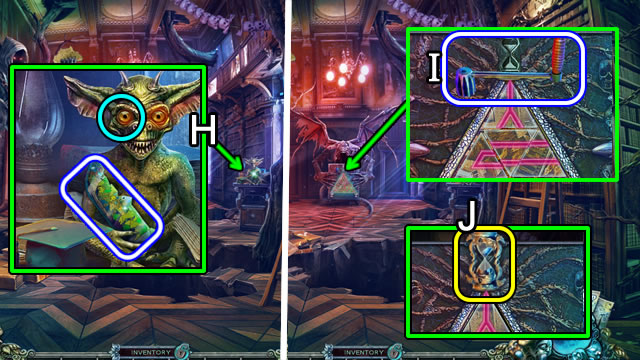
- Insert the EYE; get STAINED GLASS 2 (H).
- Take the HANDLE (I); add the HOURGLASS (J) to trigger a puzzle.
- Flip the triangles to find the pattern.

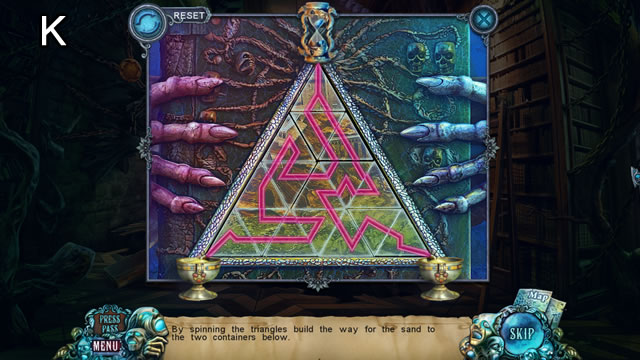
- Solution (K).
- Play the HOP; receive STAINED GLASS 1.
- Return to the Nightmare Roof.

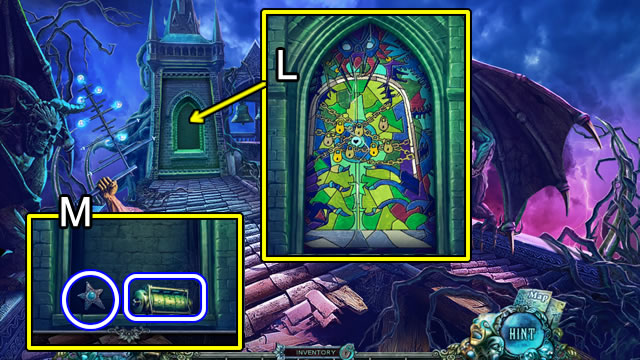
- Add STAINED GLASS 1 and STAINED GLASS 2 (L).
- Grab the STAR and CODED CYLINDER (M).
- Return to Emma’s Nightmare room.

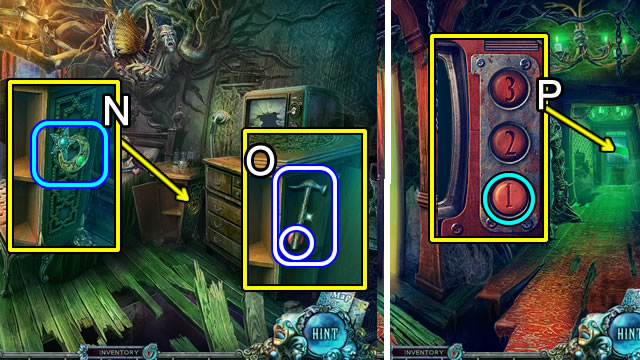
- Add the STAR and HALF MOON (N).
- Get the HAMMER and BUTTON 1 (O).
- Walk down.
- Insert and press BUTTON 1 (P).
- Speak to the man; play the HOP; receive a HORN.

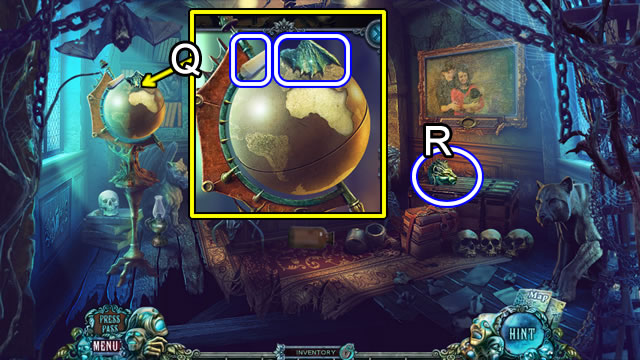
- Take the CHALK and DRAGON WING (Q).
- Grab LION 2 (R).
- Return to Emma’s Nightmare Room.

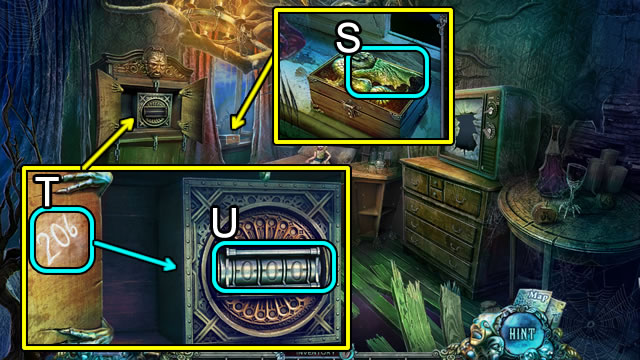
- Put the DRAGON WING (S); take the CRYSTAL SKULL.
- Use the CHALK (T).
- Insert the CODED CYLINDER (U); set tumblers to 2-0-6; take the JAR WITH ELECTRODE.
- Walk down.

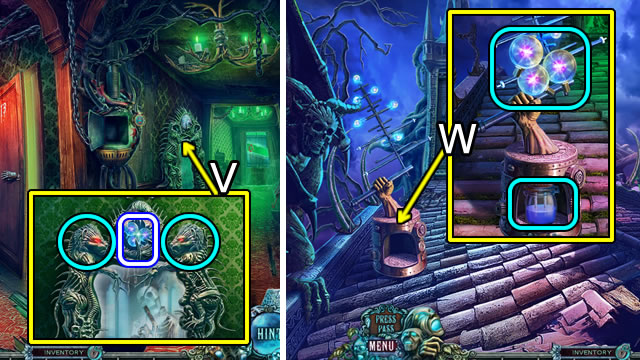
- Add LION 1 and LION 2; take PARTS OF THE ANTENNA (V).
- Go to the Nightmare Roof.
- Use the PARTS OF ANTENNA and JAR WITH ELECTRODE (W); take JAR WITH LIGHTNING.

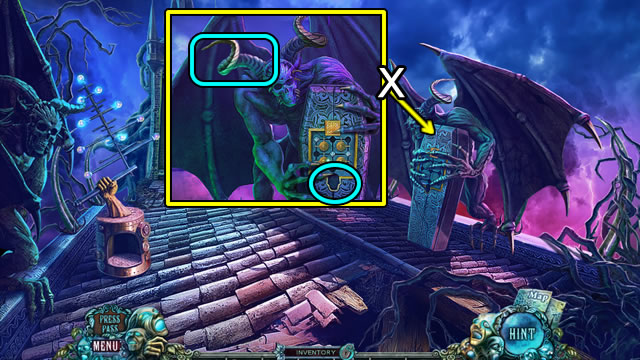
- Attach the HORN (X); insert the CRYSTAL SKULL to trigger a puzzle.

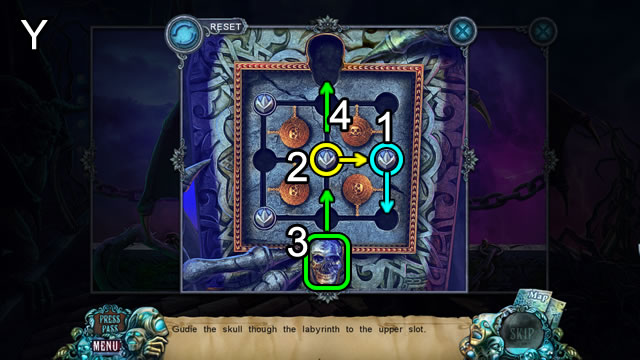
- Solution (Y).
- Grab the SCROLL.
- Go to the Nightmare Library.

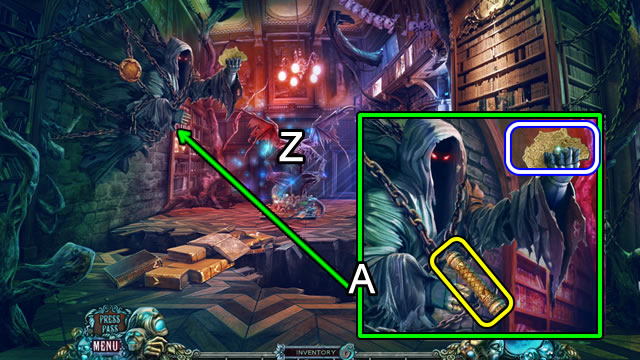
- Play the HOP (Z); receive a BOX WITH EARS.
- Give the SCROLL; get AFRICA (A).
- Walk down.

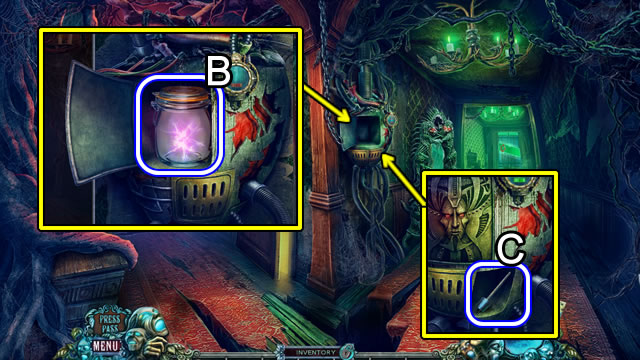
- Put JAR WITH LIGHTNING (B); take CLAPPER (C).
- Return to Nightmare Roof.

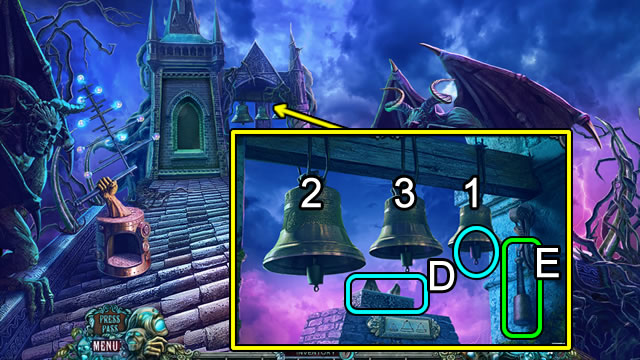
- Add the CLAPPER (1); place the BOX WITH EARS (D).
- Use the mallet (E) to strike the bells (1, 2, 3); take the HOT AIR BALLOON.
- Go to the Nightmare Office.

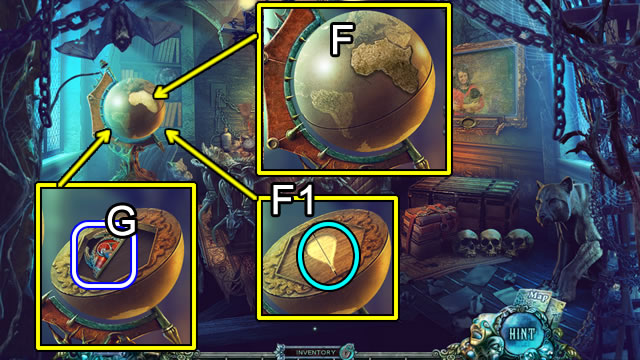
- Place AFRICA (F); insert the HOT AIR BALLOON (F1); take EMBLEM HALF 2 (G).
- Return to the Nightmare Library.

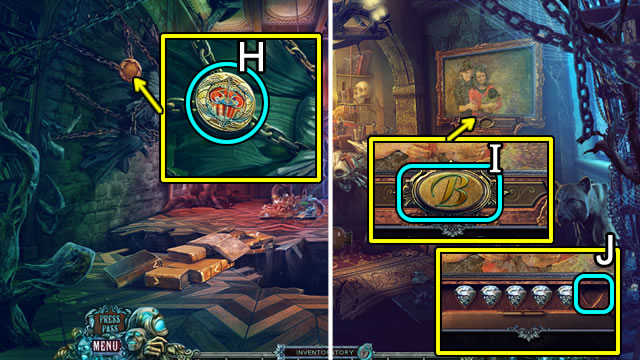
- Insert EMBLEM HALF 1 and EMBLEM HALF 2 (H); take the MONOGRAM.
- Go to the Nightmare Office.
- Play the HOP; receive a RAINBOW CRYSTAL.
- Put the MONOGRAM (I); place the RAINBOW CRYSTAL (J) to trigger a puzzle.

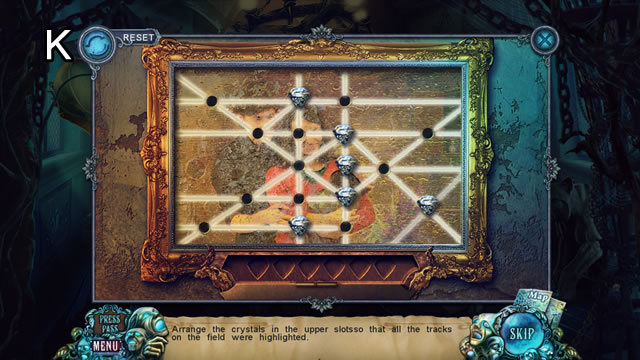

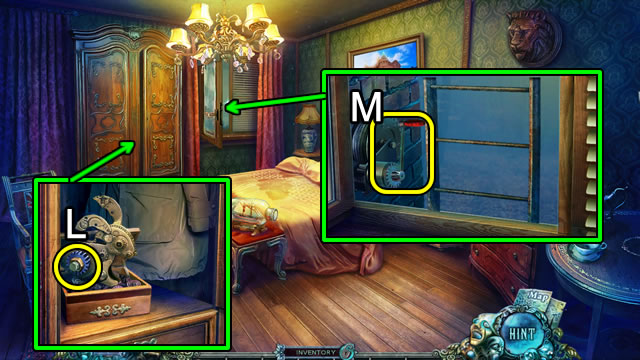
- Use the WRENCH to remove the COGWHEEL (L).
- Combine the HANDLE and COGWHEEL to create a GEAR (Inventory).
- Use the GEAR (M) to raise the ladder.
- Climb down the ladder.
Chapter 5: The Park

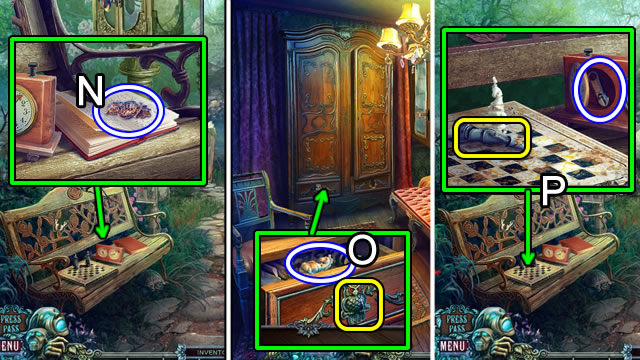
- Open the book; read the note; take the OWL (N).
- Walk down.
- Place the OWL; take the KNIGHT (O).
- Climb down the ladder.
- Place the KNIGHT; take the ZIPPER PULL (P).
- Walk down.

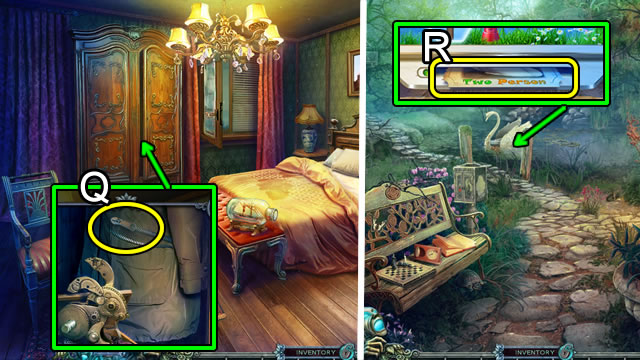
- Fasten the ZIPPER PULL (Q); take the TICKET.
- Climb down the ladder.
- Insert the TICKET (R) to open a puzzle.

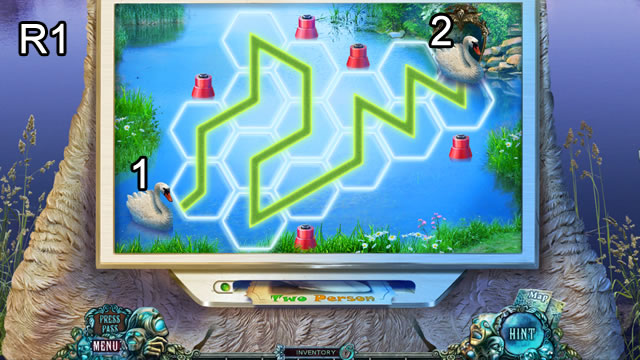

- Play the HOP; receive a CHESS QUEEN.
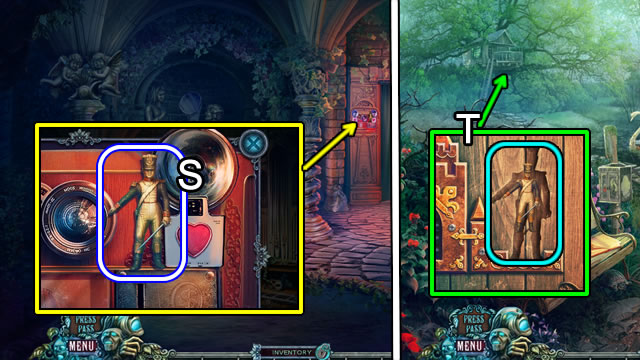
- Take the TOY SOLDIER (S).
- Walk down; walk to the Treehouse; insert the TOY SOLDIER (T) to enter the Treehouse.

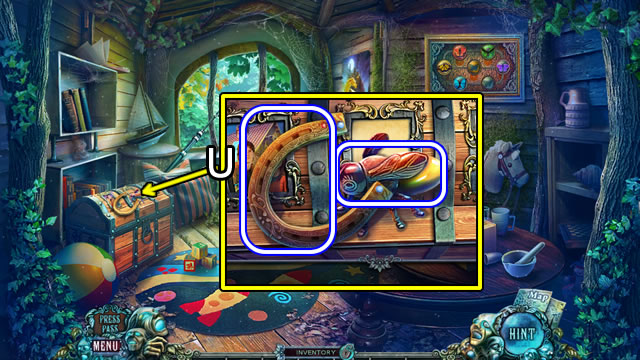
- Grab the HORSESHOE and FIREFLY (U).
- Walk down.

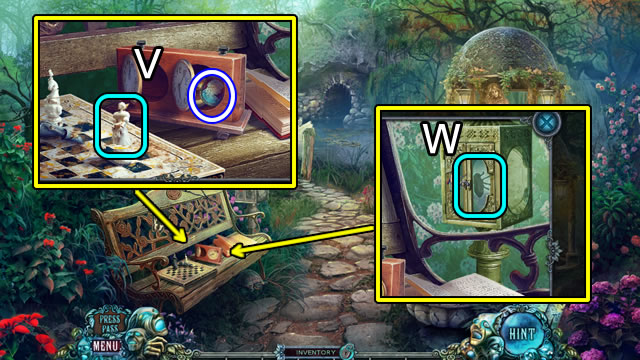
- Place the CHESS QUEEN); take the BROOCH and APPLE (V).
- Place the FIREFLY (W); take the LIGHT BULB.

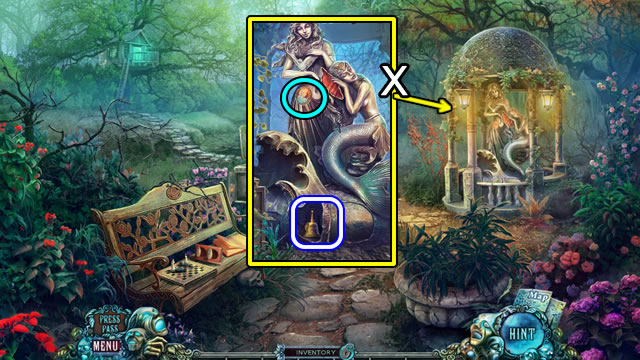
- Add the BROOCH; take the BELL and COIN (X).
- Walk to the tunnel.

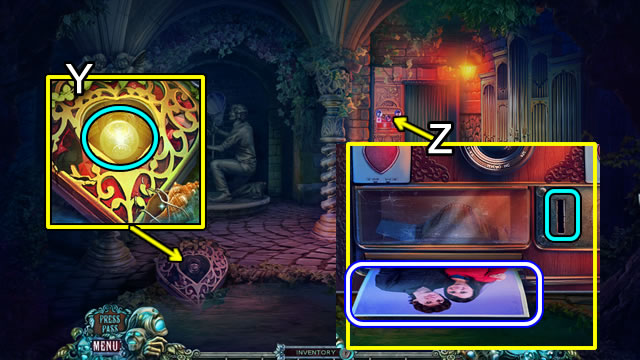
- Use the LIGHT BULB (Y).
- Insert the COIN; take the PHOTO (Z).
- Return to the Treehouse.

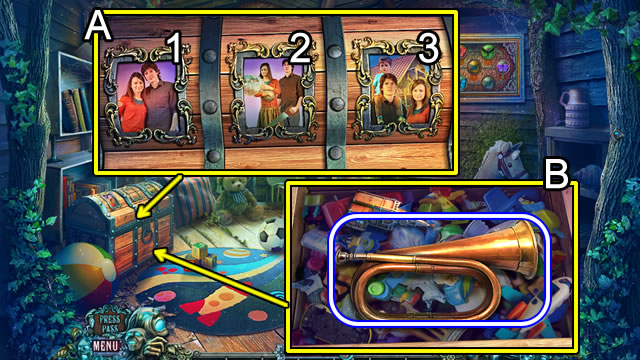
- Add the PHOTO (A); order (1-2-3).
- Take the BUGLE (B).
- Return to the Grotto.

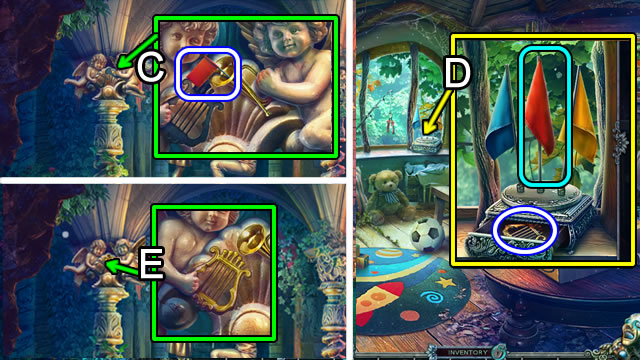
- Place the BUGLE; take the PENNANT (C).
- Return to the Treehouse.
- Add the PENNANT; take the HARP (D).
- Return to the Grotto.
- Place the HARP (E); receive a FLASK BADGE.
- Return to the Treehouse.

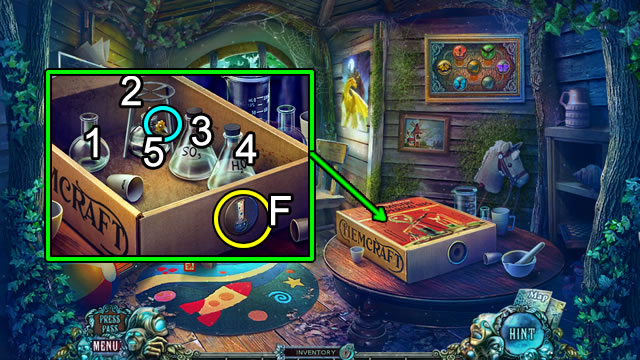
- Read the note; place the FLASK BADGE (F).
- Place flask (1) on (2). Add flasks (3-4). Turn knob (5). Take ACID.
- Walk down three times.

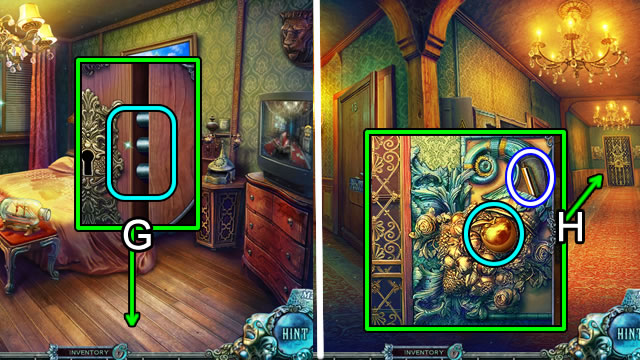
- Use the ACID (G) to open the door.
- Walk down.
- Play the HOP; receive a HAT.
- Add the APPLE (H); take the CLOCK PENDULUM.
- Walk down.

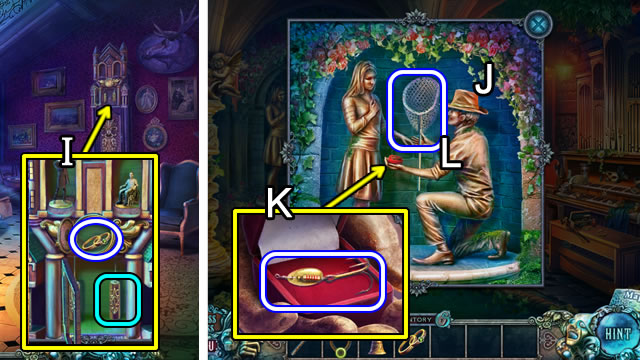
- Place the CLOCK PENDULUM (I); take the RINGS.
- Return to the Grotto.
- Place the HAT (J).
- Place the RINGS; take the HOOK (K); grab the BUTTERFLY NET (L).
- Walk down.

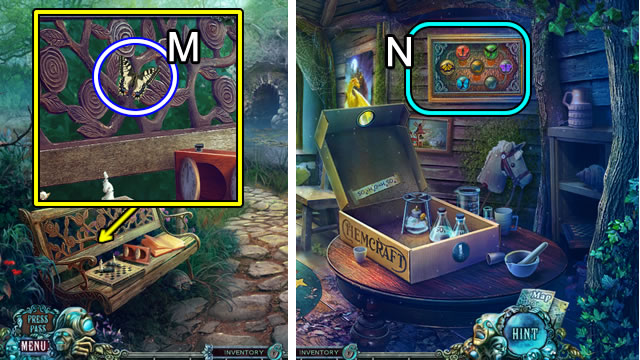
- Use the BUTTERFLY NET; get the BUTTERFLY (M).
- Go to the Treehouse.
- Add the BUTTERFLY (N) to trigger a puzzle.

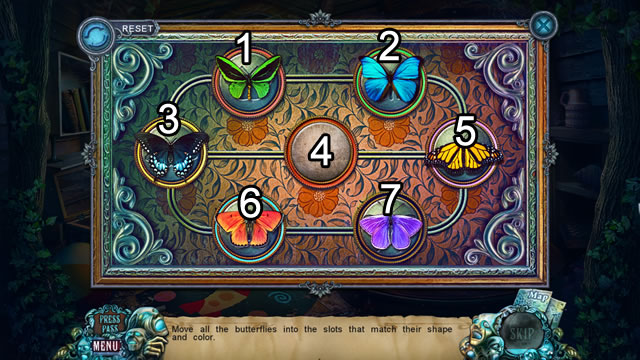
- Solution: 5-7-6-3-4-5-7-6-3-1-2-5-4-3-1-2-5-7-6-3-4-5-7-6-3-4-5-7-6-3-4-5-2-1-3-4-5-7-6-3-1-2-5-4.
- Take a REEL.

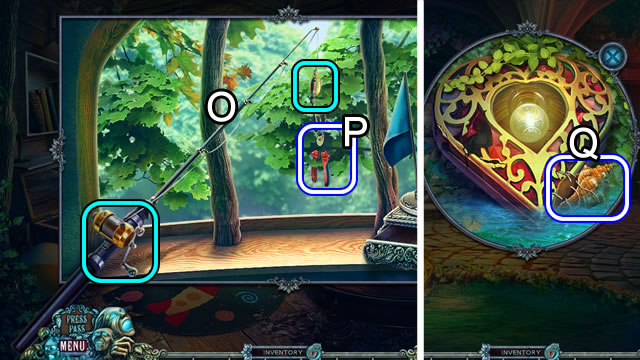
- Place the REEL and HOOK (O); select the reel and take the WIRE CUTTERS (P).
- Return to the Grotto.
- Use the WIRE CUTTERS to get the SHELL (Q).
- Play the HOP; receive a GEM.
- Combine the SHELL and GEM (Inventory); get a BEJEWELED SHELL.
- Walk down.

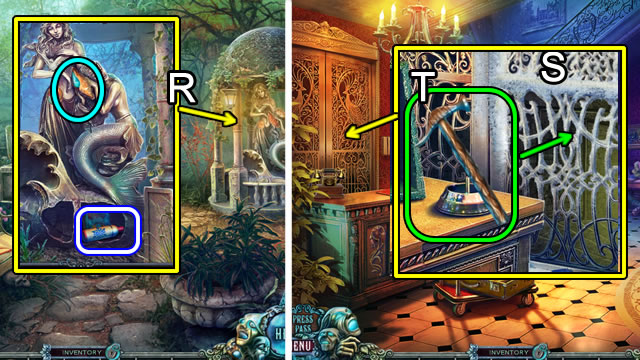
- Place the BEJEWELED SHELL; take the LIQUID NITROGEN (R).
- Return to the Lobby.
- Use the LIQUID NITROGEN (S); apply the HAMMER (T).
- Go down to the Boiler Room then right.
Chapter 6: Blue and Yellow Keys

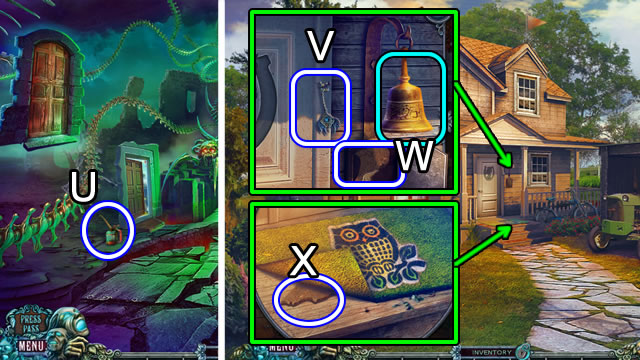
- Pick up the OIL CAN; go through the door (U).
- Play the HOP; receive a KEY.
- Take the KEY (V); place the BELL; take the ANAGLYPHY (W).
- Move the mat, and pick up the second ANAGLYPHY (X).

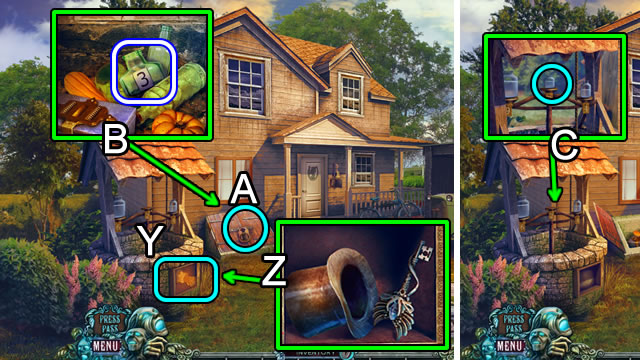
- Place the two ANAGLYPHY pieces (Y); take the TOP HAT and KEY (Z).
- Insert the TOP HAT (A); open the cellar doors; grab the BOTTLE (B).
- Place the BOTTLE. Examine the bottles to trigger a puzzle (C).

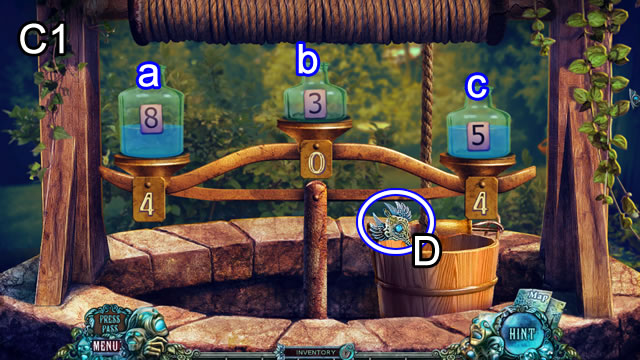
- Solution (C1): b-c, a-b, b-c, c-a, b-c, a-b, b-c.
- Take the KEY (D).
- Walk down.

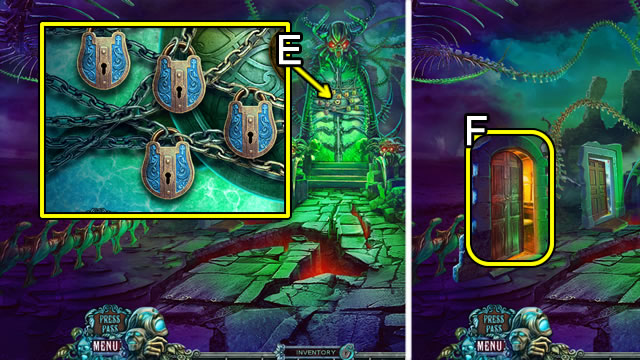
- Use the four KEYS in the blue locks (E).
- Go through the door (F).

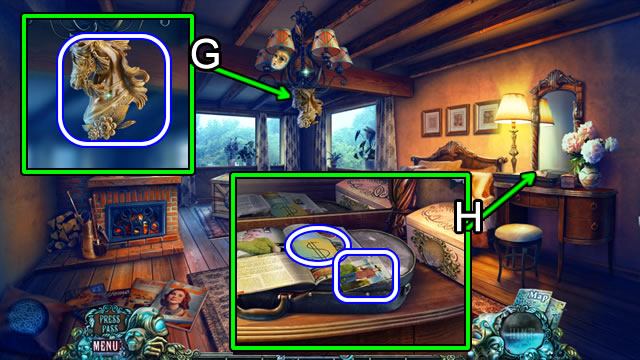
- Play the HOP; receive PRUNING SHEARS.
- Take the HORSE (G).
- Pick up the DOLLAR NOTE and JACK’S PHOTO (H).
- Return to Near the House.

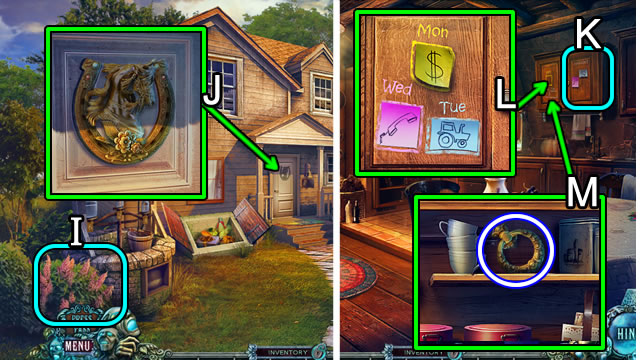
- Use the PRUNING SHEARS (I); get a BOUQUET OF FLOWERS.
- Combine the HORSESHOE and HORSE (Inventory) for an EQUESTRIAN ORNAMENT.
- Affix the EQUESTRIAN ORNAMENT (J) and enter the house.
- Place the DOLLAR NOTE on the cabinet door (K). Match the note and day color (L); take the HANDLE (M).
- Return to the Bedroom.

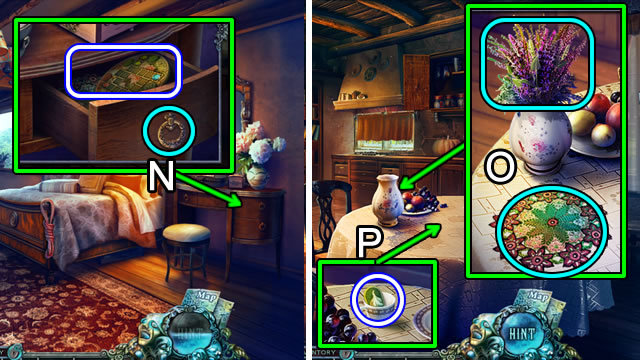
- Attach the HANDLE (N); take the CHIP and PLACEMAT.
- Return to the Dining Room.
- Place the BOUQUET OF FLOWERS and PLACEMAT (O) to trigger a fragment HOP.
- Play the HOP; take the LABEL (P). Take the KEY from Jack.

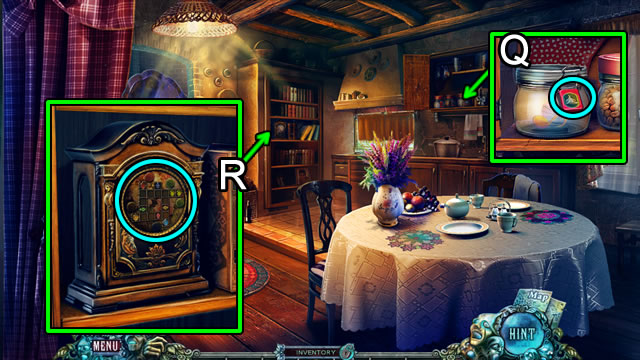
- Add the LABEL (Q); get a MUSICAL NOTE.
- Insert the CHIP (R); select the clock to open a puzzle.

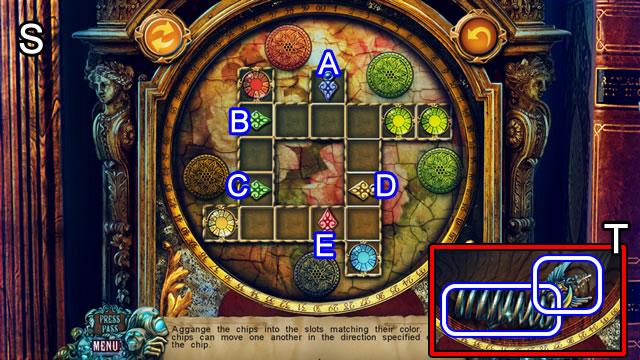
- Solution (S): A-Bx2-Ax2-Dx2-Ex2-Cx4-Ax2-Dx2-Ex2.
- Take the SPRING and KEY (T).
- Walk down.
- Play the HOP; receive a PHONOGRAPH RECORD.

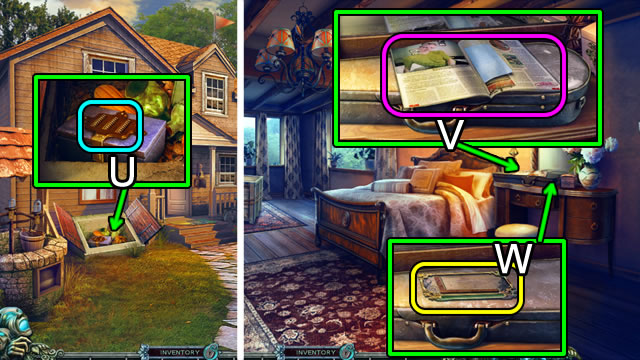
- Place the SPRING (U); take the HANDLE.
- Return to the Bedroom.
- Move the magazine (V); add the MUSICAL NOTE (W) to open a puzzle.

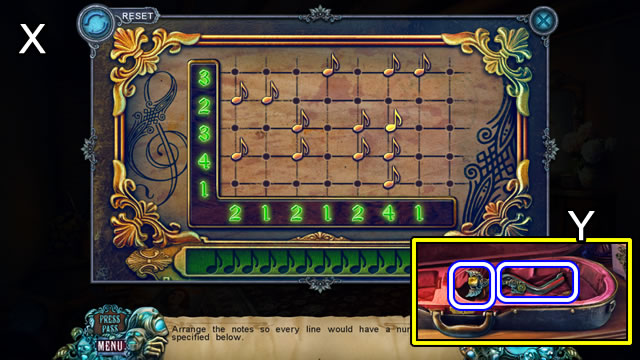
- Solution (X).
- Get the HAND CRANK and KEY (Y).
- Return to the Dining Room.

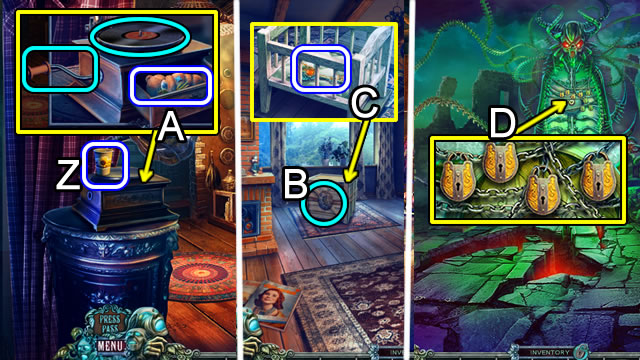
- Pick up the CUP (Z).
- Put the PHONOGRAPH RECORD and HAND CRANK; use the crank and take the BEAR (A).
- Return to the Bedroom.
- Place the BEAR (B). Take a KEY (C).
- Walk down.
- Insert the KEYS in the yellow locks (D); enter the new door and speak with Jack.
Chapter 7: Green and Red Keys

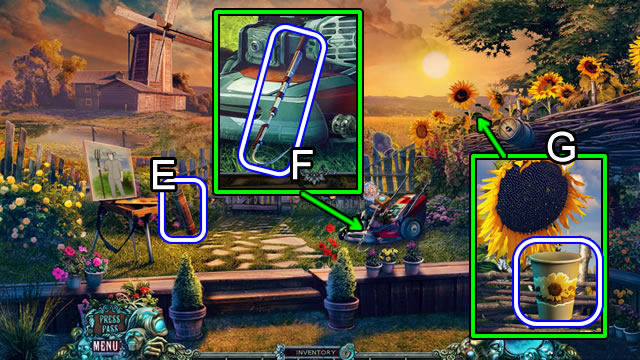
- Get the SEALED TUBE (E).
- Pick up the GAFF HOOK (F).
- Put the CUP (G); receive SUNFLOWER SEEDS.
- Return to the Bedroom.

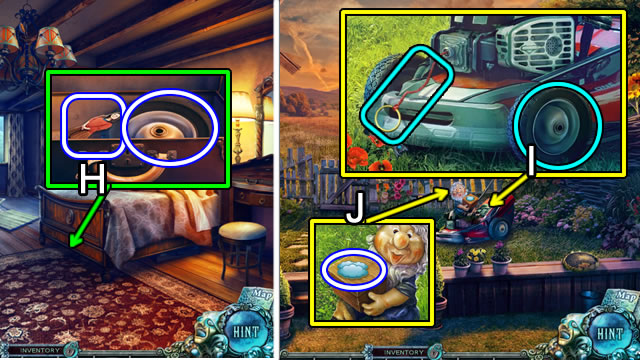
- Use the GAFF HOOK to retrieve the suitcase; take MARTHA and the WHEEL (H).
- Return to the Backyard.
- Attach the HANDLE and WHEEL (I); pull the handle.
- Take the CLOUD (J).
- Play the HOP; receive a WEIGHT.

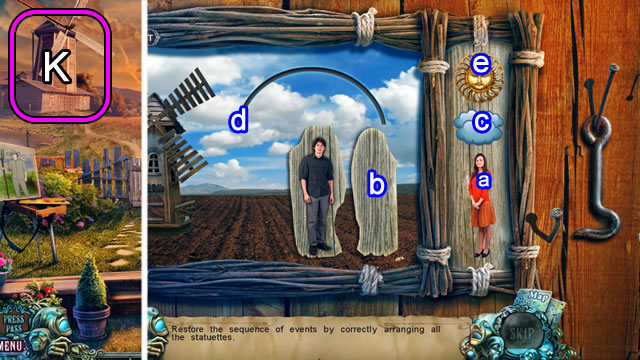
- Select the Mill (K) for a puzzle.
- Place MARTHA and the CLOUD on the side panel.
- Solution: a-b, e-d, c-d.
- Take a KEY.
- Enter the Mill.

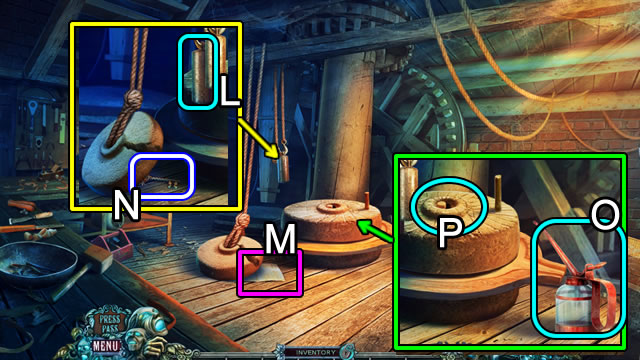
- Attach the WEIGHT (L); read the note (M); take the KEY (N).
- Put the OIL CAN (O); pour the SUNFLOWER SEEDS (P); take the OIL.

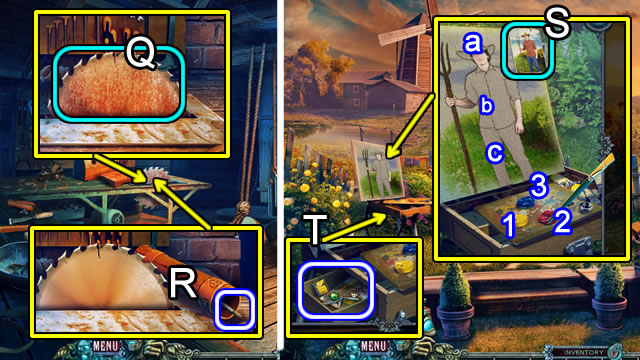
- Use the OIL (Q).
- Open the SEALED TUBE (R); take the BRUSH.
- Walk down.
- Attach JACK’S PHOTO (S) and place the BRUSH.
- Complete the painting: 1-a, 2-b, 3-c.
- Read the note; take the SECTION OF PICTURE and KEY (T).
- Walk up.

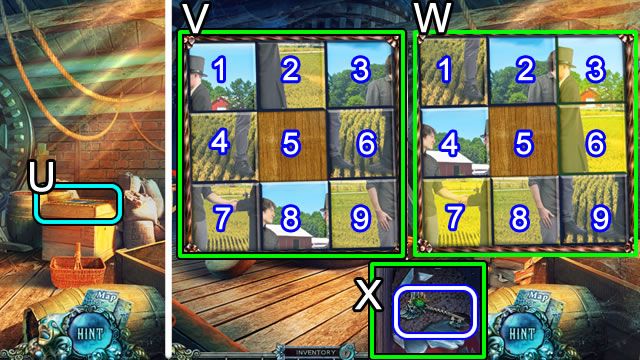
- Add the SECTION OF PICTURE (V) to open a puzzle.
- Solution part 1 (V): 8-9-6-3-2-1-4-5-6-3-2-5.
- Solution part 2 (W): 4-1-2-5-8-7-4-5-8-9.
- Take the KEY(X).
- Walk down twice.
- Use the four green KEYS in the green locks.
- Go through the new door.

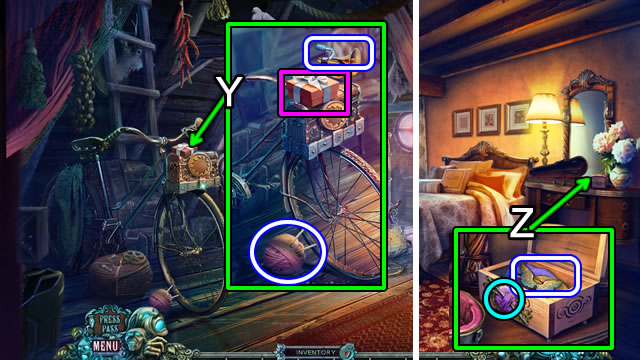
- Open the box and read the note.
- Take the BICYCLE HORN WITHOUT BULB; pick up the KNITTING (Y).
- Return to the Bedroom.
- Play the HOP; receive a DOVE.
- Place the KNITTING; take the WINGS (Z).
- Return to the Attic.

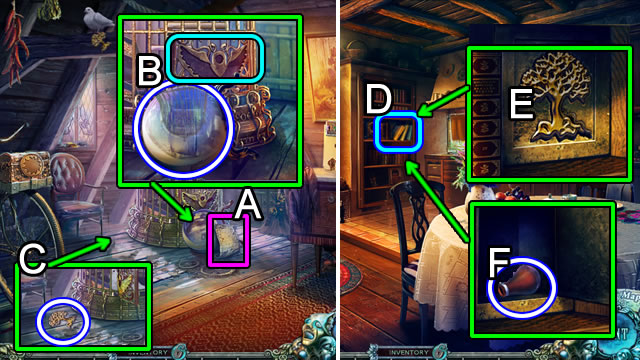
- Read the note (A).
- Take the CRYSTAL BALL; place the WINGS (B).
- Pick up the TREE (C).
- Return to the Dining Room.
- Move the books (D); insert the TREE (E); take the BULB (F).
- Return to the Mill.

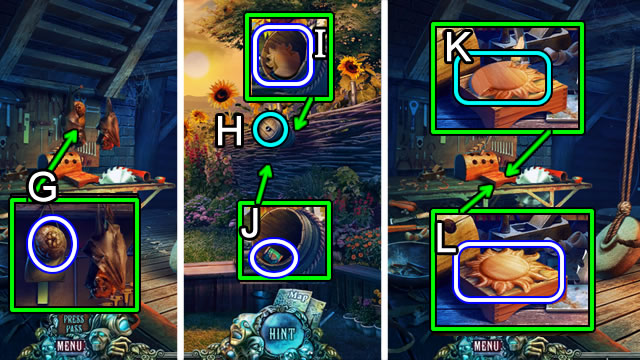
- Combine the BICYCLE HORN WITHOUT BULB and BULB (Inventory); get a BICYCLE HORN.
- Use the BICYCLE HORN (G); take the BARREL KNOB.
- Walk down.
- Use the BARREL KNOB (H) to open the barrel; take the WOODWORKING PIECE (I) and THREAD (J).
- Walk up.
- Place the WOODWORKING PIECE (K); take the SUN (L).
- Return to the Attic.

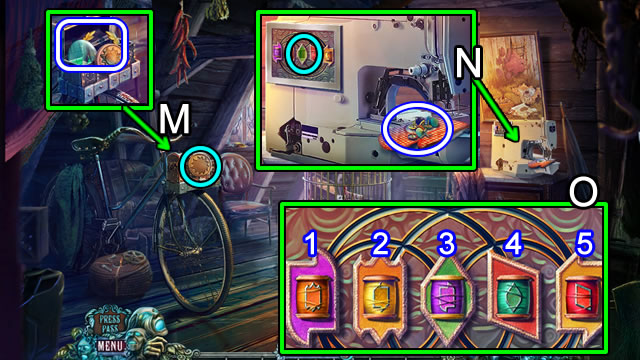
- Place the SUN; take the CHIP and LAUREL WREATH (M).
- Pick up the THUMBTACKS and add the THREAD (N) to open a puzzle (O).
- Solution: 1-3, 3-5, 1-3, 1-4, 1-3, 2-5.
- Take the POTHOLDER.
- Return to the Mill.

- Use the POTHOLDER to retrieve the CAP (P).
- Walk down.
- Place the CAP (Q); take the SIGNET and CARABINER.
- Play the HOP (R); receive SOLVENT.
- Return to the Attic.

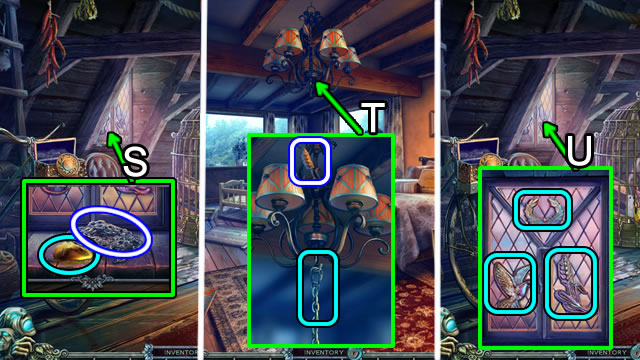
- Use the SOLVENT; attach the CARABINER; take the CHAIN (S).
- Return to the Bedroom.
- Hook the CHAIN to the chandelier and pull; take the SPRIG ORNAMENT (T).
- Return to the Attic.
- Insert the LAUREL WREATH, DOVE and SPRIG ORNAMENT (U); speak to Jack; take the red KEY.
- Walk down.

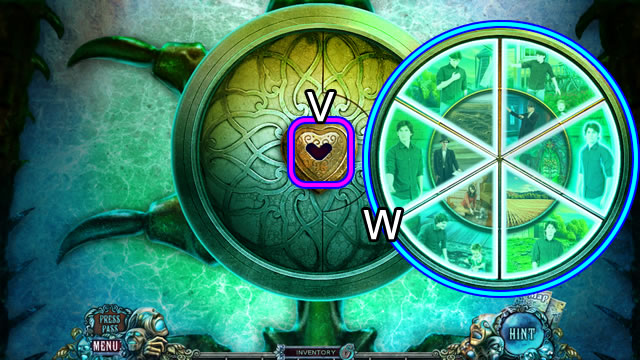
- Use the red KEY (V) to trigger a puzzle.
- Solution (W).
- Speak to Jack; take the PICTURE LOCKET.
Chapter 8: The Summoning

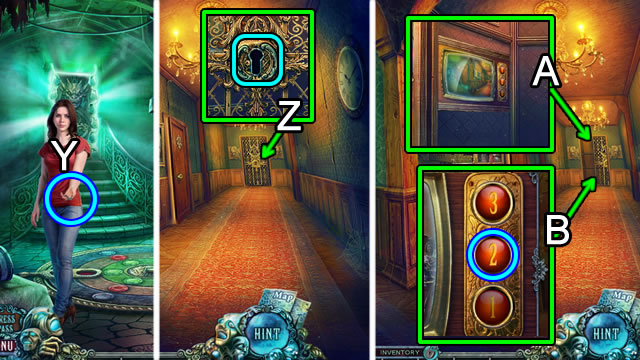
- Speak to the woman; take the KEY (Y).
- Go to the Hallway.
- Use the KEY (Z).
- Select the panel (A); press 2 (B).
- Speak to the apparition; play the HOP; receive a MEDAL.

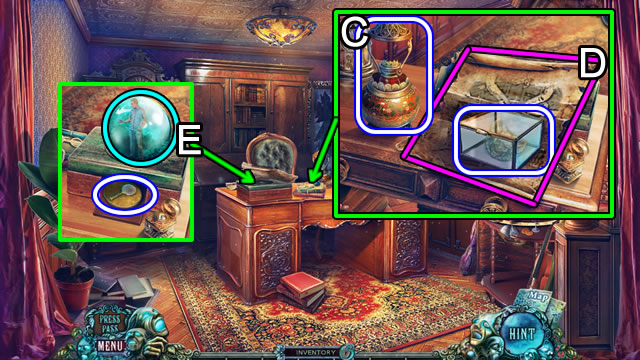
- Pick up the LAMP and GLASS BOX (C); move the blueprint (D); speak to the woman.
- Place the CRYSTAL BALL; take the MAGNIFIER (E).
- Walk down; press button 1.

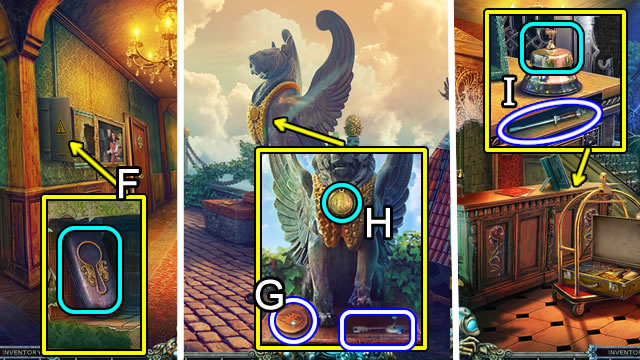
- Place the MAGNIFIER (F); take the INKWELL.
- Go to the Roof.
- Pick up the FIRE disc (G); add the MEDAL; take the GLASS-CUTTER and RECEPTION BELL (H).
- Combine the GLASS BOX and GLASS-CUTTER (Inventory); remove the DEMON BADGE.
- Return to the Lobby.
- Use the RECEPTION BELL to get a CHISEL (I).
- Return to the Boiler Room.
- Play the HOP; receive WAX.

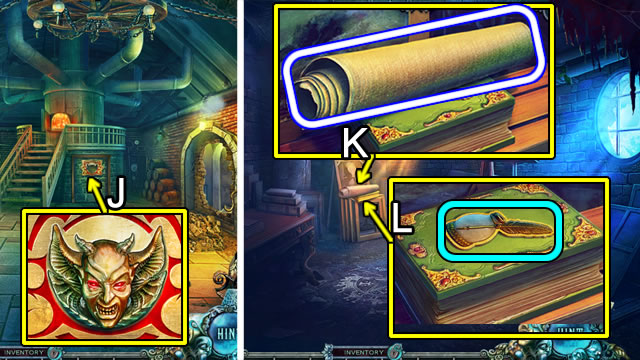
- Insert the DEMON BADGE (J).
- Enter the Secret Room; speak to the woman.
- Pick up the CANVAS (K).
- Use the INKWELL to get the SUNDIAL GNOMON (L).

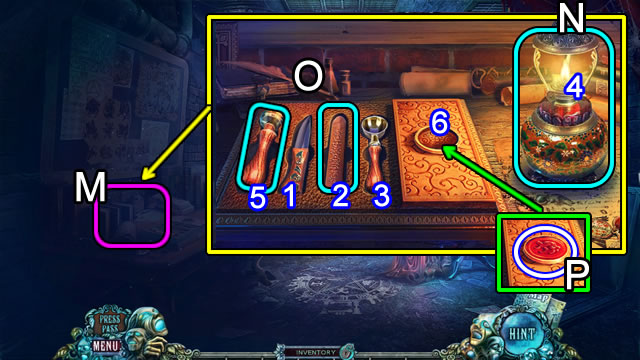
- Select the dark desk (M).
- Put down the LAMP (N).
- Add the SIGNET and WAX to the tray (O).
- Use the knife (1) to cut the wax (2). Put the cut wax in the spoon (3) and hold next to the lamp (4).
- Put the signet (5) in the melted wax (6) to create SEALING WAX (P).
- Return to Jack’s Office.

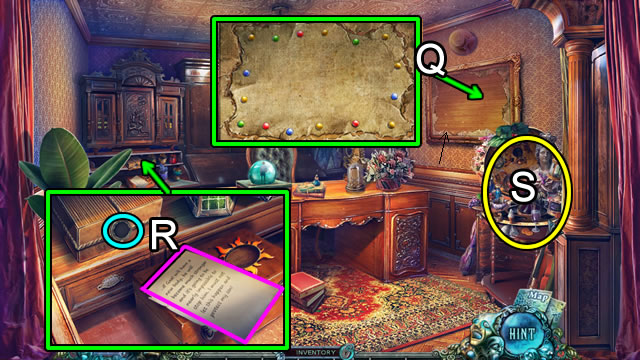
- Put up the CANVAS and THUMBTACKS (Q); take the DIARY.
- Read the note and use the SEALING WAX (R); take the SAM PHOTO.
- Play the HOP(S); receive a SUNDIAL PART.
- Return to the Roof.

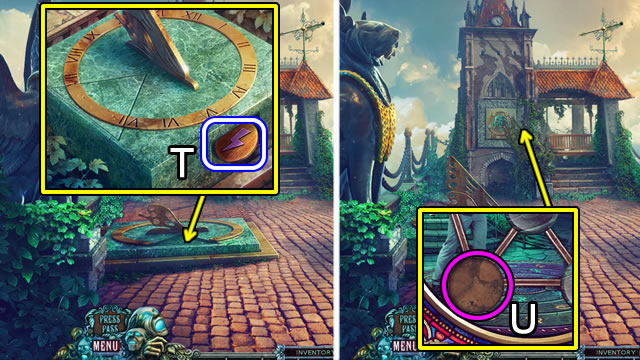
- Place the SUNDIAL GNOMON and SUNDIAL PART; take the LIGHTNING disc (T).
- Add the CHIP to the wall (U) to trigger a puzzle.

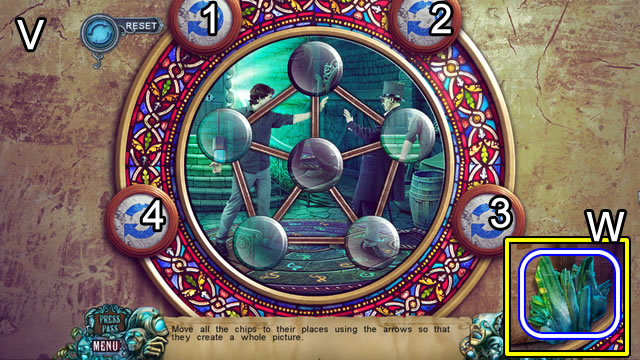
- Solution (V): 3×2-4-3×2-4-3-2.
- Take the MINERAL (W).
- Return to the office.

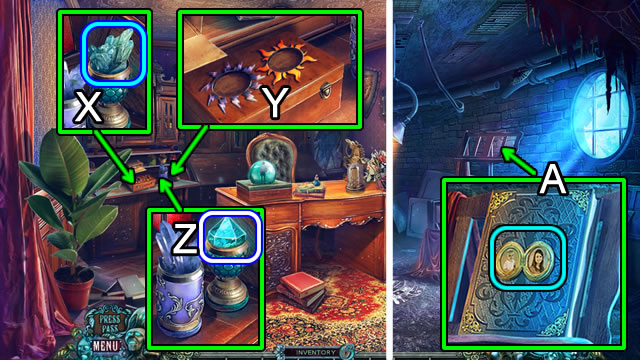
- Place the MINERAL (X) to trigger a fragment HOP for additional minerals.
- Insert the FIRE and LIGHTNING discs (Y); add the CHISEL.
- Select the hammer and chisel to create a FACETED CRYSTAL (Z).
- Return to the Secret Room.
- Combine the PICTURE LOCKET and SAM PHOTO (Inventory); get a PICTURE LOCKET WITH PHOTO.
- Place the DIARY; insert the PICTURE LOCKET WITH PHOTO (A) to open a puzzle.

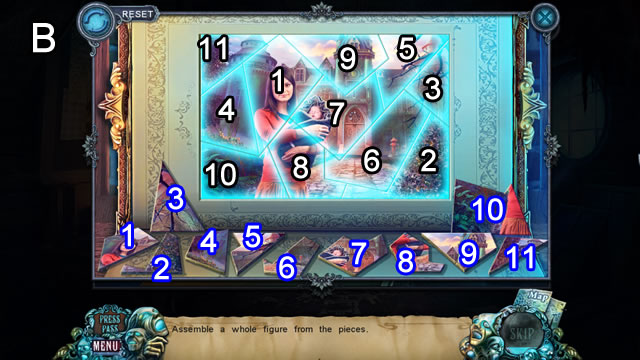
- Solution (B).
- Place the FACETED CRYSTAL; take a SUMMONER CRYSTAL.
- Walk down and right.

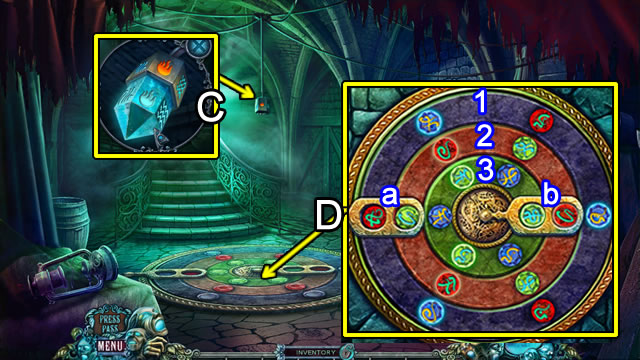
- Insert the SUMMONER CRYSTAL (C).
- Select the floor pattern to open a puzzle (D).
- Solution: 3-2-b-3×2-2×2-b-3×2-2-a-2-b-2-1×2-a-2×2-1×2-a.
- Congratulations. You have completed Fear For Sale: The 13 Keys.





 The Fall Trilogy Chapter 2: Reconstruction Walkthrough, Guide, & Tips
 Gummy Drop! Tips and Tricks, Guide, & Tips
 Sea of Lies: Tide of Treachery Walkthrough, Guide, & Tips
 Fear for Sale: Sunnyvale Story Walkthrough, Guide, & Tips
 Mystery Trackers: Blackrow's Secret Walkthrough, Guide, & Tips