Where Angels Cry: Tears of the Fallen Walkthrough, Guide, & Tips
Where Angels Cry: Tears of the Fallen Walkthrough

Welcome to the Where Angels Cry: Tears of the Fallen Walkthrough
Do you have the courage to stop the inquisitor?
Whether you use this document as a reference when things get difficult or as a road map to get you from beginning to end, we’re pretty sure you’ll find what you’re looking for here.
This document contains a complete Where Angels Cry: Tears of the Fallen game walkthrough featuring annotated screenshots from actual gameplay!
We hope you find this information useful as you play your way through the game. Use the walkthrough menu below to quickly jump to whatever stage of the game you need help with.
Remember to visit the Big Fish Games Forums if you find you need more help. Have fun!
This walkthrough was created by Amanda Barrera, and is protected under US Copyright laws. Any unauthorized use, including re-publication in whole or in part, without permission, is strictly prohibited.
General Tips
- This is the official guide for Where Angels Cry: Tears of the Fallen.
- This guide will not show when you have to zoom into a location; the screenshots will show each zoom scene.
- Hidden-object puzzles are referred to as HOPs. This guide will not show screenshots of the HOPs, however, it will mention when an HOP is available and the inventory item you’ll collect from it.
- Use the Map to fast travel to a location.
Chapter 1: The Cardinal’s Mission

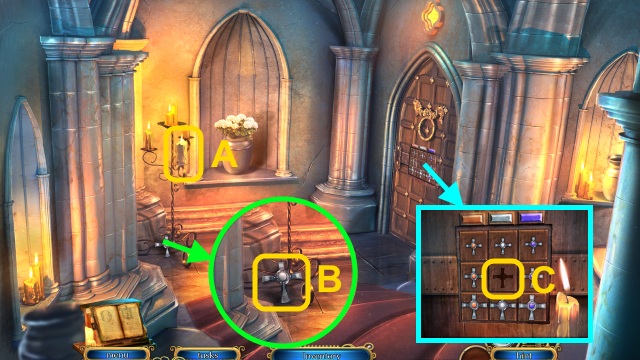
- Take the BURNING CANDLE (A).
- Take the MALTESE CROSS (B).
- Place the MALTESE CROSS (C); examine the door for a mini-game.
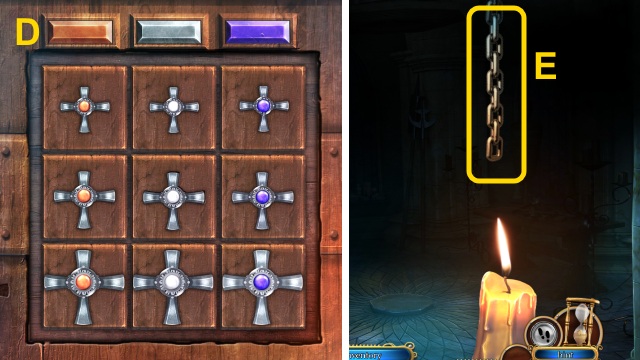
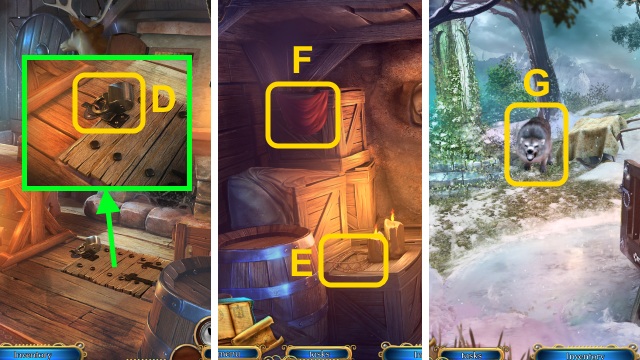
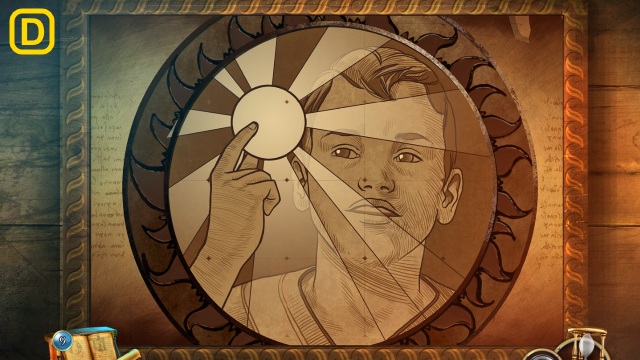
- Solution (D).
- Walk right.
- Pull the chain (E).
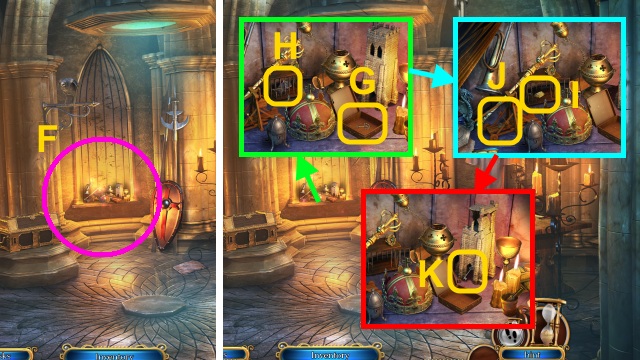
- Play the HOP to receive the ROCK (2/3) and DAGGER (F).
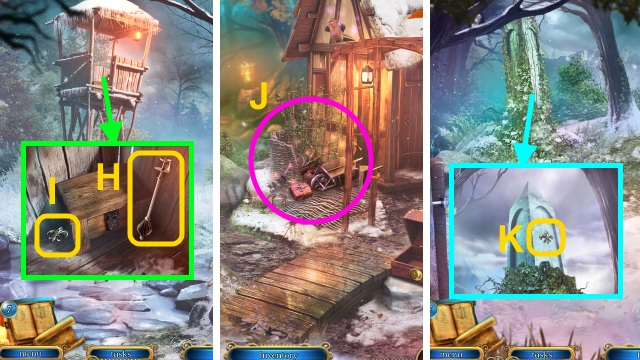
- Use the DAGGER; take the CAGE KEY (G).
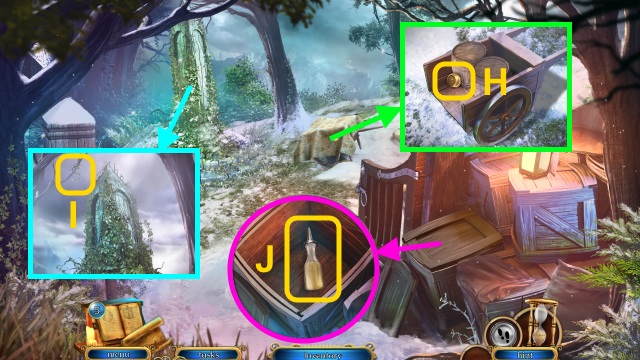
- Use the CAGE KEY (H); open the cage.
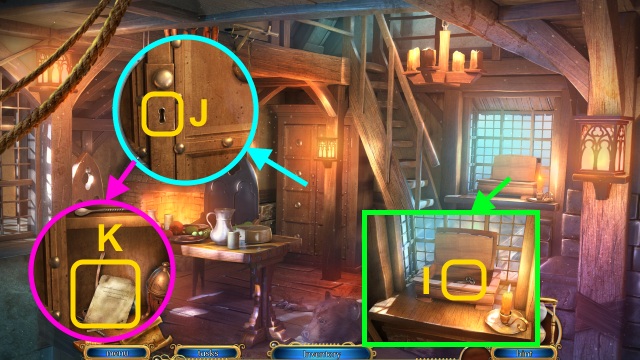
- Take the ROCK (3/3) (I).
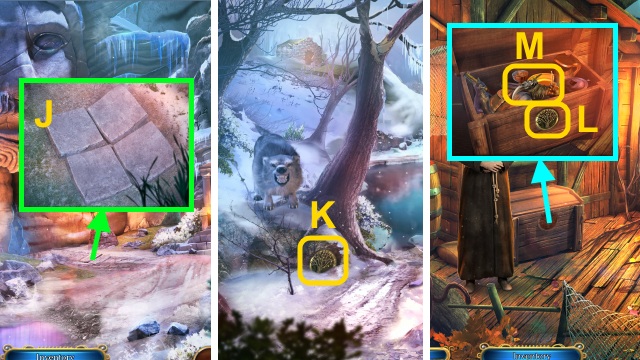
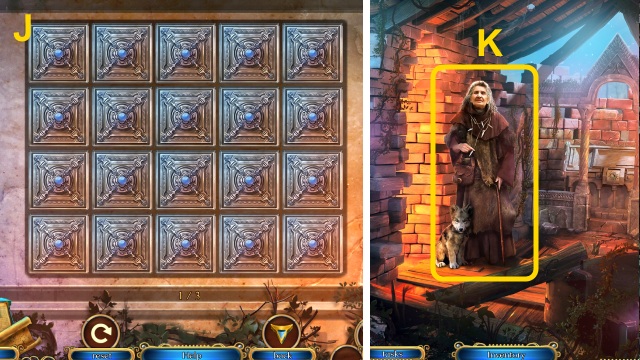
- Place the ROCK (3/3) (J); fire the catapult.
- Take the IRON KEY (1/2) (K).
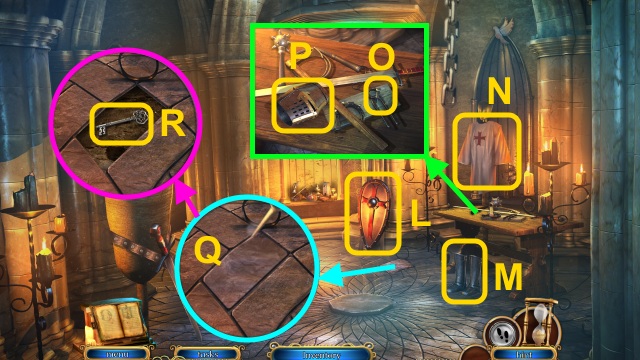
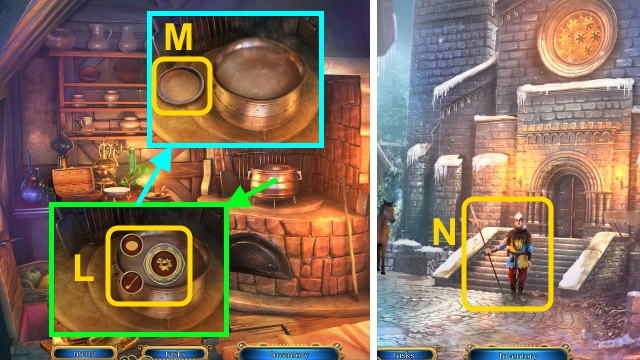
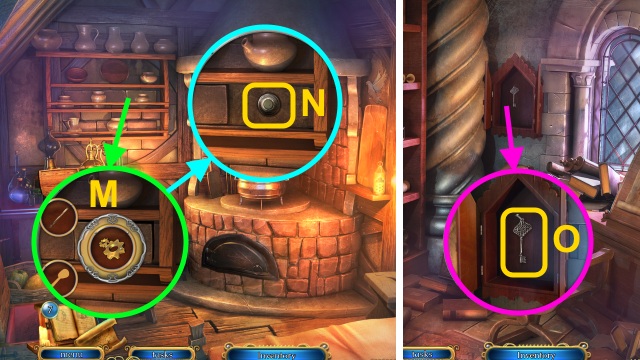
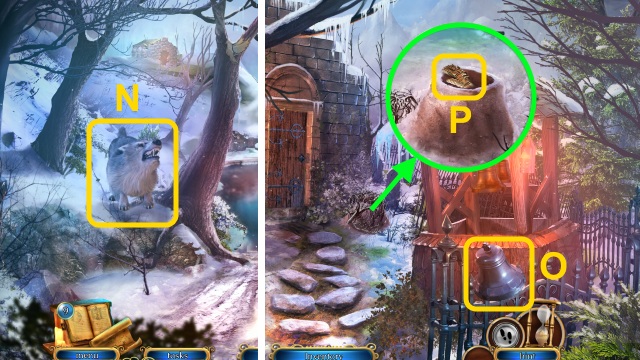
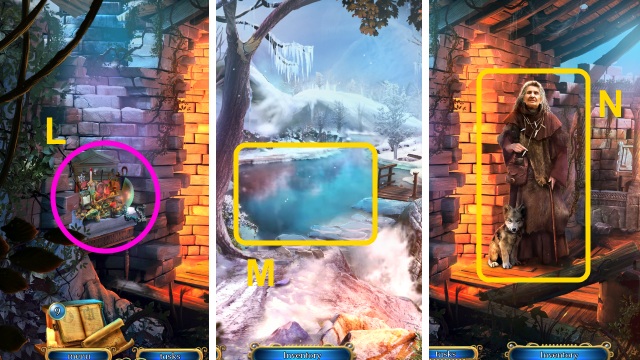
- Take the SHIELD (L), BOOTS (M), and TUNIC (N).
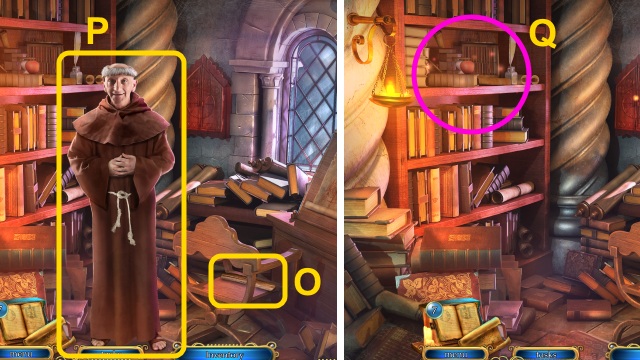
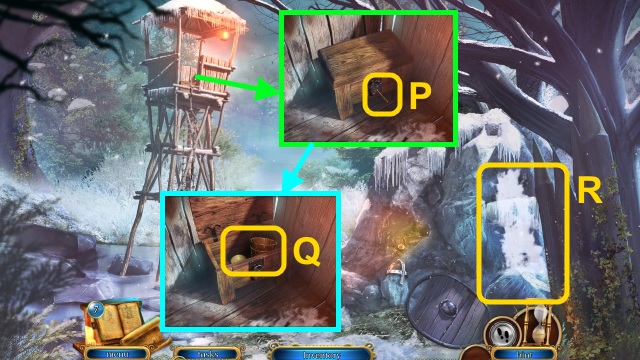
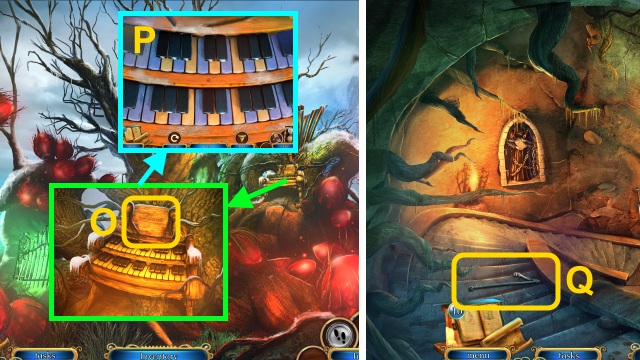
- Take the LARGE NAIL (O) and HELM (P).
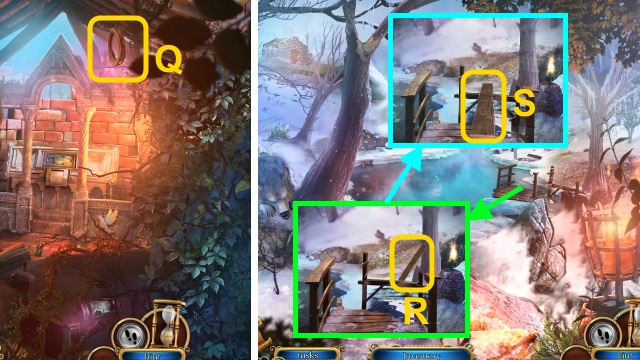
- Use the LARGE NAIL (Q); move the brick.
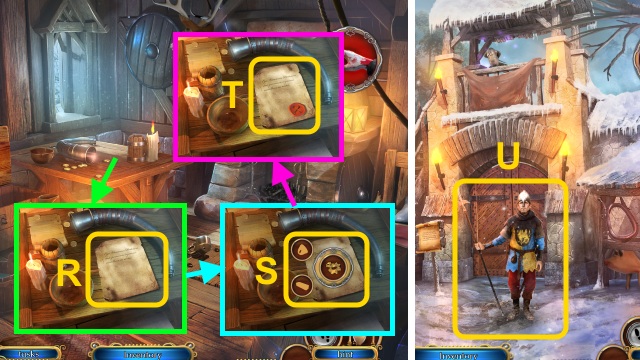
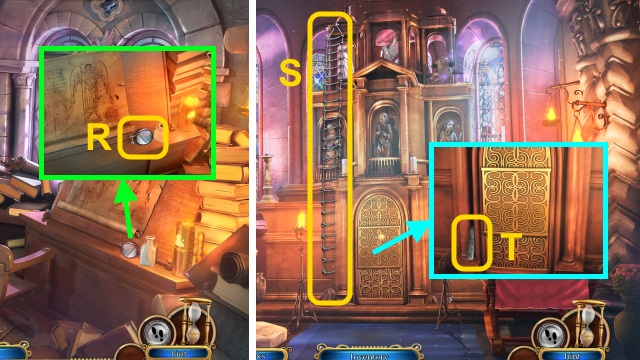
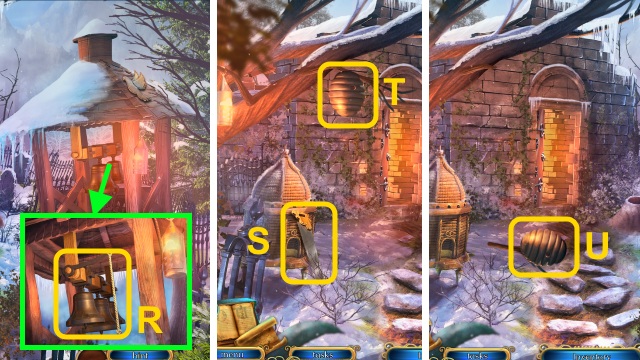
- Take the IRON KEY (2/2) (R).
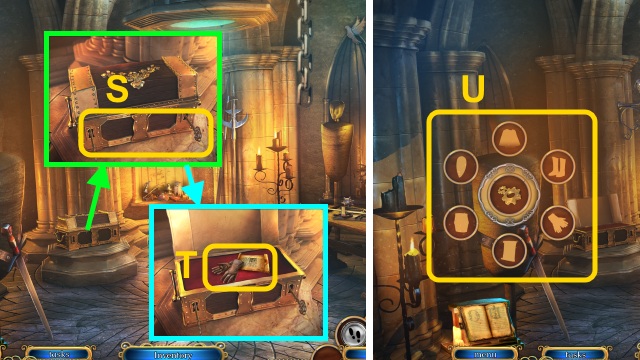
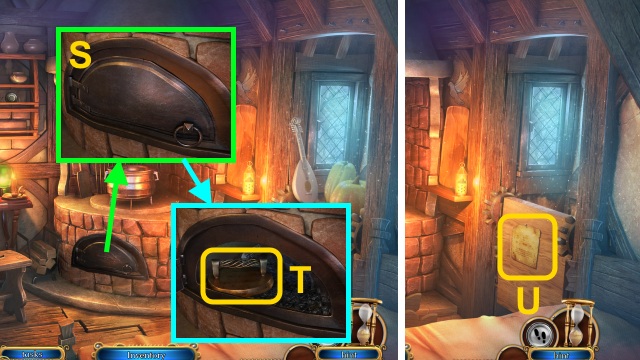
- Use the IRON KEY (2/2) (S); open the chest.
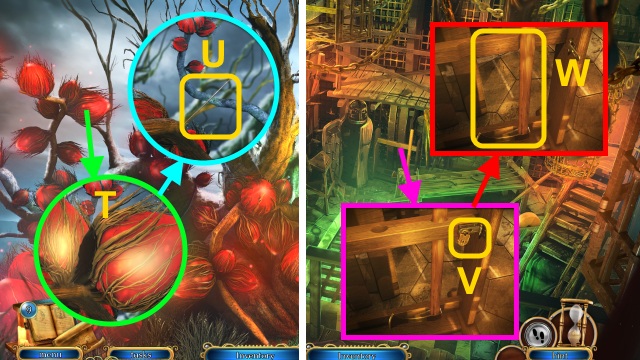
- Take the GLOVES and CARDINAL’S PERMISSION (T).
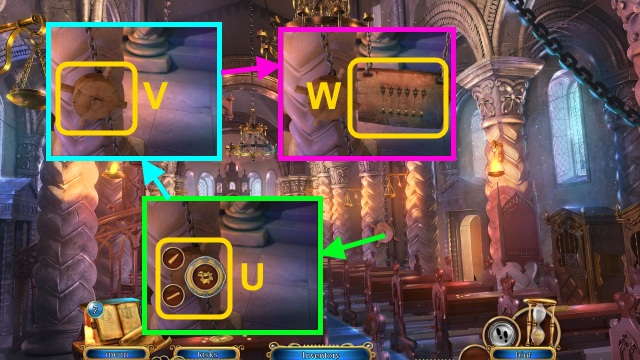
- Place the HELM, SHIELD, GLOVES, TUNIC, BOOTS, and CARDNIAL’S PERMISSION (U).
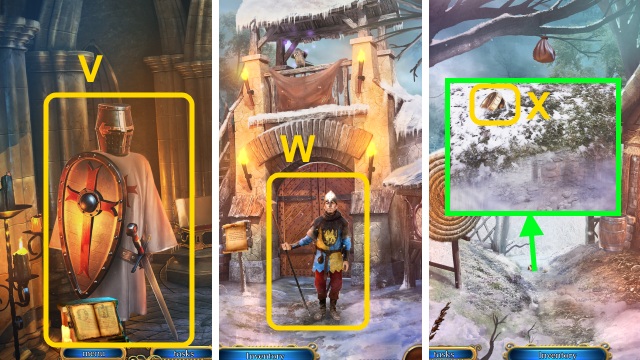
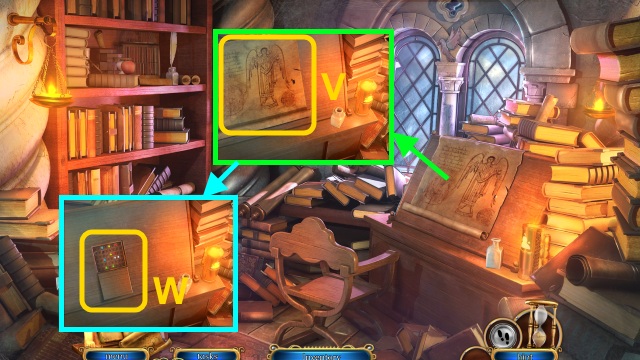
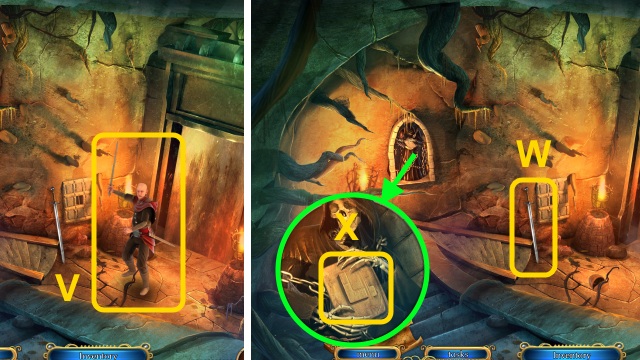
- Take the Equipment (V).
- Talk to the soldier (W); give the CARDNIAL’S PERMISSION.
- Walk left.
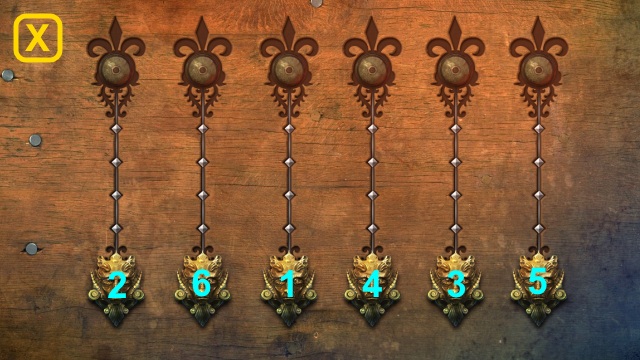
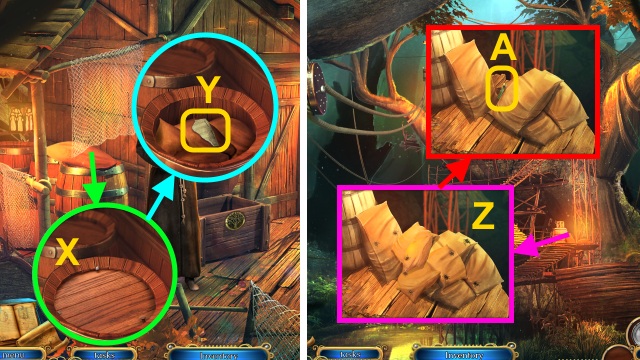
- Take the SEALING RING (X).
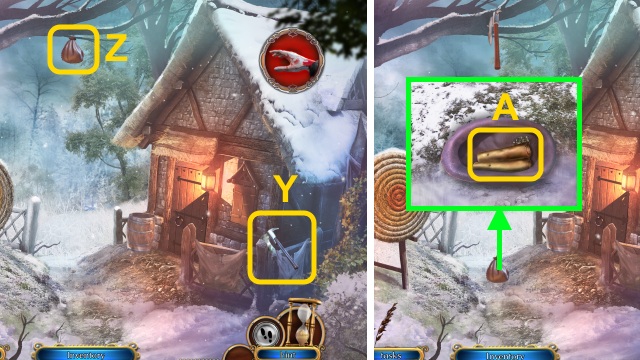
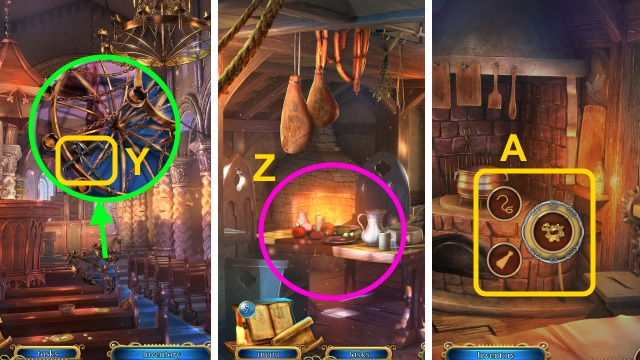
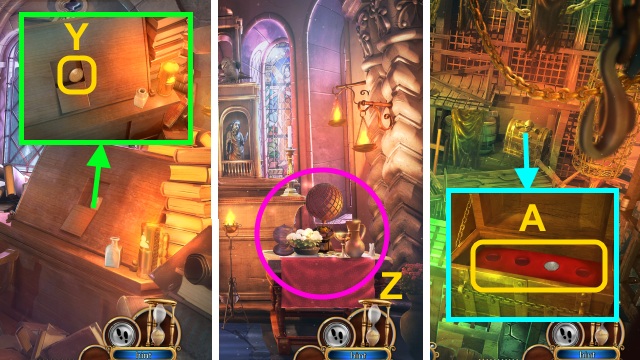
- Take the THROWING AXE (Y).
- Use the THROWING AXE (Z).
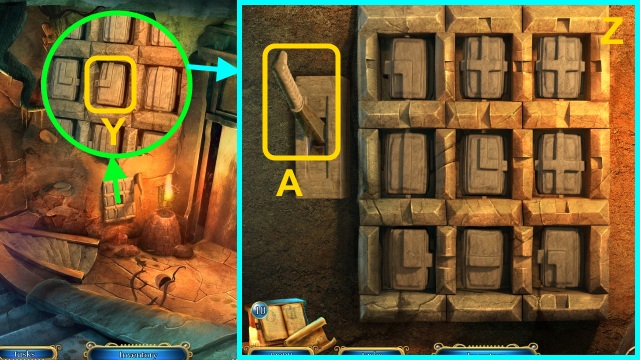
- Open the bag; take the Map and CABIN KEY (A).
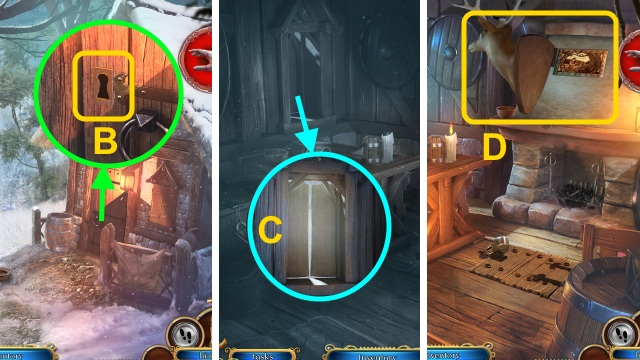
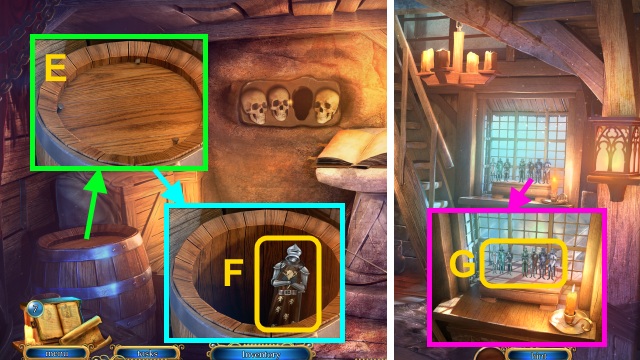
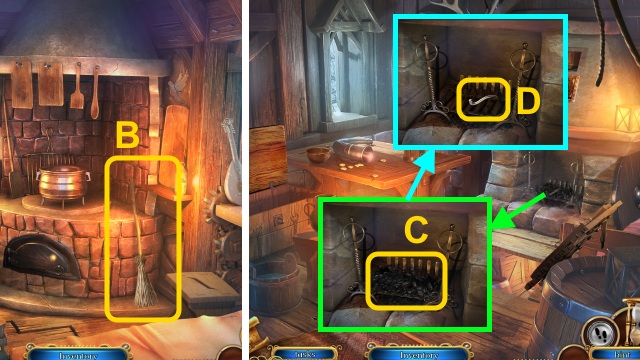
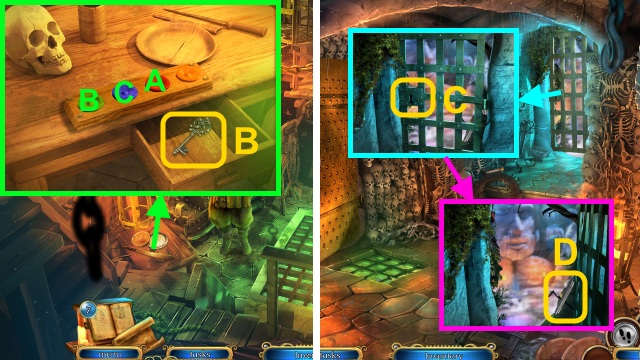
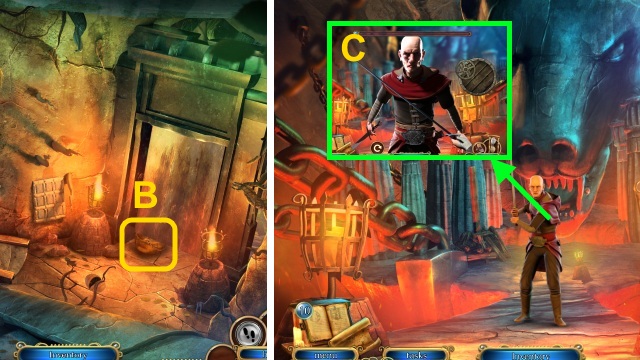
- Use the CABIN KEY (B).
- Walk right.
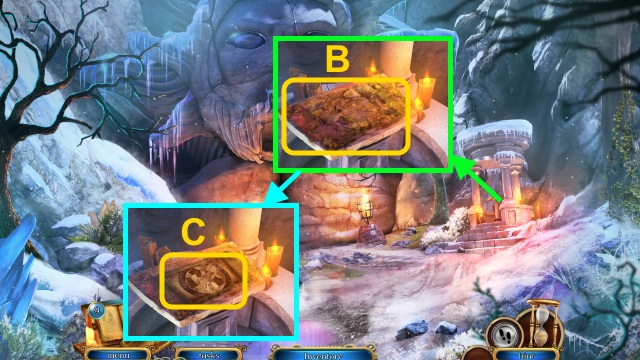
- Open the window (C).
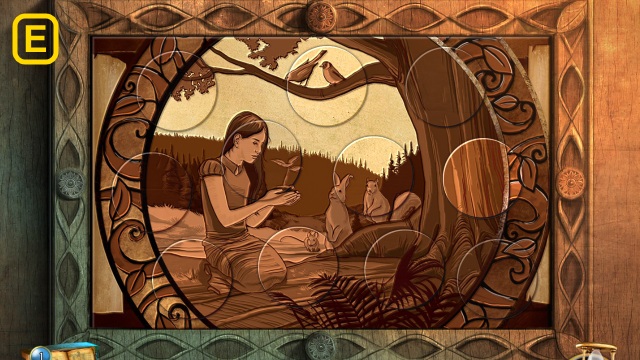
- Move the deer head; examine the frame for a mini-game (D).
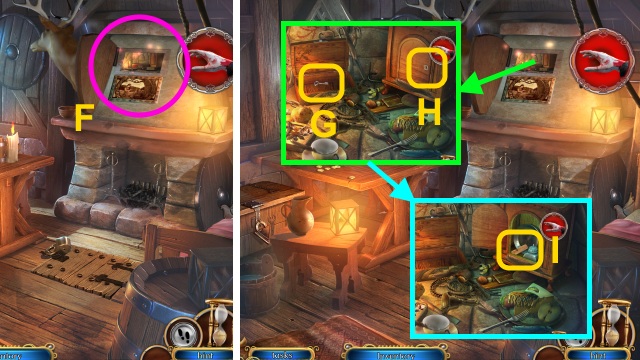
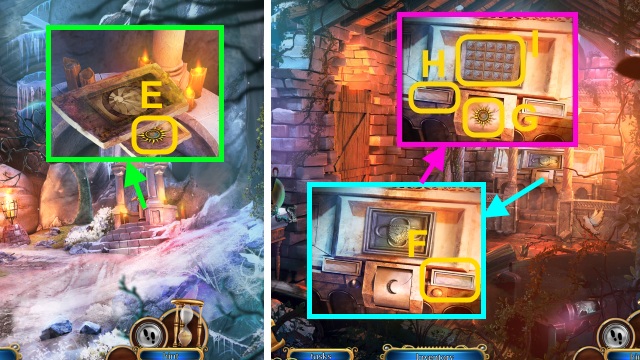
- Examine the wall for an HOP (F).
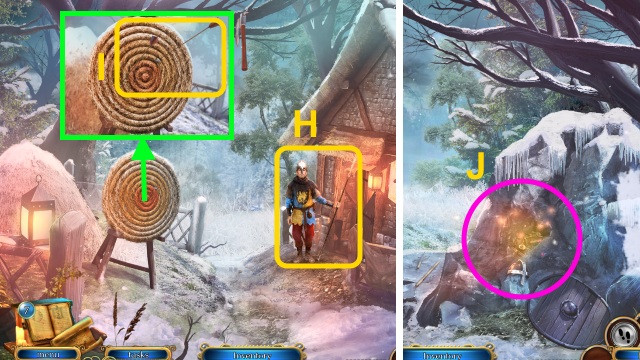
- Open the box; take the SMALL IRON KEY (G).
- Use the SMALL IRON KEY (H); take the DOG WHISTLE (I).
- Walk down, then forward.
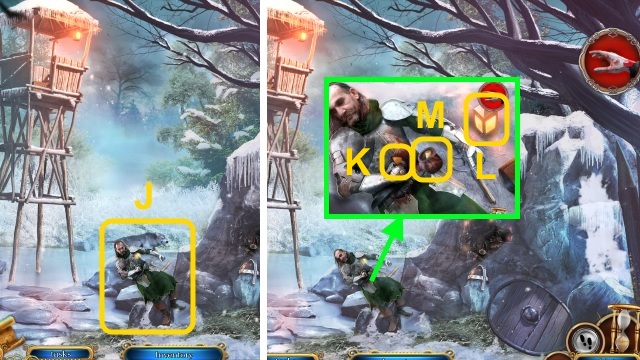
- Use the DOG WHISTLE (J); talk to Jeraldo.
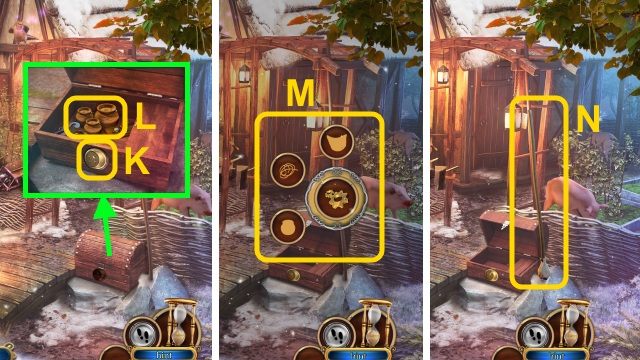
- Take the TRIANGLE MEDALLION (K) and LIT LANTERN (L).
- Open the pouch; take the BANDAGE (M).
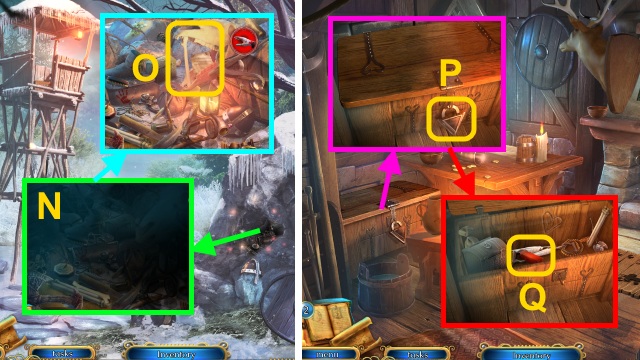
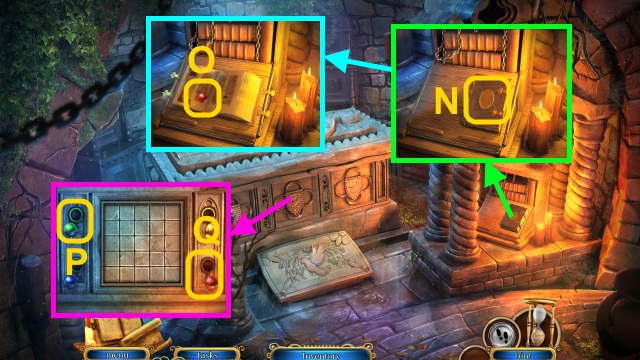
- Use the LIT LANTERN; play the HOP to receive the BONE (N).
- Use the BONE; take the UNCERTIFIED PERMISSION (O).
- Walk down, then right.
- Place the TRIANGLE MEDALLION (P); open the chest.
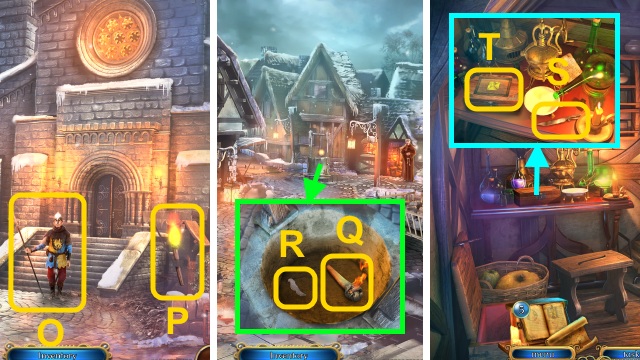
- Move the objects; take the WAX STICK (Q).
- Place the UNCERTIFIED PERMISSION (R); place the WAX STICK and SEALING RING (S).
- Take the SHERIFF’S ENTRANCE PERMISSION (T).
- Walk down twice.
- Give the SHERIFF’S ENTRANCE PERMISSION (U).
- Walk forward.
Chapter 2: Portonero Village
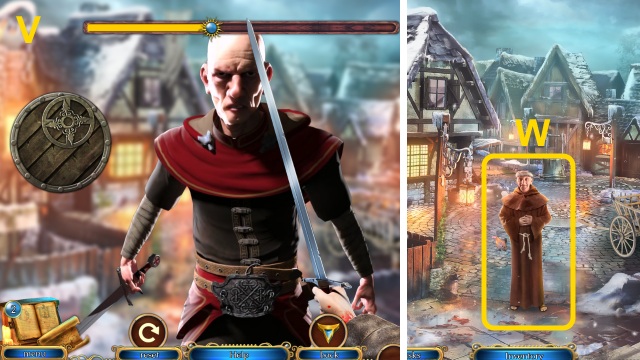
- Play the mini-game; block the attacks (V).
- Talk to Ramon (W).
- Enter Ramon’s House.
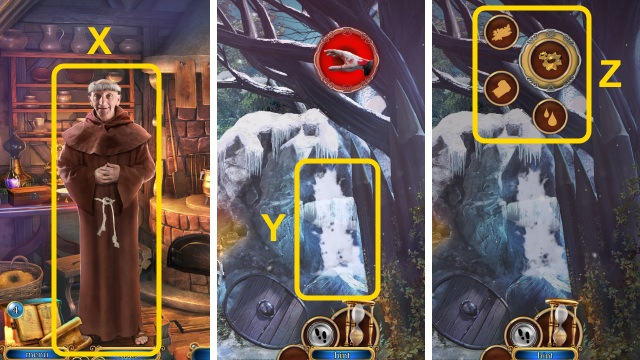
- Talk to Ramon (X); receive the HEALING HERBS.
- Go to the Wolf’s Den.
- Take the WATER (Y).
- Use the BANDAGE, HEALING HERBS, and WATER (Z).
- Go to the Village Square, then left.
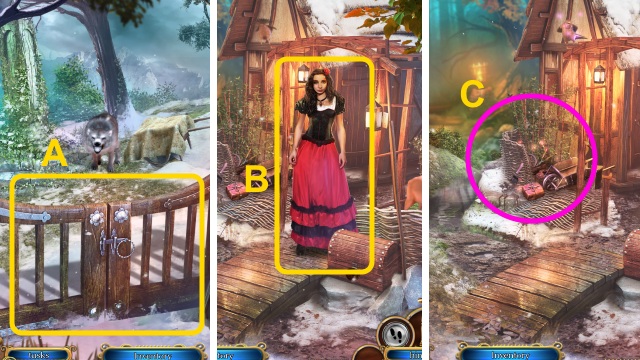
- Open the gate (A).
- Walk right.
- Talk to Dolores (B); receive the TRAPDOOR KEY.
- Play the HOP to receive the RAW MEAT (C).
- Go to the Cabin Inside.
- Use the TRAPDOOR KEY (D); open the trapdoor.
- Go forward.
- Take the STRING (E) and CLOTH (F).
- Go to the Path.
- Give the RAW MEAT (G).
- Remove the cloth; take the MOON SYMBOL (H).
- Take the WIRE (I).
- Open the crate; take the OIL (J).
- Walk right.
- Place the MOON SYMBOL (K); open the chest.
- Take the HONEY (L).
- Use the STRING, HONEY, and CLOTH (M); take the STICKY STICK (N).
- Go to the Village Square, then right.
- Talk to the soldier (O); take the TORCH (P).
- Walk down.
- Use the TORCH (Q).
- Use the STICKY STICK (R); receive the IRON DOVE.
- Enter Ramon’s House.
- Take the KNIFE (S); examine the box for a mini-game (T).
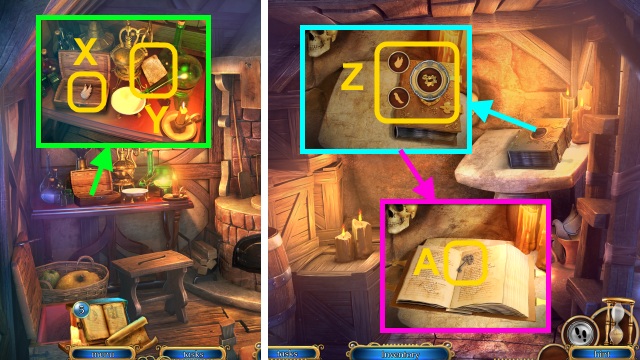
- Take the IRON WINGS (X) and Letter from the Inquisitor (Y).
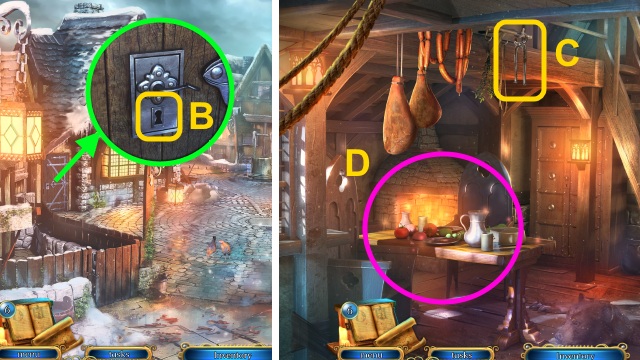
- Go to the Cabin’s Basement.
- Place the IRON DOVE and IRON WINGS (Z).
- Turn the page; take the LOCKED HOUSE SPARE KEY (A).
- Go to the Village Square.
- Use the LOCKED HOUSE SPARE KEY (B); open the door.
- Walk left.
- Take the PLIERS (C).
- Play the HOP to receive the BOWL (D).
- Go to the Cabin’s Basement.
- Use the PLIERS (E); receive the NAILS.
- Use the KNIFE; take the FIGURINE (F).
- Go to Jokin’s House.
- Place the FIGURINE (G); examine the box for a mini-game.

- Take the CABINET KEY (I).
- Use the CABINET KEY (J); open the cabinet.
- Take the Letter from the Inquisitor, LADLE, and BOLT (K).
- Go to Ramon’s house.
- Use the LADLE and BOWL (L); take the WARM SOUP (M).
- Walk down, then right.
- Give the WARM SOUP (N).
- Walk forward, then right.
- Take the WOODEN WEDGE (O).
- Talk to Ramon (P).
- Play the HOP to receive the CROSSBOW PART (Q).
- Take the MIRROR (R).
- Walk down, then forward.
- Take the ROPE LADDER (S).
- Take the IRON WEDGE (T).
- Walk down.
- Use the WOODEN WEDGE and IRON WEDGE (U); turn the mechanism (V).
- Examine the board for a mini-game (W).
- Take the HOOK (Y).
- Go to Jokin’s House.
- Play the HOP to receive the SWEEPER (Z).
- Go to Ramon’s House.
- Use the SWEEPER and WIRE (A).
- Take the BROOM (B).
- Go to the Cabin Inside.
- Use the BROOM (C); take the CROSSBOW TRIGGER (D).
- Go forward.

- Place the CROSSBOW PART, OIL, and CROSSBOW TRIGGER (E).
- Take the CROSSBOW (F).
- Walk down twice, then forward.
- Use the ROPE LADDER, HOOK, and CROSSBOW (G).
- Take the MACE (H) and FLORE DE LIS (1/2) (I).
- Go to Dolores’ House.
- Play the HOP to receive the SHEARS (J).
- Walk down.
- Use the SHEARS; take the FLORE DE LIS (2/2) (K).
- Go to the Church Ship.
- Place the FLORE DE LIS (2/2); open the door (L).
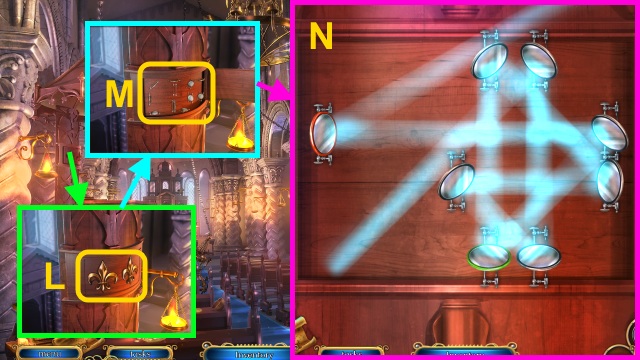
- Place the MIRROR (M); examine the panel for a mini-game.
- Solution (N).
- Use the MACE (O); pull the lever (P).
- Walk forward.
- Examine the altar for a mini-game (Q).
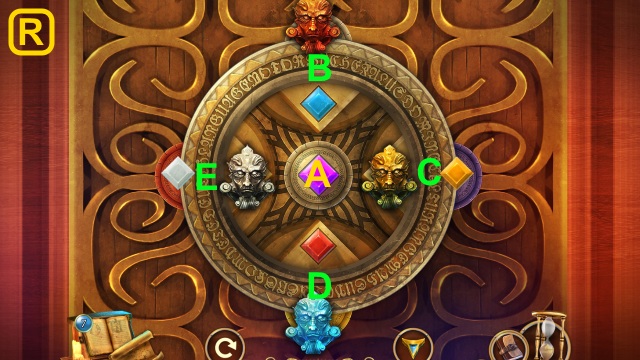
- Solution (R): Ax3, B, D, Ax3, C, E, Ax3.
- Walk forward.
Chapter 3: The Dungeons
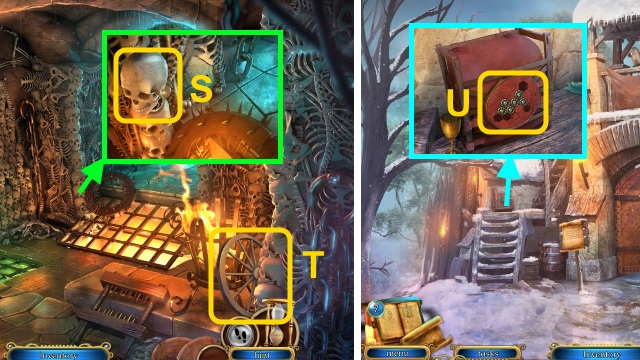
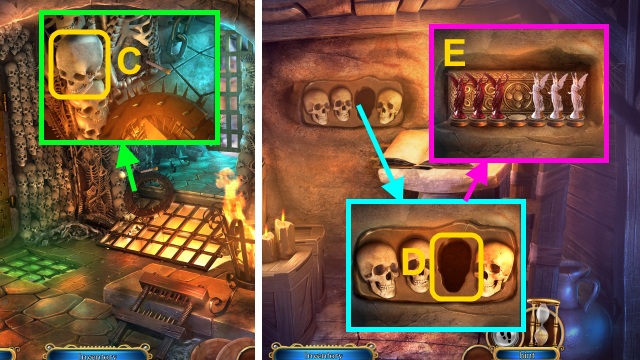
- Examine the skull (S); take the IRON MEDALLION.
- Take the RIMS (T).
- Go to the Village Gates.
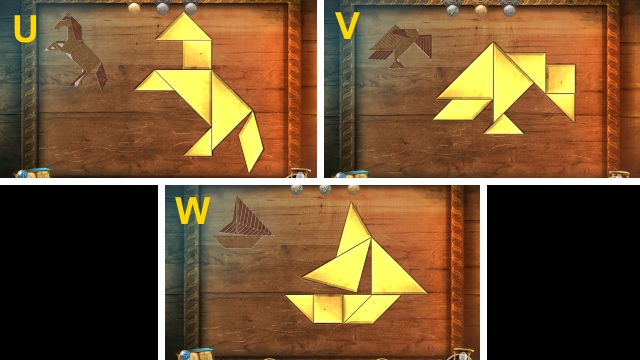
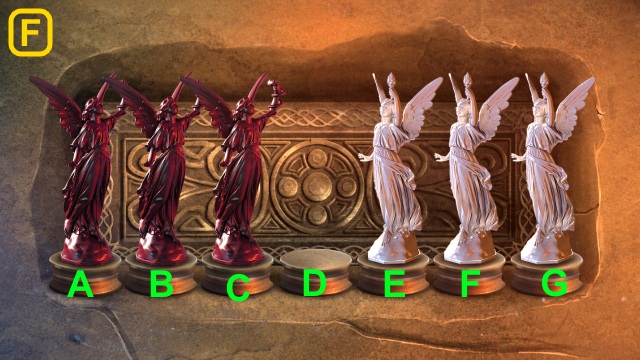
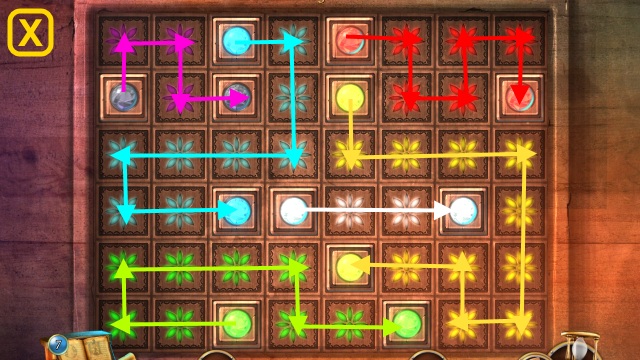
- Place the IRON MEDALLION (U); examine the board for a mini-game.
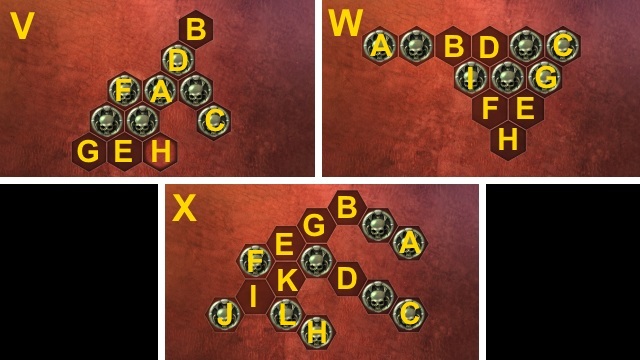
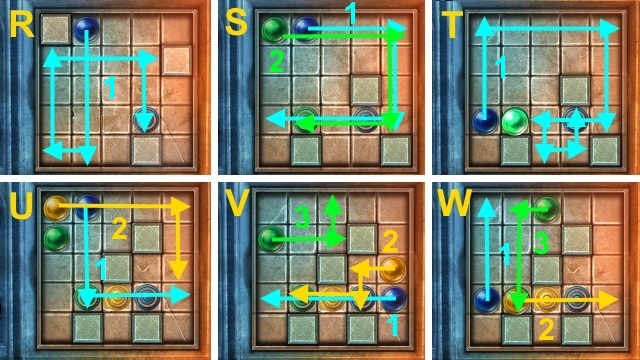
- Solution (V): (A-B)(C-D)(B-A)(A-E)(F-G)(G-H).
- Solution (W): (A-B)(C-D)(D-E)(B-F)(G-H)(H-I).
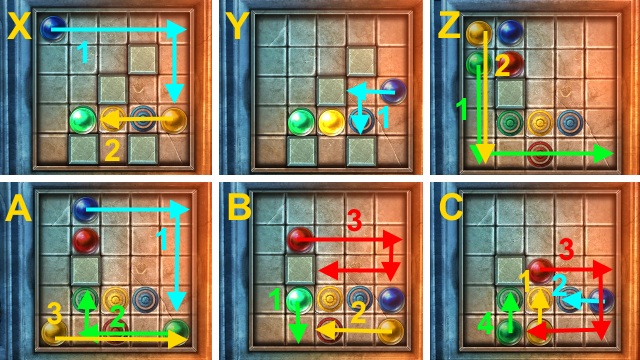
- Solution (X): (A-B)(C-D)(D-E)(F-G)(B-E)(H-I)(J-K)(E-L).
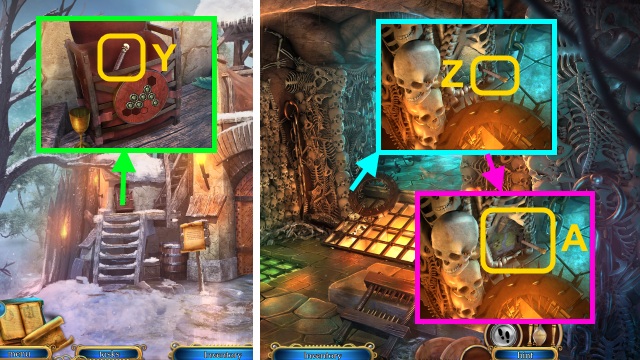
- Take the SKULL DAGGER (Y).
- Go to the Dungeons.
- Place the SKULL DAGGER (Z); examine it.
- Examine the image for a mini-game (A).
- Solution (B): A-B-G-A-G-E-G-E-G-D-G-D-G-F-G-F-G-C-G-B-C.
- Take the SKULL (C).
- Go to the Cabin’s Basement.
- Place the SKULL (D); examine it.
- Examine the wall for a mini-game (E).
- Solution (F): E-C-B-D-F-G-E-C-A-B-D-F-E-C-D.
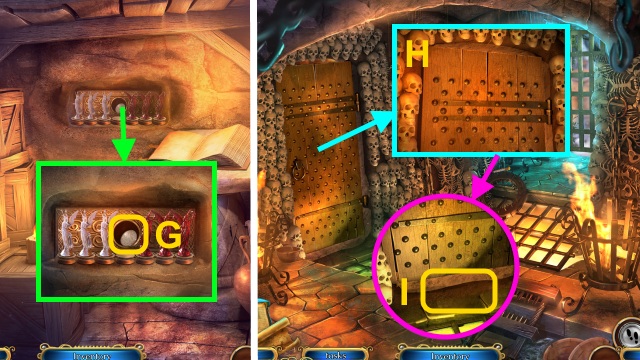
- Take the SILVER COIN (G).
- Go to the Dungeons.
- Examine the door (H).
- Give the SILVER COIN (I).
- Walk left.
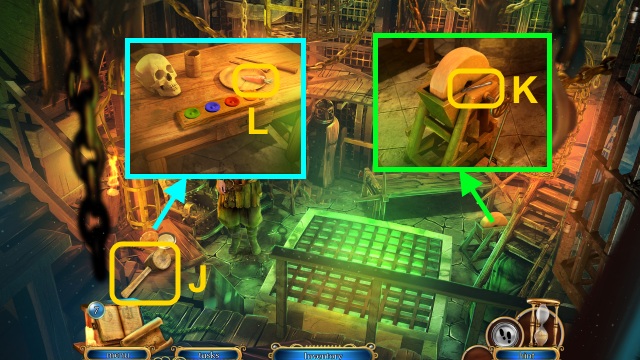
- Take the WOODEN HAMMER (J).
- Take the CHISEL (K).
- Take the CARROT (L).
- Go to Ramon’s House.
- Move the jar; use the WOODEN HAMMER and CHISEL (M).
- Press the button (N).
- Go to Ramon’s Chamber.
- Take the OUTPOST CHEST KEY (O).
- Go to the Wolf’s Den.
- Use the OUTPOST CHEST KEY (P); open the chest.
- Take the BUCKET and GOLDEN COIN (Q).
- Use the BUCKET (R); receive the BUCKET OF WATER.
- Go to Ramon’s House.
- Open the door (S).
- Pour the BUCKET OF WATER; turn the HANDLE (T).
- Take the Combination (U).
- Go to Ramon’s Chamber.
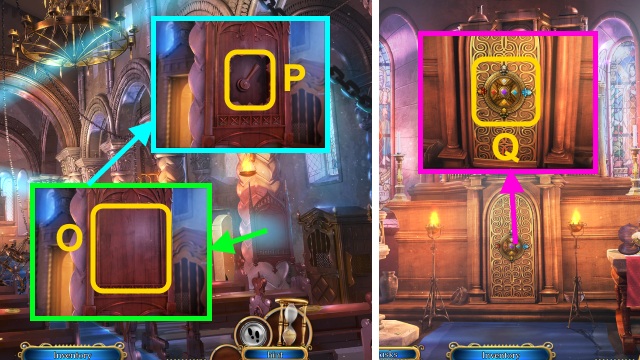
- Move the paper (V).
- Open the door; examine the board for a mini-game (W).
- Take the COPPER COIN (Y).
- Walk down, then forward.
- Play the HOP to receive the BONE COIN (Z).
- Walk forward, then left.
- Open the chest; place the GOLDEN COIN, COPPER COIN, and BONE COIN (A).
- Press the buttons: (Ax2-B-C); take the DUNGEON KEY (B).
- Walk down.
- Use the DUNGEON KEY (C).
- Open the gate; take the AXIS (D).
- Walk down three times.

- Give the CARROT (E).
- Walk down.
- Place the RIMS, NAILS, BOLT, and AXIS (F); examine the cart.
- Walk down.
- Talk to the Soldier (G).
- Walk left.
- Talk to the Soldier (H); receive the ARROW (2/4) and INCOMPLETE ARROWS (2/2).
- Place the INCOMPLETE ARROWS (1/2)-(2/2) (I); take the ARROW (3/4)-(4/4).
- Walk forward.
- Play the HOP to receive the BOW (J).
- Walk down.

- Place the ARROW (4/4) and BOW for a mini-game (K).
- Shoot the arrows (L).
- Walk down.
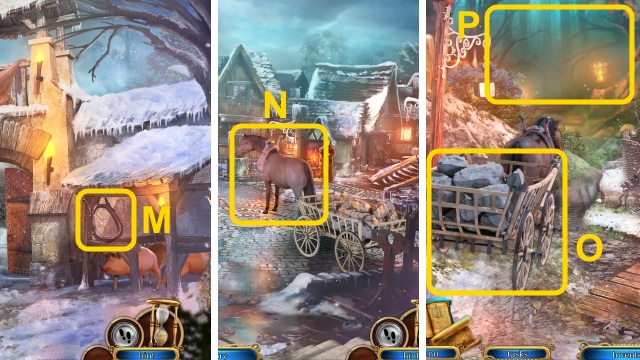
- Take the HORSE HARNESS (M).
- Walk forward.
- Place the HORSE HARNESS (N); examine the horse.
- Examine the cart (O); walk forward (P).
Chapter 4: The Wolf Queen
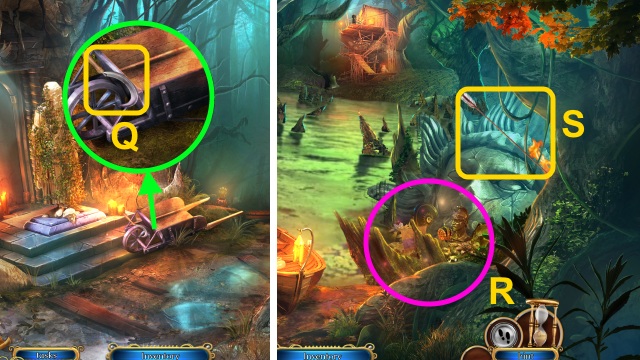
- Take the BLUNT SICKLE (Q).
- Walk forward.
- Play the HOP to receive the PADDLE (R).
- Take the BURNING ARROW (S).
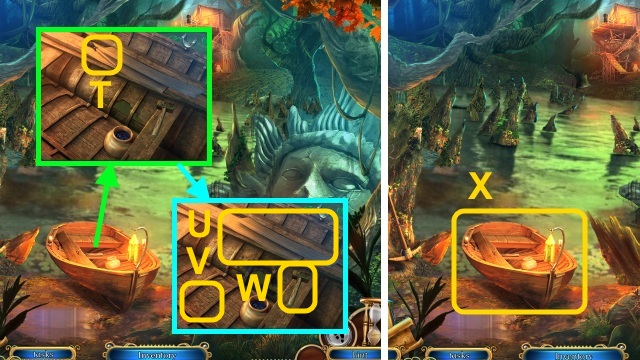
- Examine the brush (T); use it.
- Place the boards (U) nails (V), and hammer (W).
- Use the PADDLE for a mini-game (X).
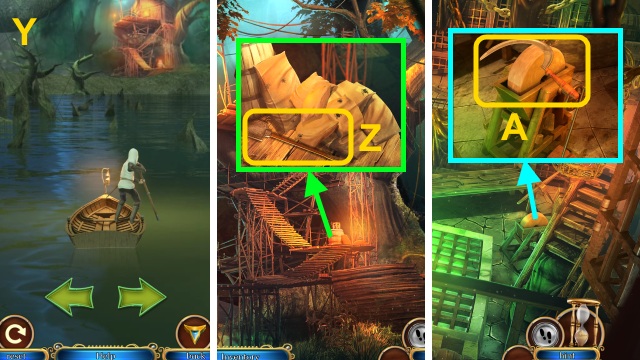
- Steer the boat (Y).
- Take the SHOVEL (Z).
- Go to the Dungeon Room.
- Use the BLUNT SICKLE (A); receive the SHARP SICKLE.
- Go to the Swamp Entrance.
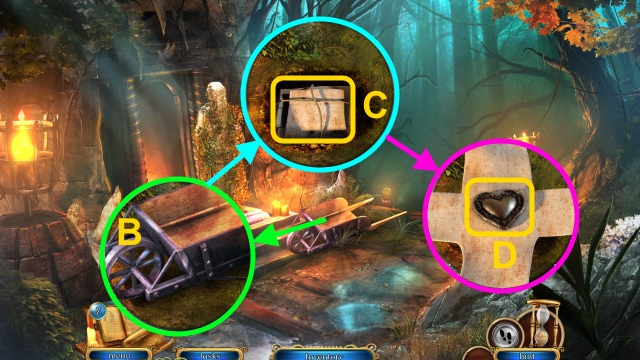
- Move the wheelbarrow (B); use the SHOVEL.
- Use the SHARP SICKLE (C); open the package.
- Take the IRON HEART (D).
- Go to the Altar.
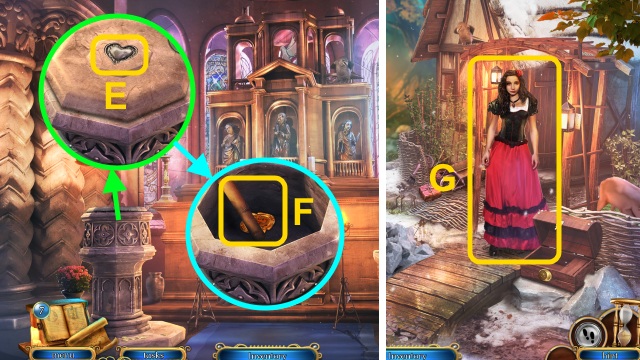
- Place the IRON HEART (E); move the cover.
- Take CELIOS’S FAMILY TREE and CELIO’S FAMILY SEAL (F).
- Go to Dolores’ House.
- Give CELIO’S FAMILY TREE (G); receive the LETTER FOR CELIO.
- Walk forward three times.
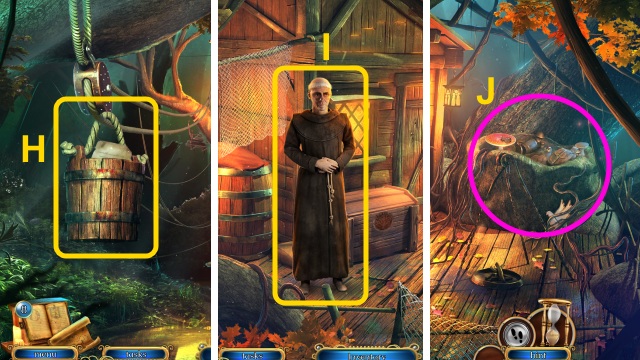
- Place the LETTER FOR CELIO (H); push the bucket.
- Walk forward.
- Talk to Celio (I).
- Play the HOP to receive the EMERALD (J).
- Walk down three times.
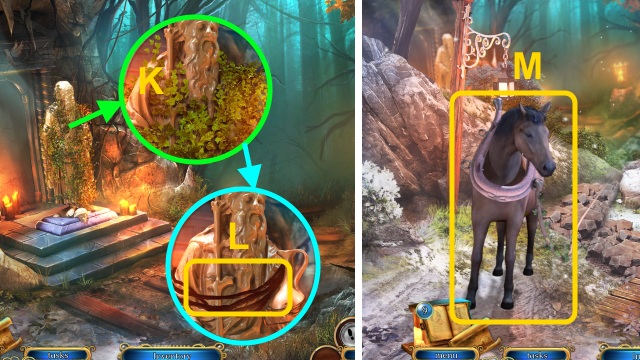
- Use the SHARP SICKLE (K); receive the IVY.
- Use the IVY (L).
- Walk down.
- Use the IVY (M); examine the horse.
- Walk forward, then left.
- Place CELIO’S FAMILY SEAL (N); take the RUBY (O).
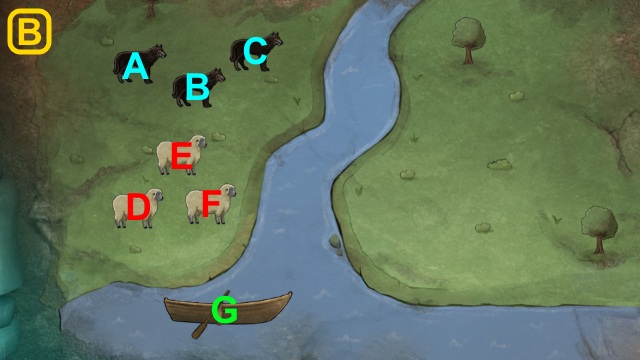
- Place the EMERALD (P) and RUBY (Q); examine the tomb for a mini-game.
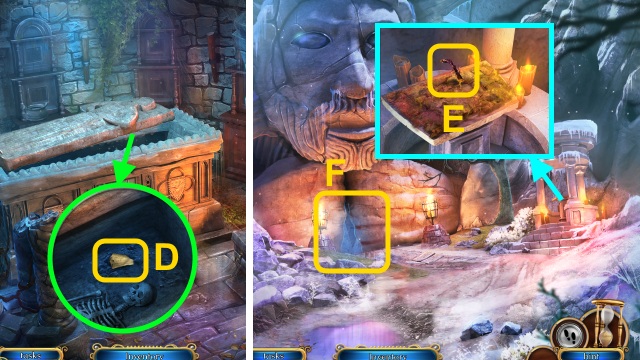
- Move the dirt; take the MUSIC NOTES (1/3) (D).
- Go to the Dungeons, then right.
- Take the STINKY ROOT (E).
- Try to walk forward (F).
- Go to the Boat.

- Use the BURNING ARROW and STINKY ROOT (G); take the PICKAXE (H).
- Go to the Passage.
- Use the PICKAXE; take the ROCK (4/4) (I).
- Place the ROCK (4/4) (J).
- Walk forward.
- Take the TREE SYMBOL COIN (K).
- Go to Celio’s Hut.
- Place the TREE SYMBOL COIN (L); open the chest.
- Take the WOLF QUEEN TALISMAN (M).
- Go to the Lake.
- Use the WOLF QUEEN TALISMAN (N).
- Walk left.
- Take the BELL (O).
- Move the sticks; take the ARMORED GLOVE (P).
- Walk forward.
- Take the LASSO ROPE (Q).
- Walk down twice.
- Use the LASSO ROPE (R); receive the PLANK.
- Place the PLANK (S).
- Walk right.
- Move the fruit (T); take the NEEDLE (U).
- Go to the Dungeon Room.
- Use the NEEDLE (V); move the plank.
- Take the AXE (W).
- Go to Celio’s Hut.
- Move the net and bag; use the AXE (X).
- Take the MUSIC NOTES (2/3) (Y).
- Walk down.
- Use the ARMORED GLOVE (Z); move the bags.
- Take the ACID (A).
- Go to the Passage.
- Use the ACID (B); examine the stone for a mini-game (C).
- Take the SUN SYMBOL (E).
- Go to the Chapel Inside.
- Press the button 3x (F); place the SUN SYMBOL (G).
- Press the button (H).
- Examine the stand for a mini-game (I).
- Solution is random (J).
- Talk to Miguela (K).
- Play the HOP to receive the IRON POT (L).
- Walk down twice.
- Use the IRON POT (M); receive the FRESH WATER.
- Walk left, then forward.
- Give the FRESH WATER (N); receive the MUSIC NOTES (3/3).
- Go to the Demon tree.
- Place the MUSIC NOTES (3/3) (O); examine them for a mini-game.
- Solution is random (P).
- Walk left.
- Take the BELL ROPE (Q).
- Walk down twice, then left.
- Place the BELL and BELL ROPE (R); pull the rope.
- Take the SAW (S); use the SAW (T).
- Take the BEE HIVE (U).
- Go Underground.
- Use the BEE HIVE (V); take the SWORD (W).
- Take the BLOCK (X).
- Place the BLOCK (Y); examine it for a mini-game.
- Solution is random; pull the lever (A).
- Place the IRON POT before the door closes (B).
- Go right.
- Talk to Augustine for a mini-game; block the attacks (C).
- Congratulations! You have completed Where Angels Cry: Tears of the Fallen.


 Golden Trails 2: The Lost Legacy Walkthrough, Guide, & Tips
 Mystery Age: Liberation of Souls Walkthrough, Guide, & Tips
 Artifacts of the Past: Ancient Mysteries Walkthrough, Guide, & Tips
 The Dragon Dance Walkthrough, Guide, & Tips
 Relics of Fate: A Penny Macey Mystery Walkthrough, Guide, & Tips