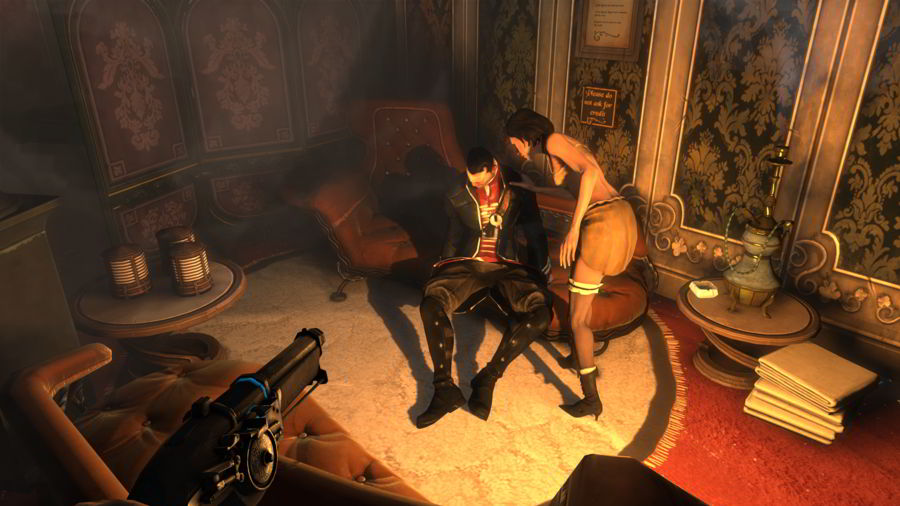
After saving Emily during The Golden Cat mission, you return to The Hound Pits Pub. Once you get there follow the simple objectives speaking to all of the people. After you’ve done so grab any desired upgrades and head to Kaldwins Bridge via the boat. This Dishonored Guide: Stealth Guide For Kaldwins Bridge will ensure you can complete the mission with minimal casualties and get all the collectibles. You’re tasked with finding Sokolov, The Royal Physician. So let’s get to it.
Once you arrive jump off the boat and look up to the buildings on your right. Using the nearby chain and Blink, you can climb to the top and avoid the 2 Guards ahead. Once up there, look ahead across the road and jump onto the building with the small hatch on the roof. Ahead of there is a door, near the fence by the water. There’s a Guard that stands nearby looking over the fence, you can avoid him but if you want to make sure he doesn’t interfere Blink behind him and put his body in the trash container nearby. Go up the stairs to the next floor and you’ll see a cart on a track. There’s some blueprints on a nearby table so be sure to grab those. Then use Blink to grab a chain above you. Then Blink over to the ledge with the Whale Oil and place it in the machine below to open the gate. Then jump into the cart and hit the switch.
When you reach the end of the tracks Blink to the roof nearby, and then across to the broken balcony with an open window. Climb out the other window onto some stairs and behind the building. Climb up the chain into the room with the Rune. Use Blink to approach the door following the objective for the bridge lights, but instead going through the side door and down the stairs. There’s 2 Guards here, wait for one to patrol close and then Blink behind him for a choke. Follow the pathway and wait for the next Guard to turn around, choke him and use the nearby switch. Cross the bridge, Blink up to a balcony and grab the Bone Charm inside. Be careful, there’s a Weeper inside too. After that head all the way back and through the door to the next area.
Be careful on the other side as 2 Guards are nearby, hide behind the metal wall and Blink to the roof above. Blink across to the balcony and enter the room. Stay hidden as a guy will walk in with a key, take him out and unlock the nearby table for some coin. Head through the door and upstairs. There’s a safe here with a Rune inside, use the code 473 to enter Pratchett’s Safe. Continue upstairs to the roof and turn around to jump behind the door. Blink to the balcony, take out the Guard and then claim the nearby Rune and Outsider Shrine.
Head back onto the balcony and use blink to traverse the nearby wall towards the lights objective. There’s not much loot around here so wait for the 2 Guards to stop talking and then Blink on top of the Guard Room. From there look at the bridge and climb the left support. You’ll see a chain near the top, Blink onto that and climb to the top. From there follow the bridge towards your objective, open the cage door and throw the Whale Oil out the small gap above the power cords. After you’ve done that continue towards your next objective, climbing down the right support and Blinking on top of the Guard Room. From there continue to Blink to Sokolov’s House and enter the door to Midrow Substation, grabbing the Rune on the other side.
When you exit the large window Blink to the metallic structure on your right. Blink to the high object just before the large spinning wheel, and then Blink over it to remove the Whale Oil and free the electric gate. Pass through and climb the small roof above the door. Turn around and get on to the Balcony. Go to the lowest area to rescue a civilian and collect the Bone Charm next to a corpse. Continue through to North End and your objective.
Just as you enter the next area look ahead and to your left for the large window. Go inside and travel to the roof. Turn around and climb behind the door, Blink down onto a balcony and claim the final Bone Charm for this area. Leave the room via the Balcony and head to the right. Use Blink to navigate the rooftops to your right to get closer to the Rune, aiming to reach the rooftop next to the tallest building. From there Blink onto a chain, being cautious not to alert the nearby Guard. After you’ve climbed the chain run around to the left, enter the door and subdue Sokolov. Grab his key, release the civilian at the back, pick up the Rune and head back downstairs. Don’t take Sokolov with you. You need to head to the lowest part of his house to claim a Sokolov Painting. There’s also a locked cabinet near his bed with 300 coin inside, which you can now unlock with his key. Inside his bedroom you’ll find Whale Oil containers, fill them and take them to the end of the hall to descend towards the lower floors. This is a bit tricky but I just went to the bottom, large floor with the Sokolov Painting sitting in the middle. Fired some crossbow bolts at the far wall and everyone followed them, I then just Blinked in and out again.
Head back up to the top of the building and pick up Sokolov. Blink back down to the objective with Sokolov. It’s easy, I made it in 5-6 Blinks and attracted 0 attention. Easily one of the easiest quests so far. Follow my techniques here for every consumable, 2 Special Actions and the Ghost and Didn’t Kill Anyone bonuses.
Did you find this Game Guide helpful? Follow us on Facebook for all our latest Game Guides, Game Reviews, Games News and our Suck My Controller Game Podcasts. You can also follow us on Twitter, Raptr, Youtube and Freeglance.


 The WoW Token
 Diablo 3 Act 1 Event Locations
 Pokemon X & Y Guide: Pokemon in Route 7 - Reviere Walk - GamersHeroes
 Why Star Wars: The Old Republics release date works
 Fallout New Vegas Snow Globe Locations