I must admit, Joint Operations: Typhoon Rising is one game which flew under the proverbial radar for me. I didn't really become aware of what it was, or that it was even out until I started getting emails from TweakGuides.com readers asking me to do a guide for it. One lunchtime at work last week I ducked out and bought the game, not expecting much, hoping only to selflessly serve my faithful readers by writing a guide for it like the saint that I am. Later that night I installed the game, thinking I was going to play a B-Grade first person shooter. Loading it up I got a very pleasant surprise. My first thought was "This game should be called 'Battlefield 2004'!"
Having written the Battlefield 1942 Tweak Guide, and being on the receiving end of lots of emails from passionate BF1942 fans, I know that I might get into trouble for saying that. I can hear them yelling "Hey! Desert Combat is 'Battlefield 2004', and don't you forget it pal!" Ok, ok, so it's not BF1942 or Desert Combat. It is however a great FPS in its own right, with loads of vehicle action, giant maps, huge servers (up to 150 players!) and fantastic graphics and atmosphere. Add to that things like day/night cycles, several great game modes and a range of other nice touches and you get a game which is worth playing even if you already play Desert Combat.
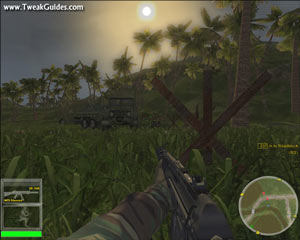
Joint Operations is based on the graphics engine used for Delta Force: Black Hawk Down, however the engine has been greatly modified and looks and feels better than ever. Unfortunately, because of a combination of factors including the advanced graphical effects used in the game, the sheer size of the maps and visible details, and some not-so-optimal game coding, many people are experiencing low framerates. When combined with sometimes laggy online gameplay on large servers, the results can be disconcerting for many players.
That's why this guide has been written: to make sure you have the knowledge and resources to be able to tweak Joint Operations correctly for maximum efficiency on your machine. The Joint Operations Tweak Guide has a truckload of setting descriptions, advanced config file tweaks and troubleshooting tips, as well as links to important resources to ensure you get the most out of this game. Don't say Koroush Ghazi doesn't respond to his readers' needs...I live to give!
Note: This guide refers to the latest version of Joint Operations: Typhoon Rising - Version 1.6.9.2. The guide is no longer being updated.
Before getting into any game-specific settings and tweaks, this section covers the obligatory system optimization information I include in all my guides. If you've followed this advice recently, you can skip this section.
Many people report problems with this game and in almost all cases these are due to general system issues and not the game itself. With that in mind I strongly urge you to take some time and follow the advice below if you truly want this game, and indeed every other game you own, to run at its fastest and most trouble-free.
The place to start is my free TweakGuides Tweaking Companion. It is the complete system optimization guide for Windows users. Designed for novice and advanced users alike, it is written in plain English to help you genuinely understand all aspects of Windows and your PC. The guide covers every major topic, from the correct installation of Windows and critical drivers and software, through to recommendations for every significant setting and feature, all the major performance and convenience tweaks and customizations, as well as detailed troubleshooting advice. There are also links to a range of reliable free applications for optimizing and maintaining your system, as well as to important resources for finding out even more about Windows and your PC. There are two separate versions: one for Vista and one for XP.
If you've ever wondered what common graphics and display settings like FPS, VSync, Refresh Rate, Antialiasing and Anisotropic Filtering are, and how they really work, then check out my Gamer's Graphics & Display Settings Guide for all the details in an easy to understand format. The guide also gives you a rundown on exactly how a game goes from a being a set of files on your hard drive to a 3D image on your screen, including relevant performance tips.
Finally, if you run an ATI or Nvidia graphics card, I have written two comprehensive guides which you should check out: the ATI Catalyst Tweak Guide and the Nvidia Forceware Tweak Guide. These guides cover absolutely everything about the latest graphics drivers, how to set them up correctly, as well as advanced tweaking, overclocking and benchmarking tips. They're a must-read for configuring your graphics card correctly.
The above information really will serve you well in the long run, not just in this game. If you don't optimize your system and keep everything updated and maintained correctly you will keep running into "mysterious" problems time and time again. Do yourself a favor and when you get a chance spend an afternoon or two optimizing your machine the right way with the guides above.
The next section goes into more detail about specific troubleshooting tips which address common performance issues with the game.

This section contains specific troubleshooting tips which address many of the most common problems experienced by Joint Operations players. Several of the tips below are drawn from my guides mentioned in the Essential Optimization section. This is no coincidence, since many common Joint Operations problems are not game bugs, but specific sub-optimal system conditions which lead to problems. Joint Operations can be quite system intensive and uses some advanced features, and this brings out instability and problems on many systems. I can't stress enough the importance of taking the time to go through the checklist of advice below if you're having a problem with the game. In fact you will probably get just as much performance benefit from these tips than just changing game settings:

Official Support: If you have a problem with the game, the first place to visit is the NovaLogic Support Site. There are also several official documents you should read for more gameplay information and answers to common questions. The first one is in your \NovaLogic\Joint Operations Typhoon Rising\ directory, and is called Readme.txt. You can also view the Official Joint Operations FAQ for more information. Finally, if you still can't find the answer to your question, you can visit the Joint Operations Support Forum, where other players may be able to help you out.
NovaWorld Account/CD Key Problems: Read this CD Key Post as a starting point for more details on what you can do if you are having issues with your CD Key and online account creation.
Windows Vista Users: If you're having problems running this game under Windows Vista, first make sure that you're using the latest Vista graphics and audio drivers for your hardware, and the latest version of this game (see page 4 for patch details). Next, make sure you don't change your UAC settings after the game has been installed, as due to Virtualization this can change the location of the game files and settings. If you can't launch the game successfully when UAC is enabled, you will need to run the game with full Admin privileges. To do this either right-click on the launch icon and select 'Run as Administrator', or right-click on the launch icon, select Properties and under the Compatibility tab tick 'Run this program as an administrator' then click OK. I strongly recommend that you refer to the TweakGuides Tweaking Companion for Windows Vista for more information - in particular check the 'Gaming in Vista' section of the Graphics & Interface chapter; the UAC section of the PC Security chapter; and the 'Personal Folders' and 'Directory Junctions & Symbolic Links' sections of the Windows Explorer chapter. These will tell you how you can fix game-related issues and also explain the relevant differences of Vista.
PunkBuster Issues: Make sure you have installed PunkBuster anti-cheat software with Joint Operations, and have it enabled in your Options menu (under the General tab) before attempting to play online. Most servers require PunkBuster to be installed and enabled, otherwise you cannot play on them. If you haven't installed PunkBuster and want to install it, insert your Joint Operations CD and install it from there. The PunkBuster anti-cheat system can cause some problems in certain circumstances. To get more information on PunkBuster, and how to troubleshoot PunkBuster-related issues, go to the PunkBuster Joint Operations Support Site for more details. If you are being booted on PB servers, you may also try this solution
Connection Problems: Joint Operations is revolutionary in that it allows up to 150 players or more to be on a single server, and this is quite a task to manage smoothly for any server. Many players have noted that at the moment, servers which have a relatively high number of maximum players (e.g. 64 players or above) can be quite laggy. This can be caused by a variety of things, but the most important factors which affect how smooth your gameplay will be online are: your hardware - this affects how quickly the game updates and displays on the screen; the distance to the server - the further away you are from the server the more lag you will experience; your connection type - the more bandwidth your connection can handle, and the better your connection, (i.e. lower ping) the smoother your gameplay will be. For people having router/firewall problems, see the Advanced Tweaking section for more details. Unfortunately any connection issues not related to hardware/connection speed are due to the game's network code, and this can only be resolved through official updates.
Recommended System Requirements: The recommended hardware requirements for Joint Operations are steep, and for reasonable performance you should try to meet them. Minimum and Recommended system requirements are listed in this FAQ: Joint Operations System Requirements. If you don't meet these hardware requirements, or barely meet them, then expect to see very poor performance, visual anomalies, and in some cases the game simply will not run. For those below minimum requirements in any area - it's time for an upgrade, as some of the advanced features of the game require full hardware support and nothing less.
Virus Scan: Do a full scan of all your files using a virus scanner such as Norton's Antivirus, a trojan cleaner such as The Cleaner, and a spyware cleaner such as Ad-aware. Viruses, trojans and spyware can cause unexplained behavior, general file corruption and system slowdown, so it's best to make sure your system isn't infected before moving on to other measures. However make sure to disable any background scanning programs once you're done (See below).
Background Programs: Disable all background applications, especially virus, trojan and spyware scanners and messaging utilities. These applications can and do use up valuable CPU resources, take up precious RAM, cause memory conflicts and crashes to desktop, and lag online play, but most importantly they interfere with read/writes to your hard drive effectively slowing it down and causing more in-game freezes and loading pauses. Full instructions on how to identify your startup programs and services and how to correctly disable unnecessary ones are in my TweakGuides Tweaking Companion.
Overclocking: Most recent games like Joint Operations are sensitive to overclocking. If you have overclocked any components on your system and are having problems such as crashes and reboots, set everything back to default speeds and try running the game. If you don't experience the same problems at default speed then your overclock is the primary culprit. In particular, read through my TweakGuides Tweaking Companion for tools and instructions on how to correctly stress-test an overclocked system and determine which components are being pushed too far. Even if every other game and program you run works just fine at your current overclock, Joint Operations may well be crashing because of your overclock and/or heat issues.
Fast CPU and Fast Graphics Card: Most recent games require a balance of both a medium to fast CPU and a medium to fast graphics card for optimal performance. If you have a fast CPU but a slow graphics card for example (e.g. P4 3.2Ghz combined with an FX5200), or vice versa, then your machine will struggle. While you can certainly reduce the load on your machine by scaling down the in-game settings and undertaking some advanced tweaking, you cannot alter the advanced character and bullet physics, the basic terrain complexity, or the sheer amount of essential detail on screen during a heavy combat scene - hence the steep requirements.
Memory Subset: It is highly recommended that you run Joint Operations on at least 512MB of RAM for relatively smooth gameplay. You should also optimize your Virtual Memory settings by following the step-by-step instructions in my TweakGuides Tweaking Companion. Combined with the tweaks covered later in this guide, this should help resolve most of your problems. A lack of RAM and sub-optimal virtual memory settings, especially when combined with overclocked memory (and/or aggressive RAM timings), can lead to lots of small in-game loading pauses, longer loading times and memory conflicts leading to freezes, crashes to desktop, and even sudden reboots.
Defragging: Make sure that after you have installed Joint Operations you run through the system maintenance procedures detailed in my TweakGuides Tweaking Companion. If you only do one thing on that list though, make sure you run the Windows Defragmentation utility after installing any game. Defragging ensures that the game's files are all on the same place on your hard drive, greatly reducing loading pauses/freezes and loading times. It may take a little while but it is well worth it.
Antialiasing and Anisotropic Filtering: If you have mysteriously low frames per second despite being certain that your hardware is capable of more, then one place to check would be your graphics card's Antialiasing and Anisotropic Filtering settings. These are explained in detail in my Gamer's Graphics & Display Settings Guide. Even 2x Antialiasing for example can turn Joint Operations from reasonably smooth to a slideshow in certain areas, depending on your hardware and in-game settings. For maximum framerates set both AA and AF to '0x' or 'Application Controlled' in your graphics card's control panel, and do the same in-game.
That's just a basic rundown of troubleshooting tips. Read the remainder of this guide for more specific settings and tweaks which can help improve your performance and resolve any problems.
Official Patch
Joint Operations, just like most modern PC games, has had several official patches released for it shortly after its retail debut. These patches fix a range of issues in the game and make some adjustments to improve overall gameplay, and as such they are a must-install. The latest version of the game is version 1.6.9.2, and you should definitely install this update as it has a range of gameplay fixes and optimizations. To get the maximum benefit out of the performance optimizations in this patch you should have DirectX9.0c installed on your machine, which you can download from Microsoft DirectX Homepage. Also make sure you have the latest graphics drivers, as they are also required to take advantage of DirectX9.0c.
Note that as of the 1.4.27 patch onwards two new Video options were added to the In-Game menu, namely Pixel Shaders and Texture Compression - both of which can significantly improve performance on older machines. Read the In-Game Settings section on the next page for more details of the impact of these options.
There are three ways you can make sure you have updated to the latest version of the game:
Generally speaking, it is recommended you use the Built-in Updater to both update your game, and to regularly check for new updates. This is particularly true immediately after a new patch release, since many sites may not have the latest version. However if you want to back up particular patches you can download them separately for storage. Either way, make sure you are updated to the latest version of the game since this not only means you have the best performance, but it is also a requirement for joining servers running the latest version of the game.
No-CD Patch
Novalogic has taken what could be considered a very wise step, and not included any CD check on Joint Operations. This means that you can run the game without the need to keep your game CD in the CD/DVD ROM drive. Therefore there is no need to look for or use any No-CD patches or files. The main form of protection on Joint Operations is its CD Key, which can be found on your CD case. This CD Key is used both during installation, and when signing up to play online. Do not share your CD key with anyone, and never ever provide it in an email, or post it in a forum for any reason. See the Troubleshooting section if you are having issues finding or using your CD Key.
Maps and Mods
The Developers of the game have released a beta mission editor called N.I.L.E (Novalogic Interactive Level Editor) which allows users to place and edit objects in real time in 3D or 2D mode. It is 6MB and you can download it from here. Fans have used NILE to create a range of new maps, such as the ones you can download here. However the best place to find a list of maps and mods is NovaXchange, an official NovaLogic site where community-made maps can be uploaded or downloaded. There's a wide range of them there which you can choose from.
NovaLogic are also releasing an expansion pack to Joint Ops called Joint Operations: Escalation, due out in mid November 2005. This pack will not be free, however it will add heavy combat vehicles and new maps to the mix.
The next section of the guide covers In-Game Settings for Joint Operations.
In this section I provide full descriptions and some recommendations for in-game settings to allow you to achieve a good balance between audio-visual quality and performance. Where possible I note the performance impact of each setting, although bear in mind that the extent of the impact depends on your particular hardware combination. It's impossible for me to give exact performance impacts such as "15% FPS reduction" or "10 FPS more" - it all depends on your hardware, and your other game and system-wide settings.
To access the in-game settings, start Joint Operations and click on Options in the main menu. Alternatively you can press ESC during a game and click on Options in the sub-menu. Note that if attempting to change the options in-game, you will only be presented with a limited number of settings. To access and change all the settings, you will need to be in the main menu Options screens. Also note that whenever you change a setting, it is important to click 'OK' on the bottom right of the screen to apply the change, otherwise the new setting may not be implemented.
All the settings under the Options section are explained in detail below:
General
Crosshair Appearance: Click the arrows either side of the crosshair image to scroll through a list of possible crosshairs to use in the game. Choose one which suits your taste. Has no impact on performance.
Crosshair Color: Click the arrows either side of the color box to scroll through the list of available colors. The color you select here will be applied to the crosshair you selected earlier, and some of your Heads Up Display (HUD) text. Again select based on your taste. Has no impact on performance.
Show Crosshair Spread: When ticked, this option allows the crosshair size to vary depending on the potential accuracy of your aim. For example the more you move around, the less likely you are to be accurate and if this setting is enabled, the wider the spread of the crosshairs to indicate this. I recommend enabling this setting as it gives you a visual indicator of your current accuracy. Has no impact on performance.
Enable PunkBuster: When ticked, uses the PunkBuster anti-cheat software installed on your system (See Troubleshooting Tips section above for more information). PunkBuster detects any cheats installed on your machine and enabling it is usually required if you want to play on most servers. I recommend you enable PunkBuster, and only play on PunkBuster-enabled servers to ensure a cheat-free experience. Has a minor impact on network bandwidth.
Keyboard Hints, Game Hints: When either or both of these options are ticked, you will get hint popups which provide keyboard or gameplay tips. If these start to bug you, untick these options to prevent them from appearing. Has no performance impact.
Video
Resolution: This setting determines how many pixels (the individual dots which make up a computer image) are displayed on the screen. A resolution of 800x600 means 800 pixels wide by 600 pixels high on your monitor. The higher the resolution (the more pixels), the more detailed and clearer the game image, but it takes more graphics card and CPU power and hence you will see less Frames Per Second (FPS). The highest resolution available in this list of resolutions is limited to what your graphics card and monitor are actually capable of rendering (drawing on screen). The resolution alone will have the biggest impact on your framerate in Joint Operations. If nothing else helps you improve your FPS, you will have to reduce the resolution.
Widescreen Display: If set to 'Yes', Joint Operations will attempt to run in a 16:9 ratio Widescreen display format, similar to modern movies. If you're not running the game on a widescreen TV/monitor, your on-screen image may not differ (i.e. it may not have black bars on the top and bottom of the screen) however you may experience a drop in framerate. Set this to 'No' unless you are using a genuine widescreen-ratio TV or monitor.
Gamma: The Gamma slider controls the overall brightness of the onscreen image. The further right you move the slider, the darker the image. Gamma values which are too high are washed out and unrealistic, however the Gamma setting has no impact on performance.
Set Default Configuration, Set Performance Configuration, Set Quality Configuration: These buttons will apply preset values for all the Video settings if clicked. For example if you click the 'Quality Configuration' button, the Video options will all change to values which attempt to provide better visual quality, but generally lower performance for your particular machine. The 'Performance Configuration' option pretty much does the opposite. I recommend you do not use these presets however, as they cannot determine the right balance of image quality and performance anywhere near as well as you can yourself by going through this guide and adjusting each setting individually.
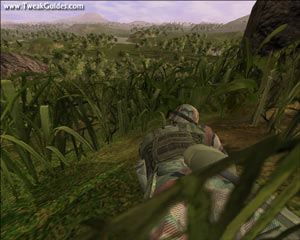
Terrain Poly Detail: This setting determines the number of polygons used to draw the terrain, which is the land, hills, valleys etc. The options here are Low, Normal, High and Highest. The higher the setting, the more polygons used, meaning the more detailed the shape of the terrain, but the lower your FPS. The visual difference between Low and Highest is not dramatic (and neither is the FPS difference), because all players have to view similar basic terrain to make things fair.
Terrain Texture Detail: This setting determines the quality of the textures (the surfaces of all 3D objects) used for the terrain. The options here are Low, Normal, High and Highest. The lower the setting the lower the visual quality of the terrain textures, but the higher your FPS. If you have a graphics card with low Video Memory (i.e. less than 128MB) then lower this setting to gain improved performance. In fact this setting has a very significant impact on performance even on high-end video cards, particularly in areas with lots of visible terrain. If you're struggling to gain FPS, you should lower this setting to Normal, or even Low.
Object Poly Detail: This setting determines the number of polygons used to render all objects in the game, except for the terrain. The options here are Low, Normal, High and Highest. The higher the setting, the lower your FPS. The visual difference between Low and Highest is not dramatic, and the performance difference is also not major, for the same reasons as the Terrain Poly Detail setting.
Object Texture Quality: This setting controls the quality of the textures used on the surfaces of objects in the game, such as buildings and vehicles - but not for the terrain. The options here are Low, Normal, High and Highest, and lowering the setting increases FPS, but reduces visual quality on object surfaces. This setting has a noticeable impact on performance, and on all but the fastest video cards lowering this setting will greatly improve performance.
Water Quality: This setting determines how realistic the water in Joint Operations looks. The possible options are Low, Normal, and High. The Low setting provides acceptable, but not highly realistic water with few ripples or motion. The Normal and High settings improve on this by showing more waves and ripples, and more realistic reflections of surrounding objects in the water, but at the cost of reduced FPS the higher the setting.
Shadows: This setting determines whether you see any shadows in the game, and how detailed shadows will be. The available options here are Off, Low, Normal and High. The higher the setting, the lower the FPS as your system has to do more calculations to determine where shadows are cast. At the Off setting, there are no shadows at all. This is unrealistic, but gives greatly improved performance. At the Low setting, only large objects cast some shadows, such as buildings. At Normal, most objects including players cast shadows. At the High setting almost everything casts a shadow, and the shadows are the most detailed possible, though not visually very different to the Normal setting. The Shadows setting has the greatest performance impact where there are one or more bright light sources. At Normal and above the FPS drop can be quite dramatic, especially when there are multiple characters on screen, since characters cast the most complex shadows.
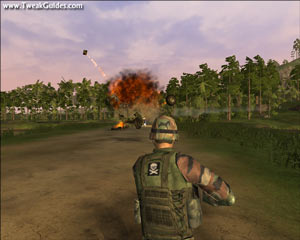
Particle Density: Particle effects are used in things such as explosions, smoke, water spray and the like. These are made up of 'particles' as the name implies, and the higher the Particle Density setting, the more volume (and hence the more realistic) these effects look. The available settings are Low, Normal and High, with the higher the setting the lower your FPS when such effects are visible. In heavy combat this setting can have a dramatic impact on FPS, so Low or Normal is recommended for most people.
Frame Effects: Frame effects include such things as the blurring of your view as you take damage, the glare of the sun, and the general haziness of the sky. The available options for the Frame Effects setting are Off, Minimal, Normal and High. The higher the setting, the greater the impact on your FPS. Setting Frame Effects to Off gives a significant improvement to framerate in almost all circumstances at minimal noticeable loss in visual quality, so disabling it is recommended for most people.
Full Screen Antialias: Antialiasing is a method of smoothing the jaggedness of lines in 3D graphics. This setting has four options: Off, 2, 4 and 6. When set to Off, there is no Antialiasing used, unless you have forced Antialiasing enabled in your Graphics card's control panel. This provides fastest performance. If set to 2, 2x Antialiasing is used, which uses your graphics card to smooth out jagged lines at the cost of some FPS. Higher levels of Antialiasing (i.e. 4x and 6x) will reduce FPS even more, but smooth out jaggedness considerably, particularly for distant objects. If you have any level of Antialiasing enabled in your graphics card control panel, they will override these settings. If you want to use Antialiasing in Joint Operations I recommend selecting 'Application Controlled' (not '0x') in your graphics card's control panel and then setting the AA level in-game here. For more details see my Gamer's Graphics & Display Settings Guide. Note that if you have a Radeon 9800 Pro and Frame Effects are set to High, you will get a black screen if Antialiasing is enabled. Either set Antialiasing to Off or lower Frame Effects below High.
Texture Filtering: This setting determines the clarity of textures as they fade into the distance. The options are Bilinear, Trilinear, Anisotropic and Anisotropic High. Bilinear and Trilinear texture filtering appear very similar, and there is only a slight FPS drop from Bilinear to Trilinear. Anisotropic texture filtering on the other hand gives a sharp drop in FPS, although textures become much crisper and clearer. Anisotropic High will cripple framerates on all but very high end graphics cards. The extent of the performance impact of this setting also depends on your chosen resolution and Terrain/Object Texture Detail settings. For more details on Anisotropic filtering see my Gamer's Graphics & Display Settings Guide.
The following are two new options introduced with the 1.4.2.7 update onwards. If you have not installed the latest update you may not have these options available to you:
Pixel Shaders: Pixel shaders create advanced lighting effects in the game. This option has three settings - High, Normal and Off. At High all pixel shader effects are utilized, which means things such as the shine on metals and weapons, advanced water effects etc. This requires a recent graphics card (e.g. Radeon 9600 Pro or above) to perform well. If you have an older graphics card or seek better framerates, reducing this setting to Normal will remove some of the less noticeable effects and gain a slight FPS improvement. If you want a big jump in performance, at the cost of some (still relatively minor) eye candy, set this to Off for maximum performance. I personally recommend Normal or Off for most people to ensure good, consistently high framerates with no real drop in visual quality.
Texture Compression: The options here are Minimal, Standard and Maximum. Texture compression reduces the size of texture file information so that more of them can fit into your graphics card's Video RAM and hence improve performance and reduce stuttering. However the more a texture is compressed, the more it may display "compression artifacts" - which essentially means you may see some discoloration (purplish tinges) and a slight reduction in detail. For the most part, Minimal texture compression ensures the best quality textures, but is recommended for those with 128MB or 256MB of Video RAM. Standard provides a good performance/visual quality balance, and is recommended for those with 64MB or 128MB of Video RAM. If you have 64MB or less of Video RAM, or simply want the best possible performance, select Maximum texture compression. Note that the visual quality is not significantly reduced with Maximum compression, but depending on your graphics card and Video RAM, the performance impact may not be as significant as the Pixel Shader option either.
The next page continues the In-Game setting descriptions.
Audio
Sound Effects, Dialog and Music Volume: These settings control the volume of the game's sound effects, in-game voice dialog and background music. You can adjust the level of these to suit your taste, however moving the volume sliders to the far left does not have any impact on performance (i.e. it doesn't remove sounds and music from memory).
2 Speaker/Headphones/Dolby Pro-Logic Audio: Select this setting if you have the appropriate audio setup. This setting should provide the best FPS since it uses the least number of audio channels, however the precise impact depends on your sound hardware and CPU speed.
4 Speaker Audio: Select this setting if you have a 4 speaker audio setup. There may be a reduction in FPS by selecting this setting over the 2 Speaker setup, since there will be 4 audio channels used. On the other hand the sound quality will be better.
5.1 Speaker Audio: If you have a 5.1 audio setup, selecting this option will provide optimal audio quality, with 6 channels used, however there may be a reduction in FPS.
Select 44KHz Output (Higher Quality Sound Effects): Ticking this option means that the game will use the highest sampling rate (44KHz) possible for sound effects, and hence give optimal sound quality. Unticking this option may improve performance, but the audio quality will drop slightly because a lower sampling rate of 22KHz will be used. The precise performance impact of this setting will depend on your sound hardware and your CPU speed.
Controls
To adjust the controls for Joint Operations you need to do two things: firstly choose the device you want to assign a particular function to - the available devices are Keyboard, Mouse and Joystick - and then scroll through the list of Actions below, click in the Control box next to the Action and then select the key, mouse or joystick button to assign to it. None of these settings have any impact on your performance, so set according to your personal taste.
Joystick: If you are not using a joystick, untick the Joystick box on the left of the screen. Has no impact on performance.
Invert Mouse Y Axis: If you are using a mouse in the game (by default it controls your view direction), ticking this option means that pushing your mouse forward will make the character look down, and pulling the mouse backward will do the opposite. Has no impact on performance, set to your personal taste.
Mouse Sensitivity: This slider determines how sensitive your mouse is in-game (if you're using a mouse). The further to the right the slider, the more sensitively your mouse reacts to being moved. Adjust this setting until you can turn around rapidly, yet also make small changes in your aim without excessive jumpiness. Has no impact on performance. Note, if your mouse is 'lagging' in the game, this is primarily due to low framerates. Adjust your settings to improve your average FPS and you will notice an improvement in mouse lag. Also see the Reduce Mouse Lag setting in the Advanced Tweaking section.
Clear Mapping: If you want to clear the current assignment for a particular action, click in the Action box and then click the Clear Mapping button to clear the current assignment to it in the Control box.
Game Defaults: If you believe your control settings are messed up and you want to start from scratch, click this button to reset all the Control options to the game defaults. Doing so will mean you will lose all your existing control customizations.
Well we're done with the In-Game settings. Come back and fine tune them as necessary, but for now we move on to some Advanced Tweaking for Joint Operations.
You can change more than just the settings available under the in-game menus in Joint Operations. There are two configuration files for the game which can be edited by users, called Admin.cfg and Game.cfg, and these can be found under your \NovaLogic\Joint Operations Typhoon Rising\ directory. Before you make any changes to these files however, create a backup copy of them first and keep them somewhere safe. You can edit these .cfg files using any text editor, such as Windows Notepad.
It's also important to note that changing the .cfg files as detailed here is not considered cheating or 'hacking', either by the community or by PunkBuster. Editing these files appropriately is simply further customizing the game settings to maximize your system's performance.
Note that settings which can be easily changed using the in-game settings are typically not covered here. You should make such changes using the settings under the Options section (See In-Game Settings section). Also note that some settings current appear to have no impact on the game, so they are not mentioned below. Details of the particular sections and settings to edit are provided as follows:
Game.cfg
DISPLAY
hw3d_res1280x768=1
There is a list of resolutions here, with either 0 or 1 next to them. These are the resolutions your video card and monitor are considered capable of rendering. If you are certain your graphics card and monitor are capable of a particular resolution here, but for some reason it is not available in-game, change the value next to that resolution from =0 to =1.
game_res=7
You should change the game resolution using the in-game settings, but in case you have problems getting into the game because of your resolution, you can change it here. 640x480 is =1, 800x600=2, 1024x786=3, 1280x720=4, 1280x768=5, 1280x960=6, 1280x1024=7, 1600x1200=8, 1920x1080=9, 1920x1440=10, and 2048x1536=11. Do not set a resolution which exceeds your hardware's capability or you may damage your monitor.
gamma=1.0
You can change the exact value of your gamma (brightness) here, but be very careful: extremely high gamma values are detected as a cheat by PunkBuster.
antialias_mode=0
You can change your Antialias level using the in-game menus, but if you've increased Antialiasing to the point where you are having problems launching the game, you can change it here to fix your problems. 0=None, 1=2x, 2=4x and 3=6x. Higher levels of Antialiasing are not possible.
lock_framerate=1
Enabled by default, this setting attempts to keep your framerate below 60fps, which is the 'tick rate' of servers - the rate at which the network and physics code run. If you set this value to =0, you may see a very slight performance improvement, however for most purposes it should have no performance impact. For high end systems if you set lock_framerate = 0 you will get larger variability in your minimum and maximum FPS, and this can cause jerkiness if your FPS constantly goes above 60fps. Note this 'lock' has nothing to do with VSync See Force VSync below.
force_vsync=0
Vertical Synchronisation (VSync) is the synchronization of your graphics card and monitor's abilities to redraw the screen a number of times each second (measured in FPS or Hz). If force_vsync = 0 (the default setting), your performance will be optimal, however you may see some image "tearing" as your monitor and graphics card go slightly out of synchronization whenever the refresh rate exceeds the monitor's abilities. For most people I recommend force_vsync=0 be used for maximum graphics performance in Joint Operations. Also make sure that in your graphics card's control panel the 'Wait for Vertical Sync' (or similar) option for Direct3D is set to 'Application Preference' or 'Off', otherwise it will override this setting and enable VSync. If image tearing really bothers you, set this value =1 however you may see a slight drop in FPS.
reduce_mouselag=1
This setting is on by default, so if you have issues with your mouse 'lagging' (being extremely unresponsive or jerky) on screen, it is almost certainly associated with low framerates. Follow the advice in this guide to adjust your other settings to improve your average FPS. Ironically the Reduce Mouselag setting also affects FPS. When enabled, it reduces your FPS, so if you have no mouse lag problems set reduce_mouselag = 0 for an increase in performance. Remember, mouse lag problems in Joint Operations are mostly caused by low FPS (and/or extremely high ping). However if nothing else works to fix your mouse lag, you may have to enable this setting.
AUDIO
audio_channels=2
Although you can change the number of channels in the Options section, by selecting either 2 Speaker (2 Channels), 4 Speaker (4 Channels) or 5.1 Speaker (6 Channels), you can also manually change it here if you wish. Importantly, if you want to disable all sound you can set this =0, however there is no significant performance improvement. Note, you cannot set greater than 6 Channels, nor can you set 1 Channel (mono).
audio_rate=44100
If the 'Select 44KHz Output (Higher Quality Sound Effects)' option is ticked under your in-game Audio settings, the highest audio rate of 44,100Hz is used. If the setting is unticked, a moderate 22,050Hz sampling rate is used. You can modify the audio sampling rate manually here to see if your FPS improves, or to achieve a different audio quality. Try various common sampling rate values such as 11025, 16000, 32000 and even 48000. Generally speaking, and depending on your audio hardware and CPU, the lower the sampling rate, the better your performance. Note that using sampling rates other than 22050 and 44100 (the two common game values) may cause audio glitches.
CONTROLS
hud_color_index=2
This setting determines the color of the text in the top left corner of your HUD. A value of =0 makes the text white, a value of =1 makes the text black, and =2 makes the text the same color as your crosshair color. Other values give different colors, so experiment (e.g. =3 is blue).
hud_detail=1
This setting determines whether your HUD is displayed or not. To display the HUD, leave this at the default value of 1. If you want to remove the HUD however, set this to =0. It is not recommended that you disable your HUD as it contains important information.
MULTIPLAYER
mpnovaworldportmin="32768"
mpnovaworldportmax="65535"
If you are having connection problems getting into NovaWorld, you can specify a specific port number to open for your router/firewall by changing these settings. Change the mpnovaworldportmin value to = the port number you wish to open. If necessary also change the mpnovaworldportmax to the same number, to make sure that only that port is used. If you plan on hosting a game, you'll need to open port 32768.
mpmaxpacketsize="1300"
This setting controls the maximum packet size in bytes being sent by the server. If the packets are too large in size, they can fragment and cause connection problems such as lag. If they are too small, you get less than optimal responsiveness. Changing this value may improve your connection smoothness and ping. I am not currently aware of the best sizes for various connections, so experiment and let me know your results.
The remaining settings in the Multiplayer sections of Game.cfg relate to options used by servers. Changing these will not have any effect on game settings if you're playing on someone else's server, such as a public server.
Admin.cfg
The Admin.cfg file is used by server administrators to allow individuals to log in to the server. Read the comments in the Admin.cfg file to see how to edit the file correctly. For more details on how to set up and use a Remote Server using the Remote Admin Tool (RAT), read the instructions in this short guide: RAT 101
The next section covers the Joint Operations Console Commands.
To open the small 1-line in-game command console, press the '~' key. To open the full command console, press CTRL + ~ together. To close the console press ESC. You can enter a range of commands in the command console, and these are covered in this section.
Please note this list is incomplete, and I require your assistance in both adding more commands, and importantly in getting accurate descriptions for all of them: Email Me
Common Commands
FPS - Displays the current Frames Per Second (FPS), the minimum FPS, maximum FPS and the CPU load for rendering the image.
RESTART - Restarts the mission from the starting point with full equipment
EXIT - Exits back to the main menu
QUIT - Quits the game back to desktop
HELP - Brings up a 13-page help screen which contains a list of all game commands
HELPMAP - Brings up the Map Legend
PAUSE - Pauses the game, press ESC to unpause
MOUSESCALE [0 - 511] - Adjusts the sensitivity of your mouse in-game. Higher values increase the mouse's sensitivity to movements
FLIPMOUSE - Toggles whether the Mouse Y Axis is inverted or not (See In-Game Settings)
VERBOSE - Toggles verbose feedback mode on/off
SCOPESCALE [128-511] - Adjusts the scale of scoped weapons
HUDDETAIL - Toggles whether the HUD is displayed or not
PRINTSCREEN - Takes a screenshot
TALK [message] - Send Global chat message
SQTALK [message] - Send Squad chat message
CTALK [message] - Send Crew chat message
SHOWSCORE - Display scoreboard
LIGHTS -
Server Admin Commands
PUNT [playername] - Punts the offending player from the server
PUNTLOG - Creates a punt log file in your \NovaLogic\Joint Operations Typhoon Rising\ directory
PUNTCRC -
BAN [playername] - Bans the offending player from the server
SAVESCORES - Turns score saving on/off
NETDELAY [ping] - Specifies the level of simulated 'lag' ping (in ms)
REDTALK - Allows the server admin to speak to red players only
BLUETALK - Allows the server admin to speak to blue players only
RESETGAME - Ends the current game and starts on the next map
LASTGAME -
LOCKGAME -
EXITGAME -
EXITMISSION -
!TIMEOFDAYRATE [seconds?] - Adjusts how fast the day/night cycle works. Enter the length in seconds between start and end of day
!TIMEOFDAY [Time] - Determines the time of day based on 24-hour clock
That's the current list of known Joint Operations console commands. As I mentioned earlier, I need knowledgeable players to send me accurate descriptions of the above commands, and of course any new ones not listed here so I can update this list for all players to use.
The next section has a few neat tweaks and wraps up the entire guide.
Here we are at the end of another TweakGuides.com tweak guide. Only a few more tweaks to go, but ones which might help you gain a few more FPS and get some more out of this great game
Disable Startup/Menu Movies
Joint Operations has several movies which load up at the start of the game and also appear in the main game menus. These movies take up valuable memory and also increase startup times. To prevent these movies from loading, you can do the following. Go to your \NovaLogic\Joint Operations Typhoon Rising\ directory, and find the following files:
Intro.bik - this is the introductory movie which plays as Joint Operations is loading
main.bik - this is the same movie as Intro.bik, but it plays in middle of the main menu
header.bik - this is the 'waving flag' movie which plays at the top of the menu screens
footer.bik - this is another 'waving flag' movie which plays at the bottom of the menu screens
To prevent any or all of these movies from loading up with the game, make backup copies of the original movies and put them somewhere safe (or rename them to something else). Then create new blank text files and give them the same name as the movie(s) you want to replace, and place them in the Joint Operations directory. To save you time, I have created blank movie files which you can download and use from here (Skipintro_JO.zip, 1KB).
Taking Screenshots
There are several ways you can take screenshots in Joint Operations. The most common way is to use the Function 11 (F11) key. This will take a screenshot and place it in your \NovaLogic\Joint Operations Typhoon Rising\ directory in medium quality .jpg format. However, if you want a better quality screenshot, you can do one of the following:
For most people I highly recommend using Fraps as it is free and has many other useful functions, such as recording in-game movies and measuring framerates.
Conclusion
That pretty much concludes all the tips and tweaks I have for Joint Operations at the moment. I hope the guide has been useful to you, but I want to tap your knowledge to make this guide even more useful for all Joint Operations players: send me your working tweaks, tips and any corrections/updates. I've only included tweaks which I have tested and which work in the current guide, however there must be many more tweaks for this game, and people who know more Console Commands, and so on. Send them in to me and I'll include them in this guide for all to share. Even if you just want to say "hi", or let me know what you think about the guide, Email Me. I'd love to hear from you. Just keep in mind that I can't provide personal tech support or tweaking advice.
If you're new to TweakGuides.com, make sure to check out my other Game Tweak Guides, as well as the TweakGuides Tweaking Companion.
Links and Credits
I wrote this guide based primarily on my own testing and research, because not much information is available on the Black Hawk Down/Joint Operations graphics engine. However I did find a range of sites very useful in gathering more information about the game. If you're a Joint Operations fan I suggest you check them out:
Official Joint Operations Site
NovaLogic Support Site
NovaWorld Joint Operations Forum
Nova-Inside Joint Operations Forum
FileShack Joint Operations Section
Just a reminder - make sure to check back on this guide regularly, as I will definitely keep it updated with the latest feedback from users and more testing, and as new patches are released for the game. Thanks for reading the guide!
 Fire Emblem: Awakening Guide – Paralogue 8: A Duel Disgraced Guide - GamersHeroes
 What does a Mass Effect MMO look like?
 GTA 5 Essentials #5: Beginnings and Endings
 Lords of the Fallen guide: First Warden boss battle
 Wolfensteins New Order is anything but