
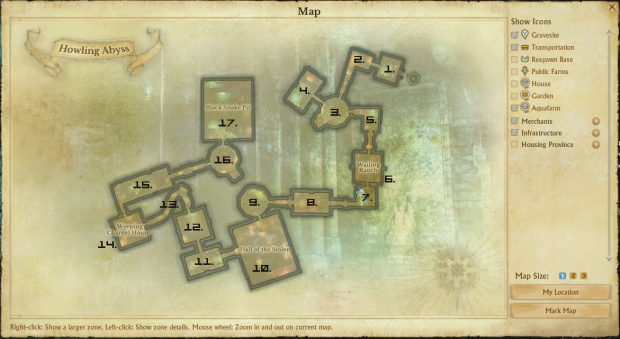
This is a level 50 dungeon located at the northernmost point of Hellswamp. There is another version of this dungeon that characters below level 50 can enter called Howling Abyss – this dungeon is queued from the same area and drops different gear.
I’ll briefly cover some of the mobs you will encounter in GHA and the environmental objects you should pay attention to, though the rest I will leave for you to discover.
You’ll encounter quite the variety of mobs throughout this dungeon, doing everything from physical, magical, and DoT damage. Most of the time the damage type is pretty obvious – a soldier, for example, does mostly physical. Keep in mind many of these mobs spawn in groups, and ranged mobs prioritise ranged characters in your party. When the tank pulls, he should be ready to either CC or taunt the other nearby creatures.
Some special rooms to mention
Room 3 features mobs on ledges that will drop explosive barrels on the party. There are cannons on the ground that you can use to kill them. Alternatively, you can just shoot at range, or climb up the vines to reach them. Try to avoid the barrels as each one will do 1k+ damage. Once you’re done here, proceed to Room 4 where there will be a chest containing a key that opens the gate to Room 5.
Room 5 is where the twin-headed snakes and snake eggs are introduced. There are torches along the walls. Pick one up and use it on hatched snakes to clear them quickly. Throw fire on the pile of wood blocking your path to continue.
Room 7 has a giant blue monster. Kill him, pick up the axe he drops, and use it to kill the Worshippers. It should more or less clear the entire room.
The hallway before Room 9 introduces explosive barrels the party can pick up and roll down slopes. Done correctly, and the barrel will kill everything in the hallway. For Room 9, focus the Medusa, pick up her head once she is dead, and use it to turn the other (shielded) mobs into stone. In statue state, they’ll go down in a couple hits. Use the trade packs lying around to depress the stone pressure plates, opening the gate to an attached room where a lever will open a gate to the next area.
Finally, Room 16 is occupied by another Medusa + friends. Once you’re done clearing them, pull the lever to raise the water level in the room. There’s a short ladder against one of the walls you can now reach. Pull the second lever to raise the water high enough to continue to the final boss.
The Bosses
Viboros The Golden
Rank: 50***
Health: 280,000
This big, two-headed snake looks scary but he’s all bark and no bite. Your standard pull will do just fine here – tank takes aggro and the rest of the party kites. He has a couple of abilities to watch out for, but none of them will do party-wipe damage.
- When he freezes the ground, you have a couple of seconds to move out. Otherwise, you’ll be frozen for a brief moment.
- He will occasionally charge at his target, and you can dodge this ability. If you get hit, you will be tripped for about two seconds.
- He spits some projectiles in a cone in front of him, but you shouldn’t worry about this.
- Most important to remember are the eggs. At various stages of his health, he will spawn increasing number of eggs. Kill the eggs before they spawn, or you’ll be dealing with an army of baby twin-headed snakes.
He drops Unidentified Armour and Weapons from the Astral Ranger, Nightblade, and Scion set. He also drops Shroudmaster and Dreadnought accessories. The chest he spawns on death drops the headpiece of one of the dungeon sets.
Ironblade Knight Captain Travis Godfrey
Rank: 50***
Health: 280,000
Expect to burn pots on this one. While Godfrey isn’t brutally challenging, he does have some tricks and abilities that will wipe a group if you aren’t prepared. Also beware of bleed damage; I recommend HoTs whenever possible.
- At the beginning of the fight, when the tank pulls first aggro, he will use a skill combo that does an insane amount of burst. A fully geared tank can expect to take up to half his health in damage. Healers should start casting as soon as the tank makes his first attack.
- Keep your distance. Throughout the fight Godfrey will shoot radial projectiles from his body that do 1k+ damage.
- Don’t group up, unless you’re in melee. The boss will occasionally leap between targets, and this damage is unavoidable. Your best shot at avoiding it is just staying far away. He’s more likely to use this ability when people are clumped together.
- He casts lightning on the ground that zaps you three times. It looks like a black/purple ring (which is hard to see in the dungeon lighting) and sounds exactly as you would expect. The first two zaps are warning shots, and you can run out of them without taking too much damage. If you don’t, the last zap can take off 3k+ HP.
- He spawns an army of frozen soldiers that move at a snail’s pace. Just kite these guys. Don’t worry about killing them. Even if you get hit by them, it will only tickle. The only danger is that they can freeze you if you stand too close for too long. This freeze effect is, however, actually a good thing.
- His final big move turns him into a literal flaming tornado. He spins around a bit after setting himself on fire, then shoots into the air. After a brief delay he’ll explode, doing a metric ton of damage if you don’t do one of the following:
- Use Protective Wings from the Auramancy tree.
- Play your instrument when you see him first set on fire.
- Let yourself become frozen by one of the soldier adds as the fire starts.
If you’re quick enough, you’ll be able to kill him before he does the fire-tornado twice. Otherwise, rinse and repeat. He cycles through his abilities like clockwork.
Godfrey drops the dungeon sets’ pants and the Hungry Snake’s Fang.
Calleil The Cursed
Rank: 50***
Health: 270,000
This is by far the most difficult boss in the dungeon. I encourage you to keep trying even if you have to pay exorbitant amounts of gold in repair bills. It’s tough as hell, but holy shit is it rewarding when you finally beat it properly.
- Stand in the right spot. Before the fight even begins, make sure everyone knows where to stand. More than the other bosses, position matters a lot in this one. The “safe” places:
- When you walk into the room, turn left. This corner has ledges along the wall. All ranged characters, including healers, should stand on one of these ledges.
- There’s a brazier/torch near the entrance. The tank should stand here if he is melee.
- In each corner is a puddle of water. These puddles turn into geysers when the boss raises the water level in the room. Melee characters can stand here/run to them when trouble starts. If the tank is a mage, he can stand in the puddle closest to the ledges where the rest of his party is.
- Starting with Calleil’s single target abilities, they’re pretty standard in the sense that they just hit like a truck and nothing else. Have magic resist for this, or you will get one- or two-shotted. As a reference, a mage with 50% magic resist will still take 3k+ damage per single-target spell.
- Now the AoEs. The first one you’ll likely see is a sleep. A black cloud with an orange starburst in the centre appears on random party members. If you see it, try to avoid it. It will slow you and then sleep you after a couple seconds.
- After the sleep, Calleil may spawn an enormous fireball on your face. This fireball will explode after a short delay. Move out of it. Similarly, he may also mark the ground with what looks like lava. That’s the tell right before a barrage of fire. Move out of that too.
- Occasionally he will use a radial spell that silences people in the area. The silence doesn’t last as long as the sleep, but it will interrupt spells.
- Calleil also spawns a bunch of elemental adds. You can ignore them for the most part. They’re slower than Godfrey’s soldiers, if not stationary. They’ll do some AoE attacks if you’re close to them. People on the ledge will ignore basically all of this damage.
- Then the party-wipe skill. Calleil will summon water from below, flooding the room. If you’re on the ground and not in one of the puddles, the water will first trip you before dealing continuous damage over time. It’s electrified and hurts like hell. Get out of it as soon as possible, and better if you avoid it altogether.

Some tricks that worked for my group include bringing two or three Protective Wings into the fight. By having someone cast PW on the tank, it gives enough time for the healer(s) to replenish HP of everyone and wait for cooldowns. PW works as a nice “oh shit” button too, in the event that Calleil spits out all the AoEs in one area and you can’t possibly get out.
Stay together and watch the cast bar of the boss. He telegraphs most of his spells ahead of time, so you should be able to react with the appropriate skills.
DPS is not the most important factor here. You can slowly whittle him down if you’re patient and careful. The most crucial thing is holding aggro and sustain.
Calleil drops the dungeon sets’ shoes as well as the Serpent’s Malice sceptre and Monstrous Desire sceptre.
Musperosa’s Spirit
Rank: 50***
Health: 316,787
This guy has the potential to one-shot even the best geared tank. He’s currently bugged, so you will need to either ignore him (i.e. skip him entirely), or fight him knowing there’s almost no margin of error. You can kite him to death, but getting too close is basically a death.
How it’s supposed to work:
- Tag and kite. Keep your distance as his melee attacks will shred you to pieces.
- He will occasionally charge at his target. Dodge it, or you’ll be tripped and stunned. The charge also does a ton of damage.
- Avoid being near him in general. This includes being behind him as he has a tail-swipe that also hurts like hell.
- He will become Enraged after a while, turning him into an angry orange monster. You will do reduced damage while he’s Enraged, and he will do at least twice his usual damage. There are secret weapons lying at the entrance of the room. Use the secret weapon (it’s a harpoon) to break his Enraged state and stun him for 6+ seconds. This is the part that is bugged. The harpoon currently passes through the boss despite a direct hit, making them completely useless. If you do this boss legitimately, your only hope is to kite until Enraged wears off and hope no one dies during it. Forewarning, he will one-shot everyone in this state if he so much as touches you.
Musperosa’s Spirit drops the dungeon sets’ gloves, arms, and belts. He also has a chance to drop similar sets as Viboros.
Ancient Titan Musperosa
Rank: 50***
Health: 320,000
Woo! Last boss. Seriously, once you get to this one it’s basically GG. He’s like a bigger, stompier version of the previous boss. Most of the stuff I mentioned earlier works here as well, with some additions:
- The first spell he will probably use looks like a green thread that connects some, if not all party members, to the boss. When you see it, run immediately towards one of the corner’s of the room. There, you will find shields that you can pick up. One person picks up this shield and presses R to activate it. This spawns a shield around all allies in a small radius that looks like Conversion Shield. This will reflect the spell back at the boss, turning him into stone. Otherwise, you will be turned into stone.
- If you think you won’t be able to make it to a shield, use a buff or HoT. The effect will persist even when you’re a statue. For example, I like playing Ode to Recovery just before turning to stone so that I can continue healing.
- Sometimes he will spit out a volley of glowing white orbs. They explode after a delay. Avoid them.
- At some point he will lasso the party towards him. As soon as your feet hit the ground, get as far away from him as possible. He follows up the lasso with a short range AoE that will kill people who are too close.
- Most of his melee attacks don’t hurt that much, but beware of the overhead swipe he does. This attack has the potential to one-shot a tank. It does miss, however.
- The secret weapon harpoons work on him. Have someone use one when he is Enraged to prevent death and to buy some time.
That’s it! He’s incredibly easy and straight-forward compared to someone like Calleil. In fact, it’s possible for one person to take him down alone. While it’s totally not advised to solo him, a ranged DPS can kite him to death. If you do die, use whatever AoE heals and buffs you can to help whoever is left in the room. You can totally heal through the door, if it comes down to that.
Ancient Titan Musperosa drops the dungeon sets’ chest piece. He also drops the Reverse Thornscale Shield.
Who to bring?
The Core
- The Tank. This guy should be fully spec’d with plenty of CC and taunts at his disposal. Plate armour, especially the set from this dungeon, is good for most mobs. If you want to do Calleil properly, I recommend switching to a full cloth set just for that boss.
- The Healer. A mixture of Vitalism and Songcraft will be needed to keep up with the incoming damage. Songcraft skills are great to stay useful while regenerating mana mid-fight. Vitalism is where your punch is; Fervent Healing is almost a must-have for those burst situations.
- The DPS. This person should preferably be ranged, as most of the bosses in GHA are extremely punishing in melee. Godfrey, for example, jumps around a lot and as a melee you will not be hitting him for half the fight. Not to mention some bosses will outright kill you in one shot if you’re too close and unlucky.
The Rest
- The CC. For a group that is not fully geared, i.e. a party that just started doing GHA runs, one person with the Witchcraft tree will make your life a thousand times easier. The trash mobs like to come in groups of threes. Bubble one, Earthen Grip the second, and take down the third. Plus, you can grant sleep immunity as well as other useful utilities.
- The Wildcard. The last person in the party is free to be whatever they want. Of course, more of any role expressed above will make certain areas easier. More DPS is always good though.
What to bring?
While Hasla gear isn’t completely necessary, most people running GHA should have at least one Hasla weapon. The bosses, and even the trash mobs, have quite the large health pools. You will want to do as much damage as you can, as quickly as you can, in order to lessen the burden on the tank and healer.
I also recommend you bring at least the quest armour from Hasla/Karkasse. The mobs hit pretty hard, and any extra bit of defence helps.
The Loot
Armour
CLOTH SET – “Fallen Martyr”
- (3Set) Increases Intelligence +20.
- (5Set) Increases Cast Speed +10% for 10 sec after a Magic Critical attack. Cooldown: 3 min
- (7Set) Has a 3% chance to cast lightning on a target and increase Attack +650% after a successful Magic Attack.
LEATHER SET – “High Inquisitor”
- (3Set) Increases Critical Damage +19.9%.
- (5Set) Occasionally reduces all received damage -80% for 2 seconds. Cooldown: 3 min
- (7Set) Occasionally increases Agility +100 and Attack Speed +50% for 5 seconds. Cooldown: 3 min
PLATE SET – “Corrupt Paladin”
- (3Set) Increases Physical Defense +314 and Magic Defense +226.
- (5Set) Reflects 6% melee damage to attackers.
- (7Set) Occasionally creates fireballs around the caster and deals constant #{buff_total_avg_damage} Magic Damage for #{buff_duration}, while converting 80% of received damage to health. Cooldown: 3 min
MISCELLANEOUS
- “Handle with Care” – [Necklace] Has a 15% chance to cast lightning on a target and increase Attack +100% after a successful Magic Attack.
Weapons
- “Serpent’s Malice” – [Sceptre]
- “Reverse Thornscale Shield” – [Shield]
- “Monstrous Desire” – [Sceptre]
- “Childkiller’s Viper Fang” – [Bow]
- “Hungry Snake’s Fang” – [Shortspear]


 Until Dawn Guide: Totem Location Guide
 Murdered Soul Suspect Ghost Girl Guide
 Minecraft Mod Examination: Wild Caves
 Destiny: House of Wolves – the fastest way to level 34
 Walkthrough Life is Strange – Episode 3: Chaos Theory