Earlier this month I discussed my initial impressions regarding raids in WildStar and whether or not I thought they lived up to the “hardcore” label that Carbine has given them. After clearing the first floor of Genetic Archives, I didn’t feel that particular portion of the raid was quite as hardcore as we were lead to believe, but it did pose a number of challenges and had more complex fights than most other MMORPGs are currently capable of. These challenges are unique to WildStar because of the combat system and the ability for players to actively dodge telegraphs means that even more difficult, twitch-based obstacles can be implemented into the game. Now that I’ve experienced more though, can I call it hardcore raiding yet?
This week my guild was able to clear the first two bosses, and two mini-bosses, of the second floor of the Genetic Archives. I felt that both of these fights were completely different than any of the fights on the first floor in both of their difficulty and their general mechanics. Additionally, roles have changed quite a bit during the last month as I know have both a Stalker Tank and DPS perspective of the first four fights and I’ve seen the considerable differences that group composition can make. While the first floor was almost completely based on learning the mechanics of each fights, and punishing the entire group for a single mistake, the second floor seems more about an overall competence and damage check.
There’s nothing quite like easily obtained, shiny-purple objects. I’m talking about epic gear of course, and there’s no better place to get it than the second floor of genetic archives. It’s almost as if Carbine preemptively felt sorry for the next four boss fights and just wanted to throw equipment at WildStar players so they wouldn’t quit out of frustration. Before reaching Phage Maw, or the Phagetech Prototypes, there are two mini-bosses and two random challenges (out of a possible four each week) that drop some pretty substantial upgrades from Veteran Dungeon gear and even slight upgrades from the first floor.
The Guardians are a good warmup for the real fights ahead.
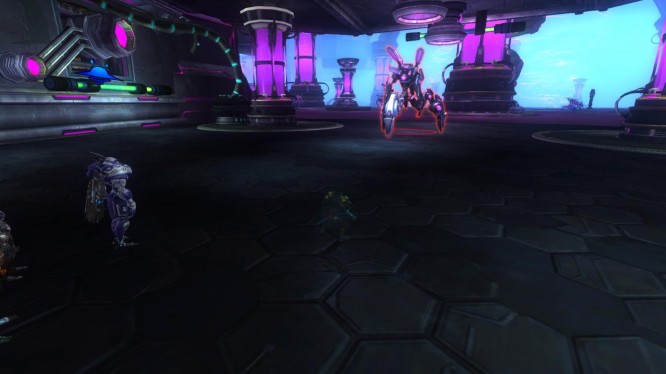
The minibosses are two Phagetech Guardians that block the path to either Phage Maw or the Phagetech Prototypes and neither are particularly difficult to beat, but they both possess interesting challenges. They are also essentially the same fight, except one spawns robots that shoots chain lightning and the other spawns robots that explode after a certain amount of time. The rest of the fight is mostly a tank and spank, but they will occasionally grapple random players and need to be interrupted while casting specific telegraphs. Failing to either dodge telegraphs or interrupt the guardians will cause all member hit to be sent to a room above the fight, where players are required to dodge lasers and jump back down from the platform. There are really no requirements for this fight, and a good number of the group can die before a wipe is needed; the most important components are clearing the additional mobs that spawn and properly interrupting the guardians.
The other challenges that spawn loot are located in the rooms connected to Phage Maw, and the Prototypes, and alternate between two separate paths on a weekly basis. These challenges are generally pretty easy and involve tasks like killing three robots within a certain amount of time, not spreading AOE to the rest of your team, or interrupting specific moves from enemies that teleport around the room. Some of these challenges can be reset and attempted again, but others you only get one shot. Since initially learning each of these challenges we’ve only failed to complete two on the first try, so it’s really a great opportunity to gear up on a weekly basis.
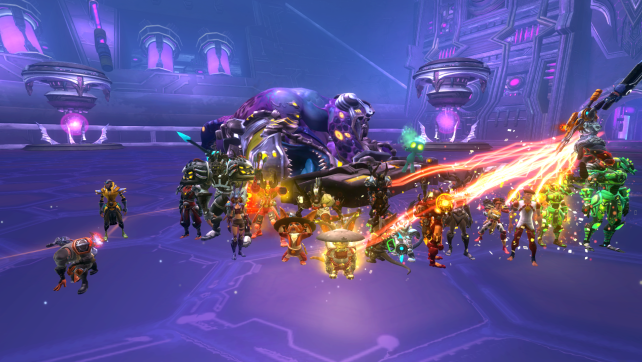
Up until now, most fights were focused on the DPS staying alive and coordinating interrupts or telegraphs, and the tank’s only duty was to stay alive and hold threat. Even most veteran dungeons were more difficult to tank than Experiment X-89 or Kuralak the Defiler, but the Phagetech Prototypes were the first time I’ve really been challenge as a tank in the Genetic Archives. For this fight there are four bosses in total but only two are active at a time. This means it’s still a two-tank fight, but each boss has to be positioned differently depending on which other boss is currently active. The way bosses shift is staggered so that both tanks don’t have to switch targets simultaneously.

By the time our excitement upon killing the Prototypes subsided the bosses had despawn…
There are a number of mechanics unique to each of the bosses that makes this fight so tricky. The four Prototypes are: The Commander, Augmenter, Protector, and Fabricator. The Commander can link raid members together to cause damage, force the other prototype to use their abilities, and can hit the tank, or anyone else unfortunate enough to be standing in the way, for an extensive amount of damage. The Augmenter summons repair bots and casts cross-shaped telegraphs on the ground. The Protector spawns waves around the room, similar to Deadringer Shallaos in Sanctuary of the Swordmaiden, creates a singularity that pulls raid members into it, and can swap positions with the other active boss. Finally, the Fabricator summons self-destructing bots that leave massive AOE on the ground for the rest of the fight.
In order for things to go according to plan, whenever the Augmenter is active the other boss needs to be tanked a decent distance away and all DPS needs to focus on its repair bots. However, whenever the Fabricator is active the other boss needs to be stacked on it, and preferably against a wall, so that the damage can cleave both bosses and the bots that he spawns. The tricky part, in addition to avoiding all of the AOE and staying alive in general, is to position each boss accordingly before they despawn and getting threat on the next boss as it activates or if there’s a swap. There’s a lot of moving around in this fight and a lot of ways that everyone can die. Whichever tank is on the commander needs various escape and deflect mechanisms or an ill-timed Destruction Protocol could lead to its doom. Thankfully, once the rotations are down the fight can be finished with a less than full raid group and the 10-minute enrage timer is very lenient.
Unlike the Phagetech Prototypes fight, which is very coordination heavy and relies on individual skill, fighting Phage Maw essentially comes down to gear. My guild initially started attempts on Phage Maw and after two raid weeks of zero success we moved onto the prototypes. We downed the prototypes the next week and finally killed Phage Maw the week after; this was likely do to how much we geared up between attempts. There’s honestly nothing difficult to the Phage Maw fight besides timing bomb kills, but with Phagebomber addon that becomes fairly trivial as well.
The entire fight consists of the tank, preferably an Engineer, slowly rotating Phage Maw’s attacks around the room in a clockwise fashion, or counterclockwise if you want to be a rebel, while it randomly spits out bombs. The bombs do a high amount of damage so they need to be killed in order to stagger the damage because Phage Maw will eventually fly into the air and detonate all remaining bombs at once. After a certain amount of bomb waves he’ll fly up in the air and shoot lasers while the raid members need to fill up the generators and use the energy shield before Phage Maw comes crashing down. The phases are fairly rinse and repeat, but during each consecutive phase Phage Maw will launch additional bombs, which become impossible to handle by the third phase. During this phase the bombs are staggered by a single DPS, usually a Spellslinger, and everyone focuses on Phage Maw in an attempt to burn him down. However, if Phage Maw isn’t killed during this phase then it’s an instant wipe when he flies into the air and all active bombs detonate.
Dear Phage Maw, %@!# you.
That makes this fight a pretty standard DPS check because if a specific amount of damage isn’t achieved by a certain phase of the fight then it’s game over. There’s really no reason anyone should die during the normal phases throughout this fight, but it does happen from time to time. After getting Phage Maw to 4% health with only one person down we realized that as soon as anyone in our group dies there isn’t any point in trying to continue. What’s unfortunate is that once you hit this wall there’s not really anything else to do until next week’s raid. While it would be nice if everyone had a perfect skill rotation and runes, the best gear possible up until this point, and a high competence level, not every guild gets to pick and choose from the best on a weekly basis.
So far on the second level of the Genetic Archives it appears that there are two very polar ideas on how hardcore bosses are handled. On one side there’s a boss that requires a high level of coordination from every member of the group, but isn’t punishing once the mechanics are learned. Conversely, there’s also a boss whose only job is to prevent raid groups that aren’t heavily geared from progressing. That being said, I found the Phagetech Prototypes fight to be a pleasant experience with a solid learning curve that made me feel somewhat accomplished after defeating them, but Phage Maw is simply a frustrating barrier to further content.

 ArcheAge Hasla Herald: The Bad and Ugly .
 FAQ: What Sci Fi IP Should Be An MMO Next? .
 Newbie Blogger Initiative 2015 .
 Airtime MMO Stream Schedule (12/1/14 – 12/6/14) .
 E3 2015: E3 After Hours .