For the seasoned Minecraft player, zombies may be no problem for you, but they’re quite dangerous to villagers. Zombies chase villagers and can easily kill cornered villagers. In Normal mode or Hardcore mode, zombies turn these victims into more zombies, causing them to form swarms as they tear through the village.
Occasionally, a nearby village experiences a zombie siege at night, in which a horde of zombies appears and gains the ability to break down wooden doors in Normal mode. (They can already do this in Hardcore mode.) During these sieges, the village may lose many inhabitants unless you do something. Losing your villagers means precious time wasted in accumulating more resources from that village.
Do your best to stop zombie sieges, as they can significantly decrease your village size, meaning you’ll have to rebuild your village to receive the multitude of resources it used to provide. You’ll also have a village full of “zombie villagers,” which are mostly just a nuisance until you can restore them back to their human state.
Use torches to build a somewhat safe zone around the village, and kill off zombie infestations before they can reach villagers and expand. Take extra preemptive measures too, such as building iron golems and adding extra doors to houses.
Add fences around the village in addition to torches. This creates a further barrier to prevent zombie invasion. Or, if you can get enough iron, make iron golems to patrol the villages instead. The iron golems will fight the zombies for you within your village!
Villagers can repopulate their own cultures, but sometimes a zombie attack leaves an entire population devastated. Just like an episode of “The Walking Dead,” your entire village will be replaced by zombie villagers! Have no fear, though, — you can restore any zombie villager back to their normal state. To restore a villager, follow these steps:
Find a zombie villager.
This type of villager burns in the daylight, so make sure that a few are indoors. A zombie villager wearing a helmet is also immune to daylight.
Throw a splash potion of weakness at the zombie villager, and then promptly right-click him with a golden apple.
The effect from the potion lasts only briefly, so act swiftly with the golden apple.
Wait.
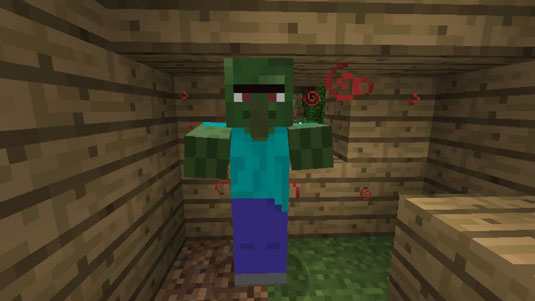
The zombie villager shakes slightly and emits red swirls, indicating that he’s reverting. Wait it out for a minute or so, and you have a villager.
If the new villagers can remain safe until the zombies have been either converted or slain, you will have restored a village to its former glory.
If you can’t find a village, build your own! Zombie villagers have the slight possibility of appearing in the same places as zombies do, so if you follow the steps in the preceding section to turn a zombie into a villager, you can start your colony.
A villager needs a home, of course. A villager lives in any enclosed space that has a wooden door. If you add extra doors, more villagers will decide to live in the same building — essentially, a door defines a living space.
After your colony has at least 10 villagers and 21 houses, iron golems may appear and defend your work. You can build a large colony by organizing a large number of houses or by building large manors or apartments that have numerous doors.
 How to Push Powerful Blocks in Minecraft with Piston Machines - For Dummies
 How to Earn Minecraft Scramble Badges - For Dummies
 How to Apply Dye to Minecraft Items - For Dummies
 Being Random with Code and Minecraft - For Dummies
 How to Build Walls, Ceilings, and Doors for Your Minecraft Construction - For Dummies