In the first two installments of the guide, I discussed how the game worked at the basic infrastructure level and the more complex political level. In this third section, I'm going to start and win a war—you should be able to do so as well if you play along.
And remember, here are the five sections of this guide:
Part One: Introduction and Interface
Part Two: Laws and Factions
Part Three: Diplomacy and War
Part Four: Relationships and Marriages
Part Five: Long-Term Planning
Making A Claim
There are many ways to succeed in Crusader Kings II, but as with most strategy games, consistent expansion is usually a good thing. “Pressing claims” is the most common way to engage in expansion. (More of this will be covered in the fifth section of this guide, “Long-Term Planning.”)
It's time to take a look at those “claims” that are available at the top of the screen. Claims come in three forms: weak, strong, and de jure. Weak claims are tied to specific circumstances and characters—for example, if a child controls the land that you has a weak claim on, then it can be “pressed” (pursued via war), but when the kids comes of age, the weak claim doesn't work. A strong claim is more direct, and can be pressed at any time for the character in question. A de jure claim is based on a character's title allowing them to have lands, and can be pressed at any time and never taken away.
Weak Claims
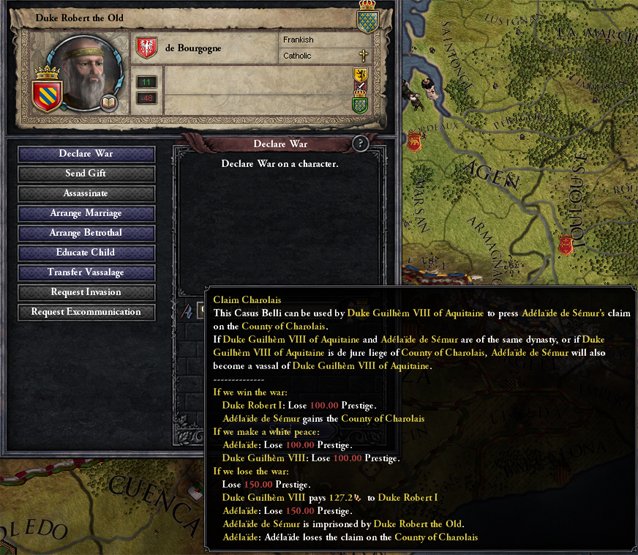
Let's give some examples. Click on the weak claim button and unless something dramatic has changed in your game, it will take you to a diplomacy screen with Duke Robert the Old of Burgundy. Here, you can see that you can press Adelaide de Sémur's weak claim on the county of Charolais. That'll remove its current count and add Adelaide.
But note the fine print in the second paragraph of the declaration of war: if Adelaide is of your dynasty, or if Charolais is your de jure holding, then Adelaide will become your vassal. Neither of these things are true—if they were, Adelaide would have the blood drop on her portrait, or Charolais would be an option in your Press De Jure Claim menu. Or an easier way to tell: if pressing a weak or strong claim would gain you a new vassal, the “If we win the war:” part of the Declare War tooltip would include “Adelaide de Semur WILL become your vassal” with the “WILL” in bright green.
That's not here, so essentially, you'd be replacing one count with another who likes you more. In rare circumstances, that can be a good thing, but most of the time—and right now—it's a waste of time. So let's move on.
De Jure Claim Expansion
Hover over the de jure claim button to see what counties our position as a duke entitles us to. Our title as the Duke of Gascogne should mean that the Count of Foix is our vassal. Instead, he's reporting to the Duke of Tolouse. Let's change that.
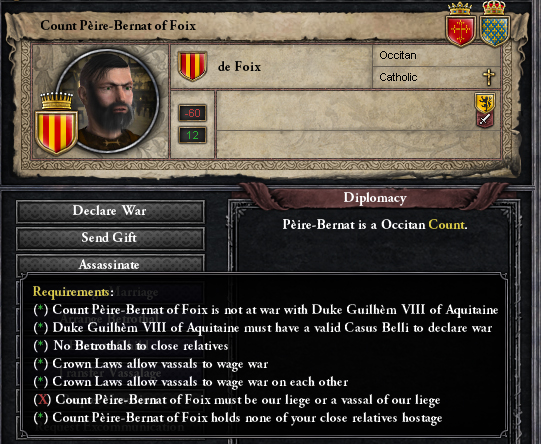
Click the de jure claim button, and we're taken to a diplomacy screen with Count Peire-Bernat of Foix. Note that “Declare War” is greyed out. Hover over it to see why. Note the X that says he has to be our liege or a vassal of our liege. That means we need to attack Duke instead of him directly.
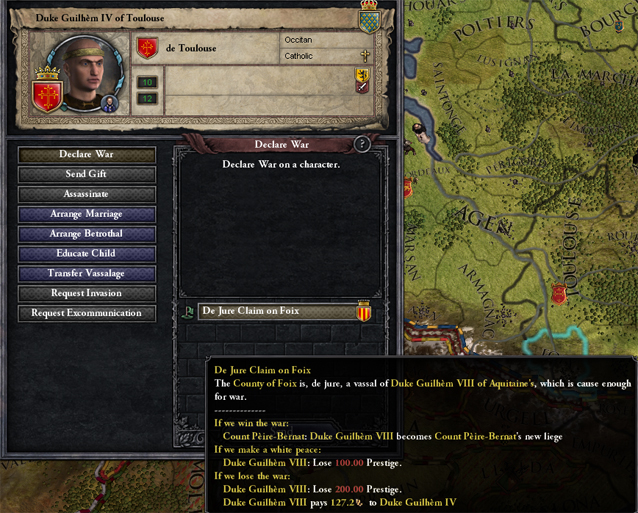
In order to quickly get to his liege, click on his portrait to get taken to his character screen. Above his head should be the Duke of Tolouse. Right-click on the Duke's face, and two options will appear. The one to the left goes to his character screen, the one to the right, diplomacy. Diplomacy's what we want. Throughout the course of Crusader Kings II, right-clicking lets you quickly enter diplomacy with that character.
Now Declare War is an option. We can see that if we win, his vassal becomes our vassal. This is a straightforward way for us to expand our lands, so let's do it.
War!
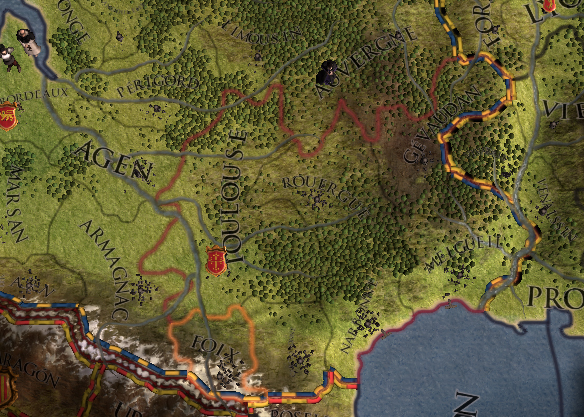
Assuming your game is paused, the first thing you'll see is that your enemy's lands are highlighted. The Duke of Toulouse's entire possessions have a dark red glow around then, while Foix, the county at the heart of the war, has a brighter orange outline. Possessing the county that you're warring over is more effective than simply possessing random enemy territory.
Raising Armies
If you're going to capture Foix and defeat Toulouse, you'll need soldiers. Open your military menu, by clicking the sword/helmet icon in the middle of the top left tab. There are three tabs immediately below: Retinues, Army Levies, and Fleet Levies. You should already start at Army Levies, but if not, click on it.
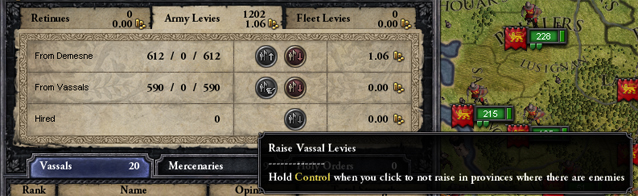
Directly below that are two rows: “From Demense” and “From Vassals.” Demense troops come directly from your lands and are always safe to raise. Vassal troops come from other lords, who will grow increasingly unhappy if you use them in aggressive wars. Still, for anything short of a sprawling empire, you'll want to have all those troops in your army as quickly as possible, so click the blue left button that get your soldiers (the right button sends them home).
Now you'll see small armies appear all over your lands. You'll want to combine them to create as big an army as possible—in this case, 1202 soldiers. (Once you reach armies of 8000 or more, they'll start losing troops due to attrition in enemy lands. Until then, though, you'll usually want all your troops in one, biggest possible army.)
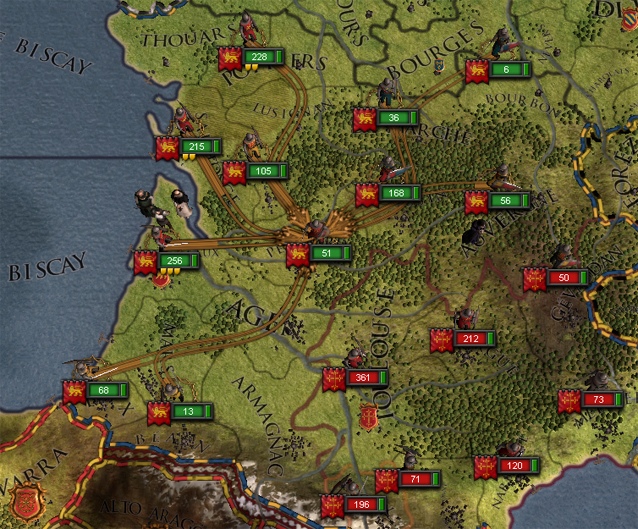
In order to combine your troops, you need to send them to the same place. On the map, left-click and drag to “lasso” all of your armies, just like in a conventional real-time strategy game or, for that matter, Baldur's Gate or Dragon Age games. Now, right-click on a province that will bring all your armies together. In this case, I've pointed my troops at Perigord, because of its central location. (I've also unpaused then quickly repaused the game so you can see that Toulouse has raised his men, and is undergoing the same process. Our troops have green numbers, the enemy's troops have red.)
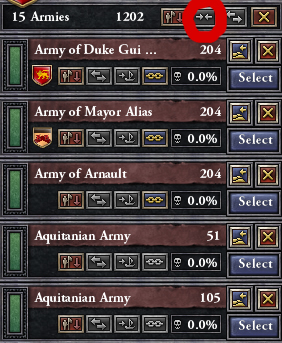
When the armies in the same province are all selected, you'll notice that a little button on the side of the screen with two arrows, representing the combining of armies, changes from grey to blue. When it does, click it, and you'll have a single larger army. With that, we can start to attack Toulouse.
Prosecuting the War
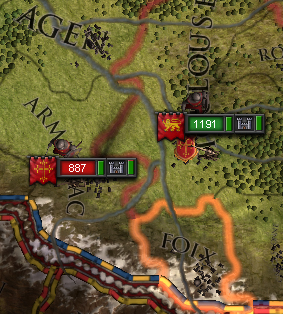
With my army combined, I've decided to attack the county of Toulouse, as it's his capital and it's closest to where my army was. As you can see, he's decided to attack Armagnac. The little castle icons next to each army indicate that they're besieging a holding in that county. The green bar to the right of the little castle shows the strength of the besieged units—when it drops all the way down, the siege will have ended. The vertical bar on the left of the castle indicates the army's morale. (Also, if you don't have enough troops to engage in a siege, a red flag will appear in front of the gate.)
Combat in Crusader Kings II is a fairly simple affair: the largest army usually wins, barring special circumstances. Winning battles also helps you win the war quickly, especially if you manage to capture the enemy lord—then you can instantly finish the war with a victory. Therefore in this case, it seems to be worthwhile to attack the slightly smaller Toulousean army, and attempt to win the war quickly.
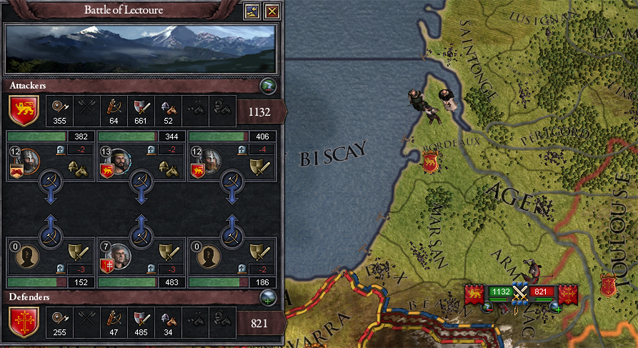
I've moved my army to Armagnac, and a battle has started. Your armies are divided into three wings, which attack each other—you can see the progression of the battle on the left side of the screen, if your army is selected. It feels like you can have control over the battle, but it's actually entirely automated.
One more important thing: if you look directly at the map here, you'll see that the enemy army has a little circle with a green plus next to it, while my army has the same with a minus. Those are terrain bonuses—since he was in Armagnac first, and I attacked him there, he has a defensive bonus. This is important, because terrain bonuses are the only way to explain how I actually lose this battle.
Replacements and New Armies
This loss may be a bad thing for Aquitaine, but it's a good thing for this tutorial, because it gives the opportunity to explain how to replace and rebuild armies.
Battles in Crusader Kings II are usually decisive, where the stronger side overwhelms the weaker and then finishes them off. That's not the case here, where despite winning, the Toulousean army only has 549 men remaining. Given that we just raised an army of over twice that, we should be able to beat that given time to rebuild.
The first thing to do is to send the remaining army home. First, make sure that it's retreated into your lands. If you attempt to disband an army in enemy territory, then half of your men don't make it home, so replacing them takes longer. Click on the Disband button for the army, or go the Military tab and click the red arrows down next to the Demense and Vassal troops.
Why? Because the way replacements work, each vassal who doesn't have their army in the field gets replacements faster than those who do. A weakened army in the field prevents the home provinces from replacing lost units.
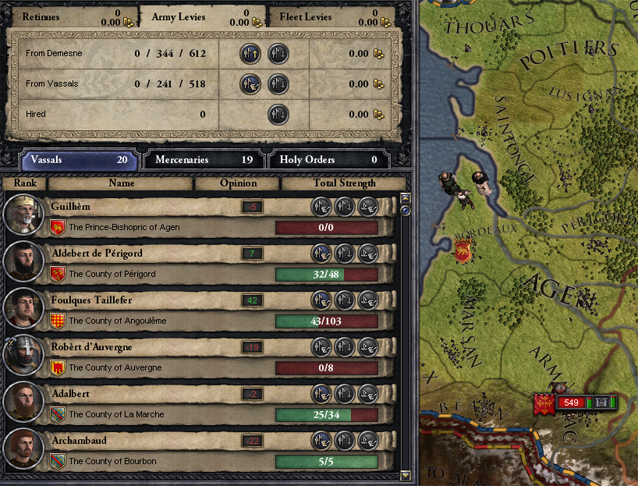
You can see how this works in the military tab. See how it says 0/344/612 and 0/241/518 for demense and vassal troops, respectively. The zeroes are troops in the field. The smaller middle numbers are the amount of troops available to be raised at that moment, while the bigger numbers on the right are the maximum allowable.
Here we have 585 troops that can be raised right now. That'll match the Toulousean forces, but we've already seen that just matching them isn't enough. We need to dominate them. Let a month pass, close the military tab, and reopen it. (Awkwardly, you have to close and re-open the military tab to see new troop numbers, they're not updated in real time.) That should get a pretty big burst of replacements. Raise the new army and join them together and we can whip Toulouse...right?
Stabbed in the Back!
Remember that Beatriz for Aquitaine faction we tried to deal with back in the Scheme section? Count Robert of Auvergne has decided that now, in the middle of a war, is the perfect time to launch his attack. We're going to tell him no, and he'll quickly declare war on us.
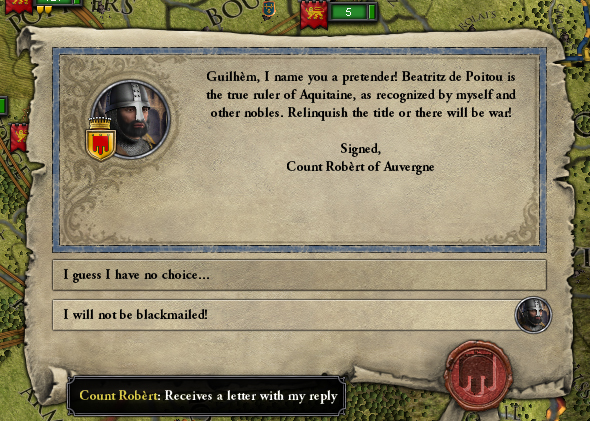
The problem is, he's right to try. A war is the perfect time to attack a weakened, distracted rival (I'll be spending a lot of time discussing how to time this properly in the Long-Term Planning section). Unfortunately for Count Robert, he doesn't have any allies, and his troops are pathetically weak, so reject his ultimatum. Sure, now we have a two-front war, but both sides are eminently defeatable.
Still, there will be times when these two-front wars aren't both winnable. It's in your interest to figure out which one needs to be fought more. In this case, losing the war with Toulouse costs us only gold and prestige. Losing the war with Auvergne, on the other hand, means we lose the Duchy of Aquitaine. Therefore: we fight Auvergne first to win, and if we're still in the war with Toulouse when that's done, we'll go for that too.
Who's Winning?
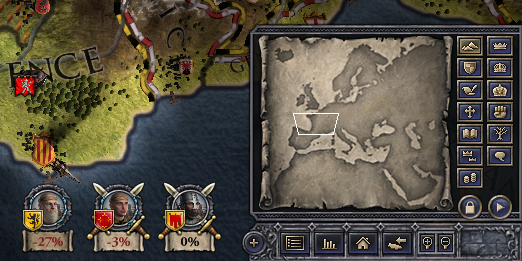
How do you tell who's winning? Take a look at the bottom right-hand side of the screen, left of the mini-map. There are two faces with numbers in this case. The left one is the war that the King of France happens to be fighting against the Duke of Flanders. We don't care about that one. The right one is the war with Auvergne, which just started, so the 0% indicates a draw. The middle one is our war with Toulouse—you can tell because it has the swords crossed behind the picture.
The number indicates the score of the war, with 100 on either side meaning it can be forced to end. Positive 100 means you win, negative 100 means you lose (if you or the enemy leader get captured in battle, the Warscore instantly changes to the 100 where the war will end). Right now we're at -3%, meaning we're losing slightly, but he's nowhere near being able to force an ending. We'll have to watch it—if the negative Warscore gets too big, we'll have to win victories or sieges to bring it down. But for now, it can be ignored.
With our much larger army, we should hunt down Auvergne's troops, beat them, then go besiege their castle. Having done that, we can look at how the Warscore works. Click on the number there on the bottom of the screen, and you'll see something like this.
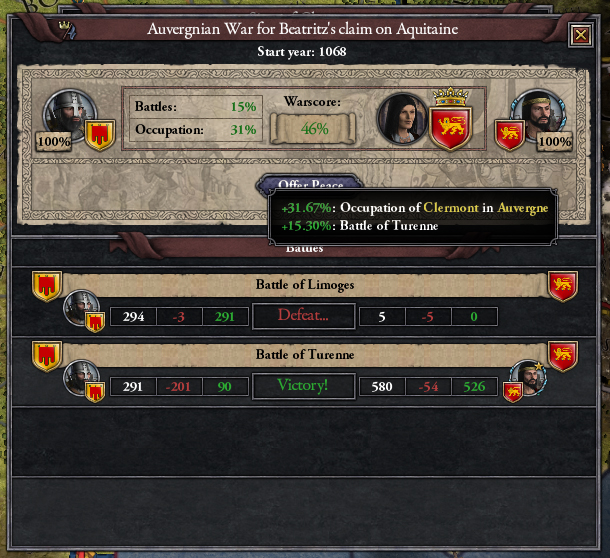
Here we've beaten Auvergne's army, and won one siege in their home county. The Warscore is a positive 46%, meaning that we're clearly winning. Hover the mouse over the score, and you'll see a breakdown of exactly how it got that way—the battle is 15%, while capturing their main castle is good for 31%. This war is as good as won; we just need to win a couple more sieges.
As a side note—occasionally you'll want to check in on the status of wars that you're not directly involved in. Click on a county that's involved in the war, and you'll see a bar with current wars. Hover your mouse over it to see the status. With the latest CK2 patch, it's easy to see which side is winning.
Siege Warfare
Most medieval wars weren't won by battles in the field, but by protracted siege warfare. Sieges are fairly simple, but they follow a few important rules.
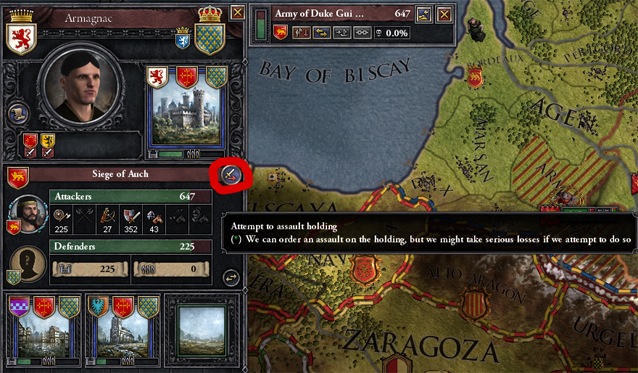
In order to start a siege, you simply need your army in the province with an enemy holding, and they'll besiege them automatically. If you click directly on that province, you can see more information. Here, in the Siege of Auch, I have an army of 647 men attacking a castle with 225 soldiers.
See the little sword with an arrow below it above the Attackers bar? That's the assault button. If you're feeling impatient, click it, and you'll try to storm the castle. Attackers take heavy casualties that way, though. As a general rule, do not assault a holding unless you have 10 times more attackers then there are defenders.
A little more information—you attack the holdings in order, so the castle pictured on top of the county screen here is first. That will be followed by the city on the bottom left, then the church on the bottom center. You can see the little red shields above each of these, indicating that all have been captured by Toulouse. Another way to see that information is on the main map, where the county of Armagnac has solid diagonal stripes that indicate that every holding in the county has been captured. If not all were captured, those stripes would be broken up into dashes.
These captured holdings are only held for the duration of the war. Even if you surrendered to Toulouse, you'd still remain in possession of everything you had before. Crusader Kings II is not like Civilization where conquests are permanent. They have to be planned and carried out legally, via diplomacy.
Fleets, Mercenaries, and Retinues
We don't need to use any of these three things to win this particular war, but you may need them in the future. Fleets are raised just like armies. Each boat can carry 100 men, so 14 boats will hold an army of 1400 men, etc. In order to move troops via boat, put the navy in the sea next to the province, select the army, and right-click on the sea (not the boats.). Then to move the army off the ships, select them by clicking the icon with armor and the troop numbers next to the boats, and right-clicking the land.
You'll also have the chance to hire mercenaries, down on the lower half of the screen. You can see how much they cost initially as well as their monthly cost. That gets pretty prohibitive, especially early in the game. On the other hand, because the mercenaries act as a single unit, they're significantly better than most vassal troops. Mercenaries are high-risk, high-reward.
As the game progresses, you'll have the chance to hire Holy Orders for faith points, but they can only be used against non-Christians. They also cost gold to maintain—less than equivalent mercenaries, perhaps, but still a lot. They're occasionally necessary against the tough Muslim rulers in Spain.
Finally, the Legacy Of Rome expansion added Retinues. These are semi-permanent batches of troops attached to specific lords. They cost less than mercenaries to maintain, but there's a cap on how many you can have. They also start with a handful of men and slowly fill up, so they're best acquired during times of peace when you know that your economy can manage them.
The End Of War
With Auvergne's rebellion easily crushable, and Toulouse eventually going to be overwhelmed (even if you have to disband, wait, and reform armies a few times, as discussed earlier). The fastest ways to beat them are, in usual order of importance:
Beat their army: In addition to battles improving your Warscore and the possibility of capturing the enemy leader, knocking out the enemy's army will prevent them from besieging your castles.
Conquer/defend the pivotal provinces: In this war, that's the county of Foix. Capturing it will improve your Warscore much more than capturing random other counties. This importance increases as the war progresses.
Retake captured provinces: In addition to improving the Warscore, recently conquered provinces are generally easier to recapture, and will allow those counties to once again provide you with gold and troops.
Capture enemy provinces: This is always good, but not always best.
Your enemies will start to surrender automatically when the Warscore nears 100% for you. There's very little reason to ever say no in these cases. When Auvergne surrenders, we'll have several characters taken prisoner, as well as paying restitution. When Toulouse surrenders, we'll simply take over the county. Likewise, if we lose the war, the enemy will automatically force victory.
There are times when you may want to try to end the war early. For example, if Auvergne's rebellion had been a bigger threat, it might have made sense to stop fighting Toulouse. If you open diplomacy with him, you'll have the offer to do a White Peace, which ends the war with no major problems on each side. In order to get him to accept that, however, you usually have to be winning the war. You can also surrender at any point to get the enemies out of your hair while you settle more important scores.
Conclusion
It's impossible for me to guess how your wars might have gone, but you have all the tools you need to beat Toulouse in the war we started. If you can manage that, you're well on your way to successful military operations in Crusader Kings II. In the next installment of this guide, we're going to look at the Relationship system that makes CK2 so incredible, as well how to use marriages and form alliances.

 Fallout 4: Power Armor - Repair and Modding, Frame locations
 How to control PS4 with Voice Commands
 Fallout 4: Unlock Cait as Companion, romance guide
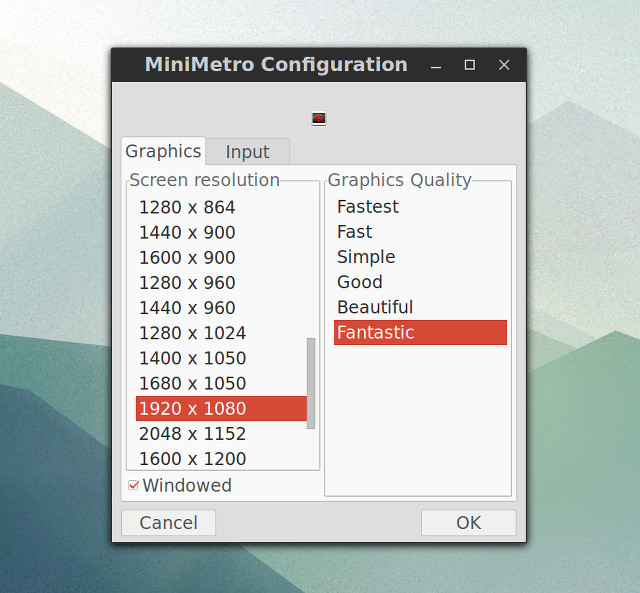 Mini Metro: A Challenging Subway System Mind Teaser
 Destiny Guide: How To Get Into Strike Solo On PlayStation 4