Unofficial Castlevania: Harmony of Despair Guide by vhayste for
This guide is for Castlevania: Harmony of Despair, a Xbox Live Arcade game that can be downloaded for 1200 MS points ($15). Harmony of Despair is a multiplayer arcade game that supports up to six players however, solo play is still possible and enjoyable. The game features 6 chapters which can be tackled in both modes. Player/players must defeat the boss on each chapter within the 30-minute time limit in order to clear the level and proceed to the next one. This timer will keep on counting down, even when you're browsing through the menus, settings or equipment. I will honestly call this as a bad design and sure is annoying since you'll always be in pressure. The good(?) thing however, is that if the time runs out, all the collected items, gold and equipment will be saved. This way, players don't need to mind the time but spend the allotted 30 minutes to grind and farm gold and items to equip, sell. Items and experienced gained for both single-player and multiplayer modes are shared between the player's characters (with the exception of certain equipment) so it is possible for a low level player to request the help of high level friends/allies and train their character(s). Author's Note Due to technical limitations, this guide is written while playing in single player. If a particular part requires multiplayer interaction, it will be noted and linked to a reliable reference, if possible. There is no fixed way of exploring the levels so just refer to the maps for instructions. Should there be details that a player must be aware of for each level, it will be marked on the map and will be discussed in this guide. Controls Chests Blue Chests - These contain random items in solo play. However in multiplayer, these chests contain the valuable item called Water of Life. You can only carry one WoL at any time and the person that opens the chest gets it. That said, if a player is already carrying a WoL, he/she must not open a blue chest. Otherwise, it will just be wasted. Reviving Players Skeleton players can be revived to full HP/MP by using a Water of Life. This item is very limited in number per chapter so players must use this item carefully. As mentioned above, Water of Life can be acquired from Blue Chests and players can only possess one at a time. If a player that has WoL already opens a blue chest, it will be wasted (and may trigger hostile reactions from teammates). To use a WoL on a skeleton player, stand next to him/her and press RT. Due to the value of WoL, you should consider reviving a skeleton player that possesses a WoL (he/she can't use it on himself) or a very skilled/ high leveled player that can help team go through the entire chapter. Stats ATK – Attack rating; determines your character's damage output or attack power *Shanoa and Charlotte's glyph/spell absorption is also affected by the MND stat. Tip: Pre-set food items in the levels will increase your character's core stats (STR, CON, INT, MND, LCK, etc.) when consumed at full (or nearly full) health. Since these increases are permanent, it would be to your advantage to eat all the food you can find (and not get hit) while exploring the castle. (Unconfirmed from this source.) Attributes Status Ailments Poison – The common status ailment across all games. You'll gradually lose HP until this ailment is cured. You can get this ailment from certain enemy attacks or by consuming Aminita mushrooms and Rusty Food Tins. Use an Anti-Venom to remove this status.
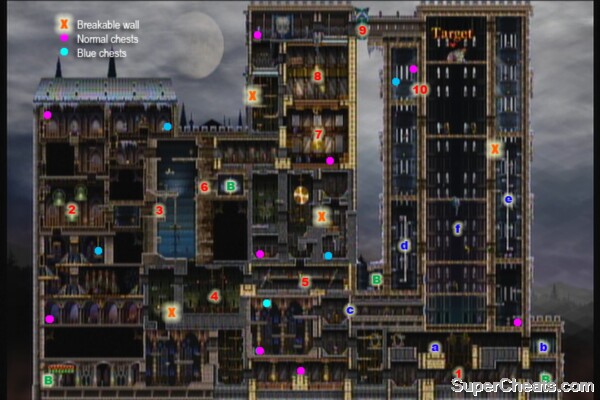
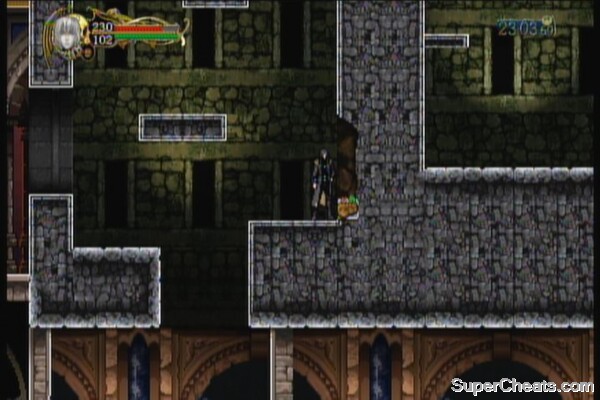
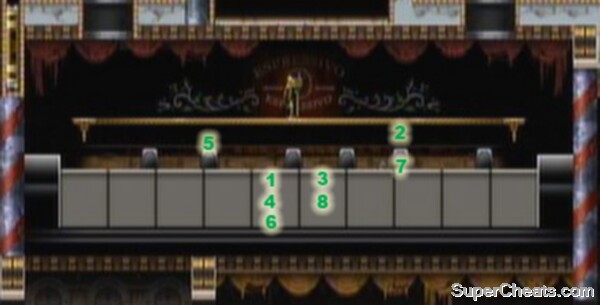
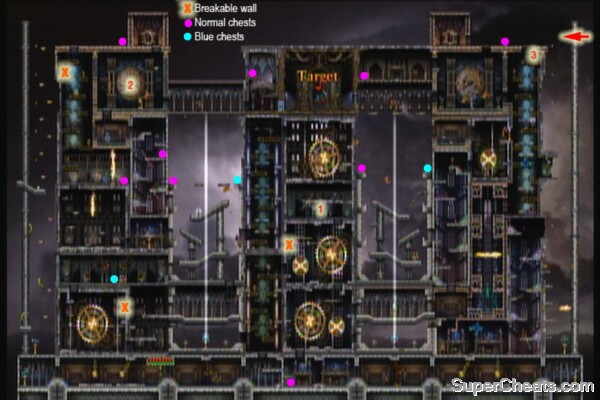
There is no fixed way of exploring the area so just refer to the map for points of interest and more details regarding them. The book near the starting point will open up the menu for you to equip the armors and weapons you have acquired. There are similar points like this scattered in the area so make sure to visit them if you ever acquired better gears to keep your equipment updated. Start off by killing the zombies near the starting point until they drop a Hobo's Clothes. Return to the book and equip it for added defense. 1.Couple of balancing scales; need at least two players to access the chest b. Chest (a) should be accessible jumping stepping on the rightmost platform then quickly jumping to the left as it goes down. It may take a few tries but its definitely possible.
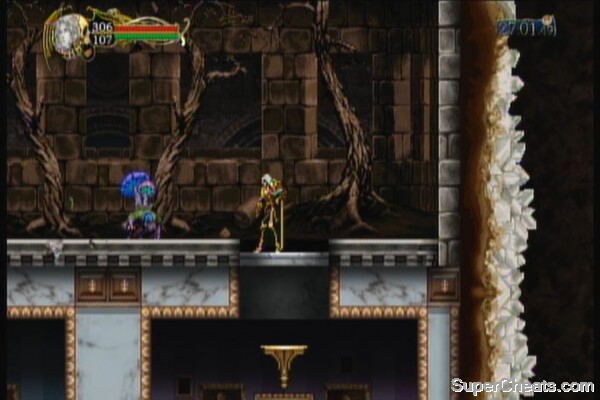
2.(Hidden Item) Slide under the middle bell so you can stand up inside it. Now jump and a yellow bell should fall down from the left. There is a Red Licorice on the top right corner of the room which recovers 15 HP and MP. However, it lowers LCK which can make it harder for enemies to drop items.
3.Pulling the lever will drain the water and fill up the room with four mermans below. 4.Keep jumping up the water to reach the upper right corridor. 5.Pull the switch to open the door (c). You can clear the enemies there to make it easier for you to deal with the boss later. This is the shortest path to the boss and the easiest way to defeat it since you will clear the enemies underneath it. The downside however is that you won't be able to collect that many chests compared to the original path. 6.Pull lever to lower the drawbridge. Don't forget to check out the blue chest on the topmost room. 7.You need to time your jump to ride the pendulum to reach the other side. 8.This room is a bit tricky since you'll need to time your jump, especially on the upper pendulum. 9.This elevator needs two persons; while rides it while the other activates it. This leads to a book and a path leading to the rooms under the boss to clear the enemies there (f). When playing solo, you can just bypass the elevator. 10.You can enter this room when fighting the boss. Before it completely destroys the floor, hug the left wall so you'll land on the alcove containing the two extra chests.
The fire-breathing skeleton contraptions in (d) and (e) can be destroyed to make it easier for you to jump on the upper platforms. If you need food, you may want to destroy the hidden breakable walls scattered in this stage. They are already marked in the map for your convenience. These specific foods also increase your stats so make sure to grab them all whenever you can. Boss: Gergoth
Refer to the map for points of interest and more details regarding them. The book near the starting point will open up the menu for you to equip the armors and weapons you have acquired. There are similar points like this scattered in the area so make sure to visit them if you ever acquired better gears to keep your equipment updated.
This stage will introduce you to new enemies. The Moldy Corpses drops Amanita Mushrooms which can poison your character for a few seconds. You may want to deliberately pick one up so it can be registered to your Item Compendium but you must avoid them in the future.
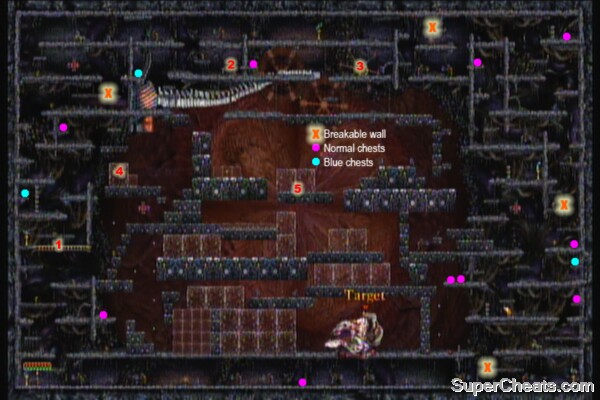
Another thing to note as well are the Iron Maidens scattered in the stage's many rooms. Stepping on one accidentally will cause massive damage so you must jump over them and avoid getting captured at all costs. If you noticed, there are pushable crates where some of the rooms where Iron Maidens are located. Push the crates to block them so you won't accidentally step into one. This stage's boss tends to move around the place and iron maidens play major role in its most damaging attack so blocking them will also prevent the boss from using them at all, making the boss fight ahead a lot more bearable. 1.Use the bone pillar as your foothold to reach the chest in the eastern ledge. 2.Use the bone pillars again to reach the chests inside the rooms on both side. 3.Destroy a few skulls to lower the bone pillar, just enough for your to reach the two chests on both ledges. 4.Activate the lever to open gate (a) 5.Activate this lever to open the gates on both sides of the boss. 6.(Hidden Item) After defeating the boss, you can obtain a hidden item here by playing a specific tune. Refer to the video below to learn how to accomplish this.
The only way to damage the boss is by attacking its head which must be done at close range. It will also release several cursed pink dolls that can drain your MP to zero and prevent any MP regeneration. These guys can be destroyed easily, though they can be annoying if they keep harassing you while you're trying to hit the boss AND destroy the puppet its trying to put inside the iron maiden. The boss will regularly release a cursed doll as it moves around the area. Have a few healing items ready (remember that you can carry several copies of the same item) since you'll be running around the area to defeat it.
Refer to the map for points of interest and more details regarding them. The book near the starting point will open up the menu for you to equip the armors and weapons you have acquired. There are similar points like this scattered in the area so make sure to visit them if you ever acquired better gears to keep your equipment updated. You need to move to the right side of the map, then jump up, proceed left then down again to reach the switch and the platform. The transparent jelly cubes here can be destroyed. Some of them contain enemies which you need to get rid off so you don't have to contend against them when you fight the boss. 1.Your main objective is to reach the lever here and move the platform. This boss is huge and has only select body parts as its weakness. This indestructible platform is essential to fight the boss and hit its weak spots. 2.The lever here will release the hammer though I would suggest skipping it if you're fighting the boss solo. The reason is that the boss needs to be standing in a correct spot for the hammer to hit it and deal massive damage and the mechanism needed to reposition it (#3) is a spawn point of infinite annoying imps. 3.You need to keep attacking the wheel to reposition the hammer and hit the lever again (#2) to swing it. This is a very tedious and time-consuming job for a solo run but it can be a very effective tool for a multiplayer session. A couple of imps will constantly spawn here to annoy the player. 4.This pair of jelly cubes are necessary for you to reach the chest on the top of the ledge, directly above them. If you happened to slash them accidentally, you won't have other ways of reaching it instead of Soma's Yorick Skull jump.
Boss: Menace
Carefully make your way to the left. The boss will slowly walk backwards; carefully move in the middle of its legs while its stepping back to avoid getting damaged. To reach the metal platform, you need to climb up again. The boss will occassionally release 1-3 flying mouths which can easily dispatched since they have really low HP. While on the platform, the easiest part to hit would be the face. Just attack it when its near; just be careful not to get in contact to avoid unnecessary damage. Next, the boss will punch you with its claws. You can easily avoid this by ducking in the midle of the platform. The face will be the first part to get destroyed if you've dealt severe damage to it so the next one to destroy would be the heart or the knee. The boss's heart is only exposed after it kicks you (double jump at the right timing to avoid this) but if you have a projectile hunter skill, then you should use it to damage it from mid-range. (e.g. Alucard's Hellfire skill)
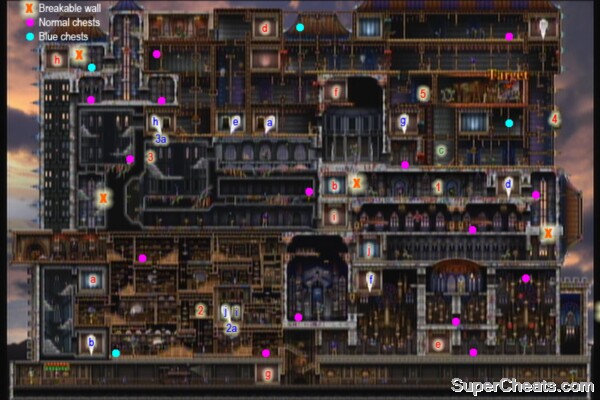
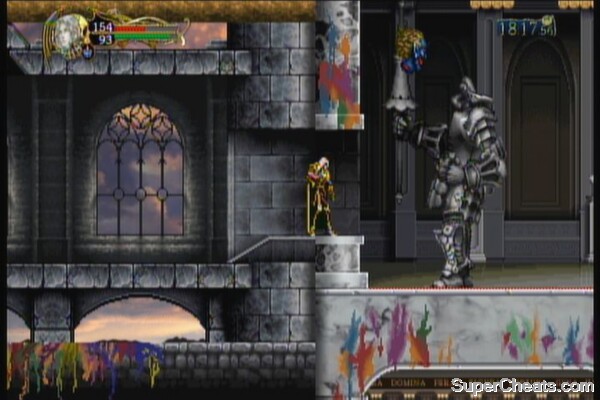
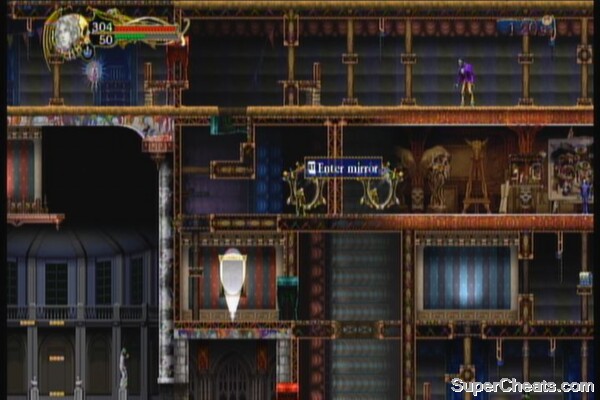
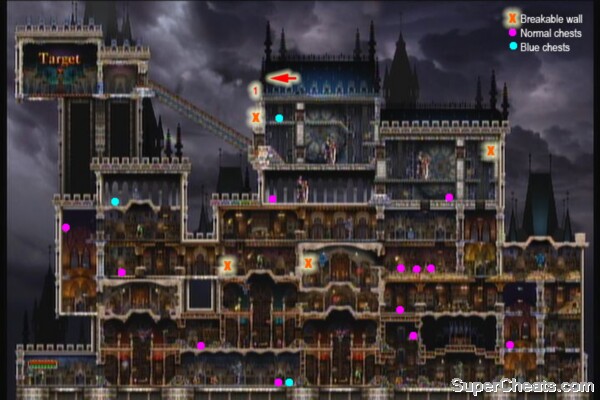
This stage can be a bit challenging to navigate if you're after the key items when playing solo. You need to enter paintings to travel to another part of the mansion. If there are two paintings beside each other, the only one you can enter is the one where the spotlight is pointed to. Refer to the map provided to know which painting leads to what part of the mansion. Blue (small) letters are the entry points while the red (small) letters indicate the exit point. The large beheaded knights called Dullahans are serious obstacles since besides having high HP, the only way you can damage it is by attacking the head. Be careful of the projectile the head will release as it will instantly curse your charater. 2.Lever will shift the spotlight in (2A) 3.Lever will shift the spotlight in (3A) 4.(Hidden Item) Just enter the alcove and Goemon will appear to the left. 5.Enter the mirror to reach the boss. Boss: Brauner
Basics
Attack – Press X (or Y for certain characters). Each character has their own, unique attacks once upgraded. Refer to the Characters section of this guide.
Slide – Press down and X to slide and kick. This move deals very little damage but is very effective in dodging attacks.
Double Jump – Press A to jump once and press it twice to double jump.
Stomp / Jump Kick – After double jumping, hold down then press A again to stomp on the enemy. This is a great way to jump even higher by using the target as foothold.
Back Dash – Press the LB to make your character dash backwards. Though used primarily for dodging frontal attacks, it is possible to keep attacking while back dashing for offensive purposes.
Personal Skill – Press RB to activate the character's personal skill. These are unique to every character.
Hunter Skill – Each character has their own set of hunter skills. They can use up to four hunter skills at any given time, which are assigned to the D-PAD. Press the D-PAD direction and the B button to activate the assigned hunter skill. Using these skills consume MP
Adjust Camera – Click the right analog stick to adjust the camera zoom. This is a good way to view the entirety of the map to know your location and of course to easily find the marked spots as featured in this guide.
Use Item – Hold LT and press RT to use the equipped item. To use an item on another player (e.g Water of Life), stand next to the player and press RT.
Dual Crush – This skill can only be activated with a partner. Both players must have at least 80MP and they must press RT while standing next to each other.
The game features different kind of chests which contains various items. When playing in multiplayer, non-blue chests will contain random items or money. In solo play, non-blue chests hold fixed types of items.
Green Chests – These chests contain random, common items
Red Chests – Contains random amount of gold
Brown Chests – These hold various food items and low level gear. Mimics also appear as brown chests in chapter 5 and 6 (Normal) or all chapters in Hard Mode.
Gold – These rare chests only appear after a boss fight. The best items in the game are acquired from gold chests.
In multiplayer, if a character's HP goes down to zero, he/she will become a skeleton. While in this state, players can still move, jump and attack while the other controls/ skills are disabled. They only have 100 HP and are very fragile so it is strongly recommended for them to stay out of trouble until they get revived. If all players become skeletons, it's game over.
You pretty much know HP/MP so this section will discuss the stats and their effect in the character's overall development.
DEF – Defense; determines your character's resistance against physical attacks
STR – Strength; boosts ATK rating when physical weapons are equipped.
CON -Constitution; also raises the DEF rating of the character
INT -Intelligence; determines the damage of magical attacks
MND* – Mind; raises your character's magical resistance.
LCK – Luck; this stat affects the item drop rate (soul drop rate for Soma).
Understanding the different attributes in the game can be beneficial for you to exploit and know the strengths and weaknesses of both you and the enemy.
When inflicted by status ailments, you must use items to alleviate them. The item called Remedy can be used to cure any ailment while there are cures for specific ailments only. It will be disadvantageous to fight with a status ailment so make sure to cure it right away.
Petrification – Your character turns to stone and becomes immobile. You need to wiggle your way out of it.
Curse – Your character loses all MP and cannot regenerate it for a few seconds. Use Uncurse potions to remove this nasty status ailment
Charm – A charmed character won't be able to control their actions and will attack other players (multiplayer). Only two enemies are known to cause this status ailment: Imps and Dracula. Imps needs to be defeated to release the charmed player from its grasp.
Chapter One: Caught in the Cradle of Decay

Hidden Item: Yellow Bell
Extra Room
You can avoid most of the boss' attacks by crouching though expect to deal lesser damage when attacking its armored legs. However, once those leg braces are destroyed, you'll deal twice as much damage when you hit it. After dealing considerable damage, it will jump and destroy the floor, destroying the adjacent floors and dragging along all enemies with it to the bottom floor. You may want to hug the walls to the left to find a room with two extra chests. (see #10 above) If you made a long detour by opening the switch (see #5 above) and killing all enemies there, then you shouldn't have problems dealing with this boss. Otherwise, it will get messy with all the enemies you need to kill. This shouldn't be a problem though if you have a strong weapon and really good defensive gears.
Boss: Gergoth
Chapter Two: Lord of Unseen Strings

Hidden item (crown)
Boss: Puppet Master
This battle will be a bit easier if you blocked the other iron maidens in the rooms where there are crates. This will restrict the boss' movements and will confine it to easily accessible iron maidens, giving you more time to catch up and prevent it from using the torture devices to its advantage. As mentioned a while ago, the boss will move around stage and attempt to use an iron maiden. It will put a puppet inside the contraption which will be replaced by your character, dealing massive damage (around 160 HP). To prevent this, you must chase the boss to the next iron maiden it will go to and destroy the puppet before it can be put inside the device.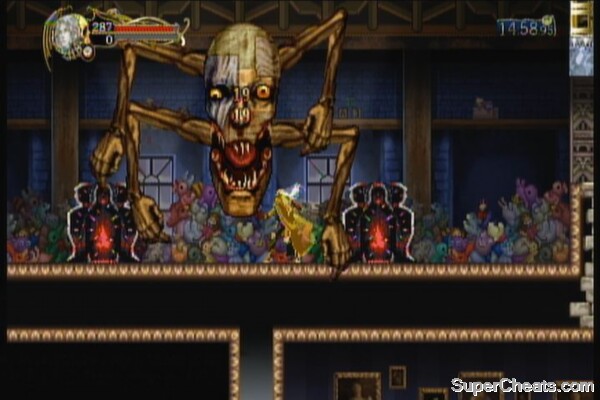
Chapter Three: The End of Chaos
5.(Hidden Item) This is a pretty tricky one to get and if you made a mistake, you won't be able to get the hidden item at all. You need to kick the black hole in the background. However, the only way to reveal that is to wake up the boss and have it destroy the platforms. This can only be done during a multiplayer session so one person can stand on the platform where the black hole is while the other wakes the boss up. You need to jump kick over the boss' head while staying in the center of the stage for better chances to hit it.
This boss should be a lot easier compared to the last one. This is because you have access to two book locations where you can easily replenish your supply of healing items if you needed. Upon reaching the boss, just attack it to wake it up. It will slowly stand and destroy the platforms in the middle of the stage, releasing the enemies trapped in the jelly cubes. If you managed to destroy all the trapped enemies, then you won't need to divert your attention fighting them while avoiding getting trampled over by the boss.
Boss Battle: Menace
Chapter Four: Esquisse of Violence
1.Pull lever to activate platform (c). This is a crucial lever since this is the only one that will allow you to get to the boss. You can just rush towards this lever and face the boss if you want to finish this stage quickly.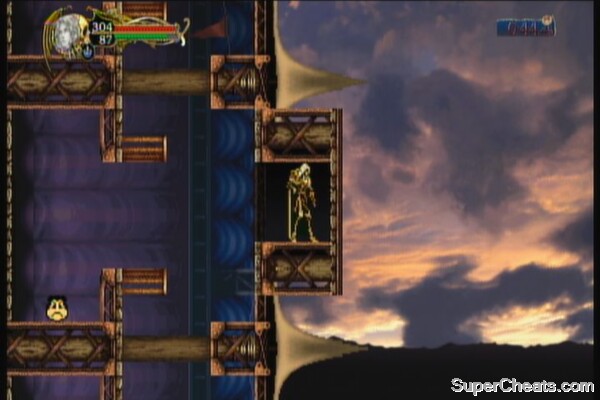
This boss should be manageable but bring in some healing items just to be safe. Since there isn't that much space, you need to keep close to him and deal as much as damage as possible. When he uses his blood art to draw a pattern, expect that a larger version will appear in the room. Getting hit or staying within that line will damage your character. You can "erase" those patterns or lines by attacking/ sliding them. Next, the boss will summon various creatures, each inflicts different status effects. Among all of them, the pair of poisonous, starfish-shaped monsters will be the hardest to avoid. Keep close and slash your way through – remember that if you managed to get behind him right after he summons his creatures, you can land some free hits since he'll be most vulnerable at that time. Refer to the video below for further info.
Boss Battle: Brauner
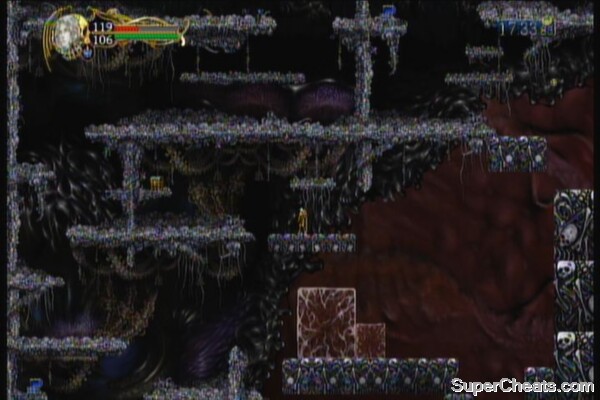
This stage is filled with traps that can easily endanger your HP before even reaching the boss. Another problem is that Death himself will keep harassing you by releasing a volley of small scythes whenever he follows you. You can deflect these scythes with your weapon or just protect yourself with your shield. You can attack Death even if he's transparent. If you managed to deal enough damage to him, he'll retreat back to his room and stop harassing you.
It will be hard to explore the entire area alone. The path to the boss however, is straightforward so you can just make a run for it.
1.This is one of the spots to deal with Death early on. There will be times that if you stay here, he'll just come right at you and will attempt to release his scythe swarm. Since he's transparent, don't mind mind going through him and attack him. I've repelled him three times using this method.

2.To reach the third tower to the east, you need to jump on the grandfather clock and land on the minute-hand of the large clock. You can then use it as a foothold to reach the moving platform to reach the teleporter mirror that will take you to the other tower.
3.(Hidden Item) Stand on this spot and press UP for the secret item to appear from the right side of the screen (red arrow in the map above). You may want to switch your map view so you can see the whole map. This item may be a lot difficult to acquire if you're playing solo. The sole reason is that the item (Vic Viper) will fly away fast upon activation and its almost impossible to catch up with it, unless you have the Mercury Boots. Having a second player waiting on the rooftop will be a great way of catching it though the person that activated it won't get the item instead. See the video here. In case you missed catching this hidden item, you need to do the chapter again to catch it.
Boss: Death
This boss has predictable attacks that can easily be avoided or predicted. If you're playing as Alucard, his Mist Form skill will play a great role in surviving most of the boss' attacks. Death is most vulnerable during these two attacks: when he's releasing a swarm of scythes and when he releases three souls that will encircle him. When you see him pointing his palm towards you, quickly dash so you can position yourself between him and the scythe swarm or better yet, behind him. As for the second attack, you can stick close and quickly move inside the soul circle. You should be able to score free hits while the souls are active. Please refer to the video below for more details about his attacks.
Boss Battle: Death
Be careful when opening brown (ordinary) chests here since they may be mimics. One best practice to avoid getting damaged by a mimic is to open a brown chest and step away from it. As soon as you notice that it didn't give you any item, you should find higher ground.

There are three Final Guards in this stage and you need to face at least two to reach the chamber where Dracula is located. You can only deal 1 damage per attack so you may want to do a hit-and-run tactic against them as you need as much HP as possible for your battle against Dracula. Other characters with multi-hit spells can easily take them out from a distance.

1.(Hidden Item) You can get this secret item alone though it still requires timing; missing it will require you to do the chapter again to get a chance to grab it again. Above the breakable wall jump to the roof and press UP. The Konami Man should be flying from the from the right side of the screen; it will be easier to see it by viewing the full map.
Hidden Item
Boss: Dracula
Dracula has three forms and your main objective is to get to the third form with as little HP lost as possible. Knowing the patterns for the first two forms are easy enough You may check out the video below for the full length battle against Drac, using a not-so-pimped-up Shanoa (Normal Mode)
Boss Battle: Dracula
For the first form, the easiest way to deal with Dracula's human form is by jump-kicking over his head then attacking him from behind. If ever he teleports in the far end of the room, keep jump-kicking him until he finishes his attack. There will be times that he will use a fire pillar spell on his own position so you can't help but to take the damage. Keep doing this until he changes to his second form.
In his beast form, you can just stay in one side of the room. Don't chase him to damage him; just stay where you are and approach him only if he jumps near your position. Beast Drac's diagonal energy blast attack can be evaded by double jumping, as well as his shockwave. He will also jump back and forth, leaving a rain of poison. He also releases five projectiles that will curse you in addition to damaging you. Move/ slide/ backstep to avoid them.
After dealing enough damage, Dracula will change to his demon form. In this form, the only weakness is its heads. For ranged attacks like Shanoa's Fulgor (lightning), you can just simply stay in the corner while attacking and move only when you need to evade an attack. If playing as Charlotte or Shanoa, players must take care not to get charmed since they'll be rendered immobile for a few seconds. Other players need to slide under Drac's hands and attack the heads while attempting to avoid any attacks thrown to them.
Post-Battle Rewards
Hard Mode unlocked
New items added in the Shop Inventory
Gamer picture added
Bone Cold Justice (10G)
Defeat an enemy by hitting back a Skeleton's bone.
You can only do this by timing your attack and hit the bone thrown by a skeleton enemy. The deflected projectile must hit and destroy an enemy. You can do this in Chapter 1 and a good spot to attempt this is the room left of the chamber with 4 mermans.
Boned (20G)
Defeat a boss with 5 players in skeleton form.
This must be set up with friends. The safest boss to attempt this achievement is Gergoth of Chapter 1 (of course). Make sure that all the extra enemies are killed or taken care of so the five of you can move around without too much problem.
Grasshopper (20G)
Jump kick 30 times in a row without touching the ground.
You can do this by jump-kicking on the Chapter 1's boss or another teammate. You can also do this on other enemies with high HP on other chapters.
Grim Synergy (10G)
Defeat a boss using a Dual Crush (10G)
Remember that it is the finishing blow that counts. To be safe, try this on the boss in Chapter 1, take note how much damage it can endure before getting destroyed. You can use multiple Dual Crushes as long as you and your partner both have enough MP.
Hunter Legend (30G)
Complete Hard Mode
Clear stage 6 on Hard Mode
Lifeguard (10G)
Bring a teammate back from the dead.
Use Water of Life on a teammate
Pack Rat (20G)
Collect 300 different types of items.
You don't need to have all the different items in your inventory to unlock this achievement. What matters are the items recorded in your Item Compendium. The compendium is automatically updated whenever you obtain a new item. Different items can be found when playing different characters (for example, female characters can find female apparels from chests), as well as their secondary weapons, scrolls, etc.
Poetic Justice (15)
Defeat an ally who has been seduced by the enemy
Dracula's seduce/charm attack only works on Shanoa or Charlotte so you can set this up with an ally that's playing Shanoa. Make it to Drac's third form and have her get hit by the heart projectile for her to get seduced. Quickly defeat the seduced female to unlock this achievement.
Slaughtervania (20G)
Rack up 10,000 enemy kills
This is cumulative for all your characters so it doesn't matter which one you use to rack up kills.
Slick Kick (10G)
Defeat a boss using sliding.
This is best done against Gergoth, the chapter 1 boss. The character you need to use should have a good defense rating. Bring in some HP potions as well. You only need to defeat the boss using by sliding so its okay to attack it normally to take out most of its HP then move in to slide and kill it.
Vampire Hunter (15)
Destroy the lord of Castlevania
Defeat Dracula in Normal Mode. (See waklthrough above for details)
Wicked Deep Pocket (20G)
Amas 1,000,000 gold.
There is no quick way to collect 1M gold; just keep playing the game and work on other achievements. Sell all the items you don't need to boost your income.


 Tomb Raider Glitches: Infinite Chickens, Flying, Skating & More
 New Set Of Fallout Shelter Tips, Tricks and Cheats For Rooms, Gear, Quests, Dwellers, Women and Weapons
 How to complete Destiny Venus Strike mission The Nexus, Ishtar Sink
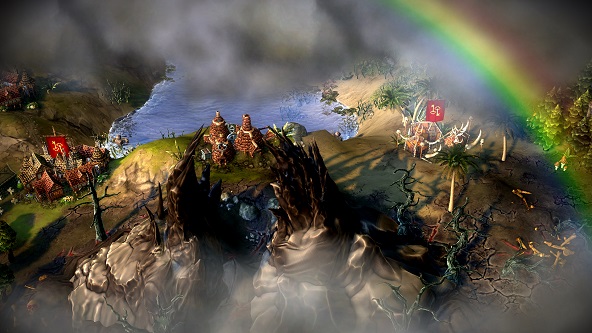 Eador: Masters of the Broken World Walkthrough
 Batman Arkham Origins Wiki: Everything you need to know about the game .