Samantha Swift: Mystery from Atlantis Walkthrough, Guide, & Tips
Samantha Swift: Mystery from Atlantis Walkthrough
Welcome to the Samantha Swift: Mystery from Atlantis Walkthrough!
An ancient artifact could hold the key to the Senses, and it’s up to Samantha to keep it from being exploited!
Whether you use this document as a reference when things get difficult or as a road map to get you from beginning to end, we’re pretty sure you’ll find what you’re looking for here.
This document contains a complete Samantha Swift: Mystery from Atlantis game walkthrough featuring annotated screenshots from actual gameplay!
We hope you find this information useful as you play your way through the game. Use the walkthrough menu below to quickly jump to whatever stage of the game you need help with.
Remember to visit the Big Fish Games Forums if you find you need more help. Have fun!
This walkthrough was created by Chie.
WALKTHROUGH MENU
- GENERAL TIPS
- STAGE 1: ALASKA – TOTEM OF LIGHTS
- STAGE 2: AUSTRALIA – SERPENT SENSE OF TASTE
- STAGE 3: GREENLAND – BEAR SENSE OF SMELL
- STAGE 4: NEW YORK – BAT SENSE OF HEARING
- STAGE 5: MOROCCO – DOLPHIN SENSE OF THOUGHT
- STAGE 6: ALEXANDRIA – OWL SENSE OF SIGHT
- STAGE 7: CONGO – MONKEY SENSE OF TOUCH
GENERAL TIPS
- “Samantha Swift and the Mystery from Atlantis” has 7 stages. Each stage has several interactive Hidden Object scenes to solve and some mini-games in between all levels.
- There are 3 Modes in the game; Adventurer, Expert Adventurer and a Bonus Hidden Object Mode.
- You will be able to choose between Adventurer and Expert Adventurer once you find the Scanner.
- Adventurer – You can click on any item on the list to see its shape in the Scanner an unlimited amount of times. You score fewer points and this section does not have a timer, it is a Relaxed Mode.
- Expert Adventurer – It lets you click on any item on the list and you can view its silhouette in the Scanner ONCE per scene. You score more points; however, this section is a Timed Mode.
- This game has 2 new things added that were not in previous versions. In addition to the items written in blue, there are now items written in yellow. You can also unlock a Hidden Object Mode at the end of the game.
SWIFT BIRDS

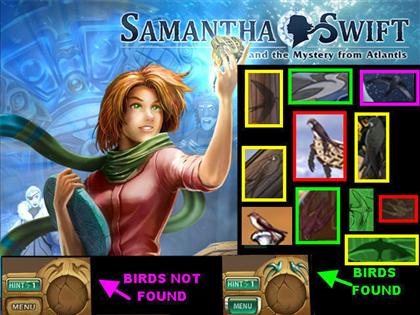
- You have to find the 2 Swift Birds in each scene to unlock a Bonus Hidden Object Mode.
- The birds come in all shapes and sizes, please look at the screenshot for examples of what assorted Swift Birds may look like.
- You can look in the lower left side of a scene to see how many Swift Birds you’ve collected for that particular scene.
- The Swift Birds that are in blue are the ones you found. The silhouette ones are the ones that still need to be found.
- From the main menu you can hover your mouse over the Hidden Object Mode title to see how many more Birds you need to find.
BONUS SECTION – HIDDEN OBJECTS MODE
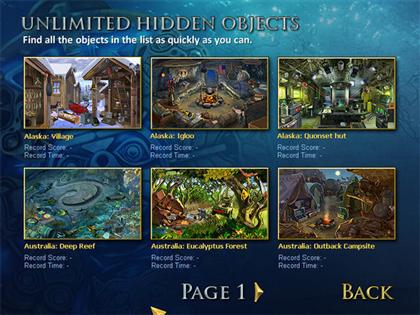
- The Unlimited Hidden Objects bonus section will allow you to find objects in a variety of scenes.
- You have to collect 60 Swift Birds to unlock this mode. There are more than 60 birds to be found in the game but all you need is 60 to unlock this mode.
- The game will keep track of your highest score and your time for each section. Replay as often as you can to see if you can improve your score.
- Each time you play you will be asked to find a set of new items. Yellow items are also included in these levels.
- When you unlock this mode during the game depends on how early on in the game you find all the birds.
- If you complete the game and have not found the required 60 birds you can replay under the same name and the bonus section will be unlocked once you reach 60.
- To access the bonus levels just go to the main menu and click on “Hidden Objects Mode” and choose the scene you would like to play.
SCORING
- You earn points in this game for a variety of things. Playing in Timed Mode gives you more points than when you play in Relaxed Mode.
- Super Sleuth Bonus = You obtain 5,000 points whenever you do not use your Scanner in a level.
- Blue Items can yield anywhere from 1,000 -2,500 points each.
- Secret Items = 2,000 -2,500 points each. This is the last item you will be asked for while playing the game.
- Regular Items = 500 points each.
- No Hints Used = You will receive 5,000 points at the end of the level if you have not used any hints.
- Yellow Items = 1,000 -1,500 points each depending on how fast you find them.
- Swift Bonus = 500 – 2,000 points. You earn that for clicking on two or more items consecutively within seconds of each other.
- Hint Item = 250 points. If you use a hint to find an item on the list, you will only receive half the points.
SCANNER / HINTS
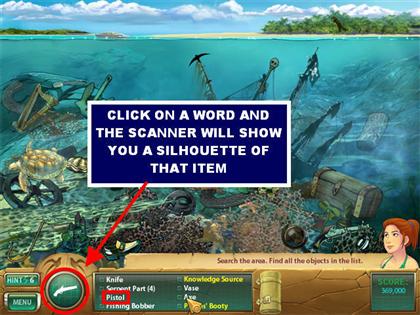
- You will find the scanner in the very first scene that you encounter. The scanner will help you look at the shape of any item on your list.
- Click on any item on the list, and it will appear on the scanner in the lower left side of the page. Looking at the shape of an item will make it easier for you to locate the item in the scene.
- You can use the scanner as many times as you like without penalty in the Adventurer Mode.
- If you click randomly in the scene you will disable the scanner temporarily. When the scanner is disabled it will turn completely black, you will have to wait a little while before it is functional again.
HINTS / LIGHTNING BOLTS
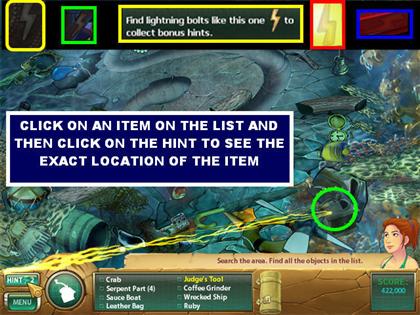
- Find the lightning bolts in the scene to collect bonus hints. You can find one lightning bolt per scene.
- The hint will show you the exact location of an item in your scanner. Click on an item on your list, and then click on the hint; a light will show you the exact location of that particular item you clicked on. The item will also remain circled until you click on it.
- The hints will carry over with you from scene to scene. You can hang on to your hints for as long as you need them.
- When you don’t have any lightning bolts left, the hint will regenerate on its own after a short while.
COLORED ITEMS
- Blue items are the items that are hidden within each scene. In order to uncover them, you have to use a tool from the tool section, also referred to as inventory items in the walkthrough.
- You will know where a blue item is located when you see your cursor turn blue with two gears moving underneath it.
- Special items are items which will not show up on your original list. They will always show up at the end of a scene.
- The scanner can help you find the secret items; just use it like you would to help you find any other item in the scene.
- Items written in Yellow are objects which are more valuable since they are listed as tricky crossword puzzle clues. For example, a “referee’s tool” is a whistle.
- When you use a hint for an item written in yellow, click on the name of the item and then on the hint. The game will show you the exact location of that item.
- The yellow riddle will turn into the name of the item you’re looking for after the hint has been used to locate it.
PDA

- The PDA gives you information about the museum, the contacts, and the travel log.
- You can customize the settings in your PDA by clicking on the Customize Button in the upper left. Use it to change the skins and background of your PDA.
- You can adjust the Volume for the Music and Sounds from this screen.
- Click on the Log Button in the upper center to view all the messages received during the game. This is a good way to go back to see if you missed some of the things that were pointed out during the game.
- Under the “My Contacts” button you can scroll through the bios of all the characters. Additional bios’ will be unlocked as you progress through the game.
- Customizing the settings is just for your own enjoyment and has no effect on the outcome of the game.
MUSEUM
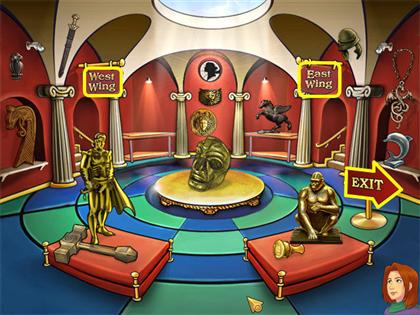
- The Museum will show you all the items you’ve collected throughout the game.
- You can access the Museum by going to the Main Menu or directly from your PDA. From the game, click on “Menu” in the lower left to access the PDA.
- Once you’re in the Museum, there are different wings you can visit while there. Click on the signs marked, West Wing, East Wing and Main Hall to view different levels of the museum.
- Click on the EXIT sign in the Main Hall to exit the Museum.
STAGE 1: ALASKA – TOTEM OF LIGHTS
ESKIMO VILLAGE
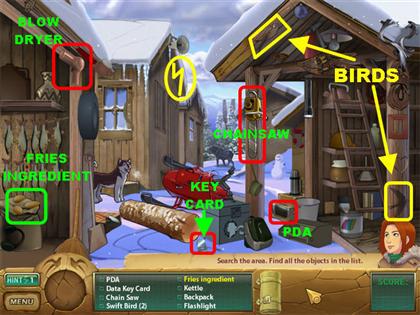
- The first Swift Bird is in the lower right.
- The second Swift Bird is in upper right side of the scene.
- The Lightning Bolt is in the upper center, it blends in with the roof of the middle house on the left.
- Pick up the PDA in the lower right side. It is on the box, next to the silver bucket.
- Pick up the Data Key Card in the lower center of the snow.
- The Blow Dryer is in the upper left.
- The Chainsaw is in the center.
- Fries Ingredient – Click on the Potatoes in the lower left side.
- Holds Fresh Flowers – Click on the Vase on the shelf in the upper left.
- Frosty Human – Click on the Snowman in the back of the scene.
- Foot Garment – Click on the sock on the upper right.
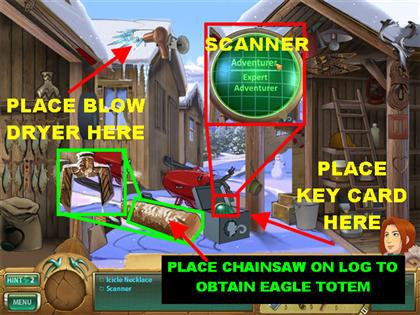
- Icicle Necklace – Place the Blow Dryer on the roof of the middle house on the left. Pick up the Icicle Necklace that appears on the roof.
- Scanner – Place the Data Key Card on the metal box in the lower center. Pick up the Scanner inside the box.
- You will be asked at this point to select the difficulty level of the game. Choose either Adventurer or Expert Adventurer.
- Eagle Totem – Place the Chainsaw on the log in the lower left side of the snow. Click on the Eagle Totem that appears in the same spot.
TOTEM POLE
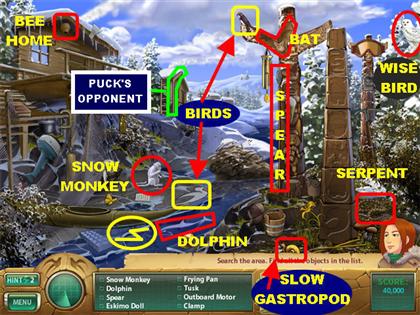
- The first Swift Bird is in the upper right side, on the left wing of the totem pole.
- The second Swift Bird is in the lower center. It is a bird shaped in snow.
- The Lightning Bolt is in the lower left. It is in the reflection of the water.
- The Spear is on the left side of the totem pole with wings.
- The Dolphin is in the water.
- The Snow Monkey is in the lower left side.
- The Bat is on the top side of the totem pole with wings.
- The Serpent is in the lower right.
- Bee Home – Pick up the Beehive in the upper left side; it will go into your tools.
- Ex- Caterpillar – It is a yellow butterfly in the lower left side.
- Puck’s Opponent – Pick up the Hockey Stick that blends into the side of the house at the end of the row.
- Wise Bird – Click on the White Owl in the upper right side; it will go into your inventory.
- Slow Gastropod – The Snail is in the lower right corner.
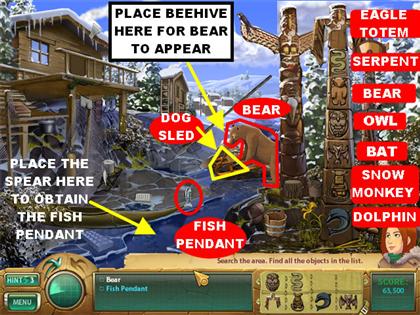
- Bear – Place the Beehive by the wooden pieces surrounded by bees over by the water. Click on the Bear once it comes towards the wood pieces.
- Fish Pendant – Place the Spear in the lower left side of the water. Click on the Fish Pendant that comes out of the water.
- Complete the Totem Pole – To complete the Totem Pole, place the items in inventory in the following manner on the totem pole in the middle. Starting from the top and going down:Eagle Totem
Serpent
Bear
Owl
Bat
Snow Monkey
Dolphin
- Pick up the Dog Sled in the center of the scene. It is located where the bear appeared.
NIGHT ESKIMO VILLAGE – SLED DOGS
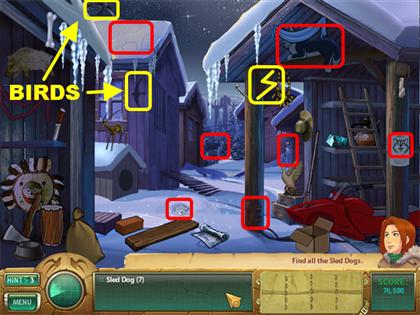
- Within this scene you need to find 7 Sled Dogs. Some are visible and some are hidden.
- You also need to find the Swift Birds in this scene even though you’ve been here before. The only difference is that it is nighttime in this scene.
- The first Swift Bird is in the upper left side of the sky.
- The second Swift Bird is in the upper left, on the side of the house in the middle.
- The Lightning Bolt is in the upper right side, carved into the wood.
- Please look at the screenshot for the locations of the 7 Sled Dogs.
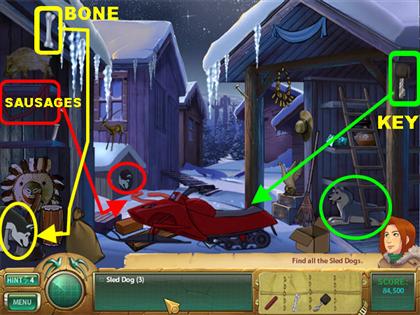
- The key is in the upper right side, on the wooden pole.
- The Sausages are in the upper left side; inside the barn.
- The Bone is in the upper left side.
- You will be asked to find 3 more Sled Dogs in the scene. You have to use your items from inventory to lure the dogs out.
- Sled Dog 1 – Place the Sausages in front of the dog house. Click on the Sled Dog once it appears.
- Sled Dog 2 – Place the Key in the snowmobile on the right. Click on the Sled Dog once the snowmobile is out of the way.
- Sled Dog 3 – Place the Bone by the dog dish in the lower left corner. Click on the Sled Dog once it comes out to eat.
ESKIMO CAMP
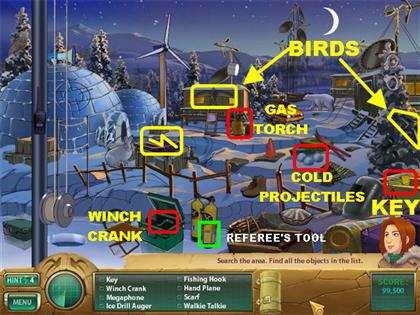
- The first Swift Bird is on the trailer in the upper center of the scene.
- The second Swift Bird is on the tree on the right edge of the scene.
- The Lightning Bolt is inside the purple box close to the large igloo.
- Pick up the Winch Crank in the green toolbox in the lower left side.
- Pick up the Yellow Key in the lower right side. It blends in with the yellow metal box.
- Pick up the Gas Torch in the center, close to the trailer.
- Cold Projectiles – Pick up the 3 snowballs on the right side of the scene.
- Referee’s Tool – Pick up the Yellow Whistle in the lower center. It blends in with the yellow tanks.
- Criminal Bracelet – Pick up the Handcuffs in the upper right.
- Fire Ingredient – Pick up the wooden logs in the lower right.
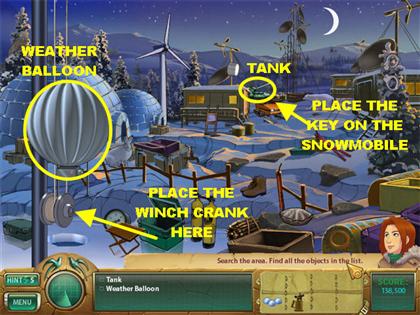
- Tank – Place the Key on the snowmobile next to the trailer. Click on the Tank once the snowmobile is out of the way.
- Weather Balloon – Place the Winch Crank on the cylinder in the lower left. Click on the Weather Balloon once it descends from the sky.

- Ancient Skull – Place the Gas Torch on the target on the large igloo and a block of ice will fall on the ground.
- Place the Gas Torch on the ice block on the ground. Pick up the Ancient Skull after the ice has melted.
IGLOO
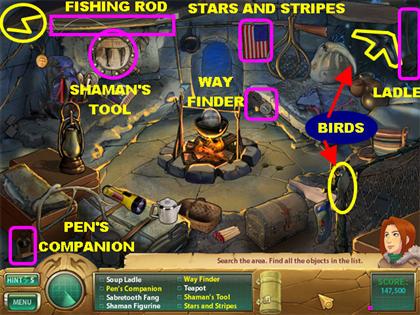
- The first Swift Bird is in the upper right side.
- The second Swift Bird is in the lower right side.
- The Lightning Bolt is in the upper left side.
- Pick up the Ladle in the upper right.
- Pick up the Fishing Rod in the upper left.
- Pen’s Companion – Pick up the Ink Bottle in the lower left corner.
- Way Finder – Click on the Compass on the right.
- Shaman’s Tool – Click on the Tambourine in the upper left.
- Stars and Stripes – Pick up the American Flag in the upper center.
- Hiker Carry-all – Pick up the backpack in the upper left.
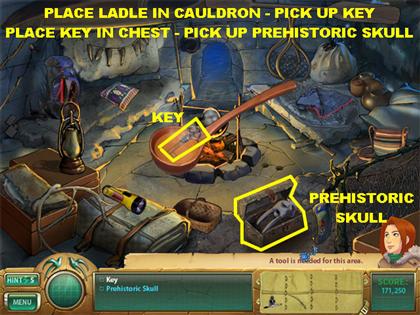
- Key – Place the Ladle in the cauldron; pick up the Key inside the Ladle.
- Prehistoric Skull – Place the Key on the chest in the lower right. Pick up the Prehistoric Skull inside the chest.

- Ceremonial Mask – Place the Prehistoric Skull in the holes on the right side of the scene.
- The fire pit moves to the side. Pick up the Ceremonial Mask in the ground.
ESKIMO CAMP
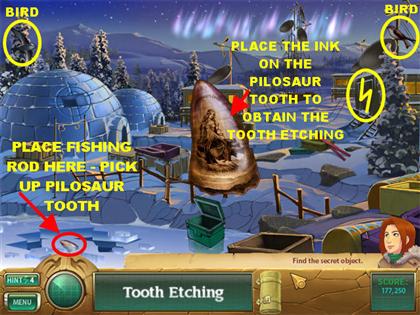
- The first Swift Bird is in the upper right.
- The second Swift Bird is in the upper left.
- The Lightning Bolt is on the door of the house on the right.
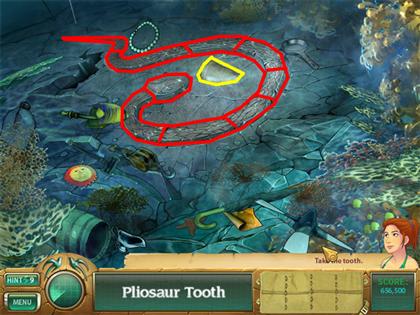
- Pilosaur Tooth – Place the Fishing Rod in the hole in the lower left. A few fish will come out before the whale comes out of the hole.
- Click on the block of ice in the hole and the Pilosaur tooth will appear in the center of the screen.
- Tooth Etching – Place the Ink on the Pilosaur Tooth and the Ink will bring out the etchings on the tooth.
- Click on the Tooth Etching to end this level.
ALASKAN OUTPOST
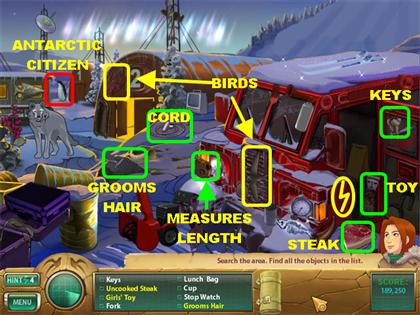
- The First Swift Bird is in the upper left.
- The second Swift Bird is on the grill of the red vehicle.
- The lightning bolt is on the side of the red vehicle.
- Pick up the Keys in the upper right side of the red vehicle.
- Pick up the Starter Pull Cord on the left side of the snow.
- Uncooked Steak – Pick up the frozen steak in the lower right.
- Girl’s Toy – Pick up the doll inside the red vehicle.
- Grooms Hair – Pick up the Comb in the lower left side.
- Measures Length – Click on the measuring tape in front of the red vehicle.
- Antarctic Citizen – Click on the Penguin in the upper left.
- Mammoth Tusks – Give the wolf the uncooked steak. Click on the Mammoth Tusks that appear in place of the wolf.
- Gold Nugget – Place the Starter Pull Cord on the snow blower in front of the vehicle. Pick up the Gold Nugget that appears in the snow.
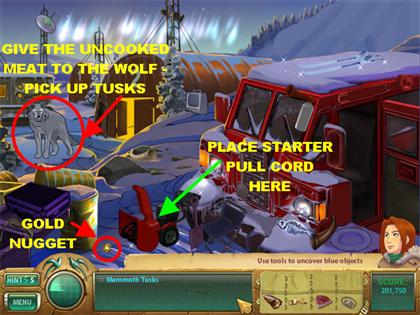
QUONSET HUT
- The first Swift Bird is in the upper left side.
- The second Swift Bird is in the upper right side.
- The Lightning Bolt is on the left side of the scene. It is against a yellow monitor.
- The USB Flash Drive is in the lower left corner.
- Pick up the Geiger Counter in the lower right.
- The 4 Mirror pieces are highlighted in purple in the screenshot.
- Germ Viewer – Click on the telescope on the left.
- No Sleep Device – Click on the Coffeemaker on the right.
- Vacation Memento – Click on the Postcard on the lower left.
QUONSET HUT
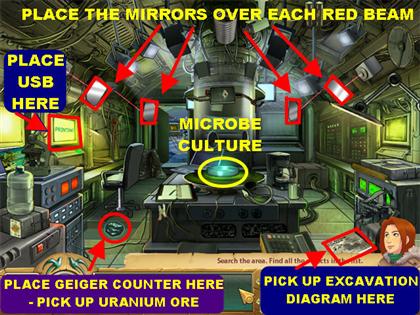
- Microbe Culture – Place the 4 Mirrors over each of the red beams in the scene. Click on the Microbe Culture in the lower center of the scene.
- The Microbe Culture appears in the center of the screen, click on it to take it off the list.
- Excavation Diagram – Place the USB Flash Drive on the flashing monitor on the left. The Printer in the lower right starts printing an Excavation Diagram, click on the diagram once the printing is complete.
- Uranium Ore – Place the Geiger Counter on the left side of the floor. Pick up the Uranium Ore that appears in the ground.
NIGHT ALASKAN OUTPOST
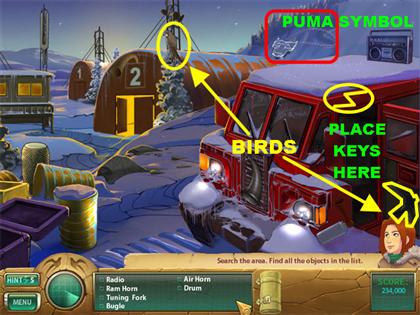
- The first Swift Bird is in the upper center.
- The second Swift Bird is in the lower right, on the vehicle’s door.
- The Lightning Bolt is in the upper right side of the vehicle.
- Pick up all the noisy items from the list.
- Engine Ignition – Place the Keys inside the door of the red vehicle. The car starts and an avalanche ensures.
- Puma Symbol – Pick up the Puma Symbol in the upper right side, above the vehicle, once the avalanche ceases.
FIND EXACT PAIRS
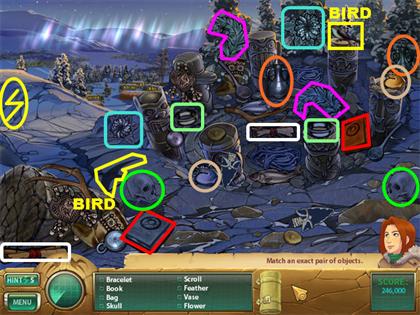
- The lightning bolt and the 2 Swift Birds have been highlighted in yellow.
- The first Swift Bird is in the upper right side.
- The second Swift Bird is in the lower left side.
- The Lightning Bolt is on the left edge of the scene.
- Please look at the screenshot for the exact pairs of bracelets, books, bags, skulls, scrolls, feathers, vase and flowers.
- The matching items have been color coordinated for easy recognition.
- Click on any item and then click on its matching pair to eliminate them from the list.
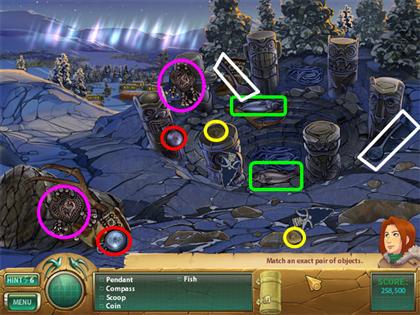
- Please look at the next screenshot for the matching pairs of pendants, compasses, scoops, coins, and fish.
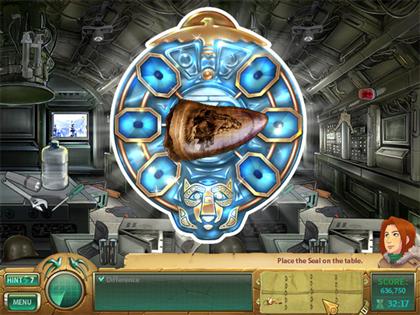
VAPOR PUZZLE – SEAL PLATE
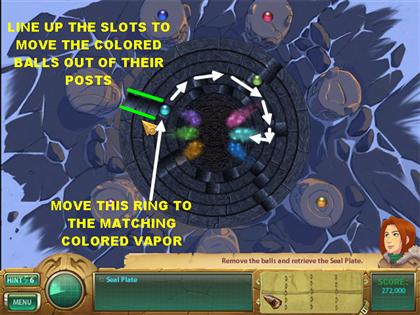

- Your goal in this puzzle is to move the colored balls down the rings to their matching vapor color.
- Line up the slots close to the posts to move the balls out of their posts. Drag the circles around to rotate the balls so you can position them closer to their vapor color.
- Drag the small ring to the matching colored vapor ring so the ball can fall into the right spot and be eliminated.
- Follow the same process for the remaining colors to win the game.
- If the balls fall into the wrong vapor color they will go back to their post.
- Click on the Seal Plate after the puzzle has been solved.
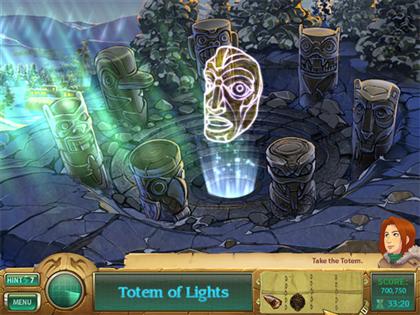
- Click on the Totem of Lights in the middle of the screen to enter it into inventory.
- The Totem of Lights will be automatically handed to Colonel Tempesta in the very next scene.
FIND THE DIFFERENCES
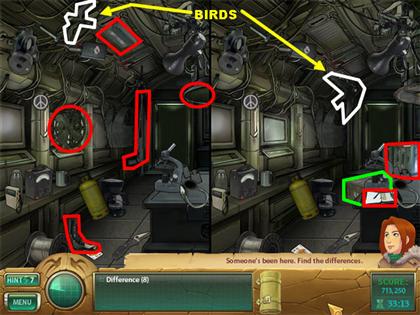
- The first Swift Bird is in the upper left, close to the monitor.
- The second Swift Bird is in the upper right.
FIND THE DIFFERENCES – PART 2
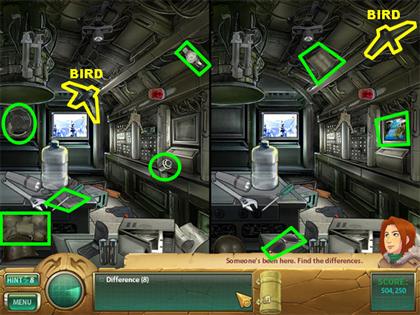
- The first Swift Bird is in the upper left corner.
- The second Swift Bird is in the upper right.
- Please look at the screenshot for the locations of all the differences.
- Place the Seal Plate anywhere on the scene after all the items have been found.
- Place the Pilosaur Tooth on the Seal Plate to end this stage
STAGE 2: AUSTRALIA – SERPENT SENSE OF TASTE
GREAT BARRIER REEF
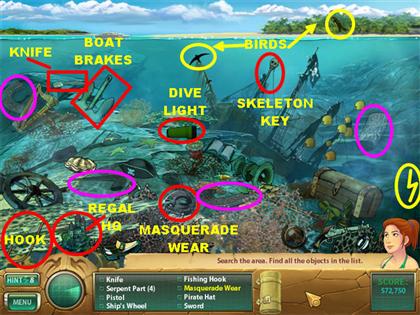
- The first Swift Bird is in the upper right side, close to the shore.
- The second Swift Bird is in the upper center.
- The Lightning Bolt is in the lower right corner.
- The 4 Serpent Parts are circled in purple.
- The Fishing Hook is in the lower left corner.
- Pick up the Dive Light in the center of the scene.
- Pick up the Skeleton Key in the upper right.
- Pick up the Knife in the upper left.
- Masquerade Wear – Click on the black Mask in the lower center.
- Regal HQ – Click on the Castle in the lower left corner.
- Boat Brakes – Click on the Anchor in the upper left.
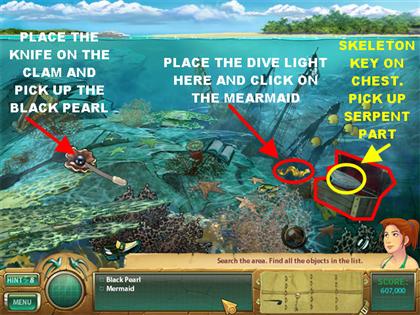
- Black Pearl – Place the Knife on the clam on the left to open it. Pick up the Black Pearl inside.
- Mermaid – Place the Dive Light on the right side of the sunken ship. Click on the golden Mermaid that appears where the light was shining.
- Serpent Part –Place the Skeleton Key on the chest in the lower right side. Pick up the Serpent Part inside the chest.
DEEP REEF
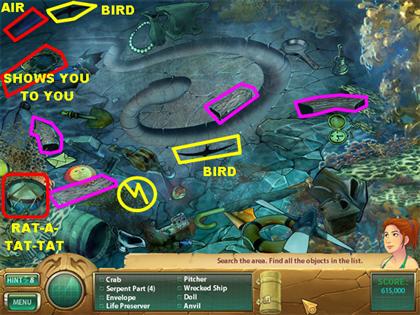
- The first Swift Bird is in the upper left.
- The second Swift Bird is in the lower center.
- The Lightning Bolt is in the lower left. It is partially hidden by a piece of coral.
- The 4 Serpent Parts are highlighted in purple.
- Air under Pressure – Click on the blue Tank in the upper left.
- Rat-a-tat-tat – Pick up the Drum in the lower left.
- Shows you to you – Click on the Mirror in the upper left side.

- Gold Mask – Place the Air Tank on the blue balloon in the upper left. Pick up the Gold Mask that appears once the balloon is inflated.
- Engraved Shell – Place the Crab in the barrel in the lower left corner. Pick up the Engraved Shell that the crab drags out of the barrel.
- Pilosaur Tooth – Place the Serpent Parts in the center of the scene, along the serpent silhouette. You have to place 9 different pieces one by one by grabbing them from inventory.
- Pick up the Pilosaur Tooth that appears in the center of the scene after all the parts have been placed.
EUCALYPTUS FOREST
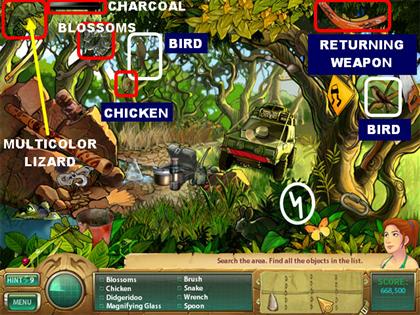
- The first Swift Bird is in the upper right side.
- The second Swift Bird is in the upper left side.
- The Lightning Bolt is in the lower right. It’s a green bolt that blends in with a green leaf.
- Pick up the Chicken in the upper left, on the tree.
- The Blossoms are in the upper left.
- Pick up the Charcoal Stick in the upper left.
- Multicolor Lizard – Pick up the Chameleon in the upper left.
- Returning Weapon – Pick up the Boomerang in the upper right.
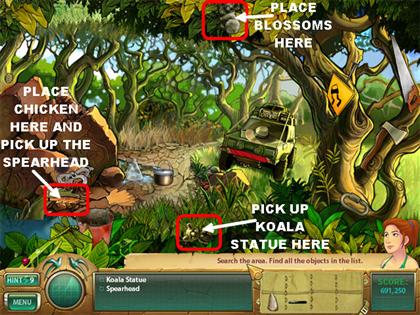
- Koala Statue – Place the Blossoms on the moving leaves in the upper center. Pick up the Koala Statue that falls in the lower center.
- Spearhead – Place the Chicken near the crocodile in the water on the lower left. Pick up the Spearhead from the crocodile’s tail.
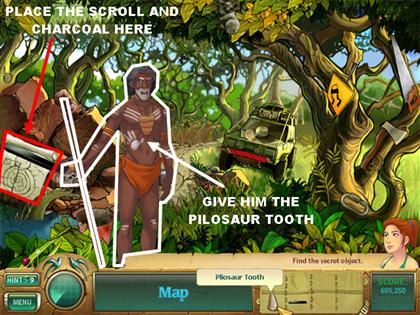
- Map – Give the Pilosaur Tooth to the Aborigine and he places a Paper Scroll in your inventory.
- Place the Paper Scroll on the engraved rock on the left.
- Place the Charcoal Stick over the Scroll. Click on the Map that appears on the Scroll.
ABORIGINE SPIRITUAL GROUND
- The first Swift Bird is in the upper left, above the tent.
- The second Swift Bird is on the left, close to the tent entrance.
- The Lightning Bolt is on the right. It’s a brown bolt that blends in with the rocks.
- Pick up the Tent Pole in the lower right.
- Pick up the Coal on the lower right.
- Pick up the Grass in the lower center.
- “Come and get it” – Click on the Dinner Triangle in the upper right.
- Thorny Plant – Pick up the Cactus in the upper left.
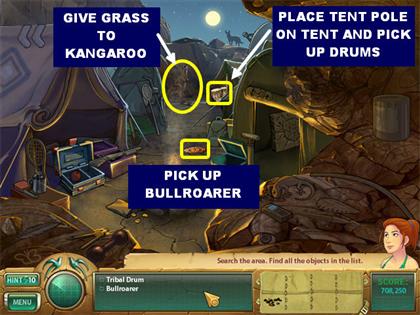
- Tribal Drum – Place the tent Pole on the tent in the back of the scene and pick up the Tribal Drum inside the tent.
- Bullroarer – Give the Grass to the kangaroo in the back of the scene. Pick up the Bullroarer that falls close to the green box in the center of the scene.
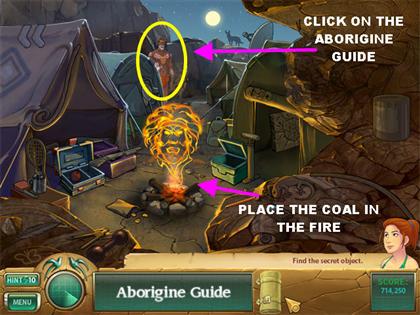
- Aborigine Guide – Place the Coal in the fire and click on the Aborigine Guide that appears in the back of the scene.
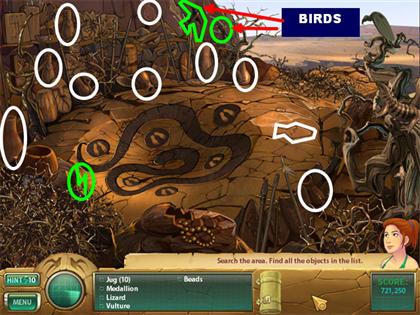
AYERS ROCK
- The first Swift Bird is in the upper center.
- The second Swift Bird is in the upper center as well.
- The Lightning Bolt is in the lower left. It blends in with the scenery.
- The 10 Jugs are circled in white.
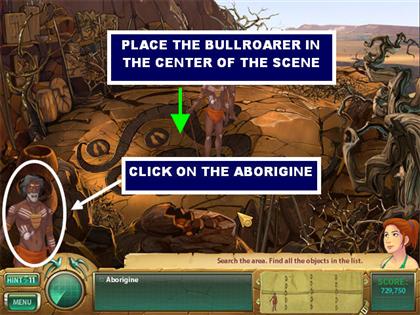
- Aborigine – Place the Bullroarer in the center of the scene. Click on the Aborigine that appears in the lower left side.
- Grab the 2 Aborigines from your Tools section and start placing them on top of the footsteps in the center of the rock. A mini-game appears on the screen.
MATCH 3
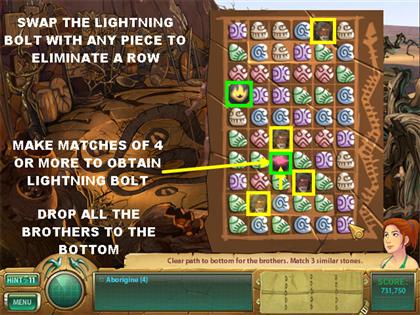
- Your goal is to clear a path to the bottom of the board for the brothers.
- Make matches of 3 or more stones to eliminate them.
- Make matches of 4stones to make a lightning bolt appear. Swap the lightning bolt with any stone to either eliminate a row or a row and a column.
- The blue lightning bolt erases the row and column it is connected to.
- The red lightning bolt destroys the row it is connected to.
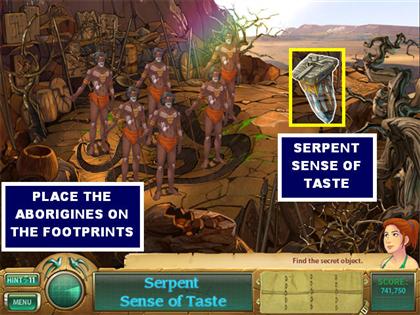
- Serpent Sense of Taste – Place the 4 Aborigines on the footprints in the center of the rock.
- Each time you place an Aborigine you have to wait for the wind or the rain to disappear before you can place another one.
- Click on the Serpent Sense of Taste that appears after all the Aborigines are in their right place.
INSERT SERPENT OF TASTE
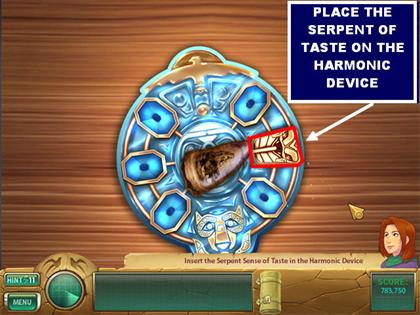
- Grab the Serpent of Taste from inventory and place it on the Harmonic Device
STAGE 3: GREENLAND – BEAR SENSE OF SMELL
GEOMAGNETIC NORTH POLE
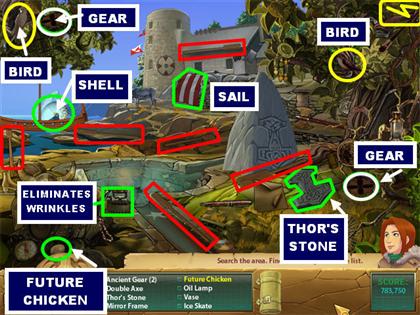
- The first Swift Bird is in the upper left.
- The second Swift Bird is in the upper right.
- The Lightning Bolt is in the upper right; it blends in with the leaves.
- Pick up Thor’s Stone in the lower right.
- Pick up the red and white Sail in the center.
- The 2 Ancient Gears are circled in white.
- The 6 Oars are highlighted in red.
- Future Chicken – Pick up the Egg in the lower left corner.
- Eliminates Wrinkles – Click on the Iron in the lower left.
- Shellfish Home – Click on the shell inside the boat in the water.
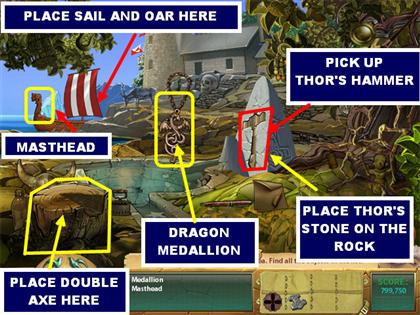
- Dragon Masthead – Place the Oar on the boat on the left.
- Place the Sail on the boat.
- The boat will move slightly, click on the Dragon Masthead that appears in front of the boat.
- Dragon Medallion – Place the Double Axe on the tree stump in the lower left.
- Pick up the Dragon Medallion in the center of the screen.
- Thor’s Hammer – Place Thor’s Stone on the large rock on the right. Click on Thor’s Hammer in the center of the large stone.
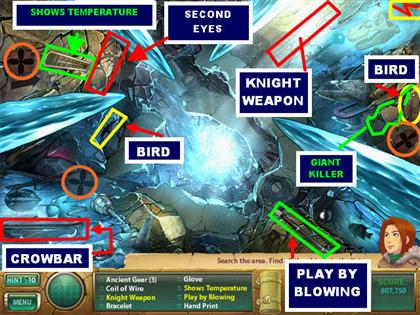
ICICLE CAVE
- The first Swift Bird is in the upper right, against the rocks.
- The second Swift Bird is on the left. It is a black silhouette of a bird against the ice.
- The Lightning Bolt is in the upper right corner.
- The 3 Ancient Gears are circled in orange in the screenshot.
- Pick up the Crowbar in the lower left.
- Play by Blowing – Pick up the Flute in the lower right.
- Shows Temperature – Click on the Thermometer in the upper left.
- Knight Weapon – Pick up the Sword in the upper right.
- Second Eyes – Pick up the Glasses in the upper left side. They blend in well with the rocks.
- Giant Killer – Pick up the large Slingshot in the upper right.
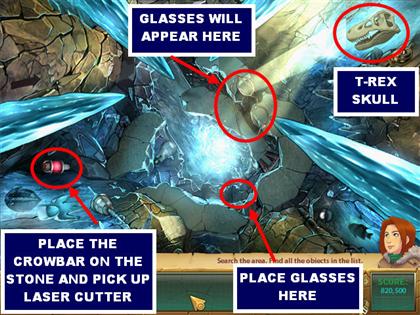
- T-Rex Skull – Place the Glasses on the large piece of ice in the center.
- The Glasses will flash a light to the upper right corner. Pick up the T-Rex Skull in the upper right.
- Laser Cutter – Place the Crowbar on the stone in the lower left. Pick up the Laser Cutter in place of the stone.
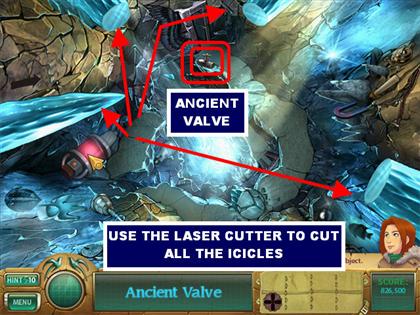
- Ancient Valve – Place the Laser Cutter on all 4 of the icicles on the scene.
- Pick up the Ancient Valve that appears in the upper center.
ANCIENT CAVE
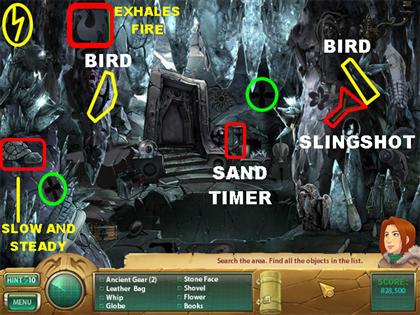
- The first Swift Bird is in the upper right side.
- The second Swift Bird is on the left side, closer to the door
- The Lightning Bolt is in the upper left corner.
- The 2 Ancient Gears are circled in green.
- Pick up the Slingshot in the upper right.
- Slow and Steady – Click on the Turtle in the lower left.
- Exhales Fire – Click on the Dragon in the upper left.
- Sand Timer – Pick up the Hourglass in the center of the scene.
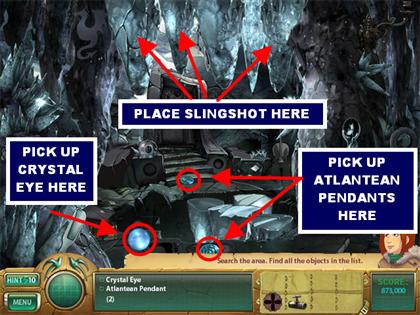
- Crystal Eye – Place the Slingshot on the upper left side. The Slingshot will break that piece and the Crystal Eye will roll to the lower left side of the ground.
- Atlantean Pendant 1 and 2 – Place the Slingshot on the icicles in the upper center. Once the icicles fall to the ground, the Atlantean Pendant will fall to the ground.
- Repeat the same process with the icicles that are left to obtain the second Atlantean pendant.
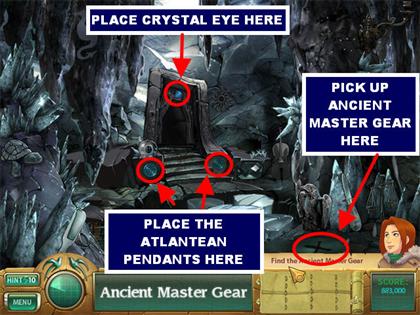
- Ancient Master Gear – Place the 2 Atlantean Pendants on the left and right side of the bottom of the steps.
- Place the Crystal Eye above the door. The door will open and the Gear will roll out of the door.
- Pick up the Ancient Master Gear that rolls into the lower center.
CAVE INTERIOR
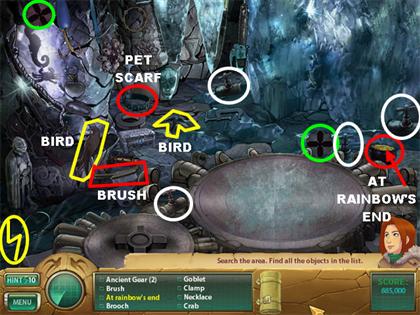
- The first Swift Bird is in the lower left.
- The second Swift Bird is on the left side of the ground.
- The Lightning Bolt is in the lower left corner.
- The 2 Ancient Gears are circled in green.
- The 4 Valves are circled in white
- Pick up the Brush in the lower left.
- Pet Scarf – Pick up the Collar on the left side of the scene.
- Pick up the Pot of Gold in the lower right to obtain “At Rainbow’s End”.
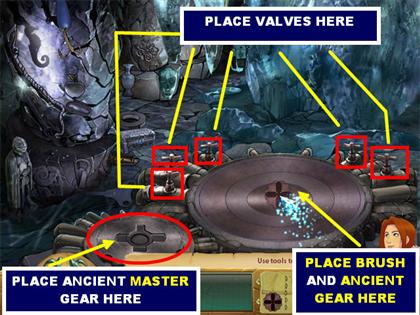
- Four Lava Gears – Place the 5 Valves on the taps next to the bowl.
- Place the Ancient MASTER Gear in the lower left.
- Place the Brush in the center of the bowl to wipe it off.
- Place the Ancient Gear in the bowl to trigger a mini-game.
LAVA GEARS MINI-GAME
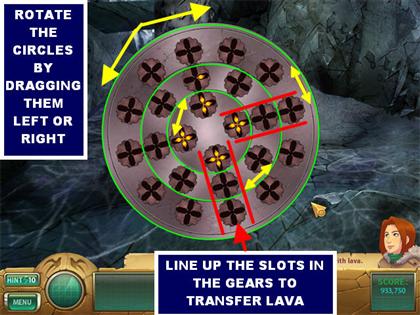
- Your goal in this mini-game is to fill the center gears with lava.
- Drag the circles around so you can line up the gears.
- Filling the gears with lava require you to line up a filled gear with an empty one. The lava in the filled gear will fall into the empty slot.
- The game will be completed once the center gears are all filled with lava.
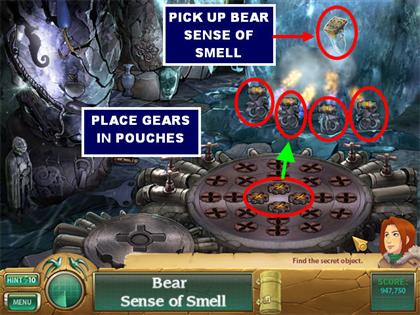
- Pick up the 4 Lava Gears once the puzzle has been completed.
- Bear Sense of Smell – Place the Lava Gears on the 4 pouches on the right.
- The Bear Sense of Smell will appear in the upper right side of the wall, click on it.
- The Bear Sense of Smell appears on your screen, click on it again to end the stage.
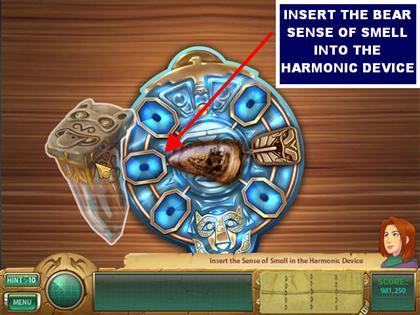
- Insert the Bear Sense of Smell into the Harmonic Device.
STAGE 4: NEW YORK – BAT SENSE OF HEARING
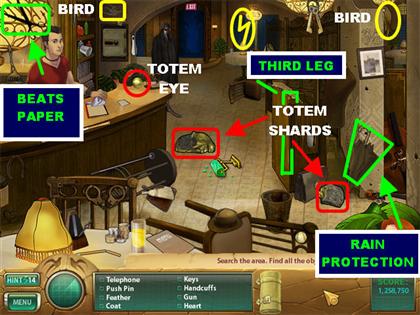
SAM’S OFFICE
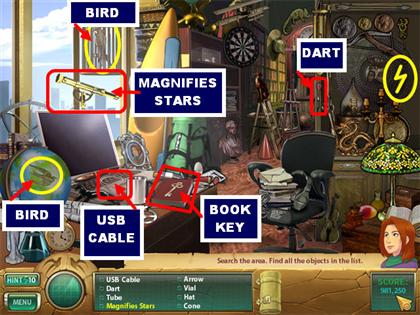
- The first Swift Bird is in the cage in the upper left.
- The second Swift Bird is on the Globe in the lower left.
- The Lightning Bolt is in the upper right.
- Pick up the Dart on the right side, above the chair.
- The USB Cable is on top of the laptop on the desk.
- Pick up the Book Key on the desk.
- Magnifies Stars – Click on the Telescope by the window.
- Wake Up Device – Click on the Alarm Clock in the lower right.
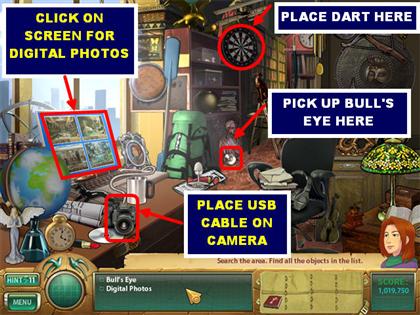
- Bull’s Eye – Put the Dart on the Dartboard in the back of the scene. Pick up the Bull’s Eye that falls to the ground.
- Digital Photos – Place the USB Cable on the Camera on the desk. Click on the Digital Photos that appear on the laptop’s screen.
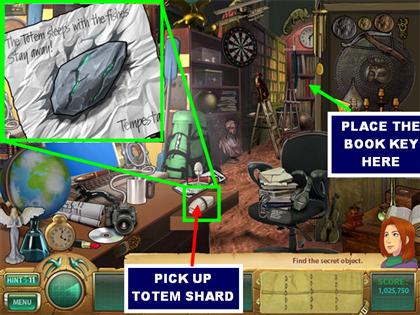
- Totem Shard – Place the Book Key on the middle shelf of the bookcase in the back of the office.
- The drawer on the desk opens up. Click on the Totem Shard inside the drawer and it will appear on your screen. Click on the Totem Shard to eliminate it off your list.
SAM’S DESK
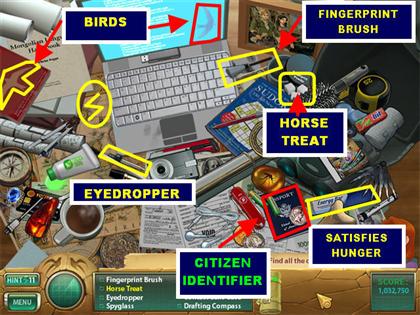
- The first Swift Bird is on the red notebook in the upper left.
- The second Swift Bird is on the laptop’s screen.
- The Lightning Bolt is in the upper left, next to the laptop.
- Pick up the Fingerprint Brush in the upper right.
- Pick up the Eyedropper on the left, next to the laptop.
- Horse Treat – Click on the Sugar Cubes in the upper right.
- See in the Dark – Pick up the large Binoculars in the lower right.
- Citizen Identifier – Click on the Passport in the lower right.
- Satisfies Hunger – Pick up the Energy Bar in the lower right.
- Fingerprints – Place the Fingerprint Brush on the fingerprints on the laptop. The brush will go into the fingerprint powder in the upper right first and then will brush the laptop.
- Click on the paper with Fingerprints on top of the laptop.
- Sweet Coffee – Place the Sugar Cubes in the cup of coffee in the lower left. Click on the coffee cup.
- You are automatically taken to a close-up view of the laptop.
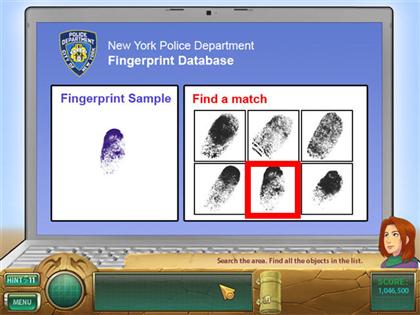
- Click on the fingerprint on the right that matches the sample on the left. Please look at the screenshot for the solution.
- Alien Microbes – Place the Eyedropper on the green liquid on the left. Click on the Eyedropper to pick up the Alien Microbes.
NEW YORK LAB
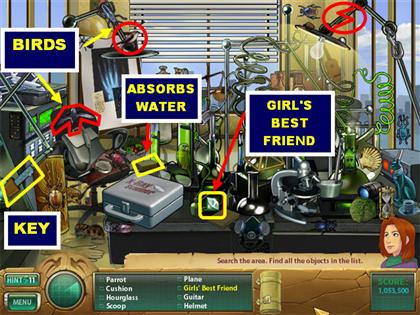
- The first Swift Bird is in the upper left, on top of the lamp.
- The second Swift Bird is on the left, on top of the chair.
- The Lightning Bolt is in the upper right side, on top of the lamp.
- Pick up the Key in the lower left.
- Girl’s Best Friend – Pick up the Diamond on the left side of the table.
- Pharaoh’s Tomb – Click on the Pyramid in the center.
- Thorny Animal – Click on the Hedgehog in the lower left.
- Absorbs Water – Click on the Sponge on the left.
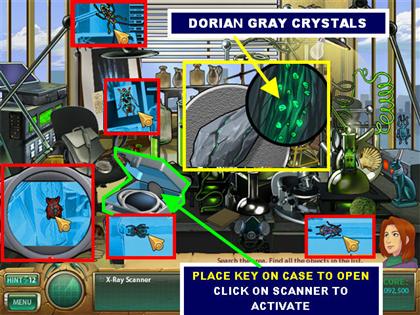
- X-Ray Scanner – Place the Key on the grey case in the lower left to open it. Click on the X-Ray Scanner inside the case.
- Five Surveillance Bugs – Use the Scanner to look for the 5 Bugs in the office. Click on the Bugs when you find them.
- The Bugs will always be colorful, the ones that are not, do not count. Please look at the screenshot for the locations of the Bugs.
- Dorian Gray Crystals – Place the Totem Shard on the Microscope on the right side of the desk.
- The Crystals appear on the green dish on the screen, click on them.
MUSEUM HALLWAY
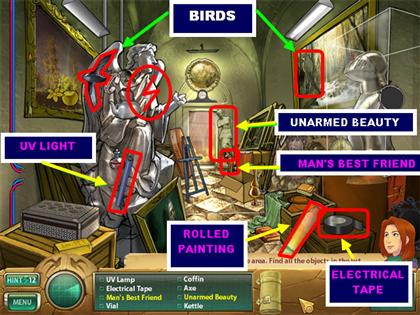
- The first Swift Bird is in the upper left side, on the wings of the angel.
- The second Swift Bird is in the upper right side, it is on the portrait on the right.
- The Lightning Bolt is on the upper left side, it is carved into the statue.
- Pick up the Electrical Tape in the lower right corner.
- Pick up the Rolled Painting in the lower right.
- The UV Lamp is in the lower left.
- Unarmed Beauty – Click on the Venus De Milo Statue in the back of the scene.
- Forbidden Fruit – Click on the gold Apple in the painting in the upper left side.
- Man’s Best Friend – Click on the Dog in the back of the scene.
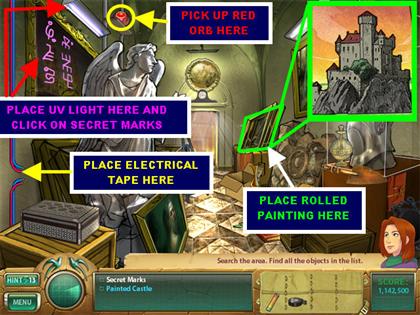
- Secret Marks – Place the UV Light above the painting in the upper left. Click on the Secret Marks that appear on the painting.
- Painted Castle – Place the Rolled Painting on the empty frame on the far right side. Click on the Painted Castle on your screen.
- Red Orb – Place the Electrical Tape on the wires in the lower left side of the wall. Pick up the Red Orb that appears above the statue on the left.
CATALOGUE ROOM
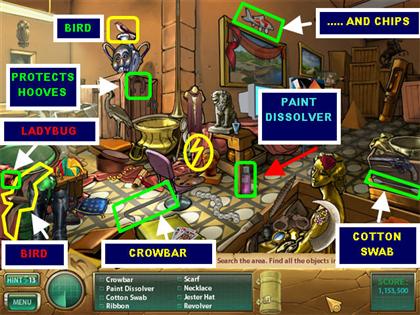
- The first Swift Bird is in the upper left.
- The second Swift Bird is in the lower left.
- The Lightning Bolt is in the lower center.
- Pick up the Cotton Swab in the lower right, against the crate.
- Pick up the Crowbar in the lower left.
- Pick up the Paint Dissolver in the lower center.
- Protects Hooves – Pick up the Horseshoe in the upper left.
- Not Gentleman Bug – Pick up the Ladybug in the lower left, it is on the green vase.
- ……and Chips – Click on the Fish in the upper center of the wall.

- Elephant Figure – Place the Crowbar on the crate on the left, close to the door, to open it.
- Click on the Elephant Figure inside the crate.
- Van Gogh Painting – Place the Paint Dissolver on the painting on the right.
- Place the Cotton Swab on the painting and click on the painting.
- Scanner Upgrade – Place the Horseshoe on the horse in the upper right.
- Pick up the Scanner Upgrade that falls on the right side of the floor.
MATCH PAIRS
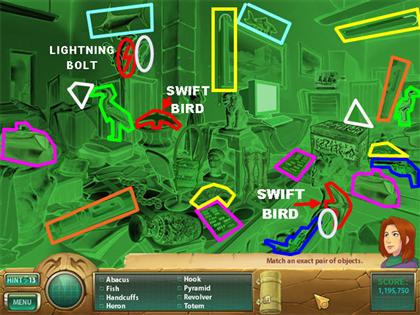
- The first Swift Bird is on the lower center. It is marked in red in the screenshot.
- The second Swift Bird is in the lower right. It is marked in red in the screenshot.
- The Lightning Bolt is in the upper left side. It is marked in red in the screenshot.
- The matching pairs are color coordinated in the screenshot. Some colors may repeat but you will be able to tell the difference by the size and shape of the items.
- Click on an item and then on its matching pair to eliminate them.
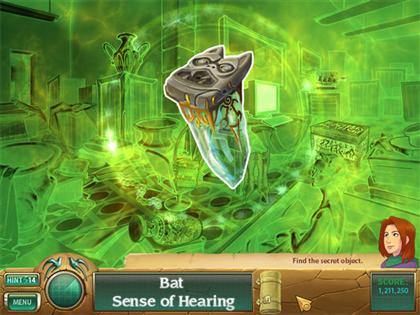
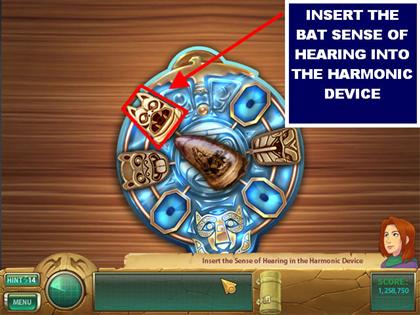
- Pick up the Bat Sense of Hearing after all the items have been found.
- Insert the Bat Sense of Hearing into the Harmonic Device.
STAGE 5: MOROCCO – DOLPHIN SENSE OF THOUGHT
NICK’S CAFE
- The first Swift Bird is in the upper left.
- The second Swift Bird is in the upper right.
- The Lightning Bolt is in the upper center.
- Pick up Totem Shard 1 in the lower right side of the ground.
- Pick up Totem Shard 2 in the center of the floor.
- Rain Protection – Pick up the Umbrella in the lower right.
- Third Leg – Pick up the Walking Cane on the brown podium on the right.
- Beats Paper – Pick up the Scissors on the upper left.
- Totem Eye – Pick up the gold Totem Eye on the right side of the counter.
NICK’S GAMBLING ROOM
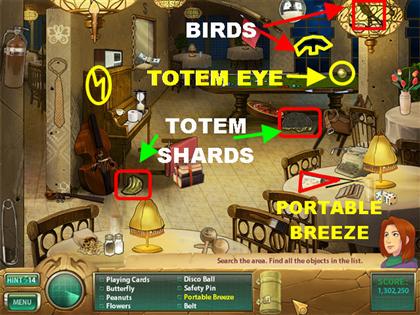
- The first Swift Bird is on the lamp in the upper right corner.
- The second Swift Bird is on the right window in the back of the scene.
- The Lightning Bolt is carved into the side of the piano.
- Pick up the Totem Shard 1 below the pool table.
- Pick up Totem Shard 2 next to the piano.
- Portable Breeze – Click on the Fan on the middle table.
- Totem Eye – Pick up the gold Totem Eye on the pool table.
MERMAID’S COVE
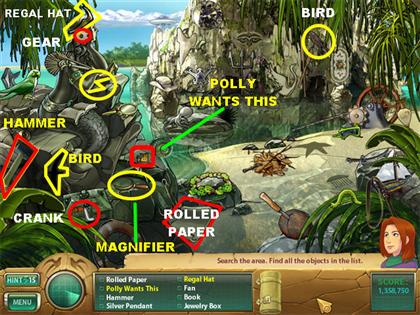
- The first Swift Bird is in the upper right; it is partially covered by the leaves.
- The second Swift Bird is in the lower left; it is a black silhouette of the bird.
- The Lightning Bolt is the upper left, close to the mermaid’s arms.
- Pick up the Hammer in the lower left.
- The Rolled Paper is in the lower left.
- Pick up the Magnifier in the lower left.
- The Crank is in the lower left.
- Pick up the Gear on the mermaid’s ear.
- Regal Hat – Click on the Crown on the mermaid’s head.
- Polly Wants This – Pick up the Cracker in the lower left.
- Note – Depending on your game, you may have unlocked the Swift Mode at this point if you’ve found at least 60 Swift Birds.

- Bashful Drawing – Place the Magnifier on top of the leaves in the center of the scene. The leaves will start burning.
- Place the Rolled Paper above the fire to obtain the Bashful Drawing.
- Dolphin Statue – Give the Parrot in the upper left the Cracker and it will fly away. Pick up the Dolphin Statue in place of the Parrot.
- Ape Bracelet – Place the Hammer on the chisel sticking out of the coconut in the lower right. Pick up the Ape Bracelet inside the cracked coconut.
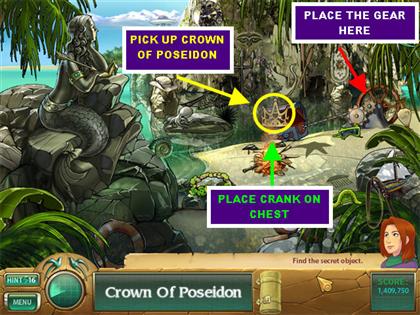
- Crown of Poseidon – Place the Gear on the mechanism on the upper right. The mechanism will pull out a chest out of the water.
- Place the crank on the chest and pick up the Crown of Poseidon inside the chest.
SCIENCE SHIP AT SEA
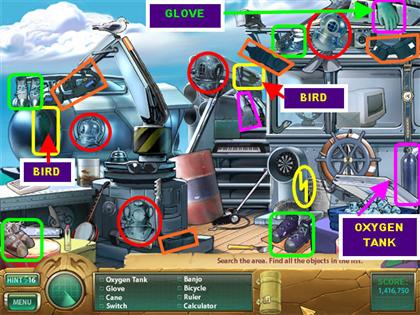
- The first Swift Bird is in the upper middle.
- The second Swift Bird is on the left edge of the scene.
- The Lightning Bolt is in the lower right, close to the ice chest.
- Pick up the Green glove in the upper right.
- The Oxygen Tank is in the lower right.
- The 4 Deep Sea Helmets are circled in red.
- The 4 Lead Dive Boots are circled in green.
- The 4 Weight Belts are highlighted in orange.
- Cleans Floors – Click on the Broom in the upper center.
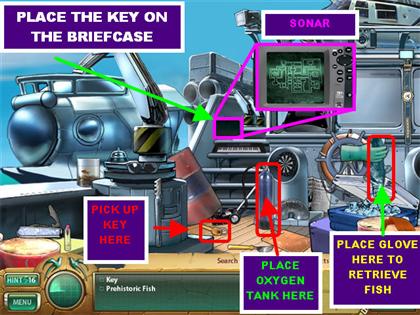
- Key – Place the Oxygen Tank on the pump in the center of the floor in order to lift up the red drum.
- Pick up the Key that appears below the red rum.
- Prehistoric Fish – Place the Glove on the ice chest in the lower right. Click on the Prehistoric Fish once it comes out of the chest.
- Sonar – Place the Key on the briefcase in the upper center to open it. Click on the Sonar inside the briefcase and it will appear on the top right side of the screen.
- Click on the Sonar one more time to end the round.
DEEP SEA EXCAVATION
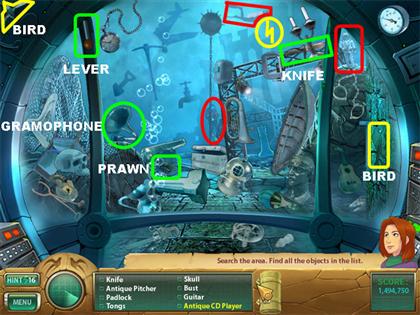
- The first Swift Bird is on the right edge of the scene.
- The second Swift Bird is in the upper left corner.
- The Lightning Bolt is in the upper right.
- Pick up the Knife in the upper right.
- The Lever is in the upper left.
- The 3 Divers are highlighted in red.
- Antique CD Player – Click on the Gramophone on the left side of the scene.
- Atlantean Statue – Place the Lever in the lower left corner. A giant mechanical hand will appear and move the large rock out of the way.
- Pick up the gold Atlantean Statue in the lower left.
- Diver – Place the Knife on the large net in the upper left to cut it. Click on the Diver that appears below the net.
- Coral Necklace – Place the Prawn in the lower right corner so the sea monster can eat it.
- Pick up the Coral Necklace that appears in the lower right corner.
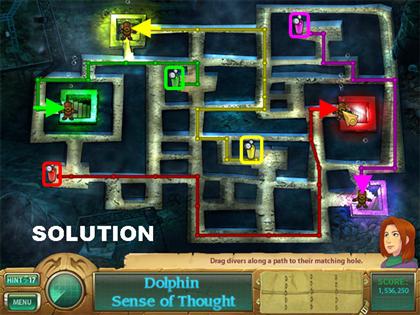
EXCAVATION HOLES PUZZLE
- Your goal is to get the divers to their excavation holes without tangling their air lines.
- Each diver you transfer to its spot safely will uncover a special artifact.
- You can double-click on a diver to undo their line.
- Whenever the air lines get tangled the puzzle will reset the lines of the 2 divers that collided with each other.
- Click on diver and drag them around the path, a line will form around the path with the color of the diver of your choice.
- While dragging a diver around, stop at each break in the path to mark a break in line.
- Keep in mind that some holes have more than one way in which you can enter.
- Please look at the screenshot for the solution.
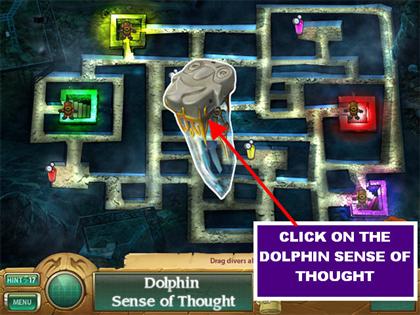
- Click on the Dolphin Sense of thought that appears in the middle of the screen after the puzzle has been solved.
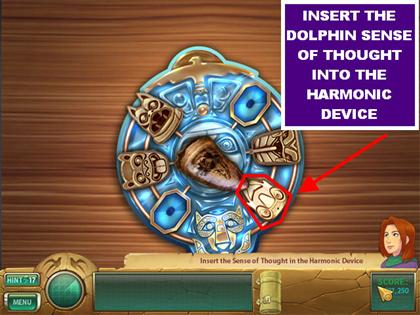
- Place the Dolphin Sense of Thought into the Harmonic Device.
STAGE 6: ALEXANDRIA – OWL SENSE OF SIGHT
SECRET PORT ENTRANCE
- The first Swift Bird is in the upper left.
- The second Swift Bird is on the brick wall on the left.
- The Lightning Bolt is on the building in the far right.
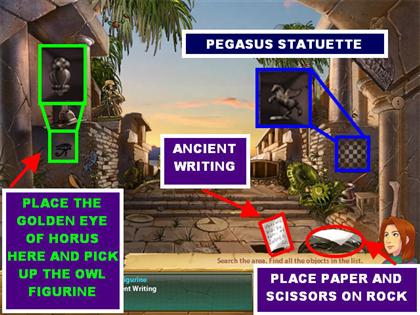
- Pick up the Golden Eye of Horus in the upper right.
- The Paper is on the ground, in the lower center.
- The 5 Chess Pieces are circled in red in the screenshot.
- Pick up the Scissors on the brick wall on the left side of the scene.
- Battle Hat – Pick up the gold Helmet in the upper right.
- Ancient Writing – Place the Paper on the rock and a secret niche will appear on the ground.
- Place the Scissors on the rock in the ground and the Ancient Writing will come out of the niche, click on it.
- Owl Figurine – Place the Golden Eye of Horus on top of the Eye of Horus sketch on the left side of the wall and a secret niche will appear.
- Pick up the Owl Figurine inside the secret niche.
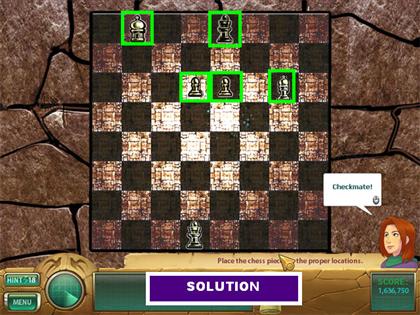
- Pegasus Statuette – As soon as this requests show up, click on the scene and the puzzle will appear.
- Your goal is to place the chess pieces in their proper locations.
- Drag a chess piece from inventory and click into the spot that sparkles.
- Pick up the Pegasus Statuette on the niche that appears in the lower right after the puzzle has been completed.
LIBRARY
- The first Swift Bird is on the left column.
- The second Swift Bird is in the center of the large statue on the right.
- The Lightning Bolt is in the center of the large statue on the left.
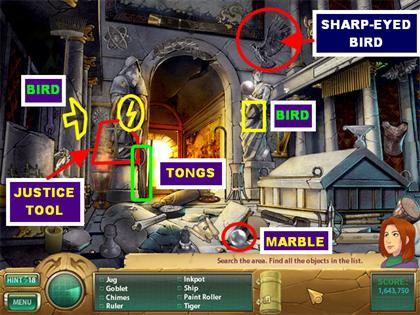
- Pick up the Marble in the lower center.
- The Tongs are below the large statue on the left.
- Justice Tool – Pick up the Scales next to the large statue on the left.
- Sharp-eyed Bird – Click on the Eagle in the upper right.
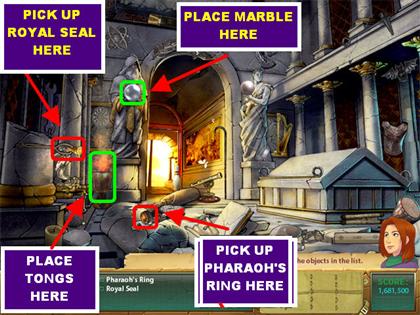
- Pharaoh’s Ring – Place the Marble on the hand of the large statue on the left and a ring will fall on the ground.
- Pick up the Pharaoh’s Ring that falls on the left side of the ground.
- Royal Seal – Place the Tongs on the fire located next to the large statue on the left. Pick up the Royal Seal the Tongs are holding.
- Ancient Blueprint – Samantha tells you that she does not have any tools to find this item at the moment so she will have to come back later.
SHATTERED ROOM
- The first Swift Bird is in the upper right side.
- The second Swift Bird is on the right side, just above the dried branches.
- The Lightning Bolt is on the upper left side.
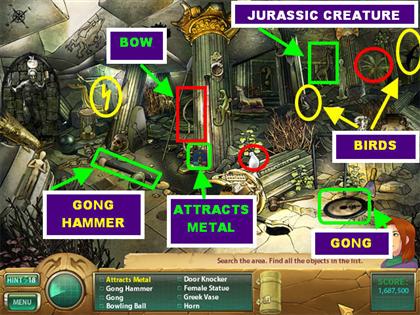
- Pick up the Gong in the lower right.
- Pick up the Gong Hammer in the lower left.
- The Bow is in the center, next to the large column.
- Attracts Metal – Pick up the Magnet in the lower center.
- Jurassic Creature – Click on the dinosaur in the upper right.
- Coconut Maker – Click on the Palm Tree in the upper right.
- Winged Postman – Click on the Pigeon on the lower center.
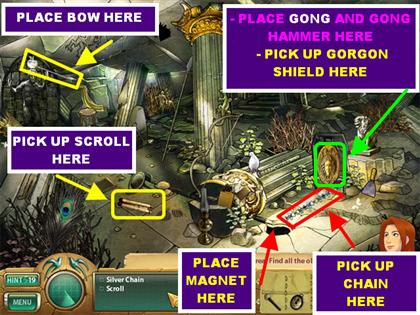
- Silver Chain – Place the Magnet in the hole in the lower right. Pick up the Chain that comes out of the hole.
- Scroll – Place the Bow on the apple above the statue in the upper left. Pick up the Scroll that falls on the ground in the lower left.
- Gorgon Shield – Place the Gong on the metal stand in the lower right.
- Place the Gong Hammer on the Gong in the lower right.
- The Gong turns into the Gorgon Shield, click on it to end this round.
SECRET TUNNEL
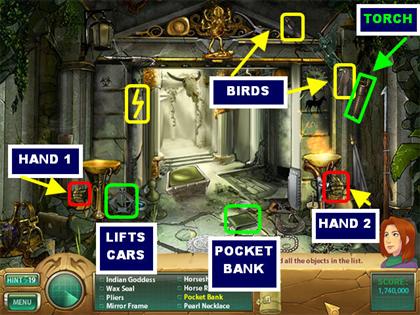
- The first Swift Bird is in the upper right.
- The second Swift Bird is in the upper right, on one of the columns.
- The Lightning Bolt is on the upper left, on the small column.
- Pick up Hand 1 in the lower left.
- Pick up Hand 2 in the lower right.
- The Torch is in the upper right side.
- Pocket Bank – Pick up the Wallet in the center of the ground.
- Lifts Cars – Pick up the Car Jack in the lower left side.

- Gold Lion – Place the Car Jack on the door on the right side of the tunnel to lift it.
- The Gold Lion falls next to the Car Jack, pick it up.
- Microbe Meteor – Place the Unlit Torch on the fire on the right side and it will go back into inventory as a Lit Torch.
- Place the Lit Torch on the stand on the left to light that fire.
- The structure in front of the tunnel will open. Pick up the Microbe Meteor inside of it.
- Golden Heart – Place the 2 Hands above the entryway and a secret niche will appear. Pick up the Golden Heart inside the niche.
ARISTOTLE ROOM
- The first Swift Bird is in the upper left.
- The second Swift Bird is in the upper center.
- The Lightning Bolt is in the upper right.
- The 2 Gold Bands are circled in purple.
- The 3 Gold Planets are circled in green.
- The 4 Chains are highlighted in dark blue.
- The 6 Owl Tiles are in light blue.
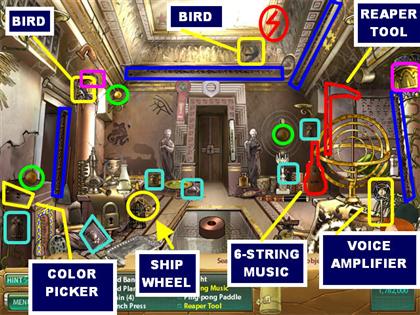
- Pick up the Ship’s Wheel in the lower left.
- Six-string Music – Pick up the Guitar on the right side of the back wall.
- Reaper Tool – Pick up the Scythe in the upper right.
- Voice Amplifier – Pick up the Microphone in the lower right.
- Color Picker – Pick up the brown Artist Palette in the lower left.
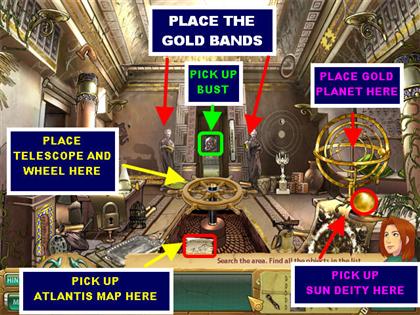
- Bust of Aristotle – Place the Gold Band on the LEFT statue in the back of the scene.
- Place the Gold Band on the RIGHT statue in the back of the scene and the door in the back will open.
- Click on the Bust of Aristotle in the back of the scene.
- Sun Deity – Place the Gold Planet on the large gold contraption in the lower right. Pick up the Sun Deity that falls below the contraption.
- Atlantis Map – Place the Telescope on the copper item in the lower center.
- Place the Ship’s Wheel on top of the Telescope.
- Pick up the Atlantis Map that appears in the niche in the floor.
LIBRARY
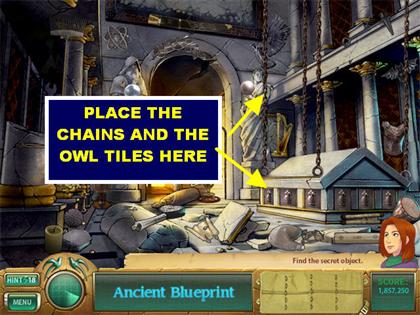
- Ancient Blueprint – Place the Chains on the coffin on the right.
- Place the Owl Tiles on the side of the coffin to trigger a mini-game.
OWL PUZZLE
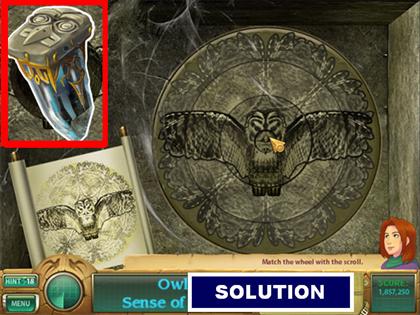
- Owl Sense of Sight – Your goal in this puzzle is to make the image on the wheel look like the one on the scroll.
- Spin the wheel around until it resembles the image in the screenshot.
- Once the puzzle is complete, the Owl Sense of Sight appears, click on it.
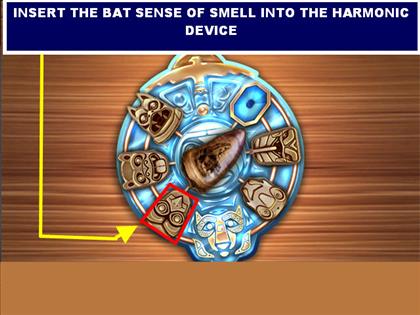
- Place the Bat Sense of Smell into the Harmonic Device.
STAGE 7: CONGO – MONKEY SENSE OF TOUCH
MEDICINE MAN VILLAGE
- The first Swift Bird is in the upper left side.
- The second Swift Bird is on the right edge of the scene.
- The Lightning Bolt is in the lower left.
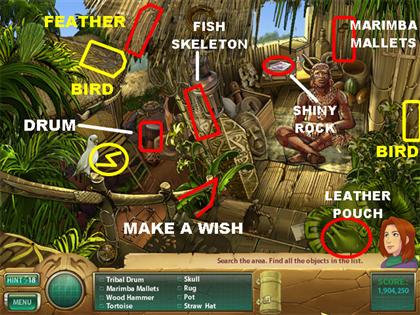
- Pick up the Tribal Drum on the left.
- The Marimba Mallets are in the upper right.
- The Fish Skeleton is in the center of the scene.
- The Feather is in the upper left.
- The Leather Pouch is in the lower right corner.
- Shiny Rock – Pick up the Crystal in the upper right.
- Make a Wish – Click on the Wishbone in the lower center.
- Many Steps – Click on the Ladder in the lower left.
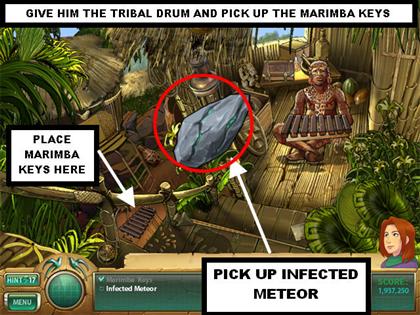
- Marimba Keys – Give the Chief the Tribal Drum.
- Pick up the Marimba Keys from the Chief and they will go into inventory.
- Infected Meteor – Place the Marimba Keys on the stand in the lower left.
- Place the Marimba Mallets on the Marimba Keys and music will start playing.
- Grab the Infected Meteor in the center of the screen.
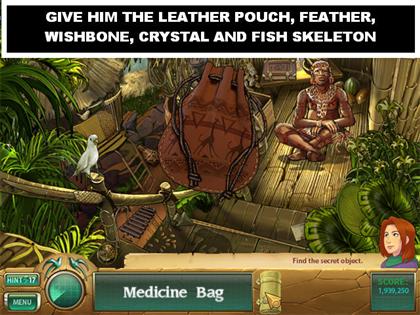
- Medicine Bag – Give the Leather Pouch to the Chief.
- Give the Feather to the Chief.
- Give the Wishbone to the Chief.
- Give the Crystal to the Chief.
- Give the Fish Skeleton to the Chief.
- The Chief gives you back the Leather Pouch as the Medicine Bag, grab it from the center of the scene.
MONKEY ALTAR
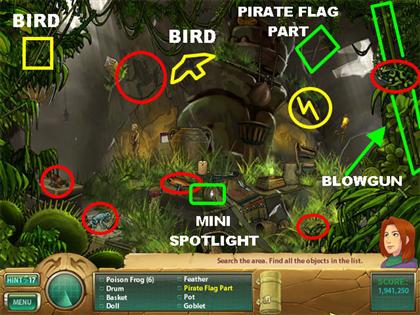
- The first Swift Bird is in the upper center.
- The second Swift Bird is in the upper left.
- The Lightning Bolt is on the right side of the altar.
- The 6 Poisonous Frogs are circled in red.
- Pick up the Blowgun on the right edge of the scene.
- Pirate Flag Part – Pick up the Crossbones in the upper right.
- Mini Spotlight – Pick up the Flashlight in the lower center.
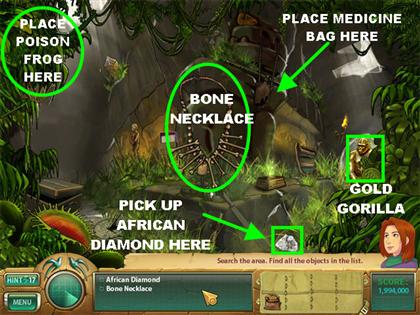
- African Diamond – Place the Blowgun in the upper center. The Blowgun blows the Diamond out of the rock.
- Pick up the African Diamond that lands in the lower right.
- Bone Necklace – Place the Poison Frog in the upper left side of the scene.
- Pick up the Bone Necklace in the middle of the scene.
- Gold Gorilla – Place the Medicine Bag on the hotspot on the lower right side of the large idol.
- Click on the Gold Gorilla that appears in the lower right.
SACRED GROUND
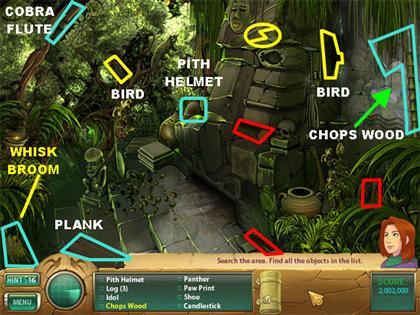
- The first Swift Bird is in the upper right.
- The second Swift Bird is on the left, it blends in with the branches.
- The Lightning Bolt is in the upper center.
- The 3 Log pieces are highlighted in red.
- The Plank is in the lower left.
- Pick up the Pith Helmet in the center of the scene.
- The Whisk Broom is in the lower left corner.
- Pick up the Cobra Flute in the upper left.
- Chops Wood – Pick up the Axe in the upper right.
- Winged Rat – Click on the Bat silhouette in the upper right.
- Seal/ Sound/ Radio – Click on the etching of the waves on the right side of the wall.
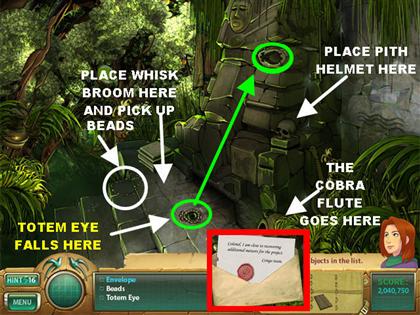
- Envelope- Place the Pith Helmet on the skeleton in the lower right and an envelope will appear in the middle of the screen, click on it.
- Beads – Place the Whisk Broom on the leaves on the steps.
- Pick up the Beads once the leaves are cleared.
- Totem Eye – Place the Cobra Flute on the basket in the lower right and a snake will come out.
- Pick up the Totem Eye that falls on the right side of the ground.
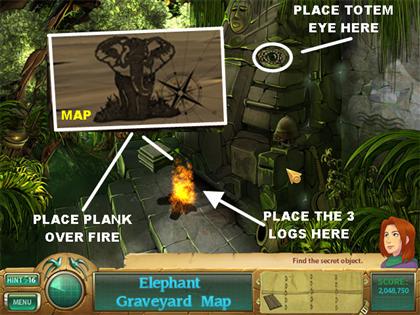
- Elephant Graveyard Map – Place the 3 logs on the steps.
- Place the Totem Eye on the upper right side of the idol and fire will burn on the logs. Eventually a burning paper will appear on the ground.
- Place the Plank over the burning paper.
- Pick up the Elephant Graveyard Map in the middle of the screen.
ELEPHANT GRAVEYARD
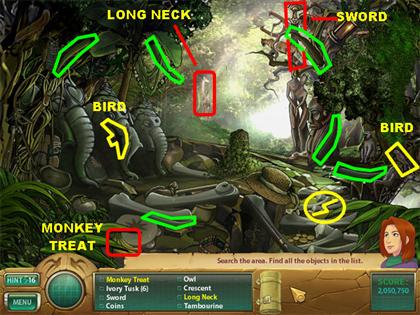
- The first Swift Bird is on the side of the middle elephant.
- The second Swift Bird is in the lower right.
- The Lightning Bolt is in the lower right, against the gray items.
- The 6 Ivory Tusks are highlighted in green.
- The Sword is on the upper right side.
- Monkey Treat – Pick up the Bananas in the lower left.
- Long Neck – Click on the Giraffe in the back of the scene.
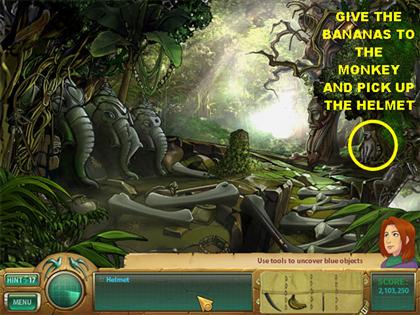
- Helmet – Give the Bananas to the Monkey in the lower right.
- Grab the Helmet that appears once the monkey moves away.
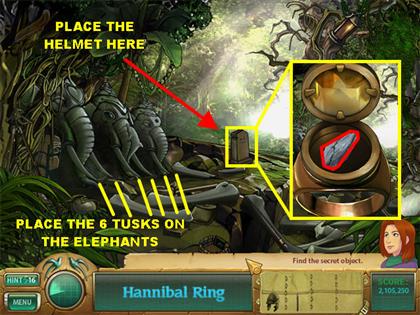
- Hannibal Ring – Place the Tusks on the elephants on the left. There are several Tusks in your inventory, place them one by one.
- Place the Helmet on the gravestone close to the elephants.
- Place the Sword over the gravestone. The ring rolls out of one of the elephants and appears in the center of the scene.
- Pick up the Meteor inside the ring.
PASSAGE TO INNER SANCTUM
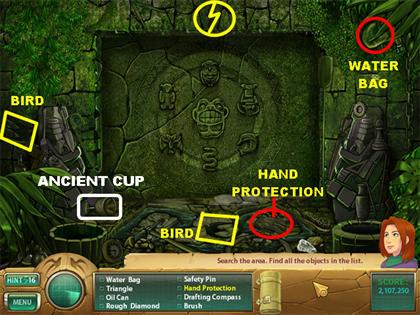
- The first Swift Bird is on the left edge of the scene.
- The second Swift Bird is on the lower center of the ground.
- The Lightning Bolt is in the upper center.
- Hand Protection – Pick up the Glove in the lower right.
- Ancient Cup – Pick up the Goblet in the lower left.
- The Water Bag is in the upper right.
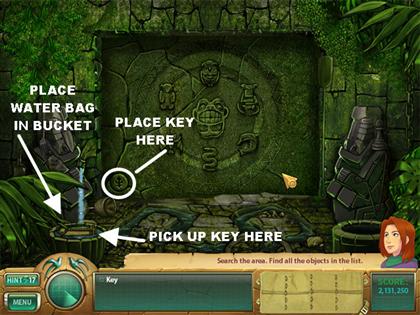
- Key – Place the Water Bag on the bucket in the lower left and it will fill the bucket with water.
- Pick up the Key that appears on top of the barrel.
- Monkey Sense of Touch – Place the Key on the lock in the lower left of the back wall and a puzzle will appear on the back wall.
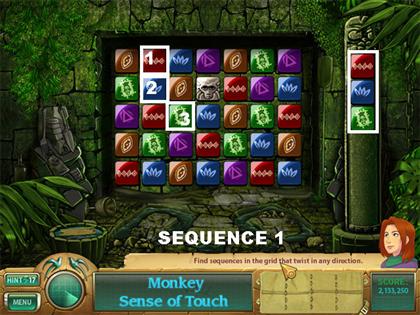
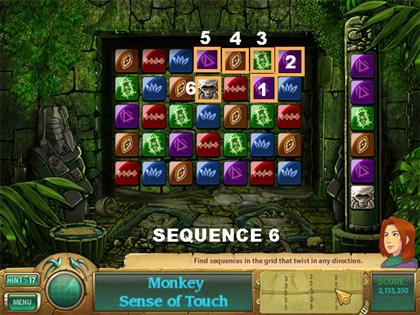
SEQUENCE PUZZLE
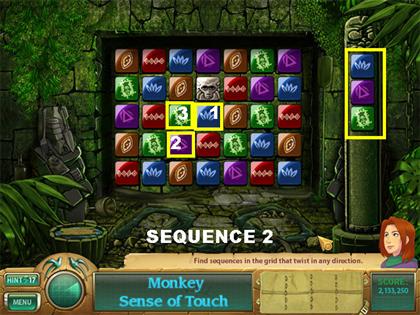
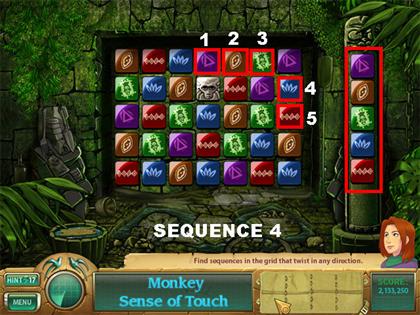
- Your goal is to find the sequences shown on the right in the grid in the center of the scene.
- Click on the tiles in the order shown.
- Each time you complete a sequence successfully another one appears.
- Make 6 sequences to win the game. Please look at the screenshots for the solutions.

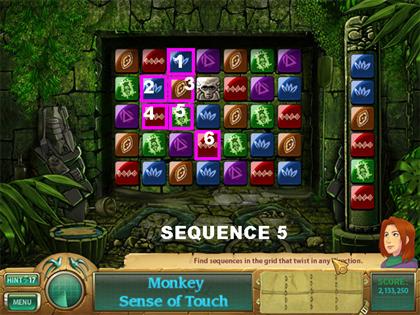
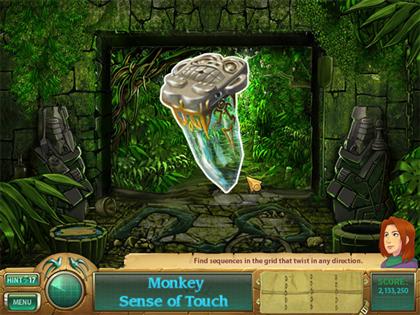
- Monkey Sense of Touch – Pick up the Monkey Sense of Touch after the puzzle has been completed.
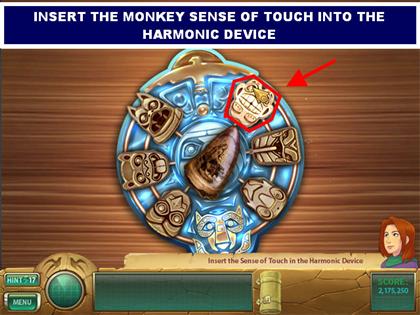
- Place the Monkey Sense of Touch into the last slot of the Harmonic Device.
TEMPESTA’S LAIR
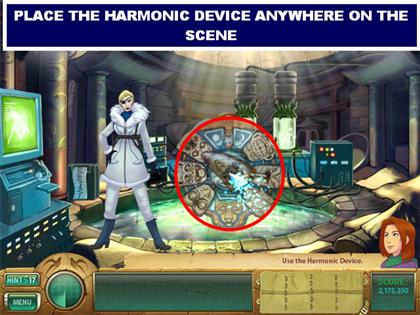
- Place the Harmonic Device anywhere in the scene.


 Letters from Nowhere 2 Walkthrough, Guide, & Tips
 Iron Roses Walkthrough, Guide, & Tips
 Angelica Weaver: Catch Me When You Can Walkthrough, Guide, & Tips
 Nightmares from the Deep: Davy Jones Walkthrough, Guide, & Tips
 Surface: The Noise She Couldn't Make Walkthrough, Guide, & Tips