Samantha Swift and the Fountains of Fate Walkthrough, Guide, & Tips
Samantha Swift and the Fountains of Fate Walkthrough

Welcome to the Samantha Swift and the Fountains of Fate Walkthrough!
Embark on a perilous journey to reclaim the Emerald of Judgment!
Whether you use this document as a reference when things get difficult or as a road map to get you from beginning to end, we’re pretty sure you’ll find what you’re looking for here.
This document contains a complete Samantha Swift and the Fountains of Fate game walkthrough featuring annotated screenshots from actual gameplay!
We hope you find this information useful as you play your way through the game. Use the walkthrough menu below to quickly jump to whatever stage of the game you need help with.
Remember to visit the Big Fish Games Forums if you find you need more help. Have fun!
This walkthrough was created by Robin, and is protected under US Copyright laws. Any unauthorized use, including re-publication in whole or in part, without permission, is strictly prohibited.
General Tips
- This is a Hidden Object Adventure game. In addition to the items on the Find List, you must find Key Items that go into your Inventory Tray so they can be used later.
- All players start the game with a profile called “Samantha.” If you want to use a different name, exit the first scene before you collect any objects, and then start a new profile.
- There is no timer.
- Mini-games are untimed and do not require special physical dexterity. There are two instances where you have to click on a slowly moving animal.
- You will always have a Custom Cursor, but you have a choice of a larger or smaller one. Switch on the Options Menu.
- The game consists of 6 long chapters, each of which has 5 to 8 Hidden Object Scenes. You will also have to complete 4 or 5 inventory tasks per chapter. Most chapters also have at least two puzzle mini-games, and some have even more.
- There are a total of 44 Hidden Object Scenes and over a dozen Puzzles in the main game.
- Use MENU in the lower left to return to the Main Menu.
- The game autosaves automatically.
- You can travel to unlocked scenes in any order you like, and revisit scenes as much as you like. If you have done everything you can in a location, you may still need to travel through that area to get to another location.
- You will exit most scenes by moving the cursor along the bottom of the scene until it turns into a downward pointing yellow arrow, then clicking there to exit. In a few scenes the exit is hidden and you will have to find it, sometimes using inventory objects.
- Use the MUSEUM option on the Main Menu to go into the Museum and view the Archaeological Finds that Samantha has made during the game.
- After you have found about half of the SWIFTS in the game you will unlock the bonus UNLIMITED HIDDEN OBJECT MODE from the Main Menu. This optional game lets you choose a Hidden Object Scene, then find all the items there as quickly as you can. Your time is recorded so you can go back and try to beat it later.
- Each time you start a new profile or replay under the same profile you will get a different find list.
- You can view your Trophies at any time from the Trophy button on the Main Menu. Note that Trophies are different than the Artifacts you will see in the Museum.
- Since some of the game Trophies require perfect play (e.g. using no hints for the entire game), we recommend saving these as goals for a replay.
General Tips for the Hint System

- You start the game with one hint.
- You can get one additional hint in most locations by collecting a LIGHTNING BOLT.
- You should also collect the two SWIFT SYMBOLS that are available in most locations. A Swift is a type of bird with long wings. The symbols can be a real bird, a drawing, a silhouette, etc.
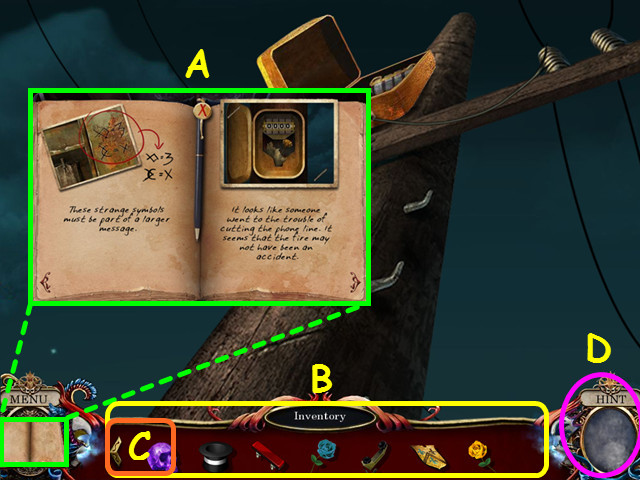
- The number of HINTS you have available is shown in the Hint Counter (B) in the lower left.
- The number of SWIFTS you have to find is shown by the Swift Counter (C) in the lower right corner that Samantha is holding. It has two spaces. When both are lit up, you have found all the SWIFTS available in this scene.
- SWIFTS and LIGHTNING BOLTS vary in size and color. The birds may be blue, black, brown, green, tan, etc, and are often against a background of the same color, like a green bird in a green tree. The LIGHTNING BOLTS are usually yellow, but can be red, orange, brown, or even green.
- When you zoom in to view a puzzle, there are sometimes SWIFTS and a LIGHTNING BOLT in that view as well, so collect them before you start the puzzle.
- Hints carry over. We played most of the game with about 12 stored up.
- The HINTS work for both Hidden Objects and inventory tasks. When you click on the HINT counter, a LIGHTNING BOLT will shoot towards the object and then circle it.
- If there is more than one object left on the Find List, click on a Find List entry, then click on the Hint counter to find that specific object.
- Although the number of HINTS is limited, there is more to the hint system in this game. If you click on any entry in the Find List, you will see its silhouette in the lower left corner (A). This does not cost a hint. This can be very helpful. However, there is one trophy that you can only get if you never use the Scanner feature in the whole game. We recommend doing this on a replay of the game.
- If you make too many incorrect clicks in a row, the silhouette feature will be disabled for a few seconds. There is no other penalty, but this will prevent you from getting one of the game trophies.
- You will also find text hints in the line just above the Find List (D). These will usually tell you if you need to go to another location and then return.
- Samantha will also make comments that can give you clues as to what to do next.
- If you are working on a puzzle, you can click on the HINT counter (B) once and you will get more detailed instructions for the game. This does not cost a HINT. At that point the HINT counter will change to a SKIP button in case you want to skip the puzzle.
- There is a trophy available for completing all the puzzles without using the SKIP, but no other penalty.
- The cursor is a very important part of the hint system in this game.
- The cursor will change to a hand when you are at a spot where you can do something in the scene that does not require a Key Item, like looking behind a wall hanging.
- The cursor will change to gears at a spot where you can use a Key Item.
- Once you have a Key Item attached to your cursor, go back to the spot where the gears appeared. If the cursor turns red, it’s the wrong object. If the cursor turns blue, it’s the correct object, and you can click there to use it.
- If the cursor turns to a magnifying glass, you can click to zoom in.
- If you hover the cursor over an item in your inventory tray, you will see its name.
- This is a guided adventure game—the game will limit which tasks you can do when. You may think it’s obvious that you need to, say, use a watering can on a dying plant, but nothing happens when you try it. Continue working on the tasks you can do, and try again later to see if the cursor turns to gears at that spot.
- Similarly, you will not be able to collect an item until its name appears on the Find List.
General Tips for the Inventory Tasks
- This game has many adventure elements where you must complete tasks important to the story, like opening a locked chest.
- Inventory tasks cannot be skipped.
- Key Items are items you will need to complete the inventory tasks. Key Items may appear on the Find List, be stand alone items in the main scene, or be given to you automatically when you complete other tasks.
- Key Items are not identified ahead of time, so watch your inventory tray to see if new items have been added.
- Key items may be used in the scene where they are found or later in the game.
- If you collect more than one of the same kind of item, for example 2 wooden planks, they will go into the same tray in your inventory.
- Items that are stored as multiples will all be used in the same place, but you will usually have to take them out of the Inventory Tray one at a time until you have placed all of them.
- If you pick up an item from your Inventory Tray and then decide you don’t want to use it, click on the tray to put it back.
- To use a Key Item, click on it in the Inventory Tray, move the cursor to where the cursor turns blue, then click again.
General Tips for the Hidden Object Scenes in the Story Mode
- All objects are generally the right color but many are much larger than lifesize and they are often out of proportion to each other, so that a safety pin might be much larger than a bowling ball.
- All players start the first scene with only 1 HINT. You can get more hints by collecting the LIGHTNING BOLTS in the scenes.
- The Find List will be different for different players, but the Key Items will always be the same.
- More items will be added to the Find List at various times. Items in white can be found immediately. Items in green require that you do something in the scene, like open a box, to reveal them.
- You cannot collect an item until its name appears on the Find List, except for the SWIFTS and the LIGHTNING BOLTS.
- Each scene has 2 SWIFTS.
- Each scene has one LIGHTNING BOLT.
General Tips for the Unlimited Hidden Object Mode (Bonus Game)
- The Unlimited Hidden Objects Mode is a bonus game available from the Main Menu..
- If you find every SWIFT, you will unlock the bonus game about half-way through the Story Mode.
- The bonus game will keep track of your highest score and your time for each scene.
- Replay as often as you like to see if you can improve your score.
- Each time you play the bonus game you will get a different Find List.
- If you completed the game in Story Mode and did not find enough SWIFTS to unlock the bonus game, you can replay under the same name.
- If you start a new profile, the bonus game will be locked until you have found enough SWIFTS under the new profile name.
Stage 1: The Emerald of Cortez
- The Prologue told you that Samantha was searching for the Emerald of Cortez, and that there are some bad guys after it as well.
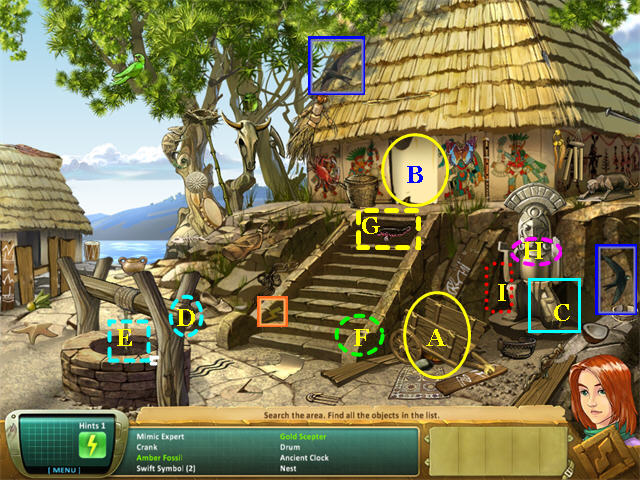
The Cortez Temple – Outside
- Collect the white items on the Find List.
- The “Mimic Expert” is a green Parrot in the upper left.
- Click on the Wagon (A) to the right of the stairs to reveal the Amber Fossil.
- Click on the Curtain (B) at the top of the stairs to reveal the GOLD SCEPTER.
- Collect the CRANK (C) from the Statue on the right.
- Use the CRANK on the Well (D) and pull up the HOOK (E).
- Put the GOLD SCEPTER in the hole at the base of the Stairs (F).
- Put the HOOK on the GOLD SCEPTER (F).
- Tithe HOOK will automatically attach itself to the Well (D). Turn the CRANK (D). It will pull back the stairs, revealing the CORAL NECKLACE (G).
- Put the CORAL NECKLACE on the Statue (H) to reveal the Exit (I).
The Cortez Temple – Inside
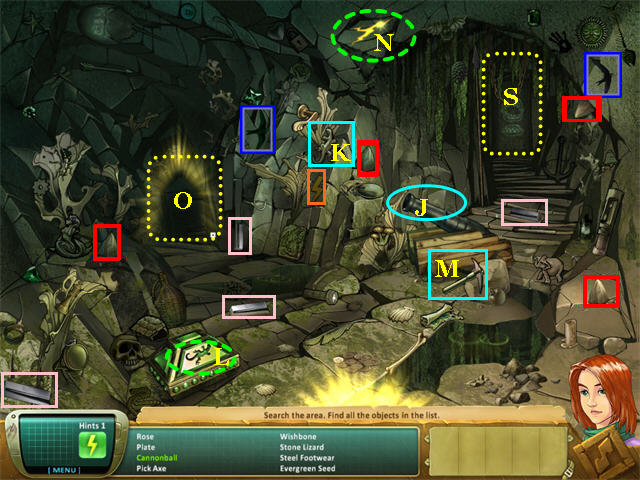
- Collect the white items on the Find List.
- “Steel Footwear” is a Horseshoe.
- “Evergreen Seed” is a Pine Cone.
- Click on the Cannon (J) to reveal the Cannonball.
- STONE LIZARD (K) is on the wall below the glowing crack in the ceiling.
- The Silver Bars are marked in pink on the screenshot.
- Use the STONE LIZARD on the Green Box (L) to open it and reveal the Silver Dolphin.
- Use the PICKAXE (M) on the Ceiling Crack (N) to reveal the Gold Idol.
- There are 4 LOOSE TEETH marked in red on the screenshot, but you won’t be able to collect them until after you’ve gone into the next room and then returned.
- Go through the archway (O) on the left to reach the next scene.
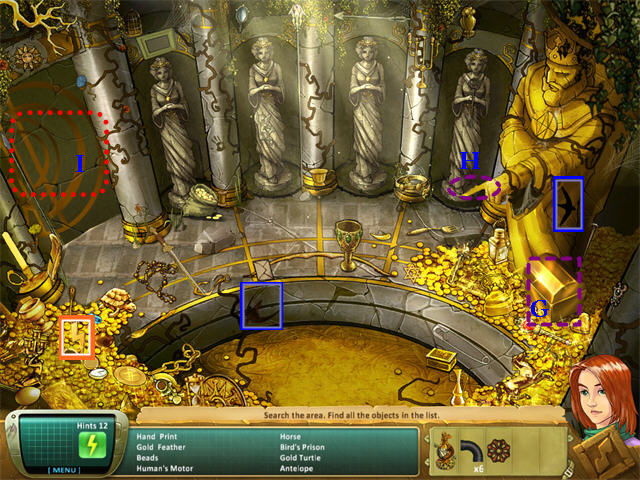
Cortez Temple – Downstairs
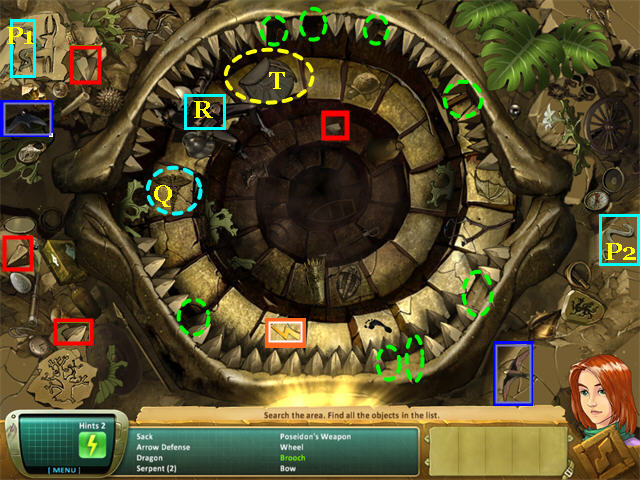
- Collect the white items on the Find List.
- The Brooch is inside the Pouch (T) at the top of the mouth.
- The Arrow Defense is a Shield on the lower left of the scene.
- Poseidon’s Weapon is a Trident pointing down at the top right of the scene.
- Put the two SERPENTS (P) on the Medical Symbol (Q) on the left side of the mouth, revealing the HEALING POTION.
- Collect the KEY (R).
- Collect 4 LOOSE TEETH as marked in red on the screenshot.
- Go back to the previous room, pick up the 4 LOOSE TEETH marked in red there, and then return.
- Place the 8 TEETH into the gaps in the mouth. The mouth will close.
- If you are having trouble finding a place to put a LOOSE TOOTH, just put a LOOSE TOOTH on your cursor, then slowly move the cursor around the circle. It will turn blue anywhere you can place a tooth. Any LOOSE TOOTH can go in any gap.
- When you return to the main Temple room, the doorway in the upper right (S) will be open.
The River Chamber

- Collect all the white items on the Find List.
- “Far-seeing Eyes” are Binoculars.
- “Walking Aid” is a Cane at the back in the center of the scene.
- Click on the Branch (U) in the upper left to move it and reveal the Gold Egg.
- The “Chair” is a camp stool on the right.
- Use the ACID (V) on the Lock (W) on the Chest to reveal the Inca Mask.
- Use the GRAPPLING HOOK (X) on the Crate (Y) floating in the water to pull it on shore.
- Use the CROWBAR (Z) to open the Crate and reveal the Dino Femur.
- One of the boards from the broken Crate has white painted symbols on it. That is the PAINTED BOARD.
- Zoom in the back right by the Fence (AA). Samantha says she needs to go back to the first location to get more BOARDS.
- Go back outside; collect 3 PAINTED BOARDS (BB) and return.
- Zoom in on the Fence (AA).
Painted Boards Puzzle
- Arrange the Boards to form a picture.
- When a piece is set correctly, it will lock into place.
- When you have a Board attached to your cursor and you click on another Board, the Board you had will go into that space and the other Board will now be attached to your cursor.
- You may find it easiest to first arrange all the Boards that are already on the Fence, then add the ones from your inventory.
- Once the picture is complete, the gate will open, and you can exit to the River House location.
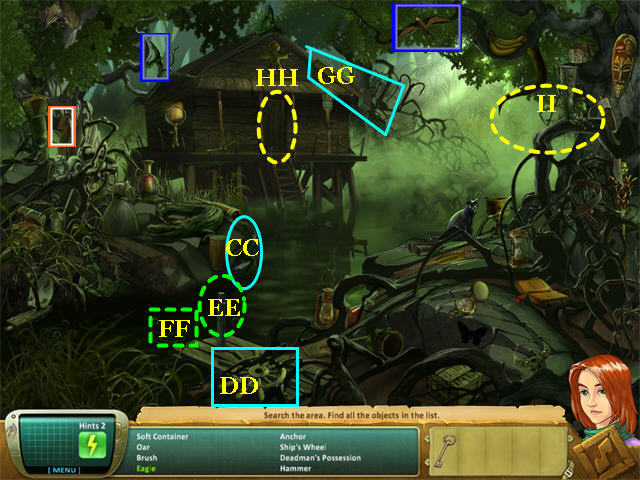
River House – Outside
- Collect the White items on the Find List.
- The “Soft Container” is a sack.
- The “Dead Man’s Possession” is a Treasure Chest on the left.
- There is a Bottle (CC) floating on the river with a Feather drawn on it. Pick it up, and you will find a picture of an Eagle.
- Use the SHIP’S WHEEL (DD) on the Post (EE). A Barrel (FF) will rise up to the top of the water.
- Use the HAMMER (GG) on the Barrel to reveal the Idol.
- Once you collect the Idol, Zombies will rise up out of the water! Samantha will say you should go into the house.
- Use the KEY to open the Door (HH) into the House.
River House – Inside
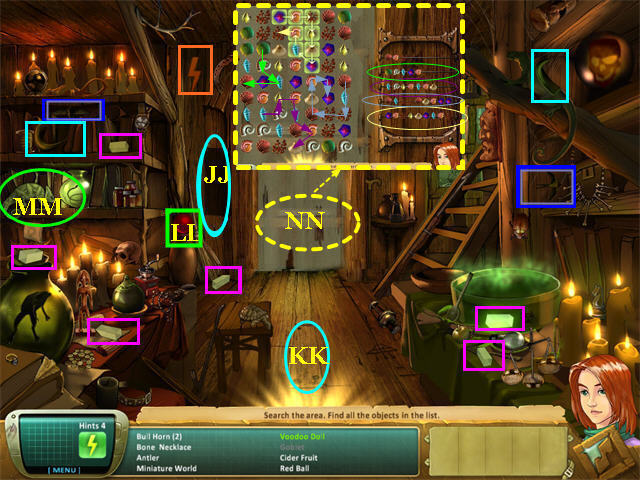
- Collect the white items on the Find List.
- Move the Panel (JJ) on the back wall to reveal the Goblet.
- Move the loose Panel (KK) on the floor to reveal the Voodoo Doll.
- Put the RED BALL (LL) on the Chameleon (MM) to turn it red, then collect the Red Chameleon.
- Zoom in on the Curtain (NN) for a puzzle.
Witch’s Shell Puzzle
- Click on adjacent shells (in any direction) to match each line of shells on the right. Our solutions are in the screenshot.
- Collect the WITCH’S BOOK. It will tell you that Zombies can be dissolved with magic SALT CRYSTALS.
- Return to the room.
- Collect the 6 MAGIC SALT CRYSTALS as shown in pink.
- Go back outside the River House.
- Put one MAGIC SALT CRYSTAL on each Zombie. After they all melt, the Crystal Skull will rise up from the water.
- Collect it, and exit the scene through the trees on the right (II). Find the spot where the cursor points sideways, then click.
Burned Ship
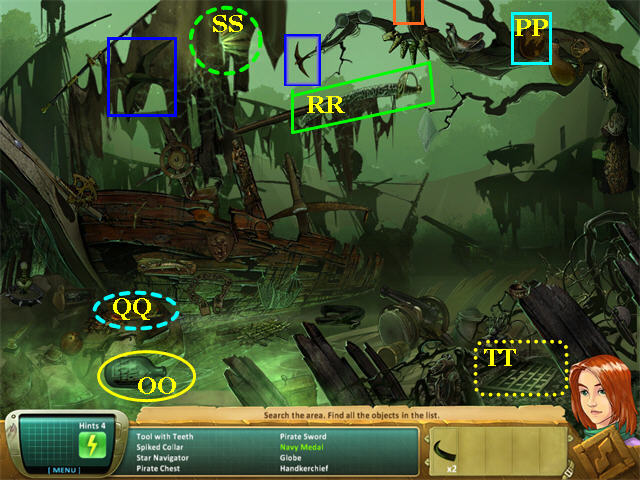
- Collect the white items on the Find List.
- “Tool with Teeth” is a Saw.
- “Star Navigator” is a Sextant.
- “Honey Expert” is a stylized Bear statuette at the bottom of the scene.
- Pick up the Bottle (OO) with a ship on it and the Navy Medal will fall out.
- Use the GLOBE (PP) on the Book (QQ) to reveal the Old Map.
- Use the PIRATE SWORD (RR) on the Sail (SS) to reveal the EMERALD CROSS.
- Move the Grate (TT) to find the entrance to the Flytrap Cave.
Flytrap Cave
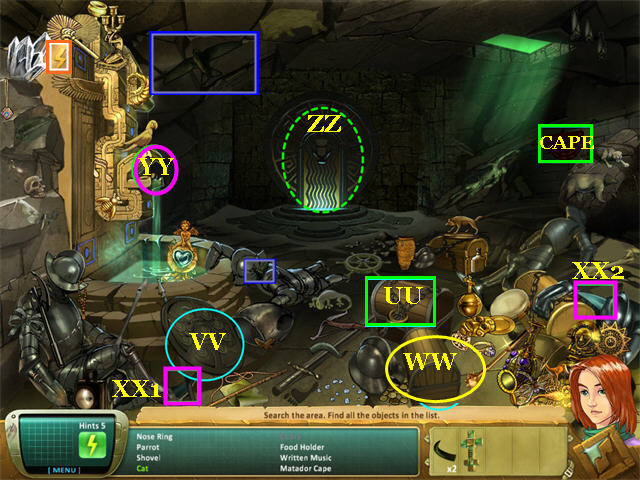
- Collect the white items from the Find List.
- The NOSE RING (UU) is a large gold ring on one of the treasure chests.
- Move the Shield (VV) to reveal the Cat.
- Open the front Chest (WW) to reveal the Cobra.
- The DIAMOND FANGS (XX) look like two different colors because one is in the shadow.
- Place the DIAMOND FANGS in the Snake Statue (YY), revealing the MATADOR.
- Now you have to find a way out of the trap! Zoom in on the Bull (ZZ) at the back of the cave.
The Golden Bull
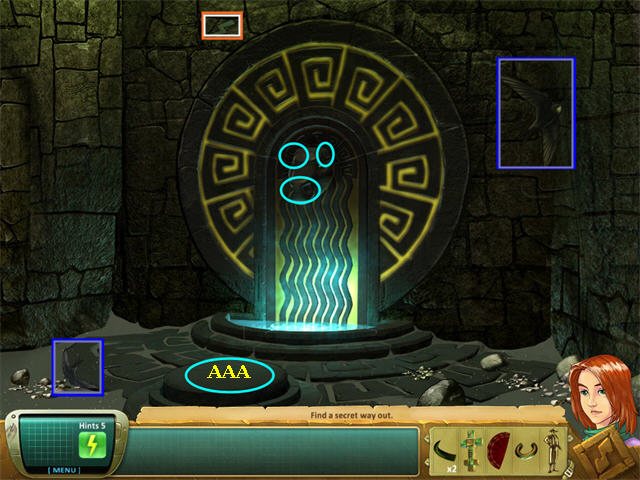
- Put the NOSE RING and the HORNS on the Bull.
- Put the MATADOR on the Platform (AAA) in front of the Bull.
- Put the CAPE on the MATADOR.
- The door behind the Bull will open, revealing the Emerald Puzzle.
Emerald Puzzle
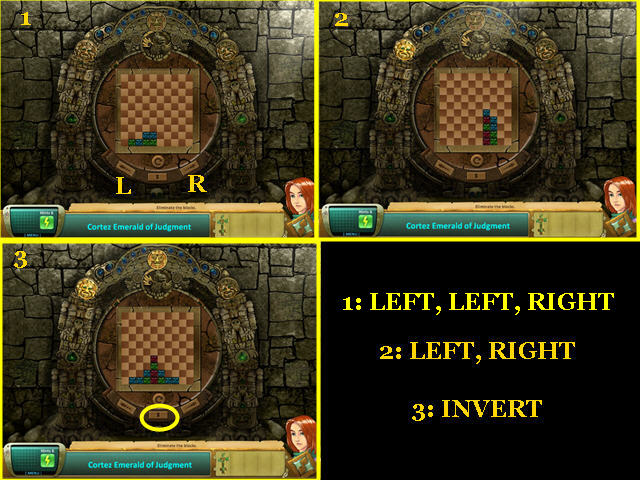
- Zoom in behind the Bull to see a board with colored tiles. You can rotate the board to the left, the right, or invert it.
- The 4th button with the circular arrow resets the puzzle to the initial position for the current round.
- You must move the board so that all tiles of one color are together—then they will disappear from the board. Continue until all tiles are removed.
- There are three rounds.
- There are many possible solutions. Here are ours:Round 1: Left, Left, Right
Round 2: Left, Right
Round 3: Invert
- This will reveal a Disk with a cross-shaped indentation. Put the EMERALD CROSS in it.
- Click one more time to remove the door and step through.
- Watch the cut scene. The Emerald of Cortez will be stolen by the villain. Samantha will return to the Museum, then decide to travel to Iraq to find the Waters of Eden.
Stage 2: The Waters of Eden
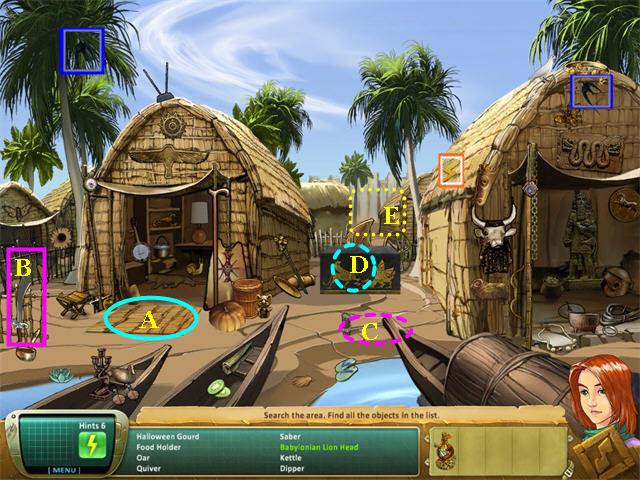
- Collect the white items on the Find List.
- Move the Mat (A) to reveal the BABYLONIAN LION HEAD.
- Collect the SABER.
- Use the SABER (B) to cut the Rope (C) and reveal the Gold Ark.
- Use the BABYLONIAN LION HEAD on the Chest (D) to reveal the Sumerian Goat.
- Leave the scene through the back alley (E).
Babylonian Fort – Outside
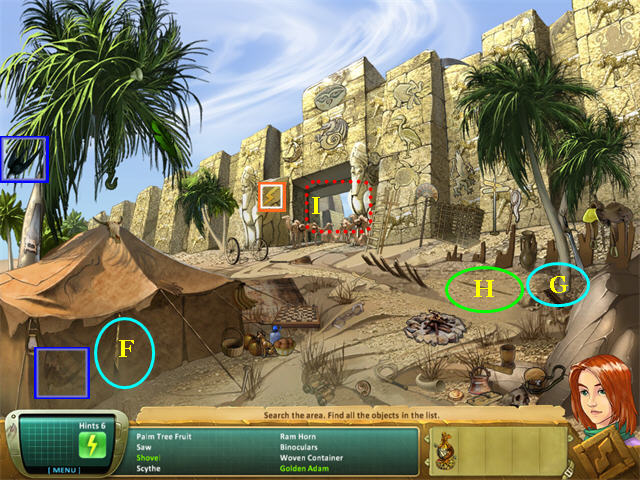
- Collect the white items on the Find List.
- “Palm Tree Fruit” are Coconuts.
- Move the Tent Flap (F) to find the GOLDEN ADAM.
- Shake the Tree (G) on the right and the SHOVEL will fall out.
- Use the SHOVEL on the ground (H) beneath the Tree to reveal the GOLD HEART.
- Walk into the Fort (I).
Babylonian Fort – Inside
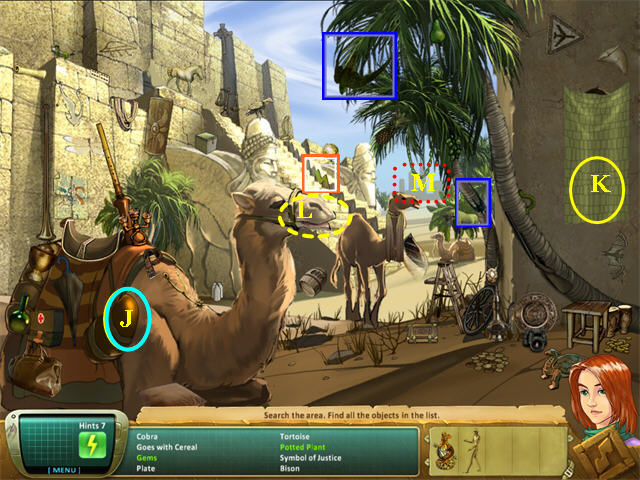
- Collect the white items on the Find List.
- “Goes with Cereal” are Milk Bottles against the wall behind the left Camel.
- “Holds Ashes” is an Urn that the left Camel is carrying.
- Collect the Gems from the Saddle Bag (J).
- Move the Curtain (K) to collect the POTTED PLANT.
- Feed the POTTED PLANT to the center Camel (L). When its head bends down, you can collect the GOLDEN EVE from behind it.
- Walk towards the City (M) in the distance.
Factory – Outside
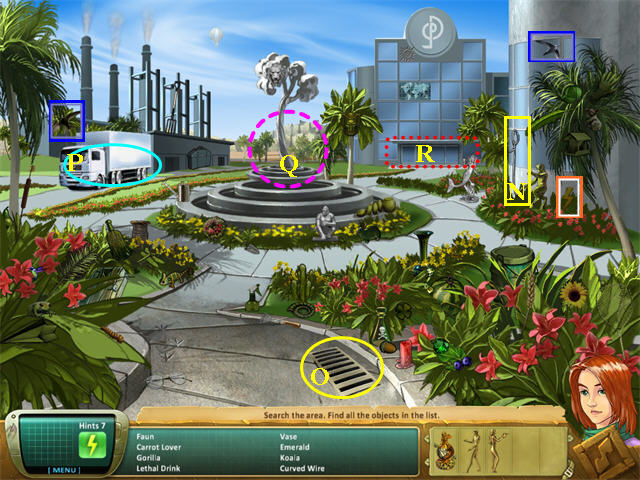
- Collect the white items from the Find List.
- Use the CURVED WIRE (N) on the Grate (O) and collect the KEYS.
- Use the KEYS to start the Truck (P). An Apple will fall out.
- Place the GOLDEN EVE and the GOLDEN ADAM on the Tree (Q) in the center of the Fountain to reveal the GOLDEN SERPENT.
- Exit the scene by going through the Doors (R) into the Factory.
Factory – Inside
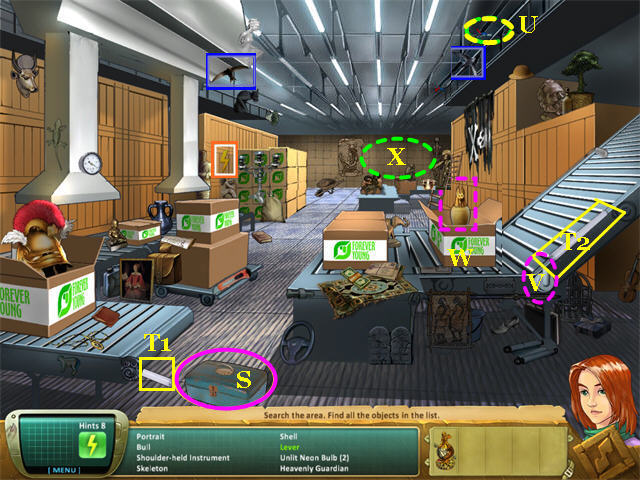
- Collect the white items on the Find List.
- Open the Toolbox (S) to reveal the LEVER.
- Put the two NEON BULBS (T) into the empty Ceiling Fixture (U) to reveal the Sphinx (“Pyramid Watcher”)
- Use the LEVER on the Conveyor Belt (V). A Box will slide down. Open it to reveal the Canopic Jar (W).
- Zoom in on the back wall (X).
Box Puzzle
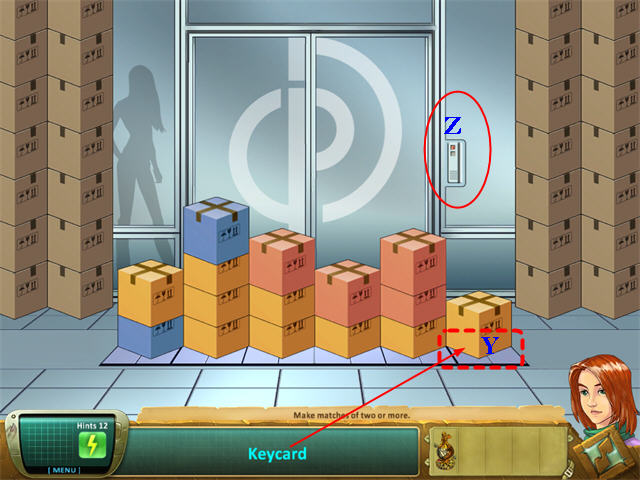
- Boxes will be removed in groups of the same color that are touching each other.
- The puzzle is easier than it looks, because you only need two boxes of the same color to remove them, not three.
- If you reach an unsolvable position, the puzzle will start over with a different pattern.
- The KEY CARD will always be on the floor underneath the last Box.
- Remove the boxes (there are many possible solutions) and collect the KEY CARD.
- Use the KEY CARD in the Door lock (Y) to reveal the exit.
Conference Room
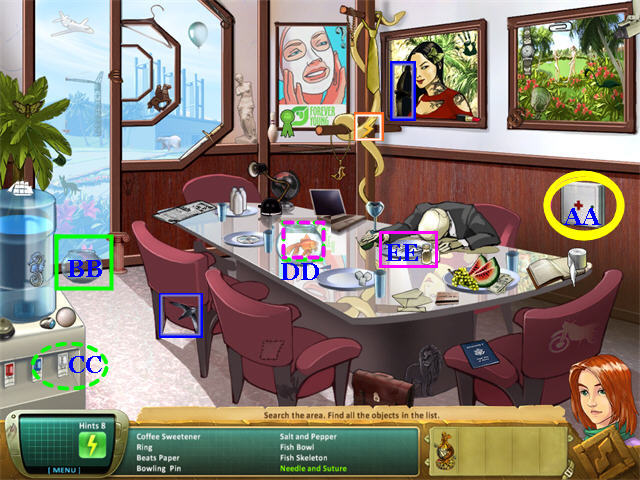
- Collect the white items on the Find List.
- “Coffee Sweetener” is a stack of Sugar Cubes on the table.
- “Plastic Money” is a Credit Card on the table.
- The Flamingo is a shadow on the painting of Adam and Eve.
- The Handprint is on the painting of M’Alice.
- Open the First Aid Kit (AA) to reveal the Needle and Suture.
- Use the FISH BOWL (BB) on the rightmost switch (CC) for the Water Fountain to get water.
- Put the FISH BOWL WITH WATER on the Table (DD).
- Put the FISH SKELETON (EE) into the FISH BOWL WITH WATER (DD) and it will turn into a live Goldfish!
- Use the EMPTY CUPID from your inventory to get more water from the Water Fountain (CC).
- Watch the cutscene. The next location to explore is in China.
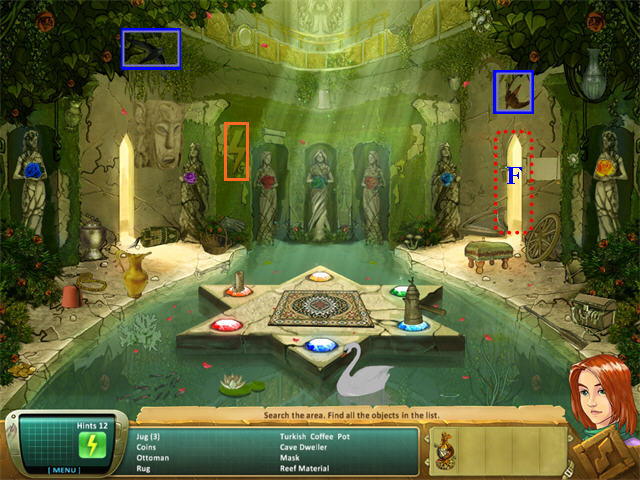
Stage 3: The Waters of Shangri-la
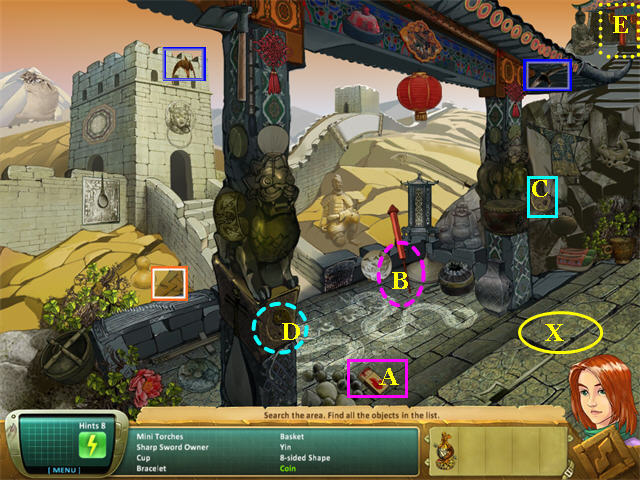
- Find the white items on the Find List.
- The MINI-TORCHES (A) are a box of Matches.
- The Rosette is a decorate item at the top of the arch.
- Move the Loose Stone (X) to reveal the COIN.
- Use the MATCHES to light the Rocket (B). It will go off, and the Star will fall onto the left side of the bridge.
- Put the YIN (C) in place next to the YANG (D). A cabinet will open revealing the Golden Mantis.
- Go up the stairs to the right (E).
Chinese Temple – Upstairs
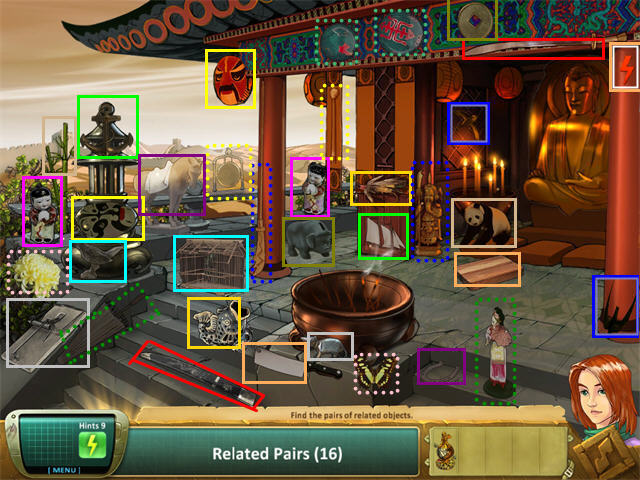
- Collect the related pairs:
Two Masks
Sword and Scabbard
Panda and Bamboo
Boy Doll and Girl Doll
Two meditation Orbs
Coin and Piggy Bank
Spear and Statue of Warrior
Parasol and Lady
Horse and Horseshoe
Ship and Anchor
Cutting Board and Cleaver
Gong and Beater
Butterfly and Flower
Mouse and Mousetrap
Bird and Cage
Fish and Hook
- When you have collected all the pairs, a doorway will open behind the Buddha statue. Go through to the Serpent Bridge.
Serpent Bridge
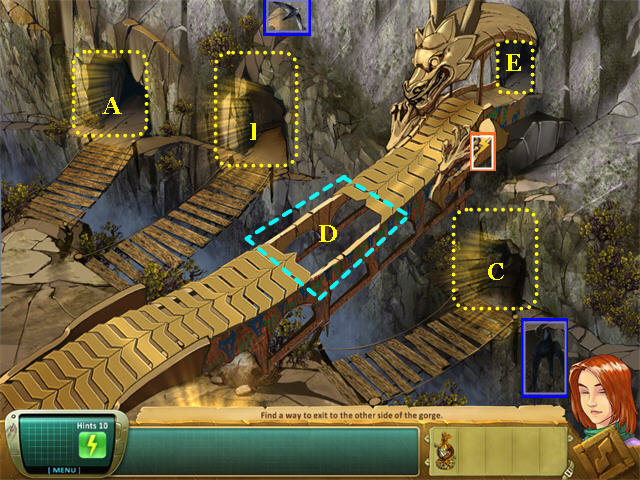
- This area has three available rooms, left (A), center (B), and right (C). You can do these in any order. When you are done, you will have collected enough pieces of the Serpent Bridge to repair the break (D) and continue over the bridge (E).
Serpent Bridge – Left Chamber
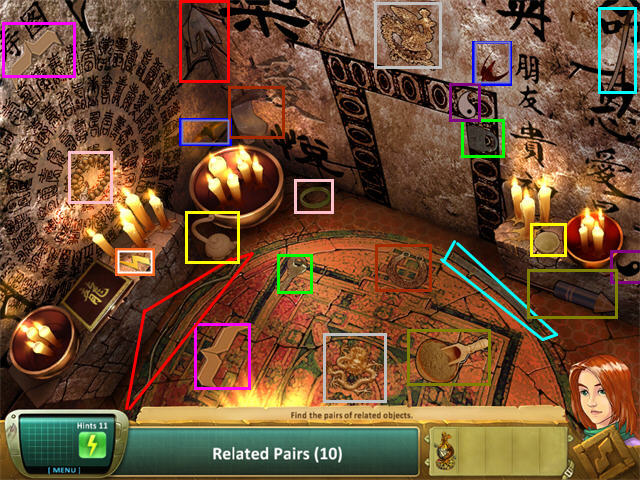
- Collect the related pairs:
Necklace and Bracelet
Bow and Arrow
Saddle and Horseshoe
Yin and Yang
Lock and Key
Sword and Scabbard
Dragon and Phoenix
Two SERPENT BRIDGE PIECES
Teapot and Tea Cup
Rocket and Gunpowder

- After you have collected all the pairs, open the Calligraphy Set (F) on the left shelf.
- Collect the PAINT STICK and the BRUSH.
- Use the PAINT STICK in the center tray of the Calligraphy Box.
- Use the BRUSH on the center tray of the Calligraphy Box and you will get a BRUSH WITH PAINT.
- Use the BRUSH WITH PAINT on the Faded Symbol (G) on the wall and the Center Door (H) will open revealing the DRAGON HORN.
- Return to the Serpent Bridge.
Serpent Bridge – Center Chamber

- Collect the white items on the FIND LIST.
- Collect the two SERPENT BRIDGE PIECES (I).
- The “Fowl Alarm Clock” is a Rooster drawing on the floor.
- You can open the Door on the left (J) and go out—but you’ll fall down a cliff! Click once anywhere on the scene to pull yourself back up.
- Open the Door in the back on the right (K) to reveal the DRAGON HORN.
- Return to the Serpent Bridge
Serpent Bridge – Right Chamber
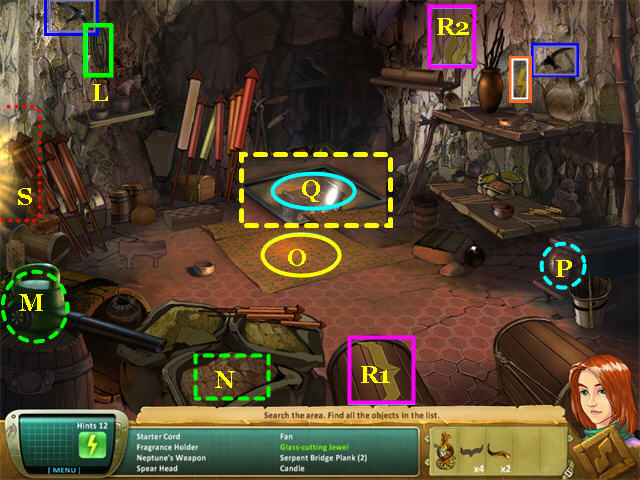
- Collect the white items on the FIND LIST.
- The two SERPENT BRIDGE PIECES (R) are marked in pink.
- Use the STARTER CORD (L) on the Leaf Blower (M) and it will reveal the Gold Statuette (N).
- Pull aside the Rug (O) lying over the heating pit. The top is covered in Glass.
- Open the Stove Door (P) to reveal the DIAMOND.
- Use the DIAMOND to cut the Glass (Q), revealing the ETERNAL FIRE.
- Return to the Serpent Bridge. You will have to exit through the left side of the scene (S)—there is no down arrow exit in this location.
Across the Serpent Bridge

- Collect the white items on the Find List.
- The Gold Ball is inside the Fish Statue (T).
- The Pearl Necklace is inside the Parasol (U).
- The Sword is just behind the Parasol—it can be hard to see if you’ve already opened the Parasol.
- Click on the Pool (V) to start a puzzle.
Chinese Word Puzzle
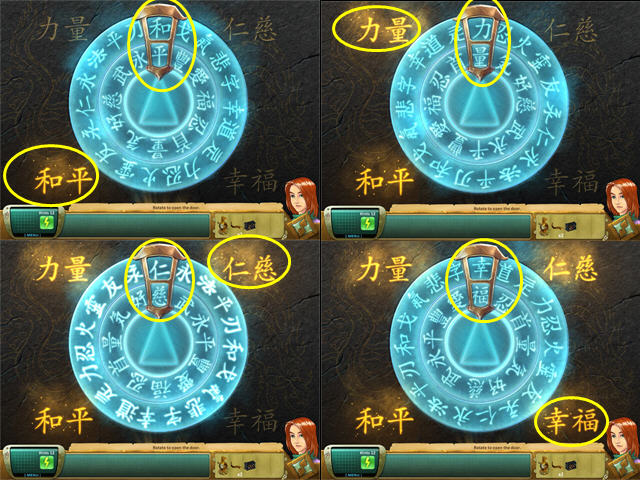
- There are four words written in Chinese on the wall. You must recreate each word using the ideographs in the rings. Put the left letter in the top ring and the right letter in the bottom ring.
- You can do the words in any order.
- Each time you do a word correctly, it will glow gold on the wall. Then you can go on to the next word.
- When you have completed all four words, the door at the back of the room will open, revealing a Dragon Statue.
Dragon Statue
- Zoom in on the Dragon Statue. Collect the two SWIFTS and the LIGHTNING BOLT from this view.
- Put the two DRAGON HORNS and the ETERNAL FIRE on the Dragon Statue (W).
- You will return to the main chamber view, and the heat from the Dragon Statue will start the Pool bubbling.
- Use the EMPTY CUPID to collect the Waters of SHANGRI LA from the Pool (V). You will need to click on the CUPID a couple of times until it returns to your inventory.
- Watch the cut-scene. Notice the new plot element: you need the waters to reverse the aging of Princess Zoe, the daughter of King Midas.
Stage 4: Solomon’s Mine
- Princess Zoe has told you that her father, King Midas, will know where to search for the Waters you need, so you start out at his palace looking for clues
Midas Palace – Outside
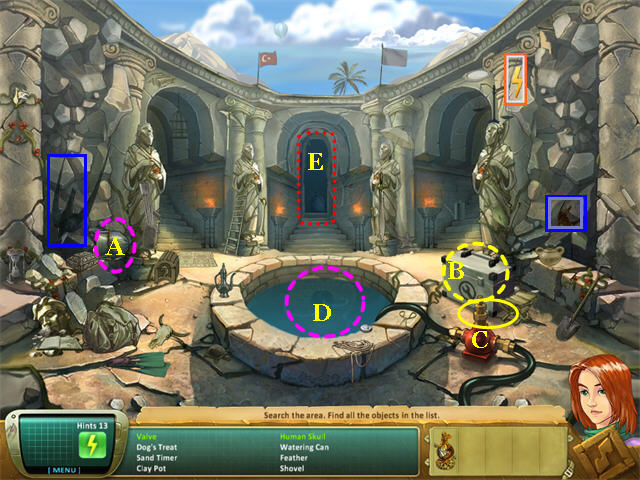
- Collect the white items on the Find List.
- The HUMAN SKULL (A) is inside the Helmet.
- The VALVE is inside the Toolbox (B).
- Put the VALVE on the Pump (C). The water will start to drain out of the pool.
- Put the SKULL into the Heart on the wall of the Pool (D) to reveal the STONE HEART.
- The Doorway at the center back (E) will now be available to you.
Midas Palace – Inside
- Collect the white items on the Find List.
- The Find List will fill three times—the third time will be the ROSES held by each statue.
- After you have collected all the ROSES, put each one onto its matching color jewel in the center design.
- As you place each ROSE, that statue will move away revealing either a PIPE PIECE or the VALVE.
- After you collect all of these, you will be able to go through the Door on the right (F) into the Treasure Chamber.
Midas Palace – Treasure Chamber
- Although there’s no sound effect for it, when you went into this room the door closed behind you and won’t open again, so you’re trapped.
- Collect the white items on the Find List.
- Most of the items are gold, but a few, like the Blue Rose, Yellow Rose, Spear, and Angel are real items scattered around the room.
- Open the Gold Box (G) at the feet of the Midas Statue and collect the RING.
- Put the RING on Midas’ finger (H). He will point to the Door (I), which will open.
Mural Puzzle
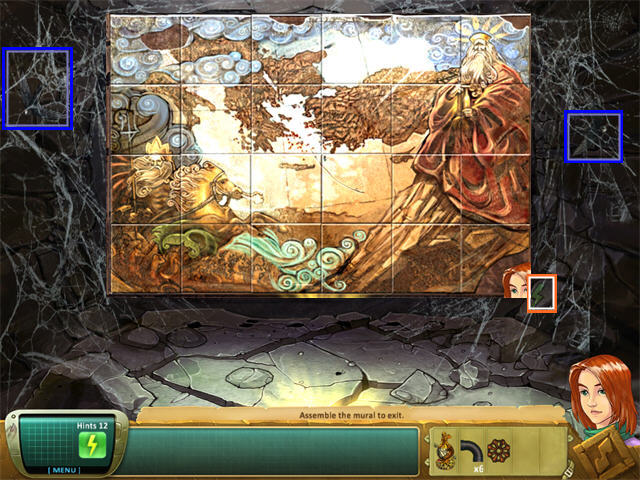
- Collect the SWIFTS and the LIGHTNING BOLT before you zoom in to do the Mural Puzzle.
- This is a jigsaw puzzle.
- Pieces do not rotate.
- Pieces will snap into place when set correctly.
- Pieces will light up once set correctly, but some of them light sooner than that. If you can move the piece again, it’s not in the right place yet.
- Once the mural is correct, the door will open. Go through to the outside.
Midas Palace—Outside the Back
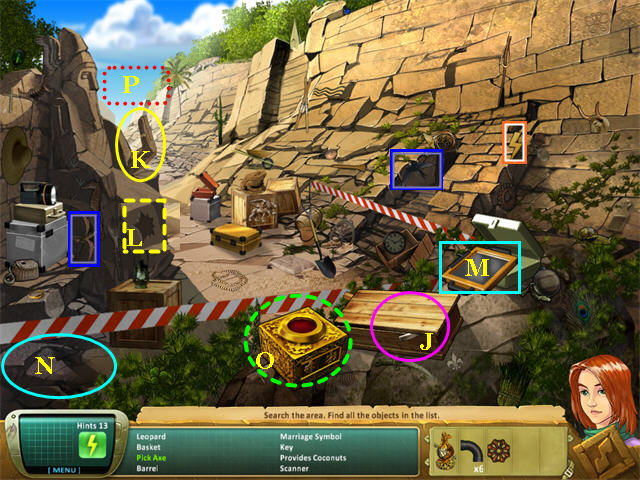
- Collect the white items on the Find List.
- Open the Crate (J) to reveal the PICK AXE.
- Move the Statue’s Arm (K) to reveal a star-shaped indentation (L).
- The next steps have to be done in this sequence.
- Use the SCANNER (M) you collected from the scene on the pile of Rocks (N) on the left. You will see the outline of the GOLD DANCER.
- Use the PICK AXE on the Rocks (N) to uncover the GOLD DANCER. Note that you cannot do this step until you have used the SCANNER there.
- Put the GOLD DANCER on top of the Gold Box (O). It will open to reveal the GOLD STAR.
- Put the GOLD STAR in the indentation (L).
- The Statue will move, revealing the Genie Bottle.
- Exit to Jerusalem through the back of the scene (P).
Jerusalem
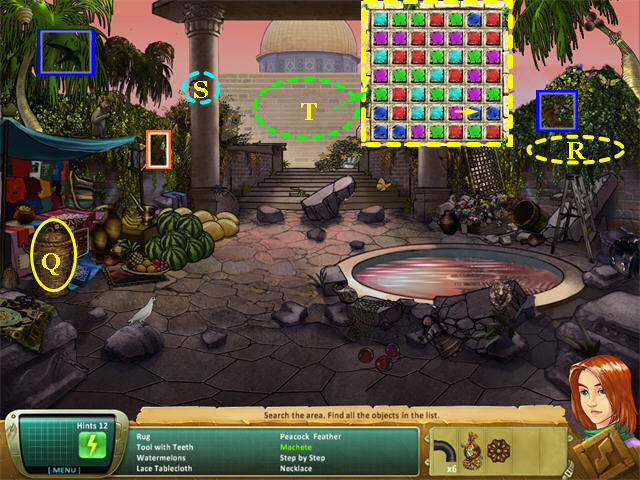
- Collect the white items on the Find List.
- Open the Basket to reveal the MACHETE (Q).
- The Rug looks more like a pillow. It is under the Plate of Fruit next to the Watermelons.
- The Moth is high in the ivy on the right.
- Use the MACHETE on the Ivy (R) to reveal the Unlit Torch.
- Put the UNLIT TORCH in place on the left pillar (S), then turn it to reveal the GOLDEN HAND.
- Zoom in on the Wall (T) in the back.
Jerusalem Wall Puzzle
- This is a match-3 puzzle. There are many possible solutions.
- Matches must be made vertically or horizontally, not diagonally.
- Once you have made a match over every square, the wall will open to reveal the entrance to King Solomon’s Mines.
King Solomon’s Mines Puzzle
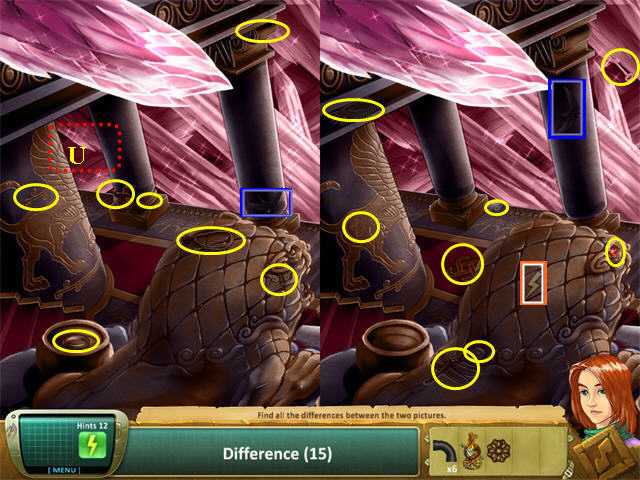
- This is a Find the Differences puzzle.
- There are also two SWIFTS and a LIGHTNING BOLT that you can collect—they do not count as differences.
- Exit to the left (U) as shown.
King Solomon’s Mine – Inside
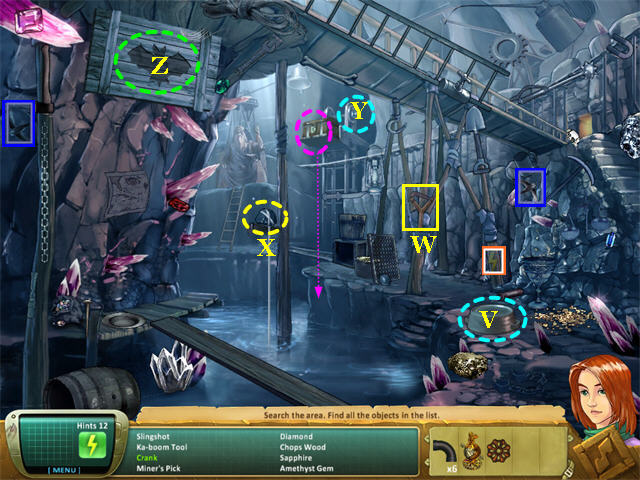
- Collect the white items on the Find List.
- The Diamond is in the upper right at the top of the stairs.
- Move the Pan (V) to reveal the LEVER.
- Use the SLINGSHOT (W) on the Rock in the center (X) and it will reveal the KEY.
- Use the LEVER on the Winch (Y) in the back and the Chest will fall down into the water, floating closer to you.
- Use the KEY on the Chest to reveal the GOLDEN BAT.
- Use the GOLDEN BAT on the Sign (Z) in the upper left. It will fall away. Zoom in to find the pipes puzzle.
Pipes Puzzle
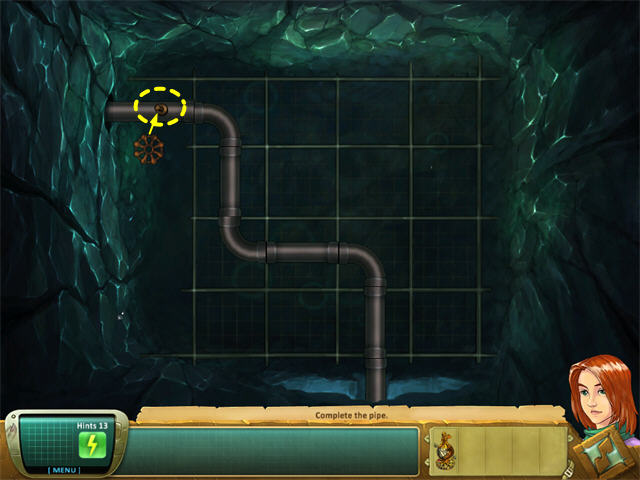
- Assemble the pipes.
- Put the VALVE on the small post at the top, and click again to turn it.
- You will be returned to the main view.
- The WATERS OF LIFE will pour down in a column on the left of the scene.
- Use the EMPTY CUPID to collect them.
- Watch the cut scene.
Stage 5: Hopi Rain Waters
- You begin outside a Hopi Dwelling. There are multiple exits from the scene, but not all of them are available at the same time. You will need to come back to this scene several times in order to go to new locations as they become available.
Hopi Dwelling – Outside
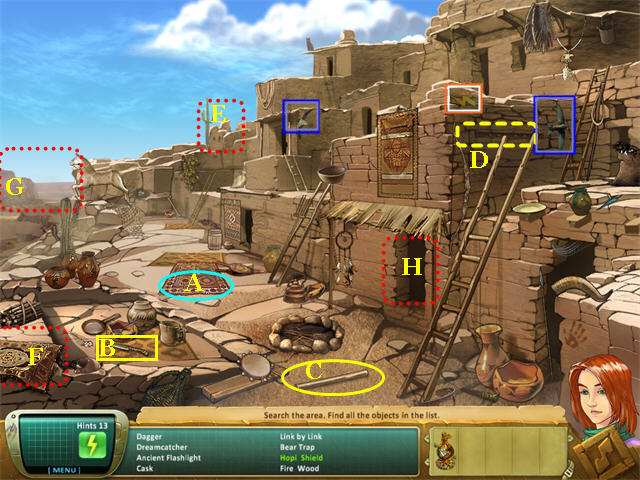
- Collect the white items on the Find List.
- Move the Rug (A) to reveal the Hopi Shield.
- Use the DAGGER (B) to cut holes in the Pipe (B) to make the Flute.
- Put the FLUTE in the pipe-shaped indentation (C) at the top of the Ladder and the FLUTE PLAYER will be revealed.
- After you collect it, you will have a conversation with the Shaman, who is sitting in front of the Door to the Dwelling (H). He tells you the Hopi People need 4 sacred tablets. He has one; you must go find the other 3.
- Exit to the Forest in the upper right (D).
Hopi Forest
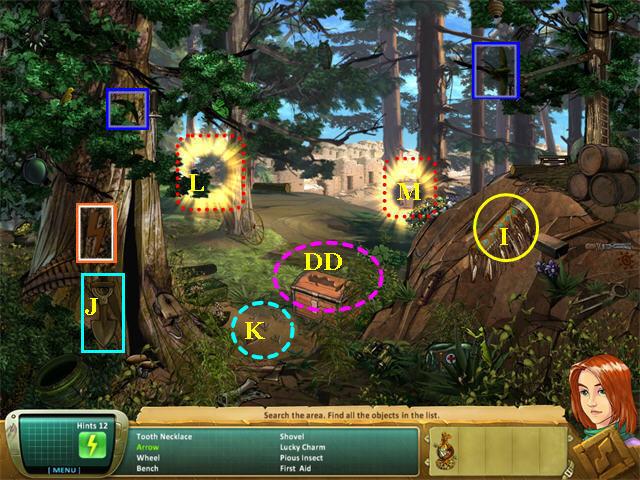
- Collect the white objects on the Find List.
- Shake the Quiver (I) to get the ARROW.
- Use the SHOVEL (J) to dig up the GOLDEN EAGLE (K).
- Continue to the left location (L).
- The right exit (M) returns to the Hopi building.
Kachina Dolls
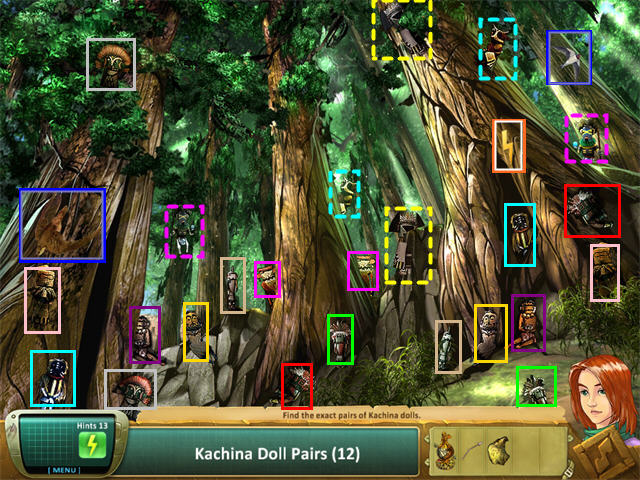
- There are 2 SWIFTS and a LIGHTNING BOLT in this view, so collect them before collecting the last Kachina pair.
- Return to the Hopi Building.
- Exit to the left (F) to the Ghost Town.
Ghost Town
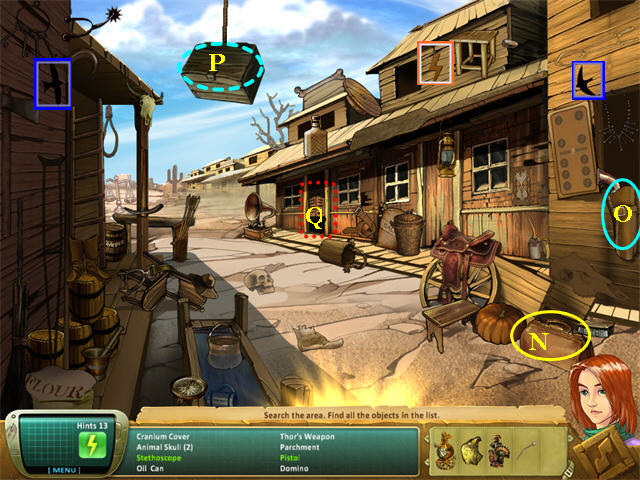
- Collect the white items on the Find List.
- The “Cranium Cover” is a hat.
- “Thor’s Weapon” is a Hammer.
- Open the Doctor’s Bag (N) to get the STETHOSCOPE.
- Take the PISTOL (O) out of the Holster.
- Use the PISTOL to shoot the Crate (P) and collect the Golden Horseshoe.
- Go through the doors into the Saloon (Q).
The Saloon
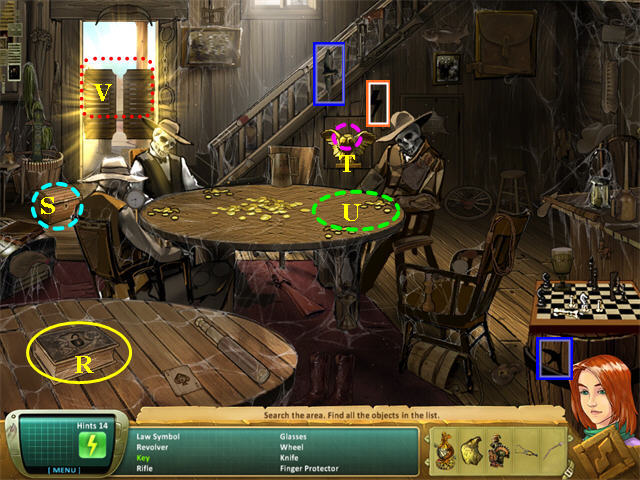
- Collect the white items on the Find List.
- Open the Book (R) to reveal the KEY.
- Use the KEY on the Chest (S) to reveal the Gold Nugget.
- Put the GOLDEN EAGLE HEAD on the Golden Eagle Body (T) to reveal a Safe behind it.
- Use the STETHOSCOPE on the Safe to open it and reveal the SILVER COINS.
- Click on the table near the empty chair (U) where the cursor turns into a magnifying glass to zoom in to the Poker Game.
Poker Game
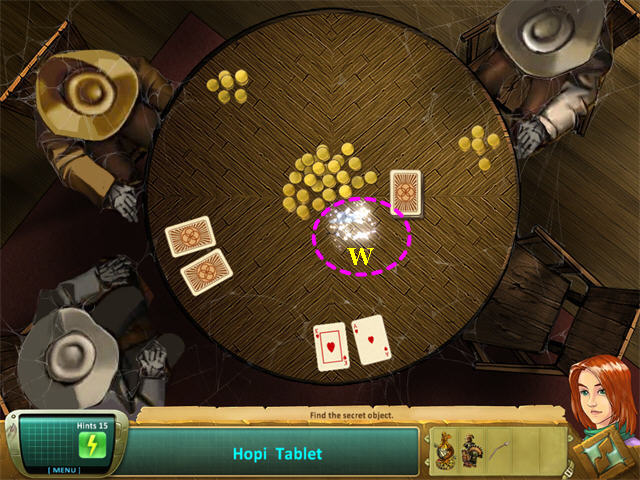
- This is more of an inventory task than a poker game, since you will only play one hand.
- When it’s your turn to bet, take the SILVER COINS from your inventory and put them in the center of the table (W).
- You will win the hand and reveal the HOPI TABLET. Collect it.
- Return to the Hopi Building by going through the Saloon Doors (V), then using the down arrow exit.
Hopi Dwelling
- A new location (G) is now available on the back left. Go there.
Hopi River
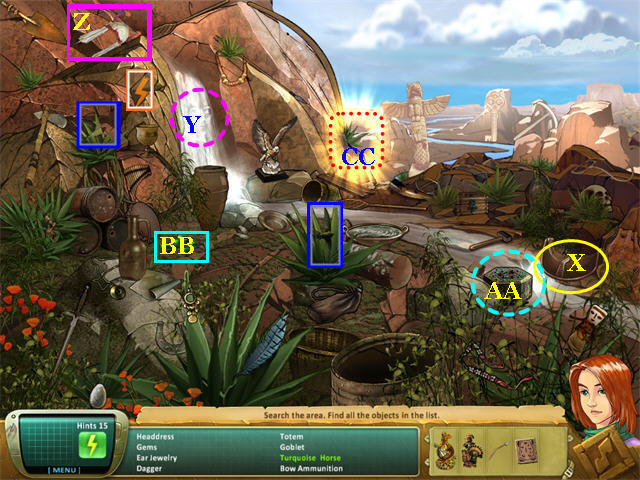
- Collect the white items on the Find List.
- Move the Saddle (X) to reveal the Turquoise Horse.
- The Medicine Bag is on the right of the scene, just to the right of Saddle.
- If you look carefully, you case see a face in the Waterfall (Y). Put the HEADDRESS (Z) there, and the Warrior Doll will fall out.
- Zoom in on the Jewelry Box (AA) on the right.
- Put the GEMS (BB) on the top of it (there’s no puzzle to it) and the box will open, revealing the HOPI TABLET.
- Use the exit just to the right of the Waterfall (CC) to return to the Hopi Dwelling. Then go back to the Hopi Forest using the exit (E) in the upper right of the Hopi Dwelling scene.
Hopi Forest
- Put the WARRIOR STATUE that you got from the Hopi River location onto the top of the Chest (DD). The lock will pop off.
- Use the ARROW to pick the lock, revealing the 3rd HOPI TABLET.
- Return to the Hopi Dwelling using the right exit (M).
Hopi Dwelling – Outside
- Give the 3 HOPI TABLETS to the Shaman.
- The Door behind him (H) will open and you will be able to go inside.
Hopi Dwelling – Inside
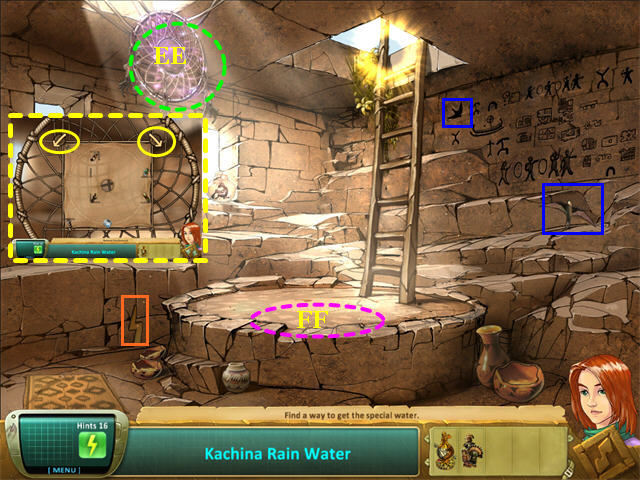
- Collect the two SWIFTS and the LIGHTNING BOLT.
- Zoom in on the Dreamcatcher (EE).
- Put the KACHINA DOLLS on the Dreamcatcher and the Diamond will pop out and start the puzzle.
Hopi Diamond Puzzle
- Now you have to use the left and right arrows to rotate the Dreamcatcher so you collect all the dolls and then put the Diamond in the center hole. There are many possible solutions. Here is one.
Left 4 times
Right 3 times
Left 7 times
Right 3 times
- You will return to the main view of the room.
- The rain will start falling.
- Put the EMPTY CUPID into the Pool (FF) to collect the water.
- Watch the cut scene. M’Alice is trying to destroy the map before you can find the last set of Waters.
Stage 6: Bermuda
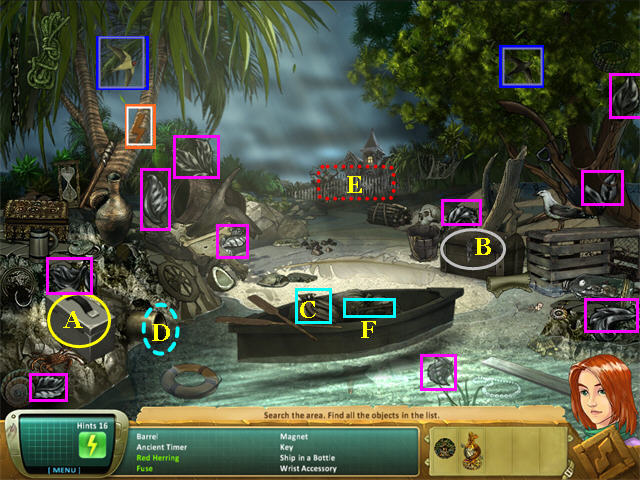
- Collect the white items on the Find List.
- The green Bracelet is high in the tree on the right.
- Open the Toolbox (A) to reveal the FUSE.
- Open the Chest (B) to reveal the Red Herring.
- Collect the 10 METAL LEAVES marked in pink.
- Use the MAGNET (C) on the Pipe (D) to get the 6 Coins. You will have to click once for each coin to collect them.
- Zoom in on the Gate (E).
The Bermuda Gate Puzzle
- Collect the LIGHTNING BOLT and the 2 SWIFTS.
- Put the METAL LEAVES into the matching shapes on the Gate. You can tell when you’re in the right position because the cursor will turn blue.
- Use the KEY (F) on the Lock (G).
- Go through the Gate.
Bermuda House – Outside
- Collect the white items from the Find List.
- The HORSE HEAD is in the Barrel (H) on the left.
- Put the HORSE HEAD on the Carousel Horse (I).
- Put the GEAR (J) in the Gearbox (K). You may need to move the cursor around to find the spot where it turns blue, since Samantha’s head may be in the way.
- Put the LEVER (L) on the Control Box (M).
- Put the FUSE in the Control Box Side (N).
- The Carousel will rotate, revealing the EMERALD CROSS.
- Once you have the EMERALD CROSS, zoom in near the base of the Tree (O).
Big Tree
- You must have both the EMERALD OF CORTEZ and the EMERALD CROSS to complete this scene. If you don’t have the EMERALD CROSS yet, return to the main view through the right exit (Q).
- Collect the two SWIFTS and the LIGHTNING BOLT.
- Put the EMERALD OF CORTEZ in the circle on the left (P).
- Put the EMERALD CROSS in the cross indentation.
- The secret entrance will open. Go through it.
The Fig Trees
- Collect the Figs as shown.
- Zoom in on the Wall (R).
Bermuda Fig Puzzle
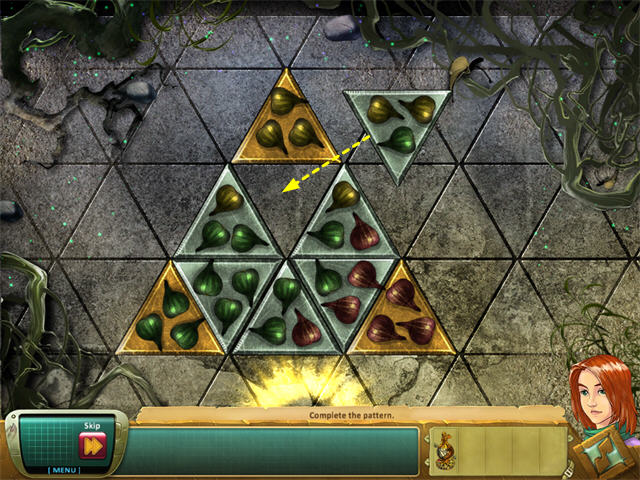
- Put the FIGS onto the game. You can put them anywhere, they will be scattered for you.
- Now you have to complete the pattern. This is like a Triominos game—you must place the tiles so that the colors on all 3 points match.
- Move the tiles around by dragging them.
- You can rotate them by clicking once so the yellow rotation arrow appears, then dragging the tile to rotate it.
- When the puzzle is complete you will return to the main view.
- The Fountain of Youth waters will flow and fill up the central pool.
- Put the EMPTY CUPID into the Pool (S) to fill it.
- After you have collected it again, the Door (T) into the house will open.
Bermuda House – inside
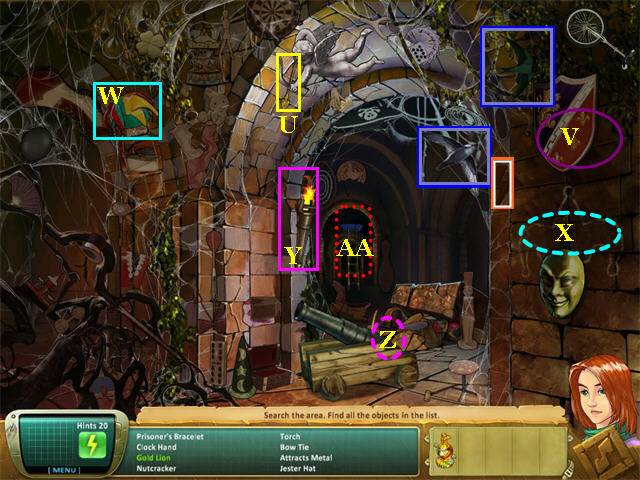
- Collect the white items on the Find List.
- The CLOCK HAND (U) is the Arrow that the Cupid is shooting.
- Move the Shield (V) to reveal the Golden Lion.
- Put the JESTER HAT (W) on the Jester (X) to reveal the CROWN.
- Use the TORCH (Y) on the Cannon (Z) to reveal the CRYSTAL BALL.
- Climb back up the Ladder (AA) at the back to return to the Front Door.
Bermuda House – Front Door
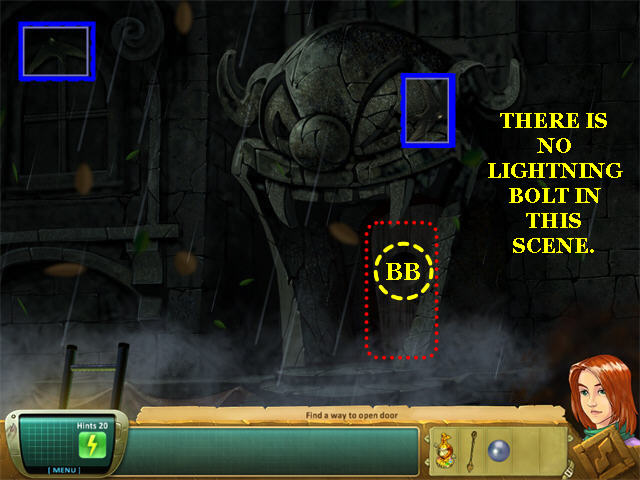
- Collect the SWIFTS. There is no LIGHTNING BOLT in this scene.
- Put the CRYSTAL BALL in the Clown’s Mouth (BB).
- Go through the door.
Bermuda Labyrinth Puzzle
- There are very few side turns in this maze, so as long as you stay focused you won’t get lost.
- Anytime you see a playing card on the wall, go all the way forward to it.
- Solution:Forward to the turn
Left
Forward all the way to the 10 of Clubs.
Right
Forward
Left
Forward all the way to the Jack of Hearts
Left
Forward
Right
Forward
Left
Forward to the turn
Left
Forward all the way to Queen of Spades
Right
Forward
Left
Forward twice
Left
Forward
Right
Forward twice
Right
Forward all the way to the King of Diamonds.
Collect the LAMP.
Right
Forward until the passage is blocked by a Spider’s Web.
Use the LAMP on the Web to clear it.
Forward to the Door and go through.
The Magician’s Lair
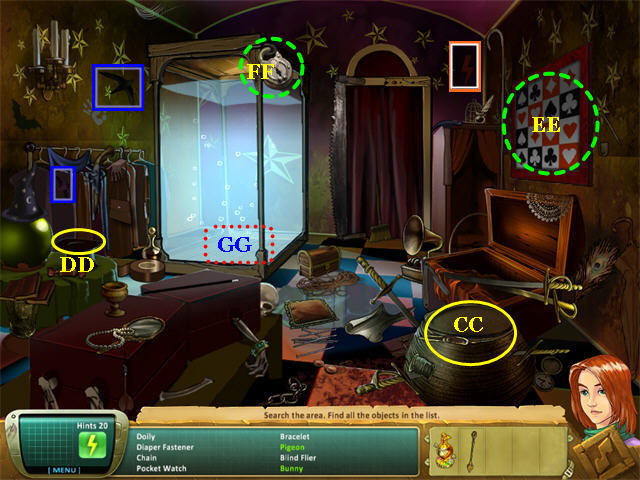
- Collect all the white items on the Find List.
- The Pigeon is in the Basket (CC).
- The Bunny is in the Hat (DD).
- Move the Wallhanging (EE) to reveal the Safe and zoom in.
Safe/Clock Puzzle
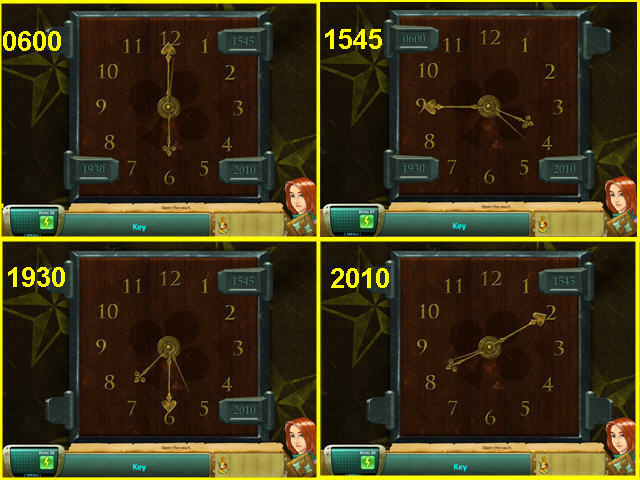
- Put the CLOCK HAND in the center of the Clock.
- To open the safe, you have to set the Clock 4 times, once for each of the numbers around the edges.
- To set the Clock, rotate the big hand.
- Read the numbers as though they were written in military time.
- The 4 times are: 6:00, 7:30, 8:10, and 3:45.
- You can do them in any order.
- Once the Clock is removed, pull the Lever, then take the KEY.
- You will be returned to the main view of the room.
- Use the KEY to unlock the Padlock (FF) at the top of the Glass Case.
- Exit through the floor (GG) of the Glass Case.
Secret Lab
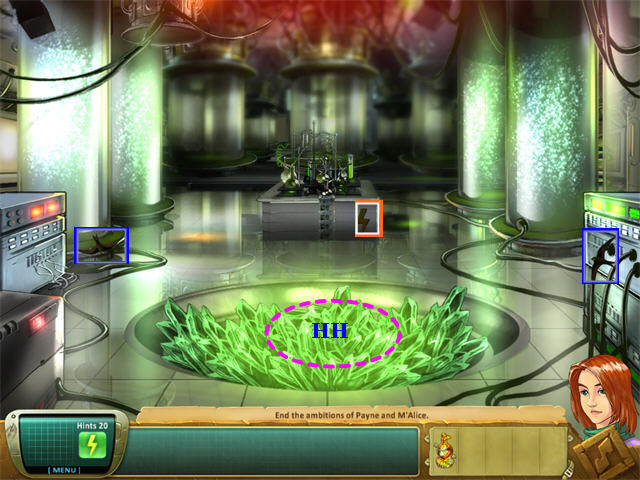
- Collect the SWIFTS and the LIGHTNING BOLT.
- Put the CUPID on the Green Crystals (HH) in the middle.
- Watch the ending.
Trophies (Spoilers)
- Since some of the game Trophies require perfect play (e.g. using no hints for the entire game), we recommend saving these as goals for a replay. The Find List will be different, but the Key Items are always the same, so you won’t need the HINTS or the Scanner for those the second time through.
- You may view your Trophies at any time by using the TROPHIES button on the Main Menu.
- You keep any trophies earned under the same profile name when you replay the game again. However, if you start under a new profile name, you will reset to zero trophies for the new profile.
- Diamond Adventurer – Complete Story Mode without using any Hints
- Swift Collector – Collect all the SWIFT symbols.
- Perfect Visionary – Complete Story Mode without ever using the Scanner.
- Master Adventurer – Complete Story Mode.
- Search and Destroy – Completed the bonus Unlimited Hidden Object mode.
- Zeus – Collect all the Lightning Bolts
- Conquistador Treasurer – Find the Emerald of Judgment (first stage)
- Not so Puzzling – Complete all Puzzles without using a SKIP.
- Sequential Searcher – Find all the objects in one scene in order on the list from first to last
- True Blue – Collect all the blue (two-step) objects without using a Hint or the Scanner.
- aMAZE ing – Complete the Labyrinth. (Bermuda House – Inside in Bermuda)
- All In – Win the Card Game (Ghost Town in Hopi Rain Waters)
- Crystal Mirror – Complete all the Spot the Differences scenes (Solomon’s Mines)
- Museum Curator – Find the first museum object (Stage 1)
- Careful Collector – Complete the game without ever breaking the Scanner (never getting an incorrect click penalty)
- She Sells Sea Shells – Solve the Shell Puzzle (River House – Inside, Stage 1)


 Amanda Rose: The Game of Time Walkthrough, Guide, & Tips
 Vampire Legends: The True Story of Kisilova Walkthrough, Guide, & Tips
 Lamp of Aladdin Tips & Tricks, Guide, & Tips
 Gemini Lost Walkthrough, Guide, & Tips
 Twilight Phenomena: The Lodgers of House 13 Walkthrough, Guide, & Tips