3 Days: Amulet Secret Walkthrough, Guide, & Tips
3 Days: Amulet Secret Walkthrough
Welcome to the 3 Days: Amulet Secret Walkthrough!
Help Anna unravel the secret of the amulet and save the world!
Whether you use this document as a reference when things get difficult or as a road map to get you from beginning to end, we’re pretty sure you’ll find what you’re looking for here.
This document contains a complete 3 Days: Amulet Secret game walkthrough featuring annotated screenshots from actual gameplay!
We hope you find this information useful as you play your way through the game. Use the walkthrough menu below to quickly jump to whatever stage of the game you need help with.
Remember to visit the Big Fish Games Forums if you find you need more help. Have fun!
This walkthrough was created by Robin, and is protected under US Copyright laws. Any unauthorized use, including re-publication in whole or in part, without permission, is strictly prohibited.
General Tips
- This is a Hidden Object Puzzle Adventure game.
- There is no timer.
- Click PLAY on the map to start the next Level.
- The game autosaves automatically at the end of each Level. However, if you exit the game in the middle of a Level, you will have to redo that Level from the beginning.
- Use the MENU icon in the lower left to leave story mode. You will then have a choice of QUIT or EXIT. QUIT takes you to the Main Menu. EXIT takes you out of the game altogether.
- To collect all the items on the Find List, you may have to visit more than one scene; use the arrows above the screen to navigate through all scenes.
- The lower right has 3 icons: the Plazmatron, the Hint icon (a question mark) and the Diary.
- The Plazamatron will be unavailable until Level 10.
- You earn 100 points each time you collect an item from the Find List.
- You earn 1500 bonus points for completing a puzzle.
- Using a Hint will cost you 100 points.
- If you click on the Hint but there is nothing more to do in this scene, you will not be charged 100 points. Instead, one of the top arrows will be circled to show you which way to go next.
- If you make too many incorrect clicks in a row, you will lose 10 points.
- Items on the Find List may be hidden until you do something else in the scene. When the cursor changes to a hand you can interact with the scene, such as opening a curtain or sliding an item across the floor.
- When there is a yellow ? on the cursor, click to zoom in or trigger a puzzle.
- Character dialogue will tell you whether you are finding items from the list or putting them back into the scene.
General Tips for the Puzzles
- You cannot skip a puzzle completely, but you can choose to do a “Hidden Object Challenge” instead of the puzzle.
- The scene for the Hidden Object Challenge is always the same, but the Find List and items vary.
- Although the Hidden Object Challenge has a SKIP button in the upper right, it’s actually a HINT button. Using it will cost you 100 points and highlight one item from the Find List.
- If you use the BACK button from the Hidden Object Challenge you will be returned to the Main Menu. If you then exit, you will have to start the Level over from the beginning. Use RESUME to return to the Hidden Object Challenge.
- If you do the Hidden Object Challenge instead of the puzzle, you will not earn any bonus points.
- Once you have seen a puzzle in story mode, it will be available from the PUZZLE tab on the Main Menu.
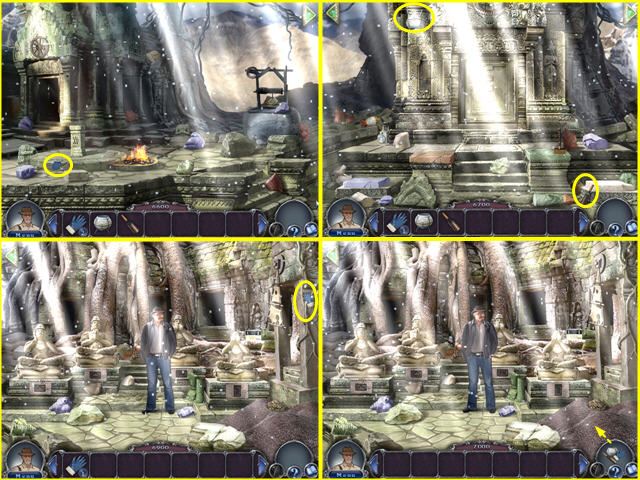
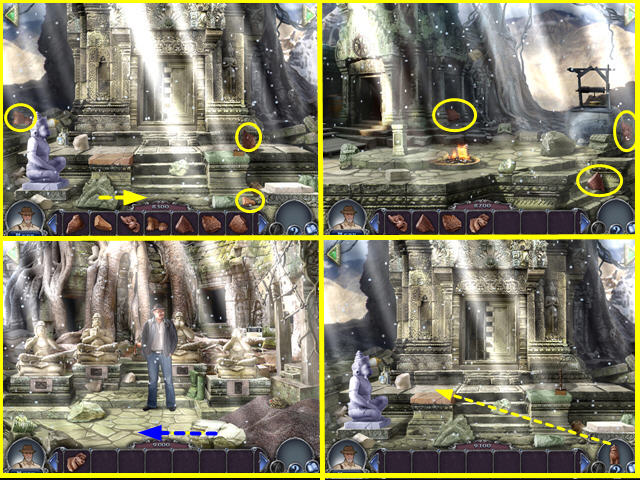
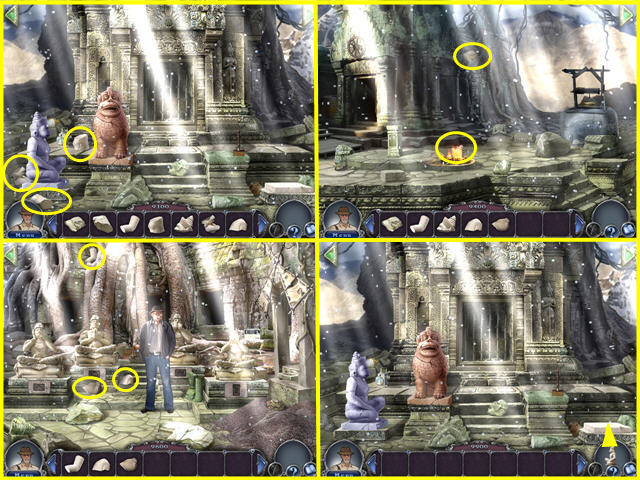
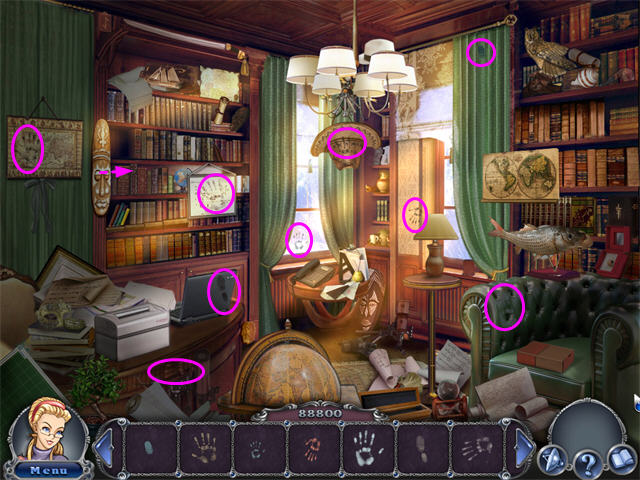
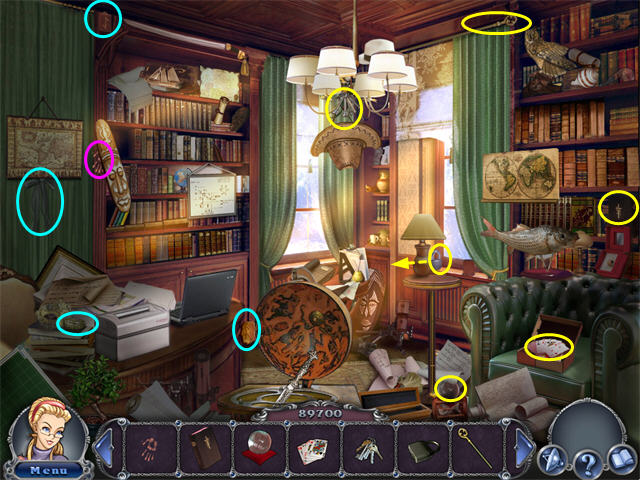
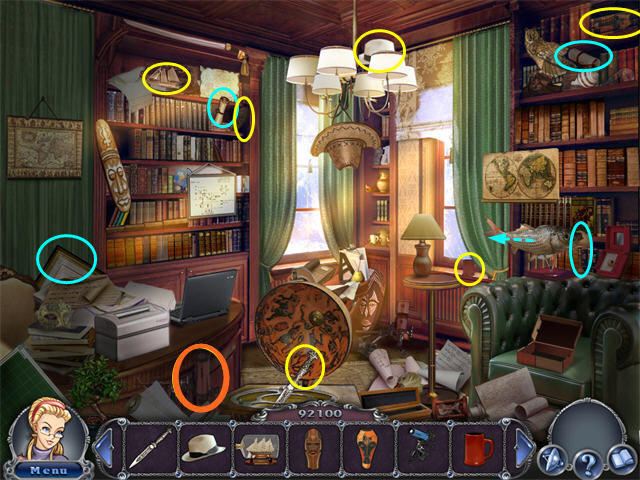
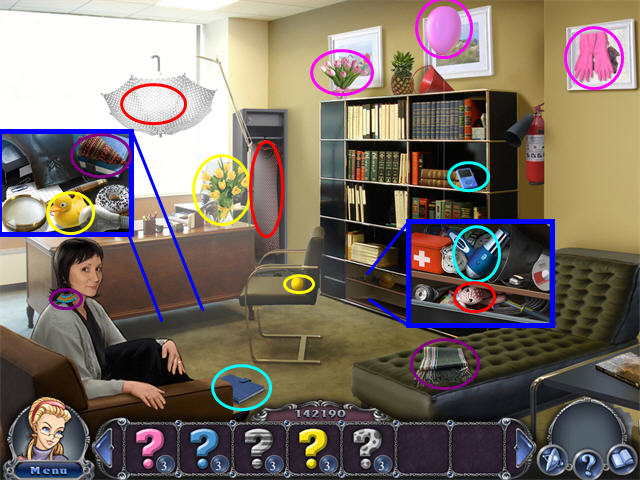
1: Stonehenge 1610

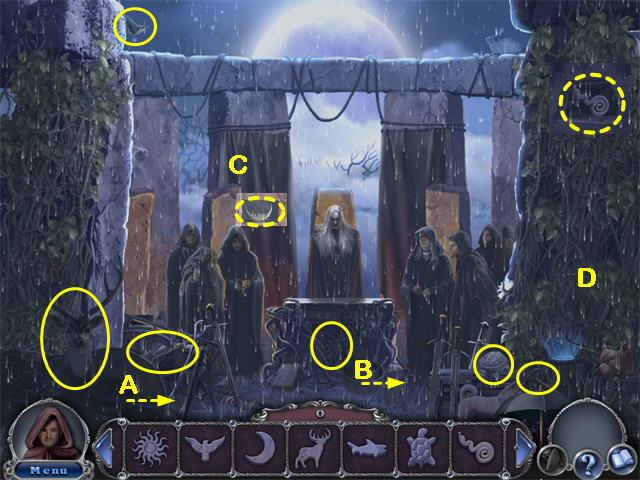
- Slide the stack of Pans (A) to reveal the Trowel.
- Slide the Stone Wheel (B) to reveal the Fish and the Shovel.
- If you cannot collect the Sun from the front of the Altar, you probably need to slide the Pans out of the way.
- Move the Curtain (C) and the Vines (D) to reveal more items.
- Collect items that match the AMULETS.
- Once you have collected all the AMULETS put them back into the scene as shown.
- The DEER needs to be placed a little lower than the hint indicates.
- Collect the Book (E).
- The Staff is composed of the Wooden Rod and The Blue Orb; both are marked in cyan.
- Collect the Scroll (F) and the Bowl (G).
- Collect the Animals marked in orange.
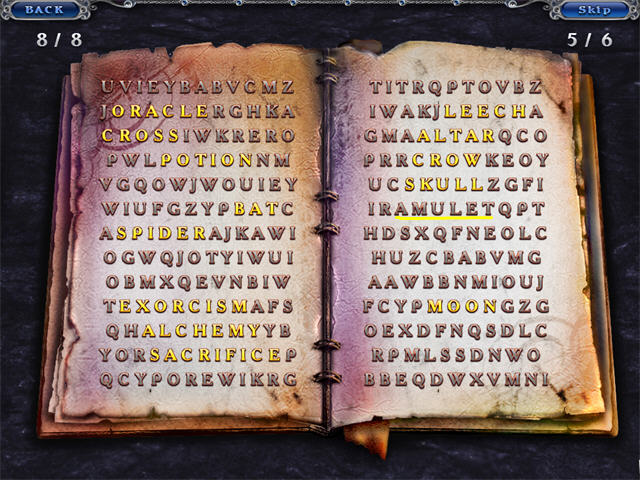
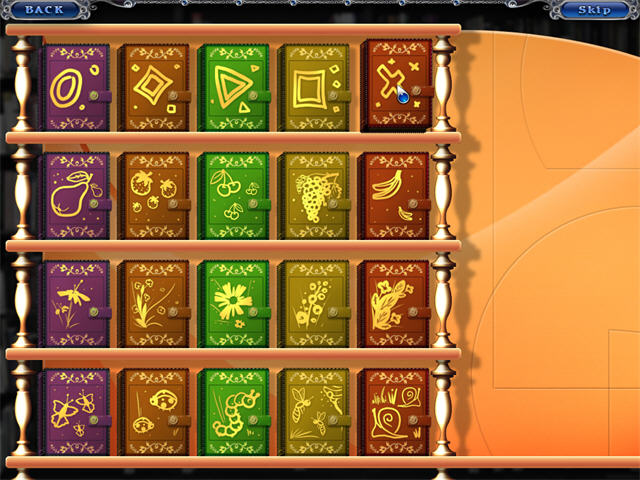
- Click on the leftmost letter and drag your cursor across to the rightmost letter to mark a word.
- The left words are ORACLE, CROSS, POTION, BAT, SPIDER, ALCHEMY, EXORCISM, SACRIFICE.
- The right words are LEECH, ALTAR, CROW, SKULL, AMULET, MOON.
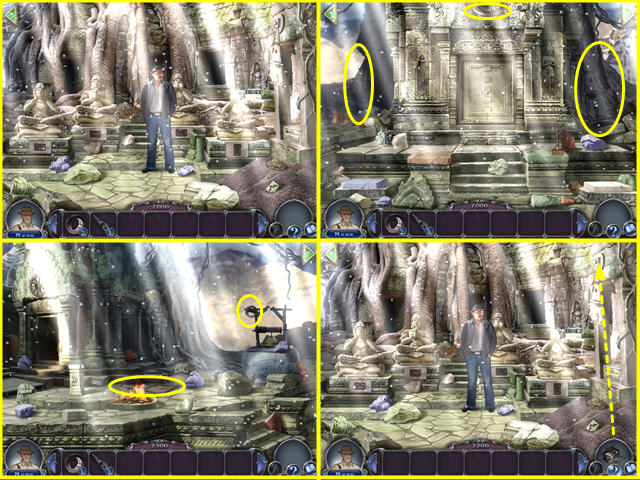
2: Tibet, 2010
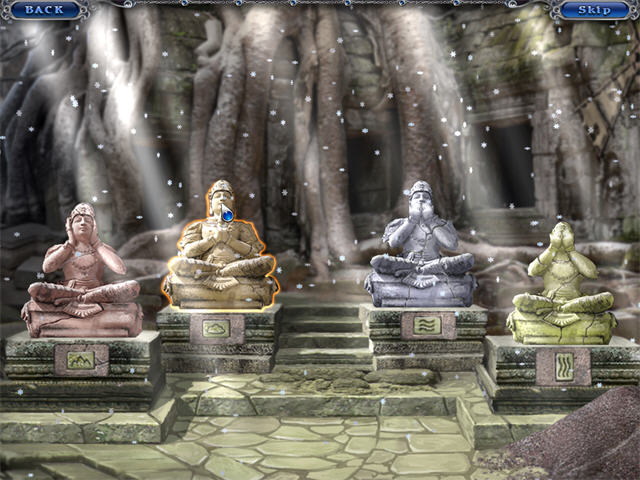
- Assemble the 4 Statues as shown. When you pick up a piece, the outline of the statue where it belongs will appear. Drag the piece to the right spot, then click to stick it.
- Pieces may overlap each other slightly.
- Collect the WELL PARTS. You will have to visit more than one scene to find them all.
- The tutorial will force you to go one scene to the left. Immediately return to the first scene using the right arrow.
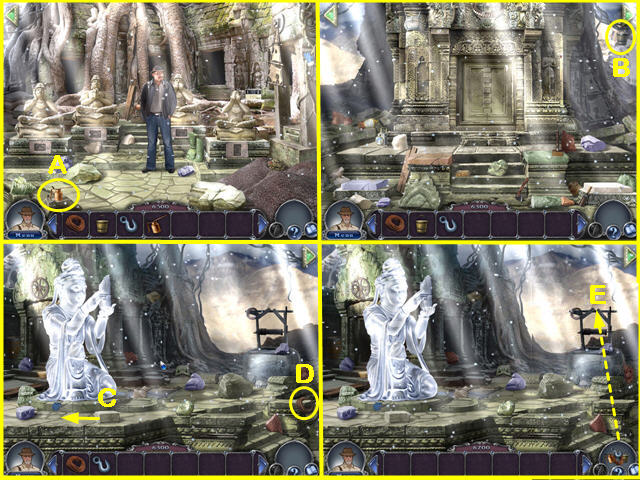
- The OIL CAN (A) is in the first scene.
- Go left. Collect the BUCKET (B).
- Go left. Slide the Brick (C) to reveal the HOOK.
- Collect the ROPE (D).
- Once you have collected all the WELL PARTS, they will reappear in the inventory bubble on the lower right. Drag the WELL PARTS to the center of the top bar of the Well (E).
- The Water Tablet will appear in the Well Bucket; no need to collect it.
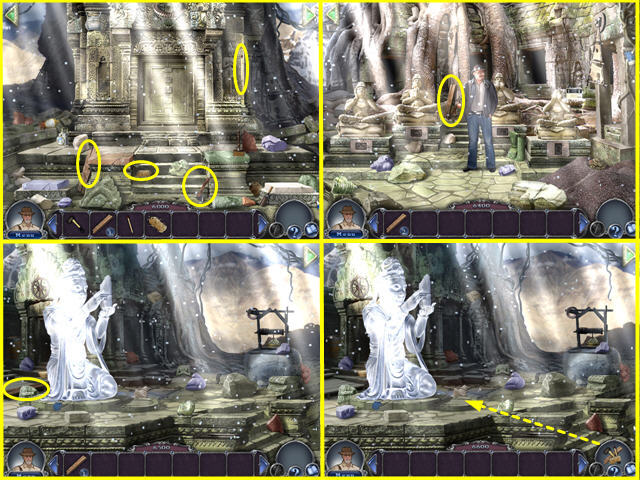
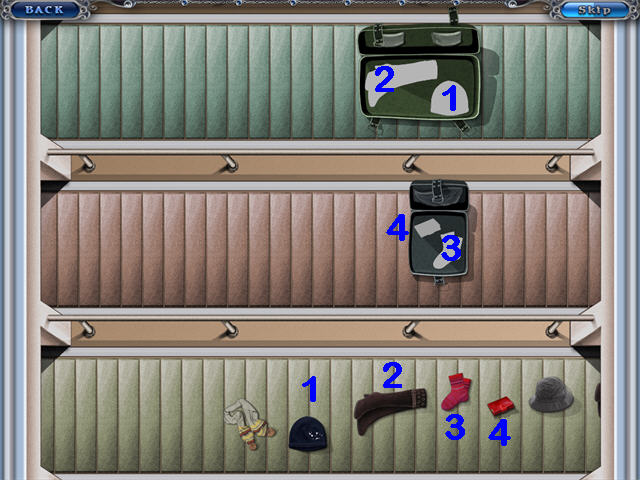
- Collect the FIRE ITEMS.
- Go right. Collect the MATCH, BOARD, AXE and KINDLING.
- Go right. Collect 1 BOARD.
- Go left twice. Collect the last BOARD.
- Drag the FIRE ITEMS to the Stone in front of the Statue. The Statue will melt revealing the Fire Tablet.
- Collect the EARTH ITEMS.
- Collect a GLOVE in this scene.
- Go right. Collect the POT and the TROWEL.
- Go right. Collect the other GLOVE.
- Drag the EARTH ITEMS to the Pile of Dirt to reveal the Earth Tablet.
- Collect the AIR ITEMS (Mill parts).
- Go left. Collect 1 GEAR and 2 WINDMILL SAILS.
- Go left. Collect the other GEAR and WINDMILL SAIL.
- Go right twice.
- Drag the AIR ITEMS to the broken Mill. The Air Tablet will be revealed at the base of the Mill.
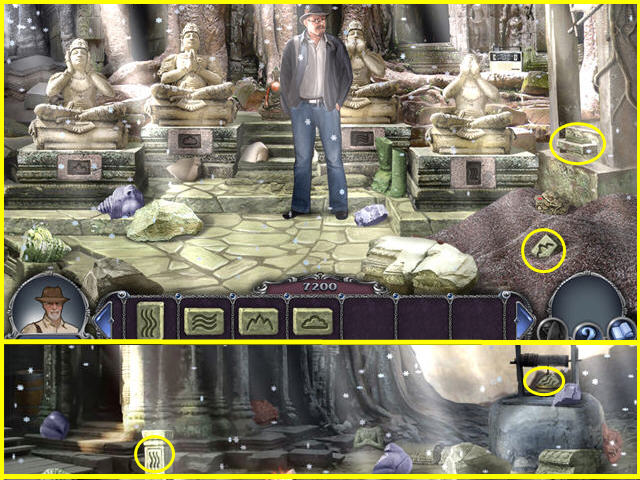
- Collect the 4 AMULETS. There are two in the rightmost scene, none in the center scene, and two in the leftmost scene.
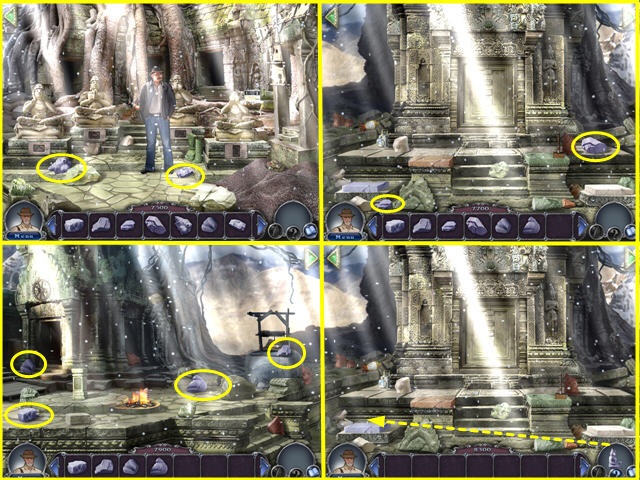
- Collect the purple statue pieces.
- Return to the center scene. Drag the Purple Statue to the Purple Pedestal.
- Collect the red statue pieces.
- Return to the center scene. Drag the Red Statue to the Red Pedestal.
- Collect the white statue pieces.
- Return to the center scene. Drag the White Statue to the White Pedestal.
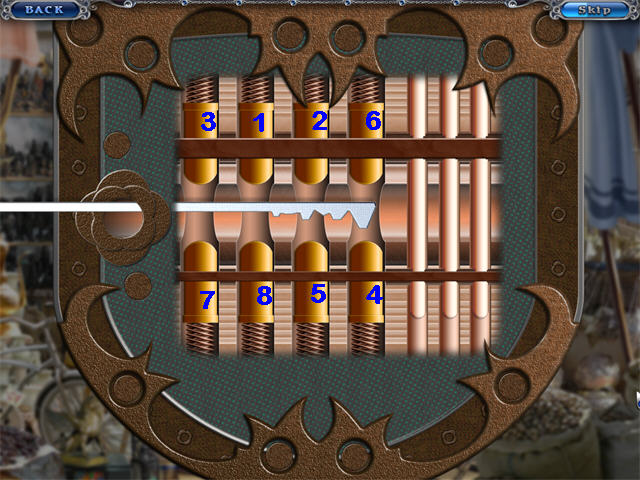
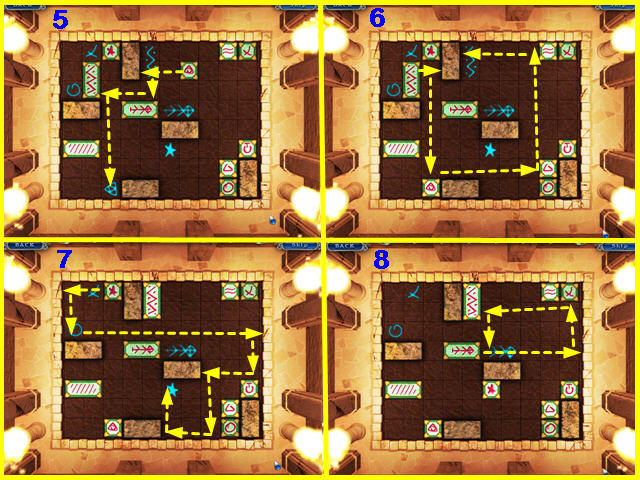
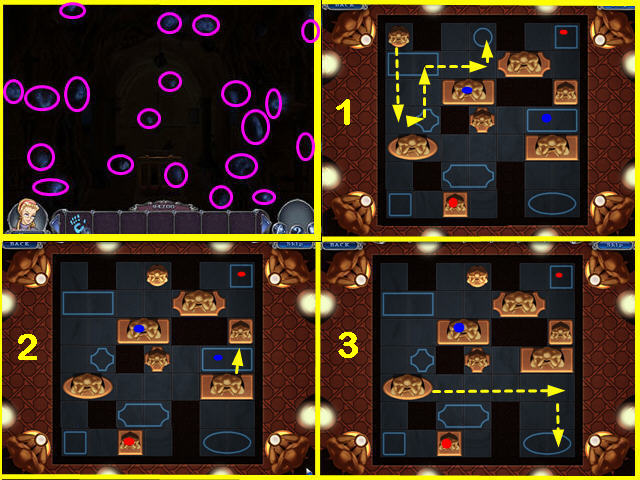
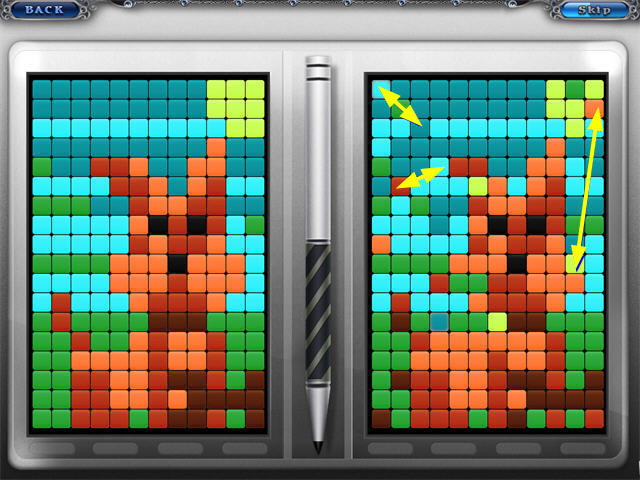
- Collect the items on the Find List to trigger a puzzle.
- Your goal is to line up the arrows on the 3 columns. Items in the left 3 squares move the left column. Items in the right 3 squares move the right column. Items at the top of the scene move the center column. The screenshot shows one possible solution.
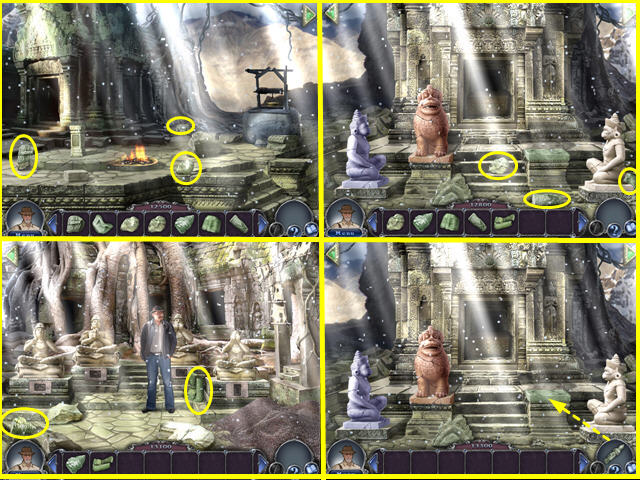
- Collect the green statue pieces.
- Return to the center scene. Drag the Green Statue to the Green Pedestal.
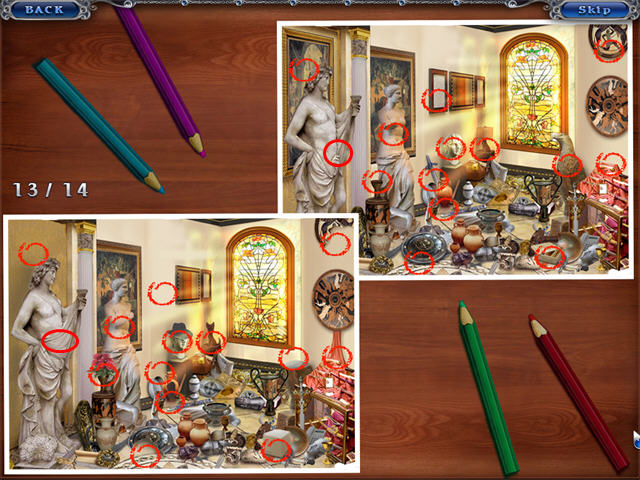
3: Eastern Bazaar
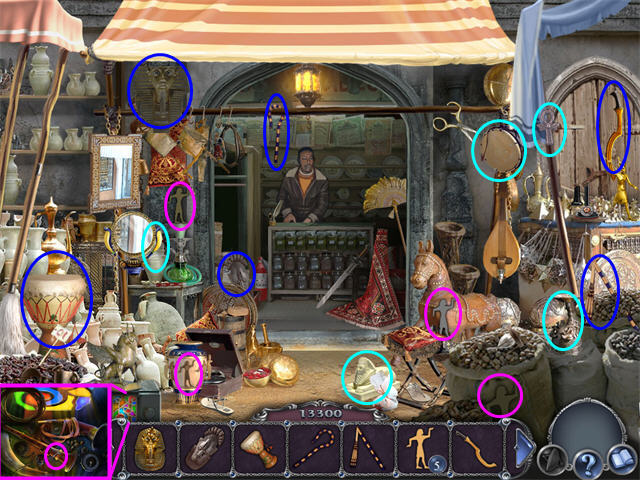
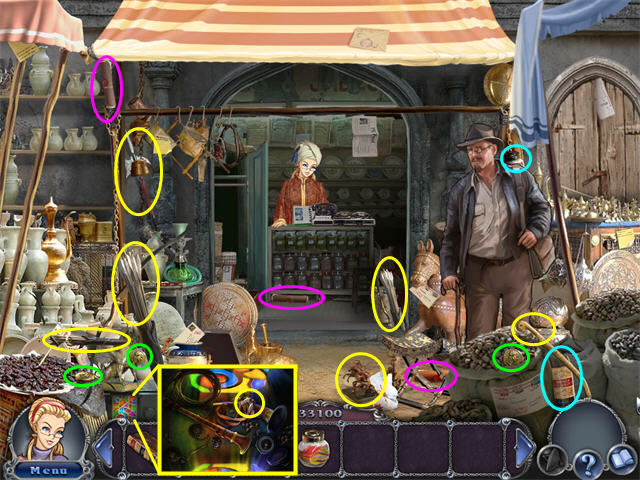
- Collect the items on the Find List.
- The Egyptian Figurines are marked in pink.
- The Scorpion is part of a pedestal base on the right side.
- Zoom into the Stained Glass Box; take the 5th Egyptian Figurine.
- The storekeeper will offer to you a discount if you beat him at Tic-Tac-Toe. You must win 4 out of 6 games to move on.
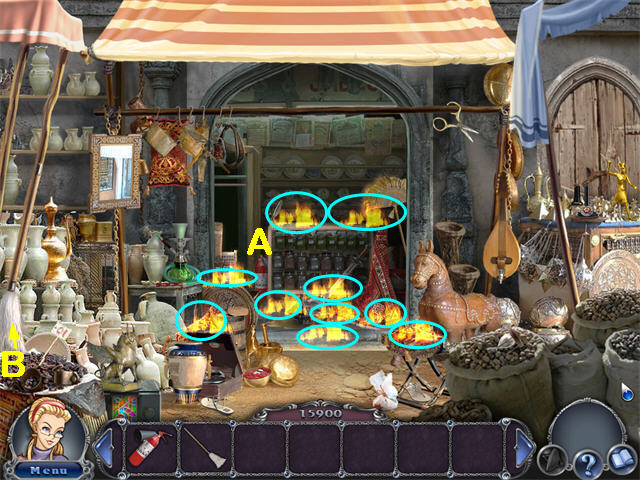
- The shop will catch fire! Take the FIRE EXTINGUISHER (A) and click on each of the 10 fires to put them out.
- Collect the BROOM (B) and use it to sweep up the Ash from each fire.
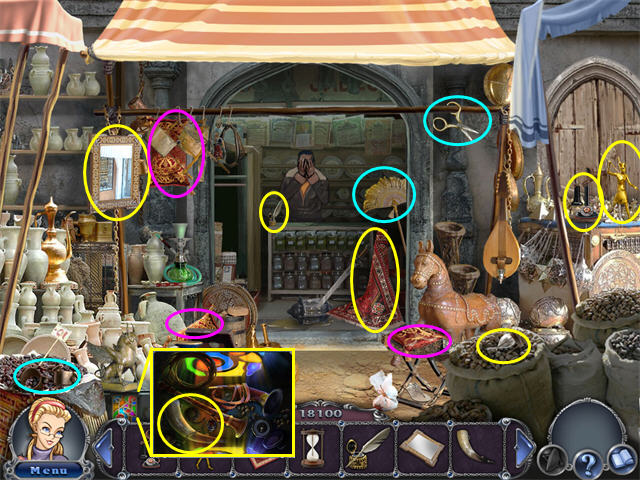
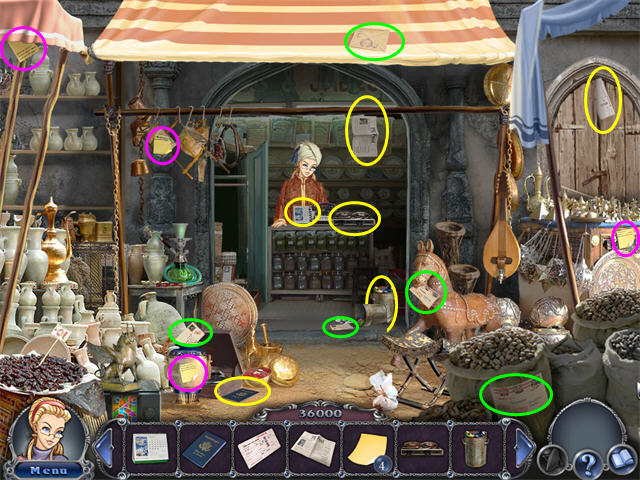
- Collect the items for the Express Order.
- The Carpet is standing inside the shop.
- The 3 Pillows are marked in pink.
- Zoom into the Stained Glass Box; take the Drinking Horn.
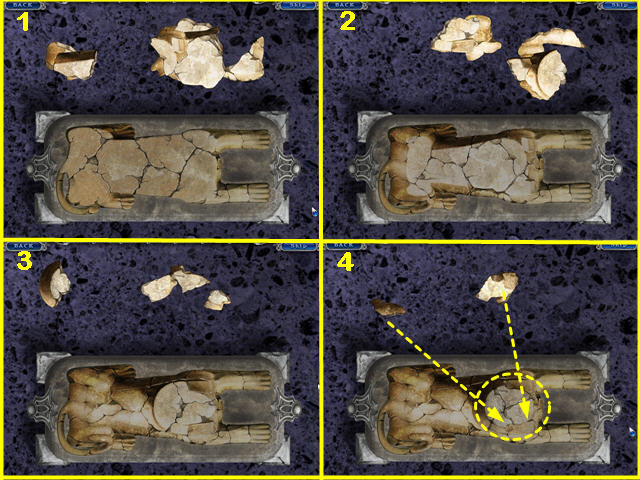
- The shopkeeper will give you a gift—a broken stone casket (box).
- This is a 3-dimensional jigsaw puzzle. Build it up one layer at a time.
- Correct pieces will lock in place.
- One the puzzle is completed you will receive a piece of the amulet from the original Stonehenge scene.
4: City Hospital

- Move the curtains and open the drawer on right.
- Click on the items in the scene that belong with the items in the list.
- The Cardiogram is the paper inside a drawer in the Cabinet behind the Curtain.
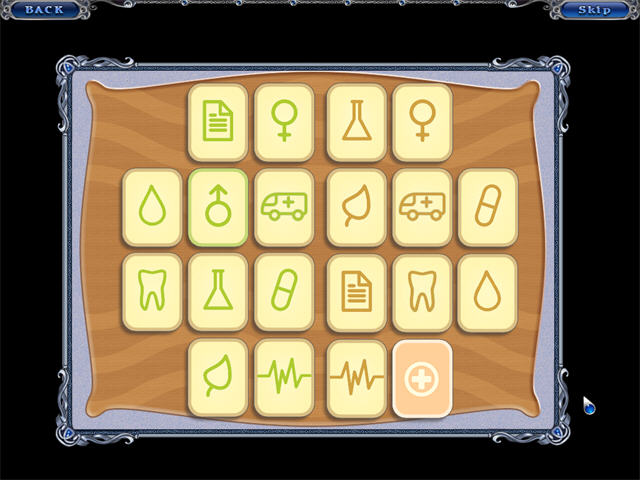
- Find the matching pairs shown in the screenshot.
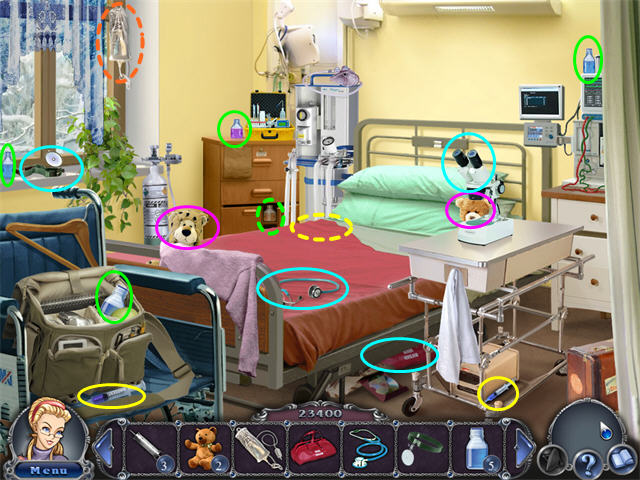
- Collect the items needed to clean the room.
- Open the cupboard on left, curtains on right and left, flip back the sheet on the bed.
- The toy Leopard counts as a teddy bear.
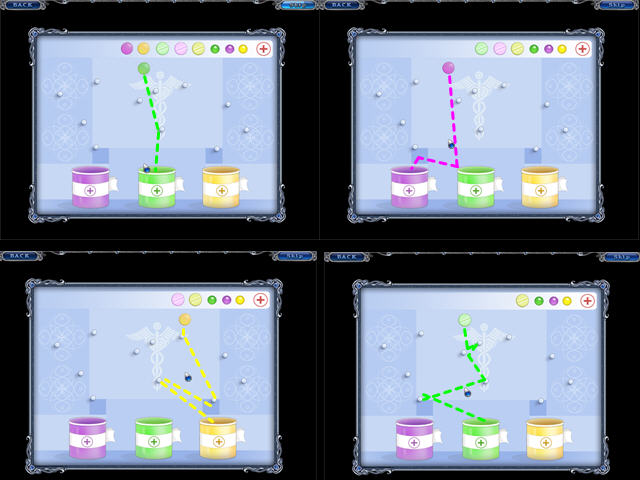
- Put each of the 9 pills into the bottle of the same color by dropping it from above.
- The pills will bounce when they hit the pegs.
- There are many different solutions; see the screenshot for an example.
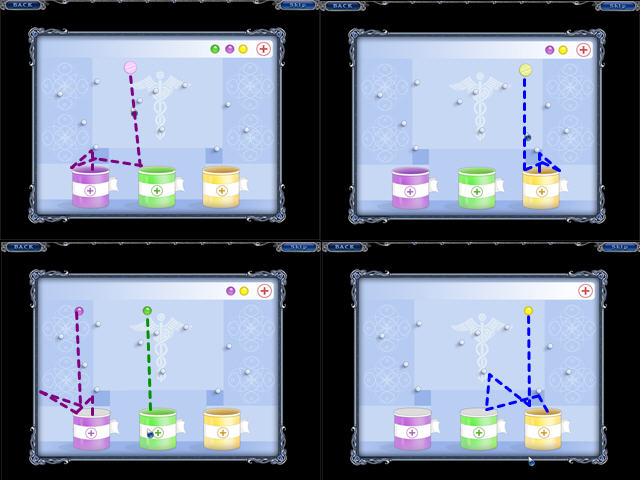
- Since the pills are of different sizes, you may need to use different starting points even if the pills are the same color.
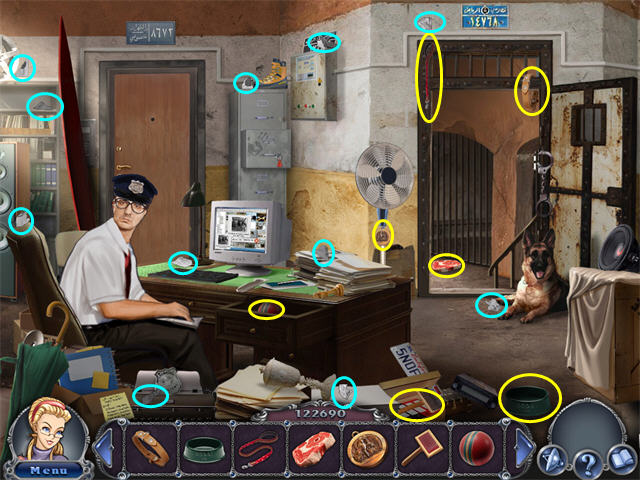
5: Police Station
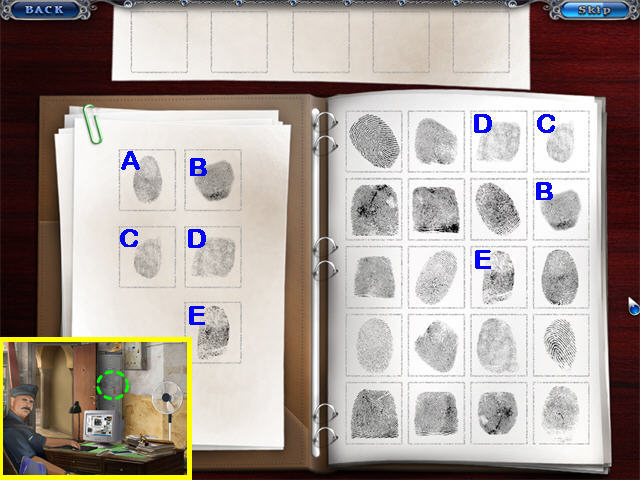
- Talk to the police officer. He will let you look around. As soon as you touch the Filing Cabinet (green), you will trigger a puzzle.
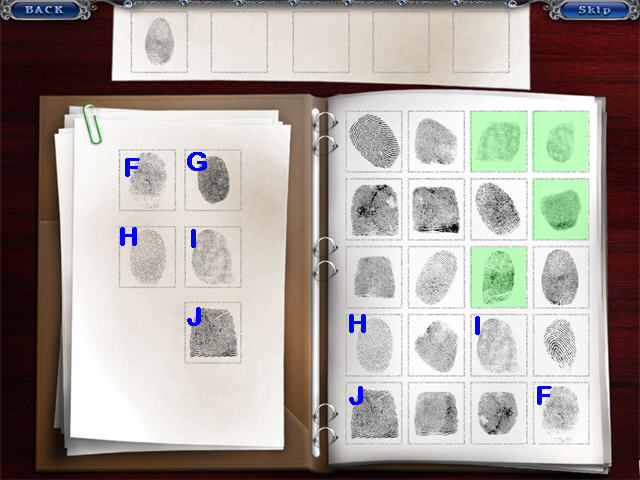
- Match as many fingerprints as you can between the left and right sides.
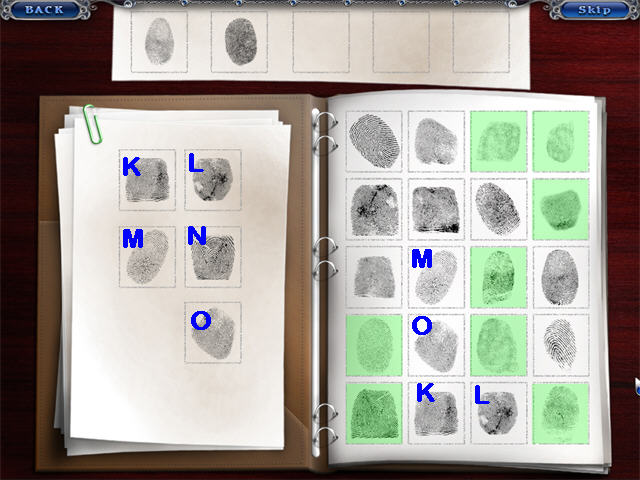
- Click on a fingerprint on the left, then on its match on the right.
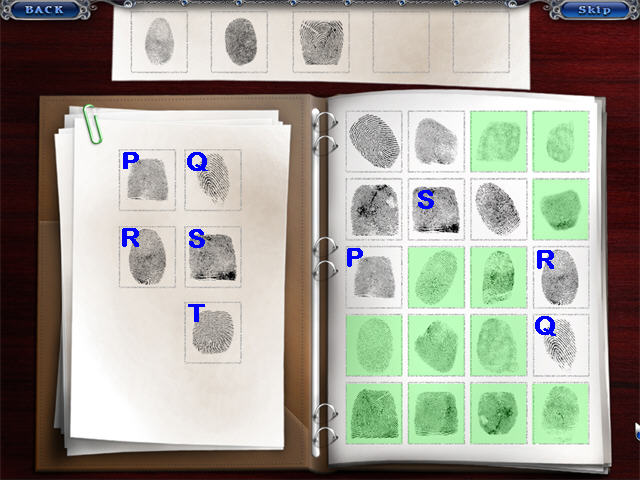
- One fingerprint will not match in each round.
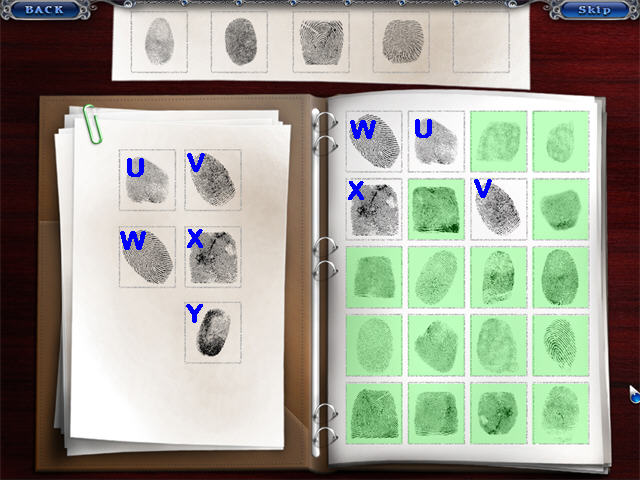
- Once you have eliminated all the fingerprints that do not match, the one that does match will be copied to the strip above.
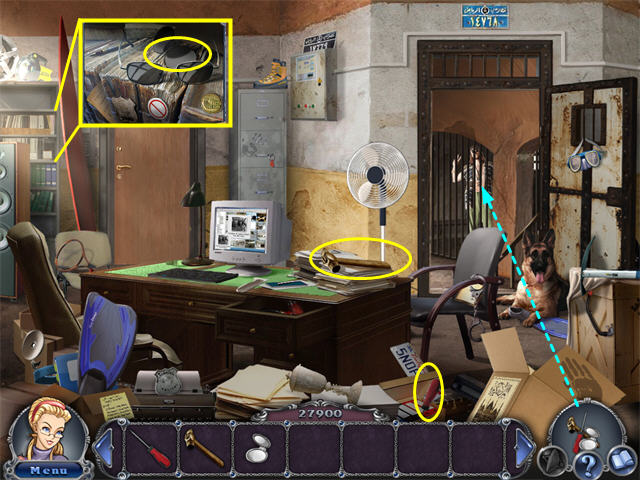
- The Police Officer will leave the room. Talk to the Prisoner.
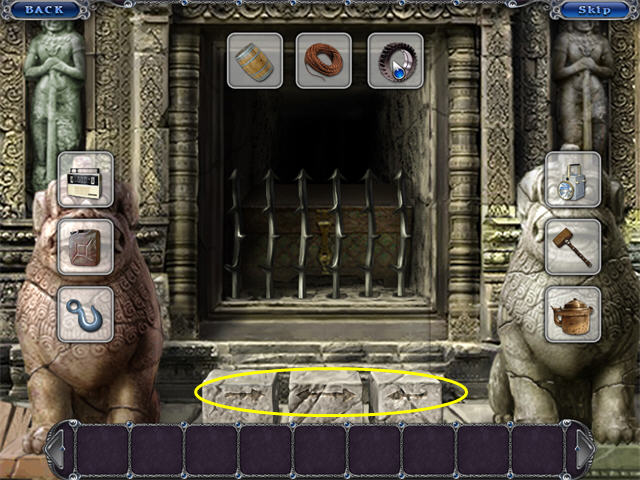
- Collect the items for the Lock Pick.
- Zoom in on the Bookcase on and collect the COMPACT. In the zoom scene it is turned the other way and looks black instead of silver.
- Give the Lock Pick items to the Prisoner.
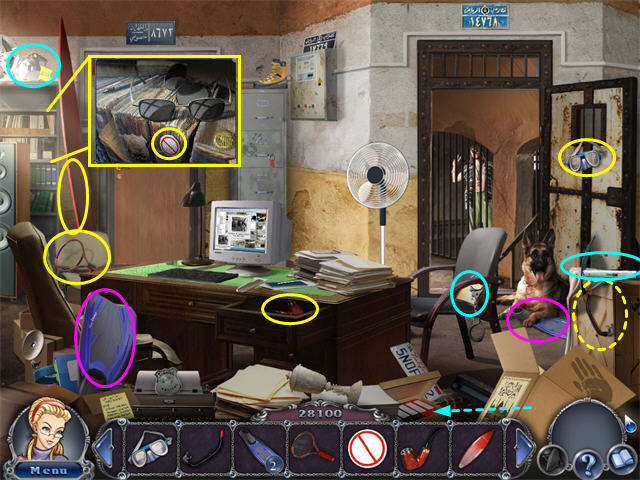
- Collect the Prisoner’s stuff.
- Move the cloth on the box on the right to reveal the Snorkel.
- Open the desk drawer to reveal the Pipe.
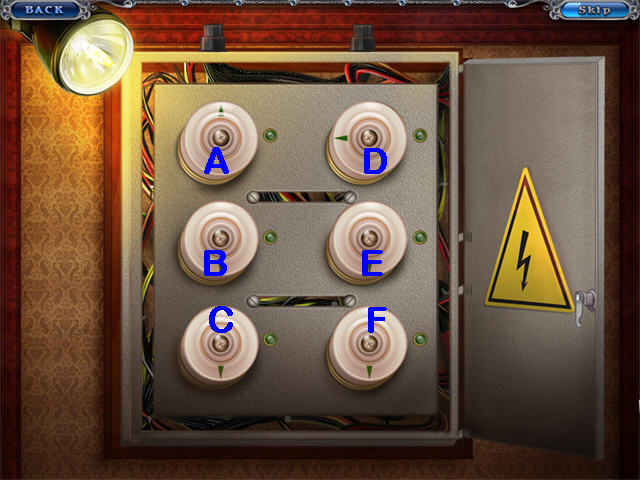
- Once you have collected all the items, you will trigger a puzzle.
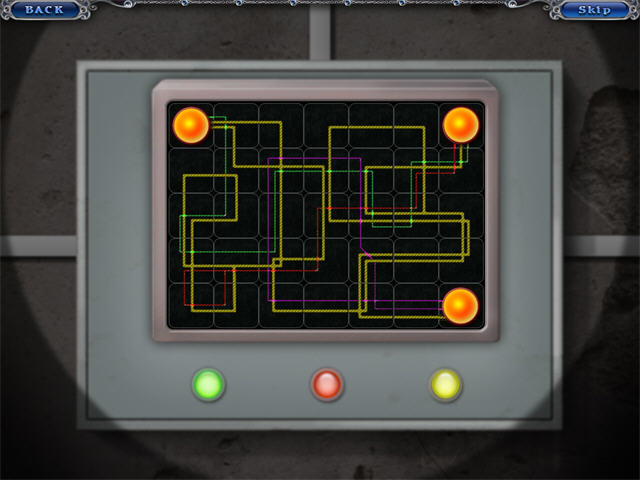
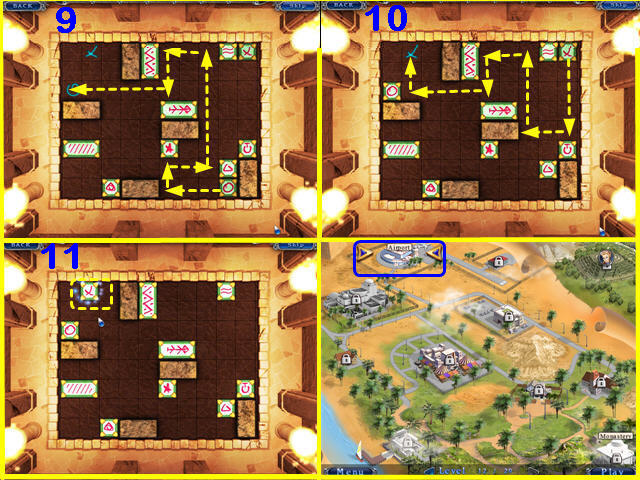
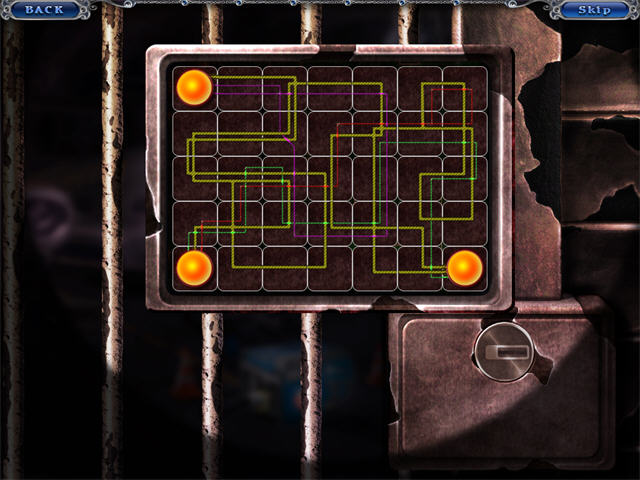
- Disable the alarm by completing the circuit. There is only one solution.
6: City Market
- Open the Lock. The screenshot shows the solution.
- Open the blue closet left of the shop counter to find the Clothes.
- Collect the items for the man with the baseball cap.
- Zoom in on the Stained Glass Box to find the Bracelet.
- Collect the items for the Professor.
- The Coins are circled in green.
- The Scrolls are circled in pink.
- Collect the items for the soldier. They are marked in yellow.
- Zoom in on the Stained Glass Box to find the Tooth Necklace.
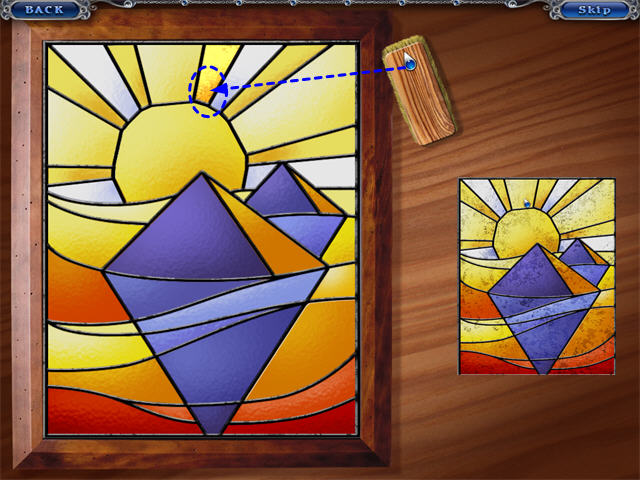
- The next customer needs you to repair a broken piece of Stained Glass.
- Start by reassembling the jigsaw puzzle.
- The completed glass is dusty. Drag the BRUSH over the speckles until the entire picture is clean again.
- Collect the requested items.
- The Notes are marked in pink.
- The Letters are marked in green.

- After you collect everything, you will get a zoom scene of the newspaper. Click on the picture of the Amulet.
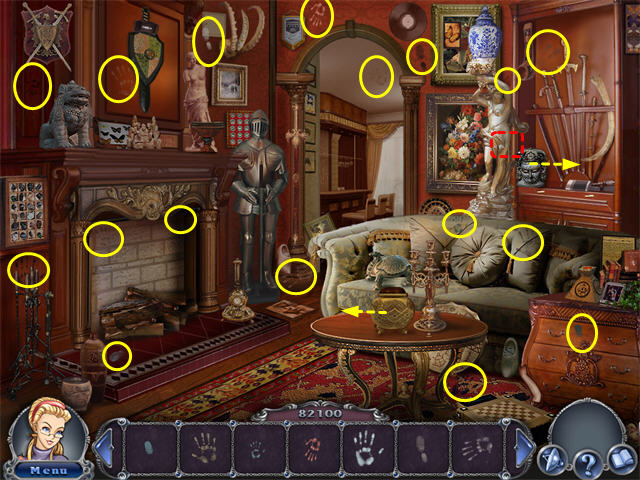
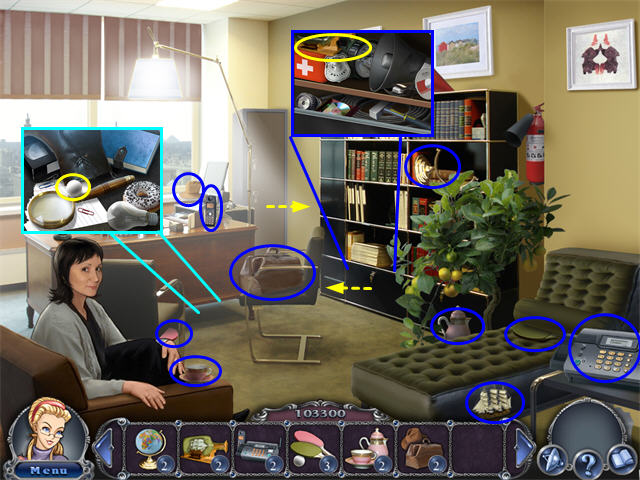
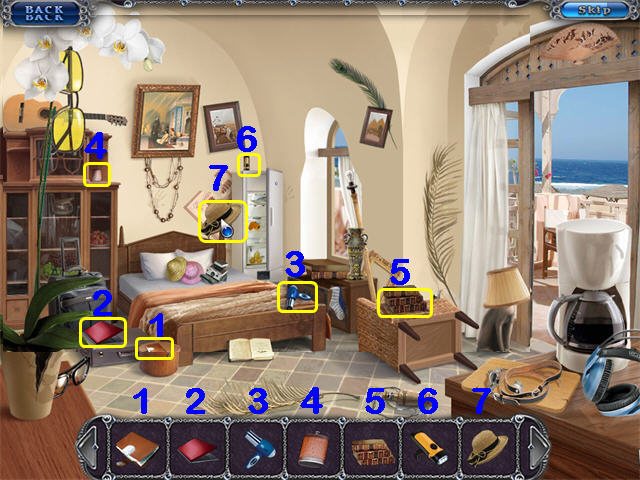
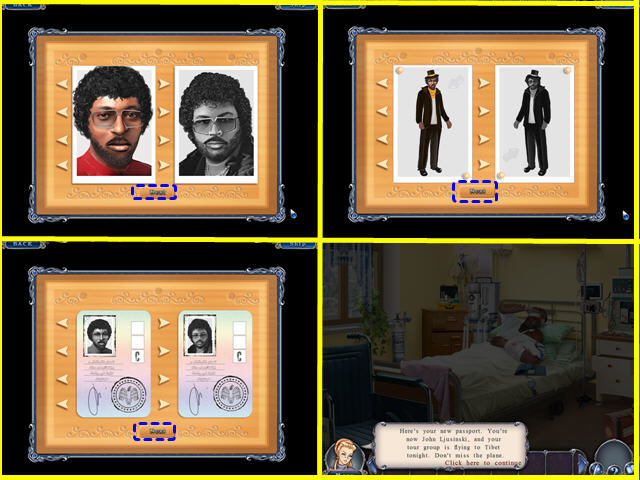
7: the Professor’s House, Day 1
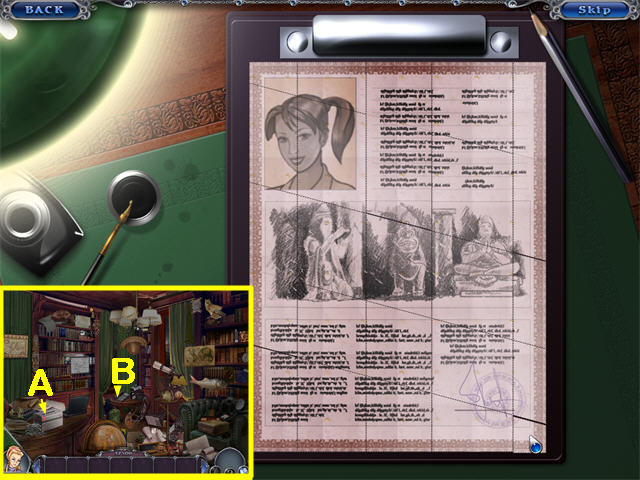
- Examine the Shredder (A) on the left table to trigger a puzzle.
- After you put the pieces together, click on the handset for the Desk Phone (B) to call Jane.
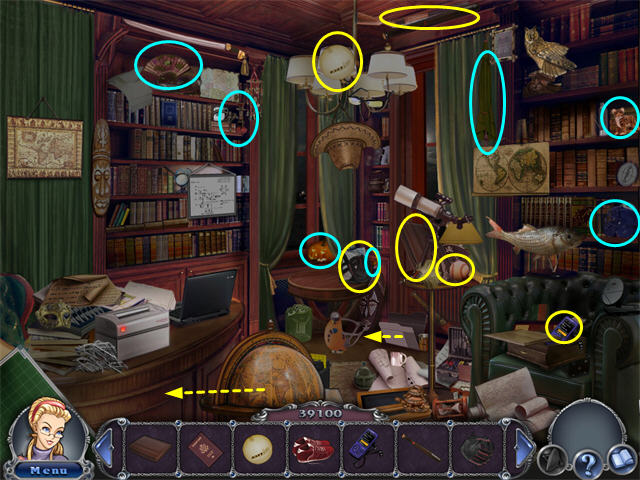
- Talk to Jane, then collect the Travel Documents.
- Slide the Globe left to reveal the Red Shoes.
- Slide the File 3-Days-Amulet-Secret left to reveal the Passport.
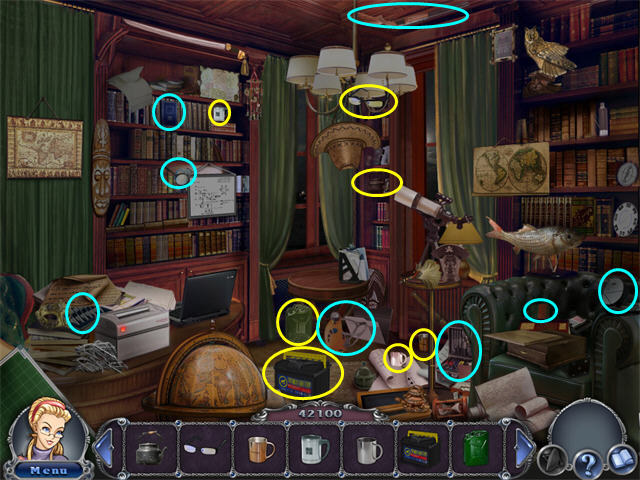
- Items from the second Find List are marked in cyan.
- Open the Curtain to find the Pumpkin.
- When you have collected everything, you will trigger a puzzle.
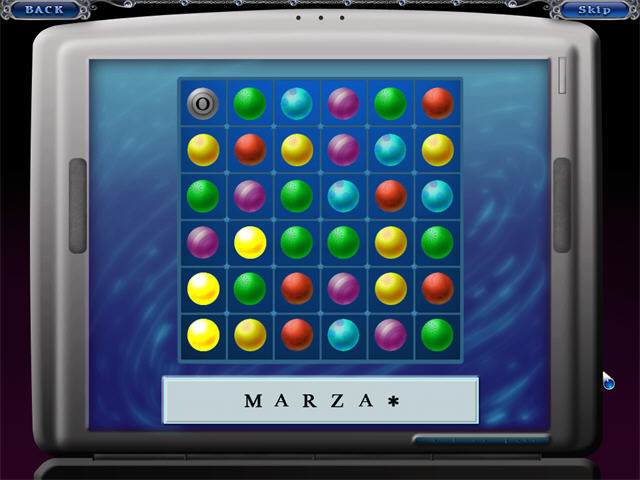
- This is a match-3 game. Your goal is to move each letter down to the bottom of the board.
- It doesn’t matter which column a letter is in when it reaches the bottom.
- When the puzzle is complete, you will get a new Find List. Collect the items.
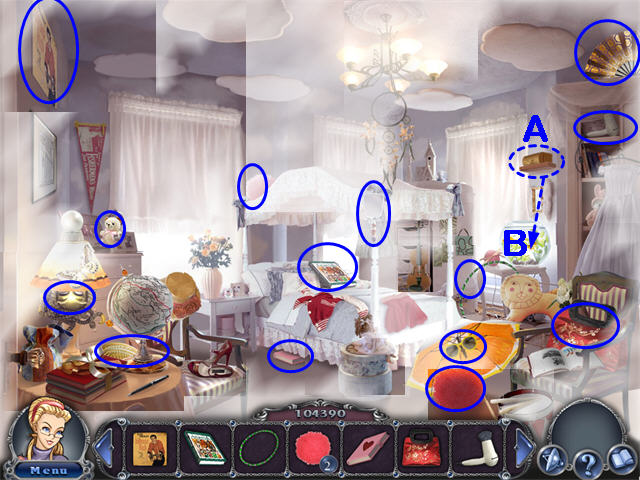
8: Psychologist’s Office, Day 1
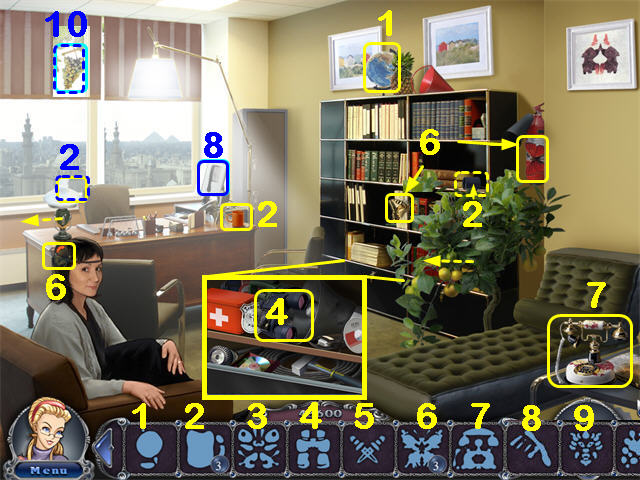
- Find objects in the room that remind you of the symbols in the Find List.
- (3), (5), and (9) do not have matches.
- Move the Shade on the left window to find the Grapes (10).
- Slide the Lamp on the desk to see a Mug on the windowsill.
- Slide the Lemon Tree to see a blue Mug on the bookcase.
- Open the Black Drawer at the bottom of the bookcase. Zoom in to see the Binoculars (4).
- When you finish the Find List, you will trigger a puzzle.
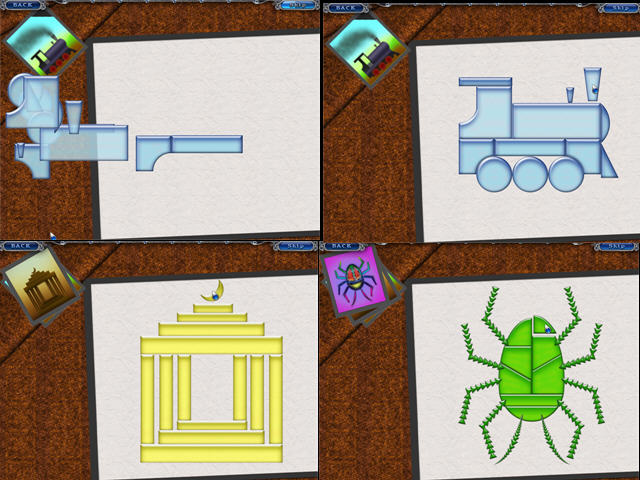
- Build the Train out of blocks. Once a piece is set correctly, it will not move.
- Build the Temple.
- Build the Spider. The pointed ends of the legs connect to the body.
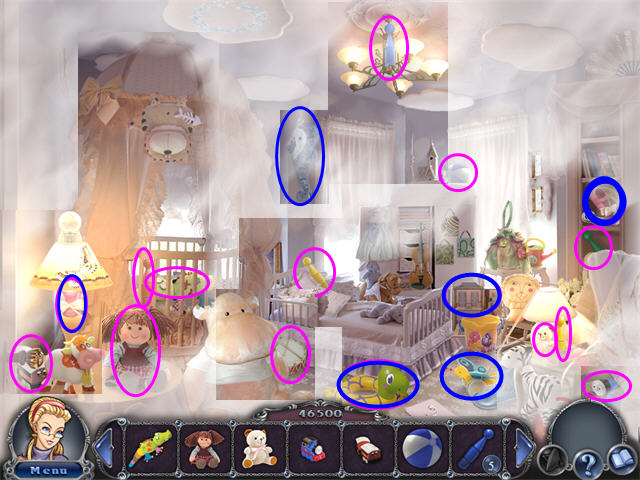
- Initially, parts of the room will be covered in mist. As you collect each item, another part of the room will clear.

- Put the furniture as shown in the screenshot.
- Pieces do not lock in place.
- Make sure that the pegs on the bottom of the furniture match the holes in the floor.
9: Jane’s Hotel, Day 1
- Collect all the items requested. The items for the first list are marked in yellow.
- The Diary is underneath the Glasses on the left.
- The items for the second list are marked in cyan.
- Open the Refrigerator.
- The items for the third list are marked in pink.
- After you have collected all the items, you will trigger a puzzle.
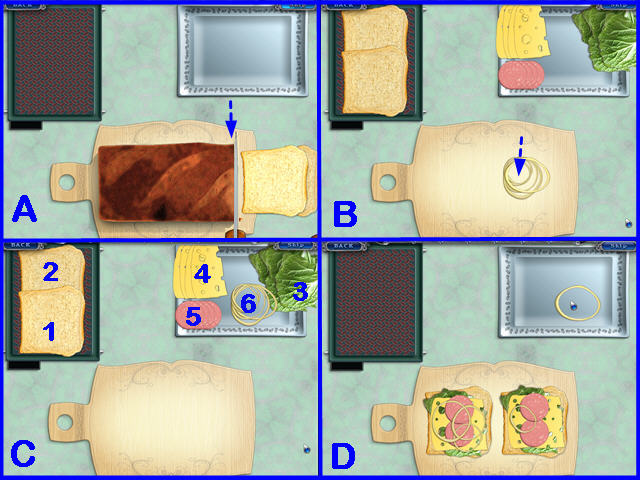
- One ingredient at a time will appear on the cutting board.
- Your cursor will automatically turn into a knife.
- Position the knife so that it is along the edge of the lighter piece. This is the cutting line.
- As you cut each slice, it will fall on the cutting board.
- After you have made all the cuts, click on each slice to put it on the tray.
- You will need 2 slices of Bread, 2 slices of Lettuce, 4 slices of Cheese, 4 slices of Meat, and 5 Onions.
- To pick up the Onions, click in the center of each one.
- Once the slices are on the trays, you can assemble the sandwich.
- Click on the slices in the order shown: both bread slices, then all the lettuce, all the cheese, all the meat, and all the onions.
- Open the Curtain.
- Collect the items on the Find List.
- Once you have collected them all, you will trigger a puzzle.
- There are several possible solutions. See the screenshot for an example.
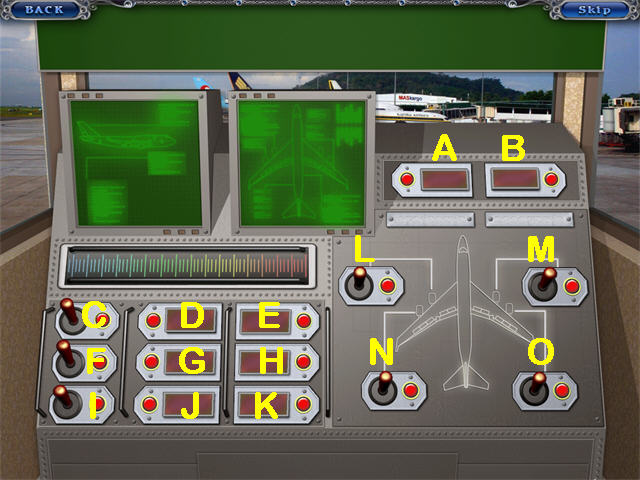
10: the Hangar, Day 2
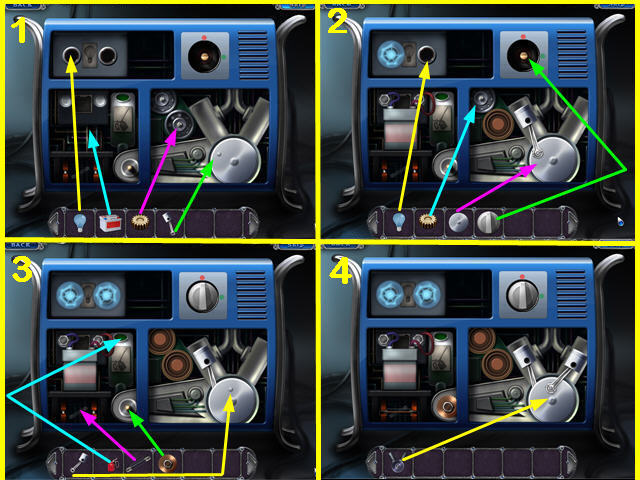
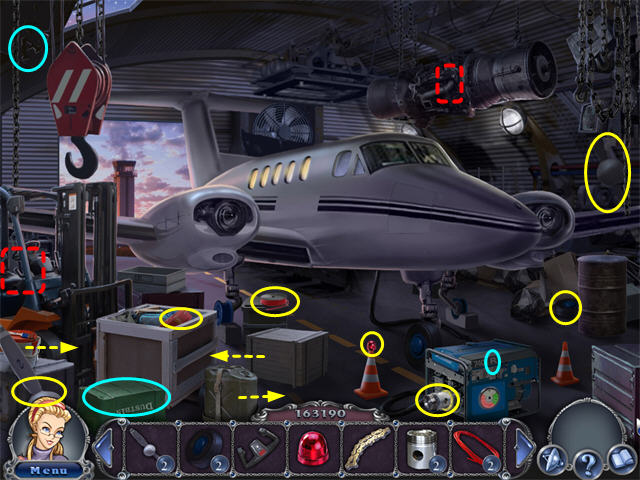
- Collect the 5 gears to start a puzzle.
- Put the Gears on the Pins as shown.
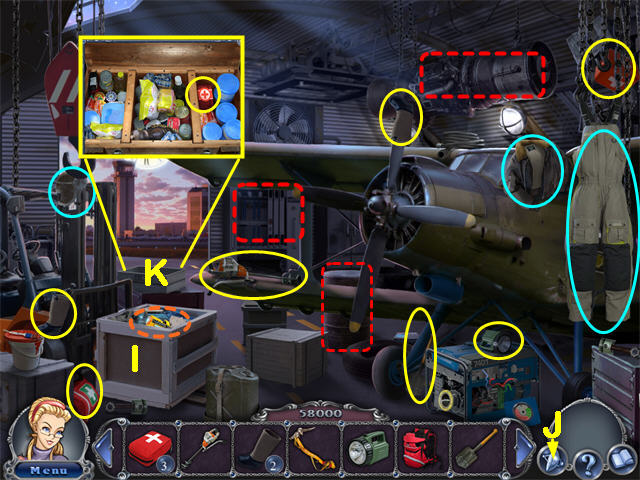
- The large box (I) on the left will now be on the ground.
- Click on the lid of this Box to open it and collect the Plazmatron. The Plazmatron icon (J) in the lower right is now available.
- Click on the Plazmatron icon to identify items in the scene that you can temporarily remove. These items will glow softly.
- We have marked where you need to use the Plazmatron with dashed red squares.
- Click on the item you want to temporarily remove. It will vanish, and you will have a few seconds to get to whatever is behind it.
- You will get the first Backpack during the Plazmatron tutorial.
- You will find another Backpack behind the Barrel.
- There is a Power Tool behind the engine hanging from the ceiling.
- Continue collecting the items from the Find List.
- Zoom in on the open box (K) to find the last First Aid Kit.
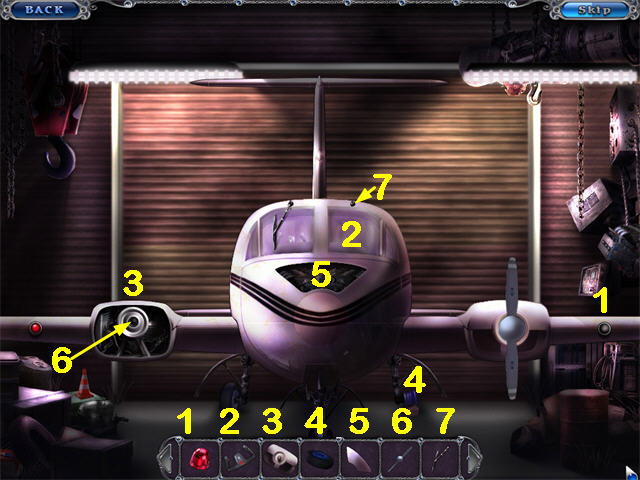
- Talk to the worker. He will tell you to repair the fuel pump.
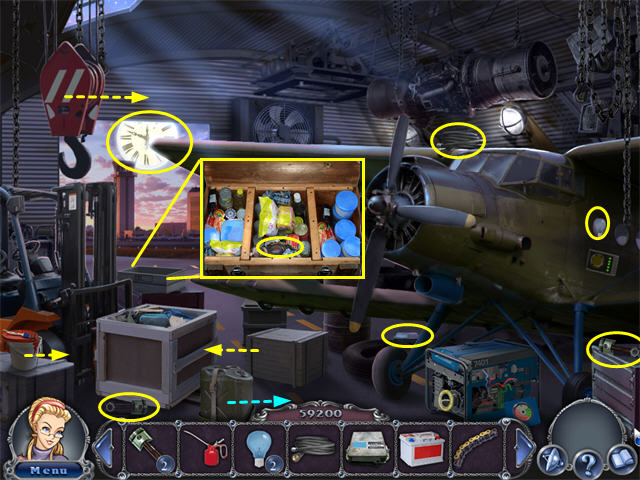
- Collect the items on the Find List. You will need to slide some boxes out of the way.
- Zoom in on the open Box and collect the CHAIN.
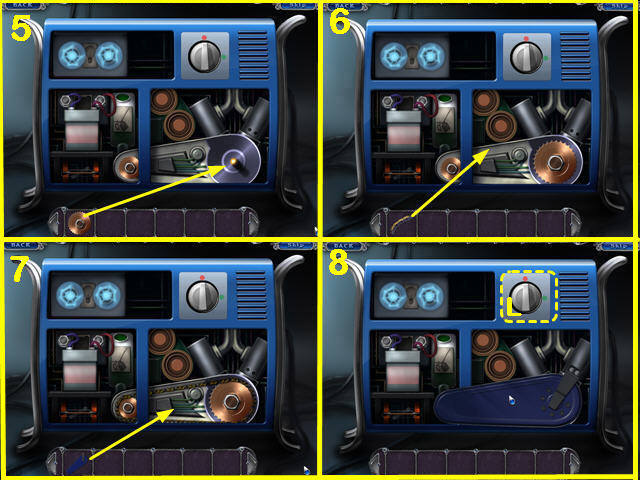
- When you have collected everything, you will trigger a puzzle.
- Repair the Pump as shown.
- In each picture, place the parts in the sequence yellow, cyan, pink, green.
- Once a part is placed correctly, it will lock into place.
- To place the Pistons, put the hole at the bottom of the Piston rod on the small peg on the silver plate.
- Note that the parts will change appearance slightly after you pick them up.
- The Power Switch (L) will turn on automatically after everything is placed correctly.
11: Tibet, Day 2
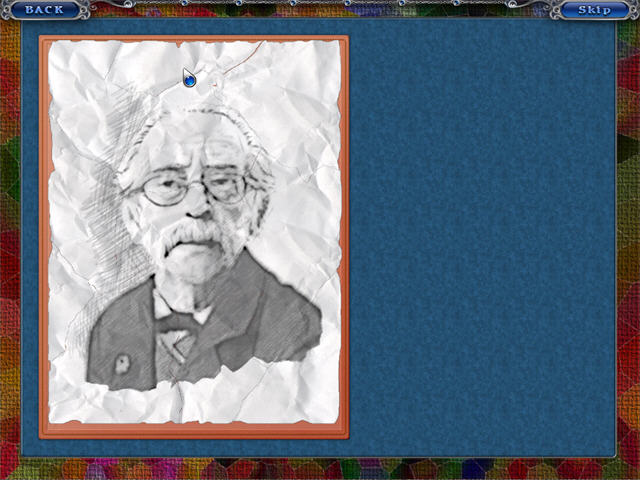
- Talk to the Professor. He will give you a Find the Differences puzzle.
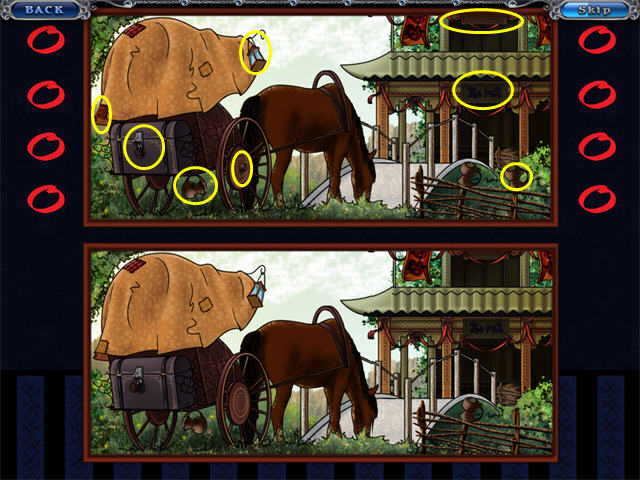
- Click on the differences in the top picture.
- The shadow of the Padlock on the back of the wagon is missing, but you may need to click on the Padlock itself to get the difference to count.
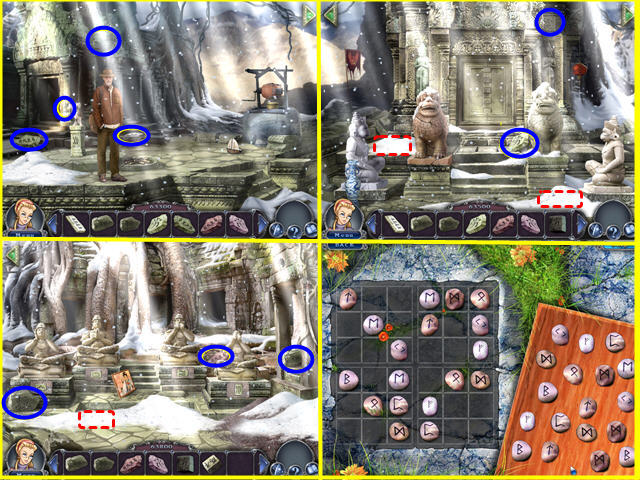
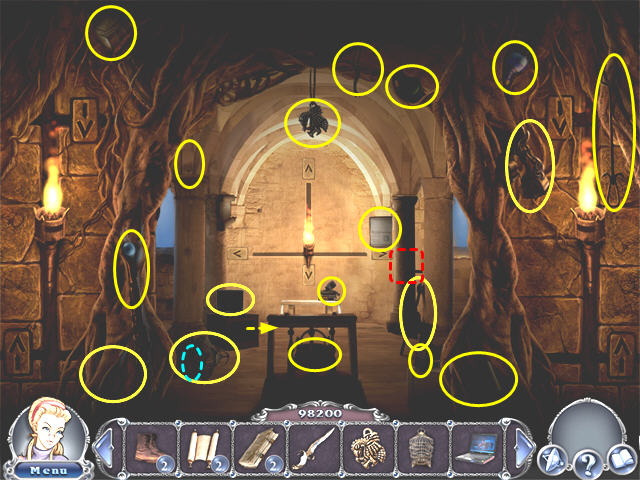
- Collect the items on the Find List.
- Areas where you need to use the Plazmatron are marked with a dashed red square.
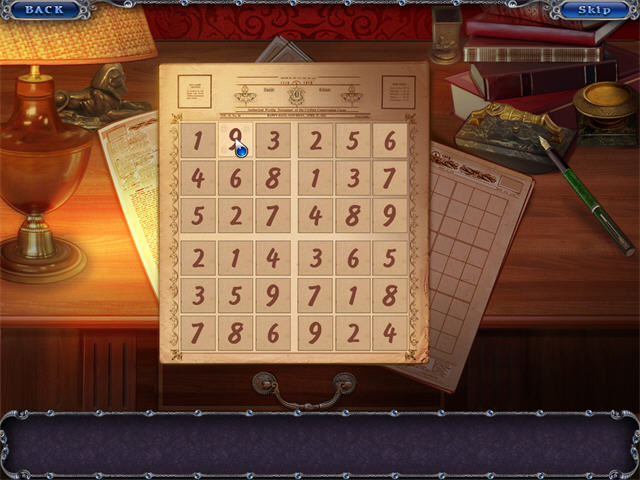
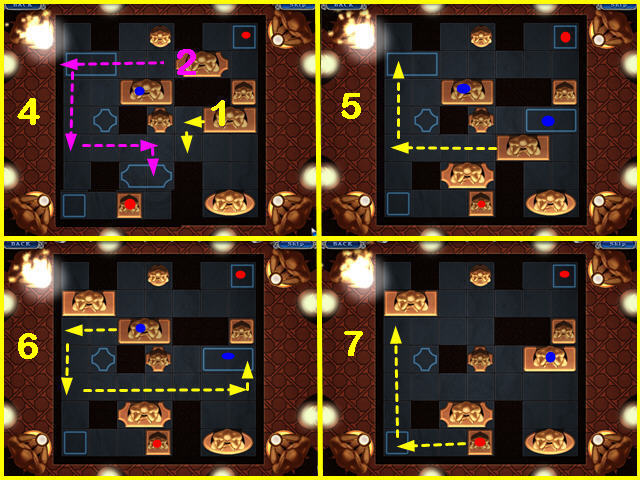
- Once you have collected 12 items, you will start a Sudoku puzzle.
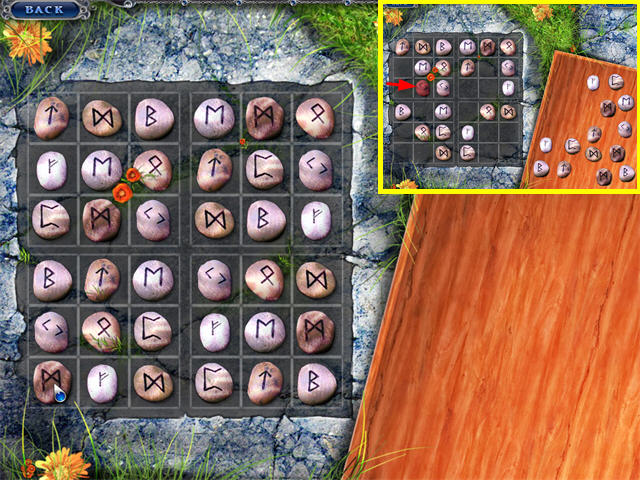
- Once a rock is set correctly, it will lock in place. If you put a rock in the wrong place, it will turn red.
- The solution is shown in the screenshot.
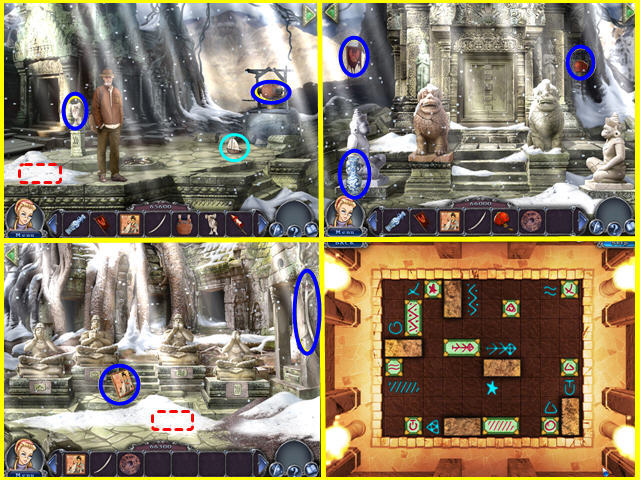
- Collect the items on the Find List.
- Use the Plazmatron as shown in the screenshot.
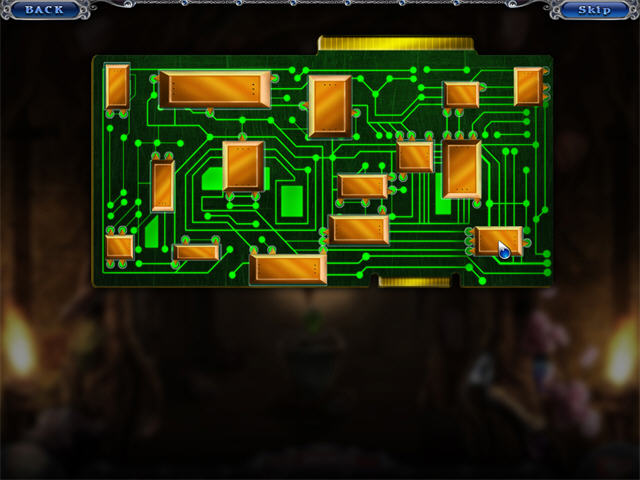
- When you have collected everything, you will trigger a puzzle.

- Put each tile on top of the symbol that it matches.
- The selected tile will always slide as far as it can go until it hits a wall, an obstruction, or another tile.
- Tiles do not lock in place, so you can move them again if needed.
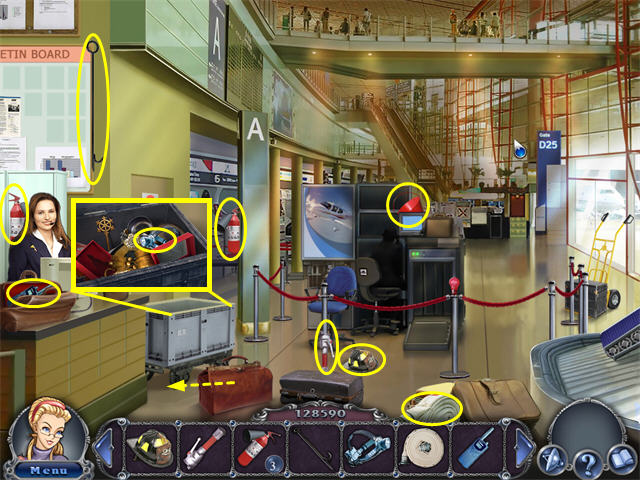
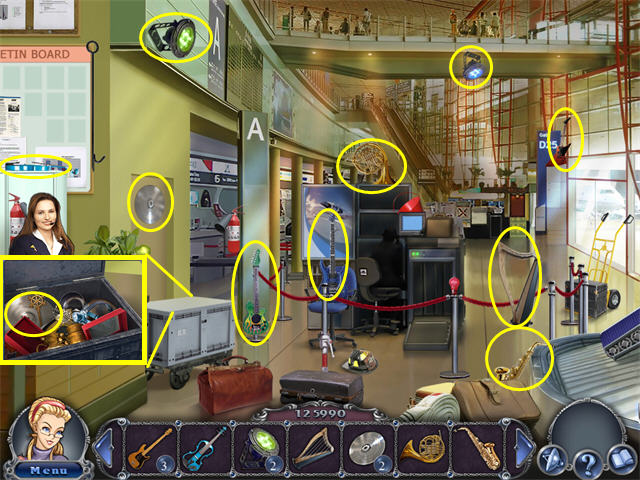
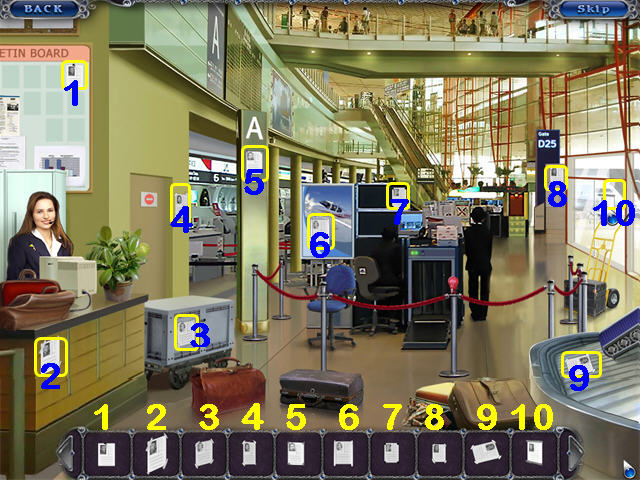
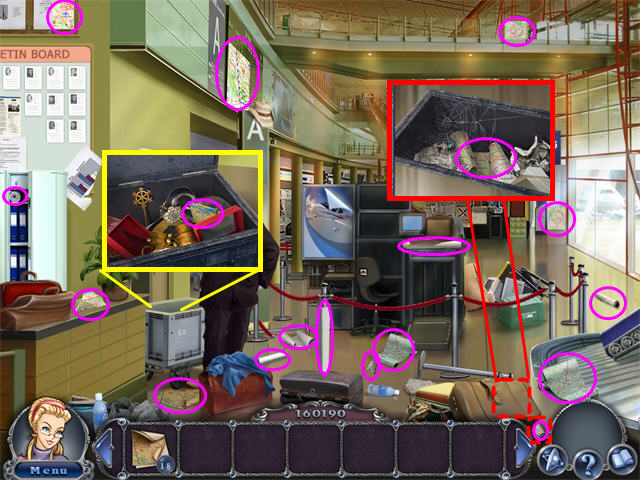
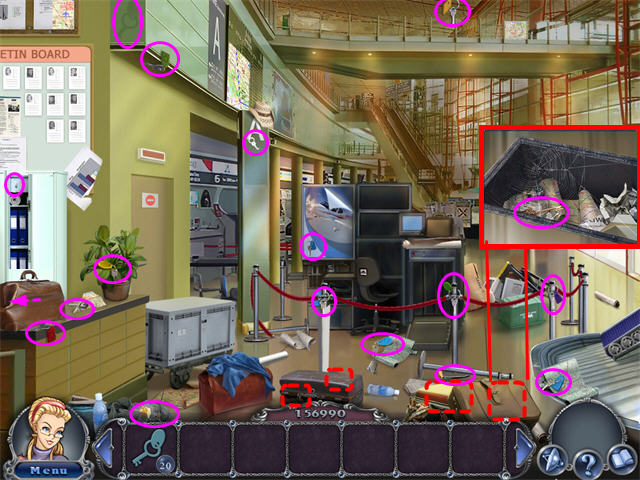
12: the Airport, Day 2

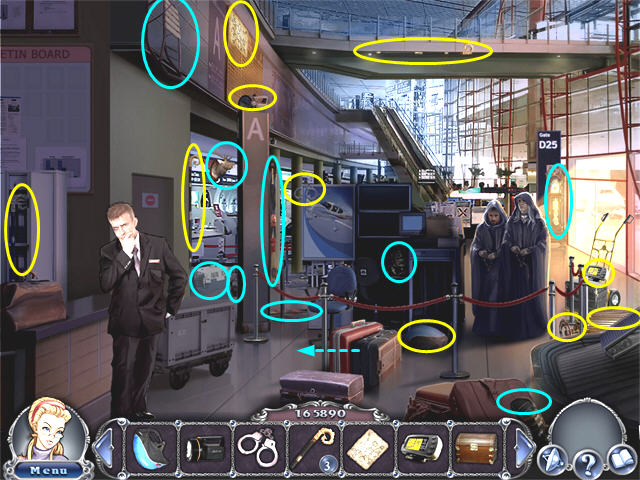
- Collect the items on the Find List.
- The Extension Cord is in the upper right.
- Take the lid off the Cart (A). Zoom in to find the GREEN BULB.
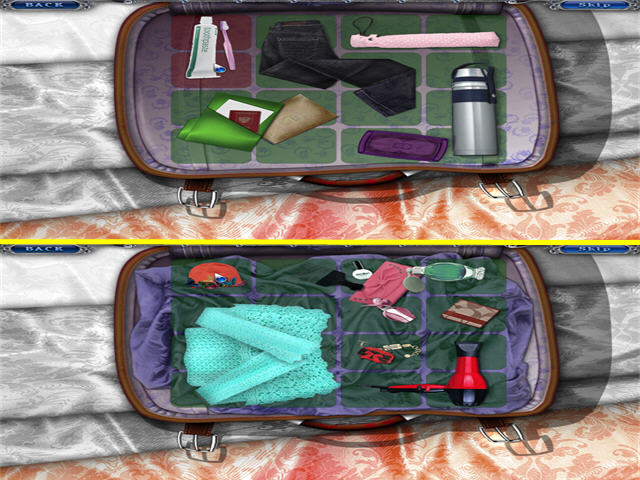
- Collect the items requested.
- Fill 6 complete Suitcases to move on. Partially-filled Suitcases do not count.
- Items and Suitcases repeat randomly.
13: the Museum, Day 2
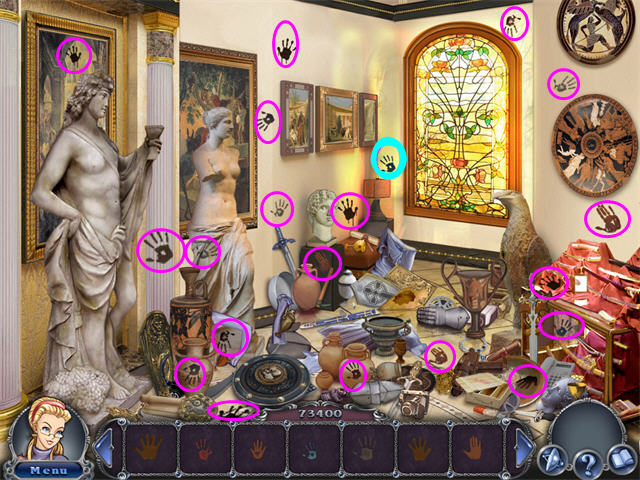
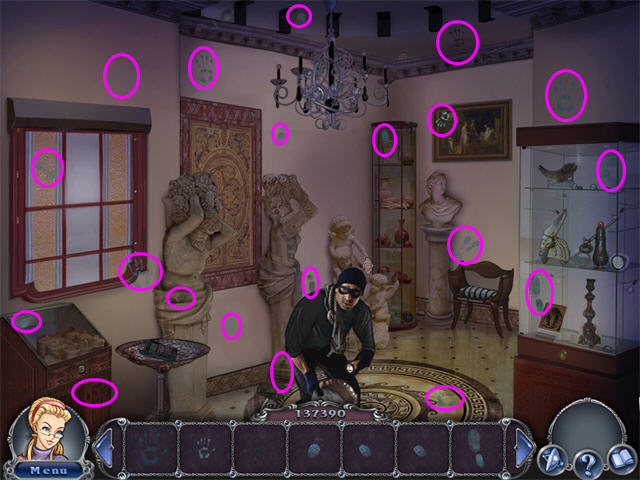
- Collect the Handprints.
- When you click on the one in cyan, the Stained Glass Window will break.
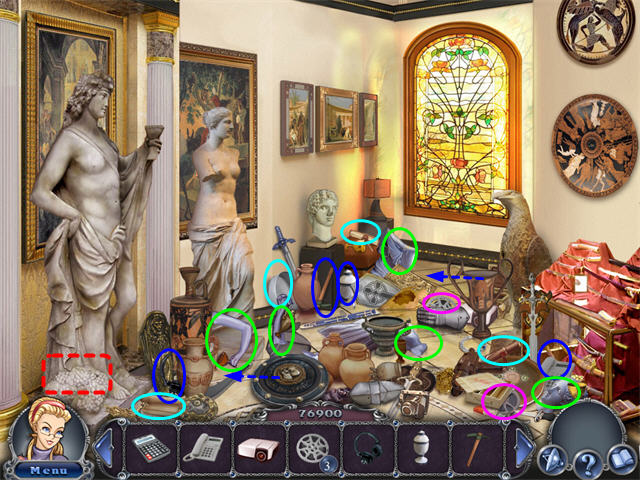
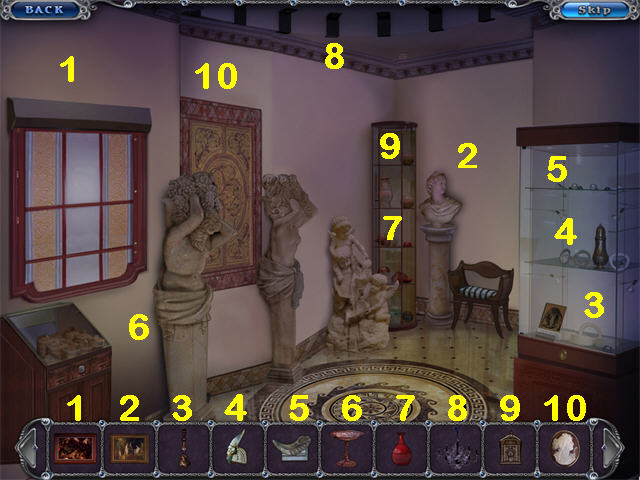
- Collect the items on the Find List.
- The 5 parts of the Statue are marked in green.
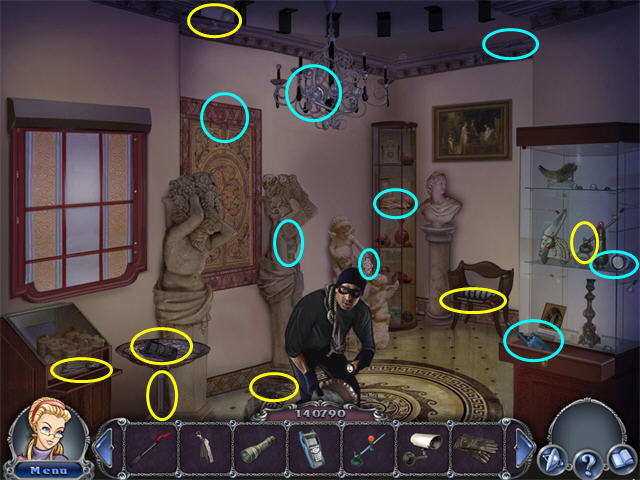
- Use the Plazmatron to reveal one of the Film Reels.
- Collect the letters.
- The Guard will give you another letter.
- Click anywhere to continue.
14: the Collector’s House, Day 2
- Collect the hand and footprints.
- There is a blue Handprint on the flower painting behind the white statue on the right that is very hard to see. Use the Plazmatron on the white Statue, then click on the painting.
- Complete the Sudoku puzzle.

- Repair the collection as shown.
15: the Professor’s House, Day 2
- The last handprint is behind the Mask.
- Open the box on the chair to reveal the Cards.
- Slide the Lamp to reveal the Padlock.
- Put the BOOKS in order.
- The columns are colors: Purple, Brown, Green, Yellow. Red.
- The rows are topics: Symbols, Fruit, Plants, Insects.
- Click anywhere to continue.
- Collect the items.
- Open the Globe to reveal the Sword.
- There is one small Mask on each bookcase.
- The Telescope is marked in orange.
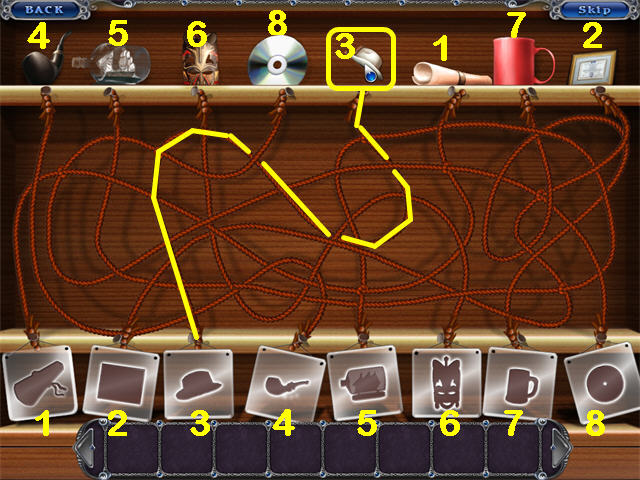
- Pick up an item.
- Observe where the cord goes from the item’s outline and click on the shelf. Ignore the knots.
- You don’t have to physically trace the cord, just click on the correct spot on the shelf.
16: the Monastery, Day 2
- Collect the handprints.
- Move each Statue to the marks that outline its base.
- Note that there are two square bases and two rectangles. Although they look identical, the puzzle requires them to go to specific spots. To make it easier to follow the solution, we have marked one rectangular Statue with a blue dot, and one square Statue with a red dot.
- When a statue is placed correctly, you will hear a musical chime.

- There are many possible solutions.
- Use the Arrow tablets to move the Torches to illuminate different parts of the scene.
- Collect the items on the Find List.
- One of the Bottles is behind the Birdcage on the floor.
- Slide the Crate to reveal the Satellite Dish.
- Use the Plazmatron to reveal the Camera.
- Place the pieces as shown.
- Each copper point must be touching a green circle.
17: the Psychologist’s House, Day 2
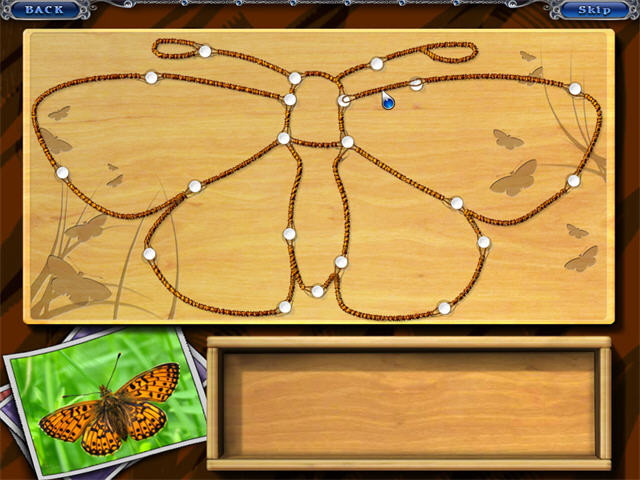
- Assemble the Butterfly. The pieces will only stick when placed correctly.
- Collect the items.
- Open the door at the bottom of the Bookcase, then zoom in to find the Bottle for the Ship in the Bottle.
- Open the Cabinet to find the Globe.
- Zoom in under the Desk and collect the Ping Pong Ball. (The Hint for this item is incorrect—it says it’s in the Cabinet, but it’s under the Desk.)
- When you click on the Jewelry Box (A), the 5 JEWELRY ITEMS will fall down into the Fishbowl (B).
- Click on the Fishbowl to start the puzzle.
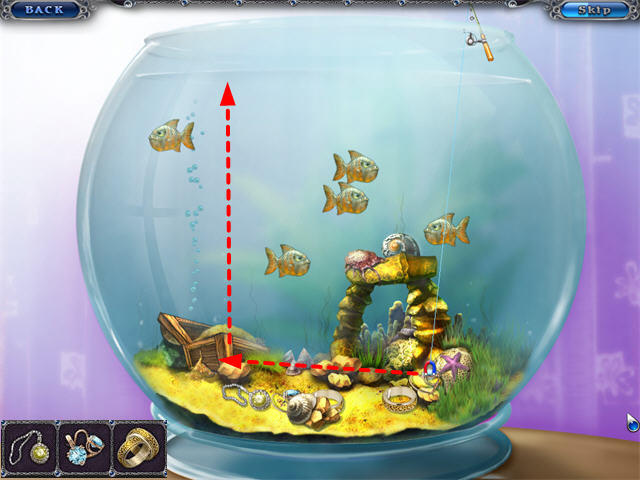
- Click once to drop the Magnet into the water. It will go all the way to the bottom.
- Move the fishing rod until the Magnet catches a JEWELRY ITEM. It will automatically start to come back up.
- Move the Fishing Rod back and forth trying to avoid hitting the body of any of the fish with the JEWELRY ITEM. It doesn’t matter if they hit the string.
- It seems to be easiest to bring item up from the far left side.
- Keep going until you have successfully collected all 5 items.
18: Jane’s Hotel, Day 2

- Collect the items on the Find List.
- The Shield is behind the Bed.
- The Table Lamp is the dark green item on the far right.
- You can only see a small part of the handle for the Pole Axe on the right side of the Bed.
- Put the items into the Labyrinth as shown.
- The four categories are technology (hairdryer), things to drink, money and documents, and things to wear.
- Collect the items on the Find List.
- One Towel is green, one is purple.
- Use the Plazmatron to collect the Wallet from behind the overturned Chair.
- Use the Plazmatron to collect the Laptop from under the Bed.
- The only Books that count are the ones on the floor by the overturned chair.
- Put the items back into the room as shown.
19: Hospital, Day 3
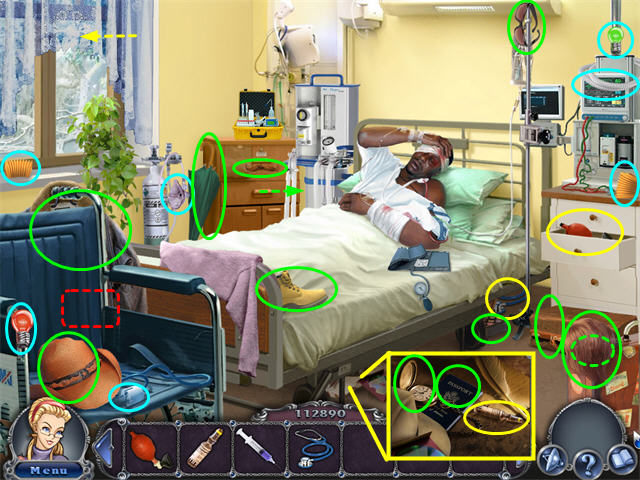
- Collect the items on the Find List.
- Zoom in under the Bed to find the Vial.
- Collect the items to repair the Ventilator.
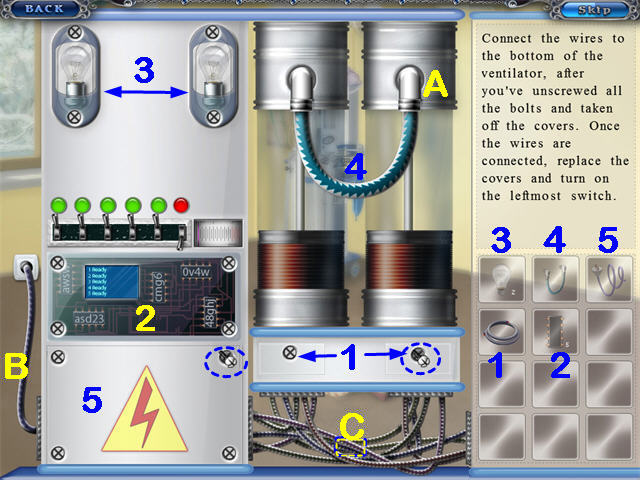
- Repair the Ventilator following the instructions on the right.
- For each step, first remove the SCREWS one at a time for that area.
- Click again to remove the COVER. The COVER and the SCREWS will now be in your inventory.
- Pick up the appropriate Ventilator part. A ghost image of it will appear on screen to show you where it goes.
- Put the part in place.
- Put the COVER back on.
- Pick up a SCREW. You will see the ghost images of all the screws for this part.
- Position the cursor so the head of the screw is just below and to the right of the ghost image and click. If you are in the right place, the screw will go in. See the examples in area 1 and 5 in the screenshot.
- If the SCREW goes back into your inventory, try a slightly different location.
- Repeat for all the SCREWS for this area.
- Flip the appropriate switch, and you will get the instructions for the next Ventilator part.
- To place the COMPUTER CHIPS, match the code letters on each chip to the code letters on the spaces.
- To place the WIRES (1), click below the Ventilator (C).
- There is a clear plastic Cover over the Circuit Board. Remove it before placing the CHIPS (2).
- To place the VENTILATOR TUBE (4), click on the right Pump (A).
- To place the POWER CORD (5), click in the center of the ghost image (B).
- The items for the disguise are marked in green on the screenshot of the hospital room.
- The TICKET is in the drawer to the left of the Bed.
- You will have to zoom in under the Bed twice, once for the Passport and once for the Pocket Watch.
- The Cell Phone is underneath the Wig.
- Use the Plazmatron on the Wheelchair to find the second Boot.
- Modify the passport. The left and right sides don’t have to match exactly, just make the best choice.
- Use the NEXT button to submit your changes.
20: Police Station, Day 3

- Listen to statements from each witness on the list. Click TRUE if you believe the witness and FALSE if you do not.
- A check means the witness statement indicates the suspect might be guilty. An x means the witness statement indicates they are innocent.
- At the end, one of the suspect pictures will be blinking. Click on it to identify the thief.
- The witness statements will repeat so you can change your answer if you need to.
- True: Professor, Lord, Grandpa, Journalist.
- False: Hostess’ Sister, Niece (fiancée), Secretary, Milkman.
- The thief is the Gardener.
- Collect the items on the Find List.
- Wait for the Helix on the left to fill in.
- Each arrow button controls a different set of colored balls.
- Hover your cursor over one of the arrow buttons to see which balls it controls. They will be outlined in white.
- Now click the arrow button until the balls circled in white on the left match the ones circled in white on the right.
- Then move on to a different arrow button until everything on the left matches everything on the right.
- Click on the COMPARE button to submit your result.
- Collect the items for the Dog.
- Collect the pieces of the Photo (cyan).
21: Airport, Day 3
- Collect the items on the Find List.
- Remove the top from the Crate, then zoom in for one of the Cymbals.
- You will repeat 4 sequences.
- Click on the control switch/button next to the light, not on the light itself.
- Solutions may be random, here are the ones we had.
- 1st Sequence: M, H, J
- 2nd Sequence: I, C, D, F
- 3rd Sequence: K, L, A, C, I
- 4th Sequence: N, D, E, H, A, G
- Collect the items to fight the fire.
- Slide the Suitcase to reveal one Extinguisher.
- Zoom in on the Crate to find the Miner’s Helmet.
- Put the FLYERS into the scene as shown.
22: Collector’s House, Day 3
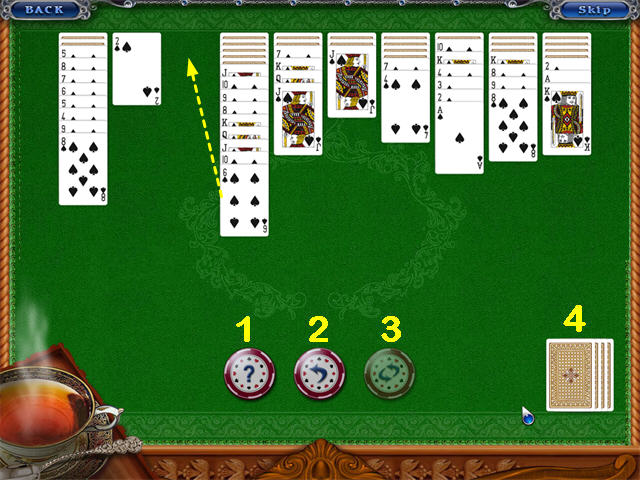
- The Hint Button (1) shows you one possible move, not necessarily the best one.
- The Take Back button (2) takes back your last move.
- When you click on the Deck (4), you will be dealt an entire new row of cards over the existing ones.
- The Shuffle Button (3) is only available when you have played all the cards from the deck and there are no more moves. It shuffles all the cards on the board
.
- The game is easier than it appears because there is only one suit and any card, not just a King, may be played into an empty space.

- Collect the items from the Find List.
- Use the Plazmatron on the Knight to reveal the Wheel.
- Continue collecting items.
- Slide the Statue on the mantel to reveal the Crossbow.
- There are many possible solutions. Here is one.
- F 3 clicks, A 1 click, D 1 click, F 3 clicks, C 1 click, F 3 clicks, E 1 click, B 1 click.
23: Museum, Day 3

- Each click on a ring turns it part-way.
- The fingerprints will turn visible when they are touching another fingerprint, but they might not be in the right place.
- Click on the dials until they match the screenshot.
- Collect the fingerprint evidence.
- Put the items back as shown.
- Collect the tools.
- The red Pliers are on the ceiling in the back.
24: Psychologist’s House, Day 3
- Collect the items as shown.
- You will have to zoom in once for each object.
- Swap tiles on the right side until the colors exactly match the left. There are many ways to do this.
- One good way is to start by making direct swaps as shown in the screenshot.
- When you have made all the direct swaps you see, start the top row and get it perfect.
- Work your way down one row at a time. Always take your swap tile from below the row you are currently working.
- The items are as follows.
- Scratchy: Hedgehog, Cactus, Wreath.
- Cold: Ice Cream, Fan, Snowman,
- Festive: Party Hat, Carnival Mask, Jack O Lantern
- Sharp: Knife, Scissors, Saw
- Scientific: Hourglass, Globe, Telescope,
- Musical: Gramophone, Headphones, Record,
- Tasty: Bananas, Pineapple, Cake

25: Monastery, Day 3
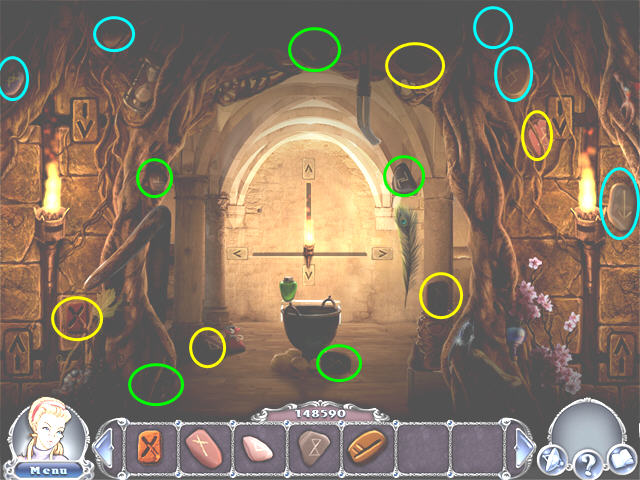
- Collect the Runestones in three groups of five (yellow, then cyan, then green).
- We have lightened the screenshot. Move the Torches as needed.
- Collect the ritual items.
- The SPOON is on the ceiling, just to the left of center.
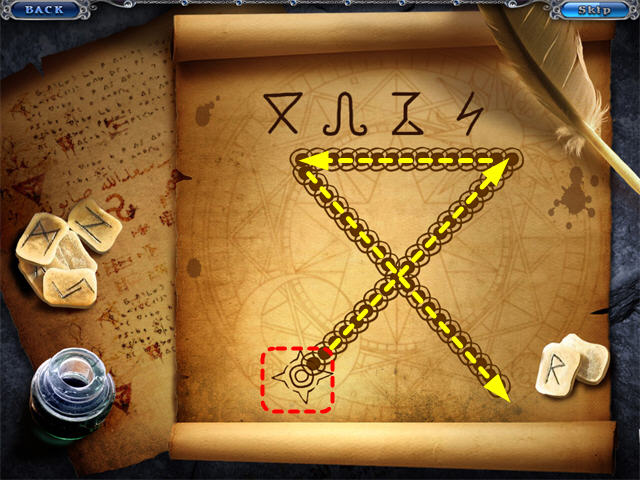
- Throughout the Level, trace the Runes as directed.
- Always click in the center of the Star (red) first, then trace away from it to the end.
26: Airport
- Collect the KEYS.
- Use the Plazmatron on the Silver Suitcase and the Tan Suitcase.
- There are two KEYS under the Silver Suitcase.
- There is one KEY under the Tan Suitcase.
- Use the Plazmatron on the Tan Suitcase, then zoom in on the Grate to find the last KEY.
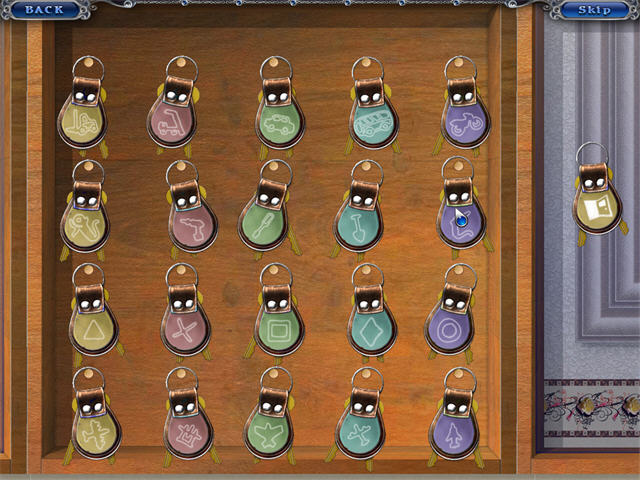
- Place the KEYS as shown.
- The one left over is the DOOR KEY.
- Collect the Navigation Maps as shown.
- Zoom in on the Crate for one.
- Use the Plazmatron on the tan Suitcase and zoom in on the Grate for another.
- You can see the end of one between the tan Suitcase and the Carousel, but you can’t pick it up because it is too close to the inventory tray. Use the Plazmatron on the tan Suitcase and pick it up from the other end.
27: Hangar, Day 3
- Collect the AIRPLANE PARTS.
- The Plazmatron works both on the large Crate on the left and the blue Forklift Truck behind it.
- The letter “A” is in the upper left section.
- Put the parts on the Plane.
28: Airport
- Collect your own luggage (yellow), then the Charter’s (cyan).
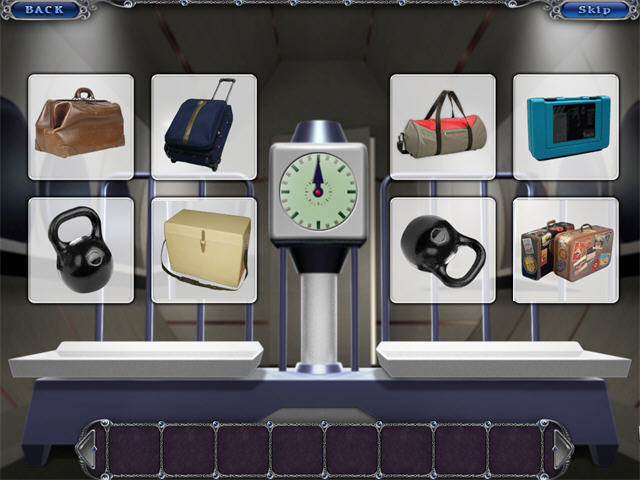
- Balance the items as shown.
- Swap two items by clicking on their tiles.
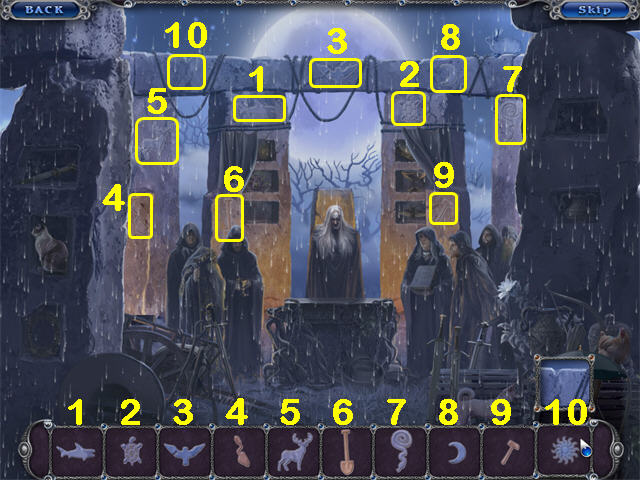
29: Stonehenge, Day 3
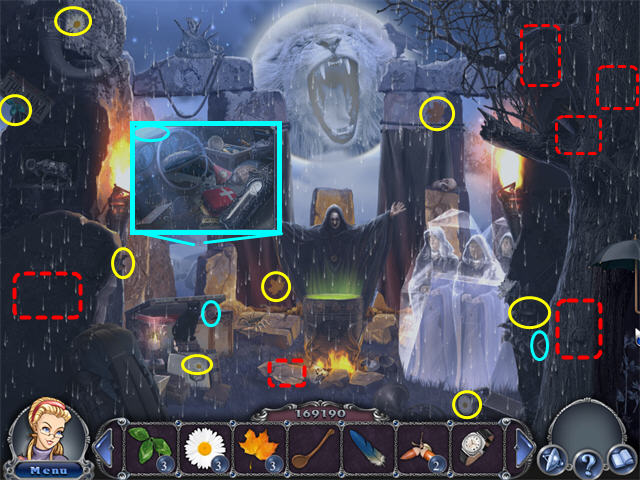
- Collect the items for the potion.
- Use the Plazmatron on the left rock to reveal the WATCH.
- Use the Plazmatron on the right Tree to reveal one of the CLOVERS.
- One of the Acorns is between the right tree and the frozen monks.
- Use the Plazmatron on the small rock in the middle to reveal a log. Click on the log and you will receive a CLOVER.
- Use the Plazmatron on the tree on the right and collect the Feather from the top alcove.
- Zoom in on the Car in the back and get the THERMOMETER off the Dashboard.
- Use the Plazmatron on the right tree to reveal A MAPLE LEAF high on the stone behind it.
- The SPOON is high on the left side of the stone behind the right Tree.
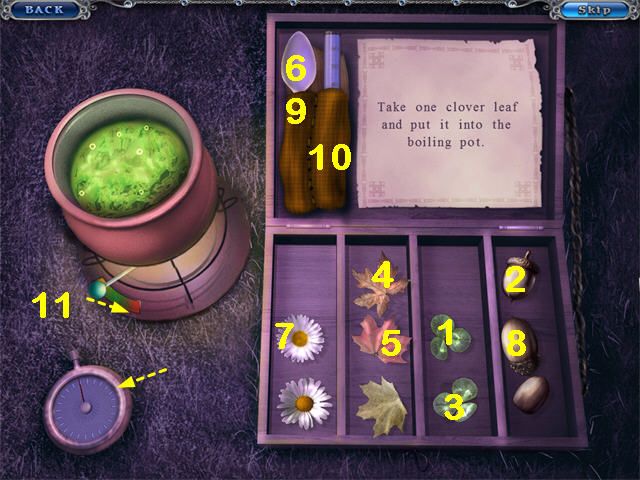
- Add the INGREDIENTS to the potion as shown.
- Put the THERMOMETER in the potion.
- Slide the lever (11) into the red zone and watch the THERMOMETER.
- Click the STOPWATCH to start it.
- When the potion has been at 100 for 15 seconds, slide the lever back to the green.
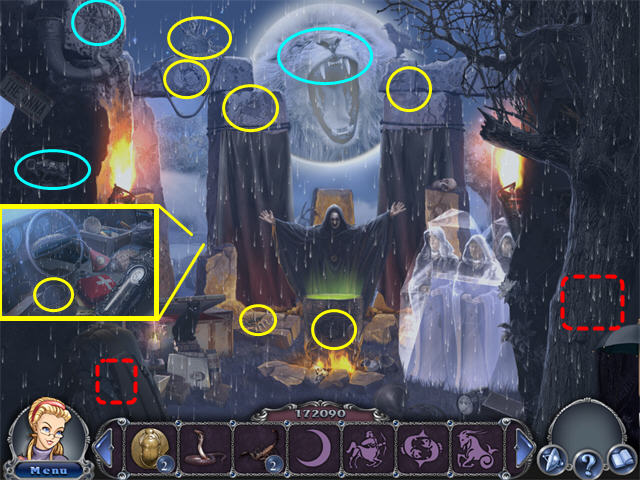
- Collect the Totems.
- Use the Plazmatron on the right Tree to reveal a Pentagram.
- Use the Plazmatron on the Backpack to reveal a Scorpion.
- Zoom in on the Car to find a Scarab.
- The demon in the sky is the Lion.
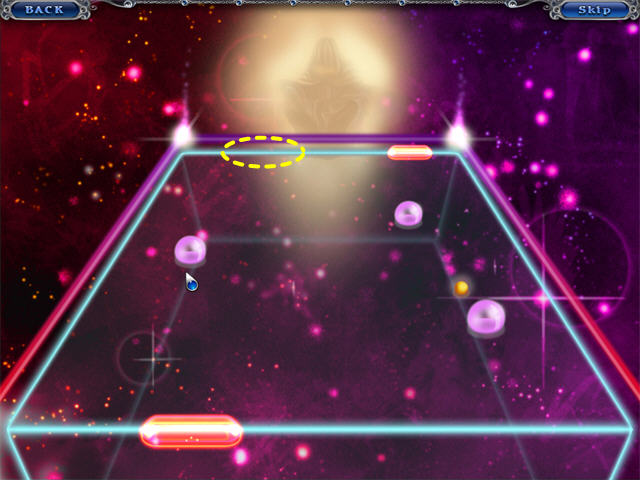
- Play the game. Your goal is to hit the back line 3 times.
- Your opponent will anticipate your moves, so try to hit the floating rings at a sharp angle to surprise him.


 Mountain Crime: Requital Walkthrough, Guide, & Tips
 Portal of Evil: Stolen Runes Walkthrough, Guide, & Tips
 Dreamland Walkthrough, Guide, & Tips
 Journalistic Investigations: Stolen Inheritance Walkthrough, Guide, & Tips
 Joan Jade and The Gates of Xibalba Walkthrough, Guide, & Tips