Tulula: Legend of a Volcano Walkthrough, Guide, & Tips
Tulula: Legend of a Volcano Walkthrough

Welcome to the Tulula: Legend of a Volcano Walkthrough!
Dive into this Hidden Object Puzzle Adventure game and become a hero!
Whether you use this document as a reference when things get difficult or as a road map to get you from beginning to end, we’re pretty sure you’ll find what you’re looking for here.
This document contains a complete Tulula: Legend of a Volcano game walkthrough featuring annotated screenshots from actual gameplay!
We hope you find this information useful as you play your way through the game. Use the walkthrough menu below to quickly jump to whatever stage of the game you need help with.
Remember to visit the Big Fish Games Forums if you find you need more help. Have fun!
This walkthrough was created by Rebekah S., and is protected under US Copyright laws. Any unauthorized use, including re-publication in whole or in part, without permission, is strictly prohibited.
General Tips
- Mini-games can be skipped once the skip button is full, however if you skip a game you may not receive all of your medals.
- The hint button (Lamp) can be used during most game play once the lamp if full.
- When the hint button is unavailable use the question mark (?) button for help.
- Click on the MENU button in the lower right corner to exit, pause or resume the game. You can also adjust your options (sound, music, and screen size).
- This game requires sequential actions, for example you cannot pick up the rake until you click the leaves.
- The cursor changes shape as an indicator, it turns into a hand for items that can be picked up and a gear to reveal something that needs to be repaired.
- In every chapter you will need to collect STONE SHARDS of a totem, and BLUEPRINTS to rebuild the village.
- Use the hint book to review spoken dialogue, hints, and remaining SHARDS and BLUEPRINT available in the current chapter.
- The counter in the lower left shows how many STONE SHARDS still need to be collected.
- During hidden object scenes Items cannot be picked up until they appear in the list and may require action to unlock.
- After the Tulula Village is unlocked you can return to it whenever you are in the map room to begin rebuilding with the merits you earn during game play.
- The Tulula Village is covered in the last chapter of this walkthrough.
Introduction

- Grab the LAMP (A) hanging over the fire pit and light the fire.
- Click the LAMP (A) to reveal the location of the NOTE PAD (B) and pick it up.
- Pick up the BACKPACK (C) in the lower left corner.
- Pick up the SCISSORS (D) located to the right of the shaman.
- Drag them over the BACKPACK to cut the ivy away.
- Pick up the LADDER (E), place it under the MASKS (F).
- Click on all three MASKS (F).
- Click the painted board, once the story begins you may skip this.
- Click twice on the pile of MASKS (G) to pick up two ARM BONES.
- Drag both ARMS to the door and open it (H).
- Enter the room.
- Click the stone repeatedly until it disappears.
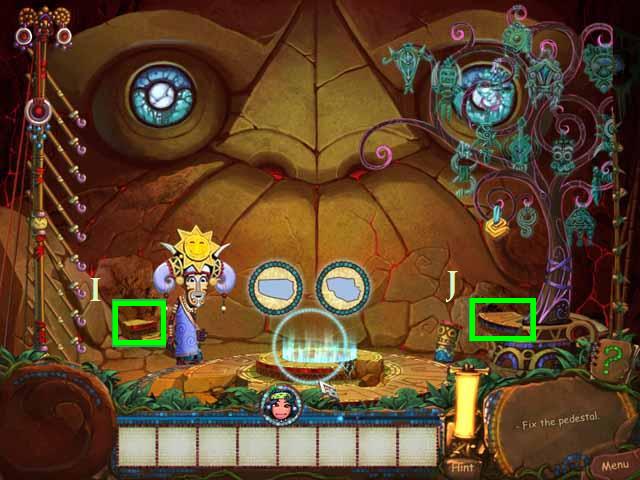
- Pick up the STONE SHARD (I) to the left of the Shaman and the one (J) left of the tree.
- Zoom in on the glowing pedestal and repair it by placing the SHARDS in the matching spaces.
- Click on Ivan the monkey.
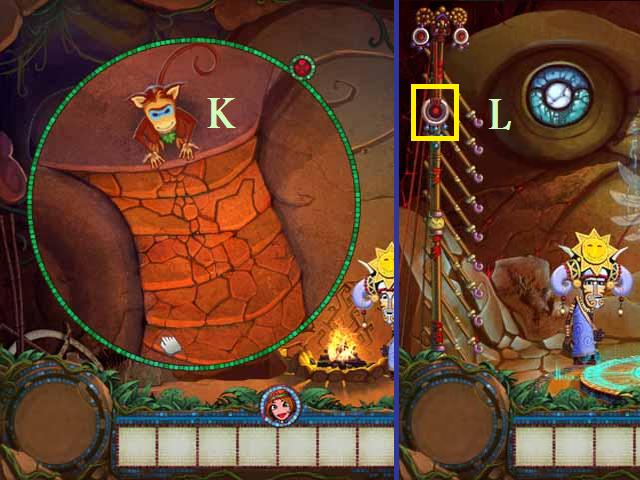
- Zoom into the stairs (K) and solve the puzzle by dragging the stones to the correct spaces.
- Click the ring in the middle of the flag pole (L).
The Chief’s Castle
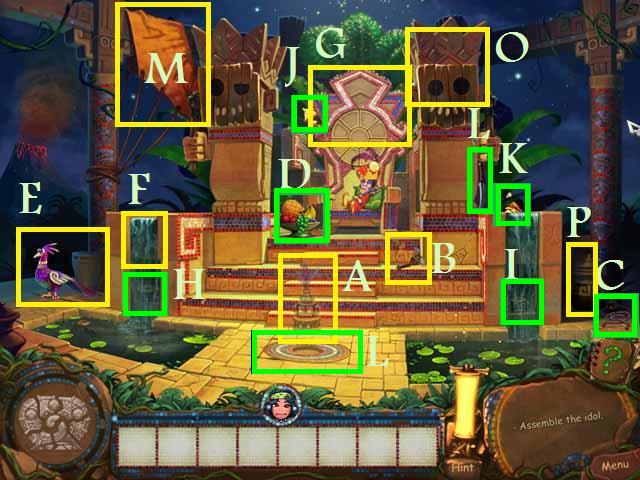
- Click on the sparkling Idol (A).
- Click the STAFF (B).
- Pick up the JUMP ROPE (C) to the right.
- Pick up the GRAPES (D) from the fruit bowl in the middle.
- Feed the GRAPES (D) to the peacock (E) and pick up a FEATHER (E).
- Repair the STAFF (B) with the FEATHER (E) and ROPE (C).
- Click either one of the fountains (F).
- Zoom in on the top of the throne (G) to enter a mini-game.
- Click the symbols in the same order as they appear in the white dream bubble. The sequence builds on itself, the first symbol of the first sequence will be the first in all the sequences. This mini-game is different each time you replay the game. You can skip this puzzle.
- Pick up the STONE SHARD revealed after the puzzle is complete.
- Pick up the two IDOL PIECES (H), (I) behind the fountains.
- Repair the Idol.
- Pick up 2 more STONE SHARDS (J), (K).
- Click on the hole (L) under the idol then the tarp (M).
- Pick up the KNIFE (N) and use it on the tarp (M).
- Place the ladder from under the tarp (M) and place it in the hole (L).
- Go down the hole (L) and return to the top.
- Click on either one of the large statues (O).
- Click on the urn (P) pick up the PEARL EYES DIAGRAM.
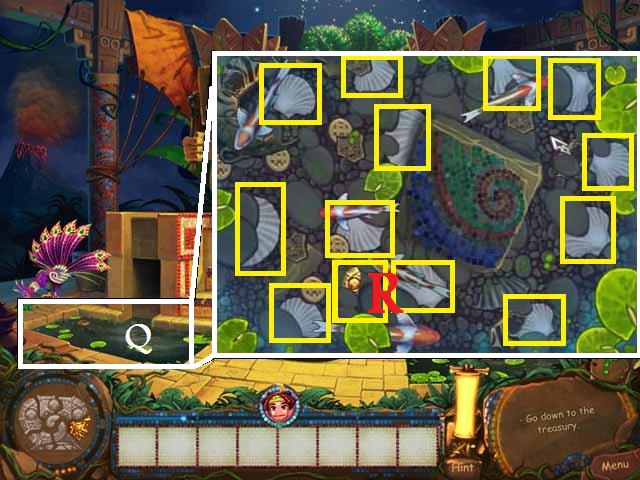
- Zoom in on the left pond (Q) to reveal a mini-game.
- Click on the rocks repeatedly until a clam is fully revealed and opens.
- Pick up all of the PEARLS.
- Pick up the STONE SHARD (R).
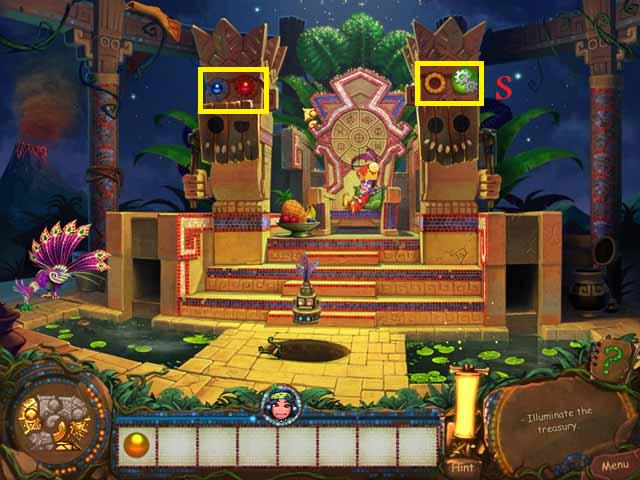
- Match the PEARLS colors to the statue’s eyes (S).
- Return to the treasury.
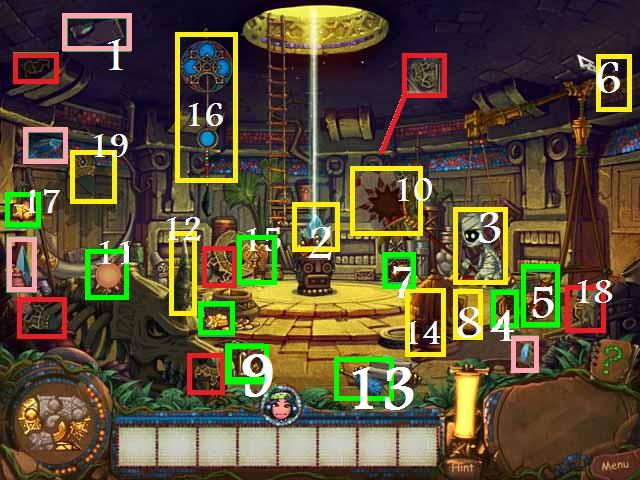
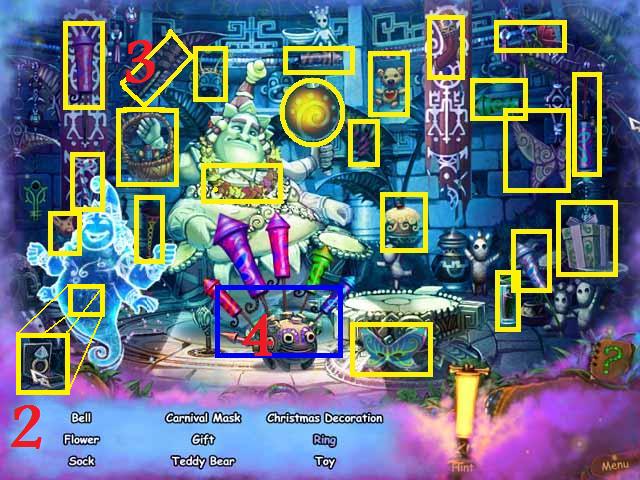
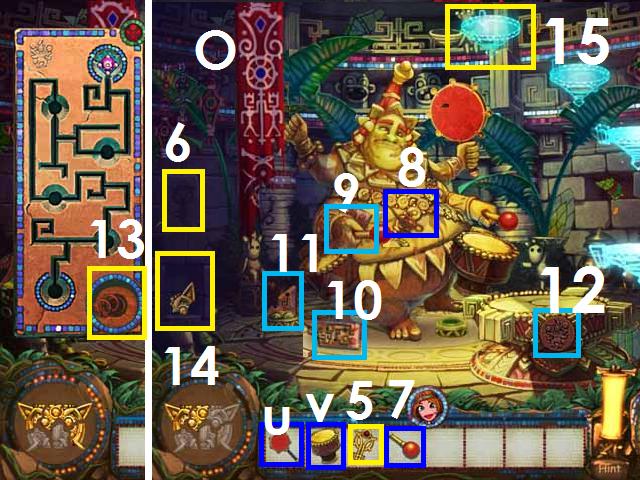
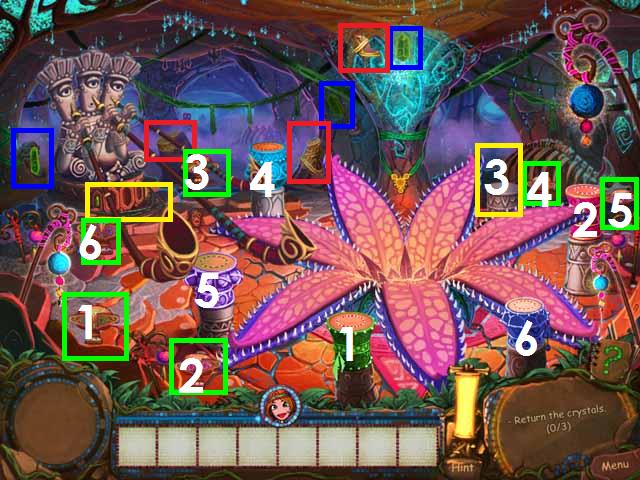
- Click on the sparkles to reveal and pick up a CRYSTAL SHARD (1).
- Click on the large crystal in the middle of the room (2).
- Repair the crystal (2) with four CRYSTAL SHARDS marked pink in the screenshot.
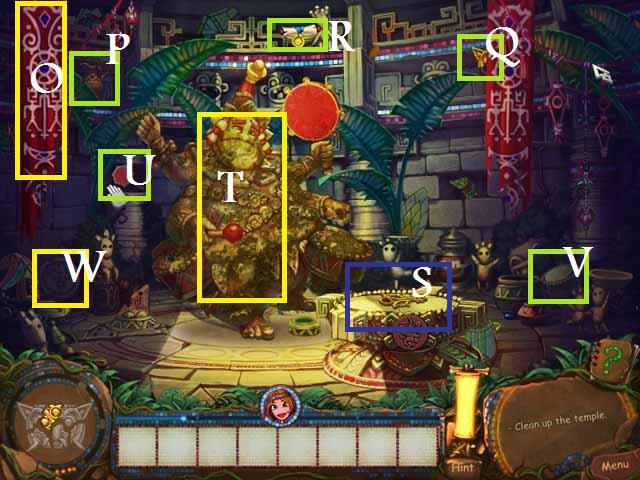
- Click on the mummy on the swing (3).
- Remove the SMALL WEIGHT (4) from the swing.
- Hang the LARGE WEIGHT (5) on the back arm of the swing (6) followed by the MEDIUM (7) then SMALL WEIGHTS.
- Fix the mummy’s medal (8) with the BROKEN PIECE. (9).
- Click the mummy’s fan (10) several times until it is positioned correctly.
- Place the SUN DISK (11) on the fan (10).
- Polish the horn (12) with the DUSTER (13).
- Open the casket (14) with the KEY (15).
- Click the emblem several times until the piece is in the correct place (16).
- Pick up two STONE SHARDS (17), (18).
- Pick up the six missing MIRROR SHARDS marked red in the screen shot and repair the mirror (19).
- Use the portal in the tomb.
Ruins of Kalamuna

- Pick up the BLUEPRINT (A) and the STONE SHARD (B).
- Repair the flags (C) with the ROPE (D) and pick up the now revealed STATUE PIECE.
- Move the tree branches (E), (F).
- Repair the statue (G) with the STATUE PIECES marked blue in the screenshot.
- Move the tassels (H) to reveal a STONE SHARD.
- Click the second statue (J).
- Move the sparkling rocks (I) to reveal a STATUE PIECE.
- Repair the second statue (J) with the STATUE PIECES marked teal in the screenshot.
- Click the bell (K).
- Zoom in on the fountain (L) to pick up the BELL CLAPPER (M).
- Repair the bell with the CLAPPER (M) then click the BELL.
- Enter the next room then return and pick up the BROOM (N).
- Use the BROOM to clean all the leaves.
- Move the flag (O) and Pick up the VASE (P).
- Pick up the STONE SHARD (Q), BLUEPRINT (R), and the MEDALLION (S).
- Exit the temple; gather water in the VASE (P) from the fountain (L).
- Use the WATER to clean the statue (T) then click the statue.
- Move the stone to reveal an INSTRUMENT (U) and pick up the DRUM (V).
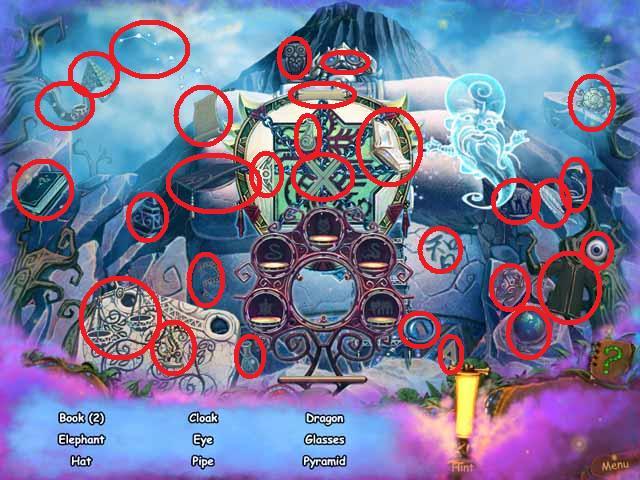
- Click on the spirit symbol (W) play hidden object scene.
- Find the items once they are listed.
- Open the ring box (1) to find the RING (2).
- Use the TORCH (3) to light the FIREWORKS (4).
- Collect the DRUM STICK.
- Move the flag (O).
- Place the MADALION (5) on the wall (14) and pick up the STONE SHARD (6).
- Replace the statues (T) INSTRUMENTS (U), (V), (7).
- Exit the tomb and pick up the OIL, just to the right of door.
- OIL (8) the statue.
- Lower the arm (9) pick up the fallen REMOTE CONTROL PART (10).
- Repair the broken remote (11) and OIL (8) all of the rust spots.
- Restore the REMOTE BUTTON (12) and slowly push it four times (13).
- Use the portal step (15).
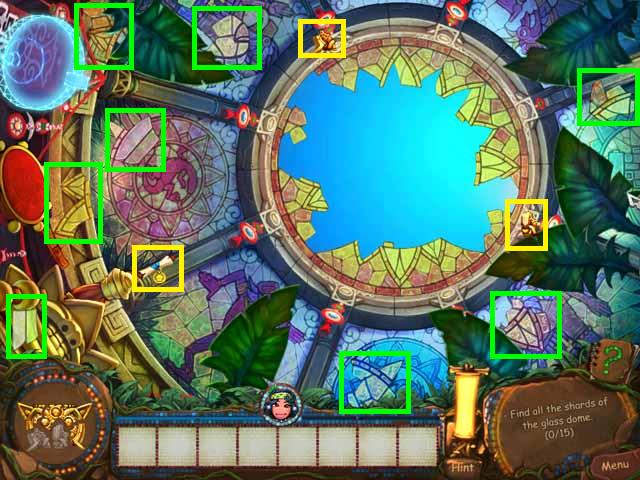
- Pick up two STONE SHARDS and BLUEPRINT shown in yellow in the screenshot.
- Pick up eight GLASS SHARDS shown in green in the screenshot and return to the other room.
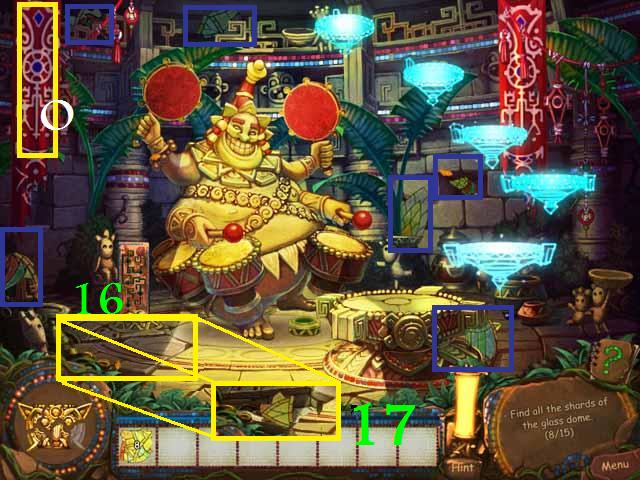
- Move the sparkly stone floor (16) to pick up GLASS SHARD (17).
- Move flag (O) to reveal GLASS SHARD.
- Pick up all seven GLASS SHARDS shown in blue in the screenshot.
- Repair the glass dome and step into the portal.
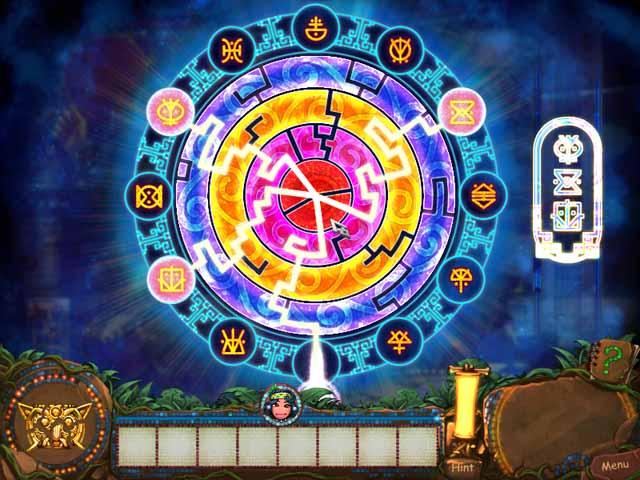
- Begin with the outer ring and spin it until all three of the shown symbols have a line leading to the middle. Continue ring by ring.
- Use the portal.
Village in the Trees
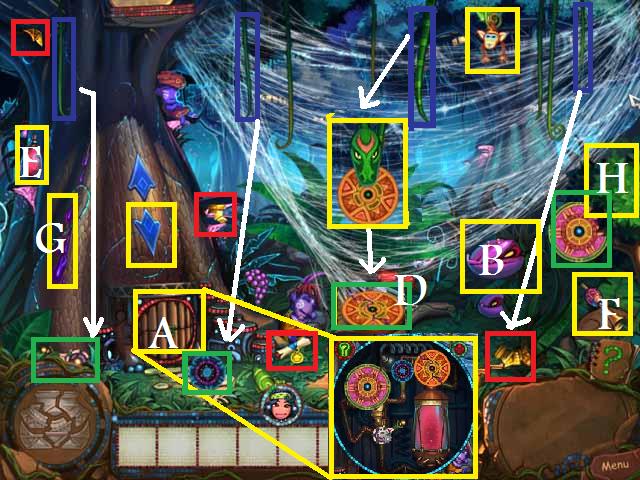
- Click the door (A) on the tree, then the venus flytrap (B).
- Click on Ivar (the monkey) several times until he gets the KEY (C) for you to pick up. Timing is important, lower him until he is just over the plant and wait for it to open.
- Open the door (B) with the KEY and zoom in.
- Pick up the FULE (E), FLUTE (F), and the STICKY WAX (G).
- Move the far right branch (H).
- Pull on the far left vine, the second vine, the snake’s tail, and the far right vine all marked blue in the screenshot.
- Charm the snake with the flute and use the STICKY WAX to repair the broken GEAR (D).
- Pick up three STONE SHARDS and the BLUEPRINT all marked red in the screenshot.
- Pick up the GEARS, and the LEVER all marked green in the screenshot.
- Fill the tank with the FUEL and replace all of the GEARS and the LEVER.
- Pull the LEVER to start up the elevator.
- Push the down arrow to lower the lift and enter the hut.
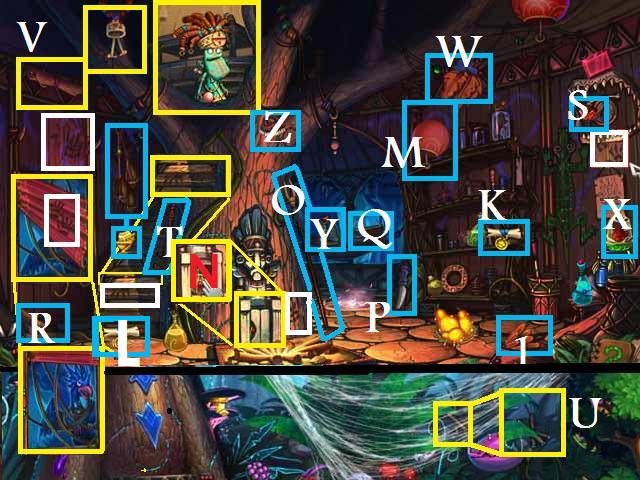
- Shake the weights hanging over the stairs and pick up the fallen STONE SHARD, and two BLUEPRINTS (K), (L).
- Pick up the LANTERN (M) and hang it on the light over the stairs.
- Click on the doctor to rouse him.
- Open the cabinet door at the trees base to get the POTION OF STRENGTH (N) and give it to the doctor.
- Click on one of the five DIRTY HANDPRINTS marked white in the screenshot.
- Pick up the brush (Z) and use to clean all of the DIRTY HANDPRINTS.
- Click the blinds.
- Pick up the FORKED STICK (O) leaning on the right side of the tree and use it to prop up the blinds, click twice.
- Cut the vines around the bird with the knife (P).
- Click the doctor to move on.
- Pick up the CALDRON (Q), BUSHWOOD (R), the FIRE POWDER (S), and the POKER (T).
- Use the POKER to pry the wood off of the second stair, and pick up the STONE SHARD that is revealed.
- Go outside and cut the spider web with the KNIFE then pick up the BUSHWOOD (U).
- Assemble the fire.
- Pick up the POTION RECIEPE (V), the CLUSTER of RED LEAVES (W), the RED SPICE (X), the EMPTY BOTTLE (Y), and the BARK of the RED TREE (1).
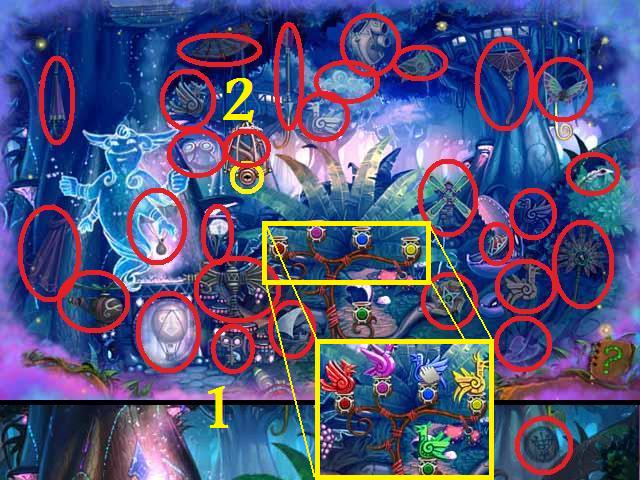
- Go outside and use the spirit world symbol to trigger a hidden object scene.
- Pick up the KEY (1) to unlock the last BABY BIRD (2).
- Put all of the BABY BIRDS on their color coded roosts.
- Pick up the AQUA VITA.
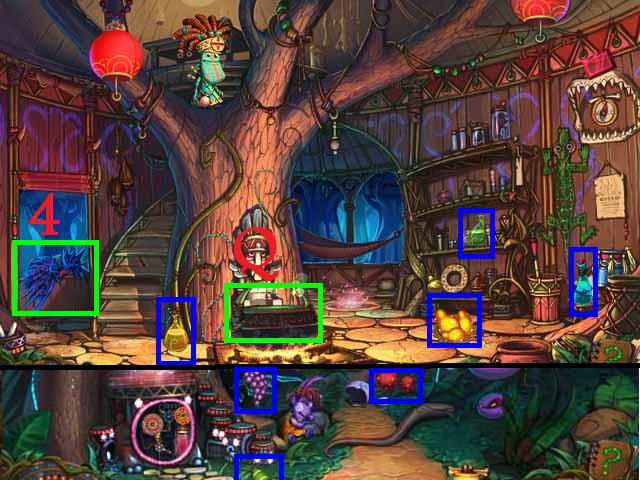
- Return to the hut and place all four ingredients in the CALDRON (Q).
- Use the EMPTY BOTTLE to pick up the potion from the CALDRON.
- Pick up the three remaining POTIONS seen in blue in the screenshot and the PEARS (3).
- Go outside and pick up the grapes, strawberries, and the limes also seen in blue in the screenshot.
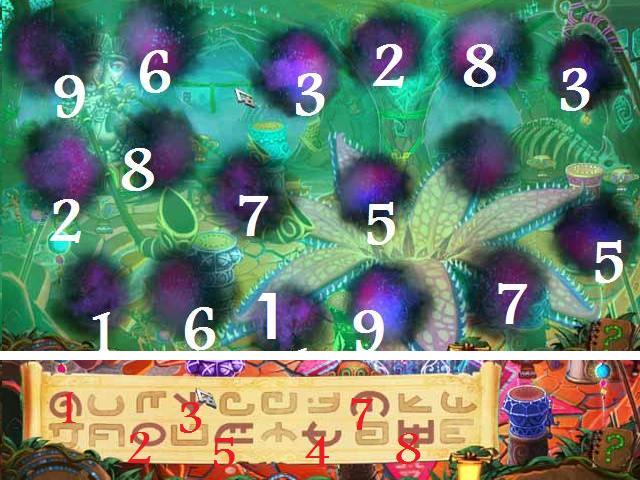
- Feed the bluebird (4) the gathered ingredients and enter mini-game.
- In this Simon says style game repeat the building sequences of ingredients by placing them in the CALDRON after they appear in the bubble.
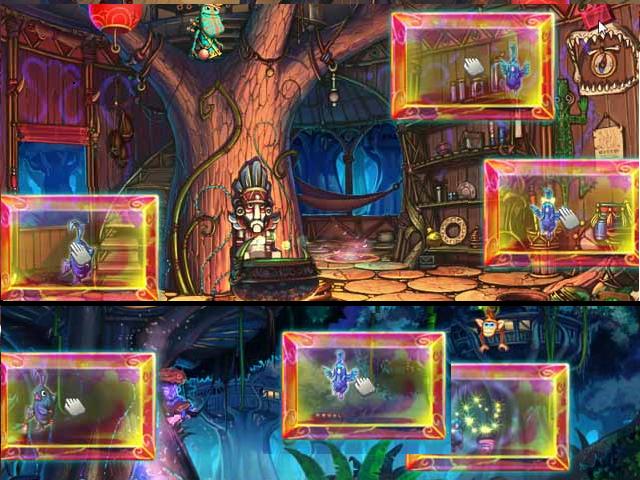
- Pick up the JEWEL (4) and use it to reveal the invisible BABY BIRDS.
- Move it slowly in a grid pattern, there are three in the hut and the rest are outside.
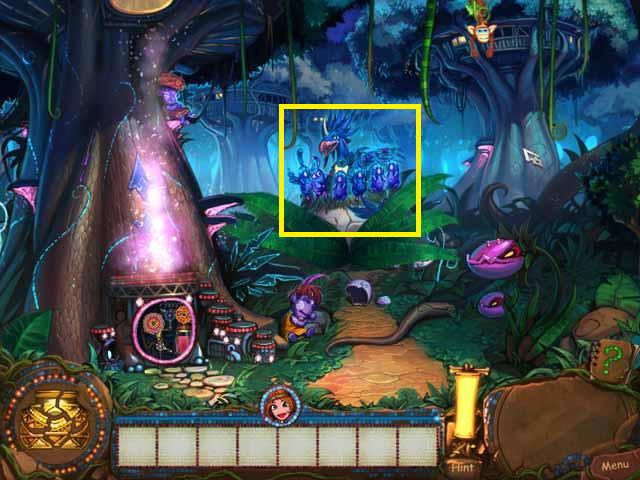
- Once you have picked up all six BABY BIRDS click on the bush (5) in the middle of the screen and drop all of the BABY BIRDS there.
- Once they are all in the nest click it once to receive your medal then use the portal to return to the map.
Jungle
- Click on the water-gate to proceed.
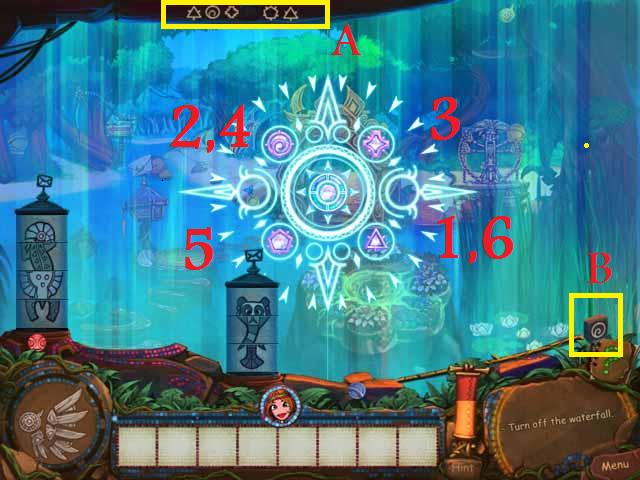
- Click on the slime at the top to reveal the symbols (A).
- Pick up the MISSING SYMBOL (B) in the lower right corner.
- Click the symbols in the same sequence they appear up top.
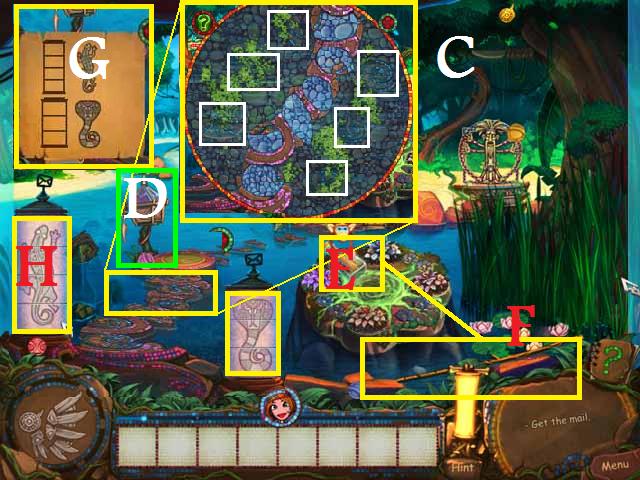
- Zoom in on the broken bridge (C) to the mailbox.
- Pick up each rock and place in the matching space.
- Click on the mail box (D).
- Click on Ivan and he will drop the BOTTLE (E).
- Retrieve the BOTTLE with the LONG STICK (F).
- Use the MESSAGE in the BOTTLE (G) to set the dials (H) to open the mailbox. Spin the panels until all three match the pictures on the MESSAGE.
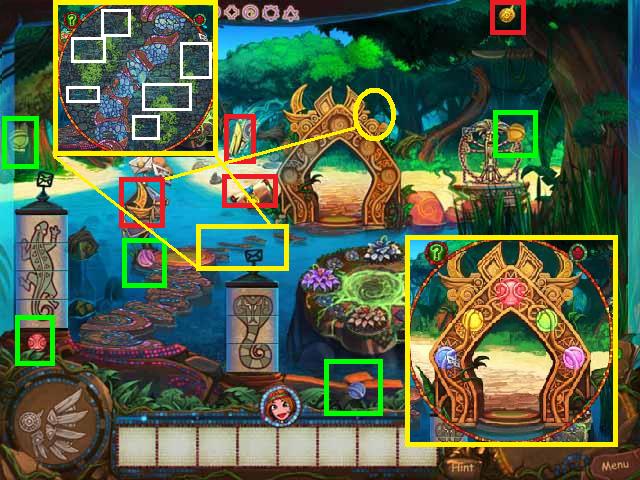
- Pick up the ship from the mailbox.
- Repair the next section of bridge (I).
- Pick up the BLUEPRINTS and the STONE SHARD all marked red in the screen shot.
.
- Place the boat on the gate’s top right side (L).
- Pick up the five STONES, marked green in the screenshot, and put in the correct open hole in the gate (M).
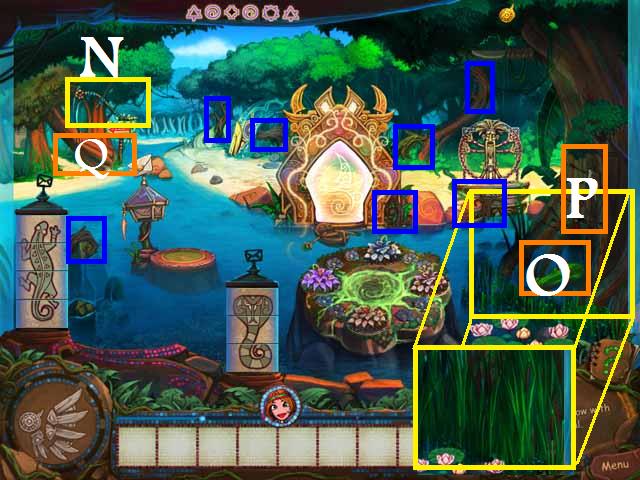
- Cut the high grasses under the far right tree with the SICLE (N).
- Click on the alligator (O) to proceed.
- Pick up the seven BRANCHES and the STONE SHARD marked blue in the screenshot.
- Place the BRANCHES over the alligator and pick up the AXE (P).
- Chop the fallen tree (Q) with the AXE and proceed down the path.
- Click on the elephant trunk (R) several times to proceed.
- Get the MAGIC CODE(S) from Ivan and return to open the mail box.
- Pick up the MAGIC CRYSTOL (T) and return down the path.
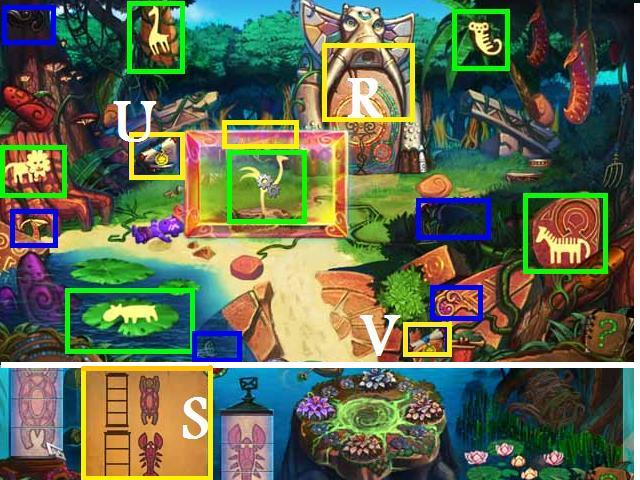
- Reveal the six hidden animals with the MAGIC CRYSTOL.
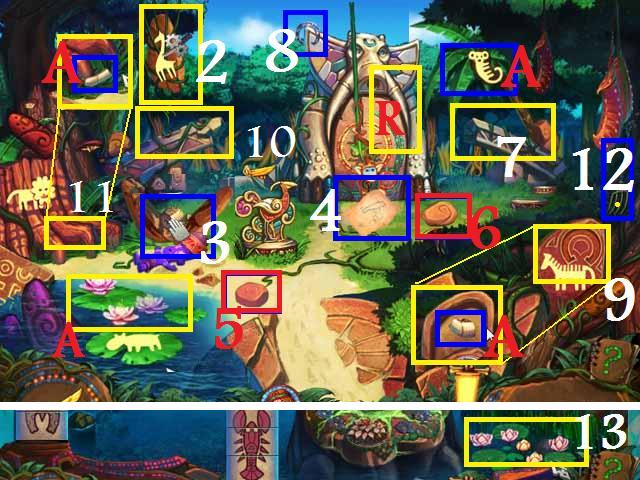
- Pick up the two BLUEPRINTS, (U), (V) and the STONE SHARD.
- Pick up the MISSING PIECES, all marked green in the screenshot and repair the ostrich stash.
- Click on the ostrich to enter mini-game.
- Click on the ostrich to start.
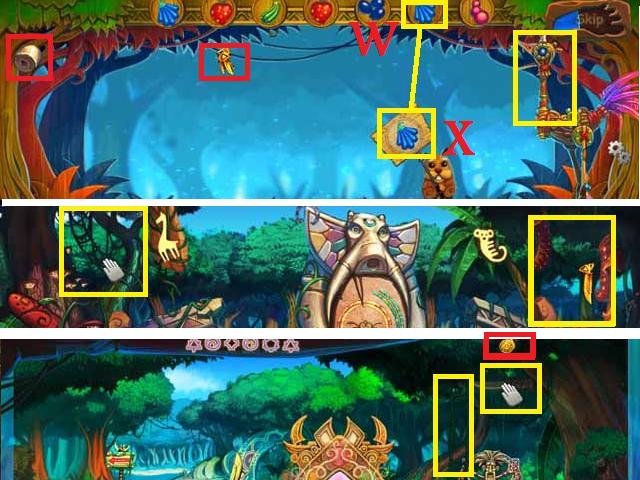
- As the goffers pop up, place matching fruit (W) on their signs (X) until each goffer has been fed three times.
- Pick up the TRUNK PIECE and the STONE SHARD marked red, and you will be taken back to the elephant.
- Move the hanging plants (Y).
- Pick up STONE SHARD (Y) and the LADDER (Z).
- Return to the main screen and use the LADDER to get the KNIFE (1), and the STONE SHARD marked red from the far right tree.
- Return down the path.
- Cut down the GIRAFFE (2) with the KNIFE and pick up a TRUNK PIECE (3).
- Click on the HORSESHOE (3) and veiw the plans (4) from Ivan when he appears.
- Pick up two ROCKS (5), (6) from the pathway.
- Drop one of the ROCKS on the catapult (7) to the right.
- Place the HORSESHOE (8) on the ZEBRA’S rock (9) and pick up the TRUNK PIECE (A).
- Pry open the LION’S tree trunk (11) with the PITCHFORK (12) and pick up the TRUNK PIECE (A).
- Drop a ROCK over the left catapult (10) to dislodge the MONKEY’S coconuts pick up the TRUNK PIECE (A).
- Go back to the main screen and pick up three LOTUSES (13) in the lower right corner.
- Place the three blooms on the hippo and Pick up the TRUNK PIECE (A).
- Repair the trunk (R).
- Zoom in on the elephant’s toes (12) to continue.
- Pick up three of the KEYS marked green in the screen shot.
- Use the spirit symbol (13) that appears to trigger a hidden object scene.
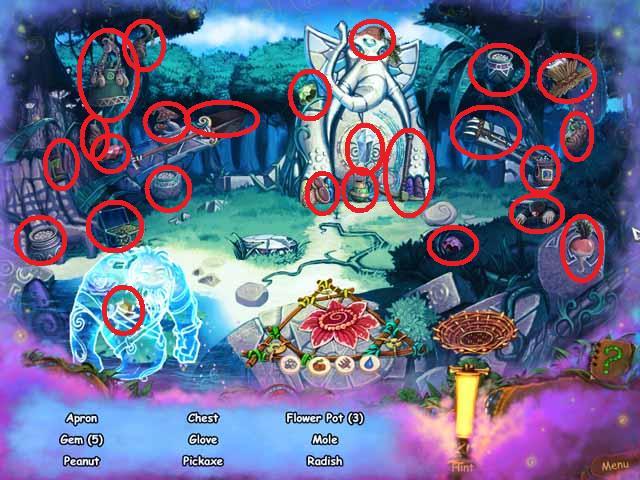
- FERTILIZE all three POTS then plant the ROOTS.
- RAKE, and then WATER the plants.
- Receive DE VEESHEE’S FILTER and return to the main screen.
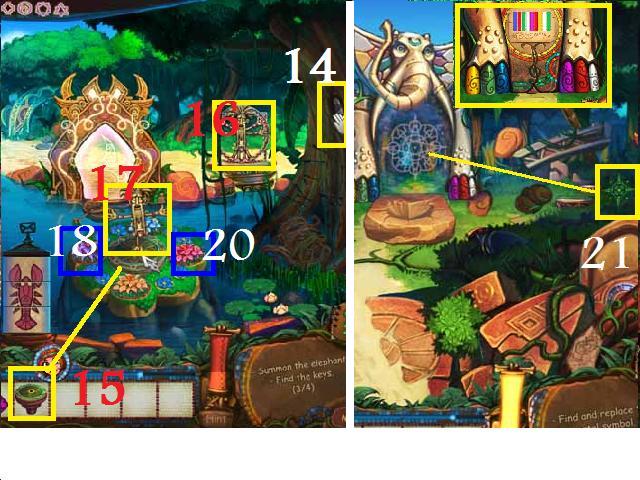
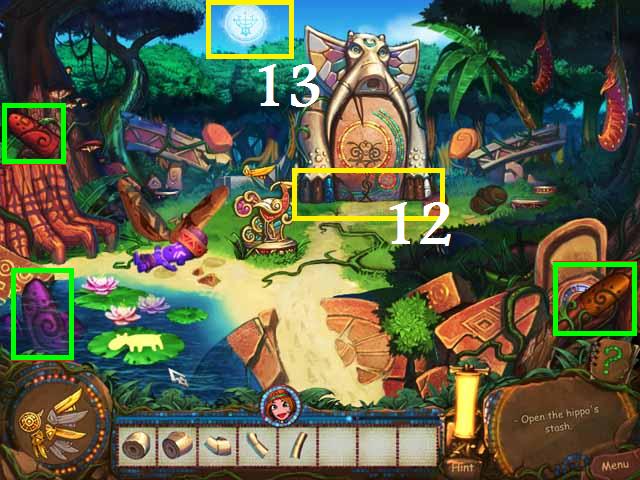
- Move the branch on the far right tree and pick up the NOTES (14).
- Put DE VEESHEE’S FILTER (15) on the flower island.
- Click on the STATUE (16) next to the gate and place the BROKEN PIECE (17) on the Clock.
- Move the flower (18) the clock hands shadow falls on and pick up the fourth KEY (19) and the final STONE SHARD (20) under the opposite flower.
- Repair the elephant’s keyboard.
- Place the NOTES above the KEYS and play the color coded sequence.
- Place the green PORTAL SYMBOL (21) and place it on the portal.
- Use the portal.
Village on the Water
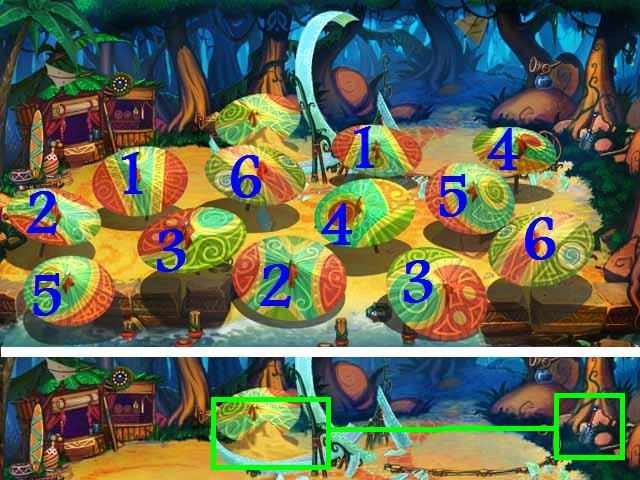
- Click on the pairs of matching Umbrellas until all but one is left open, see screenshot.
- Pick up the SHOVEL (A) and remove the sand from the last Umbrella (B) and close it.
- Move the rock (C).
- Pick up three STONE SHARDS marked green in the screenshot.
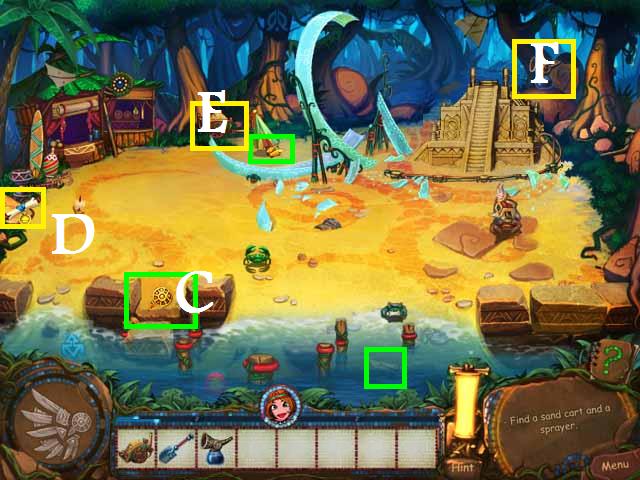
- Pick up the BLUEPRINTS (D), the SAND CART (E), and SPRAYER (F).
- Zoom in on Ivan’s sand drawing.
- Use the SANDCART, then the SHOVEL, then the SPRAYER.
- Use the same pattern to build the remaining two Sand Sculptures (SAND, SHOVEL and SPRAYER).
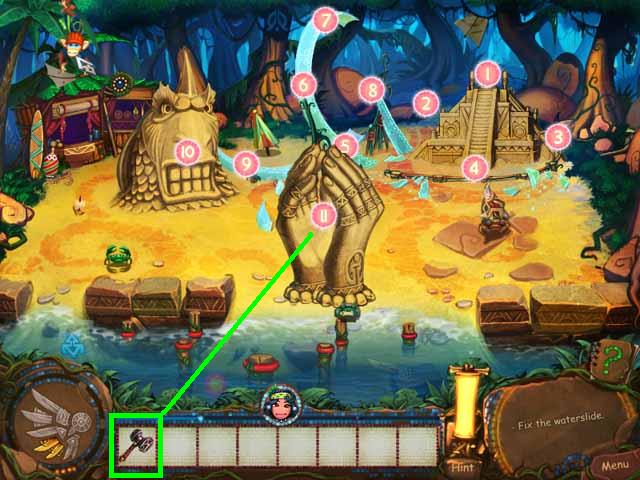
- Hammer (G) all of the Pink Dots in the order they are numbered, see screenshot. You can click on Ivan to reveal the numbers at any time, if you mess up you must restart at 1.
- Click on the slide (L).
- Move the rock (M).
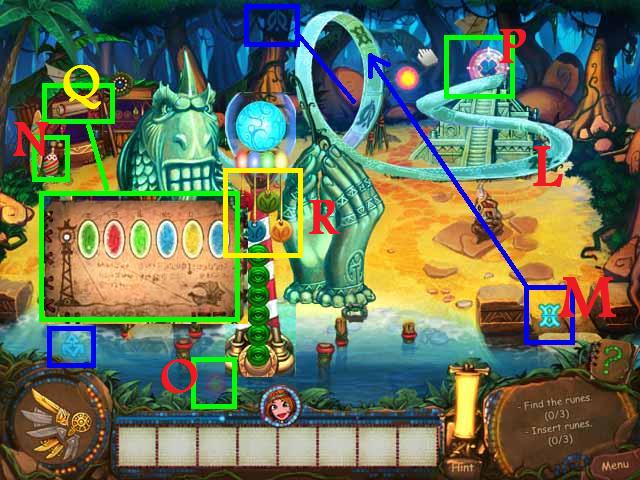
- Pick up the three RUNES marked blue in the screenshot.
- Match the RUNES to outlines on the slide.
- Use the BOBBER WITH HOOK (N) to get the RUNIC BALL (O) out of the water and place the BALL above the pyramid (P).
- Pick up the INSTRUCTIONS (Q) above the Hut Door.
- Click the Lights (R) in order of the color sequence in the INSTRUCTIONS.
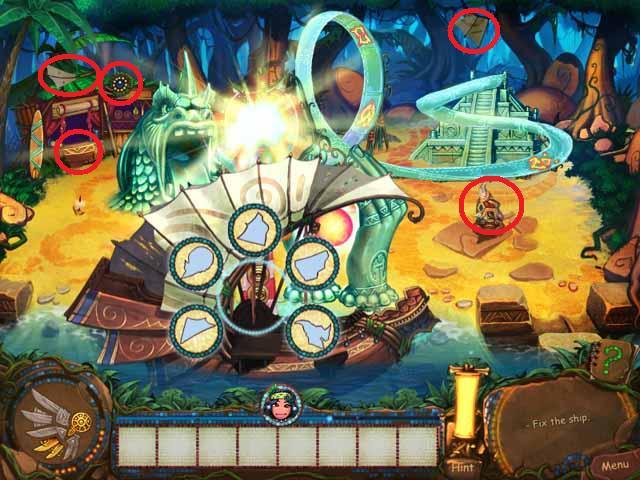
- Pick up the five SHIP PIECES marked red in the screenshot and repair the Ship.
- Shake the Hanging Cage (S).
- Pick up three STONE SHARDS and the BLUEPRINTS marked green in the screenshot.
- Pick up the three TORN DETAILS marked orange and repair the hole-cover (U).
- Use the LADDER (V) to reach the TORN KITE (Y) on the canopy.
- Pick up a KITE PART (X).
- Move the Shell (Z) and zoom in on the Secret Stash.
- Pick up the two PATTERN PIECES (1), (2) and repair the door.
- Open the stash and get a KITE PART.
- Repair the KITE (X) and attempt to put it on the statue, to continue.
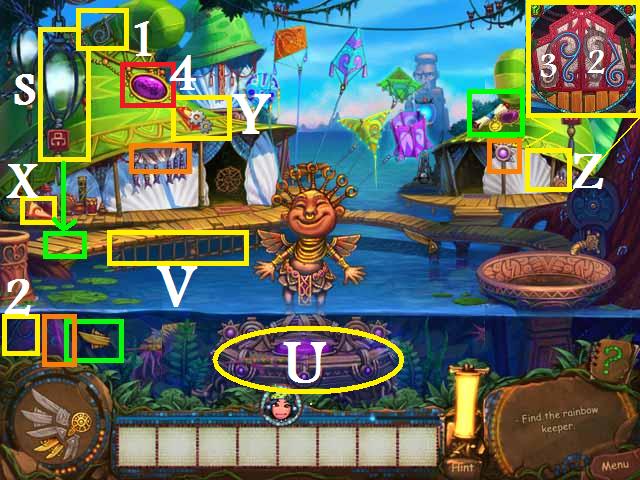
- Use the purple SPIRT SYMBOL (4) to trigger a hidden object scene.
- Open the clam shells (5) to get the PEARLS.
- Empty the three BOTTLES into the Fishbowl (6) followed by the FISH EGG. If you pick up the wrong Item first, right click to release it.
- Feed the Fish in order the SMALL FISHFOOD, the MEDIUM FISHFOOD, and then the LARGE FISH FOOD.
- Obtain the ROPE.

- Attach the ROPE (7) followed by the KITE to the statue.
- Pick up the LADDER (8), and VENT (9).
- Use the VENT as the Fountain Handle (10)and turn the water on.
- Darken its water with the SQUID (13).
- Use the LADDER to get the CAGE with CLOUD (14) and put it in the Fountain.
- Use the portal.
Maya’s Fish-House
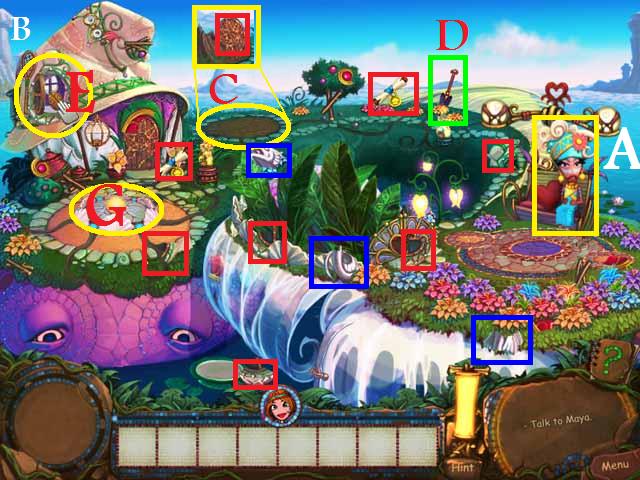
- Click on Maya (A) to continue.
- Pick up the two BLUEPRINTS and six HOUSE PARTS, all marked red in the screenshot.
- Repair the house (B).
- Dig up the tree stump (C) with the SHOVEL (D).
- Click on the sparkling window to get the SEED (E).
- Plant the SEED where the stump was (C).
- Pick up three FOUNTAIN PARTS all marked blue in the screenshot.
- Repair the fountain (G).
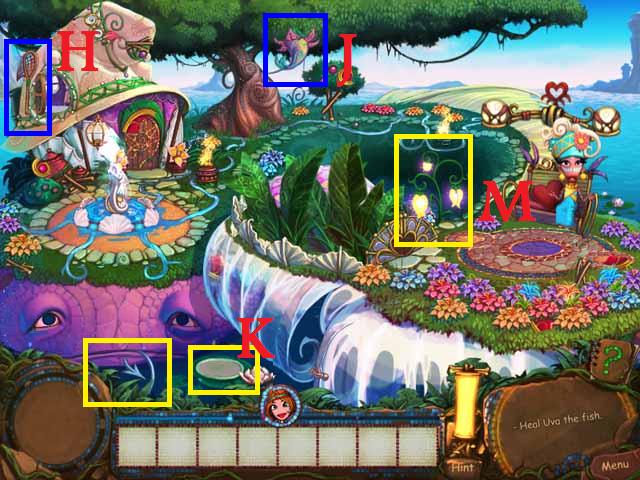
- Use the BUTTERFLY NET (H) to get the TUNA FRUIT (J) and place it on Uva’s plate (K).
- Remove the fishhook (L) from Uva’s mouth and open her mouth.
- Use the LIGHT FLOWER (M) to see in Uva’s Mouth.
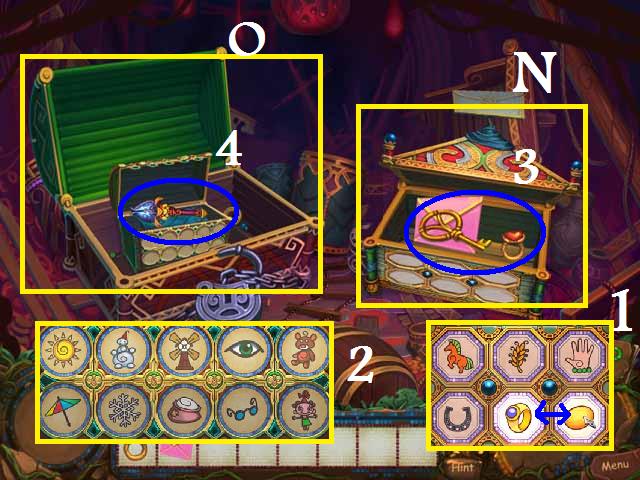
- Zoom into the mailbox (N) and solve the puzzle.
- Swap the tiles in the bottom row; match the chicken with the egg, the tree with the apple and the cow with the milk.
- Match the rabbit and carrot, the monkey and banana, and the pond and the fish.
- Match the horse and horseshoe, the hand and ring, and the wheat and bread (1).
- Pick up the RING, KEY, and ENVELOPE (3).
- Open the Chest (O) with the KEY and click the Box inside.
- Match the boast and ore, the cloud and rain drops, the house and bricks, the squirrel and nuts, and the foot and shoe.
- Match the sun and umbrella, the snowman and snow flake, the mill and bag of flour, the eye and glasses and the bear and little girl (2).
- Match the flowers and vase, the arrow and target, the cheese and mouse trap, the book and letter A, and the fire and match.
- Match the bee and honeycomb, the ostrich and paw print, the dog and bone, the tree and leaf and the wine and glasses.
- Match the lamb and fur coat, the telescope and Saturn, the fox and paw print, the pallet and brush, and the table and chair.
- Pick up the MAGIC STAFF (4).
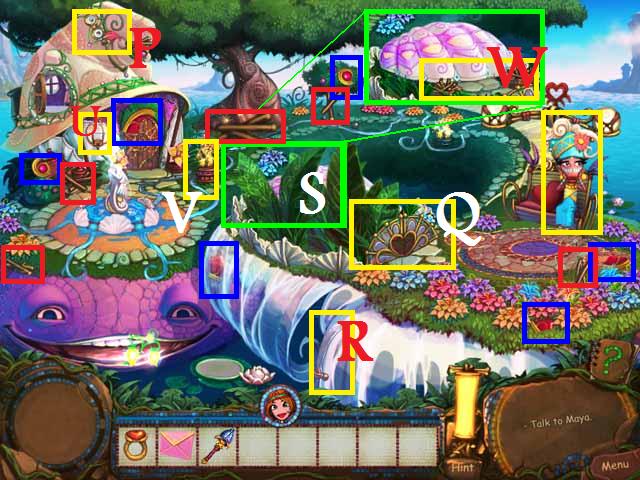
- Give Maya the MAGIC STAFF, the RING, and the ENVELOPE.
- Pick up Maya’s GLASSES (P) from the roof and give them to her.
- Pick up the six GATE PIECES marked blue in the screenshot, and repair the gate (Q).
- Open the gate.
- Pick up the MACHETE (R) and cut all of the Weeds (S).
- Pick up five bundles of BUSHWOOD marked blue in the screenshot and place in fire pits.
- Use the LAMP (U) to pick up FIRE from one of the burning pits (V) and use to light the fire pit (W).
- Return to the Shaman.
The Island of Loss
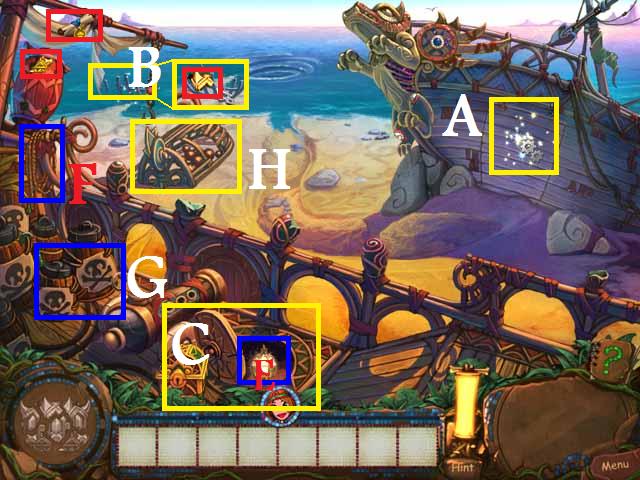
- Click on the sparkling door in the boats hold (A).
- Click on the sparkling metal in the water (B).
- Pick up two STONE SHARDS and a BLUEPRINT all marked red in the screenshot.
- Move the chest (C) and open the hatch and pick up the LAMP (E) inside.
- Pick up the WICK (F), and the POWDER (G).
- Place the POWDER, then the WICK on the small shipwreck (H) and light it with the LAMP.
- Pick up the CANNONBALLS.
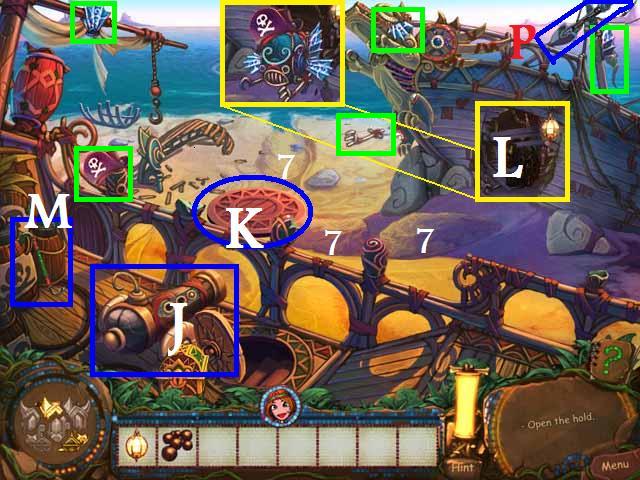
- Load the CANNONBALLS into the cannon (J) and open the hatch (K).
- Click on the cannon three times to aim it in the middle then light the wick with the LAMP.
- Light up the hold (L) with the LAMP.
- Use the CROWBAR (M) to clear the debris in the doorway.
- Pick up the five PIECES marked green in the screenshot and repair the BATHYSCAPHE (O).
- SHOVLE (P) out the ditch (7), from the BATHYSCAPHE to the water.
- Pick up the STONE SHARD that was behind the BATHYSCAPHE.
- Go underwater and return to the surface to continue.
- Pry the TERRIBLE CHUPACUBRA (Q) from the ship with the CROWBAR.
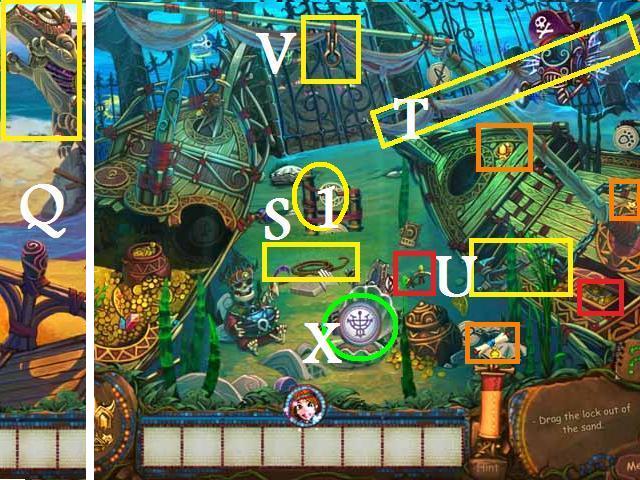
- Go underwater click on the lock (1) then the sail.
- Use the CHUPACUBRA to scare the fish.
- Remove the rock from the stingray and pick up the ROPE (S).
- Use the ROPE to tie up the Sail (T).
- Pick up two STONE SHARDS and a BLUEPRINT all marked green in the screenshot.
- Hang the ANCHOR (U) over the mast (V).
- Pick up the two WHEEL PIECES marked red in the screen shot.
- Use the spirit symbol (X) to trigger a hidden object scene.
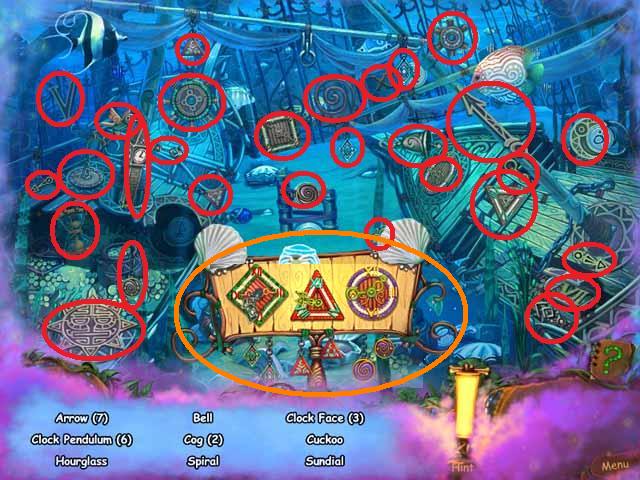
- Assemble the clock as marked orange in the screenshot.
- Clock faces first followed by the weights, then the hands.
- Move the fish and pick up the KEY (Y).
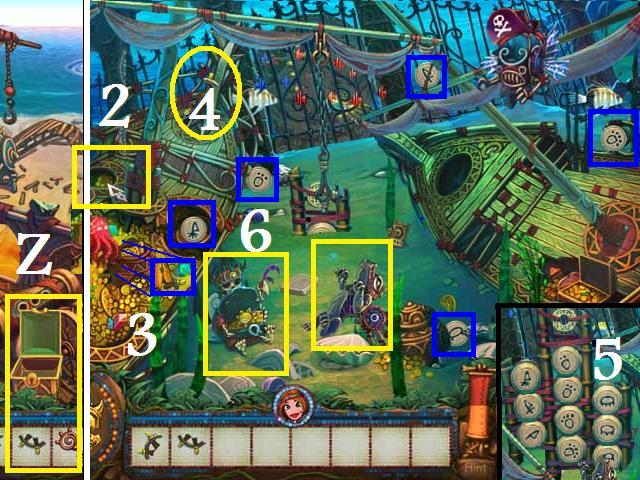
- Return to the surface and unlock the chest (Z) with the KEY and pick up a new KEY (1).
- Open the skeletons chest (6) underwater with the KEY (1) and pick up a WHEEL PIECE.
- Open the door (2) and push the octopus out.
- Pick up the final WHEEL PIECE (3) and repair the wheel (4).
- Turn the wheel (4).
- Pick up five BUTTONS, marked blue in the screenshot.
- Place the BUTTONS as seen in the screenshot (5).
- Move the CHUPUCUBRA.

- Push the BUTTONS in the order shown in the screenshot to open the gate.
- Zoom into the portal blocking the gateway (10) to activate a mini-puzzle.
- Spin the disk to open each chest, move the stones around to uncover the parts and place in the correct spot, see screenshot.
- Pick up the STONE SHARD and enter the portal.
Ice Desert
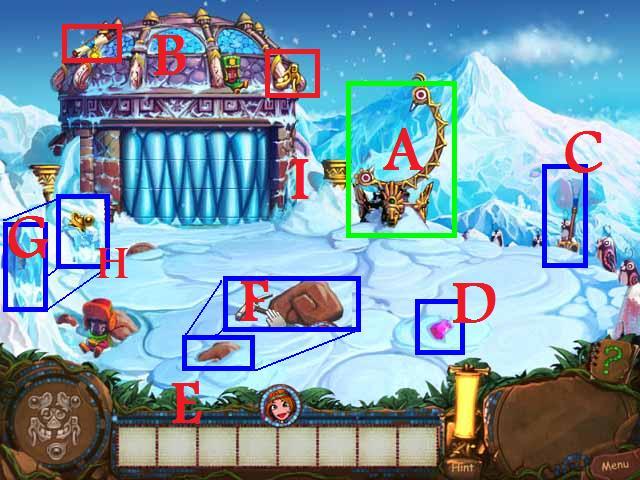
- Click on the plinth (A) then the observatory (B) to continue.
- Pick up the STONE SHARD and BLUEPRINT marked red in the screenshot.
- Use the SHOVEL (C) to clear the Snow from around the observatory.
- SHOVEL out the pink CRYSTAL (D).
- Dig out and move the stone (E) and pick up the PICKAXE (F).
- Break the ice (G) with the pickaxe and pick up the STONE SHARD (H).
- Open the door (I) using the arrows spin the rows left and right until the all of the rows match. Begin with the bottom row and match it to the perimeter.
- Go inside the observatory.
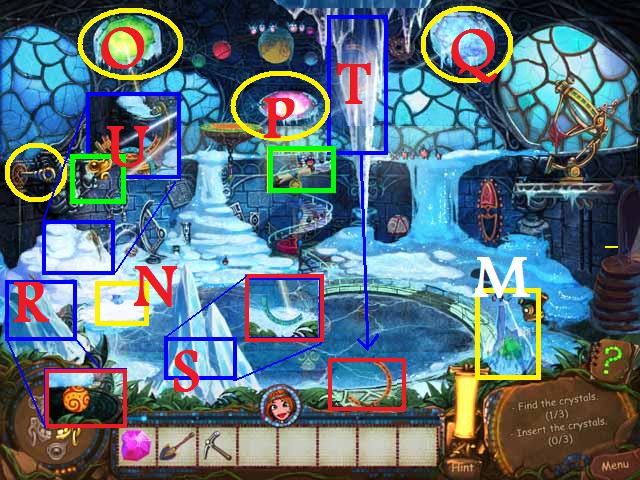
- Pick up the STONE SHARD and BLUEPRINT marked green in the screenshot.
- PICKAXE the ice (L) and pick up the green CRYSTAL.
- Dig out the blue CRYSTAL (N).
- Place the CRYSTALS in the windows, Green (O), Pink (P), and Blue (Q).
- Pickaxe the two Ice Peaks (R), (S) as well as the Hanging Icicle (T).
- Click on the generator (U).
- Pick up the three GENERATOR PIECES marked red in the screenshot.
- Repair the generator and pull the lever (U).
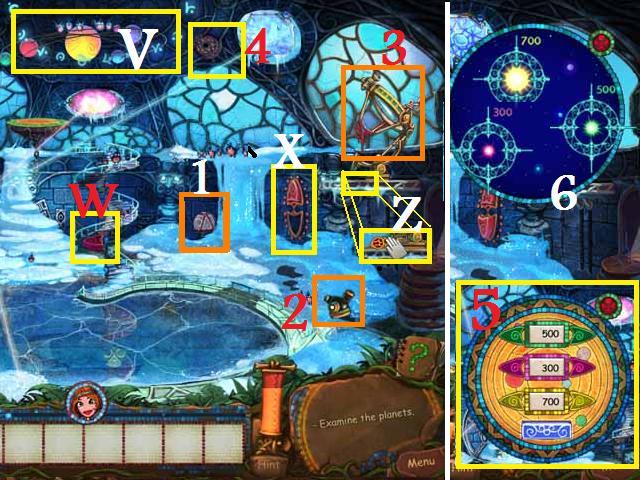
- Click the planets (V) to see the remote and continue.
- Click the telescope (3) then pick up the missing BUTTON (W).
- Repair the remote (X) and lower the lift.
- Pick up the SWITCH (Z) from the lift.
- Pick up the two TELESCOPE PARTS (1), (2) and repair the telescope (3).
- Put the SWITCH in the slot (4) and open the window.
- Raise the telescope.
- Click the telescope to continue.
- Click the different planets (6) to get their coordinates.
- Enter the coordinates into the remote using the arrows, (5), top 500, middle 300, bottom 700, and hit enter.
- Close the window.
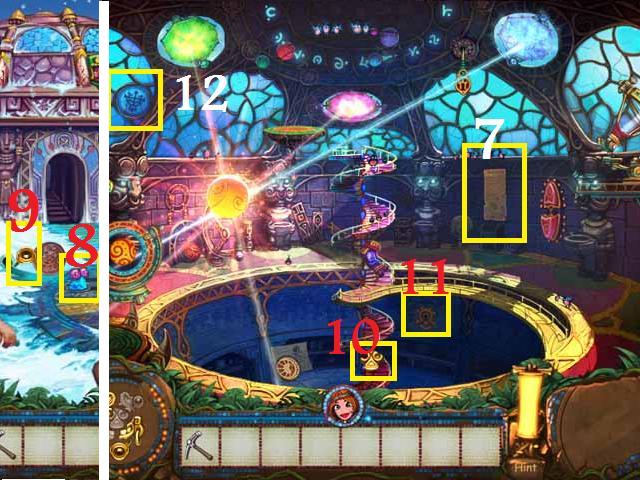
- Click the map (7) on the wall for your next step.
- Go outside.
- Move the stone statue (8) and pick up a STONE SHARD (9) from the drain.
- Go into the observatory.
- Pick up the STONE SHARD (10) from the stairs.
- Click on the key hole (11).
- Use the sprit symbol (12) to trigger a hidden object scene.
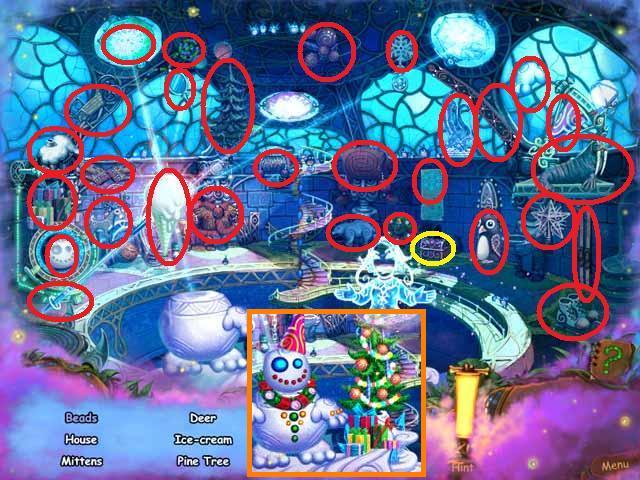
- Open the chest to get the BEADS.
- Put the PRESENTS under the tree, and decorate it (GARLAND first).
- Place the HEAD on the snowman, followed by the BEADS, HAND, HAT, and REEF.
- Receive KEY.

- Put the KEY in the key hole (11) in the observatory and pick up the BLACK MATTER (15).
- Put the BLACK MATTER in to the plinth (A).
- Pick up the ZODIAC SYMBOL (16) from inside the observatory.
- Outside put the SYMBOL on the pyramid (B).
- Click the BLACK MATTER to trigger a mini-game.
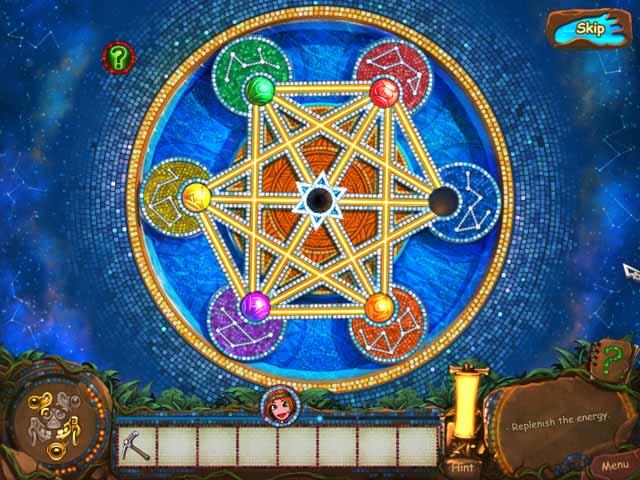
- Move the balls one at a time until each one ii in its matching color point.
- One solution from the start; move the yellow ball then the purple followed by, yellow, green, orange, green and lastly the red ball.
- Pick up the STONE SHARD.
- Enter portal.
Watch Towers
- Pick up two STONE SHARDS and two BLUEPRINTS marked red in the see screenshot.
- Click the shell (A) and the Key Master, a turtle (B) to continue.
- Move the log and pick up a nest PIECE (E).
- Pick up the two of the nest PIECES marked blue in the screenshot and repair the nest (C).
- Pick up the MEDALLION (F) and give to the Key Master.
- Open the shell and pull the lever (H).
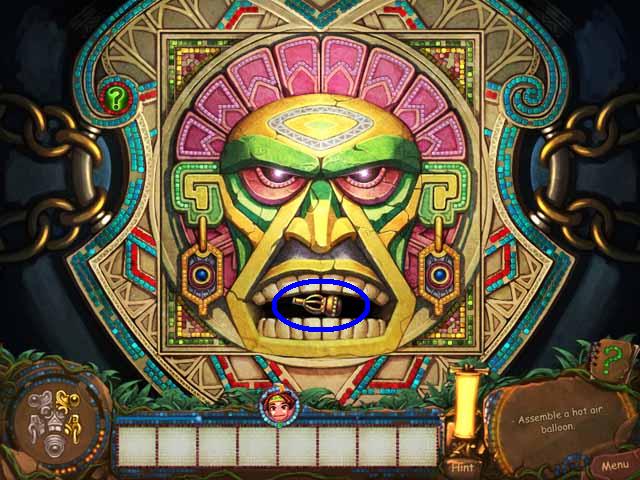
- Pick up the two PERALS marked green in the screenshot, and hang on the tower (I) then pull the lever.
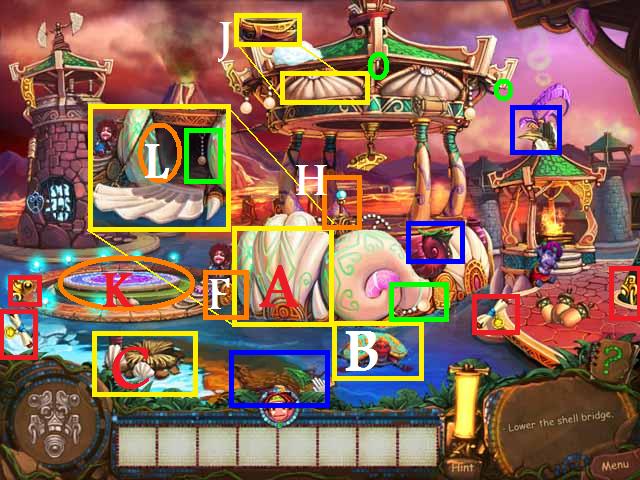
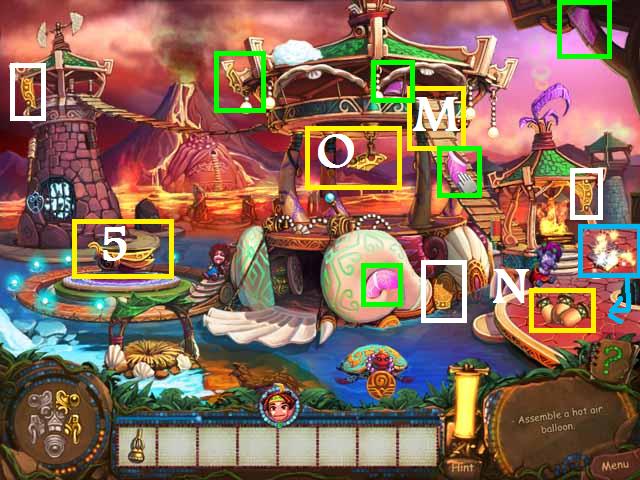
- Pick up the HOT-AIR BALLOON BASKET (J) and place on the launch pad (K).
- Click the sparkles inside the shell gate (L) to enter mini-game.
- Click each square until it is positioned correctly, it is always good to start with your corners, see screenshot.
- Receive the BALLOON PART.
- Lower the bridge (M).
- Collect all of the BALLON PARTS marked green in the screenshot and repair it the balloon (5).
- Pick up the EMPTY VESSELS (N).
- Pick up the GONG PIECES, marked white in the screenshot and repair the gong (O).
- Click on the gong then the raised stones (P) to enter a mini-game.
- Solve the puzzle see screenshot and pick up the STONE SHARD and the CLAPPER.
- Bang the gong with the CLAPPER.
- Fill the EMPTY VESSELS with the fallen snow (Q) and place on the BASKET.
- Light the TORCH (S) with the fire (T) and light the BALLOON.
- Click on the sparkling stones on the tower (U) to enter a mini-game.
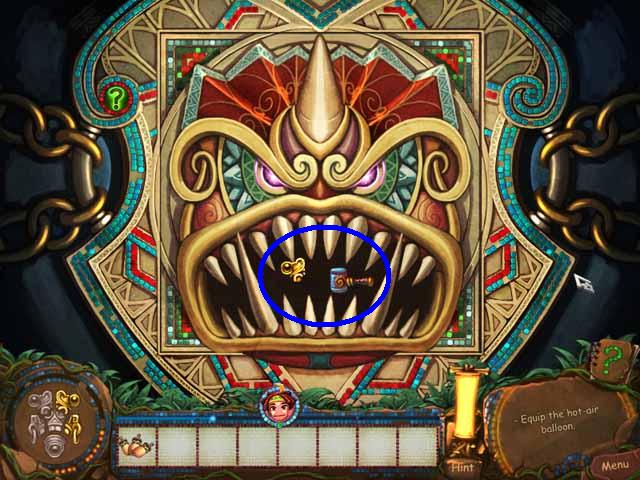
- Solve the puzzle and pick up the KEY (V).
- Unlock the tower to free the pilot.
- Travel through the volcano gates (X).
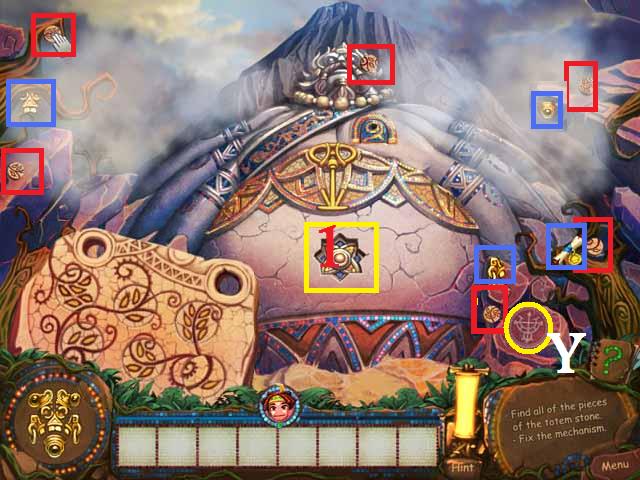
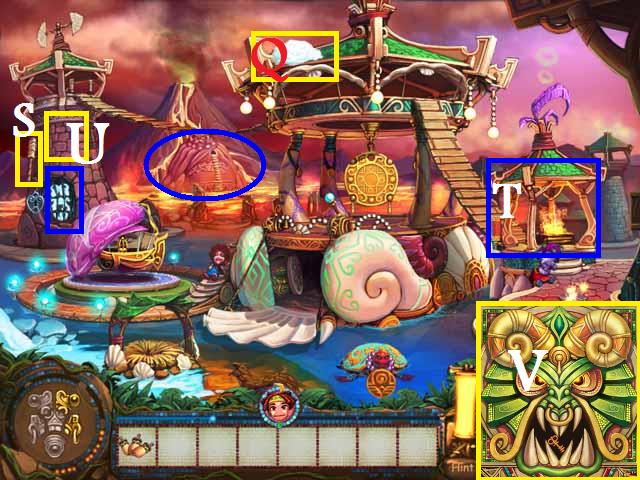
- Pick up three STONE SHARDS and the BLUEPRINTS all marked blue in the screenshot.
- Click the statues bellybutton (1).
- Pick up the six BUTTONS marked red in the screenshot.
- Place each BUTTON in its specific hole and rotate it into the correct position.
- Click the BUTTON with one leaf, followed by two leaves, three, four, five, and then six in order.
- Push the spirit symbol (Y) to trigger hidden object scene.
- Place the animal statues in the slot with their shadows (Z) and receive the HAMMER.
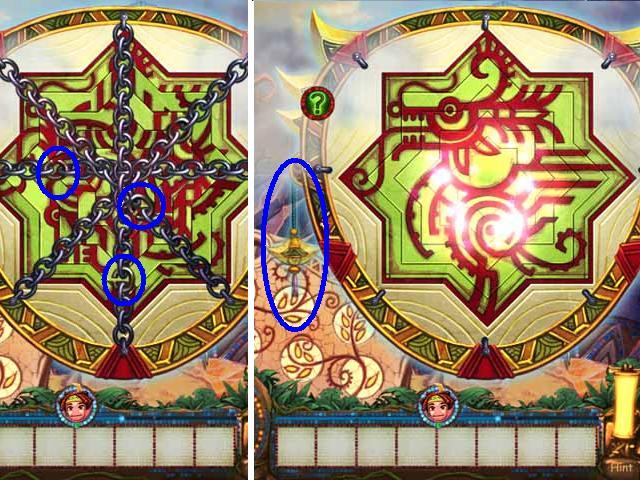
- Use the HAMMER on the broken links in each chain.
- Click on the outer ring and use the ropes to rotate it to the correct position, repeat for each ring moving in.
- Pick up the KEY.
- Unlock the door, just under the statues neck, with the key.
- Enter the Portal.
Volcano
- Move the rock (A) at the base of the tree.
- Try to pick up the STONE SHARD hanging on the ladder.
- Move the stone on stairs (B).
- Pick up the ladder RUNGS marked blue in the screenshot.
- Replace the ladder’s (C) four RUNGS.
- Pick up two STONE SHARDS and BLUEPRINT all in red in the screenshot.
- Click on the mill (E).
- Click on the well then move the rock (D) at its base.
- Pick up the BLADE PIECES seen in green in the screenshot.
- Repair the MILL BLADE (E).
- Zoom into flowing lava (G).
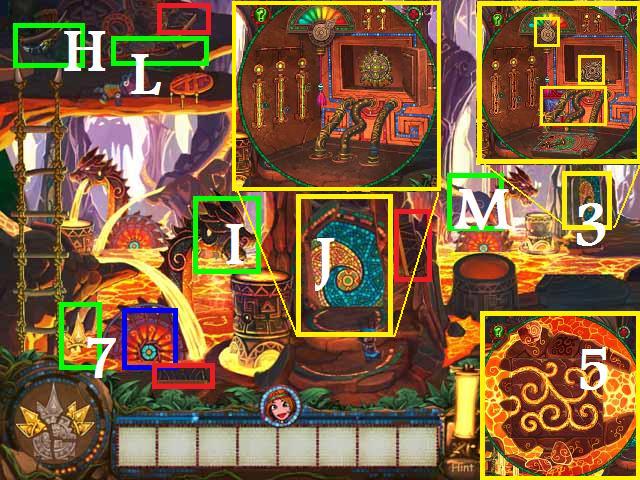
- Swap the tiles and reposition the rocks so that the lava flows freely, see screenshot (5).
- Pick up a STONE SHARD (7).
- Pick up the LEVER (H) and use it to change the direction of the Mill.
- Knock the rock out of the dragons mouth (I).
- Zoom in on elevator door (J).
- Click the elevator (3) in the background to proceed.
- Zoom back on to the front elevator (J) and pick up the PASSAGE STONE.
- Pick up the PASSAGE STONES marked red in the screenshot.
- Repair the walk way (K).
- Use the SPEAR (L) to knock the rock (M) off of the far Mill.
- Zoom into the back elevator (3) and collect the TUBES, MOTOR, SWITCH, ARROW and DOOR HANDLE.
- Zoom into the front elevator (P).
- Open the door (Q) with the handle to place the motor and replace the remaining parts.
- Set the levers as they were in the back elevator(R) and pull the handle, see screenshot.
- Take the elevator.
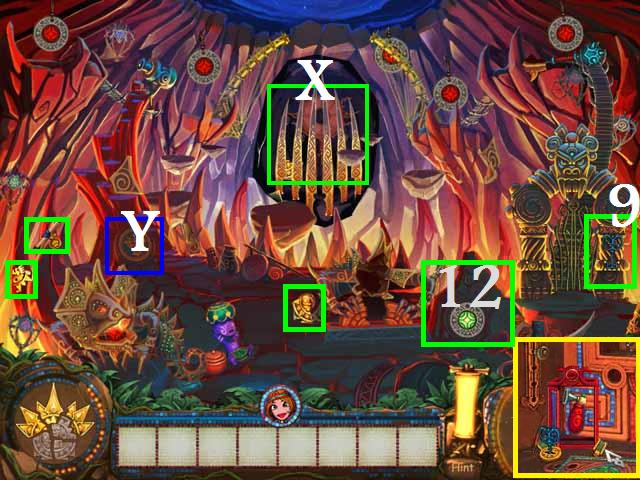
- Pick up two STONE SHARDS, BLUEPRINT and the marked green in the screenshot.
- To pick up the KEY (9) you need to click on the stone with the missing button (12).
- Go back out side and unlock the chest in the far elevator (3) and pick up the FIRE EXTINGASHER (T).
- Use the FIRE EXSTINGUSHER on the salamander (U) and pick up the BUTTON (12).
- Push the button to remove a needle.
- Click the head on the gate (X) then use the spirit symbol (Y).
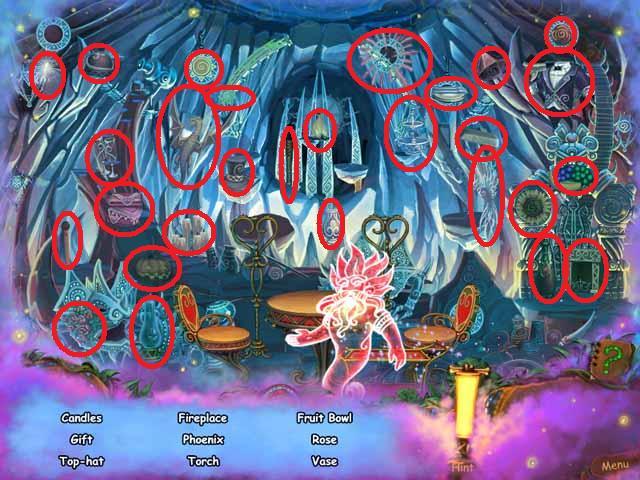
- Place the TABLE CLOTH first then, the VAUSE, GLASSES, FRUIT BOWL, FRUIT, FLOWERS, WINE, CANDELS, and the PLATES.
- Receive the BONE.

- Open the gate with the BONE and push the buttons.
- Repair the salamander and push all the buttons.
- Zoom in to telescope (Z) and solve puzzle.
- Use the MACE (1) to free the Islands (2) and pick up a STONE SHARD (3).
- Zoom in on the portal.
- Pick up five CAGES marked red in the screenshot.
- Hang the CAGES on the portal (4).
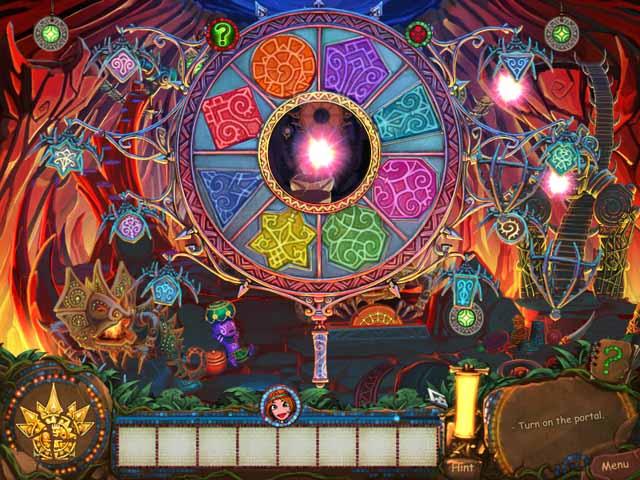
- Rearrange the symbols as seen in the screenshot.
- Go through the portal.
Cave of the Warlock
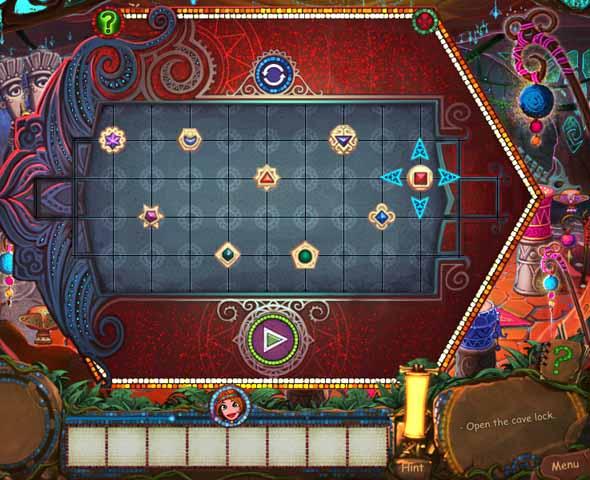
- Zoom in on the recessed floor (E) solve the puzzle by grabbing SYMBOLS that appear in a different color disk and placing them into the matching disk.
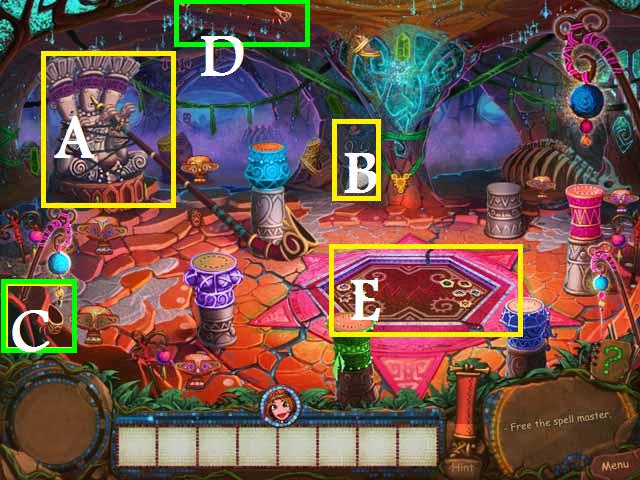
- Click on the Spell Master (A) then cut his rope and blindfolds with the SCISSORS (B).
- Pick up the two FLUTES (C), (D) and place them on the Spell Master.
- Zoom in on the floor (E) and solve the puzzle by placing the symbols in the correct positions and press play, see screenshot for solution.
- When the puzzle is solved you will be given the STAFF to use on the Flower Child (G).
- Place the three CRYSTALS marked blue in the screen shot, on the Spell Master’s base (H).
- Solve the puzzle by clicking on the matching pairs of Volco until only one is left, see the screen shot.
- Click on the last one left.
- Move Volco (I) into the Flower Child (J).
- Pick up three DRUM PIECES marked in red and repair the drum (3).
- Place the ASSISTANTS marked green in the screenshot, on the matching color drums.
- Click the matching symbols on the scroll as they are over the Flower Child. See the screenshot (K) for the order.
Tulula Village
- As you earn credits (point from game play) and you collect BLUEPRINTS from different locations you can return to the Village and begin to rebuild.
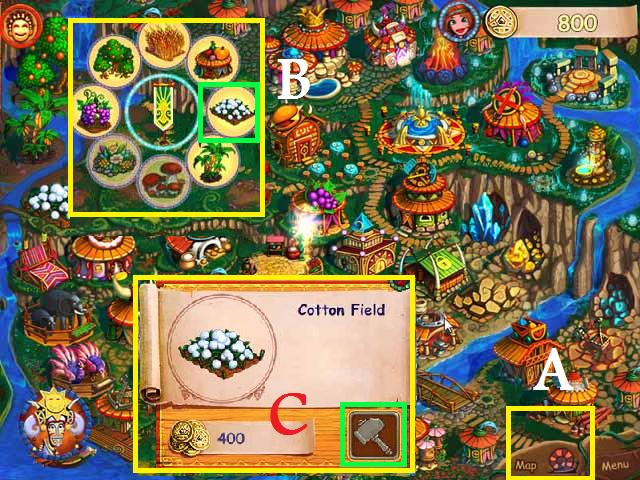
- Once in the village you can return to the map room with the button in the bottom left corner (A).
- Click on the different flag poles and choose the building (B) you wish to build then press the hammer (C).
- If you have not picked up the BLUEPRINTS and or do not have enough credits you will have to return to game play before can build that building.
- Once you beat Valco at the end the credits will automatically roll but you can return to the game and finish building the Village.
- Congratulations! You have completed Tulula: Legend of a Volcano!


 Lost Chronicles: Fall of Caesar Walkthrough, Guide, & Tips
 The Mirror Mysteries 2: Forgotten Kingdoms Walkthrough, Guide, & Tips
 Destination: Treasure Island Walkthrough, Guide, & Tips
 Time Dreamer: Temporal Betrayal Walkthrough, Guide, & Tips
 Mayan Prophecies: Blood Moon Walkthrough, Guide, & Tips