Golden Trails 2: The Lost Legacy Walkthrough, Guide, & Tips
Golden Trails 2: The Lost Legacy Walkthrough

Welcome to the Golden Trails 2: The Lost Legacy Walkthrough!
Travel back to the 18th century and uncover the secrets of bygone days with Golden Trails 2: The Lost Legacy!
Whether you use this document as a reference when things get difficult or as a road map to get you from beginning to end, we’re pretty sure you’ll find what you’re looking for here.
This document contains a complete Golden Trails 2: The Lost Legacy game walkthrough featuring annotated screenshots from actual gameplay!
We hope you find this information useful as you play your way through the game. Use the walkthrough menu below to quickly jump to whatever stage of the game you need help with.
Remember to visit the Big Fish Games Forums if you find you need more help. Have fun!
This walkthrough was created by Chie, and is protected under US Copyright laws. Any unauthorized use, including re-publication in whole or in part, without permission, is strictly prohibited.
General Tips

- From the main menu you can change the current player, play the game, and set options – including music, sound, screen size, and custom cursor.
- Finishing the game will also unlock the trophies and the Unlimited Mode on the main menu.
- Unlimited Mode lets you play lets you replay the Hidden Object Scenes.
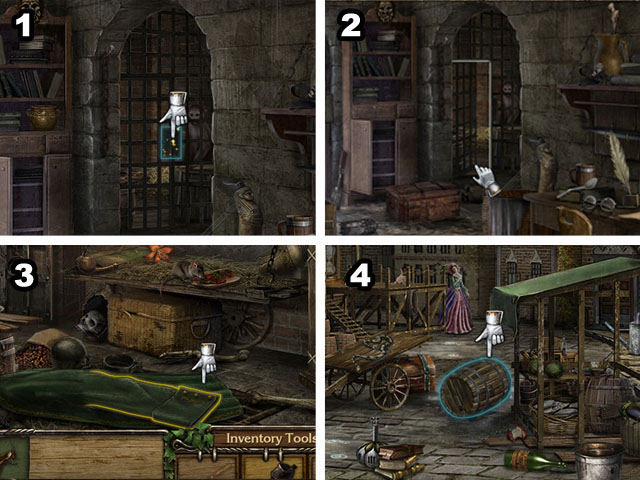
- Things that you can interact with in the game are surrounded in sparkles and circled in blue when you mouse over them (1) this will bring up another screen when clicked.
- Exits to other areas are highlighted in white (2).
- Things that you can move out of the way are highlighted in yellow (3).
- Things that you need to use inventory items on are also highlighted in blue (4).
- Make sure to find as many clovers as you can, because if you do not find enough you will not be able to play the extra episode (Episode 6).
- After you finish a scene you cannot go back, so try to find the clovers before you find the hidden objects.
- Sometimes pirates will pop up on the screen; click on them quickly to get more hints.
- Don’t skip the shooting range game at the end of the levels; it’s a good way to get clovers.
Episode 1: England
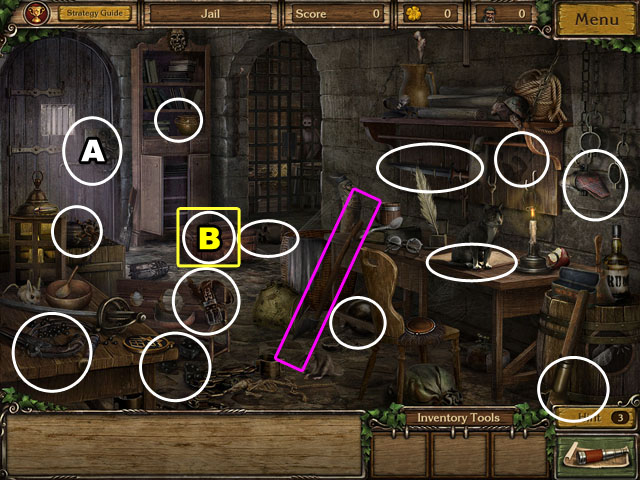
- Click the object on the door (A) to finish the first step of the tutorial.
- Find all the other objects highlighted in white.
- The objects in this game are randomized and may be different in your play-through.
- The yellow objects are either INVENTORY TOOLS which will go in your inventory to the right or objects hidden behind something.
- The next step of the tutorial has you find the AXE, it is highlighted in purple.
- The bag object can be found by opening the chest highlighted in yellow (B).
- The paper object is under the cat but cannot be collected yet.
- Once you have found everything other than the paper, you will be taken to the map.
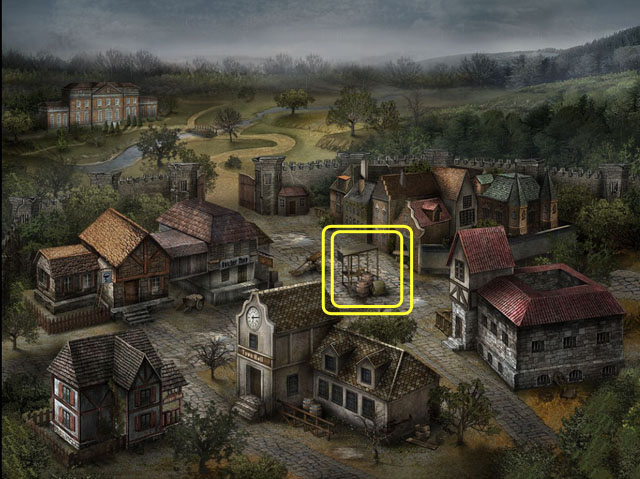
- Click on the square to travel there.
- You can get to this map by clicking on the map in the bottom right corner of the screen.

- Use the AXE to break the barrel (C).
- Find the hidden objects highlighted in white.
- There are two inventory objects highlighted in purple: the KEYS and the LETTER CUTTER.
- The pipe is hidden behind the trees on the right.
- The bracelet is behind the newspaper on the left.
- The button is behind the bottle at the bottom.
- You can only find those objects when they are in the panel at the bottom of the screen.
- Return to the jail using the map.
- Open the gate with the KEYS.
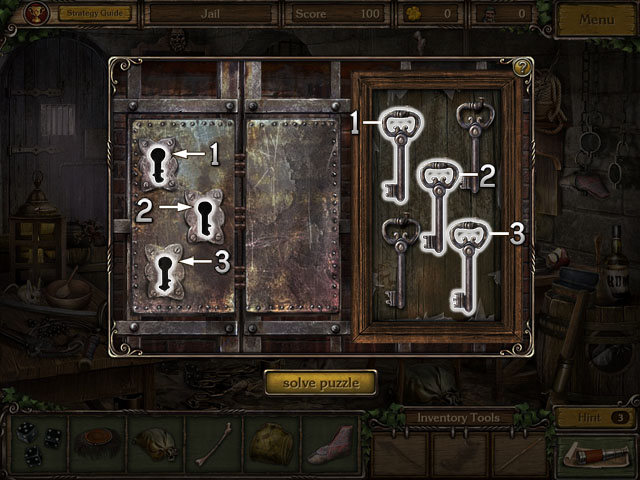
- Each key on the right fits only one hole on the left.
- Pick up the keys to see what the end looks like and compare it to the holes.
- See the screenshot for the correct solution.
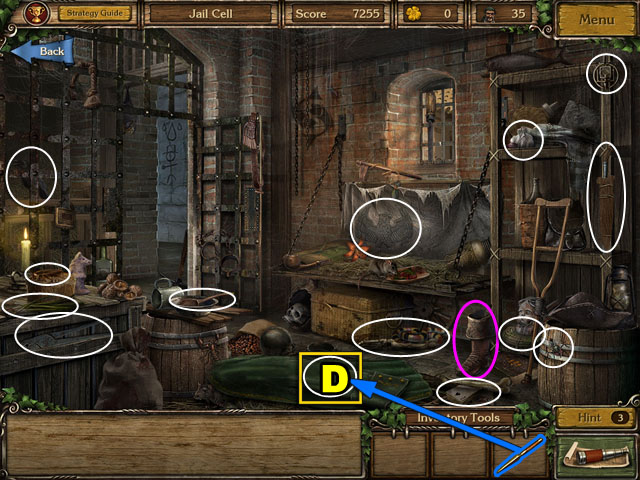
- Find the hidden objects highlighted with white.
- When the document is on the list at the bottom click on the arm of the green jacket.
- Open the letter with the LETTER CUTTER (D) and click on it to read it.
- Collect the BOOT highlighted in purple.
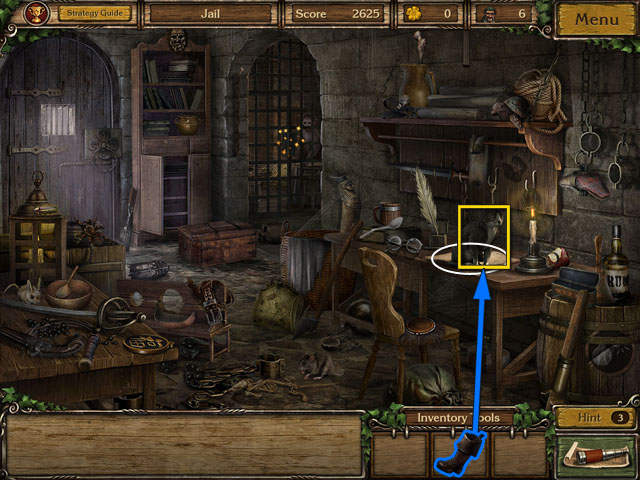
- Return to the previous room.
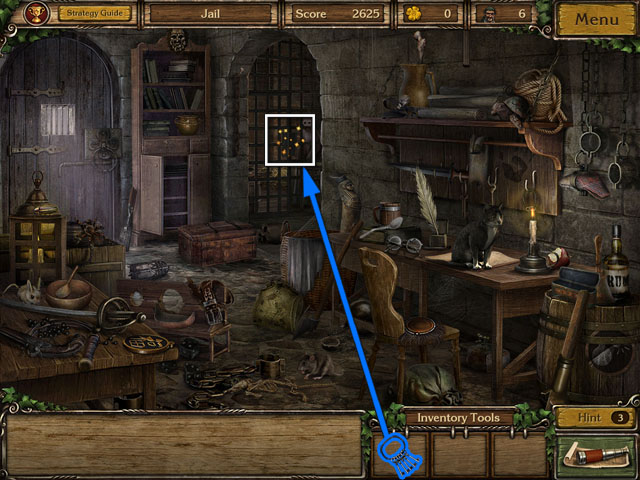
- Use the BOOT on the cat to shoo it away.
- Take the book to finish this hidden object scene.
- You will be taken to the map after finishing.
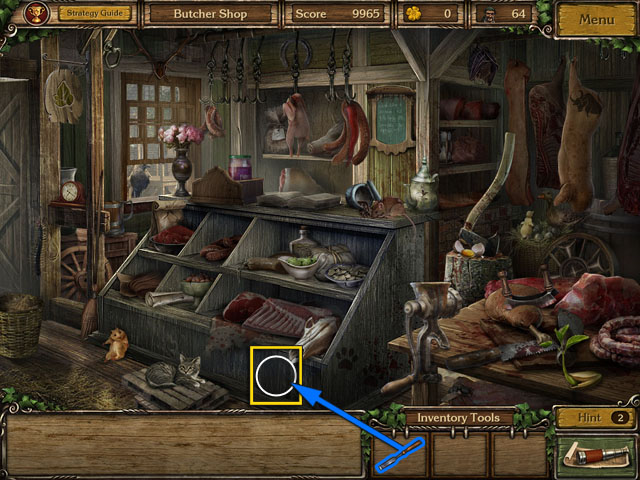
- Travel to the Butcher Shop.
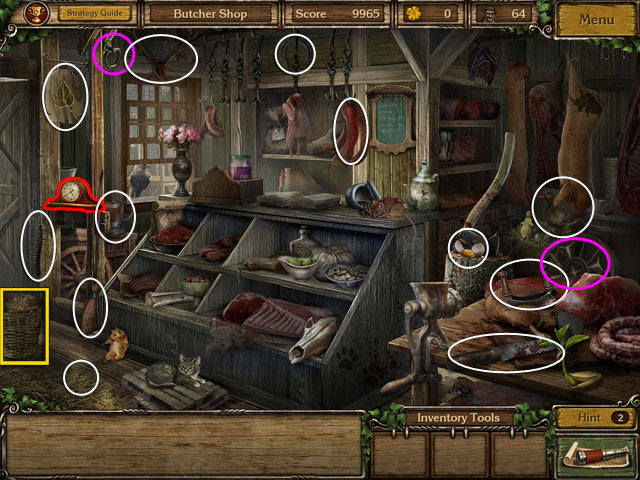
- Find the Lost Item highlighted in red. This is a Trophy that you can earn.
- Find the hidden objects highlighted with white.
- There are two inventory objects highlighted in purple: the CROSS EMBLEM and the HANDLE.
- The hidden object in the basket circled in yellow.
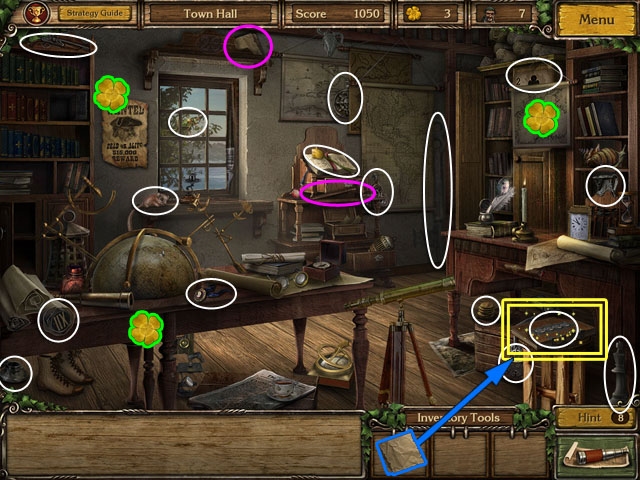
- Travel to the Town Hall next.
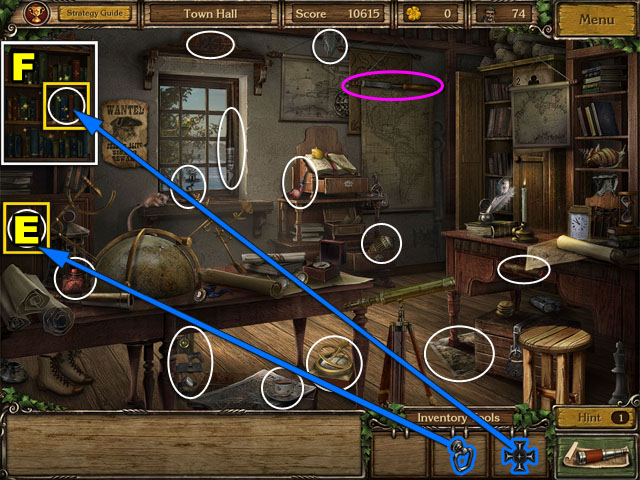
- Find the hidden objects highlighted with white.
- Place the HANDLE on the shelf (E).
- Open the shelf to collect the stone emblem.
- The WOODWORKING TOOL is circled in purple.
- Click on the bookshelf in the corner to start the next puzzle and unlock the notebook (F). It will have stars coming from it when it is available.
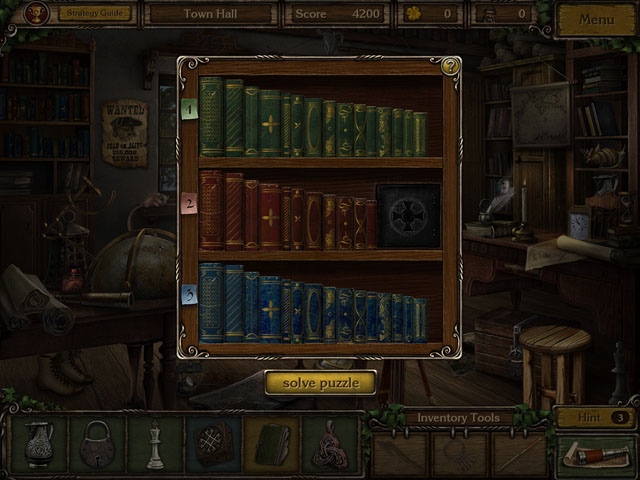
- Sort the books by color and size.
- The books should go in the shelf with the same color sticky note at the left side.
- Put all of the books in the correct shelves by switching their places first.
- Organize the books on each shelf. Take the largest book and switch it with the book on the left, then do the next largest with the 2nd book from the left and so on.
- Once all of the books have been placed correctly you will go back to the first scene.
- Place the CROSS EMBLEM in the book shelf and collect it the notebook to finish this Hidden Object Scene.
- Open the piece of wood bottom of the counter with the WOODWORKING TOOL to finish this scene.
- Collect the medallion.
- Travel to the Mansion on the map.
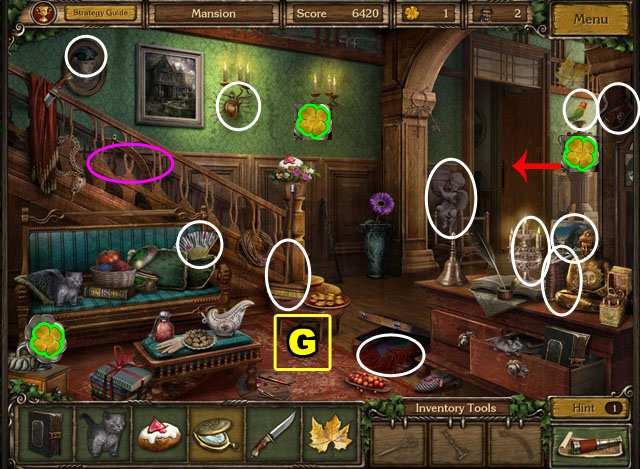
- Collect the Lucky Clovers highlighted with green.
- The locations of the Lucky Clovers may change in subsequent plays.
- Find the hidden objects highlighted with white.
- Collect the WOODEN ARCH highlighted in purple.
- Click on the piece of a paper on the ground to start the puzzle (G). This piece becomes available when looking for the map.
- The next room is indicated with the red arrow.
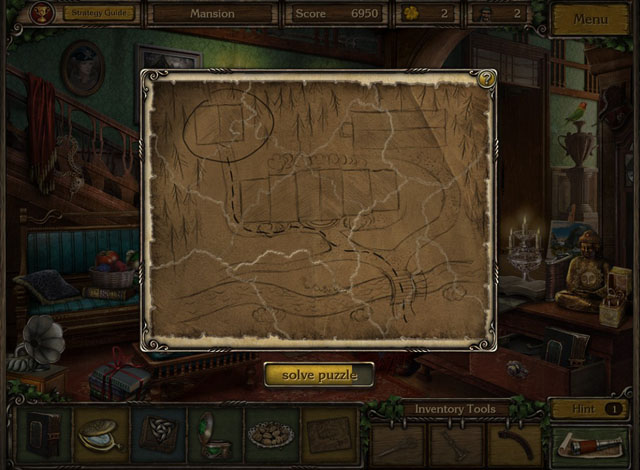
- Rearrange the puzzle pieces to solve this puzzle.
- The puzzle pieces start outside the box. Click to pick one up and put it inside the box in the middle. When you have the puzzle piece in the correct position it will glow yellow and lock in place.
- See the screenshot for the complete puzzle.
- When you have two objects left, the watch and the box, enter the next room on the right.
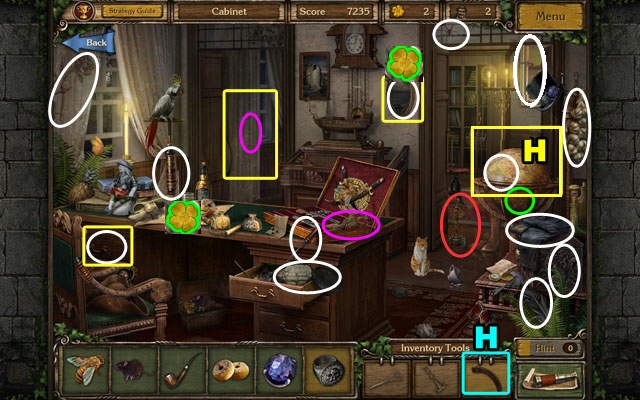
- Find the hidden objects highlighted with white.
- Collect the Lucky Clovers highlighted with green.
- Collect the Lost Item highlighted in red.
- Find the ring in the drawer to the left.
- Use the WOODEN ARCH on the globe to get the stone emblem (H).
- Find the CANDLESTICK behind the curtain and the SCISSORS in the box on the desk circled in purple.
- Find the oval engraving behind the mirror.
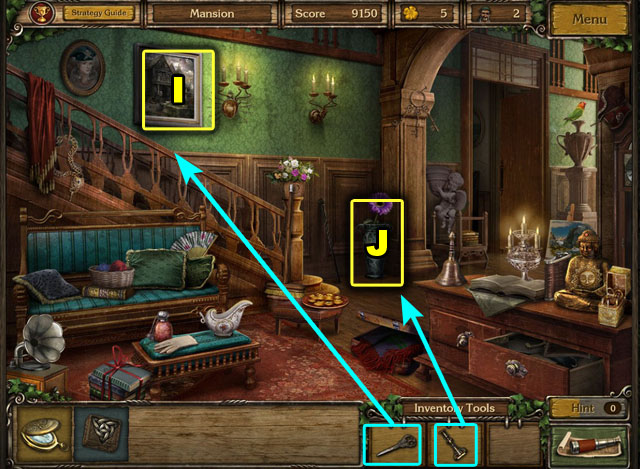
- Cut the painting with the SCISSORS to get the stone emblem (I).
- Break the vase with the CANDLESTICK to get the watch (J).
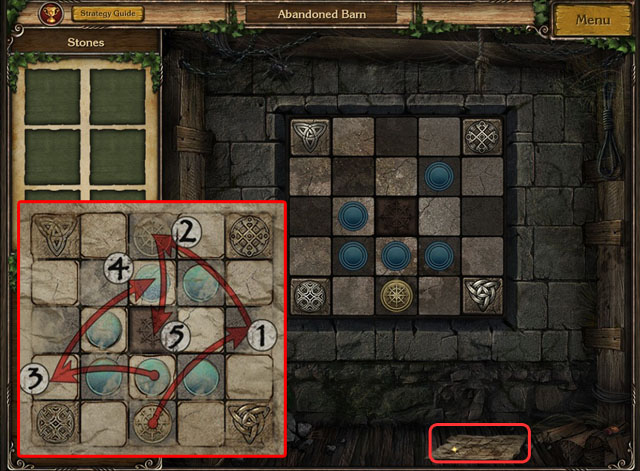
- Place four stone emblems on the matching corners of the grid to activate a mini-game.
- The object of the game is to get the golden disk into the center of the board without having any blue tablets left.
- Jumping a blue tablet with the disc or another tablet will remove it from the board.
- Try to beat it yourself or use the solution written on the paper at the bottom of the screen.
- Open the chest with the key from the left side.
- Collect the Ship’s logbook in the chest.
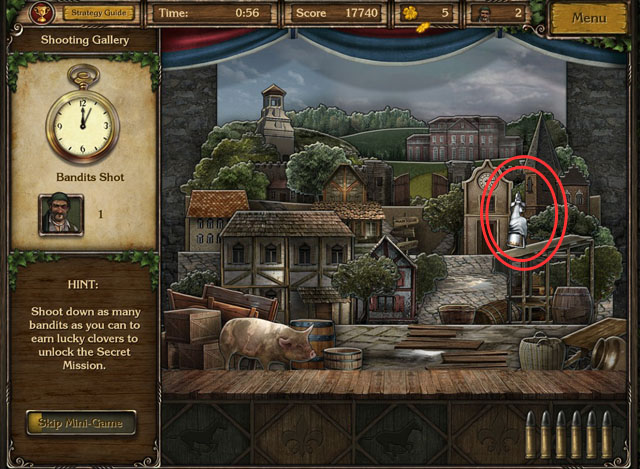
- Shoot the bandits to collect more Lucky Clovers.
- Do not shoot the citizens. There are only two and they always show up in the same places.
- When two people pop up at the same time, one will usually be a bandit and one a citizen.
Episode 2: Spain
- Collect the feather highlighted in red.
- Find the hidden objects highlighted in white.
- Collect the Lucky Clovers highlighted with green.
- The STICK is highlighted in purple.
- You will not be able to find the paper and the corkscrew yet.
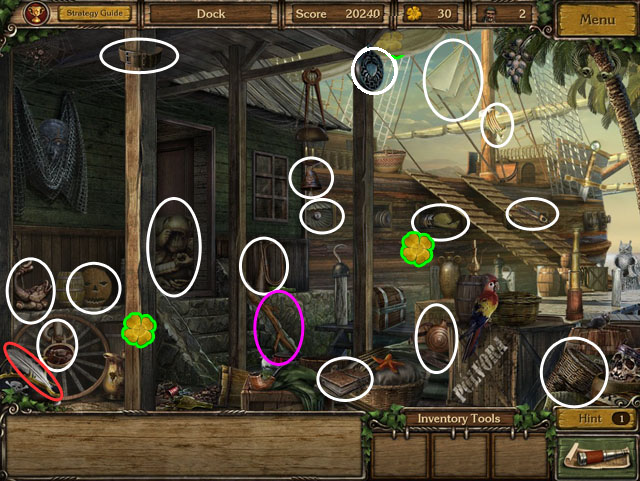
- Travel to the Bar with the map.
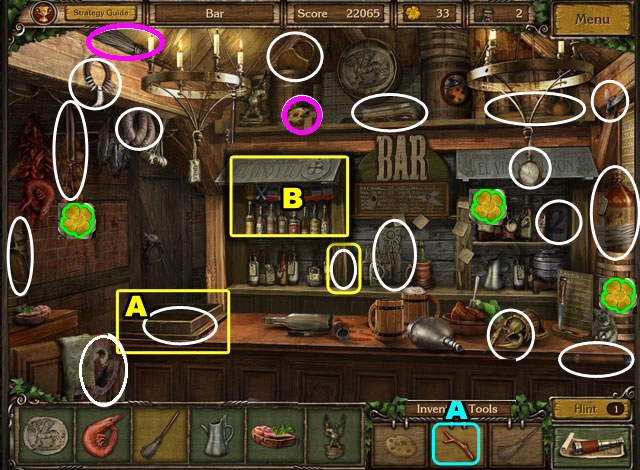
- Collect the Lucky Clovers highlighted with green.
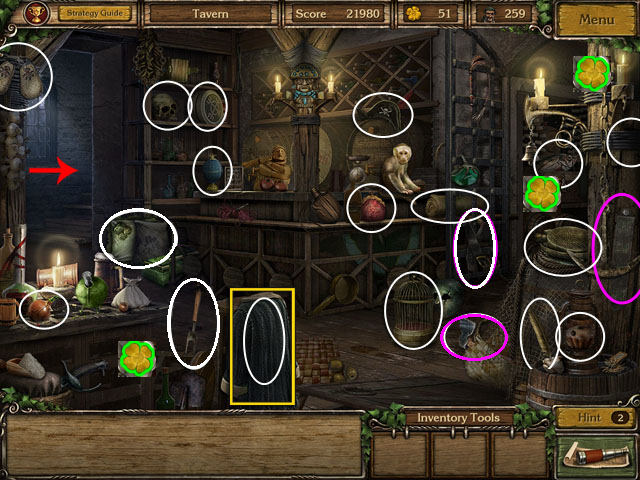
- Find the hidden objects highlighted in white.
- Place the STICK under the box to get the newspaper (A).
- Collect the inventory items highlighted in purple: the BROOM and the COOKIE.
- Click on the shelf to start the puzzle.
- After solving the puzzle, you can open the area to the right of the shelf and get the toy ship rudder (B).
- You cannot find all of the objects yet – the pencil will be the only one left.
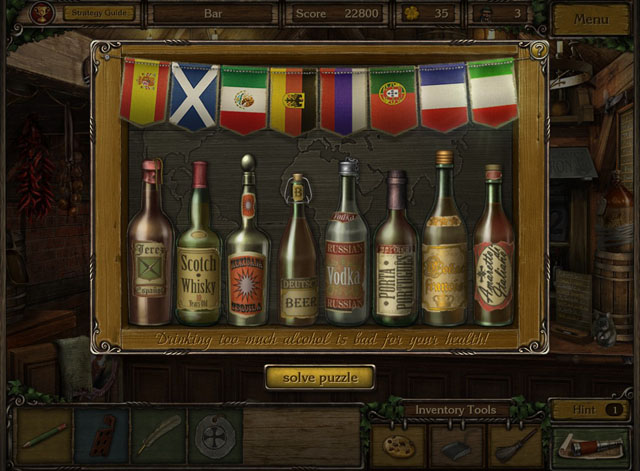
- Rearrange the bottles so that they match the flag of their country of origin.
- Click on one bottle and then another to switch their places.
- See the screenshot for the correct solution.
- After completing this area, go back to the dock.
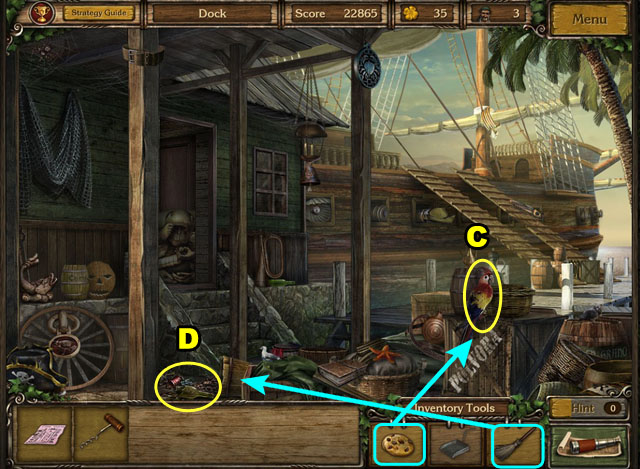
- Place the COOKIE on the parrot and collect the corkscrew (C).
- Use the BROOM to clean up the pieces of a glass and collect the document (D).
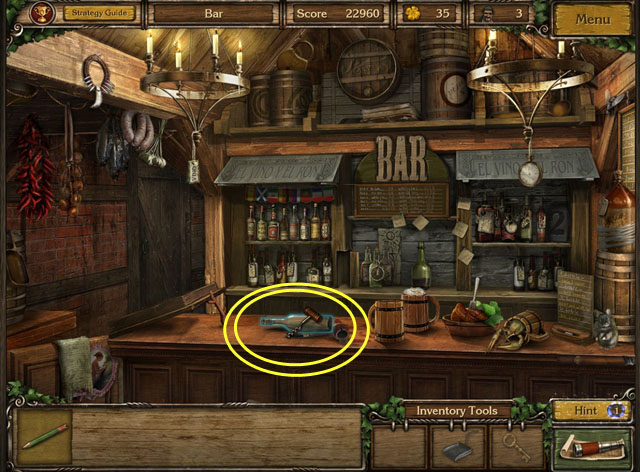
- Return to the bar one last time.
- Open the bottle with the CORKSCREW to collect the pencil.
- Travel to the Inn via the map.
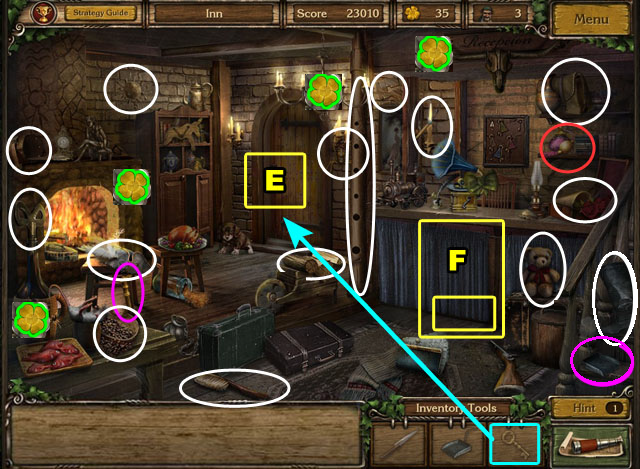
- Find the Lost Item highlighted in red.
- Collect the Lucky Clovers highlighted with green.
- Find the hidden objects highlighted in white.
- There are two inventory items, the KEY and the DUSTPAN, highlighted in purple.
- Open the door in the left with the KEY (E).
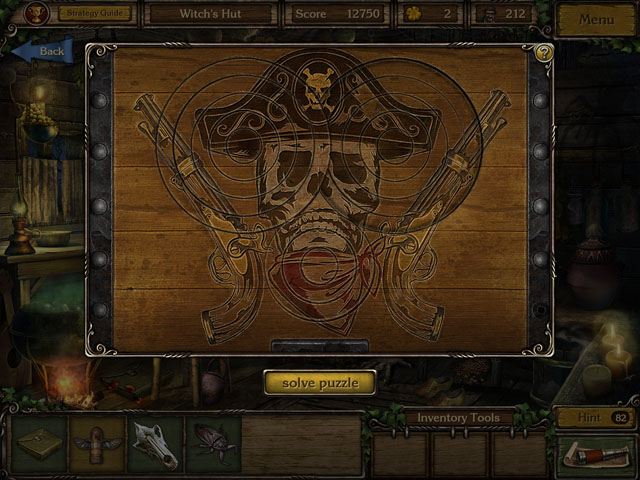
- Open the curtain and click on the puzzle board (F).
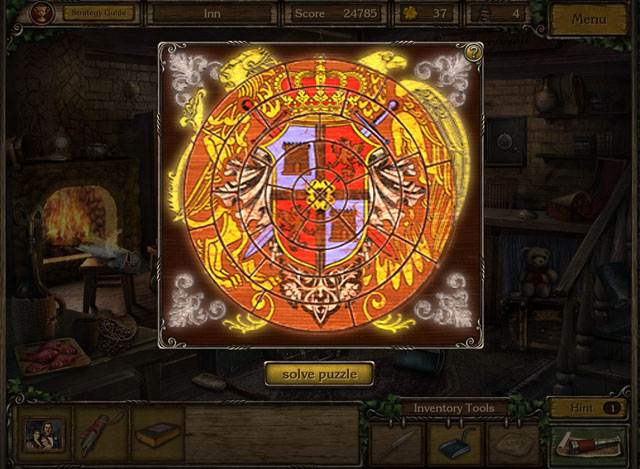
- Solve the puzzle by rearranging the discs into the correct order.
- Click on one section and then another adjacent piece to switch their places.
- Start from the center of the board and line up the blue and red parts of the shield, with the crown on top to finish.
- Some pieces can look correct at first glance, so make sure to check all of the edges for shapes that do not line up.
- See the screenshot for the completed image.
- Collect the note under the puzzle board.
- Enter the next room from the door you just unlocked.

- Click on the pot in the fire place. Collect the letters (G).
- Open the shelf and collect the CODE (H).
- Scoop the ash with the DUSTPAN to collect another document (I).
- Collect the KNIFE circled in purple.
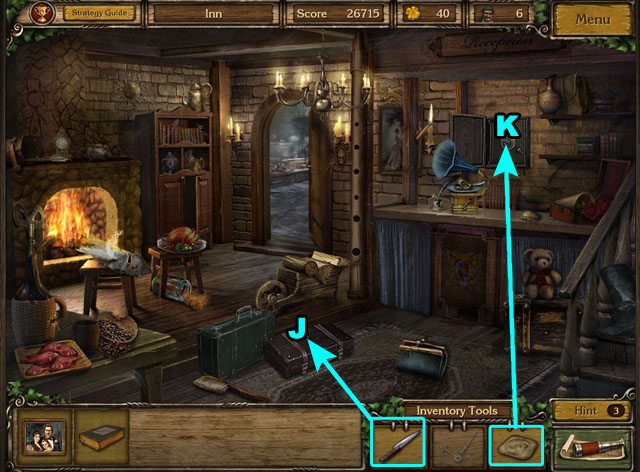
- Open the trunk with the KNIFE and collect the family portrait (J).
- Open the safe with the CODE and collect the inn ledger (K).
- Travel to the Churchyard with the map.
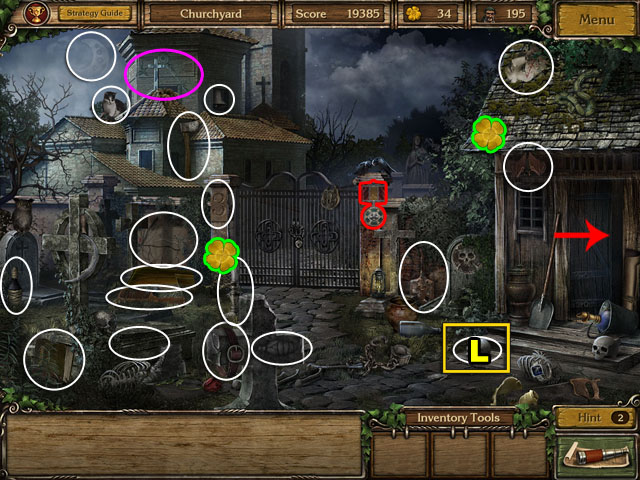
- Collect the Lucky Clovers highlighted with green.
- Find the hidden objects highlighted in white.
- Find the Lost Item highlighted in red.
- There is one inventory item in the scene, the CLOCK HANDS.
- Move the skull (L) to find the shoe buckle.
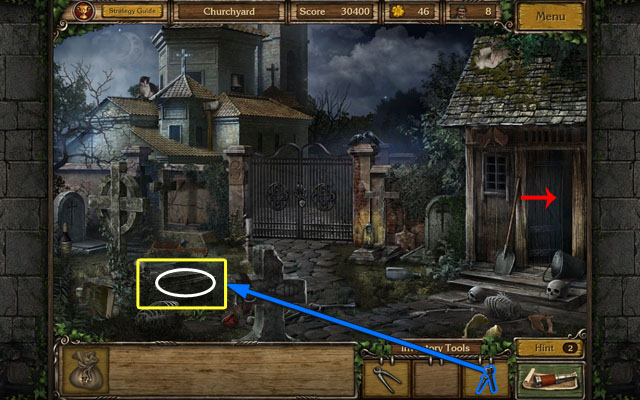
- Exit to the right when you have only one object left.
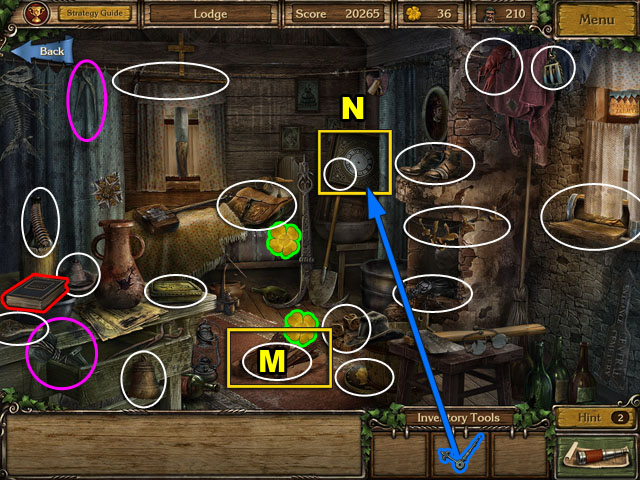
- Collect the Lucky Clovers highlighted with green.
- Find the hidden objects highlighted in white.
- Find the lost item highlighted in red.
- Click on the wood (M) to find the keys.
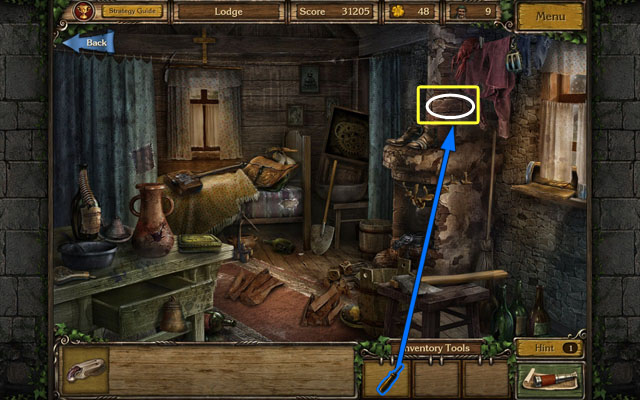
- Place the CLOCK HANDS on the clock to find the compass (N).
- There are two inventory items in the scene, the HAMMER and the WIRE CUTTERS (purple).
- Exit the scene when you have one item left.
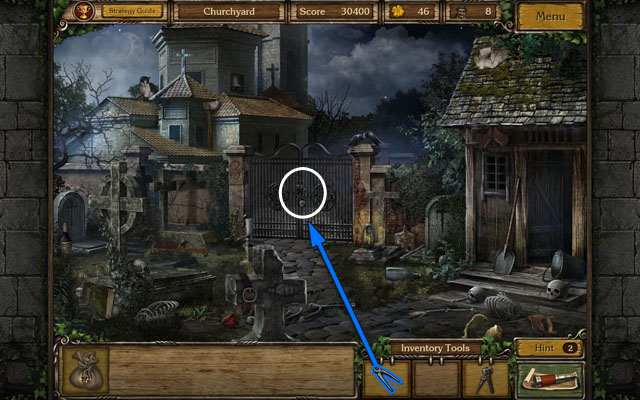
- Open the lock with the WIRE CUTTERS.
- Enter the yard.
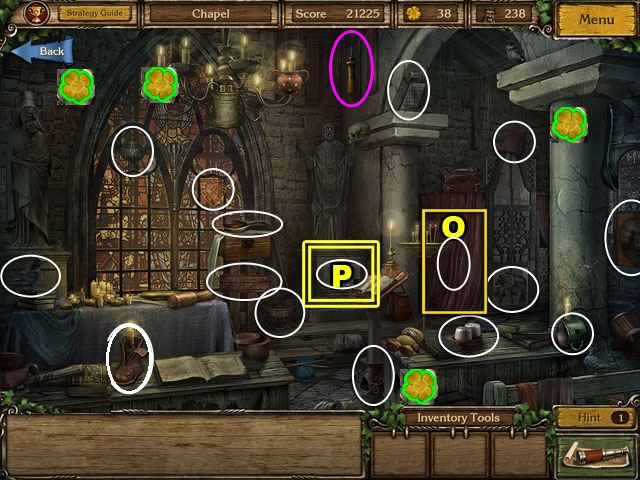
- Collect the Lucky Clovers highlighted with green.
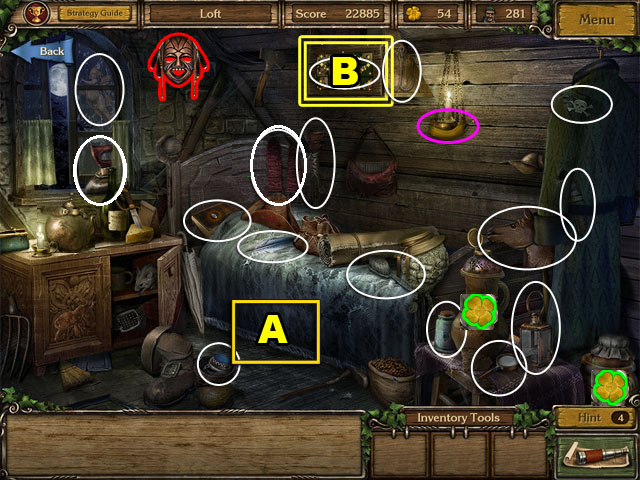
- Find the hidden objects highlighted in white.
- Open the curtain (O) to find the beads.
- Click on the board (P) to solve a puzzle and get the toy sails.
- The CHISEL is highlighted in purple.
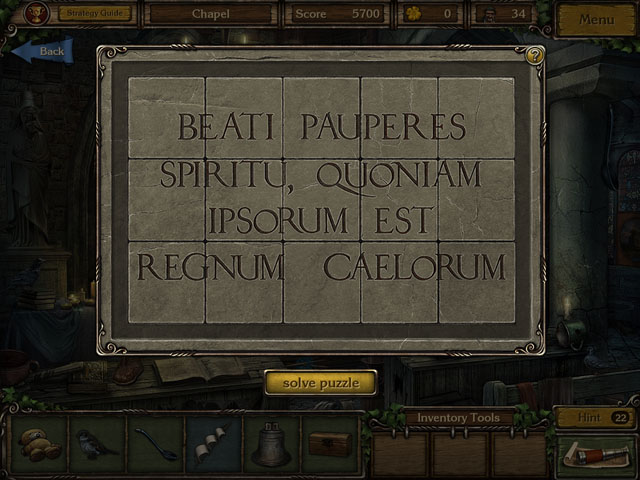
- Solve the puzzle by arranging the squares into the correct order.
- Click on a square and click on the empty spot to move it there.
- In the final solution the empty spot is in the bottom right corner.
- See the screenshot for the correct solution.
- Return to the courtyard.
- Open the coffin with the HAMMER.
- Collect the last hidden object and go to the right.
- Remove the brick with the CHISEL and take the gun.
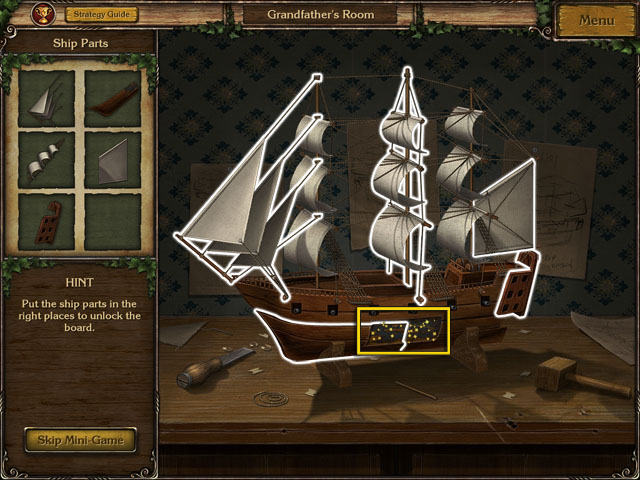
- Complete the ship by dragging the parts on the left to the correct places on the model.
- Once done, click on the glowing area.
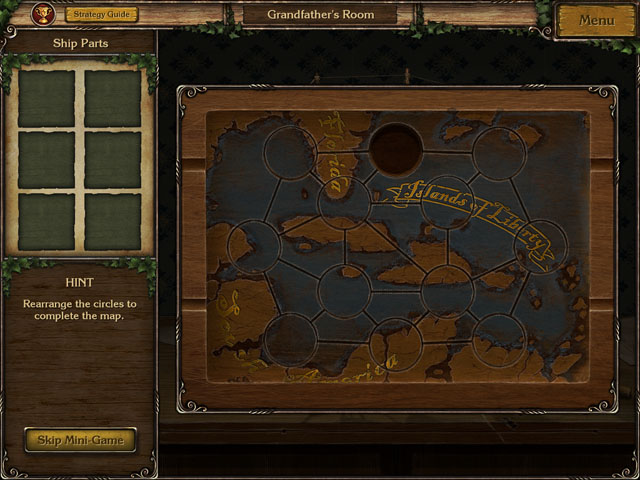
- Complete the map puzzle.
- Move the pieces around by selecting a piece and then moving that piece to a blank area.
- The final blank area will be in the top middle slot.
- You can only move the circles across the lines in the board.
- Take the ship.
- Shoot the bandits to collect more Lucky Clovers.
Episode 3: Caribbean
- Collect the lost item highlighted in red.
- Find the hidden objects highlighted in white.
- Collect the Lucky Clovers highlighted with green.
- Click on the jacket to reveal the riding crop.
- Find the two inventory items circled in purple – the AXE and the METAL BAR.
- When you are down to one object left, enter the next room from the left door.
- Find the hidden objects highlighted in white.
- Collect the Lucky Clovers highlighted with green.
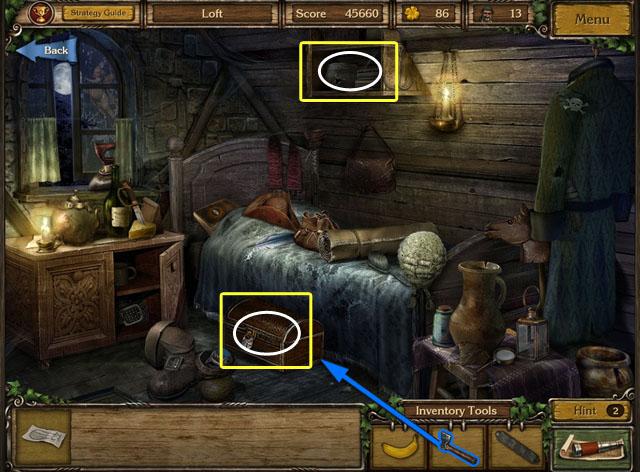
- Find the BANANA circled in purple.
- Click on the bed sheet (A) to reveal a chest.
- Click on the cards (B) to get the amulet.
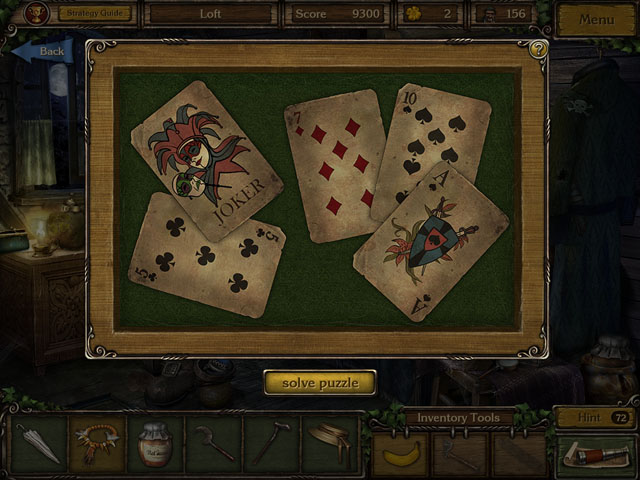
- Arrange the squares to make a complete image.
- Click one square and then another to switch their positions.
- First start solving a single card, and then put the other cards in the correct position by working from your starting place.
- See the screenshot for the completed image.
- Use the AXE on the chest to reveal the diagram.
- Take the amulet from the cabinet and leave the scene.
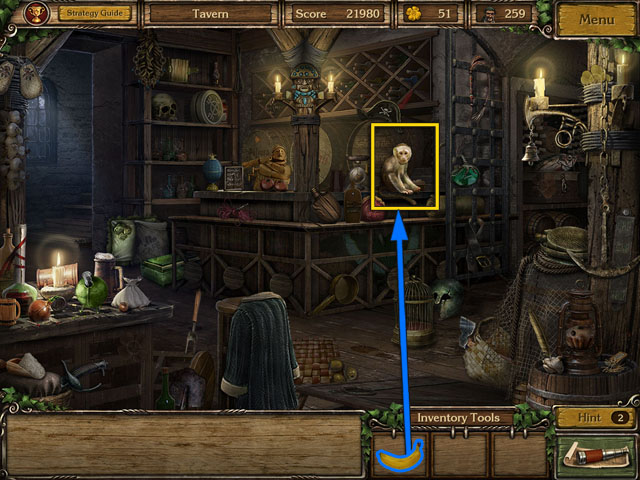
- Give the BANANA to the monkey.
- Collect the banknotes.
- Travel to the ship graveyard.
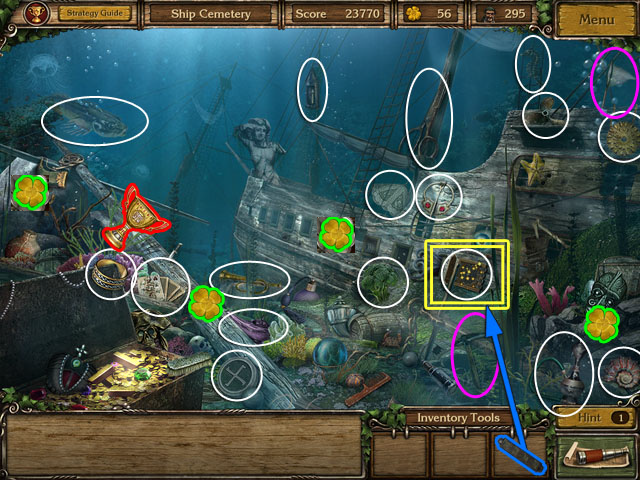
- Collect the Lost Item highlighted in red.
- Find the hidden objects highlighted in white.
- Collect the Lucky Clovers highlighted with green.
- There are two inventory items in this scene – the NET and the PICKAXE (purple).
- Place the METAL BAR on the puzzle board.
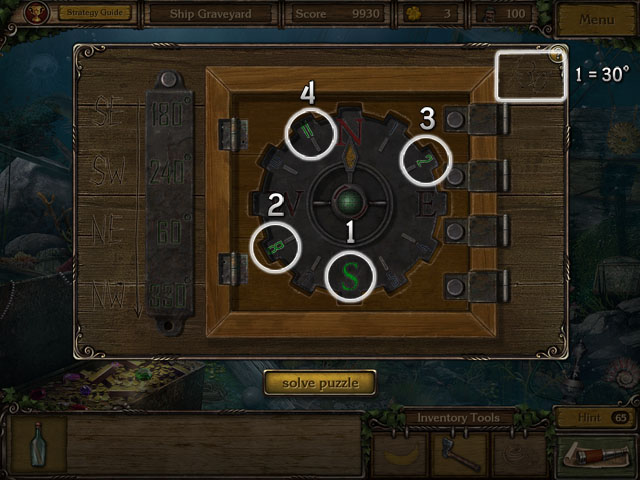
- Solve the puzzle by inputting the 4 correct directions.
- In the top right corner is a hint that each click is 30 degrees.
- On the left side are the degrees that you need to enter.
- Click the arrow until the arrow is at 180 degrees (1) and then click the button in the middle.
- Do this 3 more times for the other 3 directions.
- See the screenshot for the correct positions.
- Collect the message in a bottle from behind the puzzle.
- Travel to the Deserted Island.
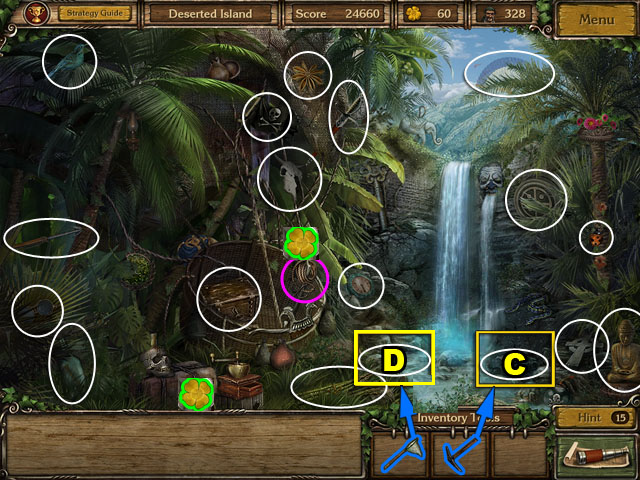
- Find the hidden objects highlighted in white.
- Collect the Lucky Clovers highlighted with green.
- Collect the ROPE highlighted in purple.
- Use the AXE to crack the rock (C) and take the bag of old clothes.
- Use the net to collect the knife (D).
- Travel to the British Colony.

- Collect the Lost Item highlighted in red.
- Find the hidden objects highlighted in white.
- Collect the Lucky Clovers highlighted with green.
- The POISON is circled in purple.
- Use the rope (E) to get the fuel jug.
- Use the knife (F) to uncover the oil lamp.
- Click on the bricks (G) and solve the puzzle to get the scroll.

- Solve the puzzle by rearranging the bricks to the correct pattern.
- Click on one brick and then another to switch their places.
- Start from the edges of the puzzle and work towards the center. Each side brick will only fit correctly in one position.
- See the screenshot for the solution.
- Travel to Montego Bay.
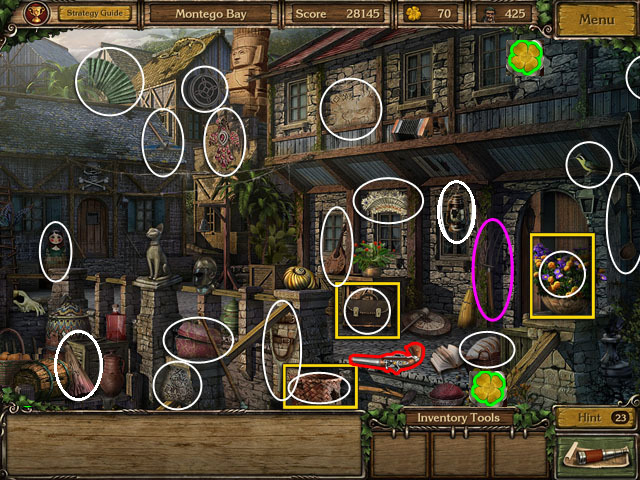
- Collect the Lost Item highlighted in red.
- Find the hidden objects highlighted in white.
- Collect the Lucky Clovers highlighted with green.
- The PITCH FORK is highlighted in purple.
- Click on the basket to get the tin with a note in it.
- Click on the bag to get the invitation.
- Click on the basket to uncover the handkerchief.
- Travel to Witch’s Island.
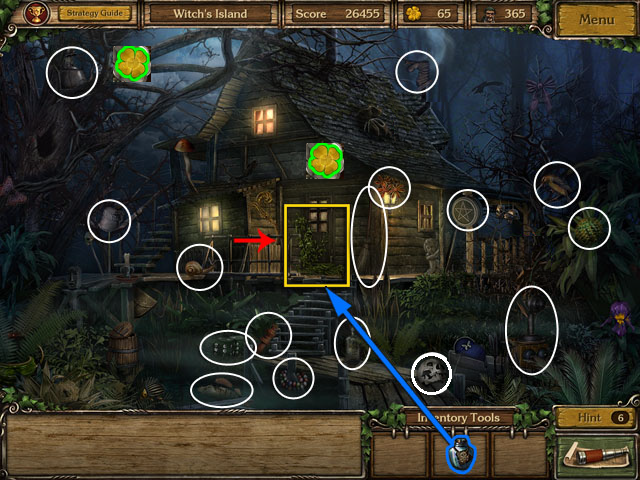
- Collect the Lost Item highlighted in red.
- Find the hidden objects highlighted in white.
- Collect the Lucky Clovers highlighted with green.
- Once you have found all the objects but the glove and the coin, use the POISON to kill the grass.
- You will automatically enter the house.
- Collect the Lost Item highlighted in red.
- Find the hidden objects highlighted in white.
- Collect the Lucky Clovers highlighted with green.
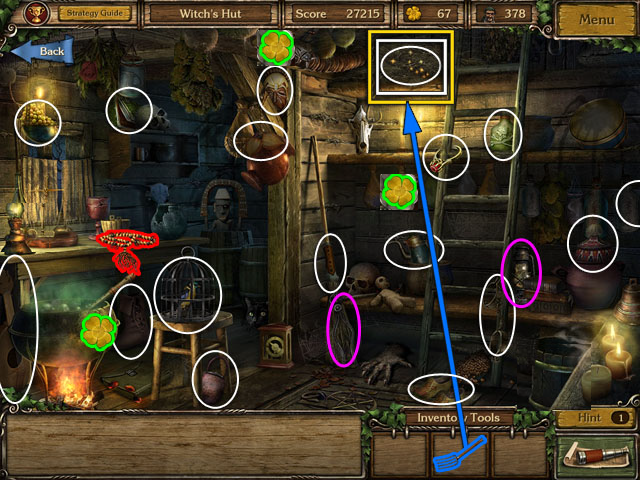
- There are two inventory items in this scene – the TONGS and the LANTERN.
- Use the PITCHFORK on the hay circled in yellow to uncover a chest.
- Click on the chest to start the puzzle.
- Solve the puzzle by aligning the rings into a picture.
- Click on the rings to rotate them until they are in the correct spot.
- Use the hat on the skeleton’s head to align the top 2 rings.
- Use the straight lines of the red handkerchief to align the bottom rings.
- See the screenshot for the completed puzzle.
- Take the Aztec totem from the chest once completed.
- Exit the cabin.
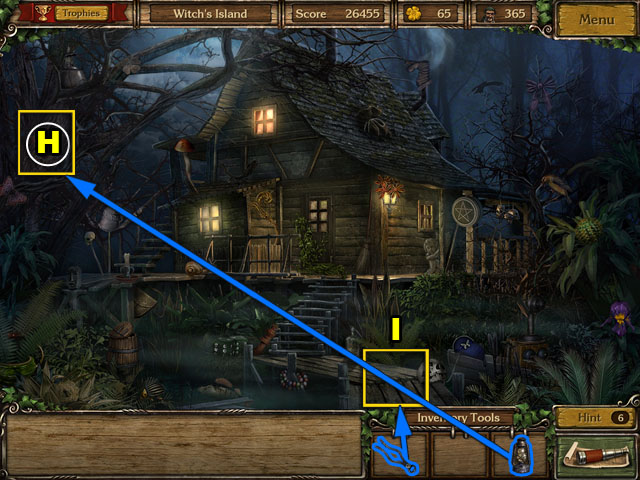
- Use the LANTERN on the hole in the tree to uncover the glove (H).
- Use the TONGS on a loose board in the pathway to pull out the coin (I).
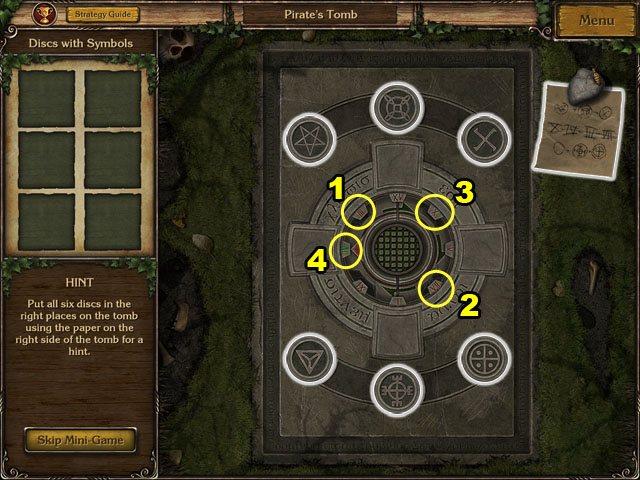
- First fill in the stone discs into the correct slots.
- The slots for all but one of the discs are shown in the note at the top right corner.
- Follow those directions and then place the last slot in the blank space.
- The note also has the order of the numbers, although it starts at the 3rd number, not the first.
- Enter the numbers by clicking the arrow to move the disc and then click the center to input the number.
- The correct combination is III, VII, X, and IV or in modern numerals: 3, 7, 10, and 4.
- After finishing the puzzle shoot the bandits to collect more lucky clovers.
Episode 4: South America
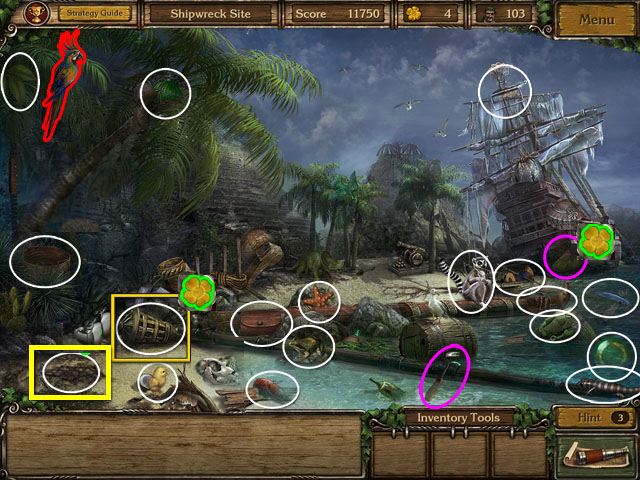
- Collect the Lost Item highlighted in red.
- Find the hidden objects highlighted in white.
- Collect the Lucky Clovers highlighted with green.
- There are two inventory items in this area: a GLASS PIECE and a PRYBAR.
- Click the seaweed to uncover the footprint.
- Click the lantern to move it and uncover the holster.
- Travel to the Hut.
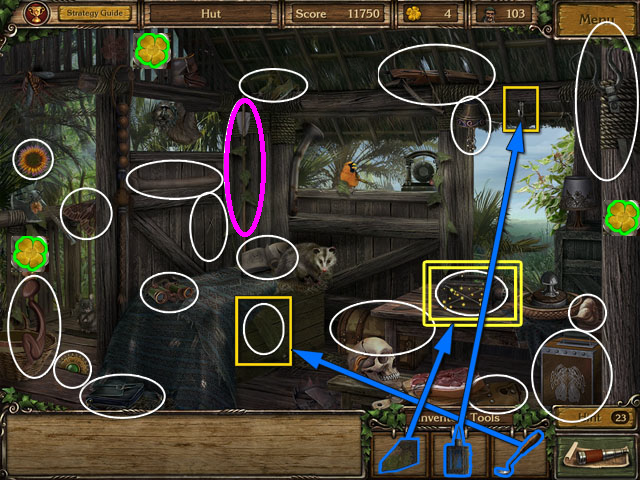
- Find the hidden objects highlighted in white.
- Collect the Lucky Clovers highlighted with green.
- Take the ARROW highlighted in purple.
- Use the PRYBAR on the crate to get the headdress.
- Use the GLASS PIECE on the broken flask to start the next puzzle.
- After finishing the puzzle use the FLASK on the hook reveal the last hidden object.
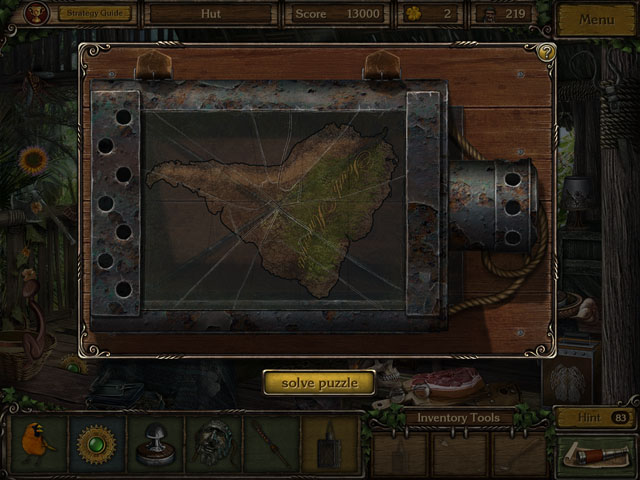
- Solve the puzzle by reconstructing the glass.
- Click the glass on the side of the scene to pick it up and put it in the middle.
- The picture you are trying to make is a map of Brazil.
- Use the straight edges to help you recreate the image.
- See the screenshot for the solution.
- After finishing the flask, pick it up and then put it on the hook to get the last object.
- Return to the Shipwreck.
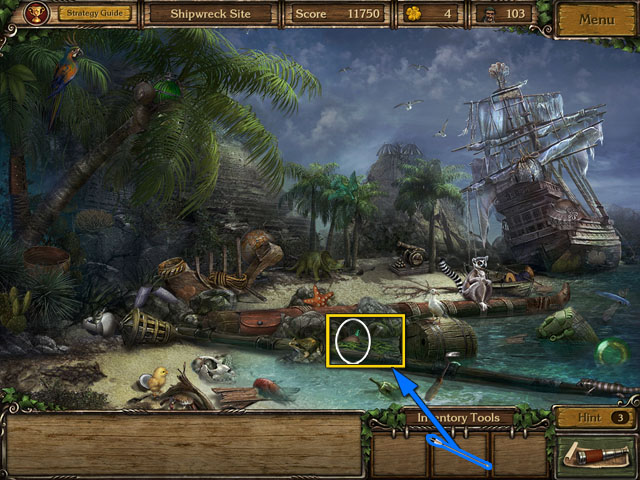
- Use the ARROW to uncover the flask.
- Travel to the Abandoned Ship.
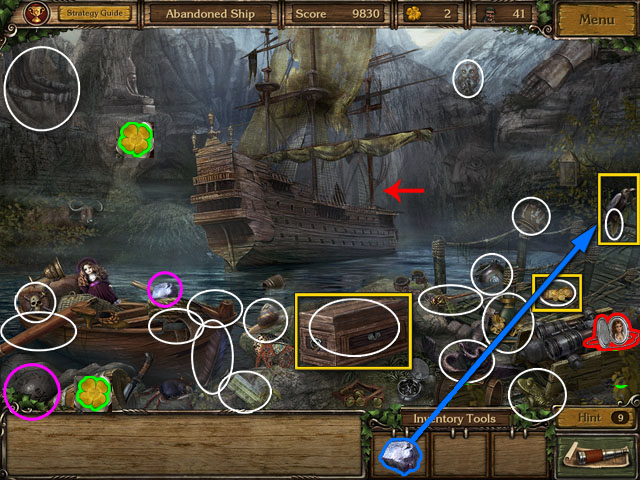
- Collect the lost item highlighted in red.
- Find the hidden objects highlighted in white.
- Collect the Lucky Clovers highlighted with green.
- There are two inventory items in this scene – the CANNON BALL and the ROCK.
- Click on the coins to get the shoulder strap.
- Open the chest to find the pirate hat.
- Use the ROCK on the vulture to get the torn piece.
- Click on the ship to enter it.
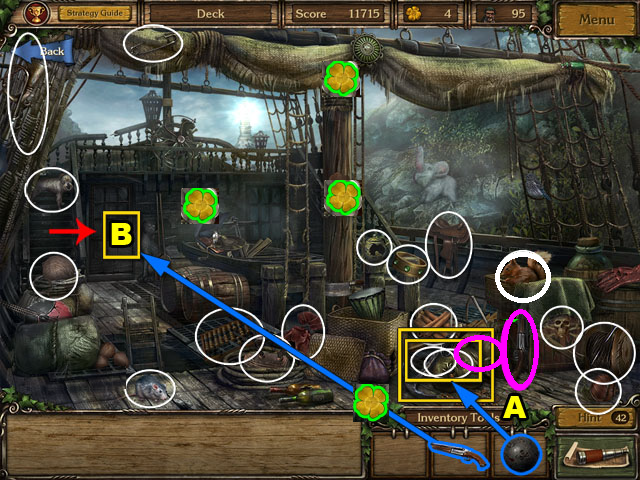
- Find the hidden objects highlighted in white.
- Collect the Lucky Clovers highlighted with green.
- Click on the sand bag and the anchor to move them out of the way.
- Use the CANNON BALL on the grate and collect the gold bards (A).
- Collect the GUN and the KNFIE highlighted in purple.
- Use the GUN on the door to open it (B).
- Enter the cabin.
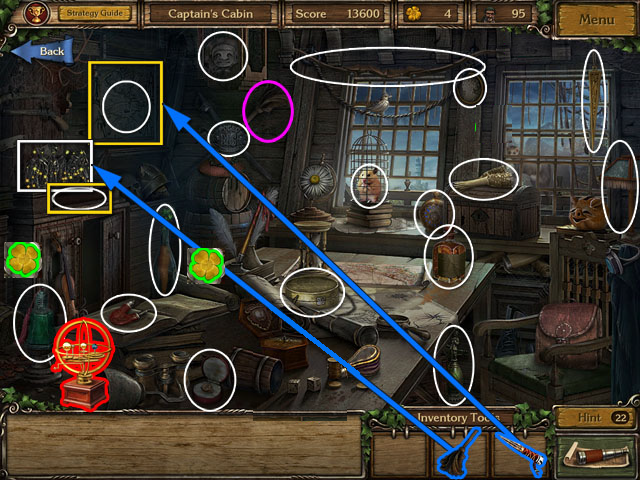
- Collect the lost item highlighted in red.
- Find the hidden objects highlighted in white.
- Collect the Lucky Clovers highlighted with green.
- The FEATHER DUSTER is circled in purple.
- Use the FEATHER DUSTER on the statues on the mantle (C) then solve a puzzle to get the scroll.
- Use the KNIFE on the poster to uncover the gold disc (D).
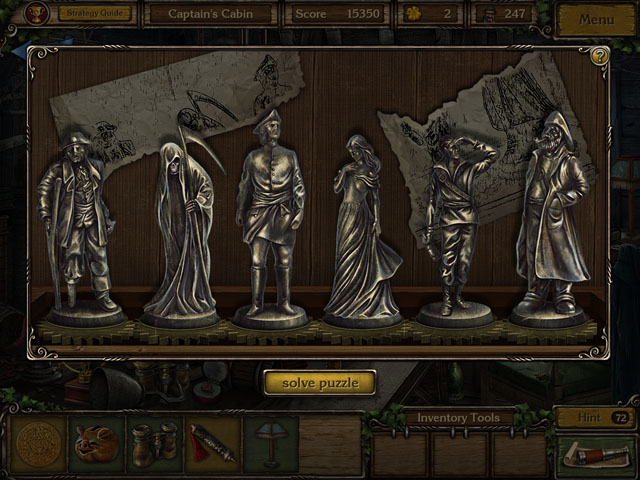
- Solve the puzzle by arranging the statues in the correct order.
- Click on any 2 statues to switch their positions.
- Use the pieces of the statues drawn on the papers in the background to help you figure out which order is correct.
- Only one of the statues does not have any clues.
- See the screenshot for the correct solution.
- Collect the scroll from the drawer when you are done.
- Travel to the Cave Entrance.
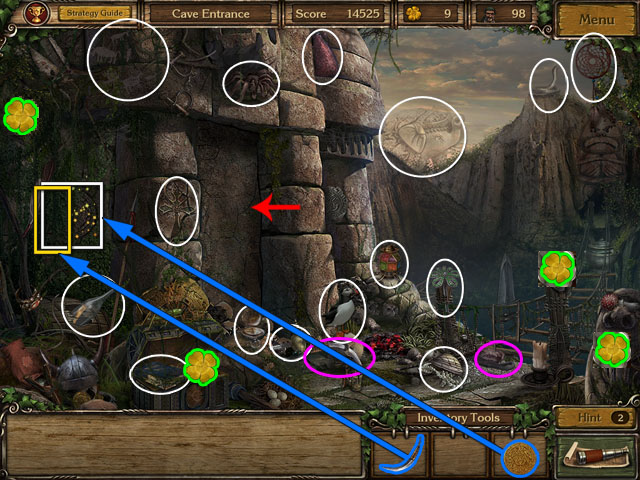
- Find the hidden objects highlighted in white.
- Collect the Lucky Clovers highlighted with green.
- Find the SICKLE circled in purple and the FLINT.
- Use the SICKLE to uncover the puzzle on the left side of the screen.
- Click on the puzzle.
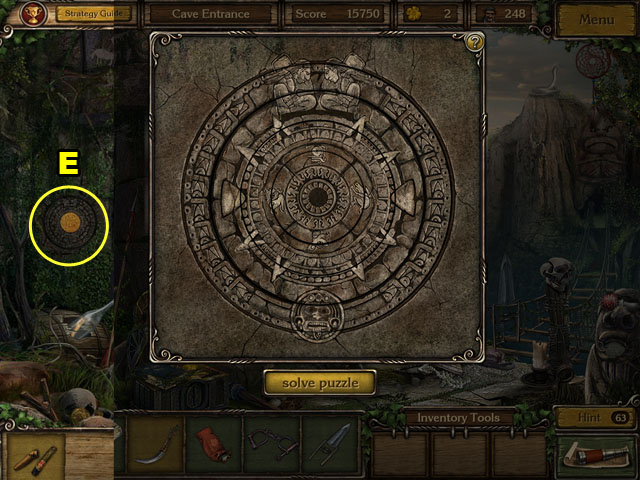
- Solve the puzzle by rotating the discs to the correct position.
- Click each ring to rotate it.
- Start at the top and match the statues of the people to the heads at the top.
- Then match the rest of the rings to the outside ring.
- After you finished, place the GOLD DISC into the middle of the puzzle (E).
- Enter the cave.
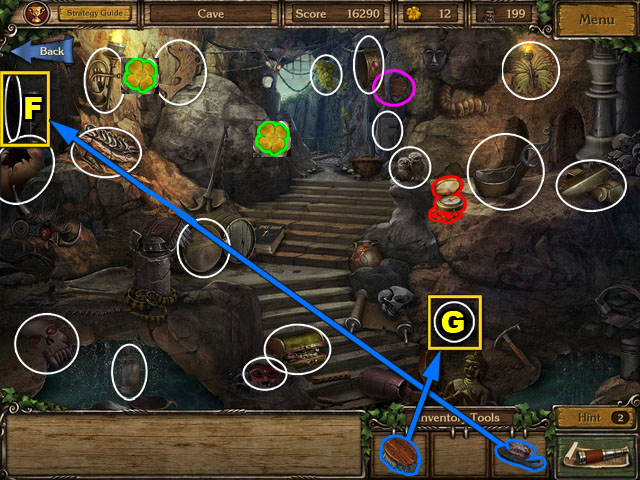
- Collect the Lost Item highlighted in red.
- Find the hidden objects highlighted in white.
- Collect the Lucky Clovers highlighted with green.
- Collect the BRUSH circled in purple.
- Use the FLINT to light the torch and find the SPEAR (F).
- Use the BRUSH to uncover the drawing (G).
- Exit the cave.
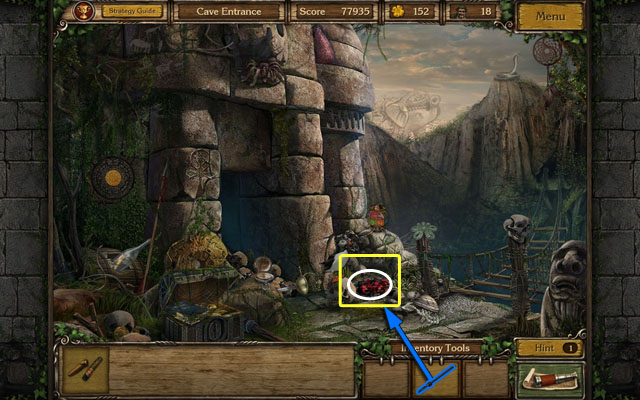
- Use the SPEAR on the hot coals to uncover the cigar.
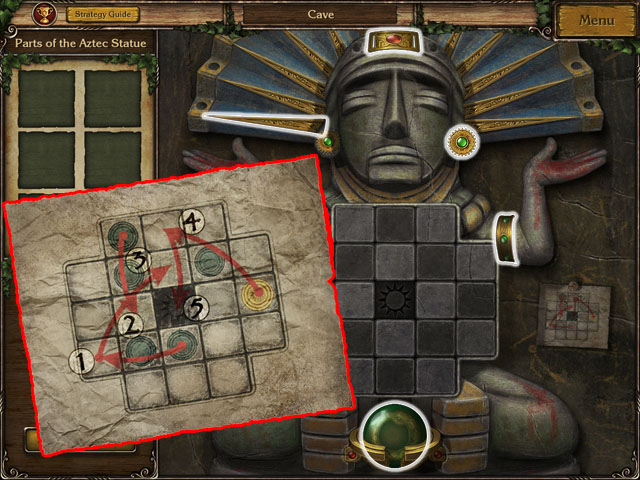
- Replace all of the jewelry onto the statue in the correct places as shown in the screenshot.
- The object of the game is to get the golden disk into the center of the board without having any blue tablets left.
- Jumping a blue tablet with the disc or another tablet will remove it from the border.
- Try to beat it yourself or use the solution written on the paper at the right of the screen to finish it.
- Take the medallion from the statue’s mouth.
Episode 5: Maghreb
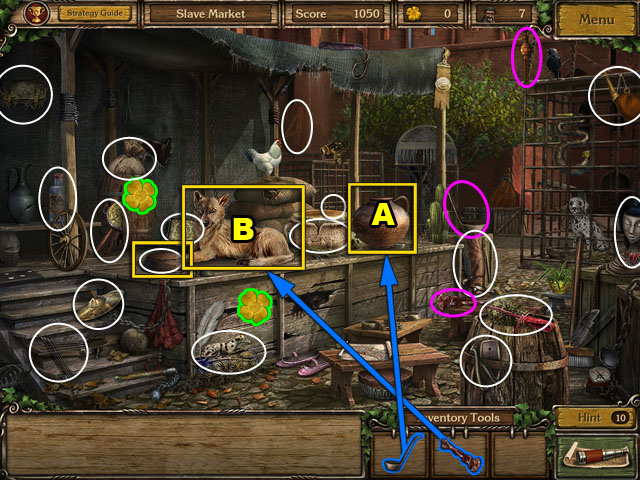
- Enter the Slave Market.
- Find the hidden objects highlighted in white.
- Collect the Lucky Clovers highlighted with green.
- There are 3 inventory items here: the LADLE, the BONE and the WHISTLE.
- Use the LADLE on the pot to get the small stone emblem (A).
- Give the BONE to the wolf and flip the upside down bowl to get the signet ring (B).
- Travel to the Bazaar.
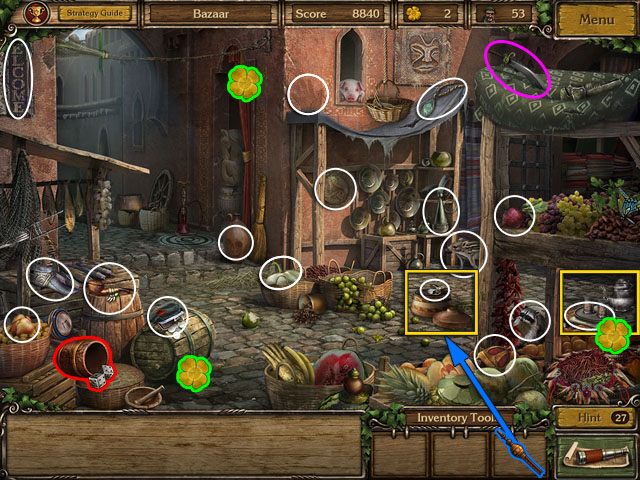
- Collect the Lost Item highlighted in red.
- Find the hidden objects highlighted in white.
- Collect the Lucky Clovers highlighted with green.
- Collect the SWORD circle in purple.
- Use the WHISTLE on the basket to get the mirror.
- Click on the tea set to find the newspaper.
- You cannot get the last object yet so travel the Harem.
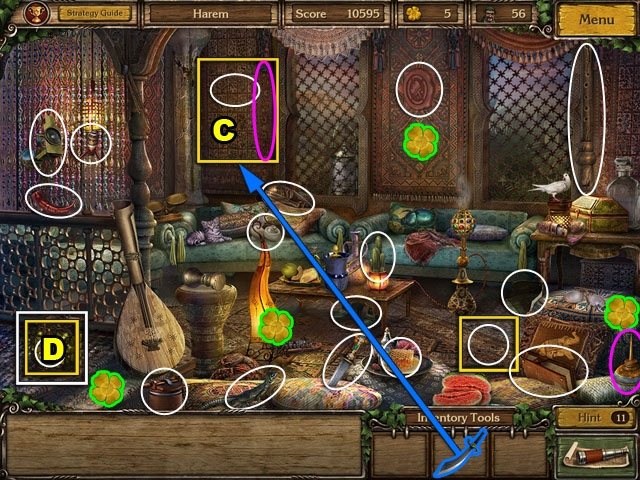
- Collect the lost item highlighted in red.
- Find the hidden objects highlighted in white.
- Collect the Lucky Clovers highlighted with green.
- Collect the OIL CAN in the bottom right corner.
- Pull up the carpet to get the dark symbol.
- Use the SWORD on the wall to get the gun and the IRON POKER (C).
- Click on the lantern (D).
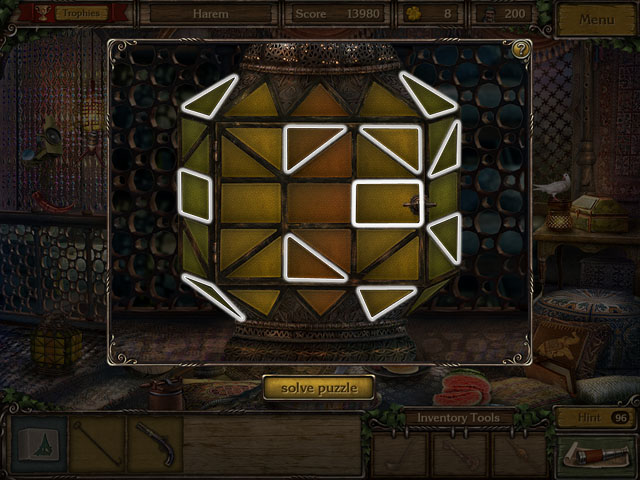
- Solve the puzzle by lighting up all of the faces of the lantern.
- Clicking a face will switch that face on and all of the faces touching it to the opposite state. If it is on, it will turn off – if it is off it will turn on.
- Click the boxes highlighted in white in any order to complete the puzzle.
- Open the lantern and collect the stone emblem.

- Return to the Bazaar.
- Use the IRON POKER on the basket to get the last hidden object.
- Travel to the Observatory yard.
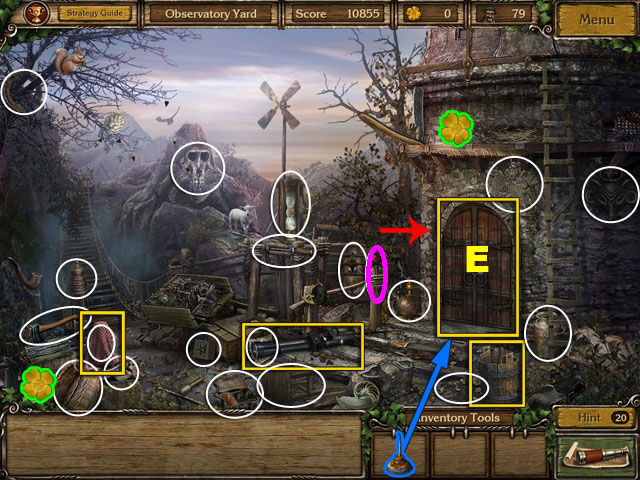
- Find the hidden objects highlighted in white.
- Collect the Lucky Clovers highlighted with green.
- Pull off the blanket to find the necklace.
- Move the scope to find the journal page.
- Tip over the bucket to get the extinguished torch.
- Use the OIL CAN on the door and go to the next scene (E).
- You will still have the key to find in this scene.
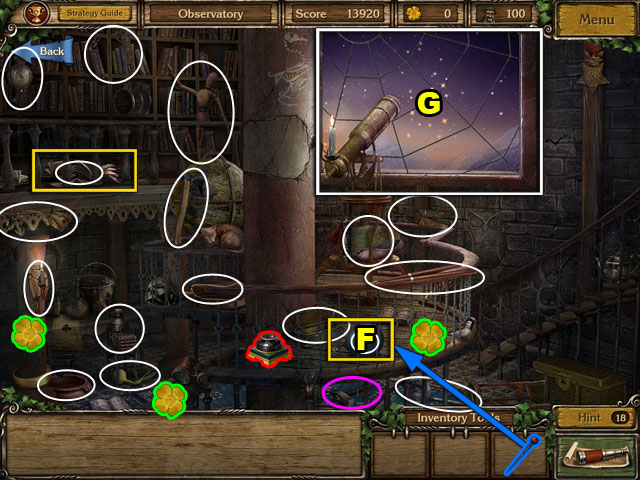
- Collect the Lost Item highlighted in red.
- Find the hidden objects highlighted in white.
- Collect the Lucky Clovers highlighted with green.
- Click on the books to find the ring.
- Find the HAMMER circled in purple.
- Use the NEEDLE on the balloon to get a stone emblem (F).
- Click on the sky to start the next puzzle (G).
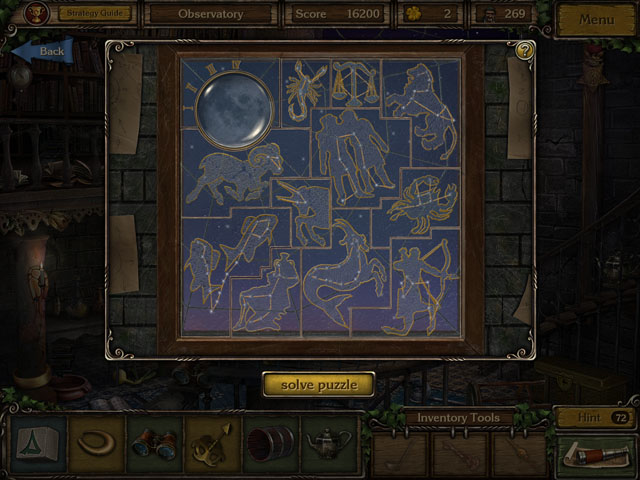
- Solve the puzzle by assembling the constellations correctly.
- Click on the constellations pieces and add them to the image in the middle.
- If they overlap at all, the pieces will fly back to the outside.
- Start with the piece near the circle cutout and work your way around, using the corner pieces as well.
- The stars will line up with the dots on the constellations.
- See the screenshot for the final solution.
- Exit the Observatory.
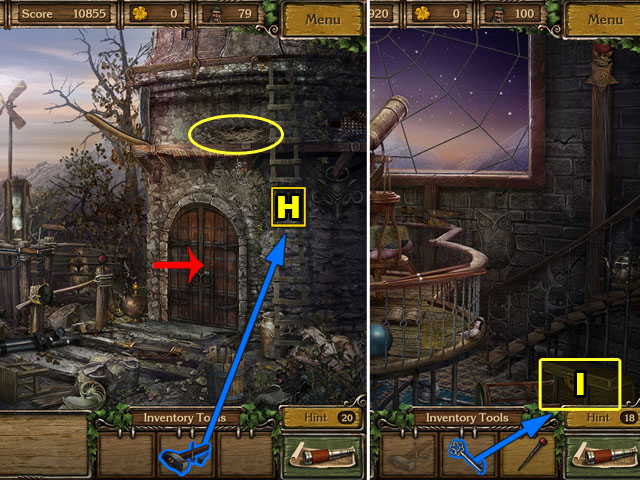
- Use the HAMMER on the broken ladder (H).
- Click on the bird nest to find the KEY.
- Go back inside the tower and use the KEY on the chest to the right (I).
- You will find the last hidden object of this level, the unusual key.
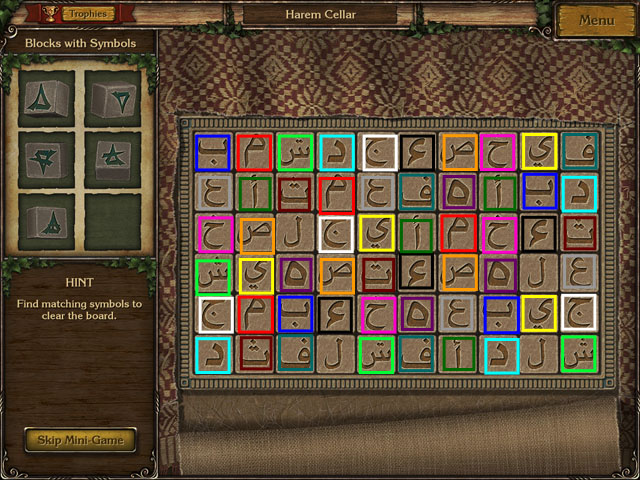
- Find matching pairs of symbols.
- Each symbol has two pairs on the board and there are 15 types of symbols.
- See the screenshot for the answer key.
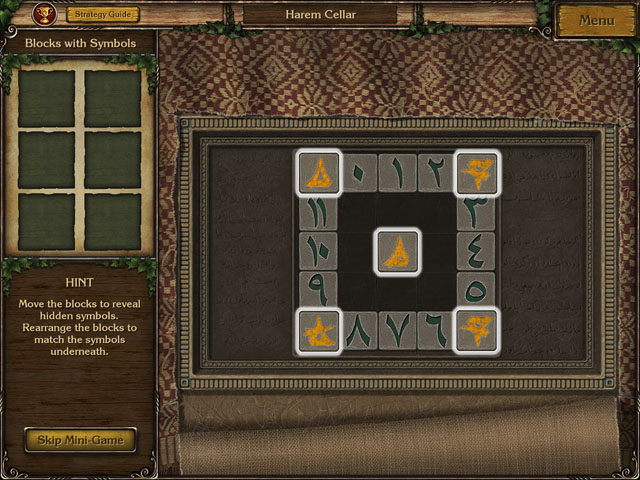
- Move the blocks to reveals the symbols underneath them.
- Rearrange the blocks to match these symbols.
- See the screenshot for the correct solution.
Episode 6: England
- Click on the ship on the main menu to access the extra episode.
- Find the hidden objects highlighted in white.
- Collect the Lucky Clovers highlighted with green.
- There are two inventory items here: the GAVEL and the PIECE OF PAPER.
- Use the PAPER on the book.
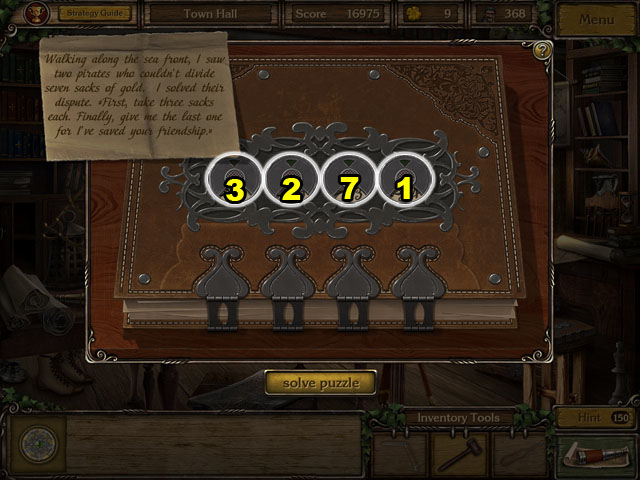
- Enter the correct number code to open the book.
- Click on the numbers to spin them.
- The note has a hint. It mentions four numbers: 2, 7, 3, and 1.
- The solution is: 3, 2, 7, and 1.
- Take the medallion and travel to the Mansion.
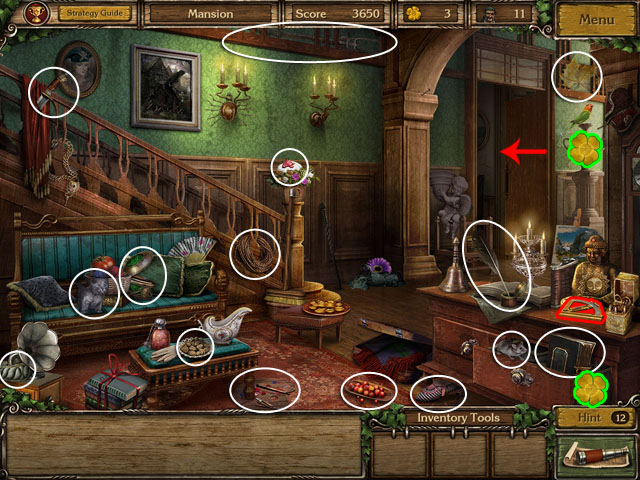
- Collect the Lost Item highlighted in red.
- Find the hidden objects highlighted in white.
- Collect the Lucky Clovers highlighted with green.
- You will not be able to find three objects at this time.
- Enter the next room.
- Find the hidden objects highlighted in white.
- Collect the Lucky Clovers highlighted with green.
- Move the waste basket to get the empty bottle.
- Close the lid of the box of knifes to find the glass.
- Use the GAVEL on the piggy bank to get the round emblem.
- Collect the KNIFE and the SCREWDRIVER highlighted in purple.
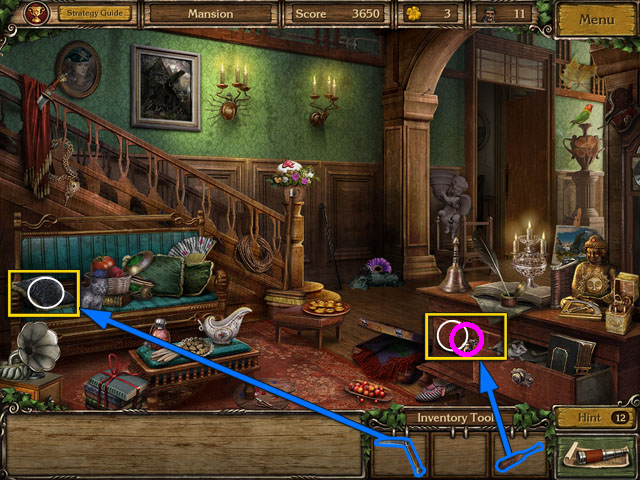
- Use the KNIFE to open up the cushion and get the round emblem.
- Use the SCREWDRIVER to open the drawer and get the letter and KEY RING.
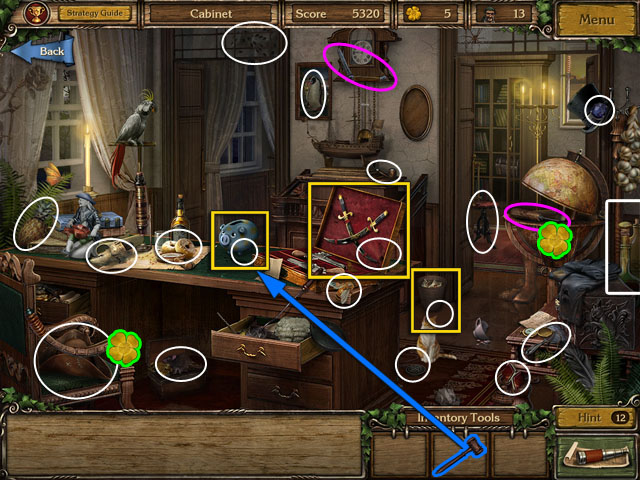
- Collect the Lost Item highlighted in red.
- Find the hidden objects highlighted in white.
- Collect the Lucky Clovers highlighted with green.
- Find the PUZZLE PIECE and the KEY highlighted in purple.
- Open the shelf with the KEY RING and take the heart medicine.
- Click on the ripped up paper on the counter.
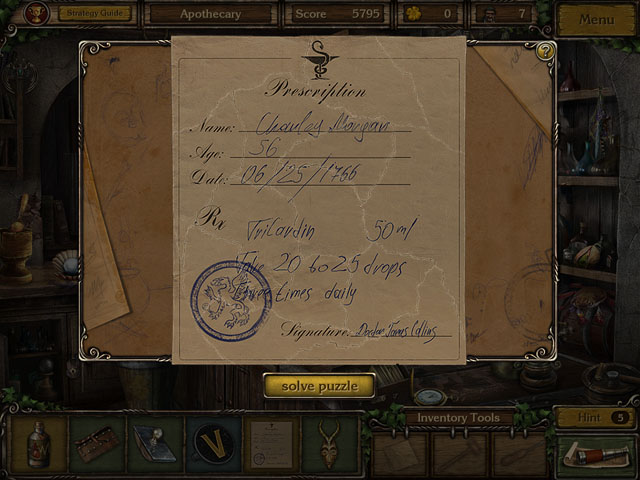
- Solve the puzzle by putting the paper back together.
- Click a piece and click it again to place it.
- Use the dark brown square in the center of the screen to line up your pieces; they will lock when they are in the correct position.
- See the screenshot for the final solution.
- After finishing the puzzle, collect the prescription and travel to the Antique Shop.
- You can’t get the final hidden object in this location yet.
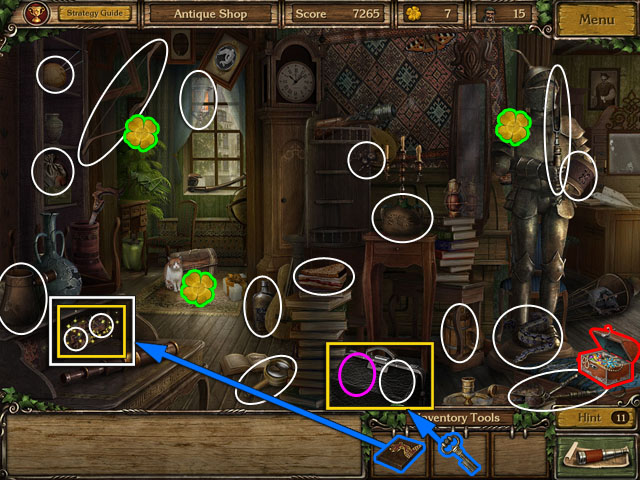
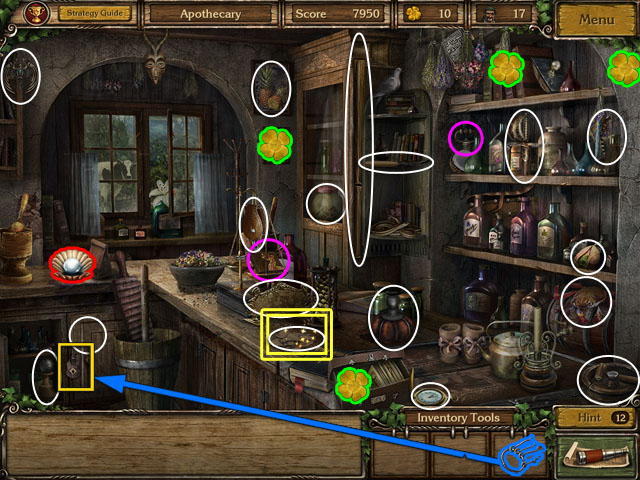
- Collect the Lost Item highlighted in red.
- Find the hidden objects highlighted in white.
- Collect the Lucky Clovers highlighted with green.
- Use the KEY on the doctor’s bag to get the newspaper and the SCOOP.
- Use the PUZZLE PIECE on the puzzle box on the desk.

- Solve the puzzle by arranging the squares into the correct order.
- Click on a square and click on the empty spot to move it there.
- In the final solution the empty spot is in the bottom right corner.
- See the screenshot for the correct solution.
- After finishing the puzzle open the box and collect the last two objects.
- Return to the Apothecary.
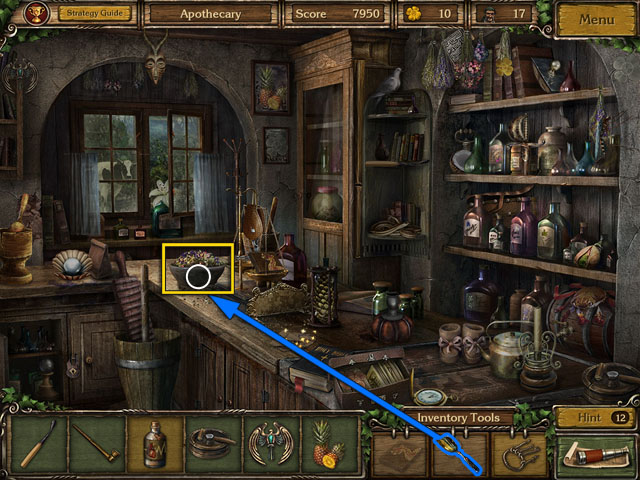
- Use the SCOOP on the bowl to uncover the last round emblem.
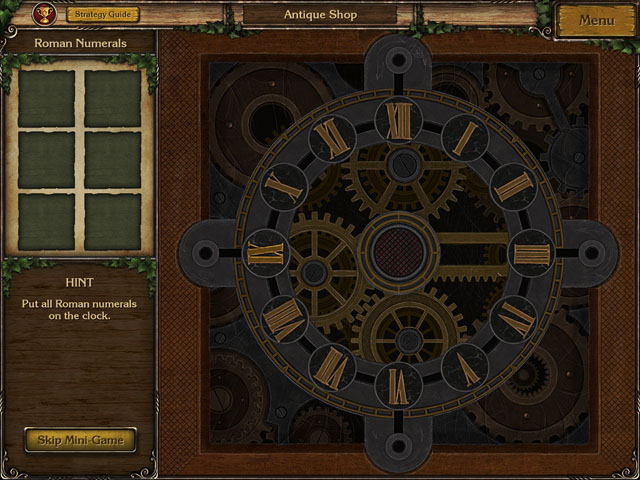
- Solve the puzzle by arranging the emblems into the numbers on a clock face.
- Put all of the emblems from your inventory on the puzzle’s empty slots.
- The button in the middle will spin the puzzle.
- You can also move any number from the spot next to it by clicking on it and then clicking where it should go.
- Start from the number ‘I’ and then put the number ‘II’ on one of the outside holes. These holes don’t spin when you click the center button.
- Spin the clock until you can put ‘II’ to the right of the ‘I’. Continue like this until you have finished them in order and then spin the clock so that ‘XII’ is at the top.
- Take the old map and play the shooting gallery game to finish the chapter.
- Congratulations! You’ve just completed Golden Trail 2: The Lost Legacy.


 Fierce Tales: Feline Sight Walkthrough, Guide, & Tips
 Chronoclasm Chronicles Walkthrough, Guide, & Tips
 Web of Deceit: Deadly Sands Walkthrough, Guide, & Tips
 Living Legends: Frozen Beauty Walkthrough, Guide, & Tips
 Hidden Magic Walkthrough, Guide, & Tips