Lara Gates: The Lost Talisman Walkthrough, Guide, & Tips
Lara Gates: The Lost Talisman Walkthrough

Welcome to the Lara Gates: The Lost Talisman Walkthrough!
Pieces of an ancient talisman have been separated, and now it’s up to you bring them back together before it is too late!
Whether you use this document as a reference when things get difficult or as a road map to get you from beginning to end, we’re pretty sure you’ll find what you’re looking for here.
This document contains a complete Lara Gates: The Lost Talisman game walkthrough featuring annotated screenshots from actual gameplay!
We hope you find this information useful as you play your way through the game. Use the walkthrough menu below to quickly jump to whatever stage of the game you need help with.
Remember to visit the Big Fish Games Forums if you find you need more help. Have fun!
This walkthrough was created by Rebekah, and is protected under US Copyright laws. Any unauthorized use, including re-publication in whole or in part, without permission, is strictly prohibited.
General Tips

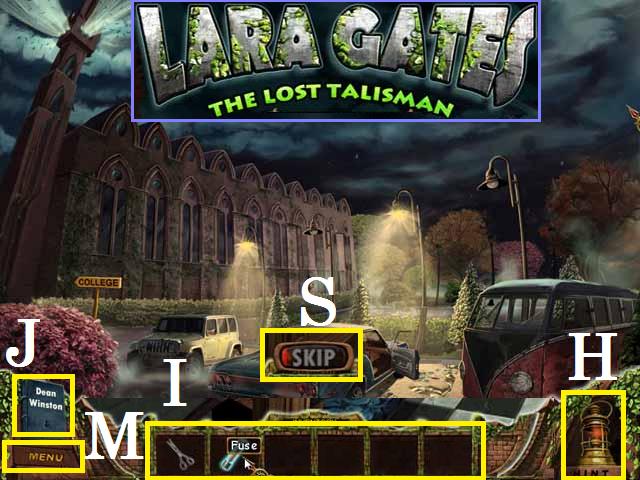
- From the main menu you can Change the player and adjust your options (sound, music, and screen size).
- You can choose to play Regular Mode (Skip and Hint’s recharge faster and Active Zones sparkle) or Expert Mode (Skip and Hint’s recharge slower and Active Zones do not sparkle).
- Click on the Menu (M) button in the lower left corner to exit, pause or resume the game. You can also adjust your options (sound, music, and screen size) and get hints.
- The cursor becomes an arrow when you can move forward into an area.
- Sparkling areas indicate a Hidden Object Scene.
- During Hidden Object scenes an item list will populate at the bottom of the screen. Collect all of the items in the list to complete the scene and receive a needed Inventory Item that.
- Usable items are placed in your Inventory List (I). Scroll over the bottom of the screen to reveal your list.
- If an item in list is a different color an action is required to uncover the item before it can be picked up.
- Once the Hint Button (H) is full you may use it to show you where a hidden object is or the next step in the game.
- You may exit and reenter a Hidden Object Scene and your progress will be saved in that scene.
- You can zoom into your Journal (J) to review clues you have picked up along the way to help solve puzzles.
- Puzzles can be skipped once the Skip Button (S) is full.
- All of the locations are not always available. The doors will close and open based on the current availability of a Hidden Object Scene or puzzle in the room.
- You will always click at the bottom of a scene to return to the last location.
- Each time you play a Hidden Object Scene the items in the inventory list may change. The screenshots in this walkthrough shows the items as listed during the current gameplay.
- You may not need to follow the exact path that this walkthrough follows, however some actions will need to be performed before you can advance in the game.
Talisman 1
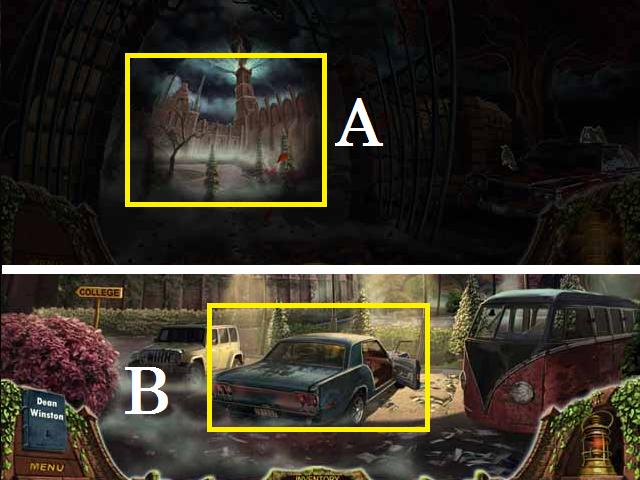
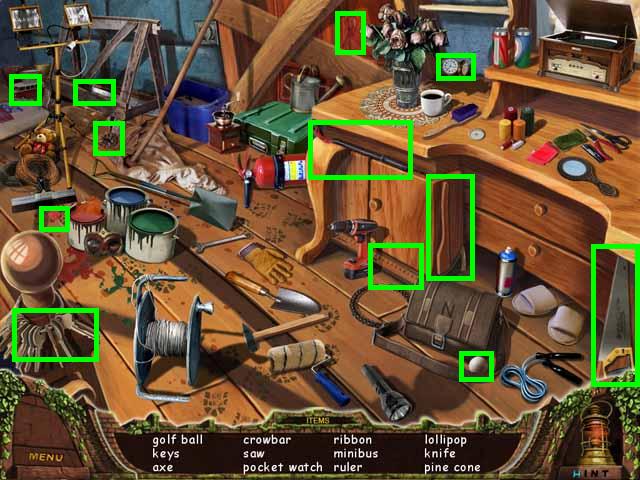
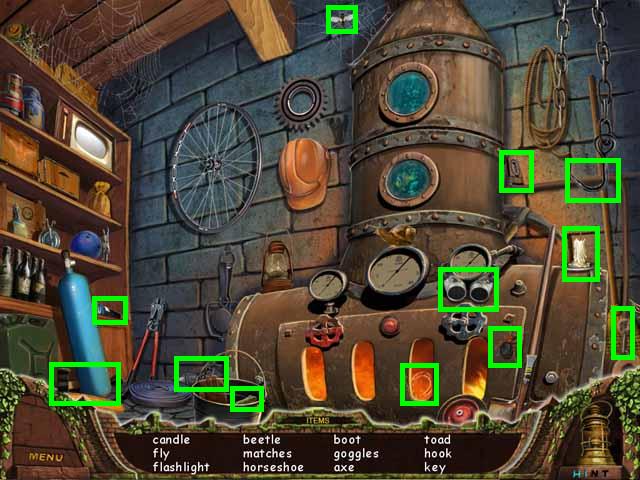
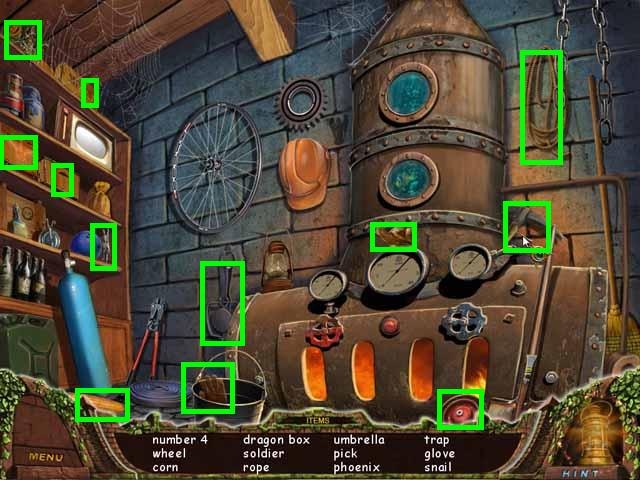
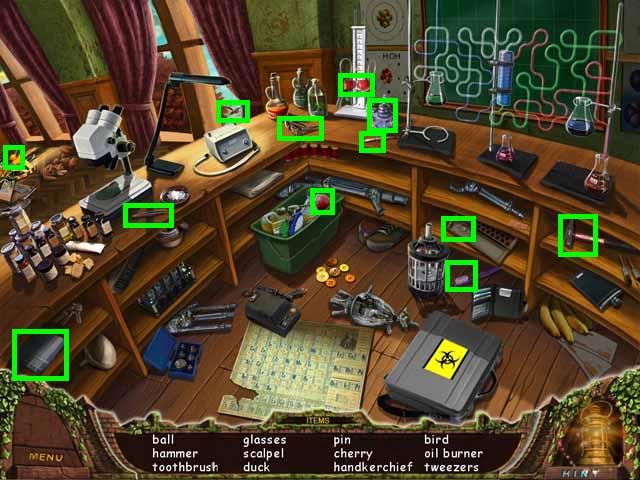
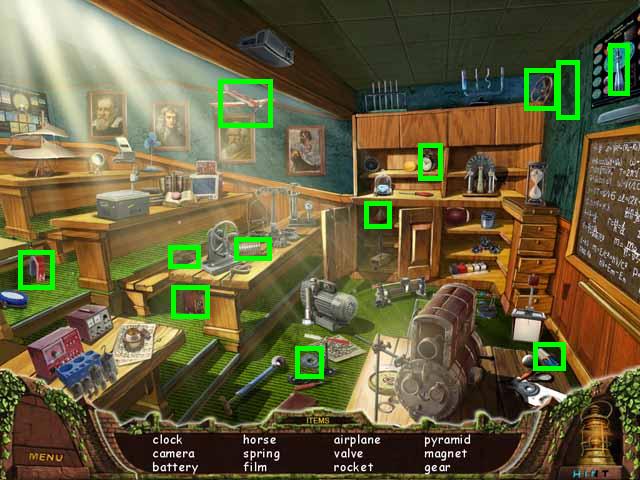
- Move forward through the gate (A) and zoom into the blue car (B) to trigger a Hidden Object Scene.

- Pick up all of the items (all are marked in green in the screenshot) on the list (C) to receive the JOURNAL and KEY.
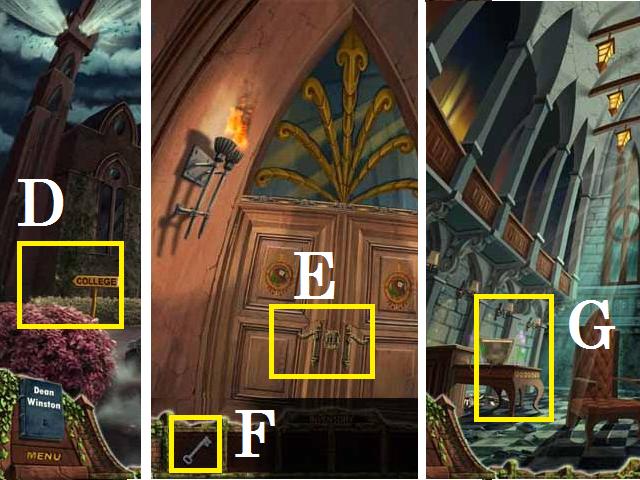
- Click on the left screen near the College Sign (D).
- Open the door (E) with the KEY from your inventory list (F) and enter the College.
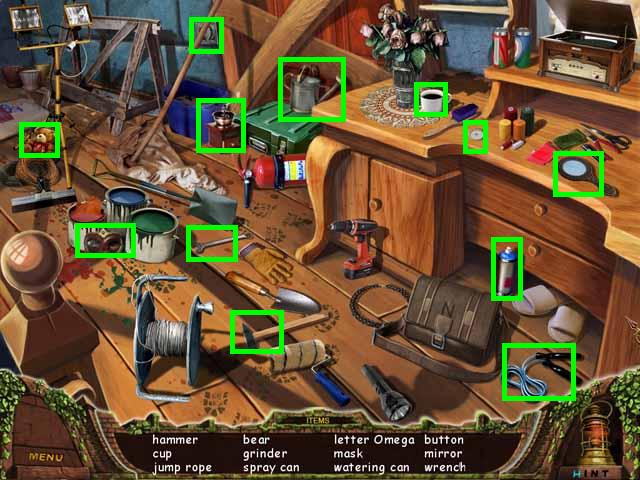
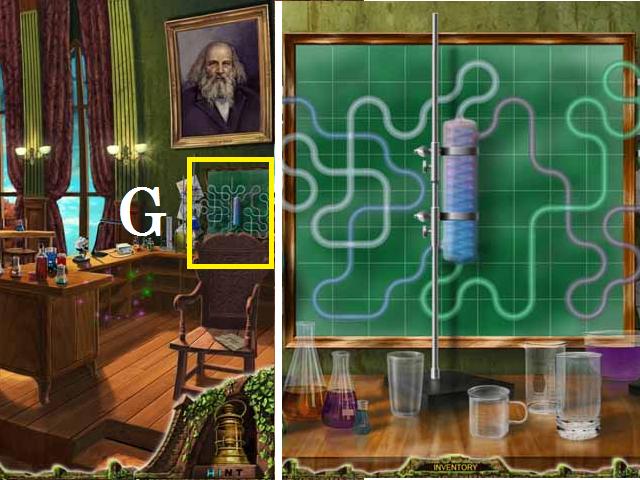
- Zoom into the computer (G) to trigger a Hidden Object Scene.
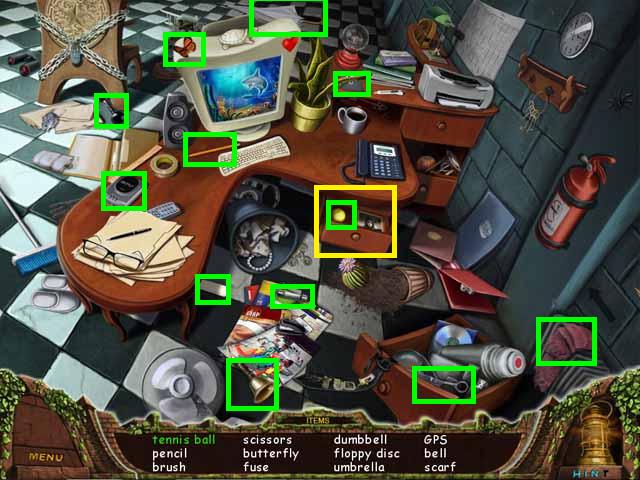
- Open the desk drawer (yellow).
- Pick up all of the items (green) to receive the SCISSORS and FUSE.
- You can Skip the dialogue or click the Continue to watch it all.
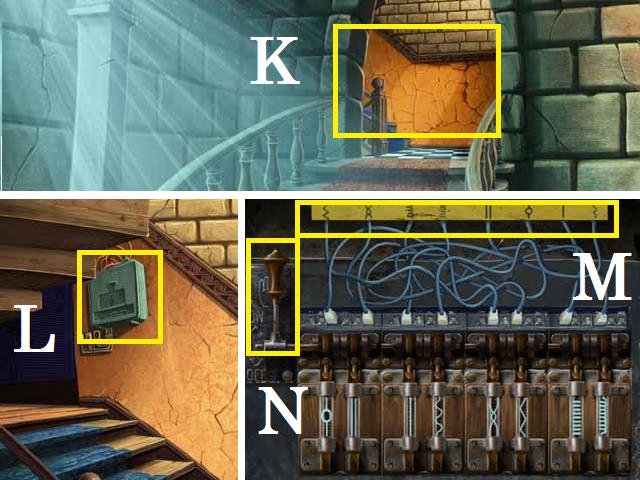
- Move into the stairwell (K) and zoom into the fuse box (L).
- Place the FUSE into the open slot and rearrange the fuses to complete the circuit. Follow the wire from the symbol on the top (M) to the fuse position and match the symbol on the fuses as shown in the screenshot.
- Pull the lever (N).
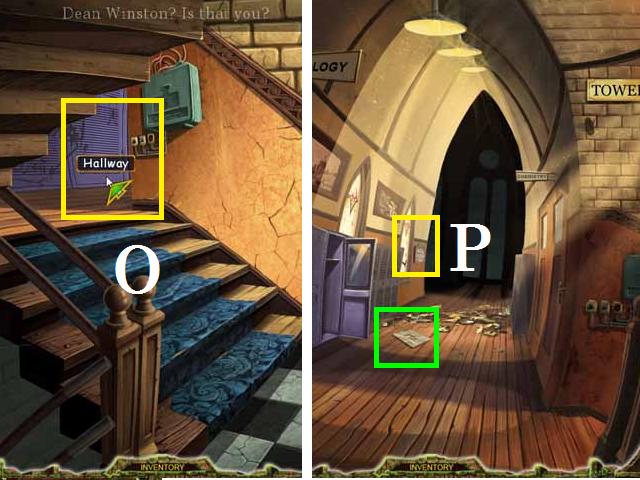
- Enter the hallway (O) at the top of the stairs.
- Pick up the JOURNAL PAGE (green) and zoom into the lights circuit panel (P).
- Rearrange the pieces in the two outer rings. (Hint: once they are in the correct order they will not be moveable).
- Then rotate the two outer rings using the handles (yellow) until they match up with the center ring as shown in the screenshot.
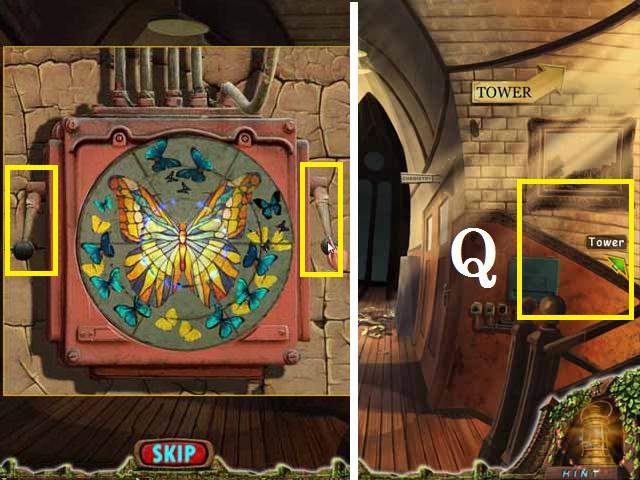
- Move up the stairs to the Tower (Q).
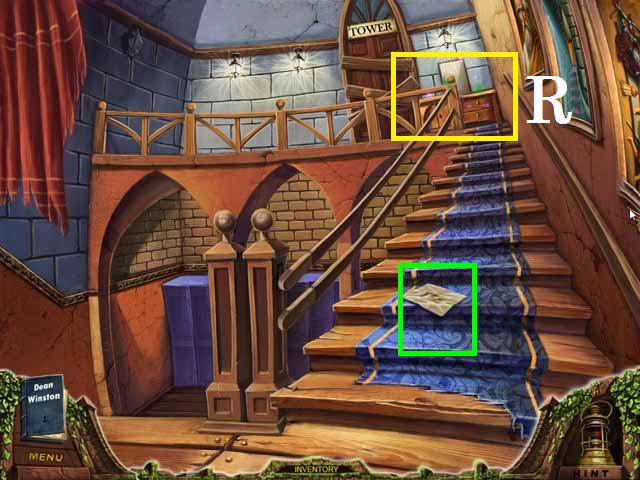
- Pick up the JOURNAL PAGE (green) and zoom into the dresser (R), at the top of the stairs, to trigger a Hidden Object Scene.
- Pick up all of the items (green) to receive the CROWBAR and AXE.
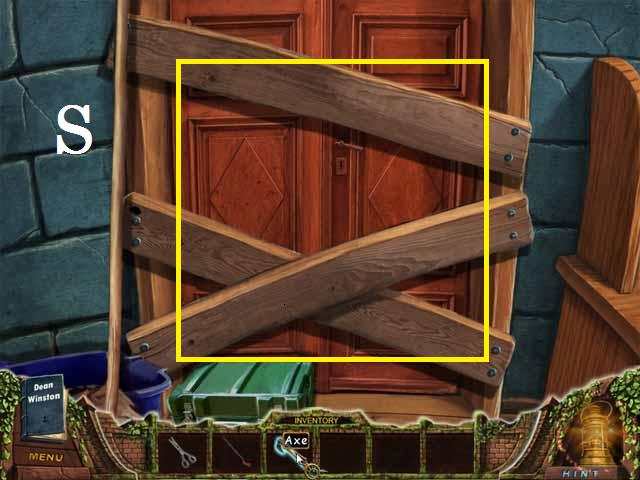
- Zoom into the Tower Door at the top of the stairs and remove the boards (S) with the AXE. Chop the wood until the door opens and enter the Tower.
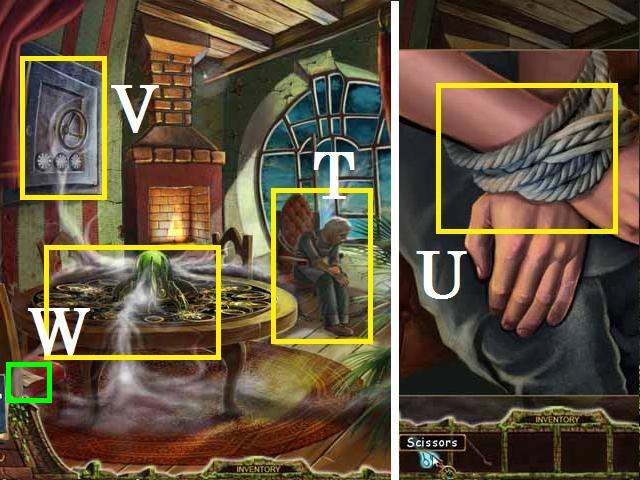
- Zoom into the gardener (T) and remove the ropes (U) with the SCISSORS.
- You can zoom into the wall safe (V) and the talisman table (W).
- Pick up the JOURNAL PAGE (green).
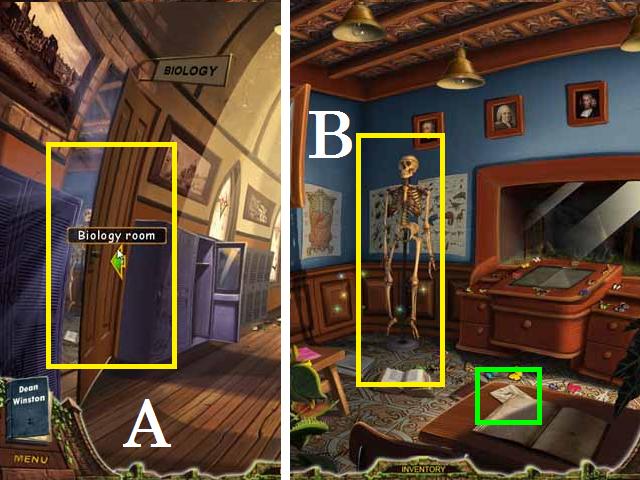
- Exit back down to the Main Hallway and enter the Biology Room (A).
- Pick up the JOURNAL PAGE (green) and zoom into the skeleton (B) to trigger a Hidden Object Scene.
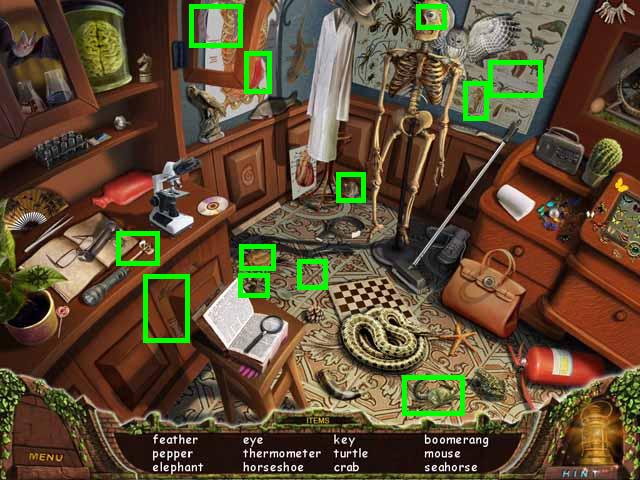
- Pick up all of the items (green) to receive the KEY and ELEPHANT.
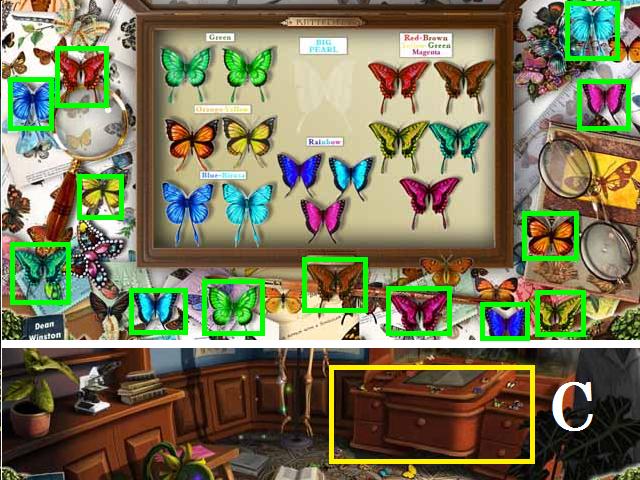
- Zoom into the vanity (C) and arrange the BUTTERFLYIES (green) as shown in the screenshot.
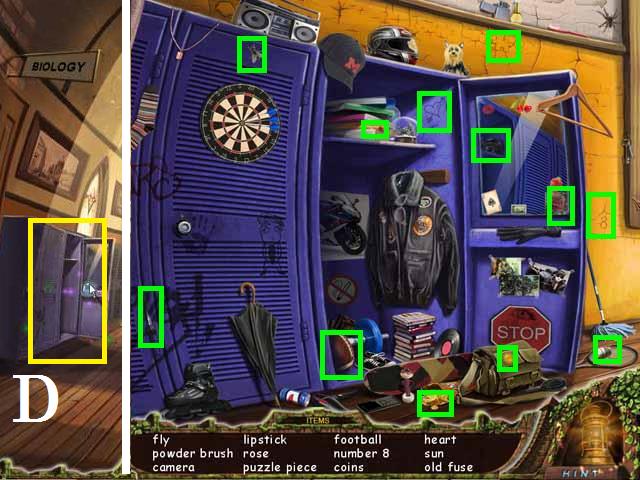
- Exit the room to the Main Hallway and zoom into the lockers (D) to trigger a Hidden Object Scene.
- Pick up all of the items (green) to receive the FLY and OLD FUSE.
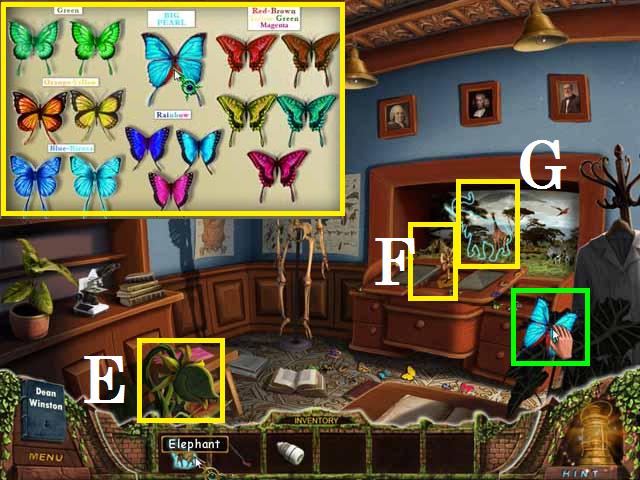
- Back in the Biology Room, feed the FLY to the Venus Flytrap (E) and pick up the BUTTERFLY (green).
- Zoom back into the vanity and place the last BUTTERFLY from your inventory.
- Place the KEY into the keyhole (F) and the ELEPHANT on the screen (G) to receive the first TALISMAN.
- The TALISMAN will be automatically added to your inventory.
Talisman 2

- You will need to return to the Tower and place the first TALISMAN on the table. Match the elephant on the TALISMAN to the elephant on the table as shown in the screenshot.
- For the remaining TALISMAN you may place them right away or hang onto them until the end.
- Move forward down the hallway and pick up the JOURNAL PAGE (green) and zoom into the fuse box (A).
- Place the OLD FUSE into the open slot and swap the fuses positions until you have completed the circuit as shown in the screenshot.
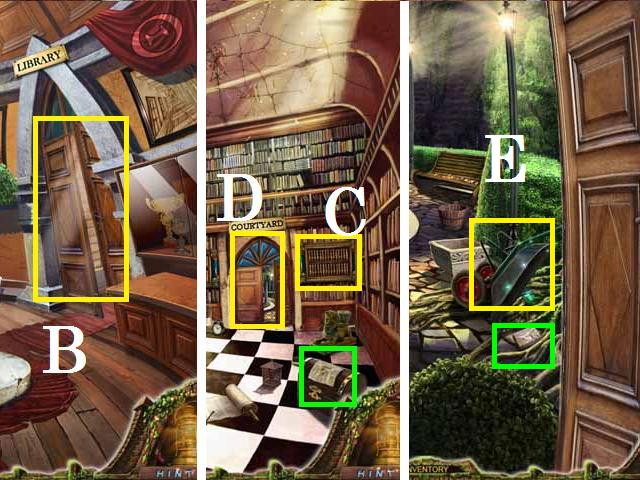
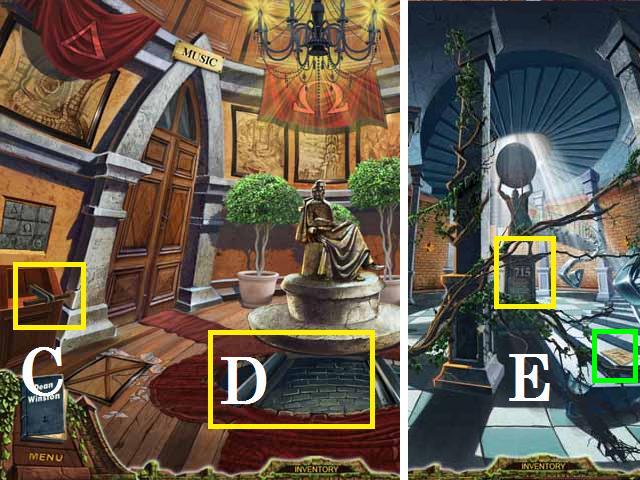
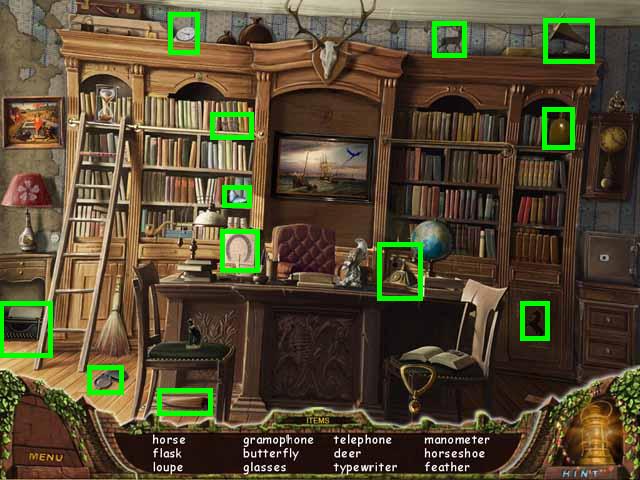
- Move forward down the hallway again to the Statue Area and enter the Library (B).
- Pick up the JOURNAL PAGE (green) and zoom into the bookcase (C). Close the window by clicking at the bottom of the screen.
- Enter the Courtyard (D).
- Pick up the JOURNAL PAGE (green).
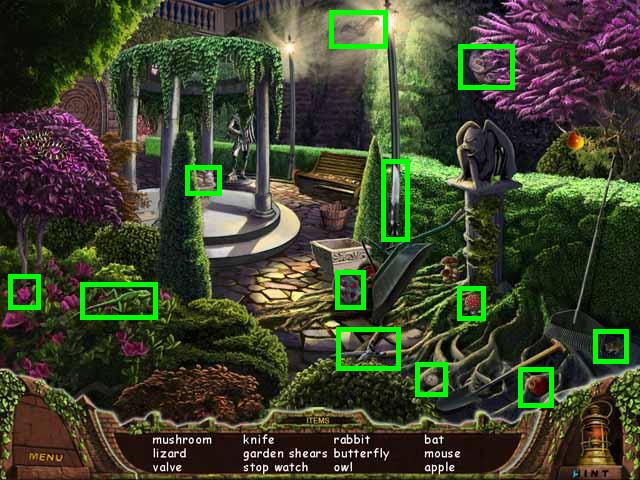
- Zoom into the wheel barrel (E) to trigger a Hidden Object Scene.
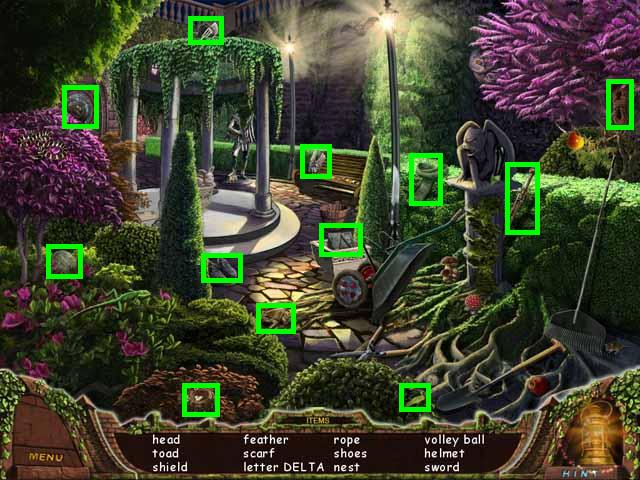
- Pick up all of the items (green) to receive the HEAD.
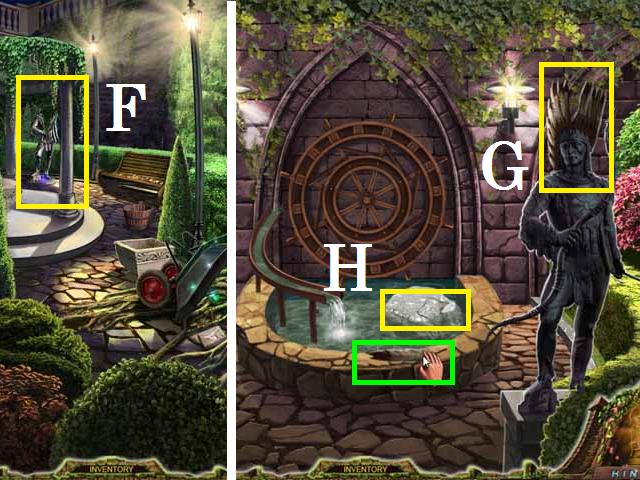
- Zoom into the statue (F) and place the head on the right statue (G).
- Move the rock (H) with the CROWBAR and pick up the FEATHER (green) once it stops.
- Place the FEATHER on the HEAD to receive a TALISMAN.
Talisman 3
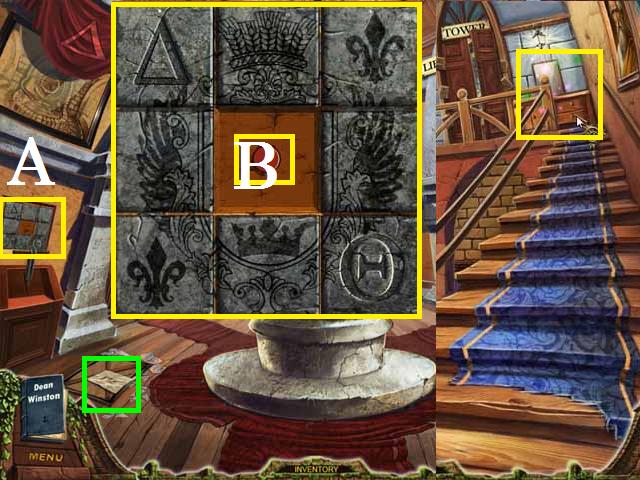
- Return to the Statue Area and zoom into the panel (A) on the far left wall.
- Arrange the tiles, by swapping their positions, as shown in the screenshot and push the red button (B) then close the window.
- Pick up the JOURNAL PAGE (green).
- Return to the stairs outside of the Tower door and zoom back into the dresser to trigger a Hidden Object Scene.
- Pick up all of the items (green) to receive the TILE.
- Return to the statue area and place the TILE over the red button.
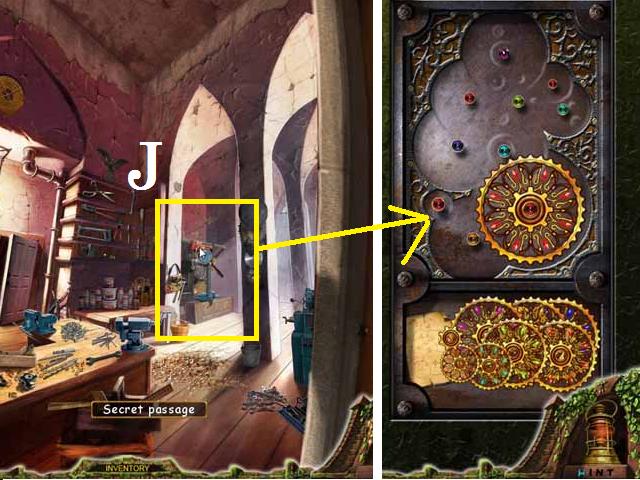
- Pull the lever (C) under the panel to move the statue and go down the Secret Passage (D).
- Pick up the JOURNAL PAGE (green).
- The secret code for the safe in the Tower is on the statues base (E).
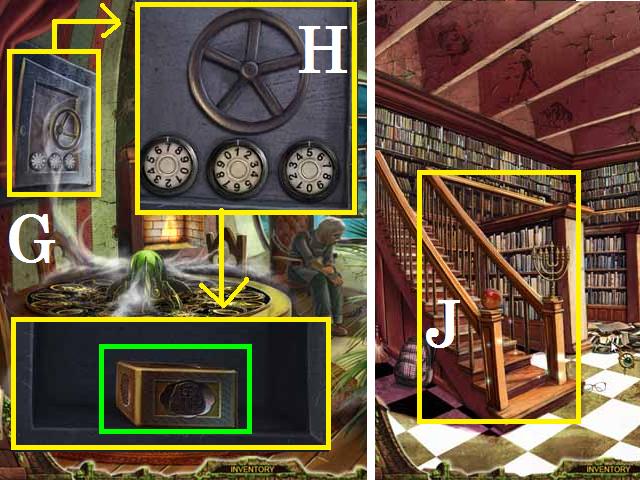
- Return to the Tower and zoom into the wall safe (G).
- Set the dials to 7, 1, and 5 as shown in the screenshot then turn the handle (H).
- Pick up the BOX (green) and return to the Library.
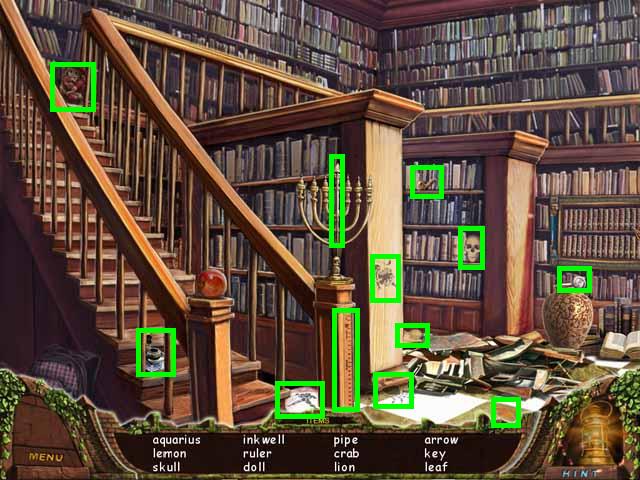
- Zoom into the stairwell (J) to trigger a Hidden Object Scene.
- Pick up all of the items (green) to receive the BOOK.
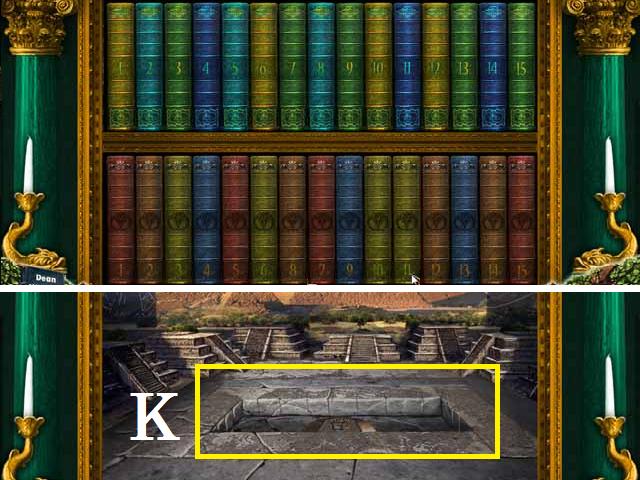
- Zoom back into the bookcase and place the BOOK in the open slot.
- Rearrange the books by swapping them with each other.
- The top shelf should be ordered, from left to right, 1-15 with all of the books that have the number in the middle of the spine.
- The bottom shelf should be 1-15 with the numbers at the base as shown in the screenshot.
- Once the shelf opens up, place the BOX in the picture (K).
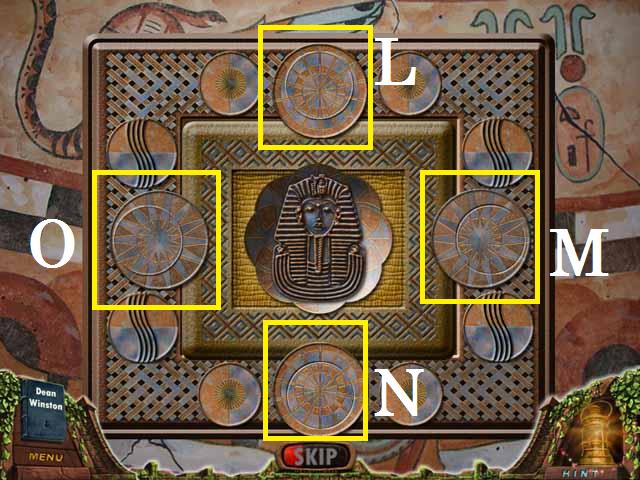
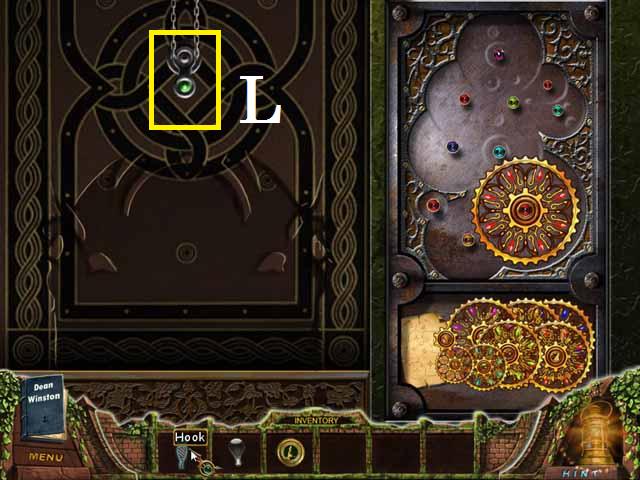
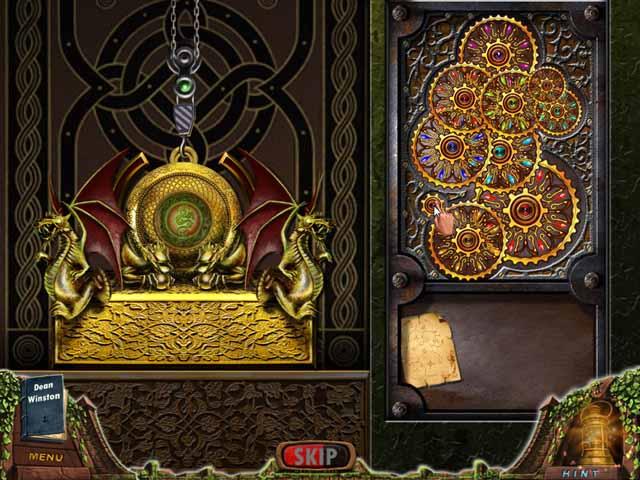
- Click in the center ring of the symbol (L), until it matches the outer ring as shown in the screenshot. Repeat this step for all four (L-O) of the middle symbols.
- Once the puzzle is solved the box will open and you will receive another TALISMAN.
Talisman 4
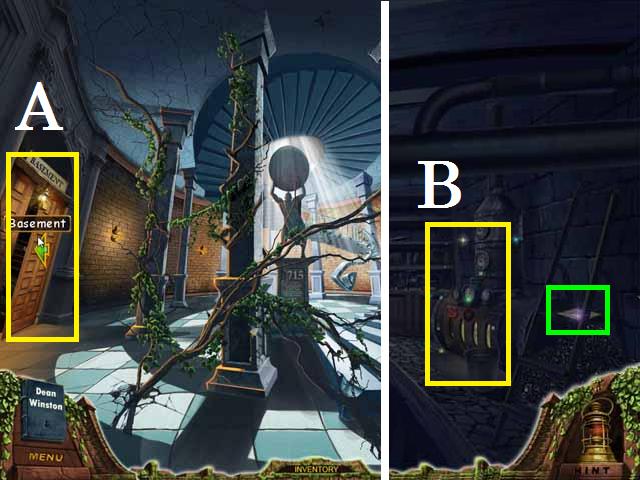
- Go back down the Secret Passage and enter the Basement (A).
- Pick up the JOURNAL PAGE (green) and zoom into the furnace (B).
- Exit out and return to the Garden through the Library.
- Zoom back into the wheel barrel to trigger a Hidden Object Scene.
- Pick up all of the items (green) to receive the VALVE.
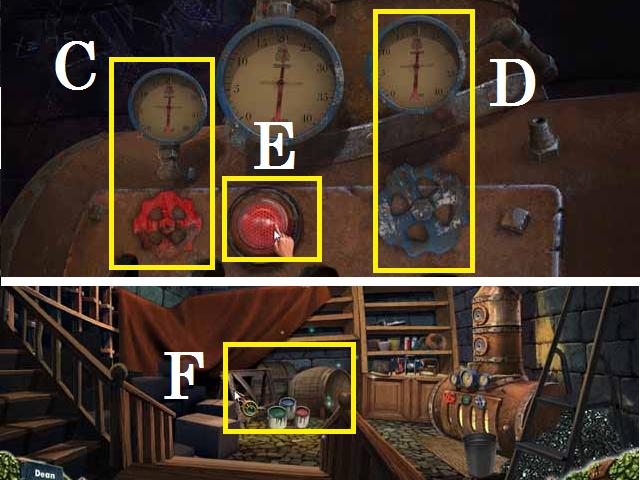
- Return to the basement and place the VALVE on the furnace as shown in the screenshot.
- Set the temperature to the far left gauge (C) by clicking on its valve until it reads 35.
- Set the temperature on the far right gauge (D), by clicking the valve, to 20 and push the green button (E).
- Zoom into the paint buckets and barrels (F) to trigger a Hidden Object Scene.
- Pick up all of the items (green) to receive the KEY.
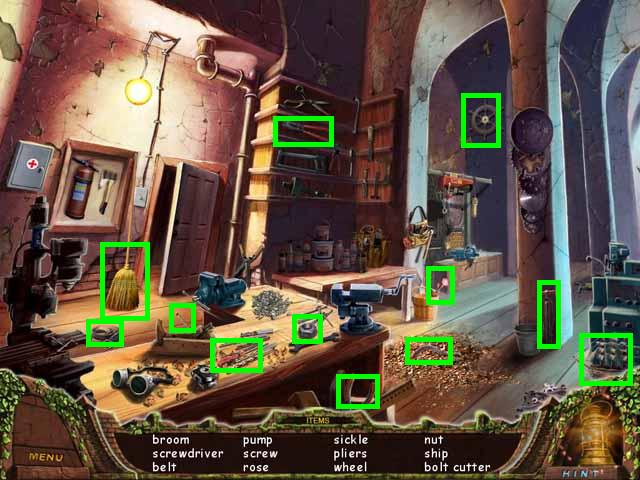
- Exit the Basement and enter the Workshop (G).
- Pick up the JOURNAL PAGE (green) and unlock the gate (H) with the KEY.
- Zoom into the work bench (I) to trigger a Hidden Object Scene.
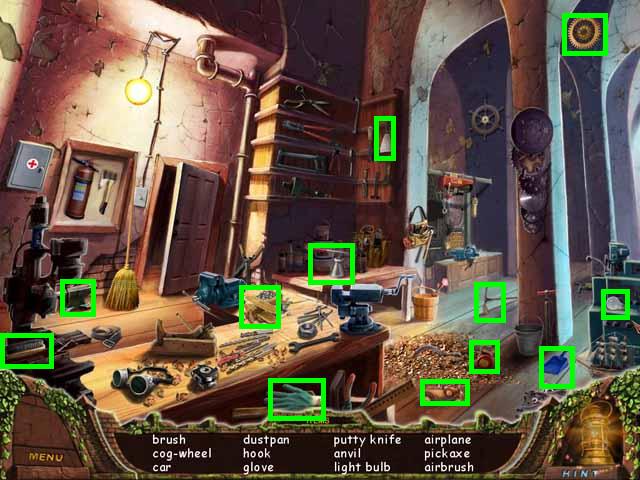
- Pick up all of the items (green) to receive the GEAR and LIGHTBULB.
- Zoom into the gear box (J), at the back of the room, and place the GEAR as shown in the screenshot.
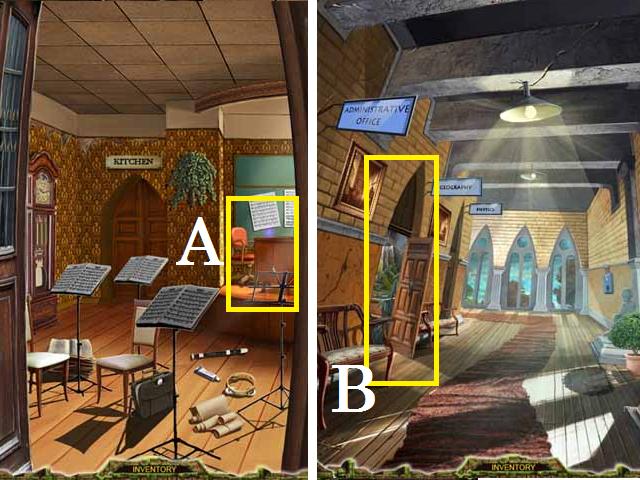
- Go back up to the Statue Area and enter the Music Room (K).
- Pick up the JOURNAL PAGE (green) and zoom into trigger a Hidden Object Scene.
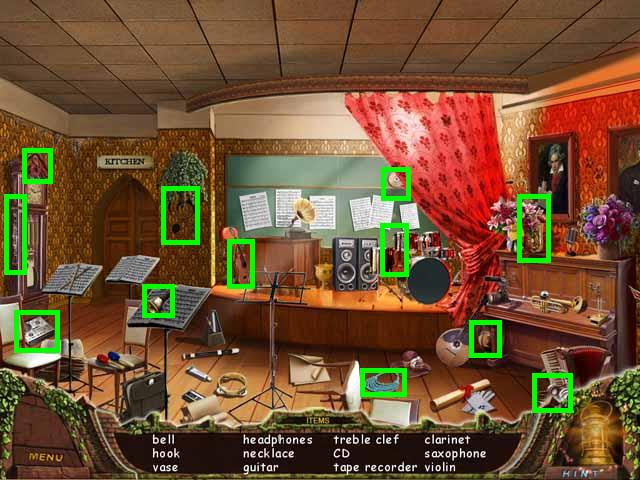
- Pick up all of the items (green) to receive the HOOK.
- Return to the Workshop down the secret passage and zoom back into the gearbox. Hang the hook on the chain (L) as shown in the screenshot.
- In the Basement zoom back into the paint buckets and barrels to trigger a Hidden Object Scene.
- Pick up all of the items (green) to receive the DRAGON BOX.
- Zoom back into the gear box in the Workshop.
- Place the DRAGON BOX as shown in the screenshot.
- Place the gears on the matching color knobs as shown in the screenshot to receive another TALISMAN. (Hint: if it is the wrong position it will not stay).
Talisman 5
- Go to the Music Room and zoom into the desk (A) then exit the music room.
- From the Statue Area exit back one scene and enter the Geography Room (B).
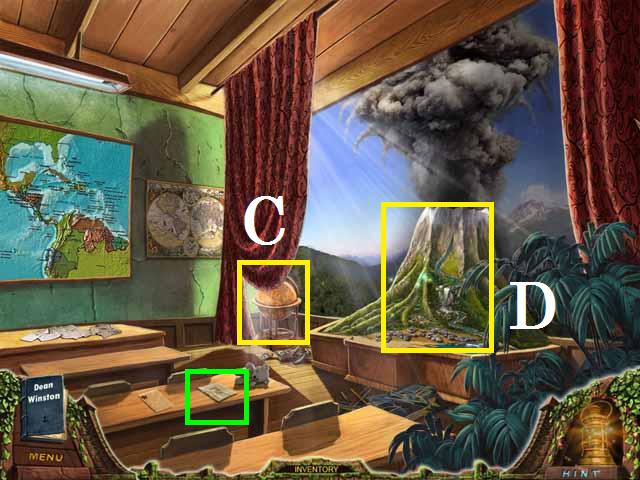
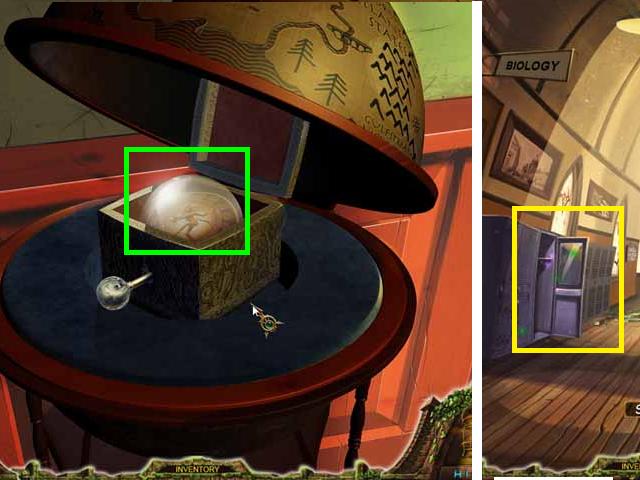
- Zoom into the globe (C) then back out.
- Pick up the JOURNAL PAGE (green) and zoom into the volcano (D) to trigger a Hidden Object Scene.
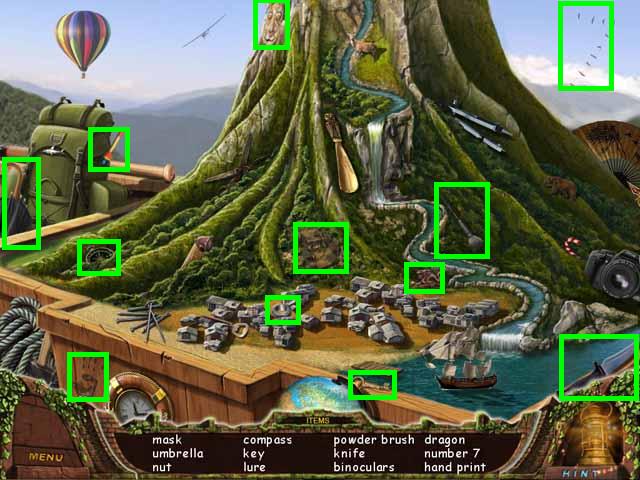
- Pick up all of the items (green) to receive the KEY.
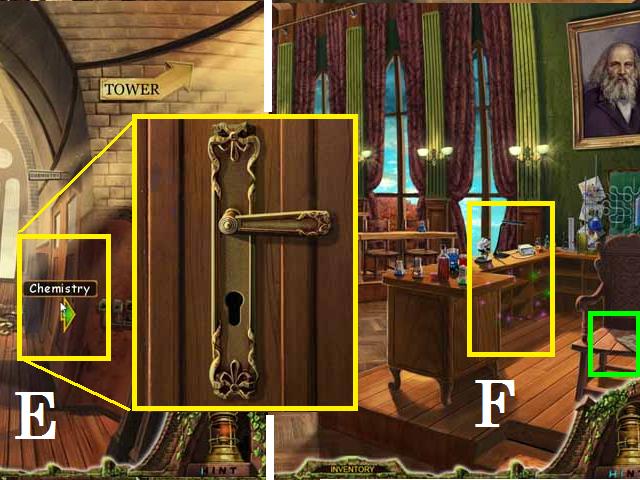
- Go back to the Main Hallway and unlock the Chemistry Door (E) with the KEY.
- Inside the Chemistry Room pick up the JOURNAL PAGE (green) and zoom into the desk (F) to trigger a Hidden Object Scene.
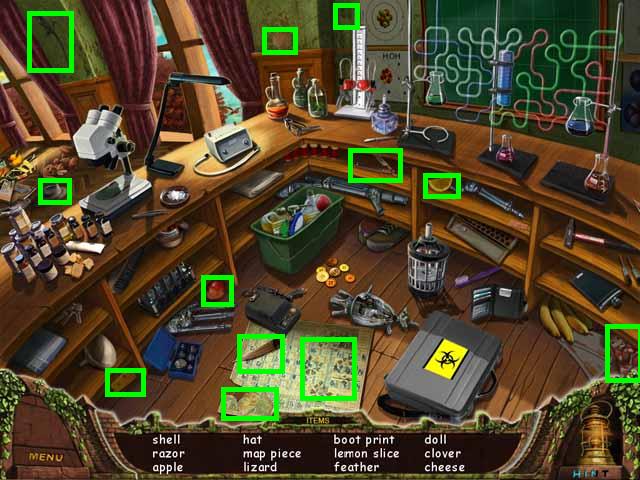
- Pick up all of the items (green) to receive the MAP PIECE.
- Zoom into the tubes and beakers (G), behind the chair, and arrange the tubes as shown in the screenshot.
- Return to the Geography Room and place the MAP PIECE on the globe to open it.
- Return to the Library and zoom back into the staircase to trigger a Hidden Object Scene.
- Pick up all of the items (green) to receive the KEY.
- Return to the Geography Room.
- Unlock the box in the globe with the KEY and pick up the SPHERE (green).
- Zoom back into the lockers in the Main Hallway to trigger a Hidden Object Scene.
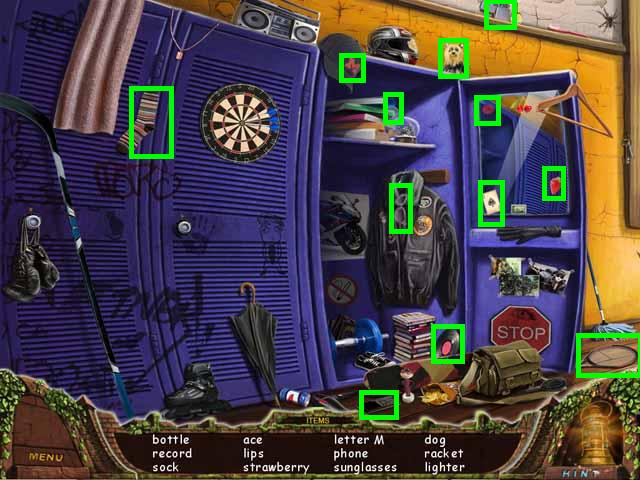
- Pick up all of the items (green) to receive the RECORD.
- Return to the Music Room and zoom in to trigger a Hidden Object Scene.
- Pick up all of the items (green) to receive the TUNING FORK.
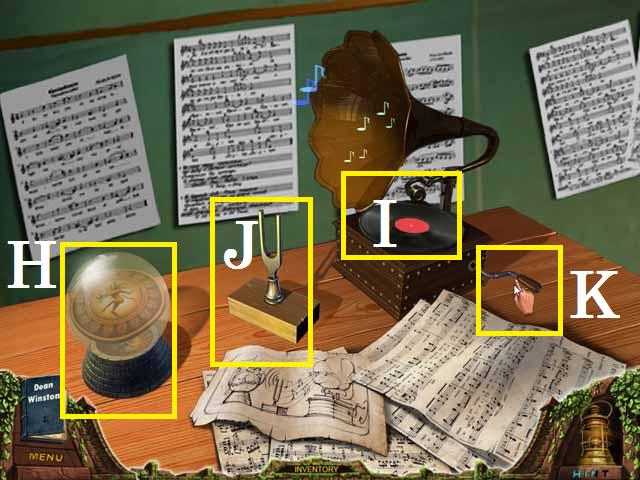
- Zoom back into the desk and place the SPHERE in the stand (H), the RECORD on the player (I) and the TUNING FORK on the desk (J) in between them.
- Crank the handle (K) to receive another TALISMAN.
Talisman 6
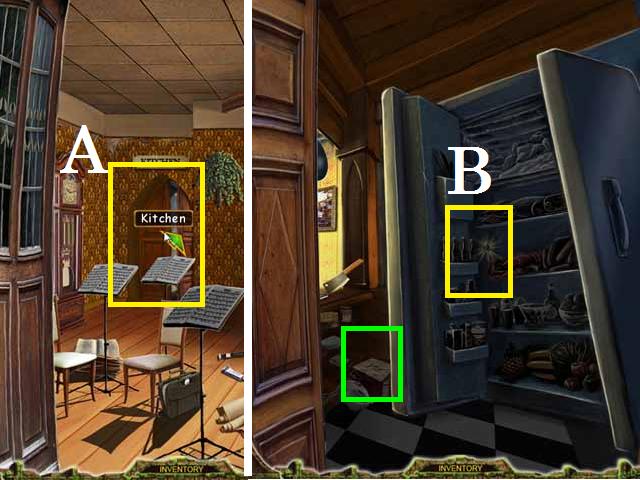
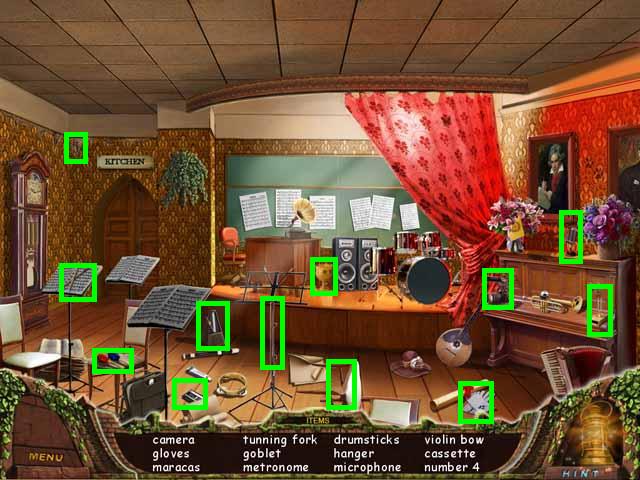
- From the Music Room enter the Kitchen (A).
- Pick up the JOURNAL PAGE (green) and place the LIGHTBULB in the fridge (B).
- Zoom into the room to trigger a Hidden Object Scene.
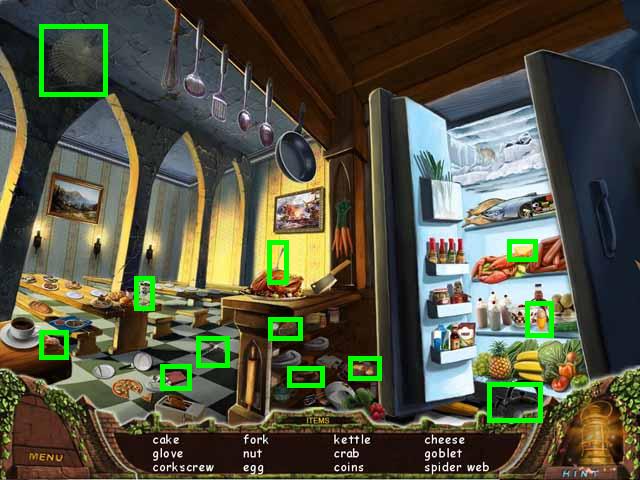
- Pick up all of the items (green) to receive the COINS.
- In the Chemistry Room, zoom back into the desk to trigger a Hidden Object Scene.
- Pick up all of the items (green) to receive the OIL BURNER.
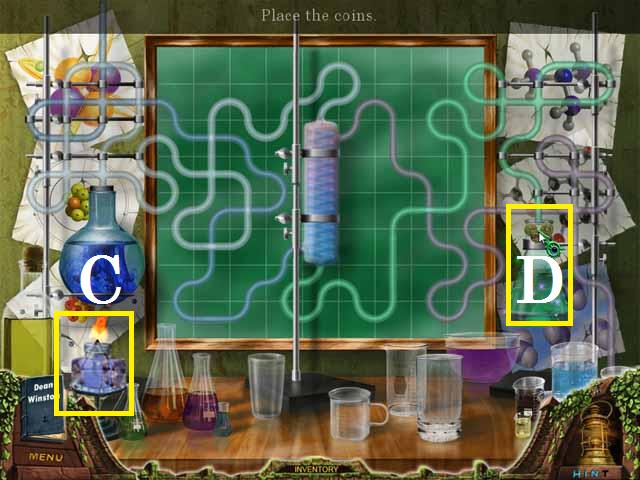
- Zoom back into the tubes and beakers and place the OIL BURNER under the left beaker (C).
- Place the COINS inside the right beaker (D) to receive another TALISMAN.
Talisman 7
- Return to the Kitchen and zoom back in to trigger a Hidden Object Scene.
- Pick up all of the items (green) to receive the ICE BLOCK.
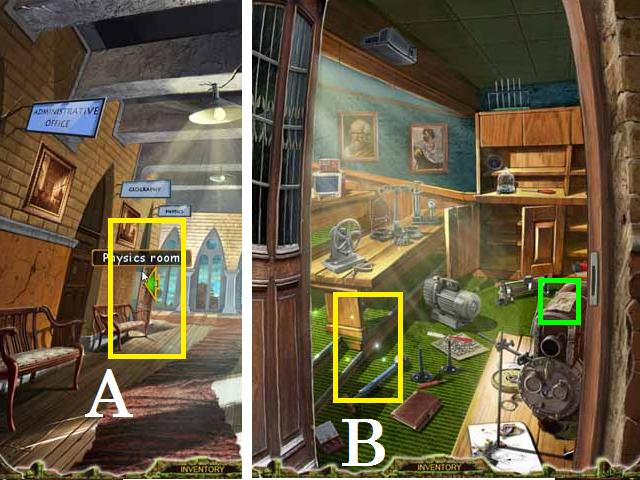
- From the Statue Area back out one hallway and enter the Physics Room (A).
- Pick up the JOURNAL PAGE (green) and zoom into the table area (B) to trigger a Hidden Object Scene.
- Pick up all of the items (green) to receive the VALVE.
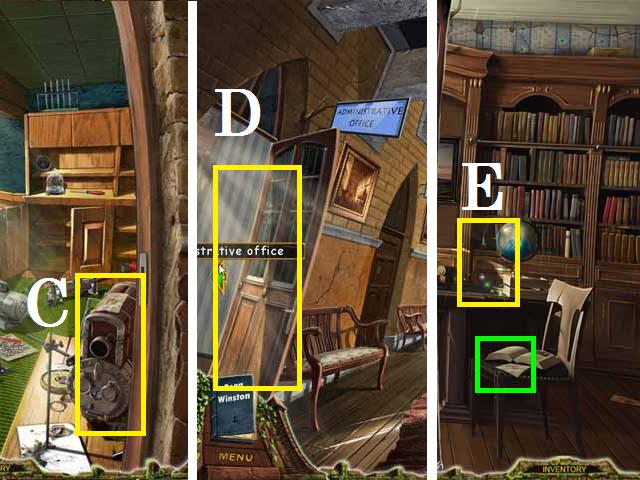
- Zoom into the manometer (C) then exit the room.
- Enter the Administrative Office (D).
- Pick up the JOURNAL PAGE (green) and zoom into the desk (E) to trigger a Hidden Object Scene.
- Pick up all of the items (green) to receive the GAUGE.
- Return to the Biology Room and zoom back into the skeleton to trigger a Hidden Object Scene.
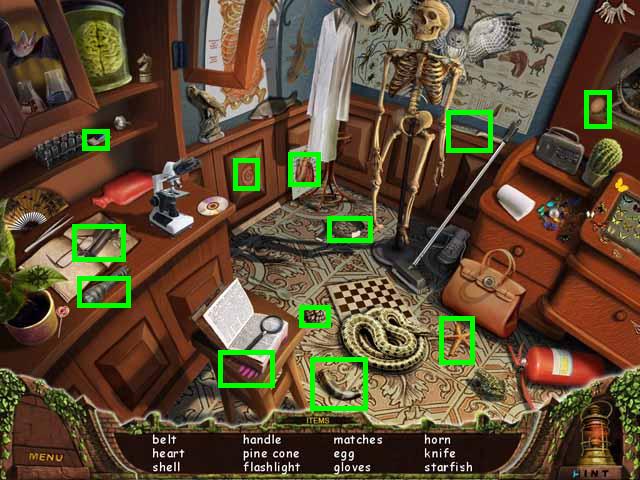
- Pick up all of the items (green) to receive the HANDLE.
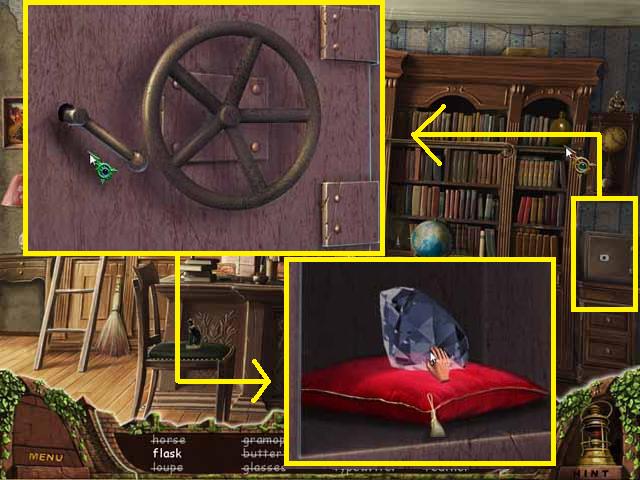
- In the Administrative Office, zoom into the safe (F) and place the HANDLE and VALVE as shown in the screenshot.
- Pick up the DIAMOND (green) from inside the safe.
- Return to the Physics Room and zoom back into the manometer.
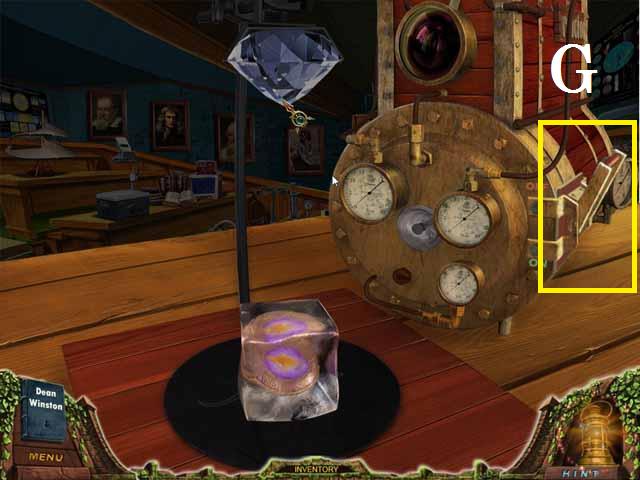
- Place the GAUGE, ICE BLOCK, and DIAMOND as shown in the screenshot.
- Pull the on lever (G) to receive the last TALISMAN.

- Return to the Tower and zoom back into the talisman table.
- Place the six TALISMEN, over the matching spaces, as shown in the screenshot. (Note: they will not stay if you placed them in the wrong spot).
- Using the yellow and blue buttons (A) rotate the inner (B) and outer gem (C) colors until they match the stationary colors as shown in the screenshot.
- Return to the Workshop and zoom in to trigger a Hidden Object Scene.
- Pick up all of the items (green) to receive the BOLT CUTTERS.
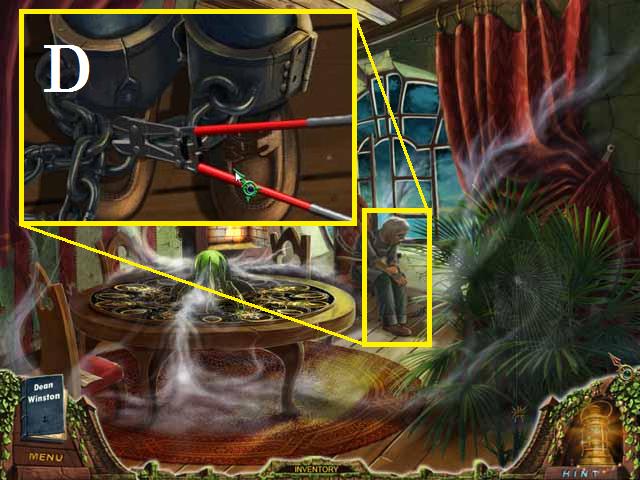
- In the Tower cut the shackles (D) off of the Gardner.
- Congratulations you have reunited the Talisman and saved the day!


 Strangestone Walkthrough, Guide, & Tips
 Vault Cracker: The Last Safe Walkthrough, Guide, & Tips
 Fear for Sale: The 13 keys Walkthrough, Guide, & Tips
 Haunting Mysteries: The Island of Lost Souls Walkthrough, Guide, & Tips
 Christmas Eve: Midnight's Call Walkthrough, Guide, & Tips