Written Legends: Nightmare at Sea Walkthrough , Guide, & Tips
Written Legends: Nightmare at Sea Walkthrough

Welcome to the Written Legends: Nightmare at Sea Walkthrough!
Trapped at the bottom of the sea by Davy Jones, you must discover his secrets, save your father and find a way to escape!
Whether you use this document as a reference when things get difficult or as a road map to get you from beginning to end, we’re pretty sure you’ll find what you’re looking for here.
This document contains a complete Written Legends: Nightmare at Sea game walkthrough featuring annotated screenshots from actual gameplay!
We hope you find this information useful as you play your way through the game. Use the walkthrough menu below to quickly jump to whatever stage of the game you need help with.
Remember to visit the Big Fish Games Forums if you find you need more help. Have fun!
This walkthrough was created by prpldva, and is protected under US Copyright laws. Any unauthorized use, including re-publication in whole or in part, without permission, is strictly prohibited.
General Tips

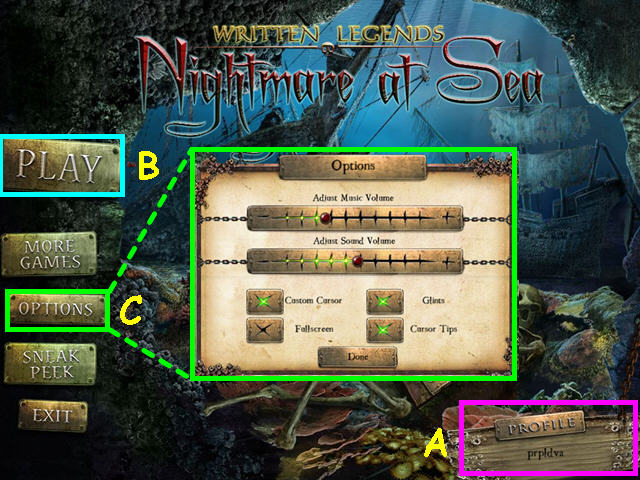
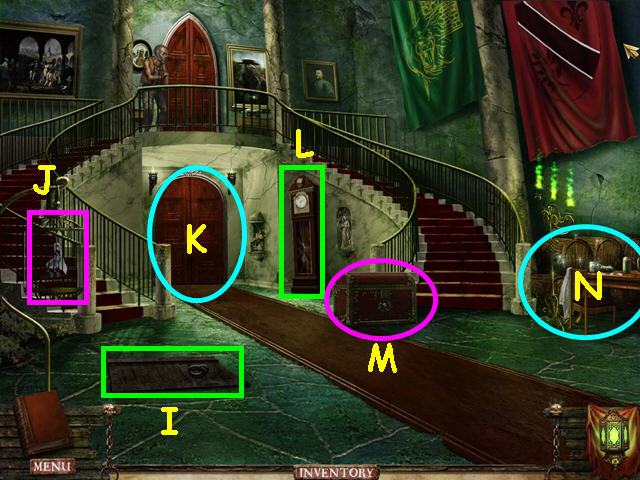
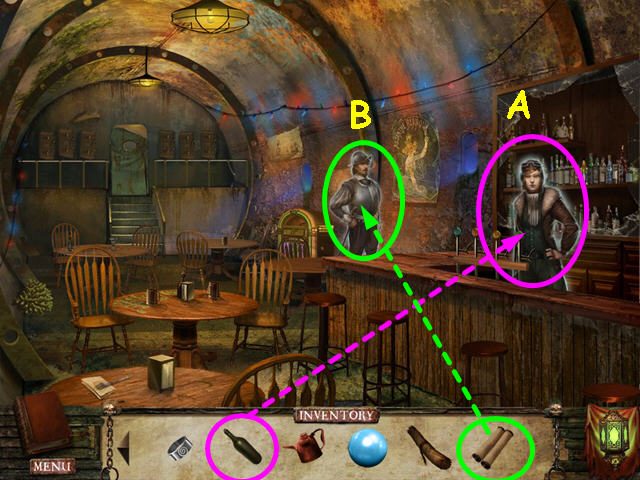
- Select ‘Profile’ on the main screen to add or delete player profiles (A).
- Select ‘Play’ to begin or continue your game (B).
- You may play this game in full screen or windowed mode by changing the settings in the Options menu (C).
- You may also adjust the volume, turn off/on the custom cursor, active item glints, and cursor tips in the Options.
- Hidden Object Scenes and mini-games are often randomized – your solution may vary.
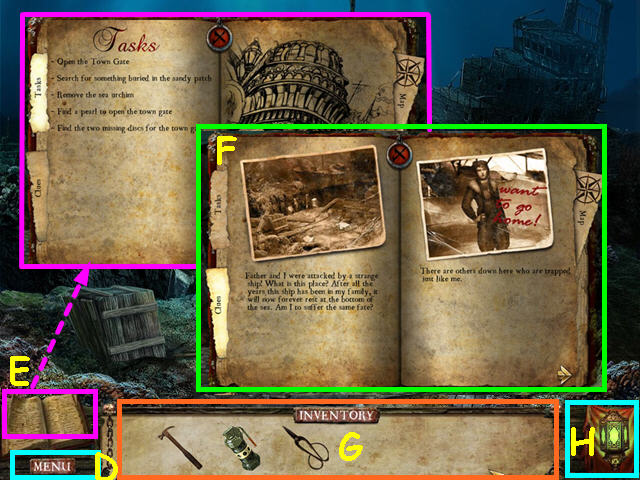
- The menu button in the lower left will give you access to the settings menu or will allow you to return to the main menu (D).
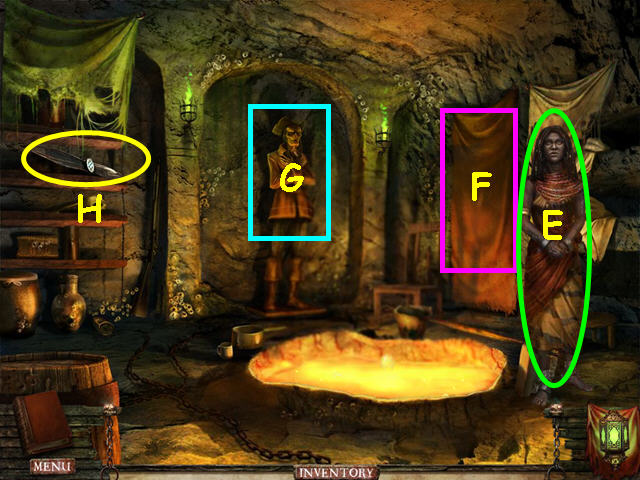
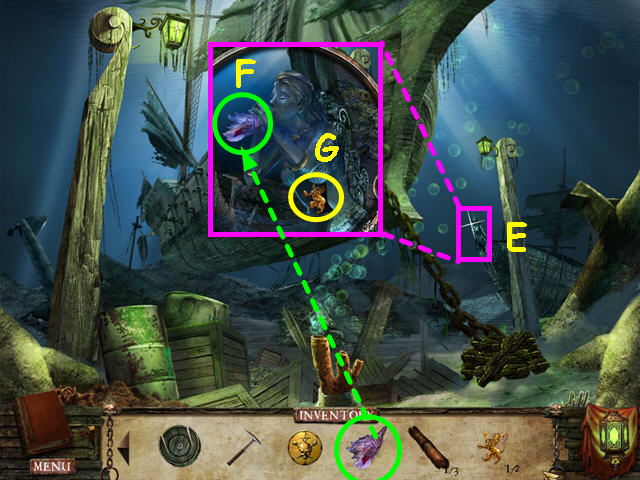
- Above the menu button is the Journal (E).
- Inside the journal you will find your task list and clues (F).
- Your inventory is in the bottom panel; click on an item to select it for use (G).
- The Inventory panel will auto -hide when not in use.
- Use the scroll buttons at each end to view more inventories.
- Hints are unlimited (H).

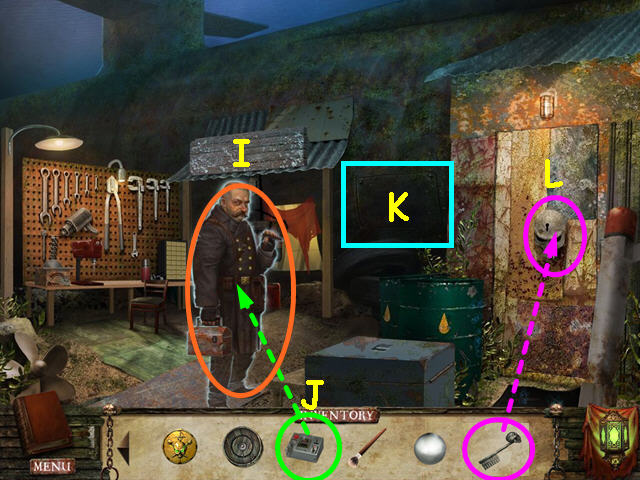
- The map is found in your journal – click on the Map tab (I).
- You can see your current location marked with an ‘X’ (J).
- Your goal location will be shaded in green (K).
Chapter 1: Under the Sea
- You will have the option of some interactive help.
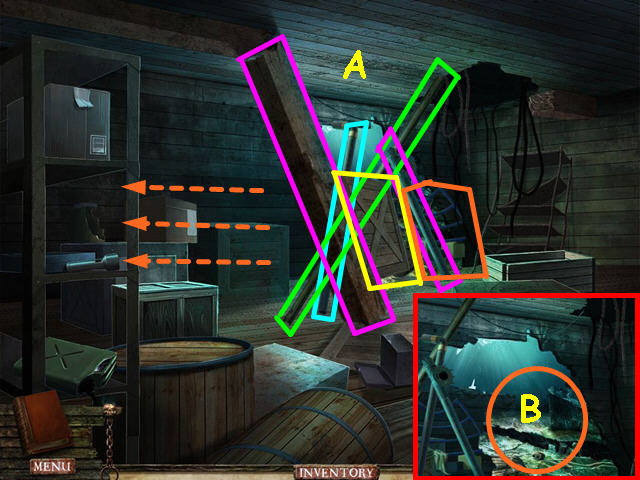
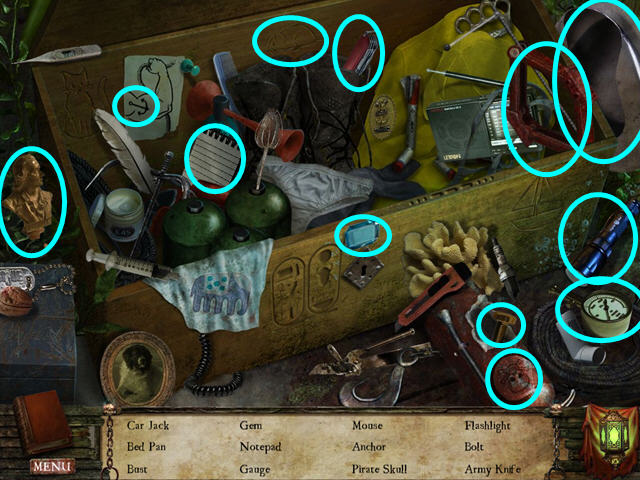
- Click on the 6 debris items blocking the hole in the hull to move them aside (A).
- Exit through the hole in the hull (B).
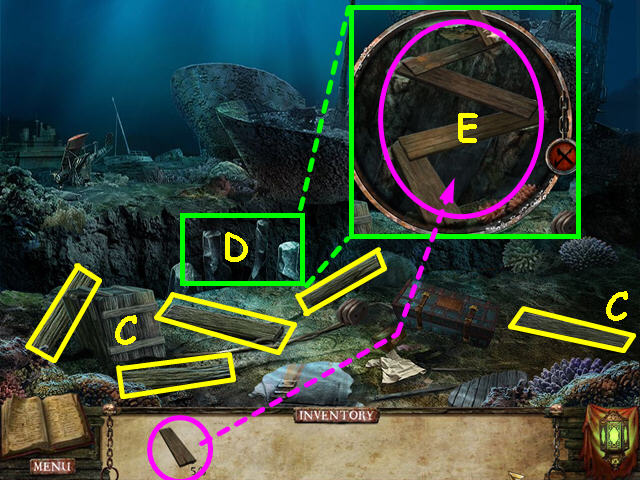
- Collect the 5 PLANKS marked in yellow (C).
- Look at the close-up of the ruined bridge (D).
- Use the 5 PLANKS on the pillars to form a walkway (E).
- Walk forward across the walkway.
- Note the doorway (F).
- Look at the close-up of the cockpit (G).
- Open the glove box (H).
- Take the FLASH GRENADE and the CUTTING SHEARS (I).
- Look at the photo of the pilot (J).
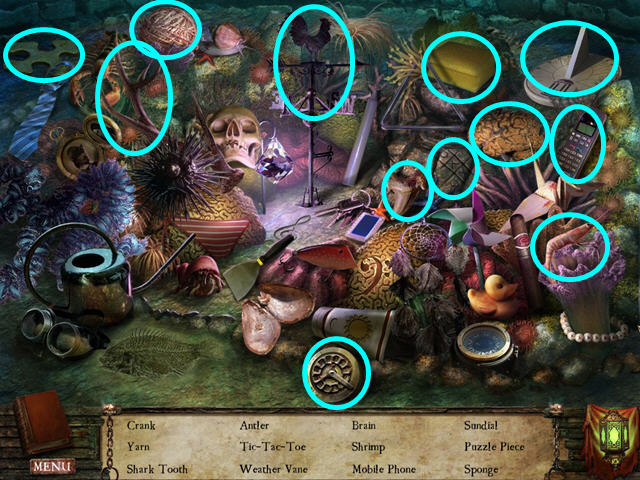
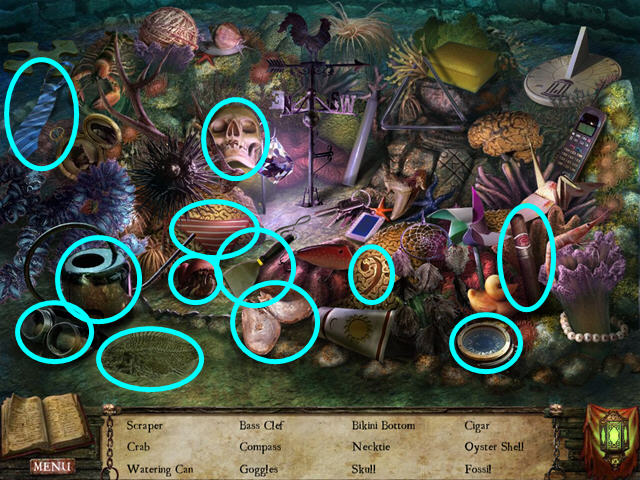
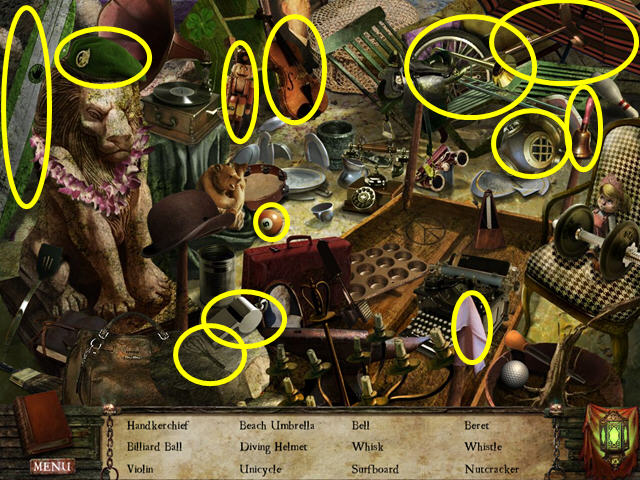
- Select the area under the wing for a Hidden Object Scene (K).
- Locate all the items on the list.
- You will earn the hammer.
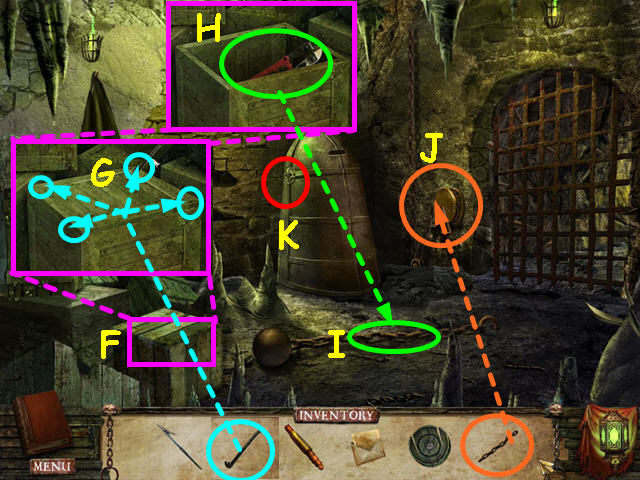
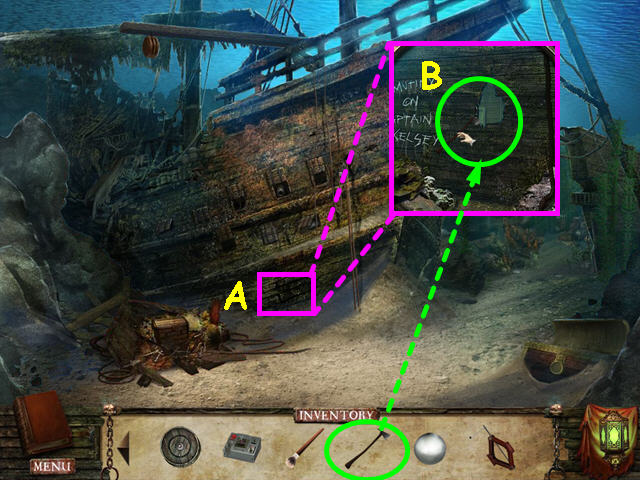
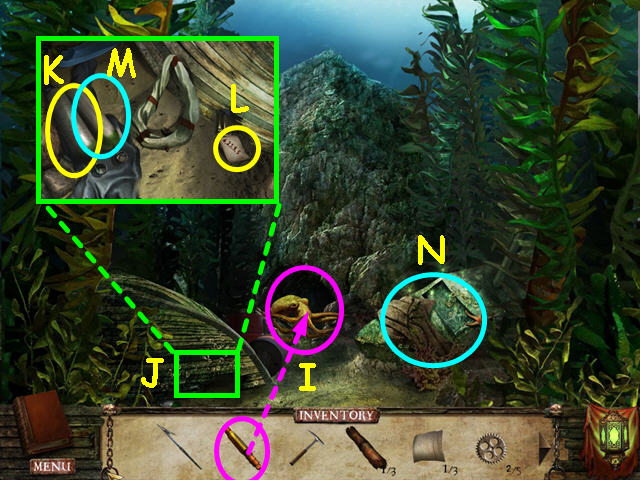
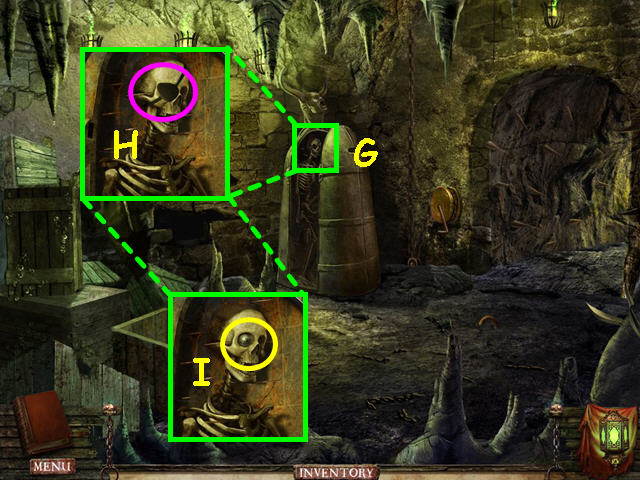
- Walk down to the crash site.
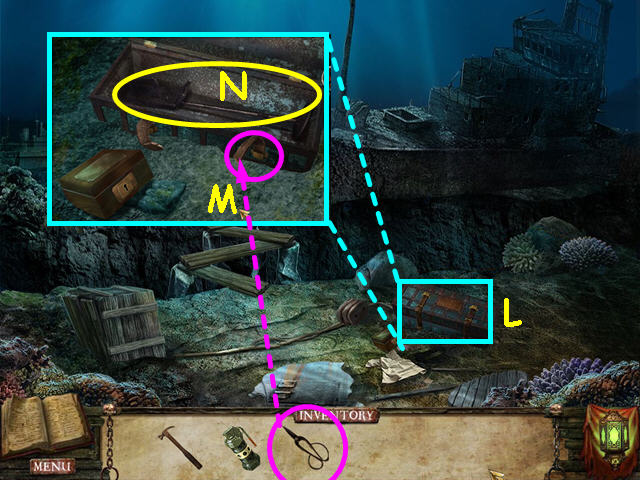
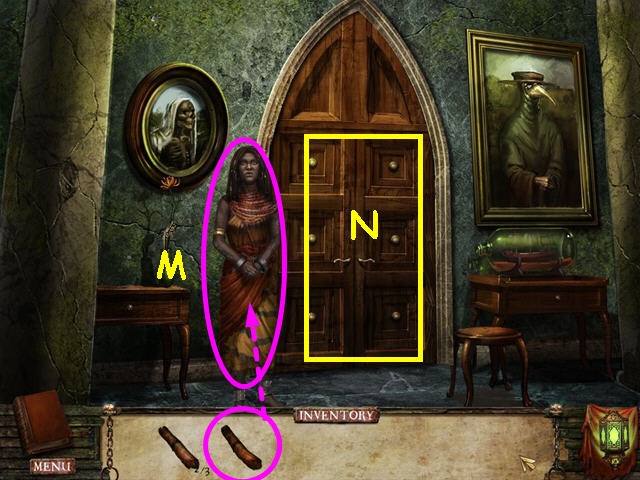
- Look at the close-up of the chests (L).
- Look at the straps on the large chest to learn you need something to cut them.
- Use the CUTTING SHEARS on the straps of the large chest (M).
- Take the METAL DETECTOR (N).
- Note the smaller chest will need a key.
- Exit the close-up, then walk forward.
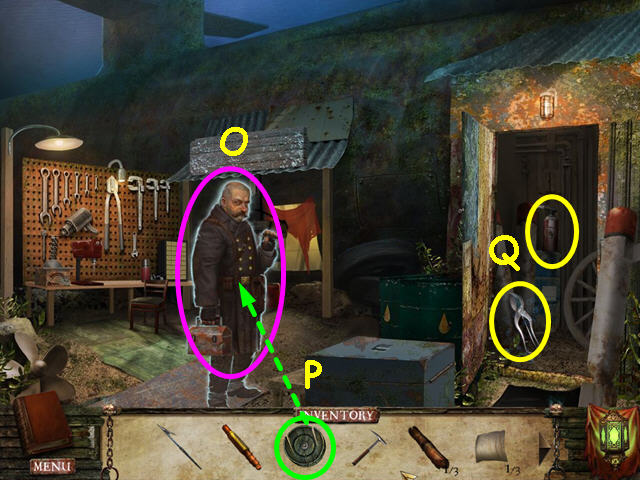
- Click on the pilot, Janeway to talk to her, then walk forward again.
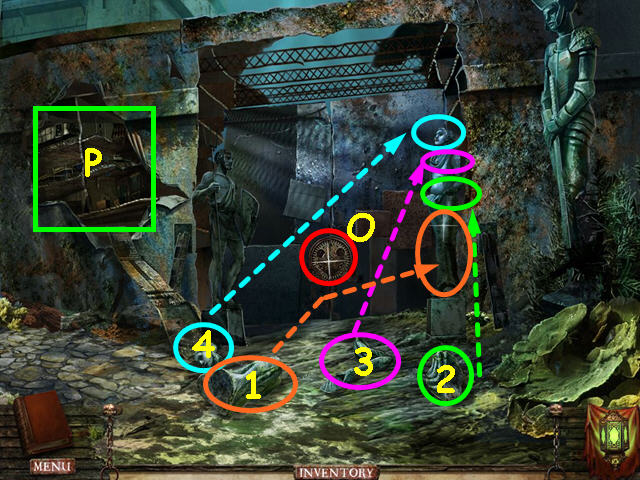
- Note the lock on the gates (O).
- Take the broken pieces of statue and place them on the pedestal from the bottom to the top (1-4).
- Note the entrance to the battleship (P).
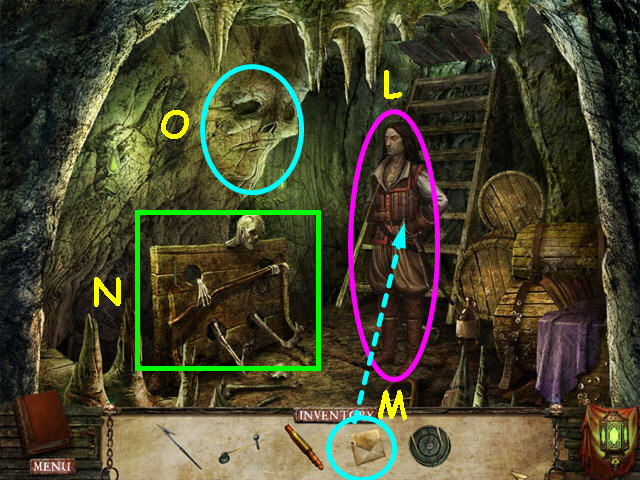
- Walk to the left.
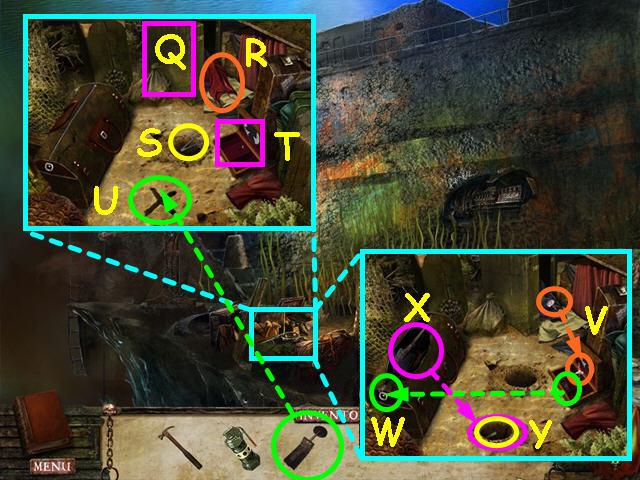
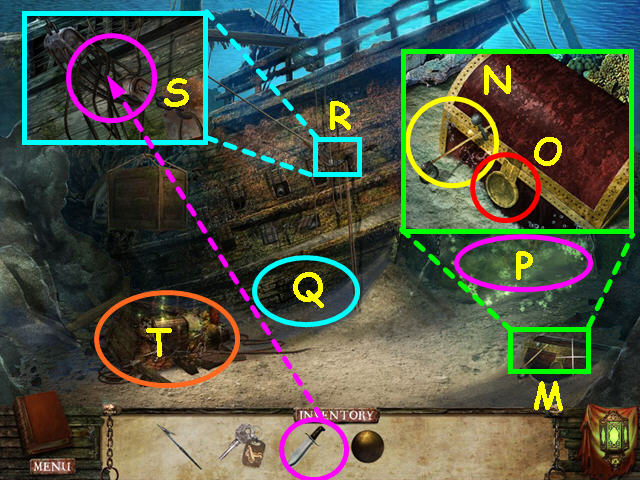
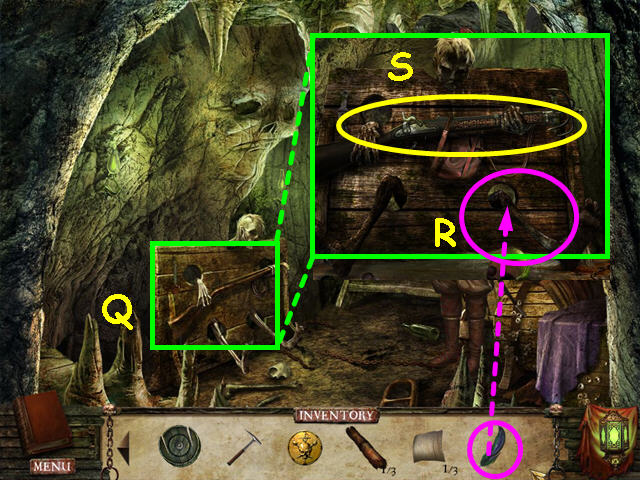
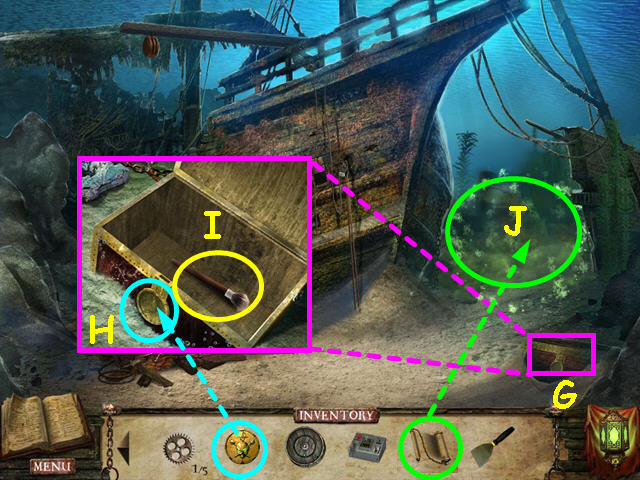
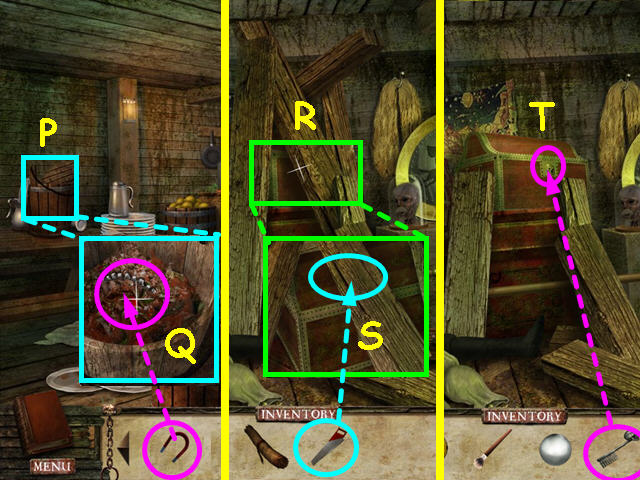
- Look at the close-up of the suitcases.
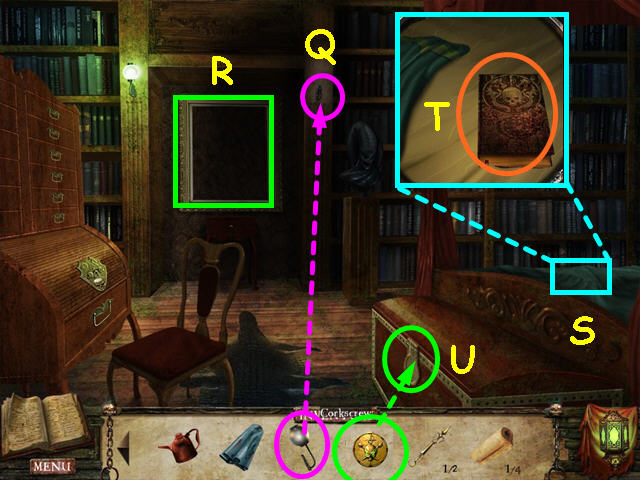
- Open the suitcase (Q).
- Move the red shirt (R).
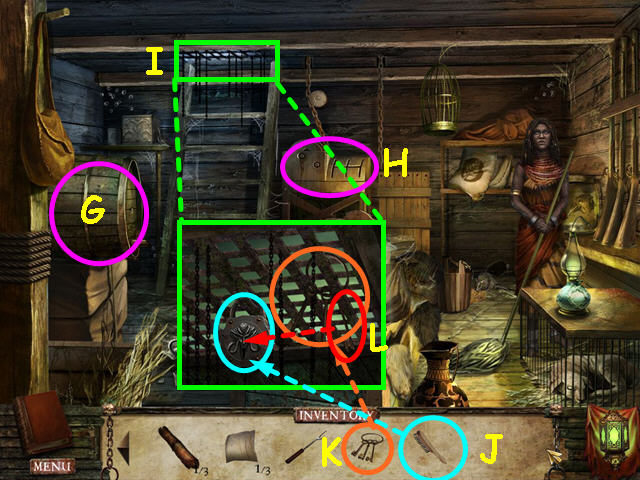
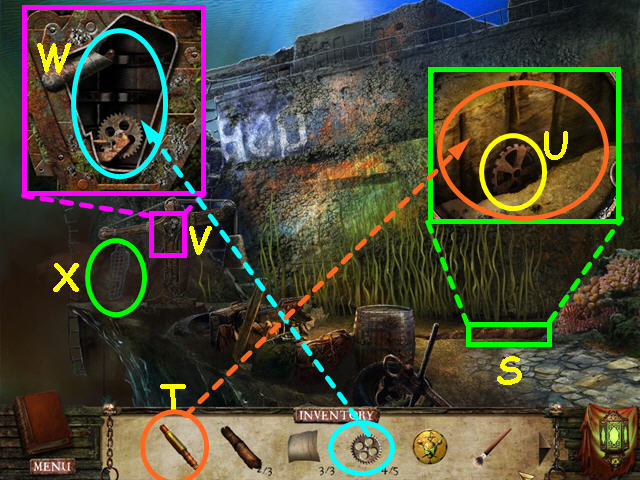
- Take the TONGS (S).
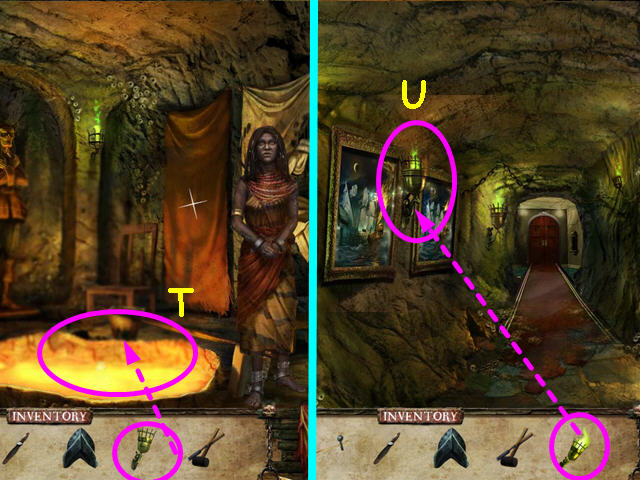
- Open the music box (T).
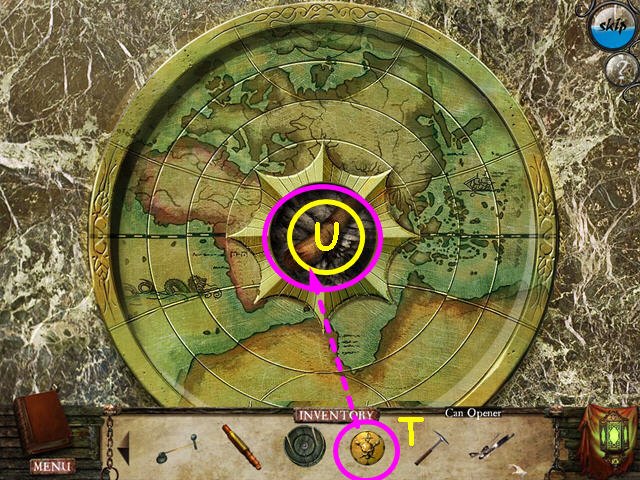
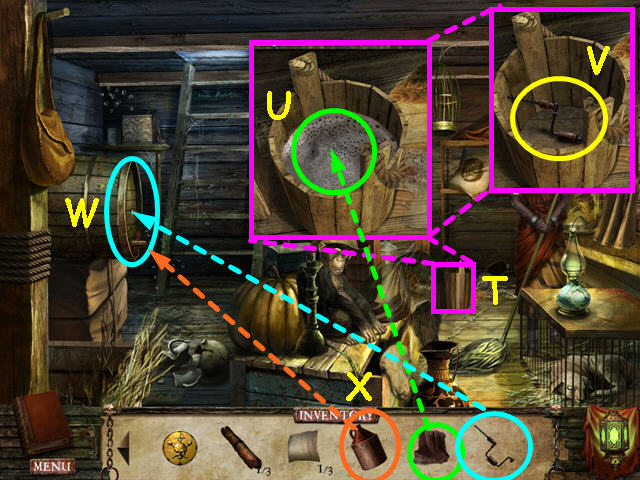
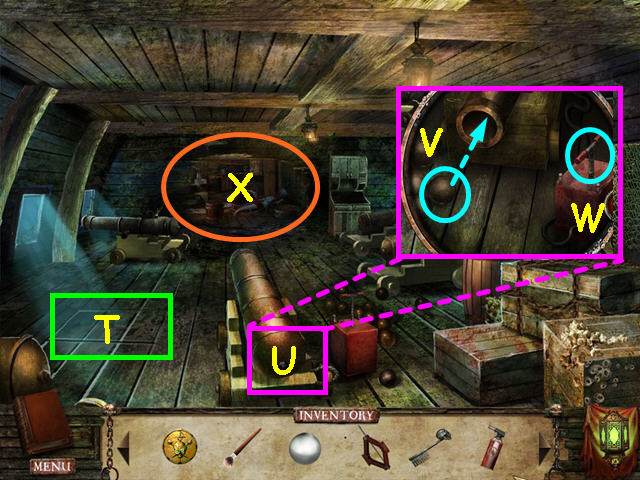
- Use the METAL DETECTOR on the sand.
- Click on the detector once it is in the scene and move it around until an ‘X’ is formed (U).
- Take the ballerina and place it in the music box (V).
- Take the zipper pull and use it on the suitcase (W).
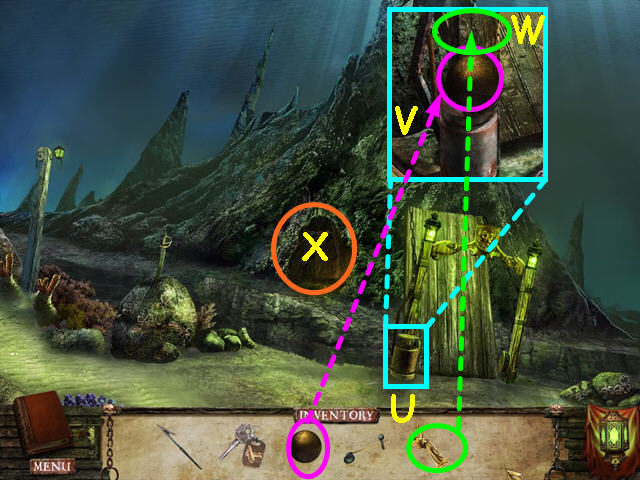
- Use the SHOVEL to dig at the ‘X’ (X).
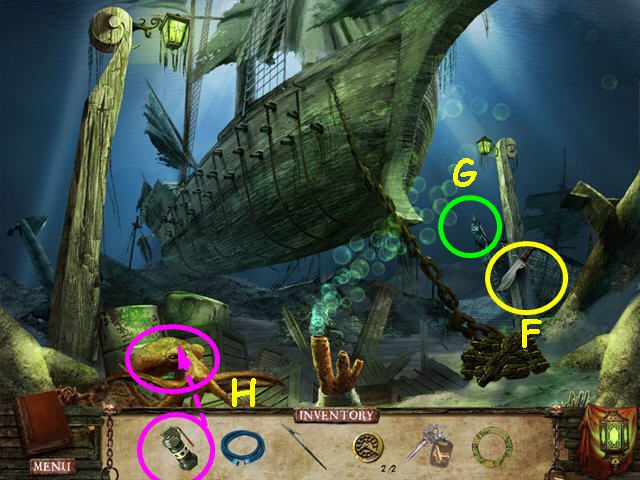
- Take the LETTER OPENER (Y).

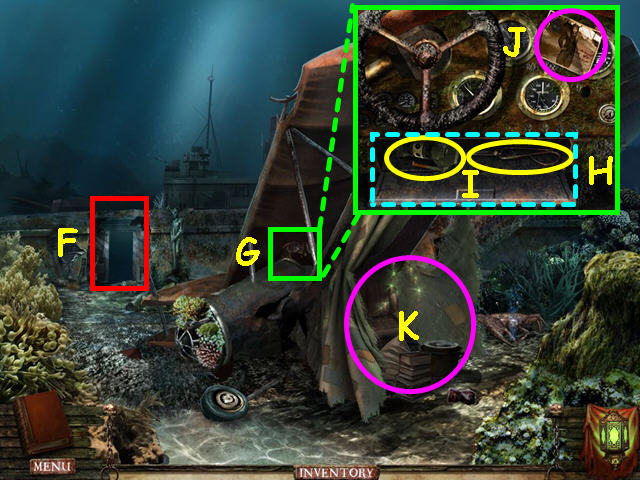
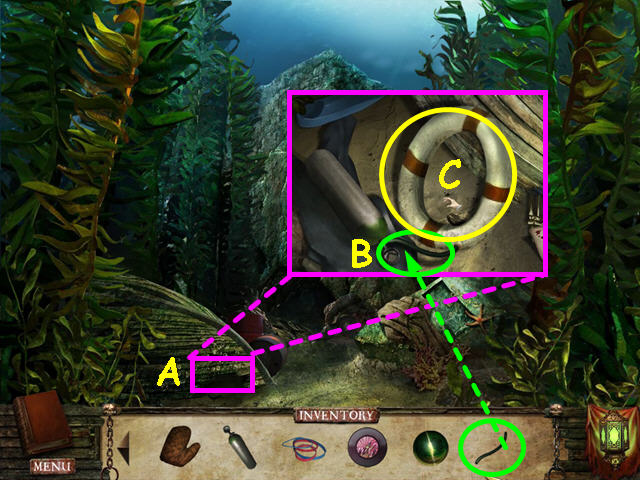
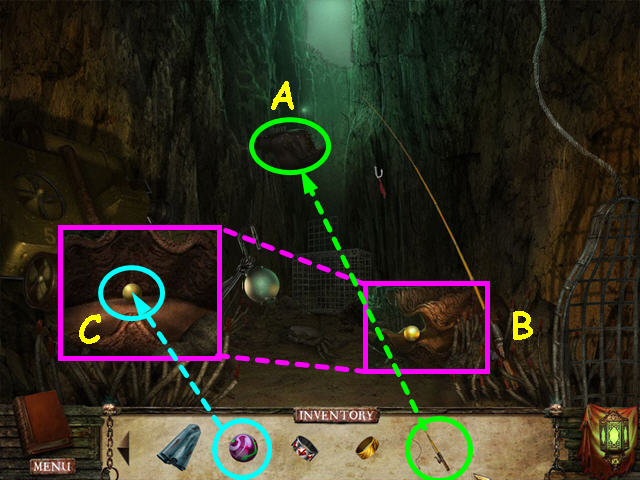
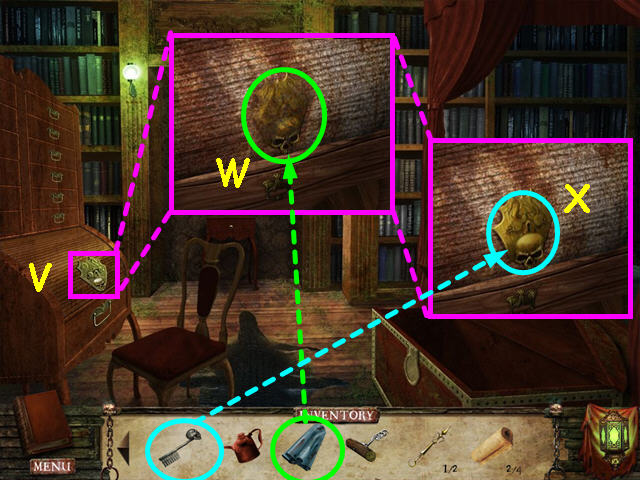
- Look at the hole in the hull (A).
- Use the TONGS to remove the spiky creatures (B).
- Take the GREEN BUTTON (C).
- Note the machine needs a valve (D).
- Exit the close-up.
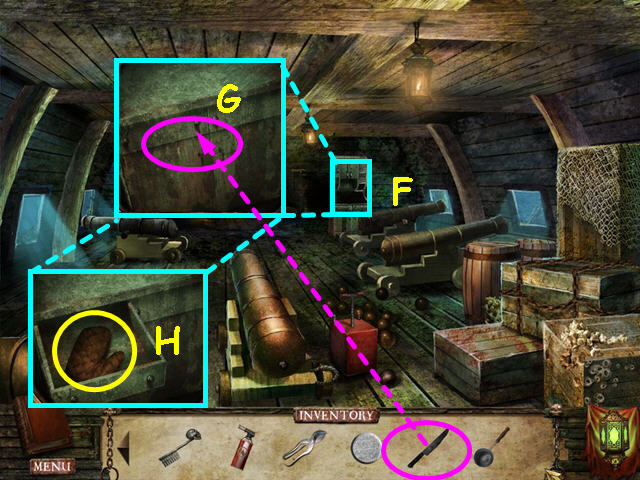
- Look at the crane to learn it is missing gears (E).
- Look at the dark chasm to learn you need some light (F).
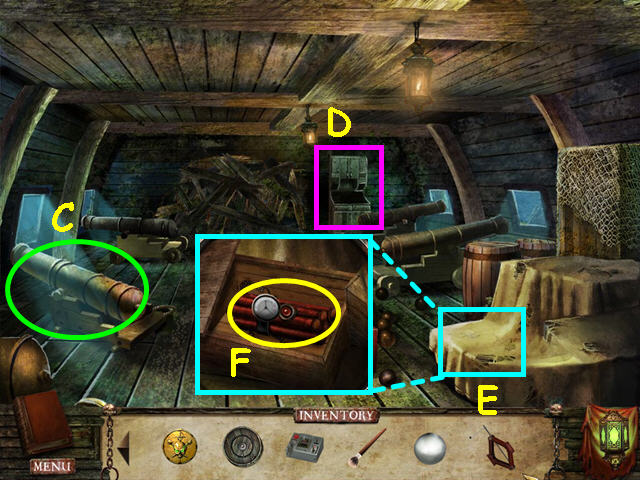
- Walk to the right and enter the battleship.
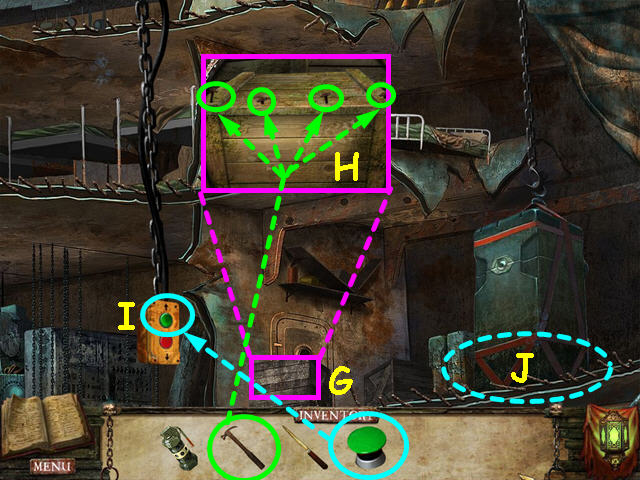
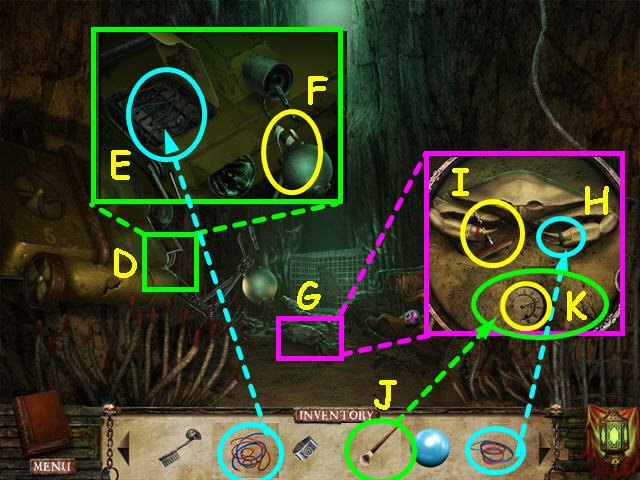
- Look at the close-up of the crate (G).
- Use the HAMMER on the 4 nails (H).
- Open the lid and take the VALVE from inside the crate.
- Place the GREEN BUTTON on the control (I).
- Press the green button to make the container rise and knock the bed over.
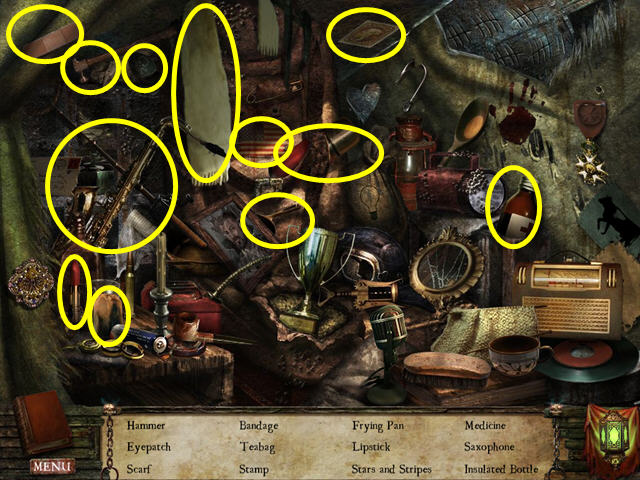
- Select the area where the bed crashes for a Hidden Object Scene (J).
- Locate all the items on the list.
- You will earn the 1 of 2 GOLDEN DISC.
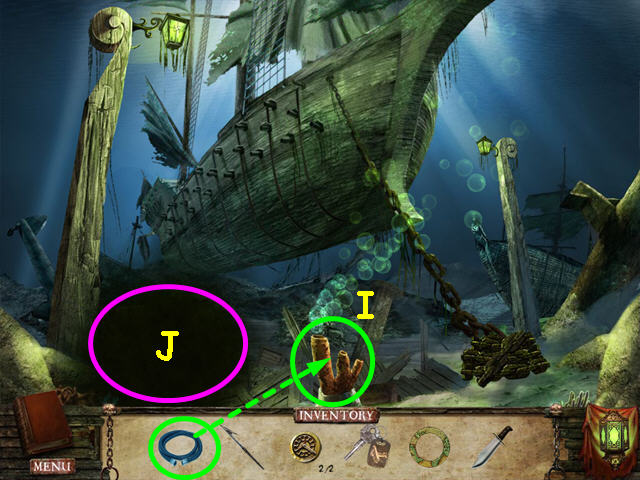
- Exit the close-up, then walk to the left.
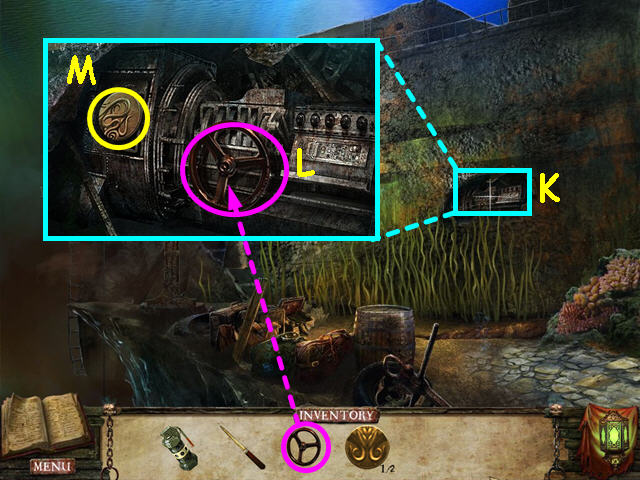
- Look at the hole in the hull of the ship (K).
- Place the VALVE on the machine (L).
- Take the 2 of 2 GOLDEN DISC (M).
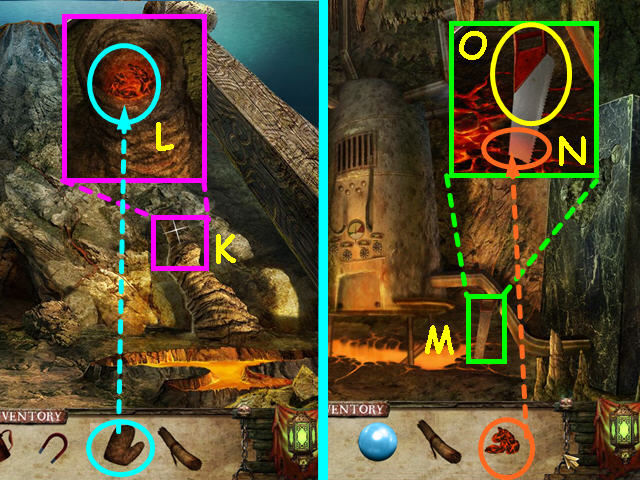
- Walk to the right.
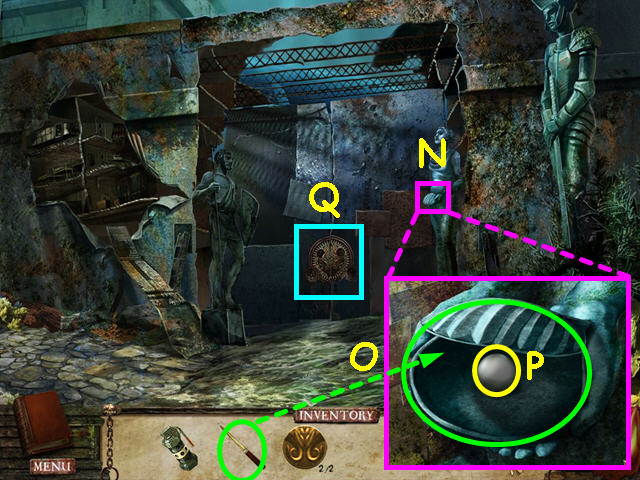
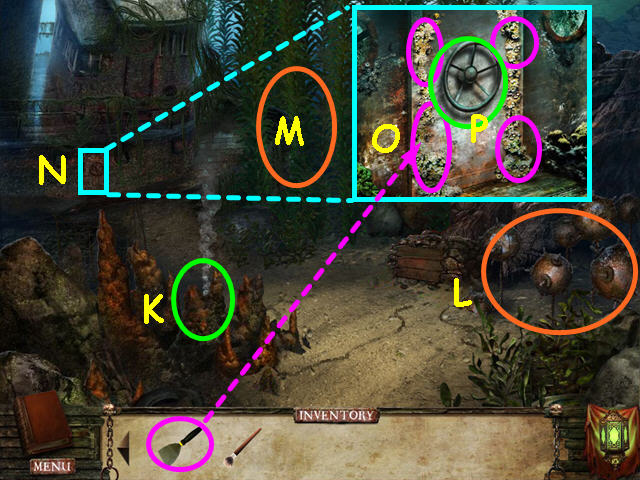
- Look at the close-up of the shell in the statue’s hands (N).
- Use the LETTER OPENER on the shell (O).
- Take the PEARL (P).
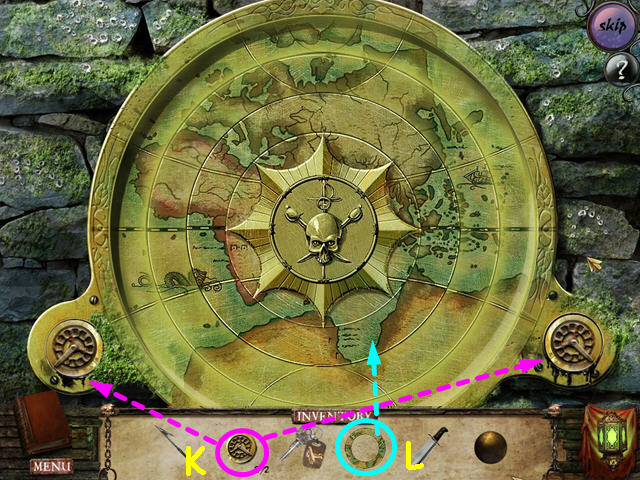
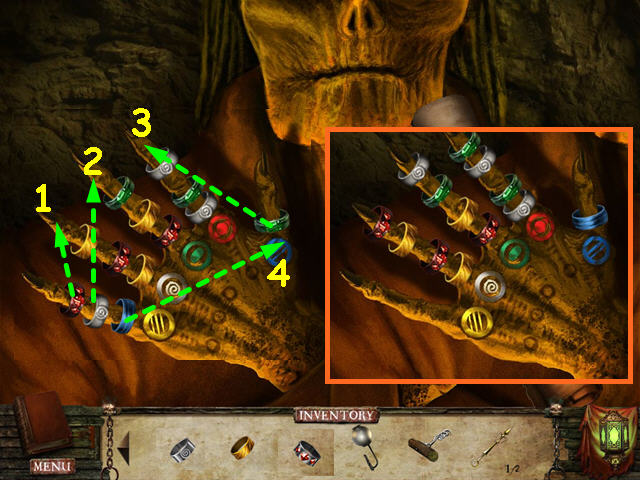
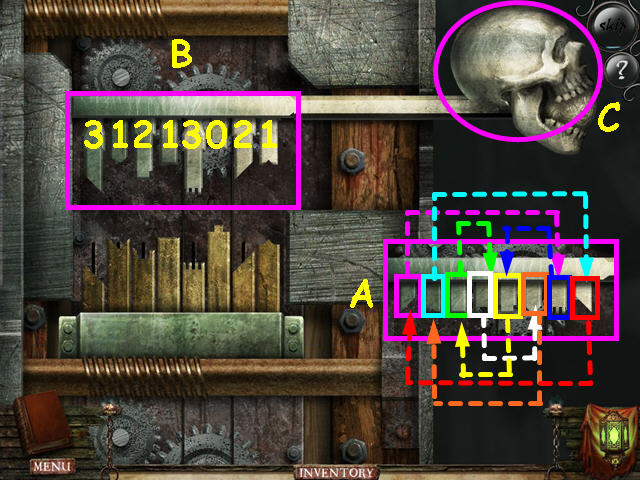
- Look at the close-up of the gate lock for a mini-game (Q).
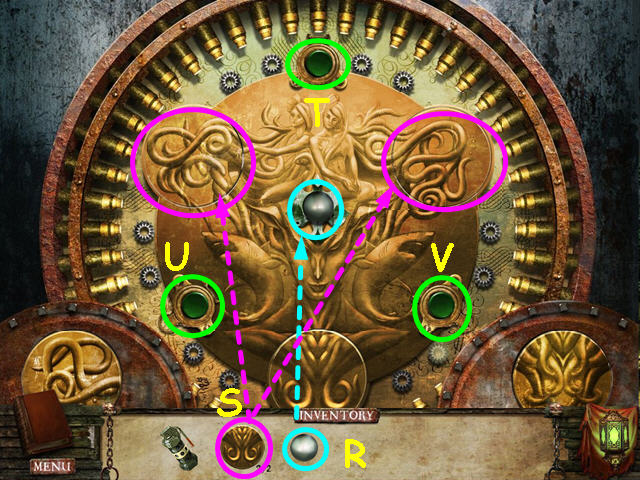
- Place the pearl in the center of the device (R).
- Place the 2 GOLD DISCS into the holes (S).
- The object of this mini-game is to complete the carving.
- Press the green buttons to move the discs.
- Each green button rotates the 3 closest discs.
- Make the following moves: Vx1, Ux2, Tx2, and Vx1.
- Walk forward through the gate.
Chapter 2: Town Of Lost Souls
- Click through the dialogue with Davy Jones until you are transported to his throne room.
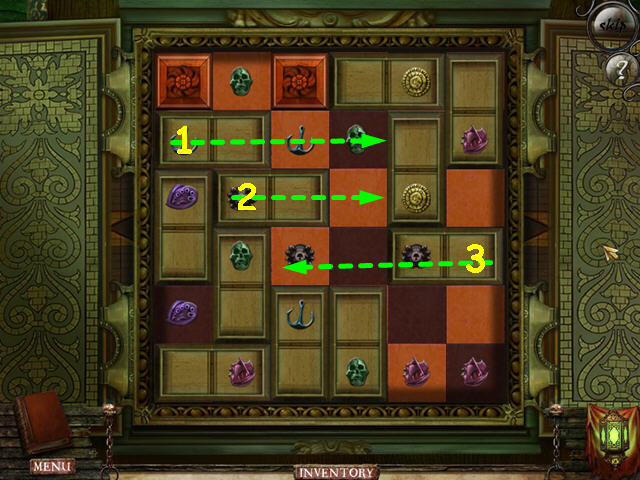
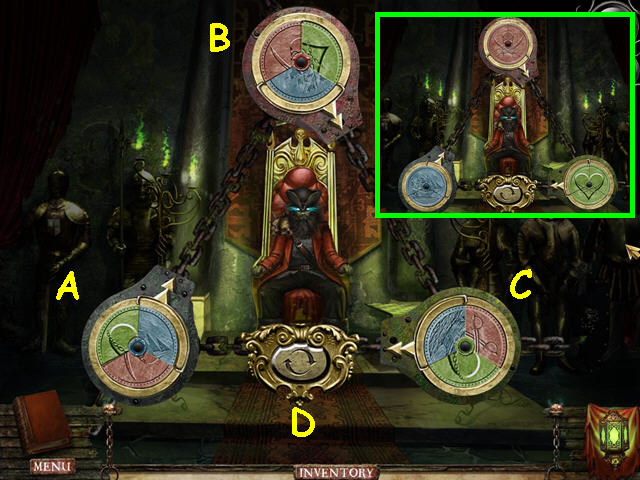
- Select the game board to the right of Davy Jones for a mini-game (A).
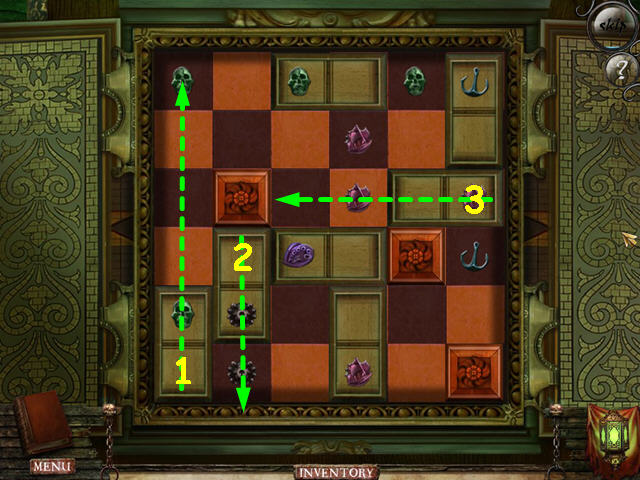
- The object of this mini-game is to slide the dominoes so that each symbol is over a matching symbol.
- Slide the dominoes in the direction indicated in numerical order (1 – 3).
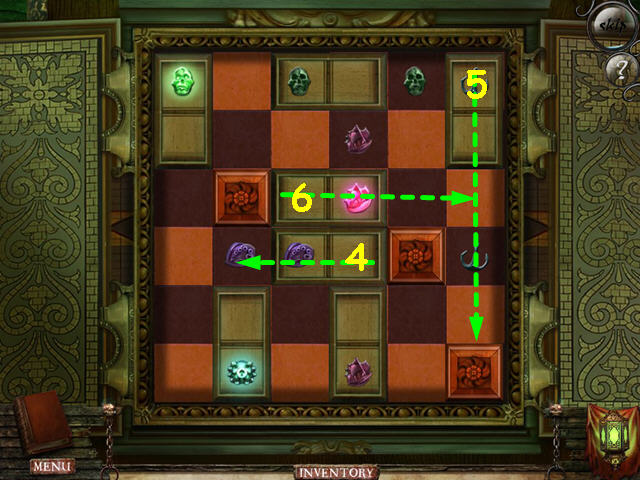
- Slide the dominoes in the direction indicated in numerical order (4 -6).
- Note the 4th move is only one space to the left.
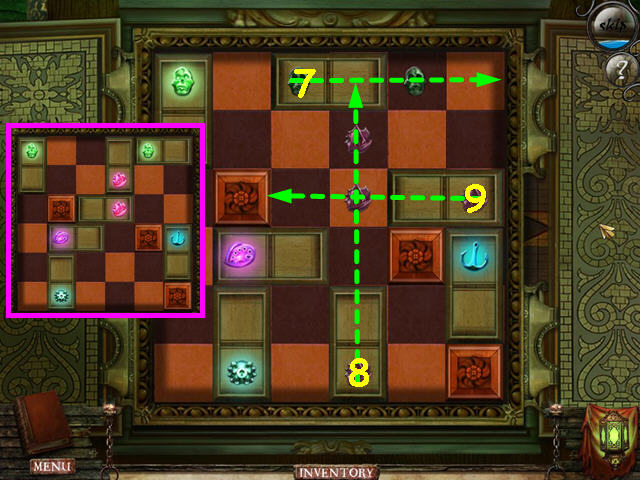
- Slide the dominoes in the direction indicated in numerical order (7 – 9).
- The final solution is shown in the inset.
- Speak with Davy Jones and learn he has your father.
- You will be returned to the entrance of the underwater city.
- Note the path to the left (B).
- Note the entrance to the tavern (C).
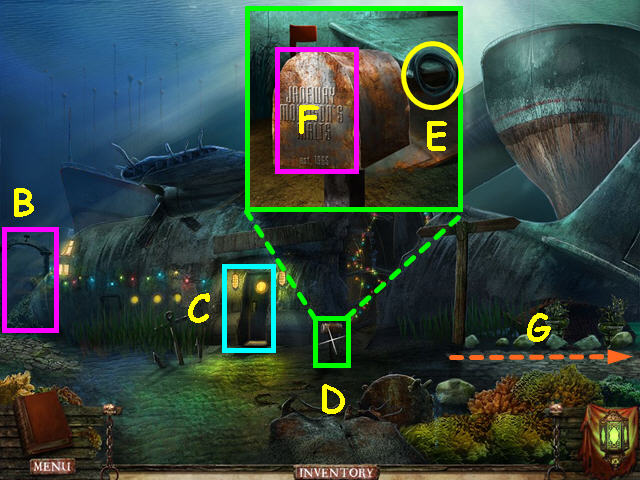
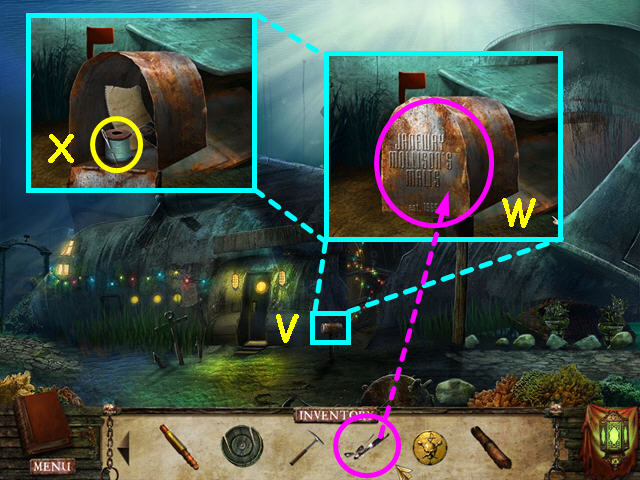
- Look at the close-up of the mailbox (D).
- Take the PUMP TUBE (E).
- Look at the mailbox to learn it is sealed shut (F).
- Walk to the right (G).
- Look at the gate on the left to learn you need some parts (H).
- Note the passage on the right will require some explosives (I).
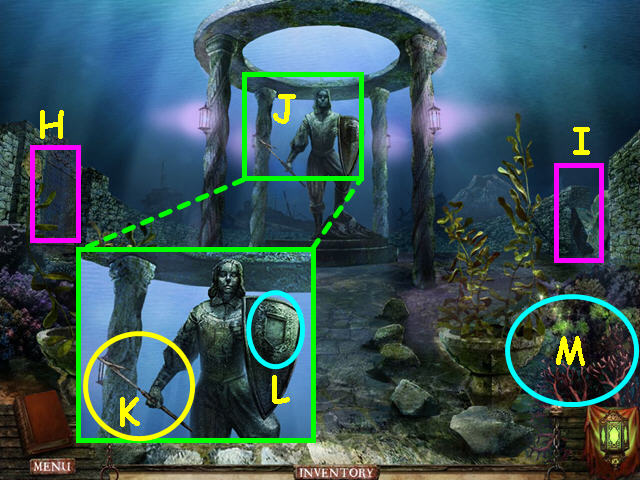
- Look at the close-up of the statue (J).
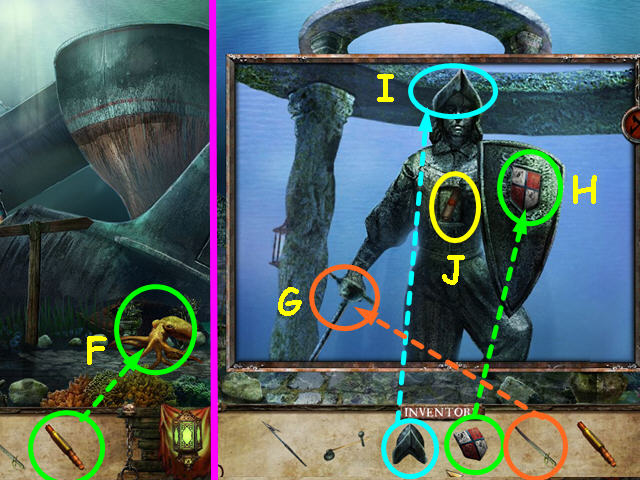
- Take the HARPOON (K).
- Note the hand that held the harpoon appears to need a sword and the head needs a helmet.
- Note the shield is missing an emblem (L).
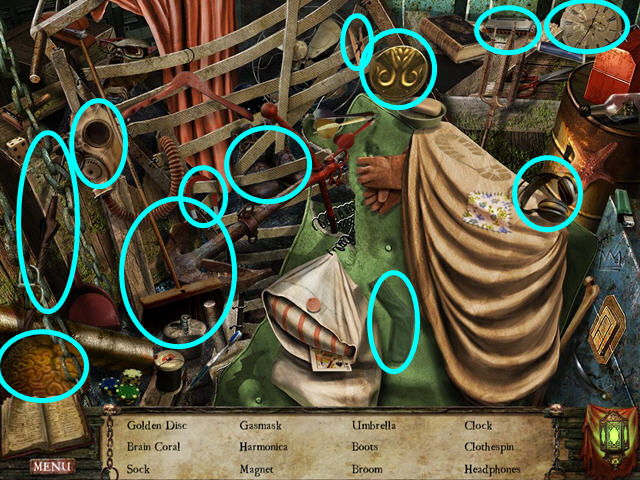
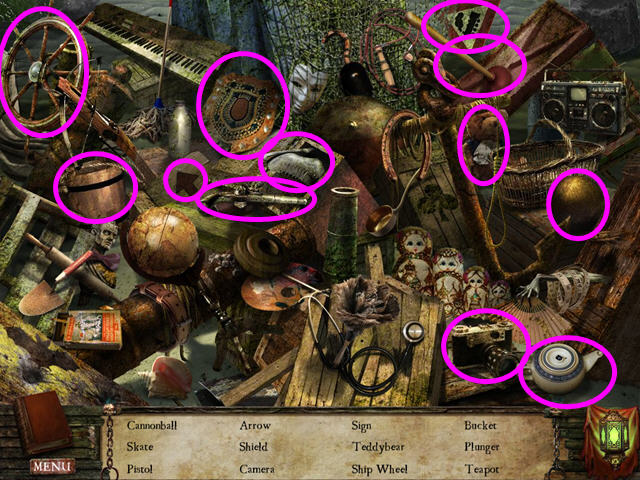
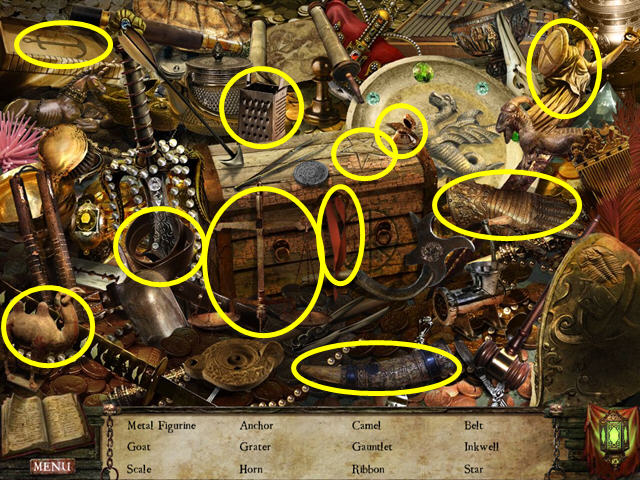
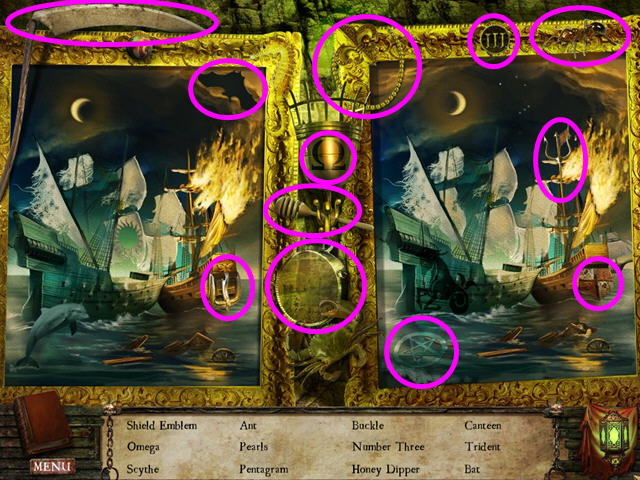
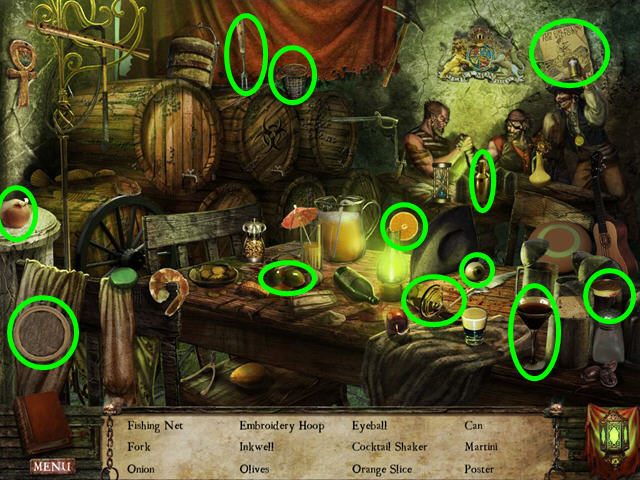
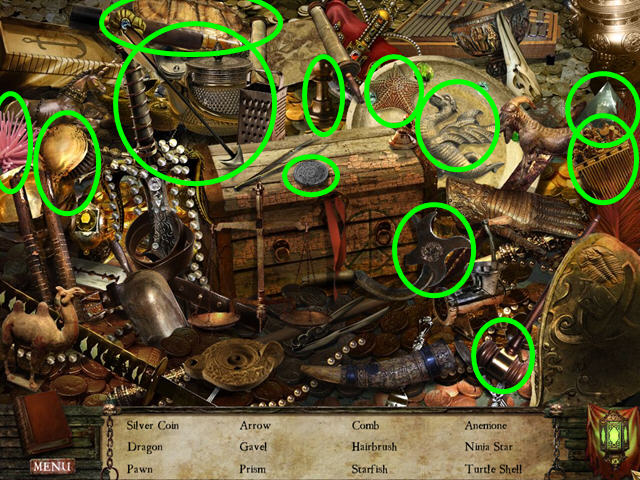
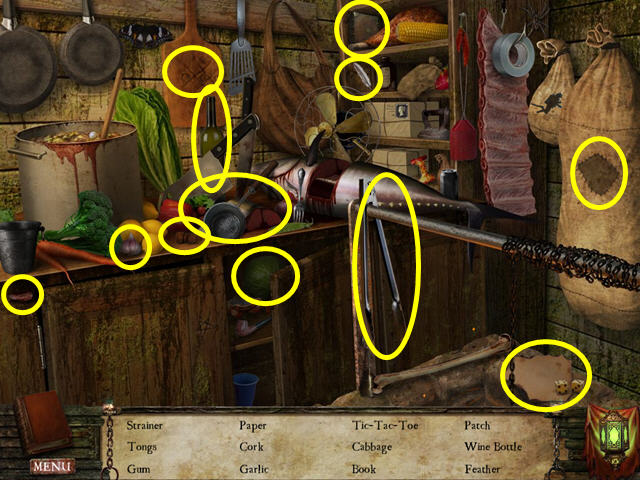
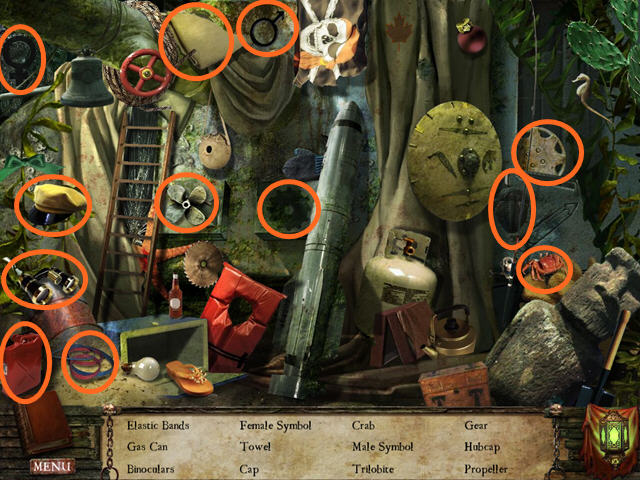
- Select the lower right area for a Hidden Object Scene (M).
- Locate all the items on the list.
- You will earn the 1 of 2 CRANK.
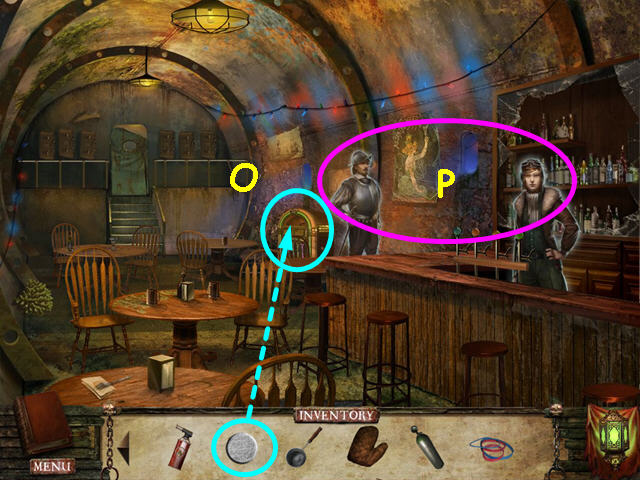
- Walk down once, then enter the tavern.
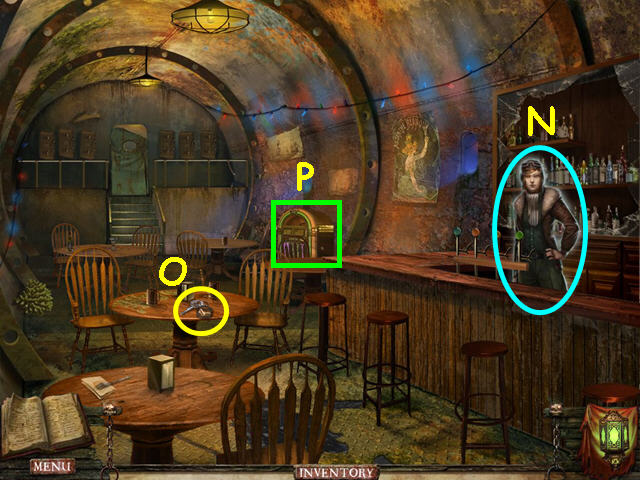
- Talk to Janeway to learn how to lower the Daggermount Bridge (N).
- Take the AIRPLANE KEYS (O).
- Look at the jukebox to learn you need a coin (P).
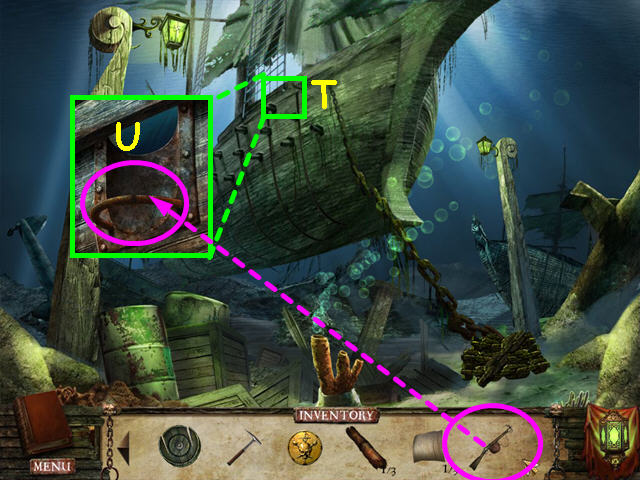
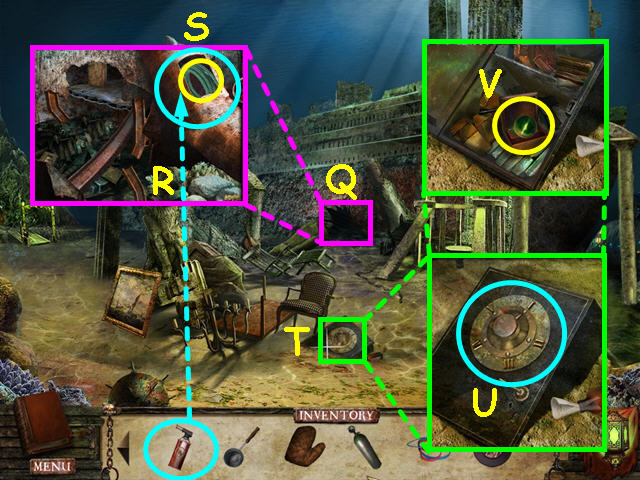
- Exit the tavern, then walk to the left.
- Look at the hole in the ocean liner (Q).
- Take the 2 of 2 CRANK (R).
- Note the weld on the pipe (S).
- Note the hammer in the jagged metal (T).
- Exit the close-up.
- Look at the close-up of the safe (U).
- Look at the safe to learn you need a combination (V).
- Read the message in the bottle (W).
- Exit the close-up.
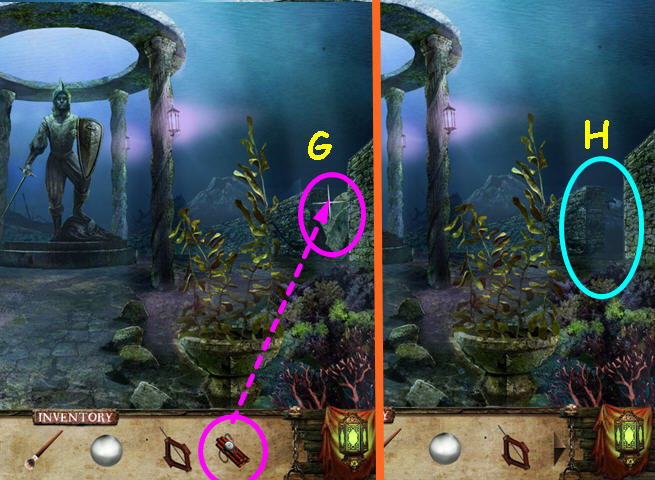
- Look at the mini-game by the columns to learn you will need something round (X).
- Exit the close-up and walk to the left.
- Click through the dialogue to talk to Straaten.
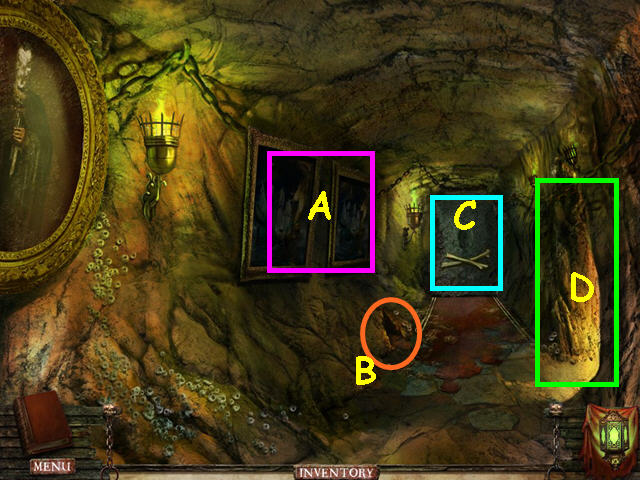
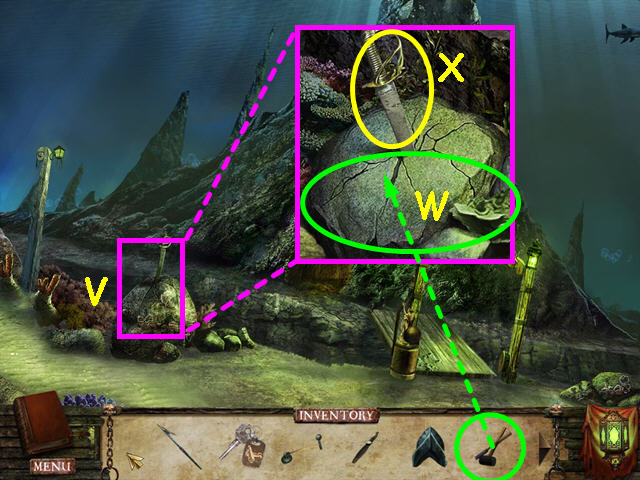
- Look at the close-up of the rocks (A); take the MAP RING (B).
- Note the sword stuck in the stone (C).
- Exit close-up.
- Note the entrance to Davy Jones’ home (D).
- Look at the base of the bridge to see the pressure plate; you will need something heavy (E).
- Exit the close-up and walk to the left.
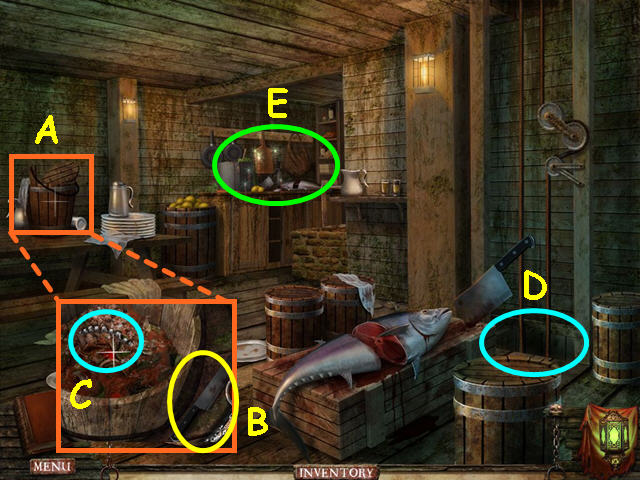
- Take the HUNTING KNIFE (F).
- Look at the figurehead on the ship to see the mermaid should be holding something (G).
- Use the FLASH GRENADE on the octopus (H).
- Use the PUMP TUBE on the bubbles (I).
- Select the area that was hidden by ink for a Hidden Object Scene (J).
- Locate all the items on the list.
- You will earn the CANNONBALL.
- Walk down twice, then walk to the right twice.
- Look at the gate on the left for a mini-game.
- Place the 2 CRANKS into the outer holes (K).
- Place the MAP RING into the device (L).
- The object of this mini-game is to restore the map.
- Drag the rings into position – moving some rings will affect other rings.
- The rings will lighten in color when correctly placed.
- Hint – use the map lines as a guide for placement.
- Walk left through the gate.
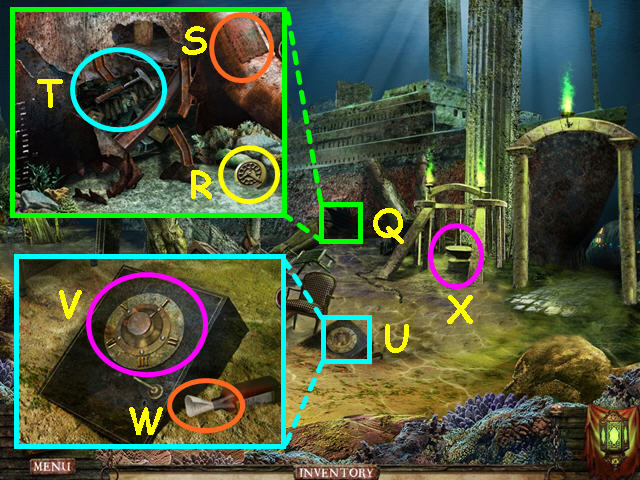
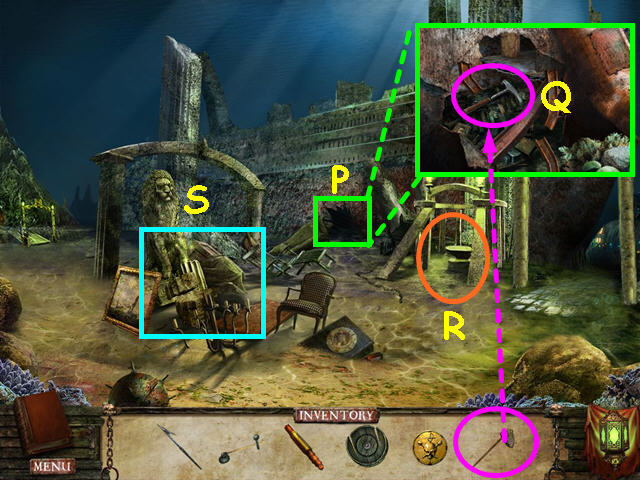
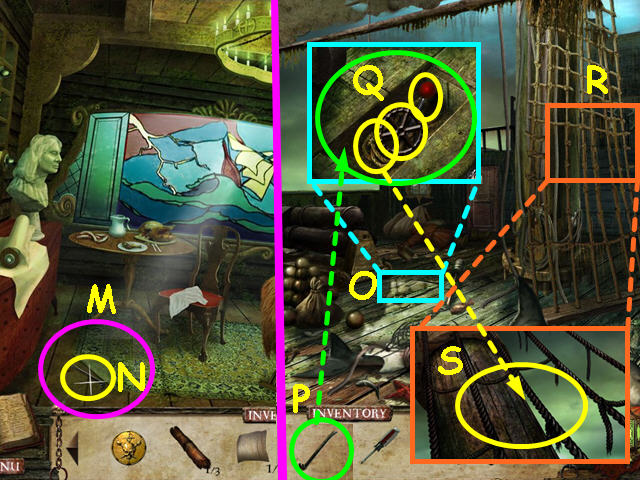
- Look at the close-up of the chest (M).
- Take the GLASS CUTTER (N).
- Note the lock requires something round (O).
- Exit the close-up.
- Note the trapped souls (P).
- Note the rotted wood and message about mutiny (Q).
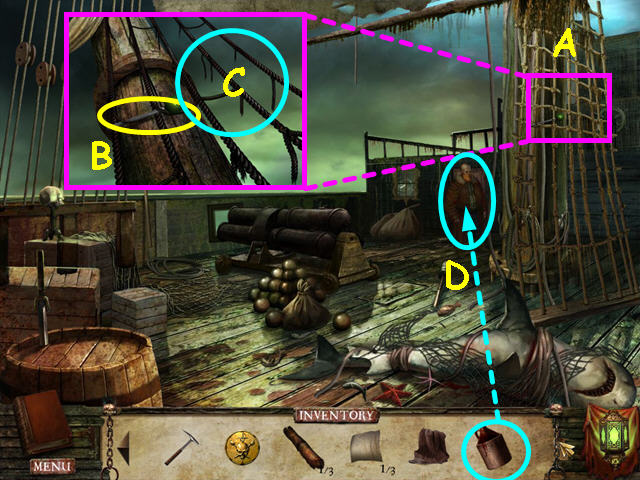
- Look at the close-up of the rigging (R).
- Use the HUNTING KNIFE twice on the tangled ropes (S).
- Select the area the chest fell to for a Hidden Object Scene (T).
- Locate all the items on the list.
- You will earn the METAL FIGURINE.
- Walk down twice, then go to the left twice.
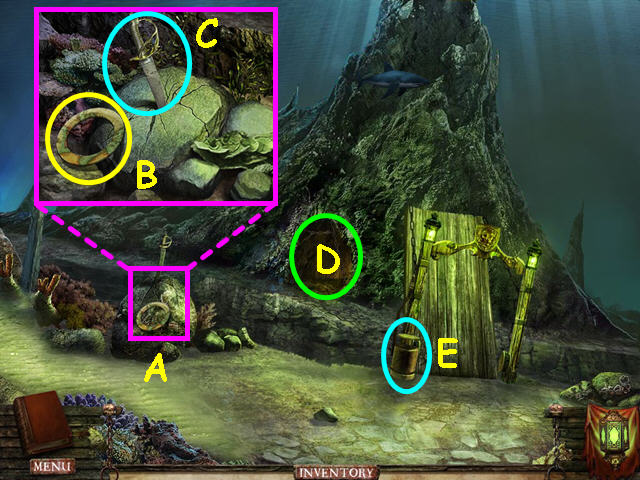
- Look at the base of the bridge (U).
- Place the CANNONBALL on the pressure plate (V).
- Place the METAL FIGURINE atop of the cannonball (W).
- Cross the bridge and enter the cave (X).
Chapter 3: The Palace
- Click through the dialogue to speak with Straaten.
- Note the painting on the left needs more light (A).
- Look in the hole to see you need protection for your hands (B).
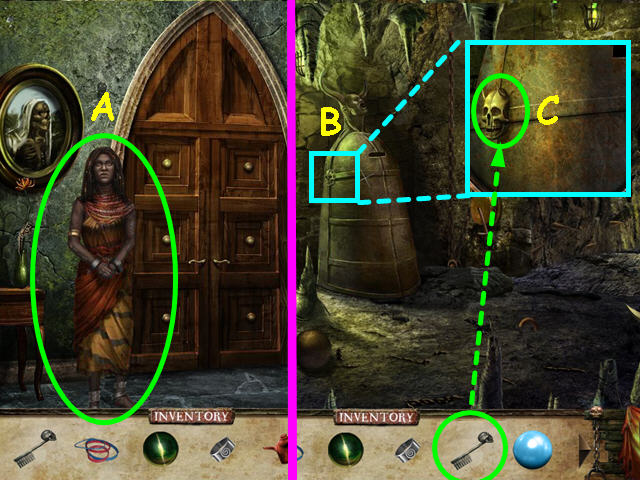
- Note the door is missing a skull (C).
- Walk right to enter the slave quarters (D).
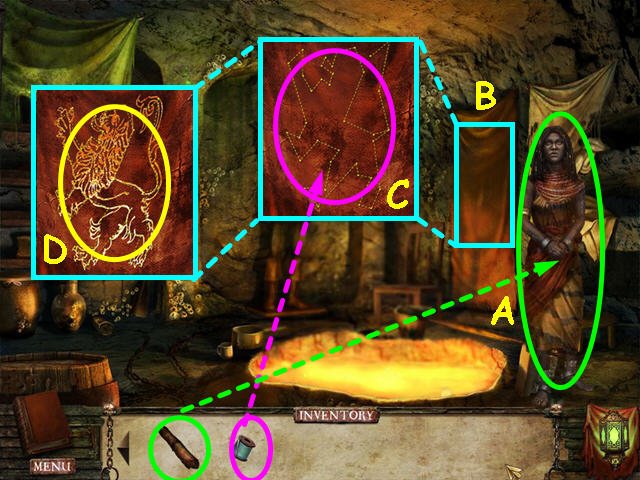
- Talk to Jaleyah to learn of the scrolls (E). She will give you the SKULL.
- Note the tapestry needs more stitches (F).
- Look at the figure to learn you need 3 rings (G).
- Take the PROPELLER (H).
- Walk down to return to the hall.
- Place the SKULL into the door then walk forward.
- Note the locked trap door (I).
- Look at the cage to learn you need to cut the bars (J).
- Look at the lock on the lower doors to learn you need 5 pearls (K).
- Look at the clock to learn it needs hands (L).
- Note the locked chest that needs something round to open (M).
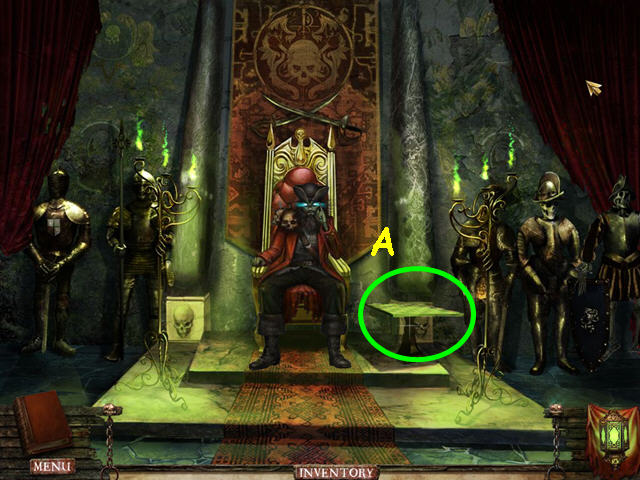
- Select the table for a Hidden Object Scene (N).
- Locate all the items on the list.
- You will earn the HELMET.
- Walk up the stairs.
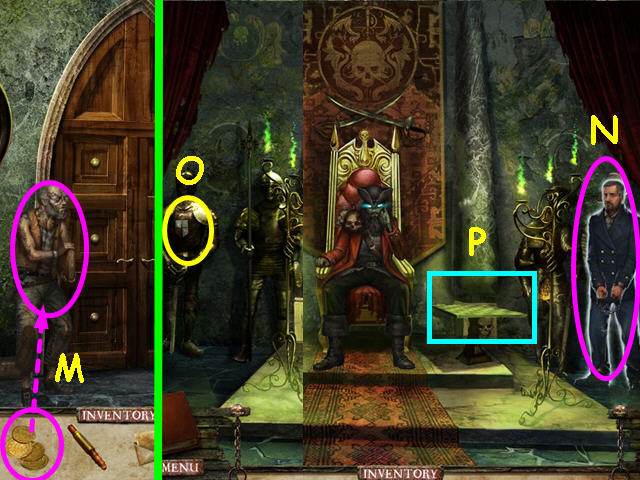
- Click through the dialogue with Straaten – he wants 5 gold doubloons to let you see Davy Jones (O).
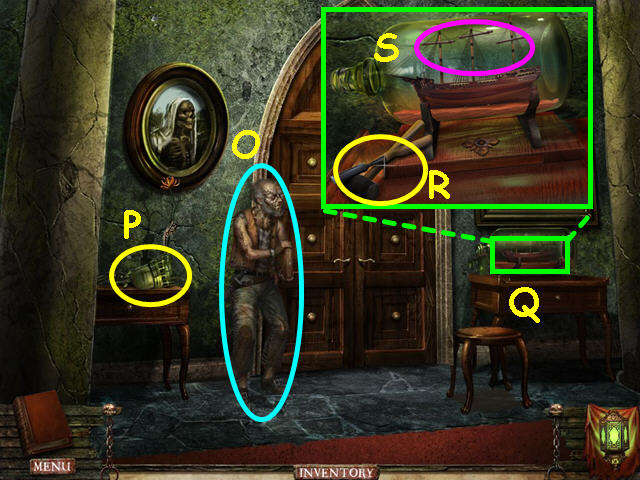
- Take the EMPTY TORCH (P).
- Look at the close-up of the ship in the bottle (Q).
- Take the HAMMER and CHISEL (R).
- Note the ship is missing 3 sails (S).
- Exit the close-up and walk down twice.
- Walk right to the slave quarters.
- Use the EMPTY TORCH on the lava pool to get the LIT TORCH (T).
- Walk down to return to the hall.
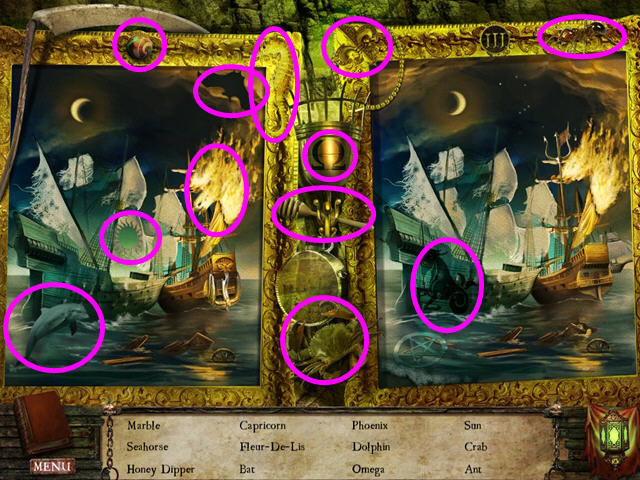
- Use the LIT TORCH on the paintings (U).
- Select the paintings for a Hidden Object Scene.
- Locate all the items on the list.
- You will earn the SHIELD EMBLEM.
- Walk down once.
- Look at the close-up of the sword in the stone (V).
- Use the HAMMER and CHISEL on the stone twice (W).
- Take the CUTLASS SWORD (X).
- Walk down, then go to the right.
- Walk down twice to return to the airplane.
- Place the PROPELLER on the front of the plane (A).
- Look at the close-up of the cockpit (B).
- Use the AIRPLANE KEYS on the ignition (C).
- Click on the keys to turn on the engine.
- Look at the box uncovered by the propeller (D).
- Open the box and take the FLARE (E).
- Walk forward twice.
- Use the FLARE on the octopus (F).
- Walk to the right.
- Look at the close-up of the statue.
- Place the CUTLASS SWORD in the statue’s hand (G).
- Place the SHIELD EMBLEM into the shield (H).
- Place the HELMET on the statue’s head (I).
- Take the EXPEDITION MANIFEST from the chest of the statue (J).
- Walk to the left.
- Talk to Willem Kelsey (K).
- Give the EXPEDITION MANIFEST to Willem Kelsey (L).
- Kelsey will give you a LETTER for NICOLETTE and 5 DOUBLOONS.
- Walk down twice, then go left twice.
- Cross the bridge and enter the cave.
- Walk forward, then go up the stairs.
- Give Straaten the DOUBLOONS, then enter the throne room (M).
- Talk to Davy Jones and he challenges you to another game of dominoes.
- Talk to your father (N).
- Note the knight on the left is missing elements from his crest (O).
- Select the game board for a mini-game (P).
- The object of this mini-game is to slide the dominoes so that each symbol is over a matching symbol.
- Slide the dominoes in the direction indicated in numerical order (1 -3).
- Slide the dominoes in the direction indicated in numerical order (4 – 6).
- Note the 4th move is all the way down, passing the matching symbol.

- Slide the dominoes in the direction indicated in numerical order (9 – 13).
- Note there other possible solutions to this mini-game.
- Slide the dominoes in the direction indicated in numerical order (14 – 17).
- Note move 17 is 2 spaces to the left.
- Slide the dominoes in the direction indicated in numerical order (18 – 20).
- The final solution is shown in the inset.
- Talk to Davy Jones and your father.
- You are transported to the dungeon.
Chapter 4: The First Trial
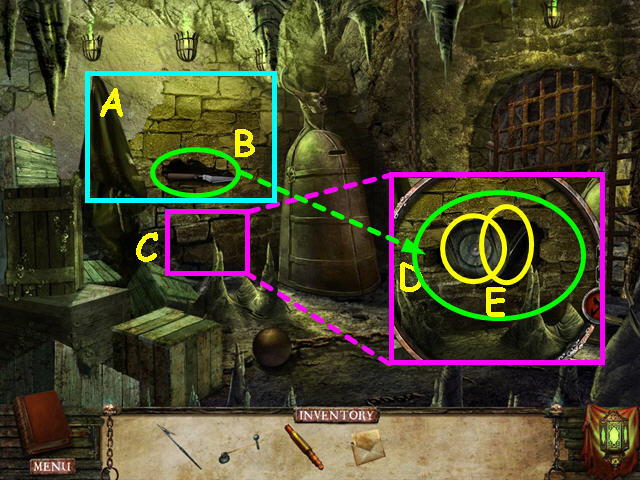
- Pull down the pirate flag (A).
- Take the PALETTE KNIFE (B).
- Look at the loose bricks (C).
- Use the PALETTE KNIFE on the bricks (D).
- Take the BROKEN CANNON WHEEL and the NAIL PULLER (E).
- Look at the close-up of the crate (F).
- Use the NAIL PULLER to remove the 4 nails (G).
- Take the BOLT CUTTER (H).
- Use the BOLT CUTTER on the ball and chain to get the CHAIN (I).
- Use the CHAIN on the winch (J).
- Click on the winch to raise the bars.
- Note the skull lock on the iron maiden (K).
- Exit the cell.
- Talk to Guy Nicolette (L).
- Give the LETTER TO NICOLETTE to Guy (M).
- Note the skeleton holding the grappling hook (N).
- Note the face on the cave wall is missing eyes (O).
- Walk up the stairs and talk to Davy Jones – he will give you the DULL MEDALLION.
- Select the table on the right for a Hidden Object Scene.
- Locate all the items on the list.
- You will earn the FISHING NET.
- Walk down, then right to return to the slave quarters.
- Talk to Jaleyah to learn about the scrolls.
- Walk down 3 times.
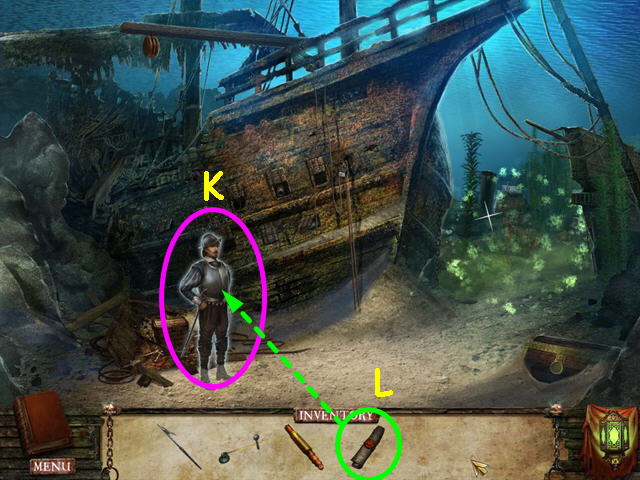
- Look at the hole in the hull (P); use the FISHING NET to get the ROCK HAMMER (Q).
- Note the mini-game by the pillars (R).
- Select the area by the lion statue for a Hidden Object Scene (S).
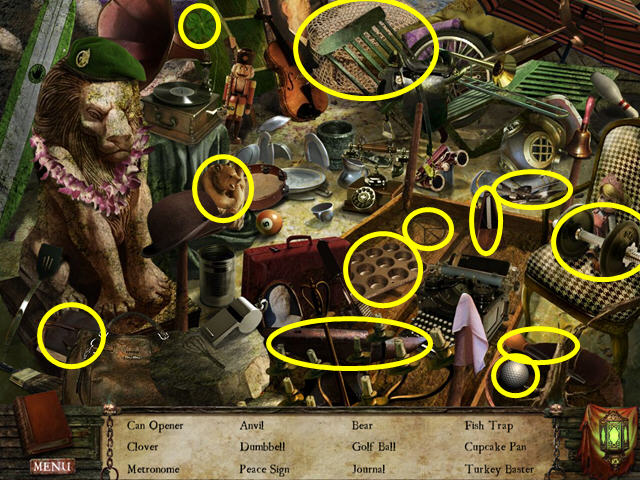
- Locate all the items on the list.
- You will earn the CAN OPENER.
- Select the mini-game by the pillars.
- Place the DULL MEDALLION into the center to activate the mini-game (T).
- The object of this mini-game is to restore the map.
- Drag the rings into position – moving some rings will affect other rings.
- The rings will lighten in color when correctly placed.
- Hint- use the map lines as a guide for placement.
- Take the DUTCHMAN BLOOD SCROLL from the compartment under the medallion (U).
- Walk to the right.
- Look at the close-up of the mailbox (V).
- Use the CAN OPENER on the mailbox (W).
- Take the NEEDLE and THREAD (X).
- Walk to the left twice, then cross the bridge and enter the cave.
- Walk right to return to the slave quarters.
- Give the DUTCHMAN BLOOD SCROLL to Jaleyah (A).
- Click through your conversation to learn you must get on the Flying Dutchman.
- She will give you the CONCH SHELL and the 1 of 3 TRANSLATED BLOOD SCROLL.
- Look at the close-up of the tapestry (B).
- Use the NEEDLE and THREAD 6 times on the outline (C).
- Take the 1 of 2 KNIGHT EMBLEM (D).
- Walk down twice, then walk to the left.
- Look at the close-up of the mermaid figurehead (E).
- Use the CONCH SHELL on the mermaid (F).
- Take the 2 of 2 KNIGHT EMBLEM (G).
- Walk down, then cross the bridge and enter the cave.
- Walk forward, then go up the stairs.
- Enter the throne room.
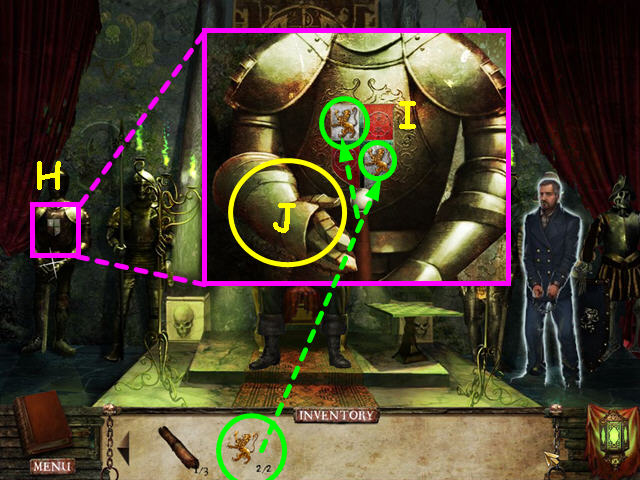
- Look at the knight on the left (H).
- Place the 2 KNIGHT EMBLEMS onto the crest (I).
- Take the GAUNTLET (J).
- Walk down 3 times to the hallway.
- Look at the close-up of the hole (K).
- Use the GAUNTLET to get the WIRE CUTTERS (L).
- Walk forward.
- Look at the close-up of the birdcage (M).
- Use the WIRE CUTTERS on the birdcage (N).
- Take the FEATHER and the 1 of 3 MINI-SAIL(O).
- Enter the trapdoor to the dungeon (P).
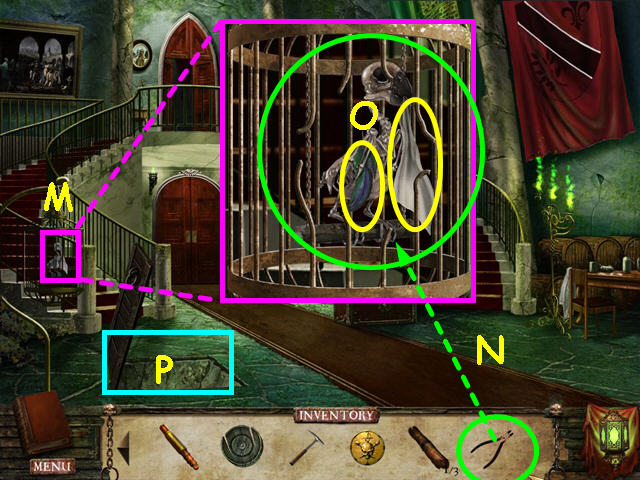
- Look at the skeleton in the stocks (Q).
- Use the FEATHER on the skeleton (R).
- Take the GRAPPLING HOOK (S).
- Walk up the steps, then walk down twice.
- Walk to the left to return to the Flying Dutchman.
- Look at the side of the ship (T).
- Use the GRAPPLING HOOK on the RING (U).
- You will automatically transport to the Flying Dutchman.
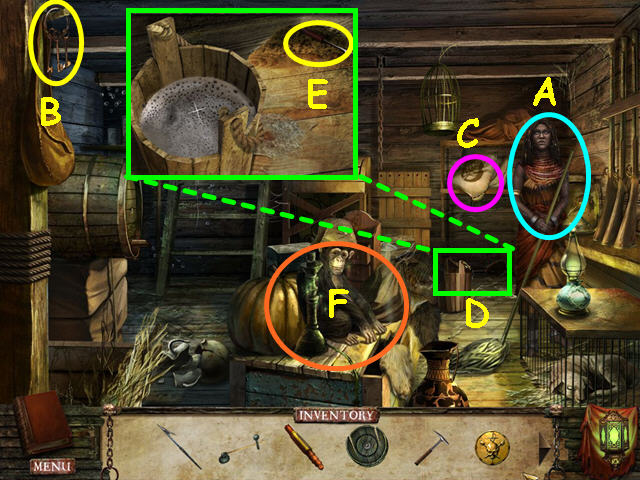
- Talk to Jaleyah to learn how to charge the medallion (A).
- Take the RING of KEYS (B).
- Click on the sack of grain (C).
- Look at the close-up of the bucket (D).
- Take the SEAM RIPPER (E).
- Select the monkey for a Hidden Object Scene (F).
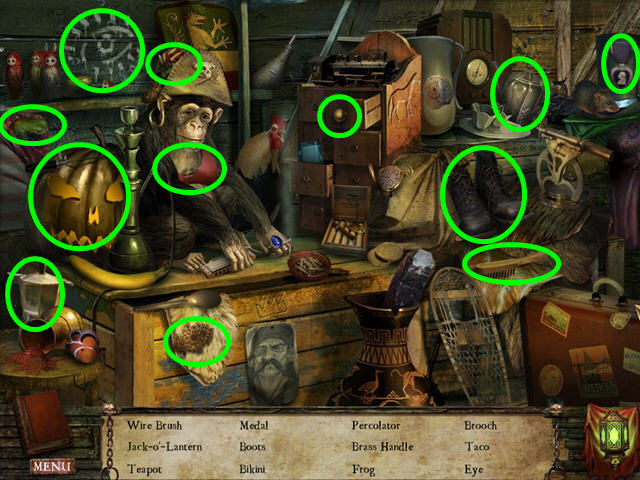
- Locate all the items on the list.
- You will earn the WIRE BRUSH.
- Note the barrel of rum (G).
- Note the anchor control is missing some knobs (H).
- Look at the close-up of the hatch (I).
- Use the WIRE BRUSH on the lock (J).
- Use the RING OF KEYS on the lock – they will hang from the hatch (K).
- Use the rightmost key on the lock (L).
- Walk forward to exit the hold.

- Click through the dialogue with Davy Jones.
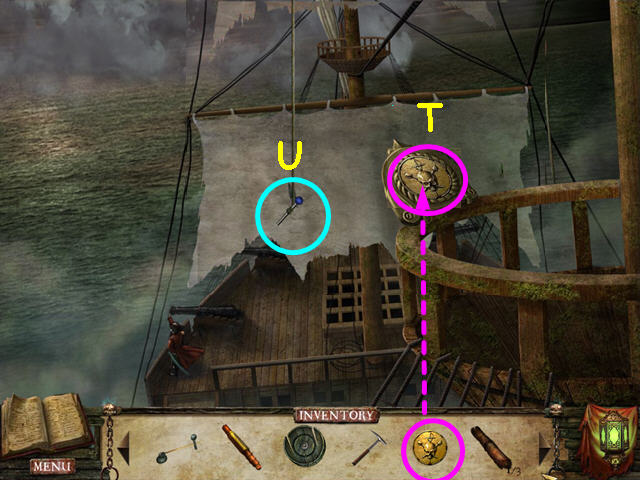
- Look at the close-up of the mast arm (M); pull the rope (N).
- Use the SEAM RIPPER on the sail patch (O).
- Take the TOWEL (P).
- Note the loose board (Q).
- Take the JUG (R).
- Look at Redbeard (S).
- Walk down to return to the hold.
- Look at the bucket (T).
- Use the TOWEL in the bucket to get the WET TOWEL (U).
- Take the HAND CRANK from the bucket (V).
- Use the HAND CRANK on the rum barrel (W).
- Use the JUG on the rum barrel to get the JUG of RUM (X).
- Walk forward to return to the deck.
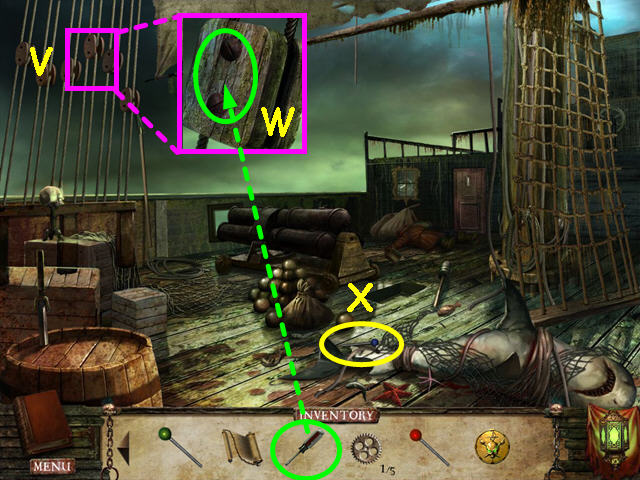
- Look at the rigging on the right (A).
- Take the GREEN LEVER (B).
- Note that rope is needed to repair the ladder (C).
- Exit the close-up.
- Give the JUG OF RUM to Redbeard (D).
- Enter the door behind Redbeard.
- Use the WET TOWEL on the window (E).
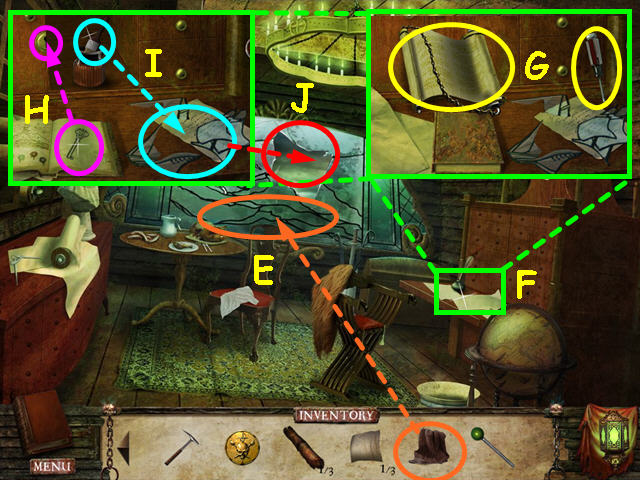
- Look at the close-up of the desk (F); take the SCREWDRIVER and the SCROLL of SOUL RELEASE (G).
- Open the book and use the key on the cabinet (H).
- Take the brush and use it on the glass fragments to get the STAINED GLASS PIECE (I).
- Place the STAINED GLASS PIECE into the hole in the window (J).
- Click on the window for a mini-game.
- The object of this mini-game is to use the paints to re-color the window.
- Refer to the legend in the upper left corner to see which color goes where (K).
- Click on one of the paint buckets, then click on a space in the picture (L).
- Should you place the wrong color, just paint over it with another color.
- Please look at the screenshot for the solution.
- Pull back the carpet where the light is shining (M); take the PRY BAR (N).
- Walk down to exit the cabin.
- Look at the loose board (O); use the PRY BAR on the board (P).
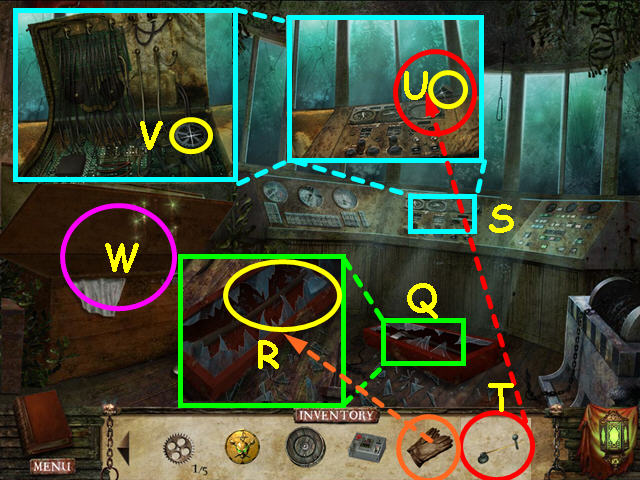
- Take the 1 of 5 ELEVATOR GEAR, the RED LEVER and the SCRAP ROPE (Q).
- Look at the close-up of the rigging on the right (R).
- Use the SCRAP ROPE to repair the ladder (S).
- Climb up the ladder.
- Place the DULL MEDALLION into the holder (T).
- The CHARGED MEDALLION will go automatically into your inventory.
- Click through Davy Jones’ dialogue.
- Look at the blue lever to see it is out of reach (U).
- Climb down the ladder.
- Look at the close-up of the tackle (V).
- Use the SCREWDRIVER to remove the screws (W).
- Take the BLUE LEVER once it falls to the deck (X).
- Walk down to return to the hold.
- Select the anchor control for a mini-game.
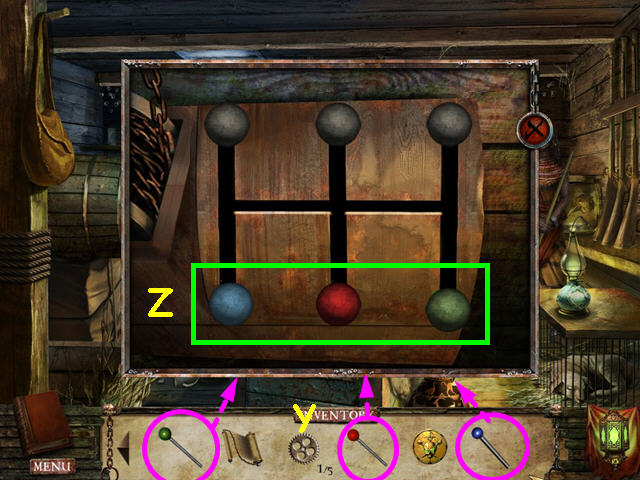
- Place the RED LEVER, BLUE LEVER and GREEN LEVER into the control (Y).
- The object of this mini-game is to move the colored levers to the positions with matching color spots.
- Slide the levers and swap positions so that the colored levers are across the bottom – BLUE -RED – GREEN from left to right (Z).
- Move the green lever down to the middle, then all the way to the right.
- Move the gray lever at the bottom left all the way to the top.
- Move the blue lever down, left, and down.
- Move the green lever all the way to the left.
- Move the gray lever at the bottom right position up, left and up to the upper middle position.
- Move the green lever all the way right, then down.
- Move the gray lever at the bottom center position up and left.
- Move the red lever down, left, and down to solve.
- Note that you do not need the gray levers in any particular position.
Chapter 5: The Second Trial
- Click through the dialog with Davy Jones to learn your second trial is to calm the volcano.
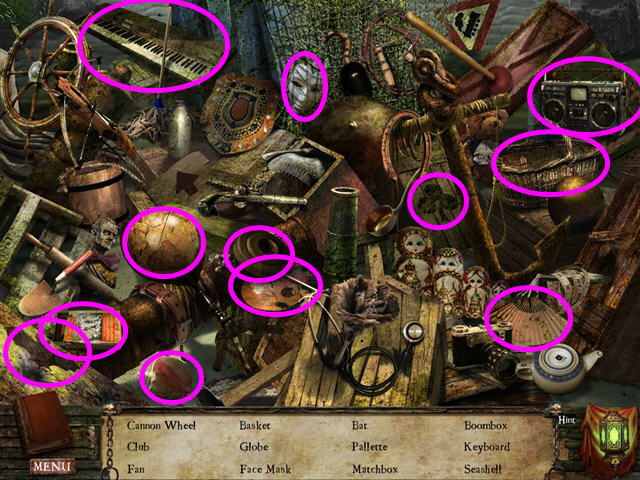
- Select the crate and barrel in the lower left for a Hidden Object Scene.
- Locate all the items on the list.
- You will earn the FRONT CANNON WHEEL.
- Walk down, then cross the bridge and enter the cave.
- Enter the slave quarters on the right and talk to Jaleyah.
- Exit the slave quarters, then walk forward.
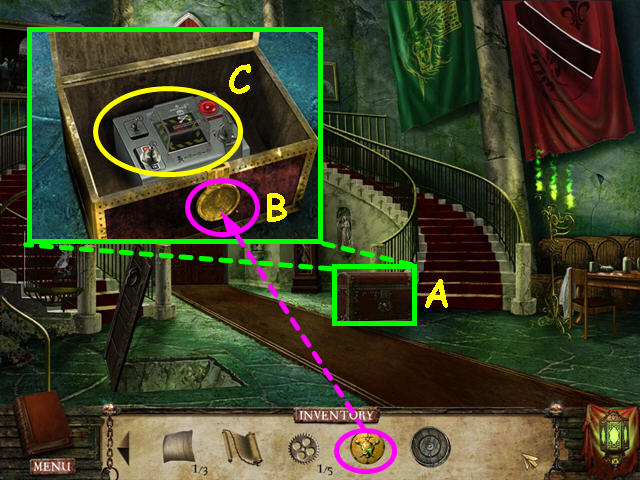
- Look at the close-up of the chest (A).
- Place the CHARGED MEDALLION into the circular indentation (B).
- Take the PROTOTYPE COMPONENT from the chest (C).
- Walk down 3 times, then walk to the right.
- Enter the tavern.
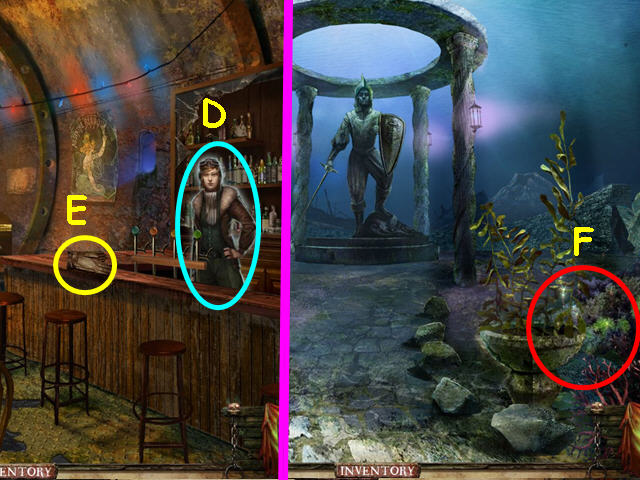
- Talk to Janeway to learn about Pavel and the minefield (D).
- Take the AVIATOR GLOVES from the bar (E).
- Exit the tavern and walk to the right.
- Willem Kelsey will talk to you about the explosives on his ship.
- Select the area in the lower right for a Hidden Object Scene (F).
- Locate all the items on the list.
- You will earn the BARNACLE SCRAPER.
- Walk to the left.
- Look at the close-up of the chest (G).
- Use the CHARGED MEDALLION on the circular indentation (H).
- Take the ARCHEOLOGIST’S BRUSH (I).
- Use the SCROLL OF SOUL RELEASE on the swirl blocking the path (J).
- Walk forward.
- Note the hot water vent (K).
- Note the minefield (L).
- Note the kelp needs to be cut (M).
- Look at the close-up of the tugboat door (N).
- Use the BARNACLE SCRAPER on the door 4 times (O).
- Click on the door valve (P).
- Enter the tugboat.
- Look at the close-up of the red box on the floor (Q); use the AVIATOR GLOVES to get the FIRE AXE (R).
- Look at the center console (S).
- Use the GLASS CUTTER to make a hole in the glass (T).
- Take the SILVER PEARL (U).
- Open the console and take the 2 of 5 GEAR (V).
- Select the chest for a Hidden Object Scene (W).
- Locate all the items on the list.
- You will earn the CAR JACK.
- Walk down twice.
- Look at the close-up of the hull (A).
- Use the FIRE AXE 3 times on the hull to make a hole (B).
- Enter the ship through the hole in the hull.
- Note the cannon is missing 2 wheels and is over a trap door (C).
- Note the cabinet with the stuck doors (D).
- Look at the covered cargo (E). Click to remove the cloth cover, then click again to open the crate.
- Take the EXPLOSIVES (F).
- Walk down twice.
- Use the EXPLOSIVES on the collapsed wall (G).
- Walk to the right (H).
- Click through the dialogue with Pavel (I).
- Give the PROTOTYPE COMPONENT to Pavel (J).
- Pavel will tell you some other items he needs and will give you a SKELETON KEY.
- Note the bolted panel (K).
- Use the SKELETON KEY on the skull for a mini-game (L).

- The object of this mini-game is to make the key fit the lock.
- Click on each of the key’s ‘teeth’ to fit into the spaces below (M).
- The number of times to click on each ‘tooth’ from left to right is: 3, 0, 4, 1, 3, 2.
- Click on the skull to open the lock (N).
- Talk to Pavel once more (O).
- Give the BROKEN CANNON WHEEL to Pavel (P). He will give you the BACK CANNON WHEEL.
- Take the WELDING TORCH and the GARDENING SHEARS from the shed (Q).
- Walk down, then go left.
- Select the dropped crate for a Hidden Object Scene.
- Locate all the items on the list.
- You will earn the SILVER DOLLAR.
- Enter the ship through the hole in the hull.
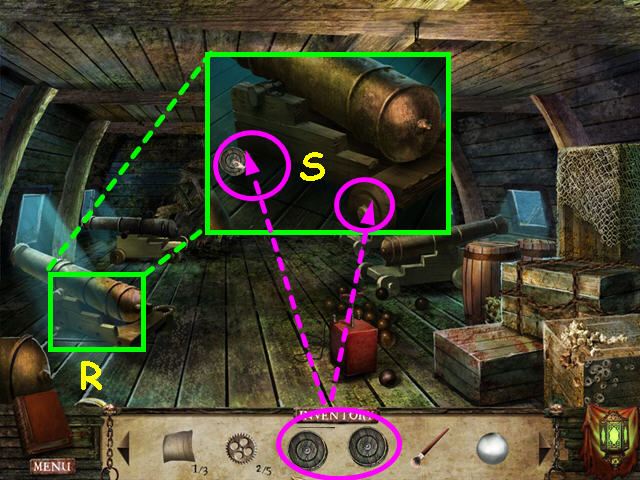
- Look at the close-up of the lower cannon (R).
- Place the FRONT CANNON WHEEL and the BACK CANNON WHEEL on the axles (S).
- Click on the cannon to move it off of the trapdoor.
- Note the hatch is missing a handle (T).
- Look at the rear of the cannon (U).
- Take a cannonball and place it in the cannon (V).
- Press the plunger of the detonator (W).
- Walk forward to the mess hall (X).
- Look at the close-up of the bucket (A).
- Take the DINNER KNIFE (B).
- Note there is something in the bucket, but you need a tool to get it out (C).
- Exit the close-up.
- Note you need something to hang on the hook to move the dumb waiter (D).
- Select the back counter for a Hidden Object Scene (E).
- Locate all the items on the list.
- You will earn the STRAINER.
- Walk down to exit the mess hall.
- Look at the close-up of the cabinet (F).
- Use the DINNER KNIFE on the drawers (G).
- Take the FIREPROOF MITT (H).
- Walk down to exit the ship, then go forward to the minefield area.
- Use the GARDENING SHEARS on the tall kelp, then walk forward.
- Use the FLARE on the octopus to scare him away from the cave entrance (I).
- Look at the close-up of the overturned boat (J).
- Take the COMPRESSED AIR TANK (K).
- Look at the code on the note (L).
- Note there is still some air in the broken tank (M).
- Exit the close-up.
- Select the boat wreck on the right for a Hidden Object Scene (N).
- Locate all the items on the list.
- You will earn the ELASTIC BANDS.
- Walk down 4 times, then enter the tavern.
- Use the SILVER DOLLAR on the jukebox to get the VINYL RECORD (O).
- You can speak with Janeway or Willem Kelsey if you choose (P).
- Exit the tavern and walk to the left.
- Look at the close-up of the hole in the hull (Q); use the WELDING TORCH on the metal patch (R).
- Take the HOSE (S).
- Look at the close-up of the safe (T).
- Refer to your journal for the combination: 4, 2, 1, 3, 5.
- The safe is using Roman numerals, so press the buttons over IV – II – I – III – V (U).
- Take the CAT’S EYE (V).
- Walk to the right twice, the go left.
- Walk forward twice to return to the kelp forest.
- Look at the close-up of the overturned boat on the left (A).
- Use the HOSE on the air tank (B).
- Take the LIFE BUOY (C).
- Exit the close-up and walk forward.
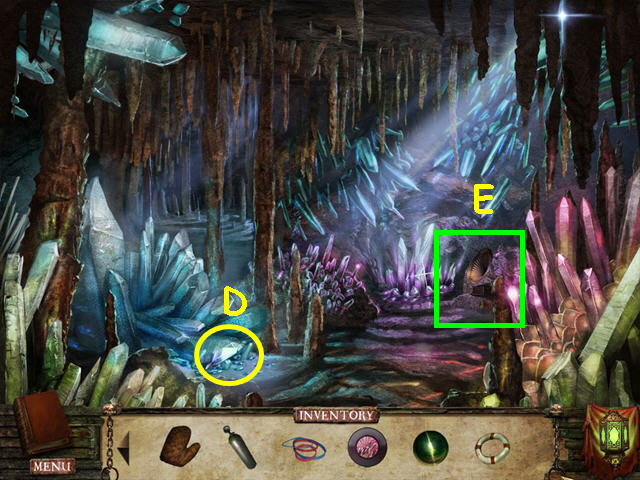
- Take the ICE CRYSTAL (D).
- Look at the gramophone for a mini-game (E).
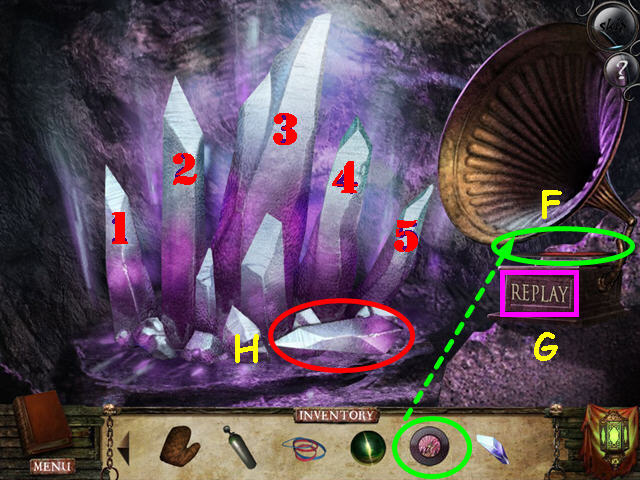
- Place the VINYL RECORD on the phonograph to trigger the mini-game (F).
- The object of this Simon-like mini-game is to copy the sequence that is played on the crystals.
- Watch the sequence as it plays on the crystals.
- Press the ‘Replay’ button if you need to see the sequence again (G).
- You will need to repeat 4 sequences.
- Our sequences were: 3-4-2-5-1, 3-4-2-5-1-3, 3-4-2-5-1-3-5, and 3-4-2-5-1-3-5-2.
- Take the VIBRATION CRYSTAL that breaks off (H).
- Walk down twice.

- Look at the close-up of the hot water tube (I).
- Use the ICE CRYSTAL on the tube (J).
- Take the WRENCH (K).
- Walk down, then enter the ship through the hole in the hull.
- Walk forward to the mess hall.
- Look at the dumbwaiter area (L).
- Place the LIFE BUOY on the hook (M).
- Click on the life buoy to send it down the shaft.
- Take the TRAPDOOR HANDLE (N).
- Walk down to exit the mess hall.
- Look at the trapdoor and place the TRAPDOOR HANDLE on the door.
- Click on the trapdoor to open it, then enter the trapdoor.
- Look at the skeleton (O).
- Take the EXPEDITION RING and the MAGNETIC COMPASS (P).
- Note the chest blocked by timbers (Q).
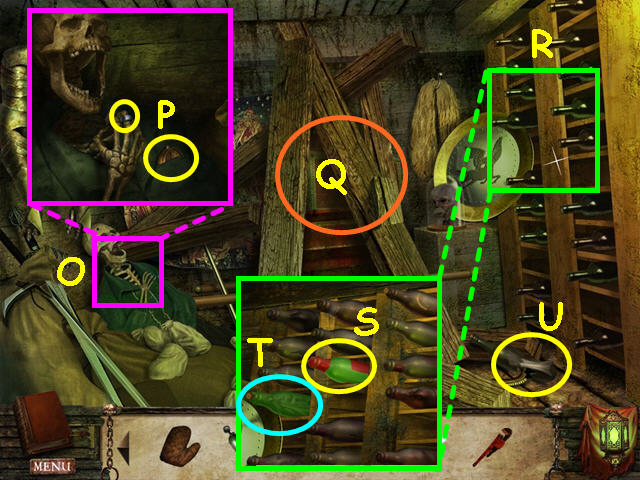
- Look at the close-up of the wine rack (R).
- Take the AGED WINE (S).
- Knock the left light green bottle to the floor (T).
- Take the 2 of 3 MINI SAIL (U).
- Walk down 3 times, then go right to Pavel’s garage.

- Give Pavel the MAGNETIC COMPASS, VIBRATION CRYSTAL, and the COMPRESSED AIR TANK (V).
- Pavel will give you the DEACTIVATION DEVICE in return.
- Look at the close-up of the metal plate (W).
- Use the WRENCH to remove the 4 bolts (X).
- Take the OIL CAN and the 3 of 5 ELEVATOR GEAR (Y).
- Walk down, then go to the left.
- Walk forward to the minefield area.
- Use the DEACTIVATION DEVICE on the floating mines (A).
- Walk right to the Thermal Plains (B).
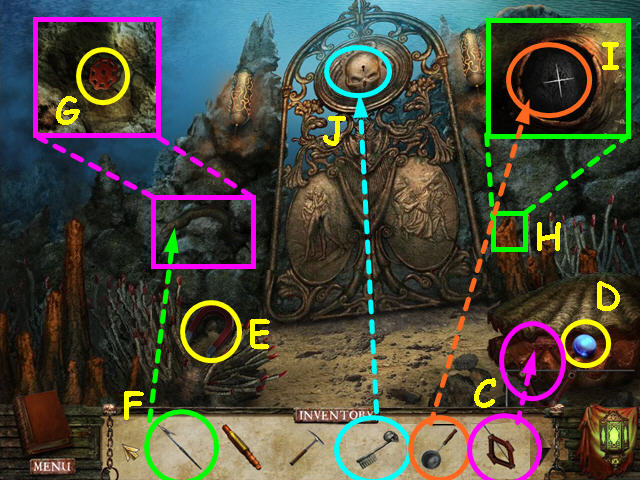
- Use the CAR JACK on the giant clam shell (C).
- Take the BLUE PEARL (D).
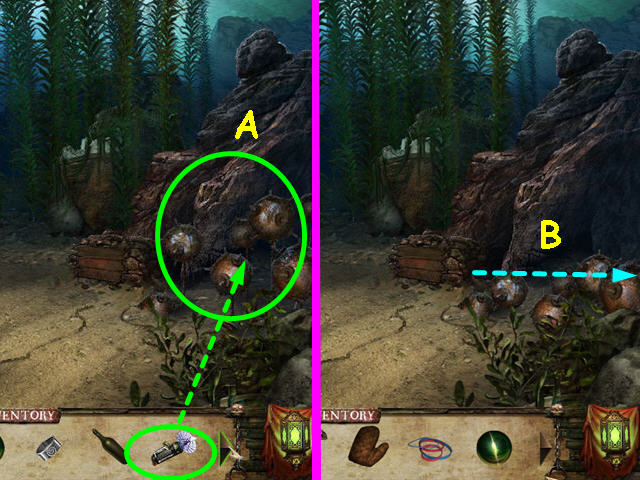
- Click on the coral to find the MAGNET (E).
- Use the HARPOON to scare away the eel (F).
- Look in the hole the eel vacated and take the 1 of 3 VALVE (G).
- Look in the tube on the right of the gate (H).
- Use the STRAINER to get the CHARCOAL (I).
- Use the SKELETON KEY on the gate for a mini-game (J).
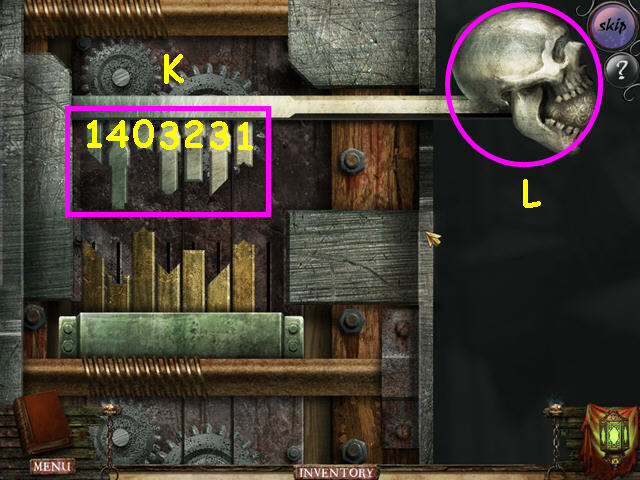
- The object of this mini-game is to make the key fit the lock.
- Click on each of the the key’s ‘teeth’ to fit into the spaces below (K).
- The number of times to click on each ‘tooth’ is 1-4-0-3-2-3-1 from left to right as shown in the screenshot.
- Click on the skull to open the lock (L).
- Walk forward through the gate.
- Look in the hole and take the 2 of 3 VALVE (M).
- Look in the lava pool (N).
- Use the FIREPROOF MITT to get the OBSIDIAN SKULL (O).
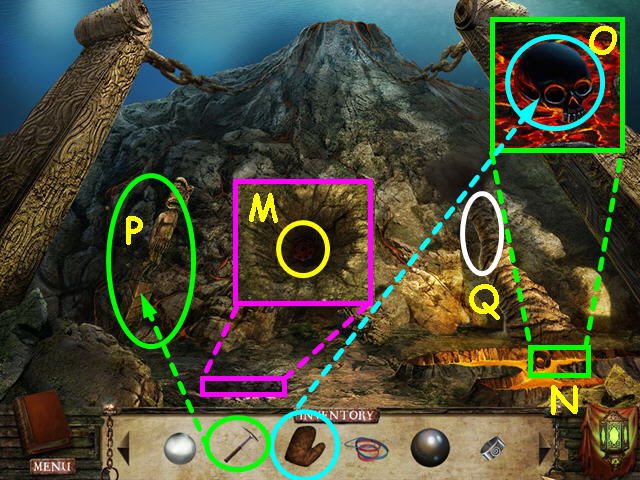
- Use the ROCK HAMMER to take the FIRE STAFF (P).
- Note the lava tube (Q).
- Enter the volcano.
- Click on the 3 symbols on the walls to return them to the stone slab (R).
- Look at the close-up of the slab (S).
- Use the CHARCOAL on the 3 outer symbols (T).
- Take the DEVIL BLOOD SCROLL from under the center triangle (U).
- Note the saw stuck in the ground (V).
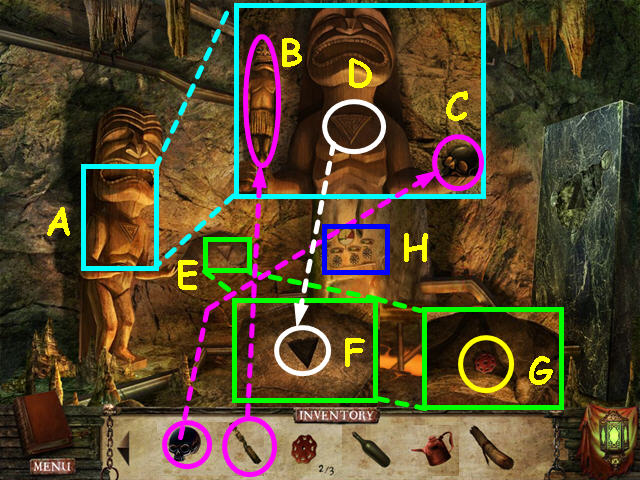
- Look at the close-up of the statue (A).
- Place the FIRE STAFF into the fist of the statue (B).
- Place the OBSIDIAN SKULL into the upturned palm of the statue (C).
- Take the TRIANGLE PIECE from the statue’s chest (D).
- Look at the close-up of the wall indentation (E).
- Use the TRIANGLE PIECE on the triangle hole (F).
- Take the 3 of 3 VALVE (G).
- Look at the boiler controls for a mini-game (H).
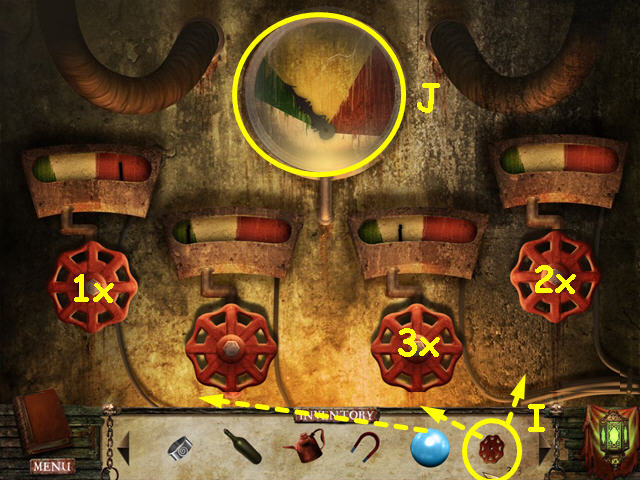
- Place the 3 VALVES onto the empty stems (I).
- The object of this mini-game is to turn the valves so that the needle in the meter moves into the green area (J).
- Turn the left valve once, the right valve twice, and turn the 2nd from the right valve 3 times.
- Walk down to exit the cave.
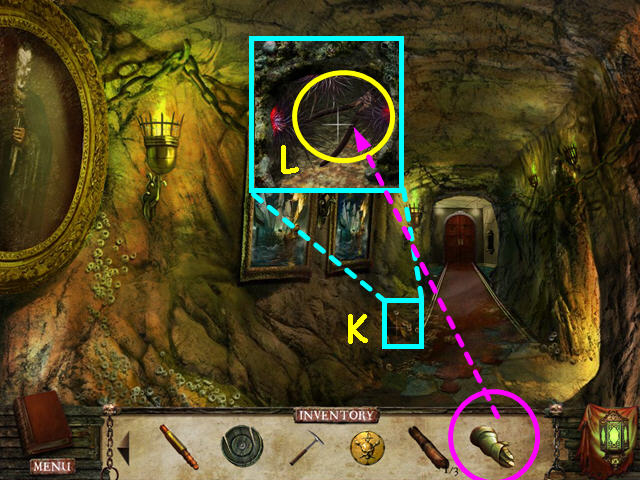
- Look at the close-up of the lava tube (K) use the FIREPROOF MITT on the opening to get the MOLTEN ROCK (L).
- Walk forward to enter the volcano.
- Look at the close-up of the saw (M); use the MOLTEN ROCK on the saw (N) and take the SAW (O).
- Walk down 4 times, then enter the ship through the hole in the hull.
- Walk forward to the mess hall.
- Look at the close-up of the bucket (P).
- Use the MAGNET on the bucket to get the 4 of 5 ELEVATOR GEAR (Q).
- Walk down, then enter the trap door.
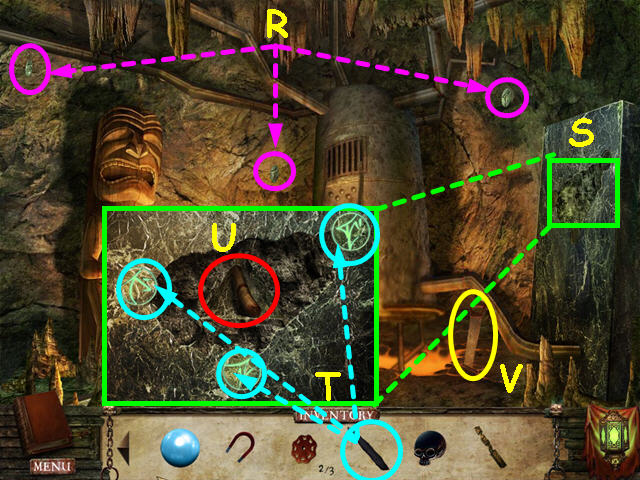
- Look at the close-up of the trapped chest (R).
- Use the SAW on the wood beams (S).
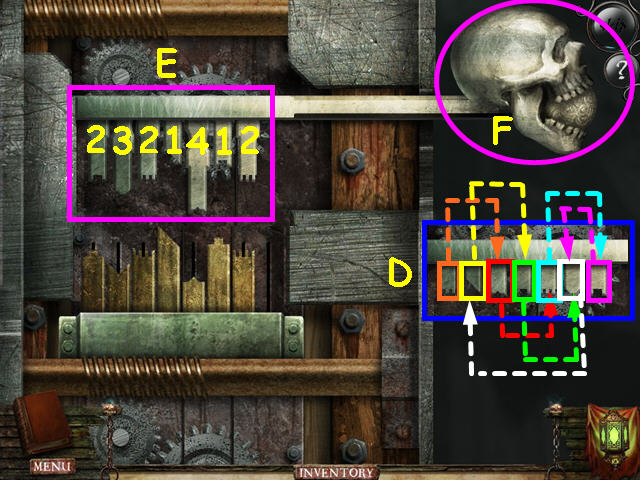
- Use the SKELETON KEY on the chest for a mini-game (T).
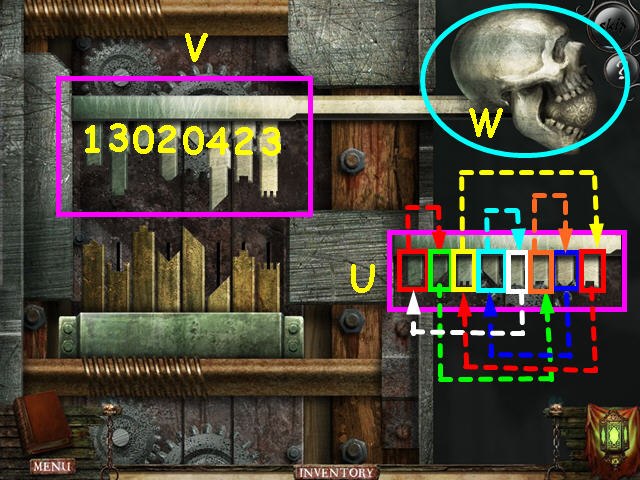
- The object of this mini-game is to make the key fit the lock.
- You must first drag each ‘tooth’ to the correct position (U).
- Click on each of the key’s ‘teeth’ to fit into the spaces below (V).
- The number of times to click on each ‘tooth’ from left to right is: 1-3-0-2-0-4-2-3.
- Click on the skull to open the lock (W).
- You will receive the NAVIGATION CHARTS.
- Walk down 4 times, then enter the tavern.
- Click through the dialogue with Janeway.
- Give Janeway the AGED WINE (A); she will give you ELECTRICAL WIRING.
- Talk to Janeway again to learn about the cage at the chasm edge.
- Give the NAVIGATION CHARTS to Willem Kelsey (B).
- Click through the dialogue and he will give you the ROLLED CHARTS to take to Nicolette.
- Exit the tavern, then go to the left.
- Select the area by the lion statue for a Hidden Object Scene.
- Locate all the items on the list.
- You will earn the OLD HANDKERCHIEF.
- Walk to the left, then cross the bridge and enter the cave.
- Click through the dialogue with your father and he will give you FATHER’S KEY.
- Select the paintings on the left wall for a Hidden Object Scene.
- Locate all the items on the list.
- You will earn the MARBLE.
- Walk forward, then go up the stairs.
- Talk to Jaleyah and give her the DEVIL BLOOD SCROLL; she will give you the 2 of 3 TRANSLATED BLOOD SCROLL.
- Enter the throne room.
- Talk to Davy Jones to learn of the 3rd trial.
Chapter 6: The Third Trial
- Click through the dialogue with Straaten and he will give you DAVY JONES’ RING.
- Talk to Jaleyah once more about the 3rd blood scroll.
- Walk down then enter the trap door to the cellar.
- Walk down again to the dungeon.
- Look at the lock on the iron maiden (B).
- Use the SKELETON KEY on the lock for a mini-game (C).
- The object of this mini-game is to make the key fit the lock.
- You must first drag each ‘tooth’ to the correct position (D).
- Click on each of the key’s ‘teeth’ to fit into the spaces below (E).
- The number of times to click on each ‘tooth’ from left to right is: 1-3-0-2-0-4-2-3.
- Click on the skull to open the lock (F).
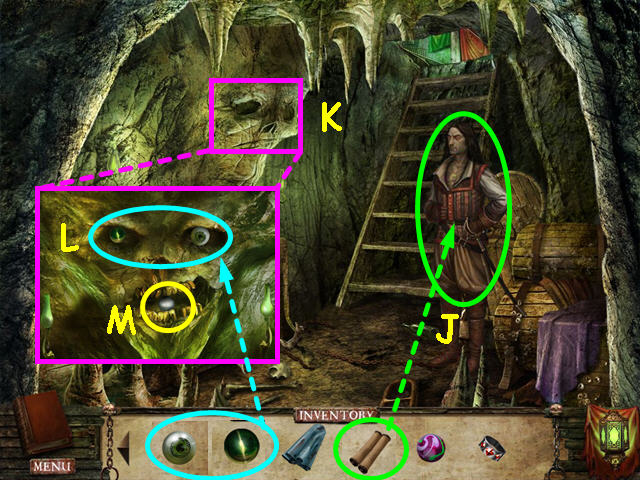
- Look inside the iron maiden (G).
- Click on the eye patch to remove it from the skull (H).
- Take the GLASS EYE (I).
- Walk to the right.
- Give Nicolette the ROLLED CHARTS (J).
- Click through the dialogue with Nicolette and he will give you the CAPTAIN’S MEDAL.
- Look at the close-up of the face on the wall (K); place the GLASS EYE and the CAT’S EYE into the eye sockets (L).
- Take the BLACK PEARL (M).
- Walk forward to exit the cellar, then walk down 3 times.
- Walk to the right.
- Talk to Willem Kelsey (N); give him the CAPTAIN’S MEDAL (O) and in return you will receive the 3 of 3 MINI SAIL.
- Walk down 3 times to your crash site.
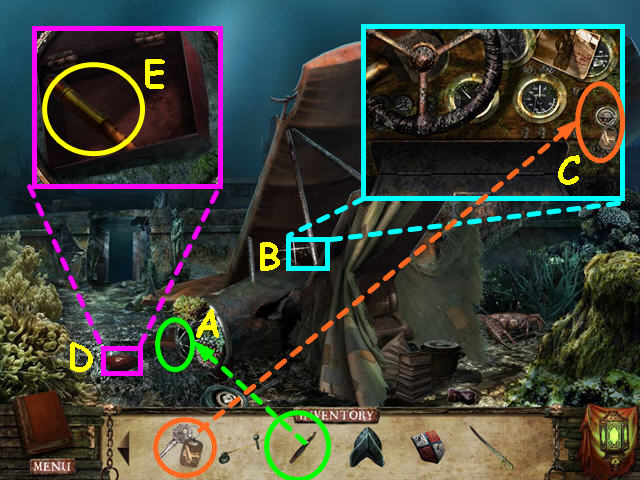
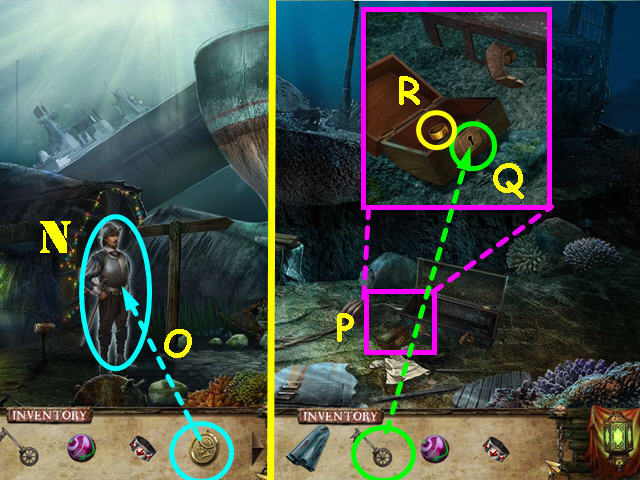
- Look at the close-up of the chests (P).
- Use FATHER’S KEY to unlock the small chest (Q).
- Take your FATHER’S RING (R).
- Walk forward and select the area beneath the wing for a Hidden Object Scene.
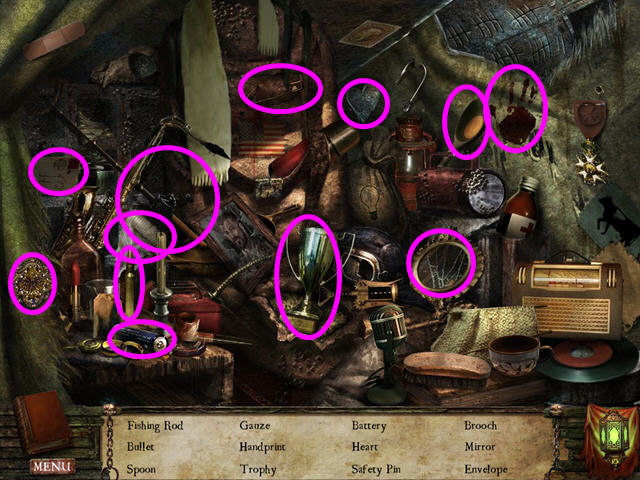
- Locate all the items on the list.
- You will earn the FISHING ROD.
- Walk forward, then walk to the left.
- Look at the close-up of the dark hole (S); use the FLARE on the hole (T).
- Take the 5 of 5 ELEVATOR GEAR (U).
- Look at the elevator control (V).
- Use the 5 ELEVATOR GEARS on the control (W).
- Click on the cage to go down to the chasm (X).
- Use the FISHING ROD on the fish (A).
- Look at the close-up of the giant clam (B).
- Use the MARBLE to swap for the GOLDEN PEARL (C).
- Look at the close-up of the submersible (D); use the ELECTRICAL WIRING on the circuits (E).
- Take the LANTERN (F).
- Look at the close-up of the crab (G).
- Use the ELASTIC BANDS on the crab (H).
- Take the CORKSCREW (I).
- Use the ARCHEOLOGIST BRUSH on the sand in front of the crab (J).
- Take the 1 of 2 CLOCK HAND (K).
- Walk down, then walk to the right. Walk forward, then go the left twice. Cross the bridge and enter the cave. Walk right to enter the slave quarters. Look at the pirate for a mini-game.
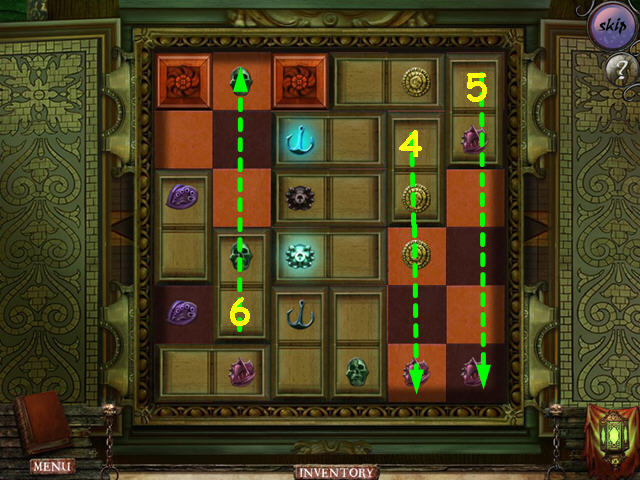
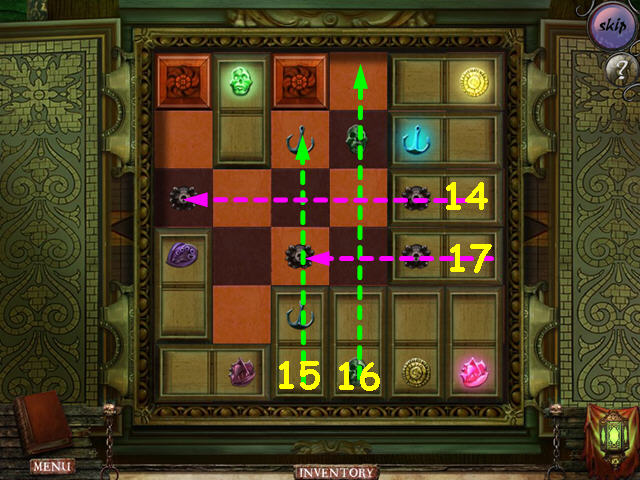
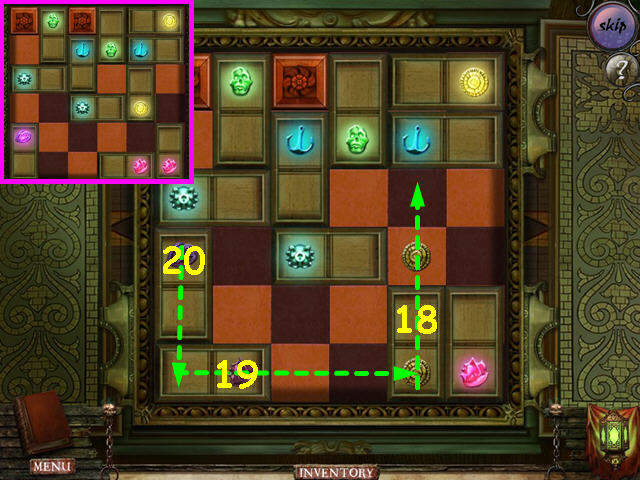
- Place DAVY JONES’ RING, your FATHER’S RING and the EXPEDITION RING on the fingers.
- The object of this mini-game is to move the rings to the finger that have the same color symbol.
- Move the rings in numerical order to the finger indicated (1- 4).
- Note the last picture will be on the next set of instructions.
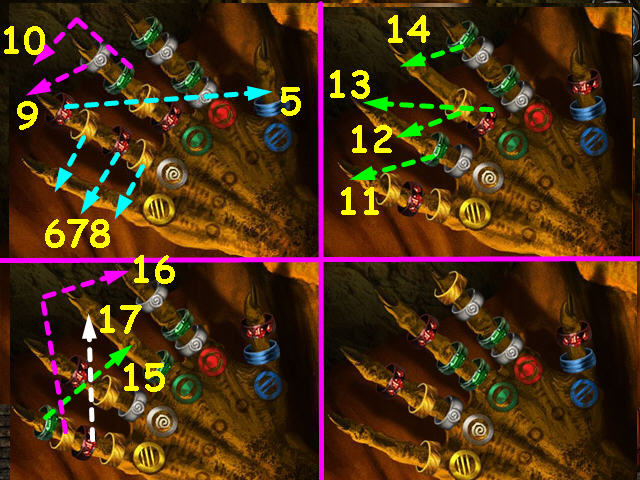
- Move the rings in numerical order to the finger indicated (5 – 17).
- Note the last picture will be on the next set of instructions.
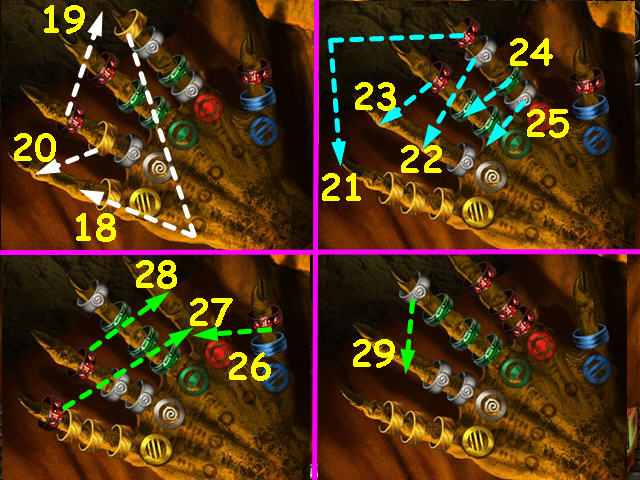
- Move the rings in numerical order to the finger indicated (18 – 29).
- Take the 1 of 4 PORTRAIT CANVAS from the pirate’s other hand.
- Walk down, then go forward and up the stairs.
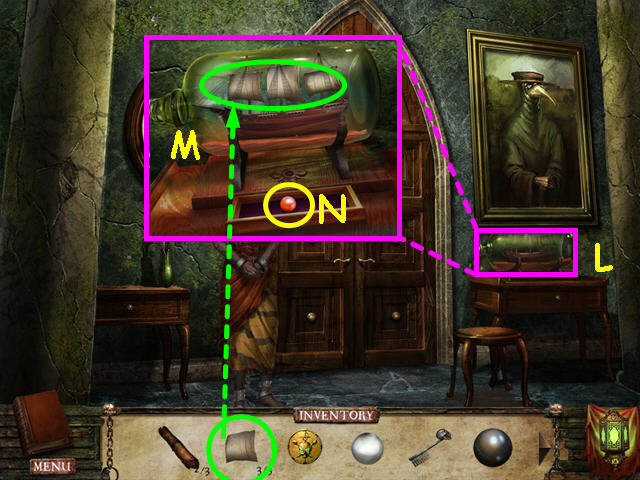
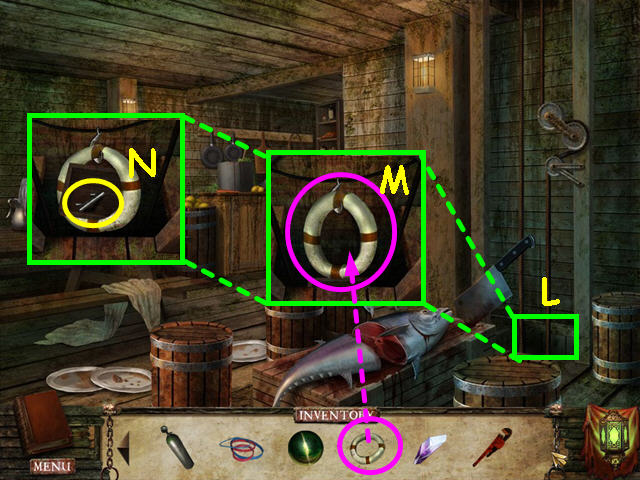
- Look at the close-up of the ship in the bottle (L).
- Use the 3 MINI SAILS on the ship (M).
- Take the CRIMSON PEARL (N).
- Walk down the stairs.
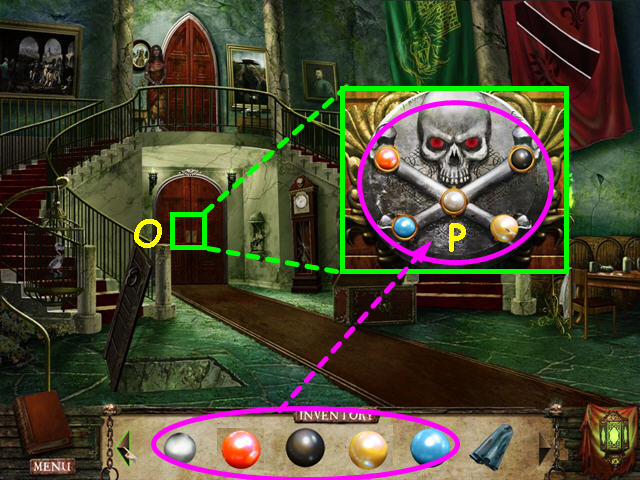
- Look at the close-up of the lower double doors (O).
- Use the CRIMSON, SILVER, BLACK, BLUE, and GOLDEN PEARLS on the lock (P).
- Walk forward to enter the private chambers.
- Place the LANTERN on the right side if the portrait (Q).
- Look at the portrait to learn you need 4 portrait canvas pieces (R).
- Look at the lump in the bead (S); click to move the blanket and look at the journal that mentions 9:04 (T).
- Use the CHARGED MEDALLION on the chest to get the 2 of 4 PORTRAIT CANVAS PIECE (U).
- Look at the close-up of the desk on the left (V); use the OLD HANDKERCHIEF to clean the lock (W).
- Use the SKELETON KEY on the lock for a mini-game (X).
- The object of this mini-game is to make the key fit the lock.
- You must first drag each ‘tooth’ to the correct position (A).
- Click on each of the key’s ‘teeth’ to fit into the spaces below (B).
- The number of times to click on each ‘tooth’ from left to right is: 3-1-2-1-3-0-2-1.
- Click on the skull to open the lock (C).

- Use the CORKSCREW on the bottle to get the 3 of 4 PORTRAIT CANVAS PIECE (D).
- Use the OIL CAN on the small door (E).
- Take the 2 of 2 CLOCK HAND (F).
- Open the tiny drawer and take the PAINTBRUSH (G).
- Walk down to exit the room.

- Look at the grandfather clock (H); place the 2 CLOCK HANDS on the clock face (I).
- Drag the clock hands to show the time 9:04.
- Take the 4 of 4 PORTRAIT CANVAS PIECE (J).
- Walk forward to re-enter the private chambers.
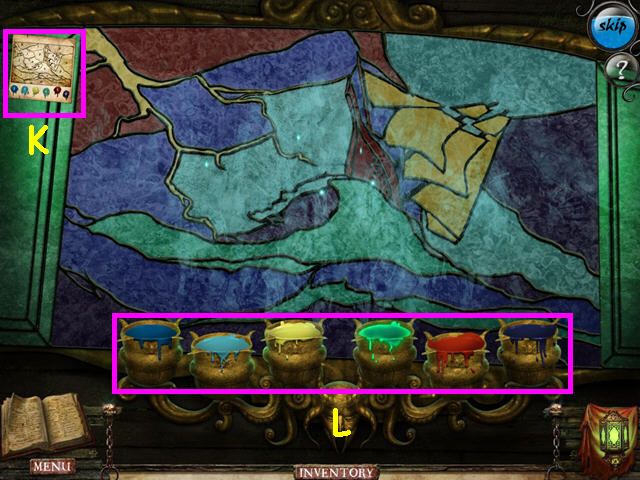
- Look at the portrait frame for a min-game.
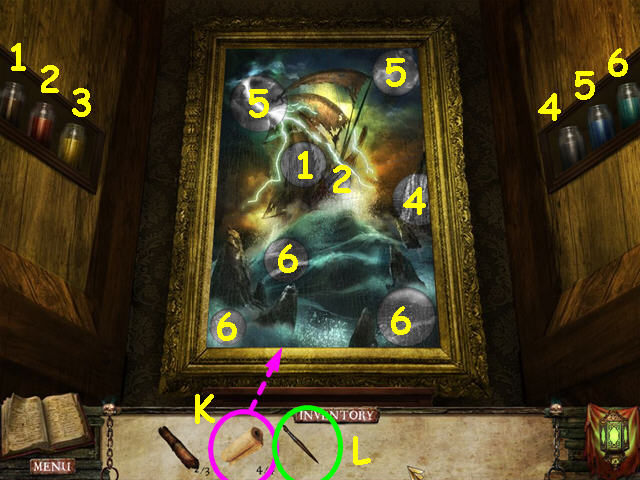
- Place the 4 PORTRAIT CANVAS PIECES into the frame (K).
- Use the BRUSH on the canvas to trigger a mini-game (L).
- The object is to paint the circles with the correct color.
- The numbered paint jars correspond to the numbered circle in the painting (1 – 6).
- Click on a paint jar, then click on a circle with a matching number.
- Should you paint the wrong color, just use the brush in the correct color and re-paint.
- You will earn the DECKEN BLOOD SCROLL.
- Exit the room, then walk up the stairs.
- Give the DECKEN BLOOD SCROLL to Jaleyah (M).
- Click through the dialogue and she will give you the 3 of 3 TRANSLATED SCROLL.
- Enter the throne room (N).
- Click through the dialogue with Davy Jones for a mini-game.
- The object of this mini-game is to move the seal discs to the correct color and position (A-C).
- The rotate button in the bottom center will rotate the 3 inner disc pieces (D).
- Click on each colored corner to rotate the disc pieces at that point.
- Make the following moves: A-C-C-D-D-A-B-C-D-A-B-B-C-C.
- Congratulations! You have completed Written Legends: Nightmare At Sea!


 Order of the Light: The Deathly Artisan Walkthrough, Guide, & Tips
 Jewelry Secret: Mystery Stones Walkthrough, Guide, & Tips
 The Tudors Walkthrough, Guide, & Tips
 Dream Day Wedding: Bella Italia Walkthrough, Guide, & Tips
 The Fall Trilogy Chapter 2: Reconstruction Walkthrough, Guide, & Tips