Hallowed Legends: Templar Walkthrough, Guide, & Tips
Hallowed Legends: Templar Walkthrough

Welcome to the Hallowed Legends: Templar Walkthrough
Strange figures have taken over a small town in Hallowed Legends: The Templar! Stop the Knights of the Templar!
Whether you use this document as a reference when things get difficult or as a road map to get you from beginning to end, we’re pretty sure you’ll find what you’re looking for here.
This document contains a complete Hallowed Legends: Templar game walkthrough featuring annotated screenshots from actual gameplay!
We hope you find this information useful as you play your way through the game. Use the walkthrough menu below to quickly jump to whatever stage of the game you need help with.
Remember to visit the Big Fish Games Forums if you find you need more help. Have fun!
This walkthrough was created by BrownEyedTigre, and is protected under US Copyright laws. Any unauthorized use, including re-publication in whole or in part, without permission, is strictly prohibited.
General Tips

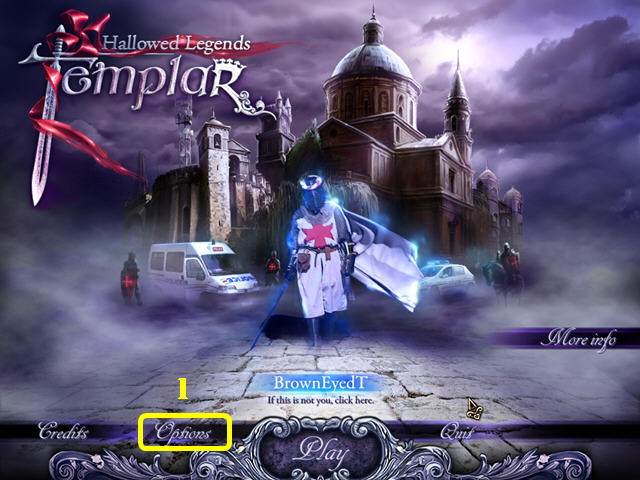
- Click on Options (1) to adjust the Music, Environment, Effects, and Voice Volume. You can also adjust Gamma, Choose Full Screen and Custom Cursor.
- You may choose between Casual, Advanced or Hardcore Modes.
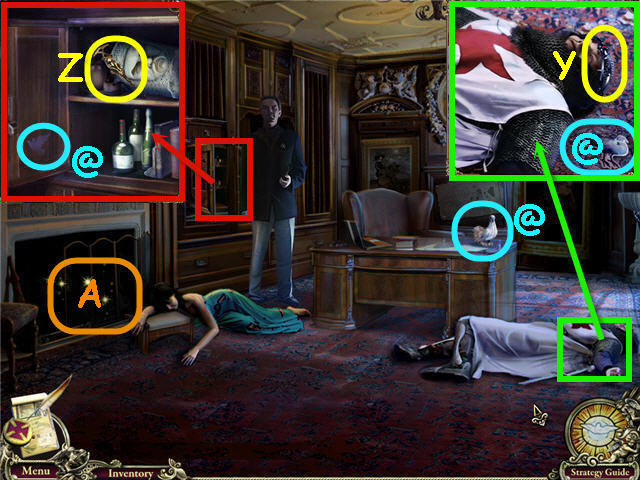
- There are 50+ SECRET DOVES to find. These can be the shape of any form of bird or fowl. They are circled in cyan in the screenshots and marked with the ‘@’ symbol.
- A magnifying glass cursor indicates you can examine the area. A gear cursor indicates you need to use an inventory item there. A grabbing hand icon indicates you can take the item.
- Throughout the guide, we will use the acronym ‘HOS’ for Hidden Object Scenes.
- Items in the find list in orange require an extra step or the use of an Inventory item in order to find.
- Items to be used together in the scene will be circled in the same color.
- Click on the dove in the lower right to get a hint.
- Click on the Info button on the lower right of a puzzle to get the directions.
- There is no penalty for random clicking.
- Examine the diary in the lower left to access your task list, map and story updates.
Chapter 1 – Hotel Maltese Cross
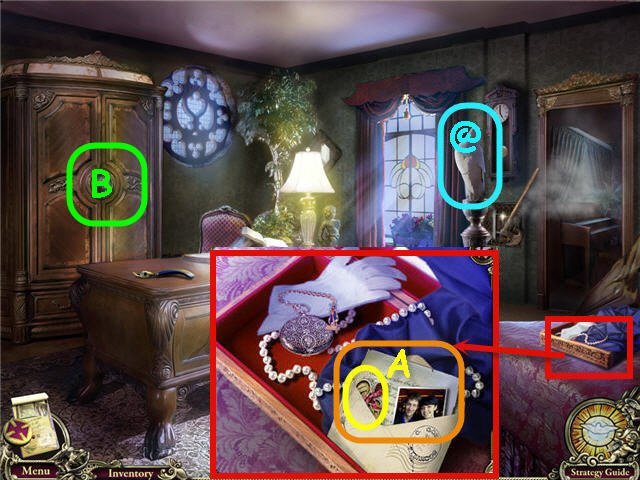
- Open the curtains.
- Take the SECRET DOVE (@).
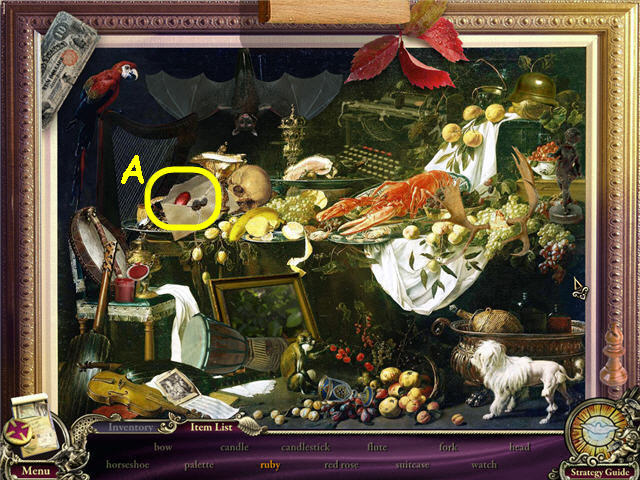
- Examine the bed; take the note and CUPBOARD KEY (A).
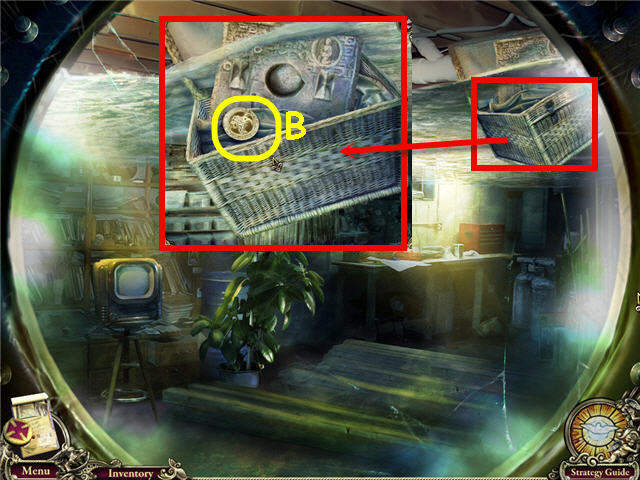
- Examine the cupboard (B); use the CUPBOARD KEY on the lock.
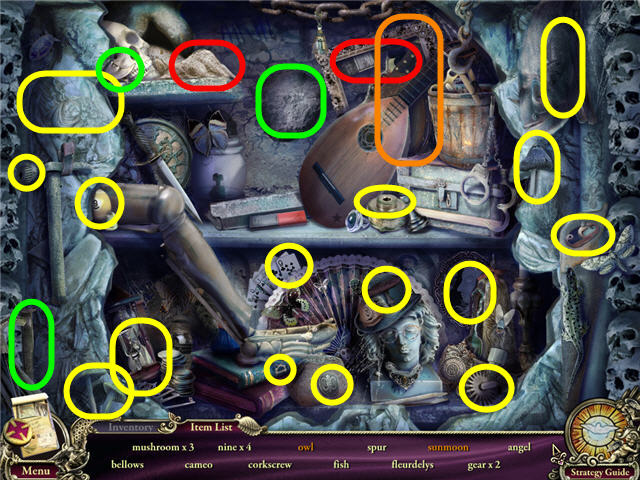
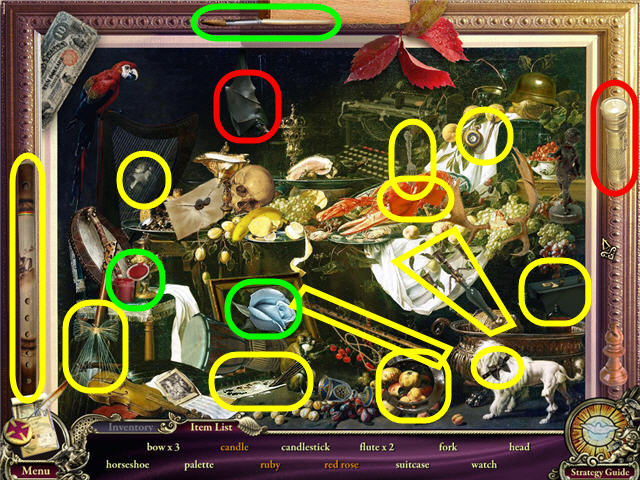
- Examine the cupboard to access a HOS.
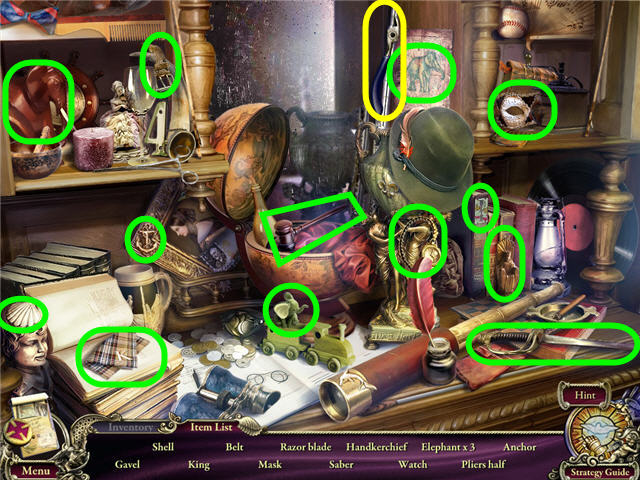
- Find the items listed and get a PLIERS HALF.
- Open the globe to get the gavel.
- Open the book to get the handkerchief.
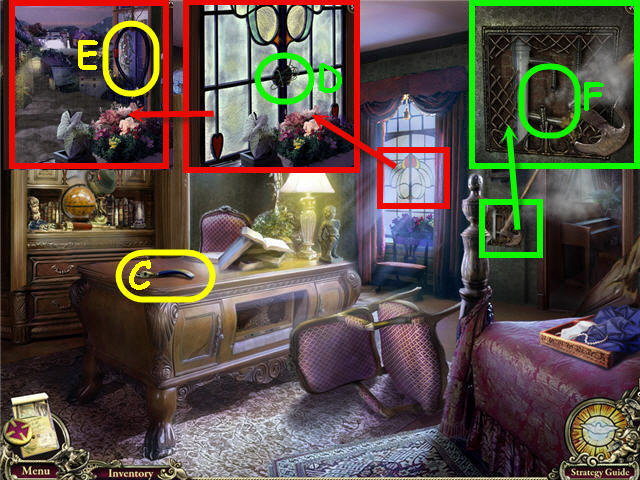
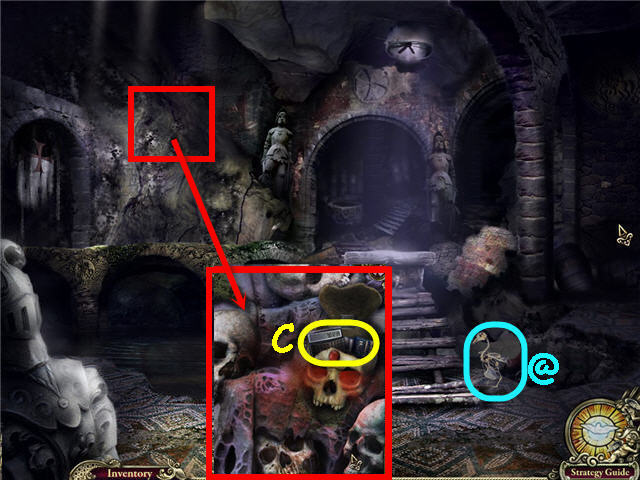
- Use the PLIERS HALF on the pliers half to get PLIERS (C).
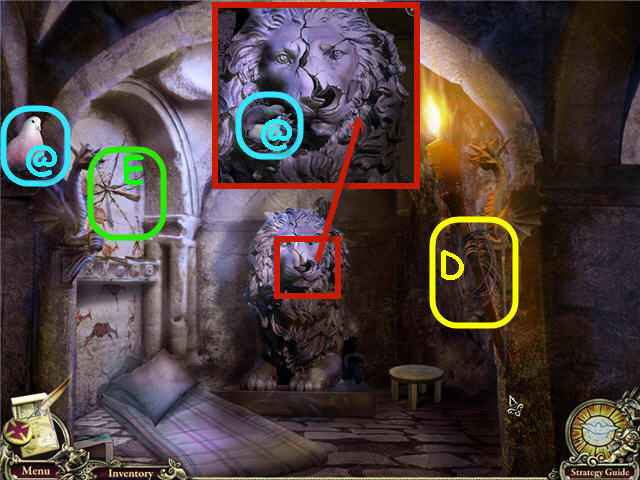
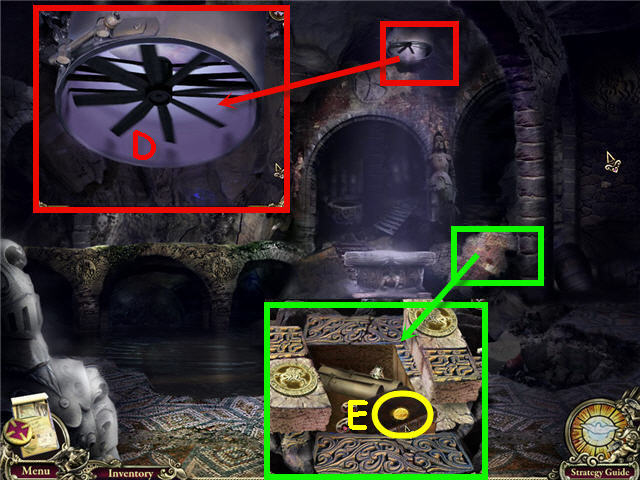
- Examine the window; use the PLIERS on the wire (D).
- Take the HOSE (E).
- Examine the pipes; use the HOSE on the pipe (F).
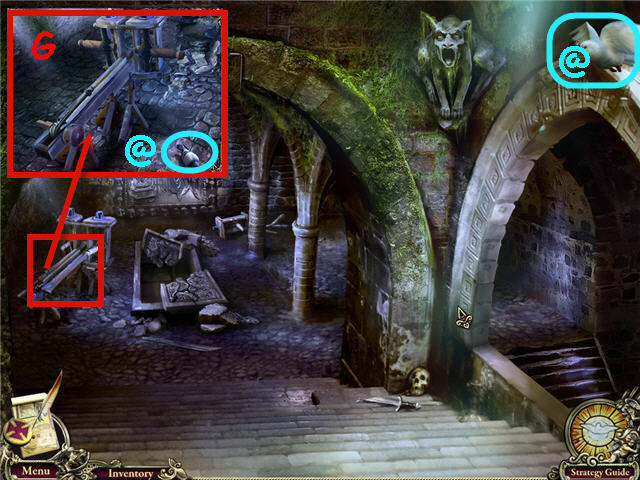
- Exit the room.
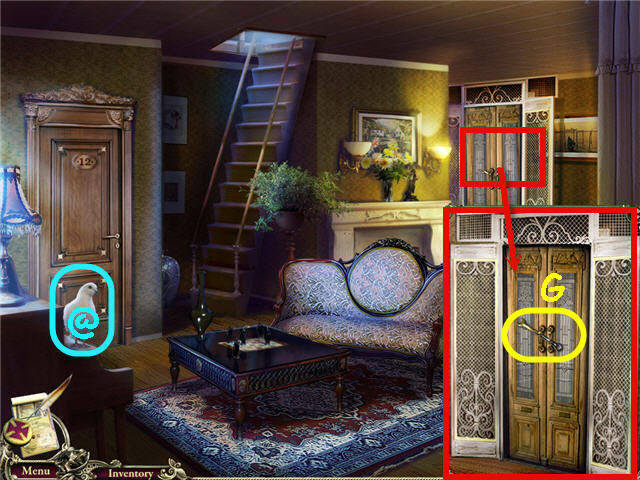
- Take the SECRET DOVE (@).
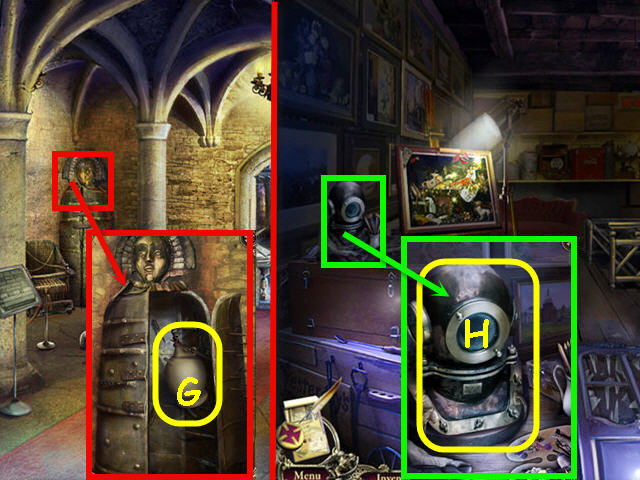
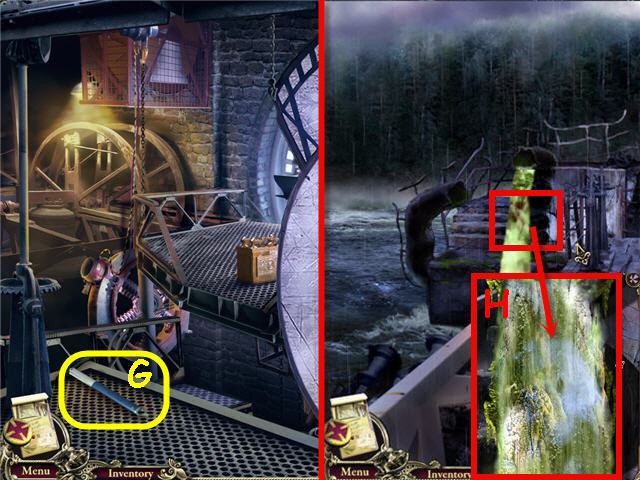
- Examine the door; take the WRENCH (G).
- Head up to the attic.

- Take the SECRET DOVE (@).
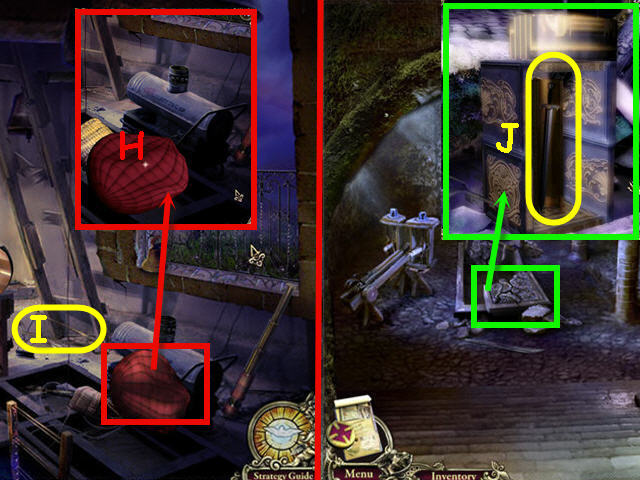
- Take the LADDER (H).
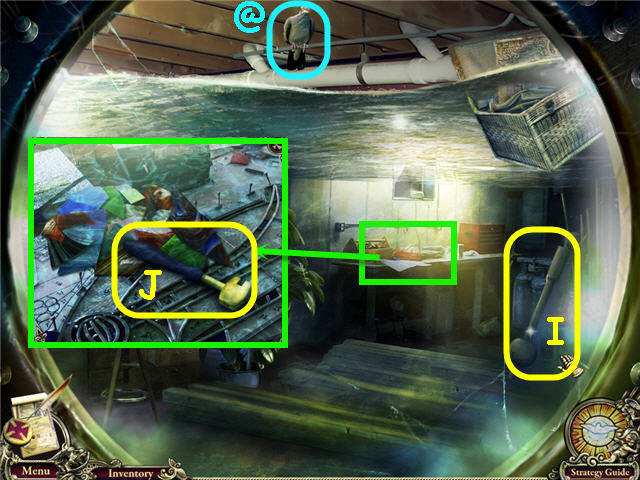
- Examine the shelf; take the SATYR (I).
- Back out.
- Examine and place the LADDER in the hole (J).
- Head down.
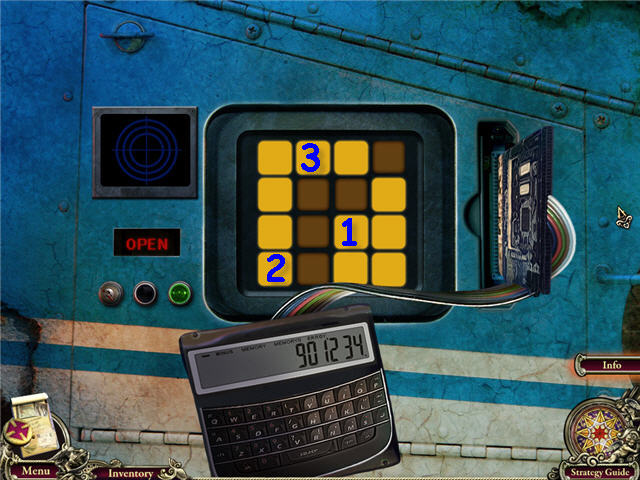
- Examine the refrigerator to trigger a puzzle.
- Move the tiles so that all are arranged under the top matching tiles.
- See screenshot for solution.
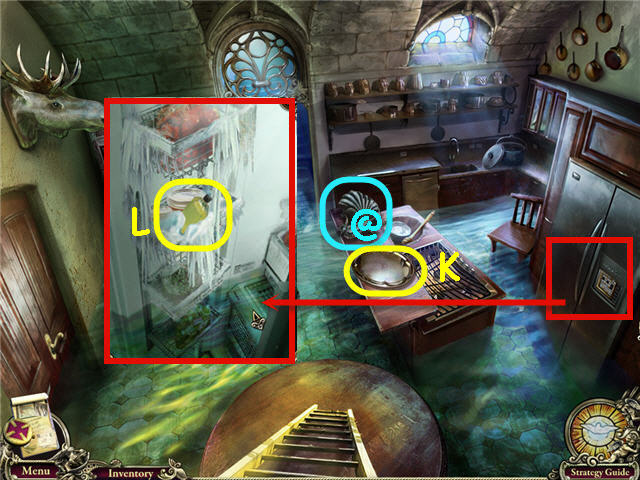
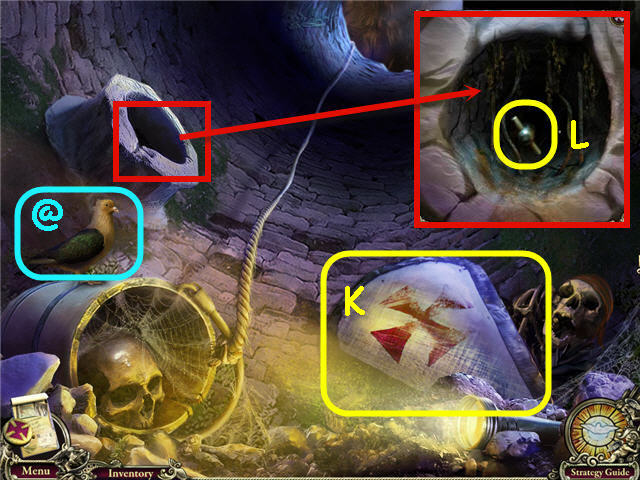
- Take the SECRET DOVE (@).
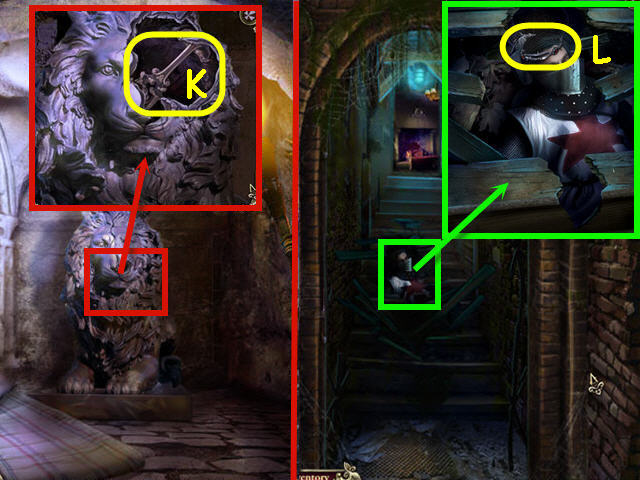
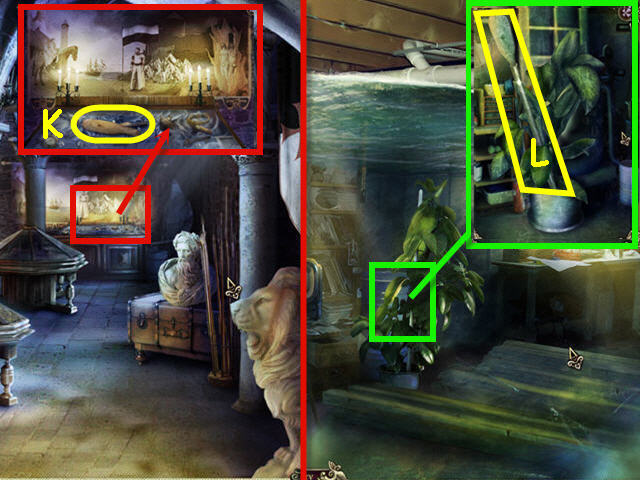
- Take the TRAY (K).
- Examine the refrigerator; take the ACID (L).
- Head straight.
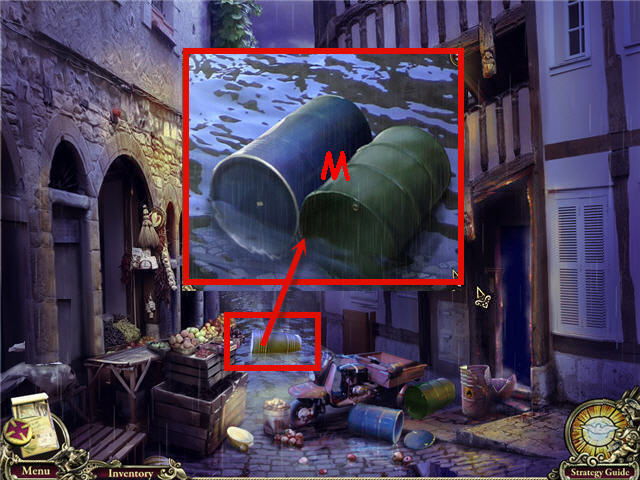
- Take the SECRET DOVE (@).
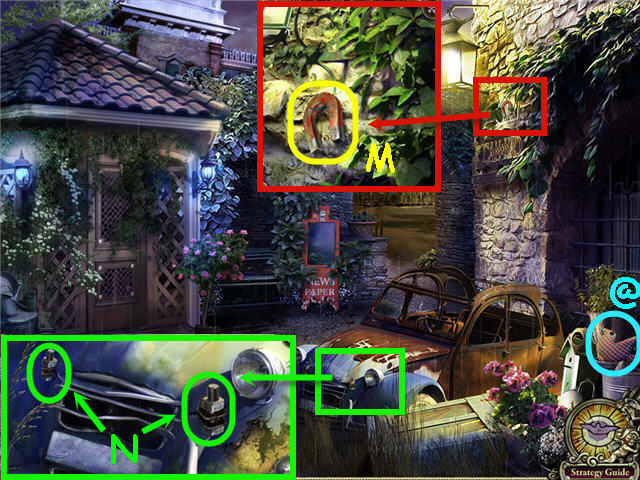
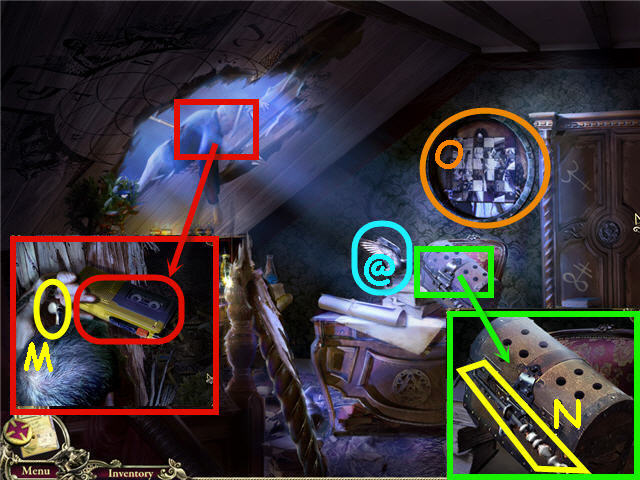
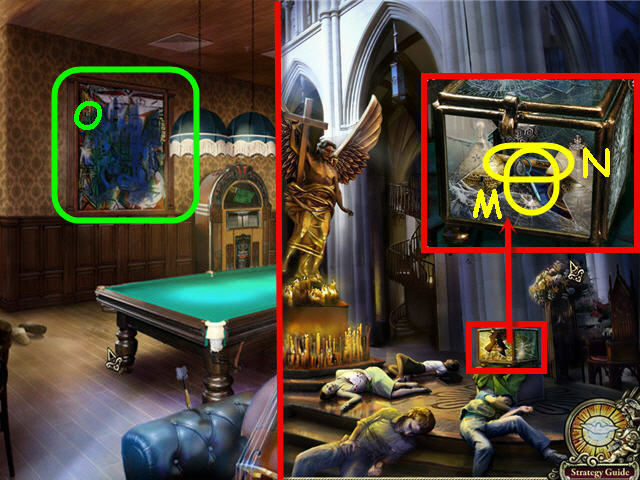
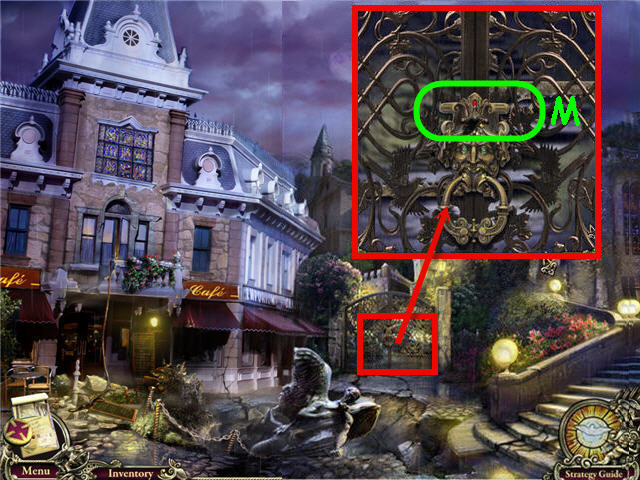
- Examine the vines; take the MAGNET (M).
- Examine the car bumper.
- Use the WRENCH on both nuts (N).
- Examine the opened hood to access a HOS.
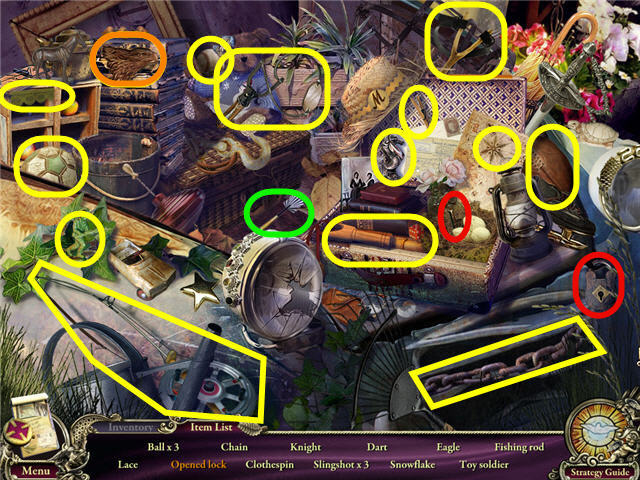
- Find the items listed to get an EAGLE.
- Move the leaves to get a dart.
- Use the key on the lock to get an opened lock.
- Head forward.
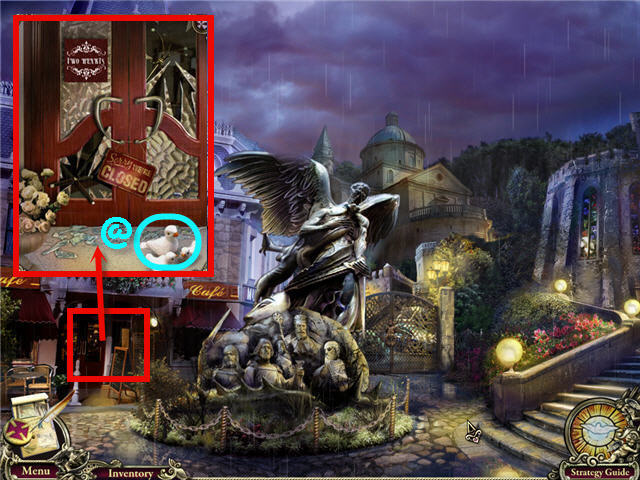
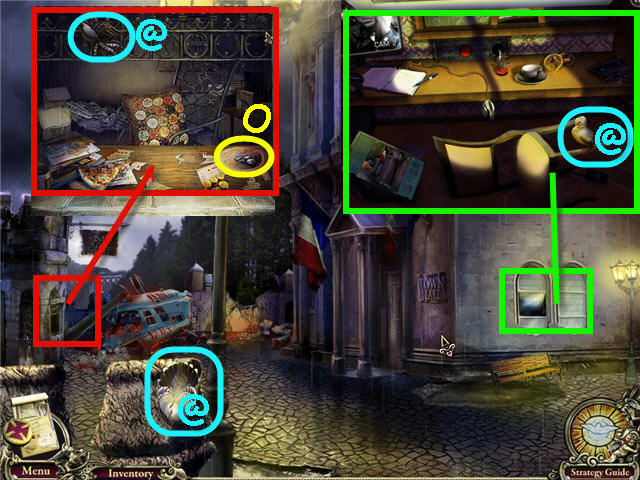
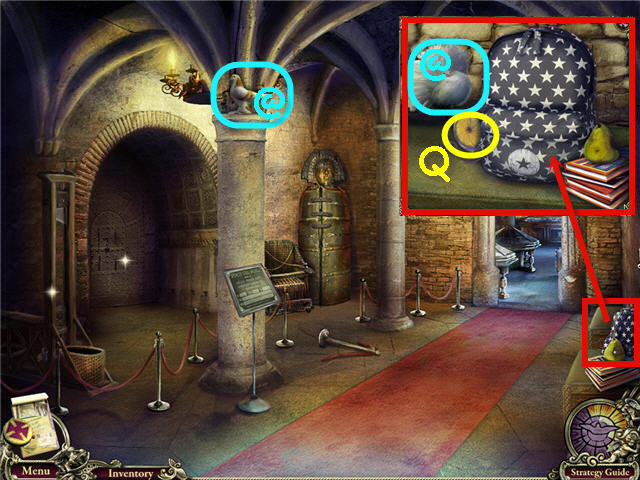
- Examine the front door; take the SECRET DOVE (@).
- Head right.
- Attempt to head up the stairs.
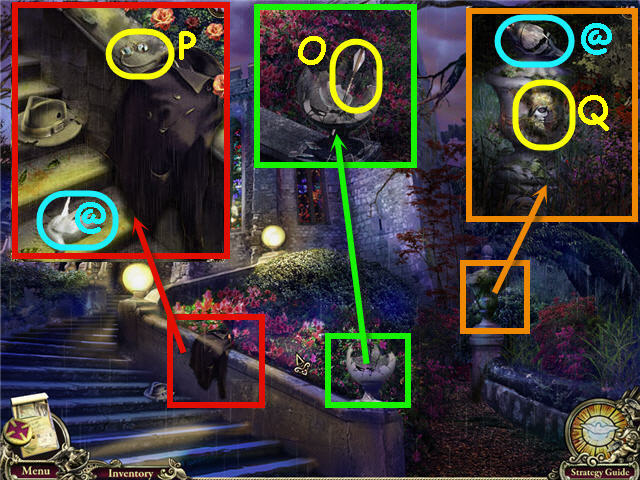
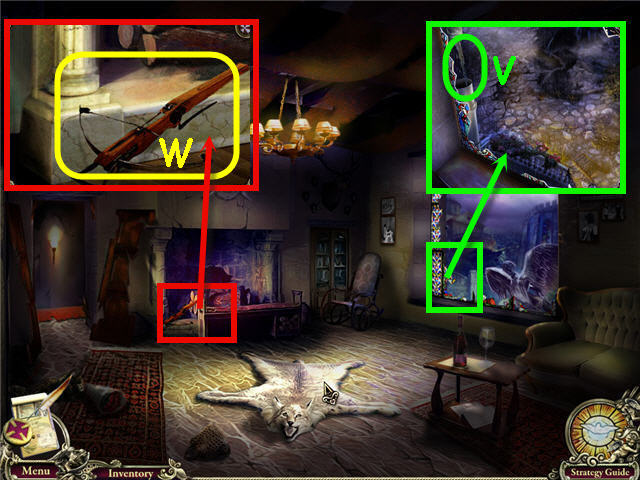
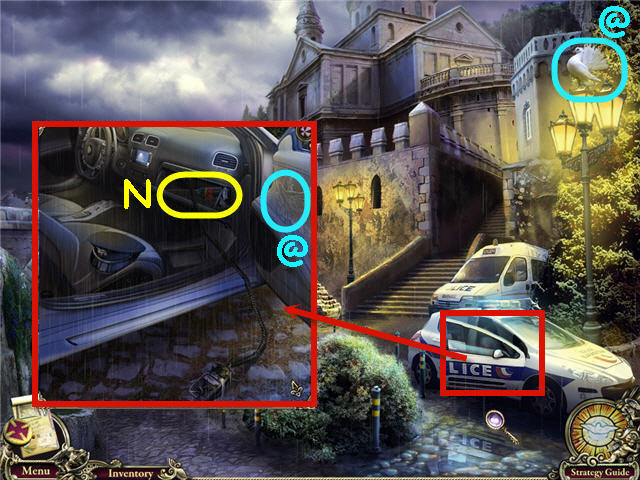
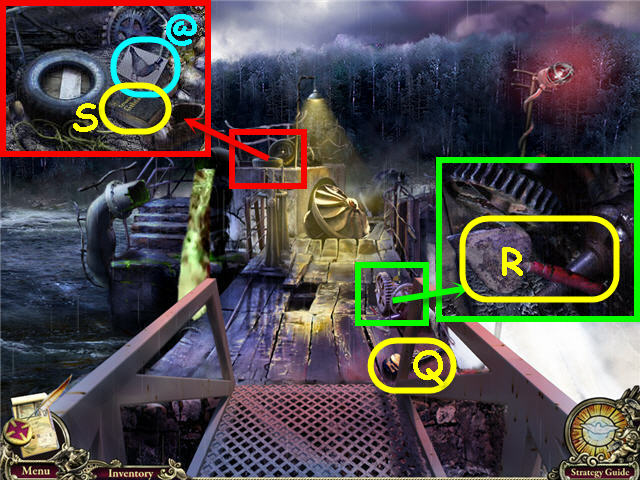
- Examine the lamp; take the CROSSBOW BOLT (O).
- Examine the clothes; take the SECRET DOVE (@).
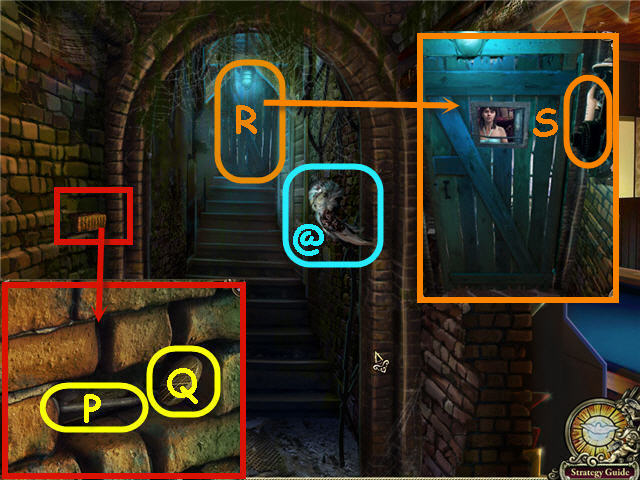
- Move the jacket; take the GLASSES (P).
- Examine the pedestal; take the SECRET DOVE (@).
- Use the ACID on the mask; take the HELMET MASK (Q).
- Back out three times.
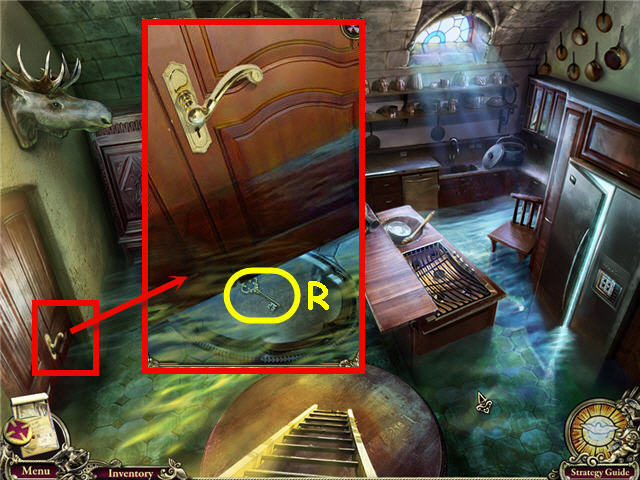
- Examine the door; use the TRAY on the bottom.
- Use the CROSSBOW BOLT in the keyhole.
- Pull the tray; pick up the key (R) and use it on the keyhole.
- Head left.
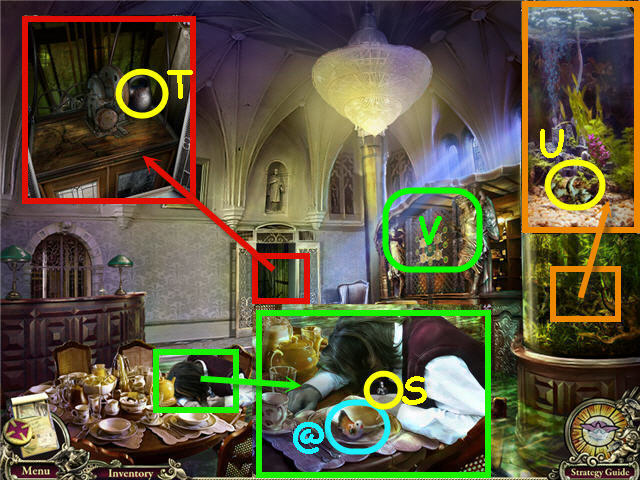
- Examine the patron; turn his head.
- Take the SECRET DOVE (@).
- Take the CHESSMAN (S).
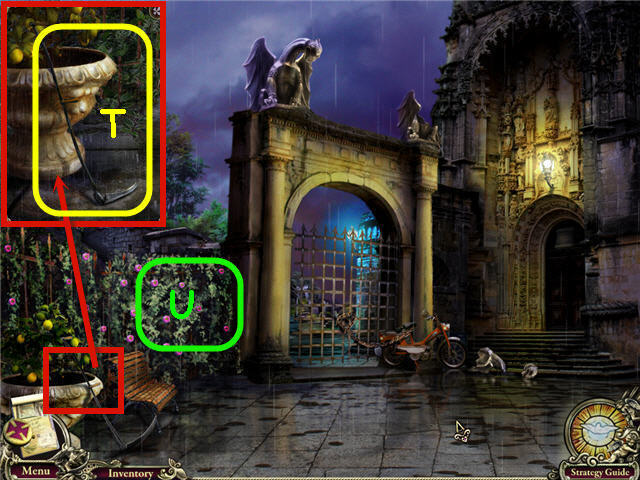
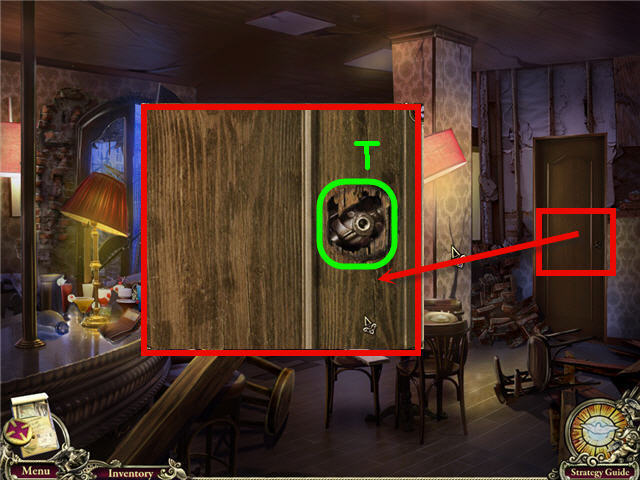
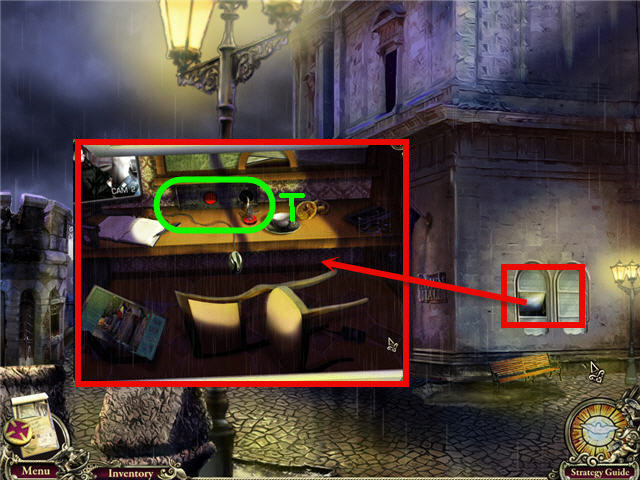
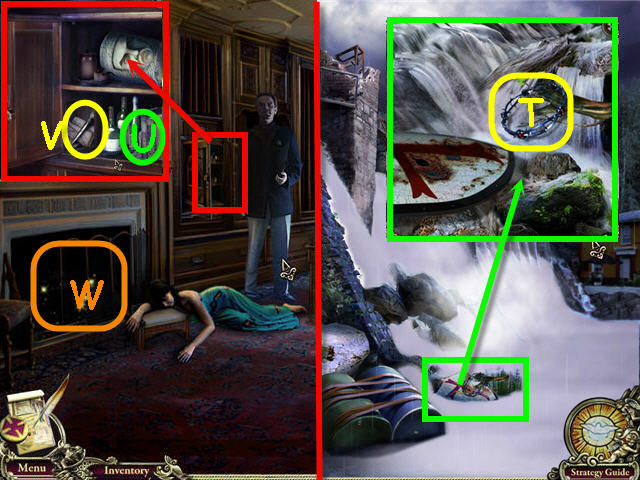
- Examine the elevator shaft; take the WEIGHT (T).
- Examine and use the MAGNET on the aquarium; get the IRON AMULET (U).
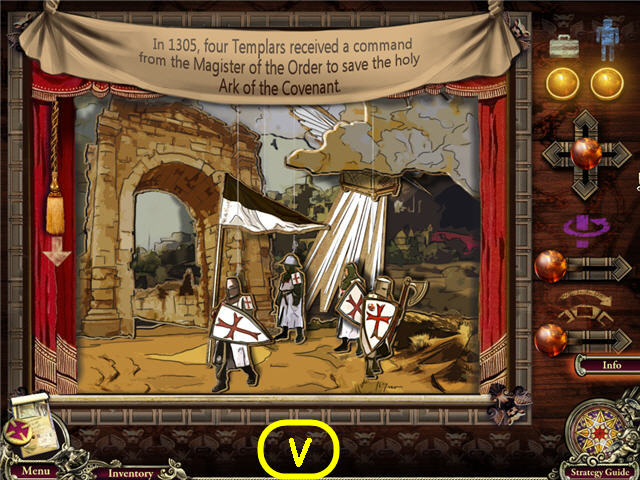
- Examine the bar (V); place the SATYR in the center to trigger a puzzle.
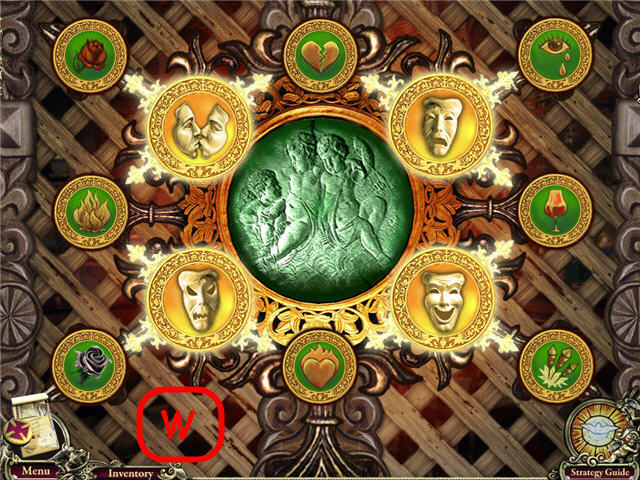
- Arrange the medallions so that they are connected to their corresponding masks.
- When correct the connections will light up. See screenshot (W) for solution.
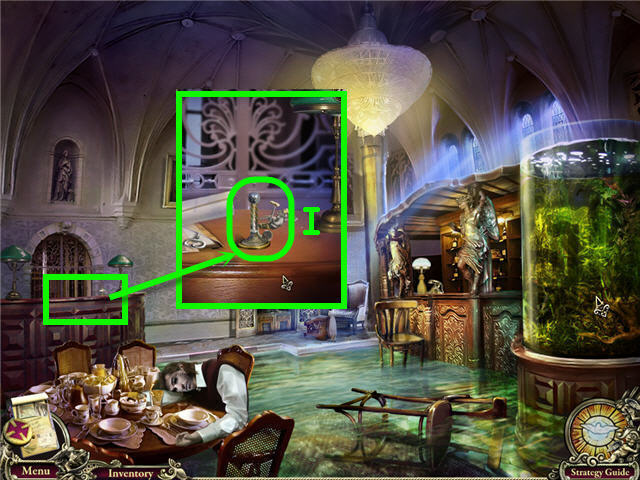
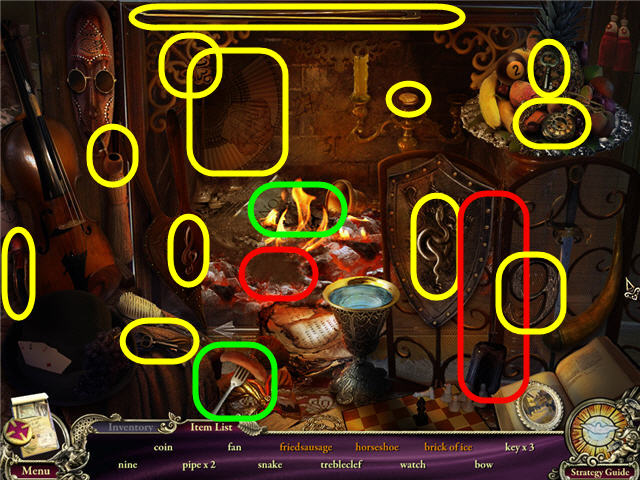
- Examine the bar to access a HOS.
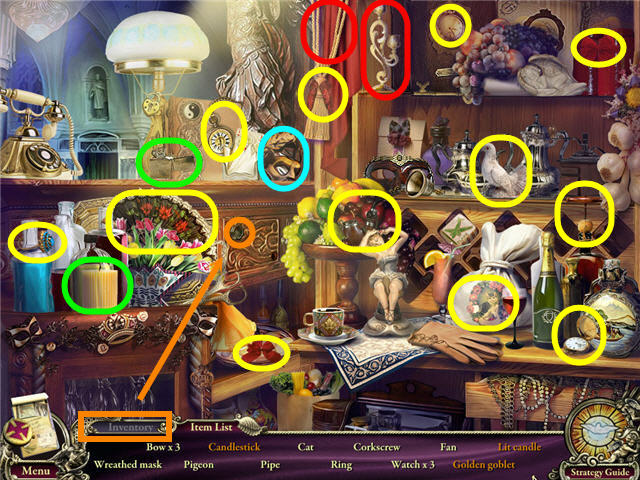
- Find the items listed and get a WREATH MASK.
- Pull the curtain cord to get the candlestick.
- Use the lighter on the candle to get a lit candle.
- Click on the Inventory tab; use the WRENCH on the screw.
- Click on the unscrewed panel to get the golden goblet.
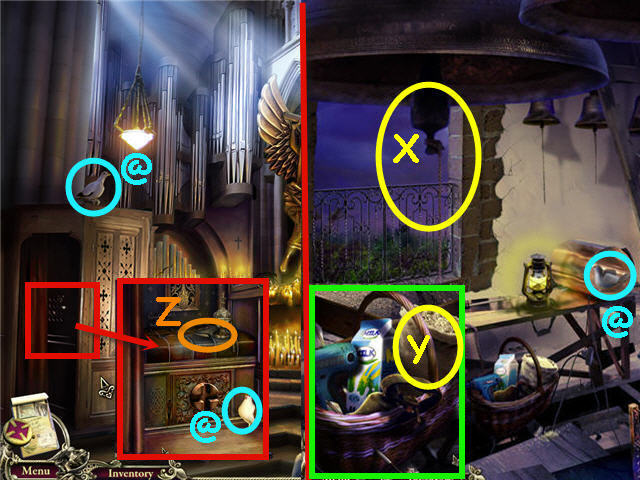
- Back out two times, head up.
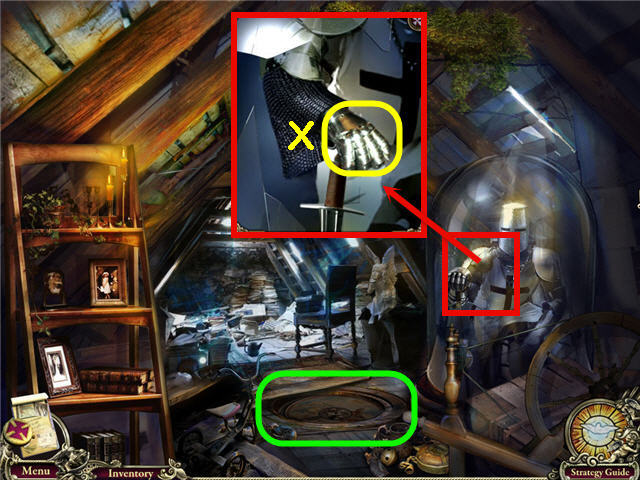
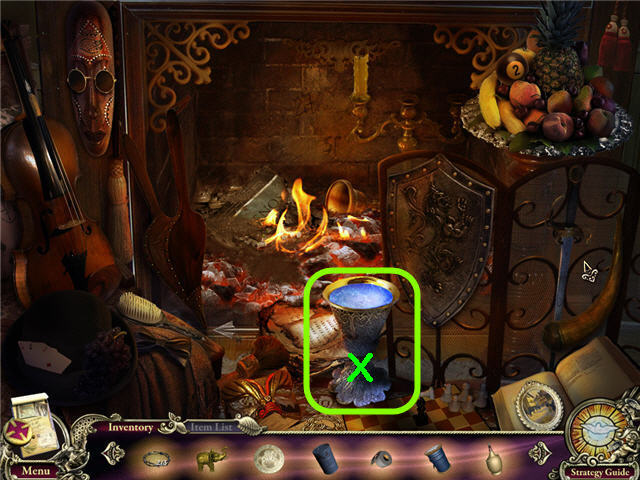
- Examine the glass case.
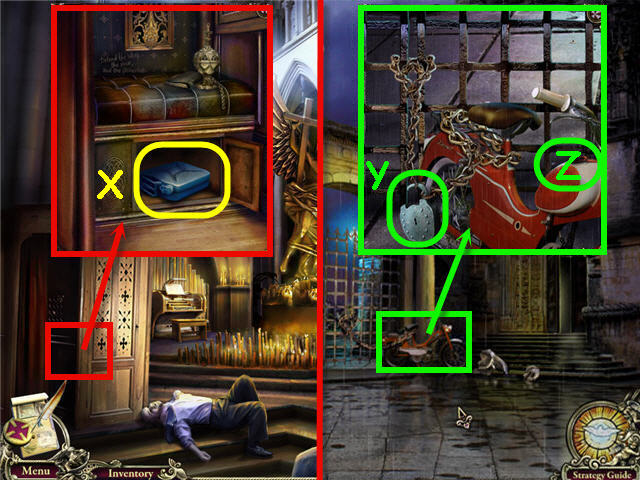
- Use the WEIGHT on the glass; take the GAUNTLET (X).
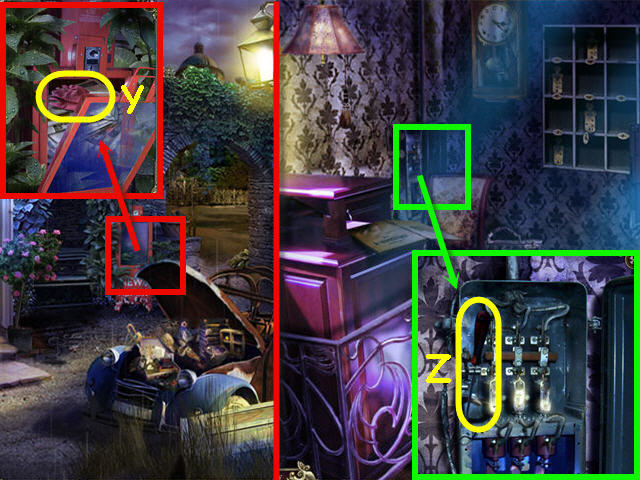
- Move the carpet; examine the recess to trigger a puzzle.
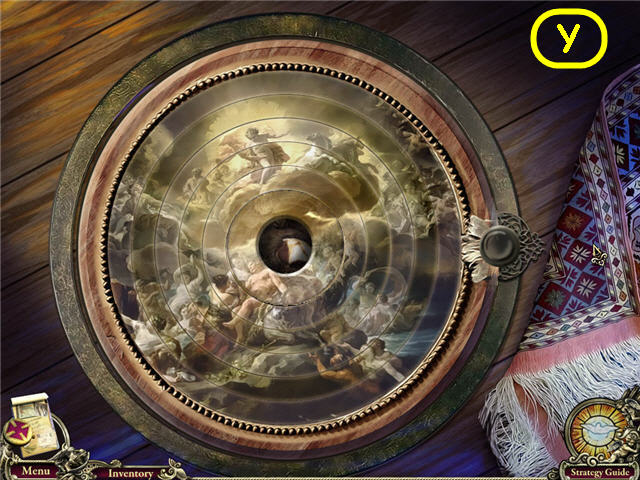
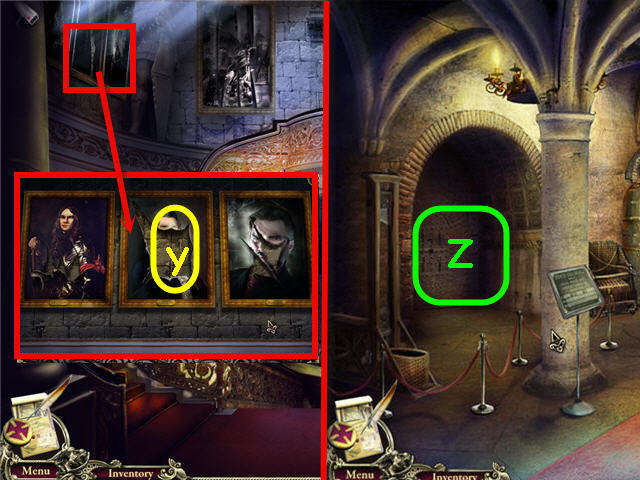
- Rotate the rings to complete the picture (Y).
- Solution: From the inside, click the 2nd ring – 6 x, 3rd ring – 3 x, outer ring – 10 x, 4th ring – 10 x, 5th ring – 1 x, 2nd ring – 1 x.
- Place the IRON AMULET in the center; take the CROWN MASK.
- Back out.
- Examine the table.
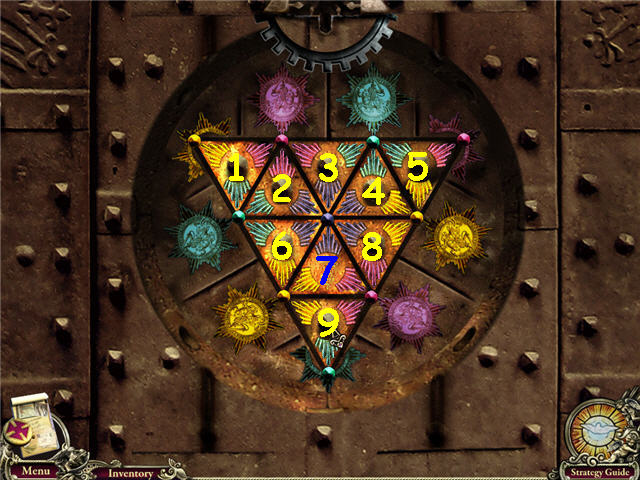
- Place the CHESSMAN on the board to trigger a puzzle.
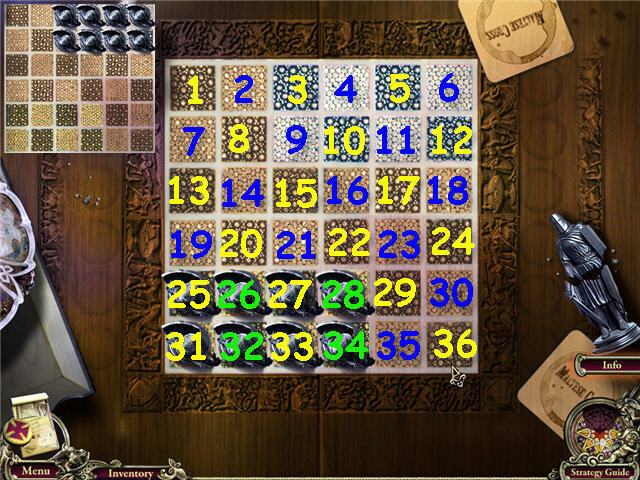
- Move the pieces from the lower left to the upper right by jumping a chessman over a chessman.
- Solution: 31-19, 32-20, 33-21, 34-22.
- 25-13, 26-14, 27-15, 28-16.
- 15-17, 21-23, 22-24, 16-18.
- 19-7, 20-8, 13-1, 14-2.
- 24-12, 23-11, 18-6, 17-5.
- 1-3, 7-9, 2-4, 8-10.
- Examine the table to access a HOS.
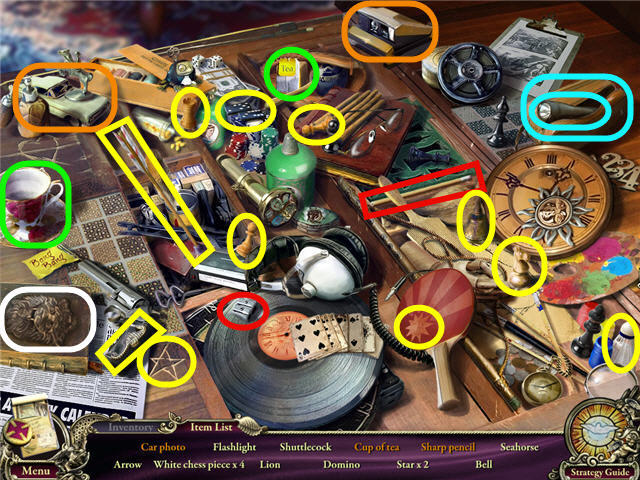
- Find the items listed and get a LION.
- Open the men’s travel case to get the flashlight.
- Use the pencil on the sharpener to get a sharp pencil.
- Use the tea bag on the cup to get a cup of tea.
- Use the camera on the car to get a car photo.
- Back out.
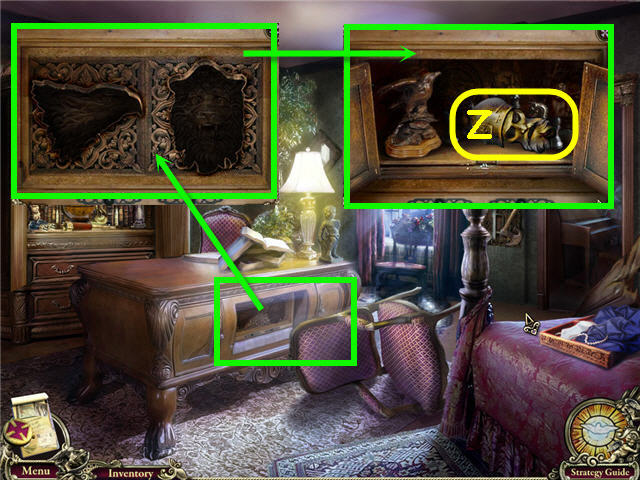
- Examine the desk panel.
- Place the EAGLE and LION in the slots; take the MITRE MASK (Z).
- Exit the room, head down, go straight twice.
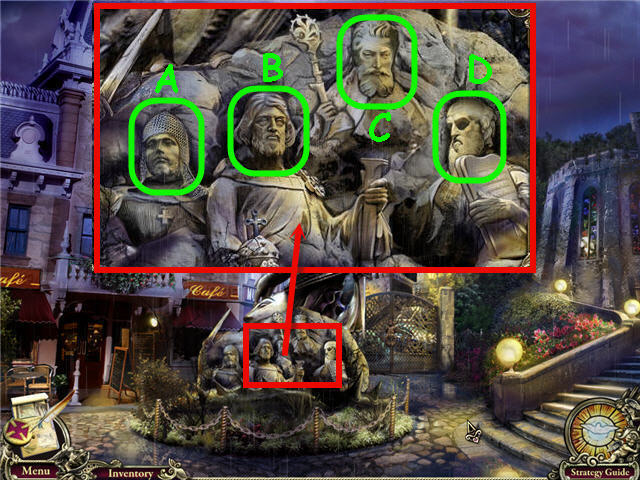
- Examine the statue.
- From left; place the HELMET MASK (A), CROWN MASK (B), MITRE MASK (C), and WREATH MASK (D) on the faces.
- Head into the passage in the statue.
Chapter 2 – The Dungeon

- Take the SECRET DOVE (@).
- Examine the newspaper.
- Click on the note; take the LOCK PICK (E).
- Examine the victim.
- Take the SECRET DOVE (@) and the BADGE (F).
- Head straight.
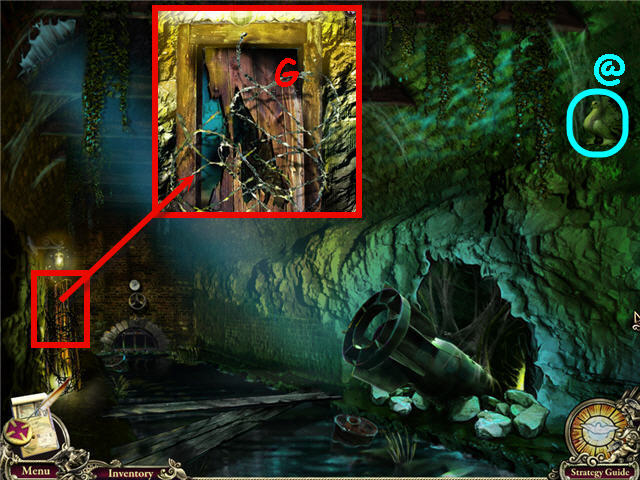
- Take the SECRET DOVE (@).
- Examine and use the GAUNTLET on the barbed wire (G); remove the wood.
- Head left.
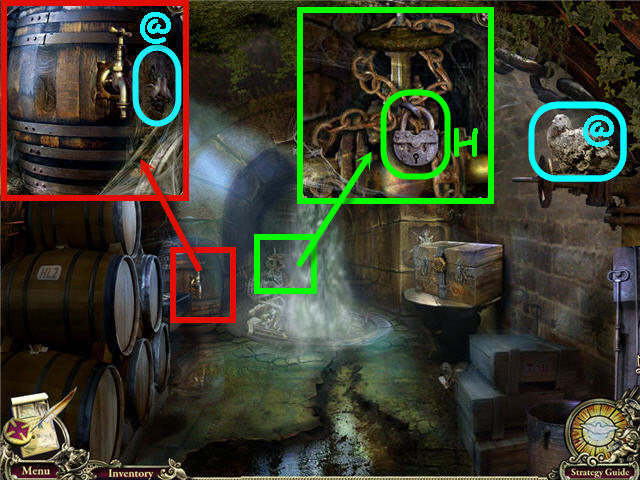
- Take the SECRET DOVE (@).
- Examine the barrel; take the SECRET DOVE (@).
- Examine the chain.
- Use the LOCK PICK on the lock (H); click on the chain.
- Examine the stone ring to access a HOS.
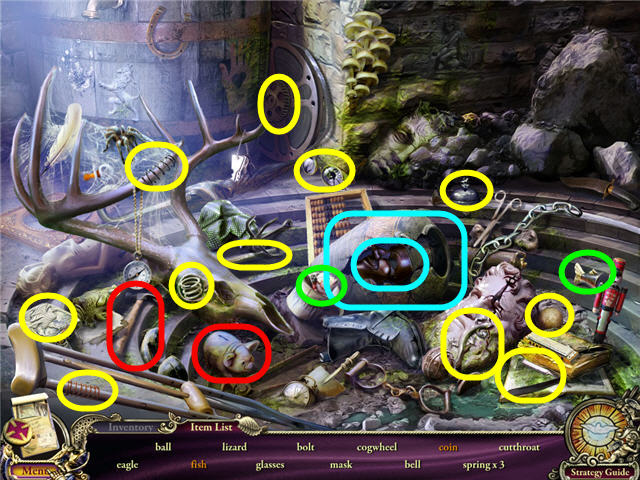
- Find the items listed and get a BELL.
- Break the vase to get the mask.
- Use the HAMMER on the piggybank to get a coin.
- Back out two times, right, back out two times, head left.
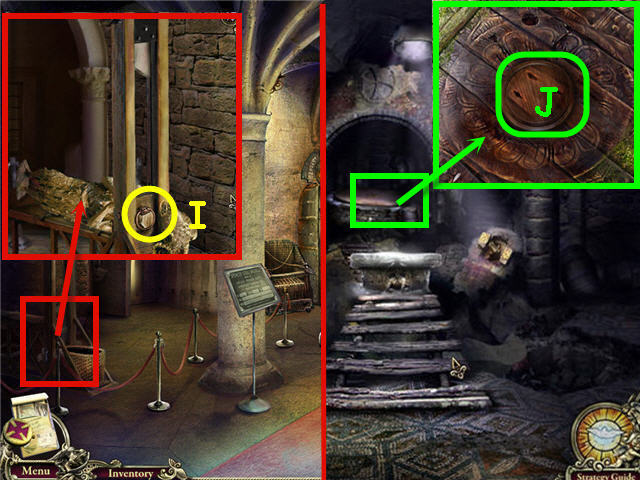
- Examine the desk; place the BELL on the stand (I).
- Head straight behind the desk.
- Take the SECRET DOVE (@).
- Pull the middle lamp cord.
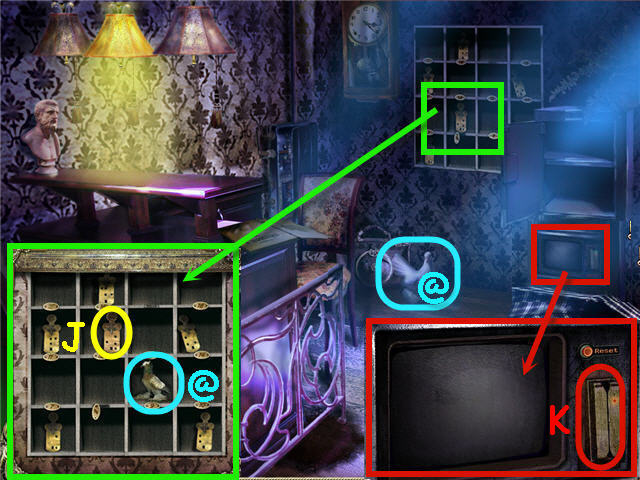
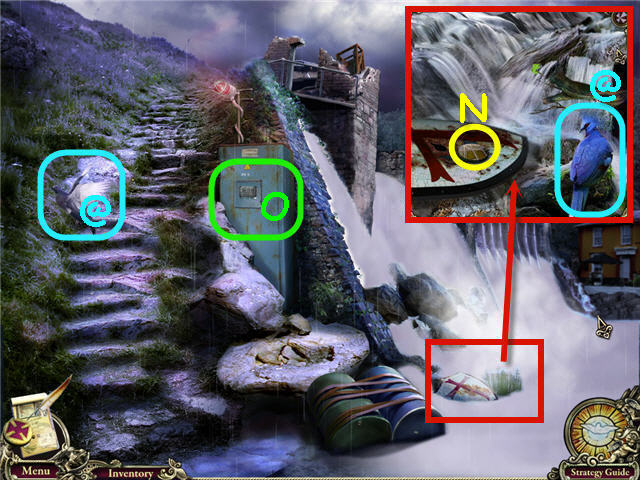
- Examine the cubby holes; take the SECRET DOVE (@) and the TAG KEY (J).
- Examine the monitor.
- Use the BADGE on the reader (K) to trigger a puzzle.
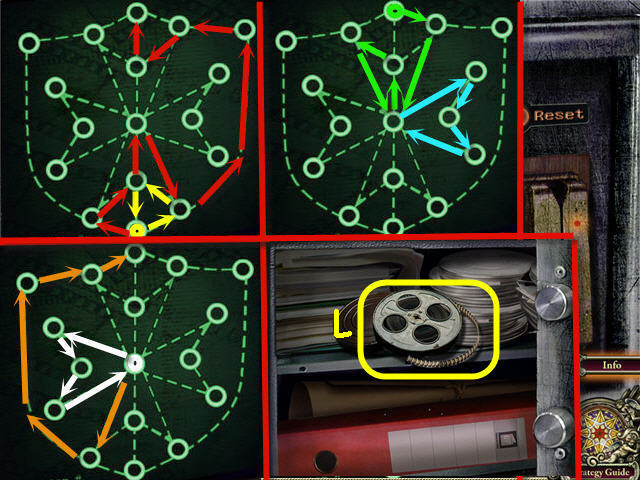
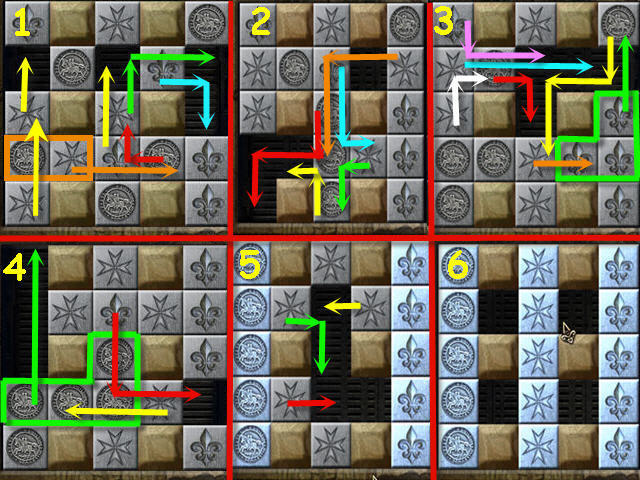
- The goal is to make a path covering all the dotted lines one time.
- Solution: Starting with the yellow dot, follow the arrows in the screenshot in this order; yellow, red, green, cyan, white, orange.
- Take the FILM (L).
- Back out three times.
- Examine and use the TAG KEY on the lock on room 12 door.
- Head through the door.
- Examine the dresser to access a HOS.
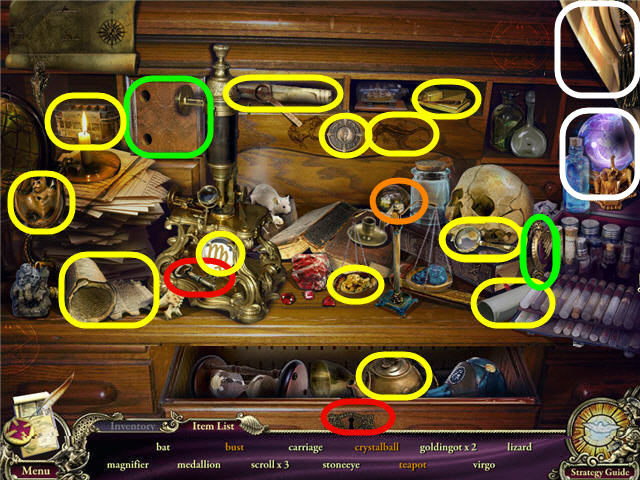
- Find the items listed and get a STONE EYE.
- Use the key on the drawer to get the teapot.
- Use the handle on the cubby to get the bust.
- Move the curtain to get the crystal ball.
- Take the SECRET DOVE (@).
- Examine the victim.
- Listen to the recording; take the WHISTLE (M).
- Examine the chest; take the FIRE IRON (N).
- Examine the picture (O) to trigger a puzzle.
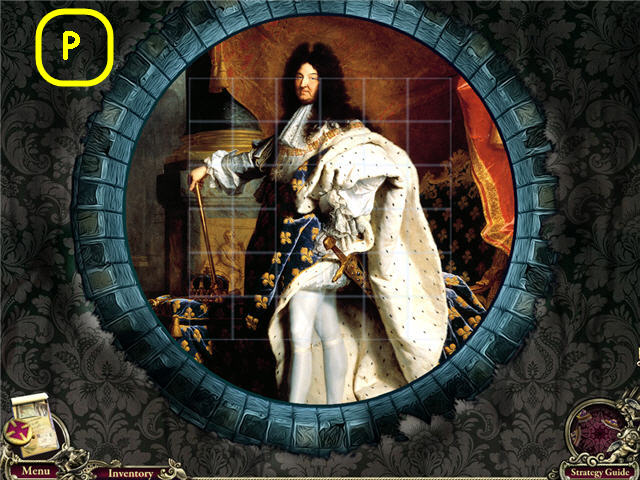
- Drag the columns and rows into place to complete the picture.
- See screenshot (P) for solution.
- Take the SWORD.
- Examine the crow.
- Use the WHISTLE on the crow to get a HACKSAW (Q).
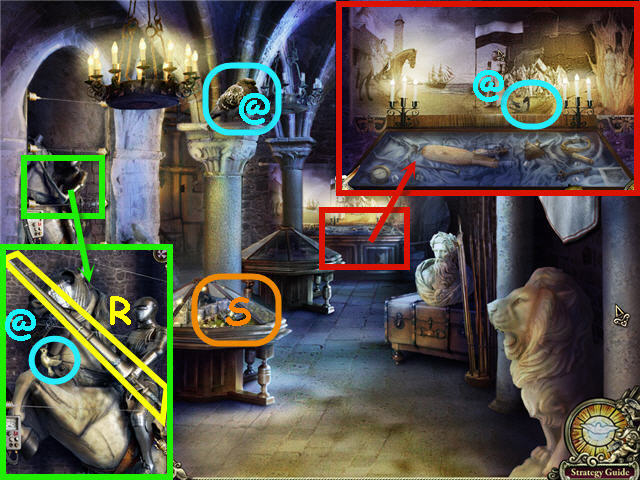
- Back out, head down, and go straight.
- Examine and click on the door.
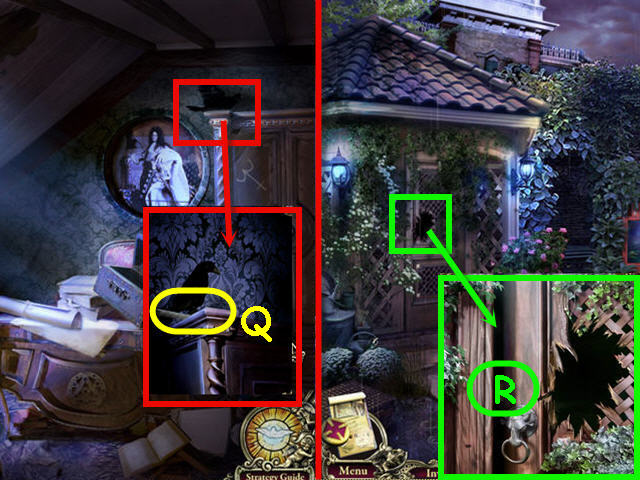
- Use the HACKSAW on the wood (R) and enter.
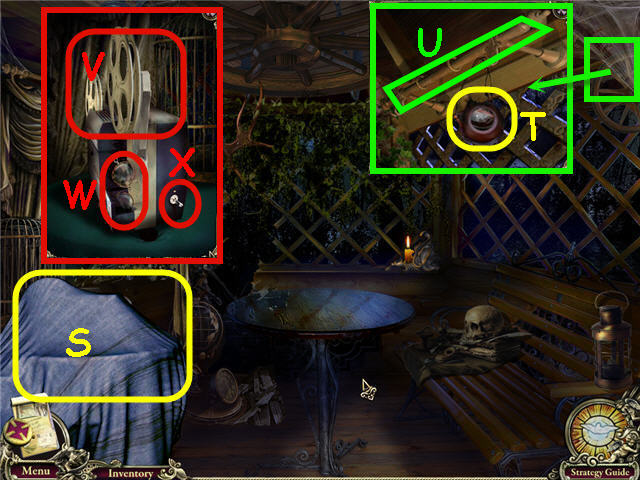
- Take the WHITE VEIL (S).
- Examine the rod.
- Take the FLASK (T); hang the WHITE VEIL on the rod (U).
- Examine and place the FILM (V) and GLASSES (W) on the projector.
- Flip the switch (X) and get a COIN.
- Back out.
- Examine the newspaper box.
- Use the COIN in the slot; take the GLOVES (Y).
- Back out, head left, and into the room behind the reception desk.
- Examine the electrical panel.
- Use the GLOVES to get the SCREWDRIVER (Z).
- Back out twice, forward twice, into the statue.
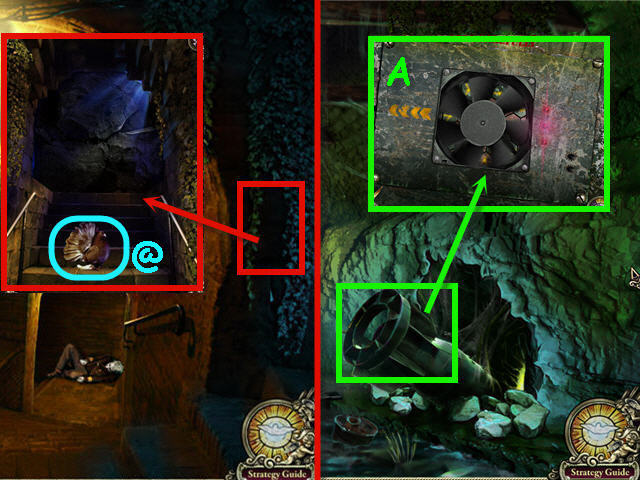
- Examine the right stairwell; take the SECRET DOVE (@).
- Head down.
- Examine the bomb.
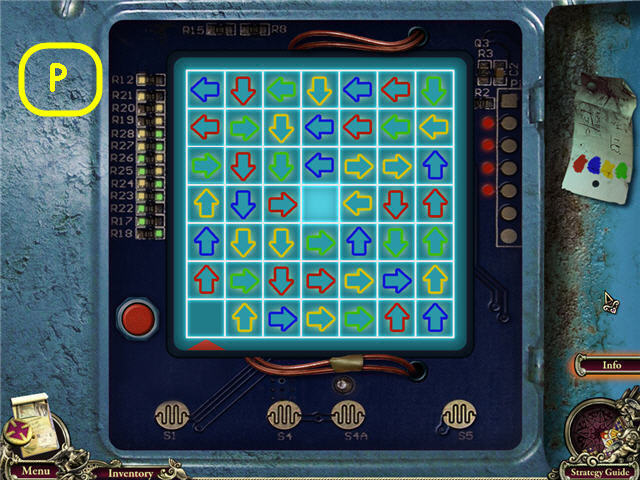
- Use the SCREWDRIVER on the panel (A) to trigger a puzzle.
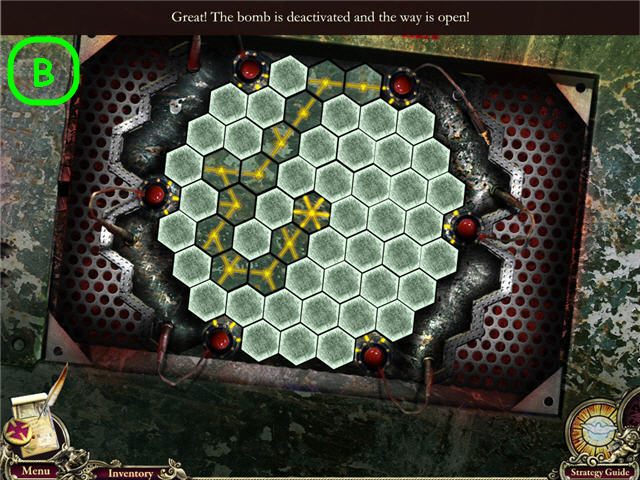
- Make a path from the center to a red outer button.
- See screenshot (B) for solution.
- Head left.
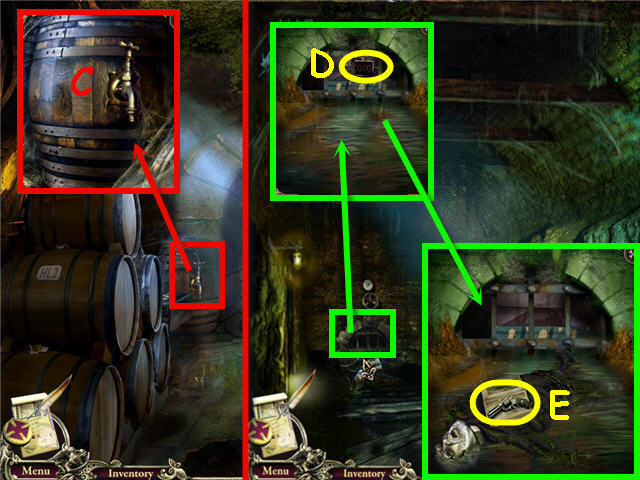
- Examine the keg.
- Use the FLASK on the tap (C); get OLD WINE.
- Back out.
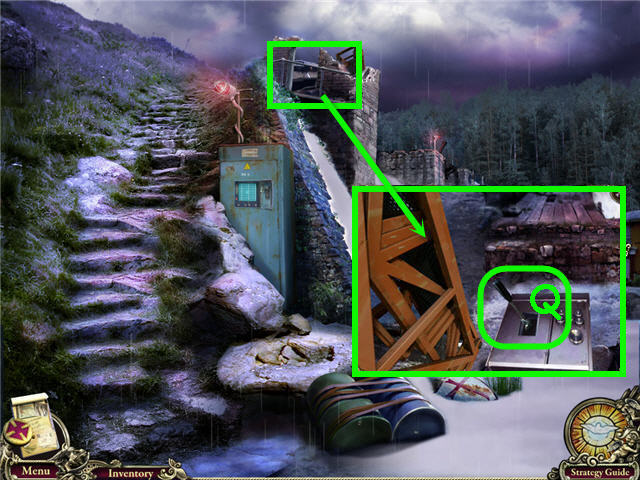
- Examine the grate.
- Use the FIRE IRON on the chest; open and take the TIMER (D).
- Click on the book to open; take the REVOLVER (E).
- Head through the hole in the right wall.
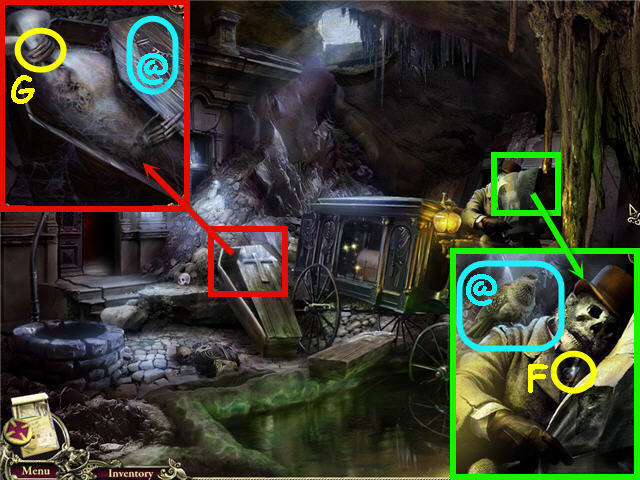
- Examine the coachman; click on the newspaper.
- Take the SECRET DOVE (@) and LEVER LEFT (F).
- Examine the coffin; take the SECRET DOVE (@) and ROPE (G).
- Move the curtain on the carriage and examine to access a HOS.
- Find the items listed and get a DRILL.
- Move the hat to get the rat.
- Use the HACKSAW from your inventory on the apple to get a half apple.
- Head inside the hospital.
- Give the OLD WINE to the madman.
- Examine the game board to trigger a puzzle.
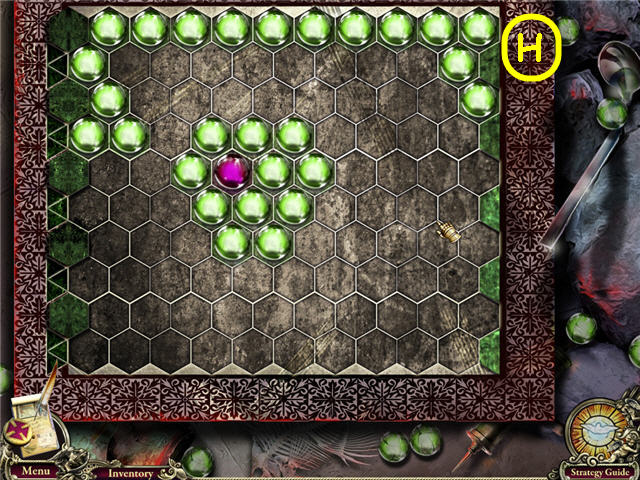
- Trap the opponents red gem by placing the green gems on the board before he gets to the edge.
- See screenshot (H) for one solution.
- Get a FLASHLIGHT.
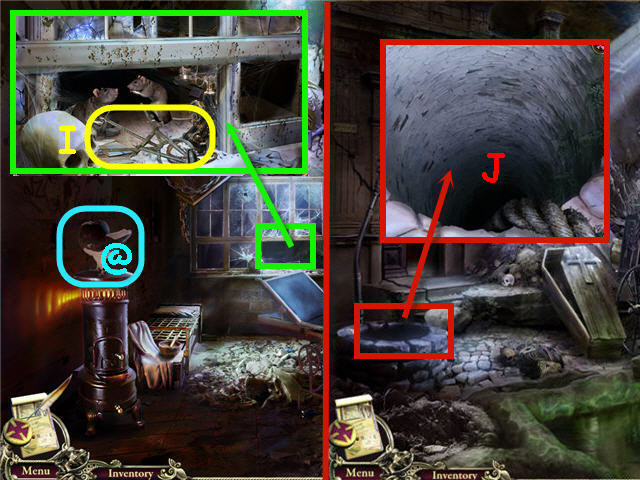
- Take the SECRET DOVE (@).
- Examine and use the REVOLVER on the window; take the FORCEPS (I).
- Back out.
- Examine and use the FLASHLIGHT on the well (J).
- Head down the well.
- Take the SECRET DOVE (@).
- Take the SHIELD (K).
- Examine and use the FORCEPS on the grate; take the LEVER RIGHT (L).
- Head up and into the hospital.
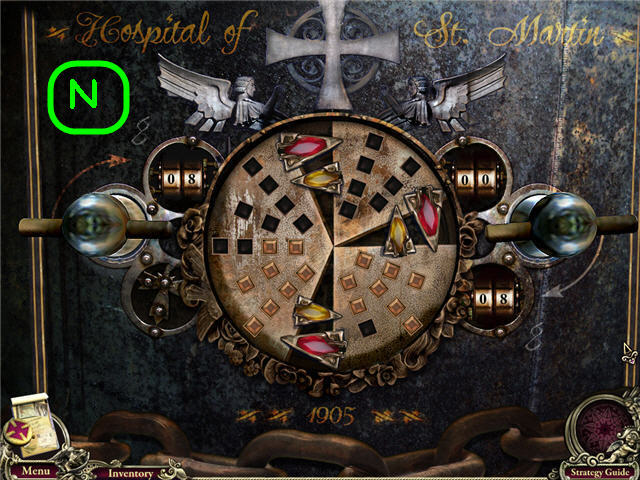
- Examine the safe.
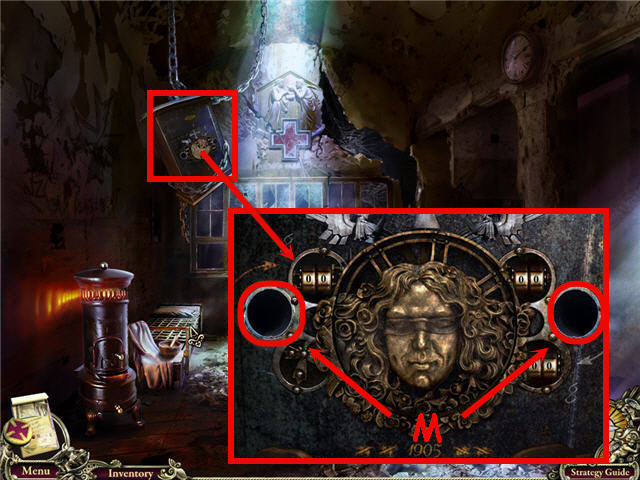
- Place the LEVER LEFT and LEVER RIGHT in the slots (M) to trigger a puzzle.
- Using the arrows to arrange the gold tiles so that there are 8 on each bottom half (N).
- Solution: The arrow sets are upper, right or lower; click only on the red arrows in this order; upper, right, upper, right, lower, right, upper, right, lower, right, upper, right, lower, right, upper, right.
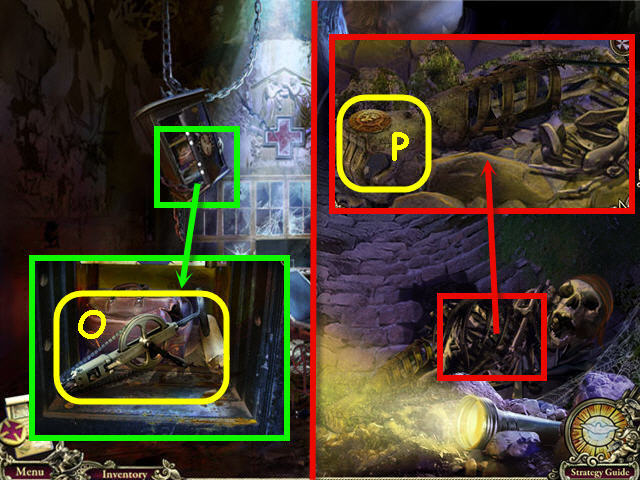
- Examine the safe; take the SURGICAL SAW (O).
- Back out, head down the well.
- Examine the skeleton.
- Use the SURGICAL SAW on the arm; get an ICON (P).
- Head up, back out and go left.
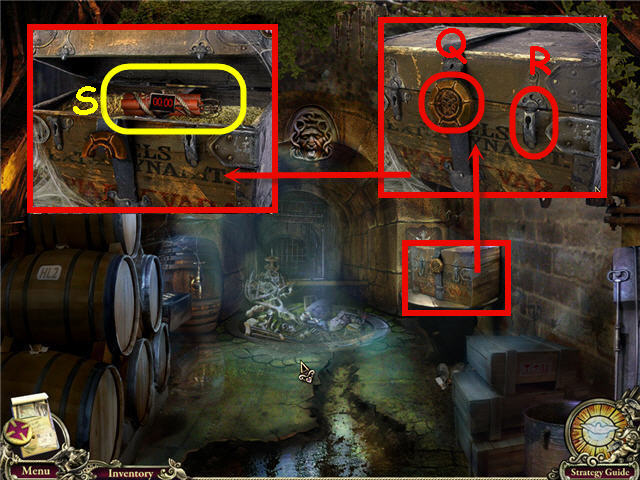
- Examine the chest.
- Use the ICON on the center lock (Q); use the DRILL on the latch (R).
- Place the ROPE and TIMER on the dynamite sticks; take the DYNAMITE (S).
- Back out two times and examine the right stairwell.
- Place the DYNAMITE on the entrance.
- Head right and up the stairs.
Chapter 3 – The Church
- Examine the planter; take the SCYTHE (T).
- Examine the vines (U) to trigger a puzzle.
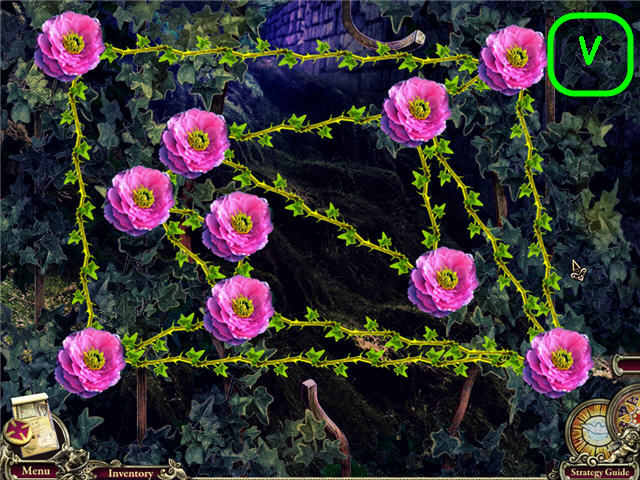
- Separate the vines so that none cross.
- See screenshot (V) for solution.
- Head through the hole in the fence.
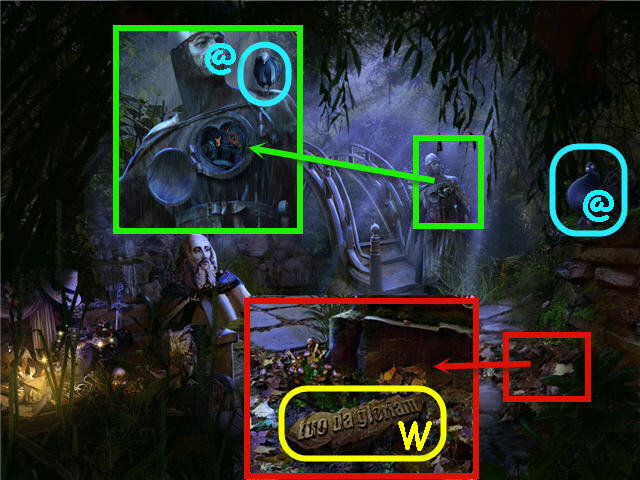
- Take the SECRET DOVE (@).
- Examine and move the pile of leaves; take the INSCRIPTION (W).
- Examine the statue; take the SECRET DOVE (@).
- Back out to the church.
- Examine and place the INSCRIPTION on the doorway.
- Enter the church and head up to the belfry.
- Take the SECRET DOVE (@).
- Examine and use the SCYTHE on the bell rope; get the CABLE (X).
- Examine the basket; take the GRAIN (Y).
- Back out.
- Take the SECRET DOVE (@).
- Examine the confessional.
- Take the note (Z) and the SECRET DOVE (@).
- Back out and left through the fence.
- Examine the bench to access a HOS.
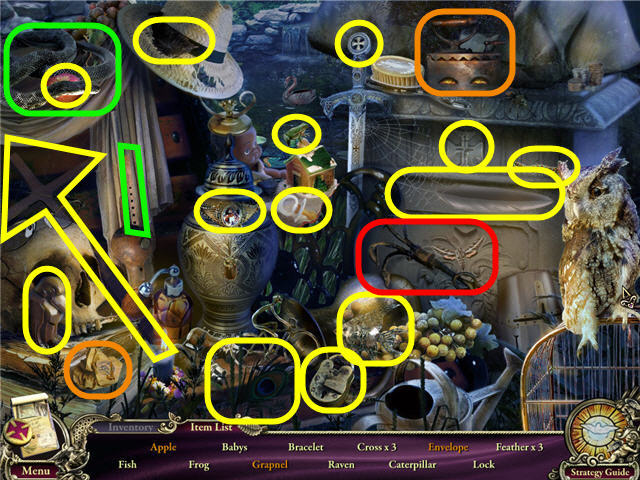
- Find the items listed.
- Use the iron on the crumpled paper to get an envelope.
- Use the flute on the snake to get the apple.
- Use the CABLE from inventory on the grapple hook to get the GRAPPLING HOOK.
- Back out three times.
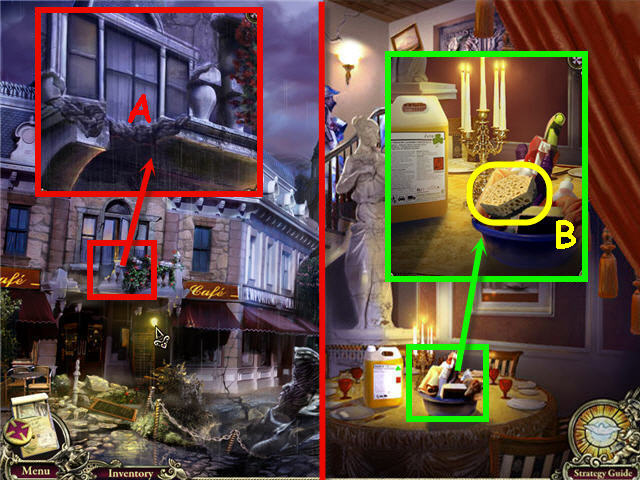
- Examine and use the GRAPPLING HOOK on the window (A).
- Head up and straight left.
- Open the curtain.
- Examine the table; take the SPONGE (B).
- Back out and head right.
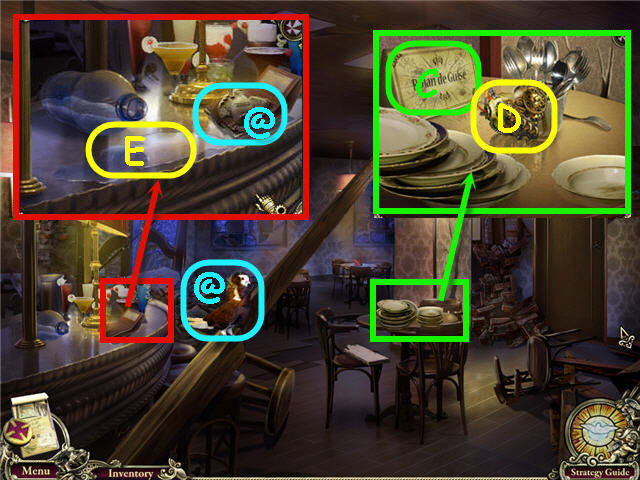
- Take the SECRET DOVE (@).
- Examine the table; move the plates.
- Click on the note (C) and take the MECHANICAL HEART (D).
- Examine the counter; take the SECRET DOVE (@).
- Use the SPONGE on the water and take the WET SPONGE (E).
- Back out.
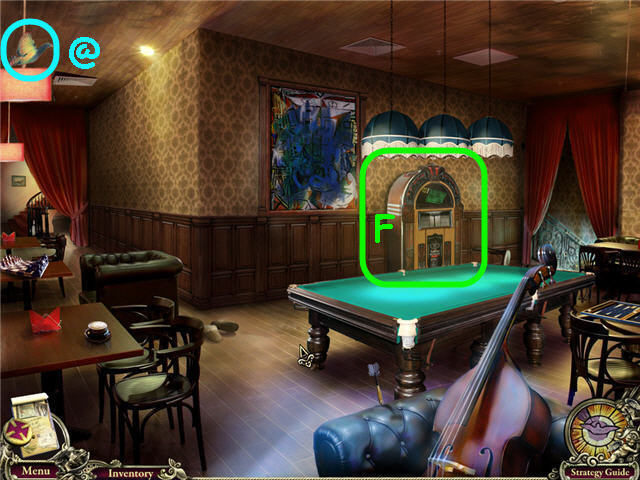
- Take the SECRET DOVE (@).
- Examine the jukebox (F) to trigger a puzzle.
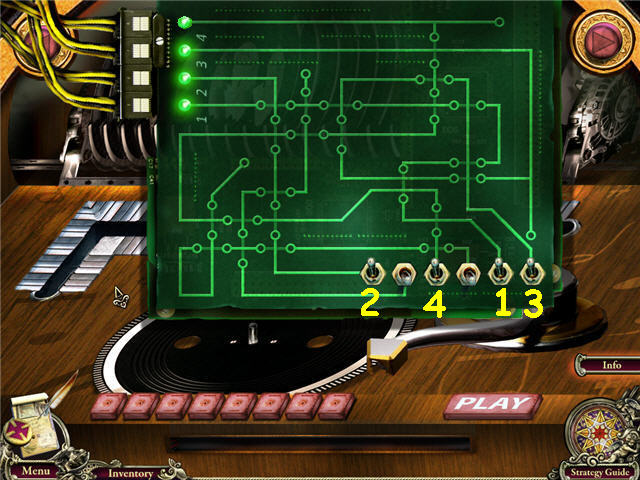
- Flip the switches in the correct order.
- Solution: From left; flip the switches 5, 1, 6, 3.
- See next screen for the next part of the puzzle.
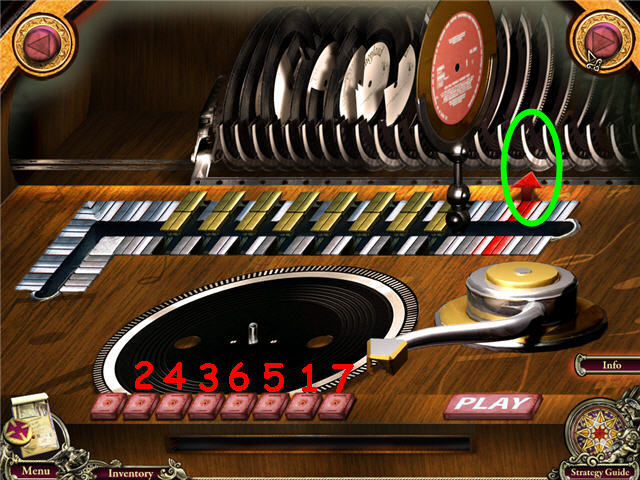
- Using the arrows on upper and left and right; line up the intact record on the whitest rack with the red arrow.
- Solution: Click the left and right arrows in this order; L, R, R, R, L, R, R, L, R, L, R.
- Move the record past the gold bars by pushing the pink buttons.
- Solution: Press the buttons in the following order from left; 7, 2, 4, 3, 6, 5, 8.
- Get a PUNCH CARD.
- Back out, right, up, and through the fence.
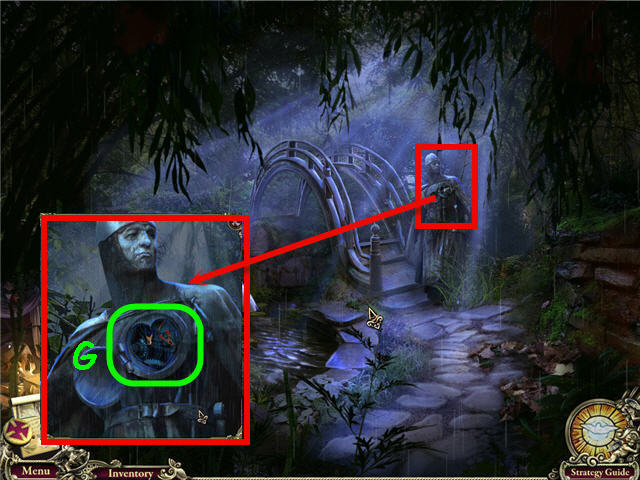
- Examine the statue.
- Place the MECHANICAL HEART in the opening (G).
- Head over the bridge.
- Click anywhere.
- Take the SECRET DOVE (@).
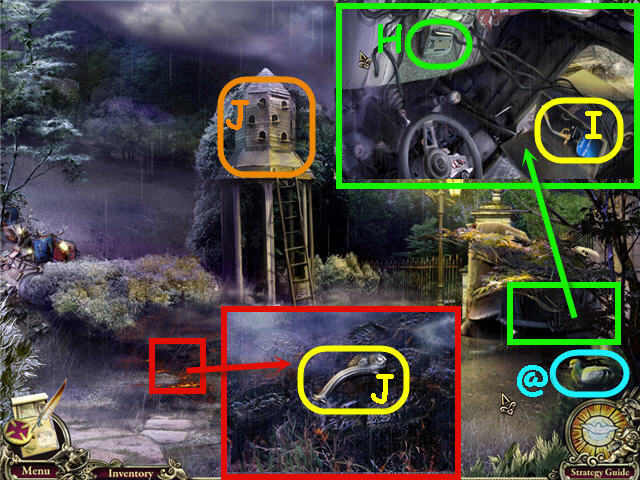
- Examine the crashed car.
- Use the PUNCH CARD on the typewriter (H); take the BURNER (I).
- Examine the scorched ground; take the HANDLE (J).
- Examine the dove house (J).
- Place the GRAIN on the bottom center to trigger a puzzle.
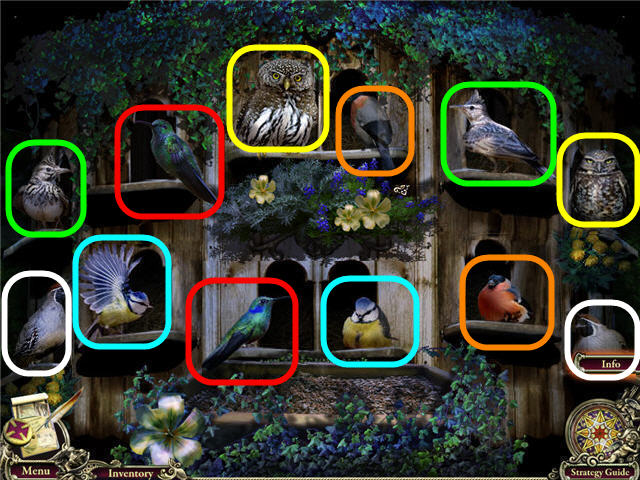
- Find the two of each species in the dove house.
- See screenshot for solution of the first set; see next screenshot for next set.
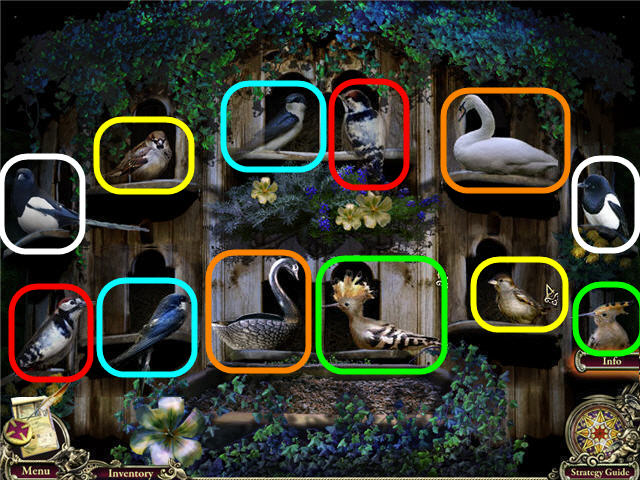
- Get a LADLE.
- Examine the cargo on the left to access a HOS.
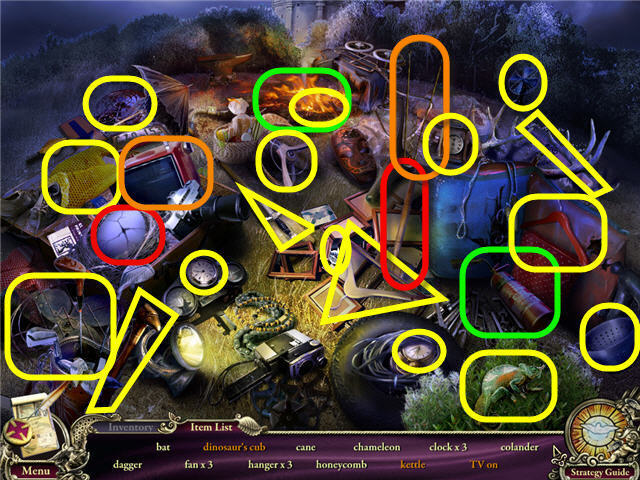
- Find the items listed and get a CANE.
- Use the extinguisher on the fire to get the kettle.
- Use the mallet on the egg to get a dinosaur’s cub.
- Place the antennae on the TV to get a TV on.
- Back out two times, head into the church.
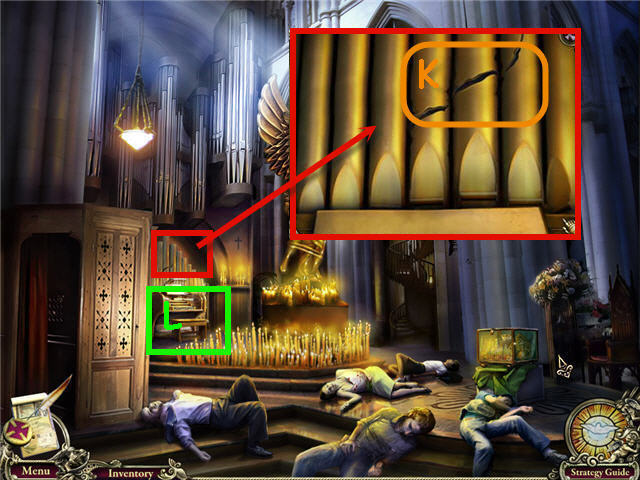
- Examine the organ pipes.
- Use the BURNER on the crack (K).
- Examine the organ (L) to trigger a puzzle.

- Press the keys in the correct order for each category above.
- See screenshot for solution.
- Examine the display case.
- Take the KEY (M) and MALLET (N).
- Back out three times, head up.
- Examine and use the WET SPONGE on the painting (O).
- Use the MALLET on the painting/glass.
- Head straight through the wall.
- Take the SECRET DOVE (@).
- Examine the brick.
- Remove the one in the middle; take the WEDGE (P) and GOLDEN SIGN (Q).
- Examine the door (R) and click on it.
- Use the CANE on the mechanism (S).
- Head right twice.
- Examine and place the HANDLE on the door (T).
- Examine the opened door to access a HOS.
- Find the items listed.
- Place the orange in the juicer; use the glass on the juicer to get a glass of juice.
- Place the saw handle on the blade to get a SAW.
- Combine the nut on a string with the goblet to get a bell.
- Back out and head straight through the hole.
- Examine and use the SAW on the stairs.
- Examine the knight; take the CRUCIFORM (U).
- Head upstairs.
- Examine the window; use the LADLE on the water (V) and get a LADLE.
- Examine the fireplace; take the CROSSBOW (W).
- Head back to the church interior.
- Examine the confessional; use the CRUCIFORM on the lock.
- Open the niche; take the GASOLINE (X).
- Back out.
- Examine the scooter; use the KEY on the padlock (Y).
- Open and place the GASOLINE in the tank (Z).
- Head straight.
- Speak to the madman (A); get a GEL.
- Examine the right statue; use the LADLE (be sure you have the water in it) on the fire.
- Examine the right statue.
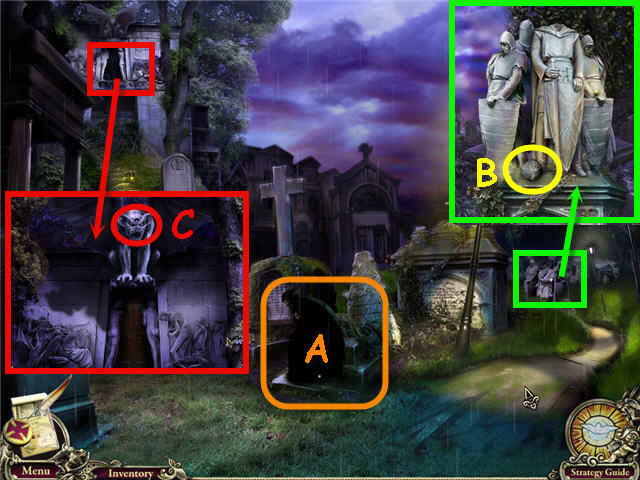
- Use the CROSSBOW on the on the head of the statue; take the CANNONBALL (B).
- Examine the tomb; place the STONE EYE on the gargoyle (C).
- Click on and head up into the tomb and down the right.
- Take the SECRET DOVE (@).
- Take the WHIP (D).
- Examine the lion; take the SECRET DOVE (@).
- Examine the WALL (E).
- Place the WEDGE on the bottom to trigger a puzzle.
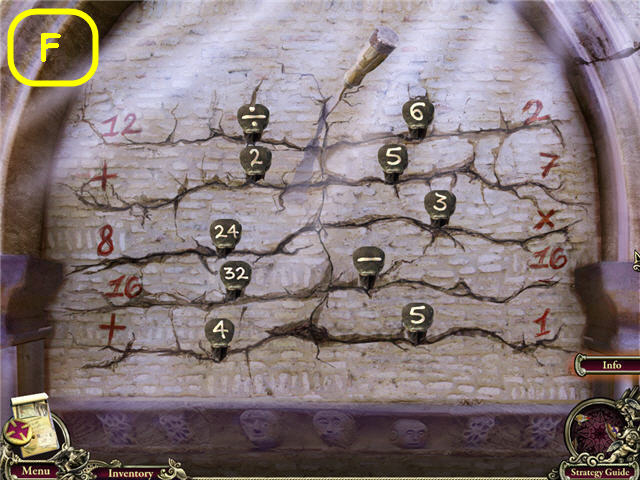
- Place the wedges in the slots above to complete the mathematical equations.
- See screenshot (F) for solution.
- Get a CHISEL when complete.
- Examine and use the CHISEL on the stool next to the lion; get a STOOL.
- Back out.
- Take the SECRET DOVE (@).
- Examine the ballista; take the SECRET DOVE (@).
- Use the CANNONBALL, STOOL, WHIP and SCYTHE on the ballista (G).
- Examine the wall to access a HOS.
- Find the items listed and get a BELLOWS.
- Use the brush on the dust to get an owl.
- Use the spike on the stone and place the moon on the sun to get a sun and moon.
- Head up to the belfry in the church.
- Examine and use the BELLOWS on the balloon (H); take the TONGS (I).
- Head back to the tomb.
- Examine the sarcophagus.
- Use the TONGS on the straps; take the SWORD (J).
- Head down the right stairs.
- Examine and use the SWORD on the lion; take the CROSSKEY (K).
- Back out five times; head up through the 2nd floor window and through the hole in the wall.
- Examine and use the GEL on the knight; take the WREATH (L).
- Back out twice.
- Examine and use the CROSSKEY on the gates (M).
- Head straight.
Chapter 4 – Town Hall
- Take the SECRET DOVE (@).
- Examine the car; take the SECRET DOVE (@).
- Open the glove box; take the ELECTRIC PROD (N).
- Head up the right stairs.
- Take the SECRET DOVE (@).
- Examine the box office; take the SECRET DOVE (@).
- Move the tray (O); take the TICKET.
- Examine the window; take the SECRET DOVE (@).
- Back out.
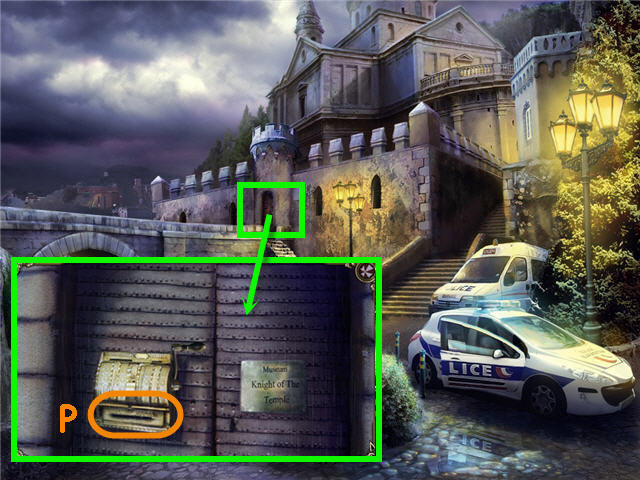
- Examine the door.
- Put the TICKET in the slot (P); pull the lever.
- Enter the museum.
- Take the SECRET DOVE (@).
- Examine the table; take the SECRET DOVE (@) and YOYO (Q).
- Head straight.
- Take the SECRET DOVE (@).
- Examine and use the ELECTRIC PROD on the horseman; take the SECRET DOVE (@) and the SPEAR (R).
- Examine the rear display case; take the SECRET DOVE (@).
- Examine the front case (S) to access a HOS.

- Find the items listed and get an ELEPHANT.
- Use the stapler on the card halves to get a playing card.
- Use the tape on the flag to get the standard bearer.
- Use the SWORD from your inventory in the slot to get a sword.
- Back out two times and head up right.
- Examine the window; use the SPEAR on the button (T).
- Enter the Town Hall.

- Take the SECRET DOVE (@).
- Examine and open the first aid kit; take the MEDICAL TAPE (U).
- Examine the painting; take the SECRET DOVE (@).
- Examine the lower level to trigger a puzzle.
- Arrange the characters and items to complete the picture (V).
- Pull the left cord to see the completed scene.
- Solution: Press the upper left button.
- Click the wings, rotate, arrow up 3 x, right 2 x.
- Click the flag; rotate, left 2 x, up.
- Click the ark artifact; rotate, left, up 4 x.
- Click the upper right button.
- Click the upper left character; down 3 x, right 2 x.
- Click the upper center characters; right, down 3 x.
- Click the upper right character; left 2 x, down 4 x.
- See next screenshot for part 2.
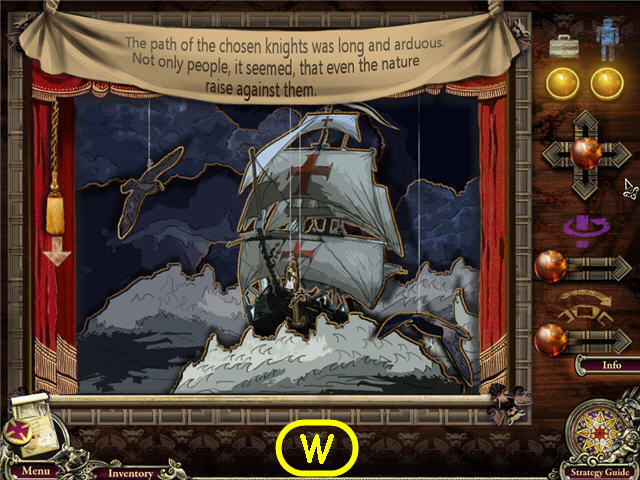
- Arrange the characters and items to complete the picture (W).
- Solution: Click bottom background lever.
- Press the upper left button.
- Click on ship; right 2 x, down 2 x.
- Click on flag; rotate, up 3 x.
- Click on anchor; rotate, left 2 x, down 4 x.
- Click upper right button.
- Click left person; up, right 2 x.
- Click lower right gull; left 3 x, up 3 x.
- Click right gull; rotate, down 3 x.
- See next screenshot for part 3.
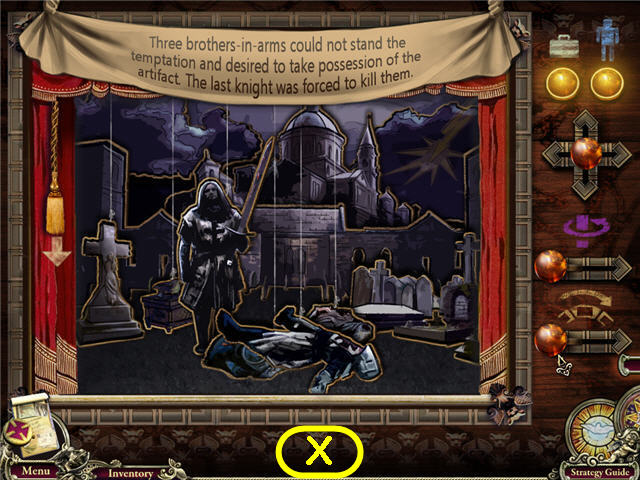
- Arrange the characters and items to complete the picture (X).
- Solution: Click bottom background lever.
- Click upper left button.
- Click on the gravestone; rotate, left 3 x, up.
- Click on the ark artifact; down 3 x, left.
- Click on the upper right button.
- Click on the standing knight; left 3 x, up.
- Click on the upper right body; rotate, down 4 x, left 2 x.
- Click on the upper left body; rotate, down 4 x, right 2 x.
- Click on the middle left body; right 2 x, down.
- Get the EMBLEM 1.
- Head upstairs.
- Take the SECRET DOVE (@).
- Examine the knight; take the SECRET DOVE (@).
- Use the GEL on his head; take the WREATH (Y).
- Examine the cabinet; take the SECRET DOVE (@) and CORKSCREW (Z).
- Examine the fireplace (A) to access a HOS.
- Find the items listed.
- Place the sausage in the fire to get a cooked sausage.
- Use the shovel on the ashes to get a horseshoe.
- We will get the brick of ice later; exit the scene.
- Back out three times and straight under the arch.
- Examine the fruit stand to access a HOS.
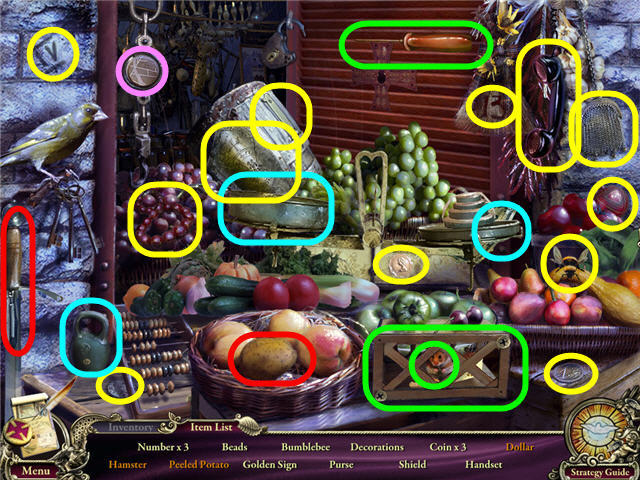
- Find the items listed and get a GOLDEN SIGN.
- Use the screwdriver on the cage to get a hamster.
- Use the peeler on the potato to get a peeled potato.
- Place the weight on the scale to get a dollar.
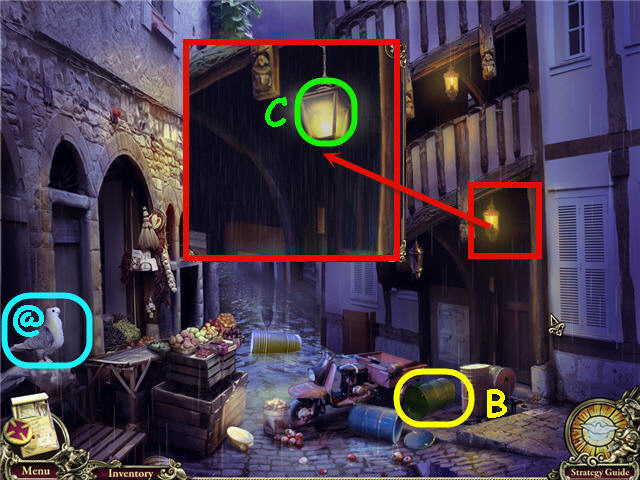
- Take the SECRET DOVE (@).
- Take the BARREL (B).
- Examine and use the YOYO on the lamp (C).
- Enter the house on the right.
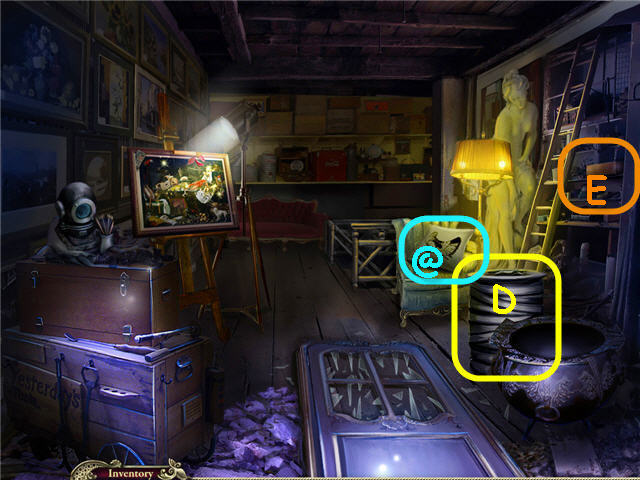
- Take the SECRET DOVE (@).
- Take the RUBBER HOSE (D).
- Examine the shelves (E) to trigger a puzzle.
- Click on each tile to flip them over to complete the picture.
- See screenshot for solution (F).
- Take the CIRCULAR SAW.
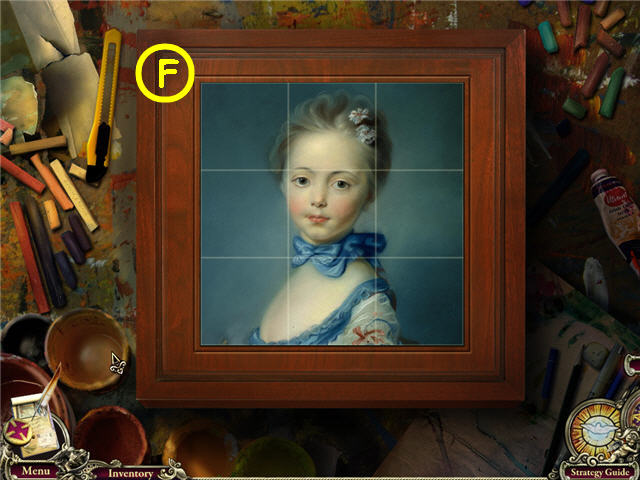
- Examine the painting to trigger a HOS.
- Find the items listed.
- Use the brush on the paint and the dipped paintbrush on the rose to get a red rose.
- Use the flashlight on the bat to get the candle.
- We will come back for the ruby; exit out of the scene.
- Back out twice and head into the museum.
- Examine and use the CIRCULAR SAW on the sarcophagus.
- Take the NITROGEN (G).
- Back out, head forward and right into the house.
- Examine and use the NITROGEN on the diving head; take the DIVING HEAD (H).
- Head downstairs to the ground floor.
- Take the SECRET DOVE (@).
- Take the CLAPPER (I).
- Examine the counter; take the CUTTER (J).
- Back out three times and up into the back room of the museum.
- Examine and use the CUTTER on the display case; take the BROKEN OAR (K).
- Back out twice, under the arch and right into the house and down to the ground floor.
- Examine the plant.
- Place the BROKEN OAR in the tube; take the PADDLE (L).
- Back out twice.
- Examine the barrel (M).
- Use the BARREL, the RUBBER HOSE and the PADDLE on the barrel.
- Head straight.
- Take the SECRET DOVE (@).
- Examine the shield; take the SECRET DOVE (@) and GOLDEN SIGN (N).
- Examine the electrical box (O).
- Use the MEDICAL TAPE on the two bottom wires to trigger a puzzle.
- Click on the arrows to complete the circuit.
- Click on the red button when complete.
- Solution: Use the code in the corner; red, blue, yellow, and green and make sure the arrows follow that order. See screenshot for solution (P).
- Examine the mechanism; flip the switch.
- Head up.
- Take the PIPE WRENCH (Q).
- Examine the gear; take the TROWEL (R).
- Examine the tire; take the SECRET DOVE (@) and BOOK (S).
- Back out.
- Examine the shield; take the WREATH (T).
- Back out twice and head up into the mayor’s office in the town hall.
- Examine the cabinet.
- Place the BOOK in the cabinet (U); take the ENVELOPE OPENER (V).
- Examine the fireplace (W) to complete a previous HOS.
- Use the NITROGEN from your inventory on the goblet (X) to get the brick of ice.
- Get a GOLDEN SIGN.
- Back out.
- Examine the paintings.
- Use the ENVELOPE OPENER on the paintings; take the STEEL KEY (Y).
- Back out twice and head into the museum.
- Examine and use the STEEL KEY on the door (Z) to trigger a puzzle.
- Click on the triangles to arrange the colored balls by the matching colored patterns.
- Solution: Click on the following triangles; 5, 4 – 2 x, 1 , 6, 7, 9, 7, 6, 7, 9.
- Back out, through the arch and right.
- Examine the painting to complete a previous HOS.
- Use the ENVELOPE OPENER from your inventory on the envelope to get the RUBY (A).
- Head downstairs.
- Examine the basket; click to open.
- Use the TROWEL on the medallion; take the EMBLEM 2 (B).
- Back out three times, into the museum and left.
- Take the SECRET DOVE (@).
- Examine the skulls.
- Place the RUBY in the skull; take the LOCK PICK (C).
- Back out twice, head up the right stairs.
- Examine the helicopter.
- Place the LOCK PICK in the slot to trigger a puzzle.
- Turn all the lights off by clicking on the squares.
- Clicking one square will turn on and off others.
- See screenshot for the order and squares to click.
- Click on the screen when complete and take the GOLF CLUB.
- Back out and head into the secret hall of the museum.
- Examine and use the GOLF CLUB on the fan (D).
- Examine the colored tiles.
- Use the EMBLEM 1 and EMBLEM 2 on the tiles; take the GOLDEN SIGN (E).
- Go into the Mayor’s Office in the town hall.
- Examine the map on the back wall.
- Place the 5 GOLDEN SIGNS on the map to trigger a puzzle.
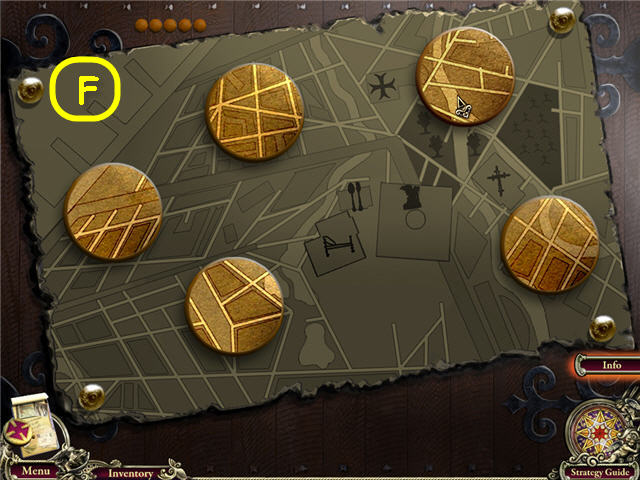
- Place the 5 GOLDEN SIGNS on the map on top of the matching map area. See screenshot for solution (F).
- Head straight through the door.
- Take the ICE AXE (G).
- Back out four times, under the arch, straight and up.
- Examine and use the NITROGEN on the toxic water (H).
- Use the ICE AXE on the frozen toxins.
- Examine the pipes to access a HOS.
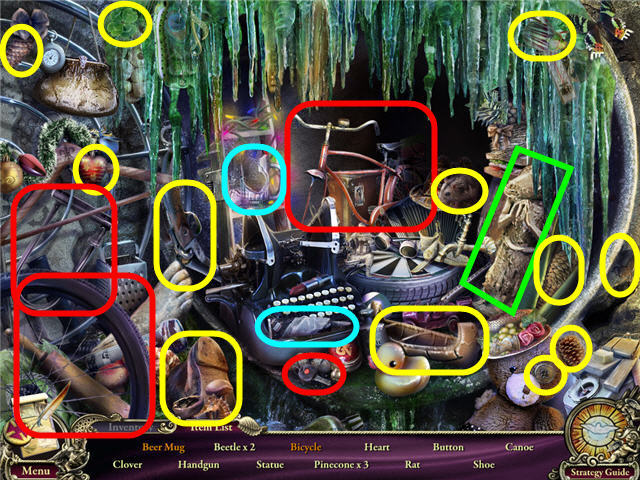
- Find the items listed and get a WOODEN STATUE.
- Use the glue on the broken mug to get a beer mug.
- Use the key on the lock; place the wheel on the bike to get a bicycle.
- Head back into the museum.
- Examine and place the WOODEN STATUE on the guillotine; take the RING (I).
- Head left.
- Examine the archway.
- Use the RING on the hatch (J) to access a HOS.
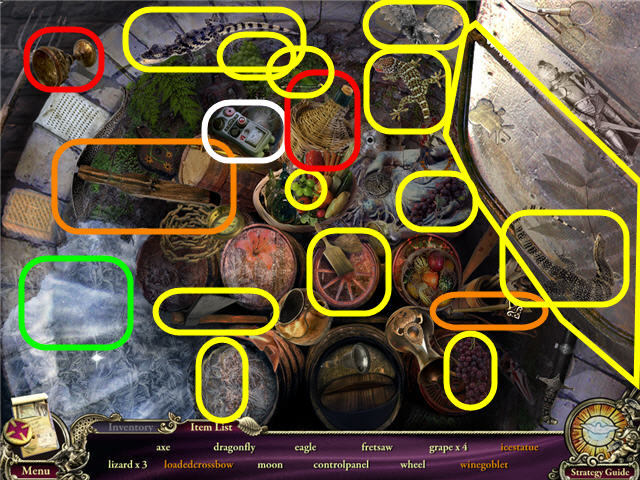
- Find the items on the list and get a CONTROL PANEL.
- Place the arrow on the crossbow to get a loaded crossbow.
- Use the CORKSCREW from your inventory on the wine bottle; use the goblet on the wine to get a wine goblet.
- Use the ICE AXE from inventory on the ice to get an ice statue.
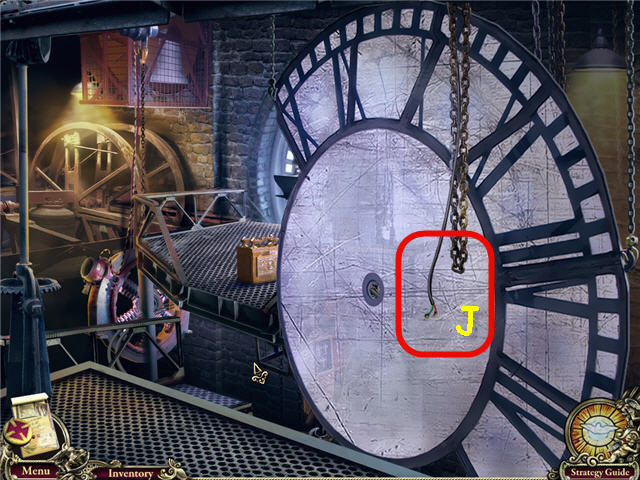
- Head into the clock tower in the town hall.
- Place the CONTROL PANEL on the wires (J).
- Click on the CONTROL PANEL.
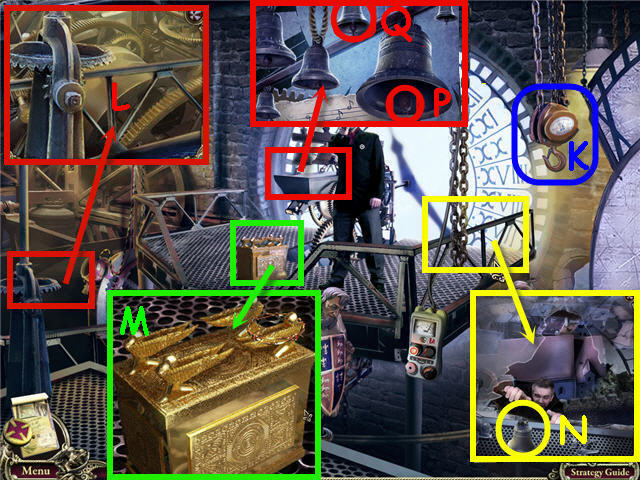
- Hang the ELEPHANT on the hook (K).
- Examine and use the PIPE WRENCH on the mechanism (L).
- Examine and place the 3 WREATHS on the ark (M).
- Examine the broken window; take the FULL BELL (N).
- Examine and place the CLAPPER (P) and FULL BELL (Q) on the bells to trigger a puzzle.
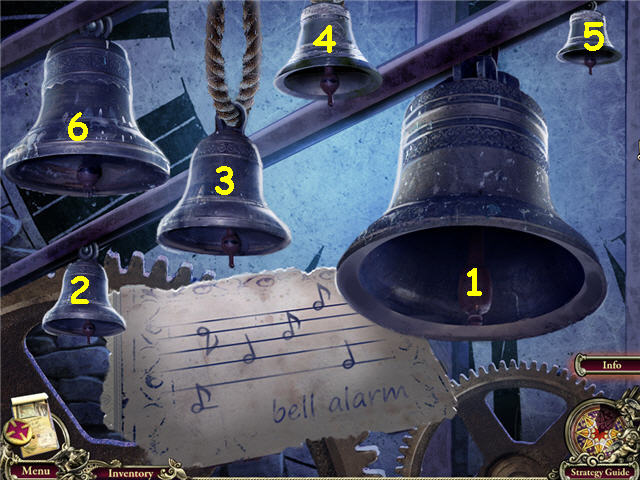
- Ring the bells in the correct order.
- Solution: Click the bells numbered in order starting at the bottom left; 5, 1, 3, 4, 6, 2.
- Tip: Click on the clapper of the largest bell to ring it.
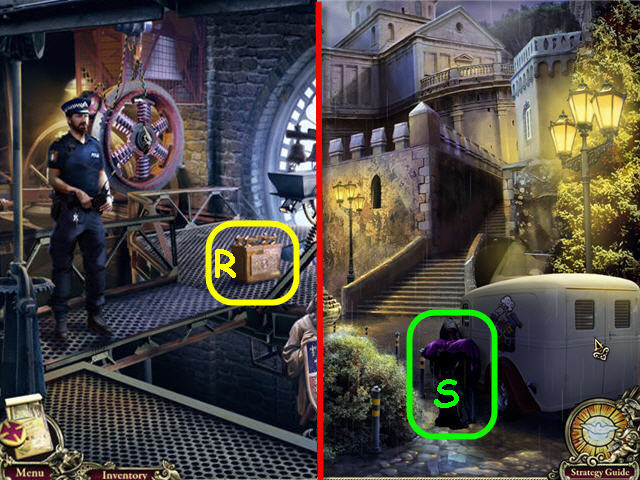
- Take the ARK (R).
- Back out four times.
- Examine and give the ARK to the robed man (S).
- Congratulations! You have successfully completed Hallowed Legends: Templar Standard Edition.


 Mystery Legends: The Phantom of the Opera Walkthrough, Guide, & Tips
 Nightmares from the Deep: The Siren's Call Walkthrough, Guide, & Tips
 Nemo's Secret: The Nautilus Walkthrough, Guide, & Tips
 Awakening Kingdoms Tips and Tricks, Guide, & Tips
 Mystery Agency: A Vampire's Kiss Walkthrough, Guide, & Tips