Exorcist 2 Walkthrough, Guide, & Tips
Exorcist 2 Walkthrough

Welcome to the Exorcist 2 Walkthrough
Take up the cross and slip into the role of a young exorcist on his first solo battle with the forces of evil in The Exorcist 2!
Whether you use this document as a reference when things get difficult or as a road map to get you from beginning to end, we’re pretty sure you’ll find what you’re looking for here.
This document contains a complete Exorcist 2 game walkthrough featuring annotated screenshots from actual gameplay!
We hope you find this information useful as you play your way through the game. Use the walkthrough menu below to quickly jump to whatever stage of the game you need help with.
Remember to visit the Big Fish Games Forums if you find you need more help. Have fun!
This walkthrough was created by Rebekah, and is protected under US Copyright laws. Any unauthorized use, including re-publication in whole or in part, without permission, is strictly prohibited.
General Tips

- You will not need to follow the exact path of this guide; however, some actions are required before you can complete another scene.
- Zoom into the sparkling areas to trigger a Hidden Object Scene. Throughout the guide, we will use the acronym ‘HOS’ for Hidden Object Scenes.
- Some items require an action before they are available in the HOS.
- Some items in the HOS are random; the screenshot shows current game play.
- At the end of every HOS solve the puzzle to receive a necessary inventory item.
- Some of the solutions to puzzles are random.
Chapter 1: The First Exorcism
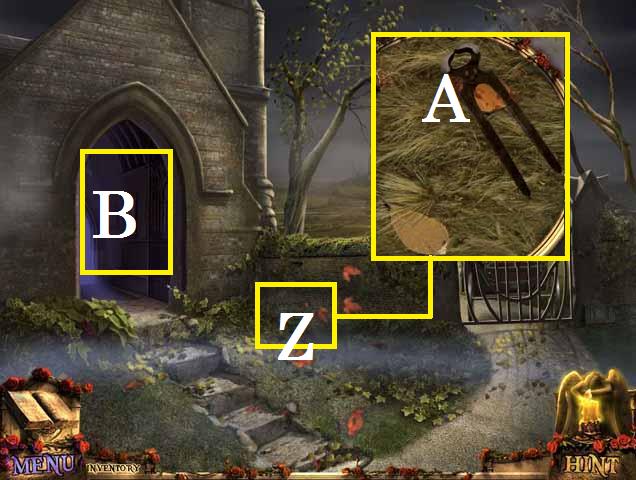
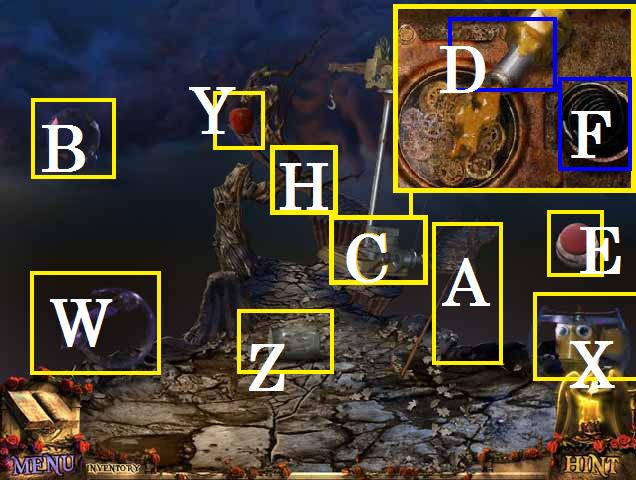
- Zoom into the ground (Z).
- Pick up the PINCERS (A).
- Enter the Chapel (B).
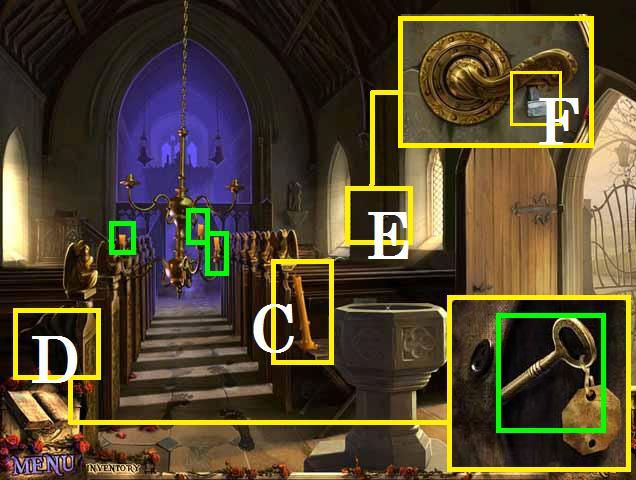
- Pick up the CANDLE (C).
- Zoom into the coat (D) and pick up the KEY (green).
- Zoom into the chandelier handle (E).
- Remove the nail (F) with the PINCERS and pull the handle.
- Pick up the three CANDLES (green).
- Pull the chandelier handle again to raise the chandelier.
- Move forward to the altar.
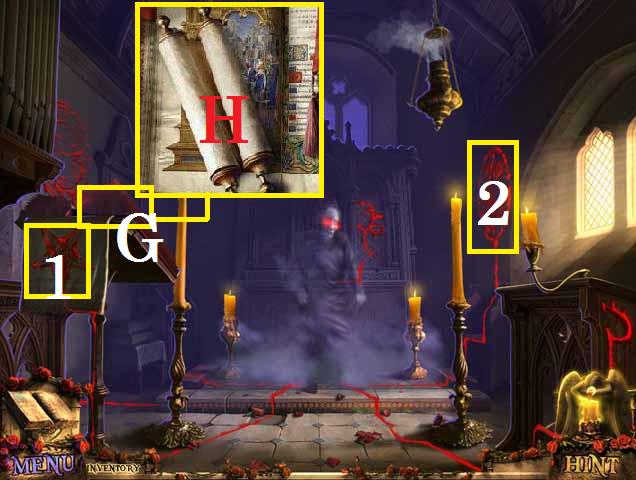
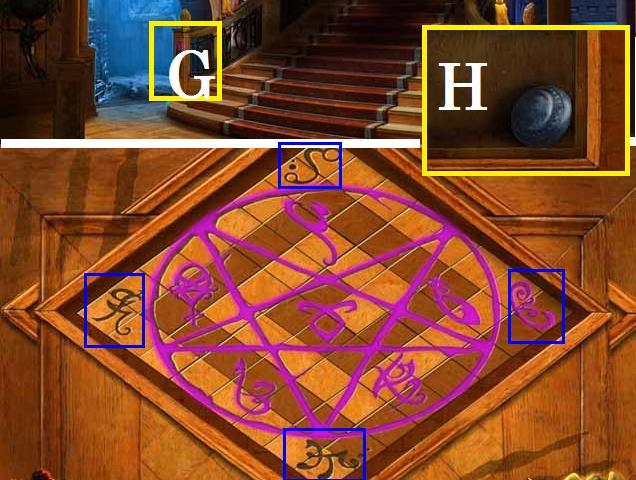
- Zoom into the book (G); flip the page and open the scroll (H).
- Place all four CANDLES as shown in the screen shot.
- Click on the symbols (1) and (2).

- Go through the now open passage to the library.
- Pick up the CHAIR (I).
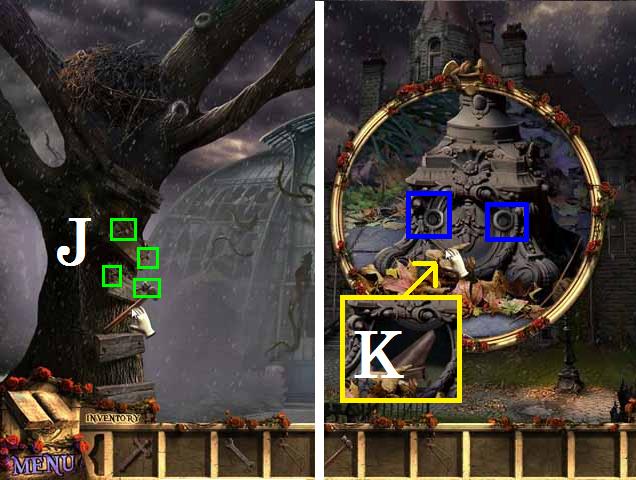
- Go through the left door (J) to enter the bedroom.
- Pick up two STATUETTES (green).
- Open the chest (K) by placing the KEY in the lock and turning it twice.
- Pick up the BOOK (L).
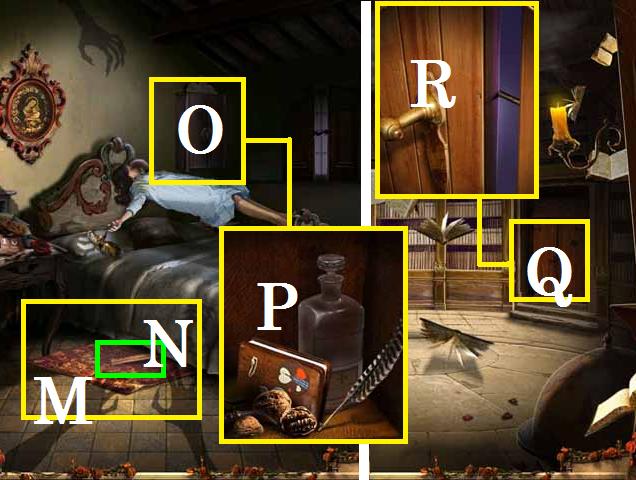
- Pull the rug (M) out from under the bed.
- Pick up the RULER (N).
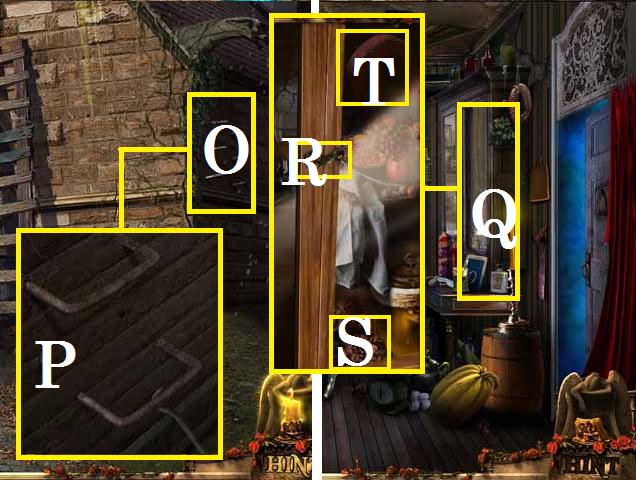
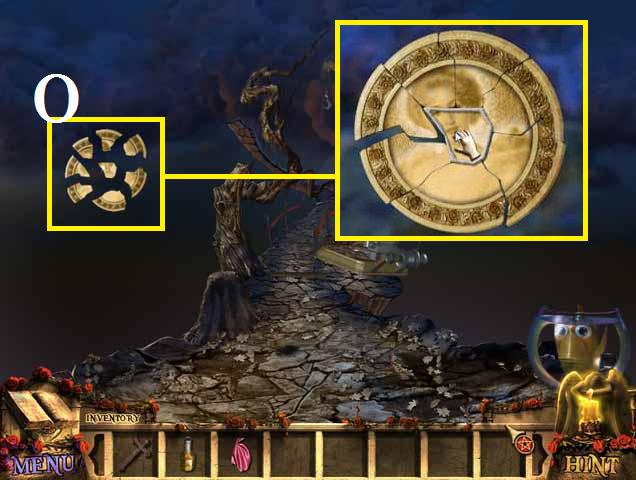
- Zoom into the shelf (O).
- Pick up the EMPTY BOTTLE (P).
- Return to the library.
- Zoom into the right door (Q).
- Open the latch(R) with the RULER.
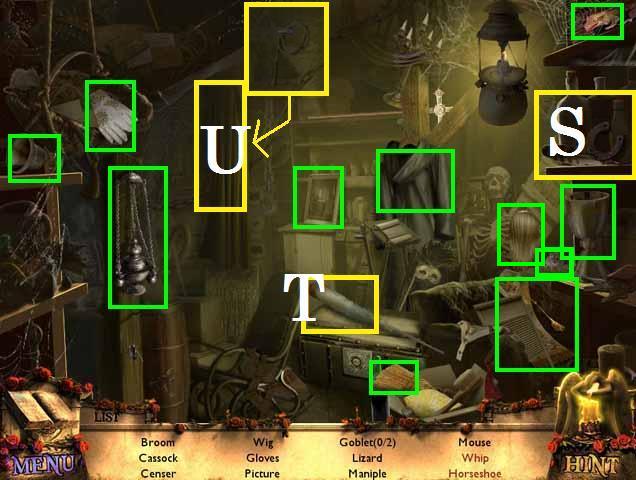
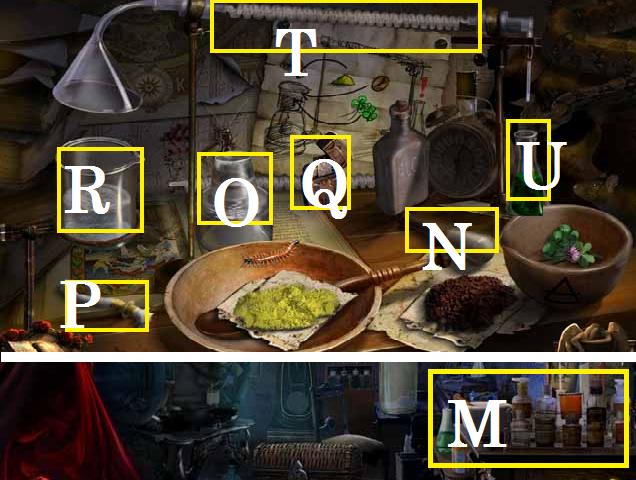
- Click on the sparkles to play a HOS.
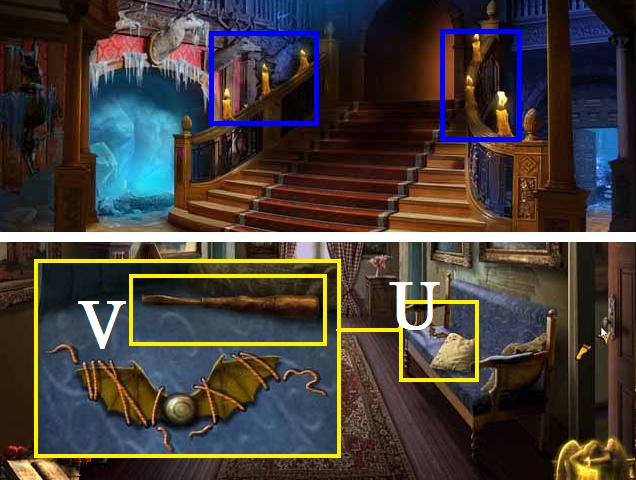
- Remove the cobwebs (S) with the duster (T) to reveal the horseshoe.
- Move the drape (U) to reveal the whip.
- Pick up the remaining items to receive the CANDELABRA.
- Return to the bedroom.
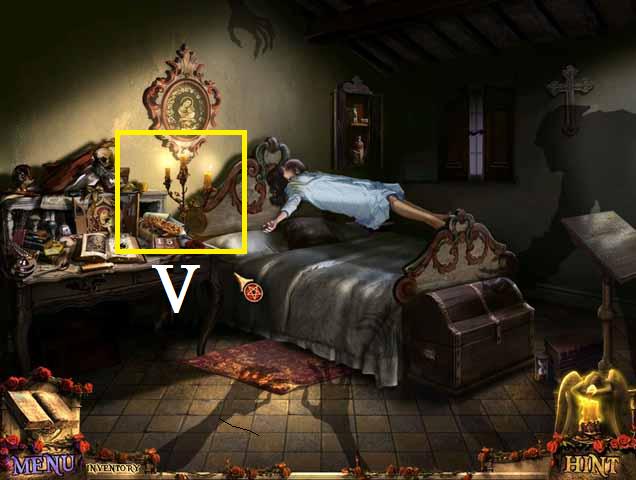
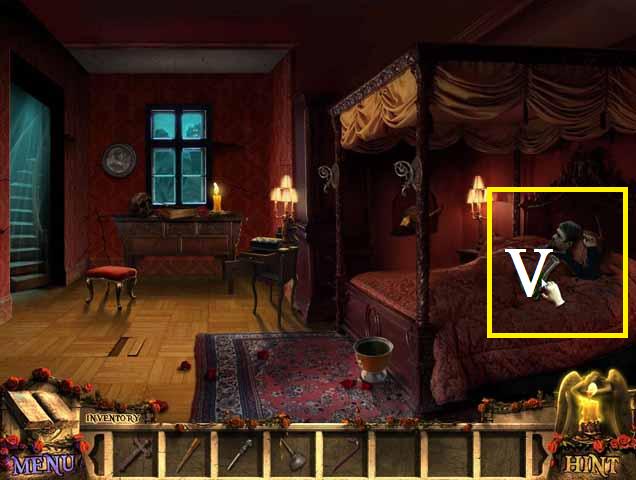
- Place the CANDELABRA on the dresser (V).
- Zoom into the sparkles to play a HOS.
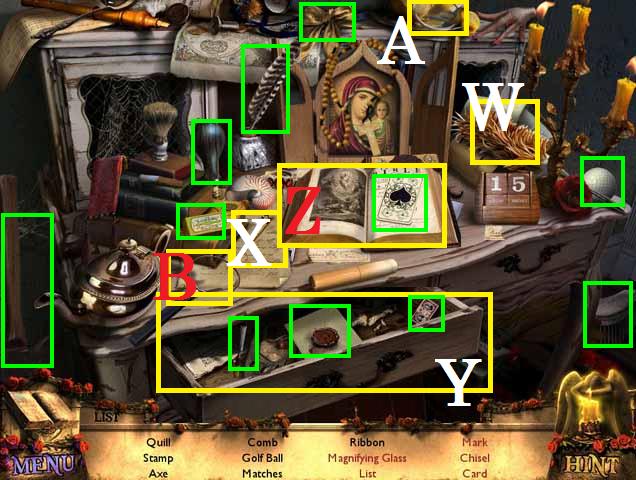
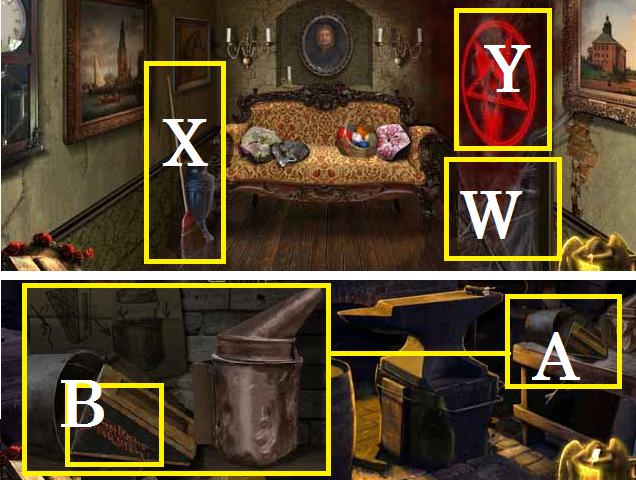
- Remove the dust with the duster (W) to reveal the key (X).
- Open the drawer (Y) with the key (X) to reveal the mark, list, and chisel.
- Open the book (Z) to reveal the card.
- Place the lens (A) on the magnifying glass (B).
- Receive the CHISEL.
- Return to the library.
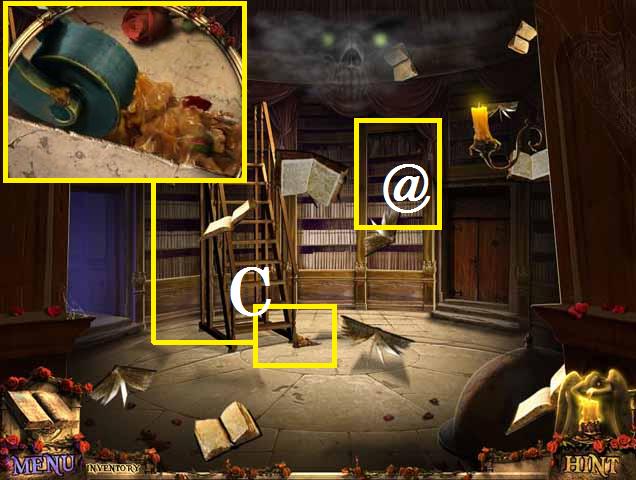
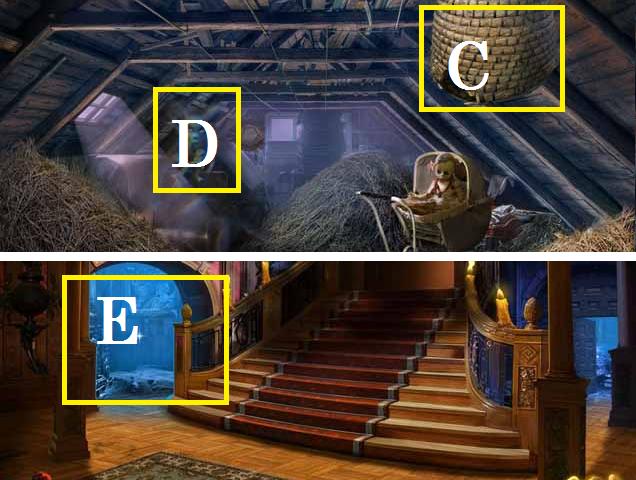
- Zoom into the ladders wheel (C).
- Remove all of the wax with the CHISEL.
- Move the ladder to the right shelf and zoom in (@).
- Place the BOOK on the shelf.
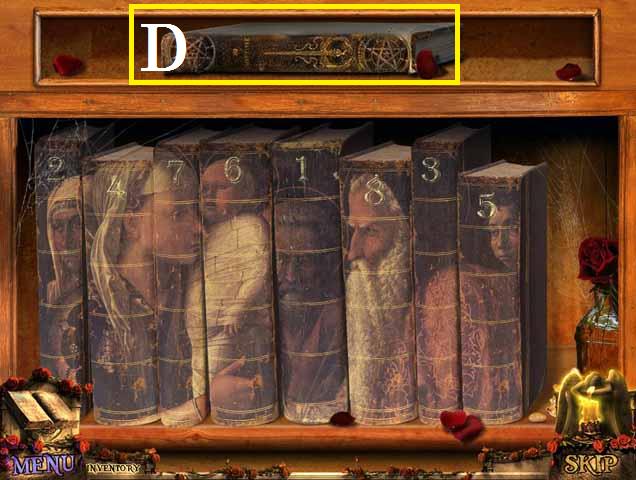
- Rearrange the books to form the picture as shown in the screenshot.
- Click on the numbered books in the following order: 7, 4, 5, 2, 8, 6, 1, and 3. (Note: this is the code found in the scroll inside the book from the altar).
- Pick up the EXORCISM BOOK (D).

- Return to the chapel.
- Zoom into the holy water fountain (R).
- Place the two STATUETTES as shown in the screenshot.
- Click on the statuettes in sequential order 1 through 6.
- Fill the EMPTY BOTTLE with water to receive the HOLY WATER.
- Return to the bedroom.
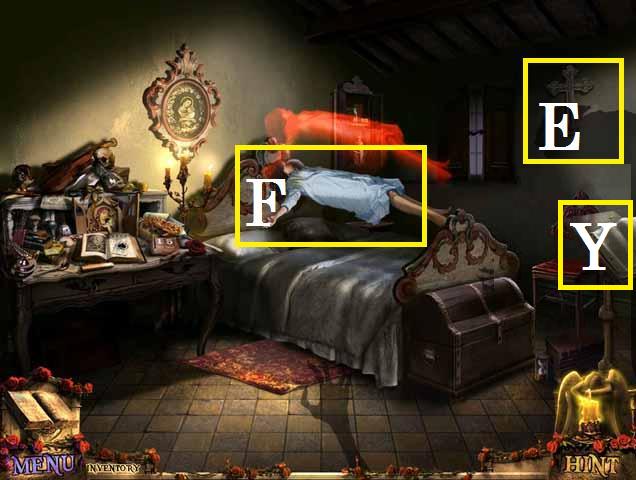
- Place the EXORCISM BOOK on the stand (Y).
- Click on the EXORCISM BOOK.
- Place the CHAIR under the HOLY CROSS (E) as shown in the screenshot.
- Pick up the HOLY CROSS.
- Pour the HOLY WATER on the girl (F).
- Click the HOLY CROSS over the girl.
Chapter 2: The Seal of Ice
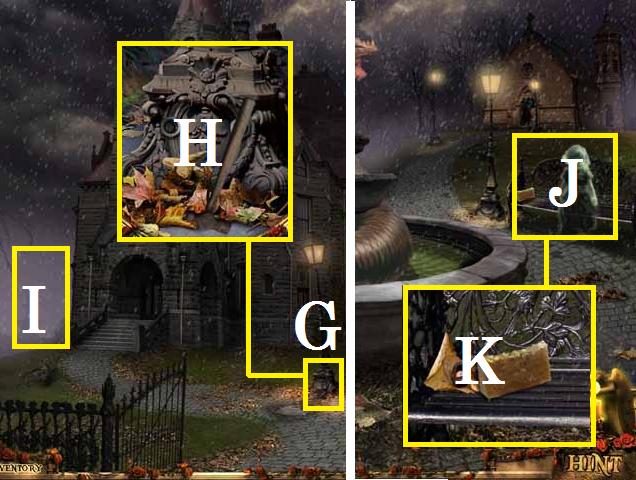
- Once the chariot has taken you to the mansion zoom into the light post base (G).
- Pick up the HAMMER (H).
- Take the path on the left (I) towards the fountain.
- Zoom into the ghost girl (J).
- Pick up the SOAP (K).
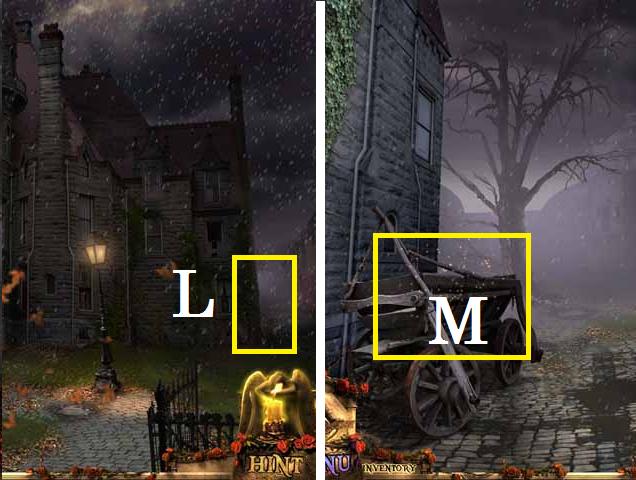
- Return to the mansions front gate.
- Take the path on the right (L) towards the barn.
- Zoom into the sparkles (M) to play a HOS.
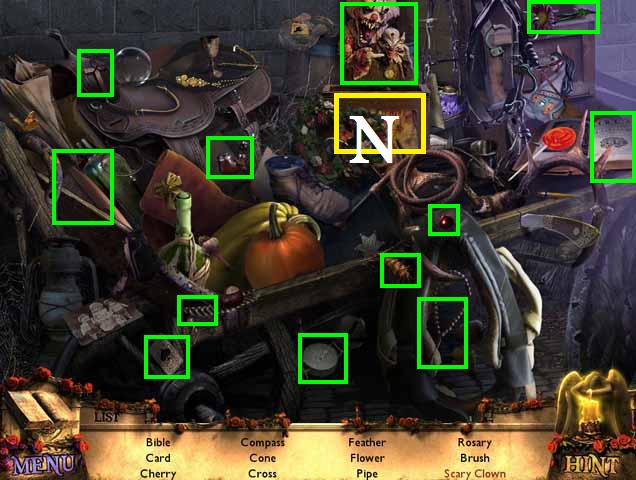
- Click on the box (N) to reveal the scary clown.
- Receive the BRUSH.
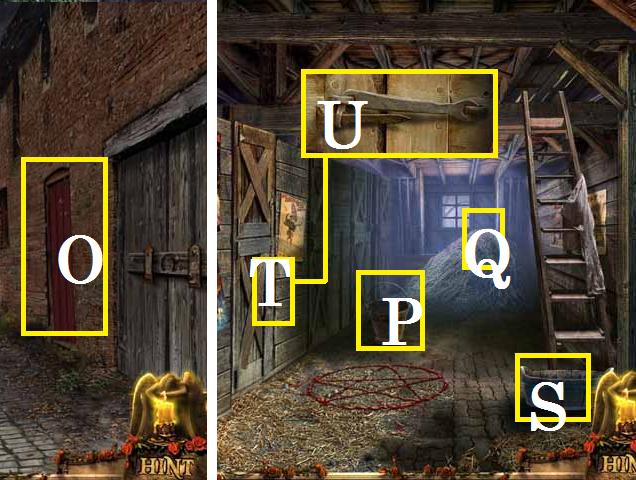
- Enter the stables (O).
- Pick up the BUCKET (P).
- Place the straw (Q) in the wooden bucket (S).
- Zoom into the stall door (T).
- Completely remove the pin (U) with the HAMMER.
- Exit the stable and move forward down the path towards the greenhouse.
- Pick up two BOARDS (green).
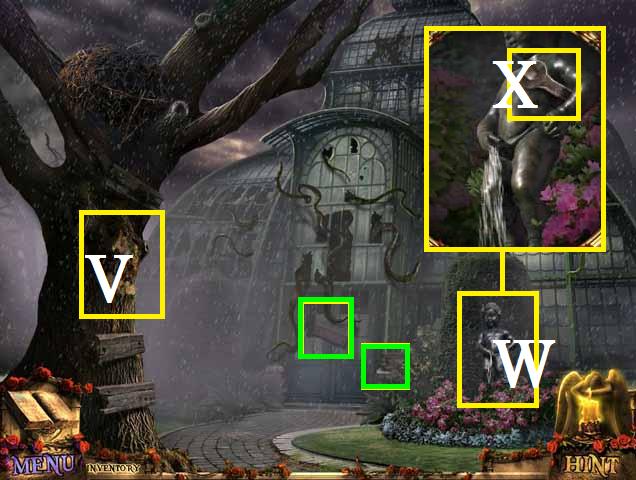
- Place the BOARDS on the tree (V).
- Zoom into the fountain (W).
- Pick up the WRENCH (X).
- Fill the BUCKET with water from the fountain to receive the BUCKET OF WATER.
- Return to the stables.
- Pour the BUCKET OF WATER over the demonic symbol (Y), followed by the SOAP and the BRUSH.
- Pick up the HORSESHOE (Z) and the LOFT KEY (A).
- Unlock the loft door (B) with the LOFT KEY.
- Enter the loft.
- Click on the symbols (C) to remember them.
- Exit back outside.
- Zoom into the door (D).
- Place the HORSESHOE on the lock (E).
- Solve the first puzzle by clicking the arrows in the following sequence: 1, 1, 2, and 3.
- Puzzle 2/4: 1, 2, 3, 3, and 4.
- Puzzle 3/4: 1, 2, 3, 4, and 5.
- Puzzle 4/4: 1, 2, 3, 4, 5, 6, 7, 1, 2, and 3.
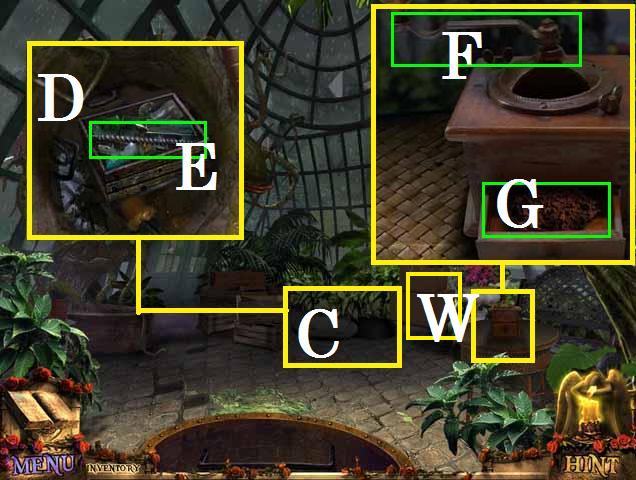
- Enter the workshop.
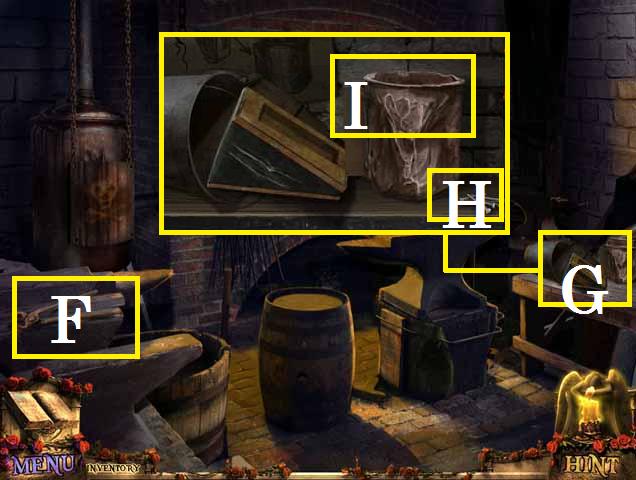
- Pick up the FIRE IRON (F).
- Zoom into the BEE SMOKER (G).
- Pick up the NAILS (H).
- Use the HAMMER on the case (I).
- Close the window and return to the greenhouse.
- HAMMER all four NAILS (green) on to the boards (J).
- Return to the mansions front gate.
- Zoom back into the light poles base; remove the bolts (blue) with the WRENCH.
- Pick up the PART OF BEE SMOKER (K).
- Enter the mansion.
- Zoom into the right pillar (L).
- Press the four symbols (blue) that where in the loft.
- Unscramble the board as shown in the screenshot.
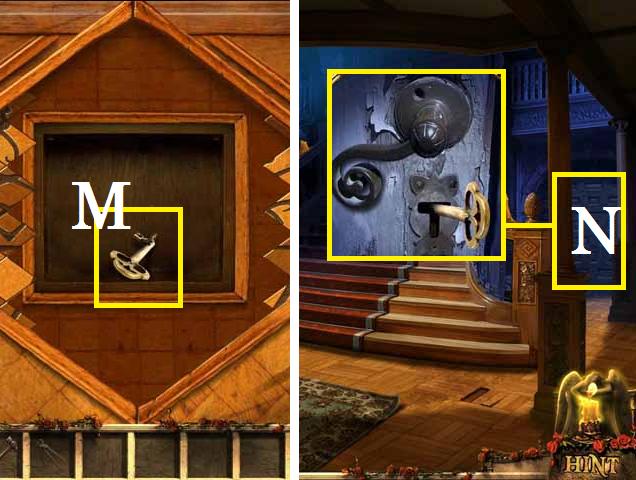
- Pick up the KITCHEN KEY (M).
- Unlock the kitchen door (N) with the KITCHEN KEY and spin the handle.
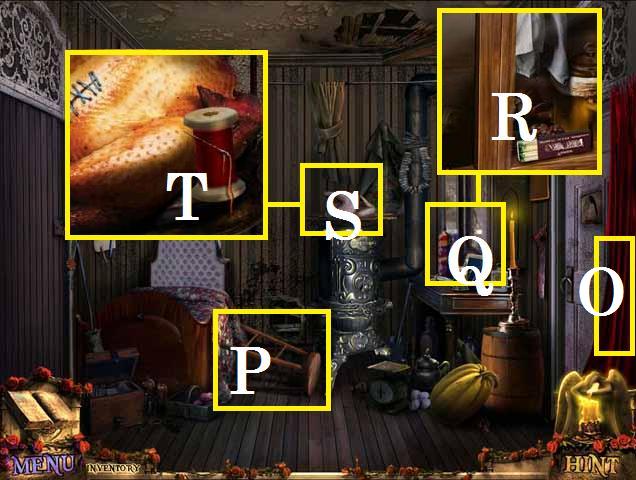
- Enter the kitchen.
- Move the curtain (O).
- Pick up the CHAIR (P).
- Zoom into the cabinet (Q); pick up the MATCHES (R).
- Zoom into the turkey (S); pick up the NEEDLE AND THREAD (T).
- Exit back to the stairs.
- Light the candles (blue) with the MATCHES and go upstairs.
- Move the pillow (U) and zoom in.
- Pick up the SCREWDRIVER (V).
- Enter the room in the right.
- Remove the cobwebs (W) with the SWAB (X).
- Place the HOLY CROSS over the demonic symbol (Y).
- Return to the workshop.
- Zoom into the BEE SMOKER (A).
- Place the BEE SMOKER PART and sew the smoker (B) with the NEEDLE AND THREAD.
- Pick up the BEE SMOKER.
- Return to the loft in the stables.
- Drop the BEE SMOKER over the bee hive (C).
- Vanquish the demon (D) by dropping the HOLY CROSS over him several times.
- Receive the PIPE.
- Return to the mansion.
- Zoom into the entryway on the left (E).
- Break the ice with the PIPE and enter the study.
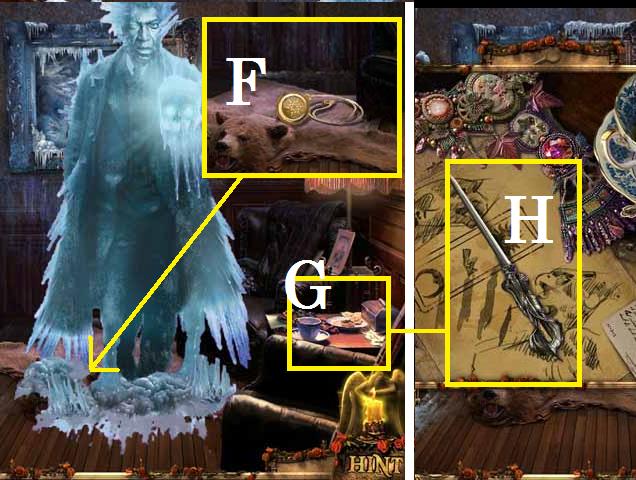
- Vanquish the demon with the HOLY CROSS.
- Pick up the SEAL OF ICE (F).
- Zoom into the table (G).
- Pick up the KNIFE (H).
Chapter 3: The Seals of Luck and Fire
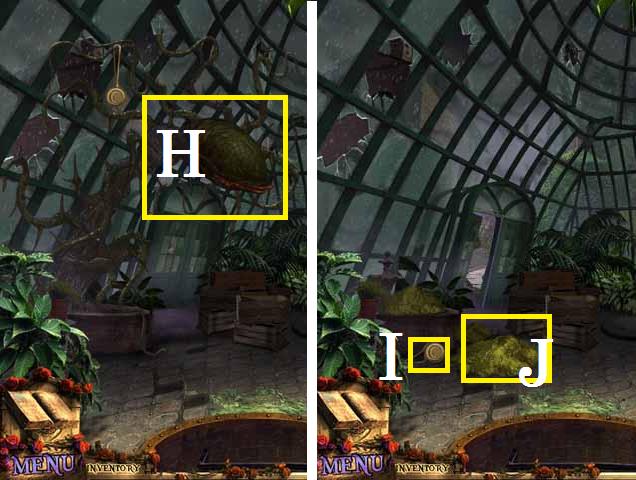
- Return to the upstairs hallway.
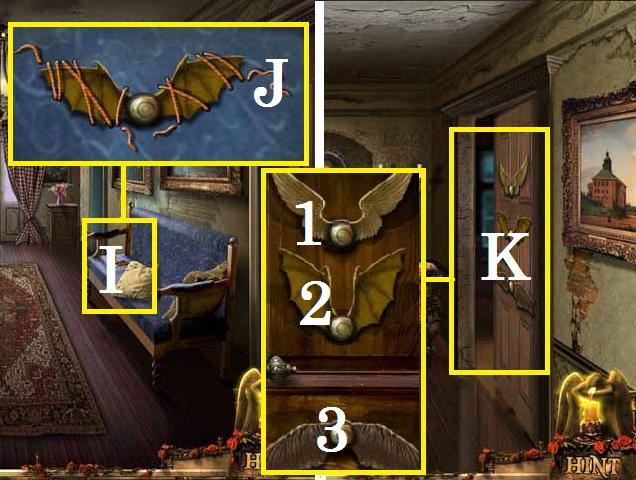
- Zoom back into the bench (I).
- Cut the LOCK PIECE (J) free with the KNIFE and pick it up.
- Go through the door on the right.
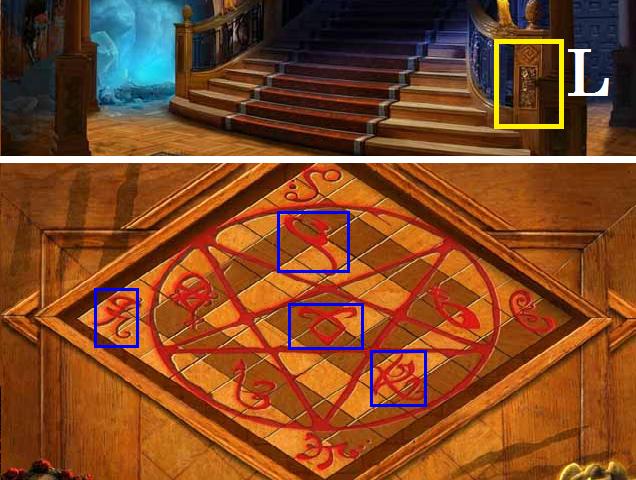
- Zoom into the door (K); place the LOCK PIECE.
- Click on the wings in order of (1, 2, and 3) to open the door.
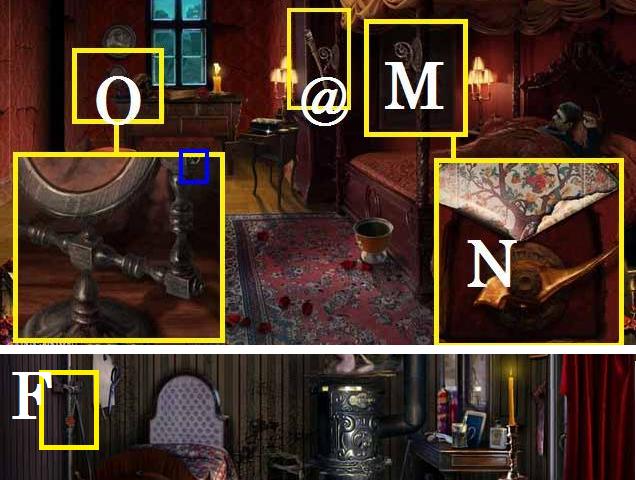
- Enter the master bedroom.
- Pick up the TORCH (@).
- Cut the tapestry (M) with the KNIFE.
- Pull the handle (N).
- Remove the screw (blue) from the mirror (O) with the SCREWDRIVER.
- Pick up the MIRROR and SCREW.
- Return to the kitchen.
- Cut the seal (F) with the KNIFE.
- Open the door.
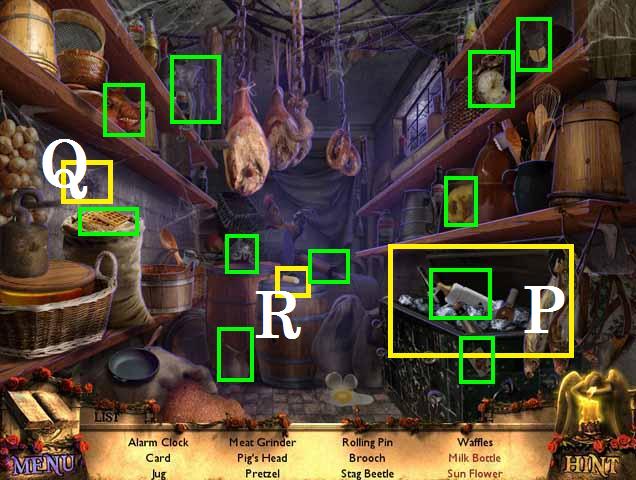
- Zoom into the sparkles to play a HOS.
- Open the chest (P) to reveal the milk bottle.
- Color the sunflower (Q) in with the chalk (R).
- Receive the MILK BOTTLE.
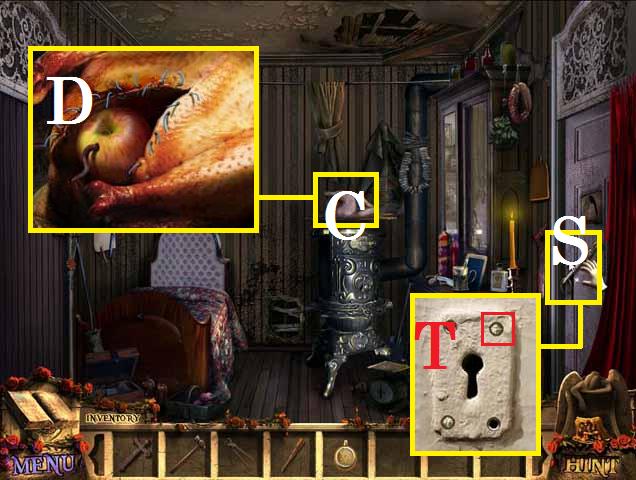
- Zoom into the door (S) and replace the SCREW (T).
- Cut the turkey (C) open with the KNIFE.
- Pick up the APPLE (D).
- Return to the alleyway outside the stables.
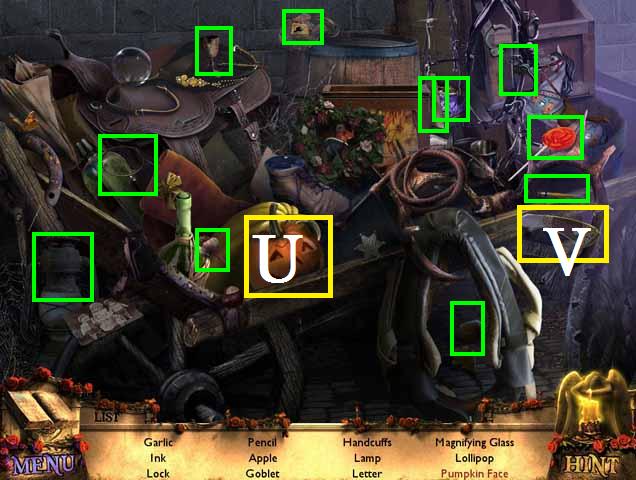
- Zoom into the sparkles to play a HOS.
- Carve the pumpkin (U) with the knife (V) for the pumpkin face.
- Receive LOLLIPOP.
- Return to the loft.
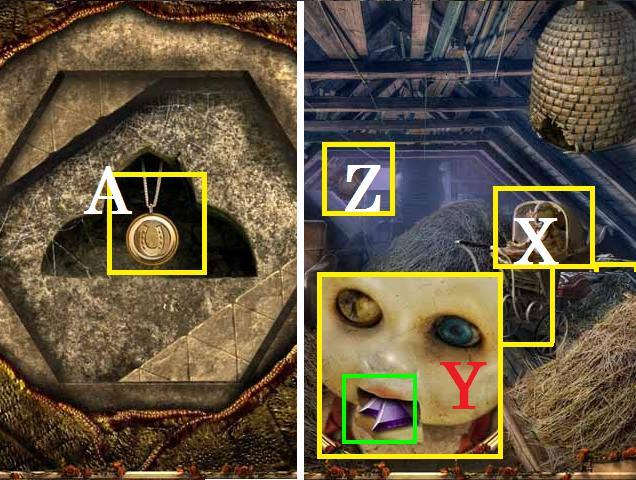
- Place the LOLLIPOP and BOTTLE OF MILK in the baby carriage (X).
- Open the dolls mouth (Y) and pick up the CRYSTAL TRIANGLES (green).
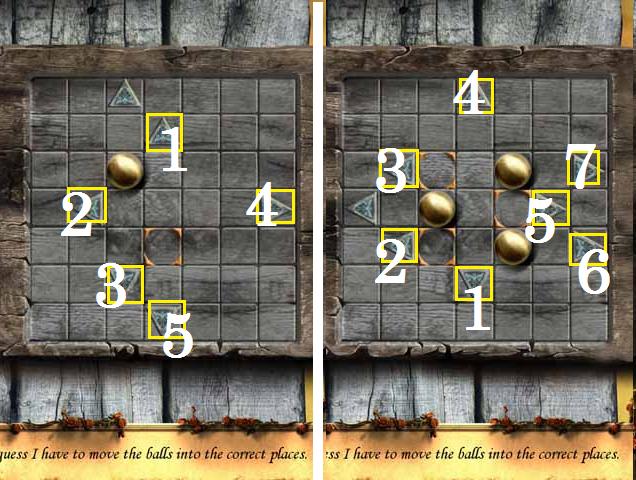
- Zoom into the puzzle (Z).
- Place the CRYSTAL TRIANGLES in the puzzle.
- Click and drag matching color pieces next to each other until the board is clear. (Note: there is no true strategy to this puzzle, I played it several times and never got stuck).
- Pick up the SEAL OF LUCK (A).
- Return to the greenhouse.
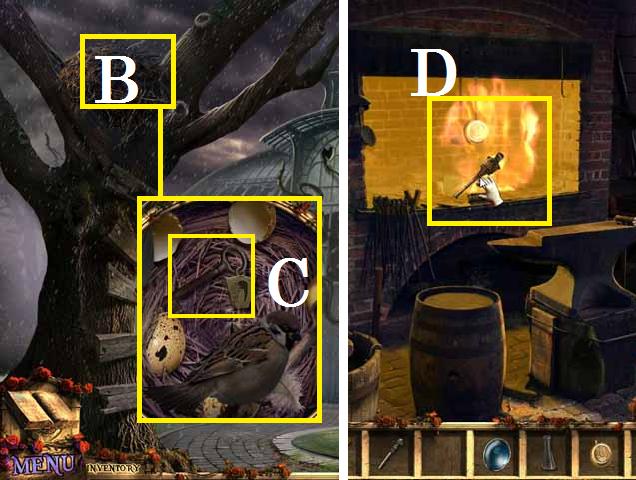
- Zoom into the nest (B).
- Place the APPLE in the nest.
- Move the shells around to reveal the SHOWER KEY (C).
- Return to the workshop.
- Light the TORCH in the fire (D) to receive the BURNING TORCH.
- Return to the kitchen.
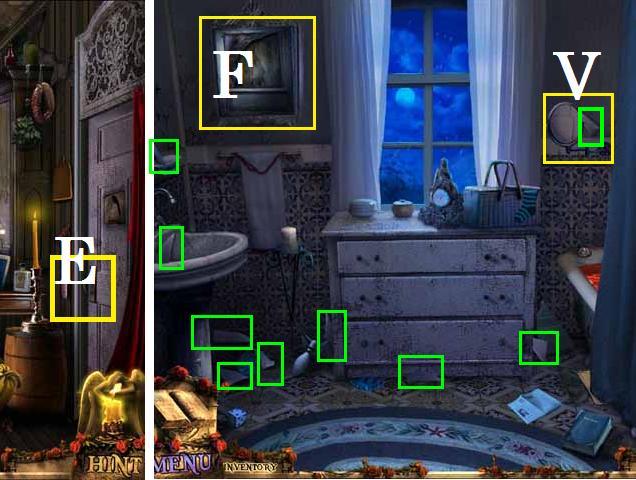
- Place the BATHROOM KEY into the lock (E) and turn it to open the door.
- Enter the bathroom.
- Unscrew the MIRROR (V) with the SCREWDRIVER.
- Pick up nine MIRROR SHARDS (green).
- Place all of the MIRROR SHARDS in the cabinet door (F).
- Click on the demonic symbols in the completed mirror to remember them.
- Return to the stairway and zoom into the left pillar (G).
- Click on the four demonic symbols (blue) from the mirror.
- Unscramble the board as shown in the screenshot.
- Pick up the BATH HANDLE (H).
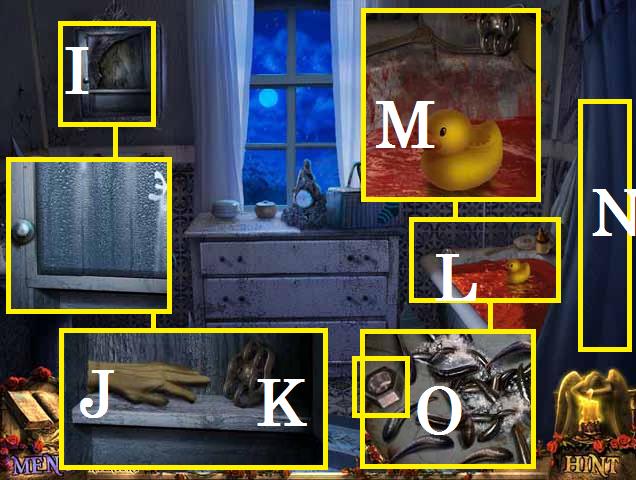
- Return to the bathroom.
- Place the BATH HANDLE on the cabinet (I).
- Open the cabinet door; pick up the GLOVE (J) and VALVE (K).
- Open the curtain (N).
- Zoom into the bathtub (L).
- Place the VALVE.
- Using the GLOVE remove the rubber ducky plug (M).
- Close the window and zoom back into the bathtub; pick up the WASHER (O).
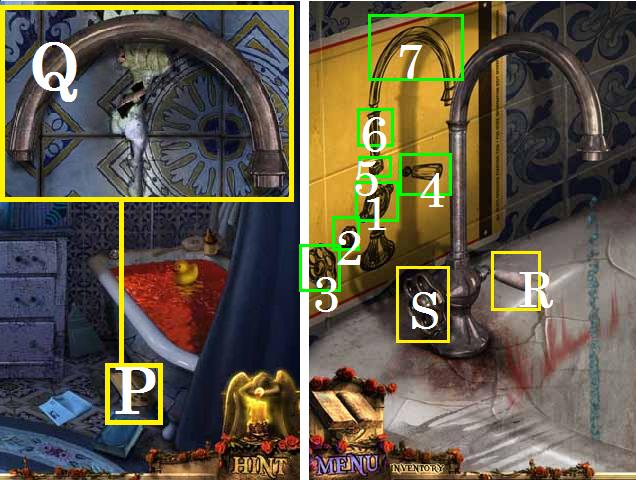
- Zoom into the directions (P).
- Move the directions to pick up the PIPE (Q).
- Break all the tiles away with the HAMMER to reveal a puzzle.
- Zoom back into the tub.
- Place the WASHER and pipe.
- Assemble the pieces in order 1-7 as shown in the screenshot.
- Pull the handle (R) and the VALVE (S).
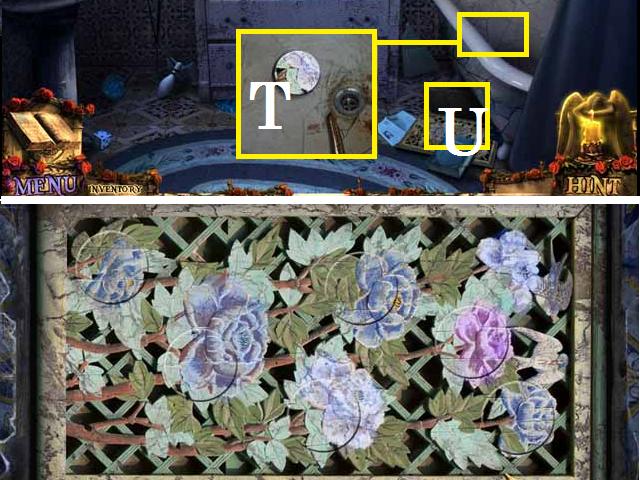
- Zoom into the drain.
- Pick up the BLOCK PART (T).
- Zoom back into the puzzle (U).
- Place the BLOCK PART and unscramble the puzzle as shown in the screenshot.
- You do not need to go down into the basement yet.
- Exit back to the kitchen.
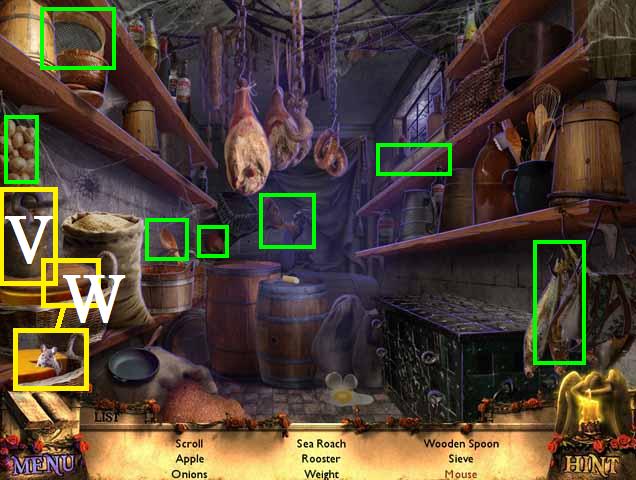
- Zoom into the sparkles to play a HOS.
- Collect the weight (V).
- Move the board (W) to reveal the mouse.
- Receive the WEIGHT.
- Return to the study.
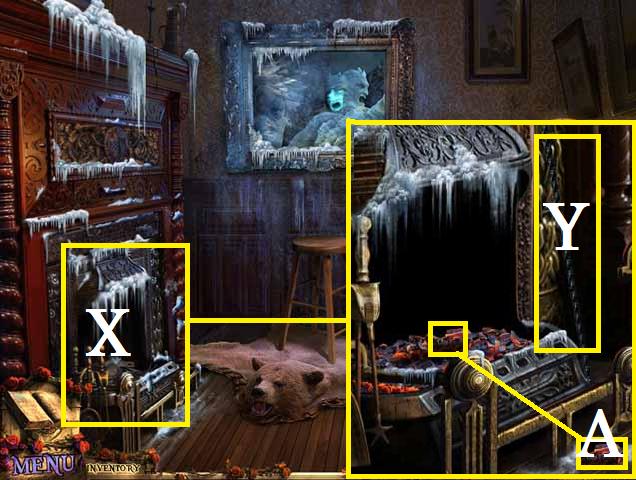
- Light the fireplace (X) with the LIT TORCH.
- Use the poker (Y) to knock out a hot coal.
- Pick up the COAL (A) with the FIRE IRON.
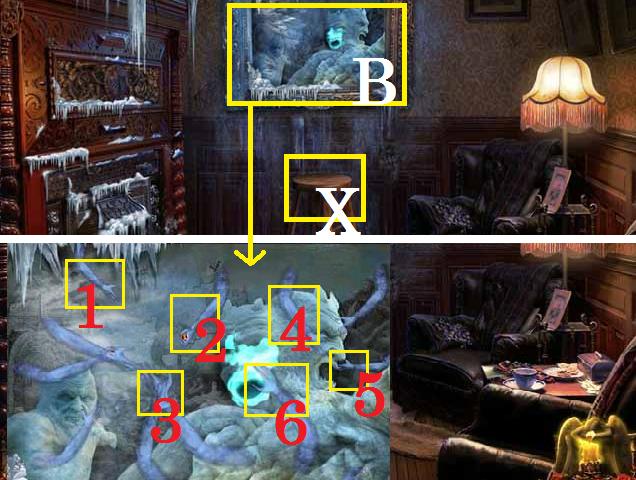
- Place the CHAIR (X) as shown in the screenshot.
- Place the COAL in the painting (B).
- Click on the arms in the sequence: 1 through 6.
- Receive the ICE.
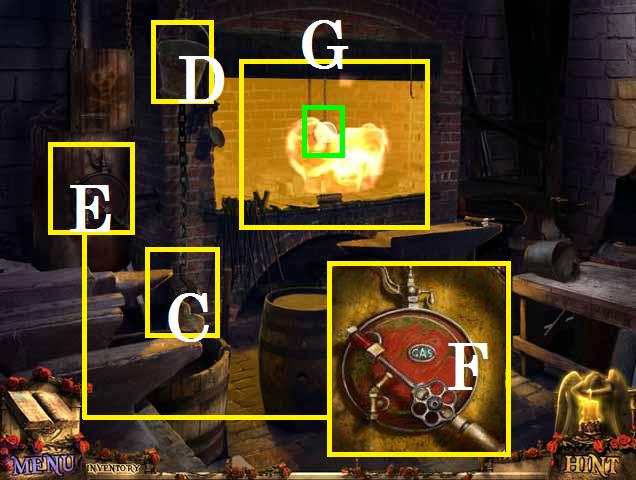
- Return to the workshop.
- Place the WEIGHT (C).
- Place the EMPTY BUCKET (D) under the valve (E).
- Spin the handle (F) and pick up the GAS.
- Place the ICE in the fire (G).
- Pick up the SEAL OF FIRE (green).
Chapter 4: The Seals of Water and Sun
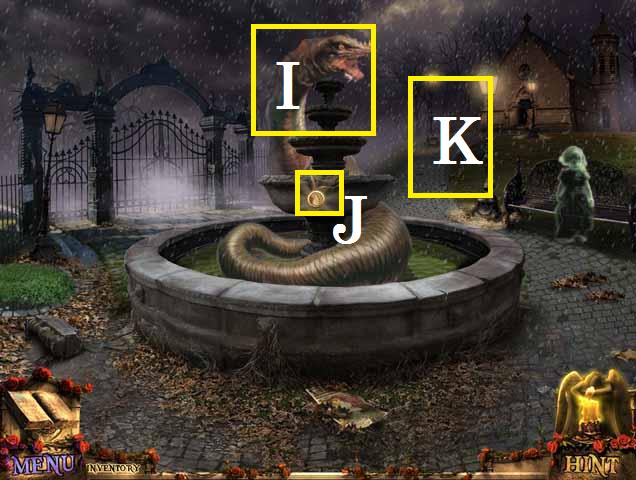
- Return to the fountain.
- Pour the GAS on the SNAKE (I) and light with the TORCH.
- Pick up the SEAL OF WATER (J).
- Move forward towards the church (K).

- Pick up the BUTTERFLY NET (L).
- Untie the BASKETS rope (M) and pick it up.
- Move the ladder (N) over to the gargle (O) and zoom in.
- Set the dials as shown in the screenshot. (HINT: the eyes light up when you have the right symbol.
- Pick up the TOADS EYE (P).
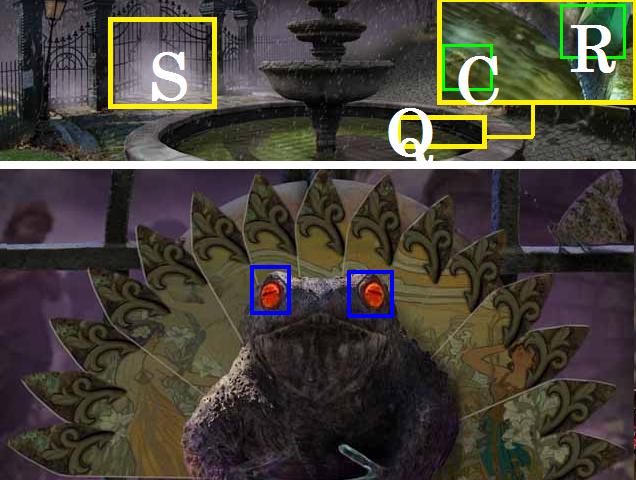
- Move back to the fountain and zoom in (Q).
- Pick up the PRISM (R).
- Using the BUTTERFLY NET, pick up the TOADS EYE (C).
- Fill the EMPTY BOTTLE with the water from the fountain to receive the POISON.
- Zoom into the gate (S).
- Place both TOADS EYES in the sockets (blue).
- Rearrange the fan pieces to create the picture shown in the screenshot. (Hint: the toads eyes flash red when a piece is placed correctly).
- Enter the graveyard.
- Click the HOLY CROSS over all of the ghost arms (blue) until they are all vanquished.
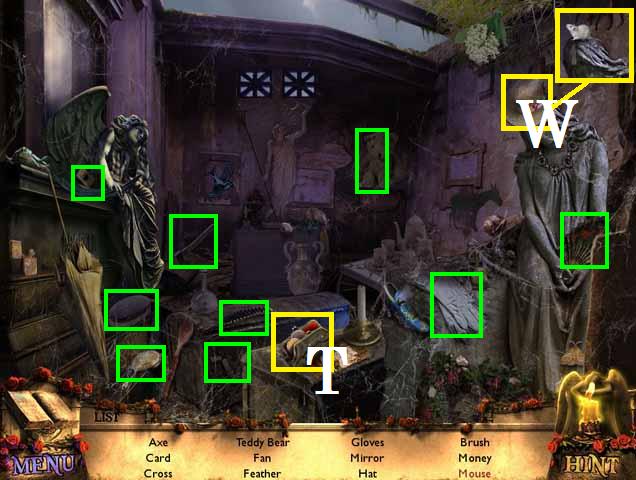
- Click on the right mausoleums door (V).
- Pick up the eight STONE SHARDS (green).

- Zoom back into the door and place all of the STONE SHARDS on the board.
- Arrange the STONE SHARDS as shown in the screenshot to play a HOS.
- Open the purse (T) to reveal the money.
- Pick up the hat (W) to reveal the mouse.
- Receive the SCRUB.
- Enter the far mausoleum.
- Pick up the OILER (Y).
- Place the PRISM (Z).
- Zoom into the reflector lamp (A).
- Place the first MIRROR and fill the lamp with the OILER.
- Click on the flint (B) to light the lamp.
- Place the MIRROR (with the arm) in the pillar (C).
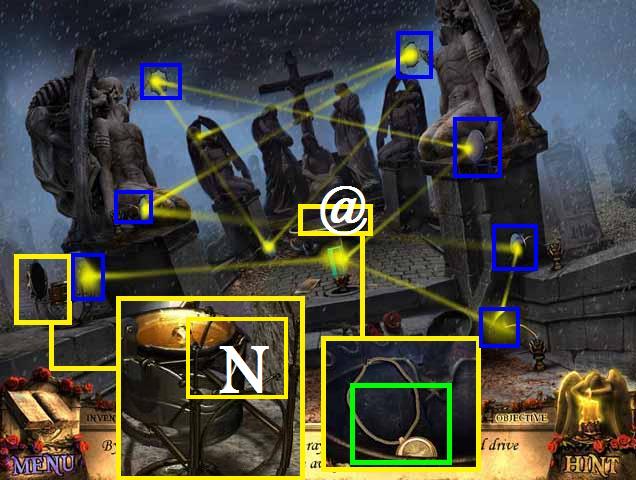
- Exit back to the fountain and take the path to the church.
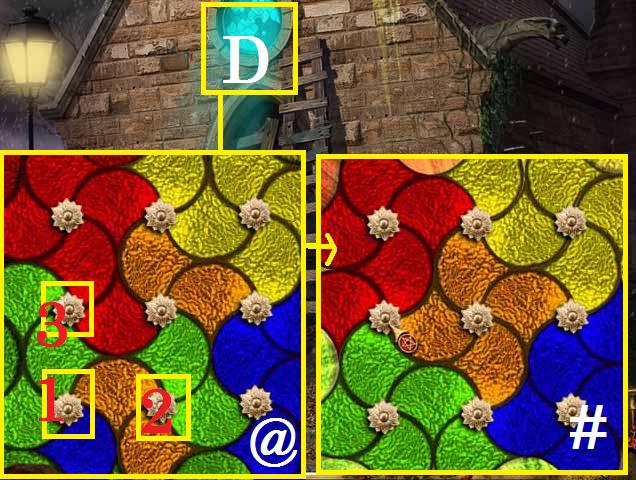
- Move the ladder back to the window.
- Clean the window (D) with the SCRUB.
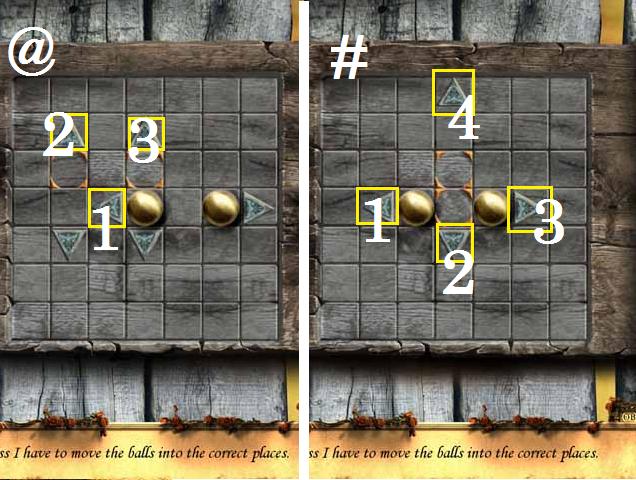
- The starting positions may be different.
- From the starting positions shown in the screenshot (@) hit the buttons in the following sequence (1, 1, 1, 2, 2, 3, 3, and 3) to get the arrangement shown in the screenshot (#).
- Notice the vine that the light shines on.
- Return to the graveyard.
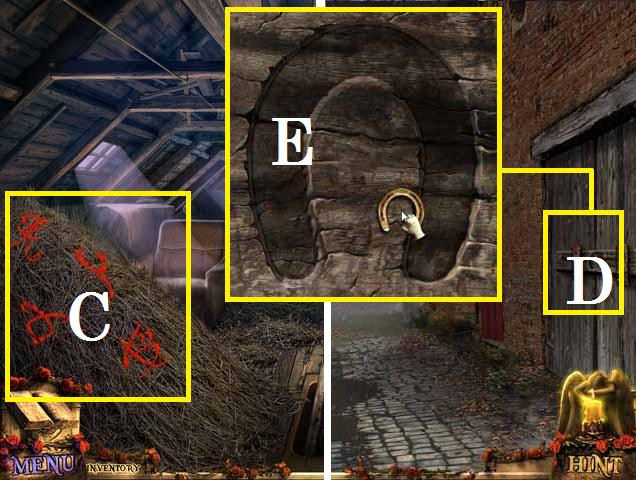
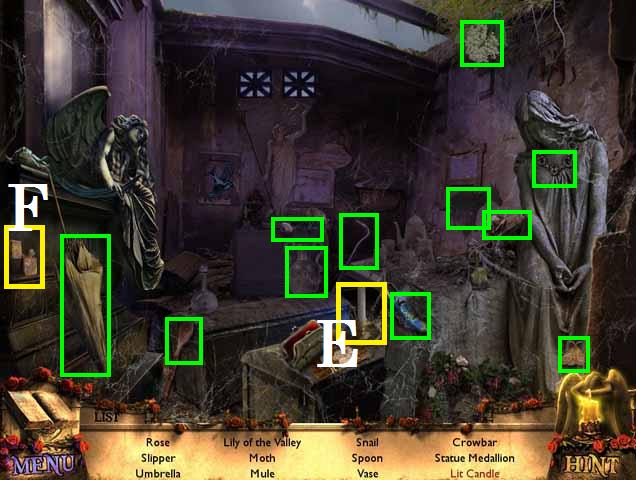
- Zoom into the sparkles to play a HOS.
- Light the candle (E) with the lighter (F).
- Receive the CROWBAR.
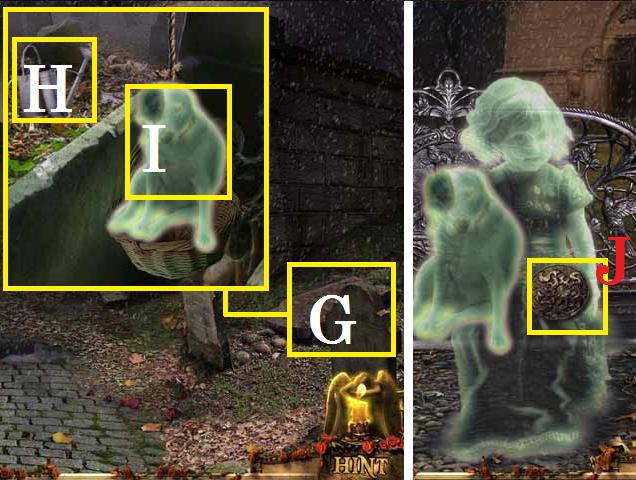
- Zoom into the grave (G).
- Pick up the WATERING CAN (H).
- Move the stone with the CROWBAR.
- Place the BASKET in the grave.
- Pick up the GHOST DOG (I).
- Exit back to the fountain.
- Give the GHOST DOG to the little girl.
- Pick up the MEDALLION (J).
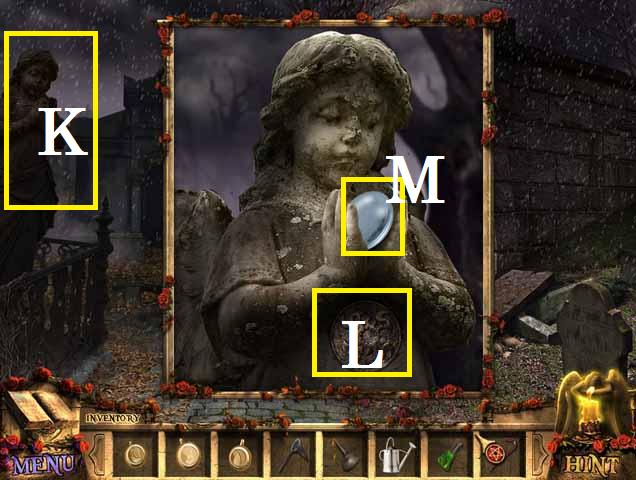
- Return to the graveyard.
- Zoom into the statue (K).
- Place the MEDALLION (L).
- Pick up the LENS (M).
- Enter the rear mausoleum.
- Zoom back into the reflector lamp and place the LENS (N).
- Position the mirrors (blue) as shown in the screenshot.
- Zoom into the urn (@).
- Pick up the SEAL OF SUN (green).
Chapter 5: The Final Exorcism
- Return to the church.
- Zoom into the side (O).
- Remove the two steps (P) with the CROWBAR.
- Return to the mansion and enter the kitchen.
- Zoom into the case (Q).
- Use the OILER on the latch (R) and open the case.
- Pick up the COFFEE BEANS (S) and the MAGNET (T).
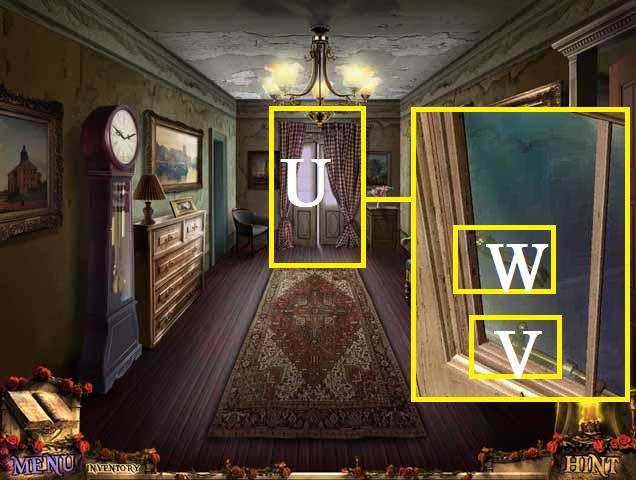
- Go back to the hallway at the top of the stairs.
- Zoom into the far door (U).
- Open the latch (V) with the MAGNET.
- Push up the glass and turn the handle (W).
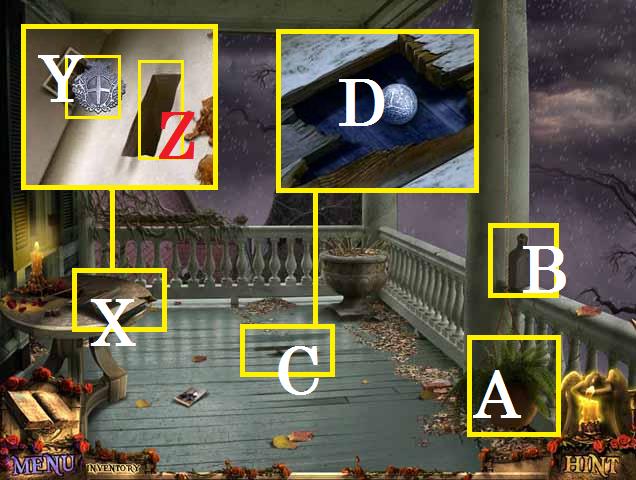
- Enter the balcony.
- Zoom into the book (X).
- Retrieve the EMBLEM (Y) using the MAGNET over the cutout (Z).
- Use the WATERING CAN on the plant (A).
- Pick up the ALCOHOL (B).
- Pry up the boards (C) with the CROWBAR.
- Pick up the METAL BALL (D).
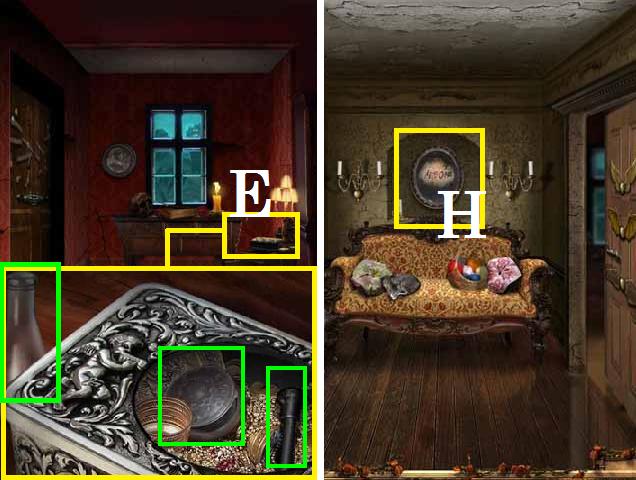
- Return to the master bedroom.
- Open the box (E) by placing the EMBLEM on its lid.
- Pick up the POWDER BOX (green), LEVER (green) and the EMPTY VIAL (green).
- Exit back one scene.
- Drop the POWDER BOX over the portrait (H).
- Exit back one more scene to the hallway.
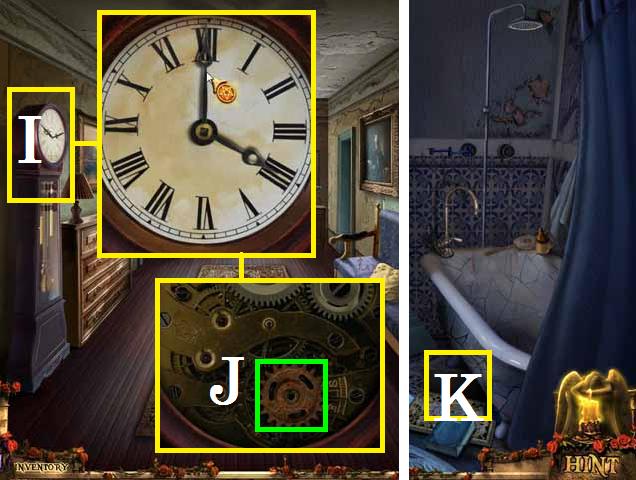
- Zoom into the clock (I).
- Set the hands to 4:00 as shown in the screenshot.
- Pick up the GEAR (J).
- Return to the bathroom.
- Go down the grate (K) to the basement.
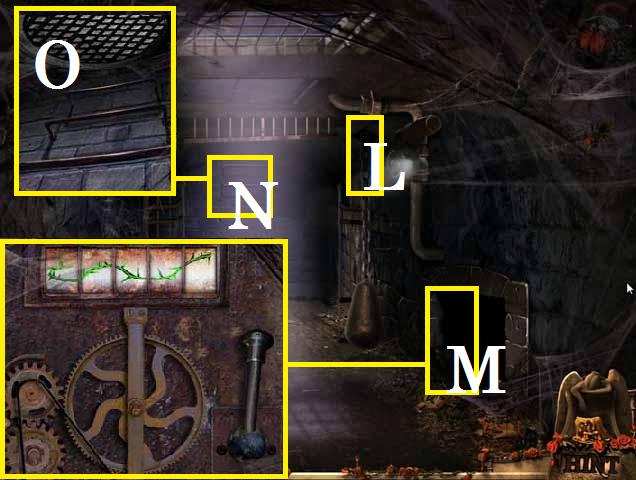
- Use the OILER on the weight (L).
- Zoom into the mechanism (M).
- Place the LEVER and GEAR as shown in the screenshot.
- Set the dials to make the vine as shown in the screenshot and pull the LEVER.
- Place the STEPS on the back wall (N).
- Open the hatch (O) with the CROWBAR.
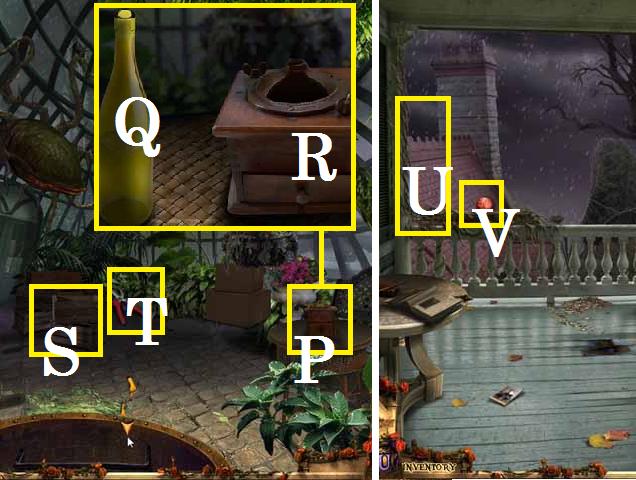
- Go through the hatch to enter the greenhouse.
- Zoom into the table (P).
- Pick up the WINE (Q) and place the COFFEE BEANS in the grinder (R).
- Move the boxes (S).
- Pick up the HEDGE SHEARS (T).
- Return to the balcony.
- Cut the old hammock (U) with the HEDGE SHEARS.
- Pick up the METAL BALL (V).

- Return to the master bedroom.
- Zoom into the door (W).
- Place both METAL BALLS as shown in the screenshot.
- Arrange all of the paddles as shown in the screenshot.
- Click on the two ball release paddles (blue) to unlock the door.
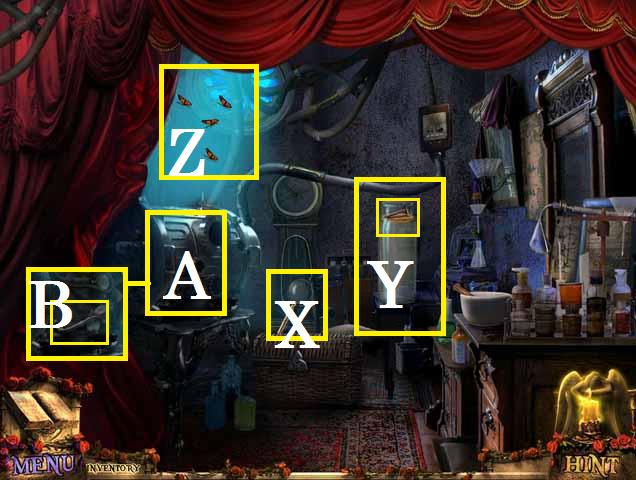
- Enter the lab.
- Pick up the MAGNIFYING GLASS (X).
- Pour the WINE in the cylinder (Y) and pick up the HATCH KEY.
- Collect the BUTTERFLIES (Z) with the BUTTERFLY NET.
- Remove the panel (A) with the crowbar.
- Pick up the COFFEE GRINDER HANDLE (B).
- Return to the greenhouse through the basement.
- Move the boxes (W).
- Open the hatch (C) with the HATCH KEY.
- Pry the box top (D) off with the CROWBAR.
- Pick up the DISTILLER (E).
- Place the COFFEE GRINDER HANDLE (F).
- Crank the COFFEE GRINDER HANDLE and pick up the COFFEE (G).
- Feed the BUTTERFLYS to the plant (H) and finish it off with the POISON.
- Pick up the SEAL OF MOON (I) and the SULFUR (J).
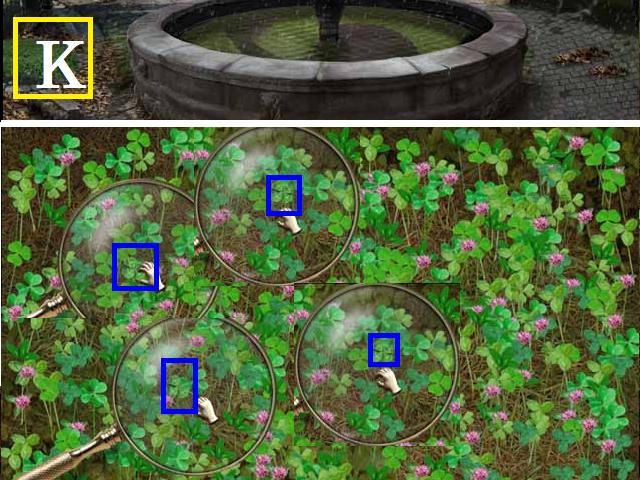
- Return to the fountain.
- Zoom into the clover patch (K).
- Using the MAGNIFYING GLASS, pick up the four (blue) four-leaf CLOVERS.
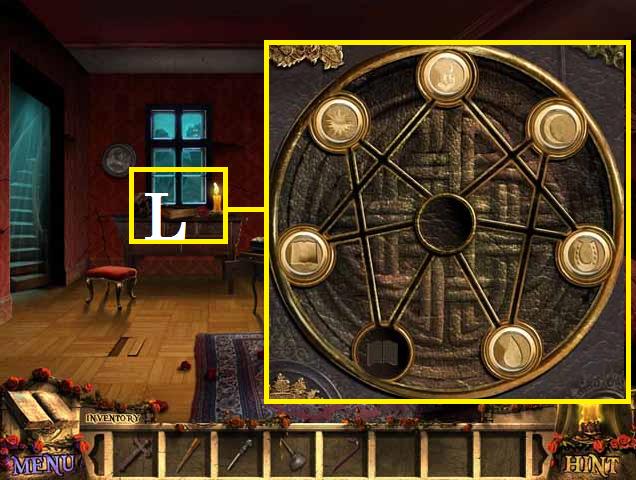
- Return to the master bedroom.
- Zoom into the seal book (L).
- Place all of the SEALS as shown in the screenshot.
- Take the stairs to the lab.
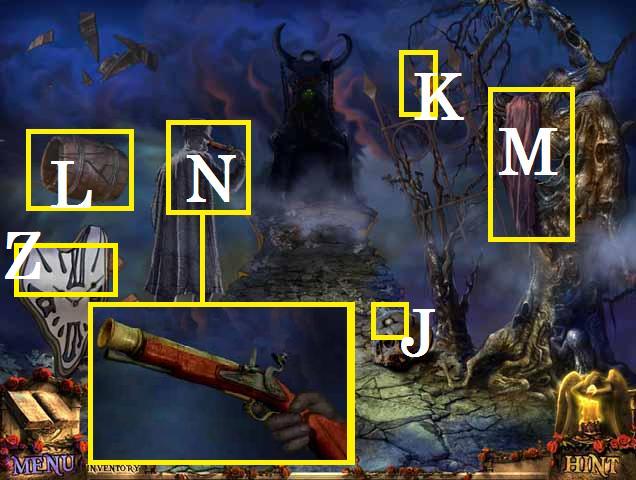
- Zoom into the table (M).
- Place the COFFEE, SULPHUR, CLOVERS, DISTILLER, and ALCOHOL as shown in the screenshot.
- Grind the CLOVERS with the pistol (N).
- Pour the ALCOHOL in the burner (O).
- Place the wick (P) in the burner and light it with the lighter (Q).
- Pour the SULFUR, COFFEE, and ground CLOVERS in the beaker (R).
- Place the DISTILLER (T).
- Pick up the ELIXER (U).
- Return to the master bedroom and give to Garret (V).
- Place the fishbowl (W) over the fish (X).
- Pick up the BUTTON (E).
- Place the apple (Y) in the jar (Z).
- Pick up the JAR OF ANTS (Z).
- Using the FISHING ROD (A) move the crystal bubble (B) closer.
- Zoom into the mechanism (C).
- Pour the BOTTLE OF ANTS on the glue (D).
- Place and push the BUTTON (F).
- Pick up the GLUE.
- Go up the ramp (H).
- Pry the BULLET (J) out with the SHARP SPIKE (K).
- Click on the clock (Z).
- Pick up the GUN POWDER (L).
- Pick up the RAG (M).
- Zoom into the PISTOL (N).
- Place the GUN POWDER followed by the BULLET in the PISTOL and pick it up.
- Exit back one scene.
- Shoot the crystal bubble with the PISTOL.
- Zoom into the broken shards (O).
- Place the GLUE on the center piece and drag the other pieces together.
- Wipe the repaired plate with the RAG.
- Go back up the ramp.
- The SEAL OF KNOWLEDGE will be added to your inventory.
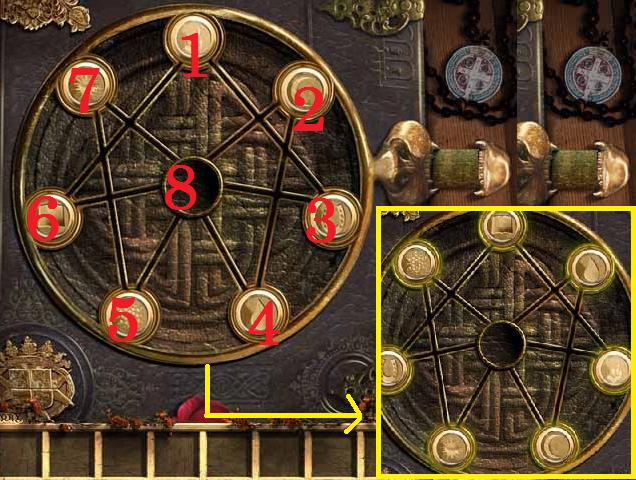
- Zoom back into the seal book and place the last SEAL.
- One solution is to click on the circles (Note: not the SEALS only the stationary location) in the following sequence: 4, 2, 8, 3, 1, 6, 8, 5, 7, and 8.
- Congratulations you have imprisoned Belphegor once again and saved your mentor!


 Mystery Chronicles: Betrayals of Love Walkthrough, Guide, & Tips
 Mystery of Cleopatra Walkthrough, Guide, & Tips
 Shaban Walkthrough, Guide, & Tips
 Myths of the World: Stolen Spring Walkthrough, Guide, & Tips
 Nancy Drew Dossier: Resorting to Danger Walkthrough, Guide, & Tips